850 T5 Project - Ivy
Discussion


So pictures of the car clean never happened - after driving the uni the next day she was almost as bad again... Shes been washed twice since and you honestly couldn't tell...
Onto more recent events, I dropped the 850 off for its annual service a couple of days ago (I do oil and filters every 5k anyway, and consumables as and when).

They tracked down two split vac lines - both on the nipples on the turbo. I missed them as visibility down there is atrocious without the car on a ramp! In any case the car runs more smoothly now at lower revs. Yellow and green hoses in the below image - which is the correct plumbing for the TCV, in case anyone needs it. I had noticed the yellow hose starting to deteriorate at the TCV so was going to replace that, but did not realise it had already split on the other end.

They also told me the lower nearside ball joint was looking a bit worse for wear and confirmed that I needed to replace a CV boot that looked a bit cracked to me. I bailed on the CV boot, separating the driveshaft honestly scares me, don't have the experience yet. £80 for this including genuine part seemed reasonable.
I did replace the control arm though, this morning when it was -4'c so there are no photos! Went for Meyle HD, as Meyle are OE. Did have some trouble with the pinch bolt as weirdly it was in backwards and both seized and bent... The car last had a replacement n/s control arm in 2014 so despite being backwards its managed to survive the last 50k without issue.
Judicious applications of a punch and heat did the trick after about an hour....nearly knocked the car off the jack stands at one point too - minor heart attack there! Steering feels much tighter and I've lost a steering wobble I had at 50+mph so that's a result.
Lastly I stuck it in for its MOT, and I'm very pleased to report she passed with no advisories..

Onto more recent events, I dropped the 850 off for its annual service a couple of days ago (I do oil and filters every 5k anyway, and consumables as and when).
They tracked down two split vac lines - both on the nipples on the turbo. I missed them as visibility down there is atrocious without the car on a ramp! In any case the car runs more smoothly now at lower revs. Yellow and green hoses in the below image - which is the correct plumbing for the TCV, in case anyone needs it. I had noticed the yellow hose starting to deteriorate at the TCV so was going to replace that, but did not realise it had already split on the other end.
They also told me the lower nearside ball joint was looking a bit worse for wear and confirmed that I needed to replace a CV boot that looked a bit cracked to me. I bailed on the CV boot, separating the driveshaft honestly scares me, don't have the experience yet. £80 for this including genuine part seemed reasonable.
I did replace the control arm though, this morning when it was -4'c so there are no photos! Went for Meyle HD, as Meyle are OE. Did have some trouble with the pinch bolt as weirdly it was in backwards and both seized and bent... The car last had a replacement n/s control arm in 2014 so despite being backwards its managed to survive the last 50k without issue.
Judicious applications of a punch and heat did the trick after about an hour....nearly knocked the car off the jack stands at one point too - minor heart attack there! Steering feels much tighter and I've lost a steering wobble I had at 50+mph so that's a result.
Lastly I stuck it in for its MOT, and I'm very pleased to report she passed with no advisories..
Thanks - also reassuring to hear that you've had success with Meyle.
Regarding mileage I should have cleared that up sooner, the car had an instrument cluster replacement in 2012 at around 150k. As I'm sure anyone reading this thread is aware, the odometers do like to fail. Apparently the garage that Ivy was sent to in 2012 preferred to replace the entire cluster as opposed to just replacing the worn out gear.
Regarding mileage I should have cleared that up sooner, the car had an instrument cluster replacement in 2012 at around 150k. As I'm sure anyone reading this thread is aware, the odometers do like to fail. Apparently the garage that Ivy was sent to in 2012 preferred to replace the entire cluster as opposed to just replacing the worn out gear.
Edited by Cookeh on Thursday 24th January 08:42
This is a rather large update, I would definitely recommend making a tea/coffee before reading through it. Or skim it, certainly easier.
We left off with Ivy passing her MOT with no advisories. Excellent. Except it wasn't, she re-payed my efforts by springing a leak in the heater core. Common symptoms of this are a damp passenger footwell (but only if your leak is very severe and if you don't have floor mats, otherwise you won't notice it), a passenger side window/windscreen that won't demist and has some sort of residue, and lastly a slightly sweet smell of antifreeze when the heater is running. The good news is this is far from a big deal, the cores are cheap (£40 for OE) and can be swapped out in less than an hour. Furthermore you can put this job off for some significant amount of time as the leak is minimised if you simply leave your heater switched off - though I wouldn't recommend this, great way to introduce mould to your carpets and then aircon/heater system.
There are lots of great guides out there so I won't bang on repeating them. Several of them state that if you simply use mole grips and clamp the heater hoses you can avoid dropping the coolant. I was lazy. I tried this method. I deeply regret; don't be lazy, don't be me, drop your coolant.
Firstly, drop both driver and passenger side lower dash trims (3x T25s on each), then peel the carpet back and remove the black support pieces (pictured) - this is where you will first visually confirm a heater core leak.

You can then remove the 2x T15 screws on the side of the heater core cage, and then 2x T25 screws positioned vertically towards the rear of the cage. With those out of the way, unscrew the T25 screw in between the heater hose couplings. Then apply a bit of force and pull the cage from the heater hose coupling. Tilt the cage back and slide it out towards the drivers side.
When removing the coupling, make sure you have rags/bags/a tray in place to catch the coolant. The core and hoses will hold a not inconsiderate amount of coolant. I caught 2L of it, another 1.5L or so evaded me entirely....


This is precisely why you should not be me, not be lazy, and just drop your coolant.
Once all the spills have been mopped up, you can look at the bottom of the cage and undo the 4x T15s securing the cage to the core and pull apart. My core was the original core, and as I keep harping on about, you can clearly see the impact that not having a pollen filter has on the heater/ac systems in these cars. If you don't have one, add on. You can also see where the leak occurs, the plastic joining onto the finned area becomes brittle or fatigues and breaks.


In the next image you can see the difference between the core I bought (PFS part) - namely the plastic surround has been replaced by a metal one to prevent the fatigue occurring.

So, fitting is the reverse of removal, blah blah. Don't forget to remove old o-rings and replace with new ones. Put them on the pipe, not into the recess on the core as they are much more likely to get ripped or misplaced via that approach.

Once everything was buttoned up I went to refill the cooling system - with coolant. This is a mistake. This is again punishment for being lazy. Don't be lazy. It turns out that one of the new o-rings had a slight tear which then resulted in me losing all the coolant I'd just added, except this time I wasn't expecting a leak so nothing was in place to catch it. DON'T BE ME, DON'T BE LAZY. 3 days later my carpets are still wet, from the backside, despite copious vacuuming, dehumidifiers, and dabbing with microfibres. Again, drop your coolant, test for leaks with plain old water. Much easier to clean if there are any issues.
I am now happy to report that the heater core is no longer leaking, and I have no other cooling system issues post-refill and burping. Yay me.
_____________
Alongside this heater core affair, I'd recently noticed my mpg dropping and the car starting to run a little more roughly. I figured it might well be the sparkplugs and given that I could find no info in recent history as to when they were last changed I ordered a set from Volvo (this was not my first choice as pretty pricey compared to aftermarket, but I needed some other parts anyway and in fairness they did knock 20% off the RRP for me).
I regret this choice immensely. Don't know if its due to just bad luck or something else, but this also turned into a massive debacle.
Naturally, the first step here is to remove the spark plug cover (6x T30s, that have a habit of rounding off) to get access to the ignition leads, which are then just pulled straight up, natch. This revealed a bit of a mess; oil here is nothing really to be worried about, especially when its as old as it clearly is here. There are two main sources for this, (i) a bad PCV system, forcing oil out from the SAS hole or PCV tube, (ii) an oil spill or leaky oil cap gasket.


I cleaned this up, so I'd be able to determine the source of my oil. When I checked again after a few engine cycles (more on that later), I found it to be the oil cap gasket so I replaced it. Genuine part is £4.80 or so, and they fail due to age and heat making them stiff.


Can see fresh oil on the backside of the filler cap.
Here's the new gasket and it installed:


Obligatory old vs new (aftermarket means replaced at one point, so at least they aren't 24 years old, but they are most definitely past their prime). Worth checking the gap on these, manual states 0.75mm for the turbos, but they seem to come pre-gapped from Volvo as 0.70mm and this is also the gapping most people on sites like VolvoSpeed, MatthewsVolvoSite and SwedeSpeed recommend. My first issue here was a broken plug in the pack.


Now, due to having that broken plug in the packet I had to go back to Volvo to get t swapped out. In fairness to them, they did - problem is it took them three days to get it and they are 12 miles away from me. This was not the end of my problems, however. After fitting all 5 genuine spark plugs and firing her up for the first time in 4 days I had a misfire. Fantastic. Bit of investigating later and it turns out cylinder 3 has the misfire. Easy to see why, when removing the ignition lead.

Two plugs in a pack of five, split. Now I don't know if this is just crappy Bosch build quality, bad luck, a pack that was dropped at some point, or what but it was an absolute nightmare as it meant going back to Volvo again - who needed another 3 days to get another replacement. Can't fault them really, didn't have to pay for either and didn't even need an invoice or proof of purchase.
I could not get the porcelain remnant of the plug out of the lead, the 24 year old rubber just split. This meant dropping £50 on some Bougicord (OE part) - which luckily were delivered within 24 hours of ordering. Accessing these is easier if you remove the top half of the airbox, and the turbo pipe - requiring removal of the throttle guard and cable.

Anyway, eventually I got a 5th spark plug off Volvo and that combined with new leads resulted in a cured Ivy that's running better than ever. The leads were original so I'm sure that even the unwanted change has resulted in improved performance.
_____________
A word on spark plugs. If you live a fair distance from the dealer like me, or if you don't want to pay the ridiculous RRP (£60!!!!!), there are a range of suitable aftermarket plugs - despite what lots of people on various forums will tell you. There is no need to "buy genuine or it breaks or wont run". The OE plug for these on release was the Champion RC8PYP. If you look on any sparkplug crossreference site, such as this one you'll find a lot of decent options. Of these, the Bosch FR7DP is recommended (which is likely the OE plug now since Volvo changed the supplier), or NGK PFR6Bs. These can both be had for around £35 or cheaper from good motor factors.
_____________
With the car running right and not leaking I decided it was overdue a clean - by a whole week technically. After the usual TFR, snowfoam, 2BM, I decided to compound the paint in some areas to remove the water etching and some etching on the bonnet from an overly strong premixed washer fluid (ran out in the middle of the Welsh valleys). Following that I went on to polishing with SRP and then a quick sealant. Should last until late spring when I'll get on with a full machine polish.

Etching example

Post compound
Which left us with this.


Voila, have a biscuit as a reward for getting through all this rambling.
We left off with Ivy passing her MOT with no advisories. Excellent. Except it wasn't, she re-payed my efforts by springing a leak in the heater core. Common symptoms of this are a damp passenger footwell (but only if your leak is very severe and if you don't have floor mats, otherwise you won't notice it), a passenger side window/windscreen that won't demist and has some sort of residue, and lastly a slightly sweet smell of antifreeze when the heater is running. The good news is this is far from a big deal, the cores are cheap (£40 for OE) and can be swapped out in less than an hour. Furthermore you can put this job off for some significant amount of time as the leak is minimised if you simply leave your heater switched off - though I wouldn't recommend this, great way to introduce mould to your carpets and then aircon/heater system.
There are lots of great guides out there so I won't bang on repeating them. Several of them state that if you simply use mole grips and clamp the heater hoses you can avoid dropping the coolant. I was lazy. I tried this method. I deeply regret; don't be lazy, don't be me, drop your coolant.
Firstly, drop both driver and passenger side lower dash trims (3x T25s on each), then peel the carpet back and remove the black support pieces (pictured) - this is where you will first visually confirm a heater core leak.
You can then remove the 2x T15 screws on the side of the heater core cage, and then 2x T25 screws positioned vertically towards the rear of the cage. With those out of the way, unscrew the T25 screw in between the heater hose couplings. Then apply a bit of force and pull the cage from the heater hose coupling. Tilt the cage back and slide it out towards the drivers side.
When removing the coupling, make sure you have rags/bags/a tray in place to catch the coolant. The core and hoses will hold a not inconsiderate amount of coolant. I caught 2L of it, another 1.5L or so evaded me entirely....
This is precisely why you should not be me, not be lazy, and just drop your coolant.
Once all the spills have been mopped up, you can look at the bottom of the cage and undo the 4x T15s securing the cage to the core and pull apart. My core was the original core, and as I keep harping on about, you can clearly see the impact that not having a pollen filter has on the heater/ac systems in these cars. If you don't have one, add on. You can also see where the leak occurs, the plastic joining onto the finned area becomes brittle or fatigues and breaks.
In the next image you can see the difference between the core I bought (PFS part) - namely the plastic surround has been replaced by a metal one to prevent the fatigue occurring.
So, fitting is the reverse of removal, blah blah. Don't forget to remove old o-rings and replace with new ones. Put them on the pipe, not into the recess on the core as they are much more likely to get ripped or misplaced via that approach.
Once everything was buttoned up I went to refill the cooling system - with coolant. This is a mistake. This is again punishment for being lazy. Don't be lazy. It turns out that one of the new o-rings had a slight tear which then resulted in me losing all the coolant I'd just added, except this time I wasn't expecting a leak so nothing was in place to catch it. DON'T BE ME, DON'T BE LAZY. 3 days later my carpets are still wet, from the backside, despite copious vacuuming, dehumidifiers, and dabbing with microfibres. Again, drop your coolant, test for leaks with plain old water. Much easier to clean if there are any issues.
I am now happy to report that the heater core is no longer leaking, and I have no other cooling system issues post-refill and burping. Yay me.
_____________
Alongside this heater core affair, I'd recently noticed my mpg dropping and the car starting to run a little more roughly. I figured it might well be the sparkplugs and given that I could find no info in recent history as to when they were last changed I ordered a set from Volvo (this was not my first choice as pretty pricey compared to aftermarket, but I needed some other parts anyway and in fairness they did knock 20% off the RRP for me).
I regret this choice immensely. Don't know if its due to just bad luck or something else, but this also turned into a massive debacle.
Naturally, the first step here is to remove the spark plug cover (6x T30s, that have a habit of rounding off) to get access to the ignition leads, which are then just pulled straight up, natch. This revealed a bit of a mess; oil here is nothing really to be worried about, especially when its as old as it clearly is here. There are two main sources for this, (i) a bad PCV system, forcing oil out from the SAS hole or PCV tube, (ii) an oil spill or leaky oil cap gasket.
I cleaned this up, so I'd be able to determine the source of my oil. When I checked again after a few engine cycles (more on that later), I found it to be the oil cap gasket so I replaced it. Genuine part is £4.80 or so, and they fail due to age and heat making them stiff.
Can see fresh oil on the backside of the filler cap.
Here's the new gasket and it installed:
Obligatory old vs new (aftermarket means replaced at one point, so at least they aren't 24 years old, but they are most definitely past their prime). Worth checking the gap on these, manual states 0.75mm for the turbos, but they seem to come pre-gapped from Volvo as 0.70mm and this is also the gapping most people on sites like VolvoSpeed, MatthewsVolvoSite and SwedeSpeed recommend. My first issue here was a broken plug in the pack.
Now, due to having that broken plug in the packet I had to go back to Volvo to get t swapped out. In fairness to them, they did - problem is it took them three days to get it and they are 12 miles away from me. This was not the end of my problems, however. After fitting all 5 genuine spark plugs and firing her up for the first time in 4 days I had a misfire. Fantastic. Bit of investigating later and it turns out cylinder 3 has the misfire. Easy to see why, when removing the ignition lead.
Two plugs in a pack of five, split. Now I don't know if this is just crappy Bosch build quality, bad luck, a pack that was dropped at some point, or what but it was an absolute nightmare as it meant going back to Volvo again - who needed another 3 days to get another replacement. Can't fault them really, didn't have to pay for either and didn't even need an invoice or proof of purchase.
I could not get the porcelain remnant of the plug out of the lead, the 24 year old rubber just split. This meant dropping £50 on some Bougicord (OE part) - which luckily were delivered within 24 hours of ordering. Accessing these is easier if you remove the top half of the airbox, and the turbo pipe - requiring removal of the throttle guard and cable.
Anyway, eventually I got a 5th spark plug off Volvo and that combined with new leads resulted in a cured Ivy that's running better than ever. The leads were original so I'm sure that even the unwanted change has resulted in improved performance.
_____________
A word on spark plugs. If you live a fair distance from the dealer like me, or if you don't want to pay the ridiculous RRP (£60!!!!!), there are a range of suitable aftermarket plugs - despite what lots of people on various forums will tell you. There is no need to "buy genuine or it breaks or wont run". The OE plug for these on release was the Champion RC8PYP. If you look on any sparkplug crossreference site, such as this one you'll find a lot of decent options. Of these, the Bosch FR7DP is recommended (which is likely the OE plug now since Volvo changed the supplier), or NGK PFR6Bs. These can both be had for around £35 or cheaper from good motor factors.
_____________
With the car running right and not leaking I decided it was overdue a clean - by a whole week technically. After the usual TFR, snowfoam, 2BM, I decided to compound the paint in some areas to remove the water etching and some etching on the bonnet from an overly strong premixed washer fluid (ran out in the middle of the Welsh valleys). Following that I went on to polishing with SRP and then a quick sealant. Should last until late spring when I'll get on with a full machine polish.
Etching example
Post compound
Which left us with this.
Voila, have a biscuit as a reward for getting through all this rambling.
Been a while. Nothing has really needed doing, she's just been tirelessly eating miles and drinking petrol (done over 1.5k since the last update, even with the shed doing the commute). Despite this there were a few smaller items I wanted to address, as well as one much larger one!
First up was headlights. They've always been a bit pathetic, really. I had thought this was down to the reflector degrading as it eventually does in all of these so hadn't bothered looking into it. Recently, during one of ECPs endless 'sales' they happened to have an offer on some Osram Nightbreakers in H1s for £9, so I grabbed a pack on the off chance they would light up at least some of my way. Access was no problem, pretty much the dream tbh - twist the covers off, unclip (push in and to the left) the metal retainers and out comes the bulb. Below is a driveway shot highlighting just how poor the light output was, followed by a picture of the old bulbs. I did struggle with picturing this on my phone but hope they go someway to conveying the difference.
 Before light output
 Mismatched bulbs
So, crap and mismatched bulbs. Why you'd only replace one bulb I've truly no idea but it might explain why I was questioning my sanity on every night-drive... I always thought the n/s headlight was brighter and had a better range. The n/s bulb actually looks like an Osram bulb of some sort too. Anyway, with them replaced and some more poor phone photography here is the after:
 After light output
This really has made a huge difference, I wouldn't say that the range is significantly greater (certainly not the claimed increase anyway), but they are brighter and the slightly whiter light does help. Thankfully, despite being a bit cooler colour wise they don't stand out desperately next to the OE parking markers eithers.
_
Just after Easter I was also able to book in her with Karmagik in Chesterfield - my preferred bodyshop - to get some slight rusting sorted on the offside arch. This side was missing the factory ppf on the dogleg and so I believe stonechipping over some years had peppered this area and it was starting to rust. £120 and three days later I collected her and applied some new ppf to the dogleg. After chatting to Steve - owner and painter - it turns out that Ivy must have been in an accident at some point as most of the area around the dogleg was full of filler. Quite possibly the same accident that resulted in new doors and wings (thanks S100HP). Thankfully the rust was also apparently only surface based, and with no pitting to the metal itself.
 OSR arch before
 OSR arch repair 2
 OSR arch repair
I'm happy with the aftermarket ppf - much thicker than the original factory stuff and it extends all the way to the edge of the dogleg as well as a bit higher. I'll be getting another and replacing the n/s side soon - which whilst still functioning is starting to oxidise colour wise, plus I cant have mismatching parts on my car! Hopefully I'll apply it slightly better too! The blend line for the repair is inside of the door, so fairly well hidden and up on the d-pillar - I actually haven't found that blend yet! Again, Karmagik are a great place if you're local and Steve is a very genuine guy.
_
Lastly, on the drive back from Easter hols my fiancee managed to break my glovebox arms. Every time she opens the glovebox she just lets it slam down and then of course every time she closes it it gets slammed - and never shut by the latch either, so there is always some sort of torsion being applied to it. Well, it finally stressed the 25 year old plastic too much and they snapped. Luckily, as most of these seem to be broken now, I managed to find a guy breaking an 850 with an upbroken set and my partner paid the tenner I was charged. In her defense she was sorry and did offer to pay for it. Fitting them is very easy, 6 bolts to remove the glovebox liner (T25s) and then it just slides out, revealing the recess for the arms. I also acquired a spare glovebox hinge screw as Ivy was missing one (can just about be seen in the second picture). That is also a T25 and was promptly screwed in.
 Glovebox repair parts
 Glovebox start
 Broken glovebox arm
 Glovebox prep
 Glovebox fixed
Oh, baby wipes are a must by the way! Ivy is a tip-car and a mtb-shuttle so having wipes is always good to keep contact points of interior clean. They also work quite well as a degreaser in the engine bay or to clean hands after doing maintenance checks. Lastly they work great for cleaning puppy-paws after muddy walks!
_
Quick snap of her half-way through her 750 mi excursion over the Easter weekend:
 Easter snap
First up was headlights. They've always been a bit pathetic, really. I had thought this was down to the reflector degrading as it eventually does in all of these so hadn't bothered looking into it. Recently, during one of ECPs endless 'sales' they happened to have an offer on some Osram Nightbreakers in H1s for £9, so I grabbed a pack on the off chance they would light up at least some of my way. Access was no problem, pretty much the dream tbh - twist the covers off, unclip (push in and to the left) the metal retainers and out comes the bulb. Below is a driveway shot highlighting just how poor the light output was, followed by a picture of the old bulbs. I did struggle with picturing this on my phone but hope they go someway to conveying the difference.
Before light outputMismatched bulbsSo, crap and mismatched bulbs. Why you'd only replace one bulb I've truly no idea but it might explain why I was questioning my sanity on every night-drive... I always thought the n/s headlight was brighter and had a better range. The n/s bulb actually looks like an Osram bulb of some sort too. Anyway, with them replaced and some more poor phone photography here is the after:
After light outputThis really has made a huge difference, I wouldn't say that the range is significantly greater (certainly not the claimed increase anyway), but they are brighter and the slightly whiter light does help. Thankfully, despite being a bit cooler colour wise they don't stand out desperately next to the OE parking markers eithers.
_
Just after Easter I was also able to book in her with Karmagik in Chesterfield - my preferred bodyshop - to get some slight rusting sorted on the offside arch. This side was missing the factory ppf on the dogleg and so I believe stonechipping over some years had peppered this area and it was starting to rust. £120 and three days later I collected her and applied some new ppf to the dogleg. After chatting to Steve - owner and painter - it turns out that Ivy must have been in an accident at some point as most of the area around the dogleg was full of filler. Quite possibly the same accident that resulted in new doors and wings (thanks S100HP). Thankfully the rust was also apparently only surface based, and with no pitting to the metal itself.
OSR arch beforeOSR arch repair 2OSR arch repairI'm happy with the aftermarket ppf - much thicker than the original factory stuff and it extends all the way to the edge of the dogleg as well as a bit higher. I'll be getting another and replacing the n/s side soon - which whilst still functioning is starting to oxidise colour wise, plus I cant have mismatching parts on my car! Hopefully I'll apply it slightly better too! The blend line for the repair is inside of the door, so fairly well hidden and up on the d-pillar - I actually haven't found that blend yet! Again, Karmagik are a great place if you're local and Steve is a very genuine guy.
_
Lastly, on the drive back from Easter hols my fiancee managed to break my glovebox arms. Every time she opens the glovebox she just lets it slam down and then of course every time she closes it it gets slammed - and never shut by the latch either, so there is always some sort of torsion being applied to it. Well, it finally stressed the 25 year old plastic too much and they snapped. Luckily, as most of these seem to be broken now, I managed to find a guy breaking an 850 with an upbroken set and my partner paid the tenner I was charged. In her defense she was sorry and did offer to pay for it. Fitting them is very easy, 6 bolts to remove the glovebox liner (T25s) and then it just slides out, revealing the recess for the arms. I also acquired a spare glovebox hinge screw as Ivy was missing one (can just about be seen in the second picture). That is also a T25 and was promptly screwed in.
Glovebox repair partsGlovebox startBroken glovebox armGlovebox prepGlovebox fixedOh, baby wipes are a must by the way! Ivy is a tip-car and a mtb-shuttle so having wipes is always good to keep contact points of interior clean. They also work quite well as a degreaser in the engine bay or to clean hands after doing maintenance checks. Lastly they work great for cleaning puppy-paws after muddy walks!
_
Quick snap of her half-way through her 750 mi excursion over the Easter weekend:
Easter snapEdited by Cookeh on Monday 6th May 19:44
S100HP said:
Great update. Glad to see rust fixed. My initial comment when I saw it was that it must've been accident damage, which you confirmed shortly after. Volvo's don't rust for the sake of it.
I'd forgotten about that, good reminder. Insurance sheet didn't mention anything rearwards of the back doors though, probably why I didn't make the connection. But you're right it must have been related to that. Edited by Cookeh on Monday 6th May 19:42
A couple of little bits were addressed today. Firstly, I got a message yesterday from my favourite breaker in the whole world, Minty, who informed me that he had a set of all-weather mats available for a very reasonable price. Shot over this afternoon to collect them, then brought them home for a quick clean up.
Pleasantly surprised at the condition they were in, been looking for a set for almost a year now; every set I've looked at has either had split rubber or holes in the textile area.
 All weather mats before
 Drivers mat before
After a very quick clean and some Autoglym VRT for some sort of protection they were looking even more reasonable. I need to find a better product though, VRT is very thin and tended to agglomerate in the grooves - which is what you can see in the corners of the rears. Textile could do with another scrub and wet-vac too...
 All weather mats after
 Drivers mat after
After that Ivy got her first bath post body shop work, and a top-up of Double Speed Wax to keep that in good shape and of course to protect the sprayed area.
 Gloss reflection shot
She would benefit from a good machine polish (which I will eventually get around to) but still reasonable levels of gloss.
Lastly, I tried to touch-up the bumper that got damaged in the hit and run around Christmas time. The paint damage was addressed a while ago, but I haven't really had the chance to get the bumper sorted professionally yet. I likely won't have the chance for a while yet either, but I'm fairly satisfied for now.
The damage was caused by the alloy and tyre of the car, so was a mix of torn up plastic and melted in rubber. The first step was to use tar and glue remover to try and get rid of as much rubber residue as possible, followed by wet sanding with 2500 grit sandpaper. I was a bit paranoid about this as of course the bumper does have some texture to it.
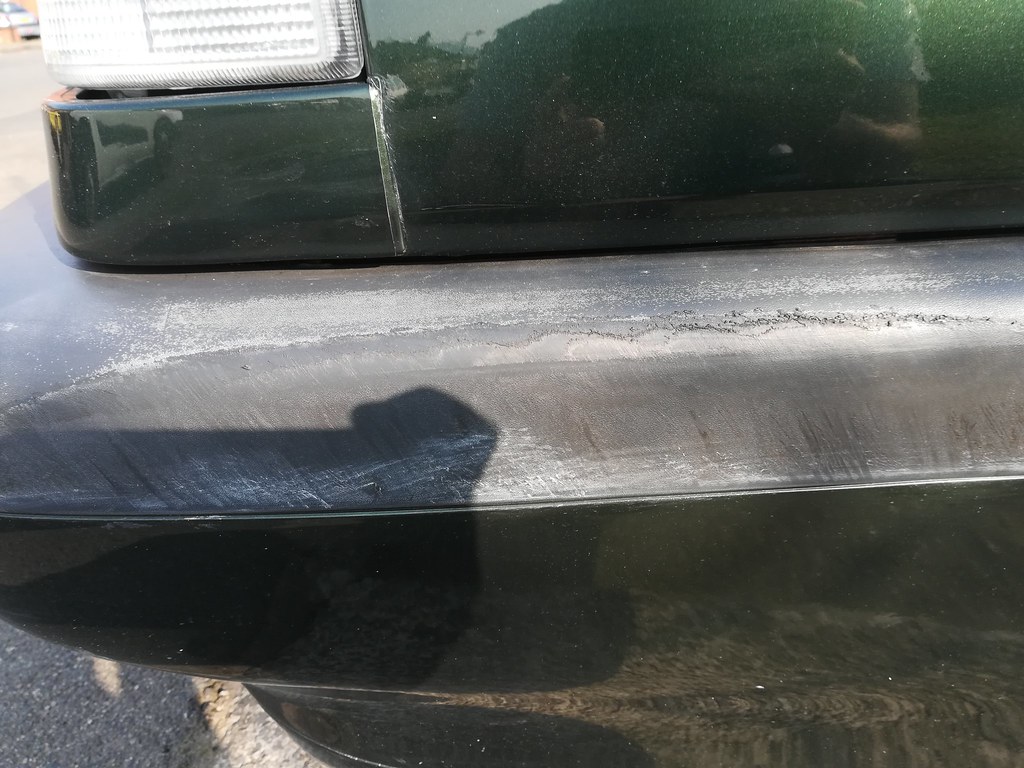 Bumper before
After sanding I applied Wurth Plastic PT Dye to restore the colour to it and try and even the appearance out some more. As you can see the result is not perfect, and there is still quite visible ridging and some deeper gorges. I feel that if went any further with the sanding I would have taken off quite a bit of the texture so I had to compromise. In any case, I feel it is a significant improvement and certainly less noticeable.
 Bumper touchup
 Upclose of touchup
Pleasantly surprised at the condition they were in, been looking for a set for almost a year now; every set I've looked at has either had split rubber or holes in the textile area.
All weather mats beforeDrivers mat beforeAfter a very quick clean and some Autoglym VRT for some sort of protection they were looking even more reasonable. I need to find a better product though, VRT is very thin and tended to agglomerate in the grooves - which is what you can see in the corners of the rears. Textile could do with another scrub and wet-vac too...
All weather mats afterDrivers mat afterAfter that Ivy got her first bath post body shop work, and a top-up of Double Speed Wax to keep that in good shape and of course to protect the sprayed area.
Gloss reflection shotShe would benefit from a good machine polish (which I will eventually get around to) but still reasonable levels of gloss.
Lastly, I tried to touch-up the bumper that got damaged in the hit and run around Christmas time. The paint damage was addressed a while ago, but I haven't really had the chance to get the bumper sorted professionally yet. I likely won't have the chance for a while yet either, but I'm fairly satisfied for now.
The damage was caused by the alloy and tyre of the car, so was a mix of torn up plastic and melted in rubber. The first step was to use tar and glue remover to try and get rid of as much rubber residue as possible, followed by wet sanding with 2500 grit sandpaper. I was a bit paranoid about this as of course the bumper does have some texture to it.
Bumper beforeAfter sanding I applied Wurth Plastic PT Dye to restore the colour to it and try and even the appearance out some more. As you can see the result is not perfect, and there is still quite visible ridging and some deeper gorges. I feel that if went any further with the sanding I would have taken off quite a bit of the texture so I had to compromise. In any case, I feel it is a significant improvement and certainly less noticeable.
Bumper touchupUpclose of touchupJust a thought with those mats. Whilst tidy enough the carpet panel in the one is colour wise worn/stained. Could you take one in to your local carpet warehouse, find a best match carpet, use the old piece for a template and replace, a bit of carpet adhesive and job jobbed. Even better if you could find one of those foot wide samples to buy.
Had another half hour to work on some bits and pieces, after changing pads discs, slider pins and ABS sensor on my fiancee's car. The first thing I wanted to address was the exhaust - haven't gotten round to touching it since getting the car. I honestly wasn't sure how it would turn out, given it was absolutely ruined before...:


The first thing I tried was some Brasso, far from ideal and didn't accomplish a huge amount other than removing some of the lighter staining.

The next step I took was a bit more drastic, using a gentle scouring pad. Got some of the heavier stains off without introducing too deep marring or scratches.


I'm confident that the metal polish and 0000 grade wire wool I've ordered will bring back some of the shine and address the few small marks. Definitely an improvement but still a long way to go, especially on the inner face.
I also finally got around to acquiring some bolts for passenger cargo net mounts - the V70s I got my part from differs from the 850s so I had to find a new bolt to secure it. If anyone else is doing this, an M6x30mm bolt works perfectly. The first step is to remove the courtesy light (just unclips), then unbolting the 10mm fastener.


The next step is simply to bolt the mount in, then screw in the trim piece - which weirdly for Volvo is a T27 and not T25 torx.


The whole point of this is to allow the cargo nets to be used when the rear seats are dropped - useful when the car is full for tip runs/holidays.

The last job I managed to squeeze in was replacing the spark plug cover bolts. During the spark plug fiasco I found that most of the heads were rounded off, making them tricky to remove. Volvo still stock these, albeit not terribly cheaply; £1.50 each with P/N 986009.


The first thing I tried was some Brasso, far from ideal and didn't accomplish a huge amount other than removing some of the lighter staining.
The next step I took was a bit more drastic, using a gentle scouring pad. Got some of the heavier stains off without introducing too deep marring or scratches.
I'm confident that the metal polish and 0000 grade wire wool I've ordered will bring back some of the shine and address the few small marks. Definitely an improvement but still a long way to go, especially on the inner face.
I also finally got around to acquiring some bolts for passenger cargo net mounts - the V70s I got my part from differs from the 850s so I had to find a new bolt to secure it. If anyone else is doing this, an M6x30mm bolt works perfectly. The first step is to remove the courtesy light (just unclips), then unbolting the 10mm fastener.
The next step is simply to bolt the mount in, then screw in the trim piece - which weirdly for Volvo is a T27 and not T25 torx.
The whole point of this is to allow the cargo nets to be used when the rear seats are dropped - useful when the car is full for tip runs/holidays.
The last job I managed to squeeze in was replacing the spark plug cover bolts. During the spark plug fiasco I found that most of the heads were rounded off, making them tricky to remove. Volvo still stock these, albeit not terribly cheaply; £1.50 each with P/N 986009.
Gassing Station | Readers' Cars | Top of Page | What's New | My Stuff