850 T5 Project - Ivy
Discussion


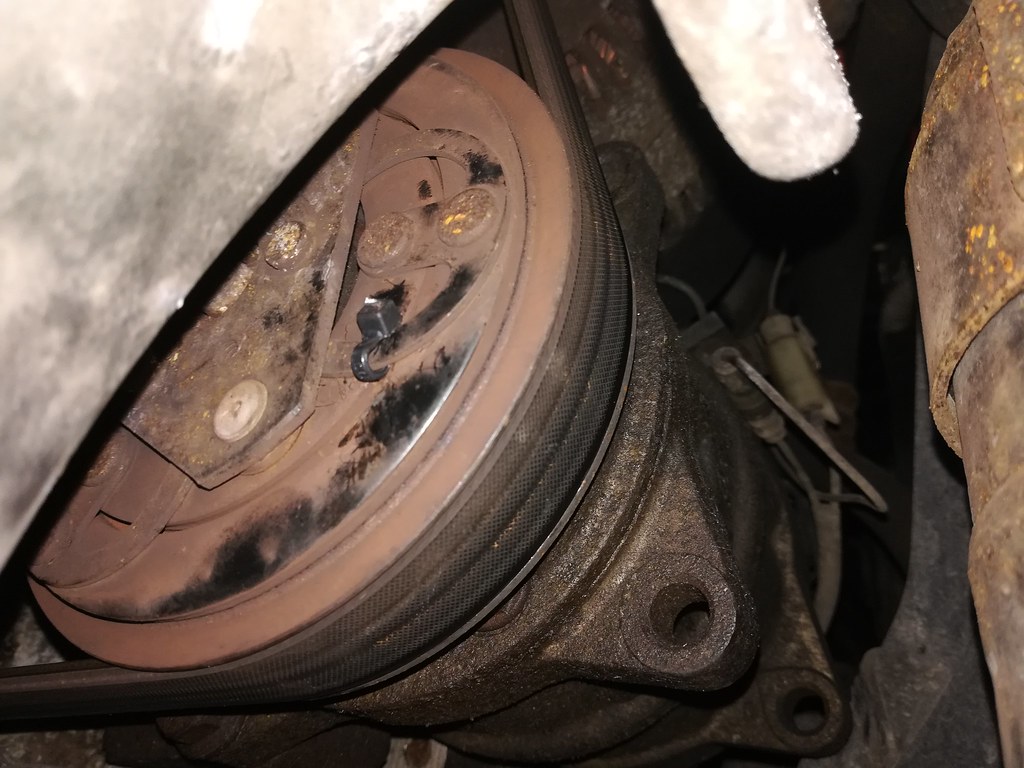
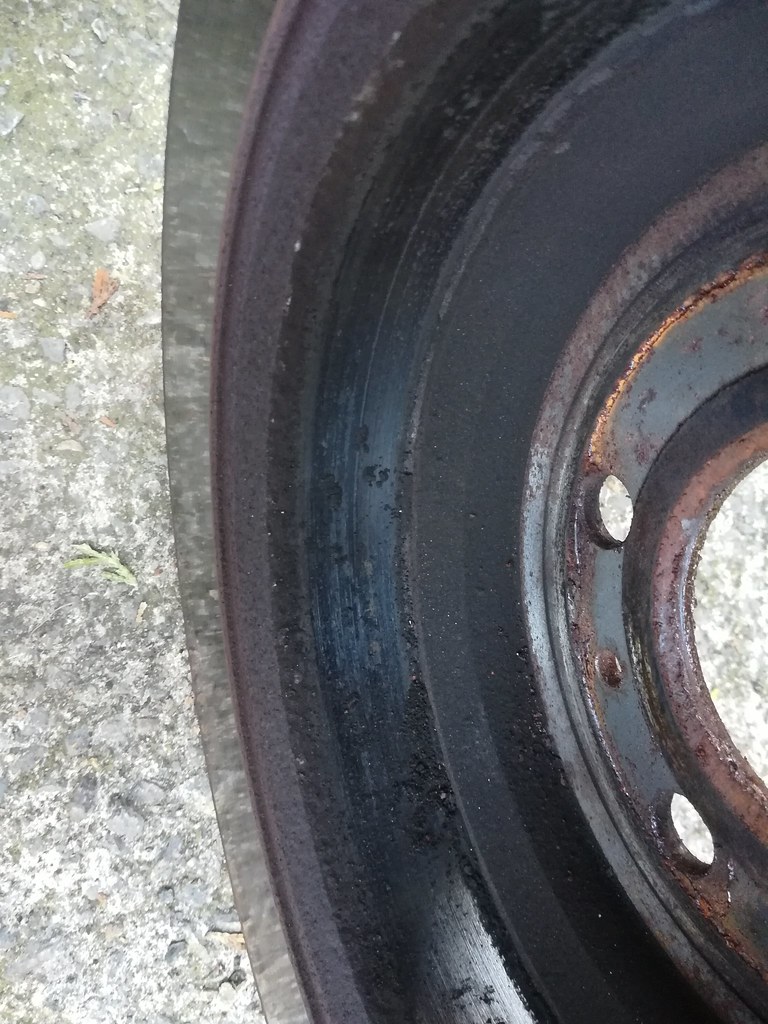
Few more bits and pieces over the last couple of weeks. First up was attempting to sort out the A/C, spurred on by those three days of sun we had at the start of the month, probably not to be seen for another year. In any case, I know that one of the most common causes of A/C not working on the 850s is down to the electromagnetic clutch on the compressor. Over time the gap increases and the magnet loses the strength to pull it in and engage it. This leads to excessive cycling of the compressor, giving sub-par temperature and intermittent A/C. Sure enough, the gap on mine was 0.8mm, roughly double the 0.3mm to 0.4mm that Volvo specs from the factory. Excessive cycling with these cars typically means 2-3s off and 1s engaged, at all times.
 Clutch gap before
There are several ways of remedying this. The official, proper, and indeed best way is to degas the system, remove the accumulator/drier and the compressor, then remove the compressor clutch and take out as many of the factory installed spacers as required to get to a factory spec gap. Of course you then have to reinstall all the above and get it regased. Honestly, I was unwilling to go down this route without knowing for sure that it was the clutch gap at fault, and besides, I didn't have an A/C clutch pulling kit or the material at the time to make one. As an alternative, I used zip-ties to shim the gap to the correct spec. I know this sounds ridiculous, but it is very well documented (along with bread-clips) on Matthews Volvo Site, VolvoSpeed, VolvoTuning and Turbobrick. It is also not permanent and will be done correctly in the future by myself, but for now....well, here it is:
 Zip-tie shim
The ziptie goes between the outer ring and each of the three smaller rings, as pictured. This pushes the assembly closer to the clutch thus reducing the gap, which is now sufficiently in spec. Forgive the picture, feeler gauges and torch in one hand, phone in the other, on my back in a confined space does not equate to a good picture!
 Clutch gap after
This did not cure my cycling issue. Well, it did, but not fully. I was now on for 2-3s and off for 4-5s.
The next most common cause of cycling when the clutch gap is within spec is of course low refrigerant. I took advantage of an offer at my local dealers which was essentially a vacuum and dry of the system, vacuum and UV leak test, then regas for £49.95. I am relieved to say they found no leaks, which is a bit of a shock on a car this age, but the amount of refrigerant in the car was only 235g when it should be 750g! A/C now blows very cold indeed, 6'C during testing at the dealers, and it is glorious. I ought to get a digital thermometer and check the temp myself as I am curious.
_
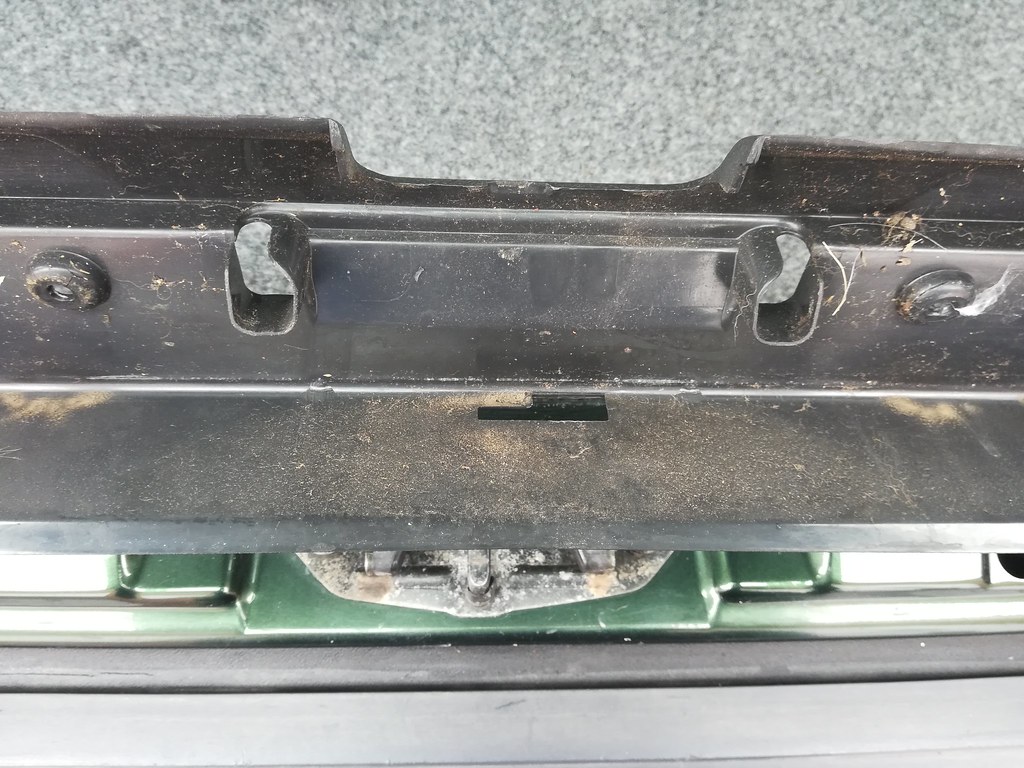
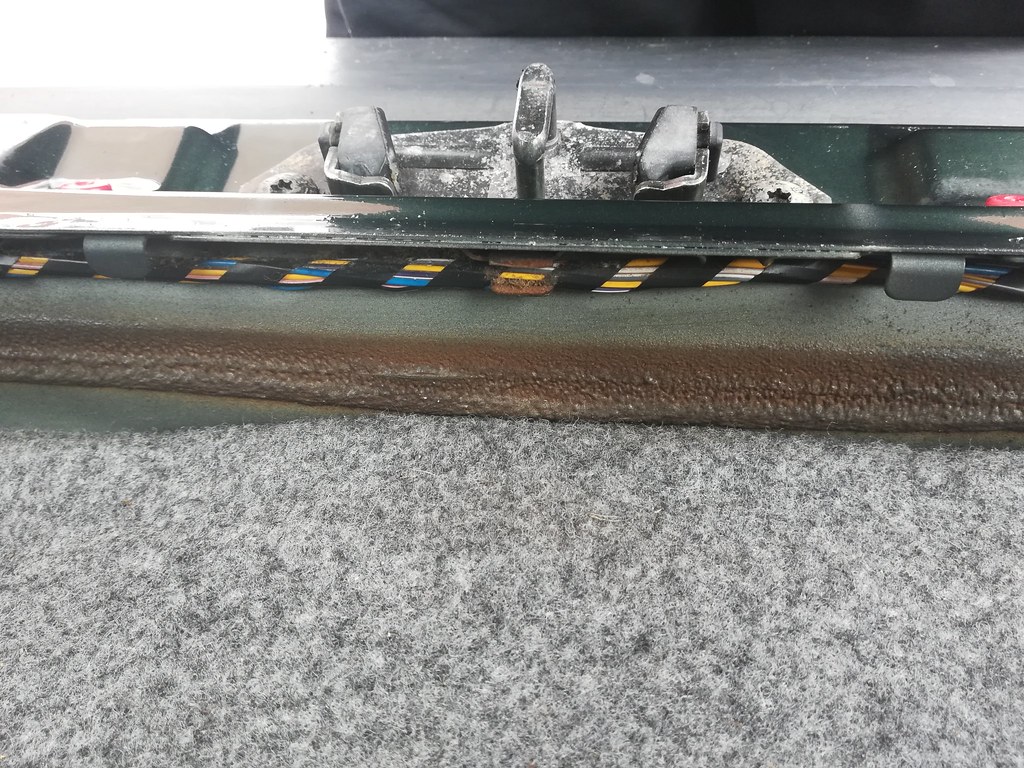
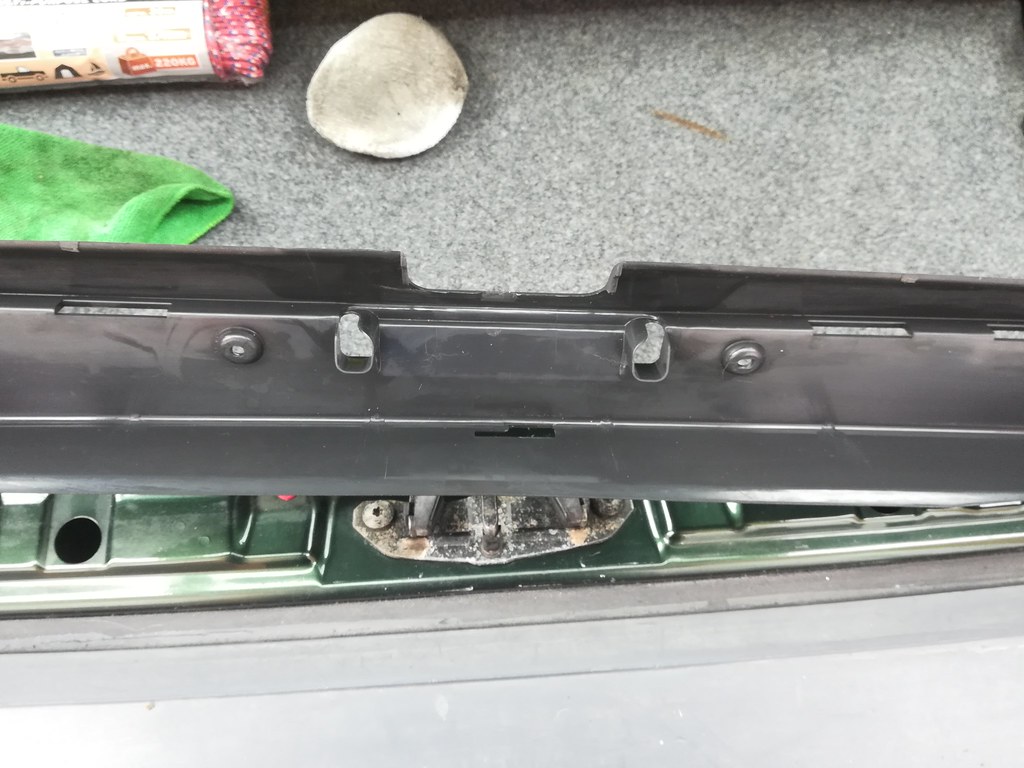
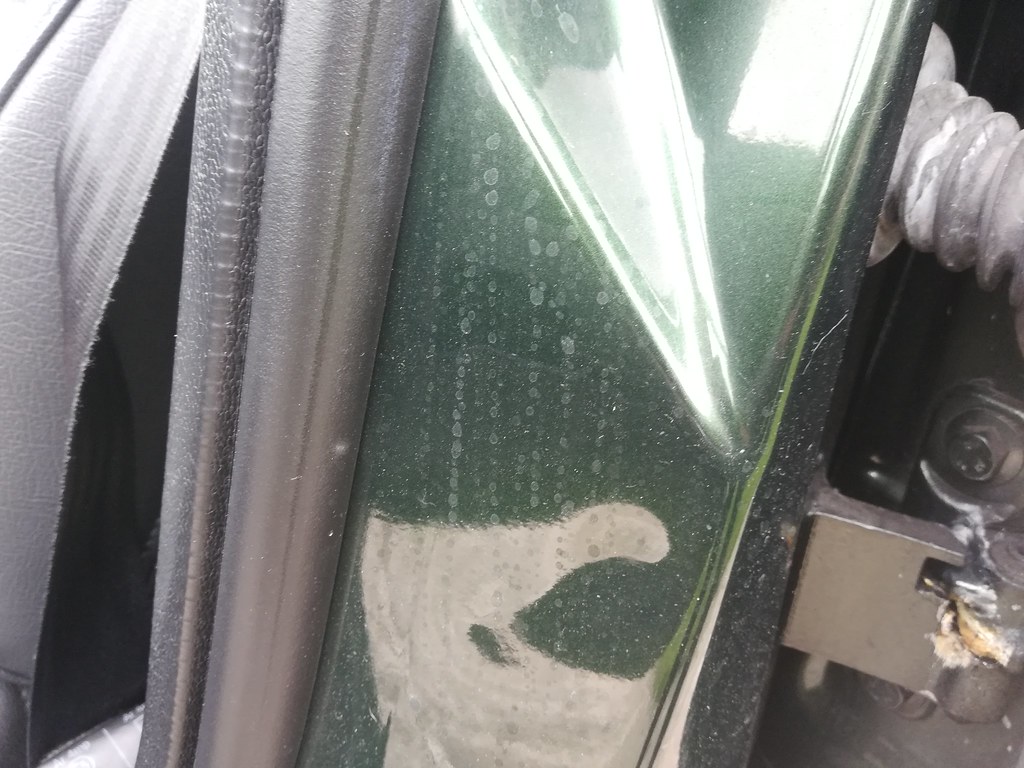
Next up was some more anally retentive stuff. Namely cleaning up the area beneath the tailgate and hatch trim. I knew it was going to be bad due to the things Ivy gets used for: regular and frequent use as a mtb shuttle, dog carrier and tip car. I wanted to get in there and keep it clean to prevent any sort of rust or damage. Before was actually much worse than I was expecting, but it came up well with some APC and a soft-bristled brush. I sealed it with some spray wax to give it some protection and treated the plastic with Autoglym VRT. The trim comes off by simply undoing the T25 torx bolts along the length of the trim piece, and is then held on with two clips at either side - just pull down from the top gently to release. I also pulled both boot drain plugs out to clean them, both were absolutely full of mud and debris - possibly explaining why the C windows fogged up so easily.
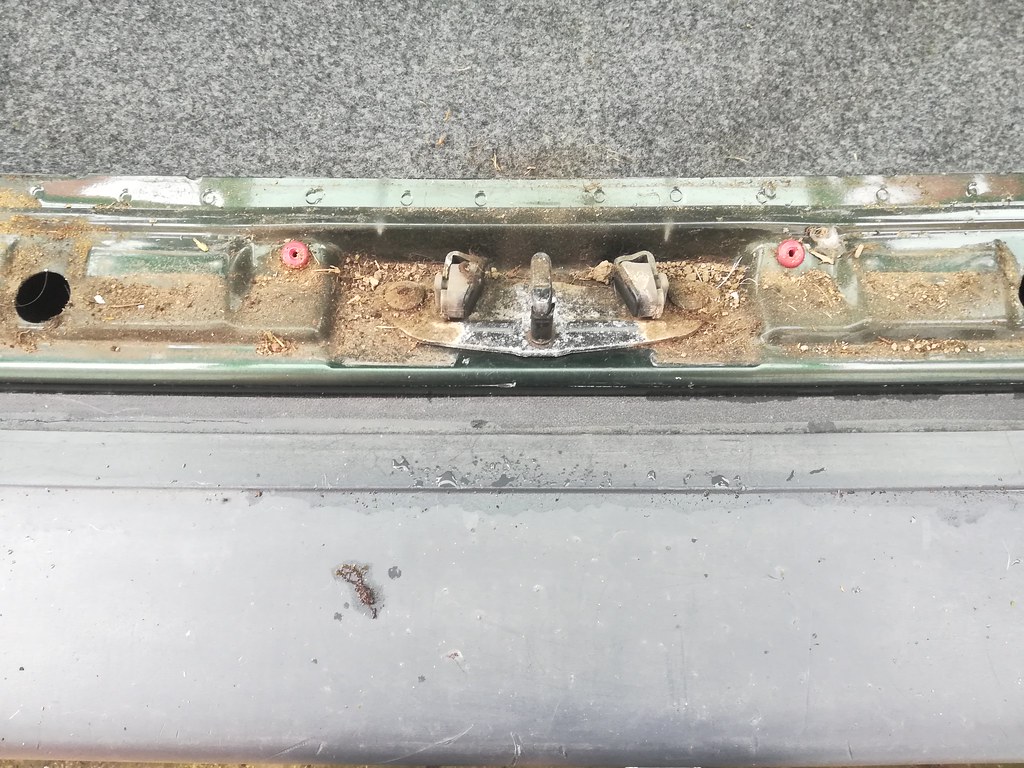 Latch area before
 Hatch area before
 Boot rear before
 Boot drain before
 Boot trim before
Dogs are great, better than people, but man oh man does their hair get everywhere.
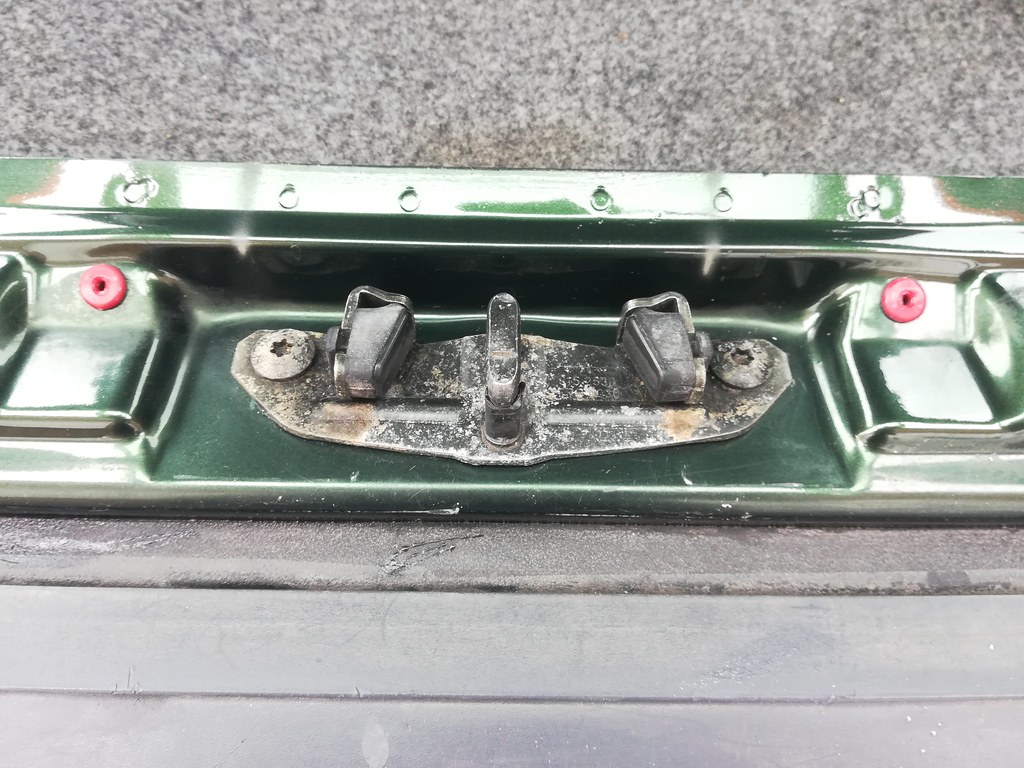 Latch area after
 Hatch area after
 Boot rear after
 Boot trim after
 Boot drain after
Not perfect, the plug in particular, but certainly a lot more respectable for ten minutes work.
_
On the subject of anally retentive stuff, I noticed the bonnet latch was starting to corrode and it was a bit of an eyesore to me. So I pulled it off (2x 10mm bolts, then thread pull-lever through the grill) and cleaned it up. Wire brushed, then treated with rust-converter, and finally sprayed with some zinc galvanising paint to protect it. The plastic part of the latch comes off by undoing the one T10 fastener closest to the spring and then pull the plastic 'arms' apart enough to clear the metal.
 Latch before
 Treated latch
 Painted latch
 Installed latch
Still got some pitting, of course, but even my anality has to draw the line somewhere!
Clutch gap beforeThere are several ways of remedying this. The official, proper, and indeed best way is to degas the system, remove the accumulator/drier and the compressor, then remove the compressor clutch and take out as many of the factory installed spacers as required to get to a factory spec gap. Of course you then have to reinstall all the above and get it regased. Honestly, I was unwilling to go down this route without knowing for sure that it was the clutch gap at fault, and besides, I didn't have an A/C clutch pulling kit or the material at the time to make one. As an alternative, I used zip-ties to shim the gap to the correct spec. I know this sounds ridiculous, but it is very well documented (along with bread-clips) on Matthews Volvo Site, VolvoSpeed, VolvoTuning and Turbobrick. It is also not permanent and will be done correctly in the future by myself, but for now....well, here it is:
Zip-tie shimThe ziptie goes between the outer ring and each of the three smaller rings, as pictured. This pushes the assembly closer to the clutch thus reducing the gap, which is now sufficiently in spec. Forgive the picture, feeler gauges and torch in one hand, phone in the other, on my back in a confined space does not equate to a good picture!
Clutch gap afterThis did not cure my cycling issue. Well, it did, but not fully. I was now on for 2-3s and off for 4-5s.
The next most common cause of cycling when the clutch gap is within spec is of course low refrigerant. I took advantage of an offer at my local dealers which was essentially a vacuum and dry of the system, vacuum and UV leak test, then regas for £49.95. I am relieved to say they found no leaks, which is a bit of a shock on a car this age, but the amount of refrigerant in the car was only 235g when it should be 750g! A/C now blows very cold indeed, 6'C during testing at the dealers, and it is glorious. I ought to get a digital thermometer and check the temp myself as I am curious.
_
Next up was some more anally retentive stuff. Namely cleaning up the area beneath the tailgate and hatch trim. I knew it was going to be bad due to the things Ivy gets used for: regular and frequent use as a mtb shuttle, dog carrier and tip car. I wanted to get in there and keep it clean to prevent any sort of rust or damage. Before was actually much worse than I was expecting, but it came up well with some APC and a soft-bristled brush. I sealed it with some spray wax to give it some protection and treated the plastic with Autoglym VRT. The trim comes off by simply undoing the T25 torx bolts along the length of the trim piece, and is then held on with two clips at either side - just pull down from the top gently to release. I also pulled both boot drain plugs out to clean them, both were absolutely full of mud and debris - possibly explaining why the C windows fogged up so easily.
Latch area beforeHatch area beforeBoot rear beforeBoot drain beforeBoot trim beforeDogs are great, better than people, but man oh man does their hair get everywhere.
Latch area afterHatch area afterBoot rear afterBoot trim afterBoot drain afterNot perfect, the plug in particular, but certainly a lot more respectable for ten minutes work.
_
On the subject of anally retentive stuff, I noticed the bonnet latch was starting to corrode and it was a bit of an eyesore to me. So I pulled it off (2x 10mm bolts, then thread pull-lever through the grill) and cleaned it up. Wire brushed, then treated with rust-converter, and finally sprayed with some zinc galvanising paint to protect it. The plastic part of the latch comes off by undoing the one T10 fastener closest to the spring and then pull the plastic 'arms' apart enough to clear the metal.
Latch beforeTreated latchPainted latchInstalled latchStill got some pitting, of course, but even my anality has to draw the line somewhere!
I couldn't help myself and had to tot up what I'd spent both mechanically and cosmetically and it has so far worked out to be around £230 a month. So basically about what it would be costing to lease a Hyundai i10, one of the VW Up! triplets or a Fabia 1.2... don't think that's too bad! Of course, there is still some money to be spent, especially cosmetically. Wheel refurb and a rear bumper respray at the minimum.
Regarding progress on the car, I nipped up to W. Yorkshire at the tail end of last week to see a V70 being broken. I had originally only intended to buy a single Perfo to act as a spare (my current spare is a Persus and does not even remotely match - and nor would it clear the 302mm brake upgrade I'm toying with). Unfortunately for my wallet, what I left with was definitely not one Perfo. Nope, the full list looked something like this:
N/S & O/S Lower D-pillar trim
N/S & O/S Upper D-pllar trim
N/S & O/S D-pillar speaker cover
N/S & O/S C pillar grilles
O/S/F floormat retaining clips
2x (TWO ) Perfos
Ah well, I still haven't learned my lesson and still should definitely not be allowed near breaker cars without adult supervision. In fairness the boot trims aren't for me - a friend of mine has a P80 V70 and his GSD has pretty much totalled the boot. I saw the trims were in good condition and offered to grab them for him. £30 for pretty much the entire boot was too good to say no to.
Regarding the Perfos, as you may have seen in some of the pics my rear two are in an absolute state, so when I saw that two of the ones on the breaker were much nicer I thought I'd buy both and use one of my scabby ones as the spare. Man-maths said that this was the better option than buying one and then paying for a four wheel refurb. Man-math said this would save me money as I wouldn't need to get the refurb as soon and it would cost less as the wheels would need less prep. Man-math is an evil thing .
.
Anyway, after spending 4 hours on Sat washing, decontaminating, glazing and waxing my fiancees car I was able to spend Sun morning sorting out Ivy. Gave her a quick maintenance wash before the sun got too high then promptly got her up on axle stands. Whilst I was washing the wheels I also gave the arches a once-over, thankfully they were still holding up well from their detail earlier this year.
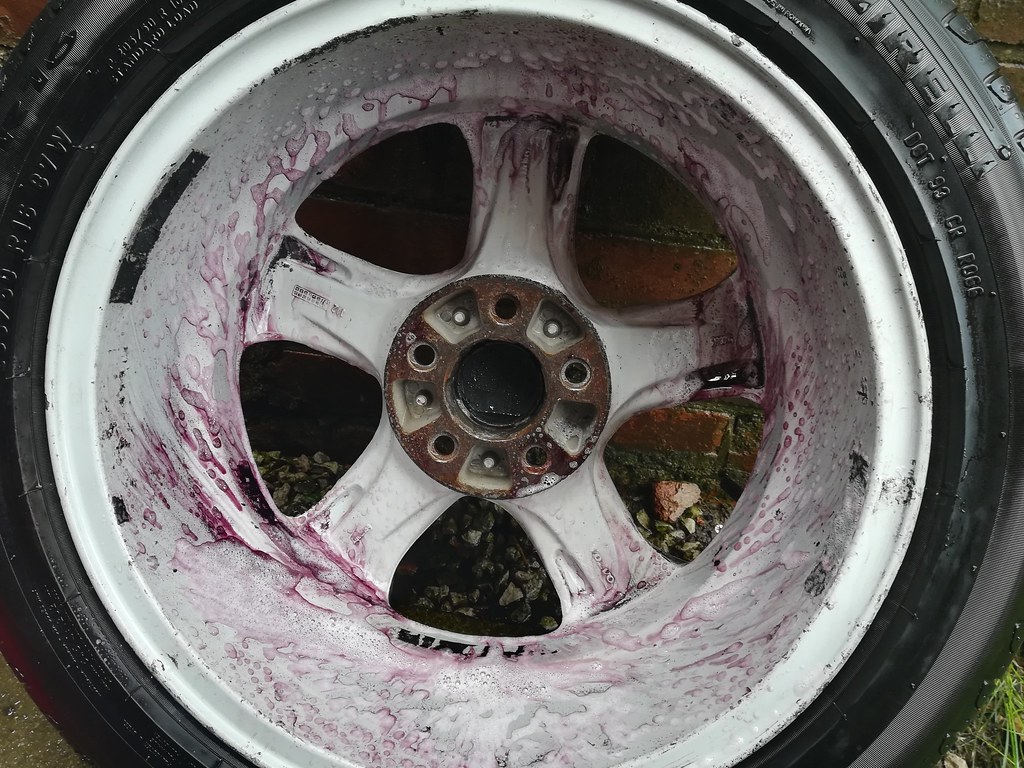
The 'new' Perfos, whilst being in much better condition in terms of corrosion were rather filthy - especially the backs!
 Perfo before
Bare in mind this photo is after the car and wheels got a full snowfoam and wash . I used Power Maxed TFR at 1:10 to get the worst of it off, APC on the tyres (1:15), which left me with this:
 Before TFR
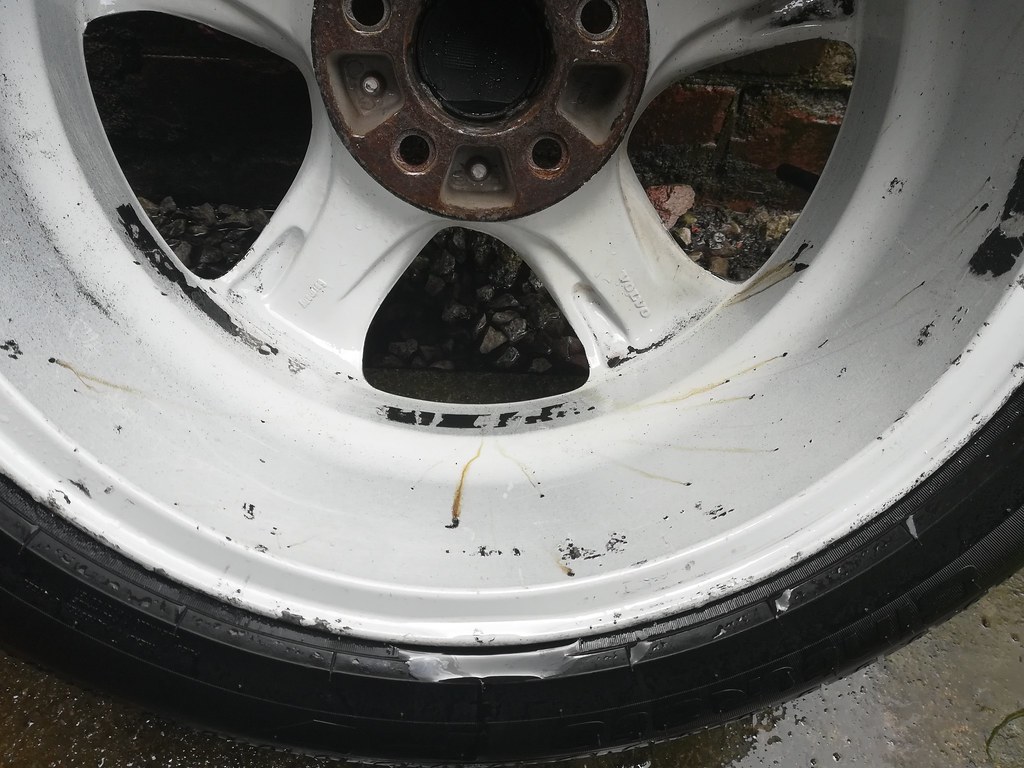
So so much wheel weight residue. So then I used Autobrite Make it Rain 3.0 as Just The Tonic to try and deal with the iron and tar deposits.
On a side note, I picked these up in the Easter sale (where they still weren't exactly 'cheap') off the back of hearing good things. I am honestly not impressed though, I used over 250ml of fallout remover just to decontaminate 6 months of fallout buildup on just the sideskirts of my partner's car - and there is still fallout there afterwards! I don't know if I'm somehow using it incorrectly but I found it to be fantastic at looking pretty but really rather crap at actually removing the fallout. As for JTT I used almost half the bottle on the wheels alone, which did not have much in the way of tar and had to apply it 4-5 times to remove tar spots that were only about 1mm2. On top of that JTT didn't touch the wheel weight residue at all (as you can see later!).
 Perfo fallout
 Perfo T&G
So after numerous hits of everything, and a combination of every brush I own I was left with this somewhat disappointing finale.
 Perfo after
Admittedly they probably haven't been cleaned properly for a long long time, but I am not happy with the wheel weight residue of the dirt on the back of the spokes. Does anyone here have any suggestions on removal of either? I don't want to use an acidic wheel cleaner as there are some chips and scratches present and I don't wish to encourage corrosion.
Here are two photos showing the difference in the 'old' and 'new' Perfos, and then the obligatory car shot.
 Old Perfo
 'New' Perfo
 Obligatory
Overall I'm pleased with the breaker haul, as I've been on the lookout for a spare Perfo for a while and they have tidied the car up somewhat - definitely less of an eyesore every time I look back at the car. The floormat retaining clips was an added bonus that I was not expecting, but again is something I've been after since purchasing the car. Volvo no longer produces them and most breakers don't want to remove them as you have to remove three bits of trim and lift the carpet to get them out... far too much hassle for a part that has little to no financial value.
Speaking of which, I'll be getting the clip installed hopefully later this week, and even more hopefully I might be getting the same part for the passenger side.
Regarding progress on the car, I nipped up to W. Yorkshire at the tail end of last week to see a V70 being broken. I had originally only intended to buy a single Perfo to act as a spare (my current spare is a Persus and does not even remotely match - and nor would it clear the 302mm brake upgrade I'm toying with). Unfortunately for my wallet, what I left with was definitely not one Perfo. Nope, the full list looked something like this:
N/S & O/S Lower D-pillar trim
N/S & O/S Upper D-pllar trim
N/S & O/S D-pillar speaker cover
N/S & O/S C pillar grilles
O/S/F floormat retaining clips
2x (TWO
) PerfosAh well, I still haven't learned my lesson and still should definitely not be allowed near breaker cars without adult supervision. In fairness the boot trims aren't for me - a friend of mine has a P80 V70 and his GSD has pretty much totalled the boot. I saw the trims were in good condition and offered to grab them for him. £30 for pretty much the entire boot was too good to say no to.
Regarding the Perfos, as you may have seen in some of the pics my rear two are in an absolute state, so when I saw that two of the ones on the breaker were much nicer I thought I'd buy both and use one of my scabby ones as the spare. Man-maths said that this was the better option than buying one and then paying for a four wheel refurb. Man-math said this would save me money as I wouldn't need to get the refurb as soon and it would cost less as the wheels would need less prep. Man-math is an evil thing
.Anyway, after spending 4 hours on Sat washing, decontaminating, glazing and waxing my fiancees car I was able to spend Sun morning sorting out Ivy. Gave her a quick maintenance wash before the sun got too high then promptly got her up on axle stands. Whilst I was washing the wheels I also gave the arches a once-over, thankfully they were still holding up well from their detail earlier this year.
The 'new' Perfos, whilst being in much better condition in terms of corrosion were rather filthy - especially the backs!
Perfo beforeBare in mind this photo is after the car and wheels got a full snowfoam and wash
. I used Power Maxed TFR at 1:10 to get the worst of it off, APC on the tyres (1:15), which left me with this:Before TFRSo so much wheel weight residue. So then I used Autobrite Make it Rain 3.0 as Just The Tonic to try and deal with the iron and tar deposits.
On a side note, I picked these up in the Easter sale (where they still weren't exactly 'cheap') off the back of hearing good things. I am honestly not impressed though, I used over 250ml of fallout remover just to decontaminate 6 months of fallout buildup on just the sideskirts of my partner's car - and there is still fallout there afterwards! I don't know if I'm somehow using it incorrectly but I found it to be fantastic at looking pretty but really rather crap at actually removing the fallout. As for JTT I used almost half the bottle on the wheels alone, which did not have much in the way of tar and had to apply it 4-5 times to remove tar spots that were only about 1mm2. On top of that JTT didn't touch the wheel weight residue at all (as you can see later!).
Perfo falloutPerfo T&GSo after numerous hits of everything, and a combination of every brush I own I was left with this somewhat disappointing finale.
Perfo afterAdmittedly they probably haven't been cleaned properly for a long long time, but I am not happy with the wheel weight residue of the dirt on the back of the spokes. Does anyone here have any suggestions on removal of either? I don't want to use an acidic wheel cleaner as there are some chips and scratches present and I don't wish to encourage corrosion.
Here are two photos showing the difference in the 'old' and 'new' Perfos, and then the obligatory car shot.
Old Perfo'New' PerfoObligatoryOverall I'm pleased with the breaker haul, as I've been on the lookout for a spare Perfo for a while and they have tidied the car up somewhat - definitely less of an eyesore every time I look back at the car. The floormat retaining clips was an added bonus that I was not expecting, but again is something I've been after since purchasing the car. Volvo no longer produces them and most breakers don't want to remove them as you have to remove three bits of trim and lift the carpet to get them out... far too much hassle for a part that has little to no financial value.
Speaking of which, I'll be getting the clip installed hopefully later this week, and even more hopefully I might be getting the same part for the passenger side.
I've always had good results with Autosmart products... Tardis for glue and tar removal, though yes you'd need to scrape off as much if the wheel weight gunk first then soak it and rub it to get it all off. Red 7 is an excellent fallout remover / wheel cleaner though a bit expensive, however not compared to paying nigh on £15 for 500ml of fancy packaged stuff.
Ultimately, the best option is a wheel refurb. Mine appear to have beeyn painted then clear coated with a horrible, thick layer which as soon as it's breached, flakes off. It's round all the rims but also on a couple of spoke faces and looks terrible. Powder coating up here is £150, drive in, drive out and so that's the route I'll be going down. Seems frivolous but wheels really do make a car.
Ultimately, the best option is a wheel refurb. Mine appear to have beeyn painted then clear coated with a horrible, thick layer which as soon as it's breached, flakes off. It's round all the rims but also on a couple of spoke faces and looks terrible. Powder coating up here is £150, drive in, drive out and so that's the route I'll be going down. Seems frivolous but wheels really do make a car.
You are quite right, wheel refurb is the way to go. If I can manage to get a spare set of wheels, and find the time to drive a couple of 3 hour round trips I could get all four wheels done for around £100 (if I drop them off as bare alloys with no tyres and leave them for a few days). Next cheapest after that is around £180 - boo, but they are only 5 mins away - yay.
So, Davie was kind enough to pop up to a local-to-him breaker and grab a few pieces for me. Even more kindly, he declined any sort of payment or beer tokens - top chap! So this little lot got added to the now fitted Perfos and the still-waiting carpet retaining clips.
 Parts haul Davie
Luckily for me, my fiancee left for a girls night out at 1530 so I was able to get into that pile and get them on the car. Firstly I started with the seatbelt buttons, they were oxidised but not holed or cracked so I used some Plast-RX to get the oxidation and some scratches out, then installed them. You just need to pry the tabs off using a small screwdriver.
Do not, I repeat, do not lose the small spring that sits beneath the red part of the button.
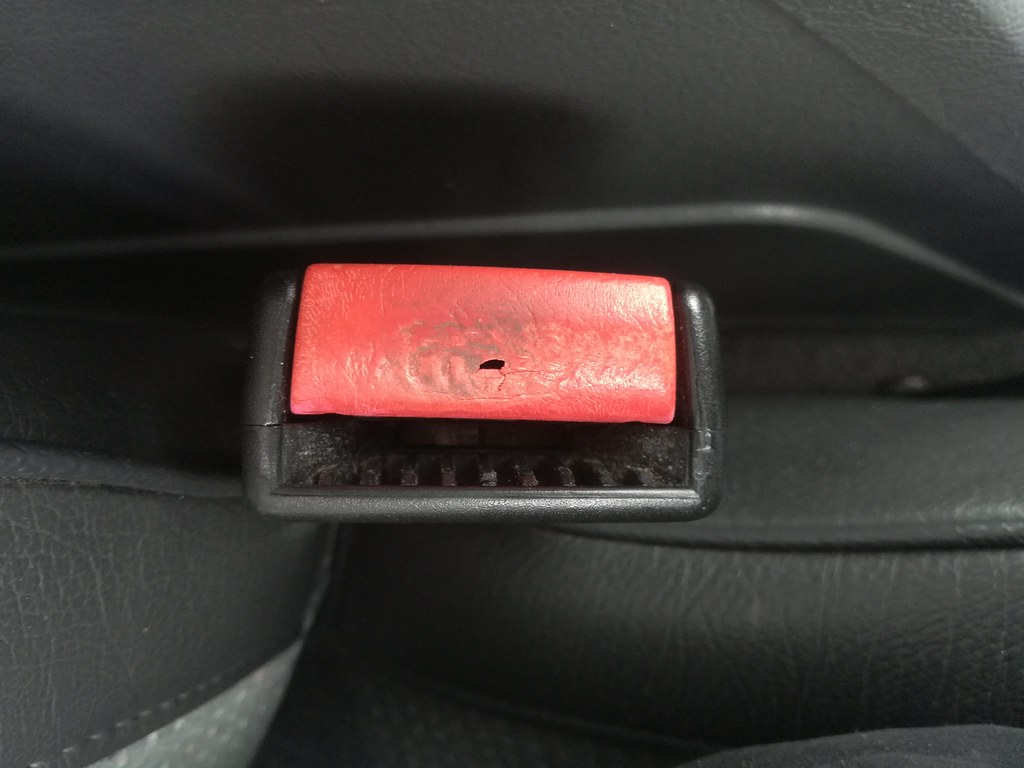 Old button condition
 New button installedFlickr
Next up was the door marker light, mine kept popping loose on one corner which I found far more irritating than it should have been!
 Old door marker light
 New door marker light
I then turned my attention to my sometimes notchy throttle. A two-pronged attack was used here, (i) cleaning and re-lubing the pedal pivot, and (ii) lubing as much of the throttle cable as possible from both throttle body and pivot ends). Feels smoother now, but really I need a new throttle cable. Mine is a little bit stretched and cannot be adjusted due to a broken adjuster nut!
 Accel pedal dirty
 Cleaned lubed pedal pivot
For the throttle body end, I detached the cable and suspended it before very, v e r y, v e r y slowly pouring cable oil down it. I must have spent an incredibly boring 15 minutes doing this, God I need a life.
[url=https://flic.kr/p/2gxLVDG]
 [/url] Oil throttle cable
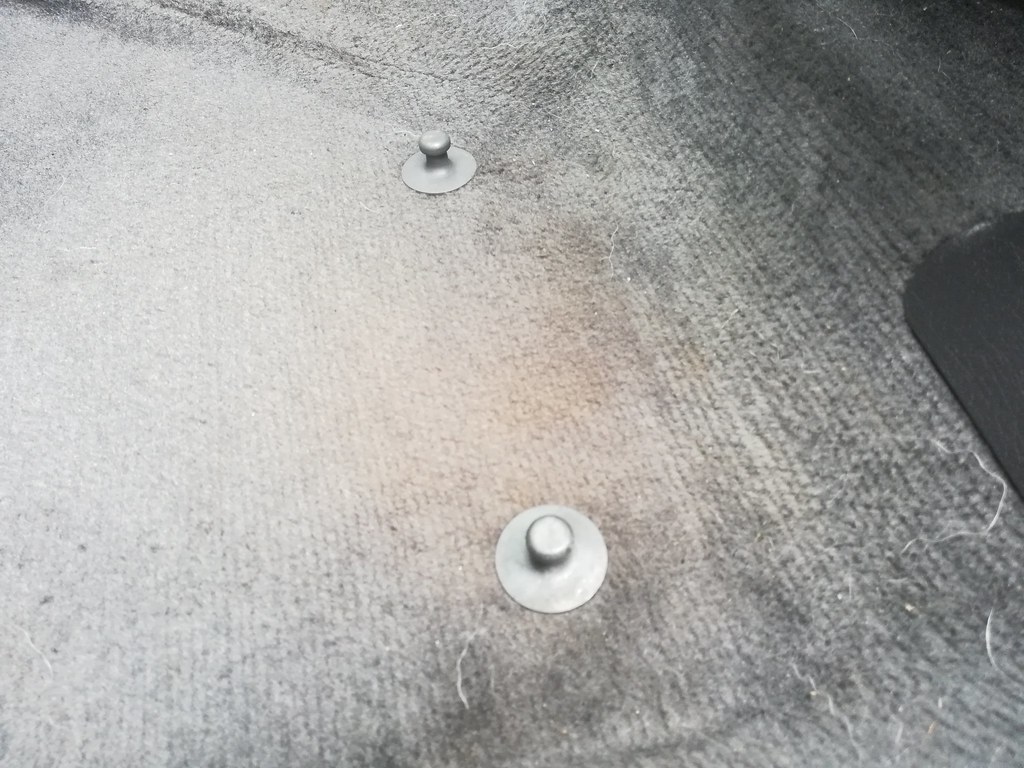
Next up was the carpet retainer clips. Very easy job to do, take the sill trim off (just unclips) and the seat trim off (slides off), and voila - you can lift the carpet.
 Carpet trim removal
 Retainer pins on
[url=https://flic.kr/p/2gxM9R8]
When removing the sill trim I noticed a fastener drop out. Turns out the dash has been sitting a full 1cm too low on the OS as this fastener was not aligned with its hole. Said hole was stripped, but I put it back in and it seems to be holding for now.
I cleaned up the SIPS sticker on the dash which seems to have partially melted and slid away, leaving a trail of goop... Tar and glue remover on a makeup pad worked well:
 SIPS sticker before
 SIPS sticker after
I then gave the door shuts a wipe down with a product I bought mega cheap the other day (think it was £3.50 for 750mL): Turtlewax Waterless Wash and Wax. Normally I do my shuts during my maintenance wash but I didn't have time this week so I whizzed round them with this. I was very impressed by it and would certainly recommend it - especially at its sale price.
 Turtlewax WWW Test 1
 Turtlewax WWW clean 1
 Turtlewax WWW Test 3
 Turtlewax WWW clean 3
 Turtlewax WWW bonnet
... and that was all for this afternoon! Thanks again, Davie - massively appreciated.
Parts haul DavieLuckily for me, my fiancee left for a girls night out at 1530 so I was able to get into that pile and get them on the car. Firstly I started with the seatbelt buttons, they were oxidised but not holed or cracked so I used some Plast-RX to get the oxidation and some scratches out, then installed them. You just need to pry the tabs off using a small screwdriver.
Do not, I repeat, do not lose the small spring that sits beneath the red part of the button.
Old button conditionNew button installedFlickrNext up was the door marker light, mine kept popping loose on one corner which I found far more irritating than it should have been!
Old door marker lightNew door marker lightI then turned my attention to my sometimes notchy throttle. A two-pronged attack was used here, (i) cleaning and re-lubing the pedal pivot, and (ii) lubing as much of the throttle cable as possible from both throttle body and pivot ends). Feels smoother now, but really I need a new throttle cable. Mine is a little bit stretched and cannot be adjusted due to a broken adjuster nut!
Accel pedal dirtyCleaned lubed pedal pivotFor the throttle body end, I detached the cable and suspended it before very, v e r y, v e r y slowly pouring cable oil down it. I must have spent an incredibly boring 15 minutes doing this, God I need a life.
[url=https://flic.kr/p/2gxLVDG]
[/url] Oil throttle cableNext up was the carpet retainer clips. Very easy job to do, take the sill trim off (just unclips) and the seat trim off (slides off), and voila - you can lift the carpet.
Carpet trim removalRetainer pins on[url=https://flic.kr/p/2gxM9R8]
When removing the sill trim I noticed a fastener drop out. Turns out the dash has been sitting a full 1cm too low on the OS as this fastener was not aligned with its hole. Said hole was stripped, but I put it back in and it seems to be holding for now.
I cleaned up the SIPS sticker on the dash which seems to have partially melted and slid away, leaving a trail of goop... Tar and glue remover on a makeup pad worked well:
SIPS sticker beforeSIPS sticker afterI then gave the door shuts a wipe down with a product I bought mega cheap the other day (think it was £3.50 for 750mL): Turtlewax Waterless Wash and Wax. Normally I do my shuts during my maintenance wash but I didn't have time this week so I whizzed round them with this. I was very impressed by it and would certainly recommend it - especially at its sale price.
Turtlewax WWW Test 1Turtlewax WWW clean 1Turtlewax WWW Test 3Turtlewax WWW clean 3Turtlewax WWW bonnet... and that was all for this afternoon! Thanks again, Davie - massively appreciated.
rickygolf83 said:
Great thread, just read from start to finish.
Good diy result on the scuffed bumper, and credit to you for addressing all the small, even minute details!
Thank you. I personally can't help it, they all stand out to me and I can't ignore them for too long.... I normally last a few months tops before I crack!Good diy result on the scuffed bumper, and credit to you for addressing all the small, even minute details!
Small update today. Managed to finally get the o/s/f handle colour coded and fitted:
 Old handle
 Colour coded handle
Whilst the door card was off I also gave the panel a good clean and checked the cavities. In them I found this:
 Door rattle cause
 Lower window runner
This is the lower window guide, meant to keep everything aligned when the window is lowered. It is meant to be attached with a blind rivet, but I can't even see a rivet point or a tab on the part, perhaps it detached. I have not had any issues whilst lowering the window, but now I am rather paranoid and will be checking the door to see if there is another one in its place or if I can reattach this one somehow... Bummer!
Small little update, as I haven't had much time to work on the car recently. I did manage to head to a local breaker and grab a few things however... Namely an o/s door seal, an o/s/r arch liner, a n/s/f ABS sensor (which may not actually be at fault), and another seat of floormat retaining pins for the passenger side. All for a very reasonable £30 (or the same as each one goes for individually on Fleabay). Fitting most of those will have to wait until after I submit my PhD thesis in the coming weeks, but I did manage to sort the passenger floor clips at least!
 N/S/F Mat Pins
This afternoon I also found myself with a spare half-hour, so I decided to tackle the wheel weight residue seen in a previous post. I borrowed a very worn caramel wheel (it had 1mm remaining before the stop line) from my tame bodyshop to try and remove it.
Before TFR
I am extremely impressed by the caramel wheel, quick and very easy - though it took some getting used to as I found it very ineffective unless used at the correct angle. I also was not at all expecting the mess!
 Caramel wheel mess
 Caramel wheel results
To end the update, here are a couple of shots of one of the rare moments the 850 has been clean over the last fortnight!
 850 wash
 850 wash2
N/S/F Mat PinsThis afternoon I also found myself with a spare half-hour, so I decided to tackle the wheel weight residue seen in a previous post. I borrowed a very worn caramel wheel (it had 1mm remaining before the stop line) from my tame bodyshop to try and remove it.
Before TFRI am extremely impressed by the caramel wheel, quick and very easy - though it took some getting used to as I found it very ineffective unless used at the correct angle. I also was not at all expecting the mess!
Caramel wheel messCaramel wheel resultsTo end the update, here are a couple of shots of one of the rare moments the 850 has been clean over the last fortnight!
850 wash850 wash2An unexpected update, caused by a rather urgent part failure. Yesterday, as I got into the car to drive home from Uni, I found that my seatbelt would not extend. It wouldn't retract either, even after unbolting the seatbelt to give it more slack. This was a slight problem for obvious reasons, and given I needed to get home and that I needed the car for today, I had to fix it.
I Googled rather furiously for a few minutes to see if anyone had a solution for it, and whilst there are a lot of threads complaining of the problem there were no solutions other than replacing it. Fine in 2011 when you could still buy them, fine up until a few years ago when they were common in breakers yards, an utter ballache in 2019 when the nearest breaker and the only one Ive seen being broken all year is 2 hours away.
Anyway, I ended up stripping the whole seatbelt assembling out, disassembling it to try and figure out how the mechanism works, before fixing it and reassembling it. All in all, it took far longer than I would have liked (3 hours!!) but I did seem to resolve it and it does appear to be working fine now.
I have posted a much longer and detailed post on how I did in on one of the larger Volvo forums in case it helps someone else in the future, so I'll be a lot more concise here, where there isn't much need for truckloads of details on how to reassemble a 1995 seatbelt!
The first thing to do would be to unclip the -ve battery terminal and drain the power to avoid (dealer only and costly) SRS light resets. Next up is to remove the seat trim, which lifts up to a 40' angle or so and then pushes back, to reveal the SIPS airbag trigger and bolt for the lower seatbelt mount:
 Trim panel removed
Next up is to unbolt that seatbelt, and remove the B-pillar trim, giving access to the two 14mm bolts and the one T30 screw that secure the assembly to the B-pillar.
 Seatbelt assembly
Then remove the butyl tape on the bottom of the assembly, undo the clip and the two push rivets to reveal the seatbelt mechanism:
 Wind and lock mechanism
Missing from this picture is the rudimentary gyroscope which is responsible for locking the seatbelt mechanism when the car is rolled/inverted/tilted. In the video below you can see that the 'leg' kicks out when it is moved away from vertical - this is what pushes against the green 'D' shaped plastic in the picture, locking the mechanism.
Volvo 850 Seatbelt Gyro - YouTube
(Someone please teach me to embed videos on here!)
The problem I had, is that the triangular metal piece (that disables extension), and the green 'D' piece (which controls locking) were both out of place. The triangular piece needs to be in front of the 'D', as pictured, which needs to be as far to the right as possible.
After making sure everything was spacially arranged correctly, I attempted to remount the seatbelt - only to find it locked immediately. This turned out to be because the gyroscope would kick the leg out and jam the whole thing again. The solution to this was the tie some fishing line to the 'D', and route it out of the mechanism and trim so that once mounted I could pull it loose manually and free the system.
This was the winning ticket, and combined with unravelling my messy tangled belting, seems to be working perfectly again.
 Seatbelt tangled
 Rewound seatbelt
Now, I hate to admit it, but I did not fully clean all of this up before reinstalling (I know, ban hammer is coming my way), but in my defence it was now 2130, there was no light, and I was rather grumpy! I did at least give it a quick vacuum and wipe down.
I also managed to tick another little annoyance off the to-do list this morning... the glass position sensor. Since its mounting bracket had broken (before my ownership), it had been flopping around between the dash and the A-pillar. I finally got around to using some 3M VHB to stick it where it belongs:
 Floppy sensor
 Sensor mount broken
 Sensor mounted
It really is the little things!
I Googled rather furiously for a few minutes to see if anyone had a solution for it, and whilst there are a lot of threads complaining of the problem there were no solutions other than replacing it. Fine in 2011 when you could still buy them, fine up until a few years ago when they were common in breakers yards, an utter ballache in 2019 when the nearest breaker and the only one Ive seen being broken all year is 2 hours away.
Anyway, I ended up stripping the whole seatbelt assembling out, disassembling it to try and figure out how the mechanism works, before fixing it and reassembling it. All in all, it took far longer than I would have liked (3 hours!!) but I did seem to resolve it and it does appear to be working fine now.
I have posted a much longer and detailed post on how I did in on one of the larger Volvo forums in case it helps someone else in the future, so I'll be a lot more concise here, where there isn't much need for truckloads of details on how to reassemble a 1995 seatbelt!
The first thing to do would be to unclip the -ve battery terminal and drain the power to avoid (dealer only and costly) SRS light resets. Next up is to remove the seat trim, which lifts up to a 40' angle or so and then pushes back, to reveal the SIPS airbag trigger and bolt for the lower seatbelt mount:
Trim panel removedNext up is to unbolt that seatbelt, and remove the B-pillar trim, giving access to the two 14mm bolts and the one T30 screw that secure the assembly to the B-pillar.
Seatbelt assemblyThen remove the butyl tape on the bottom of the assembly, undo the clip and the two push rivets to reveal the seatbelt mechanism:
Wind and lock mechanismMissing from this picture is the rudimentary gyroscope which is responsible for locking the seatbelt mechanism when the car is rolled/inverted/tilted. In the video below you can see that the 'leg' kicks out when it is moved away from vertical - this is what pushes against the green 'D' shaped plastic in the picture, locking the mechanism.
Volvo 850 Seatbelt Gyro - YouTube
(Someone please teach me to embed videos on here!)
The problem I had, is that the triangular metal piece (that disables extension), and the green 'D' piece (which controls locking) were both out of place. The triangular piece needs to be in front of the 'D', as pictured, which needs to be as far to the right as possible.
After making sure everything was spacially arranged correctly, I attempted to remount the seatbelt - only to find it locked immediately. This turned out to be because the gyroscope would kick the leg out and jam the whole thing again. The solution to this was the tie some fishing line to the 'D', and route it out of the mechanism and trim so that once mounted I could pull it loose manually and free the system.
This was the winning ticket, and combined with unravelling my messy tangled belting, seems to be working perfectly again.
Seatbelt tangledRewound seatbeltNow, I hate to admit it, but I did not fully clean all of this up before reinstalling (I know, ban hammer is coming my way
), but in my defence it was now 2130, there was no light, and I was rather grumpy! I did at least give it a quick vacuum and wipe down.I also managed to tick another little annoyance off the to-do list this morning... the glass position sensor. Since its mounting bracket had broken (before my ownership), it had been flopping around between the dash and the A-pillar. I finally got around to using some 3M VHB to stick it where it belongs:
Floppy sensorSensor mount brokenSensor mountedIt really is the little things!
Managed to find a few hours on Saturday to address some more things on the ever growing To-Do List!
With the ever growing difficulty in finding parts for 850s, I decided it would be prudent to try and track down MOT-essential pieces and try and get some spares built up. Firstly was that seatbelt. Whilst it is still working perfectly (and silky smooth I might add, after finally getting a quick clean), I think it's a reasonable thing to have in stock, so to speak.
With this in mind, I messaged around my go-to breakers/pages and ended up at Shemtek Automotive Solutions. Shem is somewhat of a guru for 5cyl engines and P80s so seems to always have something in. I took the short 35min trip to see him first thing Sat morning. I went for just the seatbelt, but as has happened so many times before, I ended up with far more than that... :wall::wall:
 Breaker haul
Thankfully I did actually manage to get a seatbelt, but somehow found myself walking out with a steering wheel, the iron cross grill emblem, some small airbox mounts, and the lower window guide found broken a few posts prior.
Once home, I wrote a little list of things I wanted to accomplish, in order of preference, and aimed to see how far I could get down it in the time I had. It looked something like this:
[I][LIST=1]
[*]Replace o/s/r door seal (bought a few posts back)
[*]Replace lower window guide (as found detached a little while ago)
[*]Investigate squeaking handbrake
[*]Remove remaining wheel weight residue from other wheels
[*]Clean up parts haul and store
[/LIST][/I]
On the subject of the door seals, mine had a split (or two) in it, making it a bigtime eyesore and also leaking some noise in above 50mph.
 Ruined door seal by Cookeh_, on Flickr
With the old seal off (just some push-fit clips and pinch seams) and the faces cleaned it was time to fit the new seal - after giving that a clean and condition, of course!
I used new clips from 227sparts on eBay, which were very reasonably priced and good quality - highly recommended. I found this easiest to accomplish by seating the top edge (pinch-seam) first, followed by the other pinch seams, then working my way top to bottom.
 Replacement door seal by Cookeh_, on Flickr
I'm not entirely happy with the way the lower taped section turned out, but the seal is at least doing its job. I may address it in the future for cosmetic reasons if it continues to nag me.
Next up was the window guide. This wasn't too noticeable, only really causing problems when closing the door with the window wound down - you could clearly hear the window rattling.
Fitting was rather simple. I removed the access panel pictured below (obviously the door car must come off first, but that has been covered many times in this thread!), which gave me all the access I needed. Located it roughly in position was easy, the tricky part comes in sliding the bottom of the upper window guide into the top of the lower window guide.
With that done, it was time to investigate the handbrake. I'd noticed an intermittent squeal that changed frequency with wheel speed, but went away when gently applying the handbrake. This lead me to suspect the handbrake was biting slightly, or I had some brake dust build up on the inside of the rotor hats (Volvo handbrakes, especially P80s, are famed for very dusty handbrake shoes).
With the wheel off, caliper removed, and rotor off, my suspicions were confirmed, with burnt on dust deposits on the inner hat surface:
 Burnt deposits
I wire brushed this clean, and also took a wire brush to the mechanisms and reluctor ring whilst in there:
 Cleaned reluctor ring
I'm pretty happy with the condition that lot is all in, which saves me a fair bit on replacing it all. Happy to report no squeals since - even if I have only done 30 miles in one drive cycle.
Conveniently, the wheels with weight residue left were the rear ones, so they were treated to a caramel wheel whilst off.
Pleased with my progress so far, I tackled the last part of my aims. Not pictured is the re-organising of my spares box and spares draws, which is slowly expanding. I did, however, have to do something about the steering wheel before storing it...
 Steering wheel before
I found this wheel face down near the scrap pile at Shems, it had clearly been out there for some while given the caked-on dust and dirt. I don't know what made me pick it up, or even ask what he wanted for it (it was nothing, as he thought it was trashed) - but I'm glad I did...
I attacked it with a dry brush first, to knock most of the heavy stuff off, then APC with a variety of brushes, microfibres and a magic eraser, which got me to this state:
 Steering wheel 50/50
 Steering wheel 50/50 2
I'm really very very surprised by the condition it is in - even more so considering where it was living. The plan with this wheel is to eventually fit it, before sending my current wheel off for a retrim as it is badly worn with lots of scuffs. I'm hoping to take it with me next time I visit Russia as my fiancee has a childhood friend there that now does auto upholstery and has quoted the equivalent of £50 for a full retrim in 'custom' colours... I'm currently tempted by a two tone (a la R models) or a mix of perforated and solid grain leather.
 Clean steering wheel
 Clean steering wheel 2
With the ever growing difficulty in finding parts for 850s, I decided it would be prudent to try and track down MOT-essential pieces and try and get some spares built up. Firstly was that seatbelt. Whilst it is still working perfectly (and silky smooth I might add, after finally getting a quick clean), I think it's a reasonable thing to have in stock, so to speak.
With this in mind, I messaged around my go-to breakers/pages and ended up at Shemtek Automotive Solutions. Shem is somewhat of a guru for 5cyl engines and P80s so seems to always have something in. I took the short 35min trip to see him first thing Sat morning. I went for just the seatbelt, but as has happened so many times before, I ended up with far more than that... :wall::wall:
Breaker haulThankfully I did actually manage to get a seatbelt, but somehow found myself walking out with a steering wheel, the iron cross grill emblem, some small airbox mounts, and the lower window guide found broken a few posts prior.
Once home, I wrote a little list of things I wanted to accomplish, in order of preference, and aimed to see how far I could get down it in the time I had. It looked something like this:
[I][LIST=1]
[*]Replace o/s/r door seal (bought a few posts back)
[*]Replace lower window guide (as found detached a little while ago)
[*]Investigate squeaking handbrake
[*]Remove remaining wheel weight residue from other wheels
[*]Clean up parts haul and store
[/LIST][/I]
On the subject of the door seals, mine had a split (or two) in it, making it a bigtime eyesore and also leaking some noise in above 50mph.
Ruined door seal by Cookeh_, on FlickrWith the old seal off (just some push-fit clips and pinch seams) and the faces cleaned it was time to fit the new seal - after giving that a clean and condition, of course!
I used new clips from 227sparts on eBay, which were very reasonably priced and good quality - highly recommended. I found this easiest to accomplish by seating the top edge (pinch-seam) first, followed by the other pinch seams, then working my way top to bottom.
Replacement door seal by Cookeh_, on FlickrI'm not entirely happy with the way the lower taped section turned out, but the seal is at least doing its job. I may address it in the future for cosmetic reasons if it continues to nag me.
Next up was the window guide. This wasn't too noticeable, only really causing problems when closing the door with the window wound down - you could clearly hear the window rattling.
Fitting was rather simple. I removed the access panel pictured below (obviously the door car must come off first, but that has been covered many times in this thread!), which gave me all the access I needed. Located it roughly in position was easy, the tricky part comes in sliding the bottom of the upper window guide into the top of the lower window guide.
With that done, it was time to investigate the handbrake. I'd noticed an intermittent squeal that changed frequency with wheel speed, but went away when gently applying the handbrake. This lead me to suspect the handbrake was biting slightly, or I had some brake dust build up on the inside of the rotor hats (Volvo handbrakes, especially P80s, are famed for very dusty handbrake shoes).
With the wheel off, caliper removed, and rotor off, my suspicions were confirmed, with burnt on dust deposits on the inner hat surface:
Burnt depositsI wire brushed this clean, and also took a wire brush to the mechanisms and reluctor ring whilst in there:
Cleaned reluctor ringI'm pretty happy with the condition that lot is all in, which saves me a fair bit on replacing it all. Happy to report no squeals since - even if I have only done 30 miles in one drive cycle.
Conveniently, the wheels with weight residue left were the rear ones, so they were treated to a caramel wheel whilst off.
Pleased with my progress so far, I tackled the last part of my aims. Not pictured is the re-organising of my spares box and spares draws, which is slowly expanding. I did, however, have to do something about the steering wheel before storing it...
Steering wheel beforeI found this wheel face down near the scrap pile at Shems, it had clearly been out there for some while given the caked-on dust and dirt. I don't know what made me pick it up, or even ask what he wanted for it (it was nothing, as he thought it was trashed) - but I'm glad I did...
I attacked it with a dry brush first, to knock most of the heavy stuff off, then APC with a variety of brushes, microfibres and a magic eraser, which got me to this state:
Steering wheel 50/50Steering wheel 50/50 2I'm really very very surprised by the condition it is in - even more so considering where it was living. The plan with this wheel is to eventually fit it, before sending my current wheel off for a retrim as it is badly worn with lots of scuffs. I'm hoping to take it with me next time I visit Russia as my fiancee has a childhood friend there that now does auto upholstery and has quoted the equivalent of £50 for a full retrim in 'custom' colours... I'm currently tempted by a two tone (a la R models) or a mix of perforated and solid grain leather.
Clean steering wheelClean steering wheel 2Thank you for the words of encouragement!
Found another hour this morning to investigate some recent boost issues. The car has been under-boosting by around 50%, with some weird boost behaviour at the top end and when letting off after WOT.
Obviously the first suspects are vacuum lines, then boost pipes, but both turned out to be fine, well, fine after I reattached the detached fresh air line to the TCV.
 Fresh air vac detached
I then thought the TCV itself must be the problem, which are recommended to be replaced every 60k - fairly sure mine is original. After digging around on the internet for vacuum line diagrams for the TCV, I found that two lines were inverted.
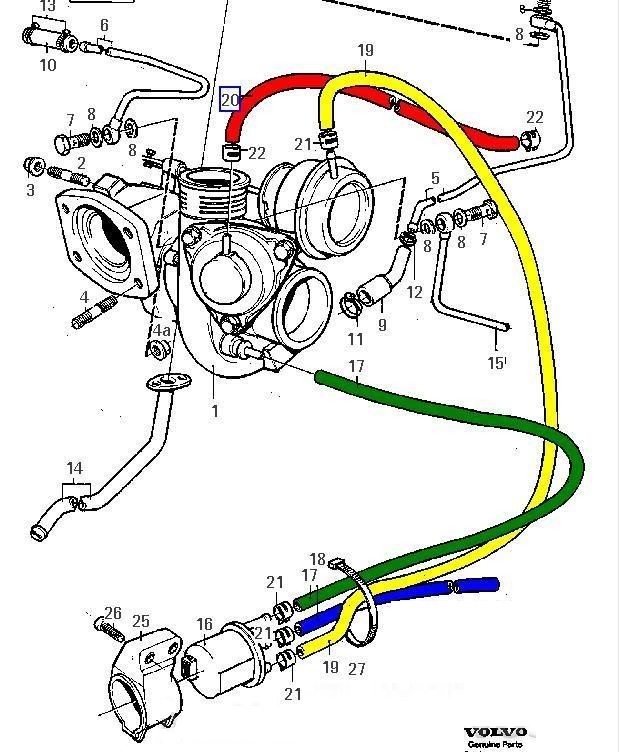
The yellow line on this hose (marked on TCV with a yellow dot) should be going to the wastegate actuator, but on my car it was going to the cold side compressor housing. The compressor housing line (green) was going the actuator.
Given my inane ability massively snowball and overcomplicate things, I decided that rather than just swap the lines I should gain access to the TCV by dismantling the entire airbox, fresh air hoses, two intercooler hoses, and both battery and battery tray. Flawless logic I'm sure... All just to make access to this a bit easier:
 TCV plumbed
In my defence access can be a bit tight, especially if you want to check orientation as it is buried beneath two air pipes and attached to the bottom of the airbox, wedged into the dizzy cap. A feeble defence, I know!
On disassembly of all that I remembered an airbox mount was broken (just about visible in the picture below), and that I'd snagged a replacement at Shems on Saturday. Out it came, and it was quickly replaced with a shiny old one.
 Airbox mount issue
 Broken airbox mount
 New airbox mount
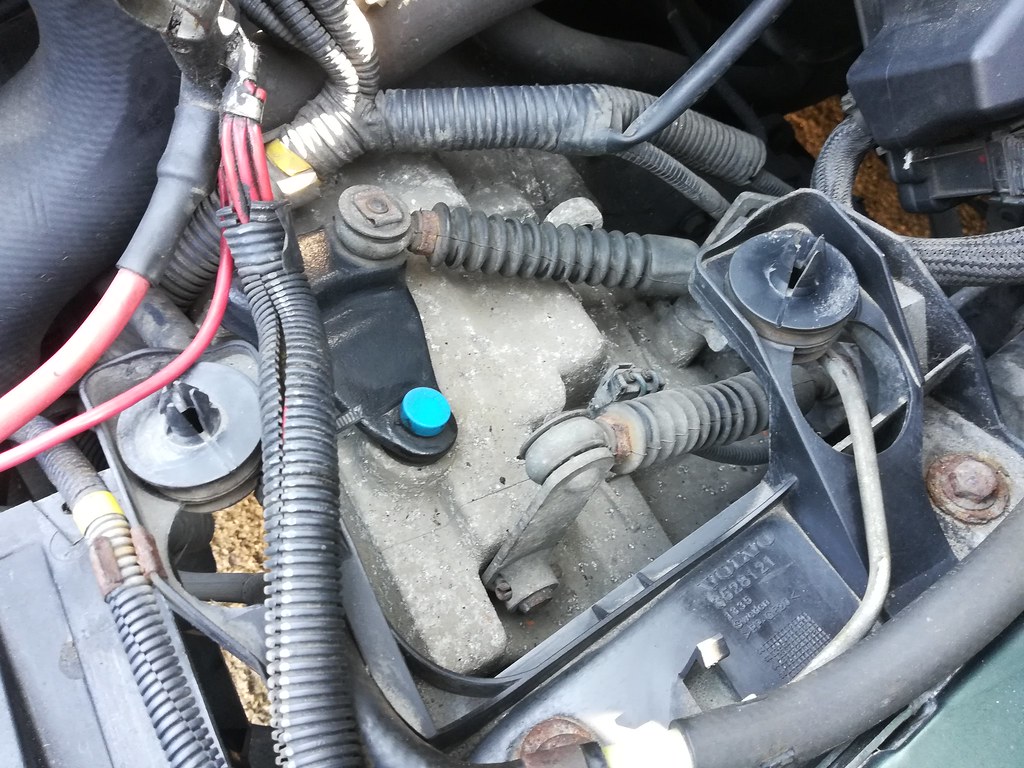
Whilst doing that I noticed some dirt going beneath the battery tray, so with this being me, I ripped the battery and its tray out, encountering some rather rusty bolts in the process. I believe this car has had a battery leak at some point, that or water just pools in this area.
 Dirty and rusty tray
 Battery tray bolts
 Battery tray dirt
Unfortunately I couldn't spare the time to do a proper clean, but it did get a good vacuum and a wipe down with copious amounts of APC. I gave the bolt heads a lick with the wire brush and a quick spray too. Far from perfect but it should help prevent the heads from deforming further for when I next need to get into the area.
 Cleaned tray
 Cleaned wires and p-clip
The nasty looking p-clip needs to be replaced. It works fine but I can't drag my eyes away from it. Same with the bolts eventually, and I really want to do something about the rusty bolt that has disintegrated top left...sadly that's holding a vacuum tree and evap canister in place so I wasn't going to touch that without a replacement on hand.
Anyway, with everything back together and the TCV plumbed correctly, I took her for a test drive. Between boost leaks, vacuum leaks, and this latest TCV issue I don't think I'd ever driven the car with the turbo behaving properly. That is until today, anyway. It almost felt like a new car, spooled up properly, much more induction noise, boosting all the way to the factory specifications, with none of the hesitation or backlash it had previously. Had a huge smile on my face the whole drive, and apparently when I got home too as my partner was curious as to why I was giggling walking through the front door! Car is a bit of a loon now, torque steer in third, proper feeling of being pushed into your seat too. Now I'm not going to claim its a fast car (not by todays standards anyway) but its power delivery is definitely fun and rather addictive!
Found another hour this morning to investigate some recent boost issues. The car has been under-boosting by around 50%, with some weird boost behaviour at the top end and when letting off after WOT.
Obviously the first suspects are vacuum lines, then boost pipes, but both turned out to be fine, well, fine after I reattached the detached fresh air line to the TCV.
Fresh air vac detachedI then thought the TCV itself must be the problem, which are recommended to be replaced every 60k - fairly sure mine is original. After digging around on the internet for vacuum line diagrams for the TCV, I found that two lines were inverted.
The yellow line on this hose (marked on TCV with a yellow dot) should be going to the wastegate actuator, but on my car it was going to the cold side compressor housing. The compressor housing line (green) was going the actuator.
Given my inane ability massively snowball and overcomplicate things, I decided that rather than just swap the lines I should gain access to the TCV by dismantling the entire airbox, fresh air hoses, two intercooler hoses, and both battery and battery tray. Flawless logic I'm sure... All just to make access to this a bit easier:
TCV plumbedIn my defence access can be a bit tight, especially if you want to check orientation as it is buried beneath two air pipes and attached to the bottom of the airbox, wedged into the dizzy cap. A feeble defence, I know!
On disassembly of all that I remembered an airbox mount was broken (just about visible in the picture below), and that I'd snagged a replacement at Shems on Saturday. Out it came, and it was quickly replaced with a shiny old one.
Airbox mount issueBroken airbox mountNew airbox mountWhilst doing that I noticed some dirt going beneath the battery tray, so with this being me, I ripped the battery and its tray out, encountering some rather rusty bolts in the process. I believe this car has had a battery leak at some point, that or water just pools in this area.
Dirty and rusty trayBattery tray boltsBattery tray dirtUnfortunately I couldn't spare the time to do a proper clean, but it did get a good vacuum and a wipe down with copious amounts of APC. I gave the bolt heads a lick with the wire brush and a quick spray too. Far from perfect but it should help prevent the heads from deforming further for when I next need to get into the area.
Cleaned trayCleaned wires and p-clipThe nasty looking p-clip needs to be replaced. It works fine but I can't drag my eyes away from it. Same with the bolts eventually, and I really want to do something about the rusty bolt that has disintegrated top left...sadly that's holding a vacuum tree and evap canister in place so I wasn't going to touch that without a replacement on hand.
Anyway, with everything back together and the TCV plumbed correctly, I took her for a test drive. Between boost leaks, vacuum leaks, and this latest TCV issue I don't think I'd ever driven the car with the turbo behaving properly. That is until today, anyway. It almost felt like a new car, spooled up properly, much more induction noise, boosting all the way to the factory specifications, with none of the hesitation or backlash it had previously. Had a huge smile on my face the whole drive, and apparently when I got home too as my partner was curious as to why I was giggling walking through the front door! Car is a bit of a loon now, torque steer in third, proper feeling of being pushed into your seat too. Now I'm not going to claim its a fast car (not by todays standards anyway) but its power delivery is definitely fun and rather addictive!
I took an hour and a half or so this morning to tick a few more jobs off the to-do list (which grows faster than I can tackle it!). Firstly was drop links, I was starting to get creaking noises when turning at low speeds and a bit of a clunk over undulating terrain. Drop links were pretty well shot, given I could move them whilst still bolted to the car! I ordered MeyleHD parts for £32 from eBay and got them fitted.
 Old droplink
 Droplink comparison
 Balljoint comparison
The MeyleHD ones have 1mm thicker diameter links, with beefier drop joints to boot (pun not intended). On top of the general wear and tear to the old ones, they were also secured with mismatched nuts The nearside had the proper flanged 15mm nuts, whilst the offside had non-flanged 17mm and 16mm nuts. Bizzare.
 New droplinks
Anyway, shiny new droplink with new nuts installed. It is somewhat depressing how quickly arches become filthy, it's only been a month since it was cleaned and dressed!
Next up was the 'new' grill emblem. The old one was cracked, and looking a bit past its prime. The new item is also a bit past its prime but is at least in one piece with slightly fewer stonechips.
 Cracked old emblem
They are held in place by four little starlock washers, one at each corner of the 'cross' and two at opposing corners of the square emblem. I just lever it off from the front with a screwdriver. The grill was then cleaned up, along with the emblem, and the bonnet frame, before reassembling it all.
 Emblem mounts
 Old emblem detached
 Cleaning the grill mount
The last thing I did will probably be quite unpopular, and definitely old fashioned (but this is a 90s car, right?! ). My number plate keeps unsticking itself. A combination of a compound curve in the vertical plane and an additional curve in the horizontal direction means it only lasts about 4-6 months before I end up having to restick it. At this point, I'm pretty tired of removing all the old residue, re-applying it, and then staring at the floppy loose numberplate about 4 washes later.
 Tape issue
I'm using 3M stuff too so it should be working, and obviously lots of other P80 Volvo owners have no issues, and indeed owners of cars with more complex bumpers. But I've had enough and I had also stumbled across some numberplate screws in the shed from an old purchase (for my old car 4 years ago ).
).
Anyway, here's the completed front with the screwed on numberplate and amended grill:
 Complete front
Not sure why or how my plastic dye has lifted in the middle but it will get re-applied shortly anyway. Another job that is done too often! :wall:
I also attempted to swap my steering wheels over, given the car was jacked up anyway, but I found myself lacking a skinny enough and long enough torx screwdriver to get at the recessed bolts. Boo.
Old droplinkDroplink comparisonBalljoint comparisonThe MeyleHD ones have 1mm thicker diameter links, with beefier drop joints to boot (pun not intended). On top of the general wear and tear to the old ones, they were also secured with mismatched nuts
The nearside had the proper flanged 15mm nuts, whilst the offside had non-flanged 17mm and 16mm nuts. Bizzare. New droplinksAnyway, shiny new droplink with new nuts installed. It is somewhat depressing how quickly arches become filthy, it's only been a month since it was cleaned and dressed!
Next up was the 'new' grill emblem. The old one was cracked, and looking a bit past its prime. The new item is also a bit past its prime but is at least in one piece with slightly fewer stonechips.
Cracked old emblemThey are held in place by four little starlock washers, one at each corner of the 'cross' and two at opposing corners of the square emblem. I just lever it off from the front with a screwdriver. The grill was then cleaned up, along with the emblem, and the bonnet frame, before reassembling it all.
Emblem mountsOld emblem detachedCleaning the grill mountThe last thing I did will probably be quite unpopular, and definitely old fashioned (but this is a 90s car, right?!
). My number plate keeps unsticking itself. A combination of a compound curve in the vertical plane and an additional curve in the horizontal direction means it only lasts about 4-6 months before I end up having to restick it. At this point, I'm pretty tired of removing all the old residue, re-applying it, and then staring at the floppy loose numberplate about 4 washes later.Tape issueI'm using 3M stuff too so it should be working, and obviously lots of other P80 Volvo owners have no issues, and indeed owners of cars with more complex bumpers. But I've had enough and I had also stumbled across some numberplate screws in the shed from an old purchase (for my old car 4 years ago
).Anyway, here's the completed front with the screwed on numberplate and amended grill:
Complete frontNot sure why or how my plastic dye has lifted in the middle but it will get re-applied shortly anyway. Another job that is done too often! :wall:
I also attempted to swap my steering wheels over, given the car was jacked up anyway, but I found myself lacking a skinny enough and long enough torx screwdriver to get at the recessed bolts. Boo.
Excellent.
It's the little details that make the difference. I'd love to say I've been doing the same but mine is looking a tad used thanks to a run north followed by several days commuting down mud covered rural tracks. Now sat deliberating whether I need to really push it for sale or equip it with all season tyres and meet the forthcoming Scottish winter head on...
It's the little details that make the difference. I'd love to say I've been doing the same but mine is looking a tad used thanks to a run north followed by several days commuting down mud covered rural tracks. Now sat deliberating whether I need to really push it for sale or equip it with all season tyres and meet the forthcoming Scottish winter head on...
Davie said:
Excellent.
It's the little details that make the difference. I'd love to say I've been doing the same but mine is looking a tad used thanks to a run north followed by several days commuting down mud covered rural tracks. Now sat deliberating whether I need to really push it for sale or equip it with all season tyres and meet the forthcoming Scottish winter head on...
Already?!It's the little details that make the difference. I'd love to say I've been doing the same but mine is looking a tad used thanks to a run north followed by several days commuting down mud covered rural tracks. Now sat deliberating whether I need to really push it for sale or equip it with all season tyres and meet the forthcoming Scottish winter head on...
klunkT5 said:
Handy tip for the air con compressor clutch, I think i will check mine as air cons never worked, Cheers.
Cheers. Yes, do try the zip tie fix. Large compressor clutch gaps are a really common cause of failure that most don't even consider. cosworth330 said:
Nice work.
I need to remove my battery tray at some point as I’ve a bit of surface rust just in front of tray where that earth is.
Thanks. I have a smidge too, wire brushed the flakes and then put some rust convertor on. Now looking for some body coloured paint to touch it in. I need to remove my battery tray at some point as I’ve a bit of surface rust just in front of tray where that earth is.
Davie said:
Excellent.
It's the little details that make the difference. I'd love to say I've been doing the same but mine is looking a tad used thanks to a run north followed by several days commuting down mud covered rural tracks. Now sat deliberating whether I need to really push it for sale or equip it with all season tyres and meet the forthcoming Scottish winter head on...
All season it and push on. I survived West Wales and snow with summer tyres with ease, I'm sure with winters it will be quite capable. In all honesty if you sold it now you'd probably find yourself looking at adverts of them again come spring. It's the little details that make the difference. I'd love to say I've been doing the same but mine is looking a tad used thanks to a run north followed by several days commuting down mud covered rural tracks. Now sat deliberating whether I need to really push it for sale or equip it with all season tyres and meet the forthcoming Scottish winter head on...
Gassing Station | Readers' Cars | Top of Page | What's New | My Stuff