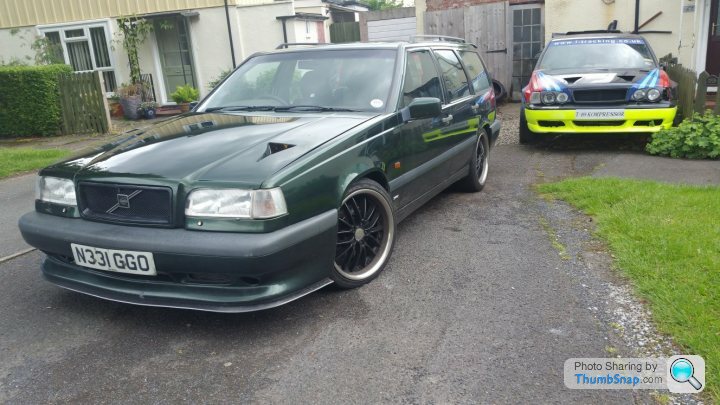
850 T5 Project - Ivy
Discussion


From a purely aesthetic point of view I almost agree, but she gets used for carting all sorts so need the travel. In addition to that I can also actually drive over speed bumps and potholes without dropping to 5mph and the ride is significantly improved (twitchiness and bump-steer also eliminated) so function beats out form in this instance.
Larger arch gap does mean I should get 17" wheels under there, with a potential upgrade to 7 or 7.5J rims too.
Larger arch gap does mean I should get 17" wheels under there, with a potential upgrade to 7 or 7.5J rims too.
Hunted down another little rattle today. Partially fixed, but need to find some parts to fix it fully...
Rattle is in the D-pillar trims, caused by the three clips (per side) that should hold it firmly being broken (50%) or missing (50%).
The part in question:

These blighters are rather easy to find, available for around £1 from Skandix.de - the only issue being ze Germans charge a flat rate of £18 shipping to the UK (up to a 31kg weight). Can't seem to find any on eBay or even any 'aftermarket' equivalents so I'm hunting down some breakers...the two I've spoken to so far are also broken or missing.
For now I was able to rig a couple of broken ones together to make 1.5 clips, which seem to be holding it:
Rattle is in the D-pillar trims, caused by the three clips (per side) that should hold it firmly being broken (50%) or missing (50%).
The part in question:
These blighters are rather easy to find, available for around £1 from Skandix.de - the only issue being ze Germans charge a flat rate of £18 shipping to the UK (up to a 31kg weight). Can't seem to find any on eBay or even any 'aftermarket' equivalents so I'm hunting down some breakers...the two I've spoken to so far are also broken or missing.
For now I was able to rig a couple of broken ones together to make 1.5 clips, which seem to be holding it:
Cookeh said:
From a purely aesthetic point of view I almost agree, but she gets used for carting all sorts so need the travel. In addition to that I can also actually drive over speed bumps and potholes without dropping to 5mph and the ride is significantly improved (twitchiness and bump-steer also eliminated) so function beats out form in this instance.
Larger arch gap does mean I should get 17" wheels under there, with a potential upgrade to 7 or 7.5J rims too.
I have to admit, I have no issues with my daily driver, no problems with loads or with speed bumps, although I try to avoid potholes.Larger arch gap does mean I should get 17" wheels under there, with a potential upgrade to 7 or 7.5J rims too.
Cambs_Stuart said:
I like the new ride height, just a subtle drop.
With these cars do you need to get the geometry re-set when you lower it?
Generally no, but depends how far you drop it. T5R and 850R sat at 35mm lower than the stock 850s and T5s using same suspension setups if I recall correctly.With these cars do you need to get the geometry re-set when you lower it?
Cookeh said:
Hunted down another little rattle today. Partially fixed, but need to find some parts to fix it fully...
Rattle is in the D-pillar trims, caused by the three clips (per side) that should hold it firmly being broken (50%) or missing (50%).
The part in question:
These blighters are rather easy to find, available for around £1 from Skandix.de - the only issue being ze Germans charge a flat rate of £18 shipping to the UK (up to a 31kg weight). Can't seem to find any on eBay or even any 'aftermarket' equivalents so I'm hunting down some breakers...the two I've spoken to so far are also broken or missing.
For now I was able to rig a couple of broken ones together to make 1.5 clips, which seem to be holding it:
Do Volvo not sell them?Rattle is in the D-pillar trims, caused by the three clips (per side) that should hold it firmly being broken (50%) or missing (50%).
The part in question:
These blighters are rather easy to find, available for around £1 from Skandix.de - the only issue being ze Germans charge a flat rate of £18 shipping to the UK (up to a 31kg weight). Can't seem to find any on eBay or even any 'aftermarket' equivalents so I'm hunting down some breakers...the two I've spoken to so far are also broken or missing.
For now I was able to rig a couple of broken ones together to make 1.5 clips, which seem to be holding it:
Stedman said:
Do Volvo not sell them?
Popped in to Volvo today looking for the clips. Given their price for the radiator I was expecting crazy money, turns our they were £1.20 which was more reasonable than expected. 3539879 is the part number for those looking. 
Fitting was simple, just pop the D-pillar trims off:

Clean the spider webs and detritus:

Slide the clips in, clipping the water hose that came lose at some point in whilst you're at it :

Reassemble. I found it helpful to pop off the speaker trim to assure everything lined up properly:

Also cleaned up the old ProSport coilovers in the hope I can sell them and recoup some money.
Edited by Cookeh on Tuesday 5th June 21:40
Well, sold the old suspension for £100 without even advertising it. Boxed it up and sent it off, all managed to fit in the Lesjofors spring box so saved me buying a box too. Gunna put that towards an armrest with cup holders, V70 gutter trim and potentially a new stereo... Or spend it on a seat retrim. Choices.

Also got round to cleaning her today after a massive 674 miles since her last bath. Learned recently that the P80 cars should have grey trim (not black) which makes me feel slightly better about the state its in.


Also got round to cleaning her today after a massive 674 miles since her last bath. Learned recently that the P80 cars should have grey trim (not black) which makes me feel slightly better about the state its in.
Edited by Cookeh on Thursday 7th June 23:49
Heard a slight thunk over rougher road surfaces today, turns out the lower spring seat's bolt had slackened off...Teach me for not re-checking torque values once the car was on the ground weighted. Tightened that up and re-torqued with the car on the ground. Bonus regarding the new suspension set-up, I didn't have to put the car on ramps to get the trolley jack under it! Woo!
Whilst trying to find that rattle I spotted some more shattered glass under the back of the seats...skinny extension on the vacuum got rid of those. Weirdly some of the debris looked a bit likes an insect nest of some sort. I also found a debit card belonging to the wife of the previous owner; was partially tempted to use it buy some more parts but realised that card had probably had enough Volvo-related abuse during their ownership! (I am of course joking, for the snowflakes out there).
Whilst trying to find that rattle I spotted some more shattered glass under the back of the seats...skinny extension on the vacuum got rid of those. Weirdly some of the debris looked a bit likes an insect nest of some sort. I also found a debit card belonging to the wife of the previous owner; was partially tempted to use it buy some more parts but realised that card had probably had enough Volvo-related abuse during their ownership! (I am of course joking, for the snowflakes out there).
Receiving this last item in the post really made me realise just how sad I was. I present to you my latest acquisition:

Yes, that's right. One plastic screw. Marvellous. Truly reached the absolute peak of motoring with this buy.
Anyway, it resides in the side of the door panel, helping(ish) to locate it (ish) properly (ish) on the door skin. It truly is pointless, but it was missing and it was free.
So we pop the door card off, revealing the post that holds the psuedo-rawlplug and place that in like so:

From there we place the door card back in place and insert the screw in, leaving us with this:

Ah, perfection.
On a more serious note, spotted something rather dire whilst in there. Seems the spot welds that hold the door check strap in place have failed some time ago, and over time this has fatigued the A-pillar metal causing that to fail and crack, which when the door is fully opened has caused it to be folded over itself. This explains the very large crack I occasionally hear when opening the door fully (something I have tried to avoid since hearing it the first time). Looks like that will require some attention sooner rather than later, hopefully just some heat, flattening and re-welding.
Here is a very poor picture due to very poor access in the area, but you can get the gist of the issue from it. Note I am holding the door check strap as otherwise it will fall into the chassis rails and be lost forever.

Yes, that's right. One plastic screw. Marvellous. Truly reached the absolute peak of motoring with this buy.
Anyway, it resides in the side of the door panel, helping(ish) to locate it (ish) properly (ish) on the door skin. It truly is pointless, but it was missing and it was free.
So we pop the door card off, revealing the post that holds the psuedo-rawlplug and place that in like so:
From there we place the door card back in place and insert the screw in, leaving us with this:
Ah, perfection.
On a more serious note, spotted something rather dire whilst in there. Seems the spot welds that hold the door check strap in place have failed some time ago, and over time this has fatigued the A-pillar metal causing that to fail and crack, which when the door is fully opened has caused it to be folded over itself. This explains the very large crack I occasionally hear when opening the door fully (something I have tried to avoid since hearing it the first time). Looks like that will require some attention sooner rather than later, hopefully just some heat, flattening and re-welding.
Here is a very poor picture due to very poor access in the area, but you can get the gist of the issue from it. Note I am holding the door check strap as otherwise it will fall into the chassis rails and be lost forever.
Helps make the car feel like less of a shed and more of a car. Helps me, anyway, with my silly mental gripes. Came from a car that was absolutely flawless in terms of trim and interior by the time I was finished with it so I kind of have to get this one back to it.
Unfortunately, the N/S/F caliper has seized now. That will be three calipers in 4 months. Ordered the parts, £90 for the caliper and pads. I'm definitely going to try and rebuild, if possible, all the calipers I've taken off the car now as she seems to eat them. I think a full fluid flush is in order though, cant see in the history when it was last done so its probably absorbed so much water now that its corroding the pistons from the inside out.
On the plus side, beat a chirp/rattle that the 850s (and all P80s) are famous for... The rear seat latches. Turns out that this chirp/rattle is caused by the rubber mount (pictured) wearing out. Sadly, Volvo dont seem to stock these as individual pieces - forcing you to buy a whole new latch. I didn't do this, I just took it out and flipped it, leaving me with the unworn side facing the latch.

Worn rubber.

Removed. You can see the profile it has and where it has worn on one side.

Flipped and installed.
Obviously this fix wont last forever and I will need to find something more permanent, but its free and works!
I also spent a £5 on something useful for once (makes a change from silly little cosmetic bits!) and bought a battery clamp. Much needed to stop the battery sliding around and connection issues causing all sorts of random gremlines.

Part and part number.

Fitted. Clever design on the battery tray means it will clamp a wide variety of batteries, and not just the stock behemoth (which I don't have).
Unfortunately, the N/S/F caliper has seized now. That will be three calipers in 4 months. Ordered the parts, £90 for the caliper and pads. I'm definitely going to try and rebuild, if possible, all the calipers I've taken off the car now as she seems to eat them. I think a full fluid flush is in order though, cant see in the history when it was last done so its probably absorbed so much water now that its corroding the pistons from the inside out.
On the plus side, beat a chirp/rattle that the 850s (and all P80s) are famous for... The rear seat latches. Turns out that this chirp/rattle is caused by the rubber mount (pictured) wearing out. Sadly, Volvo dont seem to stock these as individual pieces - forcing you to buy a whole new latch. I didn't do this, I just took it out and flipped it, leaving me with the unworn side facing the latch.
Worn rubber.
Removed. You can see the profile it has and where it has worn on one side.
Flipped and installed.
Obviously this fix wont last forever and I will need to find something more permanent, but its free and works!
I also spent a £5 on something useful for once (makes a change from silly little cosmetic bits!) and bought a battery clamp. Much needed to stop the battery sliding around and connection issues causing all sorts of random gremlines.
Part and part number.
Fitted. Clever design on the battery tray means it will clamp a wide variety of batteries, and not just the stock behemoth (which I don't have).
Whilst ordering the caliper I thought for the sake of £60 I might as well get new front disks and pads too, so that lot turned up middle of last week. Swapped the caliper out with no issues, my trusty £5 Halfords Vizibleed Brake and Clutch Bleeder being as useful as ever for both the new caliper and the n/s/r to get rid of all the old crap. I did take a pic but cant find it now, sorry! That will be the theme of this update actually, pictures are either lost or forgotten about!
Next up was the discs and pads, this was easy and quick on the n/s, but a royal pain in the arse and taking several hours on the o/s. Caliper carrier bolt had just completely rounded. Cue the application of several tools, box end and open ended spanners, mole grips, a Stilson (I think this would have worked were it not for the limited space meaning not lot of teeth could grip), files to create two very large flat areas to try and grip with a smaller open-ended spanner. Ultimately the judicious use of heat resulted in it coming loose. Subsequent disc replacement proved simple, so we now have fresh friction material on all four corners and fresh brake fluid.
I also spoke to the body shop that amended my bonnet and have been quoted £50 and a couple of hours to address the A-pillar situation above - will be getting that booked and sorted in the coming weeks. I also have a timing belt coming up which needs to be booked, around £200 for that. I'm not brave enough to try and change it myself yet, especially not with very limited time and the need of a daily.
Parts!! Shiny new useful parts!
Popped to a breaker fairly local to me ('Minty', in Derby - if anyone needs his number please message me; he's also happy to post and very reasonable prices indeed), originally just for one item but I left with six and a whole rear bench for a chap I know in need. Lovely service, very friendly and polite. Anyway, here's the haul:

So the part I went for is the pollen filter frame, its joined by the spare wheel belt, a spare frame, a carbon filter, an armrest with cupholders (WOO!), an a SC-805 headunit. The SC-805 was the optional upgrade to the SC700 for my MY of 850, and can be paired with a CD changer (which I may or may not grab at a later date).
First things first, cleaning...obviously... Started with the armrest, which wasn't too terrible. Minty was also kind enough to allow me to 'frankenstein' this good condition arm rest from two mediocre ones (one with broken cupholders but good leather, and one the other way round). Seriously top marks for this chap. To do this more easily and more thoroughly I disassembled the armrest.

Leather cover removed, two torx screws (T20s).

Front plate and cupholders removed, they all just slide out.
After cleaning and re-assembly it was taken to the car. They're very easy to remove, just two more T20 torx screws.

Here's a brief comparison of the profiles and heights of old vs new. The cupholder one has a much taller and more rounded profile, definitely more comfortable!

And the new one installed and cupholders extended.


I dont mind the contrast in colour as it matches with the centre console.
Next up was the pollen filter frame, which was decidedly dirtier. Interestingly, despite having AC most 850s did not originally come with a cabin pollen filter - they were another optional extra. This, however, led to the demise of a lot of evaporators, as you'll see below.

(very) Dirty.

Cleaned.
Access to the location for the filter is very easy. It resides under the passenger side scuttle panel. Remove the two T20 torx screws on the passenger side of the scuttle panel and then just tease it up - no need to remove it!


The second image shows the 'rain diverter' that is stock in these cars. If we take a peek down it, we can see the heater blower and the evaporator...and now we understand why the lack of a pollen filter does so much damage. When blowers are £150 (£70 for just the motor) and evaporators are also £150 it's certainly cheaper to fit a £30 new filter!

Anyway, we cleaned out the area beneath the scuttle panel, and the drain tubes whilst at it, and popped the frame in. These just press in to place, no screws or bolts to worry about.

That brings me to the spare tyre belt. It's sole purpose in life is to stop the jack from rattling around the boot, a la:

Next, that SC-805... Ah, I might finally be able to enjoy some music in my car... no CD player in the SC700, the tape deck is useless and its FM receiver is borked. Can't simply install it, though. Not when the volume control know is loose and rattling. So, first step there is to pull the knob:

Then we undo the three screws (top two on the left in the following image, then the same one in the plastic clip on the other side).

It's then a case of releasing all the clips and lifting the face. Easiest to use a flathead screw driver or similar and slowly release one at a time.

Do NOT lift the face too far, as you'll pull out one of the cables from the equalizer panel.
Once that is off you need an 11mm socket/spanner and just tighten the volume knob up.

Re-assembly is obviously the reverse of assembly, nothing special there. Then to install it just slides right in.
Removal of the stereo from the car is the easiest system I've seen. Just pop the two clips out (I use 50ps because I have some right beneath the stereo!), then pull the clips and the whole unit will slide out.

Well, no rattles and I have FM radio at last, tape deck also works, alas the CD player immediately tries to eject any CD. Quick Google suggests that's caused by a a sticking microswitch - so will take a look at that a little later. Also annoying are the gummy buttons. Might have to try and find a fix for that that doesn't strip the labelling. Or perhaps I can swap the buttons for the solid and excellent condition ones on the SC700....
Popped to a breaker fairly local to me ('Minty', in Derby - if anyone needs his number please message me; he's also happy to post and very reasonable prices indeed), originally just for one item but I left with six and a whole rear bench for a chap I know in need. Lovely service, very friendly and polite. Anyway, here's the haul:
So the part I went for is the pollen filter frame, its joined by the spare wheel belt, a spare frame, a carbon filter, an armrest with cupholders (WOO!), an a SC-805 headunit. The SC-805 was the optional upgrade to the SC700 for my MY of 850, and can be paired with a CD changer (which I may or may not grab at a later date).
First things first, cleaning...obviously... Started with the armrest, which wasn't too terrible. Minty was also kind enough to allow me to 'frankenstein' this good condition arm rest from two mediocre ones (one with broken cupholders but good leather, and one the other way round). Seriously top marks for this chap. To do this more easily and more thoroughly I disassembled the armrest.
Leather cover removed, two torx screws (T20s).
Front plate and cupholders removed, they all just slide out.
After cleaning and re-assembly it was taken to the car. They're very easy to remove, just two more T20 torx screws.
Here's a brief comparison of the profiles and heights of old vs new. The cupholder one has a much taller and more rounded profile, definitely more comfortable!
And the new one installed and cupholders extended.
I dont mind the contrast in colour as it matches with the centre console.
Next up was the pollen filter frame, which was decidedly dirtier. Interestingly, despite having AC most 850s did not originally come with a cabin pollen filter - they were another optional extra. This, however, led to the demise of a lot of evaporators, as you'll see below.
(very) Dirty.
Cleaned.
Access to the location for the filter is very easy. It resides under the passenger side scuttle panel. Remove the two T20 torx screws on the passenger side of the scuttle panel and then just tease it up - no need to remove it!
The second image shows the 'rain diverter' that is stock in these cars. If we take a peek down it, we can see the heater blower and the evaporator...and now we understand why the lack of a pollen filter does so much damage. When blowers are £150 (£70 for just the motor) and evaporators are also £150 it's certainly cheaper to fit a £30 new filter!
Anyway, we cleaned out the area beneath the scuttle panel, and the drain tubes whilst at it, and popped the frame in. These just press in to place, no screws or bolts to worry about.
That brings me to the spare tyre belt. It's sole purpose in life is to stop the jack from rattling around the boot, a la:
Next, that SC-805... Ah, I might finally be able to enjoy some music in my car... no CD player in the SC700, the tape deck is useless and its FM receiver is borked. Can't simply install it, though. Not when the volume control know is loose and rattling. So, first step there is to pull the knob:
Then we undo the three screws (top two on the left in the following image, then the same one in the plastic clip on the other side).
It's then a case of releasing all the clips and lifting the face. Easiest to use a flathead screw driver or similar and slowly release one at a time.
Do NOT lift the face too far, as you'll pull out one of the cables from the equalizer panel.
Once that is off you need an 11mm socket/spanner and just tighten the volume knob up.
Re-assembly is obviously the reverse of assembly, nothing special there. Then to install it just slides right in.
Removal of the stereo from the car is the easiest system I've seen. Just pop the two clips out (I use 50ps because I have some right beneath the stereo!), then pull the clips and the whole unit will slide out.
Well, no rattles and I have FM radio at last, tape deck also works, alas the CD player immediately tries to eject any CD. Quick Google suggests that's caused by a a sticking microswitch - so will take a look at that a little later. Also annoying are the gummy buttons. Might have to try and find a fix for that that doesn't strip the labelling. Or perhaps I can swap the buttons for the solid and excellent condition ones on the SC700....
Thanks! Wasn't aware of a plywood board. I have a great reinforced cloth piece that sits over it, but it doesn't have any compartments, or anything built in for storage. Don't suppose you have a picture or similar?
In any case, here are some pictures of microswitch and lens cleaning, in case it helps someone somewhere:

For almost all the SC-series with a CD player the microswitch you need to find is behind this right hand (as you look at the stereo face) rail. It's held in with two small screws (forget the size, sorry!), and then the middle is clipped in and a pita to remove. Use tweezers or similar to compress the clips and free it from the centre. Don't worry if you break them as they aren't structural or even important and it won't rattle even if you do break them.

This is the microswitch you're looking for. Its in the only large hole in the side, you cant miss it! Use the lettering on the sides in both images to help you locate it if you're struggling. This chap becomes gummed up over time and needs to be freed. Cottonbud with some electrical safe cleaner (contact cleaner, WD40 at a push, anhydrous isopropyl alcohol, etc) to clean him up, then use tweezers, screw driver, or whatever you fancy to push him in and out a few times until he's moving freely. Then re-assemble, which is the reverse of disassembly.
To clean the lens you have to remove a few more panels. Namely the front panel (see early post) and the top panel. Screws and clips, same as ever to remove. Levering the top off from the back corners is the easiest way of removing it, getting the rear freed and then pulling back and up to clear the tricky front clips. That leaves you with this:

You can then access the lens through the weird looking sort-of-'P' shaped hole on the top:

Again, electrical safe cleaner and a cotton bud, preferably one that evaporates quite quickly to avoid leaving any residue on the lens. I was quite surprised by the amount of dirt on the lens so was rather hopeful that was the fix. Oh well. Re-assembly is, broken record, the reverse of disassembly. Again for the top plate, it's easier to get the front clips in first and make your way backwards.
Cookeh said:
Well, no rattles and I have FM radio at last, tape deck also works, alas the CD player immediately tries to eject any CD. Quick Google suggests that's caused by a a sticking microswitch - so will take a look at that a little later. Also annoying are the gummy buttons. Might have to try and find a fix for that that doesn't strip the labelling. Or perhaps I can swap the buttons for the solid and excellent condition ones on the SC700....
Blast. Wasn't the microswitch. Also wasn't a dirty lens. Stuck for ideas now - anyone have any suggestions as to what might cause a CD player to insert a CD, spin it for around 3 seconds and then eject it?In any case, here are some pictures of microswitch and lens cleaning, in case it helps someone somewhere:
For almost all the SC-series with a CD player the microswitch you need to find is behind this right hand (as you look at the stereo face) rail. It's held in with two small screws (forget the size, sorry!), and then the middle is clipped in and a pita to remove. Use tweezers or similar to compress the clips and free it from the centre. Don't worry if you break them as they aren't structural or even important and it won't rattle even if you do break them.
This is the microswitch you're looking for. Its in the only large hole in the side, you cant miss it! Use the lettering on the sides in both images to help you locate it if you're struggling. This chap becomes gummed up over time and needs to be freed. Cottonbud with some electrical safe cleaner (contact cleaner, WD40 at a push, anhydrous isopropyl alcohol, etc) to clean him up, then use tweezers, screw driver, or whatever you fancy to push him in and out a few times until he's moving freely. Then re-assemble, which is the reverse of disassembly.
To clean the lens you have to remove a few more panels. Namely the front panel (see early post) and the top panel. Screws and clips, same as ever to remove. Levering the top off from the back corners is the easiest way of removing it, getting the rear freed and then pulling back and up to clear the tricky front clips. That leaves you with this:
You can then access the lens through the weird looking sort-of-'P' shaped hole on the top:
Again, electrical safe cleaner and a cotton bud, preferably one that evaporates quite quickly to avoid leaving any residue on the lens. I was quite surprised by the amount of dirt on the lens so was rather hopeful that was the fix. Oh well. Re-assembly is, broken record, the reverse of disassembly. Again for the top plate, it's easier to get the front clips in first and make your way backwards.
Gassing Station | Readers' Cars | Top of Page | What's New | My Stuff