4k GT86 Gets a Rocket Bunny Kit & LS3 V8 Swap!
Discussion


I'll throw in a vote for Raptor bed liner 
My build somewhat escalated as some of you know, and with a couple of coats of etch primer underneath, this has turned out well, certainly once there's a shiny engine and exhaust in there, nobody is going to notice the paint.
I ended up cutting (and no doubt ruining) a lump of the main loom so I could re-route it, the engine loom was shoved off over the passenger side wheelarch.
If I ever finish it I'll let you know whether I'd do the same again
Things are moving slowly in the grand scheme of things, as much as i'd love to rush to get things done there's few hurdles that put a hamper on diving deep in to things.
So I've been working away over the last few weeks whenever motivation struck to clean, tiny and cut away anything unnecessary in the engine bay/transmission tunnel required for the engine swap.
Starting off with the old gearbox mount structure that seriously slimmed down the opening of the gearbox tunnel and had to be removed, not a difficult job but definitely tedious drilling out the best part of 60-70 spot welds laying on one's back under a car, but with that done it really opened up the tunnel to take a proper gearbox rather than Cadbury's finest that Subaru picked for the GT86.


With that done I moved my attention to removing a couple of other bracket-bits in the engine bay that were no longer needed, namely the OEM Strut bar mounts that tie the suspension top mounts back to the firewall, a shame to lose these structurally but theres no way the bars would fit with the engine and so the mounts may as well go as well, easily removed with a few more spot welds - May look in to replacing these with a normal "over-engine" style strut bar if the room is there and there's a suitably lofty one available.
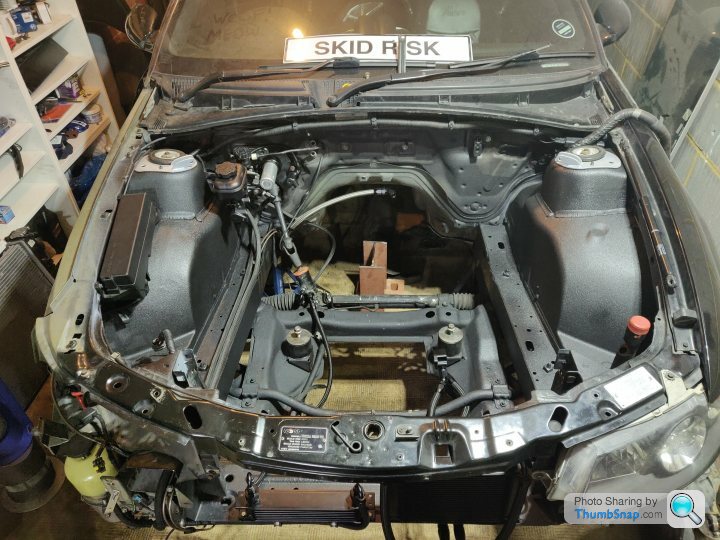
And with that and plenty more hours of tidying up the engine bay of wiring, clips, grounding bolts, old fuel lines, wiper cowl, etc I was finally left with this.

Which im fairly pleased with in terms of being clean and easy to work around, unfortunately the vast majority of leftover bits here are all body-loom related however having changed my plans slightly to get the car to a painter to have the engine bay sprayed rather than do it myself I invited him over last week to have a quick once over confirm they'd be happy to work with the car in this state, i'll leave the bulk of the taping up to them as currently i've only been quoted around £250 for the job, I imagine this might go up given the prep work i'm leaving to them perhaps or any other snags they might run in to but generally i'm not worried about that as it's all fairly good value for a professional job given the going rate for a basic compressor/gun/paint setup, not to mention the floors of my unit are un-sealed so it would be dust central!
Decided to go for a simple Nardo Grey finish in the engine bay, something neutral and flat, easy to touch up in the event of engine-related scuffs, easily absorbing not-totally smoothed out surfaces and giving a nice subtle accent to the main show piece of the engine centrally.
So that brings things up to speed now, just waiting to call to be told they're ready to receive the car in this state and i've been informed by the wiring company in the US that i'll need to wait another 4 weeks to order the wiring harness so i'm by no means in any rush to get through things.
However with that some good news to round things off.. The gearbox is here!


Not the best pictures I know but this is a brand new Tremec T56 Magnum, rated to hold up to 700 ft/lbs torque quite comfortably. It came in a package including the Flywheel, Clutch, Bellhousing, Clutch release bearing & mounting gear.
I will need to buy a shifter relocation kit (Should bought the Magnum F Sam! - Ohwell hindsight) and I still need to sus out a clutch master cylinder solution but once the car back from its engine bay paint i'm ready to start swinging this beefy combo in and making a right mess of the nice new paint!
So I've been working away over the last few weeks whenever motivation struck to clean, tiny and cut away anything unnecessary in the engine bay/transmission tunnel required for the engine swap.
Starting off with the old gearbox mount structure that seriously slimmed down the opening of the gearbox tunnel and had to be removed, not a difficult job but definitely tedious drilling out the best part of 60-70 spot welds laying on one's back under a car, but with that done it really opened up the tunnel to take a proper gearbox rather than Cadbury's finest that Subaru picked for the GT86.
With that done I moved my attention to removing a couple of other bracket-bits in the engine bay that were no longer needed, namely the OEM Strut bar mounts that tie the suspension top mounts back to the firewall, a shame to lose these structurally but theres no way the bars would fit with the engine and so the mounts may as well go as well, easily removed with a few more spot welds - May look in to replacing these with a normal "over-engine" style strut bar if the room is there and there's a suitably lofty one available.
And with that and plenty more hours of tidying up the engine bay of wiring, clips, grounding bolts, old fuel lines, wiper cowl, etc I was finally left with this.
Which im fairly pleased with in terms of being clean and easy to work around, unfortunately the vast majority of leftover bits here are all body-loom related however having changed my plans slightly to get the car to a painter to have the engine bay sprayed rather than do it myself I invited him over last week to have a quick once over confirm they'd be happy to work with the car in this state, i'll leave the bulk of the taping up to them as currently i've only been quoted around £250 for the job, I imagine this might go up given the prep work i'm leaving to them perhaps or any other snags they might run in to but generally i'm not worried about that as it's all fairly good value for a professional job given the going rate for a basic compressor/gun/paint setup, not to mention the floors of my unit are un-sealed so it would be dust central!
Decided to go for a simple Nardo Grey finish in the engine bay, something neutral and flat, easy to touch up in the event of engine-related scuffs, easily absorbing not-totally smoothed out surfaces and giving a nice subtle accent to the main show piece of the engine centrally.
So that brings things up to speed now, just waiting to call to be told they're ready to receive the car in this state and i've been informed by the wiring company in the US that i'll need to wait another 4 weeks to order the wiring harness so i'm by no means in any rush to get through things.
However with that some good news to round things off.. The gearbox is here!
Not the best pictures I know but this is a brand new Tremec T56 Magnum, rated to hold up to 700 ft/lbs torque quite comfortably. It came in a package including the Flywheel, Clutch, Bellhousing, Clutch release bearing & mounting gear.
I will need to buy a shifter relocation kit (Should bought the Magnum F Sam! - Ohwell hindsight) and I still need to sus out a clutch master cylinder solution but once the car back from its engine bay paint i'm ready to start swinging this beefy combo in and making a right mess of the nice new paint!
Edited by Samjeev on Saturday 16th April 18:27
Edited by Samjeev on Friday 1st July 18:48
Oh i do also have a bit of a plea for information for anyone that might be in the know.. I need Clutch master cylinder advice!
Of course i'm not really looking to go full race-car and mount a pedal box in the car and i've worked out (read: guestimated with some rough measurements) that i'll have roughly 50mm between the firewall and the driver's side engine head, so not a whole lot of room to work with!
In the states they've luckily got quite a nice clean billet recess plate that mounts to the OEM clutch master studs and recesses a wilwood/tilton clutch master in to the firewall to link up to the Clutch pedal, unfortunately i've been advised and do feel on my own merit this won't work with the RHD Pedal setup.
https://www.sikky.com/product/sikky-brz-frs-gt86-l...

Of course I'm no engineer/fabrication master so I need something quite compact and/or easily mounted internally or recessed into the firewall that will fit the bill. Needs to be a 3/4" Master cylinder for the T56 I believe and this is the rough room I have to work with, not the best image I know but you can see the opening in the firewall and the hole in with the master cylinder push-rod connects to on the clutch pedal roughly in the centre.
Going to be messaging a couple of the guys that have done this in Australia for their info as well but I feel I might just need to whip out the clutch pedal assembly and see what's what!

Of course i'm not really looking to go full race-car and mount a pedal box in the car and i've worked out (read: guestimated with some rough measurements) that i'll have roughly 50mm between the firewall and the driver's side engine head, so not a whole lot of room to work with!
In the states they've luckily got quite a nice clean billet recess plate that mounts to the OEM clutch master studs and recesses a wilwood/tilton clutch master in to the firewall to link up to the Clutch pedal, unfortunately i've been advised and do feel on my own merit this won't work with the RHD Pedal setup.
https://www.sikky.com/product/sikky-brz-frs-gt86-l...
Of course I'm no engineer/fabrication master so I need something quite compact and/or easily mounted internally or recessed into the firewall that will fit the bill. Needs to be a 3/4" Master cylinder for the T56 I believe and this is the rough room I have to work with, not the best image I know but you can see the opening in the firewall and the hole in with the master cylinder push-rod connects to on the clutch pedal roughly in the centre.
Going to be messaging a couple of the guys that have done this in Australia for their info as well but I feel I might just need to whip out the clutch pedal assembly and see what's what!
Edited by Samjeev on Friday 1st July 18:49
Another small but exciting update.
Last few weeks have been pretty busy with life and so on.. For example I turned 30 last month so that's pretty
 Exciting Daunting and as well as that the car was away for a little while having it's engine bay sprayed.
While it was away I got the gearbox out and dressed it up with its release bearing, bell housing and bleed line. Nothing ground breaking but it gives another excuse to show it off!


And finally this weekend just gone I got the car back from the local painter finished off in Audi's finest gloss primer.. Nardo Grey! Not the most exciting colour but as we said before it's just something to flat the whole engine out to a single colour, tie it all together and make way for the main atttraction which is the engine.
I can't wait to scuff, scratch and ruin the paint when I swing the engine/gearbox combo in


Last few weeks have been pretty busy with life and so on.. For example I turned 30 last month
so that's pretty While it was away I got the gearbox out and dressed it up with its release bearing, bell housing and bleed line. Nothing ground breaking but it gives another excuse to show it off!
And finally this weekend just gone I got the car back from the local painter finished off in Audi's finest gloss primer.. Nardo Grey! Not the most exciting colour but as we said before it's just something to flat the whole engine out to a single colour, tie it all together and make way for the main atttraction which is the engine.
I can't wait to scuff, scratch and ruin the paint when I swing the engine/gearbox combo in
Been a little while since the last update so I think i'll hit you with a double update.
The first one here is going to be general progress whereas the second is going to be more word-driven and quite exciting if you're the type that gets elated by wiring
So since getting the car back it's been a couple of weekends of work getting all of the brake system wiring and other general Engine-bay fluff back in. It might be a tad foolish I'm really trying to do as much as possible so that the engine and gearbox will only have to go in the once and not have to come back out after the fact. With that in mind i've been trying to tidy up the engine bay as much as I can. This includes tickling with the idea of cutting back and slimming down some of the OEM wiring harness but that scares me a little in the sense of it beng a "Point of no return" if I cut out anything and then the car doesn't work!
But I wanted to focus on a adding a bit of Sound & heat deadening in to the transmission tunnel, not for exhaust heat as such (those i'll have coated, or i'll wrap) but moreso for general heat and sound that will come off the gearbox in the hopes of keeping the car as Road-car-esque as possible.
Although it would've been easy to just stick a load of self-adhesive stuff down I was advised that this only really helps when there's a decent enough gap between the heat source and if anything is touching it does next to nothing to aid that, alongside the fact that the car originally had an OEM heat shield thing that desintegrated on removal I decided to try and re-create it out of something better.
I bought a big sheet of this stuff https://funkmotorsport.com/product/dual-layer-alum... and started going full art-attack on it.
Considering i'd never given this a wack and it's not the easiest stuff to work with being dual-layered and full of fibreglass I'm actually pretty pleased with how it turned out. Mounted in to a few original threaded holes and a few rivnuts and some big carbon fibre (just had it lieing around) washers to stop it rattling, the edges that were cut sealed up with some leftover gold tape I had to stop it's itch-inducing guts from spilling out i'm actually quite pleased with it. Atleast gives some bling to the bay


Following that I moved on with the help of my Dad to installing the clutch & flywheel on the engine, ready to accept the gearbox, and the gearbox mount ready to eventually accept the mated couple together.
Nothing fancy on the clutch and flywheel part, I believe its just an LS7 OEM jobby but considering the only thing i've done to the engine is give it a slightly spicy cam this should hold up plenty well enough.

After that we moved on to the gearbox mount. The engine mount kit comes with a gearbox mount that I specified for the T56 magnum gearbox i'm using and uses a couple of exciting under-tray bolts to align it in the car before you drill through to bolt it up to the existing chassis rails and sheet metal. I reinforced this a bit by installing a couple of rudimentary crush tubes in the chassis rails as I had seen a couple of horror story pics of the bolts never getting fully tight until they rip a hole in your floor and once done it was incredibly solid. Not the prettiest on the inside as you can see but its well and truly covered by carpet.
Not the greated pic in the world but you can somewhat see here how it's located rought 20cm further back than the original gearbox mount which was all that horrible looking metal I cut out in a previous update.


And with that the engine bay is ready to accept the Engine and gearbox! Bit of a cliffhanger I know but that's the way the cookie crumbled last weekend :P

To leave you with a final update to an issue I posed previously, I believe i've found a Clutch master solution in the form of this OEM Camaro/Pontiac G8 Clutch Master, it should be plenty beefy to actuate the clutch as of course these 2 cars came with the same engine and gearbox combo from the factory. It's incredibly Compact with a remote mount reservoir, so much so infact that the only parts that should protrude in to the engine bay should be the spouts for both the Remote res and the clutch line itself. You can see here offered up to the clutch pedal assembly that it all lives neatly inside the body of the assembly and barely goes past where the firewall would be (Where the thread starts on the mounting studs) So hopefully this is a good result as it also wasn't too dear, so no expensive bills for this "wing it" style of R&D on my part.


The first one here is going to be general progress whereas the second is going to be more word-driven and quite exciting if you're the type that gets elated by wiring
So since getting the car back it's been a couple of weekends of work getting all of the brake system wiring and other general Engine-bay fluff back in. It might be a tad foolish I'm really trying to do as much as possible so that the engine and gearbox will only have to go in the once and not have to come back out after the fact. With that in mind i've been trying to tidy up the engine bay as much as I can. This includes tickling with the idea of cutting back and slimming down some of the OEM wiring harness but that scares me a little in the sense of it beng a "Point of no return" if I cut out anything and then the car doesn't work!
But I wanted to focus on a adding a bit of Sound & heat deadening in to the transmission tunnel, not for exhaust heat as such (those i'll have coated, or i'll wrap) but moreso for general heat and sound that will come off the gearbox in the hopes of keeping the car as Road-car-esque as possible.
Although it would've been easy to just stick a load of self-adhesive stuff down I was advised that this only really helps when there's a decent enough gap between the heat source and if anything is touching it does next to nothing to aid that, alongside the fact that the car originally had an OEM heat shield thing that desintegrated on removal I decided to try and re-create it out of something better.
I bought a big sheet of this stuff https://funkmotorsport.com/product/dual-layer-alum... and started going full art-attack on it.
Considering i'd never given this a wack and it's not the easiest stuff to work with being dual-layered and full of fibreglass I'm actually pretty pleased with how it turned out. Mounted in to a few original threaded holes and a few rivnuts and some big carbon fibre (just had it lieing around) washers to stop it rattling, the edges that were cut sealed up with some leftover gold tape I had to stop it's itch-inducing guts from spilling out i'm actually quite pleased with it. Atleast gives some bling to the bay
Following that I moved on with the help of my Dad to installing the clutch & flywheel on the engine, ready to accept the gearbox, and the gearbox mount ready to eventually accept the mated couple together.
Nothing fancy on the clutch and flywheel part, I believe its just an LS7 OEM jobby but considering the only thing i've done to the engine is give it a slightly spicy cam this should hold up plenty well enough.
After that we moved on to the gearbox mount. The engine mount kit comes with a gearbox mount that I specified for the T56 magnum gearbox i'm using and uses a couple of exciting under-tray bolts to align it in the car before you drill through to bolt it up to the existing chassis rails and sheet metal. I reinforced this a bit by installing a couple of rudimentary crush tubes in the chassis rails as I had seen a couple of horror story pics of the bolts never getting fully tight until they rip a hole in your floor and once done it was incredibly solid. Not the prettiest on the inside as you can see but its well and truly covered by carpet.
Not the greated pic in the world but you can somewhat see here how it's located rought 20cm further back than the original gearbox mount which was all that horrible looking metal I cut out in a previous update.
And with that the engine bay is ready to accept the Engine and gearbox! Bit of a cliffhanger I know but that's the way the cookie crumbled last weekend :P
To leave you with a final update to an issue I posed previously, I believe i've found a Clutch master solution in the form of this OEM Camaro/Pontiac G8 Clutch Master, it should be plenty beefy to actuate the clutch as of course these 2 cars came with the same engine and gearbox combo from the factory. It's incredibly Compact with a remote mount reservoir, so much so infact that the only parts that should protrude in to the engine bay should be the spouts for both the Remote res and the clutch line itself. You can see here offered up to the clutch pedal assembly that it all lives neatly inside the body of the assembly and barely goes past where the firewall would be (Where the thread starts on the mounting studs) So hopefully this is a good result as it also wasn't too dear, so no expensive bills for this "wing it" style of R&D on my part.
Edited by Samjeev on Friday 1st July 10:43
Good job on the clutch master, that looks nice and tidy 
The LS7 clutch is great and holds plenty of power, easily 500lb ft of torque, so you'll be fiiiine. Nice idea with the heat shielding too, that'll definitely make a decent difference, look forward to seeing the engine in its new home!
The LS7 clutch is great and holds plenty of power, easily 500lb ft of torque, so you'll be fiiiine. Nice idea with the heat shielding too, that'll definitely make a decent difference, look forward to seeing the engine in its new home!
The Rotrex Kid said:
Love it. Bet you’re excited to actually get the engine and box in there!!
Oh absolutely, might get a chance to swing it in there this weekend If I can muster the troops and rally some help!Forgot to mention as well, as always i've released a new youtube vid covering the recent progress!
(I know it's not for everyone but I enjoy making them and although I don't chase views and such I really should push and share them more often!)
So as for part 2 of my update it's a bit more on the nerdy side..
Ive been doing alot of research and reading in to wiring solutions recently after having been in waiting-limbo with the company in the states that I was going to purchase a plug-and-play wiring harness solution from (the harness itself isn't an issue, it's the canbus integration to ensure that all of the OEM GT86 systems and functions work, push start, gauge cluster, ABS, traction control, Wheel speed sensors, etc etc etc)
Their primary solution is to use a Canbus translator and an original GM ECU however I wasn't a fan of the idea of having an extra GM ECU hanging around somewhere looking ugly so was hoping their development of a Harness that would integrate the OEM pieces with a Haltech Elite 2500 ECU would have been further along but after being told there was delays in materials for the last 6 months I decided to totally give up with them and the nail in the coffin was when someone alluded to the fact that there's only a handful of wires that need to be connected to get Haltech's Off the shelf LS Harness to play nicely with the GT86.
Diving head first in to the rabbit hole of research in to Haltech's harness and the GT86's wiring diagrams I confirmed this to be the case and that the main crux of the integration was simply hooking up the Haltech Harness in to the Can Hi and Can Lo wires somewhere in the GT86's wiring and then simply configuring the Haltech to dedicate one of it's Canbus Channels to run the GT86 canbus systems.
This might seem obvious to those in the know but to me, despite having been working in IT my entire working life and a massive computer-nerd was just a bitt witchcraft-y to get my head around at first, but once it clicked it made so much more sense.
After that the next hurdle was how to wire the Haltech harness throttle wires to the GT86 throttle cable.... A bit more digging and wiring diagram trawling later and I found exactly where on the original ECU connectors those wires end up and that lead me to begin making yet another spreadsheet for the project!
Just hoping to make not and map out exactly what im going to be joining or splicing in to what so I can refer back to it in the future.

And with that.. the trigger was pulled, comitting to installing and sorting out the wiring myself, on one hand i'm excited and hyped to dive in to it, this might be "Baby's first wiring harness install" in the grand scheme of things but it feels good to be learning something new and on the other hand i'm scared i'm going to ruin everything!
A couple of days later and...


The final major part of the puzzle is here, all that's left to purchase is boring bits like a waterpump and alternator setup, etc but i'm waiting and praying for some 4th July sales to save a few bob on that.
Ive been doing alot of research and reading in to wiring solutions recently after having been in waiting-limbo with the company in the states that I was going to purchase a plug-and-play wiring harness solution from (the harness itself isn't an issue, it's the canbus integration to ensure that all of the OEM GT86 systems and functions work, push start, gauge cluster, ABS, traction control, Wheel speed sensors, etc etc etc)
Their primary solution is to use a Canbus translator and an original GM ECU however I wasn't a fan of the idea of having an extra GM ECU hanging around somewhere looking ugly so was hoping their development of a Harness that would integrate the OEM pieces with a Haltech Elite 2500 ECU would have been further along but after being told there was delays in materials for the last 6 months I decided to totally give up with them and the nail in the coffin was when someone alluded to the fact that there's only a handful of wires that need to be connected to get Haltech's Off the shelf LS Harness to play nicely with the GT86.
Diving head first in to the rabbit hole of research in to Haltech's harness and the GT86's wiring diagrams I confirmed this to be the case and that the main crux of the integration was simply hooking up the Haltech Harness in to the Can Hi and Can Lo wires somewhere in the GT86's wiring and then simply configuring the Haltech to dedicate one of it's Canbus Channels to run the GT86 canbus systems.
This might seem obvious to those in the know but to me, despite having been working in IT my entire working life and a massive computer-nerd was just a bitt witchcraft-y to get my head around at first, but once it clicked it made so much more sense.
After that the next hurdle was how to wire the Haltech harness throttle wires to the GT86 throttle cable.... A bit more digging and wiring diagram trawling later and I found exactly where on the original ECU connectors those wires end up and that lead me to begin making yet another spreadsheet for the project!
Just hoping to make not and map out exactly what im going to be joining or splicing in to what so I can refer back to it in the future.
And with that.. the trigger was pulled, comitting to installing and sorting out the wiring myself, on one hand i'm excited and hyped to dive in to it, this might be "Baby's first wiring harness install" in the grand scheme of things but it feels good to be learning something new and on the other hand i'm scared i'm going to ruin everything!
A couple of days later and...
The final major part of the puzzle is here, all that's left to purchase is boring bits like a waterpump and alternator setup, etc but i'm waiting and praying for some 4th July sales to save a few bob on that.
No the engine still isn't in.. it's proving difficult
Obviously the Sikky engine swap kit tries to get the engine as far back towards the firewall as physically possible however that of course makes it rather tight to slip in, especially with the gearbox hanging off the back of it which is how i'm trying to fit it.
After pulling out the ARB (to be re-fitted later) the next tight point was the big chunky wiring harness and Toyota's lovely but sizeable plastic harness "Skeleton" or conduit that routes this.
So this week I went rather medieval on the wiring harness as this was something i've been wanting to do for a while.
WARNING - GRAPHIC AND DISTURBING SCENES AHEAD FOR ANY AUTO ELECTRICIANS
In an OEM setup Toyota made 1 big chunky wiring connector for the engine harness, makes removing the old engine a breeze as the harness just stays on the engine and the fat connector is just left dangling. Thing is.. I don't need it anymore, and it's in a rather annoying spot.
This is somewhat Uncharted territory as it's a bit of a point of no return.. and those that have removed it in the US/Aus haven't documented it particularly well but I wanted to hack it out to thin things out a bit... and besides.. weight saving right?
So I trawled through the maze of a wiring diagram for the 86/BRZ and confirmed the function routing and destination of each of the Pins for the AC1 and AC2 connectors, once I determined where they went (mostly the engine ECU connectors) I decided whether it was safe to cut them out, or in a few cases if I was better off grounding them and then went at it!
As i said.. I documented it all so atleast I roughly know what everything done is if anything did need to be reversed.

And then, away with thee! and off they went, I pulled back, cut back and eventually isolated the loose wires. I realise the best thing would've been to fully pull them out through in to the cabin and de-pin the other side of the connector but in all honesty I was happy to put in 80% of the effort and get 80% of the result, rather than strive for that extra 20%
Anyway once all done the loom was a fair chunk thinner, much more flexible and didn't have the ugly branch hanging out right in the middle of where the engine is to go.


[pichttps://i.imgur.com/2zBPIH9h.jpg[/pic]


And there we have it, much neater on the surface atleast now let's have another crack at getting that V8 in there...
Obviously the Sikky engine swap kit tries to get the engine as far back towards the firewall as physically possible however that of course makes it rather tight to slip in, especially with the gearbox hanging off the back of it which is how i'm trying to fit it.
After pulling out the ARB (to be re-fitted later) the next tight point was the big chunky wiring harness and Toyota's lovely but sizeable plastic harness "Skeleton" or conduit that routes this.
So this week I went rather medieval on the wiring harness as this was something i've been wanting to do for a while.
WARNING - GRAPHIC AND DISTURBING SCENES AHEAD FOR ANY AUTO ELECTRICIANS
In an OEM setup Toyota made 1 big chunky wiring connector for the engine harness, makes removing the old engine a breeze as the harness just stays on the engine and the fat connector is just left dangling. Thing is.. I don't need it anymore, and it's in a rather annoying spot.
This is somewhat Uncharted territory as it's a bit of a point of no return.. and those that have removed it in the US/Aus haven't documented it particularly well but I wanted to hack it out to thin things out a bit... and besides.. weight saving right?
So I trawled through the maze of a wiring diagram for the 86/BRZ and confirmed the function routing and destination of each of the Pins for the AC1 and AC2 connectors, once I determined where they went (mostly the engine ECU connectors) I decided whether it was safe to cut them out, or in a few cases if I was better off grounding them and then went at it!
As i said.. I documented it all so atleast I roughly know what everything done is if anything did need to be reversed.
And then, away with thee! and off they went, I pulled back, cut back and eventually isolated the loose wires. I realise the best thing would've been to fully pull them out through in to the cabin and de-pin the other side of the connector but in all honesty I was happy to put in 80% of the effort and get 80% of the result, rather than strive for that extra 20%
Anyway once all done the loom was a fair chunk thinner, much more flexible and didn't have the ugly branch hanging out right in the middle of where the engine is to go.
[pichttps://i.imgur.com/2zBPIH9h.jpg[/pic]
And there we have it, much neater on the surface atleast now let's have another crack at getting that V8 in there...
ZX10R NIN said:
Great work that looks so much neater. You must feel satisfied with your progress.
Absolutely, glad tot be doing things "right" the first time rather than have to return to bits at a later stage hopefully. Still planning to get the car up and running and driving before the end of the year so I can get out to a few meets/shows/coffee mornins before we see salt on the roads.Here it is! after attempt #7 we had gotten the process of removing the engine & Gearbox down to an art. 10-15 minutes at most, Redbull F1 team if you're hiring...
but the engine is IN!
After all those attempts and quite a bit of grinding on superfluous bits of gearbox/bellhousing and hammering the living hell out of the passenger's side of the transmission tunnel we got it in!
I unfortunately had to sacrifice the heat shield I made (a bitter pill to swallow, it wasn't cheap!) but I might adapt and attempt to refit it at a later stage.
If anyone was wondering "How on earth do you make a 6.2L v8 look small?" may i present to you.. the Toyota GT86 Engine bay:
Edited by Samjeev on Monday 18th July 17:08
Gassing Station | Readers' Cars | Top of Page | What's New | My Stuff