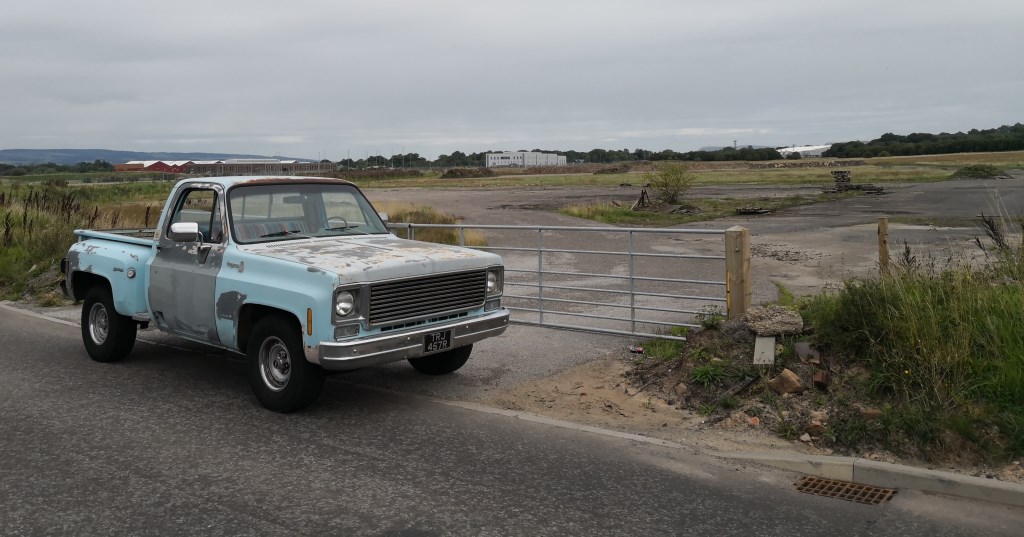
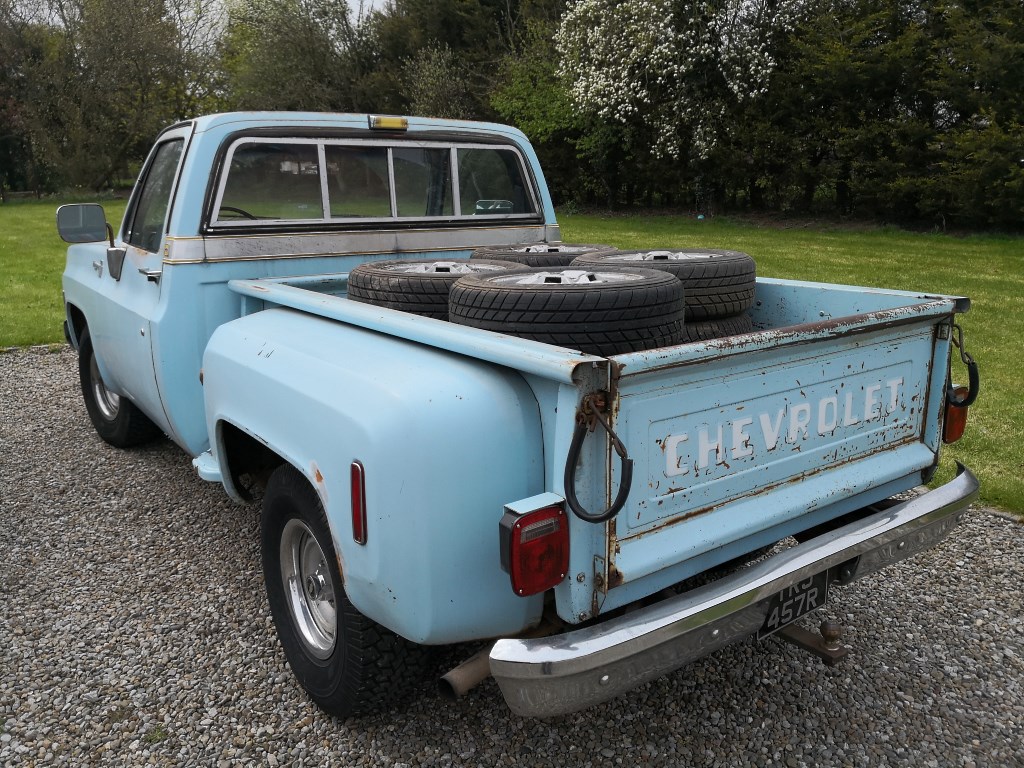
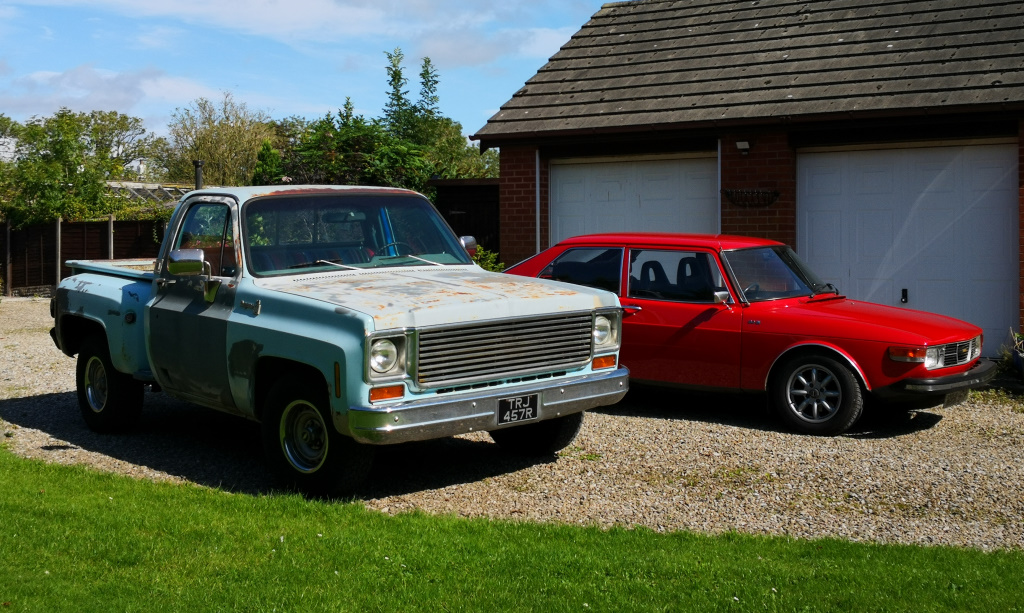
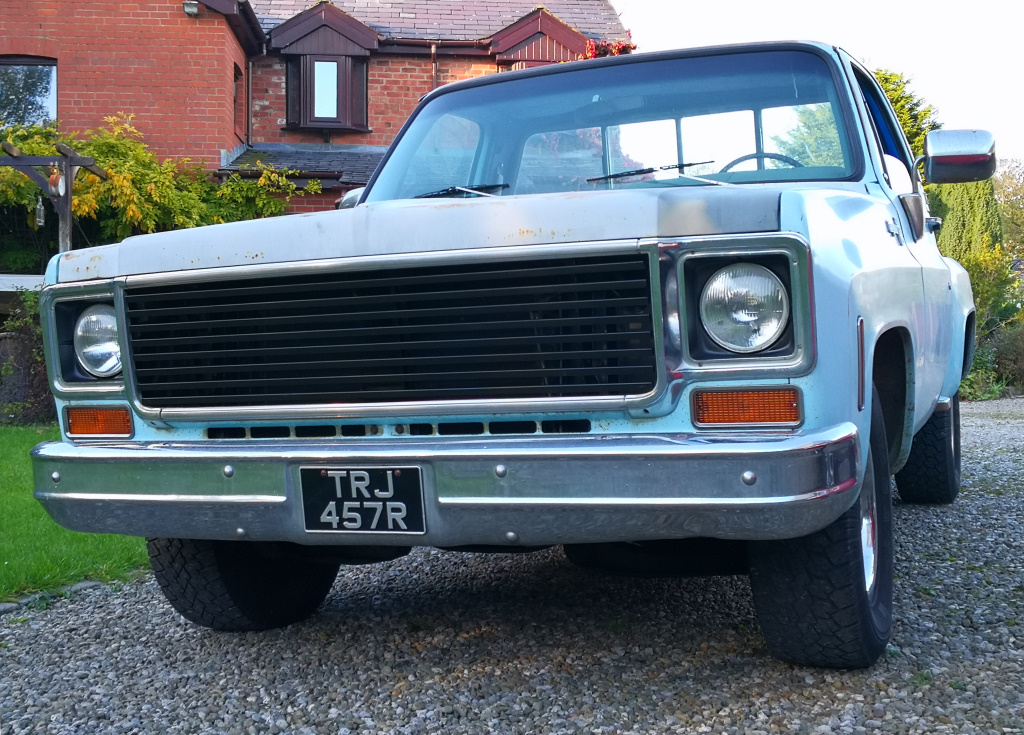
How many American trucks do I need? N+1 obviously! 1977 C10
Discussion


No more work done due to holidays and general post-summer lethargy.
Started the c10 up at the weekend after a few weeks standing, started second turn of the key so not too bad.
Went for a nice run to the badlands of Salmesbury...
and collected a barely used crosstrainer to gather dust for a few months until I pass it on to its next custodian!!
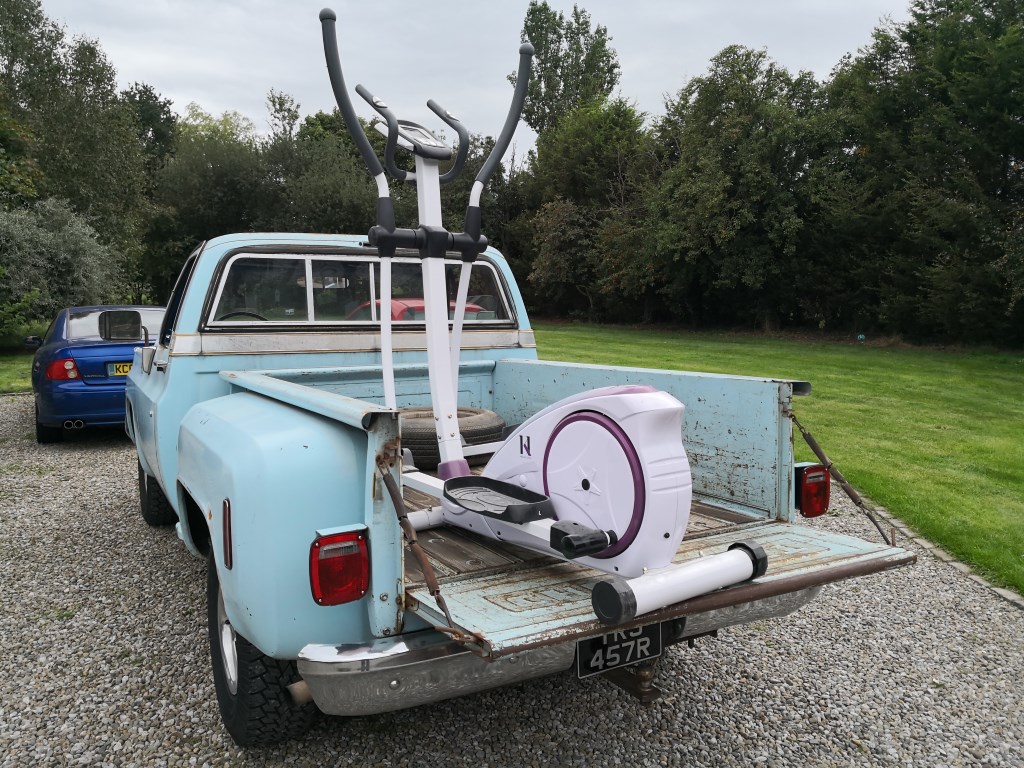
To be fair, I'm sure it would have fitted in the back of the 9-5 with minimal disassembly, but where's the fun in that??
Started the c10 up at the weekend after a few weeks standing, started second turn of the key so not too bad.
Went for a nice run to the badlands of Salmesbury...
and collected a barely used crosstrainer to gather dust for a few months until I pass it on to its next custodian!!
To be fair, I'm sure it would have fitted in the back of the 9-5 with minimal disassembly, but where's the fun in that??
Important vehicle jobs awaiting my attention
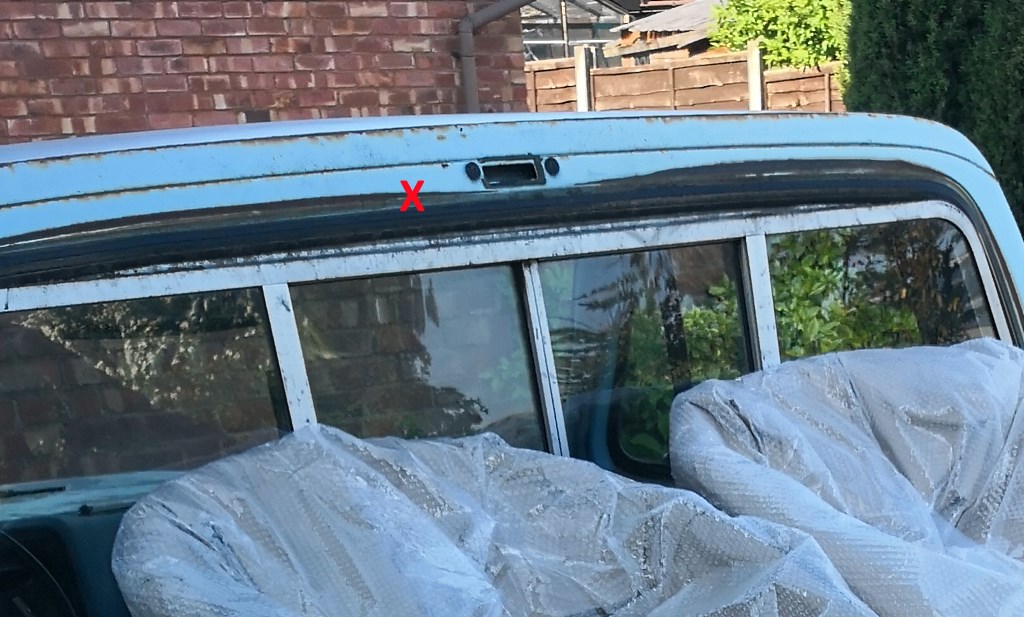
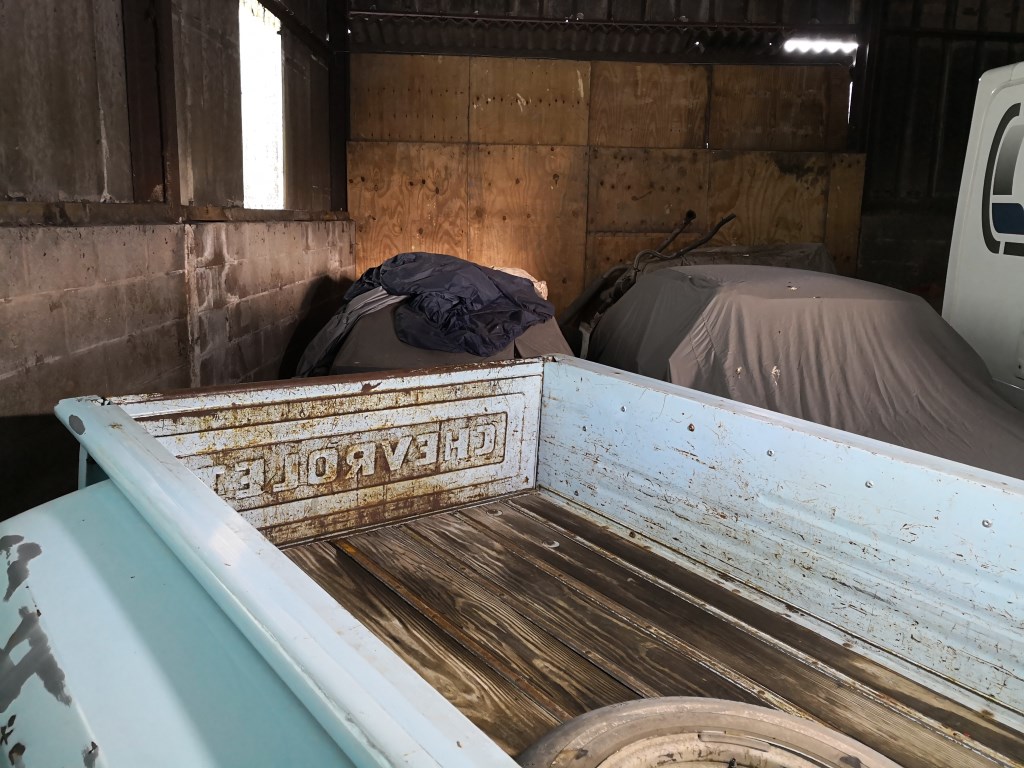
Little background, when my C10 was fitted with the 'orrible topper way back when, the standard cargo bay light had to be removed as it sticks out from roof above the rear window and would have been in the way of the topper. Removing the topper revealed the mounting holes in the rear of the cab roof.
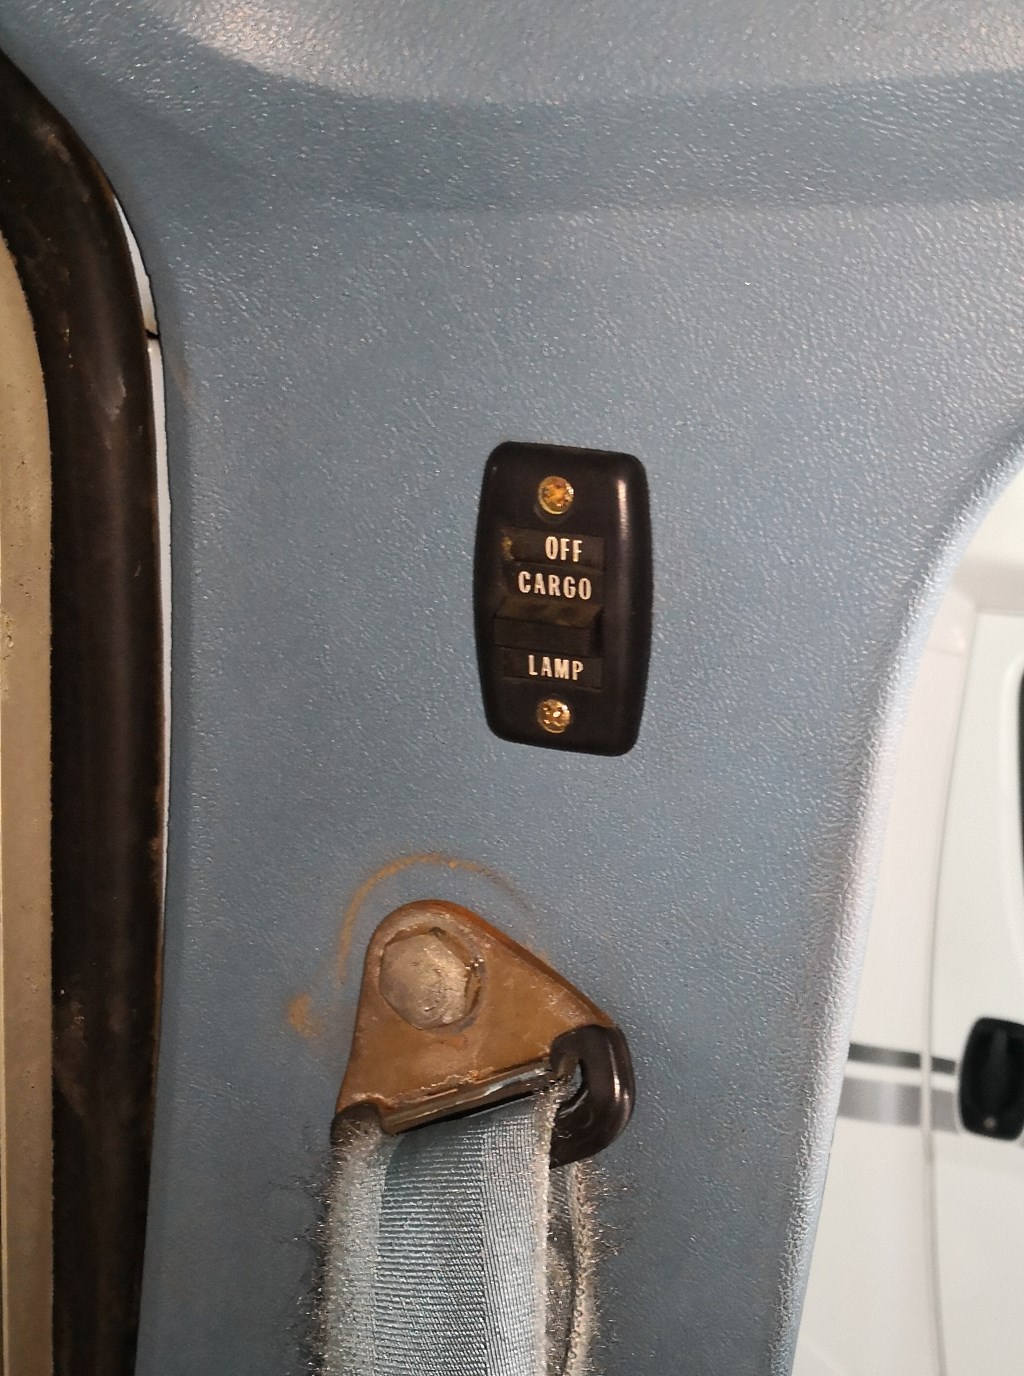
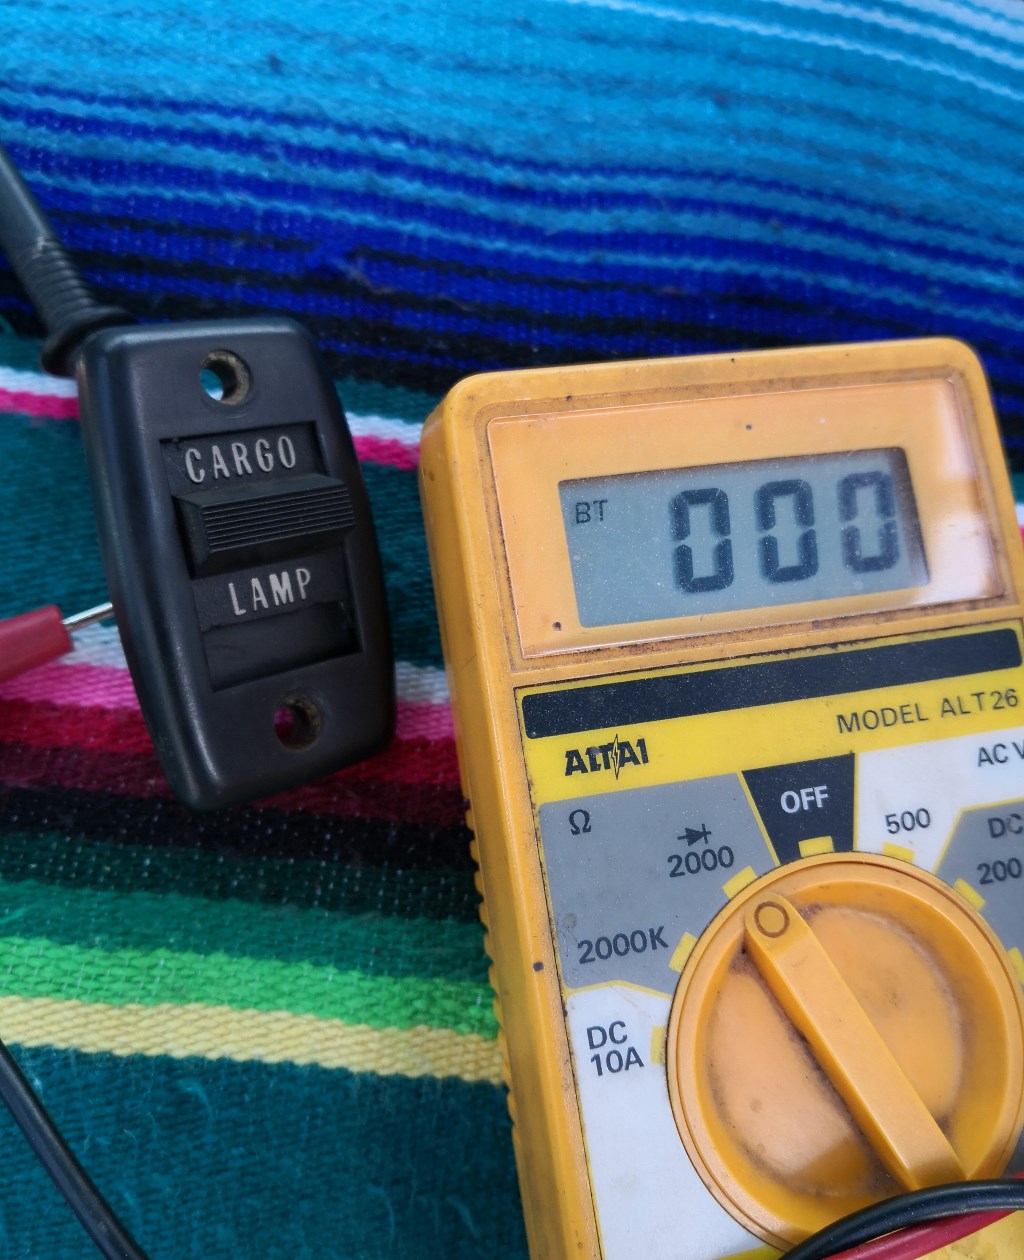
However the switch was still in place in the B pillar
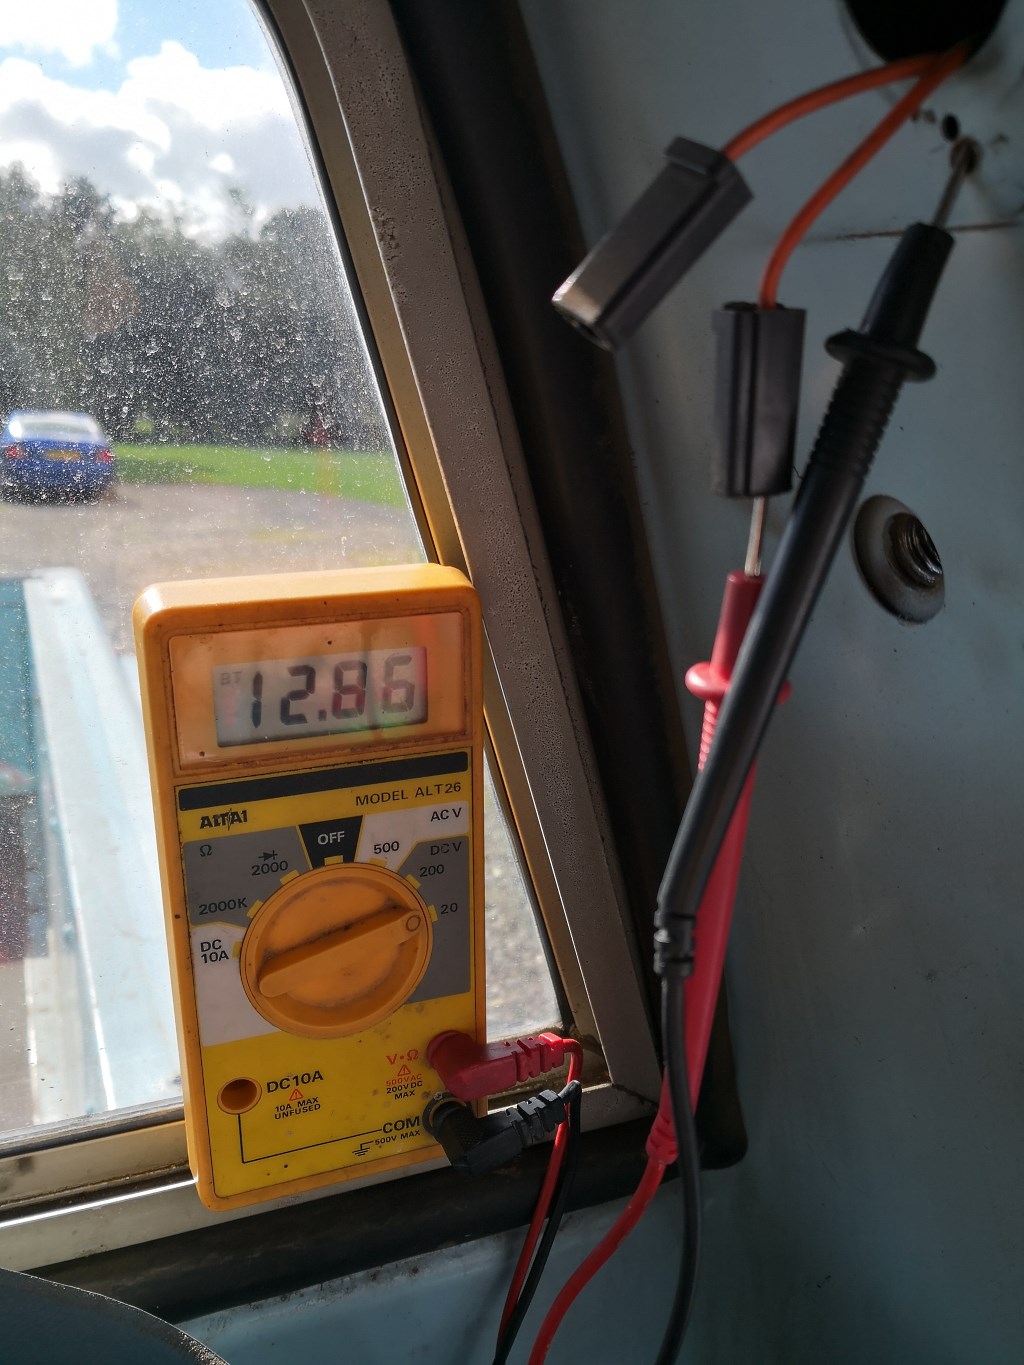
As was the wiring behind it, which pleasingly was still live
Unfortunately the switch was producing infinite resistance in all positions, so a little bit of Dremel action later
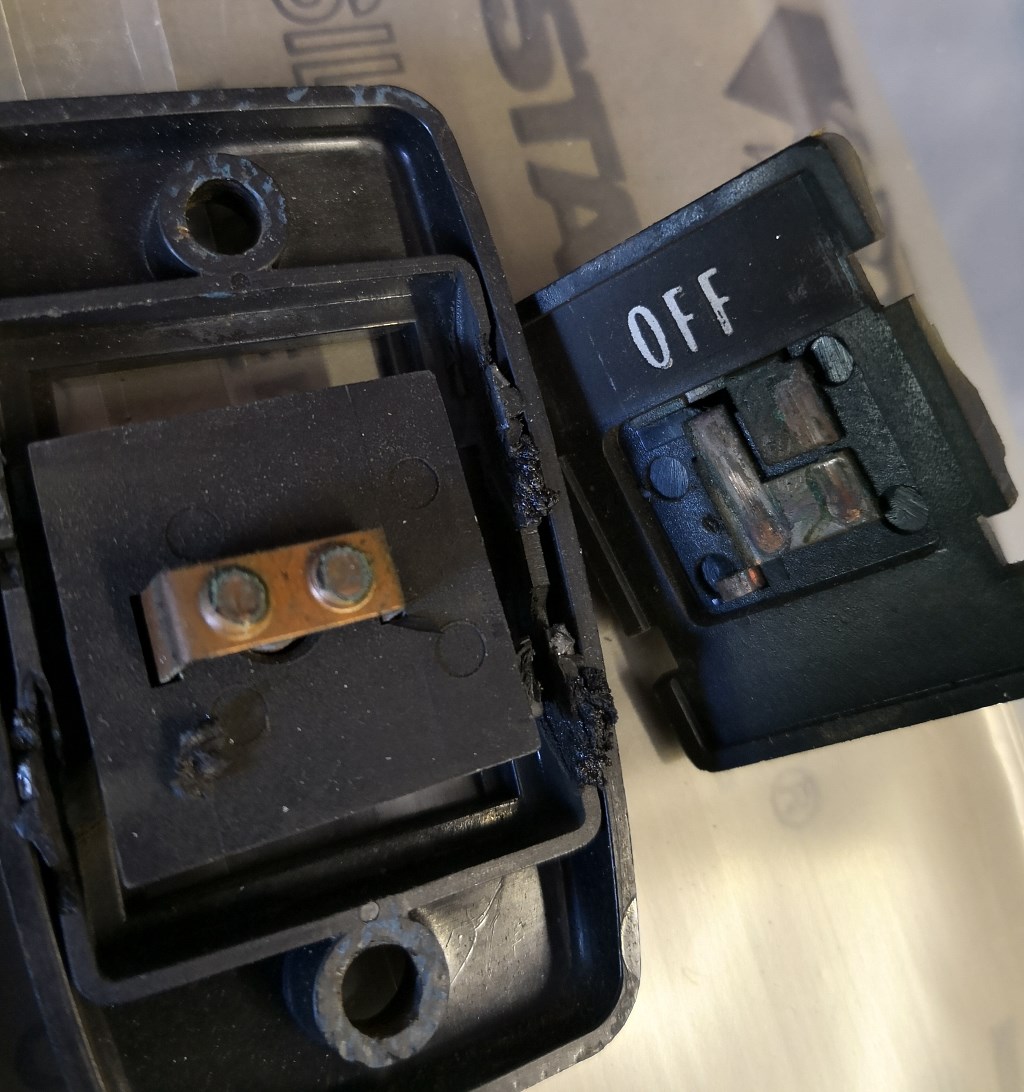
A gentle rub down produced nice, clean contacts
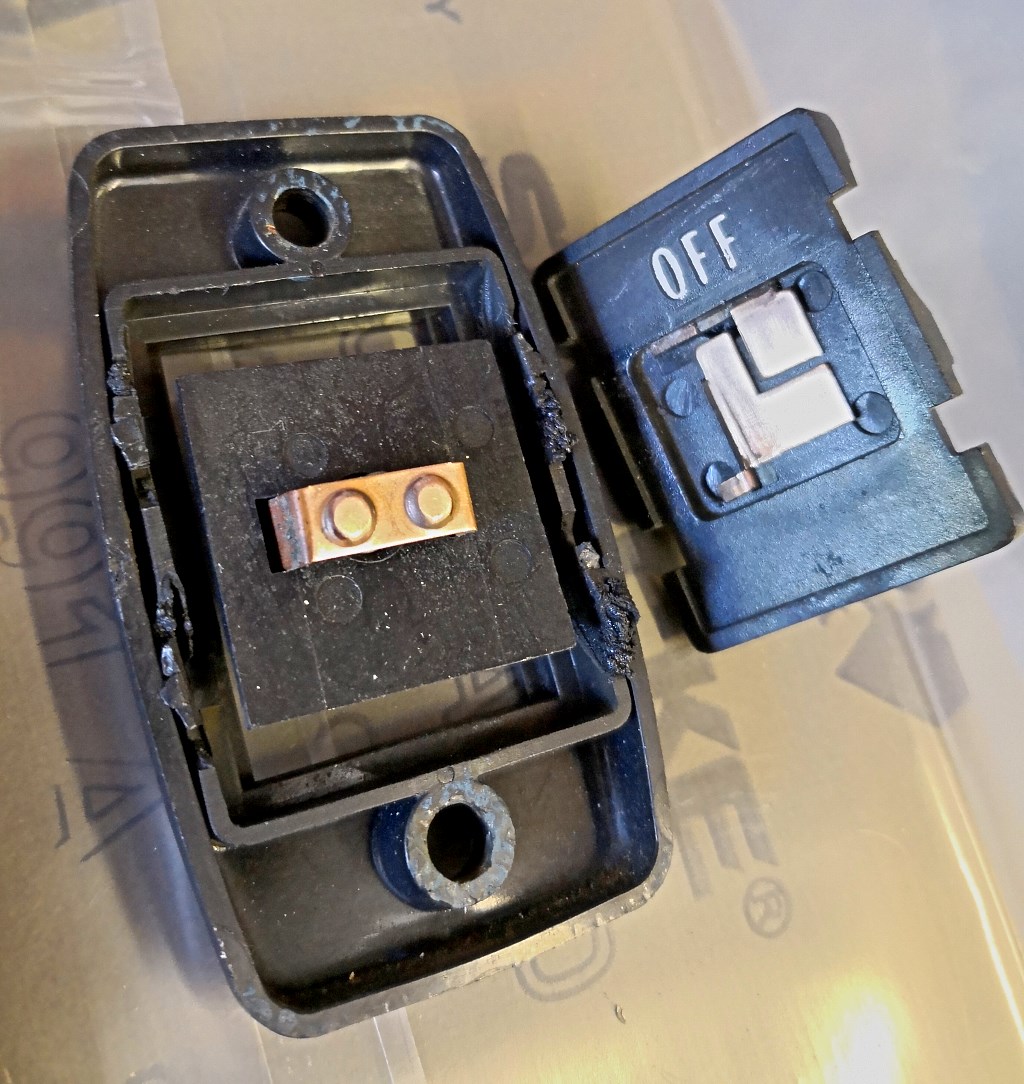
Applied switch lube and glued it back together. Pleased to see the resistance had dropped substantially
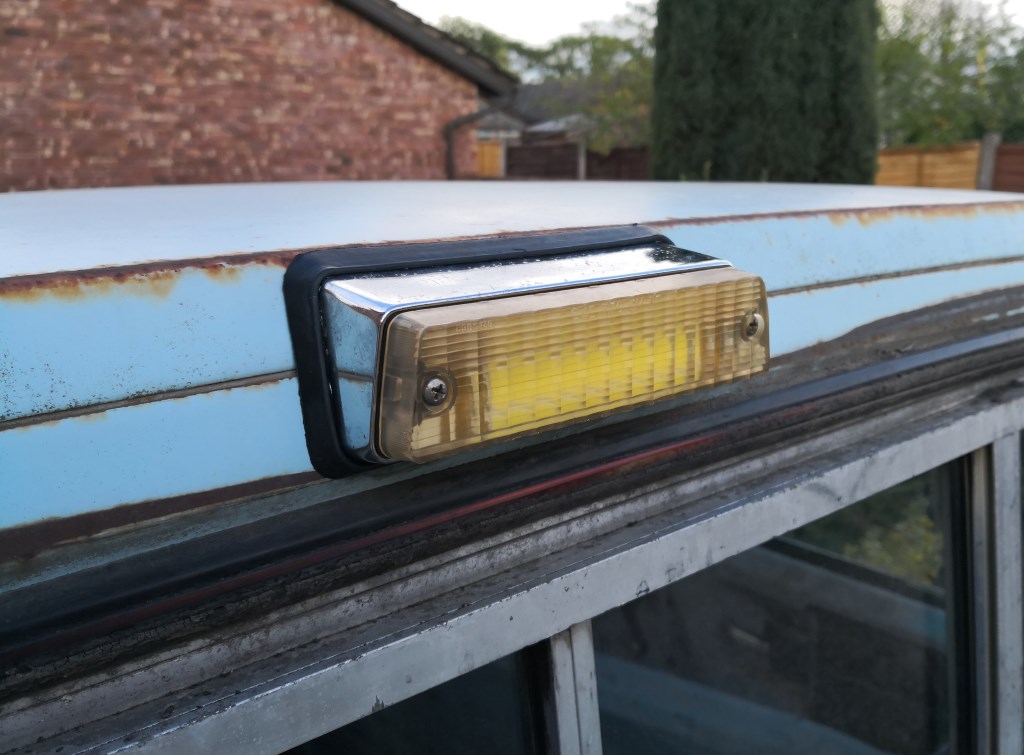
I had already obtained a genuine cargo light from the US, complete with a suitable level of patina. Since the C10 has no reversing lights, I though I might be able to make this dual purpose by making it super-bright with a little jiggery pokery
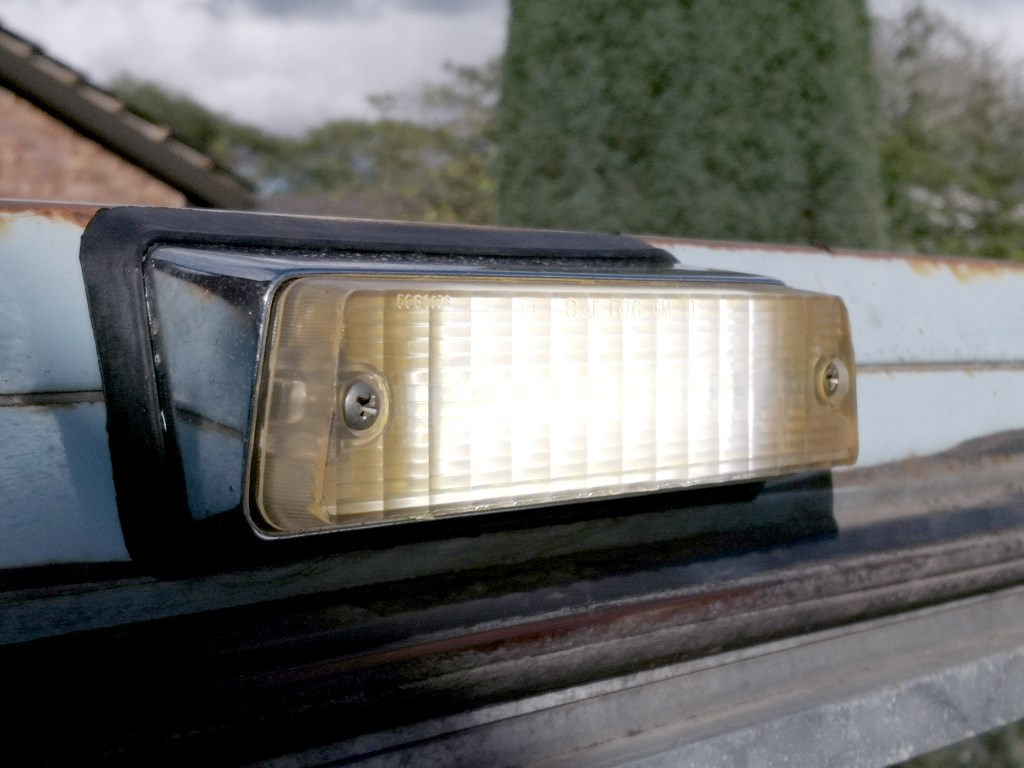
Glued four 5w COB LED strips to a piece of aluminium to provide extra heat sink capacity and wired them up, covering the bare wires with hot glue to protect against damp and vibration. It's not pretty but having tested it indoors, it is damn bright!

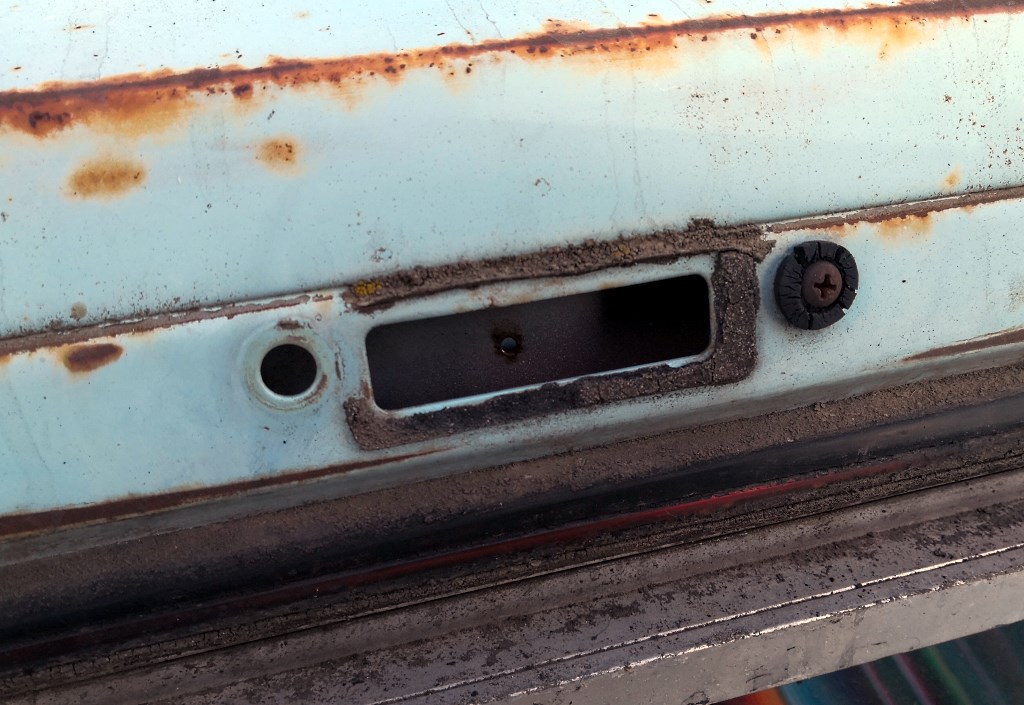
I'd like to say that fitting it was the work of five minutes, sadly not as the original wires had been cut off very short and had no slack, sitting in the box section above the rear window, about here
No chance of extending or connecting to them in situ, thus began a game of thread the needle as I tried to pass a new wire through the hole above the window, horizontally along the box section and then around a ninety degree bend and slightly forward towards the single finger-sized hole that the switch wires poke through.
This took a long time. Much swearing. Quite a bit of removed skin from my finger, feeling around blind trying to "hook" the new wire.
Eventually I managed to pull the new wire through. Confident that I could now get it back into place, I then hooked and pulled the old wires back down through the switch hole too.
At that point it genuinely was a five minute job to solder new to old and pull the whole lot back up and out of the light hole.
In reality the above five lines of text took about three hours to do!
Fitting and connecting the light was then straightforward
Quite bright in daylight
In the relative gloom of the barn
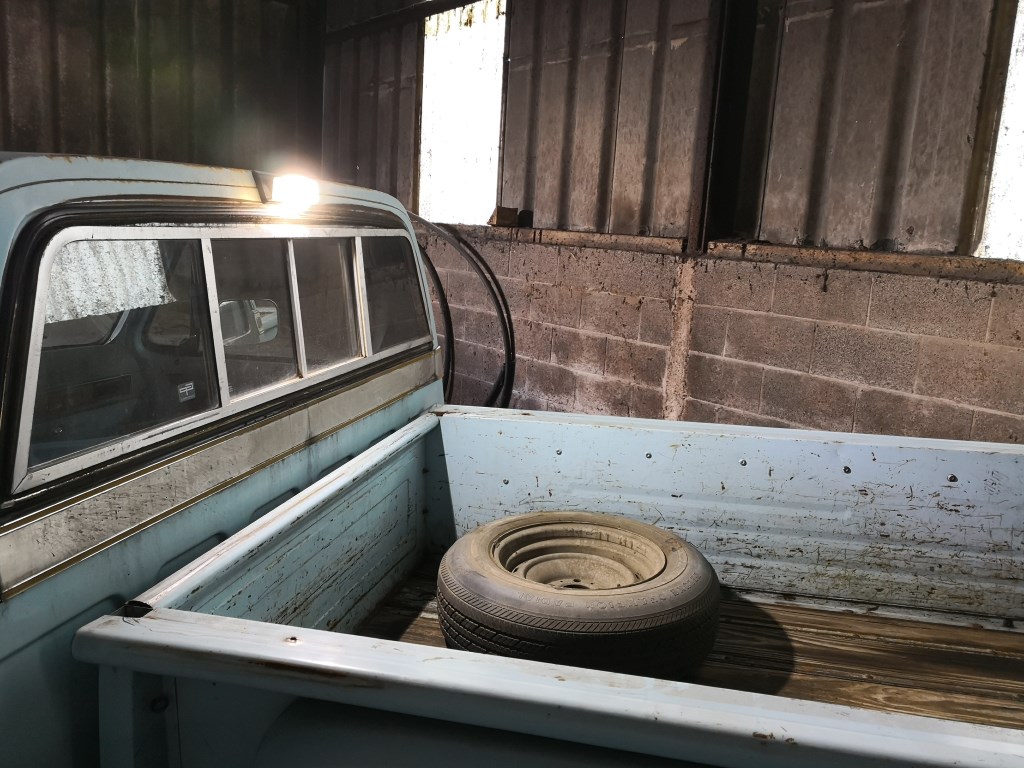
Throws a good amount of light behind too, obviously the pickup box casts a big shadow, but much better than nothing.
Another important job ticked off the list! Next time, polishing the inside of the valve caps...
- Monaro - seized front caliper (currently away for rebuild)
- Monaro - snapped fuel tank strap
- Saab 9-5 - change PS fluid for correct grade
- Saab 9-5 - rebuild entire rear suspension
- El Camino - paint roof
- El Camino - Refit screen and interior
- C10 - weld up hole in passenger door
- C10 - fit suspension upgrades and refresh all bushes and ball joints
- C10 - fit cargo bay light
Little background, when my C10 was fitted with the 'orrible topper way back when, the standard cargo bay light had to be removed as it sticks out from roof above the rear window and would have been in the way of the topper. Removing the topper revealed the mounting holes in the rear of the cab roof.
However the switch was still in place in the B pillar
As was the wiring behind it, which pleasingly was still live
Unfortunately the switch was producing infinite resistance in all positions, so a little bit of Dremel action later
A gentle rub down produced nice, clean contacts
Applied switch lube and glued it back together. Pleased to see the resistance had dropped substantially
I had already obtained a genuine cargo light from the US, complete with a suitable level of patina. Since the C10 has no reversing lights, I though I might be able to make this dual purpose by making it super-bright with a little jiggery pokery
Glued four 5w COB LED strips to a piece of aluminium to provide extra heat sink capacity and wired them up, covering the bare wires with hot glue to protect against damp and vibration. It's not pretty but having tested it indoors, it is damn bright!
I'd like to say that fitting it was the work of five minutes, sadly not as the original wires had been cut off very short and had no slack, sitting in the box section above the rear window, about here
No chance of extending or connecting to them in situ, thus began a game of thread the needle as I tried to pass a new wire through the hole above the window, horizontally along the box section and then around a ninety degree bend and slightly forward towards the single finger-sized hole that the switch wires poke through.
This took a long time. Much swearing. Quite a bit of removed skin from my finger, feeling around blind trying to "hook" the new wire.
Eventually I managed to pull the new wire through. Confident that I could now get it back into place, I then hooked and pulled the old wires back down through the switch hole too.
At that point it genuinely was a five minute job to solder new to old and pull the whole lot back up and out of the light hole.
In reality the above five lines of text took about three hours to do!
Fitting and connecting the light was then straightforward
Quite bright in daylight
In the relative gloom of the barn
Throws a good amount of light behind too, obviously the pickup box casts a big shadow, but much better than nothing.
Another important job ticked off the list! Next time, polishing the inside of the valve caps...
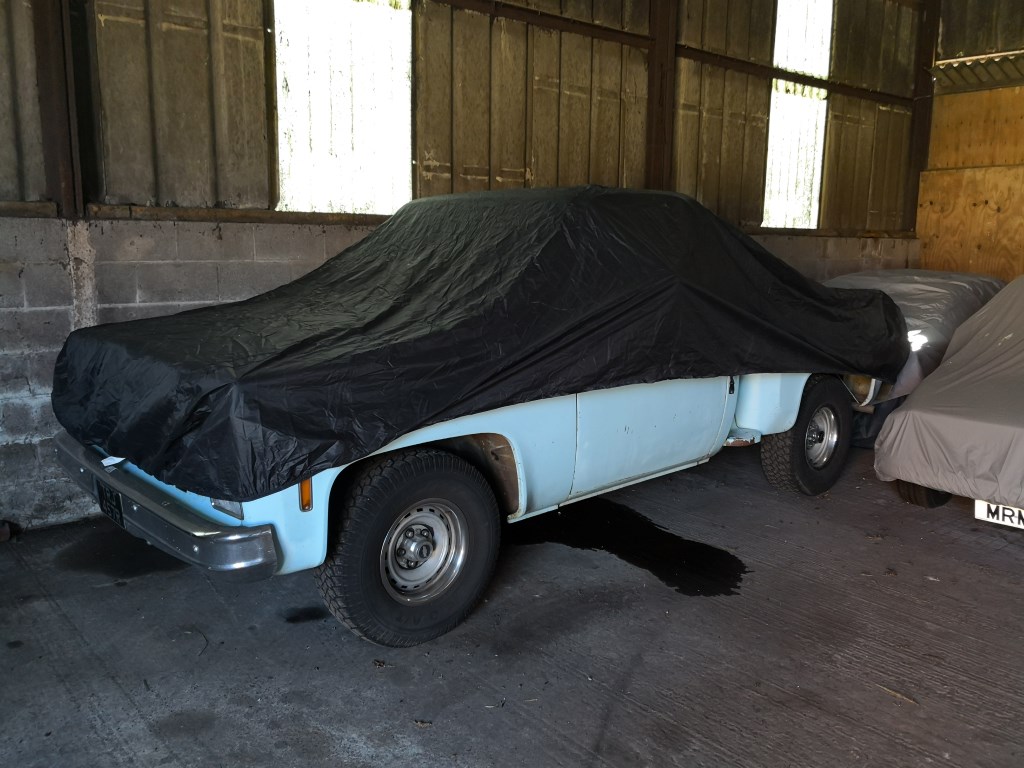
Went to wake the C10 from winter hibernation yesterday.
Last time I was at the barn a few weeks ago, I had noticed a small gearbox leak. Since then, it had worsened considerably...
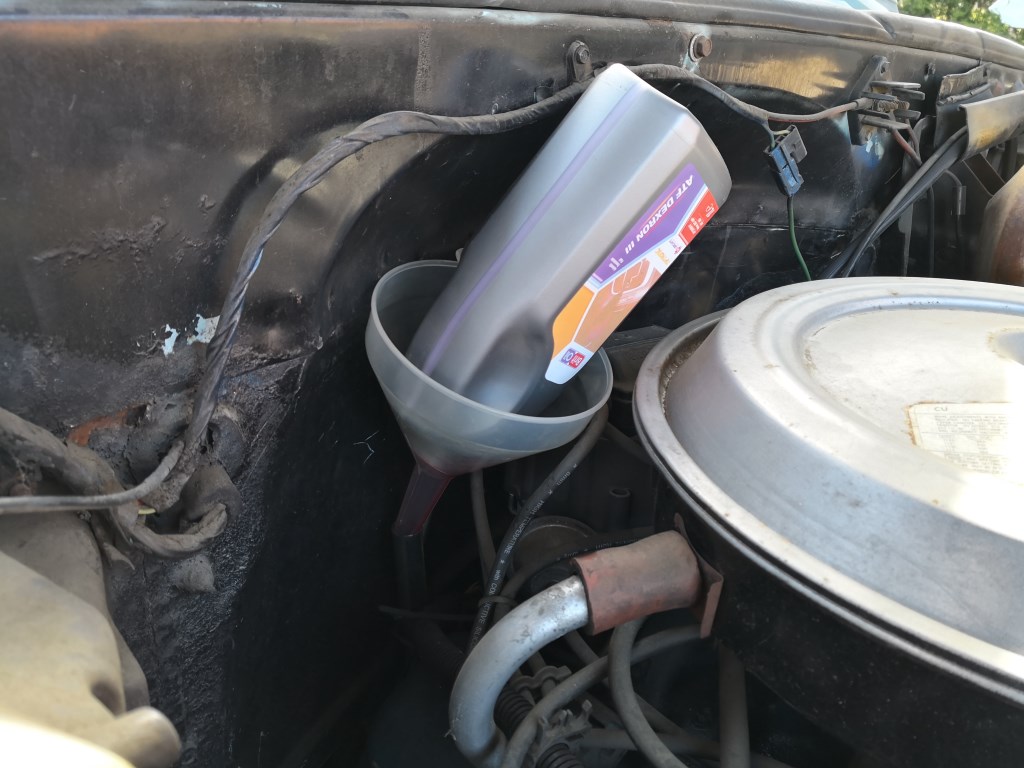
Couldn't access the gearbox dipstick whilst parked up against the wall (well not without climbing into the engine bay and performing contortions) so decided to hope there was enough fluid left to get some drive and bring them old girl home for some attention.
After a bit of cranking to get fuel through, she started easily enough, and fortunately drove and shifted ok.
Yes that is a small step by the front wing - the dipstick is very central and right by the firewall, no chance of reaching it from the floor.
Took just over a litre to get the level correct (checked warm, idling etc)
The obvious question - where was it leaking from? The underside of the gearbox was damp all over, with a drip hanging from the speedometer cable fitting, and another from the drain plug. However after wiping down and topping up, both have remained dry whilst racking up a few miles pottering around locally.
Reading up online, TH350 leaks when stood are pretty common, the suggestion being that wear to internal seals allows the converter to drain down over time, raising the level in the sump above the gasket line, speedo cable and selector seals, none of which are intended to sit below the oil level for long periods, hence major leakage.
Certainly when running and when parked immediately afterwards, there appears to be no obvious leaking going on, so if the worst problem it causes is losing a litre of ATF over winter, I can live with that. At least I know to put a large tray under it in future, although that wisdom comes a little late for my landlord's concrete floor!!
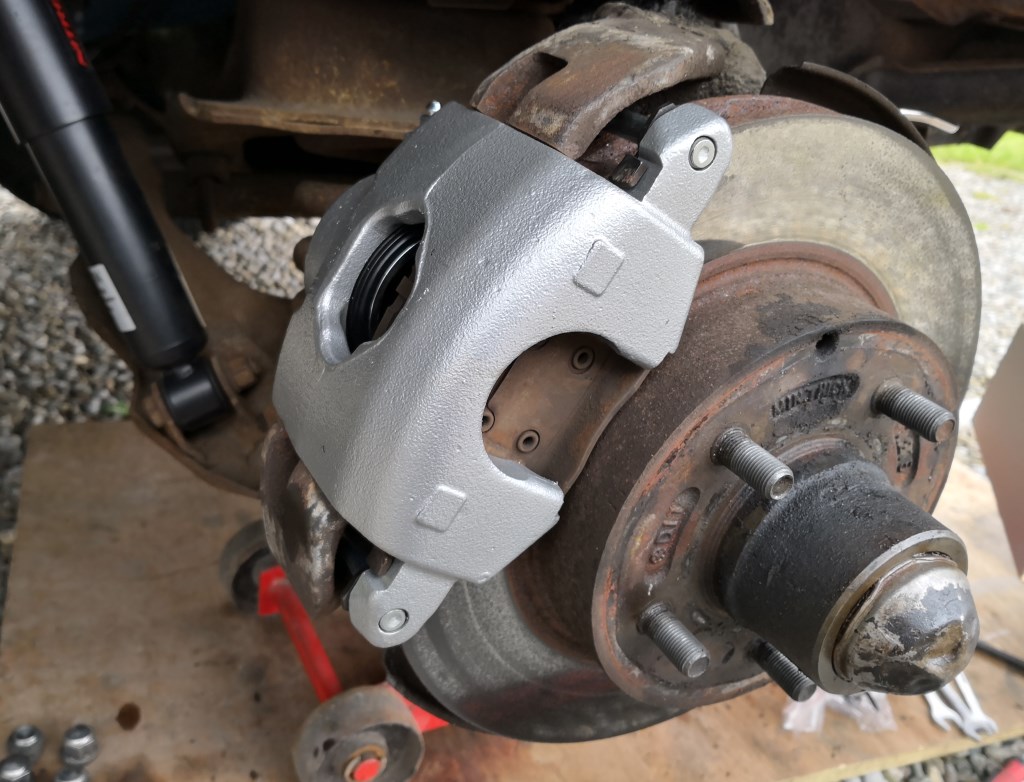
The short journey home also revealed a pull to the left under braking, although only on initial application. I pulled the offside brake apart (very large single piston sliding calipers on the front) and cleaned and lubed the sliders and exercised the piston, which although not entirely seized, needed much effort to move in or out.
I though I had loosened it up a bit so reassembled and tested, still pulling left. Called into my local MOT station and luckily timed it just right - the ramps were clear so straight onto the brake tester which confirmed a lazy offside caliper - it is working, and actually reaches the same braking effort as the nearside, but lags behind by about a second in doing so, hence the initial tug left on pressing the pedal.
Ordered a new caliper last night, even with the core charge (as I won't be posting the old one back to U.S.) it was less than £30, plus the same again in postage of course, but still very reasonable. Almost defies belief that, if you live in the U.S. and return the core, you can get a re-manufactured and guaranteed caliper for under a tenner!!
Final job, as I wanted to finish with something easy and satisfying, was to replace the broken plastic trim under the steering column with a new replacement that I had ordered a few months back.
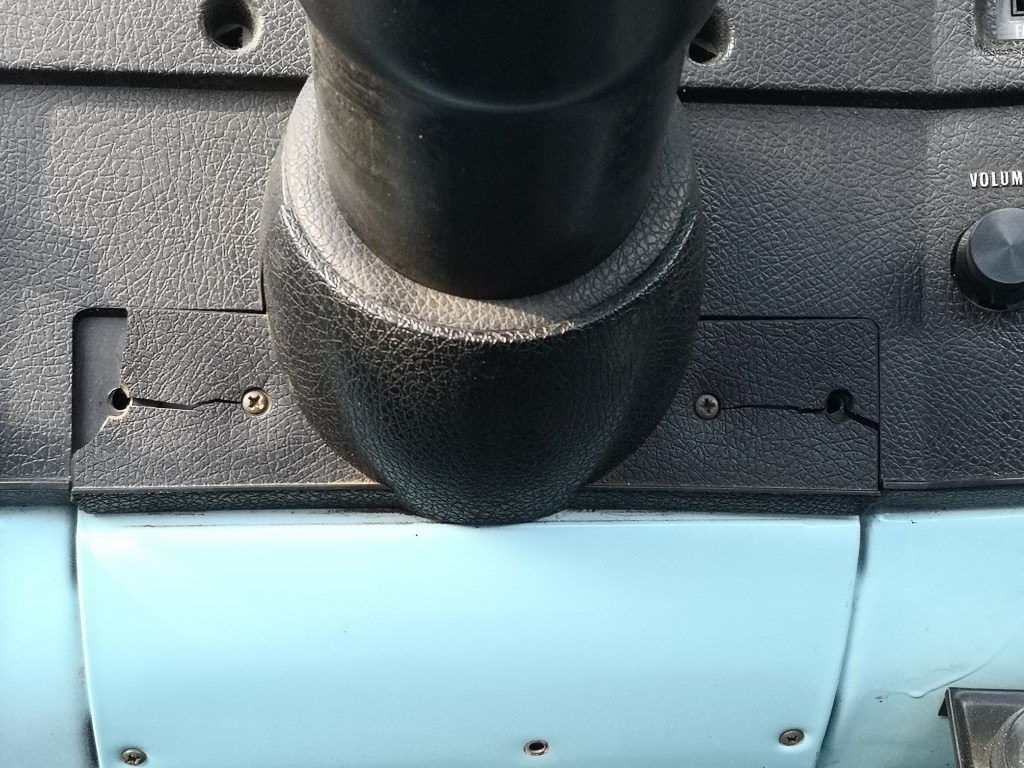
Unfortunately, when I came to unwrap it, the new one was
a) too long
b) a completely different "grain" and
c) a different shape at the lower edge.

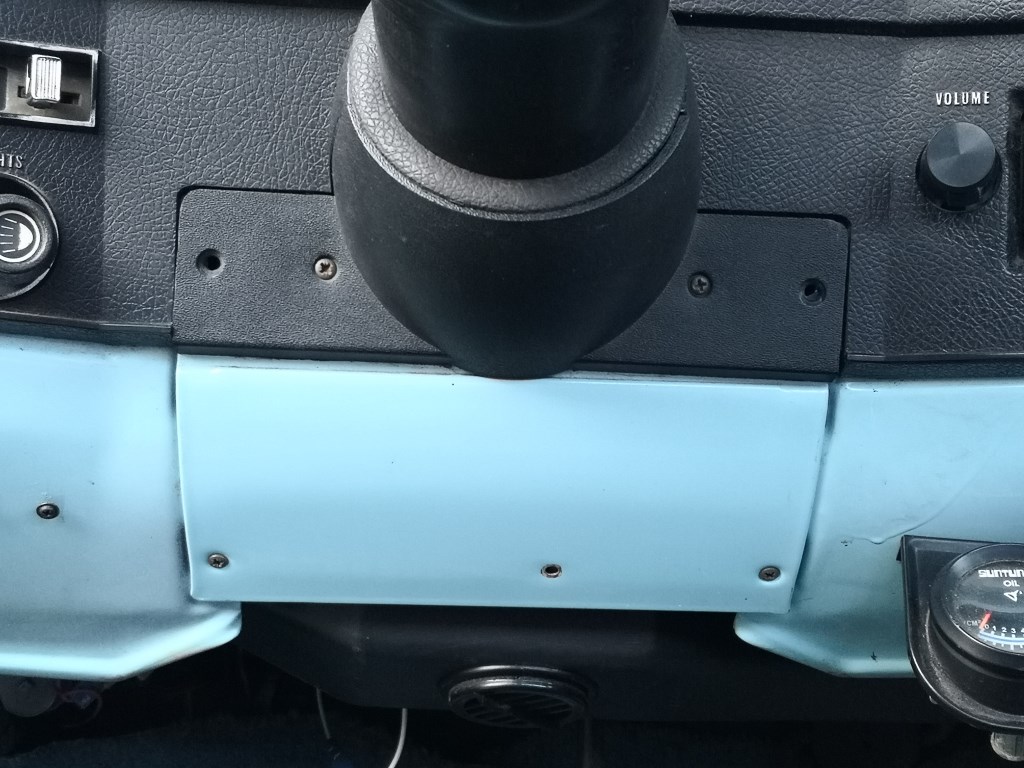
I bodged it to fit as it is marginally better than the broken piece, but will have to keep an eye out for an original piece as, looking more closely, all the repro ones seem to be incorrect for my dash...
Easy and satisfying little job my a e!!
e!!
Despite these minor trials and tribulations, I still reckon the C10 provides more smiles per mile than anything else I own
Last time I was at the barn a few weeks ago, I had noticed a small gearbox leak. Since then, it had worsened considerably...
Couldn't access the gearbox dipstick whilst parked up against the wall (well not without climbing into the engine bay and performing contortions) so decided to hope there was enough fluid left to get some drive and bring them old girl home for some attention.
After a bit of cranking to get fuel through, she started easily enough, and fortunately drove and shifted ok.
Yes that is a small step by the front wing - the dipstick is very central and right by the firewall, no chance of reaching it from the floor.
Took just over a litre to get the level correct (checked warm, idling etc)
The obvious question - where was it leaking from? The underside of the gearbox was damp all over, with a drip hanging from the speedometer cable fitting, and another from the drain plug. However after wiping down and topping up, both have remained dry whilst racking up a few miles pottering around locally.
Reading up online, TH350 leaks when stood are pretty common, the suggestion being that wear to internal seals allows the converter to drain down over time, raising the level in the sump above the gasket line, speedo cable and selector seals, none of which are intended to sit below the oil level for long periods, hence major leakage.
Certainly when running and when parked immediately afterwards, there appears to be no obvious leaking going on, so if the worst problem it causes is losing a litre of ATF over winter, I can live with that. At least I know to put a large tray under it in future, although that wisdom comes a little late for my landlord's concrete floor!!
The short journey home also revealed a pull to the left under braking, although only on initial application. I pulled the offside brake apart (very large single piston sliding calipers on the front) and cleaned and lubed the sliders and exercised the piston, which although not entirely seized, needed much effort to move in or out.
I though I had loosened it up a bit so reassembled and tested, still pulling left. Called into my local MOT station and luckily timed it just right - the ramps were clear so straight onto the brake tester which confirmed a lazy offside caliper - it is working, and actually reaches the same braking effort as the nearside, but lags behind by about a second in doing so, hence the initial tug left on pressing the pedal.
Ordered a new caliper last night, even with the core charge (as I won't be posting the old one back to U.S.) it was less than £30, plus the same again in postage of course, but still very reasonable. Almost defies belief that, if you live in the U.S. and return the core, you can get a re-manufactured and guaranteed caliper for under a tenner!!
Final job, as I wanted to finish with something easy and satisfying, was to replace the broken plastic trim under the steering column with a new replacement that I had ordered a few months back.
Unfortunately, when I came to unwrap it, the new one was
a) too long
b) a completely different "grain" and
c) a different shape at the lower edge.
I bodged it to fit as it is marginally better than the broken piece, but will have to keep an eye out for an original piece as, looking more closely, all the repro ones seem to be incorrect for my dash...
Easy and satisfying little job my a
e!!Despite these minor trials and tribulations, I still reckon the C10 provides more smiles per mile than anything else I own
Edited by 99t on Tuesday 26th March 11:19
Edited by 99t on Tuesday 26th March 11:27
Krikkit said:
Splendid as ever, one of my favourite cars on PH...
Great result on the caliper, that is ridiculously cheap even with the core surcharge! A bit of brick acid might clean up that oil spill on concrete.
Got some kitty litter on it at the moment which seems to be soaking up the worst excesses but it's not going to remove the stain. Great result on the caliper, that is ridiculously cheap even with the core surcharge! A bit of brick acid might clean up that oil spill on concrete.
Will have to try something but don't want to dissolve a big hole in the floor!!
Recon brake caliper arrived today, six days after ordering from the U.S. and looks amazingly well done for the money, assuming it works of course!
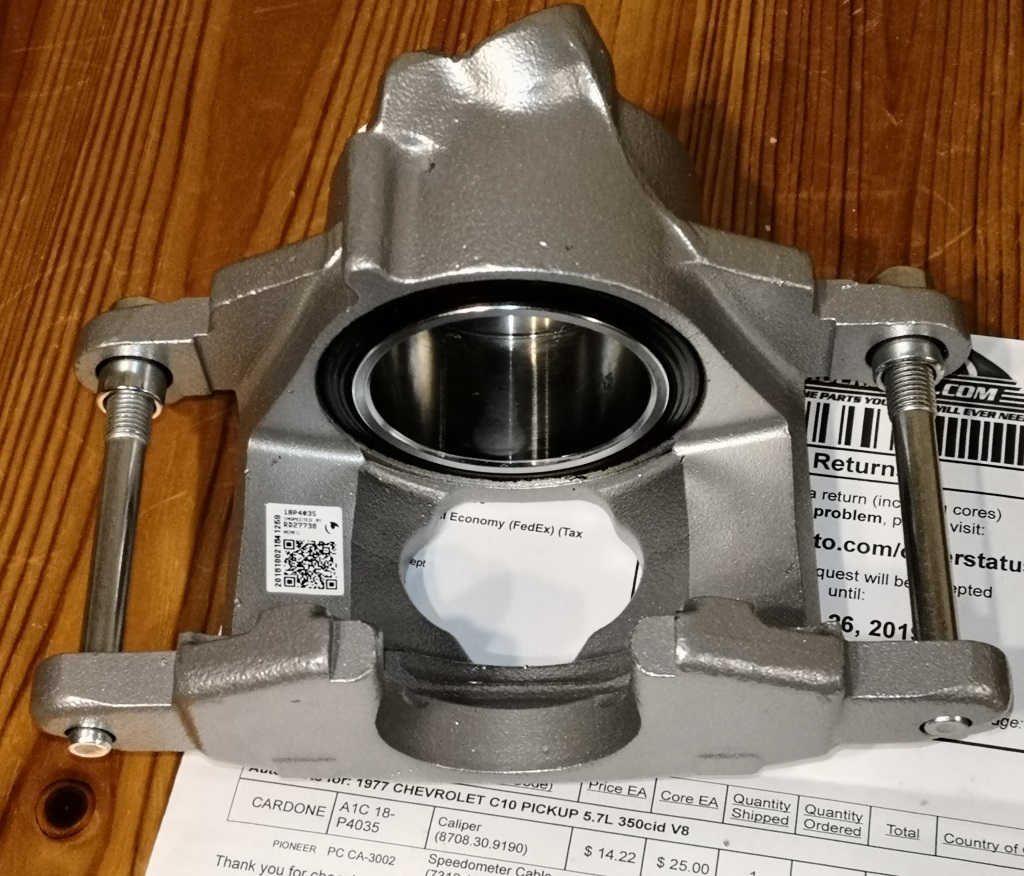
Came with a full fitting kit too - new banjo bolt, copper washers, clips and sliders.
t!
I think "well used and a bit dog-eared but cared for" is the look I'm after (if there is such a thing), rather than just downright neglected...
Came with a full fitting kit too - new banjo bolt, copper washers, clips and sliders.
fernando the frog said:
please keep it with the patina! awesome truck
The genuine patina won't be going anywhere in the short term. Some of the bits that are not so much patina and more that the previous owner started some bodywork and then gave up will be tidied up a bit as they just look a bit st!I think "well used and a bit dog-eared but cared for" is the look I'm after (if there is such a thing), rather than just downright neglected...
Bit of a catch up from the last few weeks.
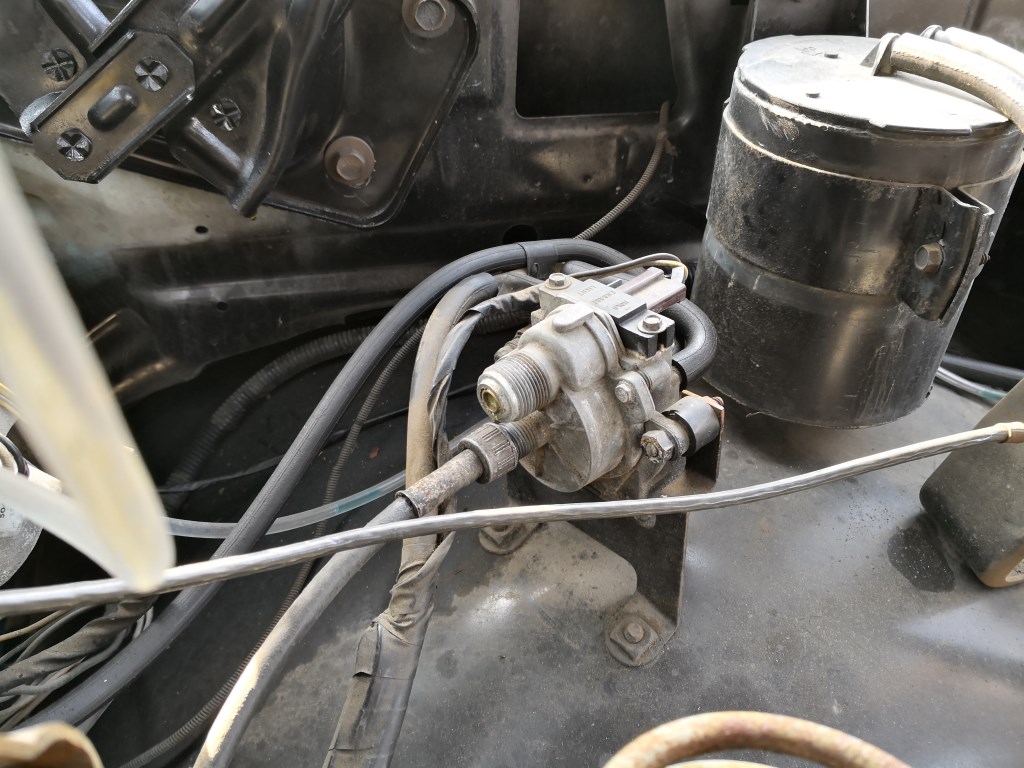
Before fitting the brake caliper, there was another pressing job to do - replacing the speedo cables. Because the C10 originally had cruise control, the cable is in two parts, joined by the cruise mechanism in the engine bay. Both cables were worn and extremely noisy so I set about replacing both.
Note, I could have replaced the pair of cables with a single one for non-cruise equipped vehicles since the cruise control steering column was replaced with a non-cruise column for its first MOT in the UK due to excessive play in the bearings. One day I may replace the column with a correct one again (although not a high priority) so will keep all the other elements of the system intact.
Cruise gubbins in the engine bay with upper cable removed
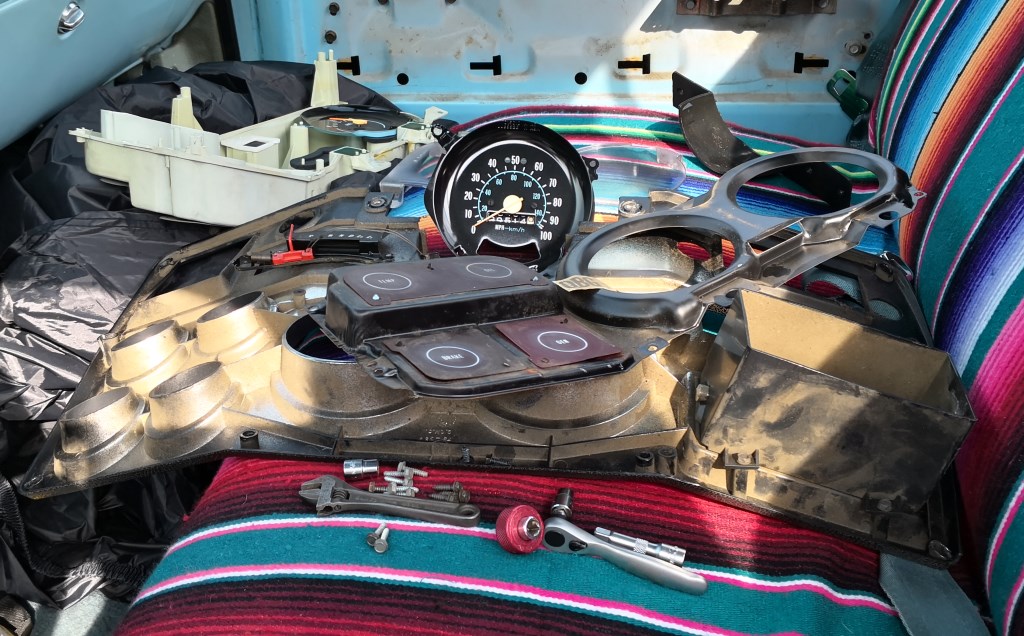
This entailed removal of the dash which was easy enough
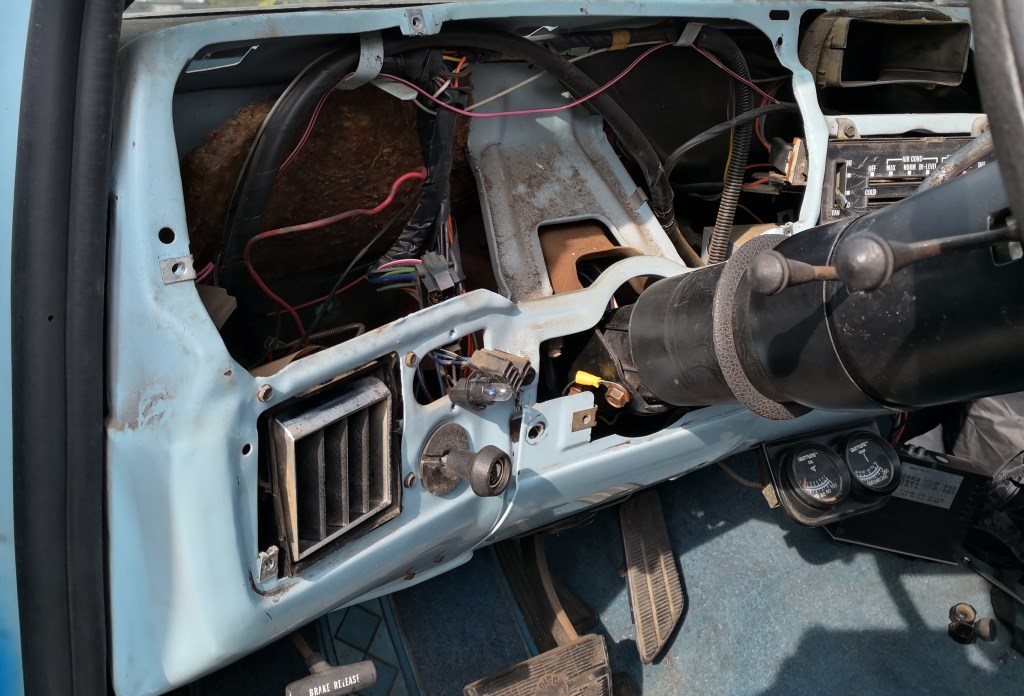
And resulted in a big pile of bits
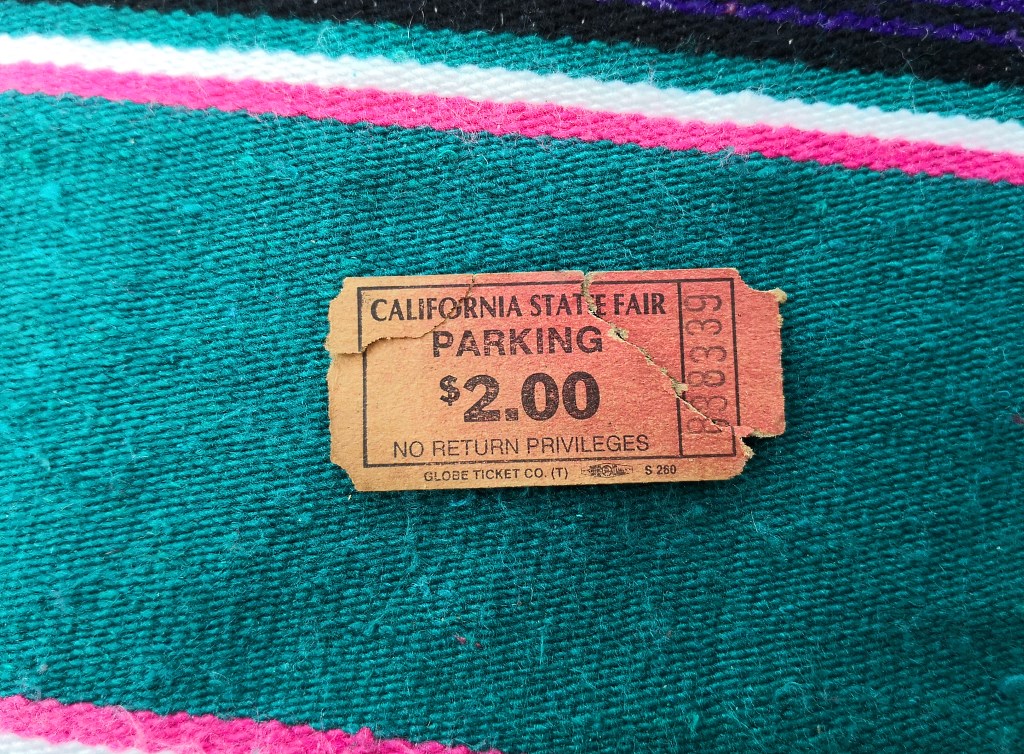
Found an old parking ticket from the truck's previous life
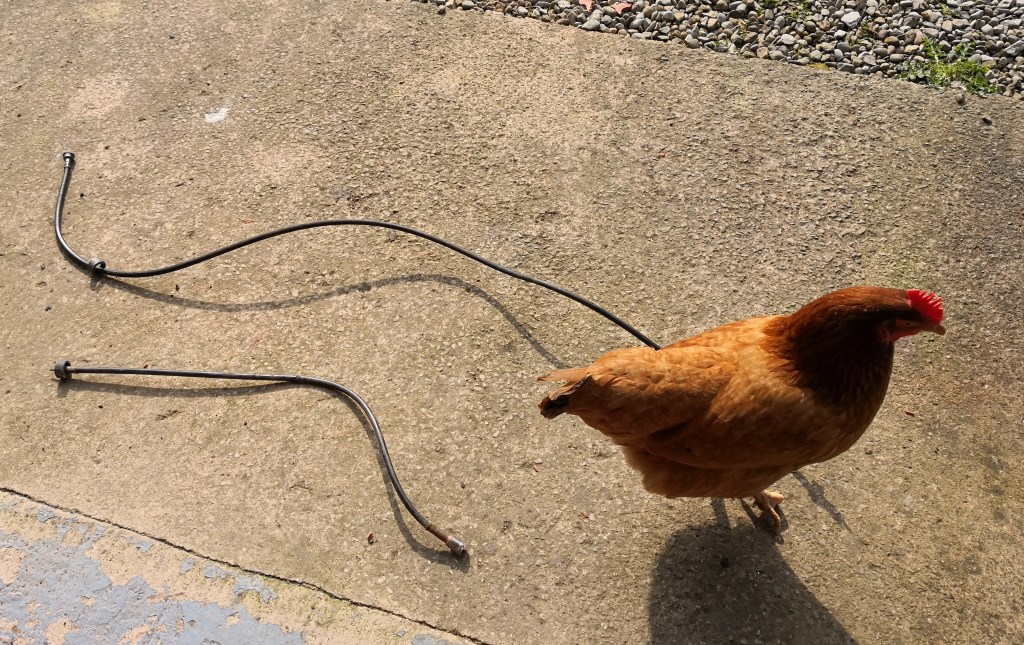
Getting the old cable out and the new one through the firewall grommet was a bit of a nightmare, the grommet had hardened and I'd foolishly neglected to order a replacement. Took a while but managed to do it in the end without destroying the grommet, my fingers or the new cable!
In comparison the lower cable was a breeze to remove. Chicken looks about to express its opinion on the old ones...
Once the interior was back together, I fitted the brake caliper which was straightforward in every way.
Test drive, I took a load of old wheels to the garage to get the rotted tyres removed to save space.
Unfortunately, the test drive revealed absolutely no difference to the pull under braking. Next candidate for replacement would be the flexi-hose on the same side.
Flexi-hose was ordered and arrived after a frustrating delay whilst the courier unsuccessfully tried to find our house on four occasions...
Fitted the flexi this weekend. Wasn't expecting it to be too bad a job. I was wrong. It turned into such a seven-hour nightmare that I didn't even take any pictures!!
Chevy, in their wisdom, put the joint with the hard line inside the C-section of the chassis, and blocked access to it with steering components and the main cross member.
Ideally the process would be:-
1) Remove the hard line from the end of the flexi.
2) Remove the large nut securing the end of the flexi to the chassis once the hard line was moved out of the way.
Unfortunately the hard line union had been rounded previously and nothing I could grip it with would get it moving. The hard line of course blocked access to the large nut securing the whole lot to the chassis with any socket and getting a spanner onto it inside the chassis wasn't going to happen. Catch 22, I could undo neither.
Plan B, then, was to cut off the hard line, allowing me to get a socket on the securing nut. Obviously I'd need to replace the line. Followed it across to the nearside where it joined the brake distribution block. I couldn't see the union due to its placement but I could feel it and (just) get a spanner onto it. Would it crack off???
Thankfully, yes! stty access again but it moved. Breathed a sigh of relief. Checked I had sufficient brake line and a spare union or two. Ok.
Cut the line. Removed the securing nut quite easily once I could get a socket onto it and the flexi was free!
Now for the hard line. The union at the distribution block took ages to remove as I could only get a tiny amount of turn on the spanner, was working blind, shoulder muscles burning and hands slippery with in brake fluid!! Eventually it came off and after a bit of wriggling and bending the hard line was free too.
Making the replacement line was easy enough, nothing too complex in its shape. Reused the union from the distribution block end as it was in perfect condition. Getting it to thread correctly back into the block and tightened down was just as bad as removing it, albeit with slightly less brake fluid involved by this point!
After this, securing and re-assembling the flexi end was fairly straightforward other than the still awful access. Refilled with brake fluid and bled the brakes through.
Somewhat broken, I elected to have a shower and some food before test driving! After all that, I think I would have been borderline suicidal if it hadn't fixed anything.
Thankfully the pull under braking had gone
Before fitting the brake caliper, there was another pressing job to do - replacing the speedo cables. Because the C10 originally had cruise control, the cable is in two parts, joined by the cruise mechanism in the engine bay. Both cables were worn and extremely noisy so I set about replacing both.
Note, I could have replaced the pair of cables with a single one for non-cruise equipped vehicles since the cruise control steering column was replaced with a non-cruise column for its first MOT in the UK due to excessive play in the bearings. One day I may replace the column with a correct one again (although not a high priority) so will keep all the other elements of the system intact.
Cruise gubbins in the engine bay with upper cable removed
This entailed removal of the dash which was easy enough
And resulted in a big pile of bits
Found an old parking ticket from the truck's previous life
Getting the old cable out and the new one through the firewall grommet was a bit of a nightmare, the grommet had hardened and I'd foolishly neglected to order a replacement. Took a while but managed to do it in the end without destroying the grommet, my fingers or the new cable!
In comparison the lower cable was a breeze to remove. Chicken looks about to express its opinion on the old ones...
Once the interior was back together, I fitted the brake caliper which was straightforward in every way.
Test drive, I took a load of old wheels to the garage to get the rotted tyres removed to save space.
Unfortunately, the test drive revealed absolutely no difference to the pull under braking. Next candidate for replacement would be the flexi-hose on the same side.
Flexi-hose was ordered and arrived after a frustrating delay whilst the courier unsuccessfully tried to find our house on four occasions...
Fitted the flexi this weekend. Wasn't expecting it to be too bad a job. I was wrong. It turned into such a seven-hour nightmare that I didn't even take any pictures!!
Chevy, in their wisdom, put the joint with the hard line inside the C-section of the chassis, and blocked access to it with steering components and the main cross member.
Ideally the process would be:-
1) Remove the hard line from the end of the flexi.
2) Remove the large nut securing the end of the flexi to the chassis once the hard line was moved out of the way.
Unfortunately the hard line union had been rounded previously and nothing I could grip it with would get it moving. The hard line of course blocked access to the large nut securing the whole lot to the chassis with any socket and getting a spanner onto it inside the chassis wasn't going to happen. Catch 22, I could undo neither.
Plan B, then, was to cut off the hard line, allowing me to get a socket on the securing nut. Obviously I'd need to replace the line. Followed it across to the nearside where it joined the brake distribution block. I couldn't see the union due to its placement but I could feel it and (just) get a spanner onto it. Would it crack off???
Thankfully, yes! s
tty access again but it moved. Breathed a sigh of relief. Checked I had sufficient brake line and a spare union or two. Ok.Cut the line. Removed the securing nut quite easily once I could get a socket onto it and the flexi was free!
Now for the hard line. The union at the distribution block took ages to remove as I could only get a tiny amount of turn on the spanner, was working blind, shoulder muscles burning and hands slippery with in brake fluid!! Eventually it came off and after a bit of wriggling and bending the hard line was free too.
Making the replacement line was easy enough, nothing too complex in its shape. Reused the union from the distribution block end as it was in perfect condition. Getting it to thread correctly back into the block and tightened down was just as bad as removing it, albeit with slightly less brake fluid involved by this point!
After this, securing and re-assembling the flexi end was fairly straightforward other than the still awful access. Refilled with brake fluid and bled the brakes through.
Somewhat broken, I elected to have a shower and some food before test driving! After all that, I think I would have been borderline suicidal if it hadn't fixed anything.
Thankfully the pull under braking had gone
Warning long post! Very overdue update, I can't believe it has been nearly two years! I still have the C10, and it gets used and fettled intermittently.
Credit where it is due, mechanically it has been near faultless since the last update, the battery being the only failure - I suspect lack of use and deep discharge finished it off, so my own fault really.
Back in May '19, I had just finished replacing the brake flexi-hose, a job so simple in theory and yet which turned out to be so horrific in reality, that I think I am still slightly scarred from the experience!
I crawled back under the truck a few days later and snapped a couple of pictures of the new brake line / union / end of the flexi location. However due to the ease of inserting a thin phone into the location, versus getting a hand holding a spanner in there, and then moving it in a meaningful way, the pictures don't really do the horror of the job justice...
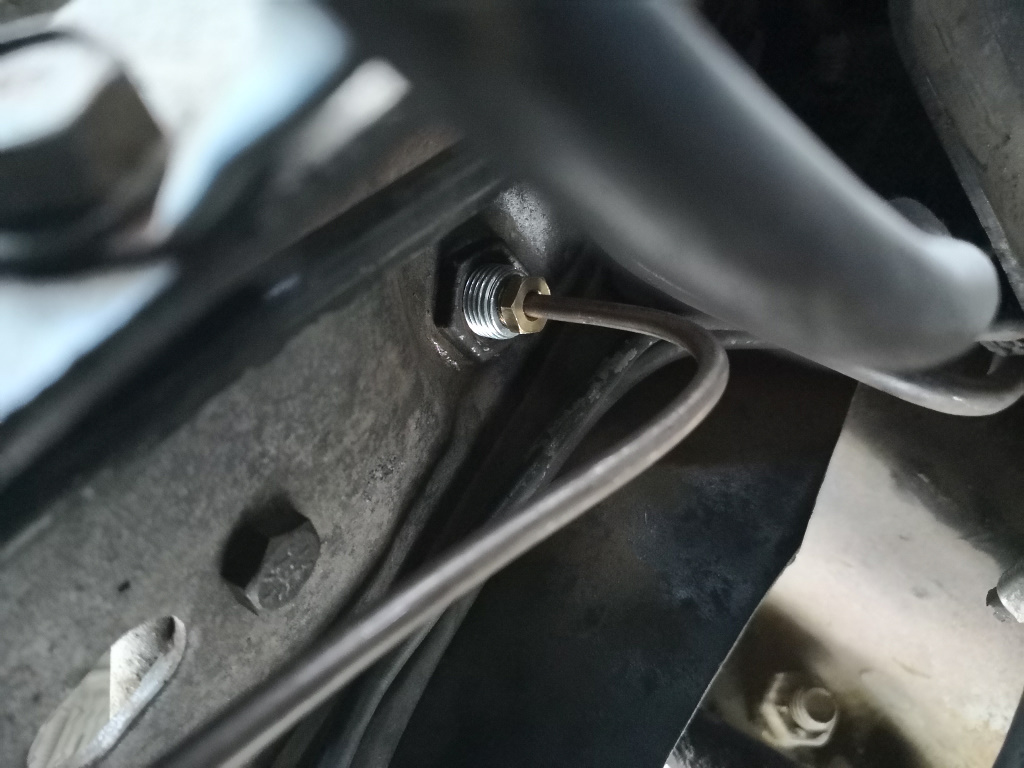
As viewed from the nearest point of reasonable access - just imagine that every thing you see has been positioned in such a way as to thwart the operation of a human-shaped arm and hand in operating a spanner on either the (previously rounded) union, or the lock nut securing the flexi inside the deep C shape chassis section.
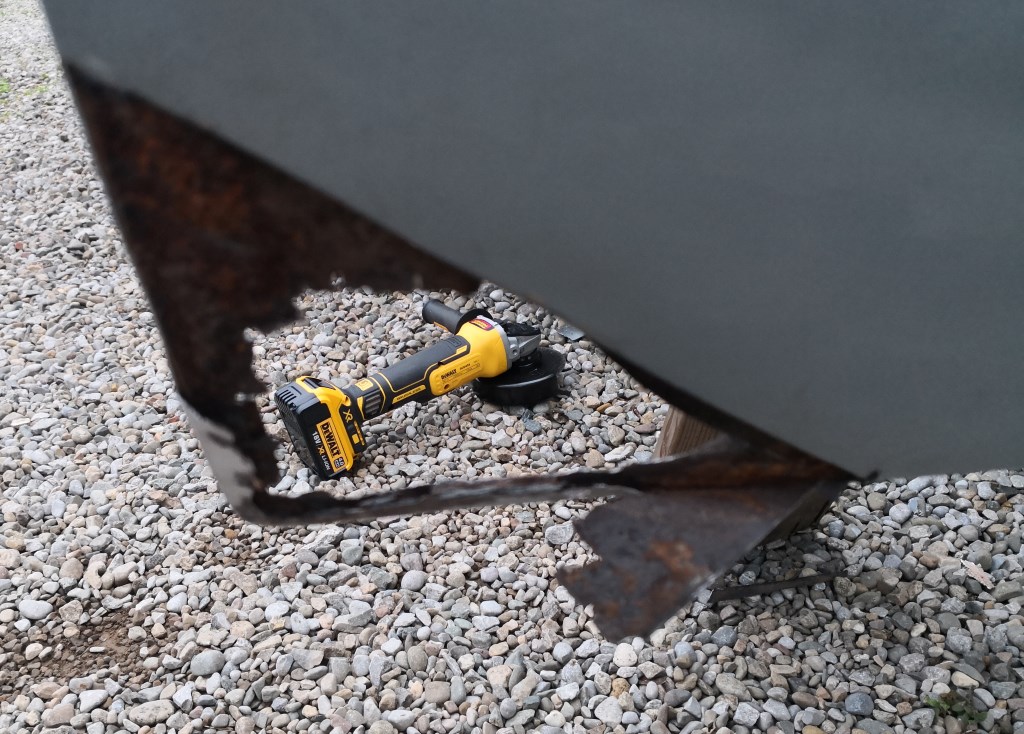
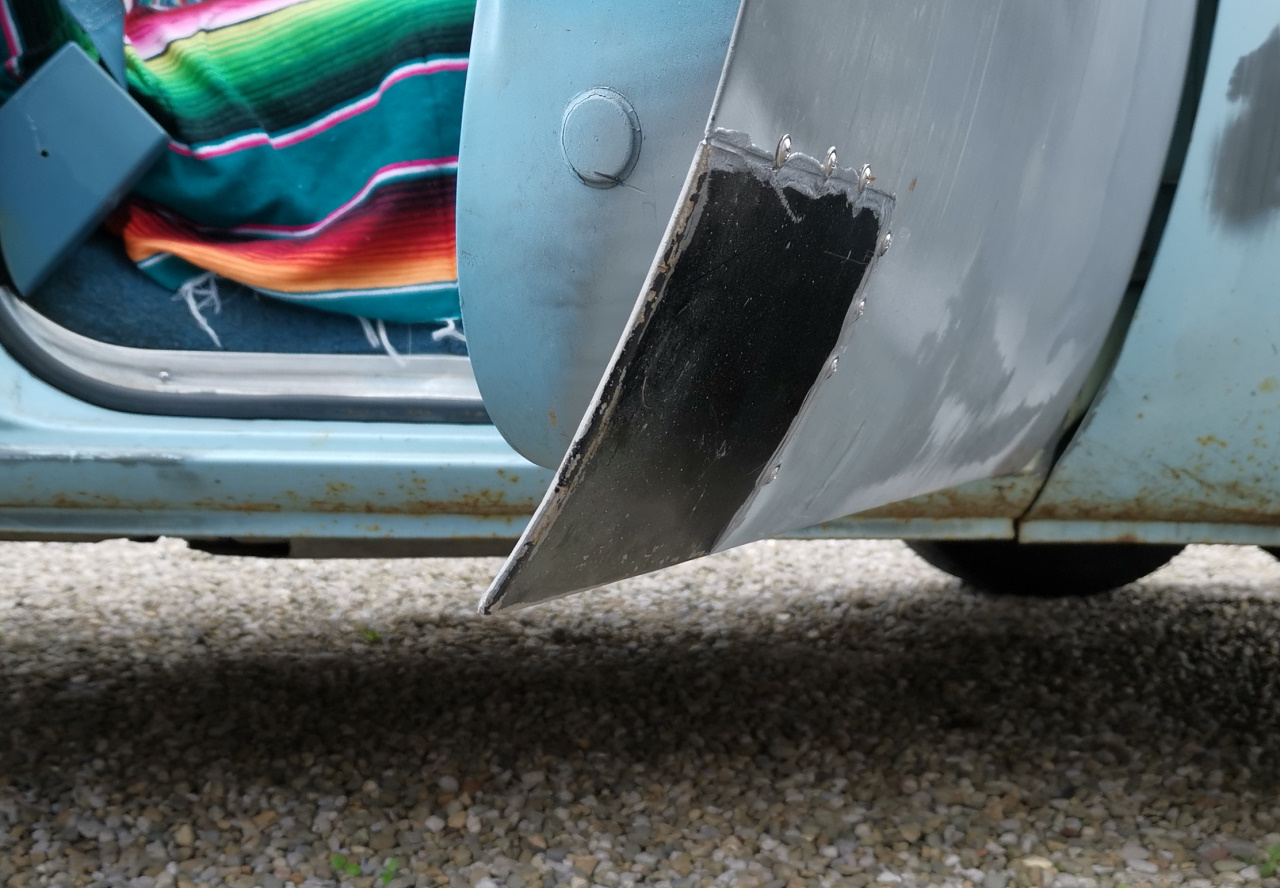
Anyway, moving on, I had previously attacked the lower rear corner of the passenger door with an angle grinder and removed the filler and rust. It stayed like that for quite a while, but eventually I got around to making up a repair section for the inner skin and welded it into place
I haven't done the outer skin yet since the front corner needs similar investigation, but I have obtained a full lower door skin repair section with the correct curve and flanges ready to fold over, so I will decide whether to do the full lower skin or just the corners depending on what I find...
A bit of lockdown DIY saw the truck earning its keep picking up some sheets of plasterboard - ok I didn't exactly push its payload limit but even with a short wheelbase truck this was easier than trying to collect them in an estate car or SUV.
I also needed to recover an old trailer for scrapping, abandoned in the brambles with flat tyres and seized brakes. Since the C10 is the only vehicle I own equipped with a tow bar, I tried to use it for the job.
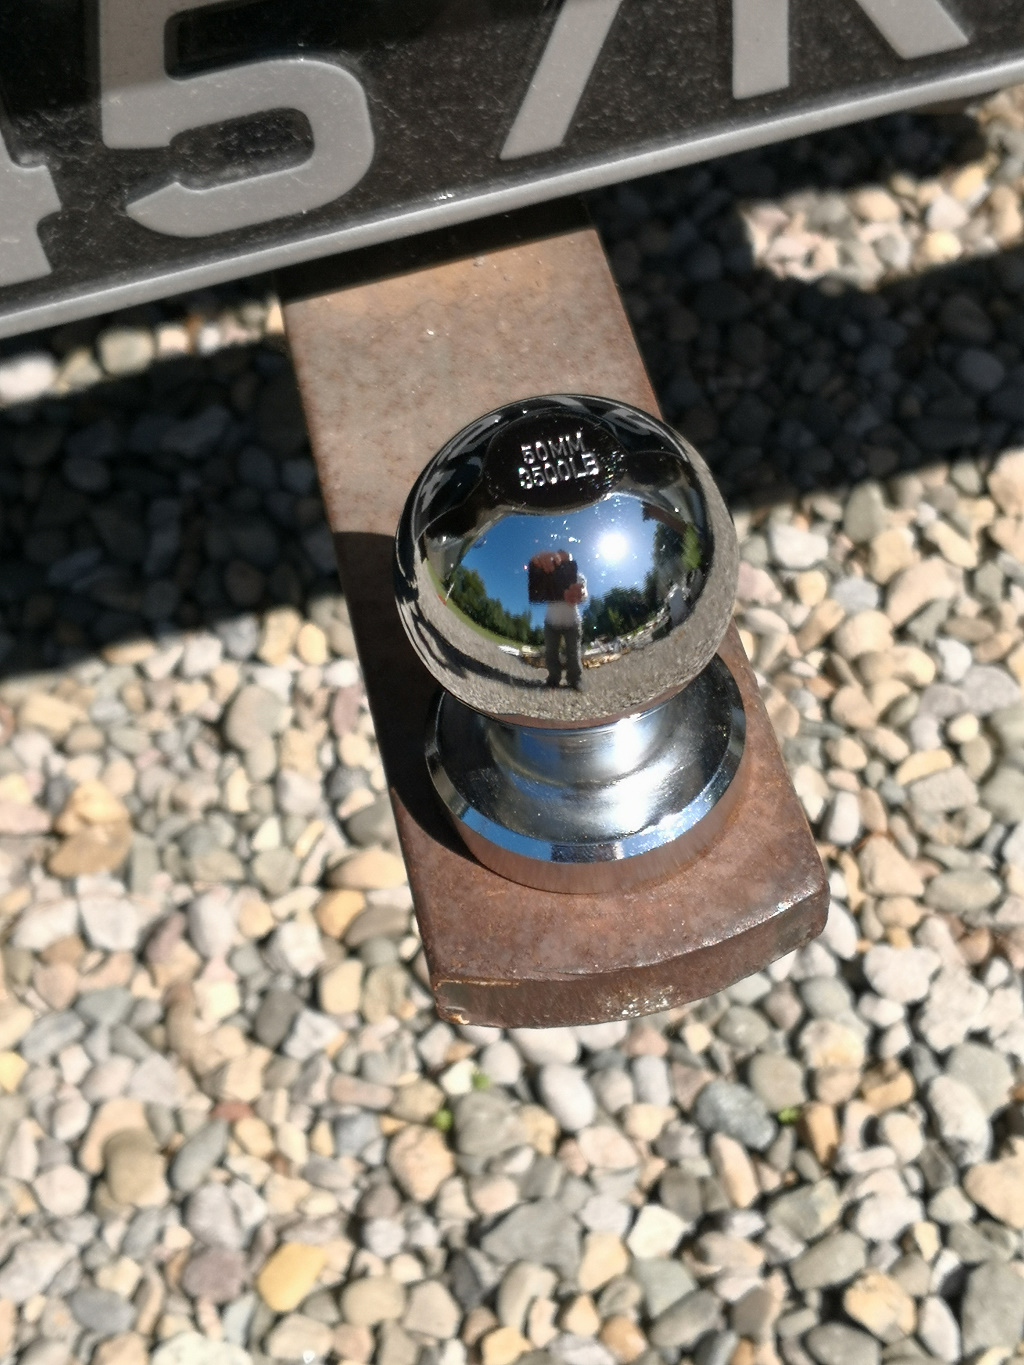
Unfortunately when I tried to hook it up I discovered that the Americans use Imperial sized tow balls and we have Metric. This wouldn't have been too bad had it been the other way around, as the coupling would have still dropped over the ball. As it was, the coupling just perched on top of the ball and came off every time I attempted to drag the trailer from its grave.
The solution was simple and cheap enough, and is undoubtedly the shiniest thing on the truck!
Inspired by someone else's efforts, elsewhere on the 'web, I gave the cab roof a coat of Tung Oil - in an attempt to slow the surface rust there from becoming too deep to treat properly at a future date.
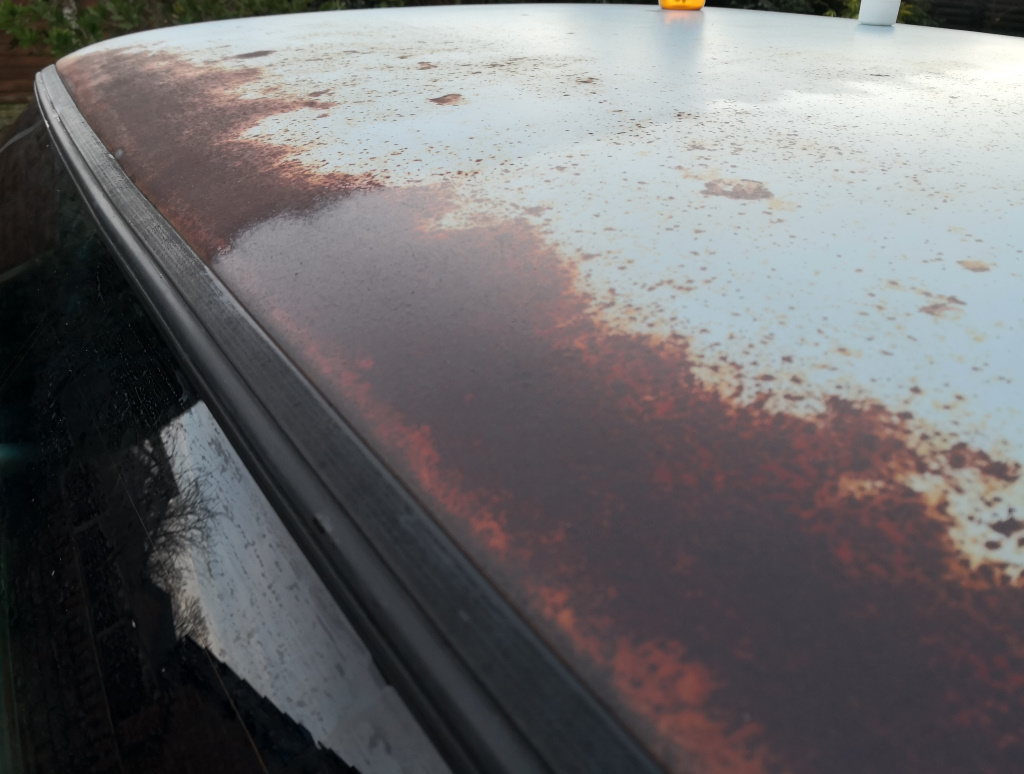
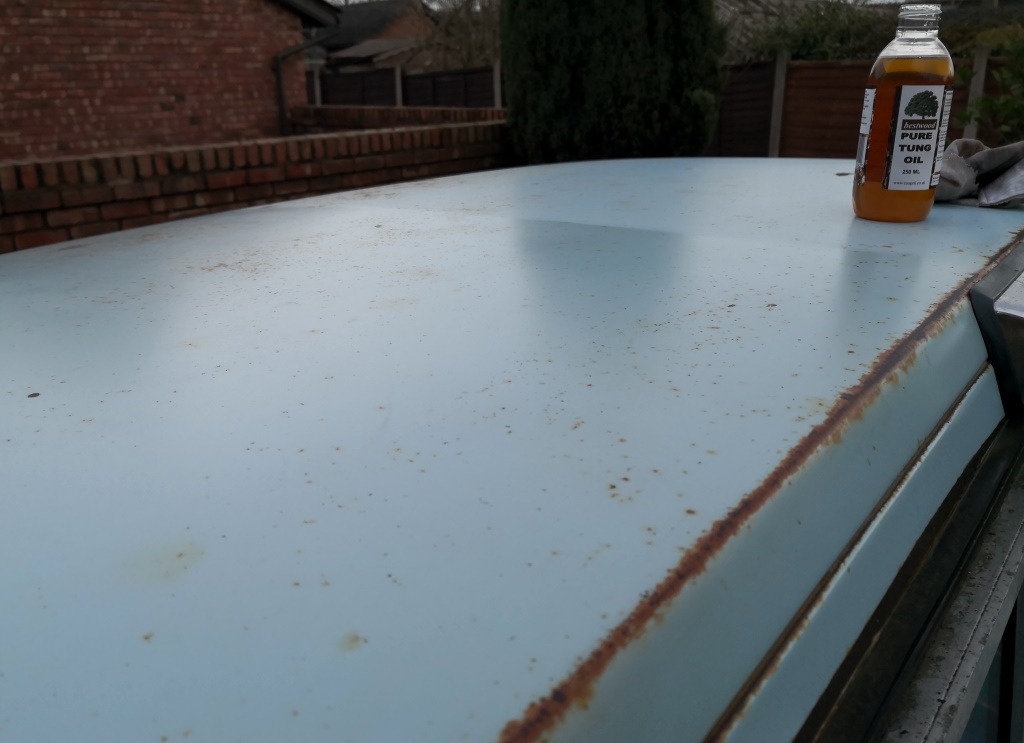
It went on nice and easily, and left a slightly glossy finish to the paint. It also beads a bit when damp, so will keep an eye on it and report on longevity (or otherwise) of the protection it appears to be providing...
Rather more obviously visually, I've been playing with front end options.
As purchased the truck came with a fairly nasty aftermarket "billet" grill, that wasn't billet at all but poorly chromed steel that was rusting through from the inside. After a couple of years in the UK it was deteriorating rapidly.
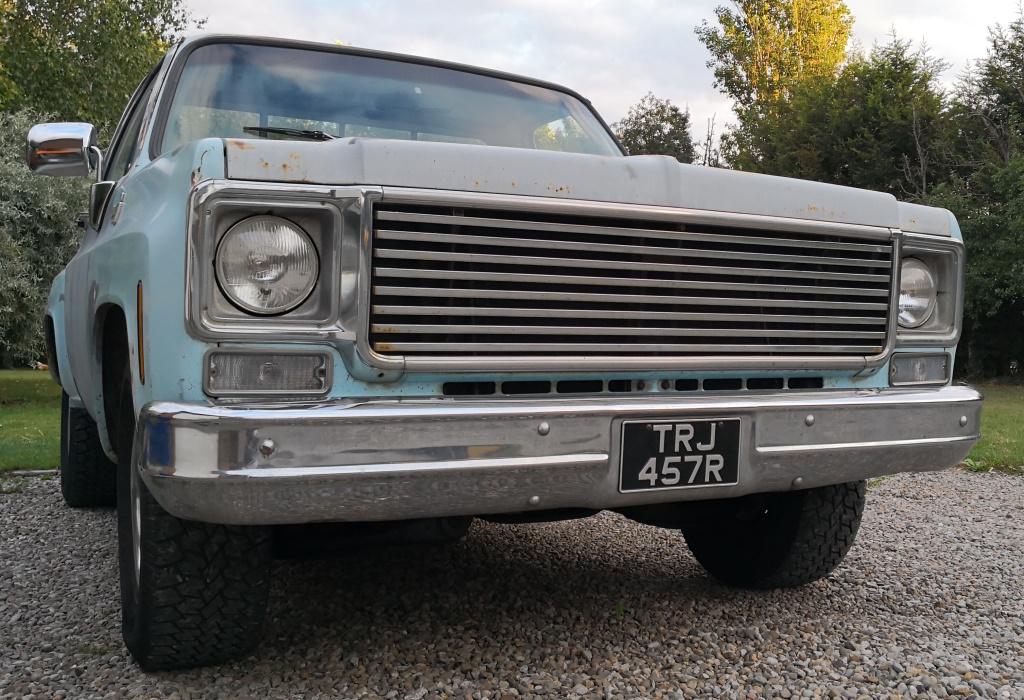
The clear front markers are correct for a '77, but I prefer the look of the earlier trucks with orange markers and as both originals were badly cracked with broken off mounting points, they were an easy first thing to replace with new repop items.
After that I tried painting the rusting grill black, but it looked odd with grey headlamp surrounds, so I blacked them out too. Then I though it looked even odder!!
Third attempt was to order a good used genuine '74 grill to go with the amber markers plus a new repop set of metal support plates needed to mount it on. Light surrounds went back to grey. I'm pretty happy with the OE "facedrop" look now I think.

Most recently, and still ongoing, I am in the process of swapping the standard "idiot light" dash for a factory gauge setup.

In the hopes of doing so I purchased a "working when removed" set of '77 Blazer gauges from a seller in the US complete with the relatively rare "tach" option.
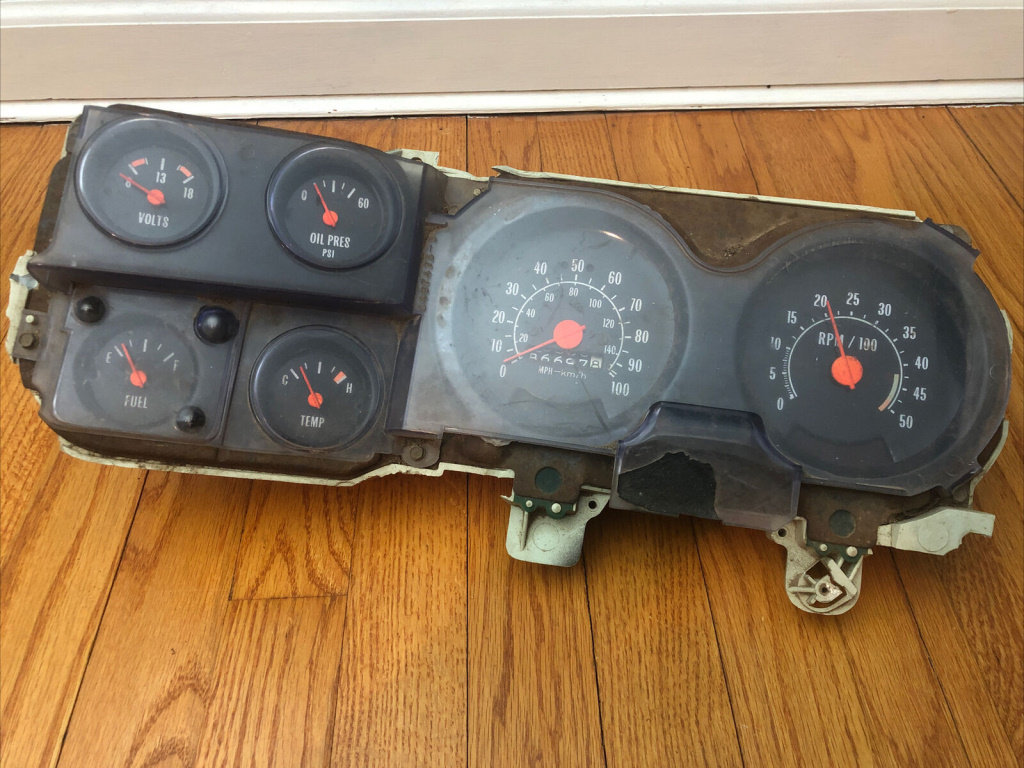
What the vendor failed to mention is that whilst they gauges may well have been working when removed, he then proceeded to store them in either a very wet shed, or a pond!!
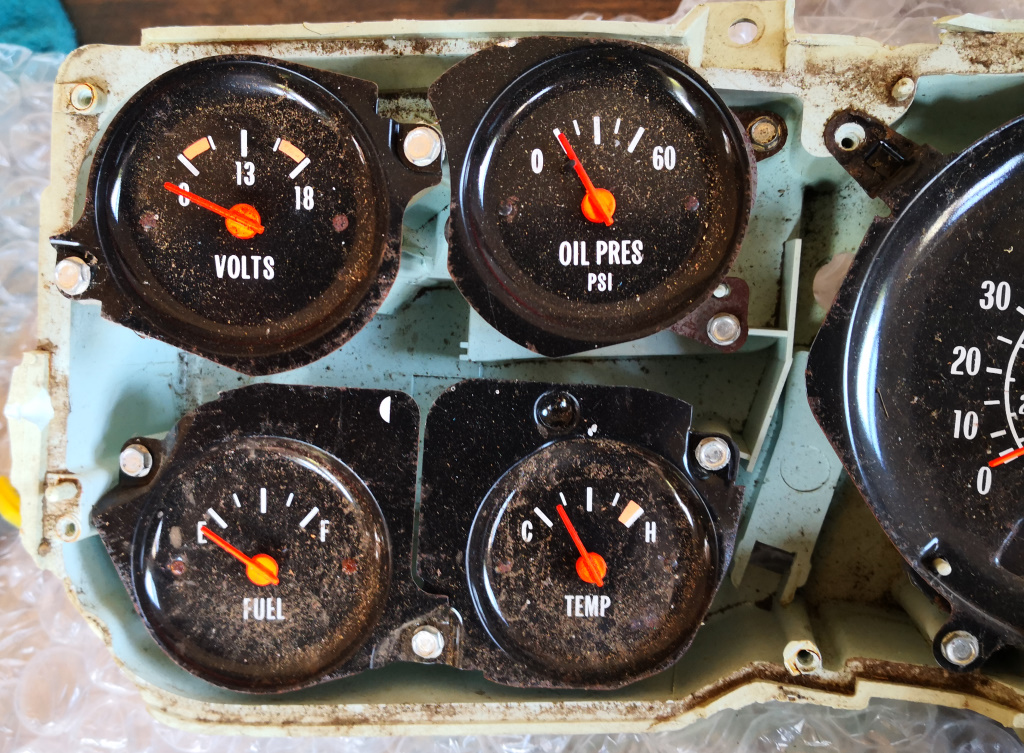
I set about testing the individual gauges and much to my surprise they all worked. The great thing about old Yank stuff like this is that so much is available new, at a price, and plus postage of course. But at least it is available.
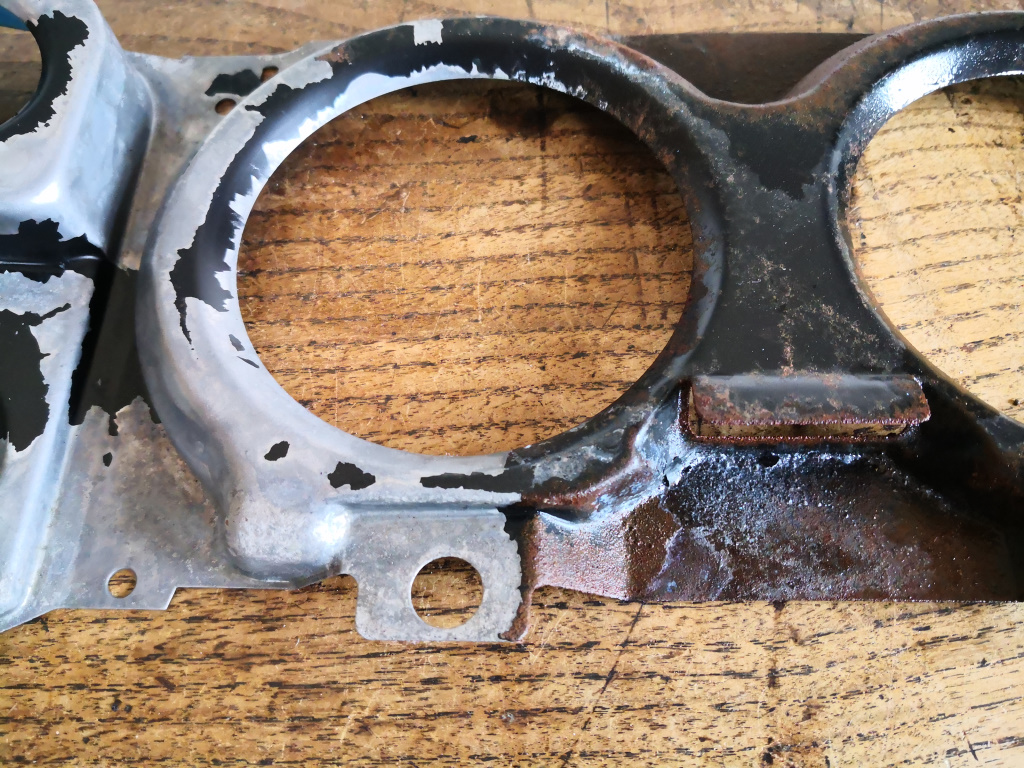
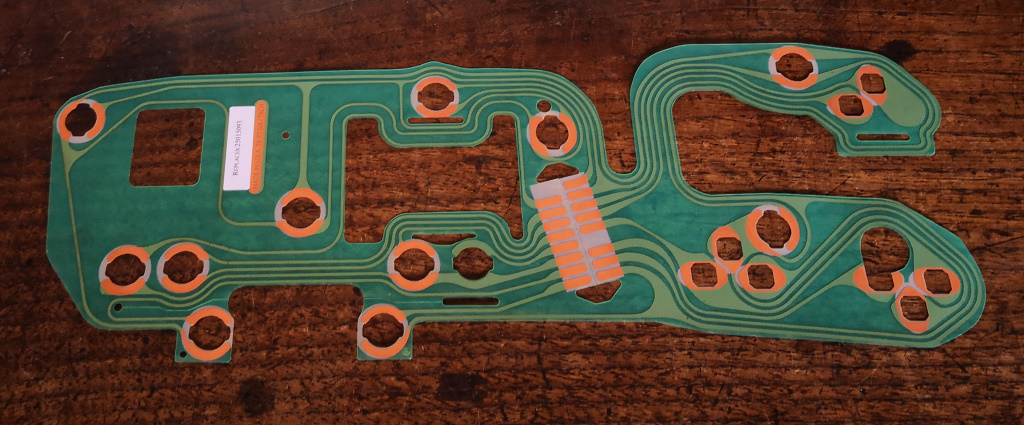
Encouraged, I ordered a new rear plastic mounting plate (as it was missing six out of eight mounting lugs!) and a printed circuit from LMC Truck, and then set about carefully stripping and cleaning what I wanted to keep.
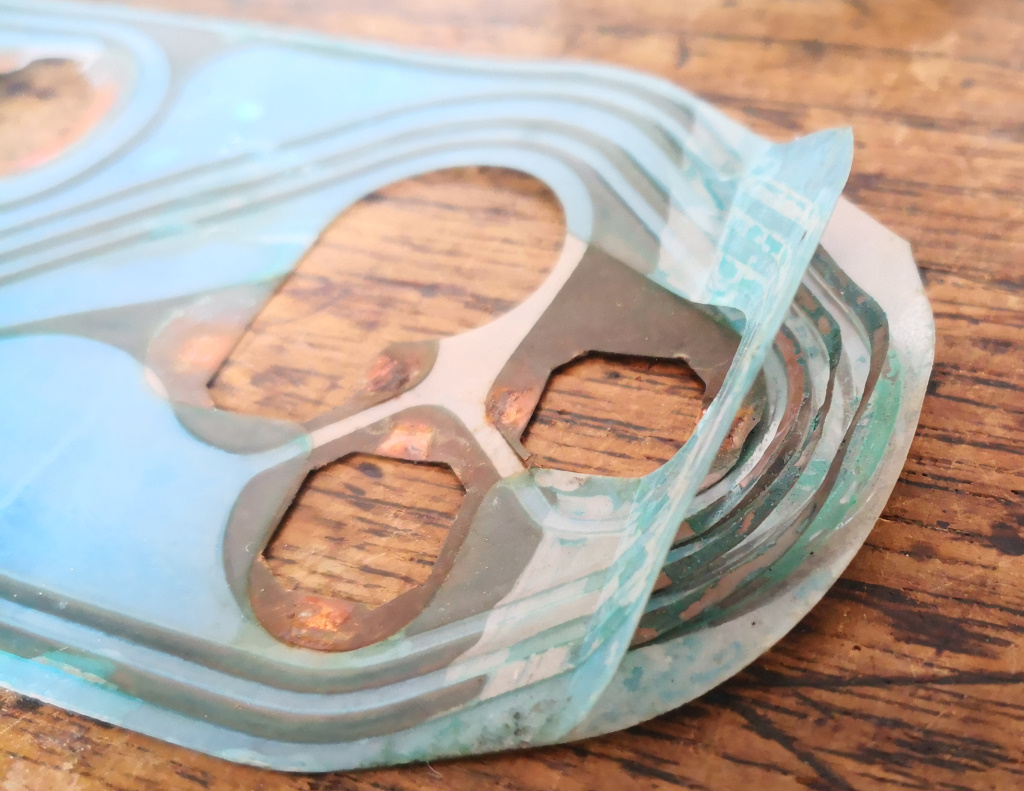
Faceplate half dipped in acid, cleaning up nicely
Polishing up the acrylic lens set - most were probably worse than the "before" in this example but all came up pretty well - certainly good enough not to require buying a new lens.
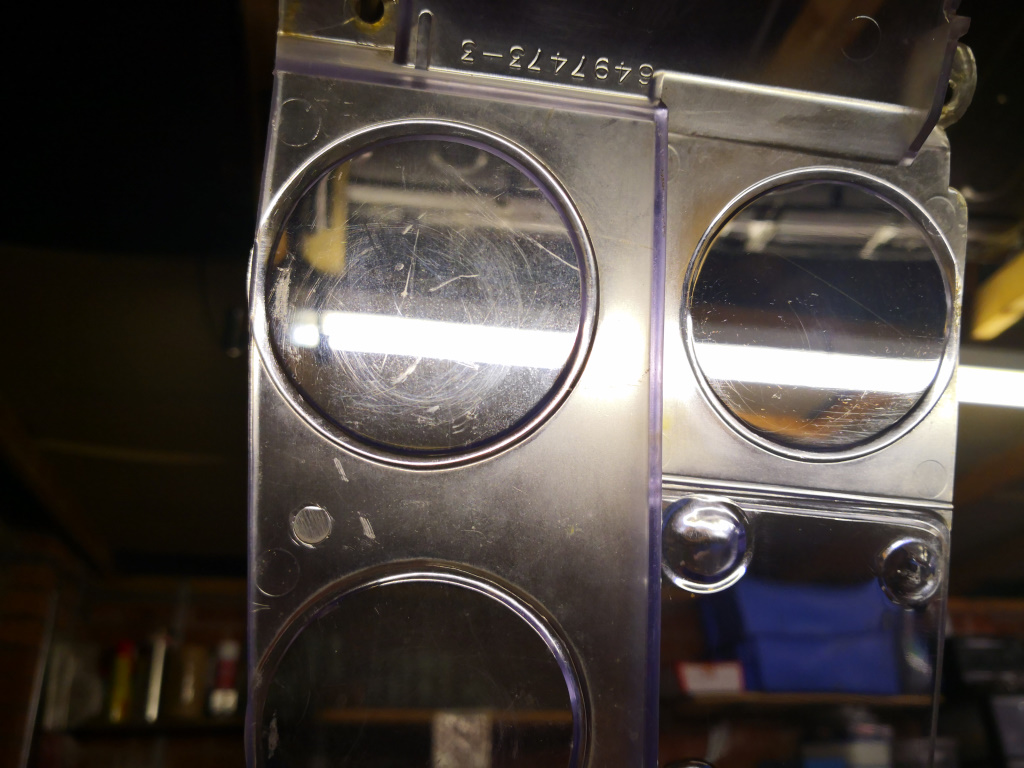
The new bits turned up from LMC - spot the difference(s)...
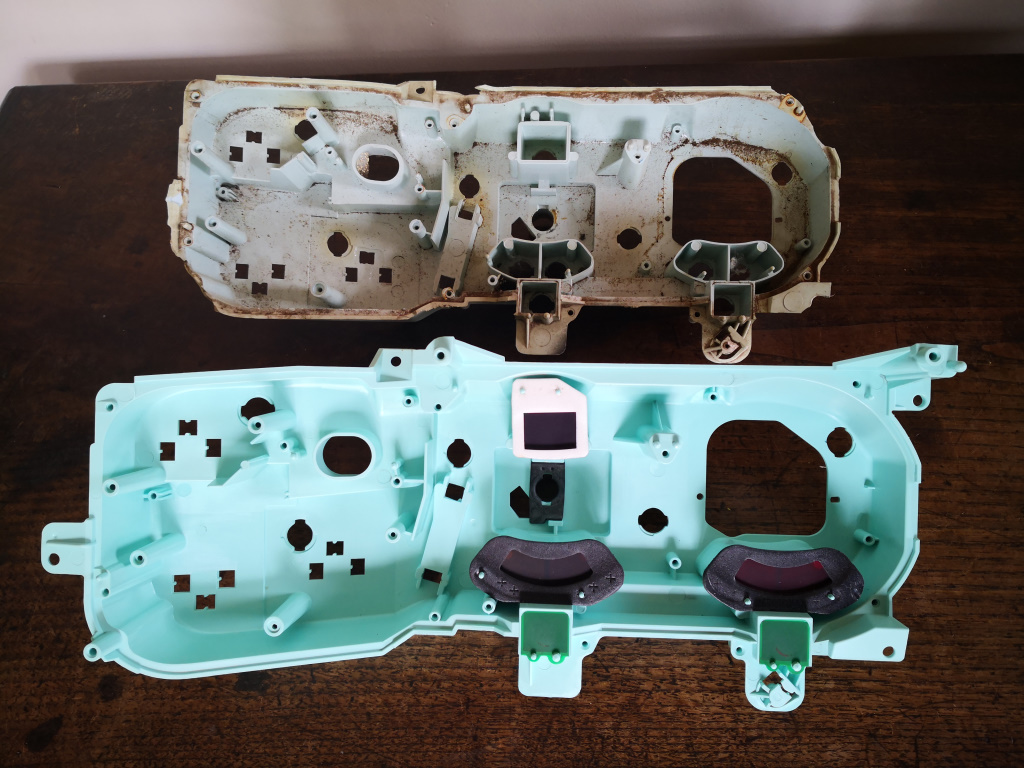
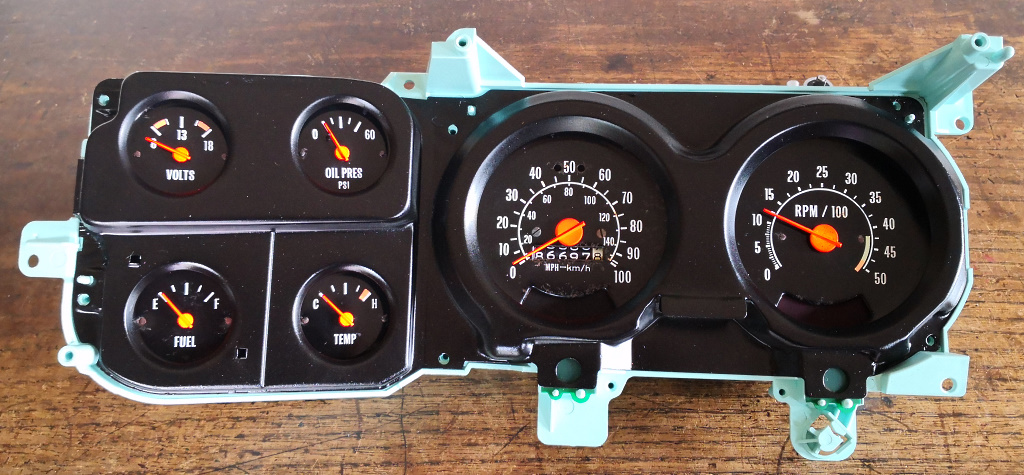
And after a lot of careful cleaning, some paint and reassembly it is looking a lot better (lens not yet fitted below)
I did consider replacing all of the bulbs whilst I had it apart. However I tested the original bulbs from both sets of gauges, only to find that out of sixteen forty-four year old bulbs, all sixteen still worked perfectly! Decided to take a chance that they may be more reliable than anything modern I could replace them with...
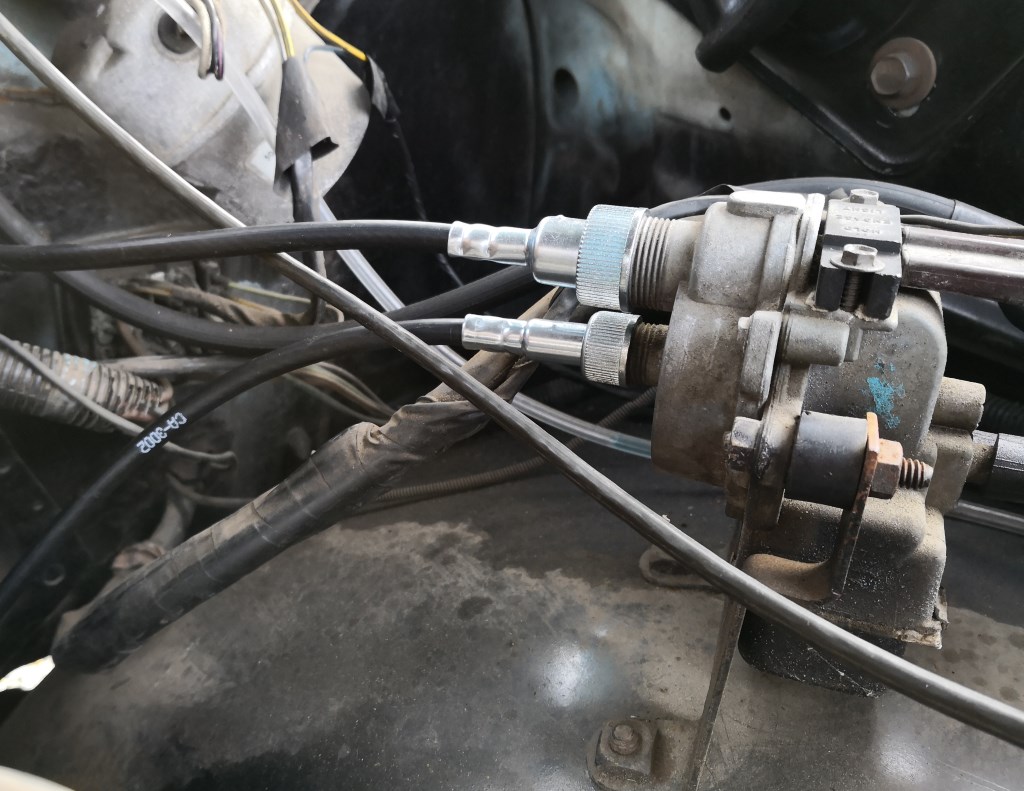
Making the gauges work in the truck isn't plug and play unfortunately.
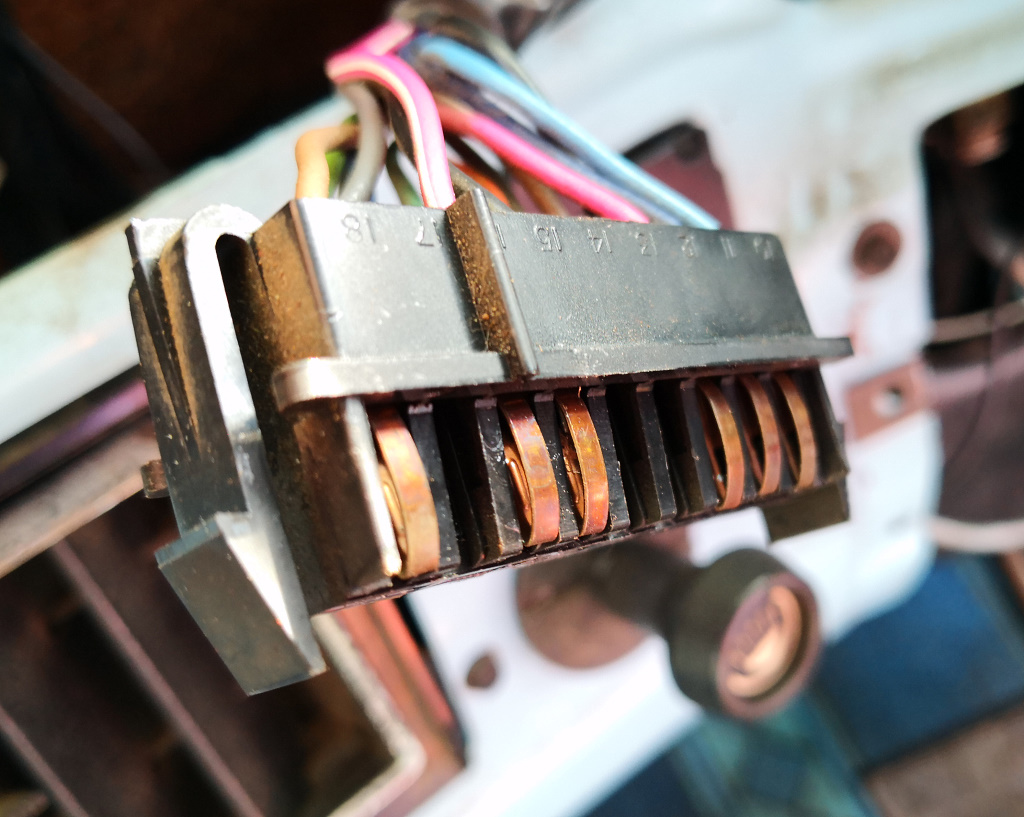
A good few of the wires in the connector need to be repositioned, hopefully they should release from the plug by pressing down a small tab on each wire connector with a small screwdriver. I'll also need to run new wires for power, ground and feed for the tach, which should be simple enough.
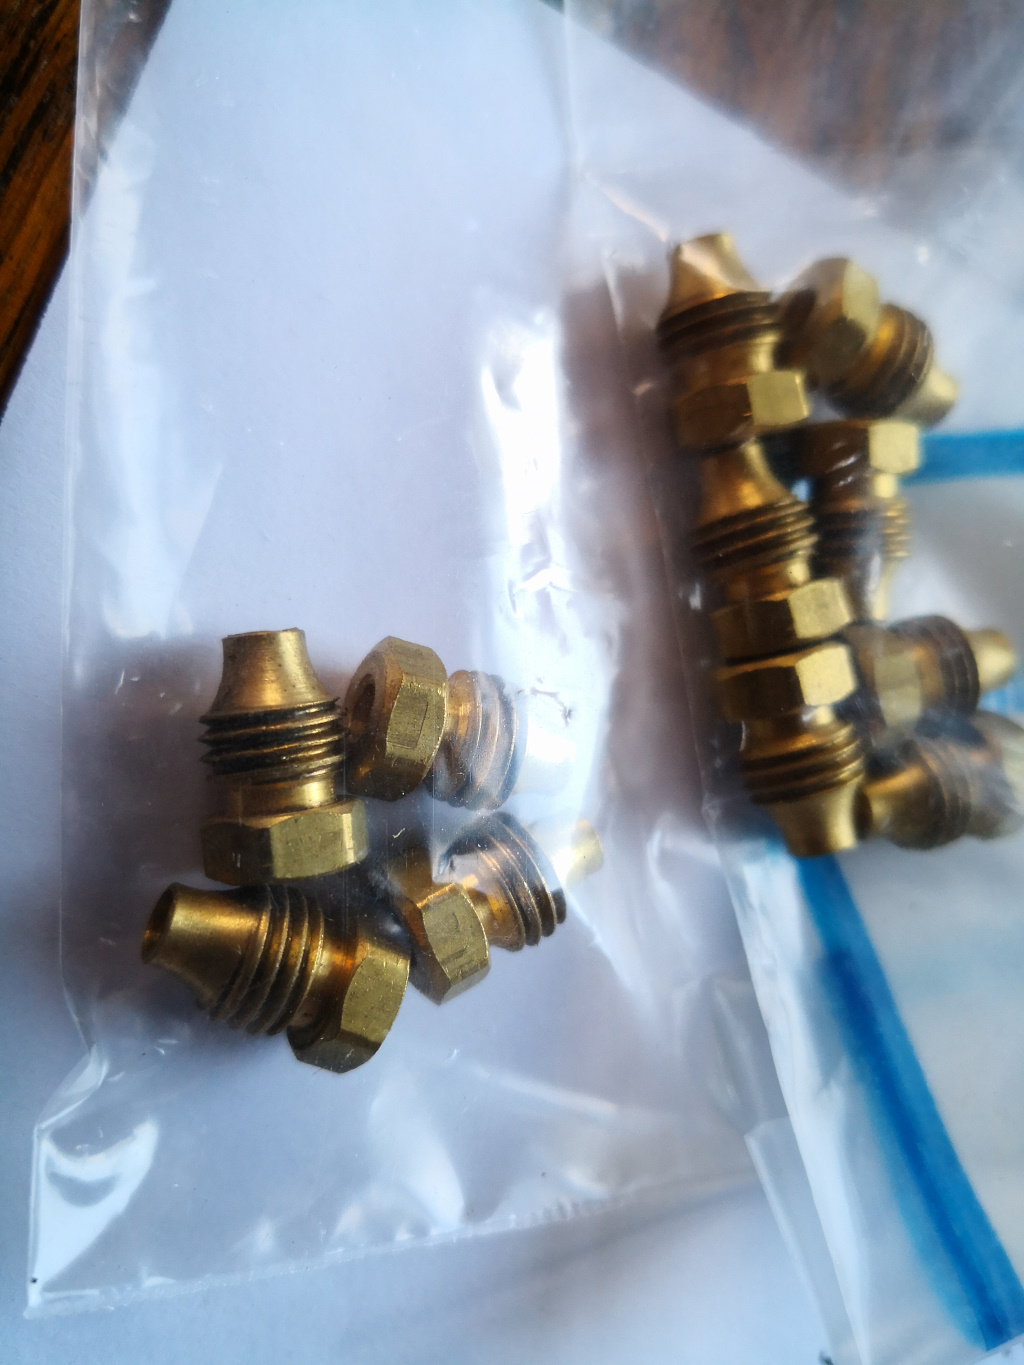
The oil pressure gauge is mechanical so I've ordered a feed line kit for that.
The temp sensor for the idiot light (off-on switch type) needed to be replaced with a correct sensor for the gauge - $4 from Rockauto and even with their cheapest postage it arrived in barely over 48 hours
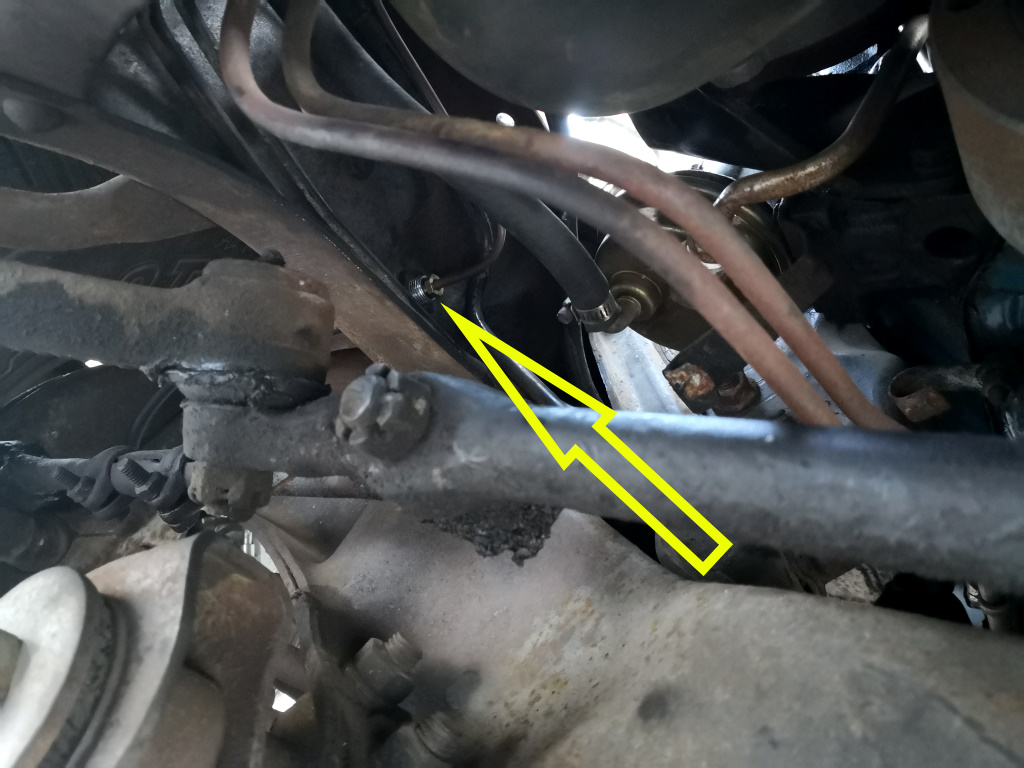
Fitting it was not fun however, as it was located in the head, between two spark plugs and behind the exhaust manifold and below the air-con compressor! Pretty much where the arrow points...
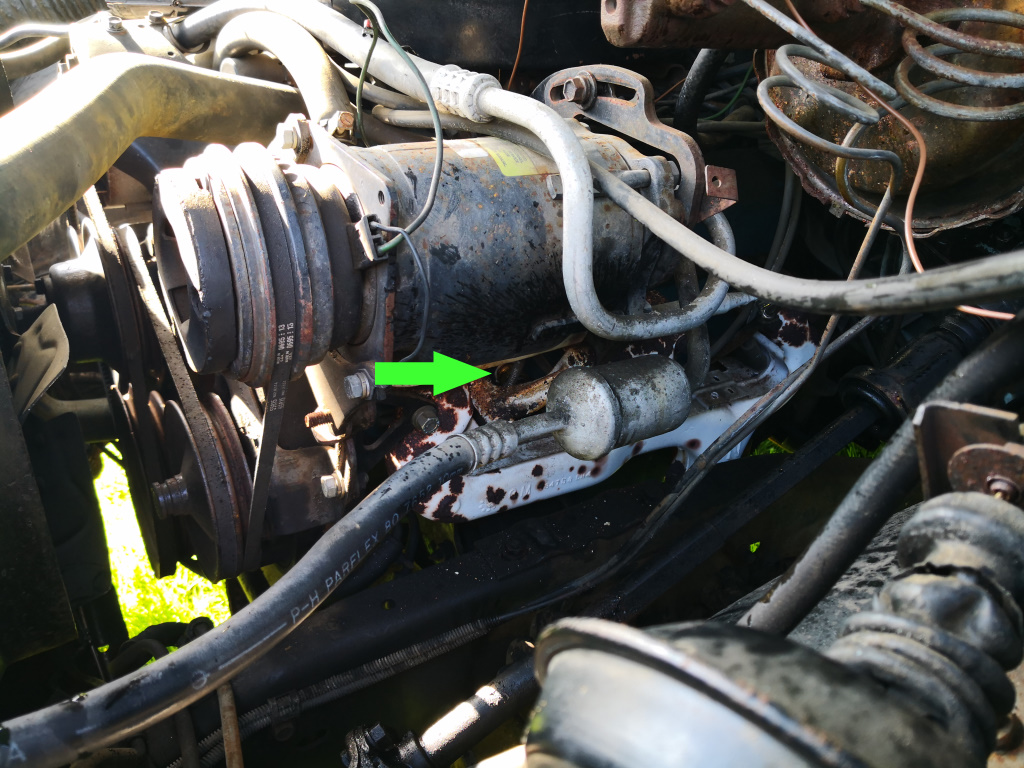
The thought of accessing it brought my anxiety levels right back up to brake union levels where I started this post!! Fortunately, a deep socket, a short extension and a breaker bar with UJ head was just right to sneak under the manifold and get onto the little blighter!
Hope to get the gauges in and working as soon as the oil line arrives...
Credit where it is due, mechanically it has been near faultless since the last update, the battery being the only failure - I suspect lack of use and deep discharge finished it off, so my own fault really.
Back in May '19, I had just finished replacing the brake flexi-hose, a job so simple in theory and yet which turned out to be so horrific in reality, that I think I am still slightly scarred from the experience!
I crawled back under the truck a few days later and snapped a couple of pictures of the new brake line / union / end of the flexi location. However due to the ease of inserting a thin phone into the location, versus getting a hand holding a spanner in there, and then moving it in a meaningful way, the pictures don't really do the horror of the job justice...
As viewed from the nearest point of reasonable access - just imagine that every thing you see has been positioned in such a way as to thwart the operation of a human-shaped arm and hand in operating a spanner on either the (previously rounded) union, or the lock nut securing the flexi inside the deep C shape chassis section.
Anyway, moving on, I had previously attacked the lower rear corner of the passenger door with an angle grinder and removed the filler and rust. It stayed like that for quite a while, but eventually I got around to making up a repair section for the inner skin and welded it into place
I haven't done the outer skin yet since the front corner needs similar investigation, but I have obtained a full lower door skin repair section with the correct curve and flanges ready to fold over, so I will decide whether to do the full lower skin or just the corners depending on what I find...
A bit of lockdown DIY saw the truck earning its keep picking up some sheets of plasterboard - ok I didn't exactly push its payload limit but even with a short wheelbase truck this was easier than trying to collect them in an estate car or SUV.
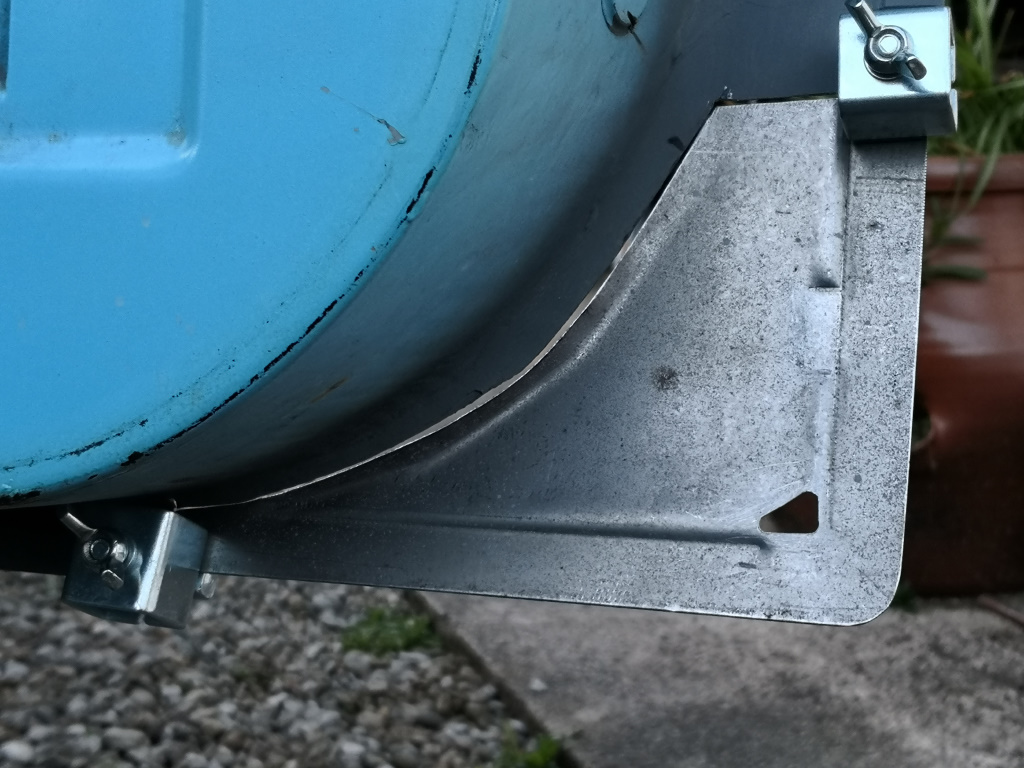
I also needed to recover an old trailer for scrapping, abandoned in the brambles with flat tyres and seized brakes. Since the C10 is the only vehicle I own equipped with a tow bar, I tried to use it for the job.
Unfortunately when I tried to hook it up I discovered that the Americans use Imperial sized tow balls and we have Metric. This wouldn't have been too bad had it been the other way around, as the coupling would have still dropped over the ball. As it was, the coupling just perched on top of the ball and came off every time I attempted to drag the trailer from its grave.
The solution was simple and cheap enough, and is undoubtedly the shiniest thing on the truck!
Inspired by someone else's efforts, elsewhere on the 'web, I gave the cab roof a coat of Tung Oil - in an attempt to slow the surface rust there from becoming too deep to treat properly at a future date.
It went on nice and easily, and left a slightly glossy finish to the paint. It also beads a bit when damp, so will keep an eye on it and report on longevity (or otherwise) of the protection it appears to be providing...
Rather more obviously visually, I've been playing with front end options.
As purchased the truck came with a fairly nasty aftermarket "billet" grill, that wasn't billet at all but poorly chromed steel that was rusting through from the inside. After a couple of years in the UK it was deteriorating rapidly.
The clear front markers are correct for a '77, but I prefer the look of the earlier trucks with orange markers and as both originals were badly cracked with broken off mounting points, they were an easy first thing to replace with new repop items.
After that I tried painting the rusting grill black, but it looked odd with grey headlamp surrounds, so I blacked them out too. Then I though it looked even odder!!
Third attempt was to order a good used genuine '74 grill to go with the amber markers plus a new repop set of metal support plates needed to mount it on. Light surrounds went back to grey. I'm pretty happy with the OE "facedrop" look now I think.
Most recently, and still ongoing, I am in the process of swapping the standard "idiot light" dash for a factory gauge setup.
In the hopes of doing so I purchased a "working when removed" set of '77 Blazer gauges from a seller in the US complete with the relatively rare "tach" option.
What the vendor failed to mention is that whilst they gauges may well have been working when removed, he then proceeded to store them in either a very wet shed, or a pond!!
I set about testing the individual gauges and much to my surprise they all worked. The great thing about old Yank stuff like this is that so much is available new, at a price, and plus postage of course. But at least it is available.
Encouraged, I ordered a new rear plastic mounting plate (as it was missing six out of eight mounting lugs!) and a printed circuit from LMC Truck, and then set about carefully stripping and cleaning what I wanted to keep.
Faceplate half dipped in acid, cleaning up nicely
Polishing up the acrylic lens set - most were probably worse than the "before" in this example but all came up pretty well - certainly good enough not to require buying a new lens.
The new bits turned up from LMC - spot the difference(s)...
And after a lot of careful cleaning, some paint and reassembly it is looking a lot better (lens not yet fitted below)
I did consider replacing all of the bulbs whilst I had it apart. However I tested the original bulbs from both sets of gauges, only to find that out of sixteen forty-four year old bulbs, all sixteen still worked perfectly! Decided to take a chance that they may be more reliable than anything modern I could replace them with...
Making the gauges work in the truck isn't plug and play unfortunately.
A good few of the wires in the connector need to be repositioned, hopefully they should release from the plug by pressing down a small tab on each wire connector with a small screwdriver. I'll also need to run new wires for power, ground and feed for the tach, which should be simple enough.
The oil pressure gauge is mechanical so I've ordered a feed line kit for that.
The temp sensor for the idiot light (off-on switch type) needed to be replaced with a correct sensor for the gauge - $4 from Rockauto and even with their cheapest postage it arrived in barely over 48 hours
Fitting it was not fun however, as it was located in the head, between two spark plugs and behind the exhaust manifold and below the air-con compressor! Pretty much where the arrow points...
The thought of accessing it brought my anxiety levels right back up to brake union levels where I started this post!!
Fortunately, a deep socket, a short extension and a breaker bar with UJ head was just right to sneak under the manifold and get onto the little blighter!Hope to get the gauges in and working as soon as the oil line arrives...
A few days after ordering the feed line kit for the oil pressure gauge, the vendor advised me that they were out of stock and had no ETA, which was slightly frustrating.
A bit of research revealed that the connector needed for the back of the gauge was a Weatherhead 6100X2 compression sleeve nut, but I struggled to find anyone holding UK stock, although Pirtek said they could obtain them, with a minimum order of 50, in around three to four weeks. I said I would give it some thought.
Searched a little further afield and found an aerospace supplier in Germany who claimed to have some in stock, for pennies each, although the postage was a little steep. Given that the postage was going to represent 98% of the cost, I ordered their entire stock of 12, thinking I could always pass the surplus ones on to anyone needing them.
My order was accepted, a dispatch date supplied and then I waited, and waited. And waited some more. Tried to chase it up with the supplier several times, no response. Dug a little deeper and found a Facebook page filled with recent complaints about the company, lack of goods, lack of comms etc.
Assumed the worst with regard to my parts and money, and bit the bullet - asked Pirtek to supply, which they duly did in around the timeframe they estimated.
At around the same time as Pirtek were getting the connectors into stock, I received a package (literally months late) from Germany...
I now have sixty-two of these little buggers, minus the one I needed
Anyway, this at least allowed me to finish off the gauges install with them all working correctly
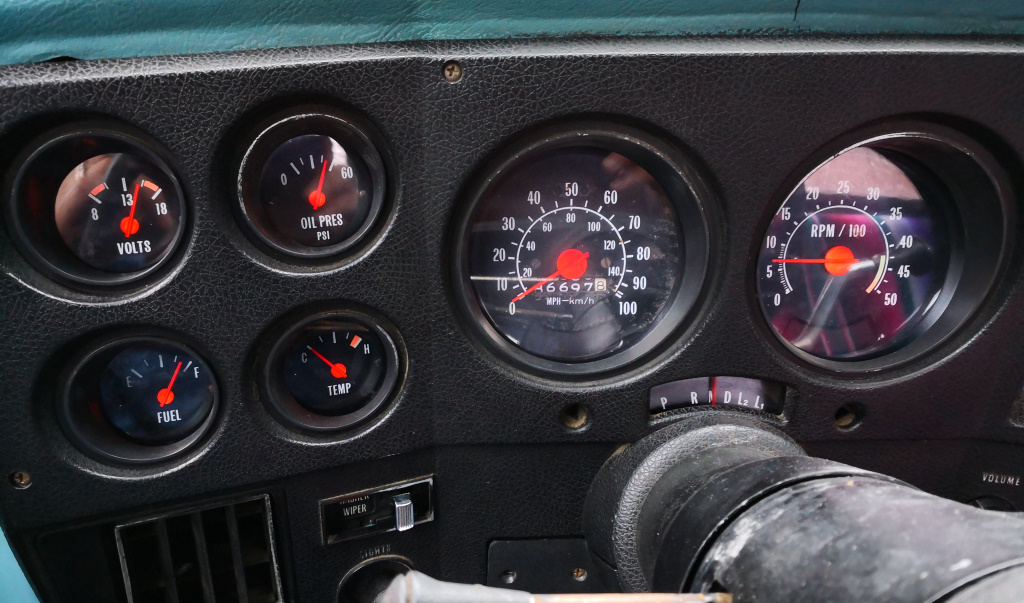
For one week. Then the very recent replacement speedometer cable tied itself in a knot internally and snapped. Sigh.
I'll fix it at some point but for now I've stuck a very antique "Road Angel" GPS to the top of the dash, so I've at least got a speed read out.
A bit more summer DIY proved once again that the short bed is entirely inadequate for almost anything involving building materials!
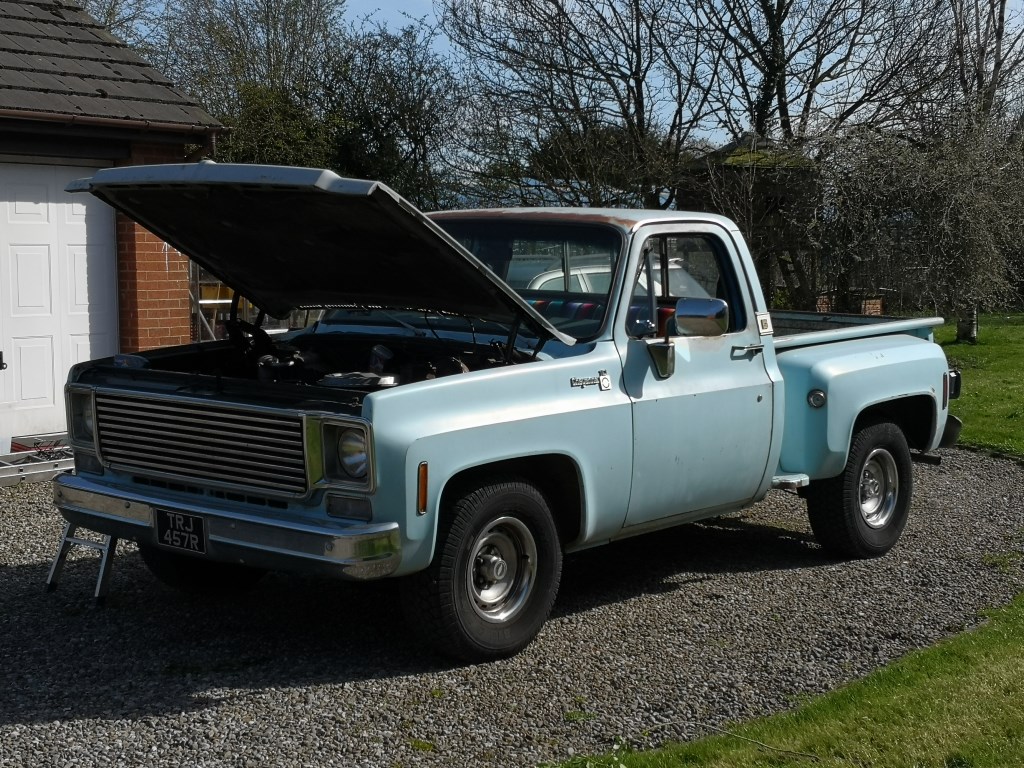
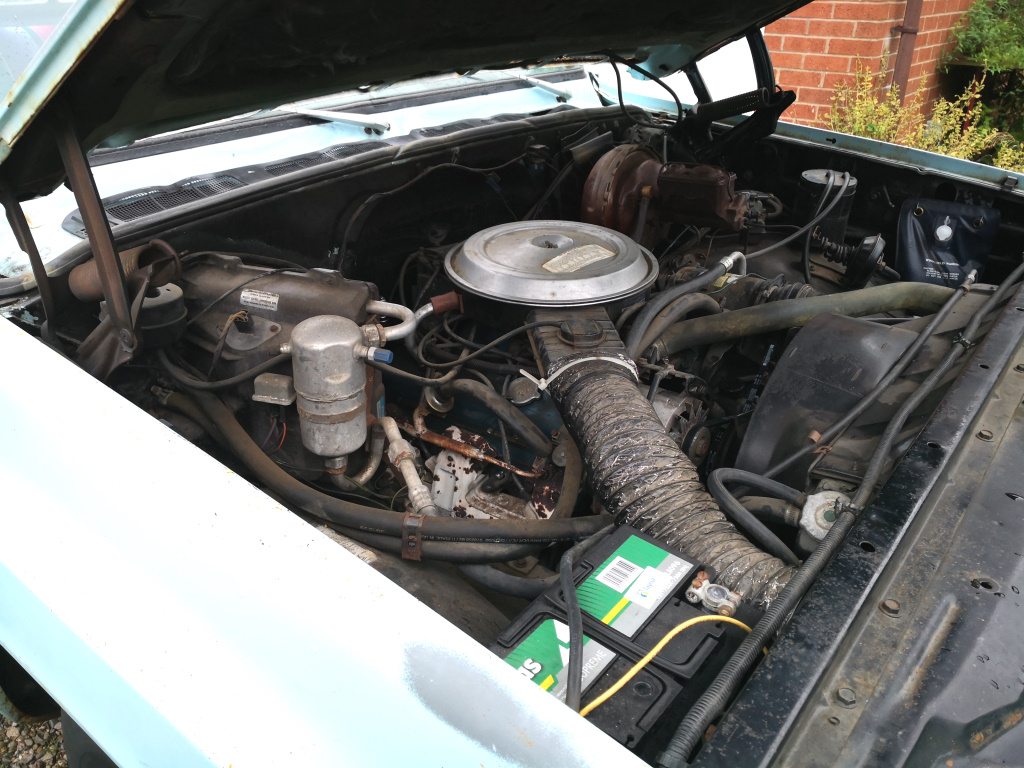
For the first time in my ownership, I had reason to remove the air cleaner (I wanted to reduce the high idle speed when the auto choke was engaged, which I duly did)
With the lid off the air cleaner, I was amused to find this...
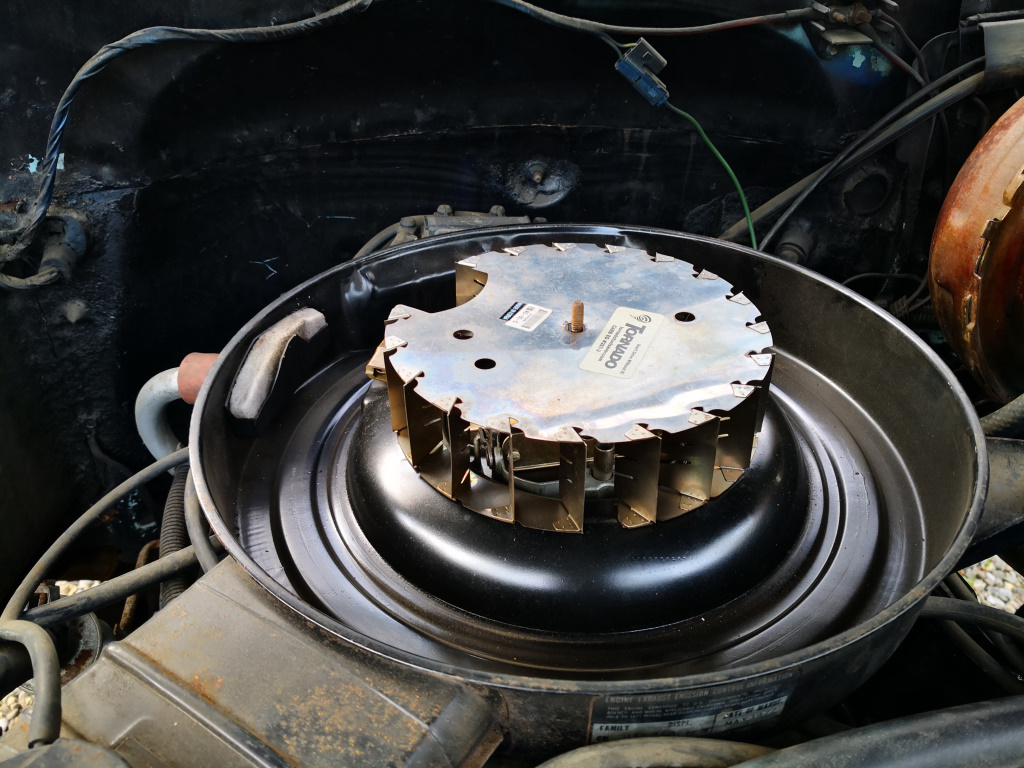
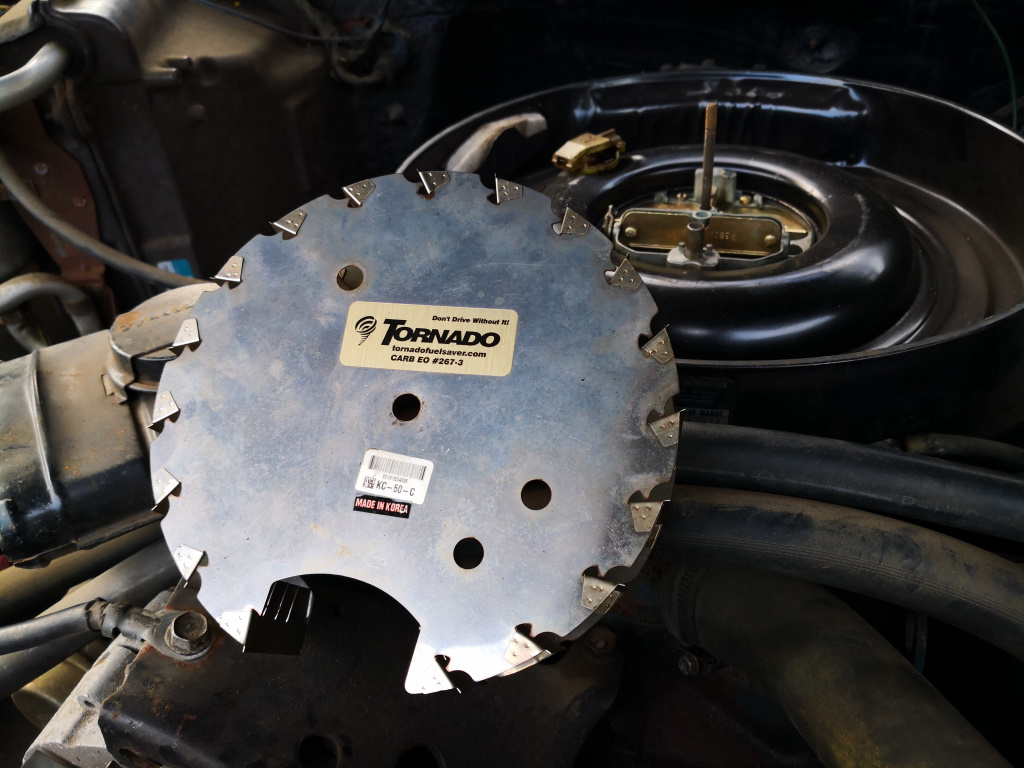
Well at least that explains the combination of raging horsepower AND extreme frugality that the c10 has been exhibiting all these years
On the basis of "if it ain't broke..." I put it back and buttoned the air cleaner back up.
Whilst running the engine with the bonnet open, I heard and noticed that the drive belts were looking a little "flappy" in operation. Further inspection revealed them to be quite slack but also in no condition to take additional tension
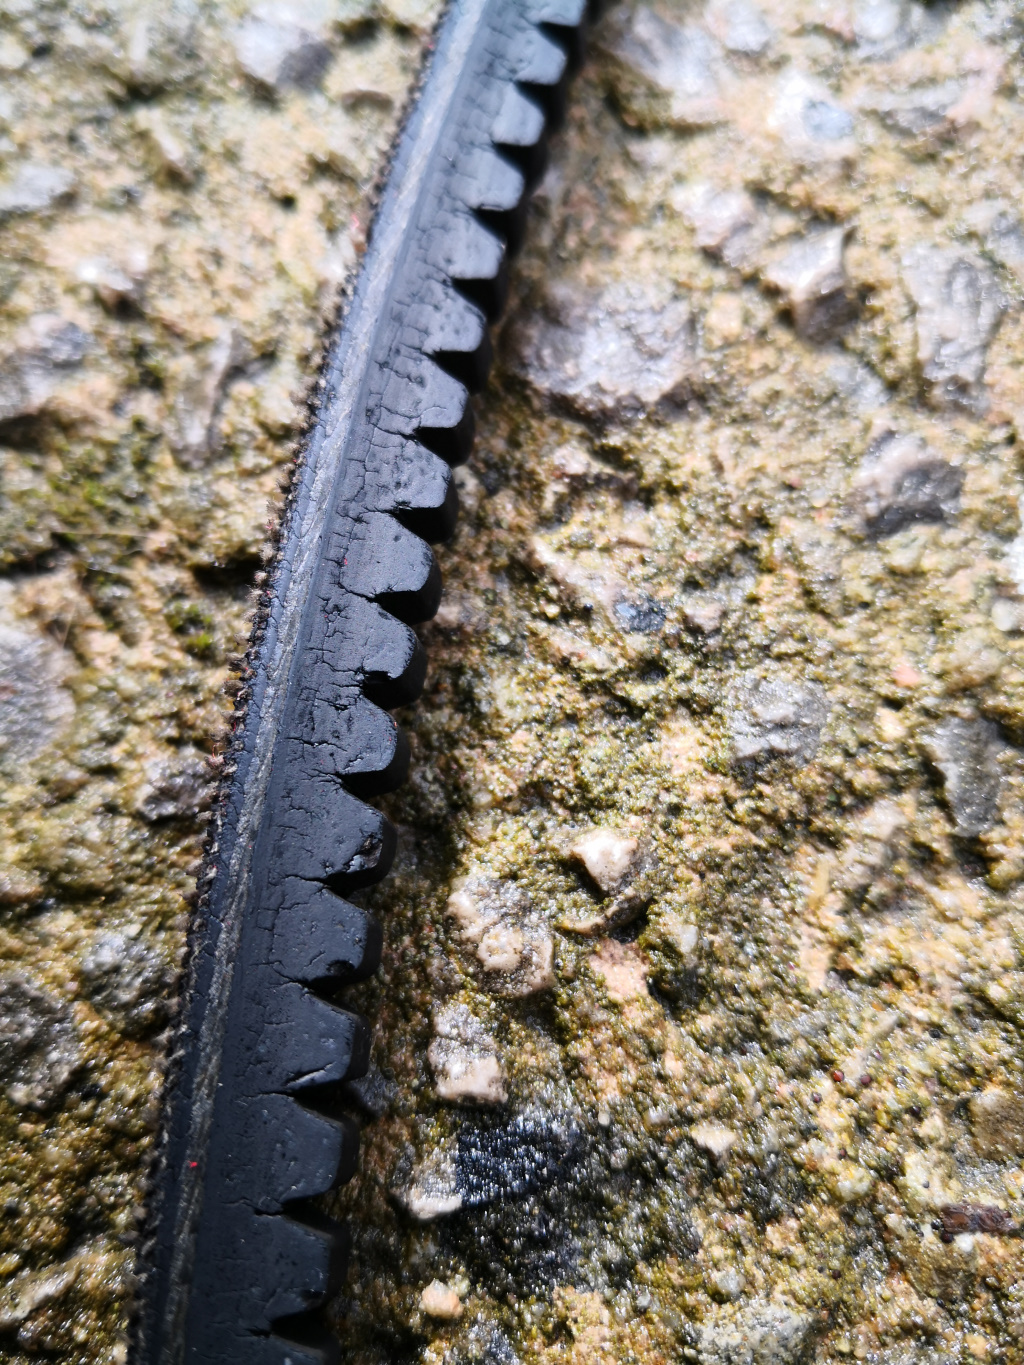
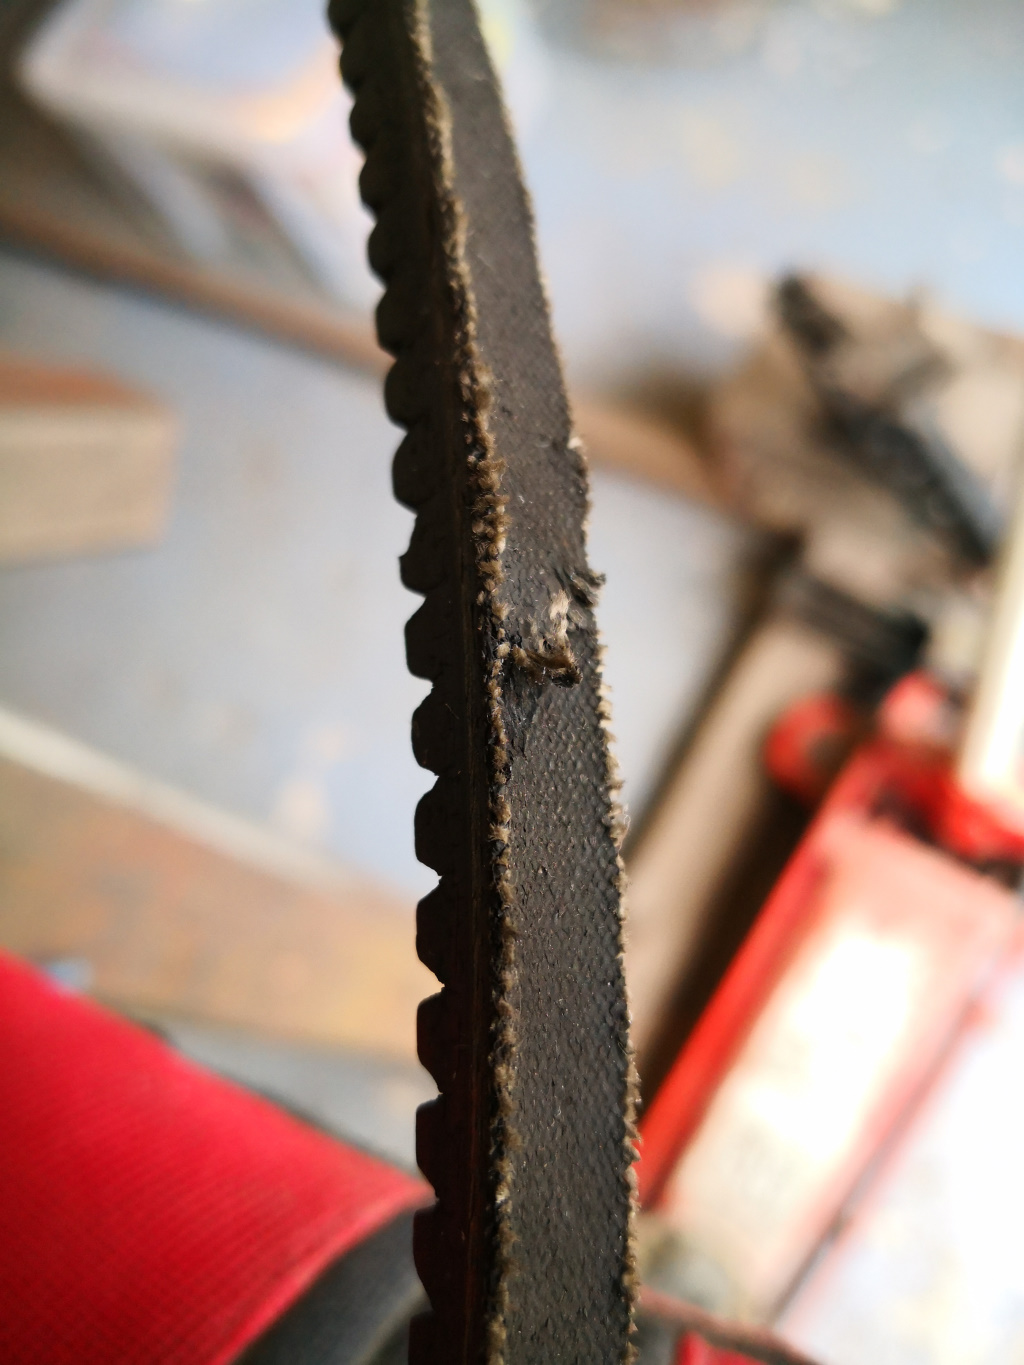
Fortunately, access is a doddle so they were quickly removed, measured and matched up to suitable items on Rockauto, which turned up very promptly as usual.
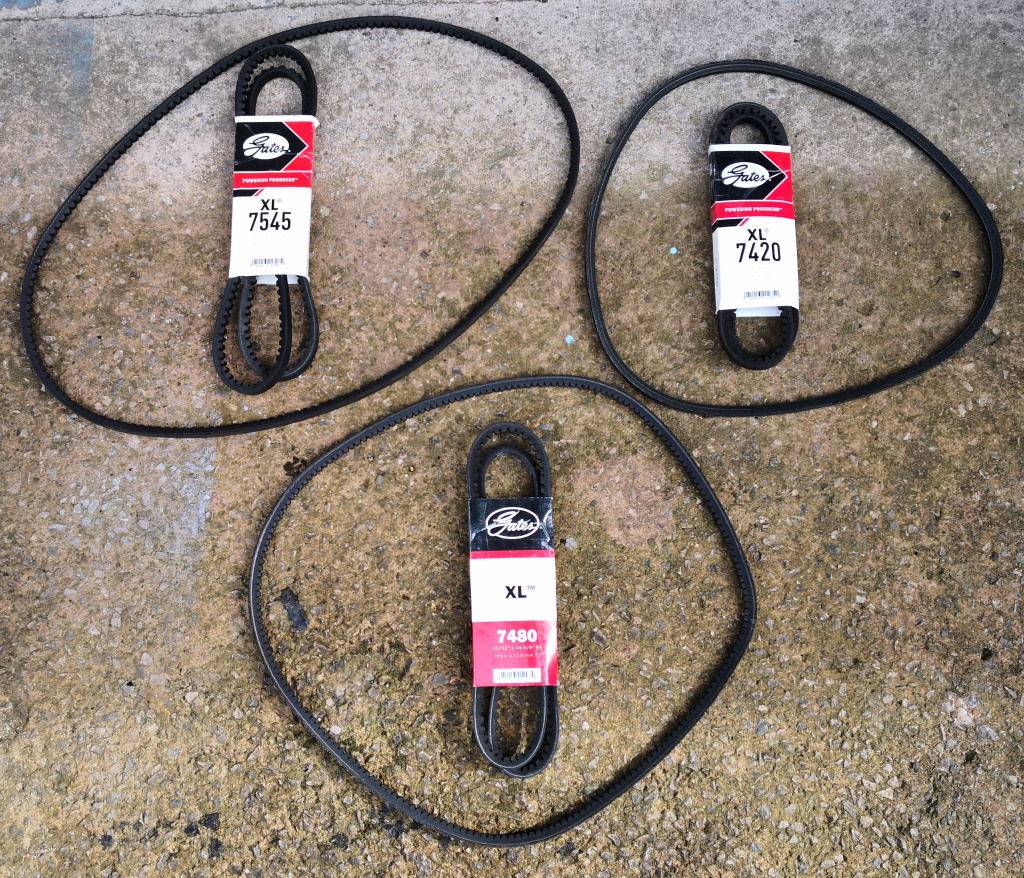
Then all I had to do was remember where each of the three went
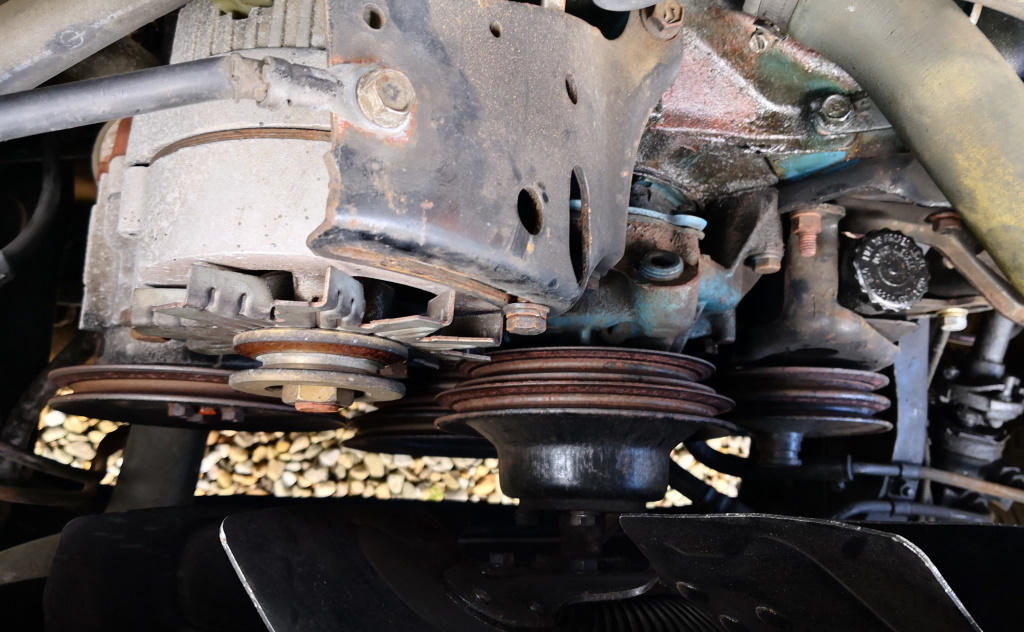
Fitted and tensioned correctly, it sounds a hell of a lot smoother from the front end, there must have been a fair old bit of belt slap going on!
I also fitted some new plugs at the same time, not to cure any particular issue, simply because their age and mileage was completely unknown.
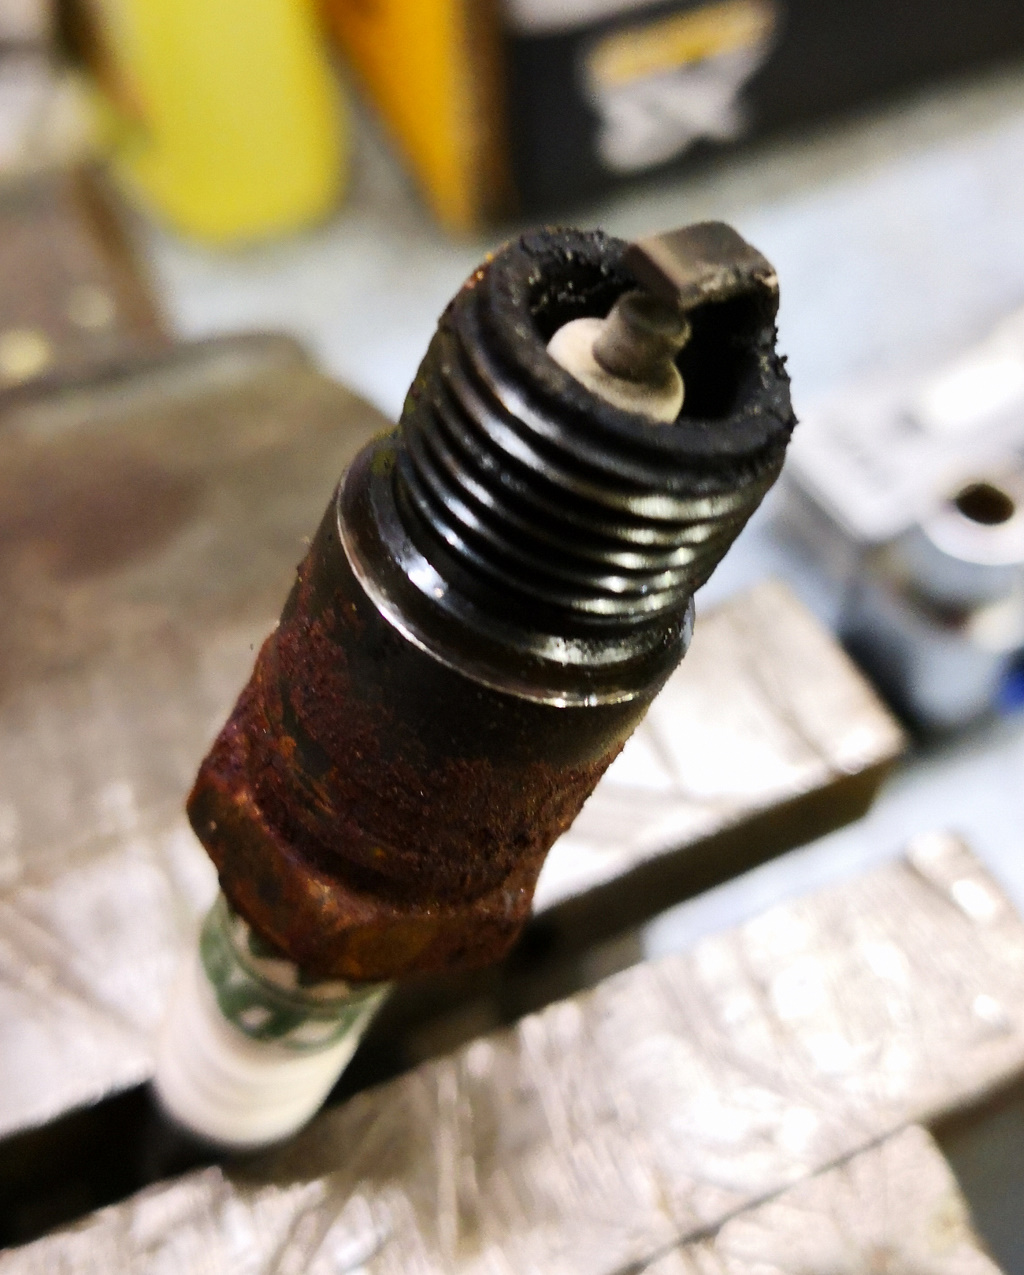
The gaps were fine and despite being rusty externally, they weren't in terrible shape.
Fitting them was reasonably straightforward, in terms of unobstructed access.
The front four were physically easy, the rear four not so much - at least for someone of average height and reach.
What looks nice access
Must be viewed in the context of how high the wing tops are and how big the engine bay is
A small stepladder and a full horizontal stretch into the back of the engine bay was the only way.
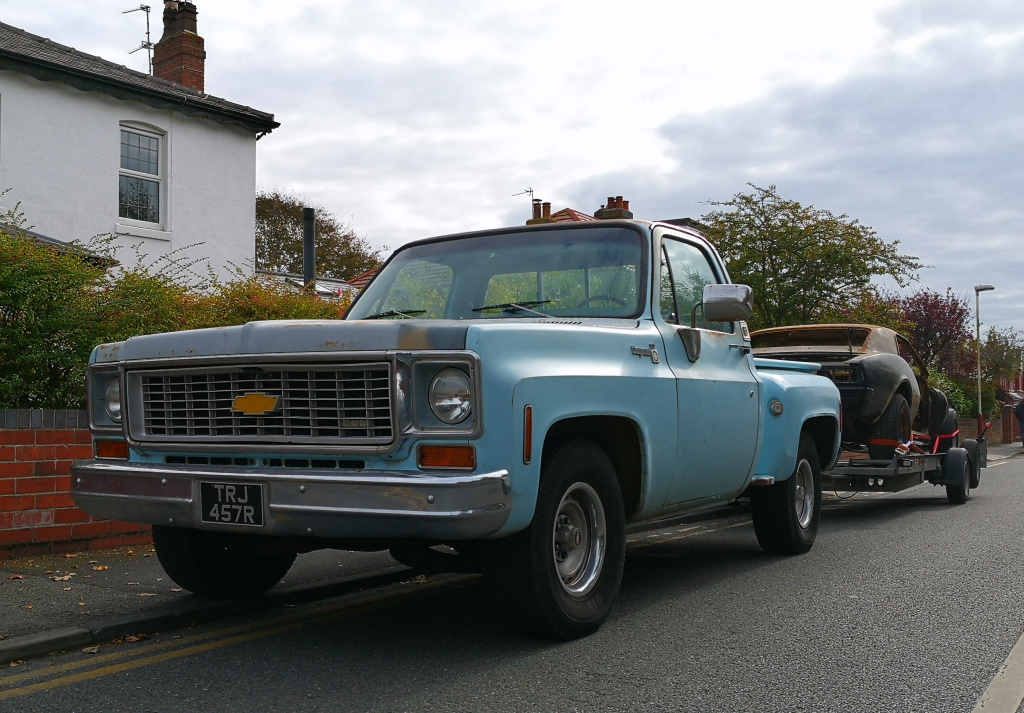
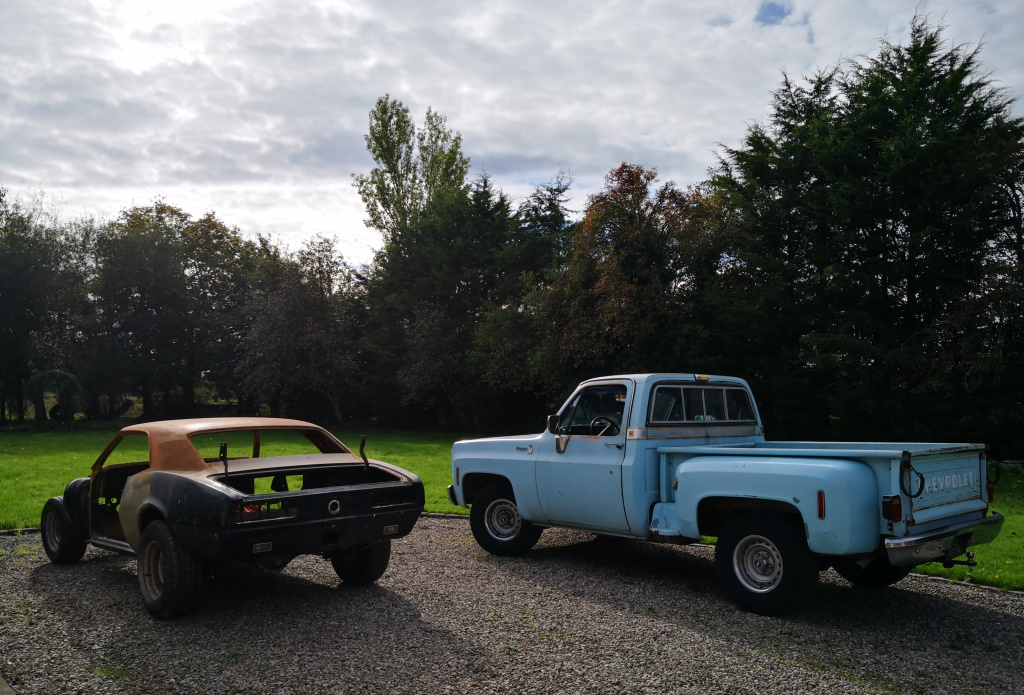
After all the fettling, I had an important job lined up for the c10 - bringing my '67 Camaro home from long-term storage so that the (huge) task of restoring and rebuilding it can begin...
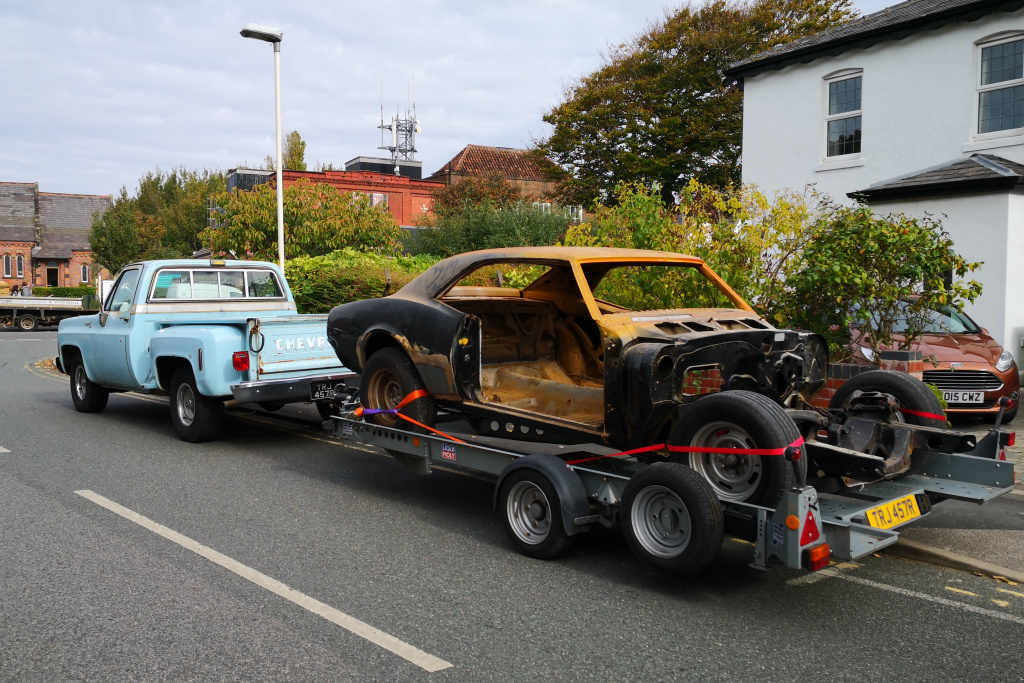
Pleased to say the towing went very smoothly with real no issues - bar one. I managed to lock the key in the cab at one point.
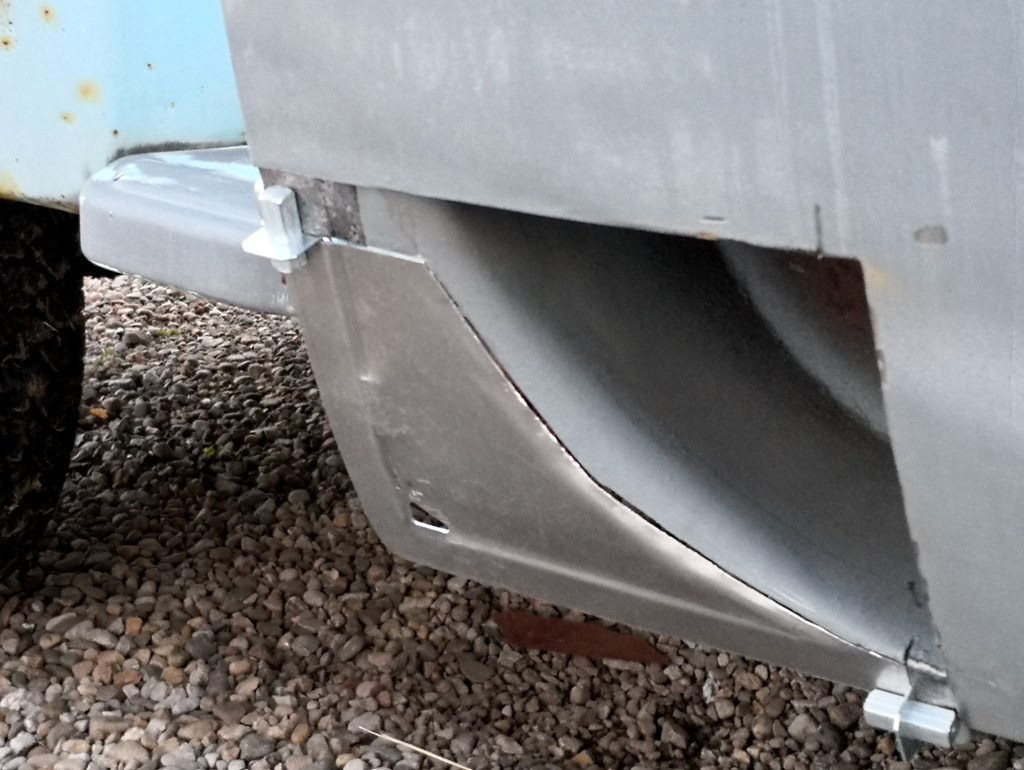
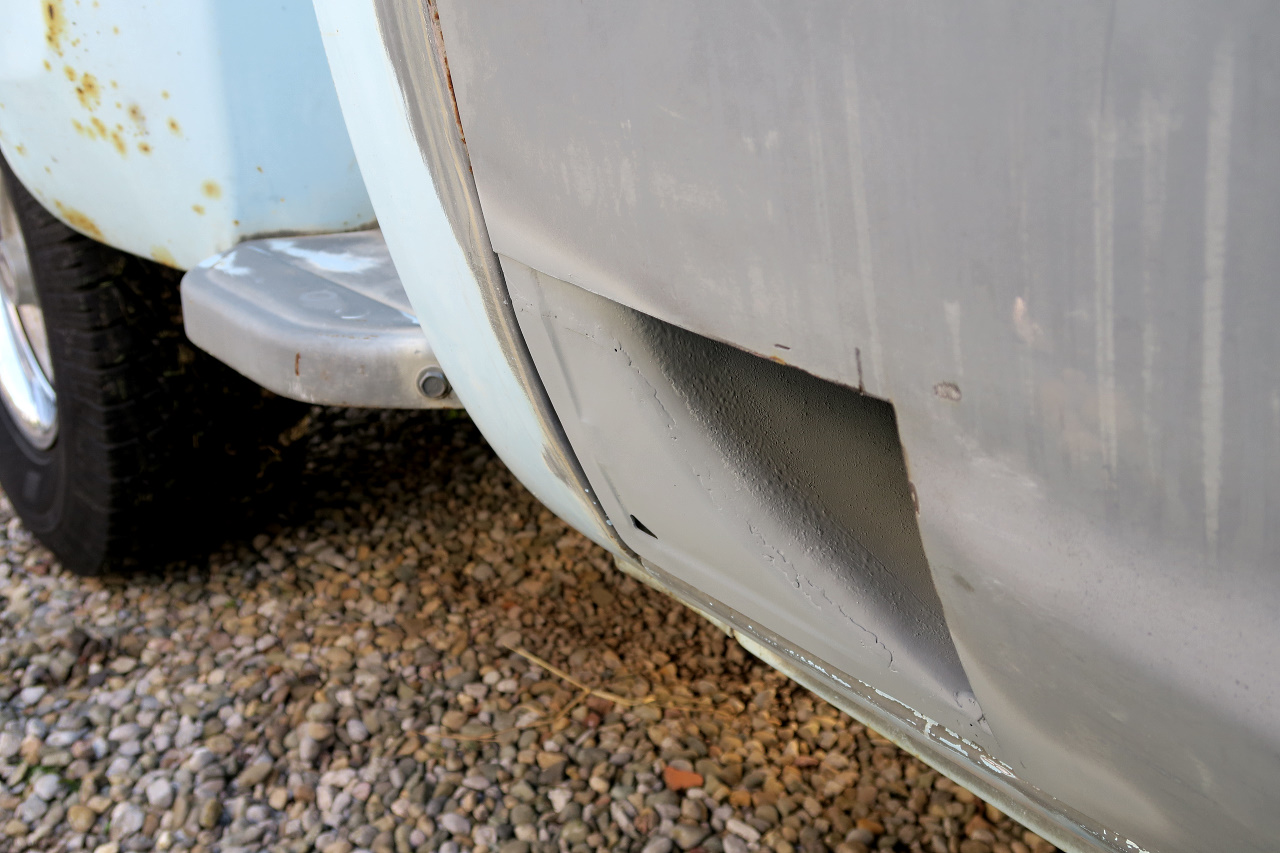
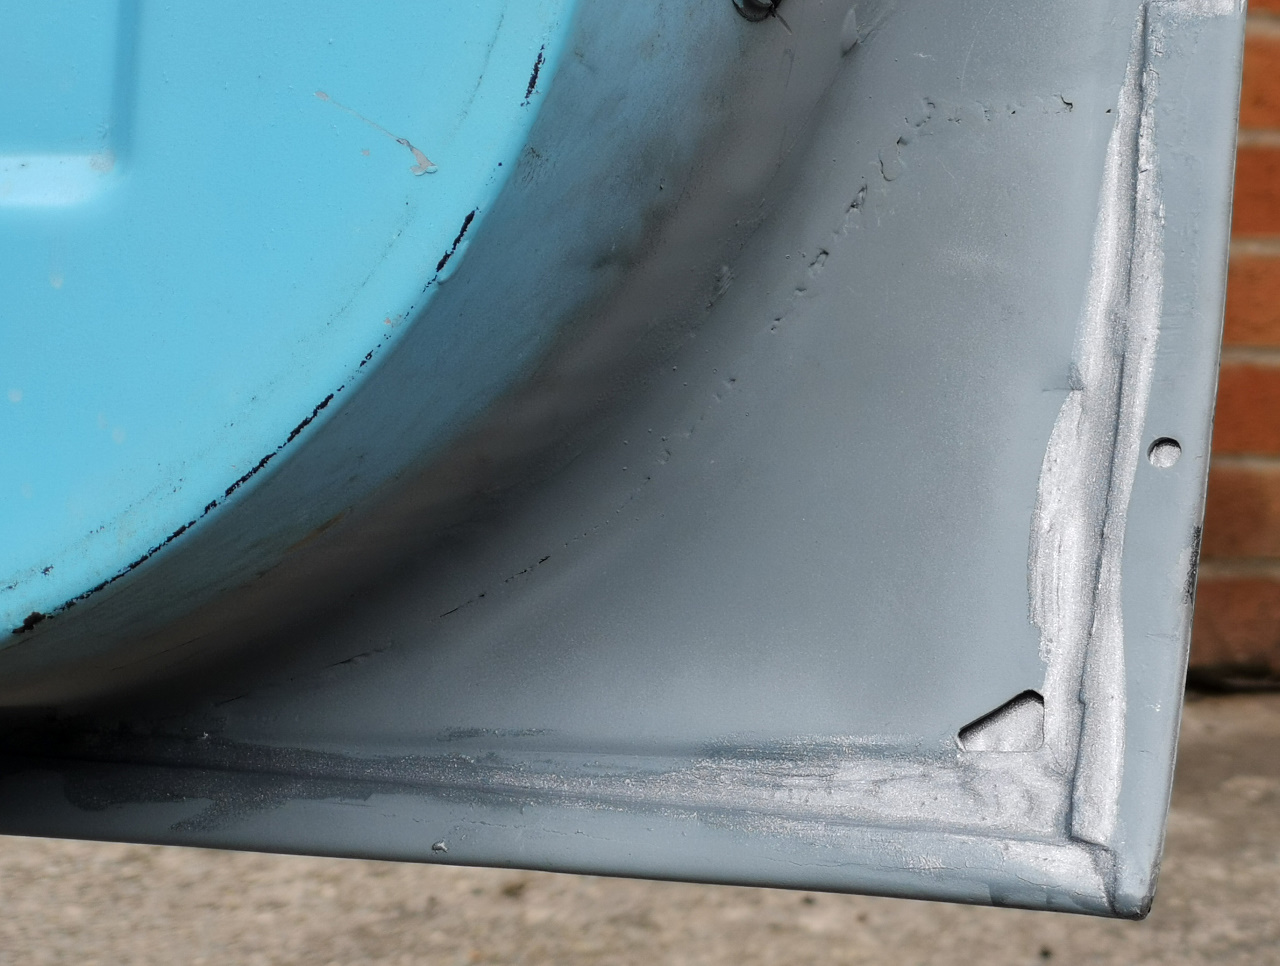
Fortunately, it was at that point that my inability to ever finish a task paid huge dividends. Remember earlier how I cut the rust out of the door skin and only repaired the inner skin, leaving a hole where the outer skin should be...? Like so
Turns out that hole is just the right size to get an arm in far enough to reach the lock mechanism and click it upwards
Other than that brief debacle, I barely knew I was towing the trailer, even when loaded. The likes of Clarkson might mock the 1970's era V8's for only producing a pitiful amount of power for the capacity, but they produce good torque right from tick over, so what little performance there is remains largely unaffected by load!
It's a good little truck this.
A bit of research revealed that the connector needed for the back of the gauge was a Weatherhead 6100X2 compression sleeve nut, but I struggled to find anyone holding UK stock, although Pirtek said they could obtain them, with a minimum order of 50, in around three to four weeks. I said I would give it some thought.
Searched a little further afield and found an aerospace supplier in Germany who claimed to have some in stock, for pennies each, although the postage was a little steep. Given that the postage was going to represent 98% of the cost, I ordered their entire stock of 12, thinking I could always pass the surplus ones on to anyone needing them.
My order was accepted, a dispatch date supplied and then I waited, and waited. And waited some more. Tried to chase it up with the supplier several times, no response. Dug a little deeper and found a Facebook page filled with recent complaints about the company, lack of goods, lack of comms etc.
Assumed the worst with regard to my parts and money, and bit the bullet - asked Pirtek to supply, which they duly did in around the timeframe they estimated.
At around the same time as Pirtek were getting the connectors into stock, I received a package (literally months late) from Germany...
I now have sixty-two of these little buggers, minus the one I needed
Anyway, this at least allowed me to finish off the gauges install with them all working correctly
For one week. Then the very recent replacement speedometer cable tied itself in a knot internally and snapped. Sigh.
I'll fix it at some point but for now I've stuck a very antique "Road Angel" GPS to the top of the dash, so I've at least got a speed read out.
A bit more summer DIY proved once again that the short bed is entirely inadequate for almost anything involving building materials!
For the first time in my ownership, I had reason to remove the air cleaner (I wanted to reduce the high idle speed when the auto choke was engaged, which I duly did)
With the lid off the air cleaner, I was amused to find this...
Well at least that explains the combination of raging horsepower AND extreme frugality that the c10 has been exhibiting all these years
On the basis of "if it ain't broke..." I put it back and buttoned the air cleaner back up.
Whilst running the engine with the bonnet open, I heard and noticed that the drive belts were looking a little "flappy" in operation. Further inspection revealed them to be quite slack but also in no condition to take additional tension
Fortunately, access is a doddle so they were quickly removed, measured and matched up to suitable items on Rockauto, which turned up very promptly as usual.
Then all I had to do was remember where each of the three went
Fitted and tensioned correctly, it sounds a hell of a lot smoother from the front end, there must have been a fair old bit of belt slap going on!
I also fitted some new plugs at the same time, not to cure any particular issue, simply because their age and mileage was completely unknown.
The gaps were fine and despite being rusty externally, they weren't in terrible shape.
Fitting them was reasonably straightforward, in terms of unobstructed access.
The front four were physically easy, the rear four not so much - at least for someone of average height and reach.
What looks nice access
Must be viewed in the context of how high the wing tops are and how big the engine bay is
A small stepladder and a full horizontal stretch into the back of the engine bay was the only way.
After all the fettling, I had an important job lined up for the c10 - bringing my '67 Camaro home from long-term storage so that the (huge) task of restoring and rebuilding it can begin...
Pleased to say the towing went very smoothly with real no issues - bar one. I managed to lock the key in the cab at one point.
Fortunately, it was at that point that my inability to ever finish a task paid huge dividends. Remember earlier how I cut the rust out of the door skin and only repaired the inner skin, leaving a hole where the outer skin should be...? Like so
Turns out that hole is just the right size to get an arm in far enough to reach the lock mechanism and click it upwards
Other than that brief debacle, I barely knew I was towing the trailer, even when loaded. The likes of Clarkson might mock the 1970's era V8's for only producing a pitiful amount of power for the capacity, but they produce good torque right from tick over, so what little performance there is remains largely unaffected by load!
It's a good little truck this.
leglessAlex said:
99t, I was just looking at your El Camino thread, and was struck by a thought. I wonder which I'd prefer more? I've been on something of a C10 craze of late, with dreams of a big block one.
Anyway, I duly typed into google 'el camino or c10' and lo and behold, this was like the third result! I love it, although I think I'd be after a more popular later C10, '70 or '71.
I guess it depends on how you want to use it and / or modify it. And how many miles you plan on doing as a big block will drink like you wouldn't believe!Anyway, I duly typed into google 'el camino or c10' and lo and behold, this was like the third result! I love it, although I think I'd be after a more popular later C10, '70 or '71.
Both of mine are standard mechanically and both have stock, pretty tired suspension so that is what the comparison is based on. The C10 is a 350, with a three speed TH350, the Elk a 327 with a 2 speed powerglide.
Despite a relative lack of gears, the Elk feels faster to drive and generally more punchy. It also feels far more composed on poor surfaces and over bumps which really shake the C10. Of course the Elk rear suspension is the same as the Chevelle of the day - a coil sprung, triangulated four link, live axle set up, versus the basic leaf sprung rear on the C10 - and it does show in the drive, it definitely feels more modern and car-like. Whether that is a good thing or not, only you would know...
A big block C10 can still be had for fairly sensible money, whilst to get a big block in an Elk, at least from the factory, you'd need to get into an SS = $$. Obviously non original BB cars can be found for less.
There is no shortage of modifying parts for either. Generally Chevelle bits will work on the Elk, although rear spring and damper rates would need to be altered. Maybe slightly more aftermarket choice for the C10 simply due to the sheer numbers of them sold.
A short bed C10 and Elk have very similar load beds, the C10 being just that bit wider (sheets of 8x4 fit between the wheel wells which they wouldn't in the Elk). Long bed C10's are obviously, well, longer.
One thing to bear in mind if considering an early 73-87 Square Body C10 (although it sounds as though you have your eye on the 67-72 CST model) is that early half ton (C10) trucks had a slightly flimsy frames that can bend quite easily. This risk can be mitigated by finding a F44 equipped version (Big 10 with a 350 as mine is) or 454 equipped from the factory, both of which had heavier duty frame rails and crossmembers.
I may well have to choose between my two at some point since I am expecting to lose some storage. I can probably find room at home for one unnecessary pickup truck, but two might be pushing man-math and marriage a step far.
Family and friends that I have discussed it with almost unanimously favour the C10 as "it is just cooler"
However, despite slightly favouring the drive of the Elk, I genuinely have absolutely no idea which I would keep...
Edited by 99t on Monday 4th April 20:37
leglessAlex said:
Do you have any recommendations of who to talk to when it comes to US importers/exporters?
Ok, it isn't a big block, but my favourite vendor of American iron (Rock and Roll Motors, Grangemouth) has this in stock and having bought two trucks from him previously, I would trust Jimmy's description 100%
Link to the advert
1971 Chevy C20
Tracked down, purchased and fitted a new, one-piece speedometer cable to replace the failed two-piece cables that I fitted very recently. Upon removal it turned out that not one but both cables had shredded themselves internally.
Chinesium? Probably but odd for both to go, unless one took the other one with it...?
Checked the speedometer itself spins freely (it does) and with the new cable fitted I have a working speedo and odo again - the insurance was a bit sniffy that the mileage had increased substantially since last renewal (replacement speedo head when I fitted the gauges) so I thought that the next time around I should have a genuine reading increase to give them!
In other news, this is why I don't buy cars to quickly fix up and flip...
July 2018: cut out rusty corner of passenger door
April 2020: get around to making and welding up inner skin repair piece
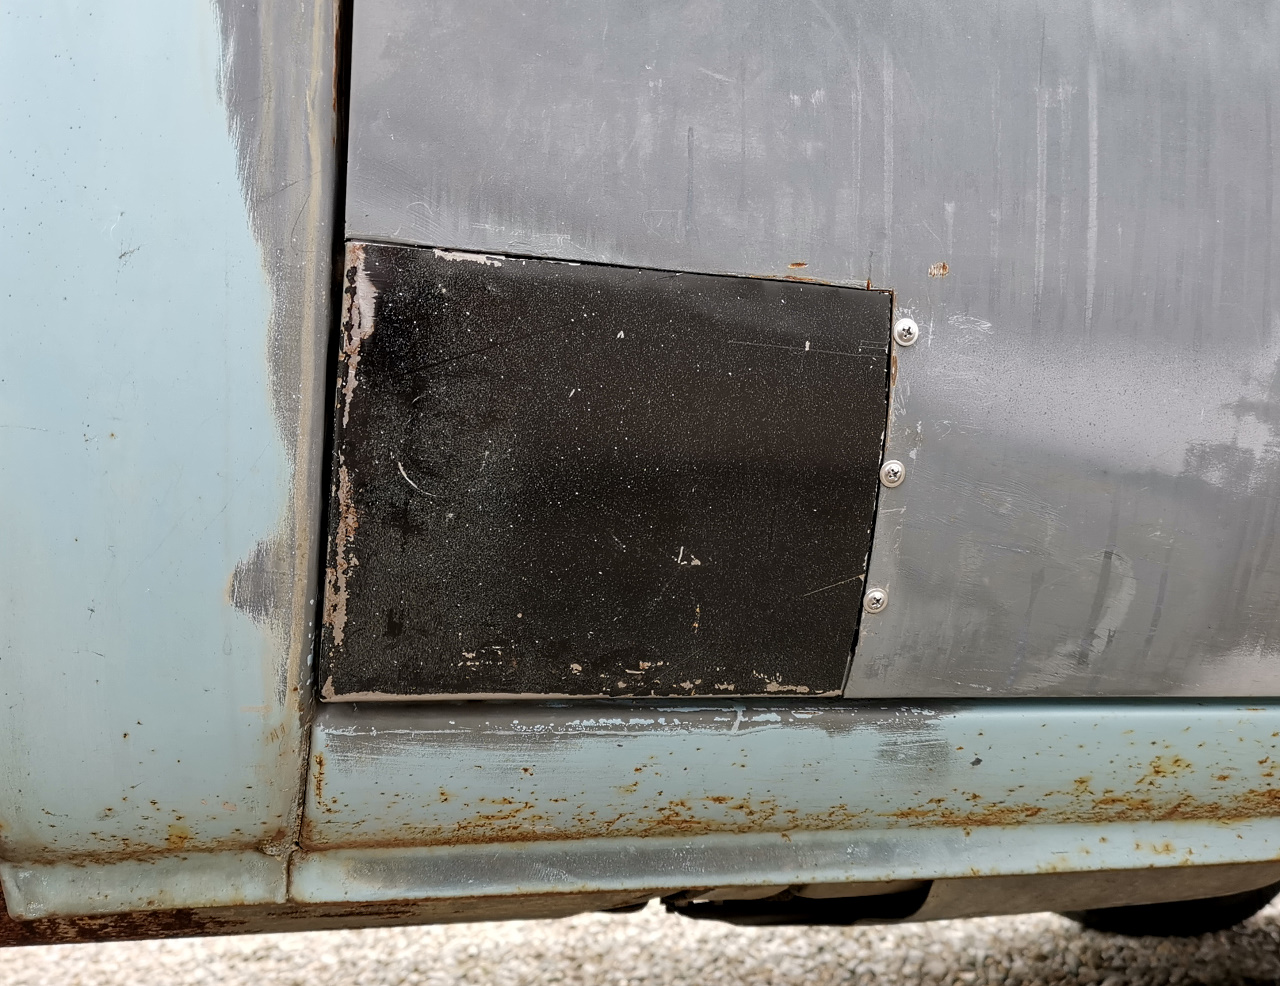
June 2022: finally fabricate and fit outer skin repair section!
In theory the fabrication element should have been minimal, since I had previously bought a full lower doorskin section complete with flanges ready to fold over.
In practice, the flanges weren't pressed at 90 degrees to each other (by quite a lot of degrees) and the curvature didn't match the shape of the door. By the time I'd flattened out one flange and re-made it and corrected the curvature, I might as well have started off with a piece of flat sheet!
Test fitting. I joggled the edges to fit inside the door with a view to fully bonding, rather than welding the piece into place.
Bit of 3M's finest and allow to set. I'll whizz off the screw heads and excess glue off later* and apply a skim of filler.
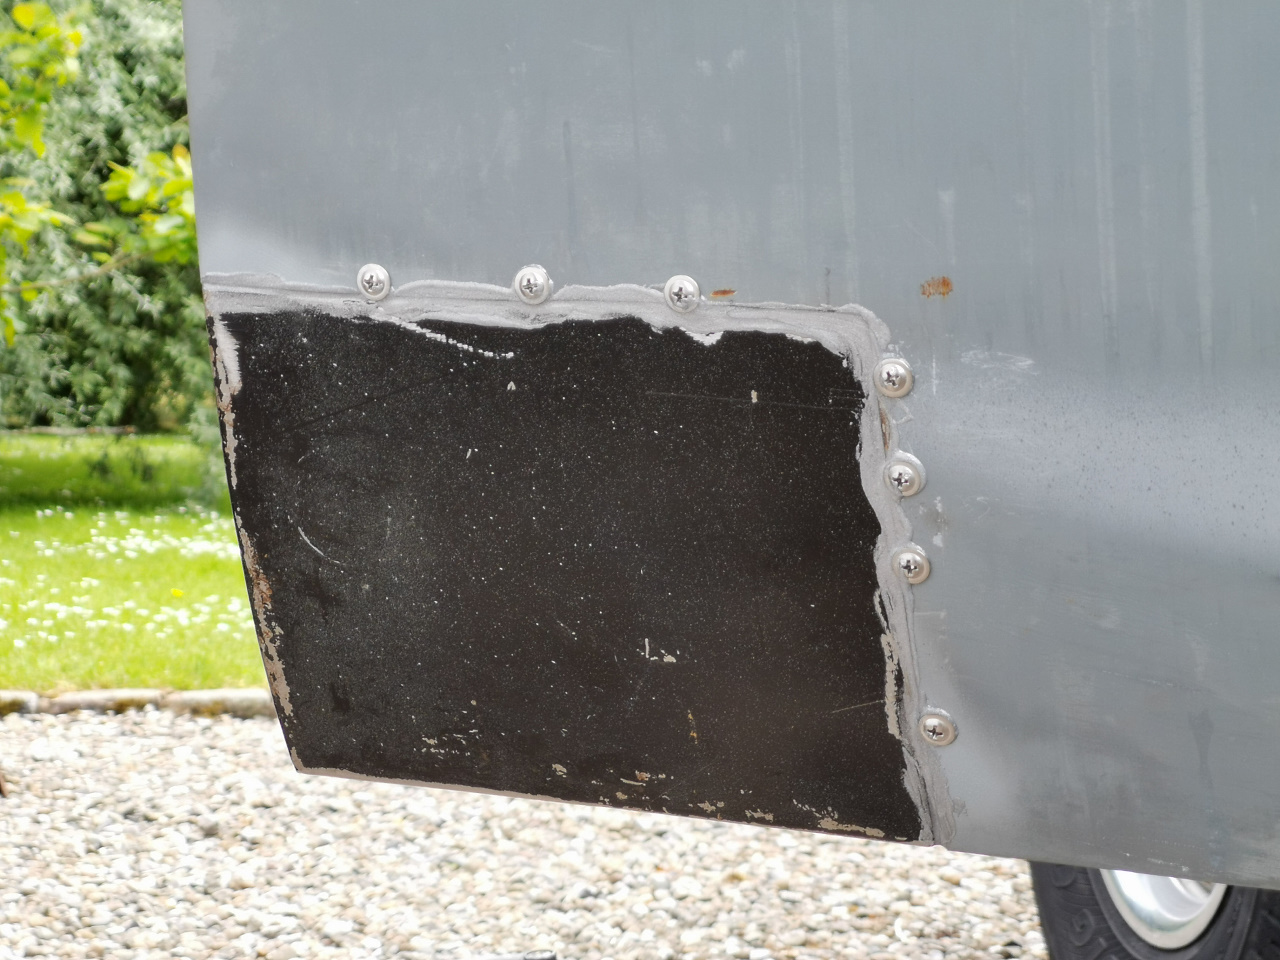
Hopefully the glue will have filled all the voids where the joints and flanges are and prevent any water ingress / future rust - not that the truck is out in all weathers much anyway.
Finally to help keep the inner door dry, I also replaced the utterly California-cooked inner and outer glass scraper seals which were more akin to brittle plastic than rubber.
Chinesium? Probably but odd for both to go, unless one took the other one with it...?
Checked the speedometer itself spins freely (it does) and with the new cable fitted I have a working speedo and odo again - the insurance was a bit sniffy that the mileage had increased substantially since last renewal (replacement speedo head when I fitted the gauges) so I thought that the next time around I should have a genuine reading increase to give them!
In other news, this is why I don't buy cars to quickly fix up and flip...
July 2018: cut out rusty corner of passenger door
April 2020: get around to making and welding up inner skin repair piece
June 2022: finally fabricate and fit outer skin repair section!
In theory the fabrication element should have been minimal, since I had previously bought a full lower doorskin section complete with flanges ready to fold over.
In practice, the flanges weren't pressed at 90 degrees to each other (by quite a lot of degrees) and the curvature didn't match the shape of the door. By the time I'd flattened out one flange and re-made it and corrected the curvature, I might as well have started off with a piece of flat sheet!
Test fitting. I joggled the edges to fit inside the door with a view to fully bonding, rather than welding the piece into place.
Bit of 3M's finest and allow to set. I'll whizz off the screw heads and excess glue off later* and apply a skim of filler.
Hopefully the glue will have filled all the voids where the joints and flanges are and prevent any water ingress / future rust - not that the truck is out in all weathers much anyway.
Finally to help keep the inner door dry, I also replaced the utterly California-cooked inner and outer glass scraper seals which were more akin to brittle plastic than rubber.
*probably a period of not less than two years
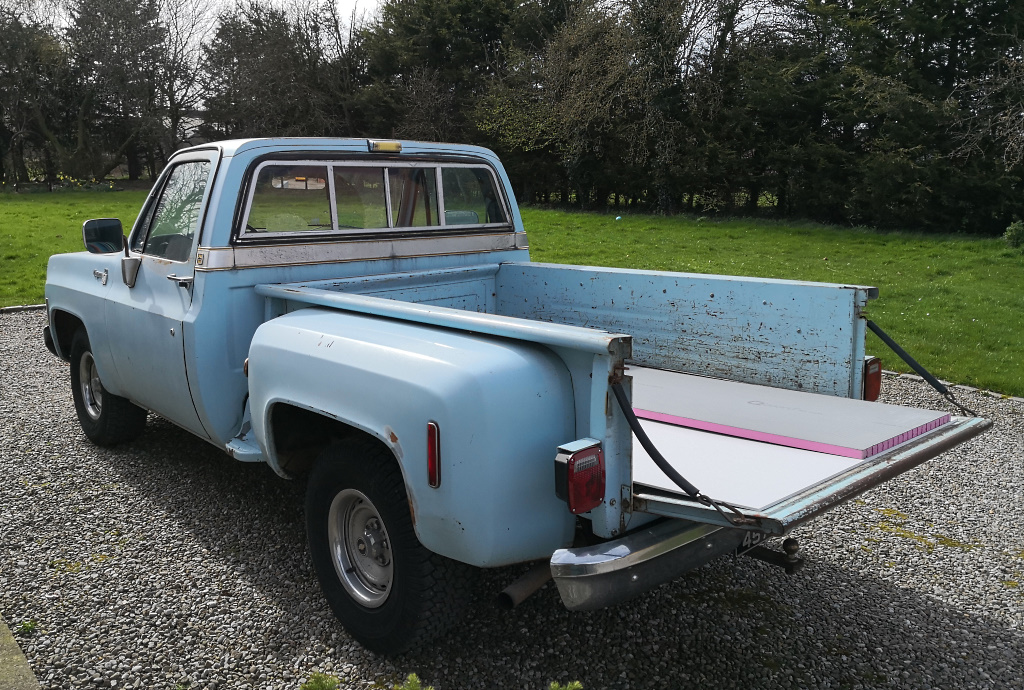
Tiny update - shock, horror! C10 actually being used as a truck!
No fettling recently, but it has been earning its keep. Firstly a tip trip with old cooker and various other household detritus
Followed by a local car boot fair to dispose of further, slightly less rubbishy rubbish - only problem being the truck received far more interest than the wares on the table in front of it! Should have charged £1 per question
There was a surprising amount of love shown by the general public for a sheddy old shed, although opinions were split pretty evenly between "it'll look good when you paint it" and "don't touch it, just clear coat it"...
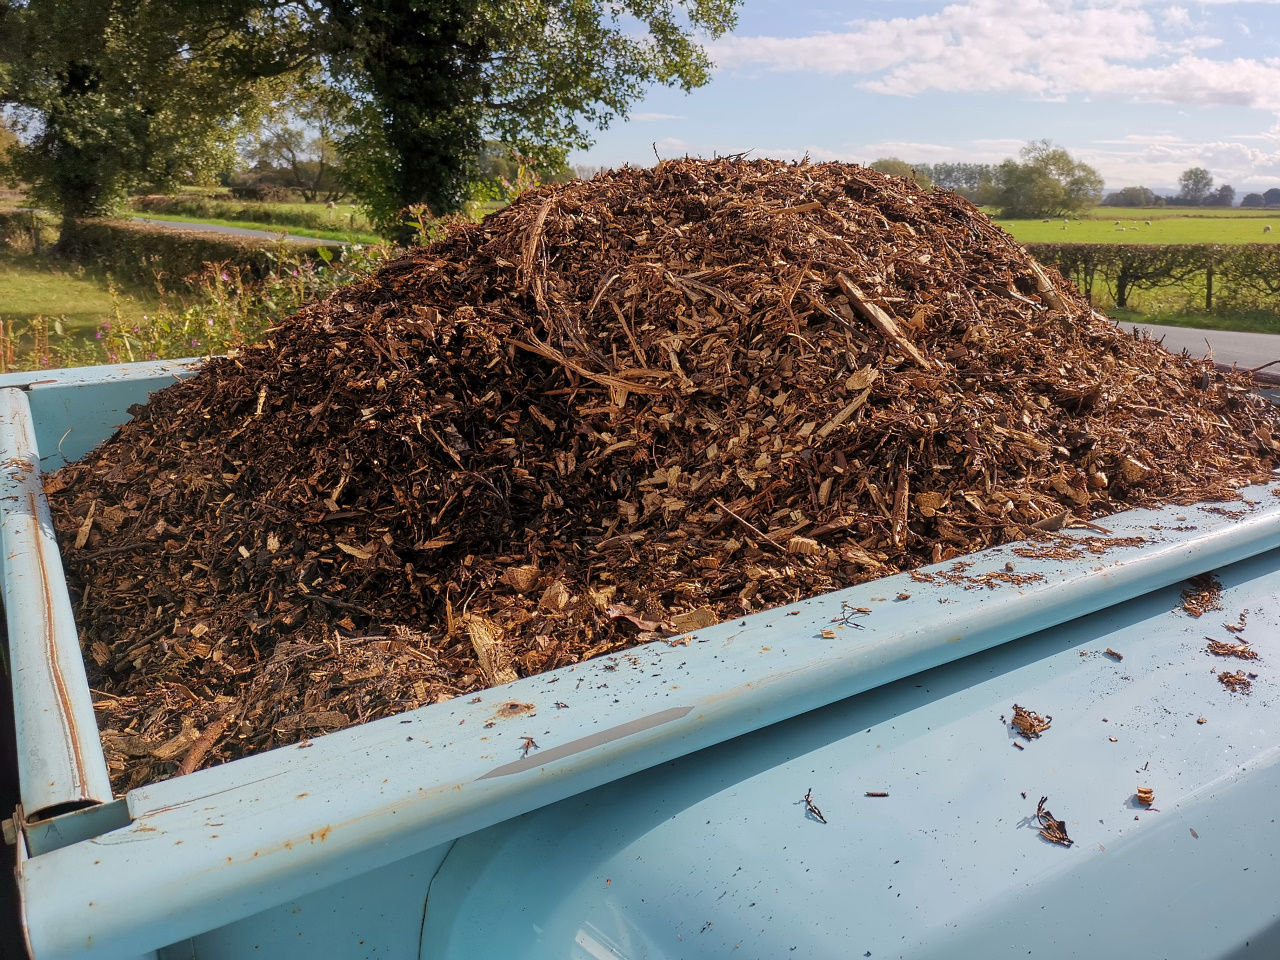
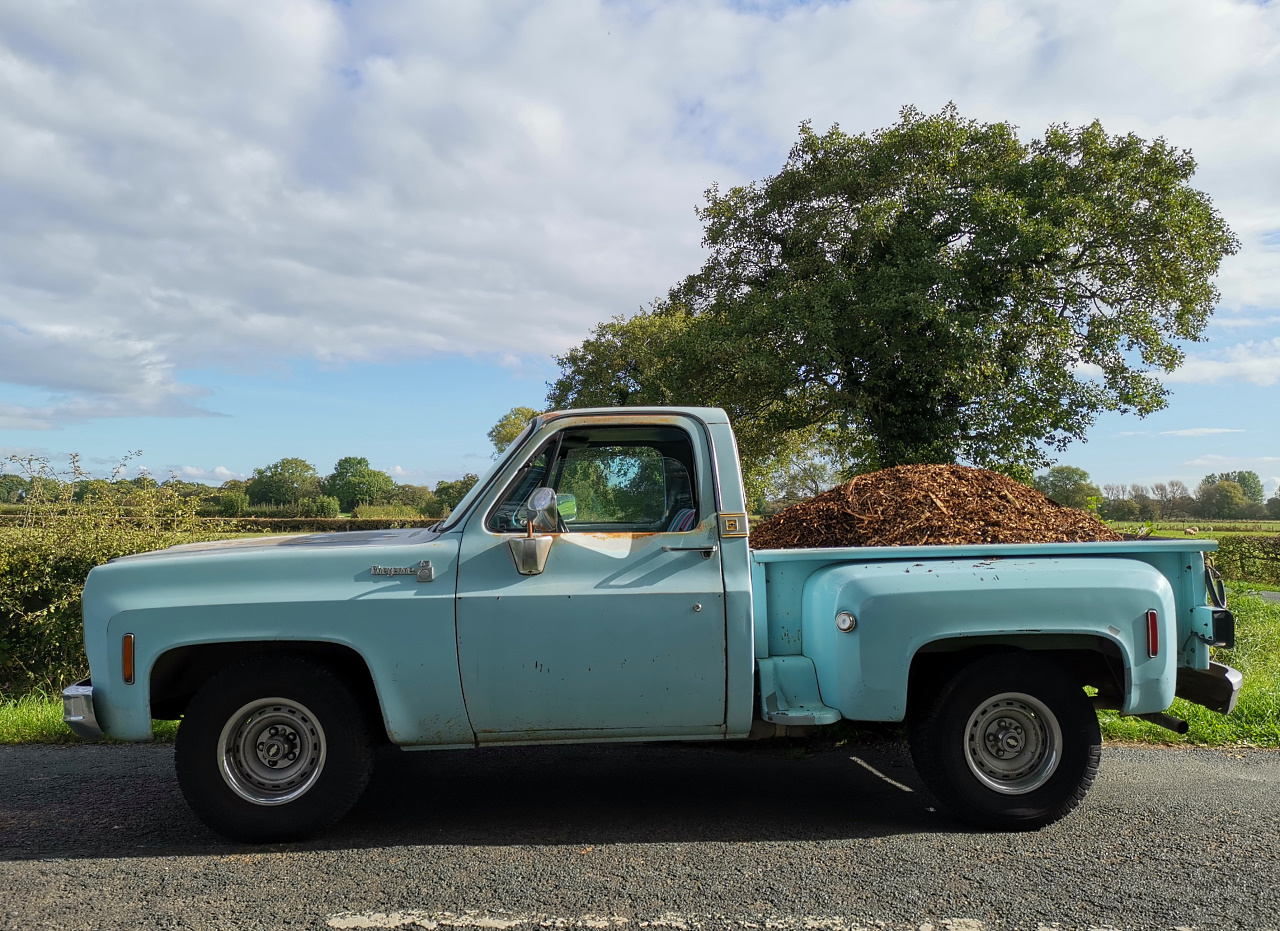
Finally, today a proper test - several buckets of damp chip bark. To be fair the rear only dropped about an inch under load. The ride is certainly better with a lot of weight in the back though...
No fettling recently, but it has been earning its keep. Firstly a tip trip with old cooker and various other household detritus
Followed by a local car boot fair to dispose of further, slightly less rubbishy rubbish - only problem being the truck received far more interest than the wares on the table in front of it! Should have charged £1 per question
There was a surprising amount of love shown by the general public for a sheddy old shed, although opinions were split pretty evenly between "it'll look good when you paint it" and "don't touch it, just clear coat it"...
Finally, today a proper test - several buckets of damp chip bark. To be fair the rear only dropped about an inch under load. The ride is certainly better with a lot of weight in the back though...
Northbrook said:
Truck looks great!
I've just got back from a tip run - quite surprised to be able to fit two tonne bags of garden cuttings in my W124 E class estate....but you're doing it more stylishly.
Cheers, not sure about more stylishly - garden cuttings in a W124 says you've been doing some pruning work for the lord of the manor, old cooker in the back of a C10 says I've probably got a sofa outside my trailer and have escaped from the set of Ozark!! I've just got back from a tip run - quite surprised to be able to fit two tonne bags of garden cuttings in my W124 E class estate....but you're doing it more stylishly.
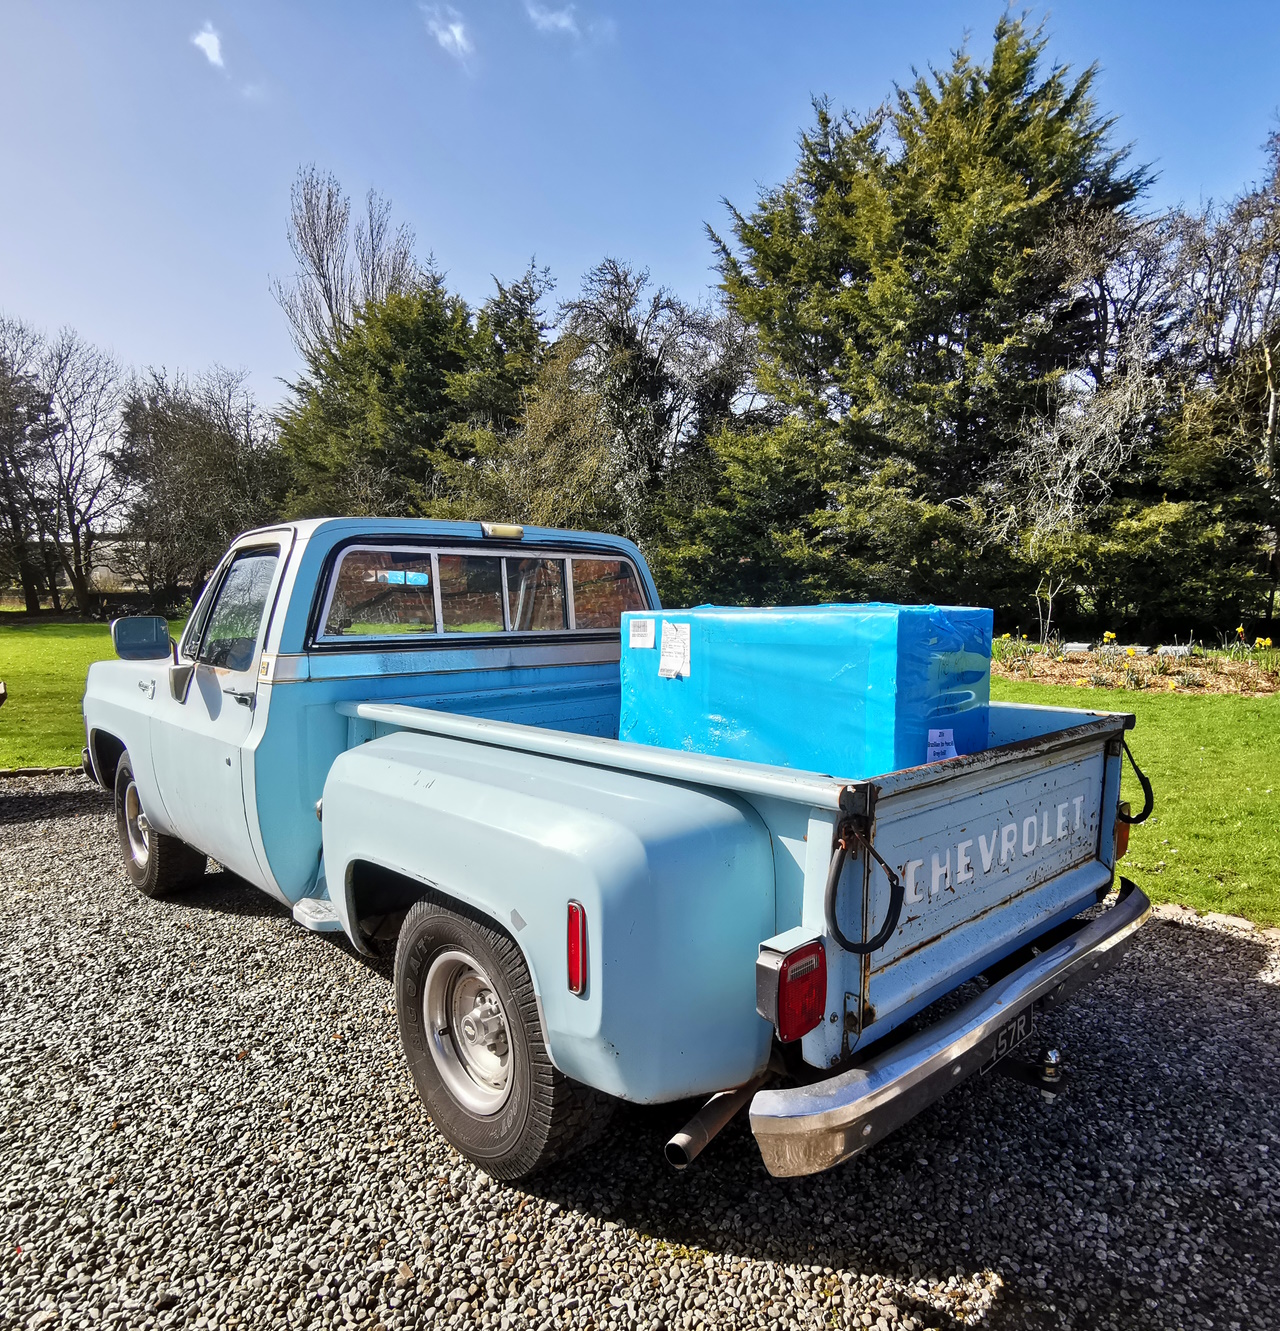
Took advantage of the sunshine to fire the C10 up after her winter snooze, in order to pick up some floor tiles for the extension.
Quite a lot of tiles as it turned out, 28 boxes plus a pallet came to a hair under 600kg.
Still a '77 Big 10 was factory rated to around 900kg (although given her age and mileage I'm not sure I would want to fully test that these days...)
Certainly caused more suspension drop than the chip bark
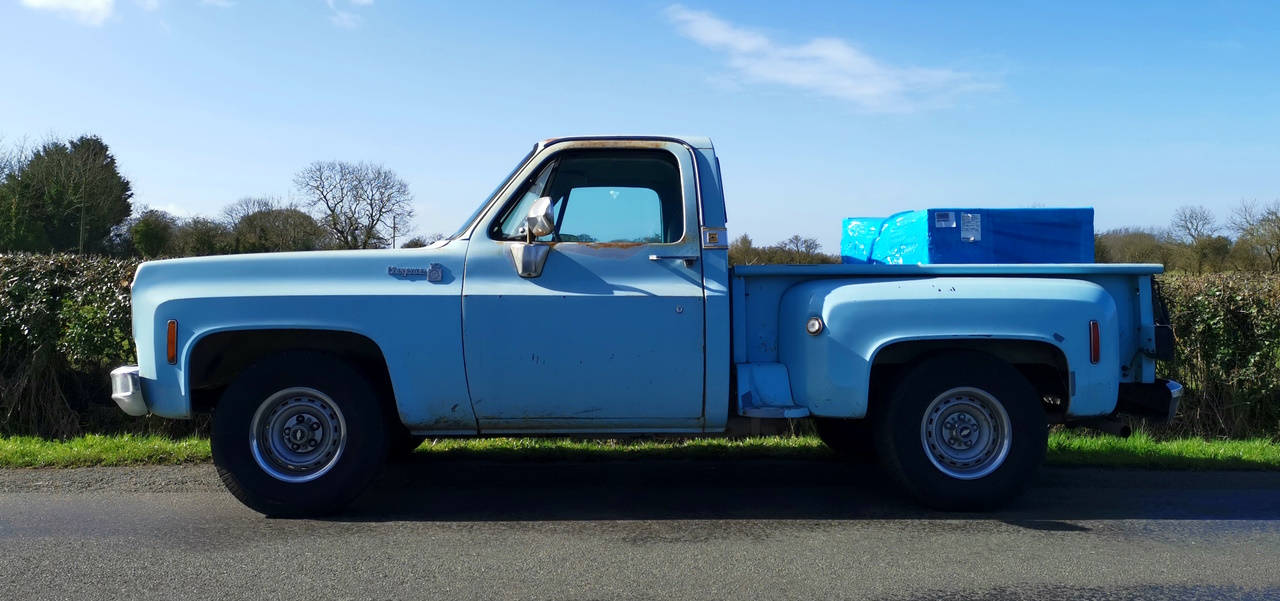
As ever, performance (I use the word lightly) was little affected by load, but the weight could really be felt when braking!
Out of curiosity, I crawled underneath to check the bump stop clearance
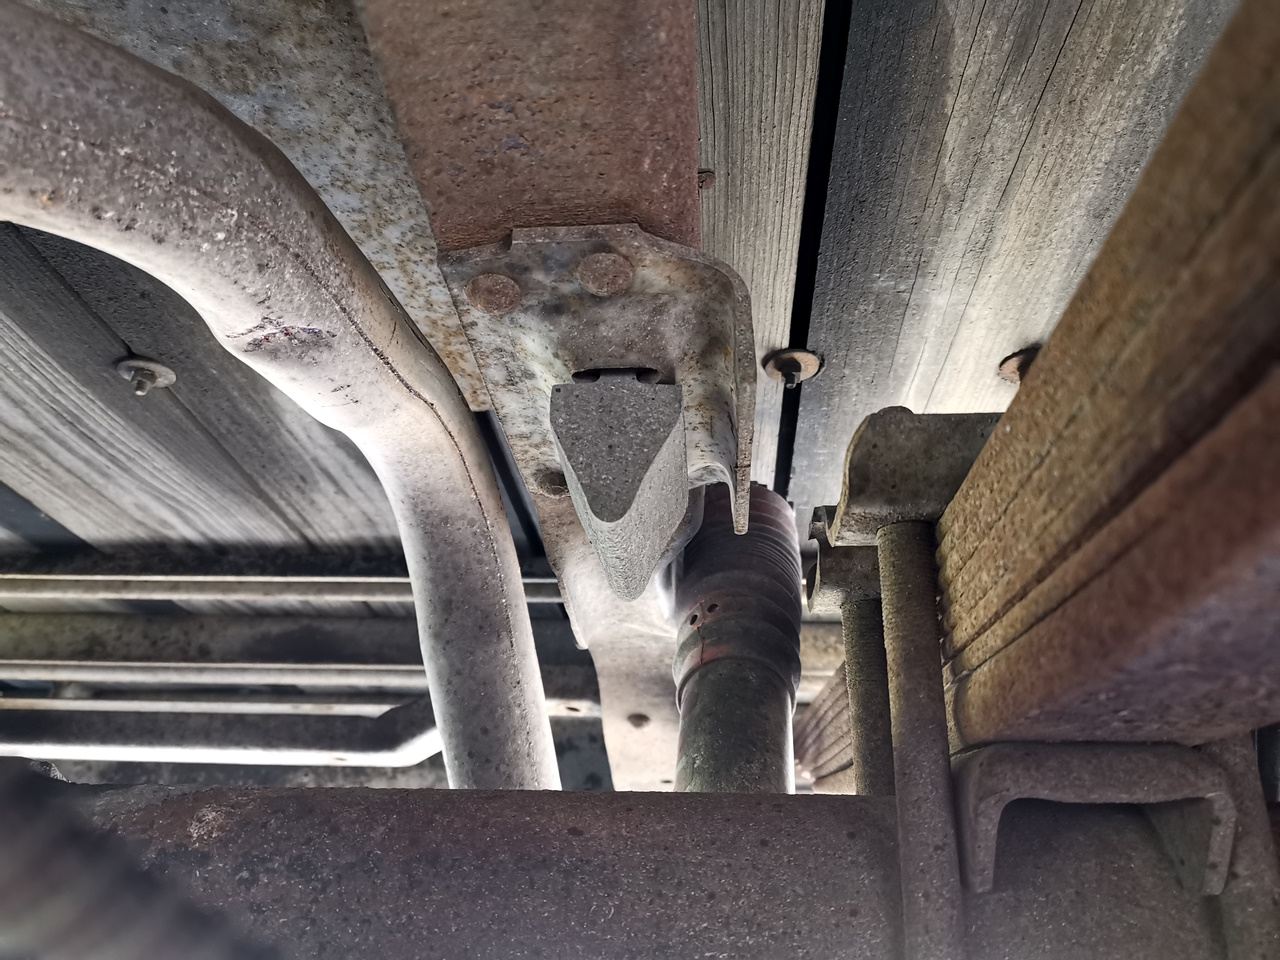
Probably 2 1/2 inches clearance versus about 5 inches unloaded, so perhaps she is still good for 900kg?
Unfortunately no forklift this end so I'm going to have to unload the tiles by hand
Quite a lot of tiles as it turned out, 28 boxes plus a pallet came to a hair under 600kg.
Still a '77 Big 10 was factory rated to around 900kg (although given her age and mileage I'm not sure I would want to fully test that these days...)
Certainly caused more suspension drop than the chip bark
As ever, performance (I use the word lightly) was little affected by load, but the weight could really be felt when braking!
Out of curiosity, I crawled underneath to check the bump stop clearance
Probably 2 1/2 inches clearance versus about 5 inches unloaded, so perhaps she is still good for 900kg?
Unfortunately no forklift this end so I'm going to have to unload the tiles by hand
RSTurboPaul said:
This is a great thread
Given the irritating complexity of modern stuff, I am seriously thinking about going 'classic' and 'easily-fixable' with something like this in the future!
Would I be right in thinking that such things tend to be a) slow and b) somewhat thirsty? lol
Cheers Given the irritating complexity of modern stuff, I am seriously thinking about going 'classic' and 'easily-fixable' with something like this in the future!
Would I be right in thinking that such things tend to be a) slow and b) somewhat thirsty? lol

Yes to both. It's great as a toy that does relatively few miles per year, it would quickly become tiresome as a daily.

Gassing Station | Readers' Cars | Top of Page | What's New | My Stuff