1985 Rover 3500 Vitesse
Discussion


[quote=mak250300]My brother had one a good few years back as can be seen on the photo. It started life with as a 2600 if I remember then had a 3500 V8 in it and then he put a Corvette engine in the thing. It sounded lovely.
I have fond memories of the car growing up heading to various car shows with Def Leppard playing on the stereo.
 [/
[/
Bet that thing was epic.
OP your car is a wonderful thing, I have fond memories of my fathers, he had 2 between my early and late teens, they were both only 2600cc and I only ever got to drive the later one due to age and lack of driving licence.
Keep up the good work and please remember to update your thread on a slightly more regular basis
I have fond memories of the car growing up heading to various car shows with Def Leppard playing on the stereo.
[/Bet that thing was epic.
OP your car is a wonderful thing, I have fond memories of my fathers, he had 2 between my early and late teens, they were both only 2600cc and I only ever got to drive the later one due to age and lack of driving licence.
Keep up the good work and please remember to update your thread on a slightly more regular basis
Well I wasn't expecting such a positive reception, and to make readers car of the week!
Thankyou for all the positive messages about the Vitesse, and hearing your SD1 stories is so cool.
I'll get cracking with the next instalment, I'm just uploading the pictures.
Joe
Thankyou for all the positive messages about the Vitesse, and hearing your SD1 stories is so cool.
Northern.N said:
LOVELY thread Joe, good to see you on PH with this too!
All the best, Nick M.
Thanks Nick, I was intending on dropping you a message about your opinion on the paint defects, see if theres anything that could be done about them.All the best, Nick M.
corcoran said:
You can have any colour you like, as long as it's red, with silver door mirrors!
That did make me laugh, I hadn't noticed I'd gotten such a car type. cpreddy1 said:
Hi Everyone,
My first post (been a lurker for many years though).
Saw this at Lake Tekapo on the South Island a couple of years back.
I was amazed at the number of rust free old cars in NZ. They can't use salt on the roads there, surely?
Must be the case, and one of the few Vitesses to have made it over to NZ, very cool spot. My first post (been a lurker for many years though).
Saw this at Lake Tekapo on the South Island a couple of years back.
I was amazed at the number of rust free old cars in NZ. They can't use salt on the roads there, surely?
I'll get cracking with the next instalment, I'm just uploading the pictures.
Joe
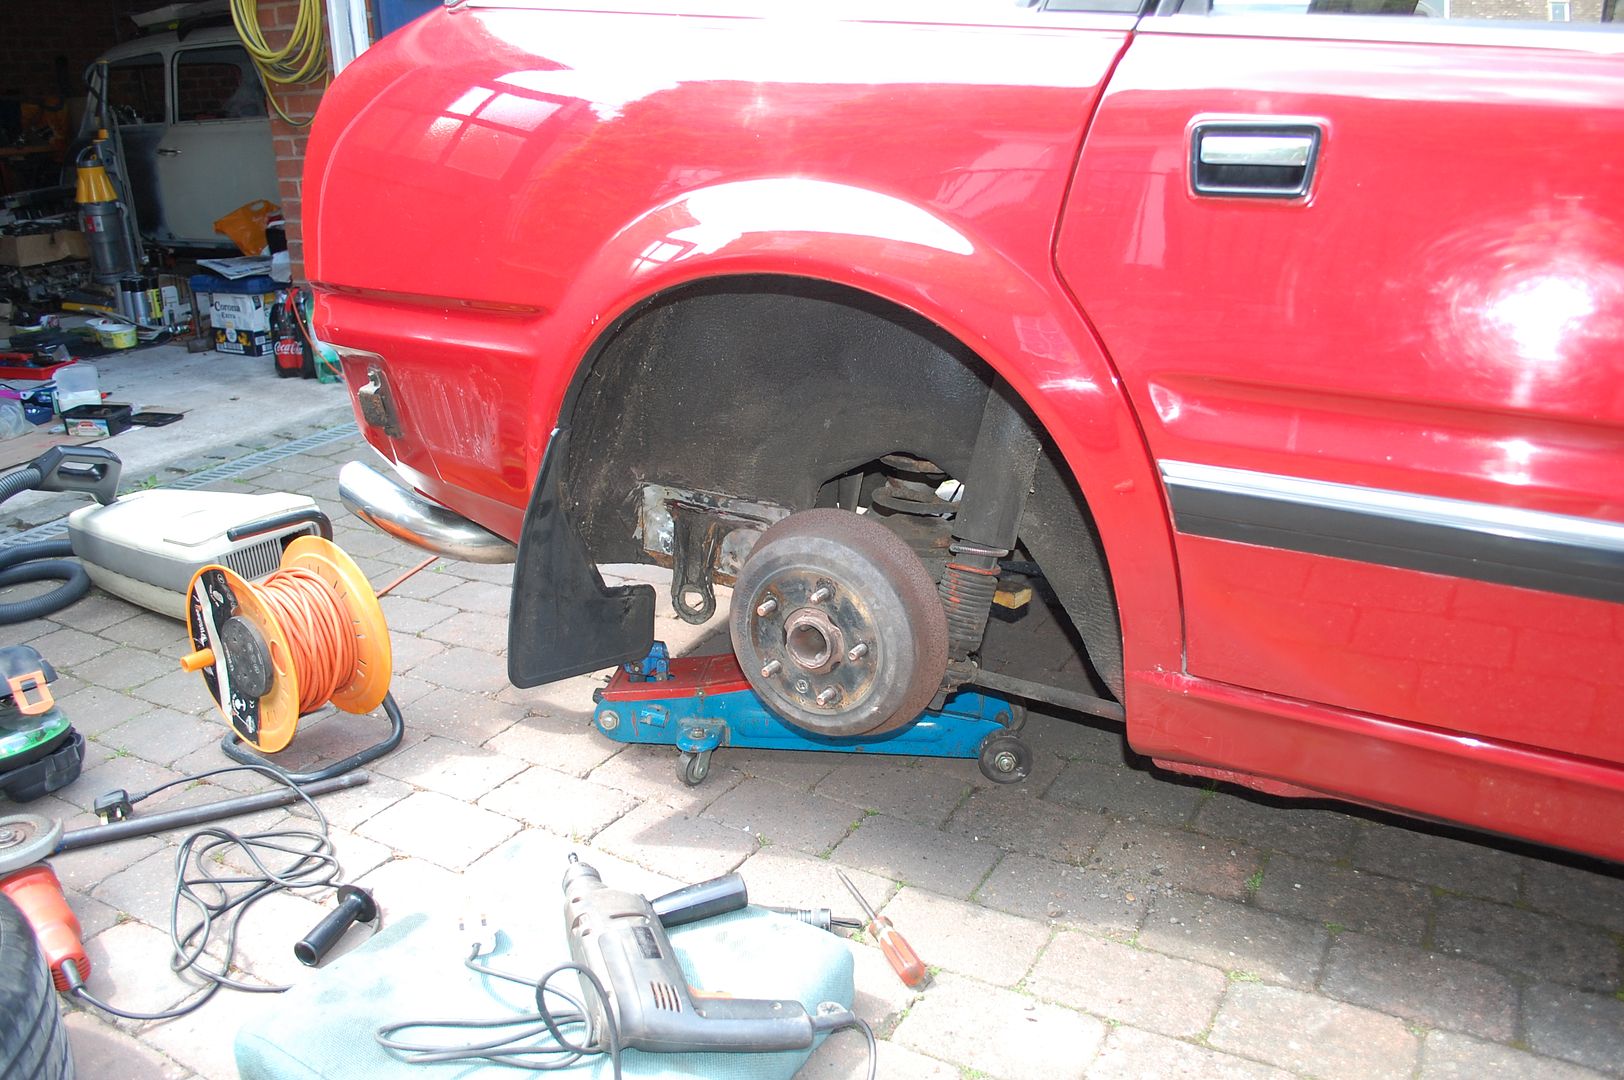
This is where things get serious.
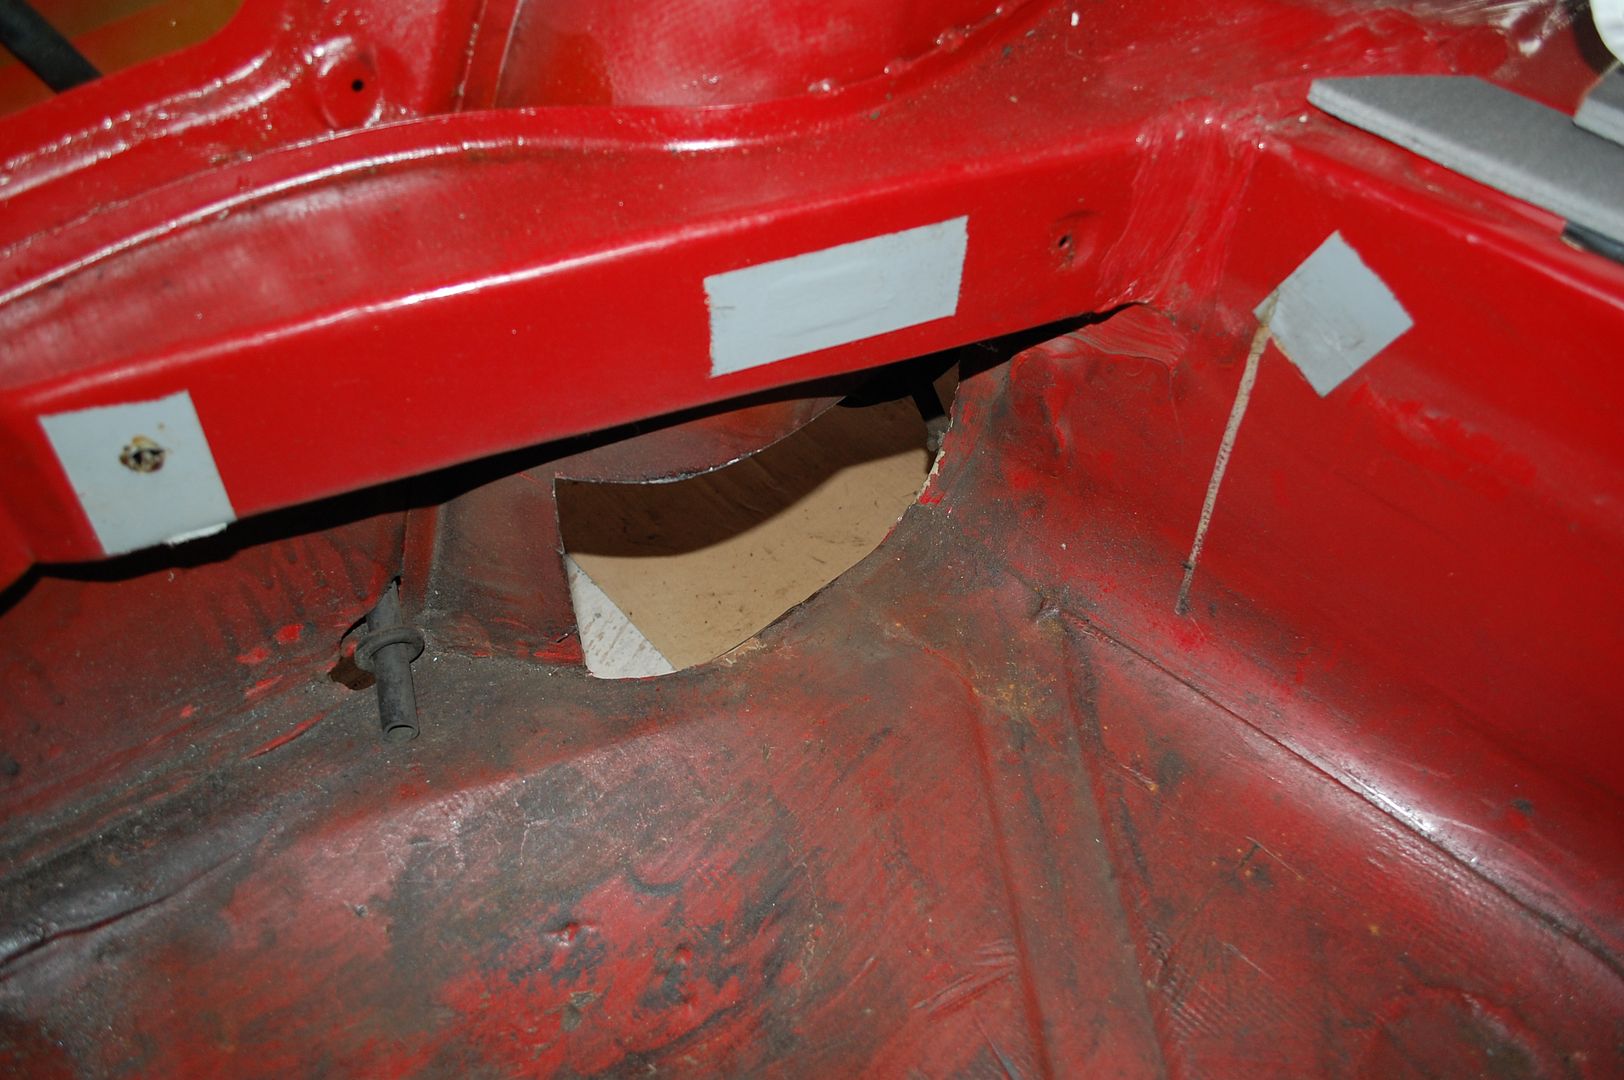
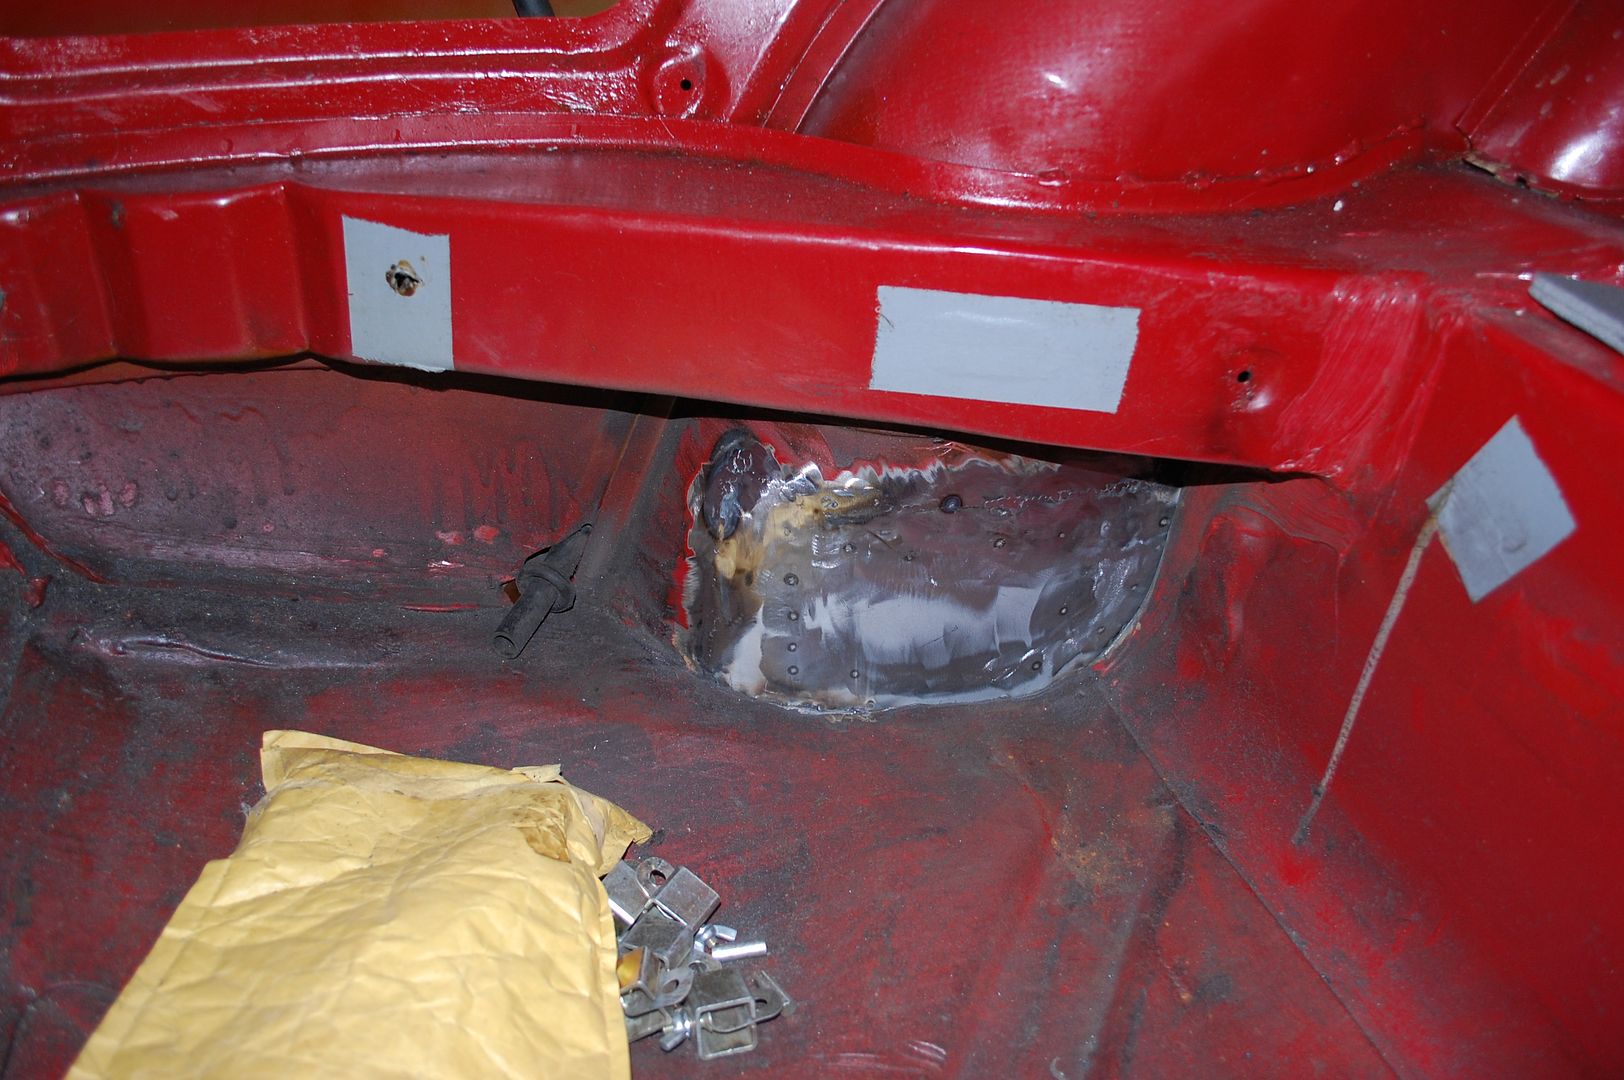
First on the agenda was the rust that I found in the boot. From the outside it's quite obvious as to why it happens.
The area is made up of the inner arch, and a strengthening panel with the towing eye welded onto it. I knew I'd have to save the towing eye, but the strengthening panel was an unknown.
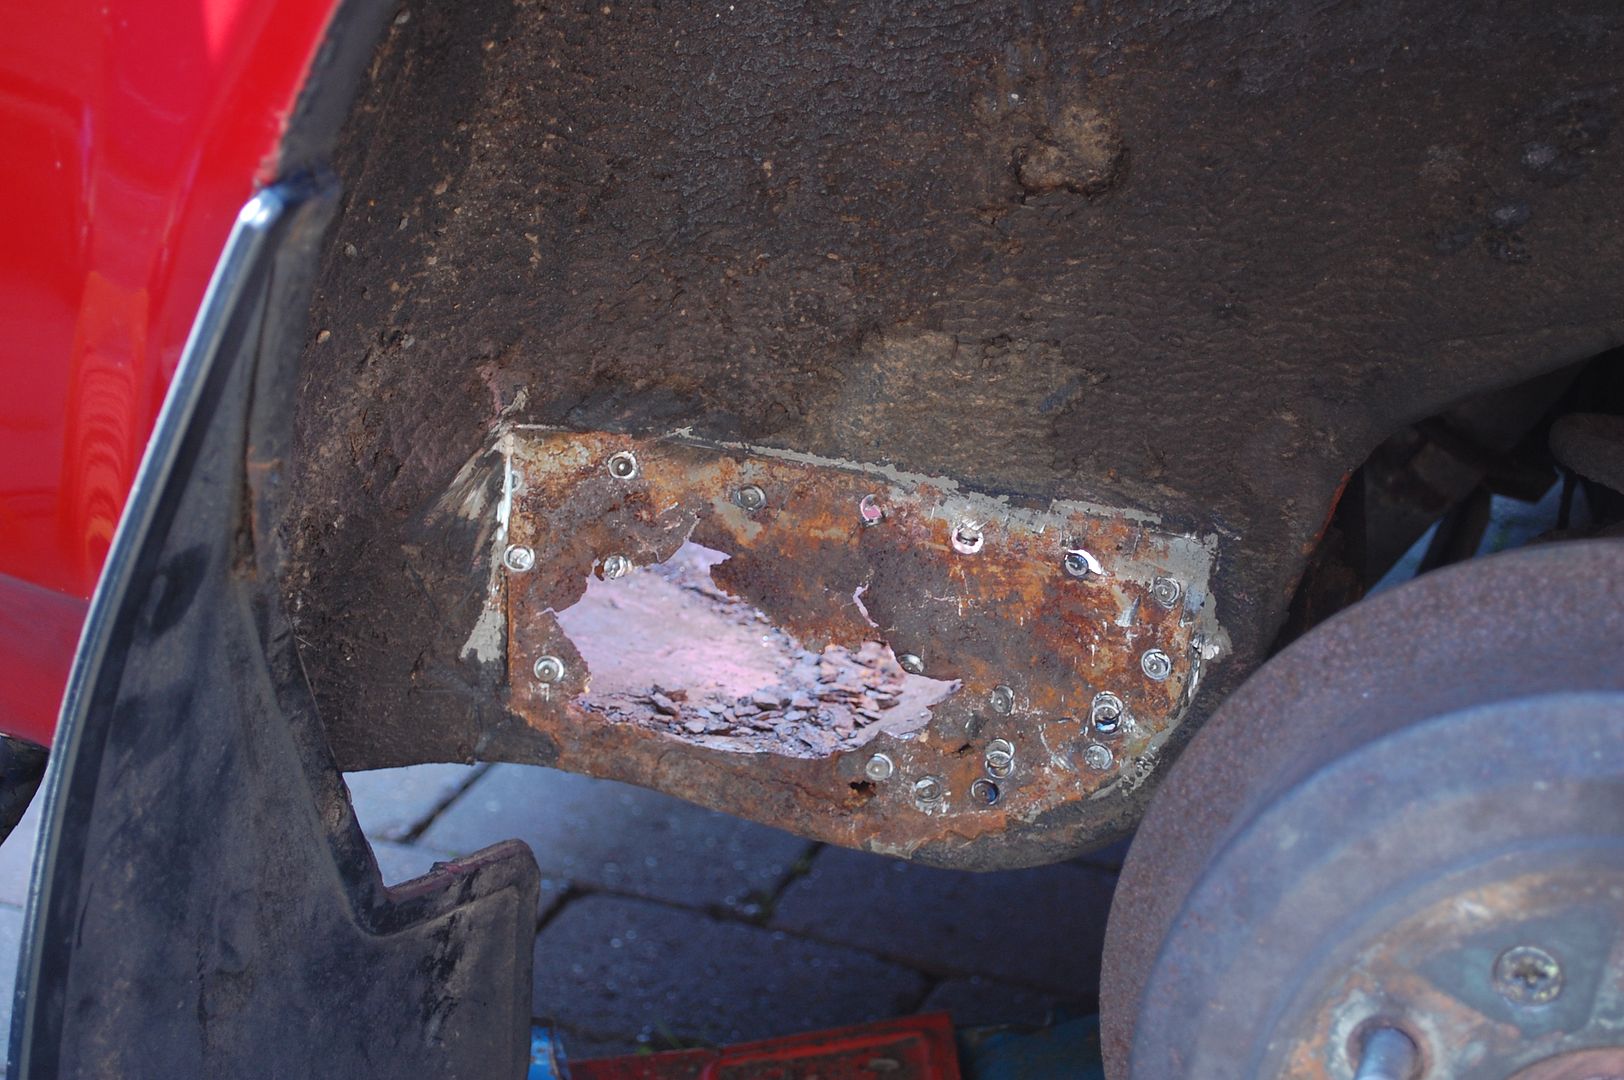
With the strengthening panel removed the damage was quite obvious.
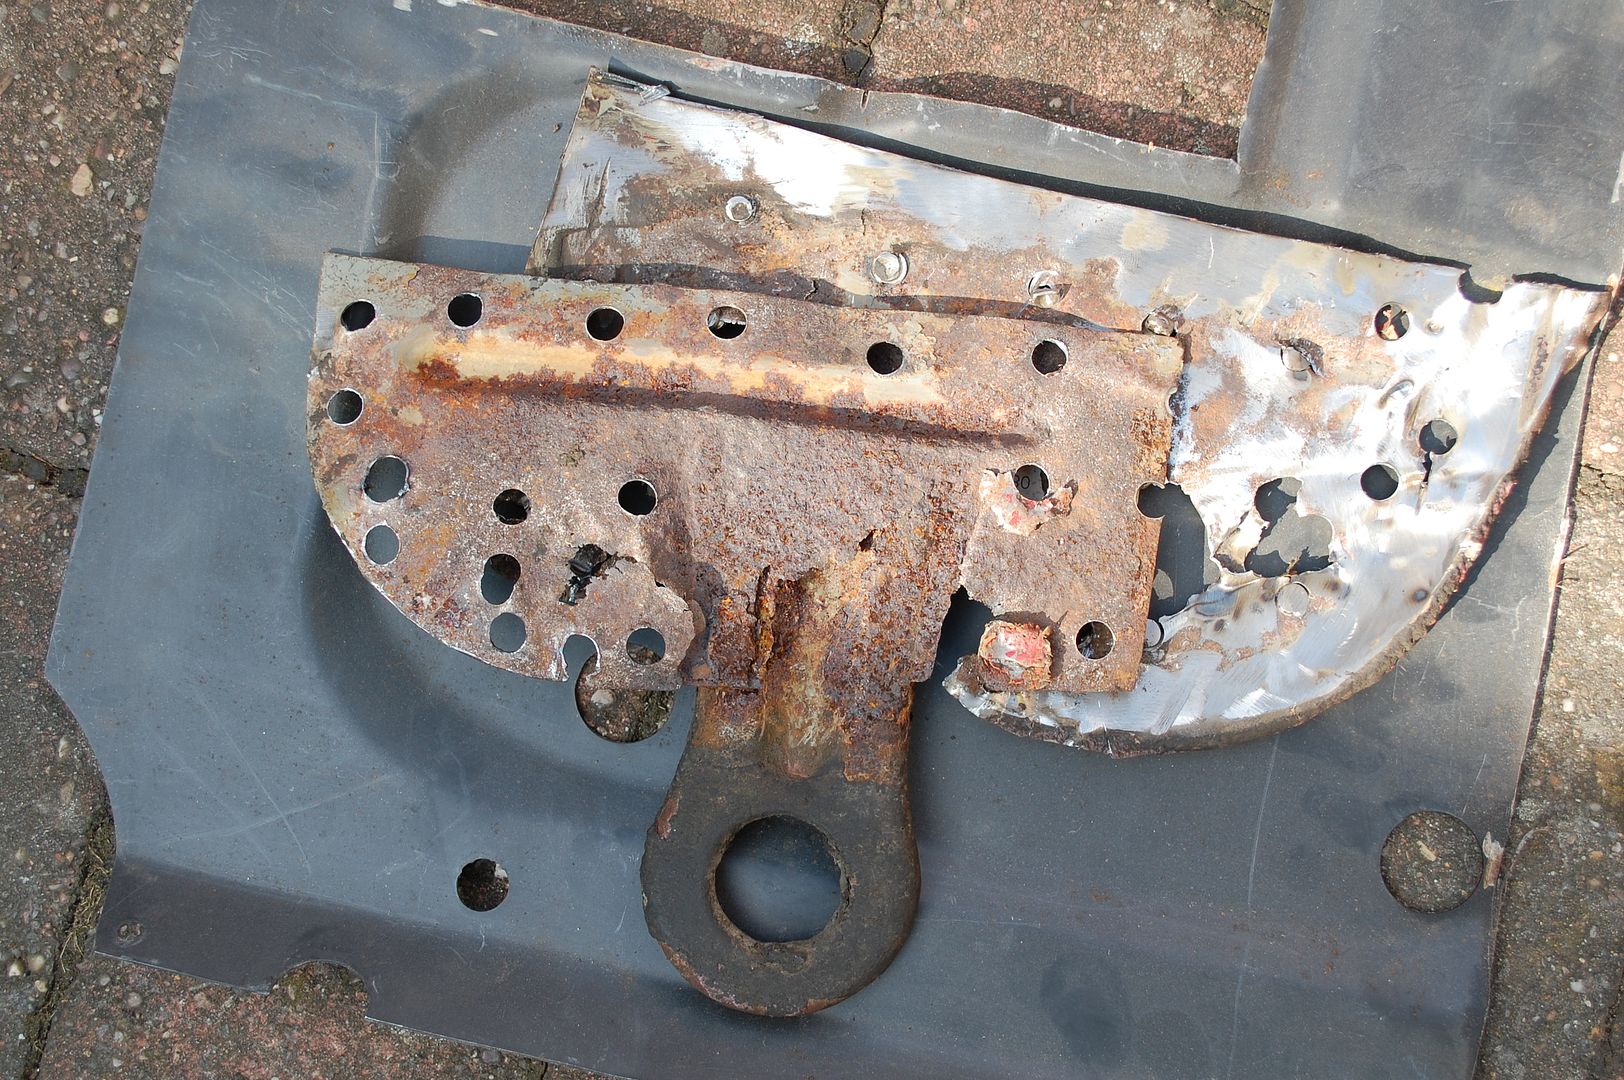
Sadly the stregthening panel was also toast! Lots to remake.
With what I needed to do outlined, out came my trusty plasma cutting disc on an angle grinder, goodbye rust.
With the drivers side investigation completed I decided it wasn't even worth removing the spot welds on the passenger side.
Using the removed panels as templates I started to make the inner arch repairs.
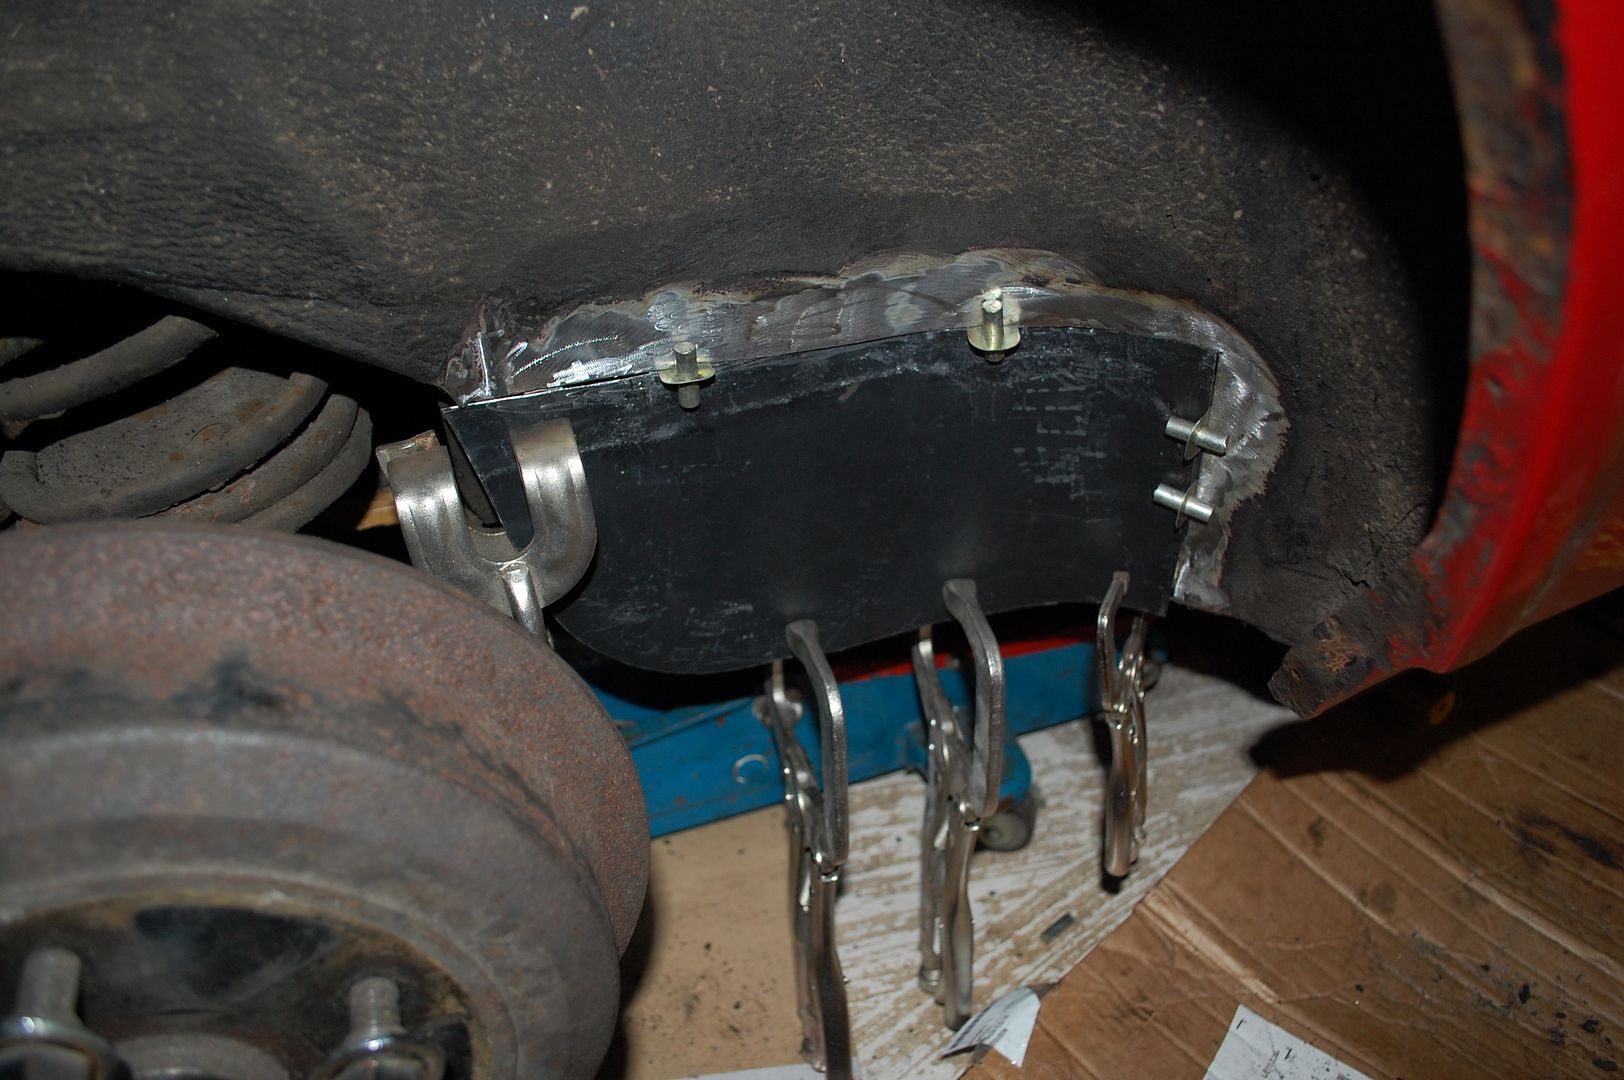
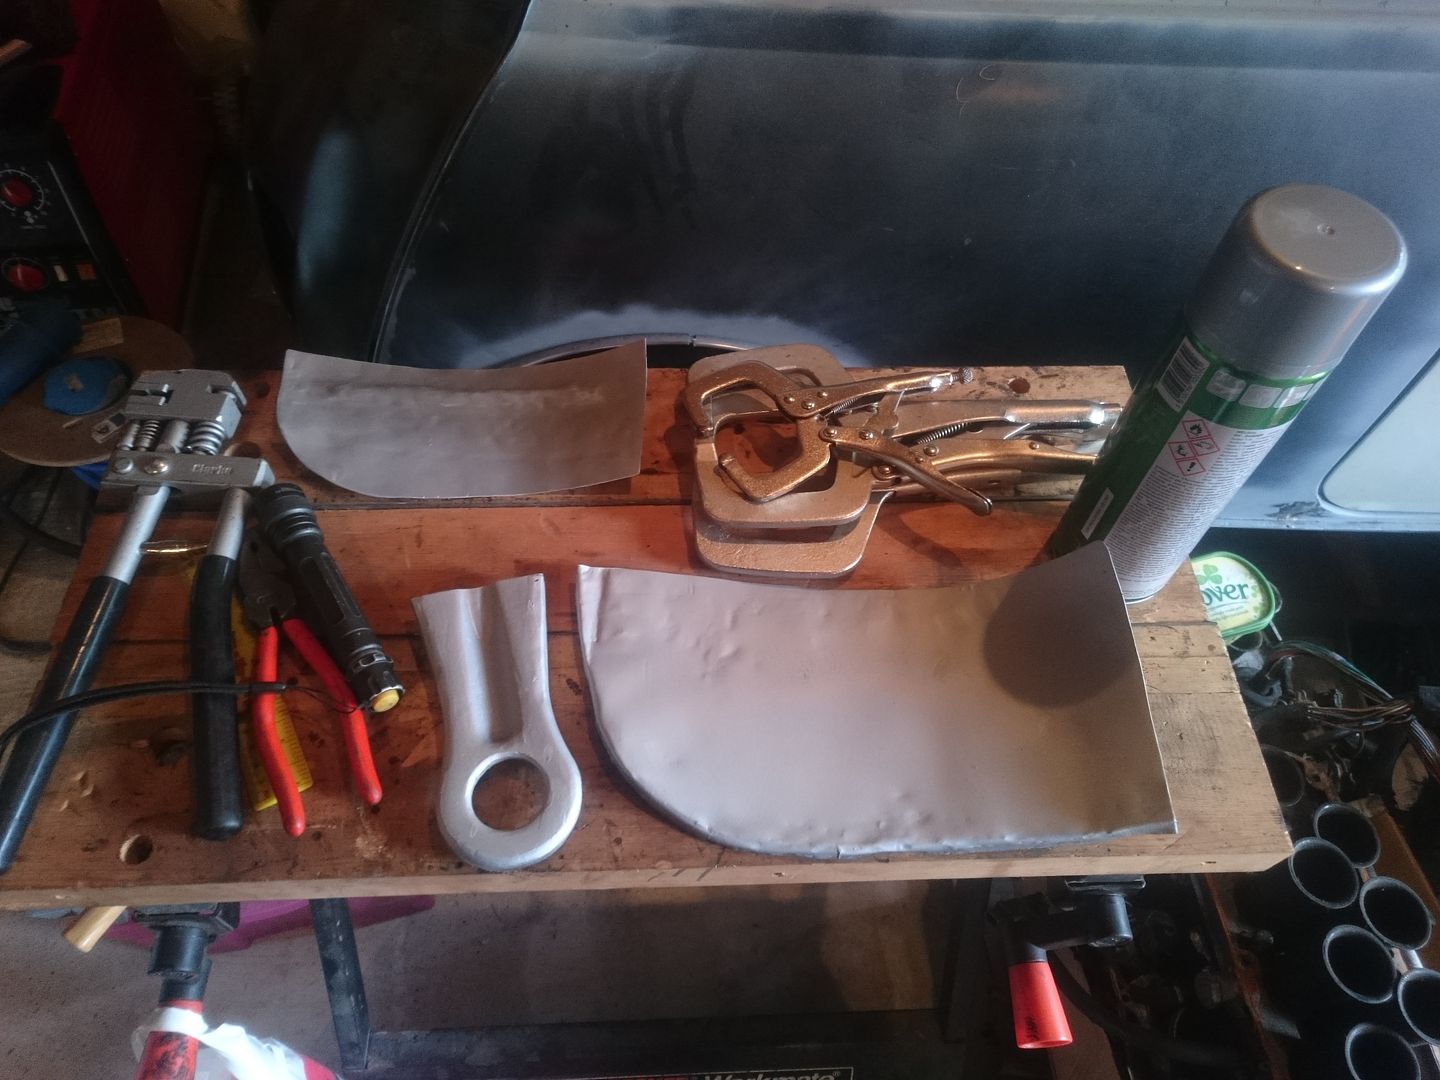
I also remade the strengthening panel, and cleaned the towing eye up. With all 3 panels ready I welded the towing eye onto the strengthening panel, and spot welded the panel onto the arch repair. So it'll be as close to factory as I can manage.
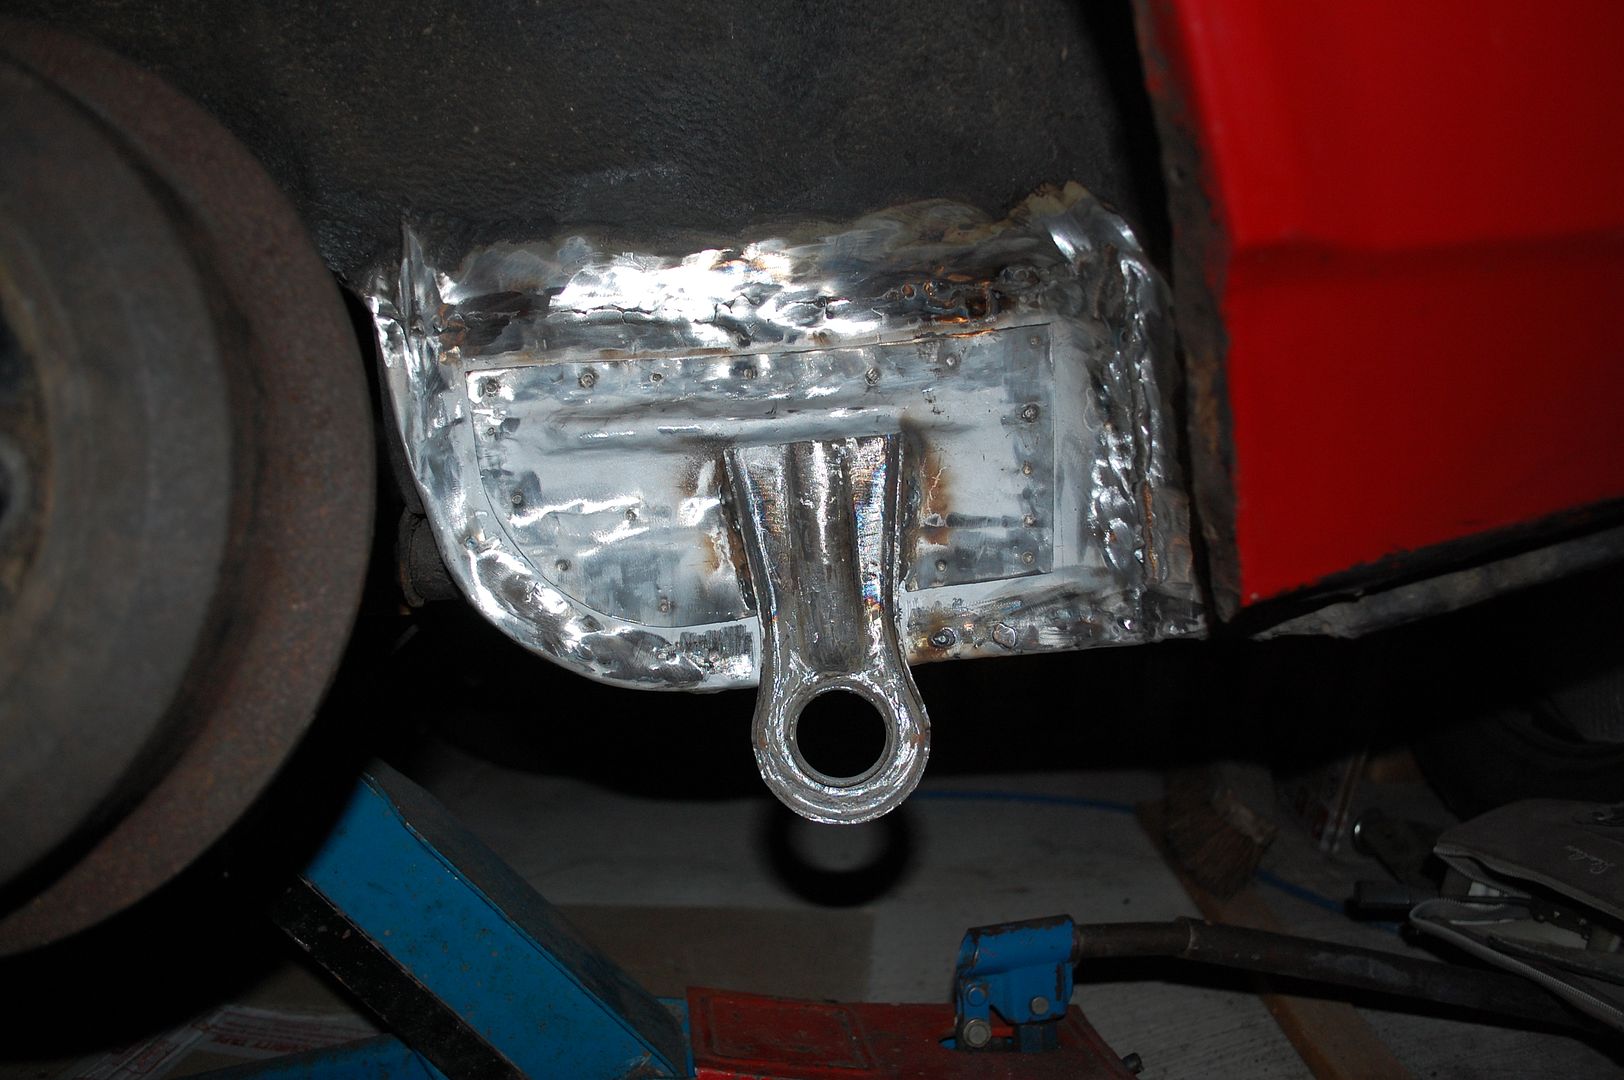
The drivers side followed an identical process, with equally satisfying results!
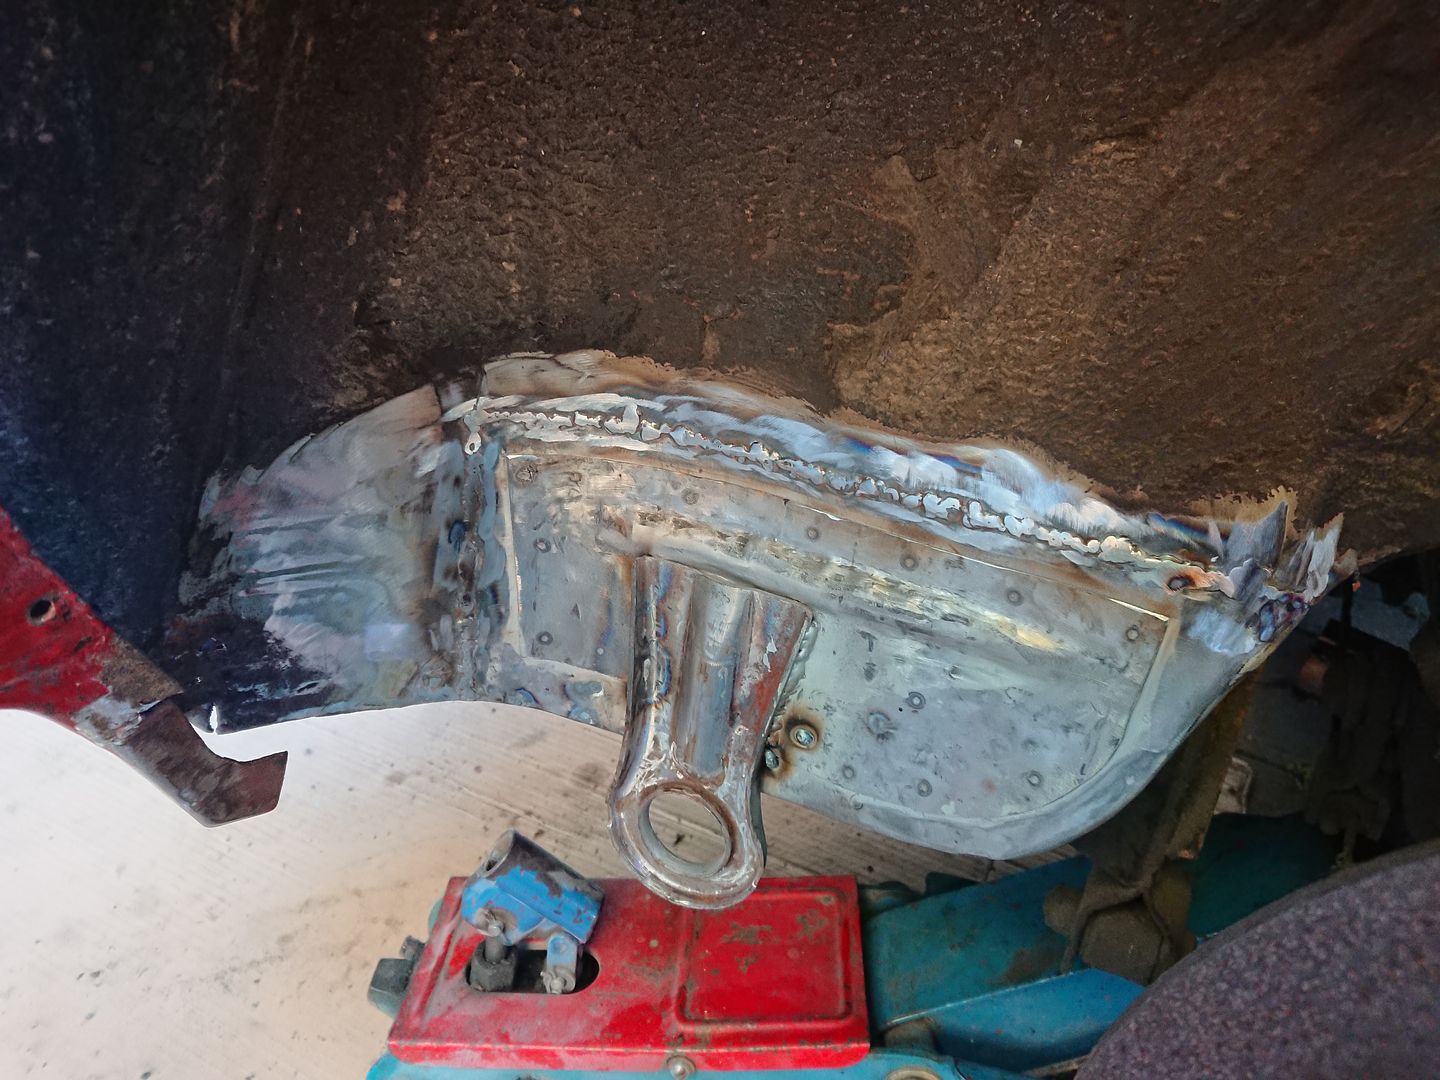
Sadly the last picture highlights a problem, poking around the sunroof drain on the right of the repair revealed some incredibly thin metal, and more than one hole...
Joe
First on the agenda was the rust that I found in the boot. From the outside it's quite obvious as to why it happens.

The area is made up of the inner arch, and a strengthening panel with the towing eye welded onto it. I knew I'd have to save the towing eye, but the strengthening panel was an unknown.

With the strengthening panel removed the damage was quite obvious.

Sadly the stregthening panel was also toast! Lots to remake.

With what I needed to do outlined, out came my trusty plasma cutting disc on an angle grinder, goodbye rust.
With the drivers side investigation completed I decided it wasn't even worth removing the spot welds on the passenger side.

Using the removed panels as templates I started to make the inner arch repairs.


I also remade the strengthening panel, and cleaned the towing eye up. With all 3 panels ready I welded the towing eye onto the strengthening panel, and spot welded the panel onto the arch repair. So it'll be as close to factory as I can manage.


The drivers side followed an identical process, with equally satisfying results!


Sadly the last picture highlights a problem, poking around the sunroof drain on the right of the repair revealed some incredibly thin metal, and more than one hole...
Joe
My dad had two 2600 SD1s in the mid eighties which were my first proper memories of cars, although I think I have some hazy recollections of a triumph dolomite sprint before that.
I think they were KND 840V (Not sure of the last bit) and the other was A322 HDB. Really fond memories of both. Remember wowing my primary school friends as the later one had 4 electric windows!!
The early one was going rusty by the time it was 6 years old. The second one which was a facelift seemed to fair better. The dash seemed so wide in the newer one with so many dials to a car mad 7 year old!
Glad to see another one is being brought back from the brink
cpreddy1 said:
I was amazed at the number of rust free old cars in NZ. They can't use salt on the roads there, surely?
No, thankfully in the few places that get snow/ice we grit the road with stones, not salt. Most of our towns are within shouting distance of a beach though, so we do still get rust here, but no where near what the UK has.We have a few Vitesse here, including a couple of late Twin Plenum models. We also got a handfull of Vandenplas EFI.
Regarding the OP, good work on the rust repair. That was a nasty little spot. Most people that repair that tend to remove the lashing loop instead of replacing it.

KelvinatorNZ said:
Regarding the OP, good work on the rust repair. That was a nasty little spot. Most people that repair that tend to remove the lashing loop instead of replacing it.
Thanks Kevin, hopefully you'll approve of all the little repairs. Well people want to see the project so lets get back into the body repairs.
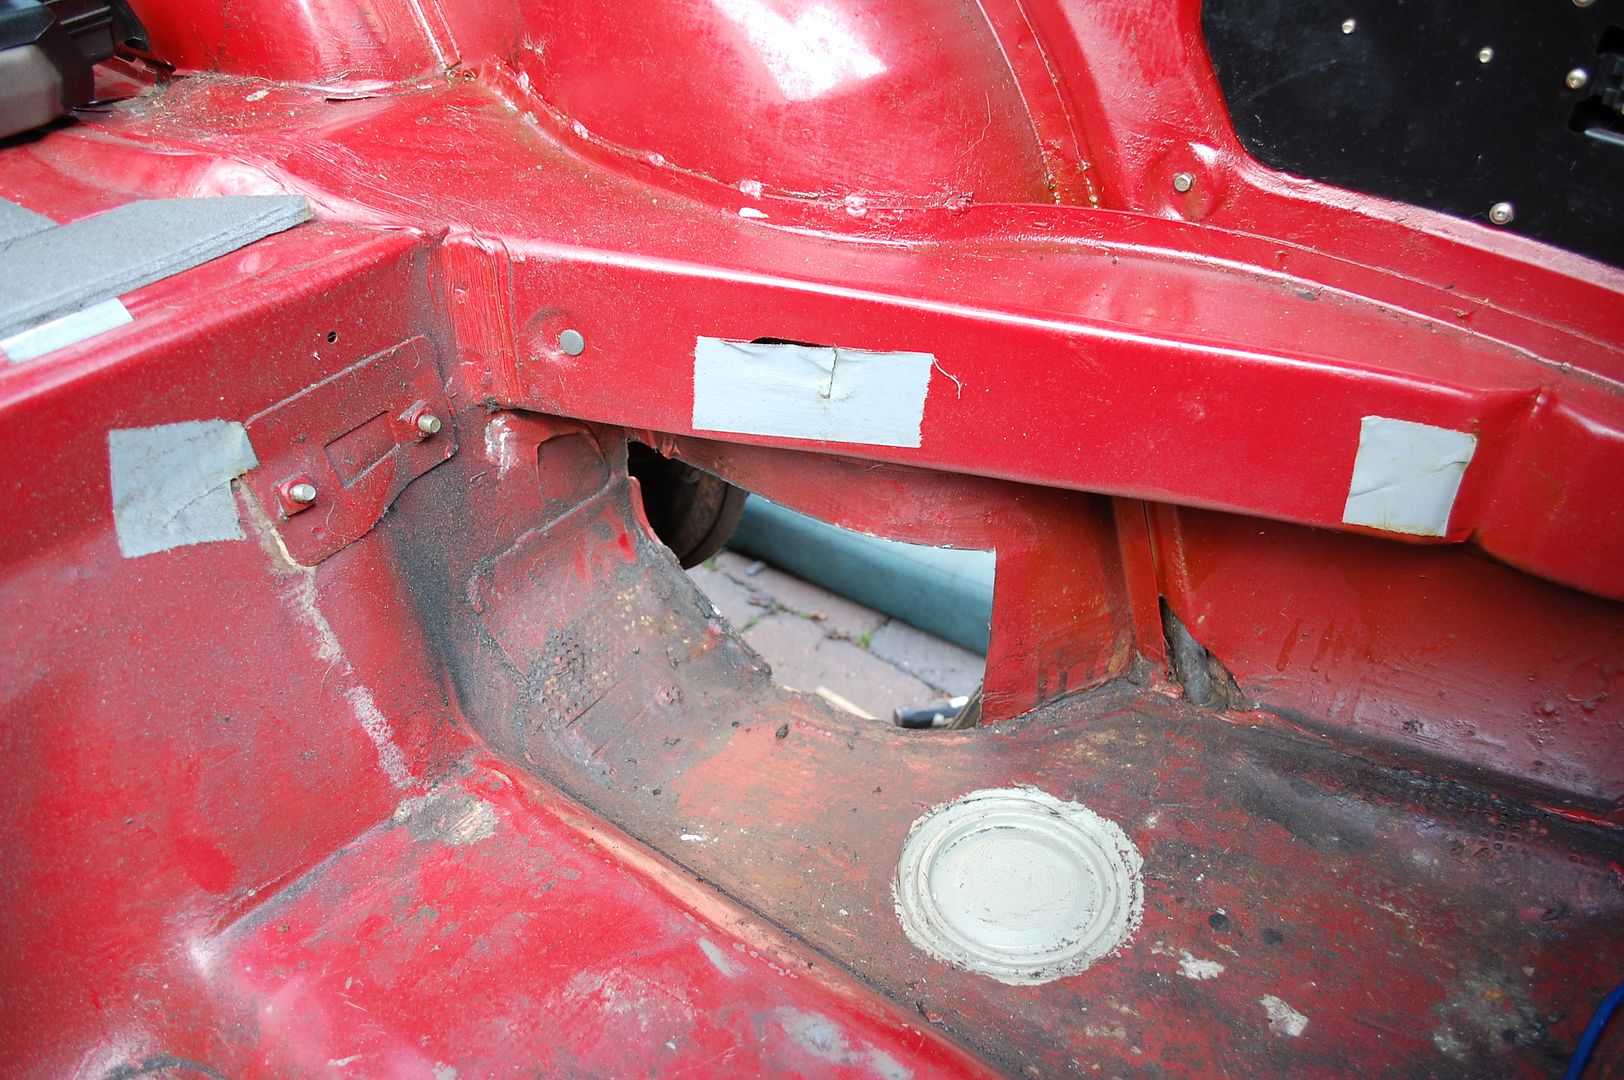
With the towing eye areas sorted I moved onto the sunroof drain area.
I wasn't the first person here!

It's quite clear that someone has been here before. The previous repair actually isn't that bad, and with the skim of filler pretty invisible. I debated leaving it and working around, but in the end I knew I could do much better.

A picture I managed to find of the car from 2009 shows slight scabbing in the area behind the mudflap, and was probably repaired around that time.

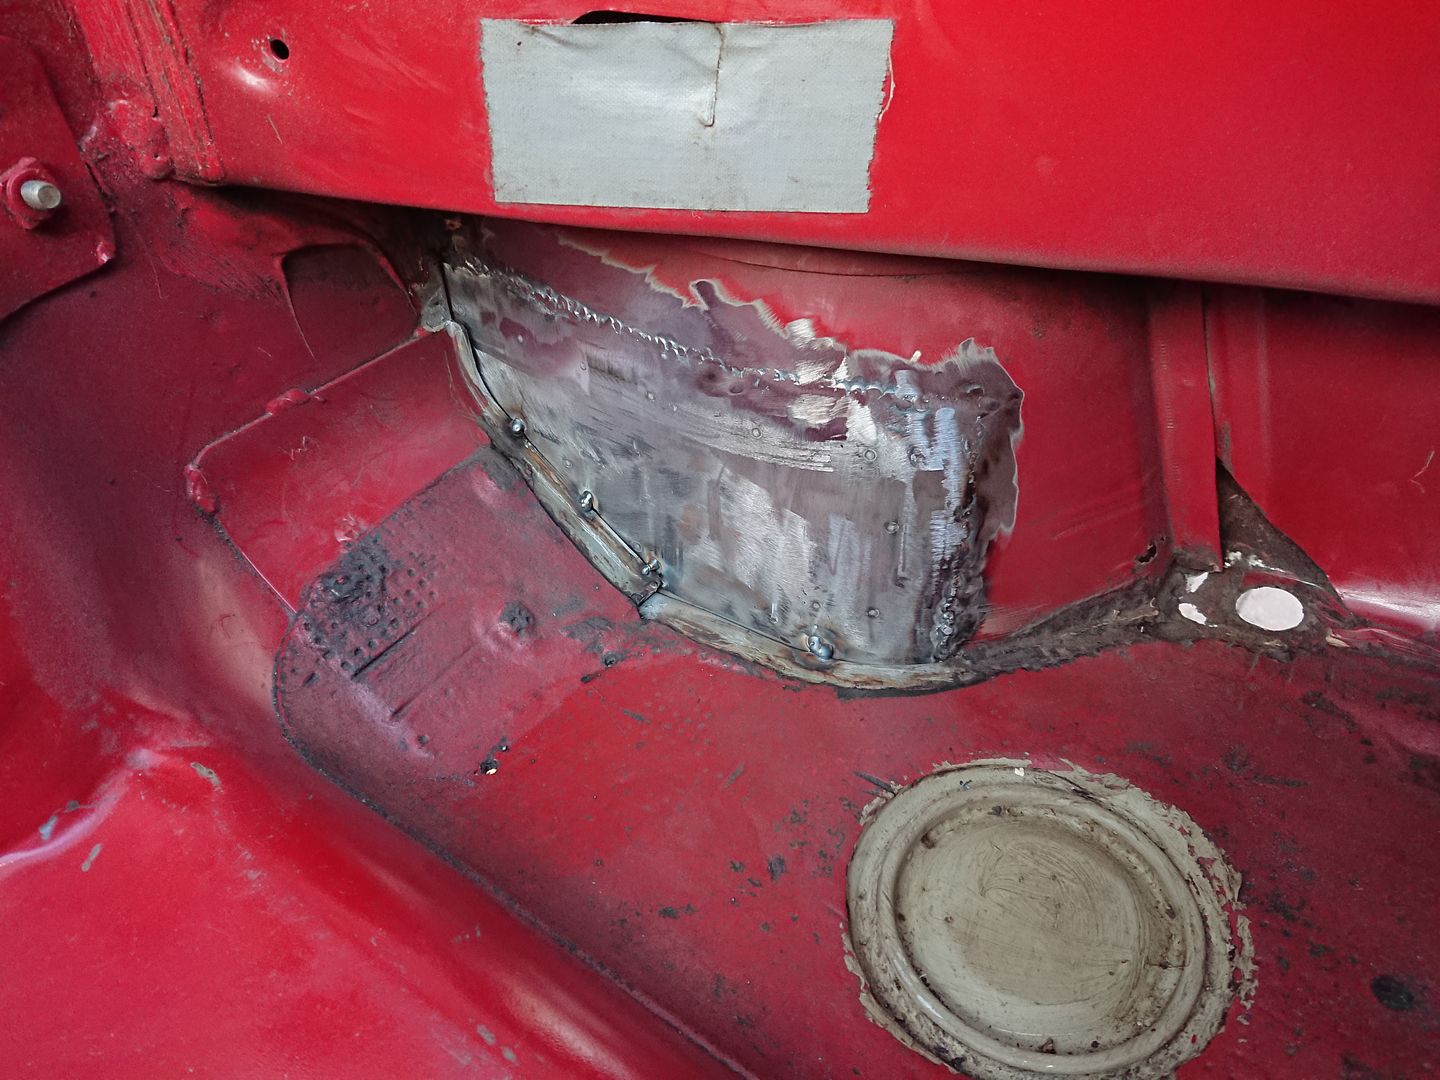
This picture really shows why cutting it off was a brilliant idea. Behind the repair is the inner wing closing panel, rusted and cut diagonally where the outer wing repair was done. This prevents the boot from sealing to the wheel arch area, and ultimately caused the area to rot again. This caused damage in the corner to the boot floor panel, outer wing panel, and both inner wing panels. The devil is in the detail so all repairs must be made!


A quick picture that shows days of work! Each repair carefully shaped to replicate what was damaged. Shown next to their rusted counterparts.

All carefully mounted up making sure the fit is good ready for welding.


The first panel to get welded in is the crucial and completely unseen inner wing closing panel. This will seal the boot area from the wheel arch and prevent it rotting again. This was coated in zinc paint to make sure it doesn't rot again. This also shows the boot floor repair welded in.


There we have a finished sunroof drain repair, not a single bit of nastiness remains, and all solid metal.
Joe
Edited by 1275 GT on Tuesday 12th June 10:13
Edited by 1275 GT on Friday 20th July 12:55

I'm new to PH but this has been a great read for me.
Growing up in the late 70's / early 80's these cars were a thing of legend.
A work friend of mine in the 90's actually bought one so he could use the engine in his Westfield that he built in the garage at his parent's house all whilst he slept in the loft space above. What was funny about this tale is that he painted the Rover up fist to look like a police car but had the symbol of Newcastle Brown Ale on each front door. Strange but true.
Good to see someone keeping this car going. Well done and keep it up!
I'd forgotten what good looking cars these were - they've aged far better than most cars of that era.
And I'm full of admiration for the skills demonstrated in the restoration. It must be immensely satisfying to bring a lovely old car back to life like this, and to know how much pleasure it gives other people as well as yourself.
Looking forward eagerly to the next instalment!
And I'm full of admiration for the skills demonstrated in the restoration. It must be immensely satisfying to bring a lovely old car back to life like this, and to know how much pleasure it gives other people as well as yourself.
Looking forward eagerly to the next instalment!
Thank you all for the kind words, it's always nice to have your work admired!
I think a lot these cars where lost to kit cars, I can completely understand why, but still a great shame so many where lost.
I think they've aged brilliantly, but then again its such a novelty seeing them, I've only ever seen 2 SD1s on the road in recent memory!
Well we've got a lot more metal work to go over, I hope you lot aren't bored yet!
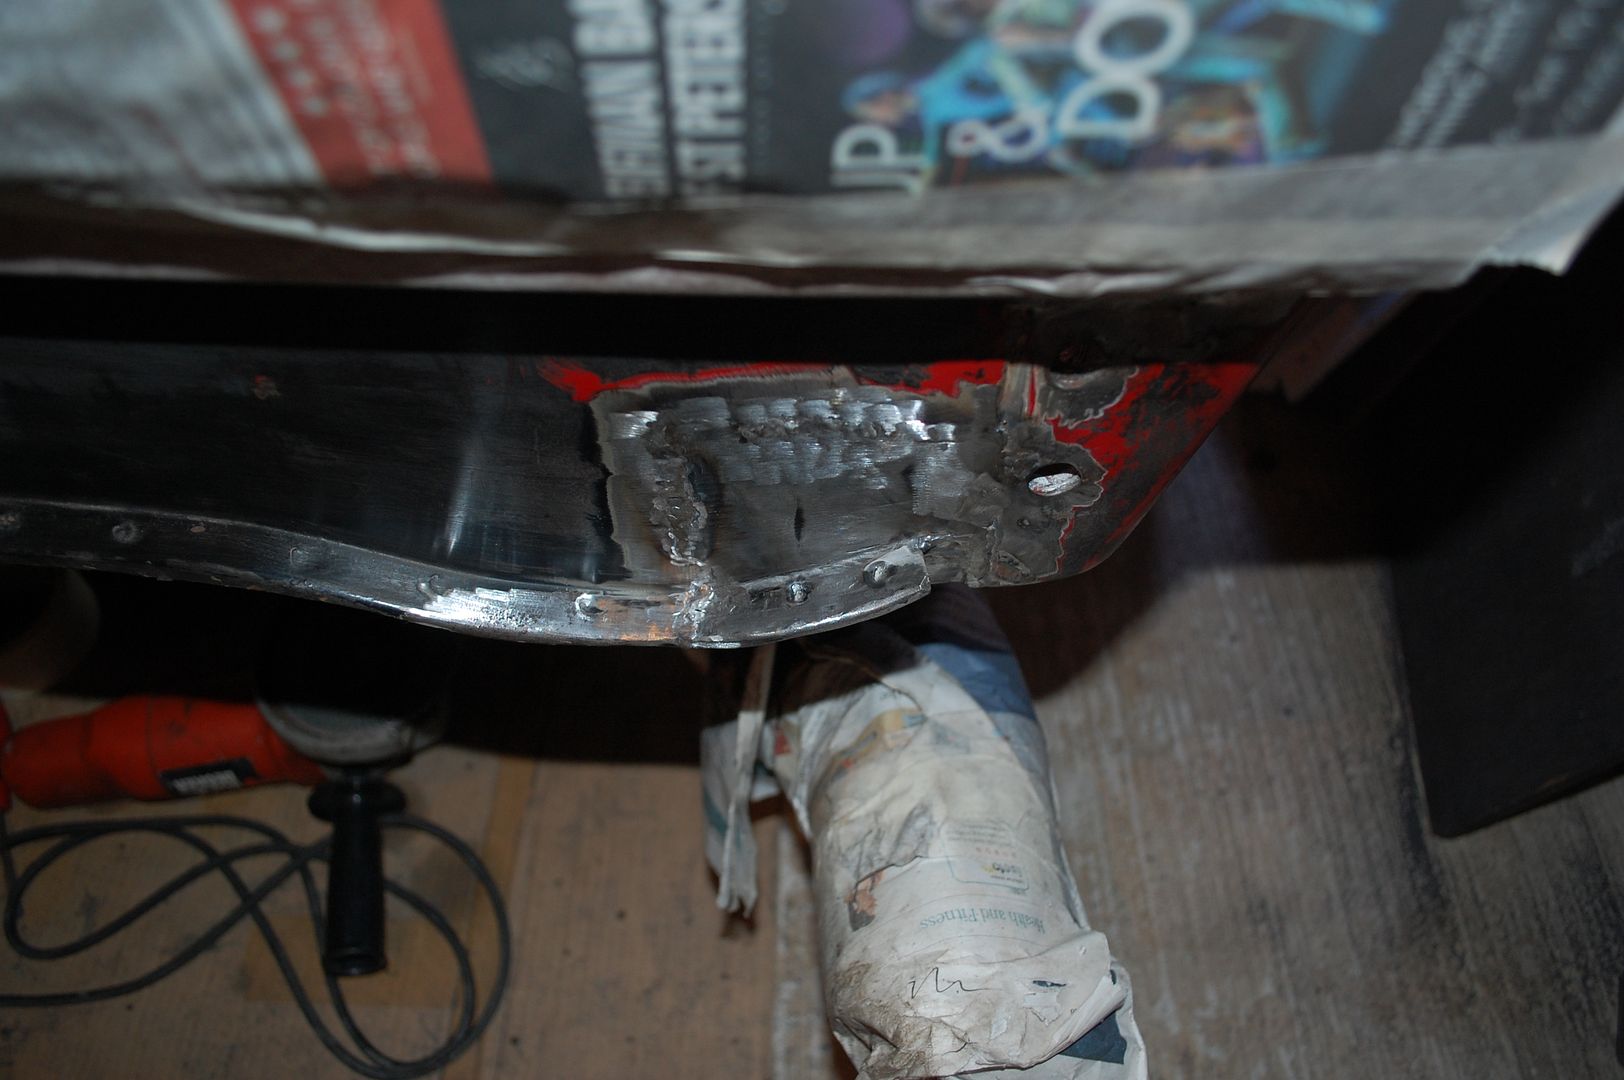
As I had to remove the bumper to get the Vitesse on the trailer the usually unseen rear end was exposed and made it more obvious that it needed some attention.
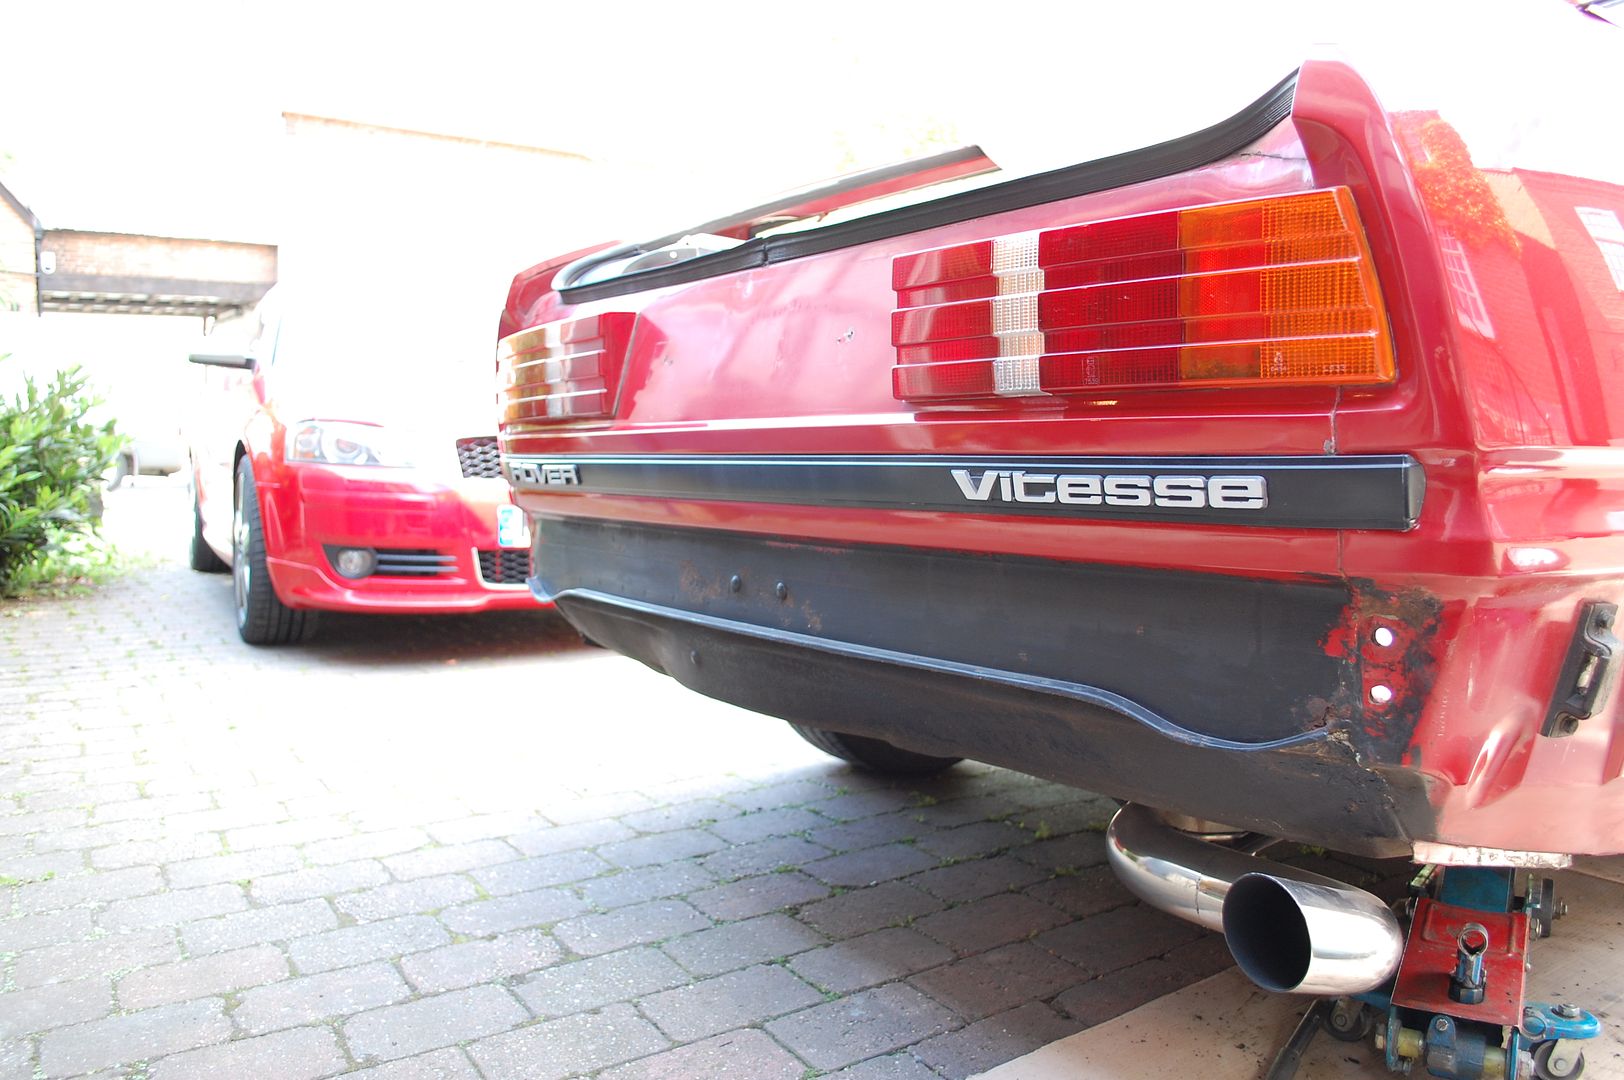
The area by the offside bumper mounting wasn't looking great either. I couldn't leave it so out came the poking screwdriver.
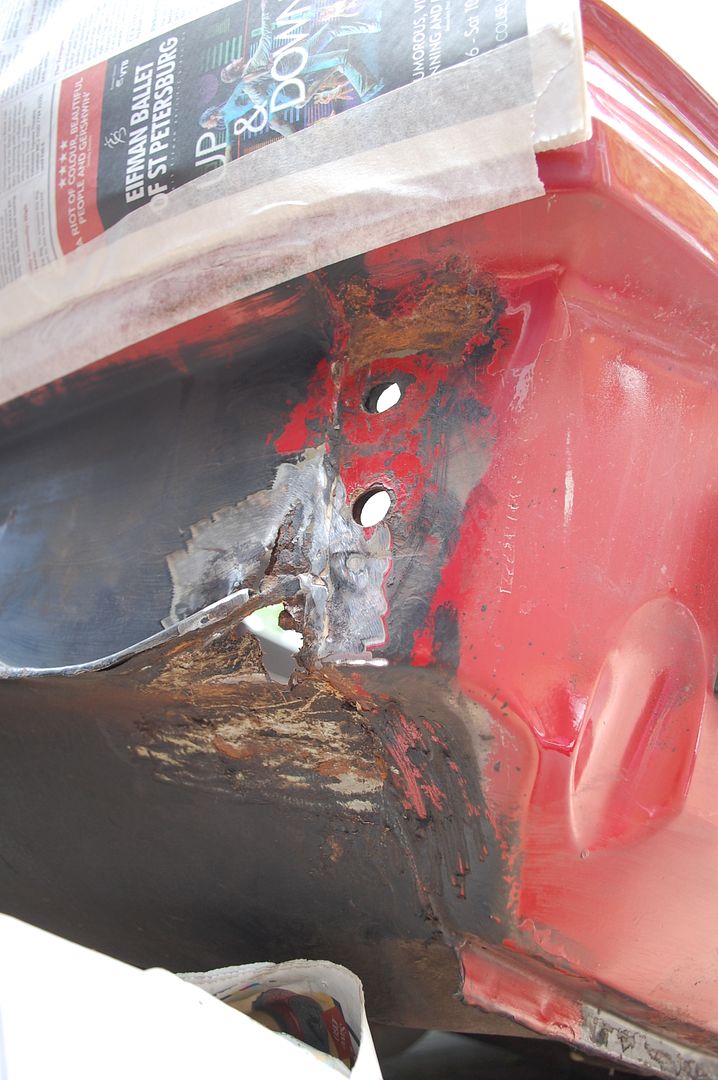
Straight through... bugger.
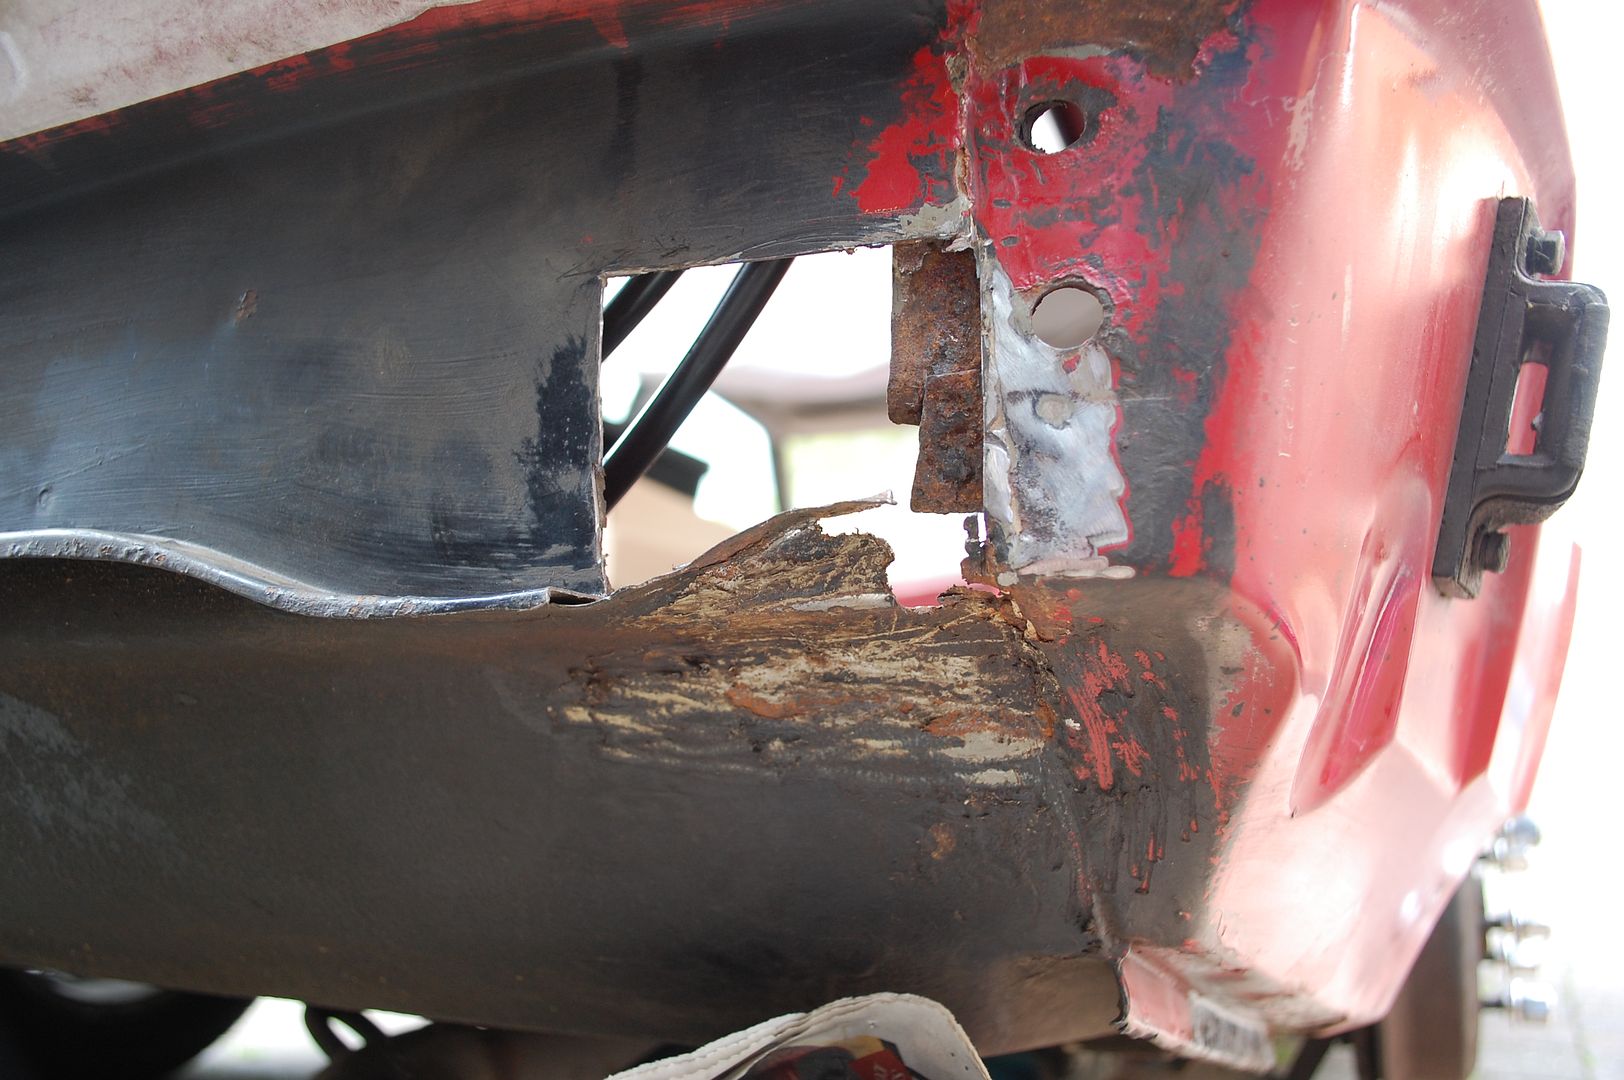
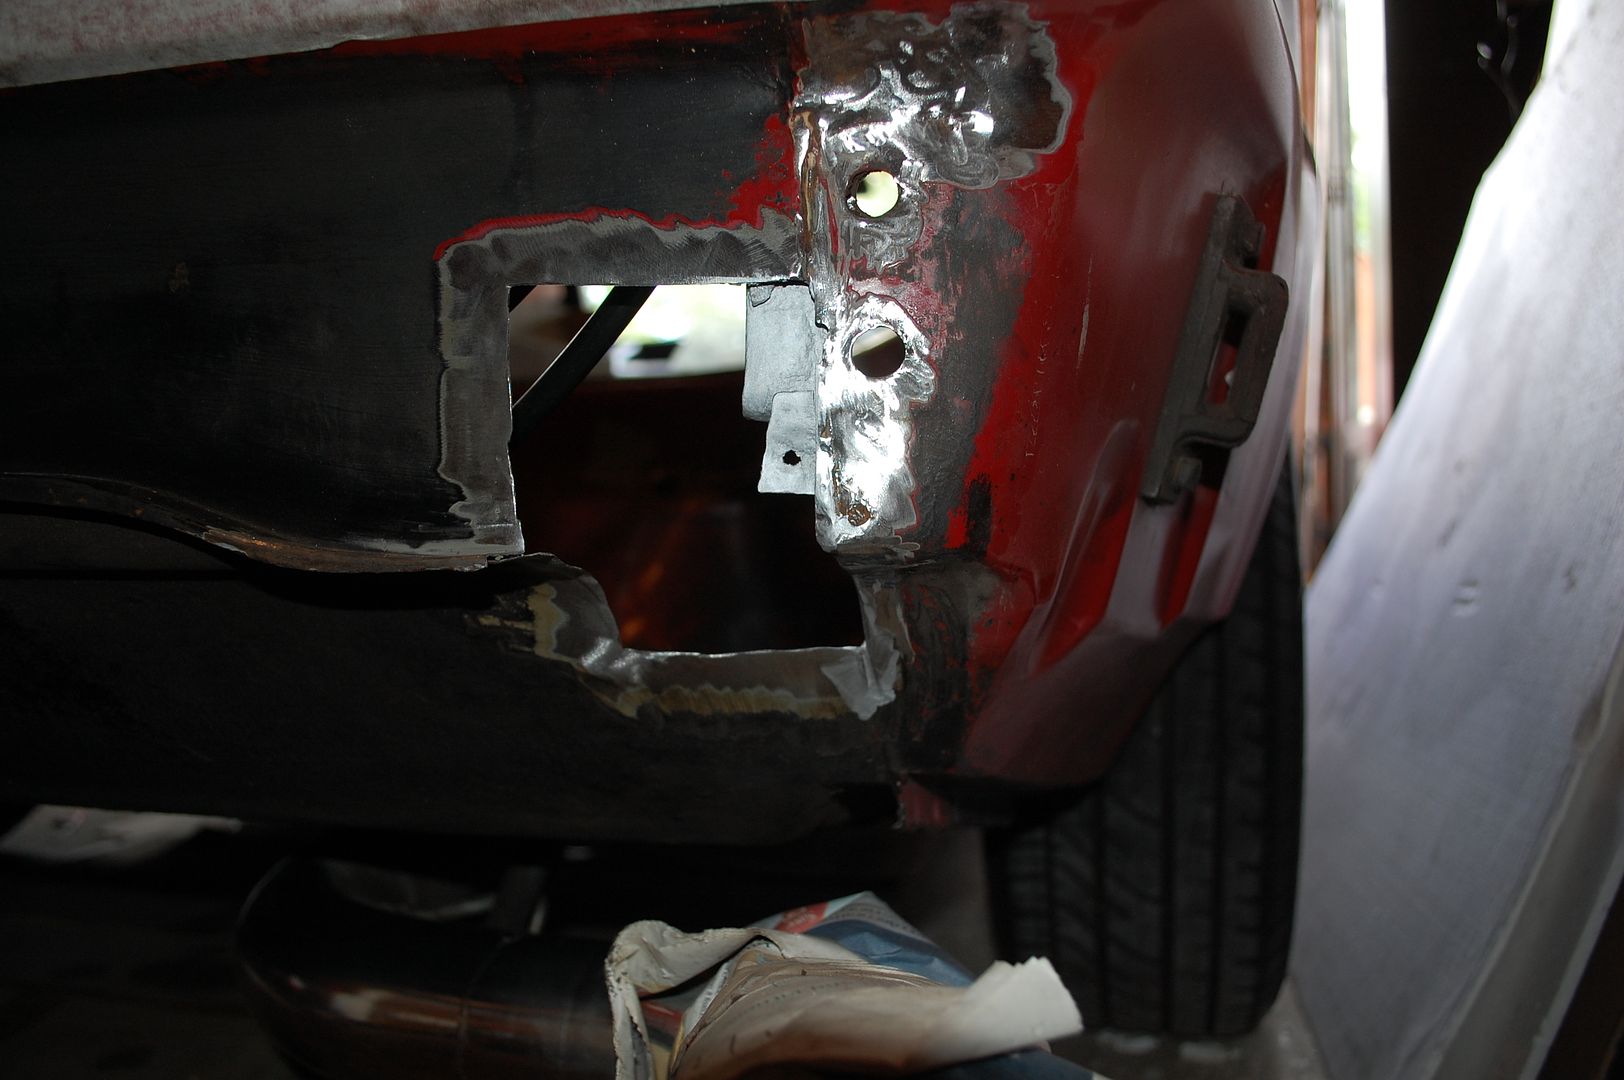
The area that has the damage is made up of the boot floor return, and the rear panel. These are then spot welded together along the curved seam.
With the rear panel section removed beyond the boot floor section I could make sure I stepped the welding so the seam was as strong as it could be.
I actually had bought a rear panel in preparation for a different project, and proved invaluable in creating the repair.
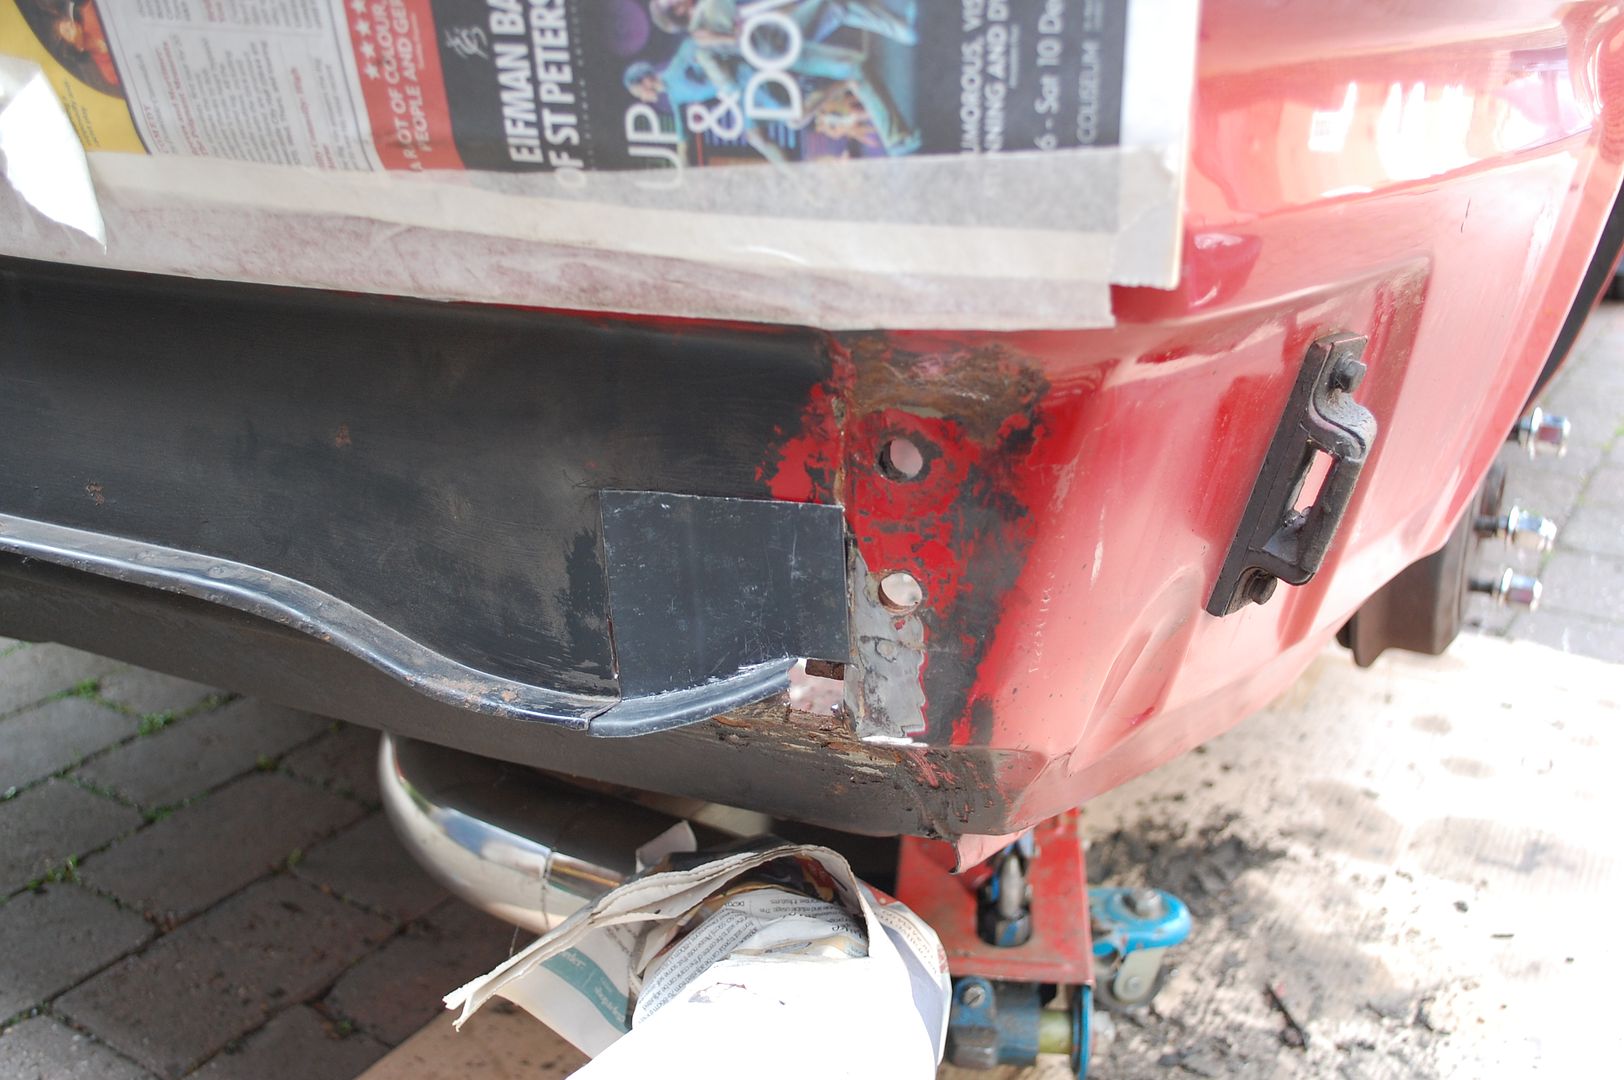
Luckily for me the damage stopped before the rear wing, that would have been a complete arse. As it is I was left with crafting the incredibly complicated boot floor section. For this I needed a cardboard template.
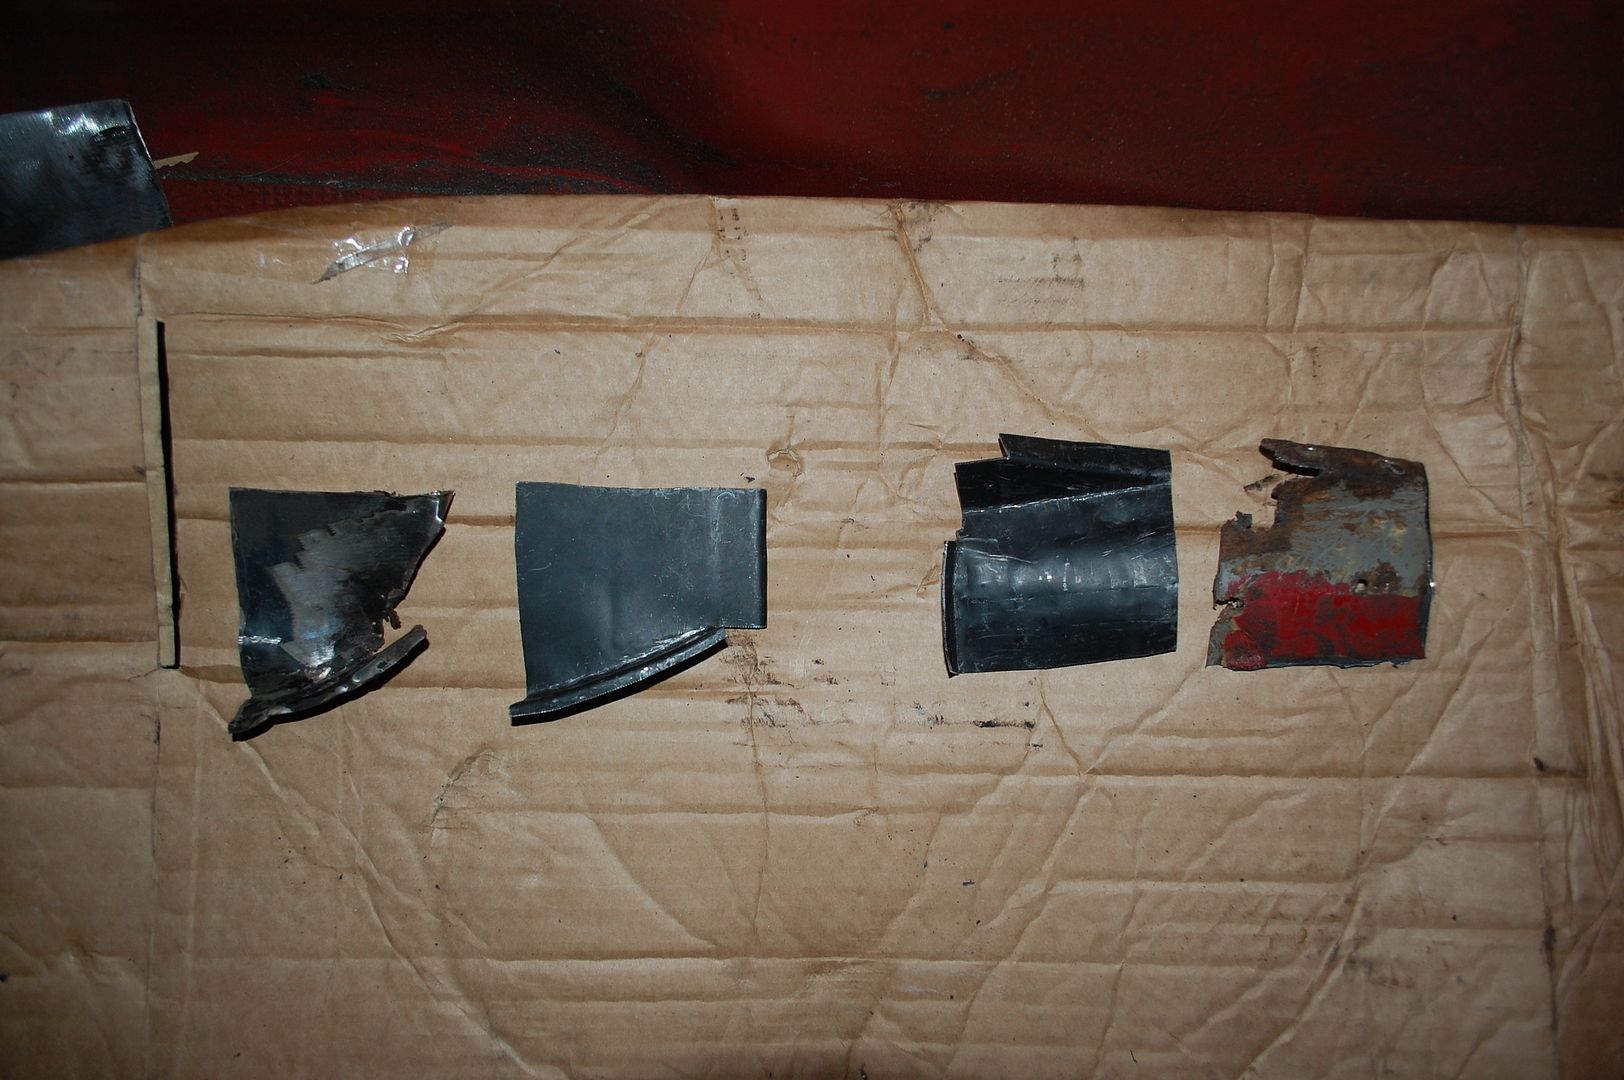
From this I remade it in steel. Lots of bending, crimping, and hammering!
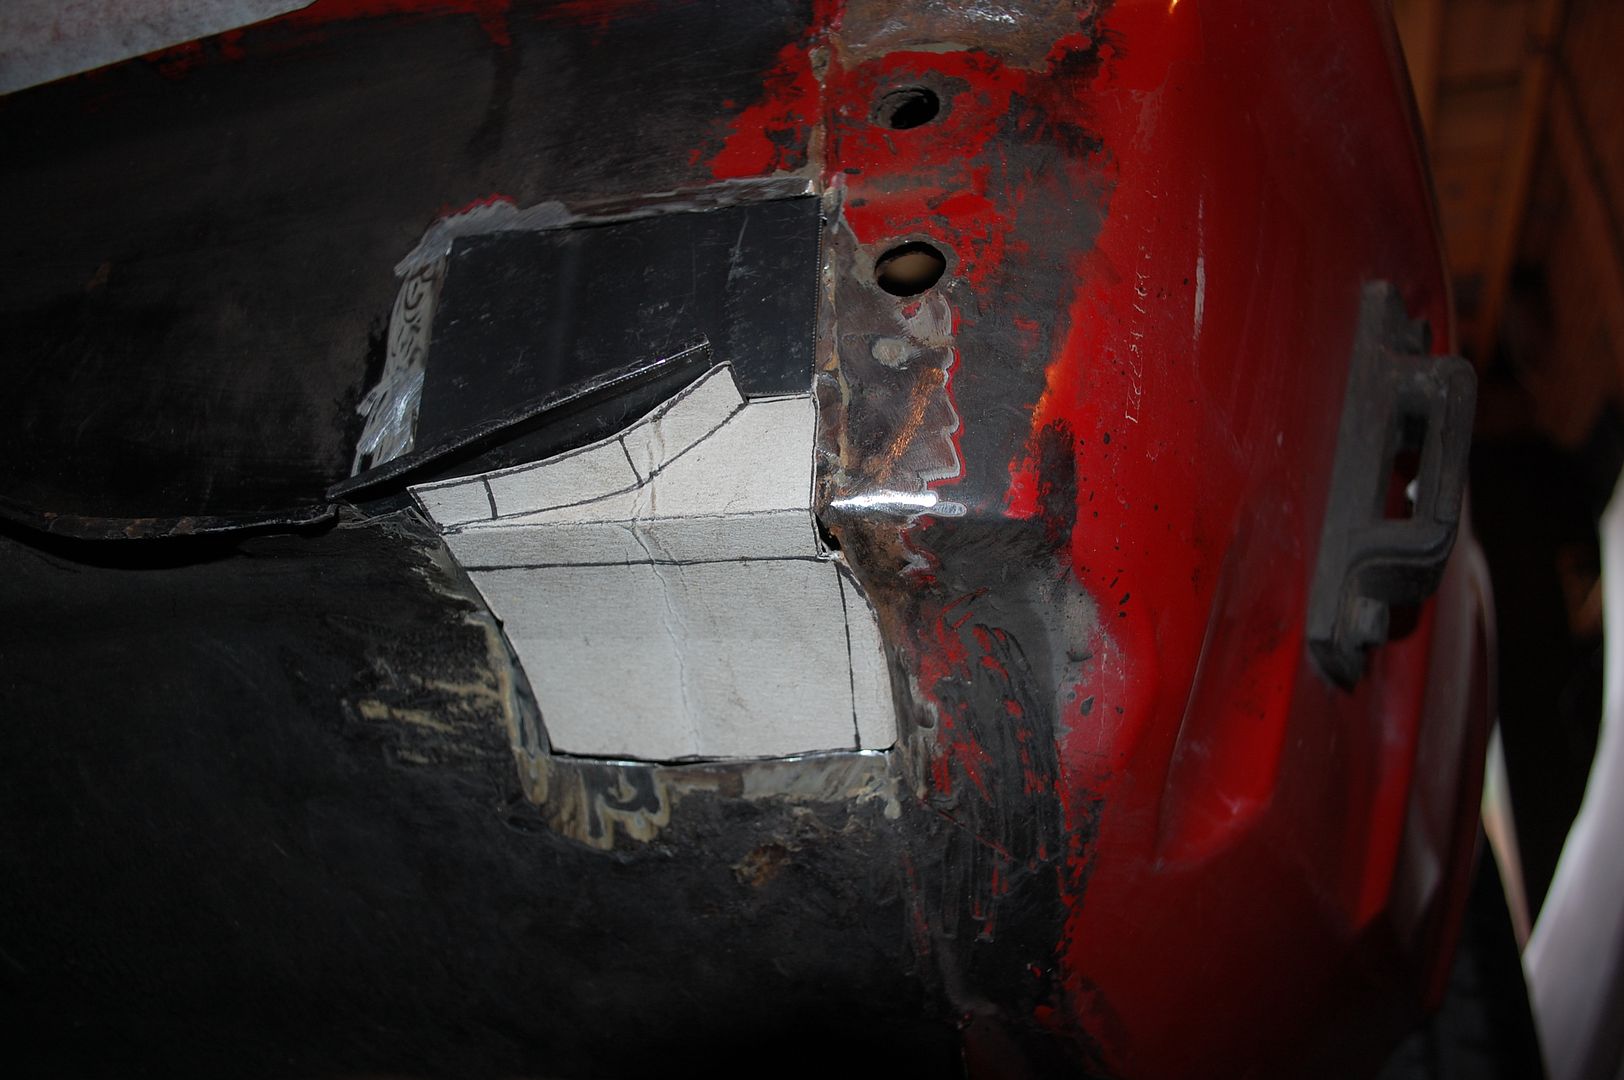
I then prepped the area, and like all previous repairs, any seams or areas that then become difficult to get too are treated in weld through paint. Absolutely brilliant stuff.
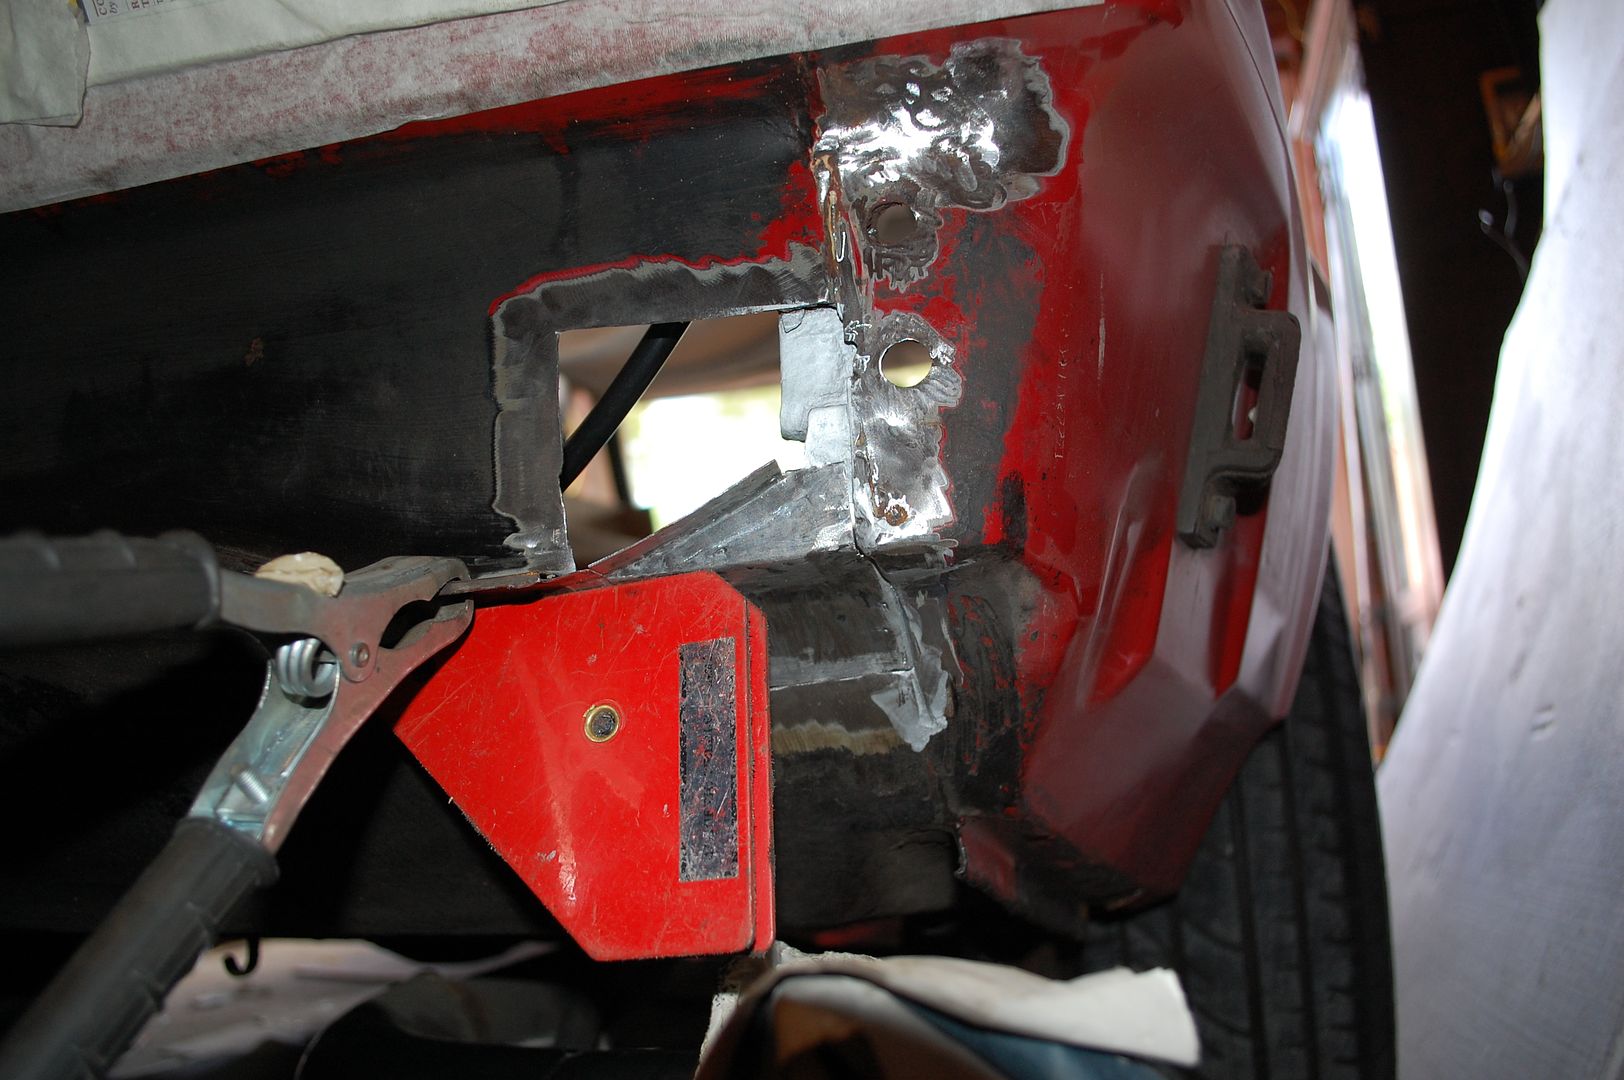
Boot floor repair held in place ready for welding.
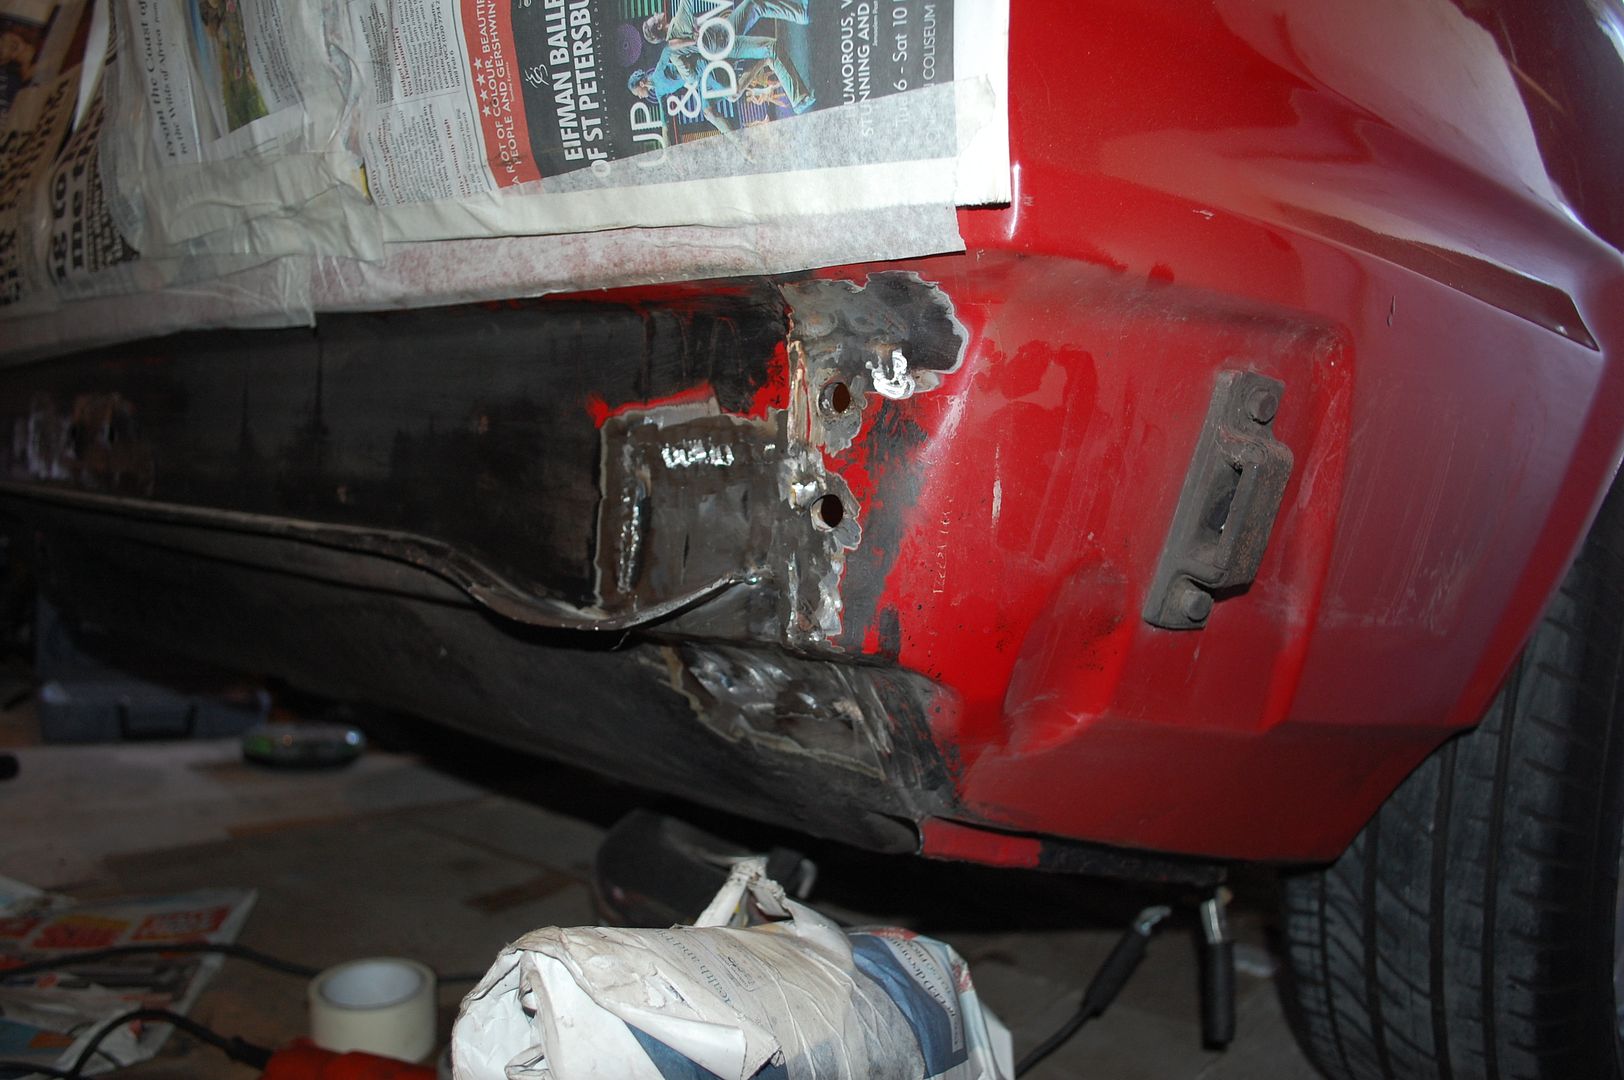
Final welded up picture with the factory spot welds replaced. (I knew buying a spot welder was a good idea.)
This repair was being done at the same time as the others, hence the time inconsistency.
I know some people are a keener on replacing panels rather than repairing but like all the rust I've found, its such localised damaged it seemed stupid to remove more than was necessary, and hopefully this is a little nicer than the usual patches people usually envisage.
Joe
I think a lot these cars where lost to kit cars, I can completely understand why, but still a great shame so many where lost.
I think they've aged brilliantly, but then again its such a novelty seeing them, I've only ever seen 2 SD1s on the road in recent memory!
Well we've got a lot more metal work to go over, I hope you lot aren't bored yet!
As I had to remove the bumper to get the Vitesse on the trailer the usually unseen rear end was exposed and made it more obvious that it needed some attention.

The area by the offside bumper mounting wasn't looking great either. I couldn't leave it so out came the poking screwdriver.

Straight through... bugger.

The area that has the damage is made up of the boot floor return, and the rear panel. These are then spot welded together along the curved seam.
With the rear panel section removed beyond the boot floor section I could make sure I stepped the welding so the seam was as strong as it could be.
I actually had bought a rear panel in preparation for a different project, and proved invaluable in creating the repair.


Luckily for me the damage stopped before the rear wing, that would have been a complete arse. As it is I was left with crafting the incredibly complicated boot floor section. For this I needed a cardboard template.

From this I remade it in steel. Lots of bending, crimping, and hammering!

I then prepped the area, and like all previous repairs, any seams or areas that then become difficult to get too are treated in weld through paint. Absolutely brilliant stuff.

Boot floor repair held in place ready for welding.


Final welded up picture with the factory spot welds replaced. (I knew buying a spot welder was a good idea.)
This repair was being done at the same time as the others, hence the time inconsistency.
I know some people are a keener on replacing panels rather than repairing but like all the rust I've found, its such localised damaged it seemed stupid to remove more than was necessary, and hopefully this is a little nicer than the usual patches people usually envisage.
Joe
Edited by 1275 GT on Tuesday 12th June 22:31
1275 GT said:
Thank you all for the kind words, it's always nice to have your work admired!
I think a lot these cars where lost to kit cars, I can completely understand why, but still a great shame so many where lost.
I think they've aged brilliantly, but then again its such a novelty seeing them, I've only ever seen 2 SD1s on the road in recent memory!
Well we've got a lot more metal work to go over, I hope you lot aren't bored yet!
As I had to remove the bumper to get the Vitesse on the trailer the usually unseen rear end was exposed and made it more obvious that it needed some attention.
The area by the offside bumper mounting wasn't looking great either. I couldn't leave it so out came the poking screwdriver.
Straight through... bugger.
The area that has the damage is made up of the boot floor return, and the rear panel. These are then spot welded together along the curved seam.
With the rear panel section removed beyond the boot floor section I could make sure I stepped the welding so the seam was as strong as it could be.
I actually had bought a rear panel in preparation for a different project, and proved invaluable in creating the repair.
Luckily for me the damage stopped before the rear wing, that would have been a complete arse. As it is I was left with crafting the incredibly complicated boot floor section. For this I needed a cardboard template.
From this I remade it in steel. Lots of bending, crimping, and hammering!
I then prepped the area, and like all previous repairs, any seams or areas that then become difficult to get too are treated in weld through paint. Absolutely brilliant stuff.
Boot floor repair held in place ready for welding.
Final welded up picture with the factory spot welds replaced. (I knew buying a spot welder was a good idea.)
This repair was being done at the same time as the others, hence the time inconsistency.
I know some people are a keener on replacing panels rather than repairing but like all the rust I've found, its such localised damaged it seemed stupid to remove more than was necessary, and hopefully this is a little nicer than the usual patches people usually envisage.
Joe
Looks like you’re doing a great job on this. I like the fact that you’re doing the localised repairs rather than hacking off whole panels. Very interesting thread and I look forward to more. I think a lot these cars where lost to kit cars, I can completely understand why, but still a great shame so many where lost.
I think they've aged brilliantly, but then again its such a novelty seeing them, I've only ever seen 2 SD1s on the road in recent memory!
Well we've got a lot more metal work to go over, I hope you lot aren't bored yet!
As I had to remove the bumper to get the Vitesse on the trailer the usually unseen rear end was exposed and made it more obvious that it needed some attention.
The area by the offside bumper mounting wasn't looking great either. I couldn't leave it so out came the poking screwdriver.
Straight through... bugger.
The area that has the damage is made up of the boot floor return, and the rear panel. These are then spot welded together along the curved seam.
With the rear panel section removed beyond the boot floor section I could make sure I stepped the welding so the seam was as strong as it could be.
I actually had bought a rear panel in preparation for a different project, and proved invaluable in creating the repair.
Luckily for me the damage stopped before the rear wing, that would have been a complete arse. As it is I was left with crafting the incredibly complicated boot floor section. For this I needed a cardboard template.
From this I remade it in steel. Lots of bending, crimping, and hammering!
I then prepped the area, and like all previous repairs, any seams or areas that then become difficult to get too are treated in weld through paint. Absolutely brilliant stuff.
Boot floor repair held in place ready for welding.
Final welded up picture with the factory spot welds replaced. (I knew buying a spot welder was a good idea.)
This repair was being done at the same time as the others, hence the time inconsistency.
I know some people are a keener on replacing panels rather than repairing but like all the rust I've found, its such localised damaged it seemed stupid to remove more than was necessary, and hopefully this is a little nicer than the usual patches people usually envisage.
Joe
Edited by 1275 GT on Tuesday 12th June 22:31
Earl of Petrol said:
Looks like you’re doing a great job on this. I like the fact that you’re doing the localised repairs rather than hacking off whole panels. Very interesting thread and I look forward to more.
Thank you, it really didn't take long to get back to solid metal, so I think the right option to take too.Right, last bit of the boot. Firstly it needed a damn good clean.

The before shot actually looks quite good, but up close it wasn't as good.

Covered in under-seal and grime.

Mid-Clean


And Immaculate.
With the boot clean it was time to address a pet hate of mine. Tow bars on SD1s. I understand the practicalities but they're so ugly!
At some point in its life my car was burdened with one, but now lives with some bungs hiding the holes of shame.
Cleaning the scabby paint around them reveals pitted but solid metal.

With matching holes through the strengthening panel, I needed 5 perfectly formed discs.

I also welded up the atrocious attempts to fit the rear number plate, each side had 3 different drilled holes!

I also attacked the under sealed rear panel with panel wipe, revealing the most amazing factory paint line.


A Common mistake people make when restoring SD1s is to carry the body colour down to the seam, you never see it behind the bumper but I like to know its done correctly, and you can't argue with an unmolested car.
With the boot finally solid it was time for paint!
Joe
 MORE
MORELove this. Dad had a 2600 straight 6 and hated it after the far superior Granada 2.8 but even he would have preferred the 3500 Rover.
Mate had a Vitesse in the late 80s. By then they had all but disappeared but when the rest of us were making more noise than motion in minis, Sambas, Renault 5s, MK1 Golfs and the like, he had this utterly awesome V8 and I've loved them since.
Edited by Watchman on Thursday 14th June 23:10
Watchman said:
MORELove this. Dad had a 2600 straight 6 and hated it after the far superior Granada 2.8 but even he would have preferred the 3500 Rover.
Mate had a Vitesse in the late 80s. By then they had all but disappeared but when the rest of us were making more noise than motion in minis, Sambas, Renault 5s, MK1 Golfs and the like, he had this utterly awesome V8 and I've loved them since.
Edited by Watchman on Thursday 14th June 23:10
The 6 cylinder SD1s were a strange one, some people loved them, others not so much. It's got to be a v8 for me though.
That must have been quite a contrast to the hot hatches, and I do love my minis too.
Lets get back to the Rover then!
Another area that I wanted to address was the front of the drivers side rear arch.

We've got horrible cracking paint, and red overspray onto the bottom seam.

Inside the rear door we also have some nastiness underneath the chrome kick strip.

I'd read good things about Bilt Hammer products, so I put their Deox gel to use. I stripped off all the paint and slathered it on as per instruction, and left it to dissolve all the rust.

A previous repair, probably done at the same time as the rear edge of the arch and actually not as bad. Some pitting, but not bad enough to cut out.

The door step didn't survive the deox quite as well. The grey colour you can see is the factory paint of the panel underneath.

Nothing some precision cutting and shaping of new metal couldn't sort. Even replicated the lead in into the step.

A good layer of Rust preventing paint all over!


Ready for some colour now!
Joe
Edited by 1275 GT on Sunday 24th June 22:47
Gassing Station | Readers' Cars | Top of Page | What's New | My Stuff