325TI - Project Mpact
Discussion


scottos said:
Oh man, this is awesome, its taken me awhile to get through!
So many cool touches to the car. It also makes me feel like an absolute peasant in the fab department
Thank you! it's turned out to be quite a long thread to get through So many cool touches to the car. It also makes me feel like an absolute peasant in the fab department
Lots of subtle touches, many will go unseen!
Sf_Manta said:
amc_adam said:
Sf_Manta said:
I got the feeling you've spent some serious time researching on RealOEM to compare the parts diagrams to figure that one out.
Kudos on finding that out though, and surprising how easy it was to switch over.
I did the same kinda thing when researching on upgrading the rear trailing arms on my E46 Touring, turns out that mundane E46's use a bush in the lower knuckle joint, some double checking on RealOEM I found that you can use the same ball joint from the upper knuckle joint in the lower position, as per the M3's... cue those old knackered bushes being swapped to ball joints
Look forwards to seeing the updates. Are you going with stock M3 brakes or planning to do a upgrade to AP or the Porsche Caliper swap? I can't recall seeing any plans in the thread so far.
Realoem has been a huge help, many hours lost on there!Kudos on finding that out though, and surprising how easy it was to switch over.
I did the same kinda thing when researching on upgrading the rear trailing arms on my E46 Touring, turns out that mundane E46's use a bush in the lower knuckle joint, some double checking on RealOEM I found that you can use the same ball joint from the upper knuckle joint in the lower position, as per the M3's... cue those old knackered bushes being swapped to ball joints
Look forwards to seeing the updates. Are you going with stock M3 brakes or planning to do a upgrade to AP or the Porsche Caliper swap? I can't recall seeing any plans in the thread so far.
That's it, I didn't realise that until recently too. Strange all the little difference's between M and non-M models.
Brake wise, I'm going with M3 discs all round. And I have a set radial mount AP calipers (4pot) from a Lotus Evora which I need to make some mounts for...... Eventually.
I did look into the Porsche swap, but thought i'd try something a bit different. See how it goes!
ColdZinc said:
Wow, brilliant work. Like someone earlier, I'm a lurker who signed up just to post this message. Looking forward to hearing how it goes on the Ring trip!
When this thread finishes, can someone please just type "/pistonheads" or something. The dross out there is getting out of hand.
Thank you! I too was a lurker for many years as some of my past builds would have been frowned upon on this forum When this thread finishes, can someone please just type "/pistonheads" or something. The dross out there is getting out of hand.
I don't think the thread will ever finish, it shall keep on evolving for years to come....do projects ever end?!

Important Stuff, the Engine.
After researching for endless hours for the common problems on S54's, where 'Preventative Maintenance' seems to be the first thing that pops into peoples heads when the E46 M3 is mentioned.
Rod Bearings, Vanos, Head Gaskets and piston rings are high up on the list of things to go wrong..... the Donor M3 came with a huge book of Receipts and Servicing over the 80,000 miles it's covered, so i'm hoping the Engine is a good one, although saying that if you were to look at the spray job on the M3 you'd thought the previous owner didn't care about the car.
An Expensive Order of parts, which seems to be never ending (the budget seems to be growing).

The Vanos is the variable valve timing, it changes the cam timing using oil pressure. The Vanos has seals that wear/go hard, has a solenoid pack that connections break (this one worked fine), Valves that get bunged up and jam, exhaust pump tabs that snap off, bolts can work them selves loose and rattles are common.
All Quite daunting stuff, i won't go into much detail with the Vanos rebuild as i'd be here all day
So, with a few bit's from Beisan Systems (Via Hack Engineering) I began stripping the Valve cover etc following the step by step on the Beisan System website,

Vanos removed, notice the two tabs on the exhaust side (left), these locate inside the Vanos pump disc and can snap off,

Vanos itself,


The Pump disc has two holes on the face that locate on into the two tabs of the exhaust cam (previously pictured above). The Tabs are 9.7mm and the holes in the pump disc are 10.7mm , this causes the two to chatter and can lead to exsessive wear or the tabs to snap off.
To help prevent this, Beisan Systems sell a pump disc with smaller holes (9.8mm) to reduce the chatter, so I done the same and Machined my own.

New 9.8mm holes marked with an star,

Gave all the the parts a thorough clean and began the rebulid, which getting a couple if seals out felt like brain surgery

Back together ready for refitting, made sure everything was coated in oil.

Cleaned all the black burnt on crud from the underside of the cam cover,

Spark plugs were changed while the plastic cover was off, also gave the newly rebuilt Vanos a bit of a spruce up,

Rod bearings are up next
After researching for endless hours for the common problems on S54's, where 'Preventative Maintenance' seems to be the first thing that pops into peoples heads when the E46 M3 is mentioned.
Rod Bearings, Vanos, Head Gaskets and piston rings are high up on the list of things to go wrong..... the Donor M3 came with a huge book of Receipts and Servicing over the 80,000 miles it's covered, so i'm hoping the Engine is a good one, although saying that if you were to look at the spray job on the M3 you'd thought the previous owner didn't care about the car.
An Expensive Order of parts, which seems to be never ending (the budget seems to be growing).
The Vanos is the variable valve timing, it changes the cam timing using oil pressure. The Vanos has seals that wear/go hard, has a solenoid pack that connections break (this one worked fine), Valves that get bunged up and jam, exhaust pump tabs that snap off, bolts can work them selves loose and rattles are common.
All Quite daunting stuff, i won't go into much detail with the Vanos rebuild as i'd be here all day
So, with a few bit's from Beisan Systems (Via Hack Engineering) I began stripping the Valve cover etc following the step by step on the Beisan System website,
Vanos removed, notice the two tabs on the exhaust side (left), these locate inside the Vanos pump disc and can snap off,
Vanos itself,
The Pump disc has two holes on the face that locate on into the two tabs of the exhaust cam (previously pictured above). The Tabs are 9.7mm and the holes in the pump disc are 10.7mm , this causes the two to chatter and can lead to exsessive wear or the tabs to snap off.
To help prevent this, Beisan Systems sell a pump disc with smaller holes (9.8mm) to reduce the chatter, so I done the same and Machined my own.
New 9.8mm holes marked with an star,
Gave all the the parts a thorough clean and began the rebulid, which getting a couple if seals out felt like brain surgery
Back together ready for refitting, made sure everything was coated in oil.
Cleaned all the black burnt on crud from the underside of the cam cover,
Spark plugs were changed while the plastic cover was off, also gave the newly rebuilt Vanos a bit of a spruce up,
Rod bearings are up next

firemunki said:
amc_adam said:
To help prevent this, Beisan Systems sell a pump disc with smaller holes (9.8mm) to reduce the chatter, so I done the same and Machined my own.
I love the simple to the point matter of fact just knocking up parts.Nunga said:
firemunki said:
amc_adam said:
To help prevent this, Beisan Systems sell a pump disc with smaller holes (9.8mm) to reduce the chatter, so I done the same and Machined my own.
I love the simple to the point matter of fact just knocking up parts.Onto the Rod Bearings,
These are known for being one of the main parts that can make the S54 go pop, the Rod Bearings can wear quite significantly causing them to spin. This can then result in damage to the Crankshaft, Conrods or bits of metal filings floating around in the oil.
Early S54's were recalled and had the later S54's Rod bearings fitted, but these still wear out. From what i have read it's the thickness of the oil (10w60) and the tight tolerances upon cold start that doesn't help with the wear of the Rod Bearings...... short journeys and thrashing them from cold isn't going to help. But it's not just the S54's that suffer from this, the S65 (V8) and S85 (v10) seem to suffer with the same Rod Bearing problem.
The Rod bearings in this engine had covered around 80,000 miles, unsure the mileage of when the recall was done. I was going to put bearings from BMW back in as i was uneasy about using something after market on such an important part of the engine, they lasted 80,000 miles so they cant be that bad.
But, After speaking to a few companies, endless hours spent researching various forums i decided to go for the KingRace Bearings and ARP Bolts (theres a lot of controversy on bolts too).
So, with the enigine on the stand it was easy to flip it upside down to do the work. Now i'm not fully confident with doing the Rod Bearings by myself so i had a friend 'help me'. Danny has rebuilt S54's before and i had more confidence in him than i did myself, so with that i stripped the sump off and Danny had a spare evening.

Each Bearing was 'Plastigauged', this checked the tolerances of each bearing on removal. When the new King Race Bearings were fitted they were 'Plastigauged' again to check clearances on each cylinder and make sure each of the new Bearings had same clearance.
Original recalled Bearings, Which were quite tight

The replacement Bearings, slightly more gap

All the original Bearings removed, pretty worn but nothing too bad. There was a slight scoring on number two bearing but the crank had no marks on it.

Prior to doing this Danny had mentioned about the nut on the end of the oil pump can sometimes back themselves off, he'd seen it on M54's and S54's. When he went to take the oil pump off to access number one rod the nut on the oil pump had already started to come loose!
With that on my mind i started googling it, noticed some people Lock Wiring them on or putting a big blob of MIG weld on the nut/gear.
So, I ran a little TIG weld to the nut/gear for peace of mind. The gear is on splines so it shouldn't come off.

All Rod Bearings and ARP Bolts fitted. Cleaned up, ready for a new gasket

The sump was full of burnt on crud, so that got a good clean too,

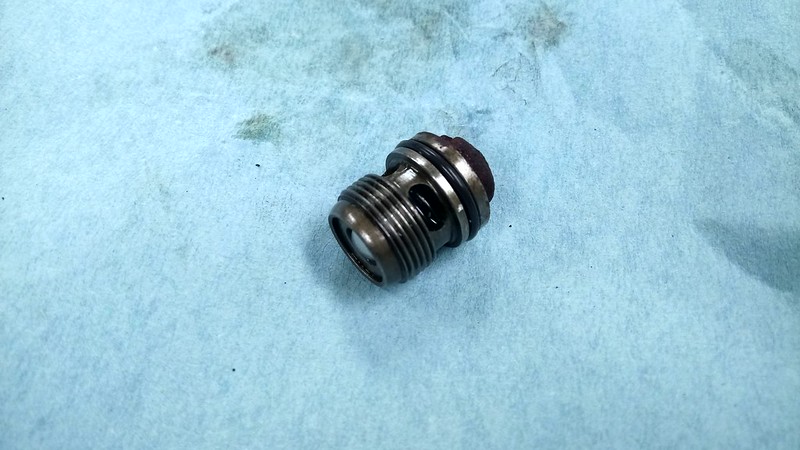
On the side of the block is this little CPV, no idea what does but they can leak and are a bugger to get to when in the car,

Changed the O-Ring seal,
Cleaned up the Manifold to Cat flanges as they were covered in so much gasket sealant,

With that done, the Flywheel, Clutch and Gearbox were all bolted onto the engine. I then had a fiddle with Gear Sticks and Linkages as with BMW's most Gearsticks are pretty interchangeable.

Notice how the 325ti Stick has a different pivot point to the M3 Stick, the different pivot point on the 325ti gearstick means it has a shorter throw than the M3....so I'll use that.
And then,

IT'S IN, IT'S FINALLY IN!
But i did notice the Gear Stick wasn't sat in the right place, with the 325ti gearstick but the M3 linkage meant the Gearstick sat really far forward. 3rd gear was nearly punching the dash, where neutral should be was in fact 4th gear.....so the M3 linkage was too long.
I then changed to the 325ti Linkage (still using the 325ti Gear Stick) but the opposite happened, and the Gear Stick was too far back. I needed something in between the two lengths.
So if you look at the above photo's at the linkages on the 325ti it has a steep bend in it, I simply took some of the bend out of it (squashed it ever so slightly in a Fly Press) this made the overall distance between the two pins longer by 4mm. The gearstick now sits perfectly, and no problems!.
There's still a fair amount before i get to hear it running, Brackets to be made and coding to be done etc..........
That's all for now folks!
These are known for being one of the main parts that can make the S54 go pop, the Rod Bearings can wear quite significantly causing them to spin. This can then result in damage to the Crankshaft, Conrods or bits of metal filings floating around in the oil.
Early S54's were recalled and had the later S54's Rod bearings fitted, but these still wear out. From what i have read it's the thickness of the oil (10w60) and the tight tolerances upon cold start that doesn't help with the wear of the Rod Bearings...... short journeys and thrashing them from cold isn't going to help. But it's not just the S54's that suffer from this, the S65 (V8) and S85 (v10) seem to suffer with the same Rod Bearing problem.
The Rod bearings in this engine had covered around 80,000 miles, unsure the mileage of when the recall was done. I was going to put bearings from BMW back in as i was uneasy about using something after market on such an important part of the engine, they lasted 80,000 miles so they cant be that bad.
But, After speaking to a few companies, endless hours spent researching various forums i decided to go for the KingRace Bearings and ARP Bolts (theres a lot of controversy on bolts too).
So, with the enigine on the stand it was easy to flip it upside down to do the work. Now i'm not fully confident with doing the Rod Bearings by myself so i had a friend 'help me'. Danny has rebuilt S54's before and i had more confidence in him than i did myself, so with that i stripped the sump off and Danny had a spare evening.
Each Bearing was 'Plastigauged', this checked the tolerances of each bearing on removal. When the new King Race Bearings were fitted they were 'Plastigauged' again to check clearances on each cylinder and make sure each of the new Bearings had same clearance.
Original recalled Bearings, Which were quite tight
The replacement Bearings, slightly more gap
All the original Bearings removed, pretty worn but nothing too bad. There was a slight scoring on number two bearing but the crank had no marks on it.
Prior to doing this Danny had mentioned about the nut on the end of the oil pump can sometimes back themselves off, he'd seen it on M54's and S54's. When he went to take the oil pump off to access number one rod the nut on the oil pump had already started to come loose!
With that on my mind i started googling it, noticed some people Lock Wiring them on or putting a big blob of MIG weld on the nut/gear.
So, I ran a little TIG weld to the nut/gear for peace of mind. The gear is on splines so it shouldn't come off.
All Rod Bearings and ARP Bolts fitted. Cleaned up, ready for a new gasket
The sump was full of burnt on crud, so that got a good clean too,
On the side of the block is this little CPV, no idea what does but they can leak and are a bugger to get to when in the car,
Changed the O-Ring seal,
Cleaned up the Manifold to Cat flanges as they were covered in so much gasket sealant,
With that done, the Flywheel, Clutch and Gearbox were all bolted onto the engine. I then had a fiddle with Gear Sticks and Linkages as with BMW's most Gearsticks are pretty interchangeable.
Notice how the 325ti Stick has a different pivot point to the M3 Stick, the different pivot point on the 325ti gearstick means it has a shorter throw than the M3....so I'll use that.
And then,
IT'S IN, IT'S FINALLY IN!
But i did notice the Gear Stick wasn't sat in the right place, with the 325ti gearstick but the M3 linkage meant the Gearstick sat really far forward. 3rd gear was nearly punching the dash, where neutral should be was in fact 4th gear.....so the M3 linkage was too long.
I then changed to the 325ti Linkage (still using the 325ti Gear Stick) but the opposite happened, and the Gear Stick was too far back. I needed something in between the two lengths.
So if you look at the above photo's at the linkages on the 325ti it has a steep bend in it, I simply took some of the bend out of it (squashed it ever so slightly in a Fly Press) this made the overall distance between the two pins longer by 4mm. The gearstick now sits perfectly, and no problems!.
There's still a fair amount before i get to hear it running, Brackets to be made and coding to be done etc..........
That's all for now folks!
I'm loving every update on this thread
I'm worried about my M54B30's oil pump as they're known for coming loose, or sheering the end of the shaft clean off Been considering getting an upgraded shaft and modified gear for mine.. but the job is a pain with the engine in the car as it involves dropping the subframe.
I'm worried about my M54B30's oil pump as they're known for coming loose, or sheering the end of the shaft clean off
Been considering getting an upgraded shaft and modified gear for mine.. but the job is a pain with the engine in the car as it involves dropping the subframe.Gassing Station | Readers' Cars | Top of Page | What's New | My Stuff