325TI - Project Mpact
Discussion


Sf_Manta said:
I'm loving every update on this thread 
I'm worried about my M54B30's oil pump as they're known for coming loose, or sheering the end of the shaft clean off Been considering getting an upgraded shaft and modified gear for mine.. but the job is a pain with the engine in the car as it involves dropping the subframe.
I didn't even know about it, makes me think i was rather lucky with the 100,000 miles of 'spirited' driving i put on the orginal M54. Your right, it would be a bit of a pain dropping it all out of the way to do the oil pump gear..... but on a possitve note, when i did strip the running gear out not a single nut or bolt was seized I'm worried about my M54B30's oil pump as they're known for coming loose, or sheering the end of the shaft clean off
Been considering getting an upgraded shaft and modified gear for mine.. but the job is a pain with the engine in the car as it involves dropping the subframe.
RoverP6B said:
How's that July deadline looking?
Seriously envious of the skills on display here... might make my 'new' 760Li less of an intimidating prospect if I could do all the work on it myself.
Well it seems to be getting very close! I wanted the car ready for Goodwood Festival Of Speed (6th July) as a decent first run, but i still have a fair bit to do before it's m.o.t ready.Seriously envious of the skills on display here... might make my 'new' 760Li less of an intimidating prospect if I could do all the work on it myself.
Progress has been made, the brake caliper mounts have been testing my patients some what
 . I've been making other little bits too, but i can't upload any photos as Flickr has seemed to have
  itself
It's been a little while since any updates, i'm not sure whats going on with Flickr but all my photo's disappeared and i've only found them today!
So with the Engine in the car i could then work out what i was going to do with the Exhaust center section, because i'd already made the back box/silencer the M3 center section wasn't going to be a straight swap.
The center section i'm using is the one that came on the donor car, It was cleaned of all the muck and crap and then began chopping it about to see what I had to work with. This wasn't as easy as it looks as the tubes are a 'D' shape, so i had to use what ever parts of the exhaust I had already cut out.
Due to the limited space i was working with their wasn't room for a Clamping joint, so the center section was welded directly to the back box.


The donor car had some really cheap de-cat pipes in it, so I'm currently looking for some original cats to go back in it that aren't extortionately priced, but those seem quite difficult to come by. May have to end up buying some 200 cell Magnaflow cats to weld in myself.
I knocked up an Aluminium heat shield to protect the Axle Carrier bushes and Rubber bits near by, also bead rolled it to help prevent any rattles and to stiffen it up a bit,

While i was fiddling with the exhaust, I noticed a couple of little holes that needed to be covered. On compacts the spare wheel is kept under the car and sits around the battery box, to lower the spare wheel there is an arm that folds up and twists to lower it down to the floor. As i no longer have the room for the spare wheel (exhaust in the way) i needed to make a cover where the lowering arm etc were.
This was made from Aluminium and a rubber gasket,


To protect the boot floor from the heat of the exhaust the compact heat shield was reused, I then took the heat shield off the donor M3, cut it down and reshaped it to fit between the battery box and bumper of the Compact. This also had some bead rolls added to stiffen it up.


Back in the Engine bay,
I started to try and remember how to reassemble the engine bay, I'm using the M3 Radiator etc.....and then i went to fit the expansion tank from the M3 onto the Compact inner wing but there wasn't any mounts, then I remembered there totally different set ups.. The Compact's expansion tank is built into the Radiator itself, on the M3 the two are separate items.
So, these are the mounts on the donor M3 which the Compact doesn't have,

Not wanting to chop them off the donor car, I made some exact copies out of stainless,

The reason i made them from stainless was so i didn't have to do any spray painting now the engine was in..... last thing I'd want was over spray and an odd colour match. I marked the position, drilled a hole in the inner wing and ground off a tiny bit of paint which was weld through primed I then puddle welded the mounts on from the inside of the inner wing. This was done to minimise the heat burning the paint off the inner wing, The mounts then had cavity wax sprayed around then to help prevent any water ingress.

That will do for this Update!
So with the Engine in the car i could then work out what i was going to do with the Exhaust center section, because i'd already made the back box/silencer the M3 center section wasn't going to be a straight swap.
The center section i'm using is the one that came on the donor car, It was cleaned of all the muck and crap and then began chopping it about to see what I had to work with. This wasn't as easy as it looks as the tubes are a 'D' shape, so i had to use what ever parts of the exhaust I had already cut out.
Due to the limited space i was working with their wasn't room for a Clamping joint, so the center section was welded directly to the back box.
The donor car had some really cheap de-cat pipes in it, so I'm currently looking for some original cats to go back in it that aren't extortionately priced, but those seem quite difficult to come by. May have to end up buying some 200 cell Magnaflow cats to weld in myself.
I knocked up an Aluminium heat shield to protect the Axle Carrier bushes and Rubber bits near by, also bead rolled it to help prevent any rattles and to stiffen it up a bit,
While i was fiddling with the exhaust, I noticed a couple of little holes that needed to be covered. On compacts the spare wheel is kept under the car and sits around the battery box, to lower the spare wheel there is an arm that folds up and twists to lower it down to the floor. As i no longer have the room for the spare wheel (exhaust in the way) i needed to make a cover where the lowering arm etc were.
This was made from Aluminium and a rubber gasket,
To protect the boot floor from the heat of the exhaust the compact heat shield was reused, I then took the heat shield off the donor M3, cut it down and reshaped it to fit between the battery box and bumper of the Compact. This also had some bead rolls added to stiffen it up.
Back in the Engine bay,
I started to try and remember how to reassemble the engine bay, I'm using the M3 Radiator etc.....and then i went to fit the expansion tank from the M3 onto the Compact inner wing but there wasn't any mounts, then I remembered there totally different set ups.. The Compact's expansion tank is built into the Radiator itself, on the M3 the two are separate items.
So, these are the mounts on the donor M3 which the Compact doesn't have,
Not wanting to chop them off the donor car, I made some exact copies out of stainless,
The reason i made them from stainless was so i didn't have to do any spray painting now the engine was in..... last thing I'd want was over spray and an odd colour match. I marked the position, drilled a hole in the inner wing and ground off a tiny bit of paint which was weld through primed I then puddle welded the mounts on from the inside of the inner wing. This was done to minimise the heat burning the paint off the inner wing, The mounts then had cavity wax sprayed around then to help prevent any water ingress.
That will do for this Update!


Fast Bug said:
"So I knocked this up"
Cue photo of beautifully sculpted, perfectly fitting piece of metal artwork.
Your version of knocked up and mine are wildly different
Cue photo of beautifully sculpted, perfectly fitting piece of metal artwork.
Your version of knocked up and mine are wildly different
haha, thanks. Well, considering the amount of time everything else on this is taking it was relatively knocked up More important bits = The Brakes.
Some of you may remember that last year i was on the hunt for some Radial Mount Calipers, I was looking at all sorts of brands and different cars to see what was about. Rather than buy mounts already available and fit Porsche calipers or buy a kit designed for E46's i thought i'd have a go at doing something myself.
After endless searching I came across a brand new set of Lotus Evora AP Racing Calipers with pads, the front calipers were four pots in red and the rears were four pots in black. I was intending on fitting the brakes inside the standard 17" compact wheels and using Standard M3 Brake Discs, I was a bit unsure if the calipers would fit inside the wheels but they were at a very good price, so i purchased them.
It's all been a bit of trial and error, no idea how brake balance will be affected or if the servo is powerful enough......we shall see.
So, a picture from a while back of when they first turned up

The Calipers are designed for a 32mm wide front Disc and a 26mm wide rear Disc, the discs i'm using are standard E46 M3 fronts are 28mm wide and rears are 20mm wide.
A bit of mocking up, and many hours measuring and drawing,

I ordered a lump of T6 Aluminium, 6082 i think. Which i then cut into four smaller lumps,

I thought the fronts would be the hardest, so tackled them first. After many more hours on the milling machine,

The bolts pictured are purely for mocking up, the back plate/stone gaurd was also trimmed to allow clearance for the caliper,


You can see in the photo how i had to chamfer one side, this made the Caliper mount clear the bottom arm so i could get full lock on the steering......luckily a friend noticed this, i hadn't.


You can see how the edge of the pad follows the radius of the disc, the pads have full coverage of the disc too..... which worked out well.
Onto the Rears, and i thought the fronts were hard work...... little did i know
Due to the size of the rear Calipers and the distance between the mounting holes, this caused the top fixing hole to clash with the top arm bolt/nut. The rear Disc on an M3 is also 3mm bigger in diameter than the front, the caliper can't sit as far in to the center of the disc due to the handbrake drum and it cant go too far out as it will clash wit the wheel.
I wasn't going to be beaten and was determined to get the Calipers to fit, After a ridiculous amount of time spent drawing and mocking up this is what i came up with,


The Caliper itself had 5mm machined off the mounting points, this allowed the caliper to sit further in towards the center. I then needed to shave a small flat onto the mounting points on the original Brake mounting tabs on the cars hub, The new Caliper mount is also mounted on the opposite side of the mounting tabs, this allowed more material to be fixed into. The rear stone guard/back plate also needed to be trimmed to allow the bolts to go in from the opposite way and room for the larger caliper.


Due to how the top bolt in the caliper would clash with the top arm bolt/nut I had to make a counter sunk bolt from a 12.9 grade hex head bolt, this would then be threaded into the mount itself avoid and interference with the top arm,

Because the Caliper is designed to use a Cap Head bolt i then had to make a 'Cap Head type Nut', I done this by turning down a 10.9 grade M24 counter sunk bolt, then drilling and tapping the inside of it. This allowed me to use and internal hex drive as space was limited.

When that was done i wound some old bolts into the threads, and then blasted the mounts. This 'etched' all the surfaces ready for paint, the bolts stopped any damage to the threads and kept them clean,

After degreasing they were sprayed with VHT paint, I've never used this before but it gives an almost anodised smooth like finish,

The back plates were repainted where i had cut them to stop any rust, all the handbrake parts were blasted/painted and rebuilt with new shoes etc,

I spent some time painting the disc centers and outer fins/vents to help prevent any rust, it might not last long but i'd kick myself at a later date for not doing it.
Spoke to HEL brake lines, they made up some lines to go from BMW to AP Racing they also use stainless fittings too,

All bolts/fittings used in the brakes are either Grade 12.9 or 10.9 high tensile.


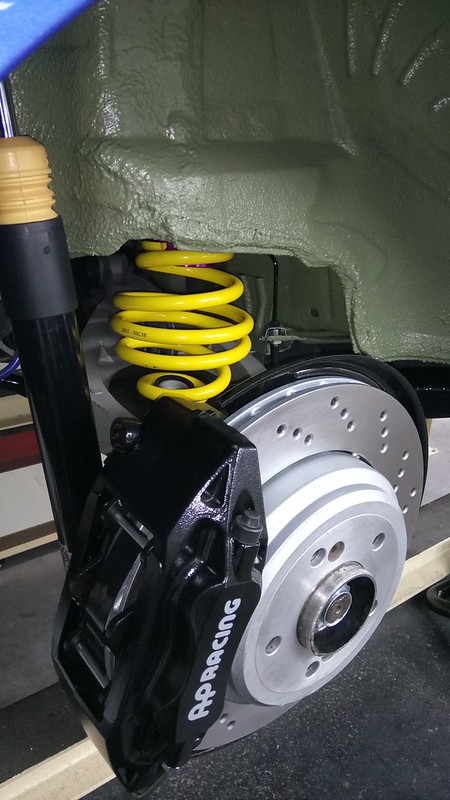
And clearance is somewhat tight, I'm going to have to get the wheels re-balanced due to the weights catching the calipers, I had to remove some of the weights,

Fronts, You'll notice a wheel spacer....because the width of the caliper and the design of the stock Compact front wheel i needed an 18mm spacer and longer bolts for clearance, the wheels sit flush with the wheel arch (none of that poking out malarky)


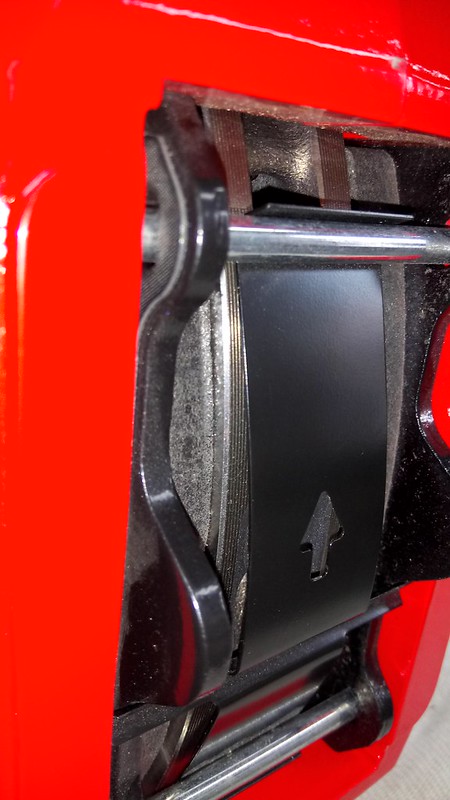
As the calipers are meant to be used with wider disks as previously mentioned, 32mm front and 26mm rear and the M3 disks i'm using are 28mm front and 20mm rear i made up some Shims to go inbetween the pad and pistons to make up the difference. These are made from mild steel, blasted and then painted with the VHT spray.

Fitted,


The Brakes were then Bled using new ATE 200 fluid,

With the cars first dead line Friday 7th July (Goodwood FOS) only a week away, the car is no where near ready. I was intending on using its first good run as a shake down, but as long as it's ready for Nurburg mid August that's all that matters!
More bit's to be made yet!
Some of you may remember that last year i was on the hunt for some Radial Mount Calipers, I was looking at all sorts of brands and different cars to see what was about. Rather than buy mounts already available and fit Porsche calipers or buy a kit designed for E46's i thought i'd have a go at doing something myself.
After endless searching I came across a brand new set of Lotus Evora AP Racing Calipers with pads, the front calipers were four pots in red and the rears were four pots in black. I was intending on fitting the brakes inside the standard 17" compact wheels and using Standard M3 Brake Discs, I was a bit unsure if the calipers would fit inside the wheels but they were at a very good price, so i purchased them.
It's all been a bit of trial and error, no idea how brake balance will be affected or if the servo is powerful enough......we shall see.
So, a picture from a while back of when they first turned up
The Calipers are designed for a 32mm wide front Disc and a 26mm wide rear Disc, the discs i'm using are standard E46 M3 fronts are 28mm wide and rears are 20mm wide.
A bit of mocking up, and many hours measuring and drawing,
I ordered a lump of T6 Aluminium, 6082 i think. Which i then cut into four smaller lumps,
I thought the fronts would be the hardest, so tackled them first. After many more hours on the milling machine,
The bolts pictured are purely for mocking up, the back plate/stone gaurd was also trimmed to allow clearance for the caliper,
You can see in the photo how i had to chamfer one side, this made the Caliper mount clear the bottom arm so i could get full lock on the steering......luckily a friend noticed this, i hadn't.
You can see how the edge of the pad follows the radius of the disc, the pads have full coverage of the disc too..... which worked out well.
Onto the Rears, and i thought the fronts were hard work...... little did i know
Due to the size of the rear Calipers and the distance between the mounting holes, this caused the top fixing hole to clash with the top arm bolt/nut. The rear Disc on an M3 is also 3mm bigger in diameter than the front, the caliper can't sit as far in to the center of the disc due to the handbrake drum and it cant go too far out as it will clash wit the wheel.
I wasn't going to be beaten and was determined to get the Calipers to fit, After a ridiculous amount of time spent drawing and mocking up this is what i came up with,
The Caliper itself had 5mm machined off the mounting points, this allowed the caliper to sit further in towards the center. I then needed to shave a small flat onto the mounting points on the original Brake mounting tabs on the cars hub, The new Caliper mount is also mounted on the opposite side of the mounting tabs, this allowed more material to be fixed into. The rear stone guard/back plate also needed to be trimmed to allow the bolts to go in from the opposite way and room for the larger caliper.
Due to how the top bolt in the caliper would clash with the top arm bolt/nut I had to make a counter sunk bolt from a 12.9 grade hex head bolt, this would then be threaded into the mount itself avoid and interference with the top arm,
Because the Caliper is designed to use a Cap Head bolt i then had to make a 'Cap Head type Nut', I done this by turning down a 10.9 grade M24 counter sunk bolt, then drilling and tapping the inside of it. This allowed me to use and internal hex drive as space was limited.
When that was done i wound some old bolts into the threads, and then blasted the mounts. This 'etched' all the surfaces ready for paint, the bolts stopped any damage to the threads and kept them clean,
After degreasing they were sprayed with VHT paint, I've never used this before but it gives an almost anodised smooth like finish,
The back plates were repainted where i had cut them to stop any rust, all the handbrake parts were blasted/painted and rebuilt with new shoes etc,
I spent some time painting the disc centers and outer fins/vents to help prevent any rust, it might not last long but i'd kick myself at a later date for not doing it.
Spoke to HEL brake lines, they made up some lines to go from BMW to AP Racing they also use stainless fittings too,
All bolts/fittings used in the brakes are either Grade 12.9 or 10.9 high tensile.
And clearance is somewhat tight, I'm going to have to get the wheels re-balanced due to the weights catching the calipers, I had to remove some of the weights,
Fronts, You'll notice a wheel spacer....because the width of the caliper and the design of the stock Compact front wheel i needed an 18mm spacer and longer bolts for clearance, the wheels sit flush with the wheel arch (none of that poking out malarky)
As the calipers are meant to be used with wider disks as previously mentioned, 32mm front and 26mm rear and the M3 disks i'm using are 28mm front and 20mm rear i made up some Shims to go inbetween the pad and pistons to make up the difference. These are made from mild steel, blasted and then painted with the VHT spray.
Fitted,
The Brakes were then Bled using new ATE 200 fluid,
With the cars first dead line Friday 7th July (Goodwood FOS) only a week away, the car is no where near ready. I was intending on using its first good run as a shake down, but as long as it's ready for Nurburg mid August that's all that matters!
More bit's to be made yet!

Only you could look at some factory brackets on the inner wing, decide that you think they look st and you can make something far better quality and that look much better too you don't want to cut them off the original shell and therefore "just knock some new ones up"
Amazing project..
t and you can make something far better quality and that look much better too Amazing project..
amc_adam said:
As the calipers are meant to be used with wider disks as previously mentioned, 32mm front and 26mm rear and the M3 disks i'm using are 28mm front and 20mm rear i made up some Shims to go inbetween the pad and pistons to make up the difference. These are made from mild steel, blasted and then painted with the VHT spray.
I was faced with a similar issue when designing my brakes for the E30 M3. I split the calipers, milled 1.5mm off the mating faces and bolted them back together.Gassing Station | Readers' Cars | Top of Page | What's New | My Stuff