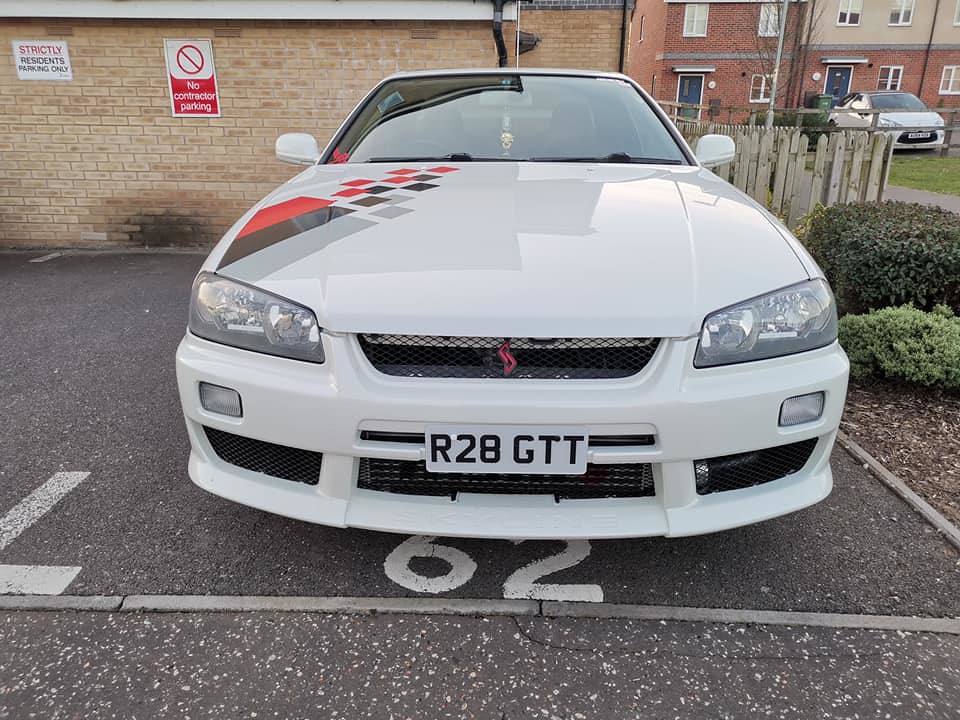
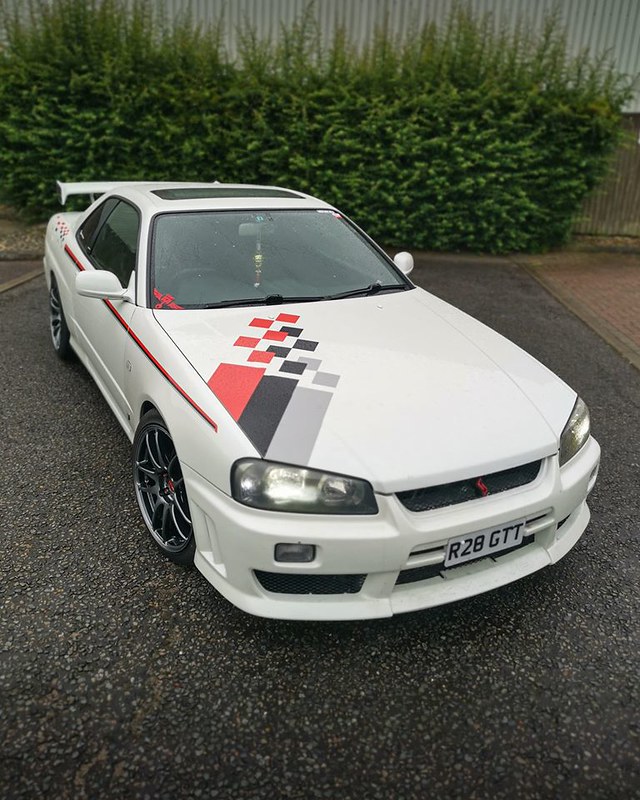
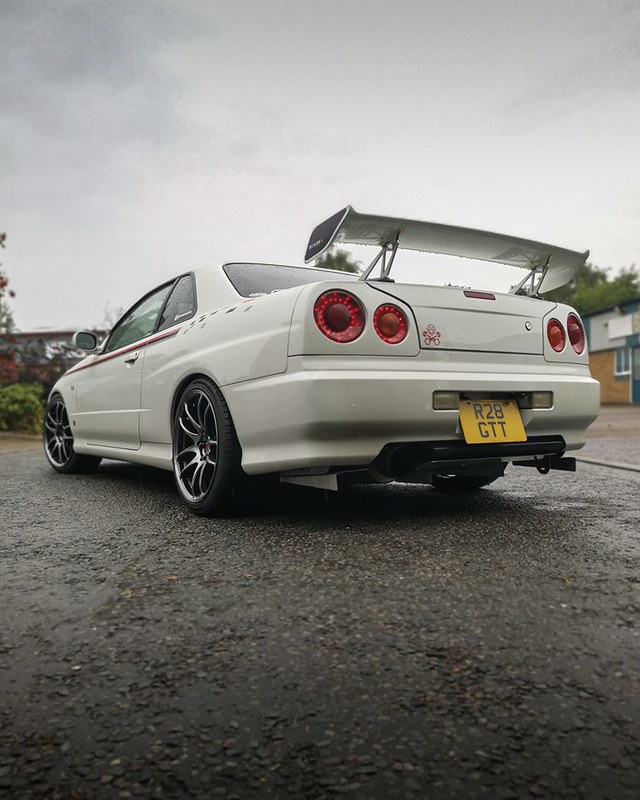
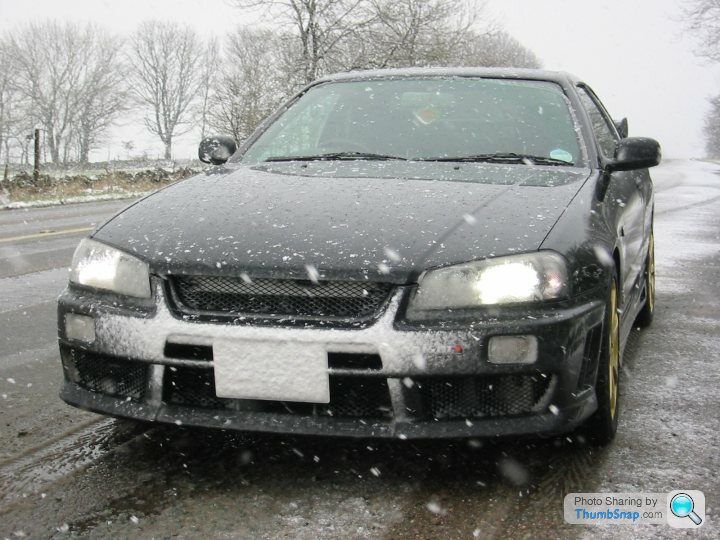
Chris' R34 GTT
Discussion


Awhile back when the bumper got repaired due to a paint defect, I wanted to cut the bumper and open it up but the bodyshop wanted too much money (I thought they were painting the whole bumper under warranty, but they werent) So i decided to go ahead with it now. The bottom piece isn't completely flat, to do that it'd need spraying so it'll do for now. While the bumper was off it was a good opportunity to get the bumper to fit better, luckily the piece I cut out was what was causing the issue.
Purchased an intercooler stencil from eBay, looks pretty good IMO

We sell bumper mesh/grille at work, although its slightly smaller than the OEM mesh, its not far off
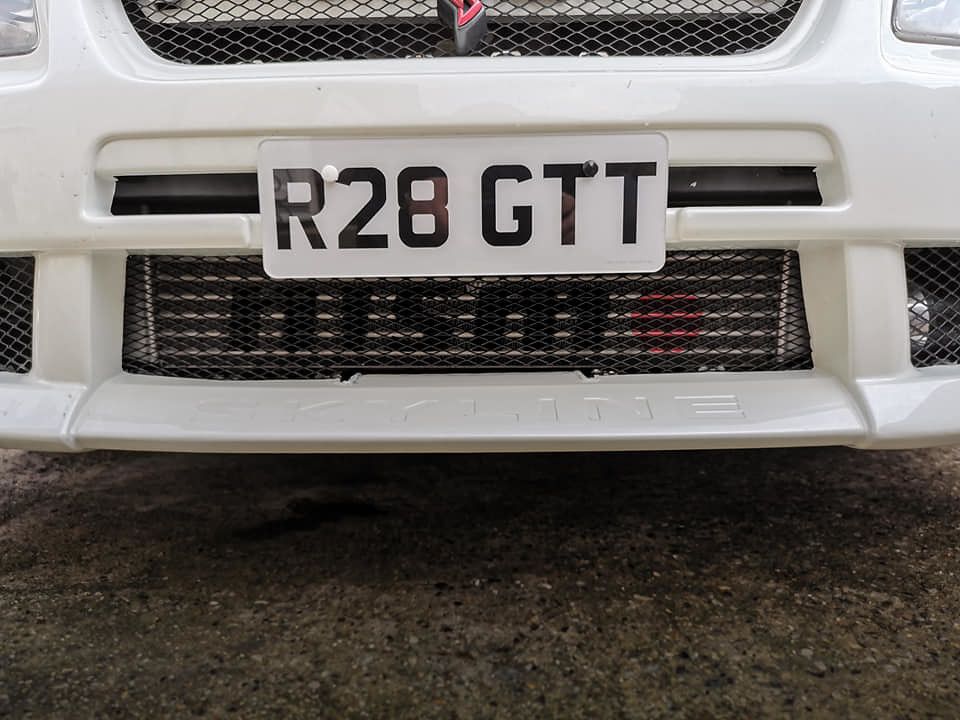
I also ordered a smaller number plate which looks sooo much better
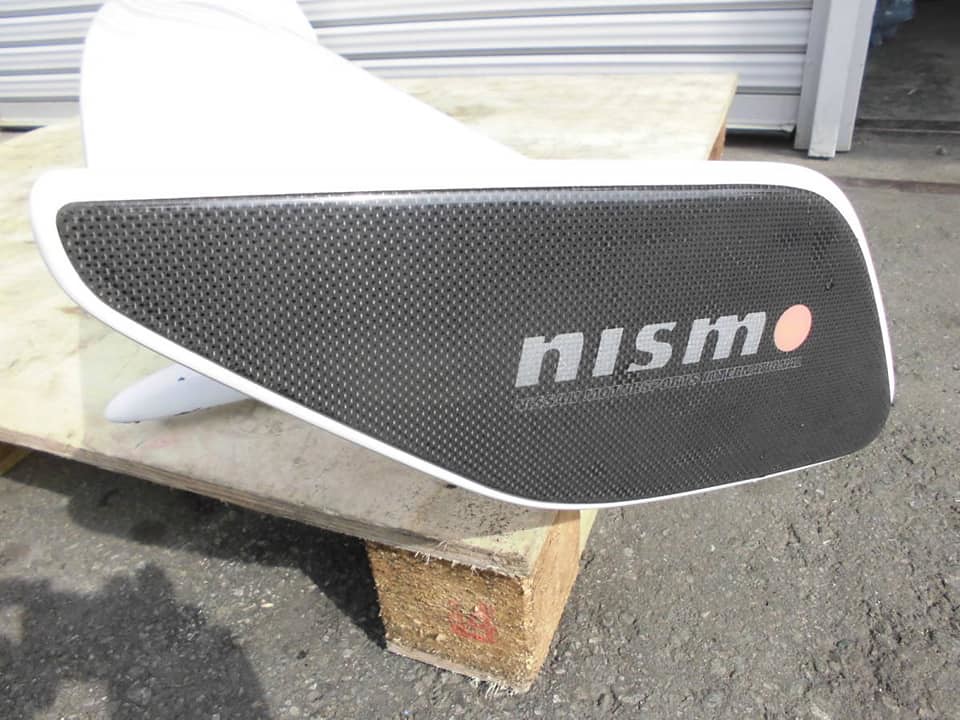
I've been eyeing up the Nismo B pillar garnish for awhile, but couldn't bring myself to spending £150+ on some stick on carbon. It wouldnt be too bad if it was a whole replacement piece, its worth the money then. Again, my work came in handy as we sell 3D carbon wrap so gave vinyl wrapping a go. A friend cut the logos for me, fake it till you make it lol

I've also seen some GTTs with a spoiler garnish, it can be seen in the Nismo parts catalog too. I've only seen 1 set of brand new ones on Yahoo Auctions and they sold for £450 + shipping + import duty (thats approx $525) which is ALOT for some gel covers.

So the carbon vinyl wrap came out again and I made a template of the spoiler ends and transfered that to the vinyl. Its not perfect but can always be re-done at a later date


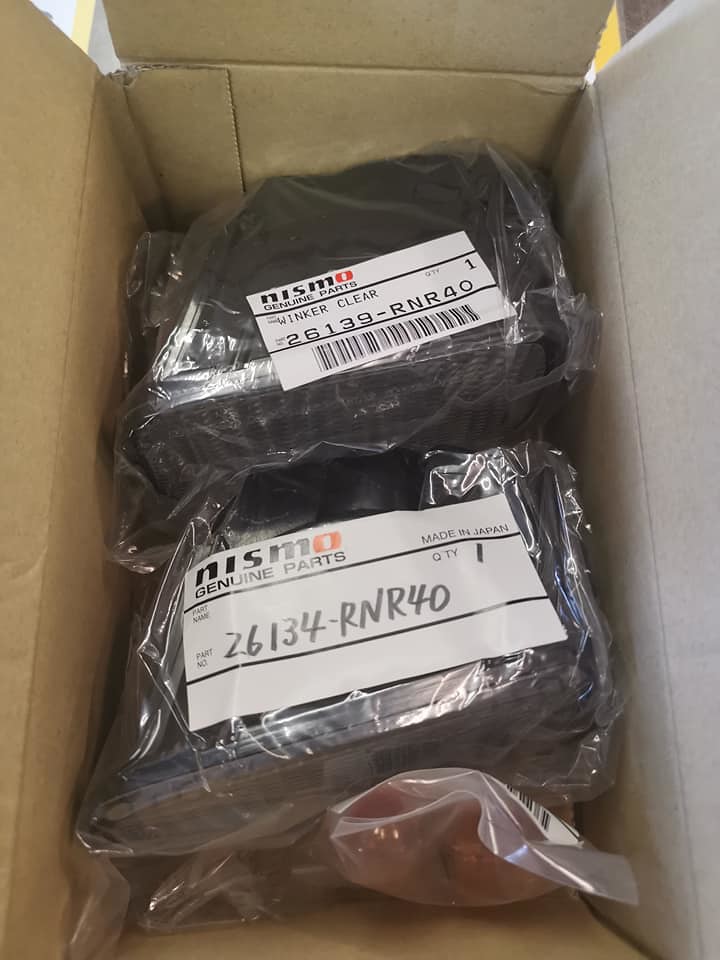
I ordered some Nismo clear indicators from RHDJapan, first time using them and it certainly wont be the last. They were dispatched from Osaka on the Friday and delivered to me on the Monday!

There's been some minor difficulties with shifting 2nd > 3rd and sometimes into 5th. The clutch doesn't slip but after a search on the forums people point to the shifter being at fault (mainly the Bush)
Alot of people have recommended an Australian company called Cube Speed. Coincidently Speedhunters recently had their contributor Ron post up with the same issue, and fitted the same kit.


I went with their Premium kit to allow adjustment on the return spring. Fitting was relatively straight forward with everything access able from the top. To fit the return springs you need the car in the air as they're a b d to get to.

The feel of it now is incredible, it's transformed the drive of the car completely. It's alot more mechanical, albeit a slight notchy feel but that's probably down to the Shortened throw now. 2nd > 3rd is now effortless.
I've made a very basic video on my phone and uploaded it to YouTube
https://www.youtube.com/watch?v=YtETQPcSTLI&fe...
I have another update to post so expect that within the next week
Purchased an intercooler stencil from eBay, looks pretty good IMO
We sell bumper mesh/grille at work, although its slightly smaller than the OEM mesh, its not far off
I also ordered a smaller number plate which looks sooo much better
I've been eyeing up the Nismo B pillar garnish for awhile, but couldn't bring myself to spending £150+ on some stick on carbon. It wouldnt be too bad if it was a whole replacement piece, its worth the money then. Again, my work came in handy as we sell 3D carbon wrap so gave vinyl wrapping a go. A friend cut the logos for me, fake it till you make it lol
I've also seen some GTTs with a spoiler garnish, it can be seen in the Nismo parts catalog too. I've only seen 1 set of brand new ones on Yahoo Auctions and they sold for £450 + shipping + import duty (thats approx $525) which is ALOT for some gel covers.
So the carbon vinyl wrap came out again and I made a template of the spoiler ends and transfered that to the vinyl. Its not perfect but can always be re-done at a later date
I ordered some Nismo clear indicators from RHDJapan, first time using them and it certainly wont be the last. They were dispatched from Osaka on the Friday and delivered to me on the Monday!
There's been some minor difficulties with shifting 2nd > 3rd and sometimes into 5th. The clutch doesn't slip but after a search on the forums people point to the shifter being at fault (mainly the Bush)
Alot of people have recommended an Australian company called Cube Speed. Coincidently Speedhunters recently had their contributor Ron post up with the same issue, and fitted the same kit.
I went with their Premium kit to allow adjustment on the return spring. Fitting was relatively straight forward with everything access able from the top. To fit the return springs you need the car in the air as they're a b
d to get to.The feel of it now is incredible, it's transformed the drive of the car completely. It's alot more mechanical, albeit a slight notchy feel but that's probably down to the Shortened throw now. 2nd > 3rd is now effortless.
I've made a very basic video on my phone and uploaded it to YouTube
https://www.youtube.com/watch?v=YtETQPcSTLI&fe...
I have another update to post so expect that within the next week
Following on with the Nismo theme
JDM Parts Rupewrecht assisted again with bidding on an item on Yahoo Auctions, this time a set of sales brochures and part catalogs inc Nismo and Tommy Kaira

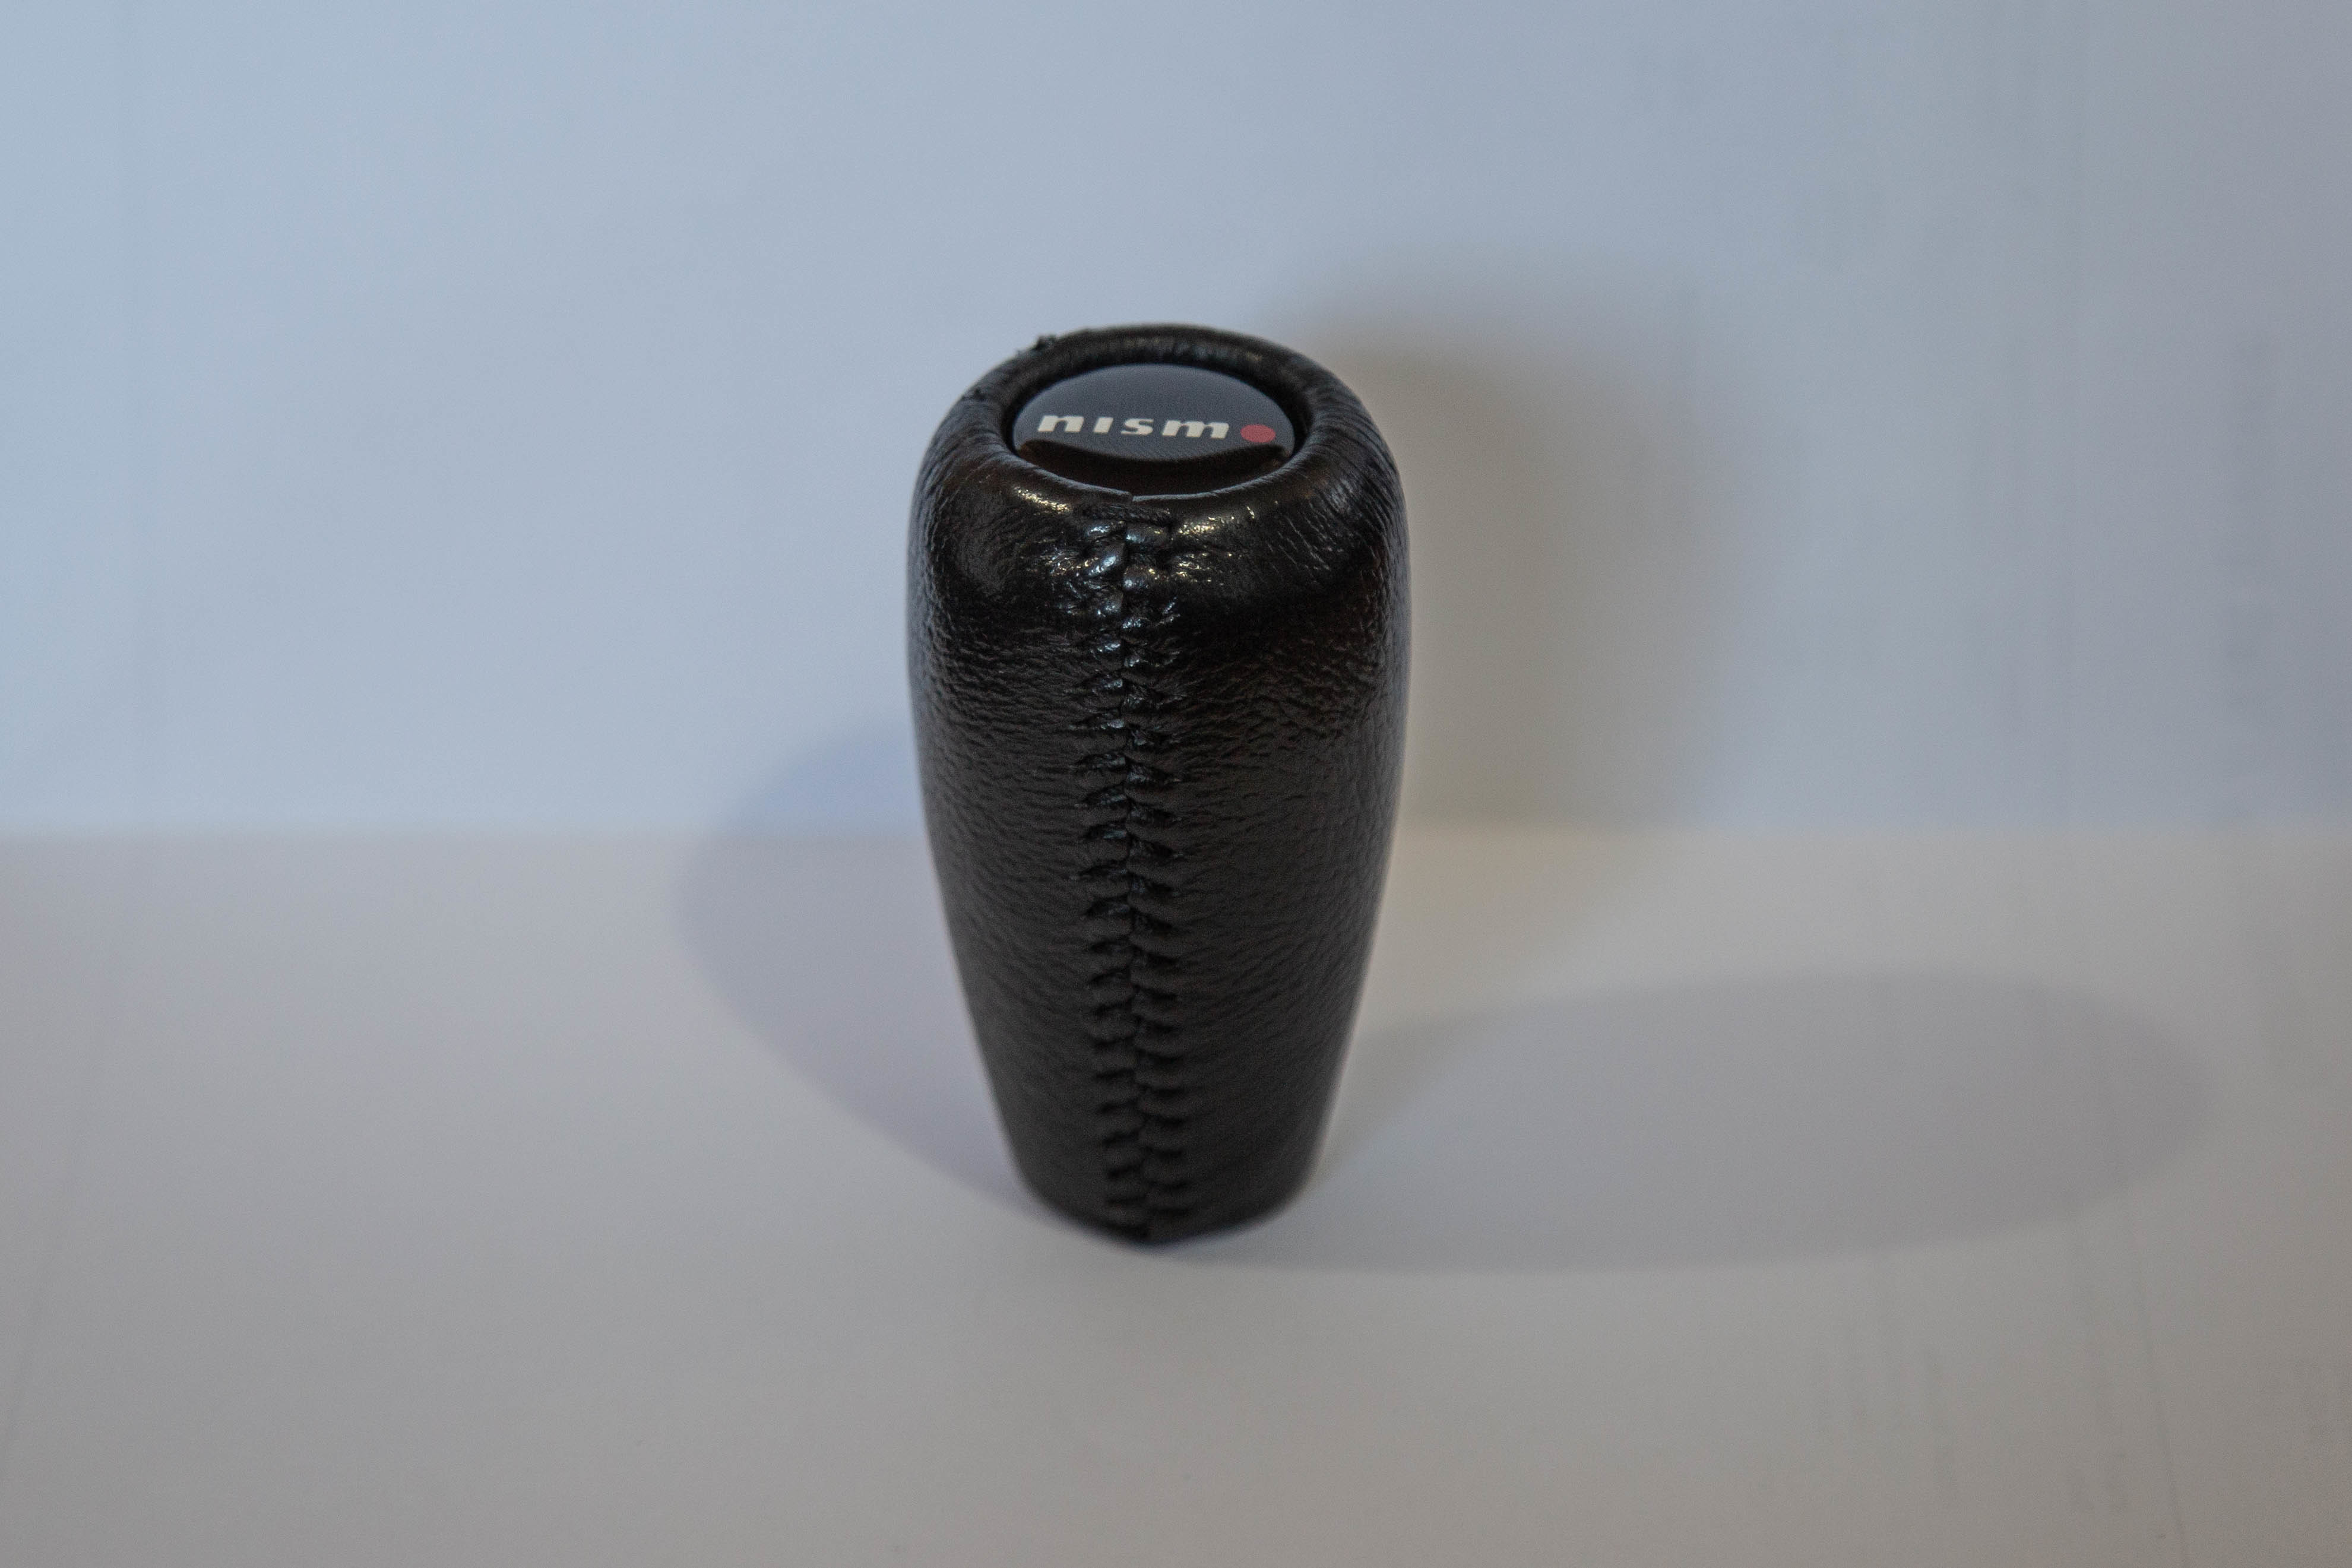
Trying to keep things period correct as much as possible, I was on the hunt for a mid logo gear shifter to company the new Cube Speed short shifter. I managed to find one under half the price of a new one someone had offered.


We sell a leather cleaner and restorer at work which should bring it back to life. After a scrub with hot water and washing liquid it was time to get messy with this stuff

The photos don't show much difference, but in person its made such a difference


Another Nismo part I've been wanting for a loooong time were the tail lights which got discontinued years ago, along with the Sun Line Racing equivalents. Alot of people suggested ZLED but I'm not 100% sure on the GTR Style lights, I much prefer the individual LED style.
I was browsing through Facebook and spotted a post on a Supra page by a company called Daniel Man's Custom Lights. I messaged Daniel with what I'd like and he was happy to give it a go. I sourced a spare pair of light units and got them sent straight to Daniel.
A week or so later and they arrived just before the country's lock down for the Covid-19 pandemic (please excuse the dirty car!)


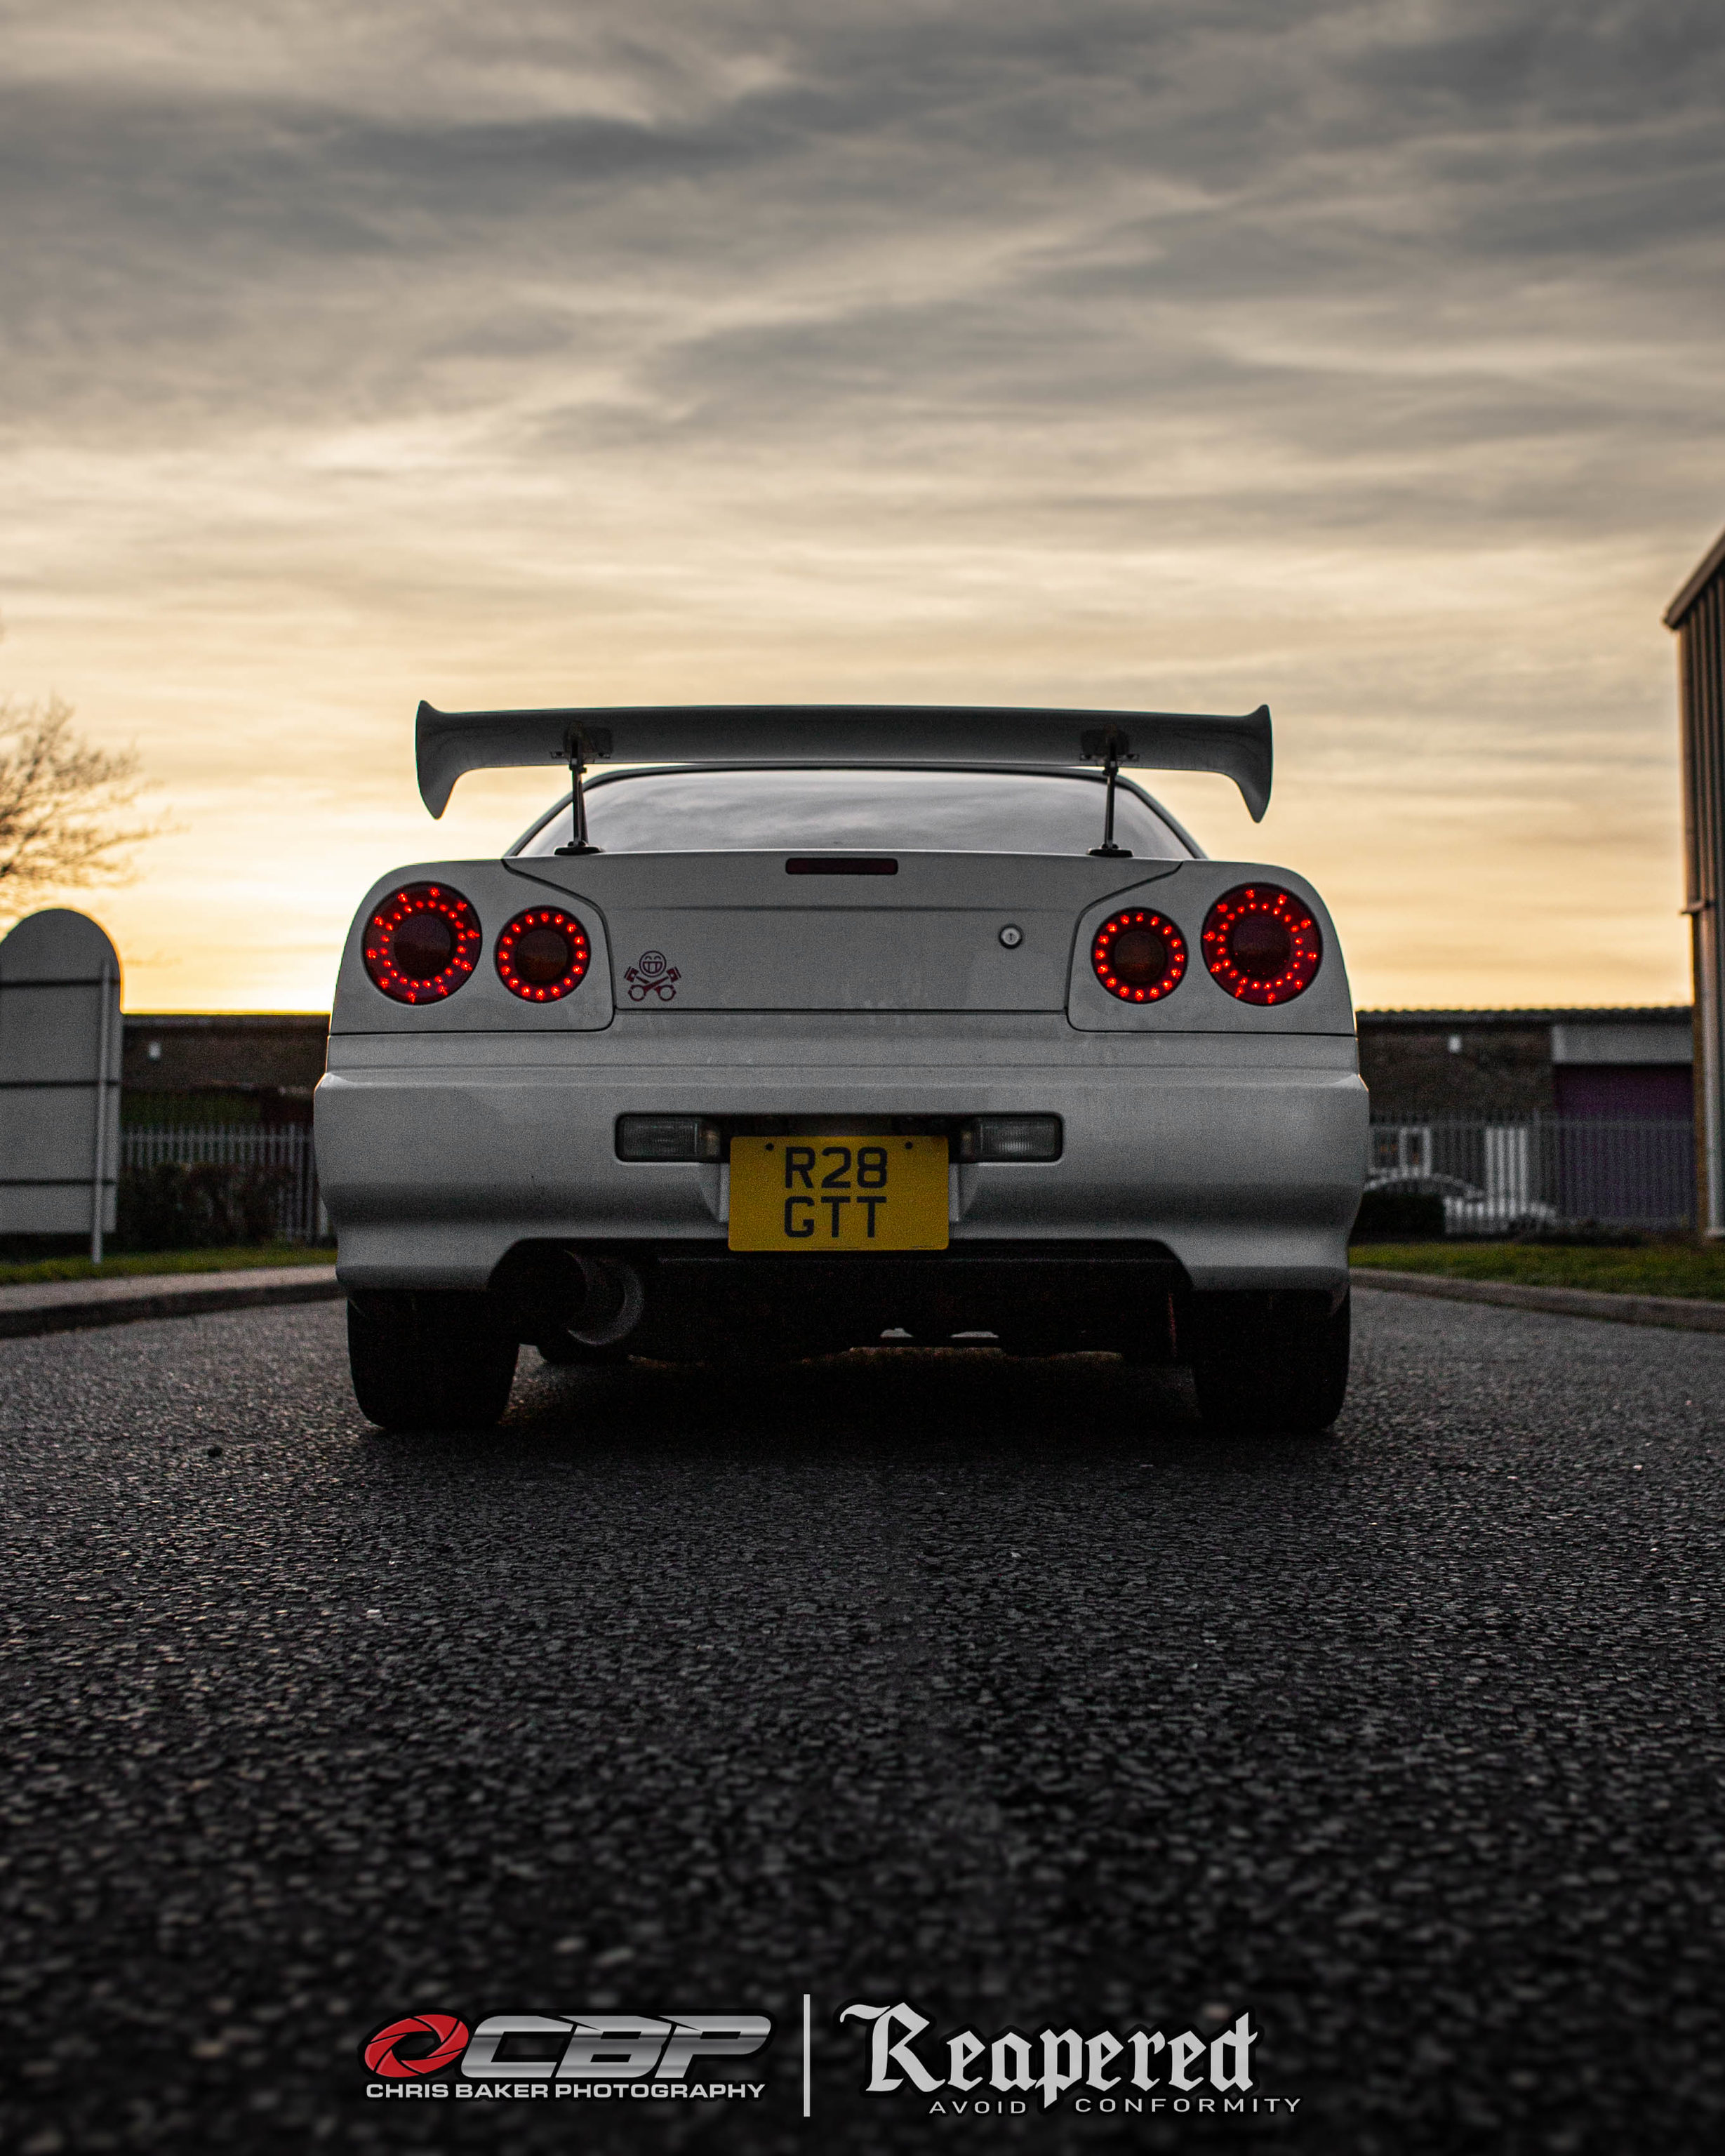

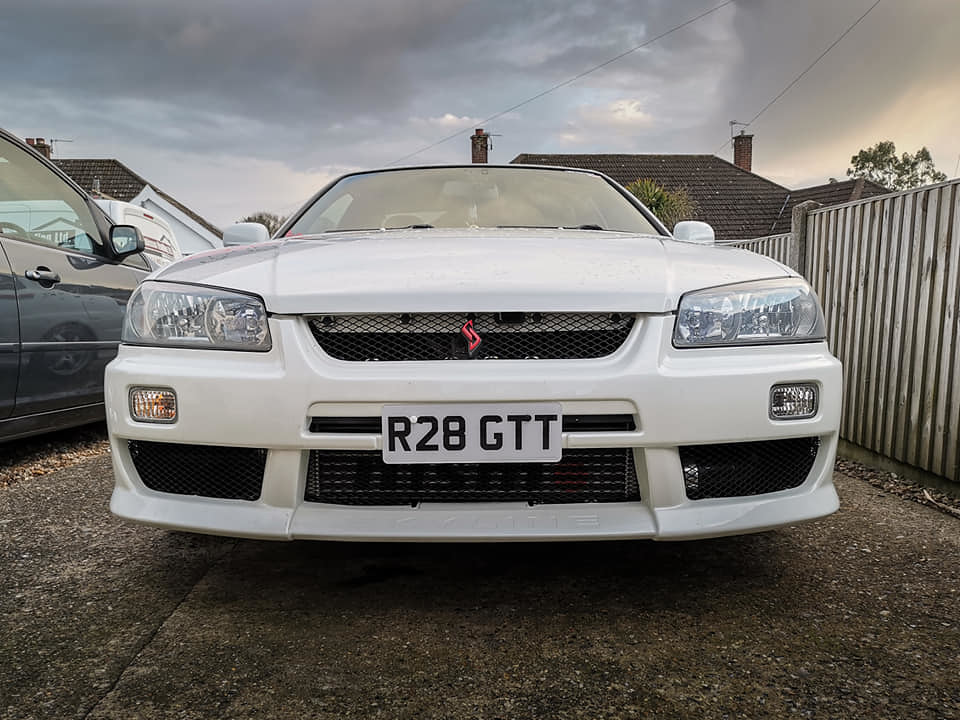
A couple of front shots while I was there


JDM Parts Rupewrecht assisted again with bidding on an item on Yahoo Auctions, this time a set of sales brochures and part catalogs inc Nismo and Tommy Kaira
Trying to keep things period correct as much as possible, I was on the hunt for a mid logo gear shifter to company the new Cube Speed short shifter. I managed to find one under half the price of a new one someone had offered.
We sell a leather cleaner and restorer at work which should bring it back to life. After a scrub with hot water and washing liquid it was time to get messy with this stuff
The photos don't show much difference, but in person its made such a difference
Another Nismo part I've been wanting for a loooong time were the tail lights which got discontinued years ago, along with the Sun Line Racing equivalents. Alot of people suggested ZLED but I'm not 100% sure on the GTR Style lights, I much prefer the individual LED style.
I was browsing through Facebook and spotted a post on a Supra page by a company called Daniel Man's Custom Lights. I messaged Daniel with what I'd like and he was happy to give it a go. I sourced a spare pair of light units and got them sent straight to Daniel.
A week or so later and they arrived just before the country's lock down for the Covid-19 pandemic (please excuse the dirty car!)
A couple of front shots while I was there
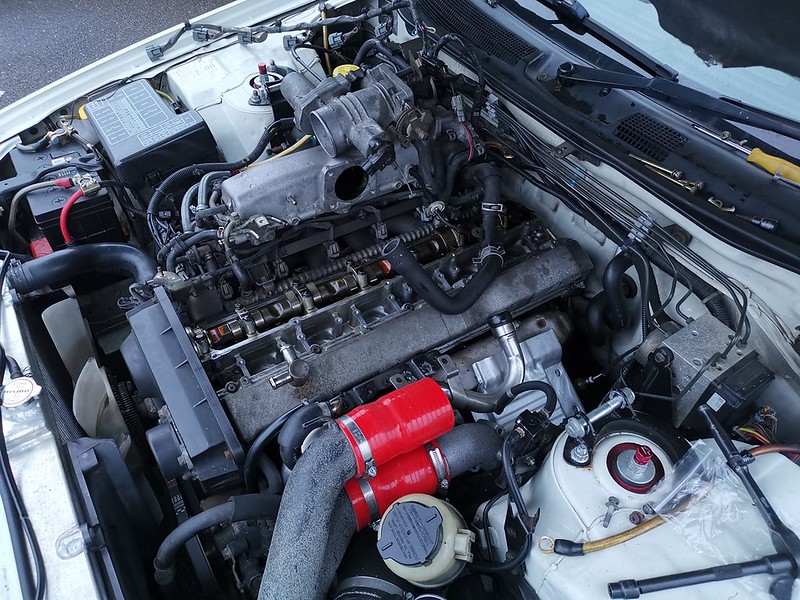
With the Covid-19 lockdown,finding things to do has been quite tricky. I decided to give the engine bay a much needed tidy and spruce up. I saw some photos of a strut brace refurbished in a wrinkle type paint which got me thinking.
I thought of using truck bed liner paint and a quick google took me to a brand called Raptor made by U-Pol (my work is a U-Pol stockist, not that we'd be able to order anything at the moment). I dont have access to a spray booth or a unit so the 'proper' stuff was out of the window, but they do do an aerosol version though. I read and got told mixed reviews of the aerosol version so I looked at alternates.
I then found a stone effect paint by Rust-Oleum, but with this pandemic getting it shipped was tricky. All local stores either didnt have it in stock, or their delivery/click and collect services were unavailable. A company called Plasti-kote do a similar product in various colours so I was on the hunt for that. I managed to find the only can in the area, although it wasnt my first choice in colour, I was too eager to give it a go.

With the pipes removed and prepped it was time to see what it was like. The paint doesnt really give a colour, its more of the coloured texture that sits on the surface. The front Intercooler pipes were originally black, so these came out slightly darker. Compared to the throttle body J pipe and turbo inlet elbow. To be honest, unless you knew you probably wouldn't notice.
Here are some before and after photos


Accessable areas degreased and cleaned
Intercooler pipes and Turbo inlet elbow painted
Hoses replaced with red silicone inc new stainless clamps
TurboZentrum Silicone Turbo hose fitted
Turbo head shield repainted
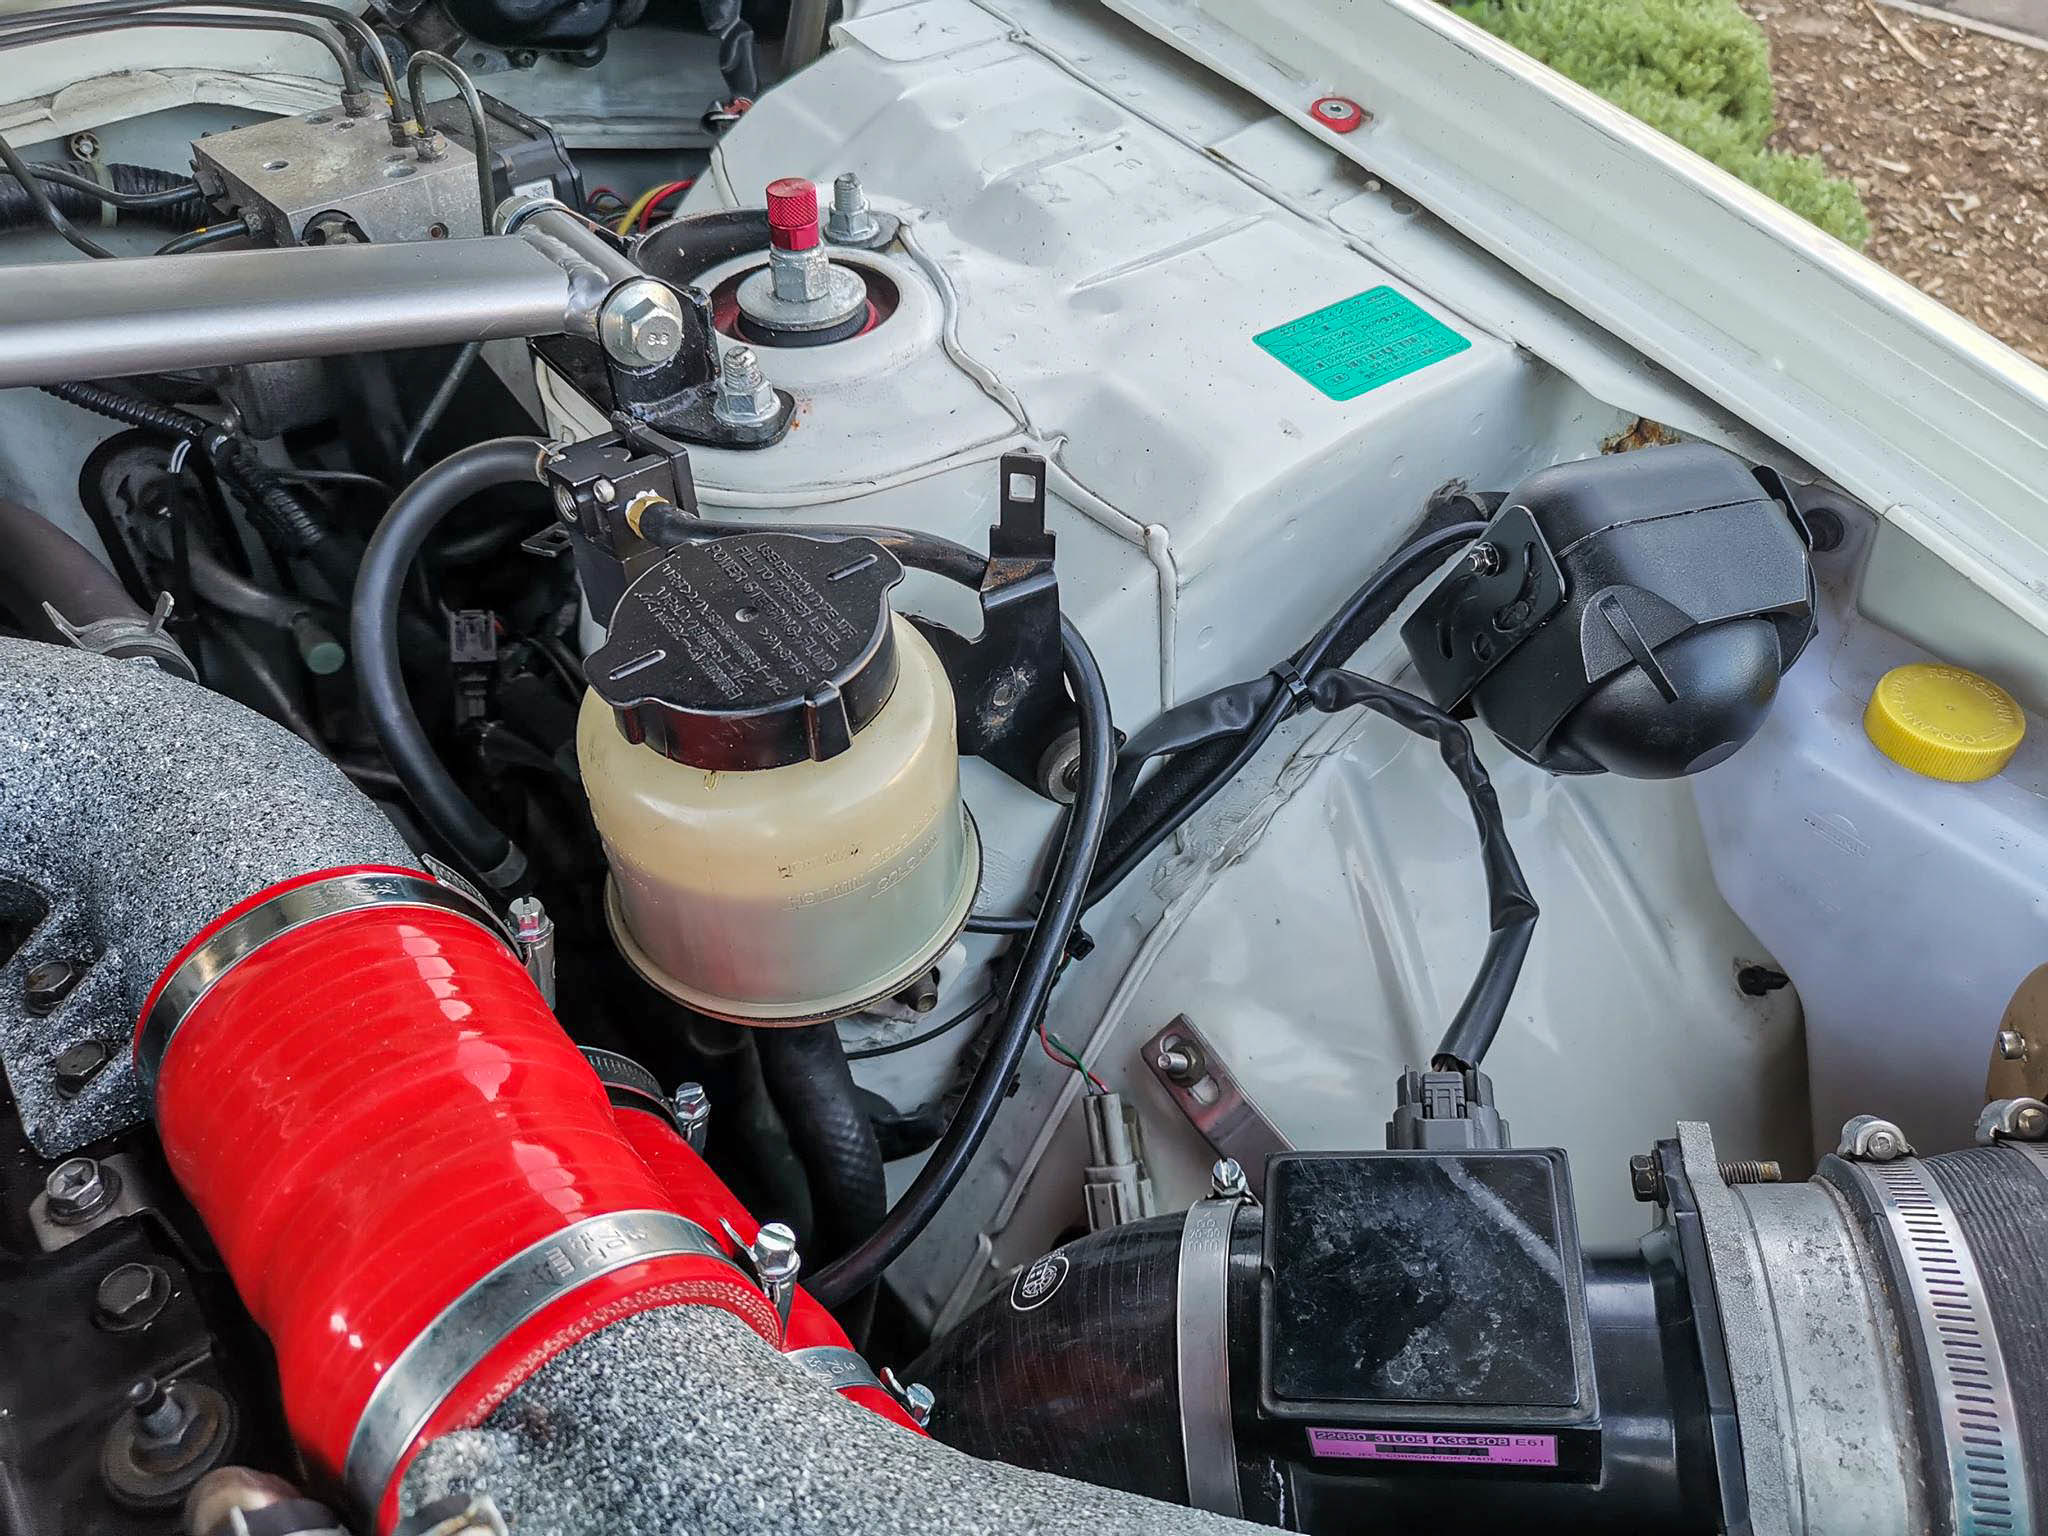
Boost controller mounted correctly, new hoses fitted
Boost controller wiring tidied up along the bulk head
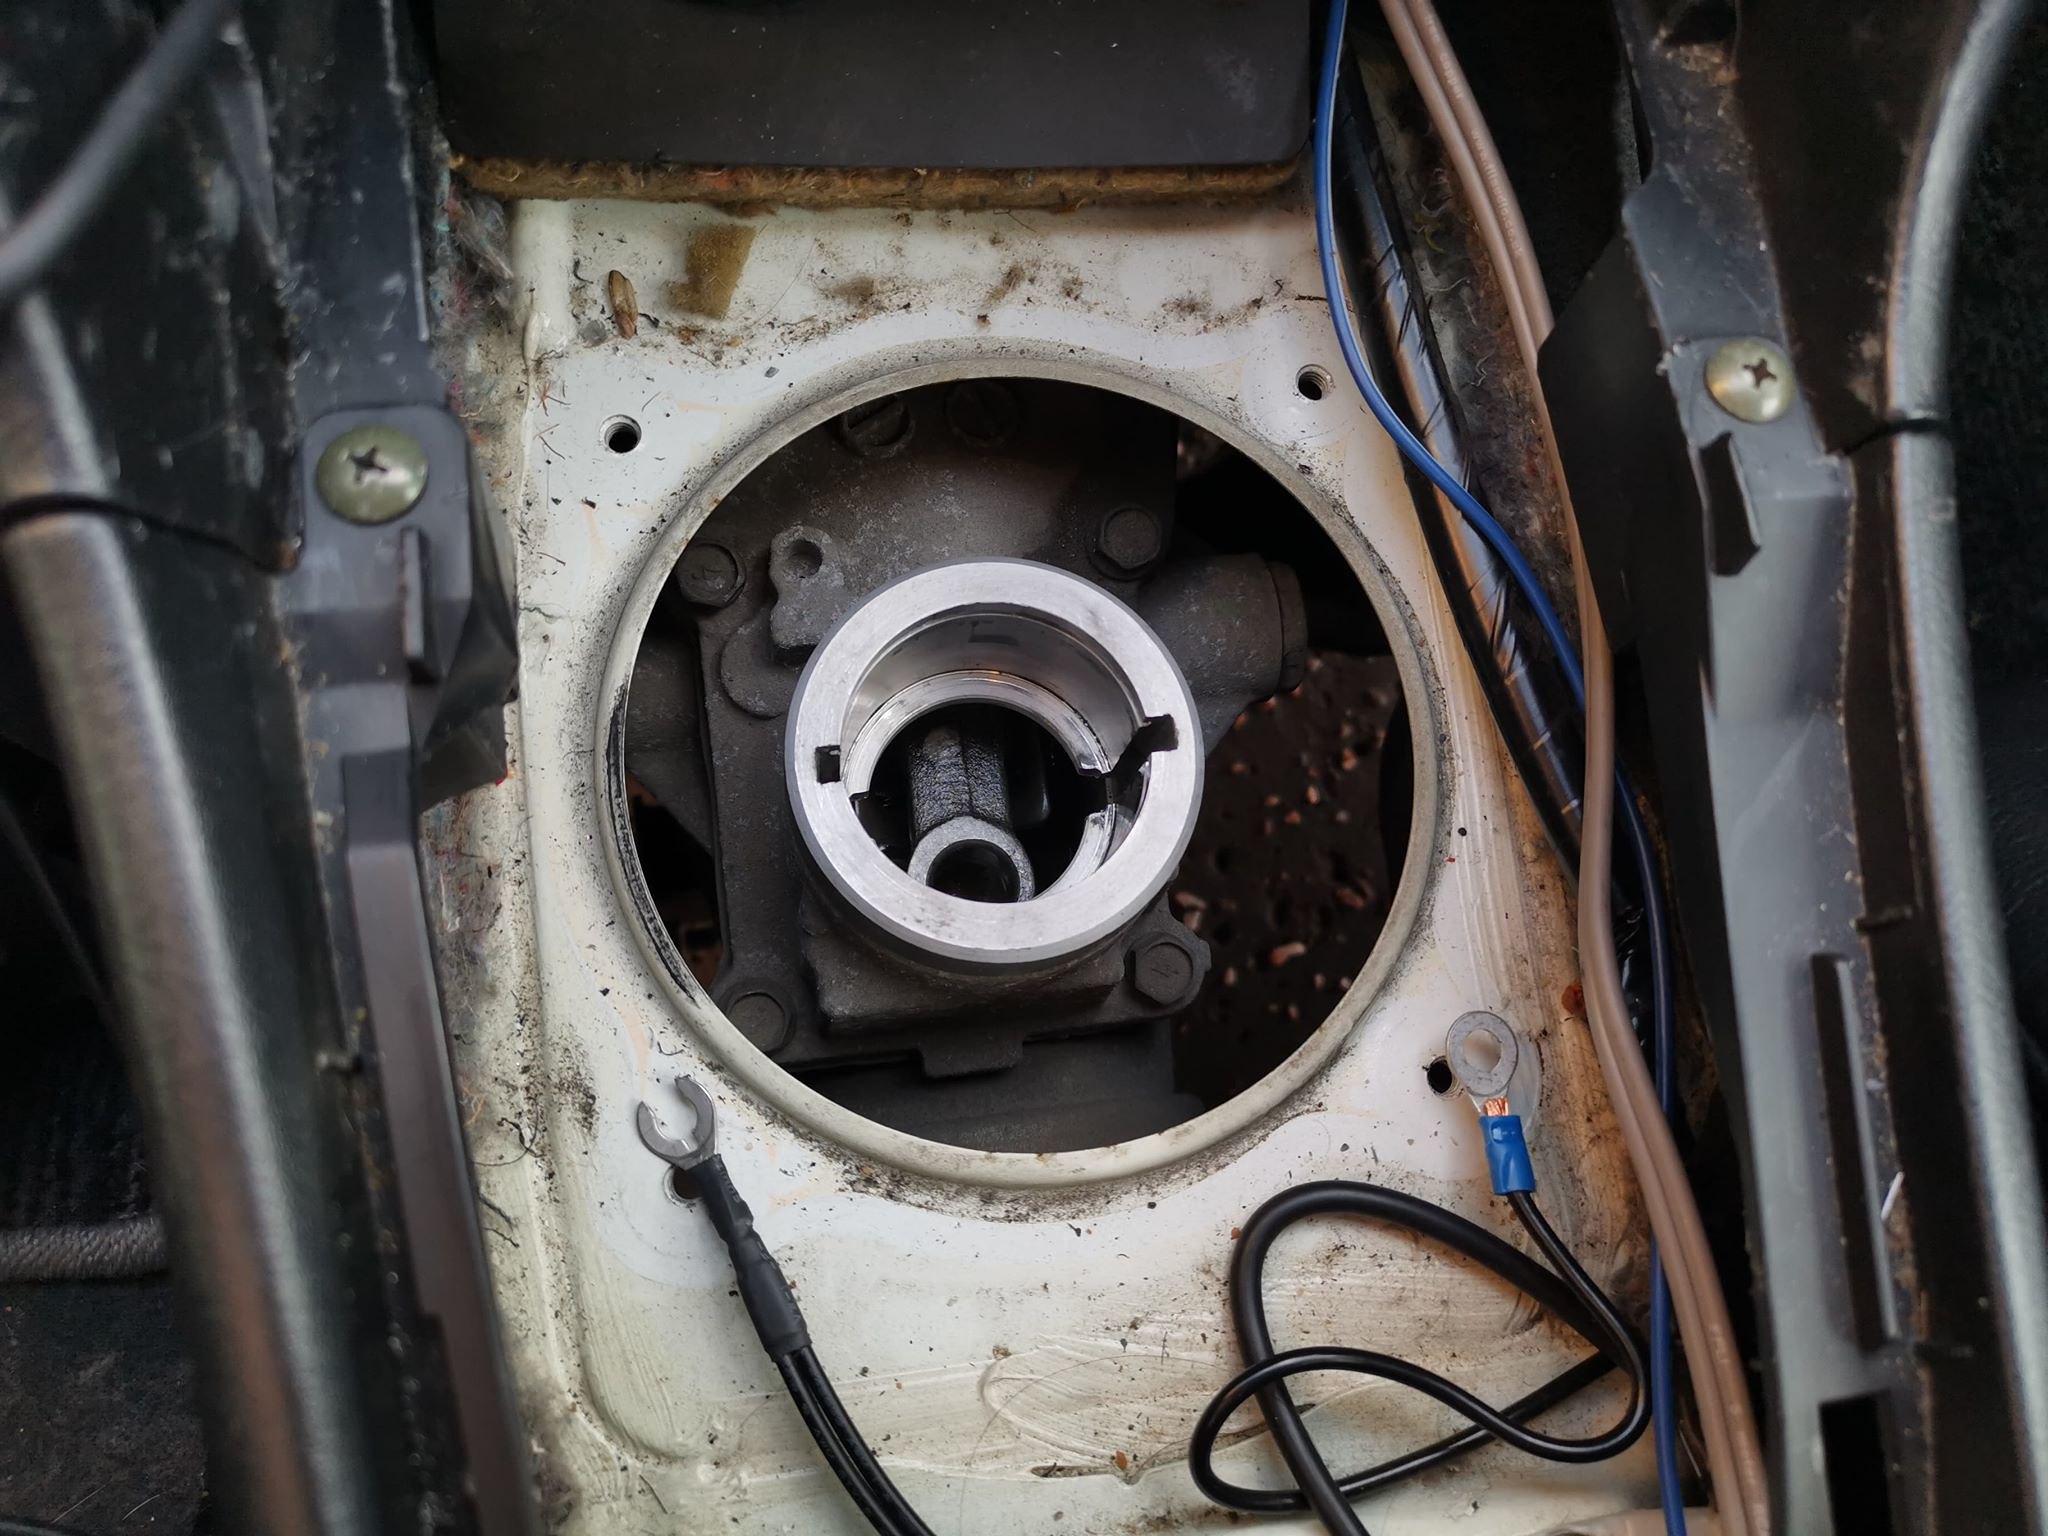
Passenger side turret wiring tidied
Amp power cable wrapped in loom tape to hide the yellow
Ground cable kit tided up and re-routed
Carbon Canister, purge valve, hardlines and pipes removed
Throttle cable adjusted (had quite alot of slack)
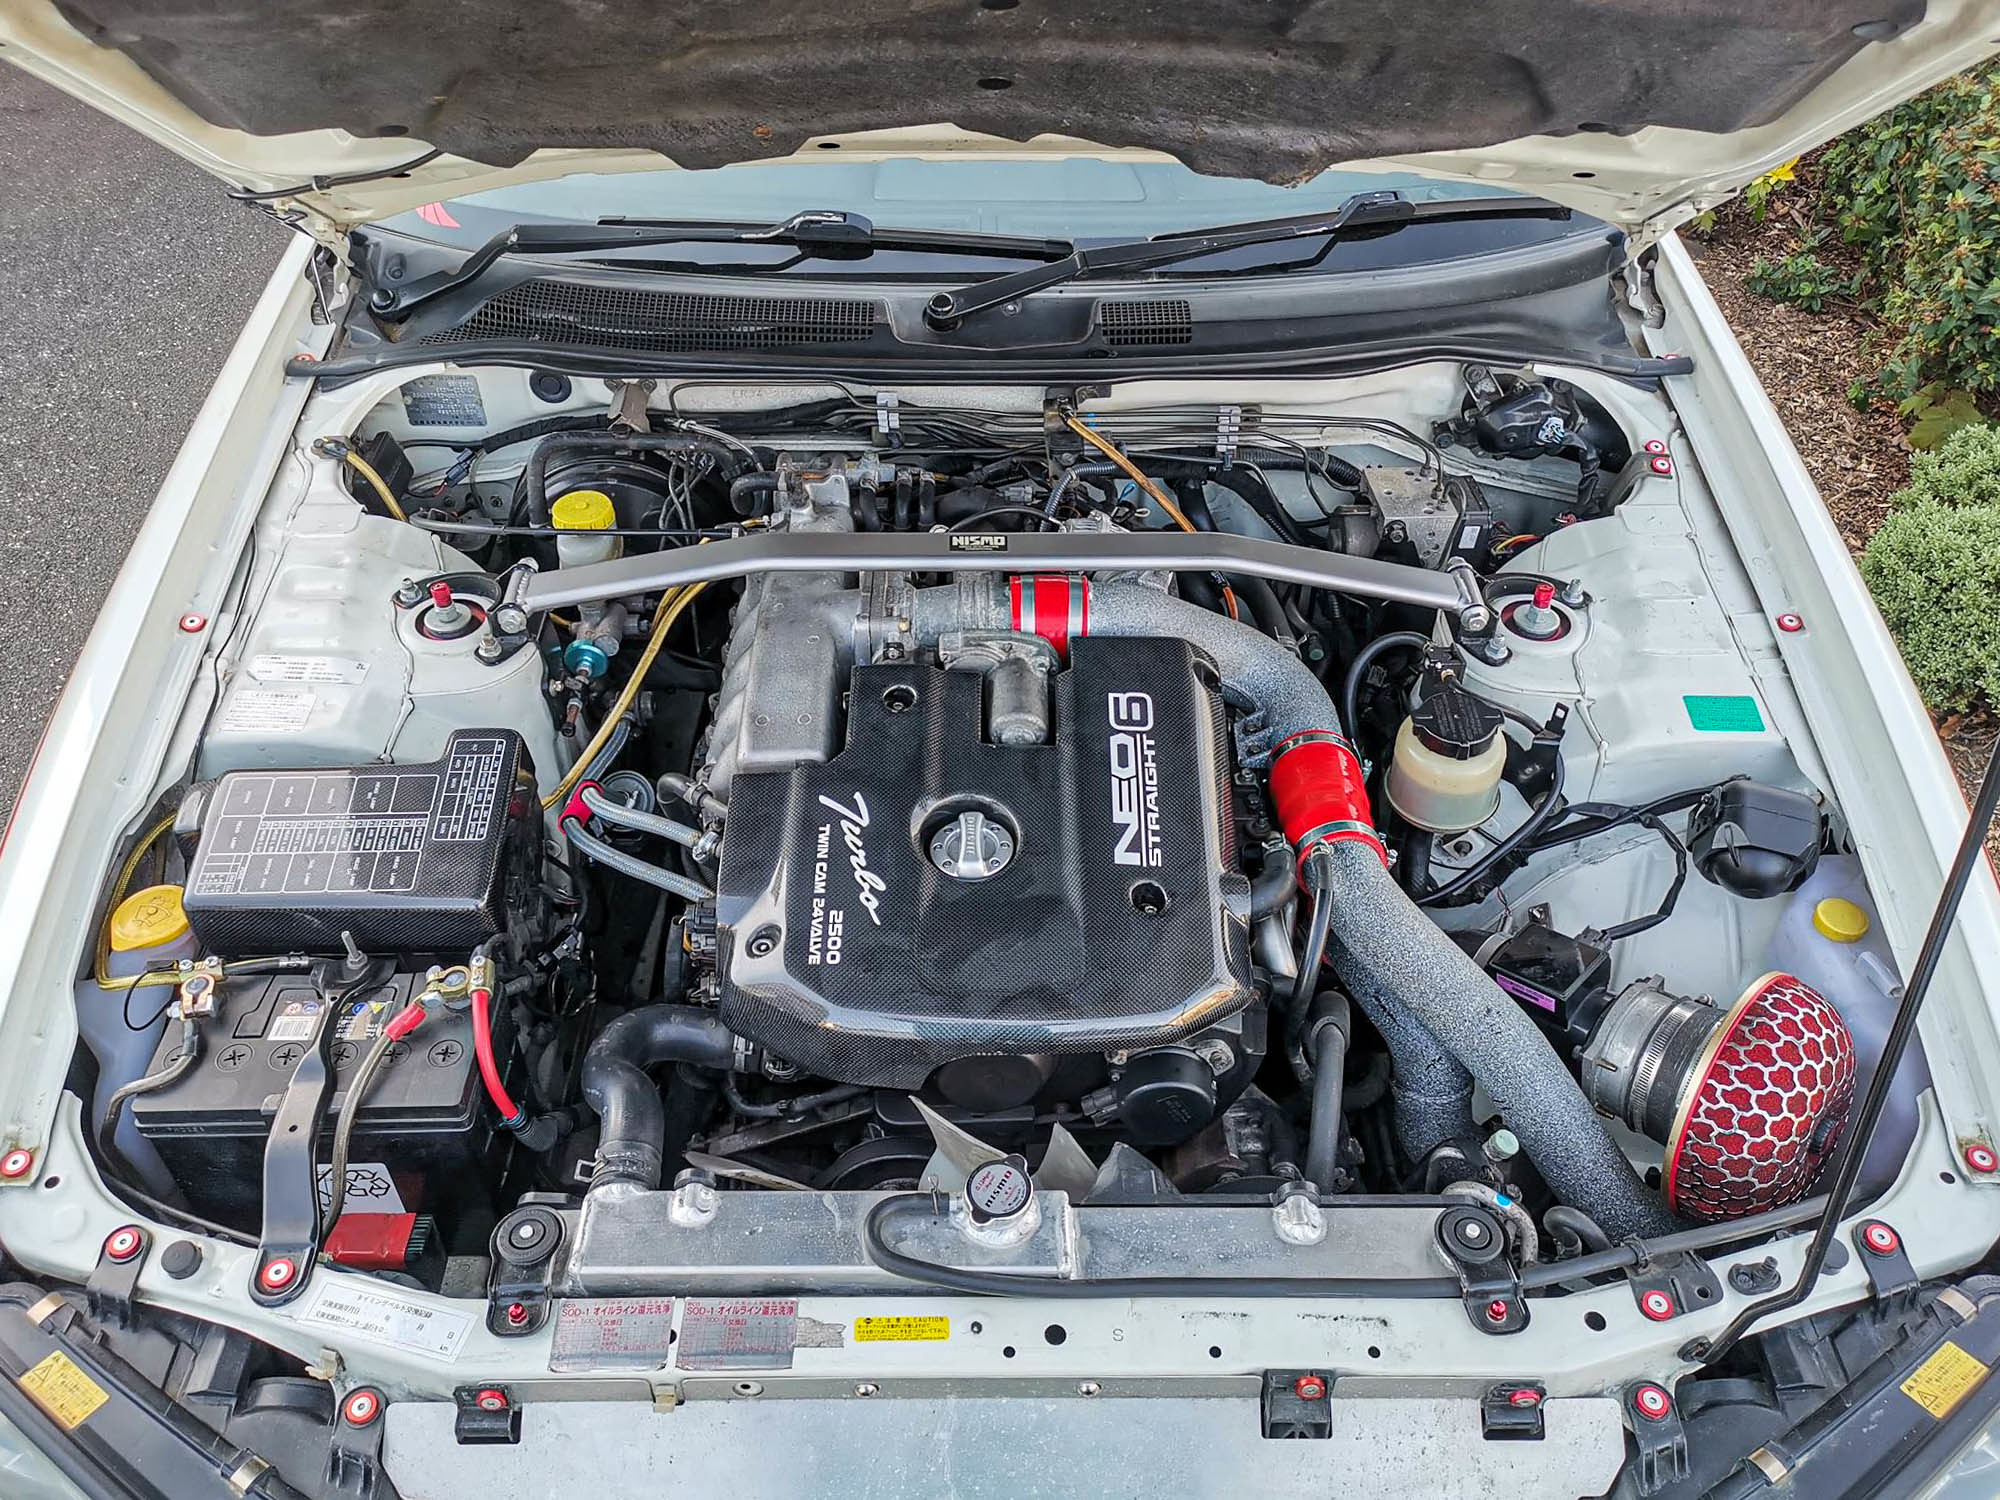


Its by far the cleanest or tidiest engine bays but its a start
I thought of using truck bed liner paint and a quick google took me to a brand called Raptor made by U-Pol (my work is a U-Pol stockist, not that we'd be able to order anything at the moment). I dont have access to a spray booth or a unit so the 'proper' stuff was out of the window, but they do do an aerosol version though. I read and got told mixed reviews of the aerosol version so I looked at alternates.
I then found a stone effect paint by Rust-Oleum, but with this pandemic getting it shipped was tricky. All local stores either didnt have it in stock, or their delivery/click and collect services were unavailable. A company called Plasti-kote do a similar product in various colours so I was on the hunt for that. I managed to find the only can in the area, although it wasnt my first choice in colour, I was too eager to give it a go.
With the pipes removed and prepped it was time to see what it was like. The paint doesnt really give a colour, its more of the coloured texture that sits on the surface. The front Intercooler pipes were originally black, so these came out slightly darker. Compared to the throttle body J pipe and turbo inlet elbow. To be honest, unless you knew you probably wouldn't notice.
Here are some before and after photos
Accessable areas degreased and cleaned
Intercooler pipes and Turbo inlet elbow painted
Hoses replaced with red silicone inc new stainless clamps
TurboZentrum Silicone Turbo hose fitted
Turbo head shield repainted
Boost controller mounted correctly, new hoses fitted
Boost controller wiring tidied up along the bulk head
Passenger side turret wiring tidied
Amp power cable wrapped in loom tape to hide the yellow
Ground cable kit tided up and re-routed
Carbon Canister, purge valve, hardlines and pipes removed
Throttle cable adjusted (had quite alot of slack)
Its by far the cleanest or tidiest engine bays but its a start


I've always loved the look of the BNR34 V Spec II rear diffuser, unfortunately they're expensive second hand and even carbon fibre copies are £1k. So i decided to attempt to make my own using inspiration from it. I'm by no means a fabricator so please be easy on me lol
The first decision was material, I wanted the brackets to be strong, the main diffuser strong enough to be sturdy but doesn't weigh a tonne. I decided to use 2mm thick angle iron for the side and rear brackets and 1.5mm steel box section for the front bracket.

Looking at mounting points and there is a part of the chassis that sits lower than the bumper, this should be ideal

The diffuser and fins were going to be made out of 0.9mm sheet steel. I did think Aluminium as its easy to work with but its too soft IMO. I started off with a card board template, unfortunately the exhaust sits too low at an angle for the whole diffuser 'body' to be a single piece. I tried cutting a hole to try and clear it but it left minimal material at the bottom and it would eventually snap.
So i went with a 2 piece design instead


I started off with the passenger side as it was smaller and easier to mount. A slot was cut for the exhaust hanger with enough room for any movement. The rear is braced with a piece of 2mm flat bar which uses a bolt in the wheel arch to the right side of the shock absorber.
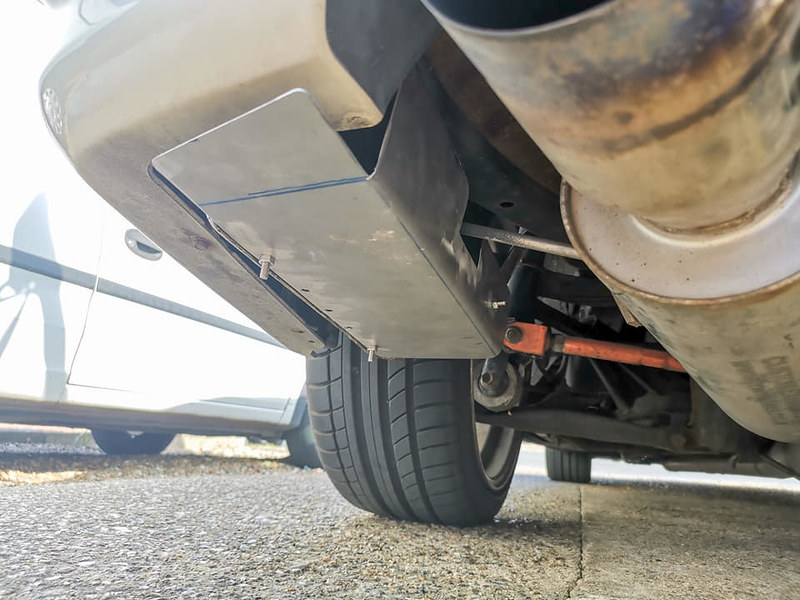
The box section bolts through the boot floor, this helped angle the diffuser down rather than having it flat. This was the first prototype for the box section, later on I made it longer so it covered the width.

You may remember me making a rear tow hook awhile back. I decided to incorporate it into the design by cutting a slot, again enough roof to not catch it when fitting/removing.

I seeked help from some friends as I don't have the skills/equipment to weld or fold sheet metal perfectly.

With the fins folded I could mock the ends up. These would be bolted on and use the same mounting points as the diffuser itself


The rear bracket was made and mocked up at the same time. I also marked the holes for the centre fins ready for drilling. At this point I decided to give the front of the diffuser a minor bend upwards rather than leaving it straight.

With everything fitted for one final time,checking clearances and everything was solid and not rattling/vibrating it was time to drop it off for powder coating. Originally I thought about having it done in black, but with the lower black trim just above it, I feared it may get lost and wouldnt be seen. Only other option was silver, the powder coater only had a satin silver so I bit the bullet and went with that.
I ordered stainless nuts, bolts, washers and rivets for the final fit


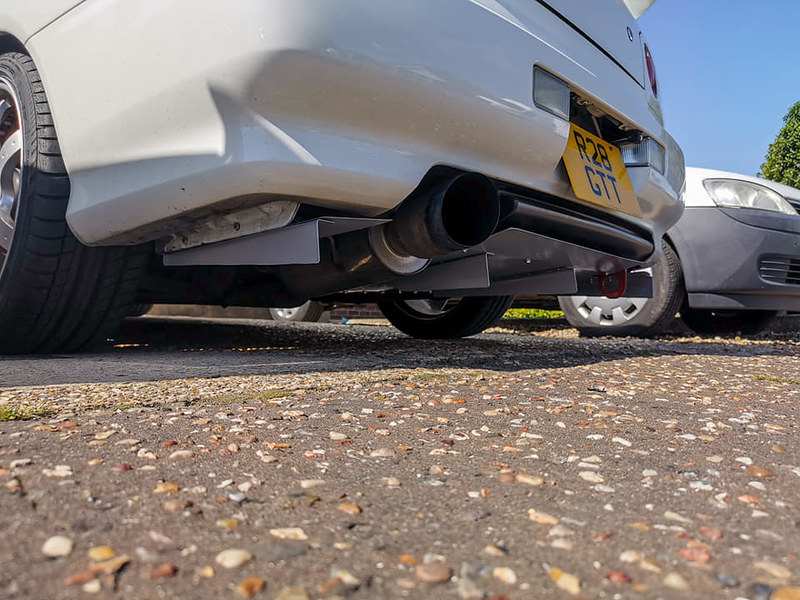


I've made flat under bumper splitters, canards and other little bits and pieces in the past but this was certainly my biggest challenge. I think its turned out very well
The first decision was material, I wanted the brackets to be strong, the main diffuser strong enough to be sturdy but doesn't weigh a tonne. I decided to use 2mm thick angle iron for the side and rear brackets and 1.5mm steel box section for the front bracket.
Looking at mounting points and there is a part of the chassis that sits lower than the bumper, this should be ideal
The diffuser and fins were going to be made out of 0.9mm sheet steel. I did think Aluminium as its easy to work with but its too soft IMO. I started off with a card board template, unfortunately the exhaust sits too low at an angle for the whole diffuser 'body' to be a single piece. I tried cutting a hole to try and clear it but it left minimal material at the bottom and it would eventually snap.
So i went with a 2 piece design instead
I started off with the passenger side as it was smaller and easier to mount. A slot was cut for the exhaust hanger with enough room for any movement. The rear is braced with a piece of 2mm flat bar which uses a bolt in the wheel arch to the right side of the shock absorber.
The box section bolts through the boot floor, this helped angle the diffuser down rather than having it flat. This was the first prototype for the box section, later on I made it longer so it covered the width.
You may remember me making a rear tow hook awhile back. I decided to incorporate it into the design by cutting a slot, again enough roof to not catch it when fitting/removing.
I seeked help from some friends as I don't have the skills/equipment to weld or fold sheet metal perfectly.
With the fins folded I could mock the ends up. These would be bolted on and use the same mounting points as the diffuser itself
The rear bracket was made and mocked up at the same time. I also marked the holes for the centre fins ready for drilling. At this point I decided to give the front of the diffuser a minor bend upwards rather than leaving it straight.
With everything fitted for one final time,checking clearances and everything was solid and not rattling/vibrating it was time to drop it off for powder coating. Originally I thought about having it done in black, but with the lower black trim just above it, I feared it may get lost and wouldnt be seen. Only other option was silver, the powder coater only had a satin silver so I bit the bullet and went with that.
I ordered stainless nuts, bolts, washers and rivets for the final fit
I've made flat under bumper splitters, canards and other little bits and pieces in the past but this was certainly my biggest challenge. I think its turned out very well
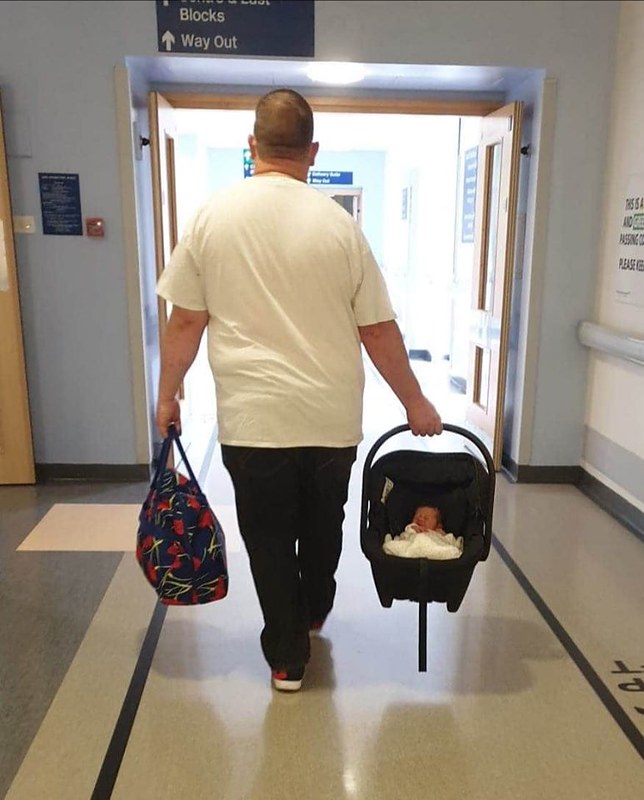
On Monday 27th July we welcomed our daughter Mia Rose into the world. Mum did an absolutely amazing job and active labour was just over 3hrs long. She's yet to go out in the R34 yet as we still need to sort out the car seat (isofix in the daily Mazda 6 is a god send)
After damaging the Work Emotions back in February, they were refurbished during the Covid-19 lockdown. From the factory in Japan the inside of the spokes are darker with a very bright outer face. The company were able to replicate it,but unfortunately the outer face is slightly darker. I had all 4 wheels done so they all match and they look just as good as before!
The car is filthy and is in a need of a deep clean but couldnt resist getting some photos

Great read, thanks for taking the time.
Very nicely thought out mods, not just throwing parts at it for the sake of it. And good on you for enjoying it for what it is, not trying to replicate a GT-R, a lot of GTS/GTT owners fall into that trap. Great attention to detail, love the little bits like the replicated stickers, and OEM stickers on the carbon bits in the engine bay.
Those seats are beautiful! What are they like to live with? I've had a DC2 with OEM Recaros and found them really tight and not particularly comfortable, the slightly wider Recaros in my ATR suit my (fat) proportions much better
My face dropped when I saw the damage to the Works, Christ I bet that ruined your day. They look great now they've been repaired though, and at least they weren't the crap that's getting fitted to most Jap cars at the minute (Bola/Japan Racing etc) so they didn't just explode.
I'm pretty jealous of the ownership experience you're having, I also have a late 90s Jap performance car, one with an excellent rep for reliability and I've not been able to buy any cool little bits of trim, let alone seats etc as it just keeps breaking so my money has to go towards keeping it on the road rather than making it cooler!
That stone effect paint is great, my gf's uncle has it on their fireplace and it's amazing how good it looks! Hadn't thought of using it for car related purposes - may have to steal that idea!
Really liking the liveries on all 3 cars, it's something I want to try on a couple of my cars if I ever fix enough issues to be in a position to worry about putting stripes on them The HKS livery on the MX5 is particularly ace!
Congrats on the new arrival.
Very nicely thought out mods, not just throwing parts at it for the sake of it. And good on you for enjoying it for what it is, not trying to replicate a GT-R, a lot of GTS/GTT owners fall into that trap. Great attention to detail, love the little bits like the replicated stickers, and OEM stickers on the carbon bits in the engine bay.
Those seats are beautiful! What are they like to live with? I've had a DC2 with OEM Recaros and found them really tight and not particularly comfortable, the slightly wider Recaros in my ATR suit my (fat) proportions much better
My face dropped when I saw the damage to the Works, Christ I bet that ruined your day. They look great now they've been repaired though, and at least they weren't the crap that's getting fitted to most Jap cars at the minute (Bola/Japan Racing etc) so they didn't just explode.
I'm pretty jealous of the ownership experience you're having, I also have a late 90s Jap performance car, one with an excellent rep for reliability and I've not been able to buy any cool little bits of trim, let alone seats etc as it just keeps breaking so my money has to go towards keeping it on the road rather than making it cooler!
That stone effect paint is great, my gf's uncle has it on their fireplace and it's amazing how good it looks! Hadn't thought of using it for car related purposes - may have to steal that idea!
Really liking the liveries on all 3 cars, it's something I want to try on a couple of my cars if I ever fix enough issues to be in a position to worry about putting stripes on them
The HKS livery on the MX5 is particularly ace!Congrats on the new arrival.
Jaaack said:
Great read, thanks for taking the time.
Very nicely thought out mods, not just throwing parts at it for the sake of it. And good on you for enjoying it for what it is, not trying to replicate a GT-R, a lot of GTS/GTT owners fall into that trap. Great attention to detail, love the little bits like the replicated stickers, and OEM stickers on the carbon bits in the engine bay.
Very nicely thought out mods, not just throwing parts at it for the sake of it. And good on you for enjoying it for what it is, not trying to replicate a GT-R, a lot of GTS/GTT owners fall into that trap. Great attention to detail, love the little bits like the replicated stickers, and OEM stickers on the carbon bits in the engine bay.
Who doesn't love the aesthetics of the BNR34?! I can see the appeal of wanting the looks of a GTR at a fraction of the cost of a real one. If I had bought a ropey example I probably would have gone down that route, but with this being so clean it made sense to keep it stock body
Its nice to see/hear people noticing the little details as they usually get unnoticedJaaack said:
Those seats are beautiful! What are they like to live with? I've had a DC2 with OEM Recaros and found them really tight and not particularly comfortable, the slightly wider Recaros in my ATR suit my (fat) proportions much better
The seats are incredibly comfy, they weren't an option originally as they were way out of my price range. But after not making a decision on the two seats at GSM, after sitting in the Sportster CS I knew they were the ones. Being a large build comfort was number 1 factor especially with the long drives to shows from Norfolk numerous times a year. Worth every single penny in my opinion Jaaack said:
My face dropped when I saw the damage to the Works, Christ I bet that ruined your day. They look great now they've been repaired though, and at least they weren't the crap that's getting fitted to most Jap cars at the minute (Bola/Japan Racing etc) so they didn't just explode.
It did put a downer on the afternoon but these things happen. The company has previously refurbed the bronze 17" wheels I purchased for the R34 and having a number of friends use them too,gave me more than enough confidence. Jaaack said:
I'm pretty jealous of the ownership experience you're having, I also have a late 90s Jap performance car, one with an excellent rep for reliability and I've not been able to buy any cool little bits of trim, let alone seats etc as it just keeps breaking so my money has to go towards keeping it on the road rather than making it cooler!
HyperRev books have helped with getting inspiration, but on the flip side has made me spend alot more money haha With the car running still relatively stock power its kept the car pretty reliable, doing limited miles kinda helps tooJaaack said:
That stone effect paint is great, my gf's uncle has it on their fireplace and it's amazing how good it looks! Hadn't thought of using it for car related purposes - may have to steal that idea!
Originally I looked at truck bed lining paint (initially U-Pol Raptor) but I dont have access to a unit/spray booth or the correct tools (compressor, spray gun etc) so had to think of something available in an aerosol at an affordable price. Its not a rock hard finish, if you grip the pipe or move it too much it will come off. Theres a few thin areas now appeared so I need to decide what to do, either repaint or go a different route.Jaaack said:
Really liking the liveries on all 3 cars, it's something I want to try on a couple of my cars if I ever fix enough issues to be in a position to worry about putting stripes on them The HKS livery on the MX5 is particularly ace!
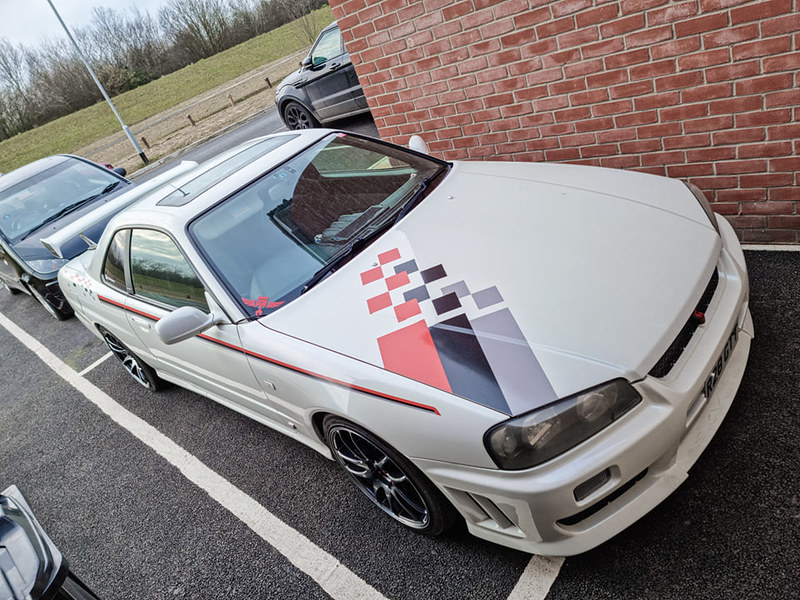
I wanted something that was different and would stand out, it also had to link in with the rest of the car and it pulled off pretty well. The Nismo livery helped break up all of the white on the R34. Having it on the Micra kinda helped and is kind of a tribute to the first proper project I had. I had thought about removing it, but after doing a photoshop I hated it lol The car isn't extreme enough to have a full body wrap, the Nismo stripes is a good compromise I think The HKS livery on the MX5 is particularly ace!Jaaack said:
Congrats on the new arrival.
Thank you leglessAlex said:
Congratulations! Fingers crossed she grows up with an appreciation for late 90s Japanese cars like her dad 
Thank you Would love to share the passion for all things automotive when shes older. Although if she wants financial stability in the future she may have to go a different route hahaI can't believe the last update was in July!
In September I was lucky enough to attend the 2nd show of the year dodging the national lock downs, this was Modified Live Snetterton. Would have been rude not to as the circuit is only a 20min drive away.


On the drive home the car threw up the TCS,SLIP and EML lights on with no change in the drive of the car. I took it to work the following week and I experienced a very bad misfire on the way in.
Not having access to Nissan Consult I did the paperclip trick and code 21 appeared, which points at the coil packs.
I removed the coil packs to check the resistance to find 4 out of 6 had no resistance. I'm guessing they're fine on initial start up but break down when they get hot (driving for 10mins after start up the misfire reappears)
I also noticed 3 out of 6 cylinders had oil down the spark plug chambers and on top where the coil pack sits. So I started to strip it down while I wait for a replacement gasket and half moons to arrive from Conceptua Tuning.
This was the first time working on the engine especially an RB, and wow what a ball ache this was haha
With the gaskets and spark plugs changed it was a waiting game for the OEM coil packs to arrive from Auto Extreme

Refitting is very straight forward so it didn't take too long to put everything back together
With the car reassembled it was time for a test drive. What better way than a 100 mile trip around the Norfolk coast. The car didnt play up at all and ran like a dream. An added bonus Mia had slept for the whole time, winner!

I'm looking forward to the salt free roads so I can enjoy this again
In September I was lucky enough to attend the 2nd show of the year dodging the national lock downs, this was Modified Live Snetterton. Would have been rude not to as the circuit is only a 20min drive away.
On the drive home the car threw up the TCS,SLIP and EML lights on with no change in the drive of the car. I took it to work the following week and I experienced a very bad misfire on the way in.
Not having access to Nissan Consult I did the paperclip trick and code 21 appeared, which points at the coil packs.
I removed the coil packs to check the resistance to find 4 out of 6 had no resistance. I'm guessing they're fine on initial start up but break down when they get hot (driving for 10mins after start up the misfire reappears)
I also noticed 3 out of 6 cylinders had oil down the spark plug chambers and on top where the coil pack sits. So I started to strip it down while I wait for a replacement gasket and half moons to arrive from Conceptua Tuning.
This was the first time working on the engine especially an RB, and wow what a ball ache this was haha
With the gaskets and spark plugs changed it was a waiting game for the OEM coil packs to arrive from Auto Extreme
Refitting is very straight forward so it didn't take too long to put everything back together
With the car reassembled it was time for a test drive. What better way than a 100 mile trip around the Norfolk coast. The car didnt play up at all and ran like a dream. An added bonus Mia had slept for the whole time, winner!
I'm looking forward to the salt free roads so I can enjoy this again
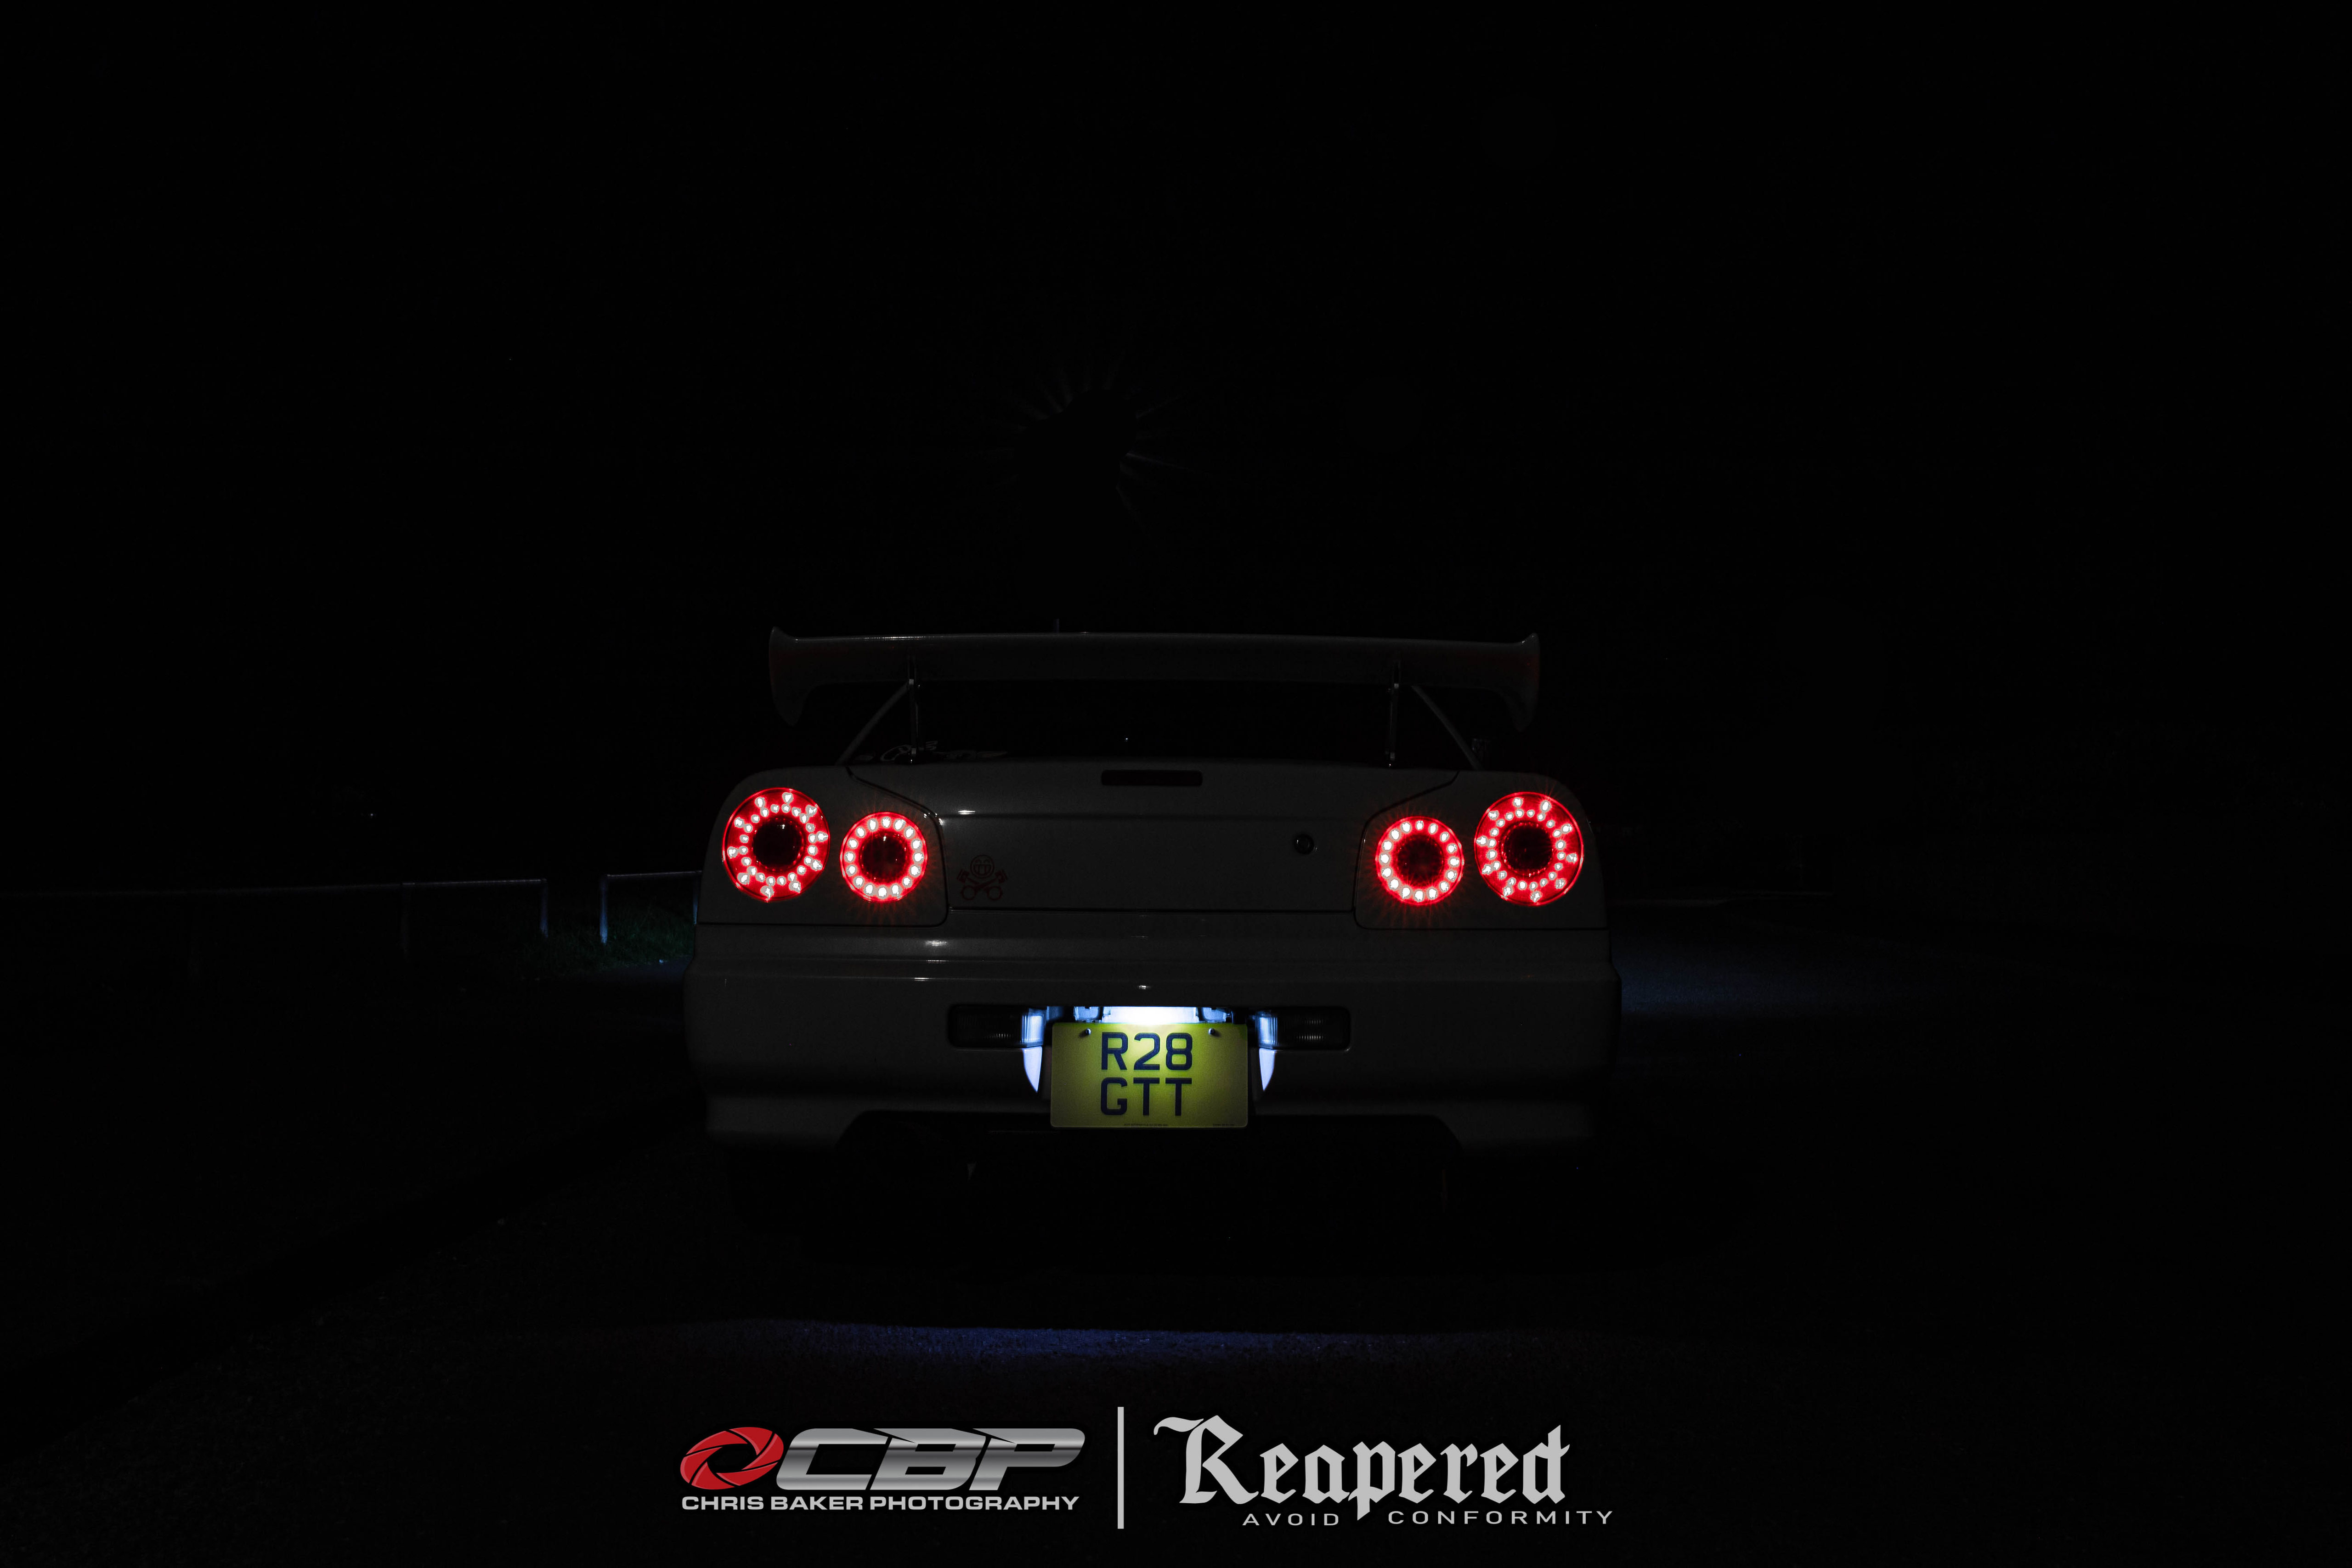
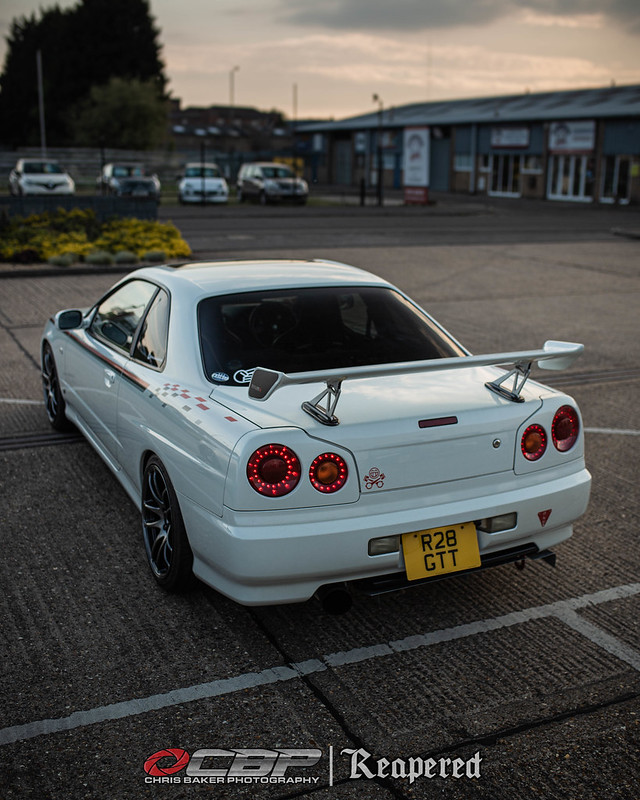
I've been wanting to try a new photo look/technique for awhile but hadn't had the spare time.
The car had been neglected since the end of summer last year and I can't remember the last time it was washed. Unfortunately with winter and moving house it wasn't at the top of my priority list (plus living in a flat didn't help)
With the car washed, now was the time to go out and take photos. I'll let them do the talking

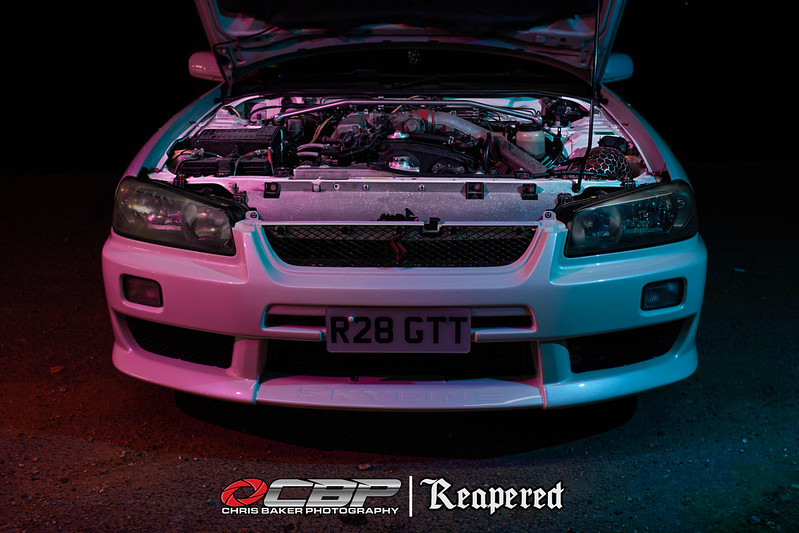
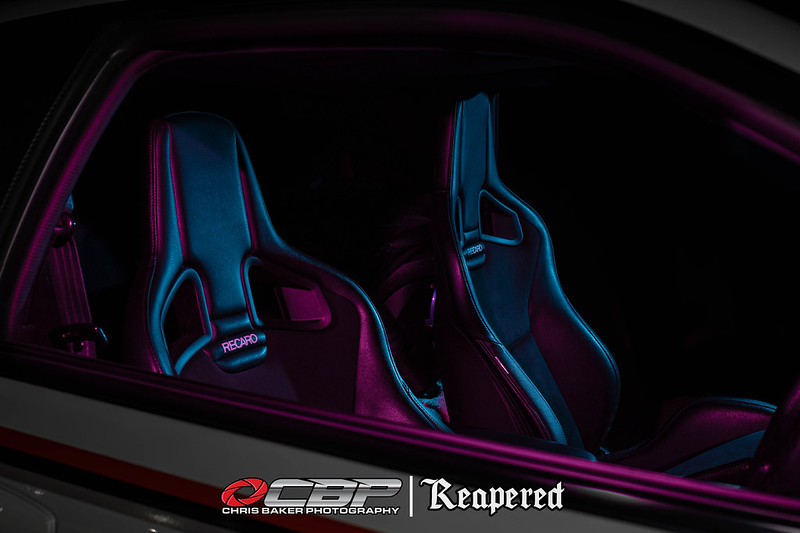


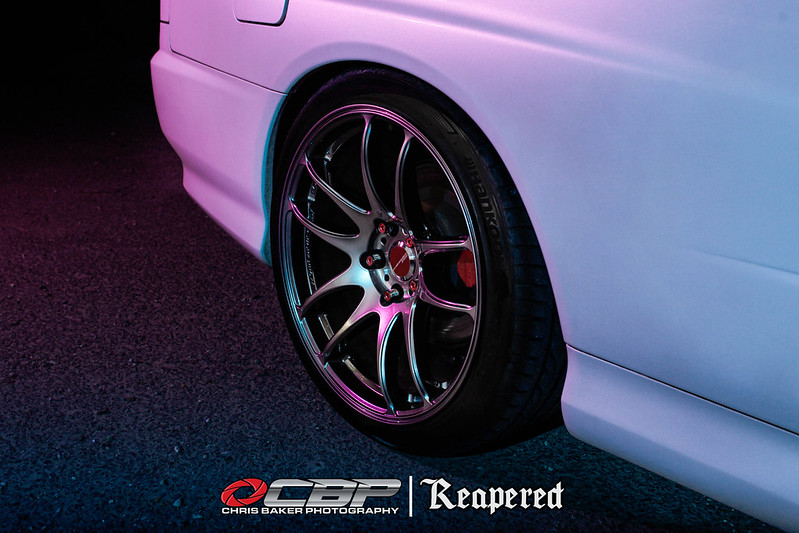

A big thank you to David Cox aka Shooting Dave for videos, it certainly helped. Just need more practice now
The car had been neglected since the end of summer last year and I can't remember the last time it was washed. Unfortunately with winter and moving house it wasn't at the top of my priority list (plus living in a flat didn't help)
With the car washed, now was the time to go out and take photos. I'll let them do the talking
A big thank you to David Cox aka Shooting Dave for videos, it certainly helped. Just need more practice now


Its been a year since I last posted anything constructive (new coilpacks, rocker cover gasket etc)
The R34 had taken abit of a back burner, I got abit distracted with the K11 and Colt CZT
Back in 2020 when the UK went into its Covid lockdown, I repainted the intercooler pipes in a stone effect paint. While re-assembling I noticed the paint had started to come off, thinking it'd be fine. Fast forward a year or so and the paint didn't last as long as I had hoped.
With the car currently off the road for the winter, it was a good opportunity to sort this.
I went with a VHT wrinkle black paint, something subtle but not plain and boring. The wrinkle texture wasn't as pronounced as I remembered but its a big improvement from before
Heres a before photo

(Apologies for the phone photos)


Sorry its nothing exciting. Next up is a service and a good clean ready for spring to arrive.
The turrets are now showing signs of corrosion so I need to start saving for the work to be done. I knew it was coming and we all know its nevitable. I'll probably buy the replacement panels from SR Autobodies and save for the labour costs
The R34 had taken abit of a back burner, I got abit distracted with the K11 and Colt CZT
Back in 2020 when the UK went into its Covid lockdown, I repainted the intercooler pipes in a stone effect paint. While re-assembling I noticed the paint had started to come off, thinking it'd be fine. Fast forward a year or so and the paint didn't last as long as I had hoped.
With the car currently off the road for the winter, it was a good opportunity to sort this.
I went with a VHT wrinkle black paint, something subtle but not plain and boring. The wrinkle texture wasn't as pronounced as I remembered but its a big improvement from before
Heres a before photo
(Apologies for the phone photos)
Sorry its nothing exciting. Next up is a service and a good clean ready for spring to arrive.
The turrets are now showing signs of corrosion so I need to start saving for the work to be done. I knew it was coming and we all know its nevitable. I'll probably buy the replacement panels from SR Autobodies and save for the labour costs
Gassing Station | Readers' Cars | Top of Page | What's New | My Stuff