MG ZS 120+ - aka "The Learning Experience"
Discussion


mattyprice4004 said:
Welcome to ZS ownership! I've had about 10 so far, lovely cars.
There's a few reasons to pick a 1.8 over the KV6 - it's a lot more 'revvy', cheap to own and run, and handling is significantly better as the weight is more evenly balanced.
KV6 radiators aren't available new, cambelt changes are £500+ and inlet manifolds are over £1000 new too.
I'd much rather have a K4 1.8 these days - I've got a diesel at the moment, but the engine weighs the front end down quite heavily.
You're always welcome to pick my brains if needed - I own and run Discount MG Rover Spares and have a worryingly OCD level of inside-out knowledge of these motors and the K Series engine.
Thank you - you've had some of my cash already and I'm a big fan of the Maoam. I will give you a bell on the old HG front having digested the pages of your website and put my order in after payday. I've been reading a bit of DVA stuff on the oil ladder and the suitability for each gasket vs head issues and I'm undecided on the best course of action as yet.There's a few reasons to pick a 1.8 over the KV6 - it's a lot more 'revvy', cheap to own and run, and handling is significantly better as the weight is more evenly balanced.
KV6 radiators aren't available new, cambelt changes are £500+ and inlet manifolds are over £1000 new too.
I'd much rather have a K4 1.8 these days - I've got a diesel at the moment, but the engine weighs the front end down quite heavily.
You're always welcome to pick my brains if needed - I own and run Discount MG Rover Spares and have a worryingly OCD level of inside-out knowledge of these motors and the K Series engine.
Smitters said:
Ha - just replied to your Fiat thread then realised I'd be replying to you here too!
I do have some updates coming, so no spoilers, but in the mean time, thanks for the talc tips. Alternator belt is new and well tensioned thankfully. Cam and other belts will be renewed shortly when the head comes off.
Duly noted on MGRS. I'm hoping to do all spannering myself, but it's good to know of a recommended guru if I get stuck. I believe MGJohn and I reside in the same county too, so if I really screw up, I may end up putting out some sort of MG distress signal via powerful lamp shining on the clouds above...
At the mo though, newly arrived baby stops (or at least slows dramatically) play. That and several jobs on our camper and Beetle that are more urgent.
I think the MG distress signal is a puff of white smoke coming out of the exhaust as another CHG pops I do have some updates coming, so no spoilers, but in the mean time, thanks for the talc tips. Alternator belt is new and well tensioned thankfully. Cam and other belts will be renewed shortly when the head comes off.
Duly noted on MGRS. I'm hoping to do all spannering myself, but it's good to know of a recommended guru if I get stuck. I believe MGJohn and I reside in the same county too, so if I really screw up, I may end up putting out some sort of MG distress signal via powerful lamp shining on the clouds above...
At the mo though, newly arrived baby stops (or at least slows dramatically) play. That and several jobs on our camper and Beetle that are more urgent.

Congrats on the little'n though!
SloppyClock said:
I think the MG distress signal is a puff of white smoke coming out of the exhaust as another CHG pops
Congrats on the little'n though!
The white smoke doesn't get that far it seems... and cheers. He's ace. Mechanic in the making.Congrats on the little'n though!
Just a little teaser as I have actually been doing things, but as I have a Samsung phone and only one of those weird cables, which is never where I want it to be, I can't load any pictures yet. So, pop quiz:
Was there,
a) coolant visibly leaking from the head/block interface when I ran the car up yesterday.
b) considerably more rust on the main chassis members creeping under the seam seal and under seal than I'd hoped.
c) a need to remove the front bumper just to unbolt the washer bottle.
d) a chunk of rust and paint knocked off a very visible spot on the front wing by a cack-handed and tired man who'd been lying on his back scraping his sheddy rust box and earnestly questioning his life choices at ten pm last night.
e) all of the above?
Sigh. I loves a project I does.
So, where was I? Oh yes. Learning lessons…
My first quest was a search for rust. I’d decided up front if there was anything really bad, I’d just turn the car around and look for something else. I’m clearly not going to do a full OEM+ restoration here, but at the same time, I don’t mind spending a few pounds on some basic kit to slow down the inevitable march of the rot. Once I’ve completed that task, it’ll be on to replacing the HG and servicing the car for parts and fluids.
So, is there any rust? Er.

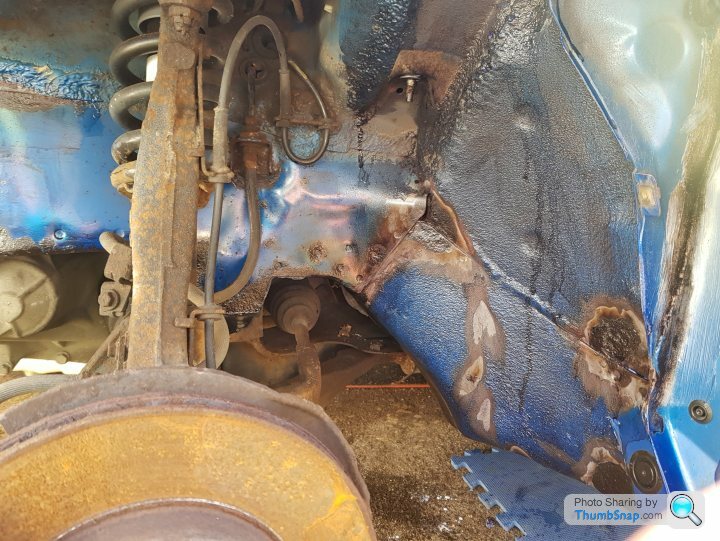
OK - the rear ARB looks scabby, and there's lots of surface rust, but actually, having pulled the interior out of the boot to check the strut tops, removed the sill bodykit to inspect the front of the sills and leading edges and jacked up the front for a meeting with a jetwasher and some degreaser, it's actually not that bad. So the plan stands - brush back any surface rust as best I can, especially in the wheel arches, leading edge of the floor pan and wherever it's obviously blowing the seam seal up and go from there. More work than I wanted, less rust than there could have been.
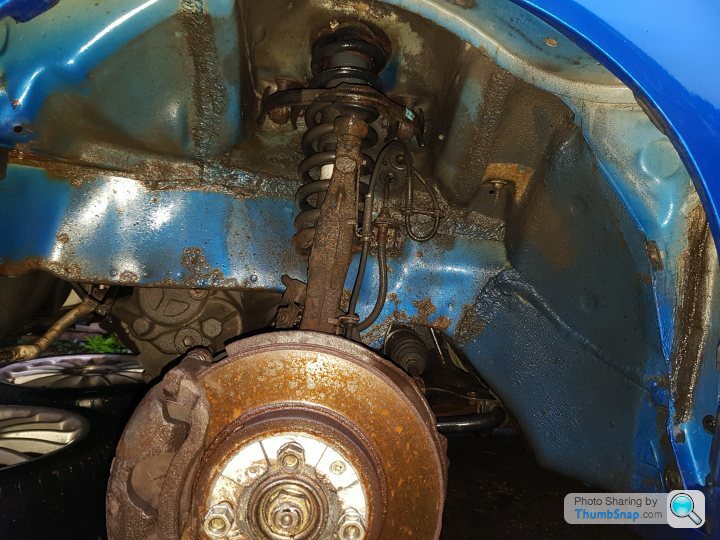
Wheel arches not too bad, though this is the better side.
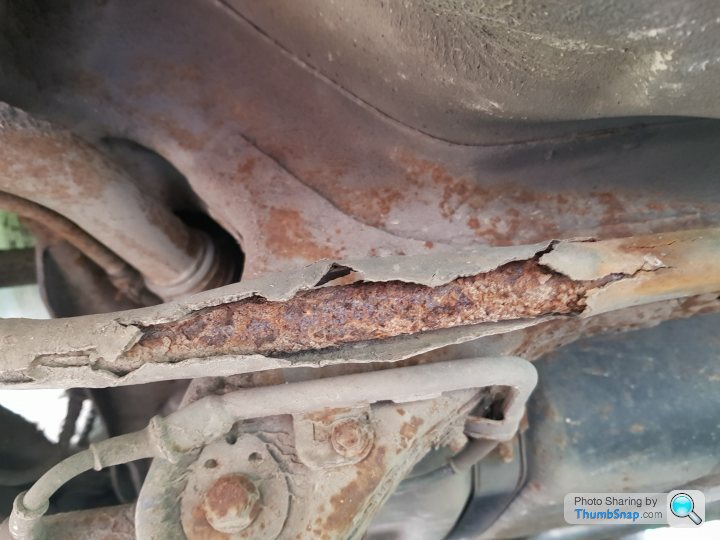
Probably the worst found so far. This has been brushed back hard, but even so, there are no holes. I'm still not looking impressed though.
Getting some converter on.
Note the hamfisted jacking attempt on the floorpan by the two plugs on the right of the pic. It left a sizable dent and damage to the underseal resulting in, you guessed it, auto-lightening, colour swap to dark red mode "on". Idiots. My missus's Beetle has had this mod too.
Looking round the car produced some interesting discoveries too...
No idea what the Brands Hatch Edition is. Google has failed to enlighten me.

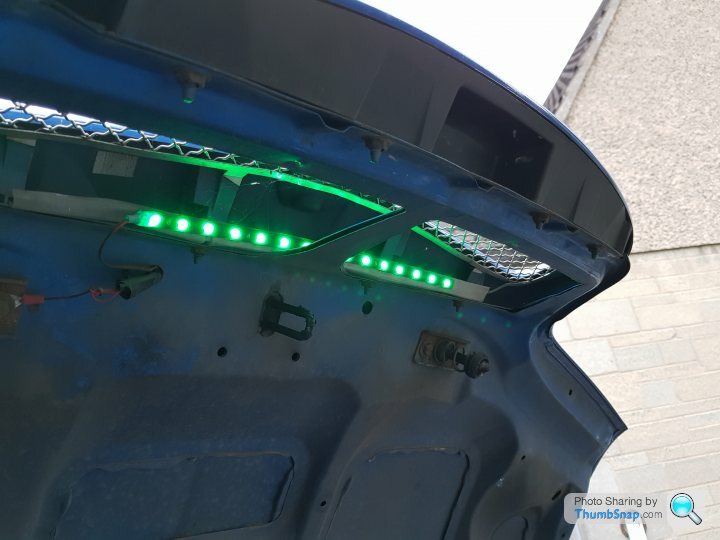
Living the LED life... also explains what the interesting switch is in the cabin. These are staying, obviously.
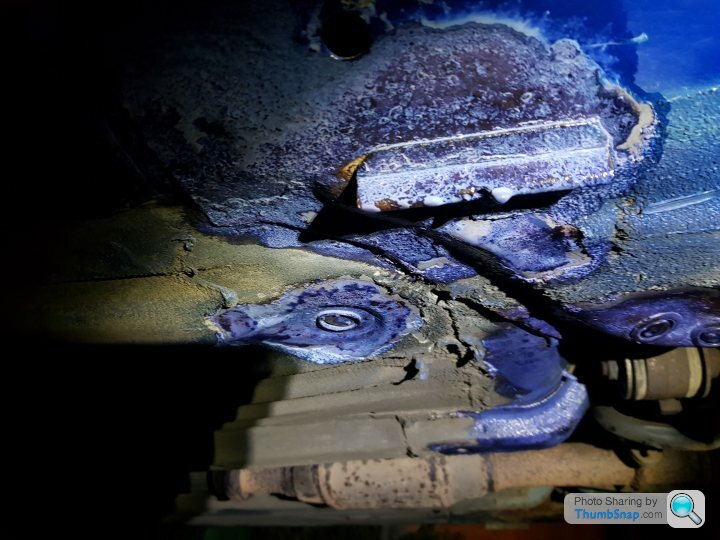
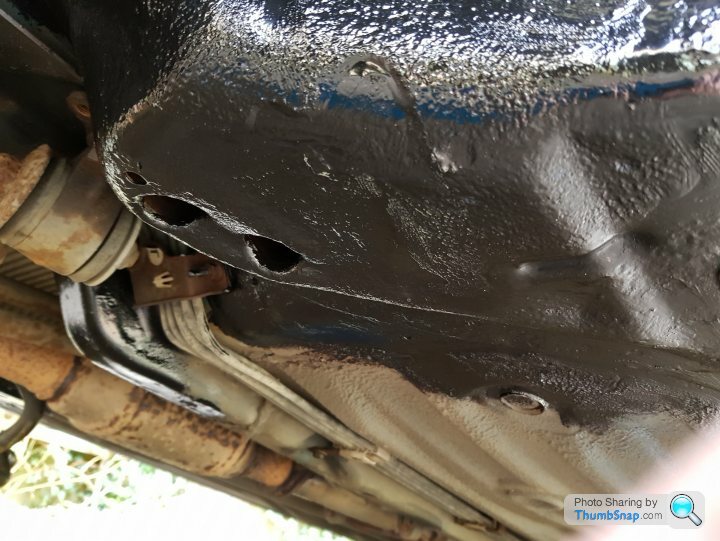
And finally, the obvious cause of the coolant loss and the reason the car came with free mineral water bottles - always a good sign. Not a great picture, and possibly highlights the amusement I'll have when removing the exhaust manifold, but there's a veritable cascade from outside cylinder 4. Like actual dripping while the engine runs. And no, before you ask, it's not coming from that coolant joint. It's dry above the head/block "seal". And there's scum in the coolant tank anyway.
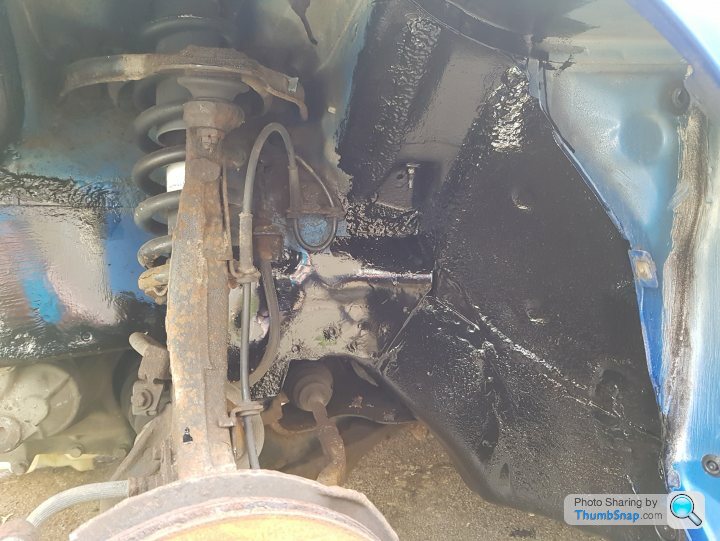
So, the next few steps will be to finish brushing back and treating the front, for which I've got some Kurust, Hammerite and a bunch of Bilt Hamber products to do the seam and undersealing. Then I'll move onto the back and do the same, before putting in my orders for:
HG, head bolts, exhaust gasket, inlet gasket, cam cover gasket, new cam belt (and tool), new water pump, new tensioner, new alternator belt (new my arse - seller's telling porkies here), new aux belt, new plugs, air and oil filters (x2, one for a quick few hundred miles to flush the engine out a bit and cut open, one to pop back on with decent oil), some Holts rad-flush, new exhaust studs, new coolant tank cap (the old one hisses, which probably isn't ideal).
I'm undecided yet on whether to pull the head off then order the HG once I measure the liner protrusion and inspect for damage, or just assume it needs an elastomer gasket. I'm not going to spend £££ on hardness testing the head because I don't want to spend £££ and because I don't want to remove the cams and carrier and then have a big time gap - the likelihood of it going back together successfully after any time elapses is minimal. Having everything on hand to simply clean and rebuild on the same (engage optimism mode) day or (reality mode) same week is more likely to yield success, though it comes with a risk.
Other amusing experiments I've been dreaming up while pacing about with a wind-filled infant at midnight are:
DIY PRT to avoid the £100+ bill for a kit. I'll check pipe IDs and ODs while doing the head and then try to figure out which parts I need to do a Frankenstein's monster of a job.
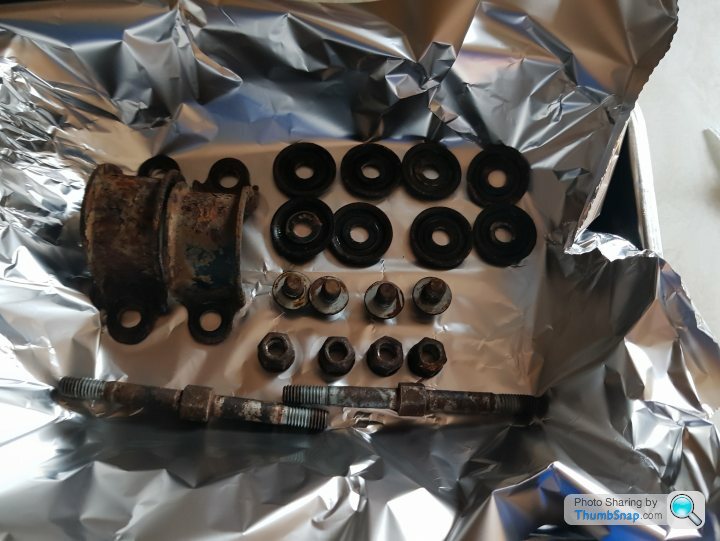
DIY bushes. OK - only little ones, but it looks amusing and not too hard, for example, to make my own for the drop links instead of paying Powerflex £40. They are simply disks with a hole through and a metal tube.
Can I make my own 421 headers? OK - a long shot here, but a good excuse to learn to weld, and the exhaust run is pretty simple, so there's no reason I can't raid a scrappy for exhaust pipe parts off various cars, buy some flanges and gaskets and get making a mess. 2-1 joiners are common, so no need for complex cuts, just a clean up of the existing manifold and some lopping off of bits to make space for new bits. I may wait until the day after the MOT to do this...
My first quest was a search for rust. I’d decided up front if there was anything really bad, I’d just turn the car around and look for something else. I’m clearly not going to do a full OEM+ restoration here, but at the same time, I don’t mind spending a few pounds on some basic kit to slow down the inevitable march of the rot. Once I’ve completed that task, it’ll be on to replacing the HG and servicing the car for parts and fluids.
So, is there any rust? Er.
OK - the rear ARB looks scabby, and there's lots of surface rust, but actually, having pulled the interior out of the boot to check the strut tops, removed the sill bodykit to inspect the front of the sills and leading edges and jacked up the front for a meeting with a jetwasher and some degreaser, it's actually not that bad. So the plan stands - brush back any surface rust as best I can, especially in the wheel arches, leading edge of the floor pan and wherever it's obviously blowing the seam seal up and go from there. More work than I wanted, less rust than there could have been.
Wheel arches not too bad, though this is the better side.
Probably the worst found so far. This has been brushed back hard, but even so, there are no holes. I'm still not looking impressed though.
Getting some converter on.
Note the hamfisted jacking attempt on the floorpan by the two plugs on the right of the pic. It left a sizable dent and damage to the underseal resulting in, you guessed it, auto-lightening, colour swap to dark red mode "on". Idiots. My missus's Beetle has had this mod too.
Looking round the car produced some interesting discoveries too...
No idea what the Brands Hatch Edition is. Google has failed to enlighten me.
Living the LED life... also explains what the interesting switch is in the cabin. These are staying, obviously.
And finally, the obvious cause of the coolant loss and the reason the car came with free mineral water bottles - always a good sign. Not a great picture, and possibly highlights the amusement I'll have when removing the exhaust manifold, but there's a veritable cascade from outside cylinder 4. Like actual dripping while the engine runs. And no, before you ask, it's not coming from that coolant joint. It's dry above the head/block "seal". And there's scum in the coolant tank anyway.
So, the next few steps will be to finish brushing back and treating the front, for which I've got some Kurust, Hammerite and a bunch of Bilt Hamber products to do the seam and undersealing. Then I'll move onto the back and do the same, before putting in my orders for:
HG, head bolts, exhaust gasket, inlet gasket, cam cover gasket, new cam belt (and tool), new water pump, new tensioner, new alternator belt (new my arse - seller's telling porkies here), new aux belt, new plugs, air and oil filters (x2, one for a quick few hundred miles to flush the engine out a bit and cut open, one to pop back on with decent oil), some Holts rad-flush, new exhaust studs, new coolant tank cap (the old one hisses, which probably isn't ideal).
I'm undecided yet on whether to pull the head off then order the HG once I measure the liner protrusion and inspect for damage, or just assume it needs an elastomer gasket. I'm not going to spend £££ on hardness testing the head because I don't want to spend £££ and because I don't want to remove the cams and carrier and then have a big time gap - the likelihood of it going back together successfully after any time elapses is minimal. Having everything on hand to simply clean and rebuild on the same (engage optimism mode) day or (reality mode) same week is more likely to yield success, though it comes with a risk.
Other amusing experiments I've been dreaming up while pacing about with a wind-filled infant at midnight are:
DIY PRT to avoid the £100+ bill for a kit. I'll check pipe IDs and ODs while doing the head and then try to figure out which parts I need to do a Frankenstein's monster of a job.
DIY bushes. OK - only little ones, but it looks amusing and not too hard, for example, to make my own for the drop links instead of paying Powerflex £40. They are simply disks with a hole through and a metal tube.
Can I make my own 421 headers? OK - a long shot here, but a good excuse to learn to weld, and the exhaust run is pretty simple, so there's no reason I can't raid a scrappy for exhaust pipe parts off various cars, buy some flanges and gaskets and get making a mess. 2-1 joiners are common, so no need for complex cuts, just a clean up of the existing manifold and some lopping off of bits to make space for new bits. I may wait until the day after the MOT to do this...
Im liking this. Fair play to you. I dont like the stickers, though......
I drove a fair few of these when they were new. I used to work at a Rover branch back in 2001 ish.
Even then, the 45 and ZS seemed 'ancient'.....BUT.....and this is a big BUT.....i still remember how good the ZS'ss's's were to drive. There was a like...consistency to all of the controls, the steering had weight and feel, the gearbox was lovely and snickety, the ride was firm but like....well, to me, 'sorted'.
The 1.8 120 engine (as i recall) was wierd...as it kinda...offered a bit of a splurge of torque. Or at least - some.
When compared to the 105ps 1.4 - which did absolutely nothing until you 'caned' it....the 1.8 had a totally different power delivery...but it did at least have some 'go' to it.
I remember thinking that, despite the ZR being (back then.....) maybe a bit 'cooler'? and perhaps better looking...? the ZS was definitely the more sorted one to drive.
M1C said:
Im liking this. Fair play to you. I dont like the stickers, though......
I drove a fair few of these when they were new. I used to work at a Rover branch back in 2001 ish.
Even then, the 45 and ZS seemed 'ancient'.....BUT.....and this is a big BUT.....i still remember how good the ZS'ss's's were to drive. There was a like...consistency to all of the controls, the steering had weight and feel, the gearbox was lovely and snickety, the ride was firm but like....well, to me, 'sorted'.
The 1.8 120 engine (as i recall) was wierd...as it kinda...offered a bit of a splurge of torque. Or at least - some.
When compared to the 105ps 1.4 - which did absolutely nothing until you 'caned' it....the 1.8 had a totally different power delivery...but it did at least have some 'go' to it.
I remember thinking that, despite the ZR being (back then.....) maybe a bit 'cooler'? and perhaps better looking...? the ZS was definitely the more sorted one to drive.
Cheers. And I have good news...I drove a fair few of these when they were new. I used to work at a Rover branch back in 2001 ish.
Even then, the 45 and ZS seemed 'ancient'.....BUT.....and this is a big BUT.....i still remember how good the ZS'ss's's were to drive. There was a like...consistency to all of the controls, the steering had weight and feel, the gearbox was lovely and snickety, the ride was firm but like....well, to me, 'sorted'.
The 1.8 120 engine (as i recall) was wierd...as it kinda...offered a bit of a splurge of torque. Or at least - some.
When compared to the 105ps 1.4 - which did absolutely nothing until you 'caned' it....the 1.8 had a totally different power delivery...but it did at least have some 'go' to it.
I remember thinking that, despite the ZR being (back then.....) maybe a bit 'cooler'? and perhaps better looking...? the ZS was definitely the more sorted one to drive.
I know what you mean about the car seeming quite "right". The torque seems to be accessible and given how utterly shagged my not quite mint 125k'er must be, it felt well sorted on the test drive. The ZR was a rear beam, whereas the ZS is independent suspension all round, which may make some difference to the feel.
My gearbox is not snickety. More stirring a long stick in a basket of wet washing. I suspect many, if not all original parts. An oil change for the gearbox is on the cards too, and once I'm satisfied that the car won't simply fall apart, I may treat it to some shifter linkage bushes and upgrades. It has quite a long throw which needs a bit of delicacy though. I've spent quite a while with a Caterham, where the shifter is direct to box, so the extra link points that introduce slop are quite a novelty.
Just a little bump to say I've not simply lost interest and let the whole thing moulder on the drive through apathy. To be clear, the blue s tter is mouldering on the drive, but through prudence rather than apathy.
As noted above, I was the lucky recipient of a second son just a week or so after buying the ZS. Therefore time and priorities were premium items. There may have been a conversation that included the phrase "...that fking car...", thus I thought it best to leave well alone and so I have.
Time has passed, nappies have been changed, life has, if not stabilised, then become less unstable, owing to the two tiny boys we have, bringing the number of boys in the house who are prone to tantrums if they don't get their way up to three... I'm learning patience and the art of not pissing off a new (and wonderful, I might add) mum.
Anyway, all that said, in a fit of keenness, I've ordered some of these:
I opted for them mainly because they're cheap. We'll see.
I have also finished the rust treatment of the front half. I'll chuck up some photos when, once again, I'm in the same place as the stupid Samsung cable. There was lots of surface rust, but nothing too damaging and deep, so I've brushed it all back, covered it in k-rust and am waiting for the time to strike for my delicate touch with the hammerite.
Impending sub-project will also be making my own bushes from some PU I bought. They're a simple one (obvs), so it's just an experiment really, but at 1/4 the cost of powerflex, it's got to be worth a go since they've got no lips or complex shapes. Watch this space.
tter is mouldering on the drive, but through prudence rather than apathy.As noted above, I was the lucky recipient of a second son just a week or so after buying the ZS. Therefore time and priorities were premium items. There may have been a conversation that included the phrase "...that f
king car...", thus I thought it best to leave well alone and so I have.Time has passed, nappies have been changed, life has, if not stabilised, then become less unstable, owing to the two tiny boys we have, bringing the number of boys in the house who are prone to tantrums if they don't get their way up to three... I'm learning patience and the art of not pissing off a new (and wonderful, I might add) mum.
Anyway, all that said, in a fit of keenness, I've ordered some of these:
I opted for them mainly because they're cheap. We'll see.
I have also finished the rust treatment of the front half. I'll chuck up some photos when, once again, I'm in the same place as the stupid Samsung cable. There was lots of surface rust, but nothing too damaging and deep, so I've brushed it all back, covered it in k-rust and am waiting for the time to strike for my delicate touch with the hammerite.
Impending sub-project will also be making my own bushes from some PU I bought. They're a simple one (obvs), so it's just an experiment really, but at 1/4 the cost of powerflex, it's got to be worth a go since they've got no lips or complex shapes. Watch this space.
Edited by Smitters on Monday 12th November 14:05
InitialDave said:
Just caught up on the last few posts, I think you did not bad there, that's a lot less rust than the front end of mine had!
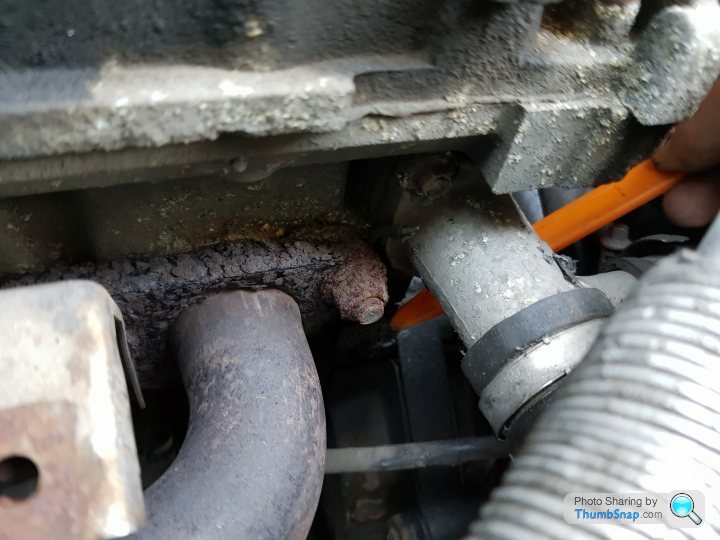
Cheers. It's an 02 build car, sold in 04, so a way before the real cost cutting came in and the underseal was more an afterthought. There is lots of surface rust though, so I'm having to be restrained in what I actually put effort into. The section where the floorpan rises up into the chassis legs and firewall seems very prone to rust, so I'm slapping on the satin black with gay abandon and tring to ignore the subframes which are peeling like onions.In other news, my home-made parts washer for small parts, which consists of a plastic 500ml food container, a good squirt of Fairy, very hot water and some crushed pasta, plus some vigorous shaking for a few mins is very, very surprisingly effective, if a little tiring. Obviously not ideal for a manifold, but good for arb droplinks...
InitialDave said:
Yes, mine had big holes there, it's definitely a bit of a trap for it. After I'd done the patching up, I waxoyled and undersealed the hell out of the whole car!
Bilt Hamber's website had a "take my money" moment last month... seam seal, underseal, cavity spray, all sorts. If I charged myself my own daily rate on labour, plus the various bits, I'm already into it for way over purchase price. Good job I'm free!I am enjoying your writing style, keep it up.
When I became a father for the first time 5.5 years ago, I sold a heavily modified TT Roadster and bought a Mercedes CLS 500 (my version of a practical family car)
Then less than three weeks after I became a father for the second time a little over 4 years ago, I went off and bought a 1981 Mercedes 500 SEL, so I can empathise with the patter of tiny feet diverting your attention away from the car.
Smitters said:
Coming soon, with pics, how to shape a bush the way you want it to be... mmmm... bush.
You've been watching too much Binky Project.Brilliant updates, they are enjoyed, and with a snot filled little one at home the time just to change the spark plugs had to wrangled out of the missus, so I admire your time making skills!
Sorry, didn't see your reply to my post! 
Lovely to see one getting some love - my ZT-T is away with a good friend having similar treatment.
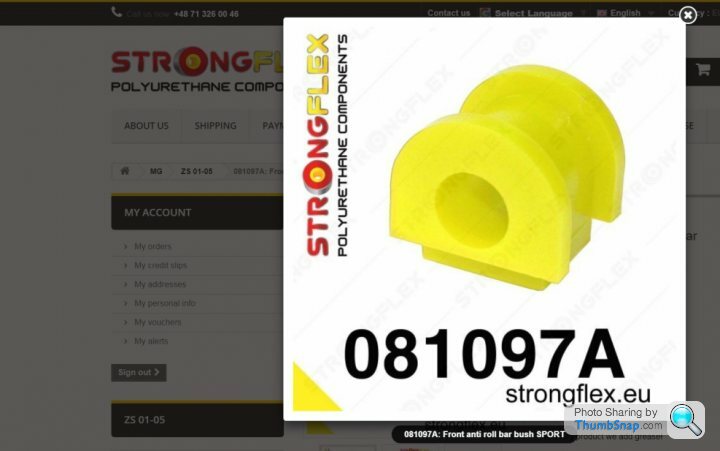
With regards to the HG, my honest opinion is that they Payen BW750 (or a copy of it) is the way to go - it just needs to be the latest iteration of such.
The MLS, while on paper is much better, does have some flaws - notably that it absolutely cannot deal with low or uneven liners (which a large proportion of K Series do have by this time).
If you need any impartial advice, you're welcome to PM me on here or drop a line to sales@dmgrs.co.uk
Lovely to see one getting some love - my ZT-T is away with a good friend having similar treatment.
With regards to the HG, my honest opinion is that they Payen BW750 (or a copy of it) is the way to go - it just needs to be the latest iteration of such.
The MLS, while on paper is much better, does have some flaws - notably that it absolutely cannot deal with low or uneven liners (which a large proportion of K Series do have by this time).
If you need any impartial advice, you're welcome to PM me on here or drop a line to sales@dmgrs.co.uk
mattyprice4004 said:
Sorry, didn't see your reply to my post!
Lovely to see one getting some love - my ZT-T is away with a good friend having similar treatment.
With regards to the HG, my honest opinion is that they Payen BW750 (or a copy of it) is the way to go - it just needs to be the latest iteration of such.
The MLS, while on paper is much better, does have some flaws - notably that it absolutely cannot deal with low or uneven liners (which a large proportion of K Series do have by this time).
If you need any impartial advice, you're welcome to PM me on here or drop a line to sales@dmgrs.co.uk
Cheers - I'll do that next week for sure. About to create some garage space, so will be able to do the engine work finally.Lovely to see one getting some love - my ZT-T is away with a good friend having similar treatment.
With regards to the HG, my honest opinion is that they Payen BW750 (or a copy of it) is the way to go - it just needs to be the latest iteration of such.
The MLS, while on paper is much better, does have some flaws - notably that it absolutely cannot deal with low or uneven liners (which a large proportion of K Series do have by this time).
If you need any impartial advice, you're welcome to PM me on here or drop a line to sales@dmgrs.co.uk
So, where was I in my tale of learning...
As yes, rust. There are only so many photos of a badly repainted car people need to see, especially as it simply highlights my somewhat cavalier attitude to quality finishes. I'm inspired by Project Binky for sure, but my outcomes are distinctly more Roadkill/early MCM. Not necessarily a bad thing. This is a cheap car. I do not need to spend 20 hours stripping and repainting the underside.
However, for your amusement:
Biggest issue here was actually the seam sealer lifting and having to chase rust into the panel seams. I haven't got it by any means, so this will eventually die, but I've slowed it right down with my SEMA spec paint job.
SEMA - Society of Extremely Messy Artists
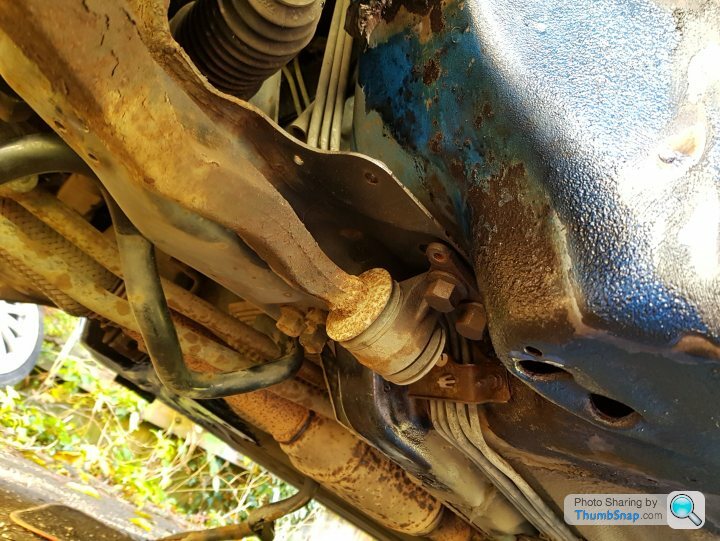
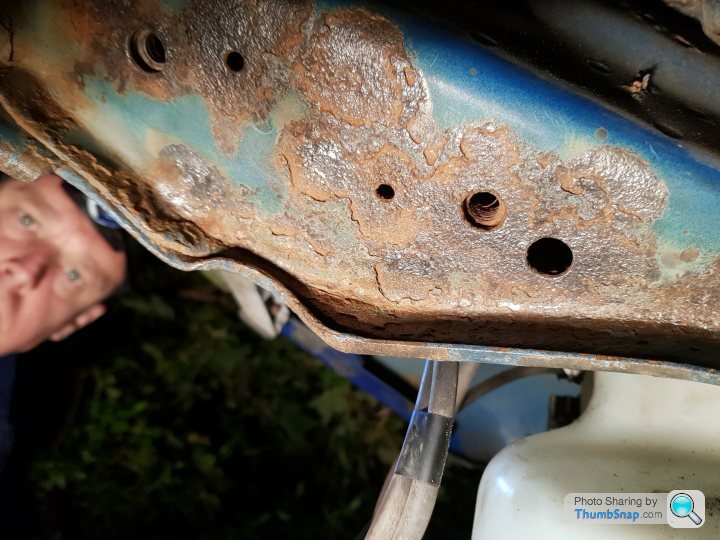
The leading edge above is a very popular spot for rust. In pulling the bungs from those two holes (which I've now lost - slick work) the amount of dust and dirt on the inside is alarming. It was dry on one side, wet on the other, but either way, I'll be getting in there somehow with a tool or two and then spraying cavity seal in for good measure.
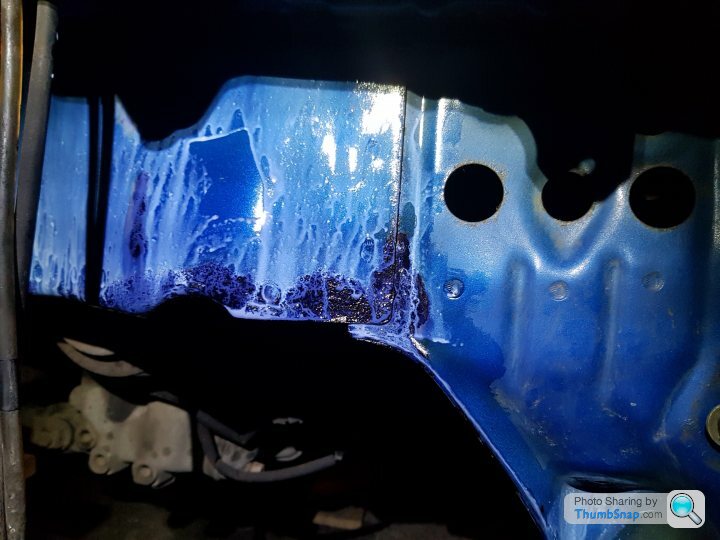
I'll be honest, this lot probably needs a second coat of paint. Where it's gone down to the bare metal the Hammerite doesn't adhere as well and runs more easily, thinning the coat.
Anyway, this marks pretty much the end of painting at the front end. There's lots more I could do, but it's diminishing returns and there are plenty of other areas to address too. I'm just pleased there's nothing structural and the sills look really solid. The last jobs will be that final coat of black anywhere that looks thin, then remount the ARB with my shiny new Polish bushes (which are "in the post..." hmmm). Then it's wheels on and either engine or de-rust the back. Probably engine and that's a big hurdle and once I've completed that I can actually drive it a bit before jacking the back up and dumping another load of s
t into my eyes, mouth and hair. Incidentally, Hammerite is a bd to get off your face. I wouldn't recommend doing a quick spot of painting before going to a PTA meeting. People look at you a bit funny when you have as many black dots and stripes on your face as I did and with my balding bonce, I've got a LOT of face.So, homemade bushes. TLDR - don't bother. Or at least, have better tools, more patience and a more precise approach.
Step 1: Make tiny parts washer to clean the bits...
That's a food pot with Fairy Liquid, crushed dried pasta and hot water. And a lot of shaking. Surprisingly effective, but again, not as much fun as an illicit dishwasher sesh... so Step 2, do Step 1, but properly:
These are nicely dry after a stint in a cooling oven after cooking my pizza. I would say if you want to get away with this, don't have them still in the oven, in an oven dish when a hungry missus comes home. The double whammy of parts in a household appliance ("Why were they wet...wait, how did you clean them?") and the things in the oven not being tasty, lovingly prepared food isn't ideal.
Step 3: Roses, chocolate, soothing tones.
Step 4: Start trimming your bush...
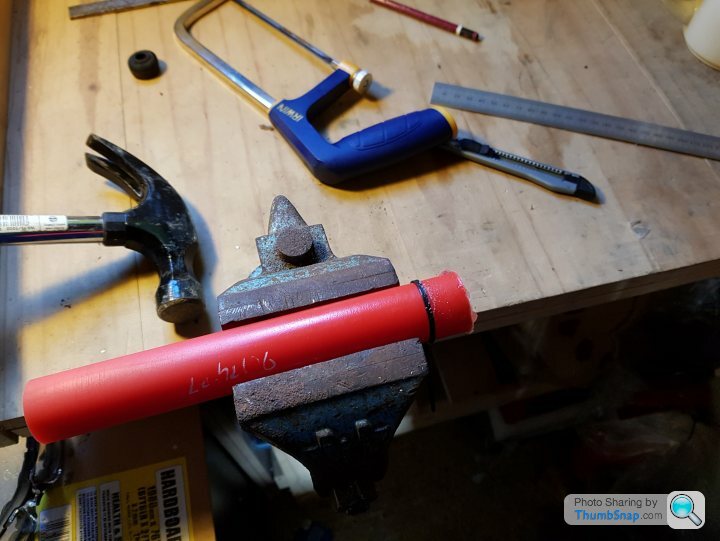
I needed eight. So repeat your trimming ten more times. Because f
k-ups.Step 5: Add holes, then the chamfered edge. Try with a knife. Decide I like being able to count to ten. Opt for something safer. Like mounting my drill in a vice, then spinning the bush up and shaving it with the knife...

Decide I like my eyes, head and chest without a flying Stanley knife in them. Pause for a coffee and rethink things.
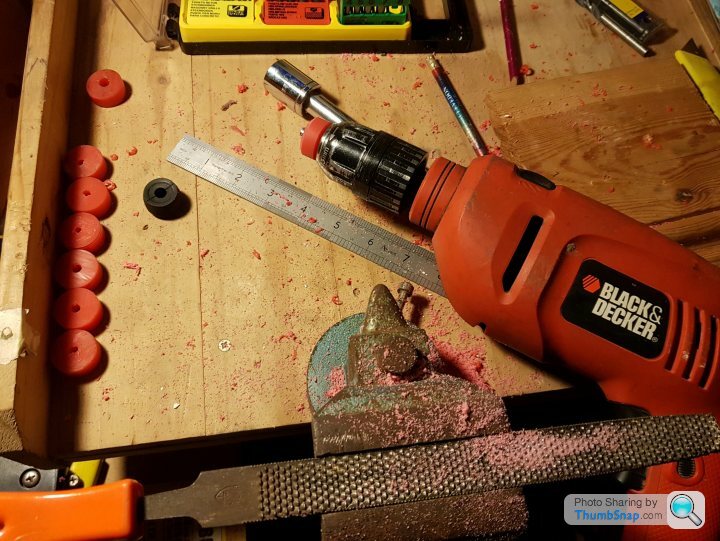
Better. However, the length of time it took to wind each bush on and off the allen bolt (twice per bush, to chamfer both edges), the actual chamfering, plus the fact that my extremely poor "by eye" drilling meant more than a few holes started central, but have ended up popping out slightly off centre gives the TLDR. Interesting exercise, but probably not worth the effort.
I'd love to now post a picture of the finished droplinks all nicely repainted, sorry - all badly repainted - and rebuilt with snazzy orange bushes, but instead I received the message "Your infant son has chickenpox. He's not very impressed." So it's back to reality and the responsibilities of life. I mean - how s
t would it be to have so many itches, but no coordination to scratch them?
Congratulations for making it this far. TBC...


Gassing Station | Readers' Cars | Top of Page | What's New | My Stuff