2002 Boxster S - up spec overhaul for Le Mans duty
Discussion


Wanted to do some of these fun threads for a while as I’ve enjoyed everyone else’s efforts.
Last year I acquired a really nice 2002 Boxster S with only 25k miles on the clock.
I just found it impossible to ignore the value of these cars at the moment and figured that it would be fun to spend some time and invest some money bringing the car up to a really nice spec.
So here it is, as I bought it.


Car drove really well but it was obvious that the brakes were not exactly right as lots of pedal pressure was needed, and also it had done lots of sitting around so the tyres were knackered and the back end had a bit of a mind of its own!
I drove it home and stuck in in the garage over winter until I had a bit of time to investigate...
Last year I acquired a really nice 2002 Boxster S with only 25k miles on the clock.
I just found it impossible to ignore the value of these cars at the moment and figured that it would be fun to spend some time and invest some money bringing the car up to a really nice spec.
So here it is, as I bought it.
Car drove really well but it was obvious that the brakes were not exactly right as lots of pedal pressure was needed, and also it had done lots of sitting around so the tyres were knackered and the back end had a bit of a mind of its own!
I drove it home and stuck in in the garage over winter until I had a bit of time to investigate...
In early new year I pulled the car out and took it for an MOT so that I could tool about in it for a bit.
First thing I noticed was a hesitation at 5200rpm.
I disconnected the maf sensor for a test and the fault went away. I tried cleaning the maf sensor and plugging it back in and the fault was better, but not eradicated. I approached Porsche for a replacement but at four million pounds I thought it was a bit excessive, and so I obtained the replacement from a standard car parts supplier by quoting the Bosch number. From memory about £80 or so. Problem solved!
I had decided that we were going to go to Le Mans in the car, and so I had about 8 weeks to get it it fettled. In the end we finished it the morning of the Le Mans trip, so I think I bit off more than I should have...
Anyway...
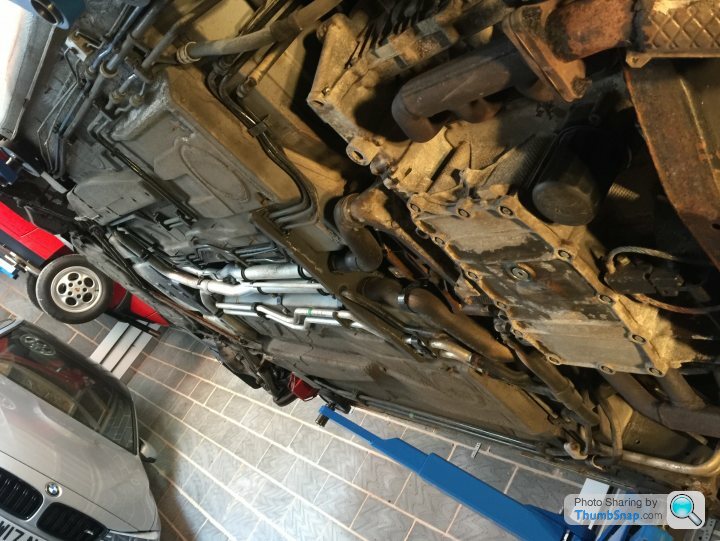
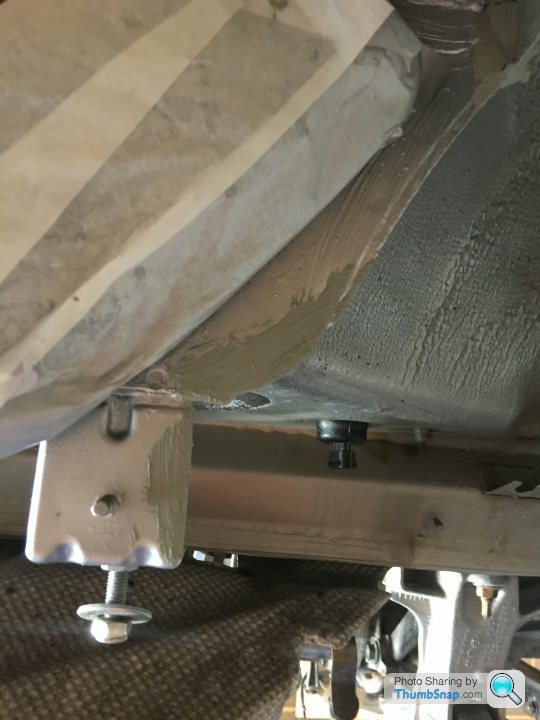
Once I had the car on the ramp, I realised that the underbody of the car was not as nice as everything else. It’s easy to forget these are 15 years old now, and although this one hadn’t done many miles that’s still a long time. It doesn’t help when most owners don’t think about washing the underside of their car anywhere near enough!
This is what I was greeted with:
Hmmmn. This might take longer than I thought because I’m a fussy sod...
This is what I was greeted with:
Hmmmn. This might take longer than I thought because I’m a fussy sod...
First up, I removed all the plastic covers from the underside of the car for cleaning later.

This is the result
You can see in that image how clean the cars are underneath those protective bits.
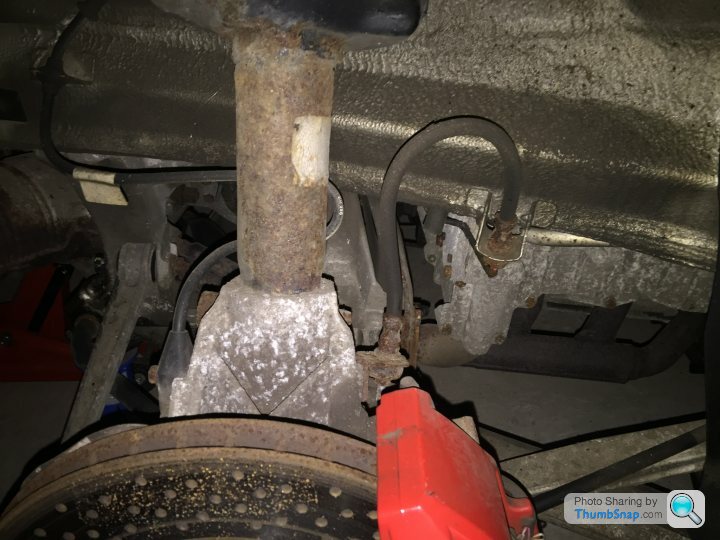
Interestingly, I didn’t like the look of the brake pipe on the near side sill. There is a little clip that collects mud - on the 987 Porsche made the cover extend forward to stop it but on the 986 they collect crap for fun.
I literally touched the pipe and it started pi55ing fluid. I’d never trust an MOT as a certificate of roadworthyness personally but if ever you needed a demonstration as to why - here it is! The car had passed an mot literally a handful of miles earlier!

This is the result
You can see in that image how clean the cars are underneath those protective bits.
Interestingly, I didn’t like the look of the brake pipe on the near side sill. There is a little clip that collects mud - on the 987 Porsche made the cover extend forward to stop it but on the 986 they collect crap for fun.
I literally touched the pipe and it started pi55ing fluid. I’d never trust an MOT as a certificate of roadworthyness personally but if ever you needed a demonstration as to why - here it is! The car had passed an mot literally a handful of miles earlier!
I continued to tear the car down - some joey had jacked it up on the sill at some point. Nice work!


The best way to describe the underbody condition was that I JUST caught it before it spoiled the car for good.
At this point it was pretty clear that I may as well go full hog and so I got some more spanners out and pulled the suspension and running gear down....
The best way to describe the underbody condition was that I JUST caught it before it spoiled the car for good.
At this point it was pretty clear that I may as well go full hog and so I got some more spanners out and pulled the suspension and running gear down....


I also got a massive list of little bits ordered from Porsche and a few others, as I had the intention of rebuilding the car with all brand new fasteners, clips and fittings. These things are often overlooked but they make a big difference to the finished job quality.


I basically begun to learn the extent that the 986 really is a 996! From the cockpit forwards it’s basically the same car. Even the back is pretty similar with the engine and box swapped around for position!
So that’s it for a start. Next, I’ll talk about new exhaust fitting and the arrival of lots of spangly new bits!
(Gosh posting these takes ages! Credit to you guys with long threads!!!)

Okay! Thanks!
I had decided to replace the old exhaust with a new one. I bought one with manifolds, 100 cell cats and one small back box (per side) rather than the huge one on the car from the factory. I also ordered four new o2 sensors because life is too short to try and remove them after 15 years!
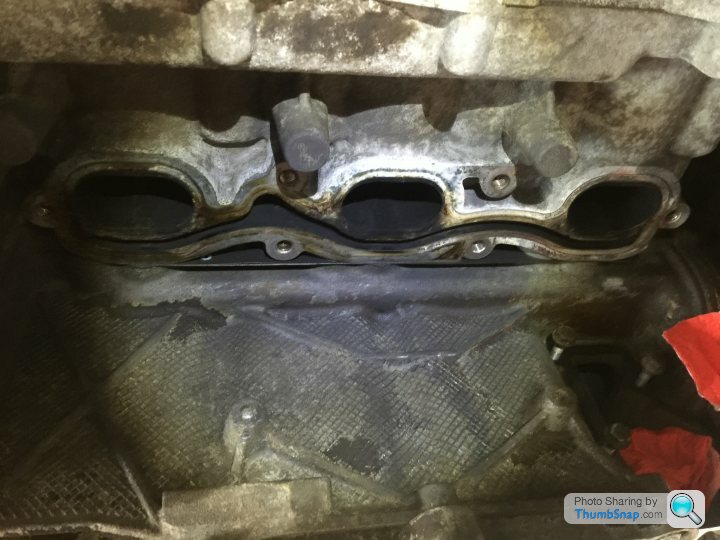
So I’ll just whip these manifolds off then... mmm. If you’ve read/done this before you’ll know what I’m on about but removing the manifolds from a cockster is a notoriously pants job. The problem is that Porsche used mild steel bolts rather than studs, and into the alloy heads that's not brilliant fun for removal a long time later.
My method was to use my induction heater (if you have never heard of one of these and you’re into spannery things google them. They’re amazing.) My particular one is a Beta Tools item which you put over your shoulder and use the wand around the bolt you want to remove. You press the button and the bolt warms red hot in a few seconds, but being an inductive heater none of the surrounding stuff heats up or takes damage. Anyway..
Taking my time I managed to remove 11 of the 12 bolts without a problem, using a process of heat and then hitting them with a light setting on my impact gun for a few seconds, followed by more heat and repeat. It took probably four heats and applications per bolt to get success. So why, then, tell me, did I try to rush the last one? What possessed me to think that that would be ok? What a plonker. Snap.
I then spent a fun evening drilling out the snapped bolt. I was lucky enough to have a scissor table under my ramp to turn in to a kind of upside down vertical drill - and by a process of be gradually increasing the size of the drill bit I was able to remove the whole of the stud without even having to helicoil/timesert it. I just cleaned the thread with tap after and bingo, job done lucky escape!

I had decided to replace the old exhaust with a new one. I bought one with manifolds, 100 cell cats and one small back box (per side) rather than the huge one on the car from the factory. I also ordered four new o2 sensors because life is too short to try and remove them after 15 years!
So I’ll just whip these manifolds off then... mmm. If you’ve read/done this before you’ll know what I’m on about but removing the manifolds from a cockster is a notoriously pants job. The problem is that Porsche used mild steel bolts rather than studs, and into the alloy heads that's not brilliant fun for removal a long time later.
My method was to use my induction heater (if you have never heard of one of these and you’re into spannery things google them. They’re amazing.) My particular one is a Beta Tools item which you put over your shoulder and use the wand around the bolt you want to remove. You press the button and the bolt warms red hot in a few seconds, but being an inductive heater none of the surrounding stuff heats up or takes damage. Anyway..
Taking my time I managed to remove 11 of the 12 bolts without a problem, using a process of heat and then hitting them with a light setting on my impact gun for a few seconds, followed by more heat and repeat. It took probably four heats and applications per bolt to get success. So why, then, tell me, did I try to rush the last one? What possessed me to think that that would be ok? What a plonker. Snap.
I then spent a fun evening drilling out the snapped bolt. I was lucky enough to have a scissor table under my ramp to turn in to a kind of upside down vertical drill - and by a process of be gradually increasing the size of the drill bit I was able to remove the whole of the stud without even having to helicoil/timesert it. I just cleaned the thread with tap after and bingo, job done lucky escape!

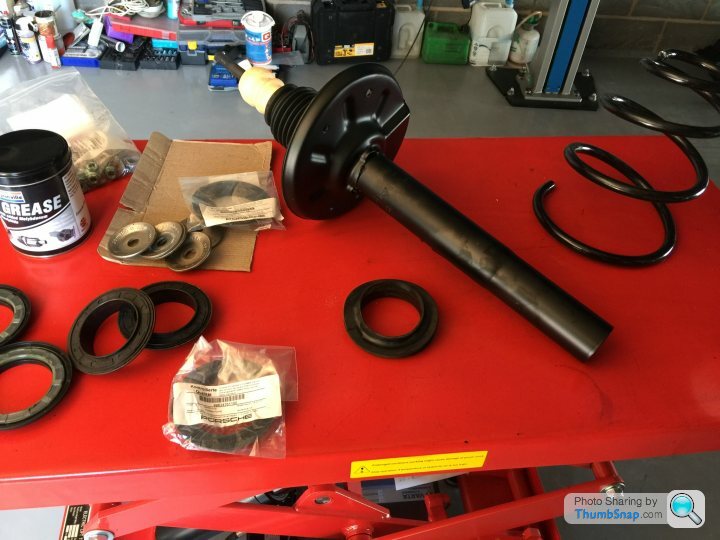
I also chose some decent monoball topmounts to replace the standard ones, and some replacement drop links (with weather boots).

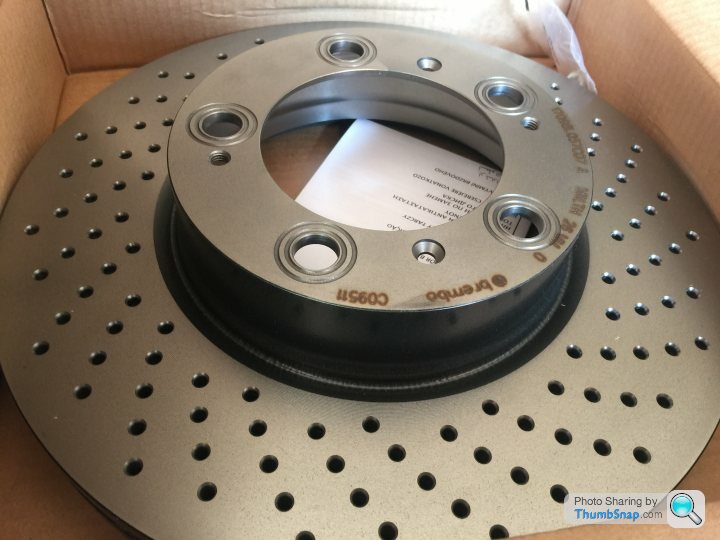
Some nice new discs too
And some decent fluid

And some new M030 sport suspension from
Porsche, with new bump stops. You can’t buy the M030 kit for a manual car now but you can buy the tiptronic kit and then order the rear springs. The kit comes with new anti roll bars too and I decided it would probably be the best compromise for mainly road use to pair up the new top mounts with a new factory sport kit rather than going for track style coil overs.

A nice set of goodridge hoses and clips etc too because the old ones were very miserable.

Some nice new discs too
And some decent fluid
And some new M030 sport suspension from
Porsche, with new bump stops. You can’t buy the M030 kit for a manual car now but you can buy the tiptronic kit and then order the rear springs. The kit comes with new anti roll bars too and I decided it would probably be the best compromise for mainly road use to pair up the new top mounts with a new factory sport kit rather than going for track style coil overs.
A nice set of goodridge hoses and clips etc too because the old ones were very miserable.
So the next quandary was how to clean the thing underneath when a) it had no suspension on it and b) it was in the middle of my garage. I had a feeling the pressure washer was the best choice so I got a big blue sheet and fastened it up onto the roof in front and behind the car. Couple of bits of wood along the middle and then a large builders bucket underneath, with a strategic slice in the sheet to allow the water to drain out:

I found that using “alubright” on the aluminium castings was quite helpful. On the stubborn bits I soaked them and wrapped the parts in clingfilm to stop the stuff evaporating too quickly. That worked ok too but mostly it was plenty of elbow grease.
The garage did end up a bit swimming pool like I have to confess because I got a bit carried away. Since being about 8 years old with my grandad where the pair of us would wash a car and end up soaked to the skin I’ve never been able to avoid that with any kind of hose!!!


Meanwhile - actually before I cleaned it - I decided to check the front rads. You know how everyone tells you to?
Well this is how it looked - check out the floor.

All of the radiators were long past their best and a few of them just fell to bits when I touched them.

I ordered a complete set of three water rads, a pair of a/c condensers, seals and dessicator and set about giving the front corners a refresh

I like to use Eastwood extreme chassis black paint for this kind of thing - it goes off absolutely rock hard. It’s a very tough epoxy based paint and I used it on the black rad frames. I also started to use the new clips for everything on rebuild.


Well this is how it looked - check out the floor.
All of the radiators were long past their best and a few of them just fell to bits when I touched them.
I ordered a complete set of three water rads, a pair of a/c condensers, seals and dessicator and set about giving the front corners a refresh
I like to use Eastwood extreme chassis black paint for this kind of thing - it goes off absolutely rock hard. It’s a very tough epoxy based paint and I used it on the black rad frames. I also started to use the new clips for everything on rebuild.
At this point or in fact just before I had to sort out the rusty bits. I hit them with the wire brushes and rust killers before etch priming, seam sealing and repainting the offending bits. I had to do a fair bit of faffing about along those sill seams even on the bits that looked ok.


Then a bit of top coat.

Then a bit of top coat.


Turning attention to suspension, I rebuilt the bearings that run above the top mounts:

And built up the m030’s:
Note to anyone doing this - the only way I found to assemble the new nuts onto the new shafts to get them safely done up was to run the impact gun in reverse with a star key in the shaft, and then a big spanner around the nut. The nuts are factory deformed so they stay tight and don’t come undone, and they feel horrible - like you’ve stripped them - as you do them up. You haven’t! Keep going!

Let’s pull some more bits off
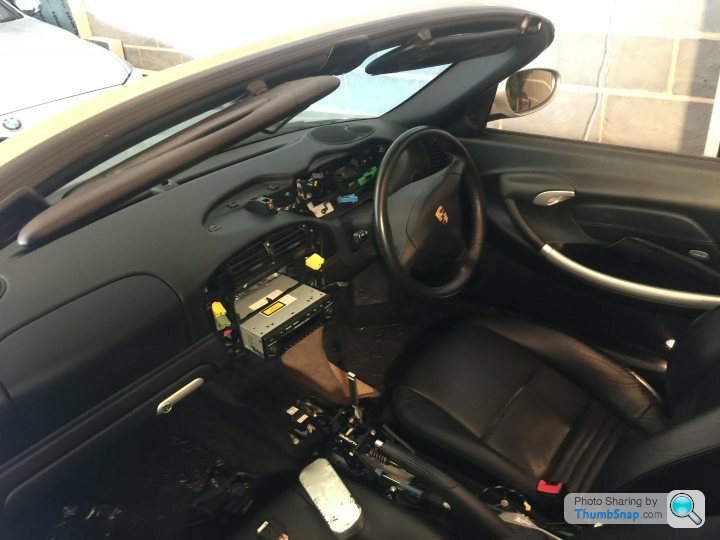
The centre console delete was also dead easy - but I’d also got a bag of OEM used trim stuff off eBay and painted that gloss metallic black - the instrument surround, radio surround and centre console. All those were just rubber finish and so very boring but I didn’t want to fit silver bits as they are a bit bling:
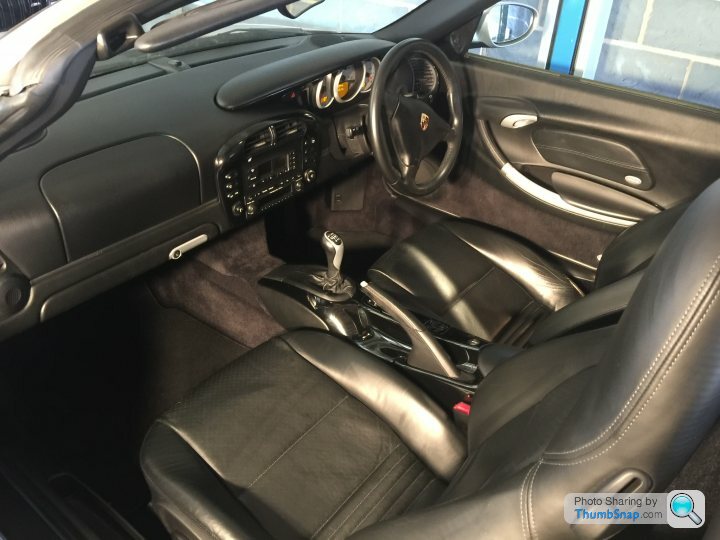
Not sure how much of that you can see in these pics :

The centre console delete was also dead easy - but I’d also got a bag of OEM used trim stuff off eBay and painted that gloss metallic black - the instrument surround, radio surround and centre console. All those were just rubber finish and so very boring but I didn’t want to fit silver bits as they are a bit bling:
Not sure how much of that you can see in these pics :
Gassing Station | Readers' Cars | Top of Page | What's New | My Stuff