BMW 330CI E46 Build thread
Discussion


Two videos from Cadwell Park
BMW E46 vs Peugeot 106 - In car footage from both perspectives.
https://youtu.be/FjX7W461cek
Compilation of a few decent laps
https://youtu.be/PSXkQANx0RI
Glorious weather this weekend and the next track day only 2 full weekends away I've cracked on with some jobs to hopefully improve the car for Anglesey.
First job on the cards is to add a little more clearance to the rear arches. The 9J wheels have a tiny bit more poke with ET35 and even with 2 degress of camber I had a tiny bit of scrubbing on the outside of the rear tyre. I have pulled the arches by a few mm to give a little more clearance.

After that I got stuck in rerunning the brake lines to the rear calipers. instead of going from the ABS pump through to the rear calipers I have brought the rear braided lines through into the rear of the car through a grommet in the rear bench. I was quite lucky that when I redid the underside of the car I fitted two long braided lines around 2.5/3m in length to replace all the steel lines that ran under the car. I have been able to bring these through into the car to a proportioning valve.
Because one braided line was longer than the other due to the standard line routing I have been able to keep it neat and run the lines down one side of the car, along the case was the neatest route as they're out of side rather than across the bottom of the rear bench.

Both of these lines go a T piece I have tucked in against the cage once again trying to keep the inside of the car tidy. The single line runs off to the proportioning valve on the exhaust tunnel. I need to order that this week and get it fitted but the single braided line is ran there ready to go.

I then focused my attention to the front of the car to run the lines to the front calipers. First job was to remove as much as i could from the engine bay to be able to make as much room as possible.

While doing so I found that the intake boot had perished and actually had a hole in it so another one of those has been ordered to replace it. it will be interesting to see if this air leak makes any difference to how the car runs as it's quite a bit hole.

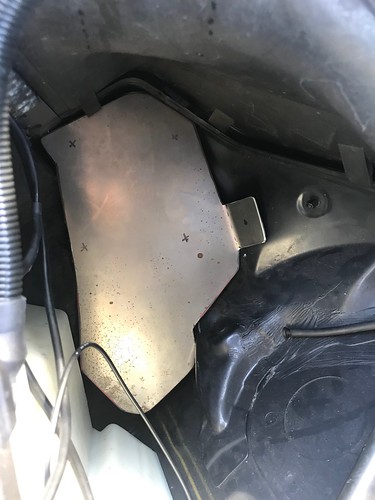
Quite a large chunk of lines removed for each of the 4 wheels and 2 lines which used to feed the ABS pump from the Master Cylinder. Also traced back a few lines which are no longer needed now the carbon canister has been removed from the rear arch
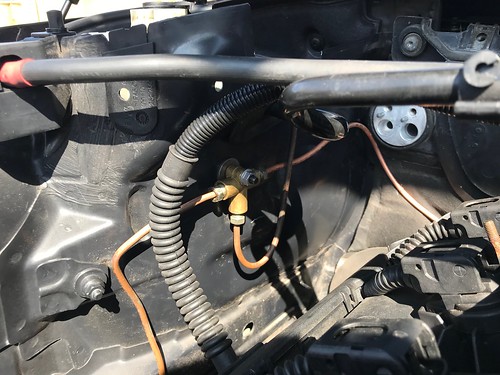
New copper lines were ran through to meet the front braided hoses for the front calipers

In the engine bay I have mounted a T piece with a front feed from the Master Cylinder going to the two front calipers all ran in fresh copper pipe with new fittings.
Not the easiest job I have done on the car since I built it. Very awkward working around the back of the engine and the engine bay due to the fact there is so little space in this engine bay to work. Also had to remove the passenger seat from inside the car to be able to get inside of it to route the rear brake lines.
When everywhere gets back to normal after the bank holiday I just need to get the line from the master cylinder to the bias valve made up as well as picking up a bias valve and making a bracket for it, I will probably go down the route of 3D printing a mounting bracket for it as they're so simple to make.
Future upgrades in the pipeline, Hopefully with some help from a friend I'm going to look at fitting a Canbus Data logger to the car to be able to get some quality logging on the go as well as forming the basis for data overlays for videos. Also going to change the camera set up inside the car for a power on mobius camera rather than the go pros. Making it a little easier when out on track having everything turned on at the press of a switch.
BMW E46 vs Peugeot 106 - In car footage from both perspectives.
https://youtu.be/FjX7W461cek
Compilation of a few decent laps
https://youtu.be/PSXkQANx0RI
Glorious weather this weekend and the next track day only 2 full weekends away I've cracked on with some jobs to hopefully improve the car for Anglesey.
First job on the cards is to add a little more clearance to the rear arches. The 9J wheels have a tiny bit more poke with ET35 and even with 2 degress of camber I had a tiny bit of scrubbing on the outside of the rear tyre. I have pulled the arches by a few mm to give a little more clearance.
After that I got stuck in rerunning the brake lines to the rear calipers. instead of going from the ABS pump through to the rear calipers I have brought the rear braided lines through into the rear of the car through a grommet in the rear bench. I was quite lucky that when I redid the underside of the car I fitted two long braided lines around 2.5/3m in length to replace all the steel lines that ran under the car. I have been able to bring these through into the car to a proportioning valve.
Because one braided line was longer than the other due to the standard line routing I have been able to keep it neat and run the lines down one side of the car, along the case was the neatest route as they're out of side rather than across the bottom of the rear bench.
Both of these lines go a T piece I have tucked in against the cage once again trying to keep the inside of the car tidy. The single line runs off to the proportioning valve on the exhaust tunnel. I need to order that this week and get it fitted but the single braided line is ran there ready to go.
I then focused my attention to the front of the car to run the lines to the front calipers. First job was to remove as much as i could from the engine bay to be able to make as much room as possible.
While doing so I found that the intake boot had perished and actually had a hole in it so another one of those has been ordered to replace it. it will be interesting to see if this air leak makes any difference to how the car runs as it's quite a bit hole.
Quite a large chunk of lines removed for each of the 4 wheels and 2 lines which used to feed the ABS pump from the Master Cylinder. Also traced back a few lines which are no longer needed now the carbon canister has been removed from the rear arch
New copper lines were ran through to meet the front braided hoses for the front calipers
In the engine bay I have mounted a T piece with a front feed from the Master Cylinder going to the two front calipers all ran in fresh copper pipe with new fittings.
Not the easiest job I have done on the car since I built it. Very awkward working around the back of the engine and the engine bay due to the fact there is so little space in this engine bay to work. Also had to remove the passenger seat from inside the car to be able to get inside of it to route the rear brake lines.
When everywhere gets back to normal after the bank holiday I just need to get the line from the master cylinder to the bias valve made up as well as picking up a bias valve and making a bracket for it, I will probably go down the route of 3D printing a mounting bracket for it as they're so simple to make.
Future upgrades in the pipeline, Hopefully with some help from a friend I'm going to look at fitting a Canbus Data logger to the car to be able to get some quality logging on the go as well as forming the basis for data overlays for videos. Also going to change the camera set up inside the car for a power on mobius camera rather than the go pros. Making it a little easier when out on track having everything turned on at the press of a switch.
Edited by tombate911 on Thursday 9th May 02:21
Photos from Cadwell with MSVT


Over the last week I've been finishing off some of the jobs ready for Anglesey on Bank Holiday Monday.
Finished running the lines around the car for the ABS delete and the Proportioning valve. Mounted it to a plate on the exhaust tunnel. Took the car out for a little test drive, tested the brake bias with the valve in it's more brake position and the rears locked up first as usual. Throwing the lever to the front of the car gave enough pressure limiting capacity to be able to lock the fronts only, happy to have the ability to run the lever in the middle of the adjustments. Nice to be able to brake properly without the ABS kicking and constantly preventing the rear brakes from locking, something i'm really looking forward to testing at Anglesey as I found the brakes really poor with the ABS constantly going off at Cadwell finding the standard front to rear bias being completely off especially with 255 tyres at the front exaggerating the problem with more mechanical grip on the front axle.
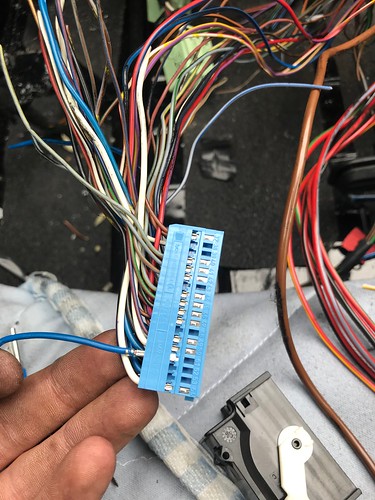
Did a little bit of wiring to replace what was already behind the dash, putting some ins fuses with permanent and switched feeds, powering a bank of 4 switches as well the the oil/pressure and temp gauge. While the dash was out I also ran a pair of wires to the Canbus wiring behind the clocks

Drawn up a dash panel to replace the android head unit. Drawn out the CAD file and then cut the plastic from a piece of black acrylic using a laser cutter

Also with a bit/a lot of help from a friend who pops on here from time to time we've fitted the car with an Arduino which is using the Canbus as a data logger for the car now with the add on of a GPS aerial, logging the available information to the SD car in the format of a .csv file which I can now open in race render to overlaying over videos and also helpful for logging temps and timing etc.
Did a little test run down the road this evening.
https://youtu.be/qRodvP1SMTA

Few minor little jobs to do before the weekend but we're pretty much ready to go and get out on circuit once again.
Over the last week I've been finishing off some of the jobs ready for Anglesey on Bank Holiday Monday.
Finished running the lines around the car for the ABS delete and the Proportioning valve. Mounted it to a plate on the exhaust tunnel. Took the car out for a little test drive, tested the brake bias with the valve in it's more brake position and the rears locked up first as usual. Throwing the lever to the front of the car gave enough pressure limiting capacity to be able to lock the fronts only, happy to have the ability to run the lever in the middle of the adjustments. Nice to be able to brake properly without the ABS kicking and constantly preventing the rear brakes from locking, something i'm really looking forward to testing at Anglesey as I found the brakes really poor with the ABS constantly going off at Cadwell finding the standard front to rear bias being completely off especially with 255 tyres at the front exaggerating the problem with more mechanical grip on the front axle.
Did a little bit of wiring to replace what was already behind the dash, putting some ins fuses with permanent and switched feeds, powering a bank of 4 switches as well the the oil/pressure and temp gauge. While the dash was out I also ran a pair of wires to the Canbus wiring behind the clocks
Drawn up a dash panel to replace the android head unit. Drawn out the CAD file and then cut the plastic from a piece of black acrylic using a laser cutter
Also with a bit/a lot of help from a friend who pops on here from time to time we've fitted the car with an Arduino which is using the Canbus as a data logger for the car now with the add on of a GPS aerial, logging the available information to the SD car in the format of a .csv file which I can now open in race render to overlaying over videos and also helpful for logging temps and timing etc.
Did a little test run down the road this evening.
https://youtu.be/qRodvP1SMTA
Few minor little jobs to do before the weekend but we're pretty much ready to go and get out on circuit once again.
helix402 said:
It’s certainly loud in the stripped out state!
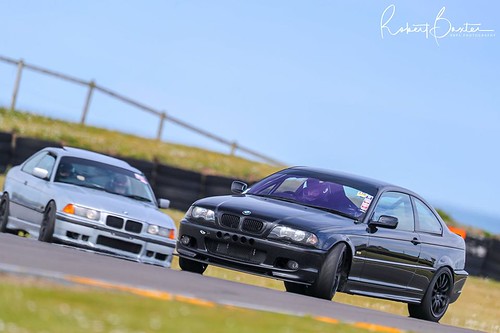
It certainly is on circuit. I always wear ear protection now inside my helmet to take the edge off the noise. But It does sound fantastic. 96db static, at the moment I don't know what it is on the drive by.So this bank holiday weekend I had the car out once again at Anglesey Circuit for a mixture of both the GP International layout as well as the Coastal Circuit.

With it only being a few weeks since the car was last out it was great to get back into the seat again on a circuit that I'm very familiar with and get back on with the job of learning how to drive the car. Cadwell was a little different as it was only the second time I had driven the circuit so took it a little easier.
The car felt totally different at Anglesey since driving it here when I first built the car 10 months ago. Obviously a lot has changed since then but straight away I have noticed the difference changing to a square 9j set up with 255's all around has made to the car, the turn in and grip on the front end if fantastic but it has also changed the balance of the car a little bit making it a bit more prone to oversteer when provoked with the throttle. However this was a great opportunity for me to start to learn how to drive the car properly and find the balance point of the car.
I can safely say this has been the best track day I've done from the point of view of having the most fun in a car I've ever had. Also I can say it's the track day I have learnt the most and seen a massive progression in my driving in just one day! Very happy!
Brakes
As posted in the previous update removing the ABS from the car has made a massive difference in the driving feel/experience but also given me a lot more confidence on the brakes without having to constantly be fighting the ABS which was consistently trying to prevent the rears from locking. Running the proportioning valve a couple of clicks from minimum pressure to the rears gave the car a nice balanced feel under braking and only locked the rears a few times when trail braking into corners, under straight line braking the difference was much better and I could just focus on driving not whether the car was actually going to stop.

Temperatures
One thing I have been focusing on developing over the previous few track days was the cooling of the car. Even though I had fitted the 19 row cooler at Oulton earlier in the year I was still seeing oil temps rising as high at 120 degrees and water temps hitting 115. I made some changes at Cadwell and noticed the drop in oil temps to around the high 90's to 100 degree mark but the increments on my oil gauge are are bar based rather than numerical. With the adding of the Canbus logger I was able to log the water and oil temps throughout the day.
The highest oil temp which was logged all day was 99 degrees and the highest coolant temp was 96. That's a difference of 20 degrees taken from both the oil and water temps with the changes made. New rad, removal of AC Condenser and using the splitter to box in under the radiator and coolers.

Videos
Couple of clear laps around the Coastal Circuit from the afternoon session. Posting times in the 1:21 region which I am very happy about, still a lot of improvement to be done yet.
https://www.youtube.com/watch?v=YNmJUhXqXtM
Followed by a few laps from the morning session around the International GP Layout
https://www.youtube.com/watch?v=-ivroGvpykQ&

What's next?
Off the back of Anglesey I don't have any track days booked at the moment but I have come away from the track day with a couple of things I want to work on and improve.
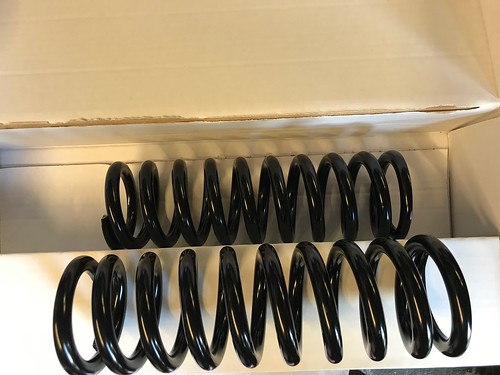
-One of them being the set up of the car. I'm going to reduce a little bit of the oversteer characteristics that has developed since moving to the 255 tyres all around. I will be looking at fitting slightly softer rear springs and potentially replacing the rear tyres. They've ran for 4-5 dry days now in comparison with the fronts which only have done 2 days which may be contributing to the handling slightly but they still have a good 3-4mm left.
-Removal of the standard heavy battery from the boot and replace it with a lightweight battery mounted somewhere in the car. While doing this I''ll have to strip back some of the interior loom to remove the battery cables so will probably reduce down and tidy up the interior loom
-Rear windows, I still have the glass rear windows in which have 3D Printed mounts holding the actuators which were prototypes at the time. The heat from the last few weeks in a closed stripped out black car has caused them to warm up and sag slightly and the rear windows haven't been the most water tight solution this year so going to replace them with some lexan windows.
-Increase the capabilities of the logger by adding in the pressure sensor wiring to the pressure sensors on the master cylinder for the front as well as fitting a pressure sensor to the rear t piece so line pressures can be logged to look at braking effort.
-Also for piece of mind and protection for the engine I am going to fit a pressure sensor to the fuel rail to be able to log fuel pressure. At the moment I am keeping the car above 1/3 of a tank just to make sure there isn't any fuel starvation going on on circuit. Would be happier to be able to see what's actually going on when it's an easy fix to add in now.
Finally - A few people has commented about how lively the car is in the youtube video already so here is an overview of the car set up at the moment. I am planning on making adjustments to settle it down slightly, I have a few things I was to try which I did briefly mention above.
Front - 8 clicks from full
Rear - 16 clicks from full
750F/400R
Front - Zero toe
3 degree camber
Rear - 14’ in toe
2 degree camber.
Less rake (rear is lower)
9J 255 square set up.
Tyre pressures 30F/28R
Edited by tombate911 on Sunday 19th May 23:27
Great update, enjoy reading your analysis and planned changes to the car.
Interested to see what you do with the battery wiring - I've not managed to do this in my VERY budget 325ti 'track car' but assume as a minimum there must be a cable running from the engine bay terminal to the battery which can be removed (could be wrong though!). There is also the detonator thing (I think) which is connected to the airbag system.
Interested to see what you do with the battery wiring - I've not managed to do this in my VERY budget 325ti 'track car' but assume as a minimum there must be a cable running from the engine bay terminal to the battery which can be removed (could be wrong though!). There is also the detonator thing (I think) which is connected to the airbag system.
The battery thing is a battery safety terminal, disconnects the battery in the event of an accident.
I’m not sure you could disconnect the front to back battery cable, doesn’t it supply all the engine bay electrics and various other items too? (Haven’t got time to go outside and check!)
I’m not sure you could disconnect the front to back battery cable, doesn’t it supply all the engine bay electrics and various other items too? (Haven’t got time to go outside and check!)
[/quote]
Also with a bit/a lot of help from a friend who pops on here from time to time we've fitted the car with an Arduino which is using the Canbus as a data logger for the car now with the add on of a GPS aerial, logging the available information to the SD car in the format of a .csv file which I can now open in race render to overlaying over videos and also helpful for logging temps and timing etc.
Did a little test run down the road this evening.
https://youtu.be/qRodvP1SMTA
[/quote]
I’d be interested in how you did the data logger, I’ve just started a 330 project my self and would like to get something like that but struggling to find something reasonably priced.
Couple of interesting things going on at the moment so thought it would be a good time to add an update.
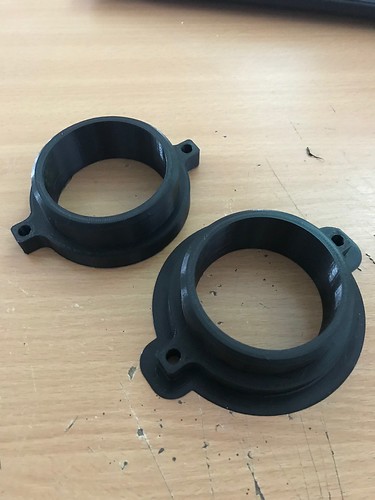
First job on the list at the moment, I was asked by a friend could I make up some custom subframe bushes for his E36 if he supplied the material.
Starting off with a nice round 3" stock of aluminium

The aim of the game with this was to solidly mount the subframe but also lift the subframe right up against the underside of the car to add some correction to the wish bone angles in an attempt to correct some of the roll centre on the rear to compliment the front set up he's running, Interesting project, will see how it goes when it's out on track in the future.


Back to my own car, I've had it parked up for a few weeks since Anglesey and have been planning making a few small changes to the car before the next outing. The main planned change was to get rid of the standard battery from the boot, relocate and replace it with something smaller and lighter.
First step was removing some of the interior to be able to get in the car to work on it

While I was in there removing the standard battery wiring which is wrapped inside the rear loom I thought I would start with removing any existing wiring which isn't being used in the car in it's current form

This obviously meant I could only cut the wires back as far as the A pillar. Not being happy with this and seeing how much potential there was for removing wire I started to dig deeper into the car.
Out came the cage

With the cage out of the way it was easy to pop out the dash and continue to trace back any wires which weren't needed.

The deeper you dig the more you find... with the main loom running completely around the back of the dash and behind the heater box I just had to keep digging.
Out came the heater box which enabled me to split the wiring loom open properly and start to rip out what wasn't being used anymore.

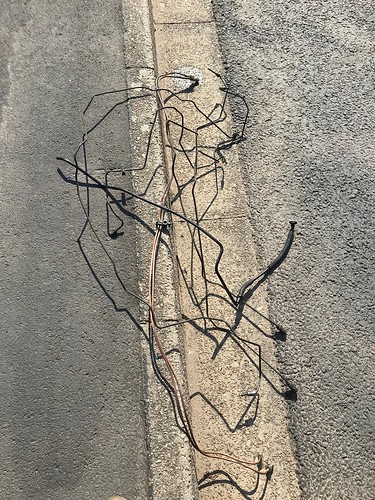
With everything now being so easy to access I've removed all the wiring for the doors, the heater controls, the electric windows, all radio wiring, all wiring to the EWS, an awful lot of wiring has been cut out.
I've taken the time to take it right back to the fuse boxes and the body control module and depin all the wires that aren't being used.

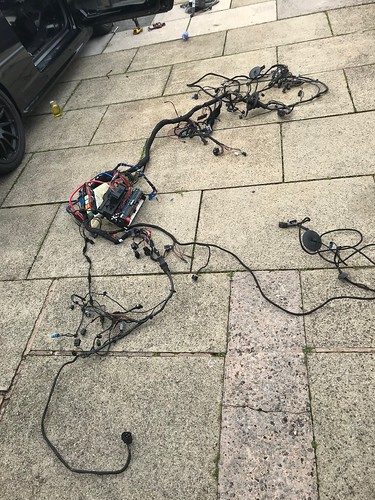
With that done you can see how much simpler the wiring to the rear of the car is now. Having it laid out on the drive way at the side of the car I could start to shape the wires back into the correct shape.

It was then placed back into the car and I checked the length and locations for the joins in the looms to make sure that when it goes back together everything exits and joins in the right place. I spent a long time tidying up the loom, heat shrinking and removing the massive commoning eathing blocks for something smaller and tidier

All roughly put back together at the moment held together just with insulation tape till new bits of wiring are added and tested. Decided to take this time to make quite a few changes to the wiring by adding in facilities for modifications in the future too.
When everything is hopefully checked and working correctly I will go back and finish wrapping up the looms but for the time being i'm still adding in new wires.

To finish of the progress for today, I've mounted a battery box behind the passenger seat and a new 250 mega fuse on the A pillar in the passenger footwell. From there the main feed to the fuse box only makes a short run. Rather than going right across the car to the other side to go through the bulkhead I've gone straight through the bulkhead through a grommet directly to the starter and removed any additional wiring from the engine bay that isn't required. I've saved an awful lot of weight just in reducing the wiring runs around the car. I've saved everything that's been removed from the car for a final weigh in when it's built and finished.
I've spent a few hours chopping up the standard heater box to remove all the insides which aren't needed to leave me with just the fan. Will do a more detailed write up about what my plans are for this when I've finished making the rest of the parts to go together with it. But i'm going to make my own front end of the heater box to duct the air from the fan into the dash vents for the driver and the screen.
I've added a new wiring loom in from the switch panel to the fuse box with an additional 4 relays, some of these will get used, some of them will be saved for future use but at least all the switching and power feeds are wired in now.
2 relays for a heated screen
Additional fuel pump relay for a second pump
Fan relay to bring on the fan from the heater box.
Couple of custom swirl pots made up. The larger one for my friends E36 build and the smaller one which will be for my E46 to mount in the Engine bay. Still plenty more work to be done on this but it's going in the right direction.

First job on the list at the moment, I was asked by a friend could I make up some custom subframe bushes for his E36 if he supplied the material.
Starting off with a nice round 3" stock of aluminium
The aim of the game with this was to solidly mount the subframe but also lift the subframe right up against the underside of the car to add some correction to the wish bone angles in an attempt to correct some of the roll centre on the rear to compliment the front set up he's running, Interesting project, will see how it goes when it's out on track in the future.
Back to my own car, I've had it parked up for a few weeks since Anglesey and have been planning making a few small changes to the car before the next outing. The main planned change was to get rid of the standard battery from the boot, relocate and replace it with something smaller and lighter.
First step was removing some of the interior to be able to get in the car to work on it
While I was in there removing the standard battery wiring which is wrapped inside the rear loom I thought I would start with removing any existing wiring which isn't being used in the car in it's current form
This obviously meant I could only cut the wires back as far as the A pillar. Not being happy with this and seeing how much potential there was for removing wire I started to dig deeper into the car.
Out came the cage
With the cage out of the way it was easy to pop out the dash and continue to trace back any wires which weren't needed.
The deeper you dig the more you find... with the main loom running completely around the back of the dash and behind the heater box I just had to keep digging.
Out came the heater box which enabled me to split the wiring loom open properly and start to rip out what wasn't being used anymore.
With everything now being so easy to access I've removed all the wiring for the doors, the heater controls, the electric windows, all radio wiring, all wiring to the EWS, an awful lot of wiring has been cut out.
I've taken the time to take it right back to the fuse boxes and the body control module and depin all the wires that aren't being used.
With that done you can see how much simpler the wiring to the rear of the car is now. Having it laid out on the drive way at the side of the car I could start to shape the wires back into the correct shape.
It was then placed back into the car and I checked the length and locations for the joins in the looms to make sure that when it goes back together everything exits and joins in the right place. I spent a long time tidying up the loom, heat shrinking and removing the massive commoning eathing blocks for something smaller and tidier
All roughly put back together at the moment held together just with insulation tape till new bits of wiring are added and tested. Decided to take this time to make quite a few changes to the wiring by adding in facilities for modifications in the future too.
When everything is hopefully checked and working correctly I will go back and finish wrapping up the looms but for the time being i'm still adding in new wires.
To finish of the progress for today, I've mounted a battery box behind the passenger seat and a new 250 mega fuse on the A pillar in the passenger footwell. From there the main feed to the fuse box only makes a short run. Rather than going right across the car to the other side to go through the bulkhead I've gone straight through the bulkhead through a grommet directly to the starter and removed any additional wiring from the engine bay that isn't required. I've saved an awful lot of weight just in reducing the wiring runs around the car. I've saved everything that's been removed from the car for a final weigh in when it's built and finished.
I've spent a few hours chopping up the standard heater box to remove all the insides which aren't needed to leave me with just the fan. Will do a more detailed write up about what my plans are for this when I've finished making the rest of the parts to go together with it. But i'm going to make my own front end of the heater box to duct the air from the fan into the dash vents for the driver and the screen.
I've added a new wiring loom in from the switch panel to the fuse box with an additional 4 relays, some of these will get used, some of them will be saved for future use but at least all the switching and power feeds are wired in now.
2 relays for a heated screen
Additional fuel pump relay for a second pump
Fan relay to bring on the fan from the heater box.
Couple of custom swirl pots made up. The larger one for my friends E36 build and the smaller one which will be for my E46 to mount in the Engine bay. Still plenty more work to be done on this but it's going in the right direction.
Progress continues. Not at a massive rate with trying to keep up with other hobbies outside of motorsport but also due to the weather we've been suffering with lately.
First job at the moment was to get a batch of S50 > M54 adaptor plates laser cut. I was asked to make 6 of these for a company I've gotten to know through racing so had a larger batch made and sat them on a shelf for future reference.

Mocked up the battery box location and added in Riv nuts to to the floor to hold it in position with P clips throughout making sure everything will be held in place properly when the car goes back together. Putting the battery behind the passenger seat to reduce long runs of battery cable. Passenger foot well would have been better but I regularly have passengers in on track days to keeping that clear.

Built up and test fitted the dash to make sure all the electrical components worked with the modifications to the wiring I had made. Got the car running, tested all the functions and drove the car down the drive.
Switch and relays for the heater screen.
Switch and relay for the fan/blower
Fuel pump relay tapped into the standard fuel pump wiring to power the new pump in the same way the car controls the intank pump which will be used as a lift pump now.
Notice the reduction in side of the heater matrix.
With everything working, new battery cables ran down the passenger side, mega fuses mounted to the bulkhead and cables ran through the bulkhead for the starter motor. I've removed all the dash again ready to finish off wrapping the loom and painting the interior again.

Pulled back the passenger side of the engine back wiring back through the bulkhead with the ECU wiring so I can be pulled back and out of the car. the loom is still a pretty big item but half the size that it was before. Quite a bit of weight saved but more on that shortly.

Yesterday I started wrapping the loom back up but rain stopped play yesterday afternoon, the bits I have done so far look so much better, will have some more photos when I've finished.
Eagle eyed viewers will have noticed how much smaller the heater matrix box is now I've cut up and removed all the bits that aren't needed anymore just leaving the motor/blower in position in the scuttle.
I'm going to mount a plate the passenger compartment side of the blower with 3 ducts on it which will go to the screen and the driver. I've got it all wired in with relays now and a switch on the centre console panel to be able to turn the fan on to either clear the screen or cool the cabin if needed.
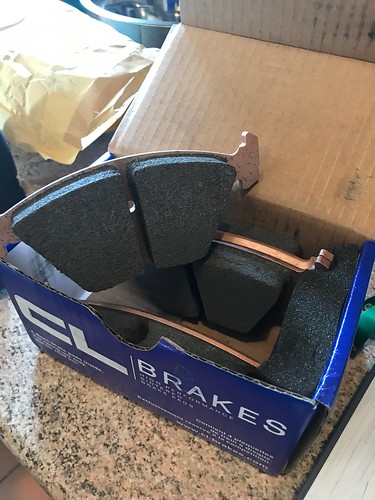
With the changes to the brakes I've been going in the right direction and feel like I'm close to getting to where I want them to be, Anglesey was so much better with the ABS removed running RC5+ all around and the proportioning valve set pretty much all the way to the front the braking was pretty balanced with the exception of the odd off camber corner or when trail braking a little too much. Looking for a little bit more power from the fronts to increase the bias I'm going to move to RC6 brake pads which have a co-efficient of ~0.5 compared with ~0.4 for the RC5's. Something else to try at Cadwell in August which will be the next outing for the car when it's finished.
Weight saving
So when the car went to Oulton Park it weighed in at 1330kg with 30l of fuel which isn't bad considering the car is running a pretty comprehensive 16 point roll cage.
Since then the following weight has been removed.
3kgs -MV1's > TD's
15kg -Air conditioning related parts
20kg -Standard battery - Oddessey PC680
15kg -Wiring from looms
07kg -Half a heater box
02kg -Rear window seals
62kg -Total saving at the moment
1330 - 30kg (Fuel) - 62 kg = 1238kg
My target at the moment is to get to 1200kg which will take me to 200bhp/ton on the nose. By no means was this current rebuild to save weight, it's just something I'm doing as i'm working through the car tidying up all the little things I've noticed over the last 12 months as well as the things I wish I had done the first time I built it, which is coming up for exactly 12 months ago.
Weight saving jobs still to do:
-Rear glass swapped to Lexan
-Front windows thermo formed Lexan
-Gut front doors and remove metal and window mechanisms.
First job at the moment was to get a batch of S50 > M54 adaptor plates laser cut. I was asked to make 6 of these for a company I've gotten to know through racing so had a larger batch made and sat them on a shelf for future reference.
Mocked up the battery box location and added in Riv nuts to to the floor to hold it in position with P clips throughout making sure everything will be held in place properly when the car goes back together. Putting the battery behind the passenger seat to reduce long runs of battery cable. Passenger foot well would have been better but I regularly have passengers in on track days to keeping that clear.
Built up and test fitted the dash to make sure all the electrical components worked with the modifications to the wiring I had made. Got the car running, tested all the functions and drove the car down the drive.
Switch and relays for the heater screen.
Switch and relay for the fan/blower
Fuel pump relay tapped into the standard fuel pump wiring to power the new pump in the same way the car controls the intank pump which will be used as a lift pump now.
Notice the reduction in side of the heater matrix.
With everything working, new battery cables ran down the passenger side, mega fuses mounted to the bulkhead and cables ran through the bulkhead for the starter motor. I've removed all the dash again ready to finish off wrapping the loom and painting the interior again.
Pulled back the passenger side of the engine back wiring back through the bulkhead with the ECU wiring so I can be pulled back and out of the car. the loom is still a pretty big item but half the size that it was before. Quite a bit of weight saved but more on that shortly.
Yesterday I started wrapping the loom back up but rain stopped play yesterday afternoon, the bits I have done so far look so much better, will have some more photos when I've finished.
Eagle eyed viewers will have noticed how much smaller the heater matrix box is now I've cut up and removed all the bits that aren't needed anymore just leaving the motor/blower in position in the scuttle.
I'm going to mount a plate the passenger compartment side of the blower with 3 ducts on it which will go to the screen and the driver. I've got it all wired in with relays now and a switch on the centre console panel to be able to turn the fan on to either clear the screen or cool the cabin if needed.
With the changes to the brakes I've been going in the right direction and feel like I'm close to getting to where I want them to be, Anglesey was so much better with the ABS removed running RC5+ all around and the proportioning valve set pretty much all the way to the front the braking was pretty balanced with the exception of the odd off camber corner or when trail braking a little too much. Looking for a little bit more power from the fronts to increase the bias I'm going to move to RC6 brake pads which have a co-efficient of ~0.5 compared with ~0.4 for the RC5's. Something else to try at Cadwell in August which will be the next outing for the car when it's finished.
Weight saving
So when the car went to Oulton Park it weighed in at 1330kg with 30l of fuel which isn't bad considering the car is running a pretty comprehensive 16 point roll cage.
Since then the following weight has been removed.
3kgs -MV1's > TD's
15kg -Air conditioning related parts
20kg -Standard battery - Oddessey PC680
15kg -Wiring from looms
07kg -Half a heater box
02kg -Rear window seals
62kg -Total saving at the moment
1330 - 30kg (Fuel) - 62 kg = 1238kg
My target at the moment is to get to 1200kg which will take me to 200bhp/ton on the nose. By no means was this current rebuild to save weight, it's just something I'm doing as i'm working through the car tidying up all the little things I've noticed over the last 12 months as well as the things I wish I had done the first time I built it, which is coming up for exactly 12 months ago.
Weight saving jobs still to do:
-Rear glass swapped to Lexan
-Front windows thermo formed Lexan
-Gut front doors and remove metal and window mechanisms.
With such bad weather through the middle of June progress has been limited up until last weekend when we finally got some good weather to be able to crack on with the car,
The weekend start off with a lot of prep work, in order to paint the car properly I wanted to completely remove the interior look from the car but it goes through the bulk head on both sides as the interior loom also contains the ABS wiring as well as wiring for the front lights but it had to come out to do it properly and finish off the last bits of wrapping the wiring loom.
Lots of time went into lightly rubbing down the inside of the car, panel wiping and hoovering to make sure it was as clean as possible ready for painting, the idea was to get it prepped ready for when we got a couple of good days weather together,
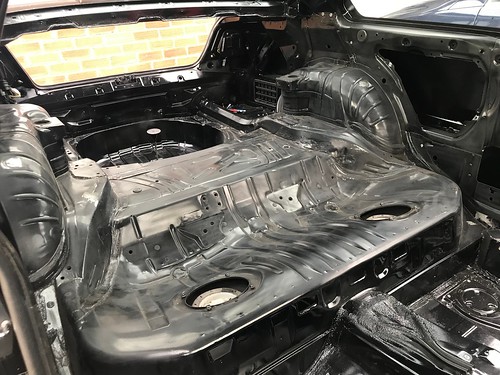
Glass removed from the rear and all the exterior and interior sections that I didn't want covering in paint masked up.

Checking the weather forecast on the Friday afternoon it was forecast warm, dry and no wind. Perfect weekend to get the inside of the car painted. Last time I did it i borrowed my friends unit which was great, however it's much more difficult to get the car a rolling shell to get it there on the trailer then having to get it out of the unit on the Sunday for them to go back to work on the Monday morning, because of this I decided I would buy a cheap gazebo from ebay and make use of the wide drive way at home. Friday night I got the Gazebo up over the car without the sides on ready to start early saturday morning.
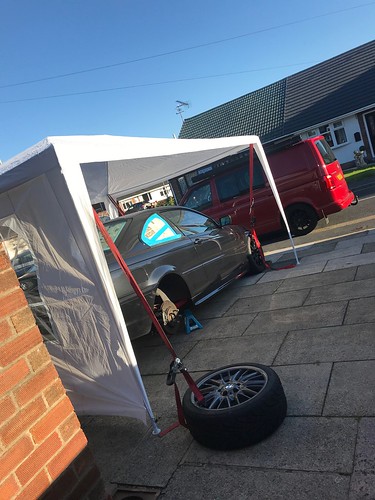
Saturday morning the weather was perfect to get on with the painting. I set to putting the sides onto the Gazebo to make sure all the over spray was contained and gave the neighbours a heads up just in case.

Final wipe down and a hoover and it was time to put some paint down inside the shell.
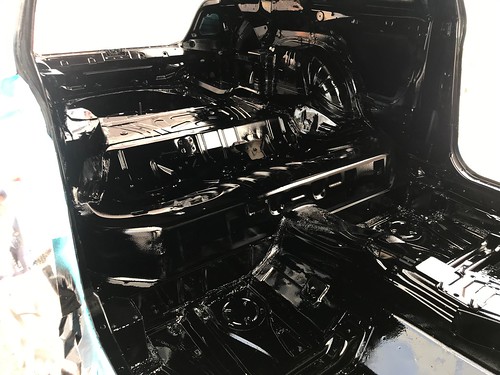

With the painting done it was a case of leaving it in the Gazebo over night till the Sunday when i then turned my attention to getting the shell water tight before the thunderstorms came which had been forecast for Monday.
First job on the list was fixing in the rear windows, in the past I had 3d printed adaptors for the rear motors, will all the wiring and motors removed I've gone for fixed glass windows for the time being. I made swap them for the lexan i've purchased for the job at some point but for now I'm going to keep the glass, keeps it water tight and doesn't scratch.

I then left the car for the week making sure the paint was left long enough to ensure it was fully hardened and reduce the chance of it getting marked when putting the car back together.
First job was putting back in the roll cage and the strut brace, takes a little while to get all the mounting points lined up when fitting this cage. there's 16 tie in points in the shell in total so a couple of hours work to get all the bolts in and torqued up.


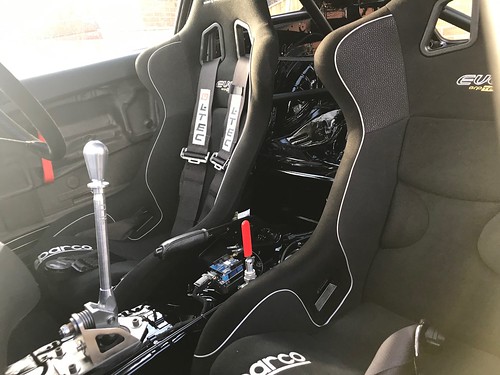
Carrying on with the refitting of the interior, or lack of it now I should say, brake lines ran back through the car and the shifter fitted.

Continued to P clip all the wiring throughout the car, looks so much better with the wiring fuller wrapped and held in place properly with black plastic P clips and stainless fittings. I spent a little bit of time today cutting away the remainder of the lower dash now I had decided how i was going to finish it.
I had also 3D printed some more duct adaptors to fit into the built in air ways in the dash board. You can see in the image below the small lengths of air ducting connecting the outlets I made on the fan motor to the dash, much better without the heater matrix taking up so much room.

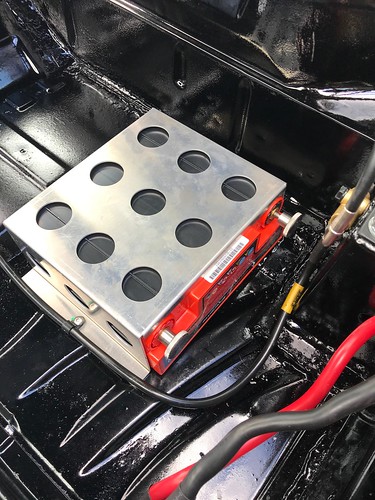
Battery mounted up behind the passenger seat and battery wires ran down the to Mega fuse I've mounted on the A pillar.
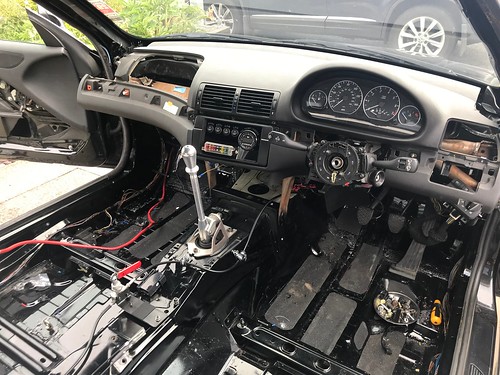
This photo really shows how much cleaner and tidier the inside the cabin area is now it's being built for a second time, looks so much better with the reduced wiring, no lower dash and removed heater matrix.
Refitted the switch panel to the dash which now has the additional wiring for fuel pump, heated screen, switched 5v camera feed via a USB and the interior fan switch. Also mounted the logger to the centre console in the same position to provide quick access for downloading data during track days.

Dashboard all back together now, I've tried to pay a lot of attention to parts when refitting them, down to the likes of painting the handbrake before refitting.

Final jobs for the day were to refit the brake pedal as well as the drivers floor covered in grip tape.
Also finished off running the cables down from the dashboard to the dash bar to tidy it up a little more but forget to take a photo with those bits done as my phone had died.
That pretty much makes the interior of the car finished except door cards, seats and door bars but I'll do all of those right at the end when I know I don't need to get inside the car again or under the dash.
I can turn my concentration now to the mechanical changes I've got planned for it, will be mounting up the swirl pot in the engine bay as well as mounting the high pressure fuel pump when it arrives.
Fitting a set of softer springs to the rear of the car in the hunt for reducing a little bit of the oversteer which is apparent when pushing the car a little harder.
Set of 350lbs rear springs to experiment with for the next track day, currently running 400lbs
Will also get the Carbon Loraine RC6 brake pads fitted in the evenings this week and get the brakes bled up, just waiting on a new brake hose for the engine bay between the master cylinder and the front T piece to make it a little tidier rather than running a piece of copper to it.
The weekend start off with a lot of prep work, in order to paint the car properly I wanted to completely remove the interior look from the car but it goes through the bulk head on both sides as the interior loom also contains the ABS wiring as well as wiring for the front lights but it had to come out to do it properly and finish off the last bits of wrapping the wiring loom.
Lots of time went into lightly rubbing down the inside of the car, panel wiping and hoovering to make sure it was as clean as possible ready for painting, the idea was to get it prepped ready for when we got a couple of good days weather together,
Glass removed from the rear and all the exterior and interior sections that I didn't want covering in paint masked up.
Checking the weather forecast on the Friday afternoon it was forecast warm, dry and no wind. Perfect weekend to get the inside of the car painted. Last time I did it i borrowed my friends unit which was great, however it's much more difficult to get the car a rolling shell to get it there on the trailer then having to get it out of the unit on the Sunday for them to go back to work on the Monday morning, because of this I decided I would buy a cheap gazebo from ebay and make use of the wide drive way at home. Friday night I got the Gazebo up over the car without the sides on ready to start early saturday morning.
Saturday morning the weather was perfect to get on with the painting. I set to putting the sides onto the Gazebo to make sure all the over spray was contained and gave the neighbours a heads up just in case.
Final wipe down and a hoover and it was time to put some paint down inside the shell.
With the painting done it was a case of leaving it in the Gazebo over night till the Sunday when i then turned my attention to getting the shell water tight before the thunderstorms came which had been forecast for Monday.
First job on the list was fixing in the rear windows, in the past I had 3d printed adaptors for the rear motors, will all the wiring and motors removed I've gone for fixed glass windows for the time being. I made swap them for the lexan i've purchased for the job at some point but for now I'm going to keep the glass, keeps it water tight and doesn't scratch.
I then left the car for the week making sure the paint was left long enough to ensure it was fully hardened and reduce the chance of it getting marked when putting the car back together.
First job was putting back in the roll cage and the strut brace, takes a little while to get all the mounting points lined up when fitting this cage. there's 16 tie in points in the shell in total so a couple of hours work to get all the bolts in and torqued up.
Carrying on with the refitting of the interior, or lack of it now I should say, brake lines ran back through the car and the shifter fitted.
Continued to P clip all the wiring throughout the car, looks so much better with the wiring fuller wrapped and held in place properly with black plastic P clips and stainless fittings. I spent a little bit of time today cutting away the remainder of the lower dash now I had decided how i was going to finish it.
I had also 3D printed some more duct adaptors to fit into the built in air ways in the dash board. You can see in the image below the small lengths of air ducting connecting the outlets I made on the fan motor to the dash, much better without the heater matrix taking up so much room.
Battery mounted up behind the passenger seat and battery wires ran down the to Mega fuse I've mounted on the A pillar.
This photo really shows how much cleaner and tidier the inside the cabin area is now it's being built for a second time, looks so much better with the reduced wiring, no lower dash and removed heater matrix.
Refitted the switch panel to the dash which now has the additional wiring for fuel pump, heated screen, switched 5v camera feed via a USB and the interior fan switch. Also mounted the logger to the centre console in the same position to provide quick access for downloading data during track days.
Dashboard all back together now, I've tried to pay a lot of attention to parts when refitting them, down to the likes of painting the handbrake before refitting.
Final jobs for the day were to refit the brake pedal as well as the drivers floor covered in grip tape.
Also finished off running the cables down from the dashboard to the dash bar to tidy it up a little more but forget to take a photo with those bits done as my phone had died.
That pretty much makes the interior of the car finished except door cards, seats and door bars but I'll do all of those right at the end when I know I don't need to get inside the car again or under the dash.
I can turn my concentration now to the mechanical changes I've got planned for it, will be mounting up the swirl pot in the engine bay as well as mounting the high pressure fuel pump when it arrives.
Fitting a set of softer springs to the rear of the car in the hunt for reducing a little bit of the oversteer which is apparent when pushing the car a little harder.
Set of 350lbs rear springs to experiment with for the next track day, currently running 400lbs
Will also get the Carbon Loraine RC6 brake pads fitted in the evenings this week and get the brakes bled up, just waiting on a new brake hose for the engine bay between the master cylinder and the front T piece to make it a little tidier rather than running a piece of copper to it.
Update August 2019.
With the build thread only being a diary of post from myself I've not been on posting any progress posts for a while but I've uploaded some more photos to flickr so thought I would pop on a post a few for anyone interested.
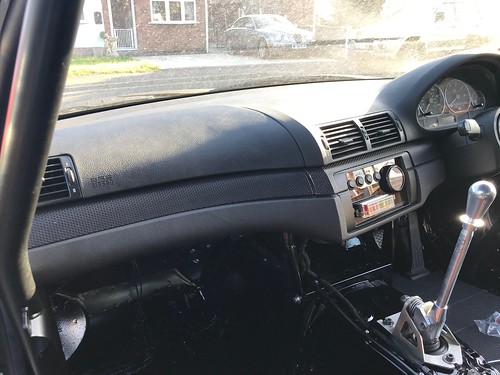
Start off with a bit of simple progress which was to finish off the dash, I got new trim clips to hold the dash trims in place properly, in the past a few have been missing or come out from hitting kerbs on track, I also trimmed the one around the switch panel to make it fit correctly as it never did even when i bought the car
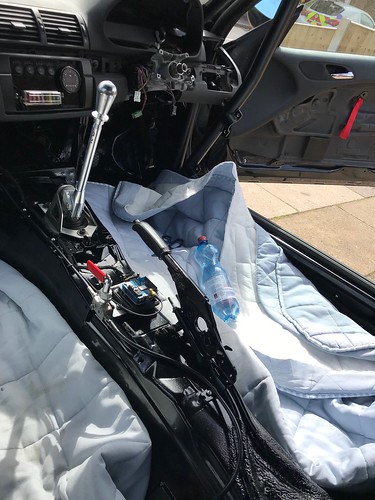
Finished P clipping all the wiring looms around the car. Looks so much better now all the loom inside the car has been reduced and re wrapped as well as the effort I went to drilling holes and riv nutting the length of the car to hold all the looms and lines in place makes it look so much more presentable inside.

Mounted the Ardunino Logger to the centre control again keeping it easily accessed in the centre of the car for removing data from. note the duvets in the foot wells trying to ensure the inside of the car doesn't get marked when putting it back together
Fresh grip tape on the drivers foot plate, grip tape onto the passenger floor to so the seats and harnesses could be refitted.
Drivers side

Passenger side

With all the interior put back together I then focused my attention on the fuel set up, much easier to do it now while the whole car is in bits and had the chance to run all the wires.
A lot of race cars I've seen over the past two years following the racing around the UK have horrible boxes in the boots or fuel pumps and pots on the rear shelf of the cars and it just looks unsightly. Decided to go a little bit different with this something tidier that doesn't involve running fuel lines inside the car.
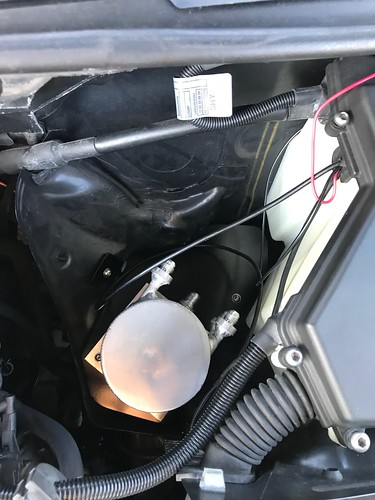
Starting off with a custom swirl pot and 044 pump.

Marked up a car template in the little bit of space behind the intake in the engine bay

Transferred the template to a sheet of stainless steel

Cut out and test fitted to make sure the brackets for holding it secure are in the right place.
Painted the bracket and mounted it with the swirl pot
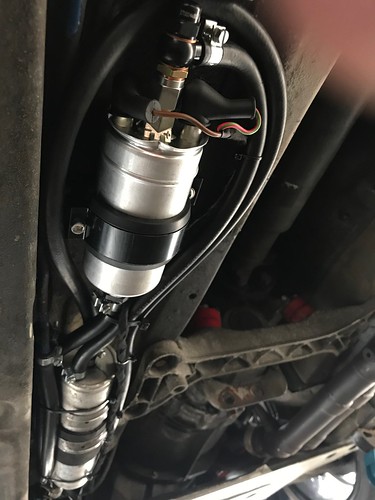
Main pump now mounted under the car tucked in against the chassis leg. All of this will be plated over to protect it under the car anyway.

Tried my best to keep the plumbing under the car nice and neat but with 4 addition lines having to go to the swirl pot, two from the main tank, one return from the reg in the filter and one from the new pump it wasn't the easiest of jobs to pack it in a small space.
Finally the other end in the engine bay all plumbed in

Final job for the day today was the bleed the brakes and fit the RC6 brake pads to the front, I've replaced some of the copper lines in the engine bay with a braided line from the master cylinder to the front T Piece to tidy it up and use a banjo bolt o the cylinder.
While the wheels were off bleeding the brakes gave them a quick wash, such a great looking wheel the TD1.2

That pretty much brings this summer rebuild to an end. Only thing I've changed which I haven't documented is that I've changed to Mobius cameras which are now wired on a switch on the dash to record on power on with the logger which should make things a lot easier.
Pretty much ready for the next outing which is the 25h August at Cadwell Park
Final job for this week is a little bit of sealing under the car and some paint on the underside in a couple of areas where holes have been drilling and repainting the front splitting to make it look a little more presentable as a long term fixture as it's serving a purpose for the moment.
With the build thread only being a diary of post from myself I've not been on posting any progress posts for a while but I've uploaded some more photos to flickr so thought I would pop on a post a few for anyone interested.
Start off with a bit of simple progress which was to finish off the dash, I got new trim clips to hold the dash trims in place properly, in the past a few have been missing or come out from hitting kerbs on track, I also trimmed the one around the switch panel to make it fit correctly as it never did even when i bought the car
Finished P clipping all the wiring looms around the car. Looks so much better now all the loom inside the car has been reduced and re wrapped as well as the effort I went to drilling holes and riv nutting the length of the car to hold all the looms and lines in place makes it look so much more presentable inside.
Mounted the Ardunino Logger to the centre control again keeping it easily accessed in the centre of the car for removing data from. note the duvets in the foot wells trying to ensure the inside of the car doesn't get marked when putting it back together
Fresh grip tape on the drivers foot plate, grip tape onto the passenger floor to so the seats and harnesses could be refitted.
Drivers side
Passenger side
With all the interior put back together I then focused my attention on the fuel set up, much easier to do it now while the whole car is in bits and had the chance to run all the wires.
A lot of race cars I've seen over the past two years following the racing around the UK have horrible boxes in the boots or fuel pumps and pots on the rear shelf of the cars and it just looks unsightly. Decided to go a little bit different with this something tidier that doesn't involve running fuel lines inside the car.
Starting off with a custom swirl pot and 044 pump.
Marked up a car template in the little bit of space behind the intake in the engine bay
Transferred the template to a sheet of stainless steel
Cut out and test fitted to make sure the brackets for holding it secure are in the right place.
Painted the bracket and mounted it with the swirl pot
Main pump now mounted under the car tucked in against the chassis leg. All of this will be plated over to protect it under the car anyway.
Tried my best to keep the plumbing under the car nice and neat but with 4 addition lines having to go to the swirl pot, two from the main tank, one return from the reg in the filter and one from the new pump it wasn't the easiest of jobs to pack it in a small space.
Finally the other end in the engine bay all plumbed in
Final job for the day today was the bleed the brakes and fit the RC6 brake pads to the front, I've replaced some of the copper lines in the engine bay with a braided line from the master cylinder to the front T Piece to tidy it up and use a banjo bolt o the cylinder.
While the wheels were off bleeding the brakes gave them a quick wash, such a great looking wheel the TD1.2
That pretty much brings this summer rebuild to an end. Only thing I've changed which I haven't documented is that I've changed to Mobius cameras which are now wired on a switch on the dash to record on power on with the logger which should make things a lot easier.
Pretty much ready for the next outing which is the 25h August at Cadwell Park
Final job for this week is a little bit of sealing under the car and some paint on the underside in a couple of areas where holes have been drilling and repainting the front splitting to make it look a little more presentable as a long term fixture as it's serving a purpose for the moment.
Still enjoying the updated to this as it is way beyond what I have done to my E46 'track' 325ti.
The big red cable in the photo below, does it go from the battery to the terminal in the engine bay only? Looks like easy weight to remove if so but I've not managed to fully trace the cable yet. Any knowledge welcome!
The big red cable in the photo below, does it go from the battery to the terminal in the engine bay only? Looks like easy weight to remove if so but I've not managed to fully trace the cable yet. Any knowledge welcome!
tombate911 said:
While I was in there removing the standard battery wiring which is wrapped inside the rear loom I thought I would start with removing any existing wiring which isn't being used in the car in it's current form
d_a_n1979 said:
Fantastic build; good to see the car going round Anglesey too; sounds great 
Whilst you were driving, I was fishing round the corner in Rhosneigr and then even more round the corner at the Oyster Catcher having lunch and a pint haha
Sounds great, I was actually over there yesterday while my friends were doing a motorbike track day I took the road bike for a lap of the island to a few of the beaches. Great to see the island from a different perspective. Glad you think it sounds good, never heard it from outside of the car!! Something I need to do which means giving it to someone else to drive.Whilst you were driving, I was fishing round the corner in Rhosneigr and then even more round the corner at the Oyster Catcher having lunch and a pint haha
Max M4X WW said:
Still enjoying the updated to this as it is way beyond what I have done to my E46 'track' 325ti.
The big red cable in the photo below, does it go from the battery to the terminal in the engine bay only? Looks like easy weight to remove if so but I've not managed to fully trace the cable yet. Any knowledge welcome!
From the battery there is two cables. The big red cable in the photo below, does it go from the battery to the terminal in the engine bay only? Looks like easy weight to remove if so but I've not managed to fully trace the cable yet. Any knowledge welcome!
The larger one goes down the driver side of the vehicle to the bulkhead fitting, through the bulkhead under the ABS pump through another bulkhead fitting to the jump start point infront of the ABS pump then it goes across the engine to the starter motor over the top of the scuttle.
The smaller one goes down the drivers side and behind the dash behind the heater matrix wrapped up inside the loom where it is the main feed to the fuse box.
What I have done is take one battery cable from the battery on the passenger side to a fuse on the A pillar. From the fuse one feed goes through the bulkhead straight to the starter motor taking the shortest route. I was actually able to reuse the standard wiring which goes from the starter to the jump start point on near the ABS pump. a second wire takes the short run up to the main feed of for the fuse box. By doing that I have removed over 3/4 of the large diameter battery cable from the vehicle and reduced it in size slightly. The main saving was getting the battery out of the boot and into the passenger side.
tombate911 said:
From the battery there is two cables.
The larger one goes down the driver side of the vehicle to the bulkhead fitting, through the bulkhead under the ABS pump through another bulkhead fitting to the jump start point infront of the ABS pump then it goes across the engine to the starter motor over the top of the scuttle.
The smaller one goes down the drivers side and behind the dash behind the heater matrix wrapped up inside the loom where it is the main feed to the fuse box.
What I have done is take one battery cable from the battery on the passenger side to a fuse on the A pillar. From the fuse one feed goes through the bulkhead straight to the starter motor taking the shortest route. I was actually able to reuse the standard wiring which goes from the starter to the jump start point on near the ABS pump. a second wire takes the short run up to the main feed of for the fuse box. By doing that I have removed over 3/4 of the large diameter battery cable from the vehicle and reduced it in size slightly. The main saving was getting the battery out of the boot and into the passenger side.
Thanks, looks like it is staying for now then!The larger one goes down the driver side of the vehicle to the bulkhead fitting, through the bulkhead under the ABS pump through another bulkhead fitting to the jump start point infront of the ABS pump then it goes across the engine to the starter motor over the top of the scuttle.
The smaller one goes down the drivers side and behind the dash behind the heater matrix wrapped up inside the loom where it is the main feed to the fuse box.
What I have done is take one battery cable from the battery on the passenger side to a fuse on the A pillar. From the fuse one feed goes through the bulkhead straight to the starter motor taking the shortest route. I was actually able to reuse the standard wiring which goes from the starter to the jump start point on near the ABS pump. a second wire takes the short run up to the main feed of for the fuse box. By doing that I have removed over 3/4 of the large diameter battery cable from the vehicle and reduced it in size slightly. The main saving was getting the battery out of the boot and into the passenger side.
tombate911 said:
d_a_n1979 said:
Fantastic build; good to see the car going round Anglesey too; sounds great
Whilst you were driving, I was fishing round the corner in Rhosneigr and then even more round the corner at the Oyster Catcher having lunch and a pint haha
Sounds great, I was actually over there yesterday while my friends were doing a motorbike track day I took the road bike for a lap of the island to a few of the beaches. Great to see the island from a different perspective. Glad you think it sounds good, never heard it from outside of the car!! Something I need to do which means giving it to someone else to drive.Whilst you were driving, I was fishing round the corner in Rhosneigr and then even more round the corner at the Oyster Catcher having lunch and a pint haha
Finished off a few little jobs ready for Cadwell Park.
One of the ones I really wanted to do was to remove the splitter and approve its appearance a little bit now I've decided it's staying as it's helping dam the air in through the rad and cooler and well it makes the front end look a little more aggressive too. So I've removed it, numerous coats of filler and flatting to get a reasonable finish and a couple of coats of 2k paint to finish it for a little while. Will be making another at some point with a slightly different shape.
Took a few photos of the car.


Love the new and improved interior, can't wait to get some seat time in it. I have noticed though how loud the fuel pump is even though it's exterior mounted so going to look at adding a bit more rubber between the mount and the chassis but i'm sure I won't notice it with over the sound of the exhaust with ear plugs in.

One of the ones I really wanted to do was to remove the splitter and approve its appearance a little bit now I've decided it's staying as it's helping dam the air in through the rad and cooler and well it makes the front end look a little more aggressive too. So I've removed it, numerous coats of filler and flatting to get a reasonable finish and a couple of coats of 2k paint to finish it for a little while. Will be making another at some point with a slightly different shape.
Took a few photos of the car.
Love the new and improved interior, can't wait to get some seat time in it. I have noticed though how loud the fuel pump is even though it's exterior mounted so going to look at adding a bit more rubber between the mount and the chassis but i'm sure I won't notice it with over the sound of the exhaust with ear plugs in.
Gassing Station | Readers' Cars | Top of Page | What's New | My Stuff