1974 Camaro Z28
Discussion


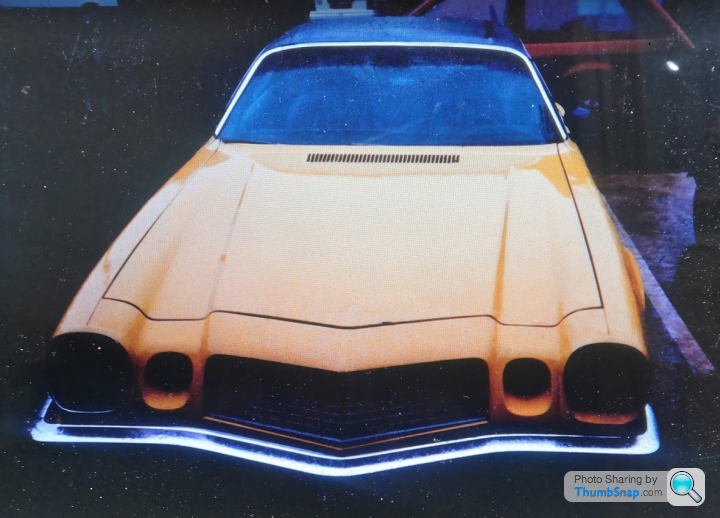
I bought it with a 4.1 or 4.2, can't remember which, straight six then bought a 350 off a friend. it had high lift cam and Offenhauser inlet. I put Hedmann headers on it with straight through pipes/ Unfortunately the only carb i had at the time was a Carter 4 barrel which worked but wasn't ideal. it already had 10" wide rear tyres on it which i managed to wreck doing an almighty burn out from the lights in Milton keynes, never seen so much tyre smoke lol. Sold it to a fella who had an XR3 who seemed scared of it on the test drive and a week later he contacted me to say it had gone up in flames. It was fun while it lasted. My big regret was not buying a late 70s Camaro from a friend that had a built 400 small block in it, that thing shifted.
74 was the only year with that front that still had the small rear window, as we said we might have had the only two in the country ! : )
74 was the only year with that front that still had the small rear window, as we said we might have had the only two in the country ! : )
Spanglepants said:
I bought it with a 4.1 or 4.2, can't remember which, straight six then bought a 350 off a friend. it had high lift cam and Offenhauser inlet. I put Hedmann headers on it with straight through pipes/ Unfortunately the only carb i had at the time was a Carter 4 barrel which worked but wasn't ideal. it already had 10" wide rear tyres on it which i managed to wreck doing an almighty burn out from the lights in Milton keynes, never seen so much tyre smoke lol. Sold it to a fella who had an XR3 who seemed scared of it on the test drive and a week later he contacted me to say it had gone up in flames. It was fun while it lasted. My big regret was not buying a late 70s Camaro from a friend that had a built 400 small block in it, that thing shifted.
74 was the only year with that front that still had the small rear window, as we said we might have had the only two in the country ! : )
That's a great story to read, shame about the ending! I've got to admit I'm a little terrified of mine going up in flames, seems to be every few weeks one catches fire in the US, so I've always got an extinguisher on the back seat!74 was the only year with that front that still had the small rear window, as we said we might have had the only two in the country ! : )
Finally had a really positive breakthrough with the car. After losing sleep trying to figure out where my wiring issues might lie, at about 3am I remembered I'd read a thread online about the headlight dimmer switch actually forming part of the circuit. I knew mine was original and had seen better days, then I remembered about a year ago I took a brand new switch out of the box of spares to give to my dad to try and get a retaining nut for. Worth a try I thought.
Sure enough, it fixed both the issues I was having with the negative and dash-bulb wires and the gauges sprung to life!

As you can see though, the light is uneven - thats because I'm currently missing 6 of the 10 bulb holders. I ordered 12 so I had some spares from a UK dealer. Unfortunately, they turned out to be the wrong size as you can see here (original on the right).

After some searching online, I found I need 5/8" T10 holders (obviously...) so I've placed another order in with RockAuto who are lifesavers as usual. I'll put the car back together as I want to actually get out and drive it this weekend, but the dash will have to come out again next week when they arrive. I've also ordered LED warm lights for the holders.
With the bulbs I had, I did some investigating to see what the bulbs illuminate and thought I'd share it here so that hopefully it may help others. So from the circuit board as you look at it attached to the clocks:

1 - Clock & Temp gauge
2 - Tacho (upper)
3 - Speedo (upper)
4 - Fuel & Volt gauges
5 - Speedo (lower)
6 - Turn signal (left)
7 - ???
8 - Parking brake
9 - Tacho lower
10 - Turn signal (right)
With the exception of 3 and 7, all the lights seem to work. I'll try and do a bit of digging this morning and find why that is, but at the moment Im at a loss as to potential causes. The bulb and holders obviously work, the circuit board is brand new. As a result of 7 not working, I'm not sure what it's for - perhaps either a warning light or a backlight for the odometer.
With that side of the project on hold, I once again got my good friend Josh round to sort the suspension.

Unfortunately we temporarily abandoned the fronts as we needed a few small bits. I took the break in play to order some new droplinks from RockAuto once again.

The rears however were fair game, so out came the old air suspension. Definitely seen better days but quite cool to see - I'm not sure its original as the air-lines attached to it definitely seemed to be retro-fitted.

It was dark by the time we were done so at the moment I don't have an 'after' pic of the rears. They have made an incredible difference to the stiffness of the back end though! We are hopefully taking another run at the fronts this afternoon, so watch this space...
To pick up where we left off then...
Armed with daylight and the right tools, we set about the fronts. Here is the new Hotchkis 2" lowering spring beside the old OE spring:

Along with the OE shock against the new Koni Classic:

The shocks were an absolute doddle, straight in.

The springs were a little tricker - especially on the drivers side where the CV boot didnt want to seperate so we dropped the back end of the lower arm instead.

With daylight starting to dwindle and in 30+ degree heat, we were hoping for a break of good luck. So with that the sky emptied itself for a good hour and we got soaked. Some stunning skies following the thunderstorm though!

Unfortunately that now meant working into the night which we were trying to avoid, having already pulled a couple of 0400 shifts on the car in the last fortnight. We knew the suspension was going to take some banging and sensitive persuasions with the pry-bar to get the spring perched properly. But we managed it.

So finally after scraping what felt like our entire bodies on all the sharp bits of metal we could find, as well as dealing with every drunken neighbour coming home from a night out and telling us how badass the car is, we got the car back on its wheels. 3am potato-phone pic.

I got up early next morning to put the dash back in, wire the clocks up and put the rest of the interior in. I got a message from my friend Steve who fancied a drive so we headed out to Wakefield for a local meet (I've nicked these photos off social media)

The car has been completely transformed, although gradually the drive got worse and I developed a worrying knocking. Turns out that putting a car back together in the early hours isn't always a great idea and we'd forgotten to tighten the wheel nuts back up on the rear! Thankfully an obviously easy fix and caught before any damage was done.
The car got a lot of attention at the meet. As ever I use the brutal honesty of children as a barometer and two kids said they preferred mine to Steves 1st gen, so thats good enough for me!

The rake looking good as the springs start to settle too.

So they all lived happily ever after right? Job well done?
Nope!

The drivers-side leaf-springs appears to have collapsed so back to RockAuto it is...
I've also made the low-end misfire worse, I'm assuming by piggy-backing the live from the dizzy so I'll definitely need to reroute that wire. She sings like a bird above 2500rpm though!
Armed with daylight and the right tools, we set about the fronts. Here is the new Hotchkis 2" lowering spring beside the old OE spring:
Along with the OE shock against the new Koni Classic:
The shocks were an absolute doddle, straight in.
The springs were a little tricker - especially on the drivers side where the CV boot didnt want to seperate so we dropped the back end of the lower arm instead.
With daylight starting to dwindle and in 30+ degree heat, we were hoping for a break of good luck. So with that the sky emptied itself for a good hour and we got soaked. Some stunning skies following the thunderstorm though!
Unfortunately that now meant working into the night which we were trying to avoid, having already pulled a couple of 0400 shifts on the car in the last fortnight. We knew the suspension was going to take some banging and sensitive persuasions with the pry-bar to get the spring perched properly. But we managed it.
So finally after scraping what felt like our entire bodies on all the sharp bits of metal we could find, as well as dealing with every drunken neighbour coming home from a night out and telling us how badass the car is, we got the car back on its wheels. 3am potato-phone pic.
I got up early next morning to put the dash back in, wire the clocks up and put the rest of the interior in. I got a message from my friend Steve who fancied a drive so we headed out to Wakefield for a local meet (I've nicked these photos off social media)
The car has been completely transformed, although gradually the drive got worse and I developed a worrying knocking. Turns out that putting a car back together in the early hours isn't always a great idea and we'd forgotten to tighten the wheel nuts back up on the rear! Thankfully an obviously easy fix and caught before any damage was done.
The car got a lot of attention at the meet. As ever I use the brutal honesty of children as a barometer and two kids said they preferred mine to Steves 1st gen, so thats good enough for me!
The rake looking good as the springs start to settle too.
So they all lived happily ever after right? Job well done?
Nope!
The drivers-side leaf-springs appears to have collapsed so back to RockAuto it is...
I've also made the low-end misfire worse, I'm assuming by piggy-backing the live from the dizzy so I'll definitely need to reroute that wire. She sings like a bird above 2500rpm though!
Edited by Rogue86 on Sunday 9th August 20:29
Managed to get out for my first night-drive last night, just a quick shake-down to see how the headlights fared - they are absolutely brilliant. I actually received two-pairs of these by accident when I ordered them, so as a thanks to Steve who has helped me out a lot with this car I've donated them to his 67. Really would recommend these for anyone who has 7" lamps (Jeep, Defender etc).

Also wanted to make a mention of these guys who were incredibly helpful both when Royal Mail lost their delivery and again when they turned out to be the wrong size - they even found where I could get them from online.

With all the warm LEDs in, the dash lights up nicely. Hopefully as the earlier dark nights draw in I'll be able to go out and get some 'proper' photos without really upsetting all the neighbours!


Here's a clear shot of the new clock surround - the steering wheel and lack of stereo are both letting the interior down at the moment so will need to sort those.

Also managed to fit in having the spoiler mounted and painted. It's not the best job to be honest and it needs to go back for some remedial work as the fibreglass appears to have warped, but it passes the 6ft test.


Absolutely in love with how the rear looks now.

Also wanted to make a mention of these guys who were incredibly helpful both when Royal Mail lost their delivery and again when they turned out to be the wrong size - they even found where I could get them from online.
With all the warm LEDs in, the dash lights up nicely. Hopefully as the earlier dark nights draw in I'll be able to go out and get some 'proper' photos without really upsetting all the neighbours!
Here's a clear shot of the new clock surround - the steering wheel and lack of stereo are both letting the interior down at the moment so will need to sort those.
Also managed to fit in having the spoiler mounted and painted. It's not the best job to be honest and it needs to go back for some remedial work as the fibreglass appears to have warped, but it passes the 6ft test.
Absolutely in love with how the rear looks now.
Mr lestat said:
Looks great. Is there meant to be a piece in the middle of the steering wheel covering the nut.
Thanks. Yeah there's a small trim-piece but the tabs are warped so it doesn't sit flush. I could glue it in place but it would make my life difficult when I come to replace the wheel. Rogue86 said:
Mr lestat said:
Looks great. Is there meant to be a piece in the middle of the steering wheel covering the nut.
Thanks. Yeah there's a small trim-piece but the tabs are warped so it doesn't sit flush. I could glue it in place but it would make my life difficult when I come to replace the wheel. Heres one for the brave.... https://www.ebay.co.uk/itm/Barnfind-Camaro-new-win...
toby-w8jtf said:
Heres one for the brave.... https://www.ebay.co.uk/itm/Barnfind-Camaro-new-win...
Insane price, not even a Z28.toby-w8jtf said:
Heres one for the brave.... https://www.ebay.co.uk/itm/Barnfind-Camaro-new-win...
How much would you have to throw at that to make it a driving vehicle which looked ok ish ? £20k ?
Mr lestat said:
How much would you have to throw at that to make it a driving vehicle which looked ok ish ?
£20k ?
Looking at the state of a lot of those parts I suspect you could easily double that by the time you've got the parts over here.£20k ?
Even at the 3k he actually wants I wouldnt fancy taking that on, there's not even anything I'd seriously consider taking as spares. I hope someone does though!
toby-w8jtf said:
Heres one for the brave.... https://www.ebay.co.uk/itm/Barnfind-Camaro-new-win...
Blimey, that ad's a stream of consciousness isn't it 
While I've popped in, just wanted to say how much I enjoy this thread. OP's IG page (linked a while back I think) has some stunning photos on as well

seiben said:
While I've popped in, just wanted to say how much I enjoy this thread. OP's IG page (linked a while back I think) has some stunning photos on as well
Really appreciate that, thank you! (IG is @rogue86photog) - unfortunately it's becoming more of a car and dog page as the commercial photography I get paid the most for these days is boring! I still try and tease the odd bit of aviation through though and the automotive stuff is picking back up.Bit more cosmetic work this week...
The last set of images didn't quite tell the full story of the spoiler. I bought it used from a chap in Lincoln, whose dad used to keep old Camaros - it was fibreglass and missing some quite considerable chunks along the leading edges. When I first visited the bodyshop, I wasn't able to leave the car with them so it was repaired on the assumption that it was straight, which we found wasn't the case when it was fitted. It seems to have warped (probably through years of storage) and on the drivers side there was a gap big enough to get your finger in!

It's not quite visible in the pic, but the last owner had also painted the car with the spoiler on, so when it was swapped there was an inch-thick line of old paint now visible. We talked through some options with the bodyshop and decided that the best way to move forward was to address the boot-lid itself rather than undo the work on the spoiler - largely in part as the bootlid had some imperfections and itself wasn't level. Not damaged, just clearly made on a Friday afternoon!


The finished article, now with improved panel gaps and a spoiler that actually sits evenly.


It was funny to hear the bodyshop had been inundated with visitors since I dropped the car off too. Word had got out about the car around all the other units locally and guys were apparently turning up in droves to have their photo taken next to it!
In between rain showers yesterday I though I'd try and bodge that cover onto the steering wheel. I wasn't able to simply screw it on as a poster suggested above as unfortunately the recess the cover sits in is too large. I found that a rattle-can lid fits perfectly around the steel hardware surrounding the nut on the steering wheel, so I managed to get some self-tappers into that through into the cover. Then I padded the lid out with some number-plate sticky foam pads and covered it in black fabric tape.
The result actually isn't bad, there's no movement in it and it's easy to remove for when I come to upgrade. It does mean there is a small gap behind it but unless you know these cars intimately you probably wouldn't know it shouldn't sit like that.

I've ordered an inline metal fuel filter and some new hoses so that will probably be the next job, along with taking the wheels off and checking to see what the noise coming from the brakes is.
The last set of images didn't quite tell the full story of the spoiler. I bought it used from a chap in Lincoln, whose dad used to keep old Camaros - it was fibreglass and missing some quite considerable chunks along the leading edges. When I first visited the bodyshop, I wasn't able to leave the car with them so it was repaired on the assumption that it was straight, which we found wasn't the case when it was fitted. It seems to have warped (probably through years of storage) and on the drivers side there was a gap big enough to get your finger in!
It's not quite visible in the pic, but the last owner had also painted the car with the spoiler on, so when it was swapped there was an inch-thick line of old paint now visible. We talked through some options with the bodyshop and decided that the best way to move forward was to address the boot-lid itself rather than undo the work on the spoiler - largely in part as the bootlid had some imperfections and itself wasn't level. Not damaged, just clearly made on a Friday afternoon!
The finished article, now with improved panel gaps and a spoiler that actually sits evenly.
It was funny to hear the bodyshop had been inundated with visitors since I dropped the car off too. Word had got out about the car around all the other units locally and guys were apparently turning up in droves to have their photo taken next to it!
In between rain showers yesterday I though I'd try and bodge that cover onto the steering wheel. I wasn't able to simply screw it on as a poster suggested above as unfortunately the recess the cover sits in is too large. I found that a rattle-can lid fits perfectly around the steel hardware surrounding the nut on the steering wheel, so I managed to get some self-tappers into that through into the cover. Then I padded the lid out with some number-plate sticky foam pads and covered it in black fabric tape.
The result actually isn't bad, there's no movement in it and it's easy to remove for when I come to upgrade. It does mean there is a small gap behind it but unless you know these cars intimately you probably wouldn't know it shouldn't sit like that.
I've ordered an inline metal fuel filter and some new hoses so that will probably be the next job, along with taking the wheels off and checking to see what the noise coming from the brakes is.
Cheers guys - got to agree, the little touches like that make all the difference to the inside of the car - it's a much nicer place to be already.
I decided to tackle a few smaller jobs last night - rerouting the fuel lines over the engine (and replacing the lines themselves) along with the filter as they've all seen better days and I'm a little worried about the thing catching fire! I also needed a coolant overflow bottle as at the moment it simple sprays all over the lower arm.
So I grabbed an old Tequila bottle I had laying around in the kitchen, stole the brackets from the metal fuel filter and got it mounted.

The state of the old filter which had been resting on the valve cover - for some reason the previous owner routed the lines under the coolant hoses so that they were sat on the engine itself. You can see a scorch mark where they touched and the filter itself breaking down.

The new routing - metal filter just above the pump, new lines from the pump to the carb and to the tank, with the lines now above the coolant hoses. Much safer!

I decided to tackle a few smaller jobs last night - rerouting the fuel lines over the engine (and replacing the lines themselves) along with the filter as they've all seen better days and I'm a little worried about the thing catching fire! I also needed a coolant overflow bottle as at the moment it simple sprays all over the lower arm.
So I grabbed an old Tequila bottle I had laying around in the kitchen, stole the brackets from the metal fuel filter and got it mounted.
The state of the old filter which had been resting on the valve cover - for some reason the previous owner routed the lines under the coolant hoses so that they were sat on the engine itself. You can see a scorch mark where they touched and the filter itself breaking down.
The new routing - metal filter just above the pump, new lines from the pump to the carb and to the tank, with the lines now above the coolant hoses. Much safer!
Gassing Station | Readers' Cars | Top of Page | What's New | My Stuff