MK1 Mazda 3 MPS - Family Connection
Discussion


Bright Halo said:
That’s a lovely touch with the number plate. I don’t normally like personalised plates but what you have done there is something very special.
Nice one
The R3 Recaro’s are a very nice place to spend your driving time.
Thank you. Trying to keep it semi tasteful, while indulging my creative side.Nice one
The R3 Recaro’s are a very nice place to spend your driving time.
Fingers crossed I can get the seats in by the end of next week. Although I am off to Iceland with the wife.....but I want to put seats in more.....don't tell her that mind.
Sooooooo we have seats fitted into the MPS! After a very wet walk today I got to pick her up.
Here are a few photos that include some modifications to the brackets so the seats could fit snuggly on.


The brackets were chopped at the back, L-brackets welded on and some tubing for bracing was welded on to maintain strength. Then cleaned up and painted.
Apparently the poor tech had to use a hand drill and drill out about 50 rivets from the stock runners so everything was flush.
Thankfully no other modification was needed with the brackets. Now bolted to the seat they were popped into the car et voila..


Massive thanks to Z Cars Evolution in Ashford for the custom work and for continuing to look after the MPS.
They look fantastic. Drivers side seems to have picked up a bit of a water stain, nothing that a quick clean won't sort.
First impressions of the new seats are very positive. You sit a good bit lower than the stock seats, are held in place extremely well and on my little drive around town feel very comfortable to boot. Hopefully when we get some better weather (read dry and sunny) I can put the car through a bit more of an enthusiastic drive and really feel the benefit.
While I was away on holiday my retrimmed steering wheel from Reggie's Wheels was delivered. Awaiting some free time to pop that in.

Unsure about the molded grips at 9 and 3 but they do feel very ergonomic. Flat bottom and thicker than the stock wheel I am hoping it also improves the driving experience. It is also doggeh approved.
Further parts are also coming, on one of the owners groups someone was selling a brand new Mishimoto turbo intake pipe (TIP) and Mishimoto silicone coolant hose set for almost half price. These should be winging over to me shortly.
Here are a few photos that include some modifications to the brackets so the seats could fit snuggly on.
The brackets were chopped at the back, L-brackets welded on and some tubing for bracing was welded on to maintain strength. Then cleaned up and painted.
Apparently the poor tech had to use a hand drill and drill out about 50 rivets from the stock runners so everything was flush.
Thankfully no other modification was needed with the brackets. Now bolted to the seat they were popped into the car et voila..
Massive thanks to Z Cars Evolution in Ashford for the custom work and for continuing to look after the MPS.
They look fantastic. Drivers side seems to have picked up a bit of a water stain, nothing that a quick clean won't sort.
First impressions of the new seats are very positive. You sit a good bit lower than the stock seats, are held in place extremely well and on my little drive around town feel very comfortable to boot. Hopefully when we get some better weather (read dry and sunny) I can put the car through a bit more of an enthusiastic drive and really feel the benefit.
While I was away on holiday my retrimmed steering wheel from Reggie's Wheels was delivered. Awaiting some free time to pop that in.
Unsure about the molded grips at 9 and 3 but they do feel very ergonomic. Flat bottom and thicker than the stock wheel I am hoping it also improves the driving experience. It is also doggeh approved.
Further parts are also coming, on one of the owners groups someone was selling a brand new Mishimoto turbo intake pipe (TIP) and Mishimoto silicone coolant hose set for almost half price. These should be winging over to me shortly.
Edited by Jester86 on Thursday 5th March 15:42
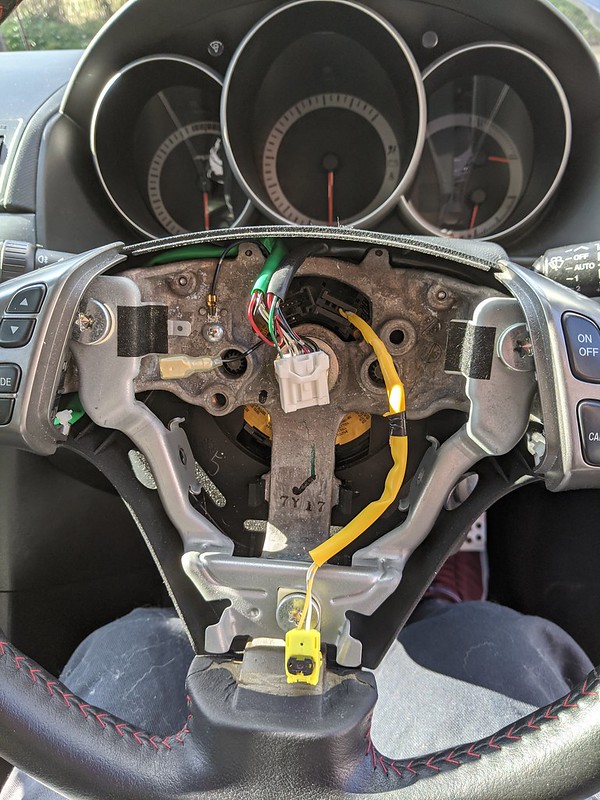
Inbetween night shifts I got my new steering wheel on. Maxiumum points for not setting the airbag off and blowing myself up.
If anyone is doing this, safety disclaimer. Make sure you disconnect the battery for at least 10 minutes before removing the airbag.
The good thing is I did this on my Clio 182 Trophy so I had half an idea about how it should go.
Took the most time to remove the airbag.
The retrimmed and standard wheel side by side. You can see the difference in thickess and shape.
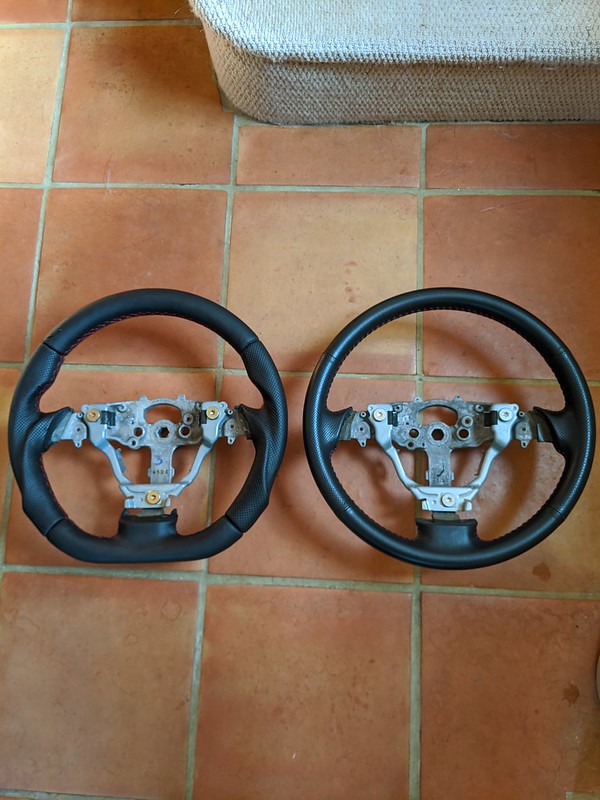
Finally all back together again.

Impressions are good, much more pleasent to handle and even the moulded grips are growing on me.
If anyone is doing this, safety disclaimer. Make sure you disconnect the battery for at least 10 minutes before removing the airbag.
The good thing is I did this on my Clio 182 Trophy so I had half an idea about how it should go.
Took the most time to remove the airbag.
The retrimmed and standard wheel side by side. You can see the difference in thickess and shape.
Finally all back together again.
Impressions are good, much more pleasent to handle and even the moulded grips are growing on me.
April 1st Update!
So I received my second hand but still in original packaging Mishimoto goodies. An absolute steal as they were about half price.


So Turbo Inlet Pipe (TIP) on the left and a set of coolant hoses on the right. Stock TIP is really restrictive and the OEM coolant hoses will split and fail with age. So when I can eventually fit or get them fitted, they should make quite a nice little upgrade.
A more interesting or divisive upgrade is the following. As a result of fitting the recaros (superb seat and I love them) I have encountered a bit of an annoying issue due to how much lower they are then stock seats.
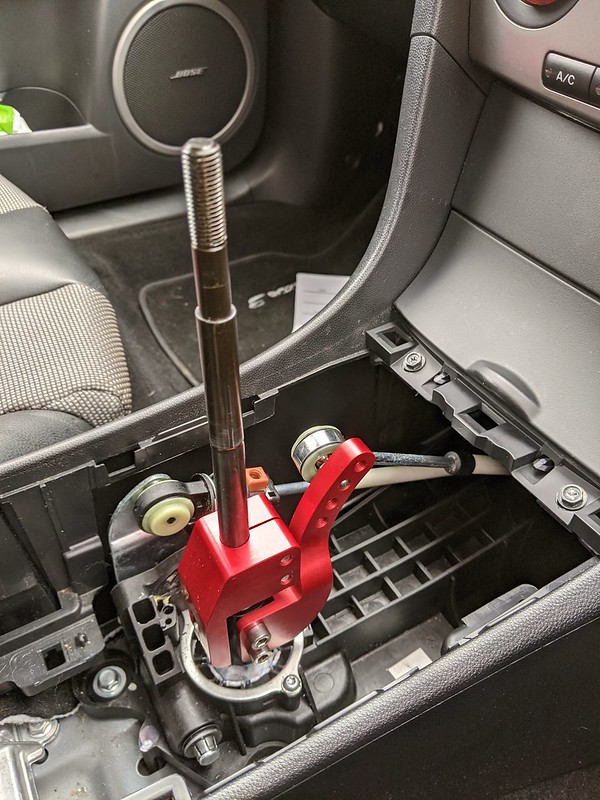
When trying to change gear, quite often I find my elbow/forearm rubbing the arm rest and limiting my range of movement. This problem is exacerbated when we go for a "spirited" drive and you really want to gel with the car. So in looking around I ordered a 90mm gear stick extension for Tegiwa and that arrived and got fitted today as its barely a 30 second screw off/screw on job.
Stock:

Extension:

Yes not the most aesthetically pleasing item, and if it stays I am sure I will paint/powder coat it to make it compliment the lightbulb gear knob!
Now I will do some testing, being a key worker I am still going to work so will be able to see how it fares in the coming weeks. Seeing how the shifts feel, if they feel longer, if I need to replace the bushes under the gearstick and if I need to get a short shift plate.
On a more mundane note I have ordered Oil/Filter/Cabin Filter/Magnetic Sump Plug for this years servicing. Should be arriving whenever ECP dispatch and deliver.
Stay safe everyone!
So I received my second hand but still in original packaging Mishimoto goodies. An absolute steal as they were about half price.
So Turbo Inlet Pipe (TIP) on the left and a set of coolant hoses on the right. Stock TIP is really restrictive and the OEM coolant hoses will split and fail with age. So when I can eventually fit or get them fitted, they should make quite a nice little upgrade.
A more interesting or divisive upgrade is the following. As a result of fitting the recaros (superb seat and I love them) I have encountered a bit of an annoying issue due to how much lower they are then stock seats.
When trying to change gear, quite often I find my elbow/forearm rubbing the arm rest and limiting my range of movement. This problem is exacerbated when we go for a "spirited" drive and you really want to gel with the car. So in looking around I ordered a 90mm gear stick extension for Tegiwa and that arrived and got fitted today as its barely a 30 second screw off/screw on job.
Stock:
Extension:
Yes not the most aesthetically pleasing item, and if it stays I am sure I will paint/powder coat it to make it compliment the lightbulb gear knob!
Now I will do some testing, being a key worker I am still going to work so will be able to see how it fares in the coming weeks. Seeing how the shifts feel, if they feel longer, if I need to replace the bushes under the gearstick and if I need to get a short shift plate.
On a more mundane note I have ordered Oil/Filter/Cabin Filter/Magnetic Sump Plug for this years servicing. Should be arriving whenever ECP dispatch and deliver.
Stay safe everyone!
DaveyBoyWonder said:
I really like that and some nice OEM mods.
TheDukeGTi said:
Enjoying the improvements on this, great work!
Thanks guys I appreciate it.So some initial feedback. The throw is a touch longer but I am definitely no longer having arm rest issues, so I will give it a few drives to see.
I have a feeling the Corksport shifter which can be made up to 0.6" higher than stock along with being a 35% quicker shift may be a great purchase. Being height adjustable I could probably find the sweet spot for height with this and the shift extension together.
Just need to get the man maths/Corona maths sorted!
A few minor updates that were done on my days off!
Car was cleaned, I spaced it out to make the most of the days off. MPS on day 1. MX5 and wifes car on day 2!
On my very last day off I received part of my ECP order, thankfully this did include the cabin filter which i'll do next time around.
Job 1:
Felted and organised my glovebox lid. If you remember it was a little bit of a mess following the EONON headunit install.

Job 2:
Decided to get a new Bosch S4 battery as I wasn't sure how old the battery was on the car. Preventative more than anything else.

The state of some battery box was quite something. Loads of debris was in the bottom and some surface corrosion on a few bits and pieces which will be penned in for tidying up in the future. The debris is there because the MPS actually funnels some air to the battery to keep it cool.

Not sure about the battery I removed. Don't think I have heard of Torque X. It didn't look the most solid of batteries that's for sure.

So with those few jobs done, just a little bit of feedback about the gear stick extension. It is ok, I am not mad about how the throw feels, definitely much easier to use from an arm point of view. Leaning towards buying the Corksport Shifter assembly beause this has adjustable height and the ability to act as a short shift also. Along with some solid shifter bushings to take away some of the......wobble.....in the action.
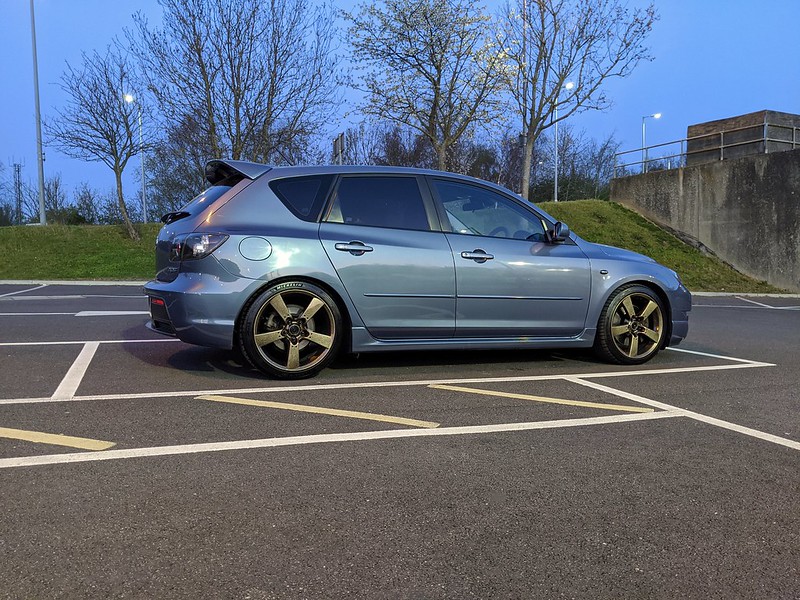
I will leave you with an early morning shot of the MPS after I parked up at work. Looking quite dashing if I do say so myself.
Car was cleaned, I spaced it out to make the most of the days off. MPS on day 1. MX5 and wifes car on day 2!
On my very last day off I received part of my ECP order, thankfully this did include the cabin filter which i'll do next time around.
Job 1:
Felted and organised my glovebox lid. If you remember it was a little bit of a mess following the EONON headunit install.
Job 2:
Decided to get a new Bosch S4 battery as I wasn't sure how old the battery was on the car. Preventative more than anything else.
The state of some battery box was quite something. Loads of debris was in the bottom and some surface corrosion on a few bits and pieces which will be penned in for tidying up in the future. The debris is there because the MPS actually funnels some air to the battery to keep it cool.
Not sure about the battery I removed. Don't think I have heard of Torque X. It didn't look the most solid of batteries that's for sure.
So with those few jobs done, just a little bit of feedback about the gear stick extension. It is ok, I am not mad about how the throw feels, definitely much easier to use from an arm point of view. Leaning towards buying the Corksport Shifter assembly beause this has adjustable height and the ability to act as a short shift also. Along with some solid shifter bushings to take away some of the......wobble.....in the action.
I will leave you with an early morning shot of the MPS after I parked up at work. Looking quite dashing if I do say so myself.
Jester86 said:
On my very last day off I received part of my ECP order, thankfully this did include the cabin filter which i'll do next time around.
I hope the 3 MPS is as easy to do on the 6 MPS! It takes all of about 60 seconds, half of which is emptying the glovebox. 
Genuinely the very easiest I've ever done. Which slightly makes up for the nightmare that is the Mondeo.
Next MPS COVID update.
First is the boring one. I changed the cabin filter! If the internet is to have you believe its a pig of a job that takes hours. From getting tools out to sitting down with a cup of tea was about 45 minutes. Not bad considering it was the first time i've taken off the fuseboard!
Below is said fuseboard, in addition to those plugs there are couple more on the top side that need to be removed.

After removing it and the bracket it sits on you are left with this. You can just about make out where the cabin filter goes above the right hand green plug. There is a plastic cover that you take off to get to them.


It was obvious the filter had been done before as 1 of the 4 securing screws had been lost! Unfortunately I didn't have one to replace it with but the other 3 secure it well enough. Obligatory dirty filter photo, it was still well worth changing.

First is the boring one. I changed the cabin filter! If the internet is to have you believe its a pig of a job that takes hours. From getting tools out to sitting down with a cup of tea was about 45 minutes. Not bad considering it was the first time i've taken off the fuseboard!
Below is said fuseboard, in addition to those plugs there are couple more on the top side that need to be removed.
After removing it and the bracket it sits on you are left with this. You can just about make out where the cabin filter goes above the right hand green plug. There is a plastic cover that you take off to get to them.
It was obvious the filter had been done before as 1 of the 4 securing screws had been lost! Unfortunately I didn't have one to replace it with but the other 3 secure it well enough. Obligatory dirty filter photo, it was still well worth changing.
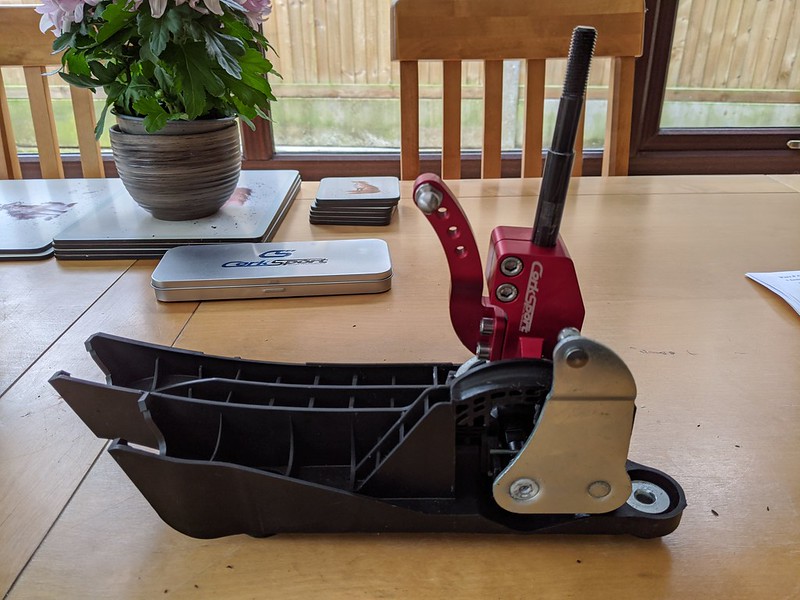
The more interesting job of the weekend however was this.

Corksport adjustable shifter and solid shifter bushings. Handily it came with full A4 instructions which made fitting really quite straightforward.
First up was removing the requisite interior panels to get to the shifter and remove it from the car.


Then being a good husband I used the kitchen table to dismantle the OEM assembly.

Then reassembled.
It was at this point I removed the OEM rubber bushes from the bottom of the assembly.
They got fitted when the housing was back in the car. Bolted it all back up and here is the last photo before I put the interior back in and COBB lightbulb back on.
I adjusted the shift height to maximum, which is half an inch higher than stock and feels great. While I originally had the short shift set to maximum, after a quick row through the gears I felt it was too short and didn't want to miss any gears. So dropped it down a peg which was the ideal compromise.
Took her for a short run to Sainsbury's for the essentials and the difference is remarkable. Really would love to go for a longer run to properly warm the gearbox up. But that will have to wait until I go back to work on Monday.
That should round out the major changes for the interior. Seats, steering wheel and gearshift, All the tactile things that I interact with have been changed. She truely feels so different to when I originally brought her home, and I do wish I could take the old man out so he could experience what I have done.
Going forward, I think the changes will possibly lean towards performance/reliability/servicing upgrades. The lure of a fruitier exhaust is proving to be very tempting and I would like to liberate some noise from her. While keeping her perfectly dallyable.
Corksport adjustable shifter and solid shifter bushings. Handily it came with full A4 instructions which made fitting really quite straightforward.
First up was removing the requisite interior panels to get to the shifter and remove it from the car.
Then being a good husband I used the kitchen table to dismantle the OEM assembly.
Then reassembled.
It was at this point I removed the OEM rubber bushes from the bottom of the assembly.
They got fitted when the housing was back in the car. Bolted it all back up and here is the last photo before I put the interior back in and COBB lightbulb back on.
I adjusted the shift height to maximum, which is half an inch higher than stock and feels great. While I originally had the short shift set to maximum, after a quick row through the gears I felt it was too short and didn't want to miss any gears. So dropped it down a peg which was the ideal compromise.
Took her for a short run to Sainsbury's for the essentials and the difference is remarkable. Really would love to go for a longer run to properly warm the gearbox up. But that will have to wait until I go back to work on Monday.
That should round out the major changes for the interior. Seats, steering wheel and gearshift, All the tactile things that I interact with have been changed. She truely feels so different to when I originally brought her home, and I do wish I could take the old man out so he could experience what I have done.
Going forward, I think the changes will possibly lean towards performance/reliability/servicing upgrades. The lure of a fruitier exhaust is proving to be very tempting and I would like to liberate some noise from her. While keeping her perfectly dallyable.
I have stockpiled some parts ready to carry out a few bits over the next few days.
First up was replacing the stock turbo inlet pipe (TIP for short). I had put this job off for a little bit as I was waiting for a Corksport silicon Bypass Valve hose to do at the same time. These are known to fail over time, so it made sense to do it at the same time I was overhauling the induction.
It was a relatively easy job to get the old TIP out, but I was held up by one of the 3 bolts that hold the battery tray in. It had decided to crumble away until it was no longer a bolt. Use of a hex socket and a bit of hammering got it to bite then came off.
Folded the battery tray out of the way to get to the turbo side of the TIP, which didn't seem to be clamped down by the jubilee very well. Removed a couple of couplings and a nut or two and whipped it out.
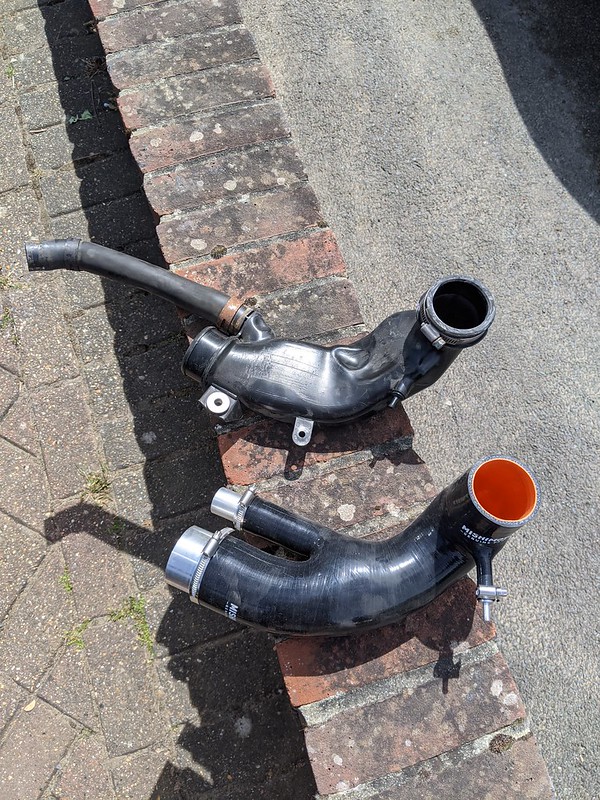
Side by side with the OEM TIP with the OEM Bypass Valve hose still attached. It isn't the best angle but the OEM TIP is extremely pancaked compared to the Mishimoto TIP.

Now snuggly into place.

Short ram intake attached to TIP and below it you can see the new Bypass Valve Hose (it would have been easier if I didn't insist on having black under the bonnet!)

Battery box back into place. Another chance to see the new BPV hose with CS on it oooooh aaaaaah.
Not the most attractive of engine bays I know. But it is a lot more spacious than if the stock airbox was in!
Took the car for a quick shakedown drive to make sure I hadn't got any boost leaks and a drop in power. All seems ok, in fact she felt so much smoother on boost and quieter. Almost to the extent I thought I had broken the car, before glancing down at the speedo and realising she was still rapid. So the turbo spools much better, it must have been quite a restriction in the stock TIP.
Tomorrow, uprated front discs and pads to go on.
First up was replacing the stock turbo inlet pipe (TIP for short). I had put this job off for a little bit as I was waiting for a Corksport silicon Bypass Valve hose to do at the same time. These are known to fail over time, so it made sense to do it at the same time I was overhauling the induction.
It was a relatively easy job to get the old TIP out, but I was held up by one of the 3 bolts that hold the battery tray in. It had decided to crumble away until it was no longer a bolt. Use of a hex socket and a bit of hammering got it to bite then came off.
Folded the battery tray out of the way to get to the turbo side of the TIP, which didn't seem to be clamped down by the jubilee very well. Removed a couple of couplings and a nut or two and whipped it out.
Side by side with the OEM TIP with the OEM Bypass Valve hose still attached. It isn't the best angle but the OEM TIP is extremely pancaked compared to the Mishimoto TIP.
Now snuggly into place.
Short ram intake attached to TIP and below it you can see the new Bypass Valve Hose (it would have been easier if I didn't insist on having black under the bonnet!)
Battery box back into place. Another chance to see the new BPV hose with CS on it oooooh aaaaaah.
Not the most attractive of engine bays I know. But it is a lot more spacious than if the stock airbox was in!
Took the car for a quick shakedown drive to make sure I hadn't got any boost leaks and a drop in power. All seems ok, in fact she felt so much smoother on boost and quieter. Almost to the extent I thought I had broken the car, before glancing down at the speedo and realising she was still rapid. So the turbo spools much better, it must have been quite a restriction in the stock TIP.
Tomorrow, uprated front discs and pads to go on.
Onto this mornings fun. Front discs and pads.
I have never changed discs and pads before so this was going to be a bit of an adventure for me. Did plenty of reading and felt semi confident that I could do it without completely messing it up.
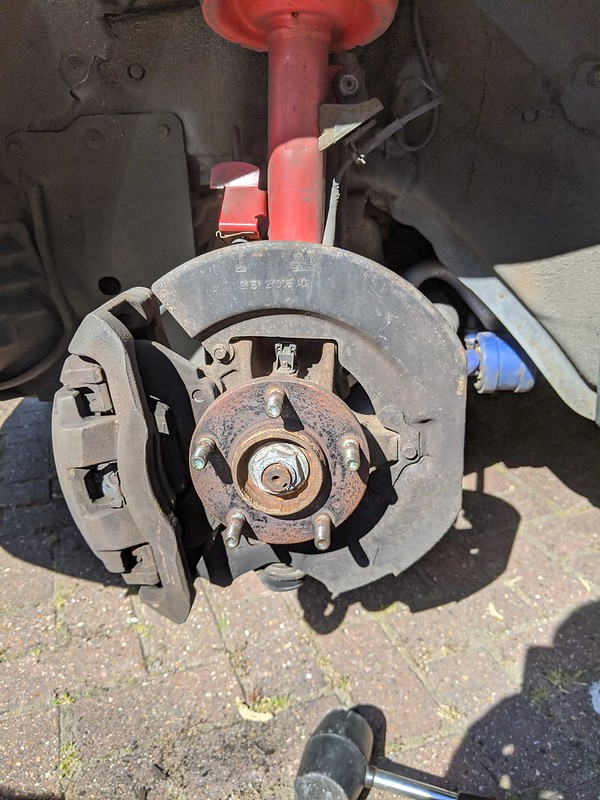
The pads that came out had plenty of life left on them, but the discs were quite lipped.
For anyone wondering the discs are DBA T3 4000 with Hawk HPS 5.0 pads.
What we started with:

Disc removed:
New pads/discs installed:

Back on the floor:

It took me about 3 hours all in. I had a few issues as it was my first time, I put it down to inexperience. Had to work out how to get the new pads into the piston which required some pliers and slight bending to allow them to pop in nicely. But the main one was faffing around pushing the piston all the way back which I had to do a few times before I managed to get it back to the default position. I think I could probably do it in 1.5 hours/2 hours now.
Took the car out for a little shakedown, and within a few metres I could hear something ticking. Fearing the worst I took a punt that I had bent the dust shield and it was clipping the disc. Luckily I was right and the following drive showed that I think I have done a decent job.
The wheels didn't fall off. Which is a good start.
Probably take her out this evening and bed the pads in a little bit when the roads are a little quieter.
I have never changed discs and pads before so this was going to be a bit of an adventure for me. Did plenty of reading and felt semi confident that I could do it without completely messing it up.
The pads that came out had plenty of life left on them, but the discs were quite lipped.
For anyone wondering the discs are DBA T3 4000 with Hawk HPS 5.0 pads.
What we started with:
Disc removed:
New pads/discs installed:
Back on the floor:
It took me about 3 hours all in. I had a few issues as it was my first time, I put it down to inexperience. Had to work out how to get the new pads into the piston which required some pliers and slight bending to allow them to pop in nicely. But the main one was faffing around pushing the piston all the way back which I had to do a few times before I managed to get it back to the default position. I think I could probably do it in 1.5 hours/2 hours now.
Took the car out for a little shakedown, and within a few metres I could hear something ticking. Fearing the worst I took a punt that I had bent the dust shield and it was clipping the disc. Luckily I was right and the following drive showed that I think I have done a decent job.
The wheels didn't fall off. Which is a good start.
Probably take her out this evening and bed the pads in a little bit when the roads are a little quieter.
So remember about 6 months ago when I replaced the headunit with a nice shiny new EONON unit. Well I have replaced it......with the brand new EONON.
It was shiny and I couldn't resist.
Obligatory box shot.

I now have 3 reverse cameras and 2 OBD dongles. I mean who doesn't like free add ons!
This is the old unit.

Which was a huge improvement over stock, but here is the brand spanking new one.

It is quite a decent step up, running Android 10 and being a full 9" screen. Fit is much better and has less scratchy plastics. I must admit I am getting quite good at stripping out and replacing the units now. Losing the CD changer is not an issue and made fitting it so much easier with more space for cramming cables.
But the big bit of news is that the car is booked in for a full respray, original Cosmic Blue with all external plastics going to gloss black, fitting of a TRC splitter. June 22nd for 2 weeks, she should look amazing at the end of it. Really quite excited.
I have decided on the full respray because the car at the very minimum needed a full front end respray. Spider cracking of paint on the roof was leading to rust spots, poor crash repair on the offside passenger arch was really starting to bother me, rear bumper has some paint chunks out of it and lacquer peel underneath an old badge that was removed on near side front wing. I could have spent ages chasing all the defects, whereas if I go for a full respray I then have a completely blank canvas with everything done to a high standard.
It was shiny and I couldn't resist.
Obligatory box shot.
I now have 3 reverse cameras and 2 OBD dongles. I mean who doesn't like free add ons!
This is the old unit.
Which was a huge improvement over stock, but here is the brand spanking new one.
It is quite a decent step up, running Android 10 and being a full 9" screen. Fit is much better and has less scratchy plastics. I must admit I am getting quite good at stripping out and replacing the units now. Losing the CD changer is not an issue and made fitting it so much easier with more space for cramming cables.
But the big bit of news is that the car is booked in for a full respray, original Cosmic Blue with all external plastics going to gloss black, fitting of a TRC splitter. June 22nd for 2 weeks, she should look amazing at the end of it. Really quite excited.
I have decided on the full respray because the car at the very minimum needed a full front end respray. Spider cracking of paint on the roof was leading to rust spots, poor crash repair on the offside passenger arch was really starting to bother me, rear bumper has some paint chunks out of it and lacquer peel underneath an old badge that was removed on near side front wing. I could have spent ages chasing all the defects, whereas if I go for a full respray I then have a completely blank canvas with everything done to a high standard.
Thought I would post a little update before the car goes in for paint on Monday. Just a little record of some of the damage/issues with the paint at the moment.
Drivers side wing clip has started to break, hence the panel gap! Quite a common issue.

Lacquer missing from where a badge has been removed on the wing.

One of the rust spots on the roof.

More roof rust spots.

Rear bumper paint damage.

Just a small example of the bonnet!

Probably the worst example is a poor repair in the past has lead to some cracking in the drivers side rear wing. The rear bumper to this wing paint match is also quite easy to see in direct sunlight.

With the respray I have had a few other requests of the painters. Windscreen will be coming out to make sure the roof can be done properly along with side skirts, bumpers and spoiler.
1. All the black plastics around the car to go to a gloss black.
2. All the badges will be going gloss black also.
3. Fit TRC front splitter (which is yet to arrive) along with Maxton side sill extensions.
I cannot wait to see it all come together and see the final product. Also have her booked in with my detailer for ceramic protection roughly a month after the respray.
Drivers side wing clip has started to break, hence the panel gap! Quite a common issue.
Lacquer missing from where a badge has been removed on the wing.
One of the rust spots on the roof.
More roof rust spots.
Rear bumper paint damage.
Just a small example of the bonnet!
Probably the worst example is a poor repair in the past has lead to some cracking in the drivers side rear wing. The rear bumper to this wing paint match is also quite easy to see in direct sunlight.
With the respray I have had a few other requests of the painters. Windscreen will be coming out to make sure the roof can be done properly along with side skirts, bumpers and spoiler.
1. All the black plastics around the car to go to a gloss black.
2. All the badges will be going gloss black also.
3. Fit TRC front splitter (which is yet to arrive) along with Maxton side sill extensions.
I cannot wait to see it all come together and see the final product. Also have her booked in with my detailer for ceramic protection roughly a month after the respray.
Jester86 said:
Thought I would post a little update before the car goes in for paint on Monday. Just a little record of some of the damage/issues with the paint at the moment.
Drivers side wing clip has started to break, hence the panel gap! Quite a common issue.
I've seen some pretty horrific "fixes" for that! Drivers side wing clip has started to break, hence the panel gap! Quite a common issue.
Jester86 said:
<Snip rusty pictures>
I've not been impressed with Mazda's rust protection, it's almost Mercedes bad. Seems they _all_ suffer, got to be getting pretty tricky to find a decent one that doesn't have some serious corrosion now. Particularly as (certainly on the 6) there are some really bad rust traps designed in and the bodykit on the MPS makes it even worse. Particularly I think it'll be hard to find a decent 6 MPS soon (saw some horrific bubbly examples when trying to price up how much to sell if for) as the youngest of those will be 12 years old now. I had to do a bunch of work to ours and if hadn't sold it pretty sure would be needing to do more this year!
Gassing Station | Readers' Cars | Top of Page | What's New | My Stuff