Hold(en) my beer - Monaro, Ute and Commodore content
Discussion


Have you looked at something like this?
https://www.zoro.co.uk/shop/automotive/cylinder-he...
I’ve seen them use something similar on POWERNATION vids on YouTube.
https://www.zoro.co.uk/shop/automotive/cylinder-he...
I’ve seen them use something similar on POWERNATION vids on YouTube.
Huskyman said:
Have you looked at something like this?
https://www.zoro.co.uk/shop/automotive/cylinder-he...
I’ve seen them use something similar on POWERNATION vids on YouTube.
I've had the bores honed already, so something like that isn't needed now, that sort of thing feels like it'd take actual skill /experience to do well so I left that to Knight Engine Services https://www.zoro.co.uk/shop/automotive/cylinder-he...
I’ve seen them use something similar on POWERNATION vids on YouTube.

Appreciate the suggestion though. I've seen some bits that look like a hook shape that you just run around the inside corner of a cylinder just to take the corner off, it's very much just taking off the knife edge really from what I understand.
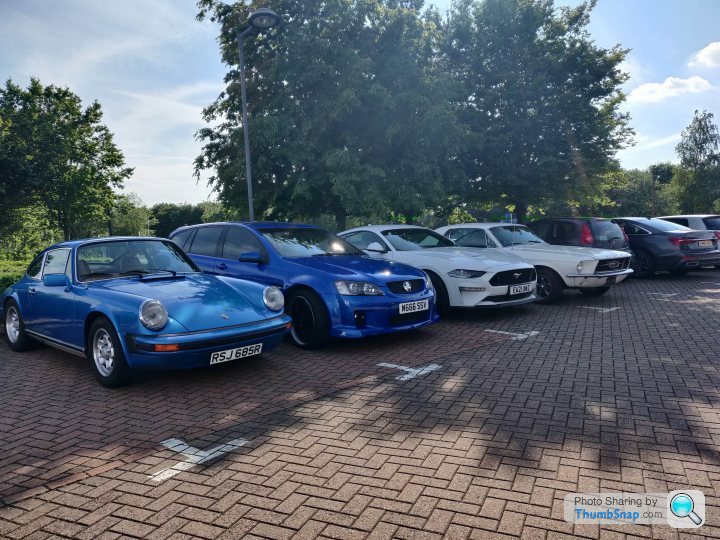
A little mini car show at work on Friday
So I set about softening the corner of the liners with a hand file, hard to really give many good photos of this, but here are some anyway...
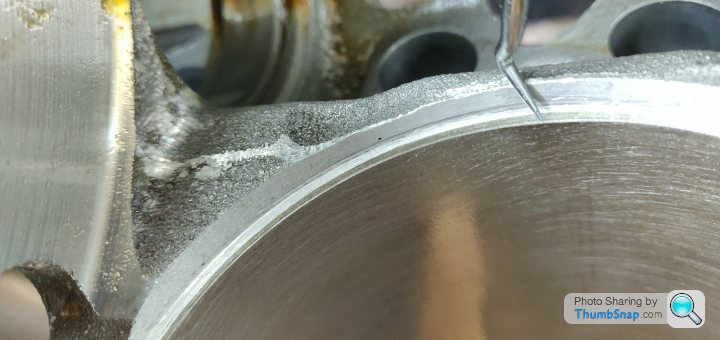
Attempting to illustrate with the stabber there the smoothed corner compared to original to the left.
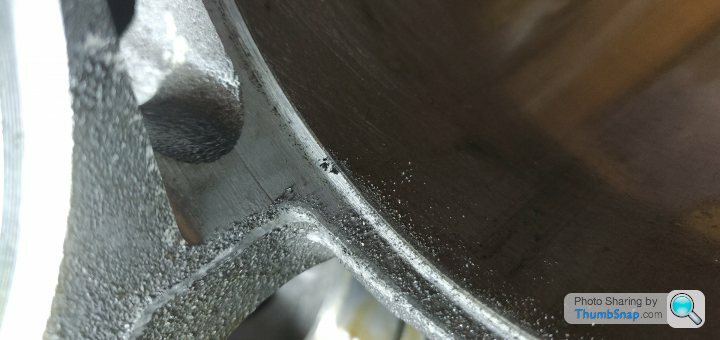
Can see why even if I could get access, this was never going to happen with the bottom end still in place with all that metal going everywhere.
This took a while, there wasn't much to it beyond getting on with it, so I did...
Next up was the matter of the snug lifters. So first off I went at the bores with a rifle brush jobber and WD40. I then cleaned up the lifters themselves with WD40 and a microfibre cloth, and tried each pair in their relevant bores.
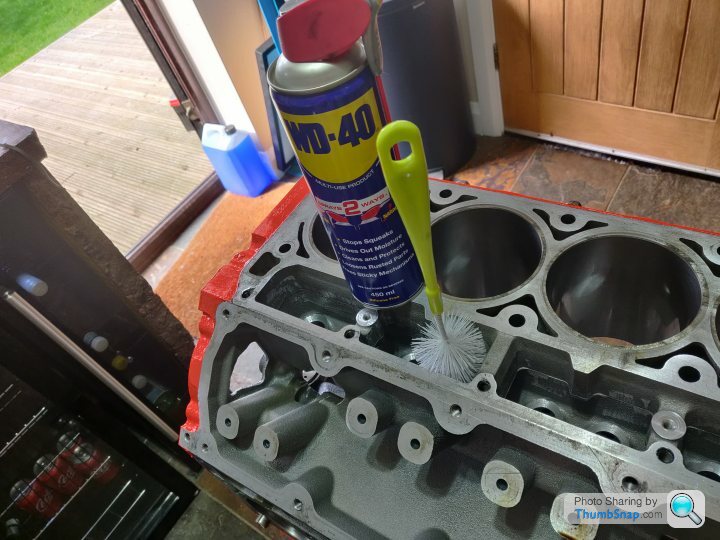
All of them were fine fortunately, I was more considered with how I put them in (i.e. keeping them square and level) and this helped them 'feel' better going in, and then basically I let them drop to the bottom, and then used my fingers from underneath to basically tickle them up and down to verify they dropped freely under their own weight, which they all did.
I'm happy that that is free enough movement wise, so am good to carry on again putting the thing back together.
First up was an appropriately redneck task though, that of taking the engine into the garden and hosing it off
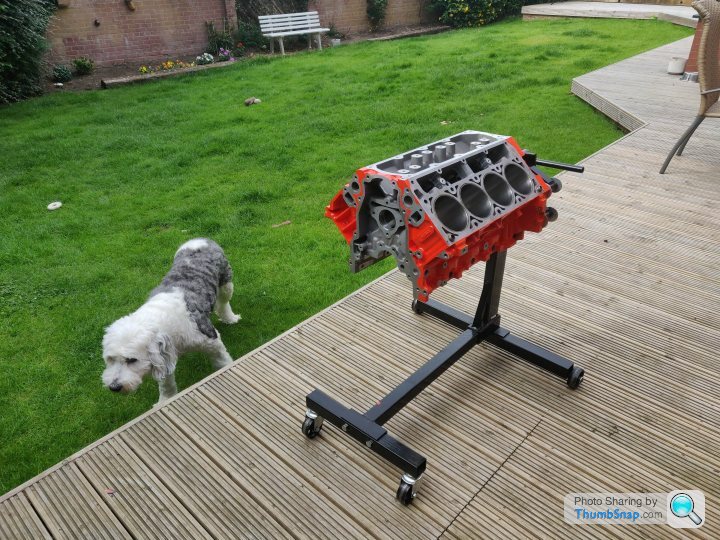
Wanted to do this to make sure those little dusty bits of metal were definitely gone. I'd been wiping them off but felt that a good blasting would help. The liners are iron so as soon as I was done I dried them and coated them in WD40, don't need them rusting, then got on with drying it off using the air compressor.
A good day's progress, I'm happy that I can put it all back together again now and have done what I can to try and ensure the stroker will survive for a little while at least
So I set about softening the corner of the liners with a hand file, hard to really give many good photos of this, but here are some anyway...
Attempting to illustrate with the stabber there the smoothed corner compared to original to the left.
Can see why even if I could get access, this was never going to happen with the bottom end still in place with all that metal going everywhere.
This took a while, there wasn't much to it beyond getting on with it, so I did...
Next up was the matter of the snug lifters. So first off I went at the bores with a rifle brush jobber and WD40. I then cleaned up the lifters themselves with WD40 and a microfibre cloth, and tried each pair in their relevant bores.
All of them were fine fortunately, I was more considered with how I put them in (i.e. keeping them square and level) and this helped them 'feel' better going in, and then basically I let them drop to the bottom, and then used my fingers from underneath to basically tickle them up and down to verify they dropped freely under their own weight, which they all did.
I'm happy that that is free enough movement wise, so am good to carry on again putting the thing back together.
First up was an appropriately redneck task though, that of taking the engine into the garden and hosing it off
Wanted to do this to make sure those little dusty bits of metal were definitely gone. I'd been wiping them off but felt that a good blasting would help. The liners are iron so as soon as I was done I dried them and coated them in WD40, don't need them rusting, then got on with drying it off using the air compressor.
A good day's progress, I'm happy that I can put it all back together again now and have done what I can to try and ensure the stroker will survive for a little while at least
Finally got the motivation to get back on with things! The clutch and pushrods are likely to arrive on the 15th which is great news. As such, really time to start putting this all back together...
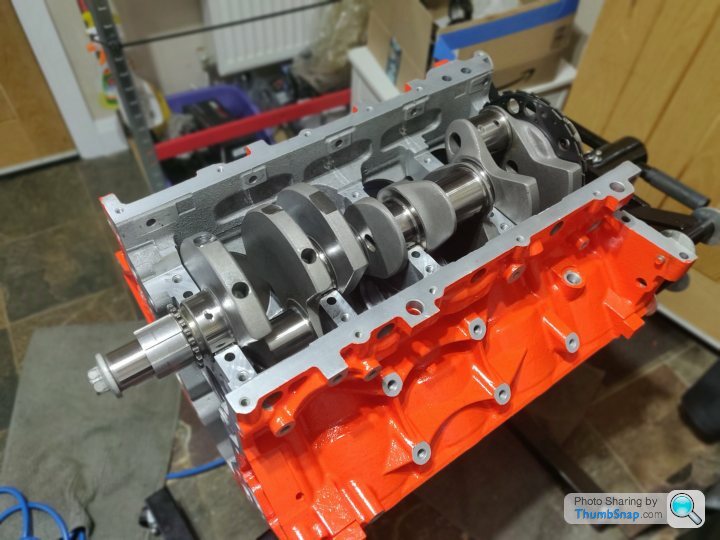
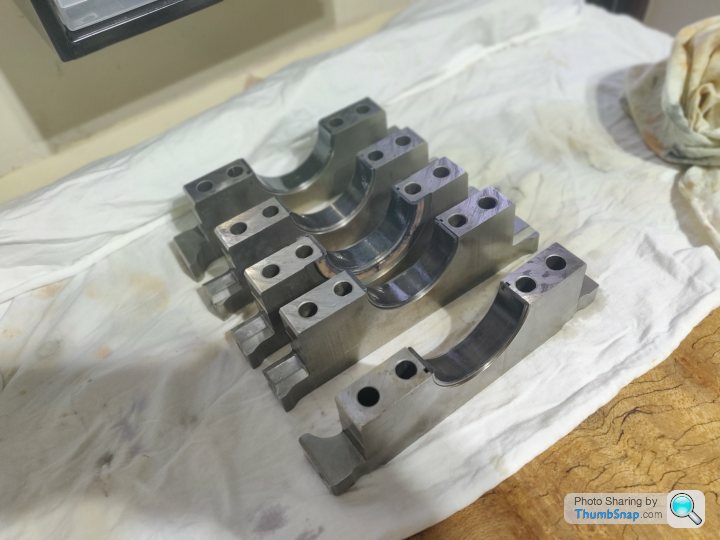
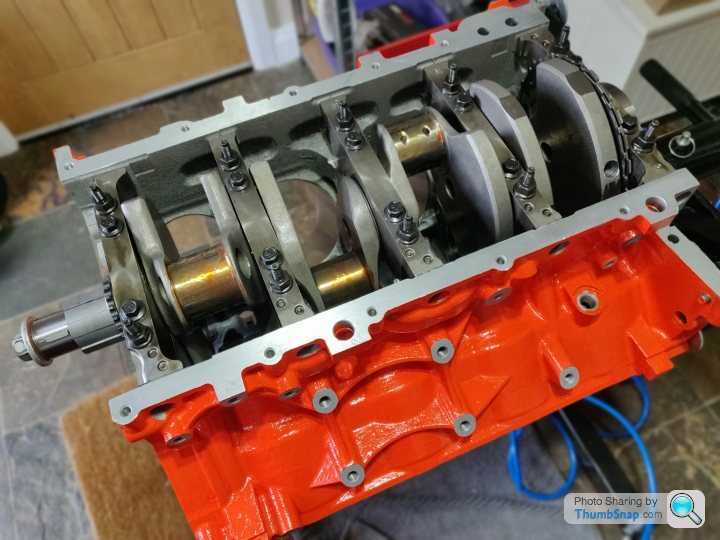
So first up, parts cleaning again. The block is nice and clean, have been air blasting it and the bores are nicely WD40'd, so this evening have hosed off, air blasted dry, wiped down, air blasted again and then WD40'd the crank, cam, main caps and cam retainer plate.
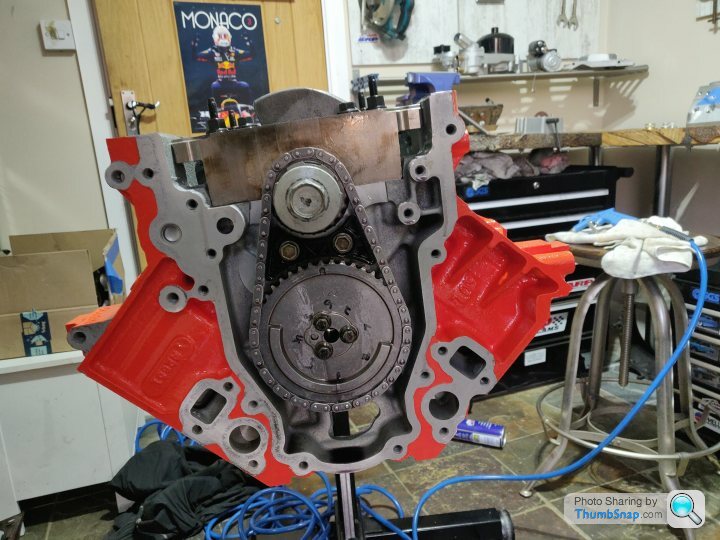
The various bolts and such are just soaking in oil, as is the timing chain and cam gear.
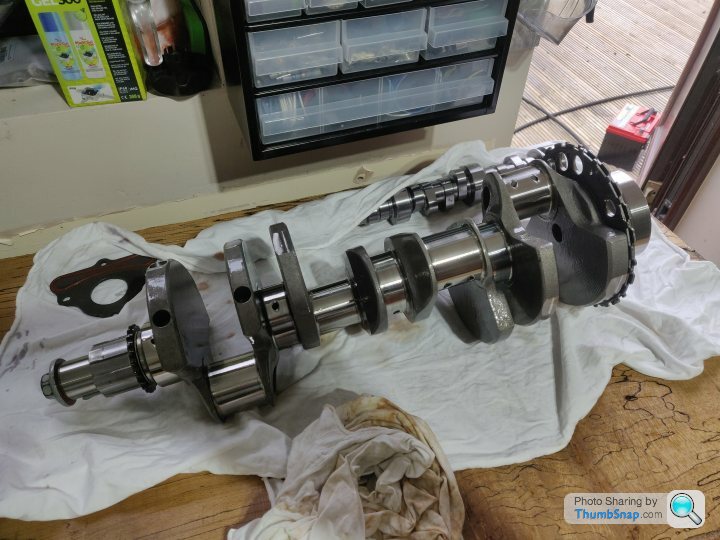
Going to pop the crank in place and lube / finger tighten the main cap bolts now and probably call it an evening after that, but typically once I start I'm chipping away for hours without realising! The key is to set myself a small task to do in order to get started without it seeming too daunting how much needs to be done
So first up, parts cleaning again. The block is nice and clean, have been air blasting it and the bores are nicely WD40'd, so this evening have hosed off, air blasted dry, wiped down, air blasted again and then WD40'd the crank, cam, main caps and cam retainer plate.
The various bolts and such are just soaking in oil, as is the timing chain and cam gear.
Going to pop the crank in place and lube / finger tighten the main cap bolts now and probably call it an evening after that, but typically once I start I'm chipping away for hours without realising! The key is to set myself a small task to do in order to get started without it seeming too daunting how much needs to be done
fastbikes76 said:
Still here 
Loving the updates and still following keenly!
Keep em coming
Cheers Loving the updates and still following keenly!
Keep em coming
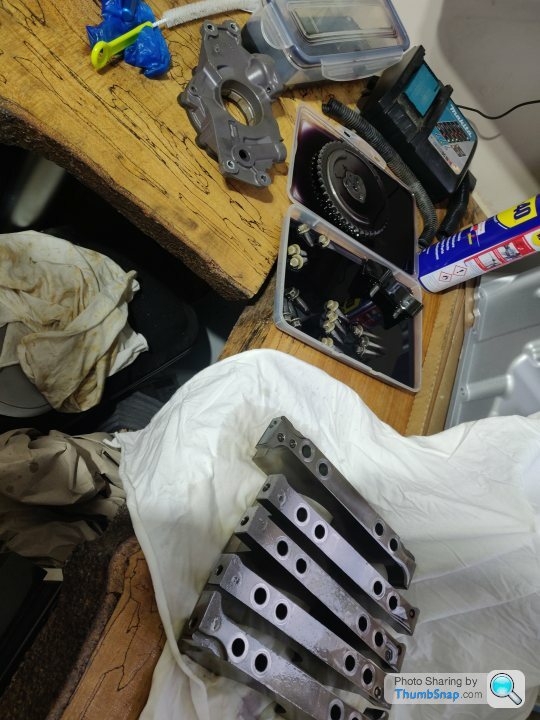
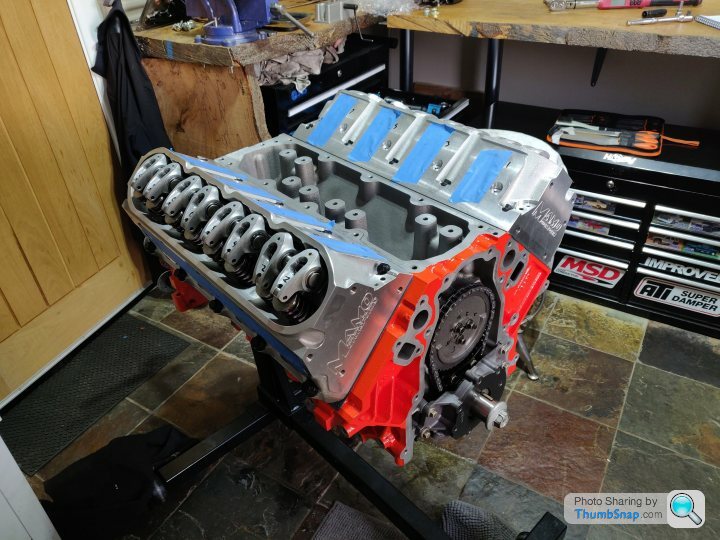
Crank is sat in place and finger snugged the main cap bolts down
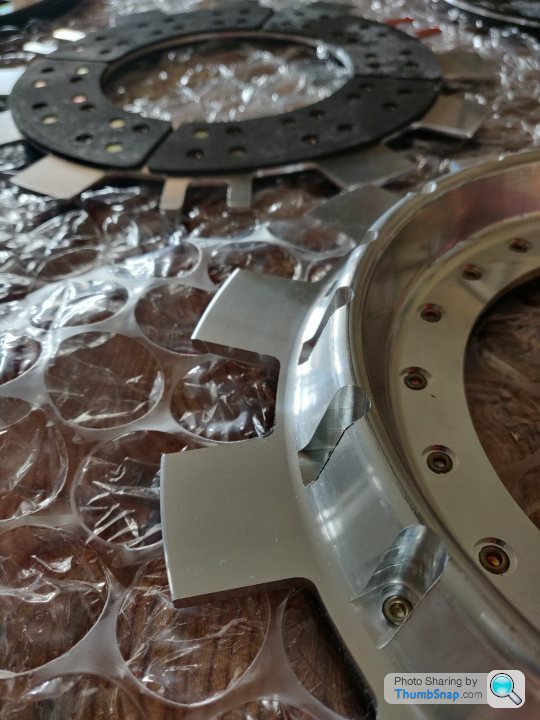
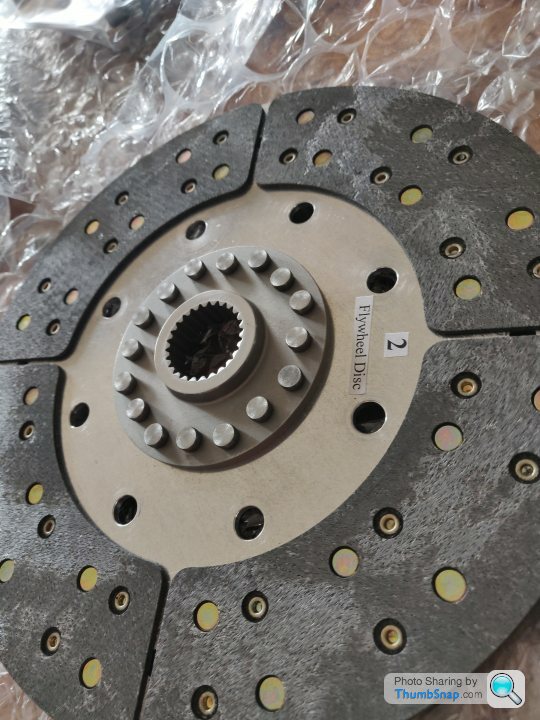
Some clean engine bits porn for y'all
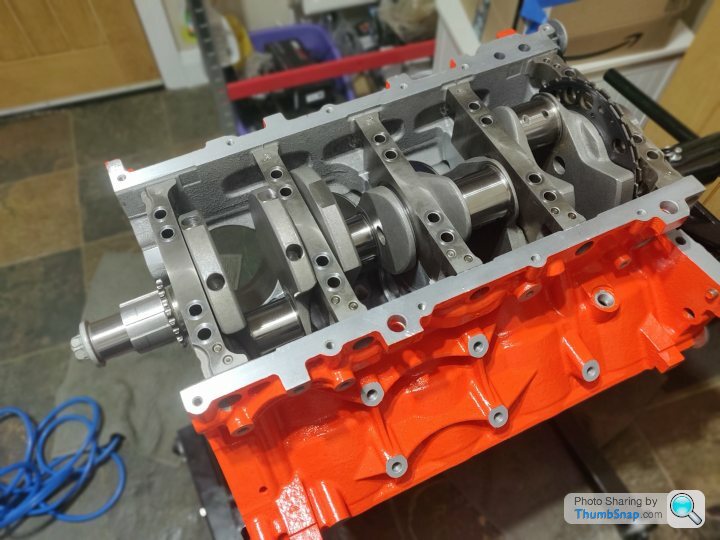
In my haste (I was making very good time) I used the ARP bolt lube on the first few main caps, then remembered they're OEM bolts whose torque specs are with a drop of oil as a lube, not the ARP stuff.
So had to take them back out, clean them up, then ran some cleaned up old bolts through the threads in and out a couple of times cleaning them up inbetween to get the ARP lube off.
Could then use the recommended drop of mineral oil on the threads and under the collar and snug them back in.
Will recruit the good lady to help me tomorrow evening, I torque, she writes the values down, you don't have to note them by any means, but I want to have a record of it all and I'd like to put my feet up for a bit now this evening.
More updates to come tomorrow, I'll get the mains torqued and being optimistic we'll feasibly the pistons in tomorrow evening


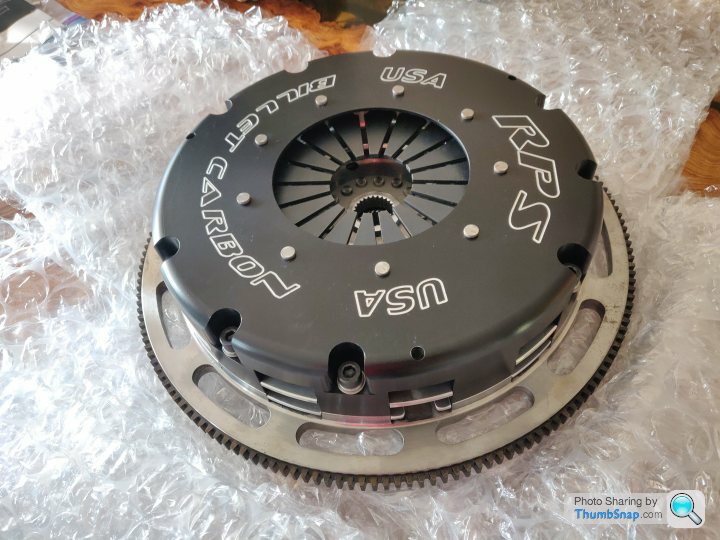
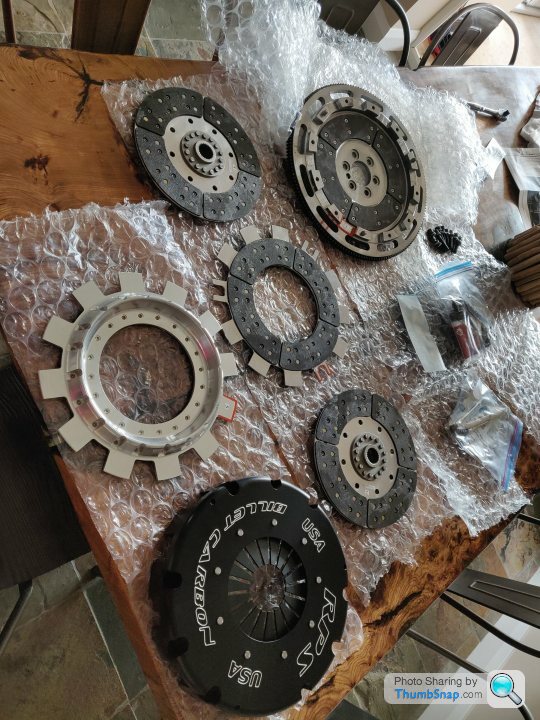
Nice. That.s a proper clutch.
I have a twin plate, cant remember which, but it had a yellow pressure plate. On the odd occasion feels strange as one plate bites before the other, but only occasionally.
Fired up last night, all good except for the pas pump has decided to pee from the back of it now. Top end is nice and quiet again.
Ill update my thread when later.
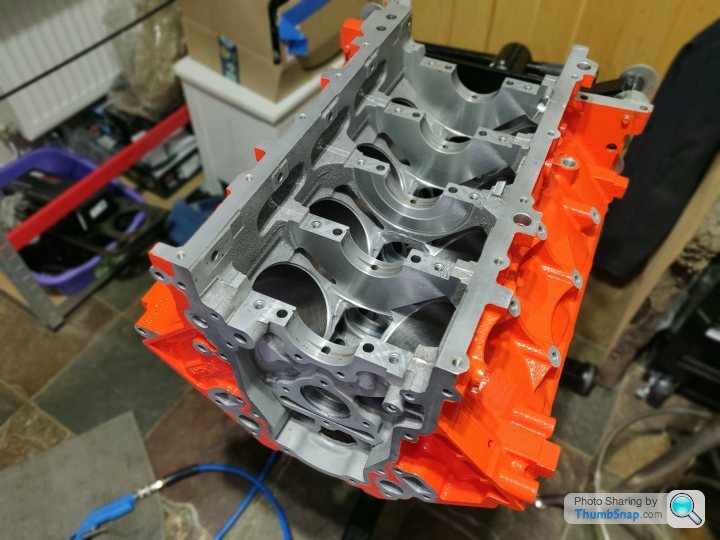
More progress last night...
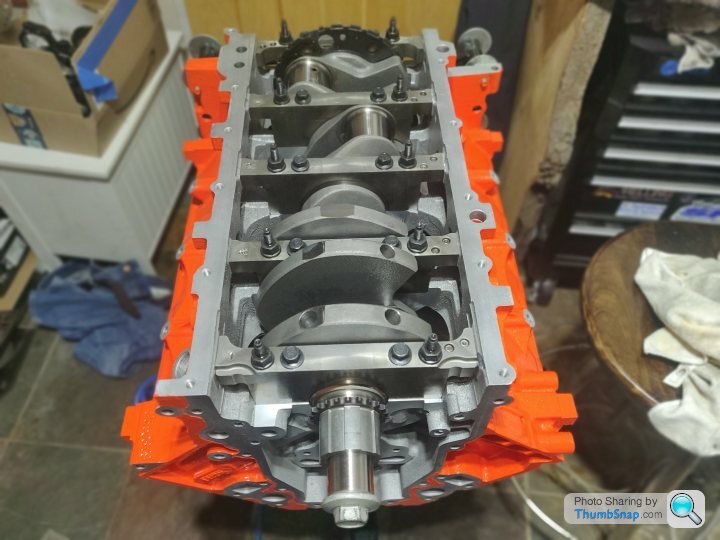
I didn't take as many pictures as all this stuff has been done earlier in the thread already, but cleaned, air blasted and assembly lubed the crank journals
Cleaned, air blasted and oiled the bores
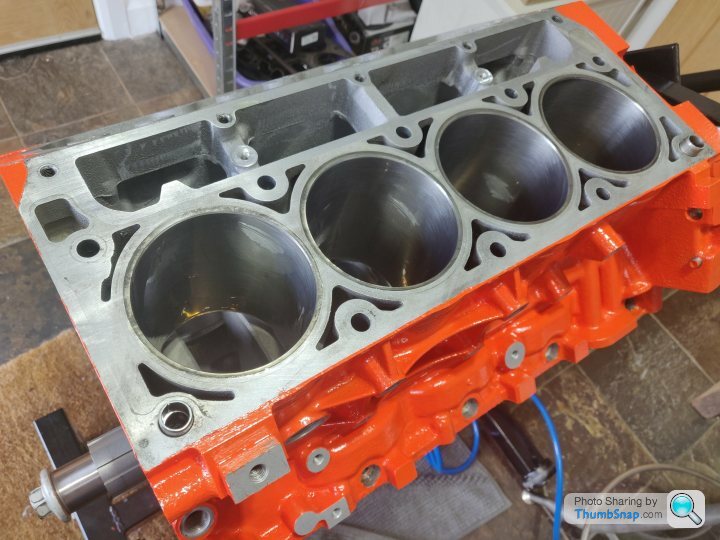
Chucked some pistons in, torqued to 68lbft
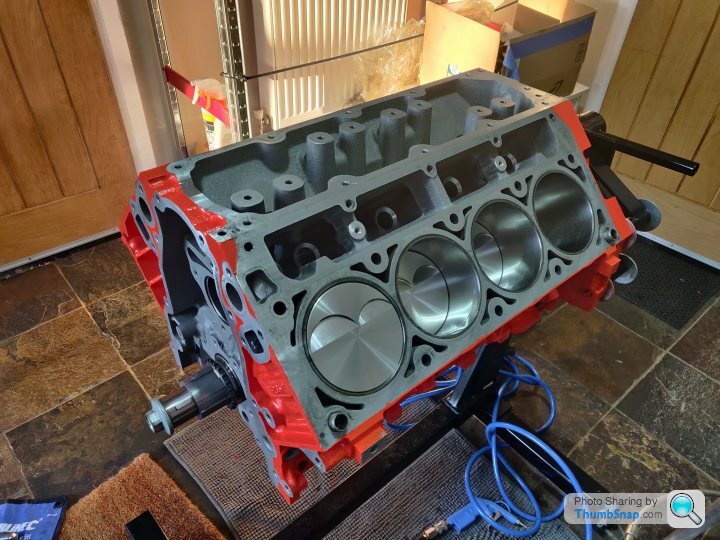
Lubed up and slipped in the cam
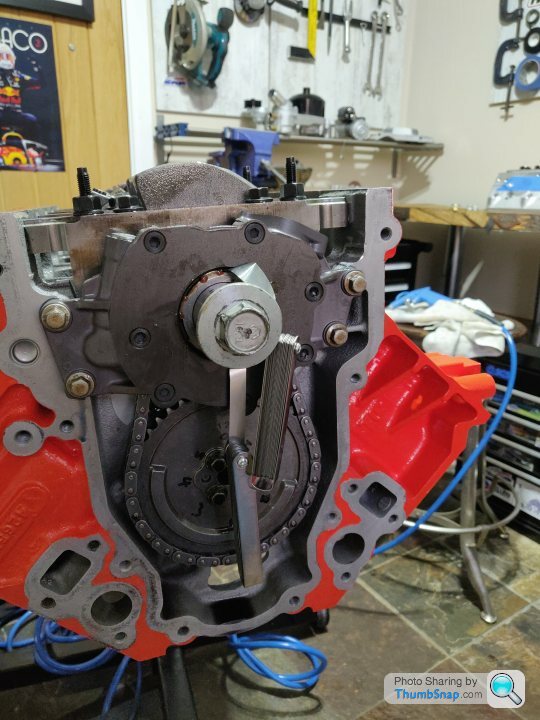
Stuck the chain damper (remembered it this time!), chain and cam gear on
Installed the oil pump with the clearance as needed
Slung the lifters in and put heads on with one bolt just to 'seal up' the inside (from above anyway).

It was tempting to torque the heads down, launch the pushrods in and bolt the rockers on just for the sake of it, but I need some high temp thread sealant for the intake rocker bolts (some protrude into the intake runner) and the main cap side bolts, so until that arrives I can't really 'finish' it anyway, so thought I'd stop there.
Still rotates over nice and freely so I'm pleased it's back together well enough.
I didn't take as many pictures as all this stuff has been done earlier in the thread already, but cleaned, air blasted and assembly lubed the crank journals
Cleaned, air blasted and oiled the bores
Chucked some pistons in, torqued to 68lbft
Lubed up and slipped in the cam
Stuck the chain damper (remembered it this time!), chain and cam gear on
Installed the oil pump with the clearance as needed
Slung the lifters in and put heads on with one bolt just to 'seal up' the inside (from above anyway).
It was tempting to torque the heads down, launch the pushrods in and bolt the rockers on just for the sake of it, but I need some high temp thread sealant for the intake rocker bolts (some protrude into the intake runner) and the main cap side bolts, so until that arrives I can't really 'finish' it anyway, so thought I'd stop there.
Still rotates over nice and freely so I'm pleased it's back together well enough.
So the high temp thread sealant finally arrived.
Last night I torqued the heads down, although getting 25, then 50, then 80lb ft 20 times meant I was a bit warm by the end of it so opted to leave it there
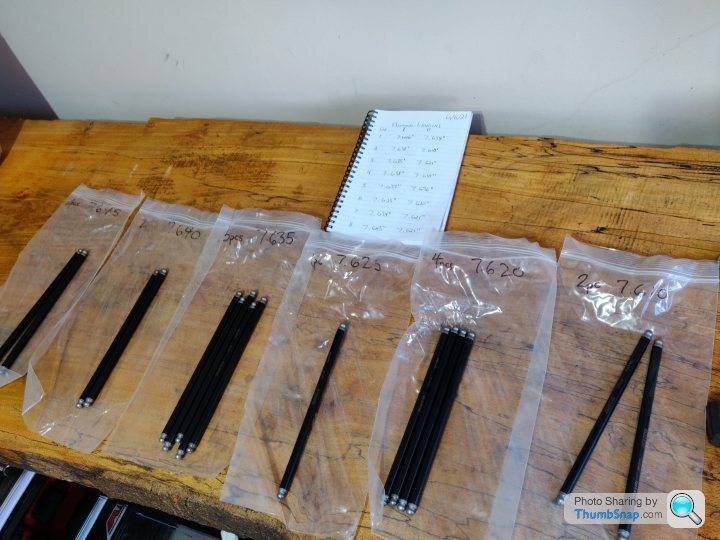
The pushrods conveniently have their length printed on them and were all bagged in their size groups so that's nice. Plan is to drop those in tonight, I'll give them a measure just to be sure and also there's bound to be some tolerance variation so will try to match the longer / shorter ones of a size with the best match of length I needed originally.
Then it's torqueing the rockers down, double checking the preload as I do that and it's sort of technically most of an engine, mechanically speaking anyway
Booked an MOT for the wagon, I thought Friday the 13th seemed as good a time as any
Also topped up the tyres on it and the Ute, ensured the Ute battery was topped up and now have the Monaro battery on trickle charge. The Ute is still SORN which seems a little lazy of me, the life of a child with too many toys...
I've also sent a deposit on a used 3 inch 'header back' Difilipo exhaust for the Wagon (finally!). It has some nice sports cats in it, and the mufflers have been repacked, it'll need some tinkering to make it meet up to the aftermarket 'tri-y' headers that came on the wagon, so will probably take the whole lot over to an exhaust place and see if they can make something up to bridge the gap. Could presumably weigh in my existing cats for some scrap value too
Last night I torqued the heads down, although getting 25, then 50, then 80lb ft 20 times meant I was a bit warm by the end of it so opted to leave it there
The pushrods conveniently have their length printed on them and were all bagged in their size groups so that's nice. Plan is to drop those in tonight, I'll give them a measure just to be sure and also there's bound to be some tolerance variation so will try to match the longer / shorter ones of a size with the best match of length I needed originally.
Then it's torqueing the rockers down, double checking the preload as I do that and it's sort of technically most of an engine, mechanically speaking anyway
Booked an MOT for the wagon, I thought Friday the 13th seemed as good a time as any
Also topped up the tyres on it and the Ute, ensured the Ute battery was topped up and now have the Monaro battery on trickle charge. The Ute is still SORN which seems a little lazy of me, the life of a child with too many toys...
I've also sent a deposit on a used 3 inch 'header back' Difilipo exhaust for the Wagon (finally!). It has some nice sports cats in it, and the mufflers have been repacked, it'll need some tinkering to make it meet up to the aftermarket 'tri-y' headers that came on the wagon, so will probably take the whole lot over to an exhaust place and see if they can make something up to bridge the gap. Could presumably weigh in my existing cats for some scrap value too
Edited by SturdyHSV on Thursday 22 July 08:34
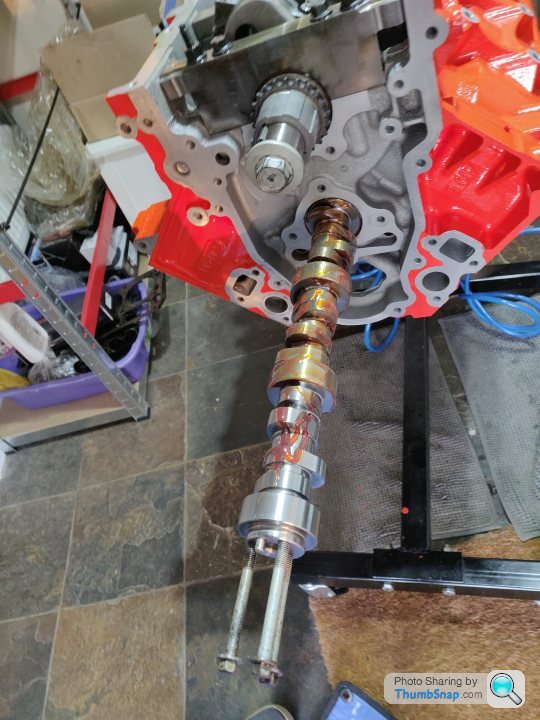
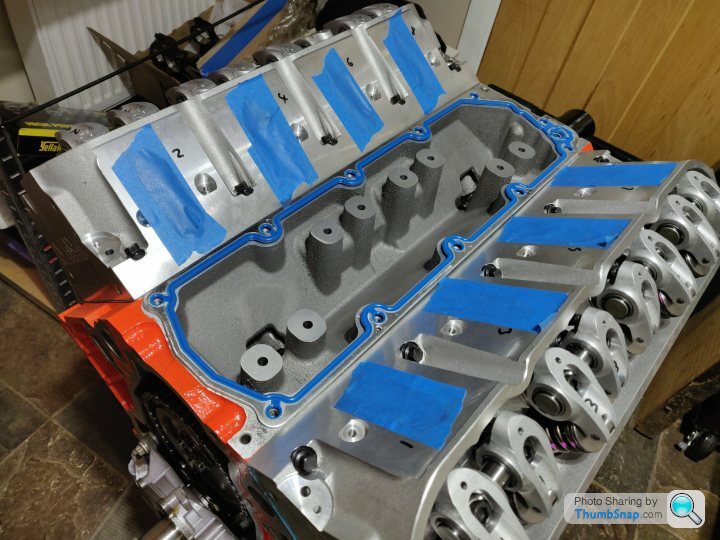
Mercifully the pushrods all came bagged individually, and had their lengths printed on them too, so popping them in the right places was pretty easy with the notes I'd made previously.
I quickly measured them as I went just to be sure, but even with a quick measurement they were all within a couple of thou.
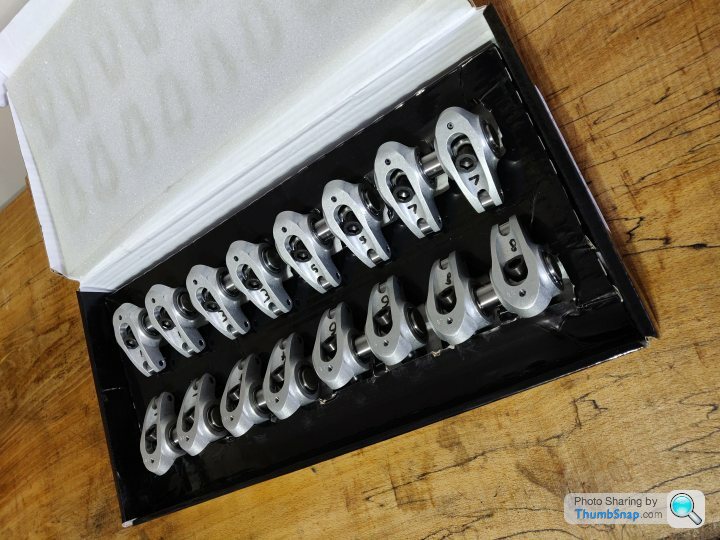
Dab of assembly lube on the tips and popped them in, then time for the rockers, which again I'd labelled up to ensure any odd tolerances differences stayed the same as when I measured for the pushrods.
Put the high temp PTFE thread sealant on the intake bolt and a dab of oil on the exhaust bolt (this is a blind hole) and bolted them down

All torqued down to 43 lb ft (these thicker M10 bolts are torqued down higher than most) and tested the engine still rotated over without too much resistance now that it's pushing against spring resistance etc as well...

Trying to slowly 'break' it free it'll peak at about 45 lb ft to start it moving (using my dodgy 'torque wrench set higher and see what peak torque it records' method) but takes about 28-30lb ft to keep it rotating once it's moving, which I'm pleased with as from previous reading it would be acceptable to be up to 25 lbft for just the rotating assembly by itself with no cam etc.
Next up will be putting the various covers back on and the oil pickup / sump etc. And get it looking a bit more like an engine
I quickly measured them as I went just to be sure, but even with a quick measurement they were all within a couple of thou.
Dab of assembly lube on the tips and popped them in, then time for the rockers, which again I'd labelled up to ensure any odd tolerances differences stayed the same as when I measured for the pushrods.
Put the high temp PTFE thread sealant on the intake bolt and a dab of oil on the exhaust bolt (this is a blind hole) and bolted them down
All torqued down to 43 lb ft (these thicker M10 bolts are torqued down higher than most) and tested the engine still rotated over without too much resistance now that it's pushing against spring resistance etc as well...
Trying to slowly 'break' it free it'll peak at about 45 lb ft to start it moving (using my dodgy 'torque wrench set higher and see what peak torque it records' method) but takes about 28-30lb ft to keep it rotating once it's moving, which I'm pleased with as from previous reading it would be acceptable to be up to 25 lbft for just the rotating assembly by itself with no cam etc.
Next up will be putting the various covers back on and the oil pickup / sump etc. And get it looking a bit more like an engine
So some more progress, time to put the windage tray on. I'd already checked for clearance before, or so I thought, perhaps I'd had a beer or two or had music too loud, as a couple of rods would clip the tray...
This is why you check again anyway!
Either way, shimmed it up a touch to get enough clearance and bolted it down. Much worklight usage was employed and general squinting. Needs at least 0.050" clearance ideally, so relatively easy to eyeball...
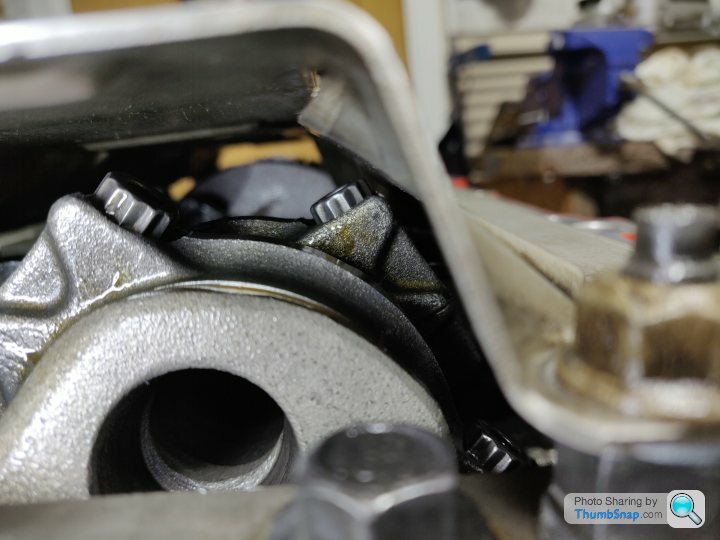
Then was a case of putting the oil pickup tube on, lots of lube around the o-ring, as this pinching causes a catastrophic lack of oil pressure.
Now, as there was a shim under the windage tray, then it's likely the pickup is slightly higher (so lower in the sump). It needs at least 0.250" of clearance to safely supply oil to the engine. So a test fit of the sump without the gasket on and with some blutack was in order to work out the clearance...
Or lack thereof as it turned out. Ended up sitting a little off the block on the left (as you look at the motor upside down from the front)
This led to a lot of faffing about as I tried to work out how much / little clearance I had, which seemed odd as there was only a tiny bit of shim under the tray.
After a few fits, it didn't seem to be hitting the pickup. So I slathered on (no exaggeration) the engineer's blue, and tried again...
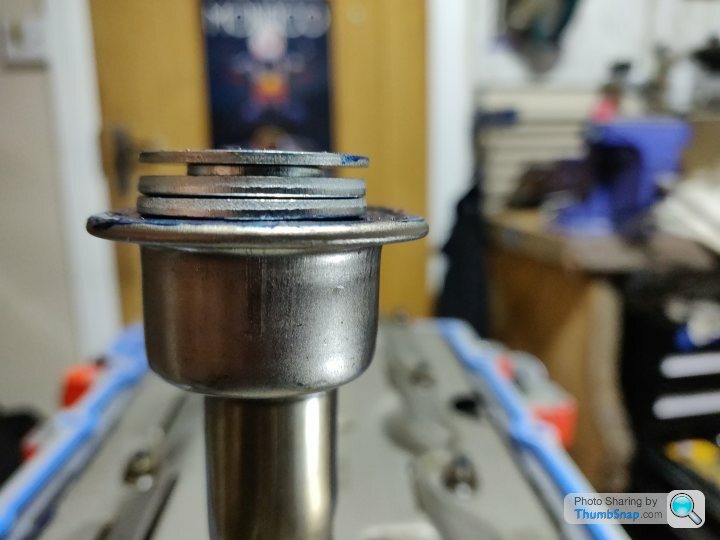
Ah haa, it's just nicking it there. I thought I'd just try it with the gasket as it is pretty thick aluminium gasket with a captive gasket material inside. Stacked 0.250" of washers on the pickup, loads of blue, off we go again.

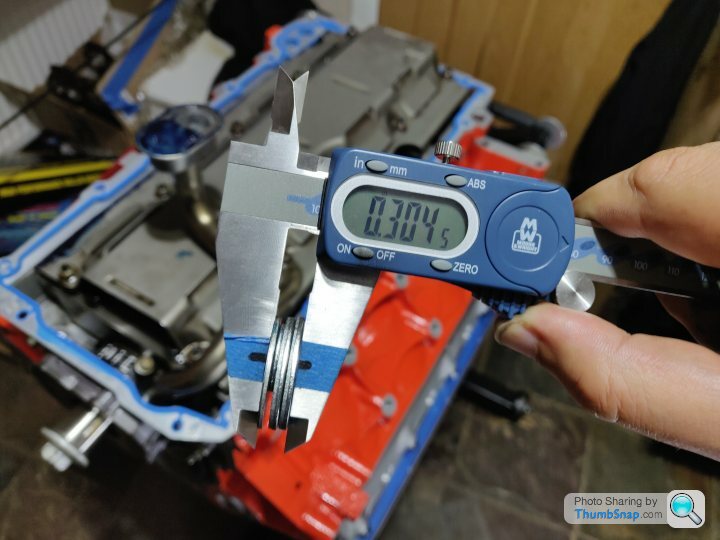
Great success. So I wanted to get a better feel for the clearance, so stacked another washer on, and this led to just a few tiny dots from the high points of the globs of blue, so I'm happy the clearance is at least more than 0.305"
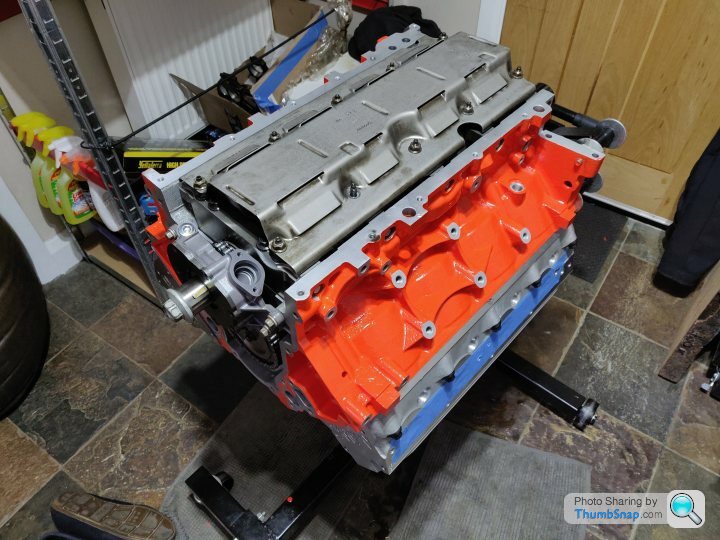
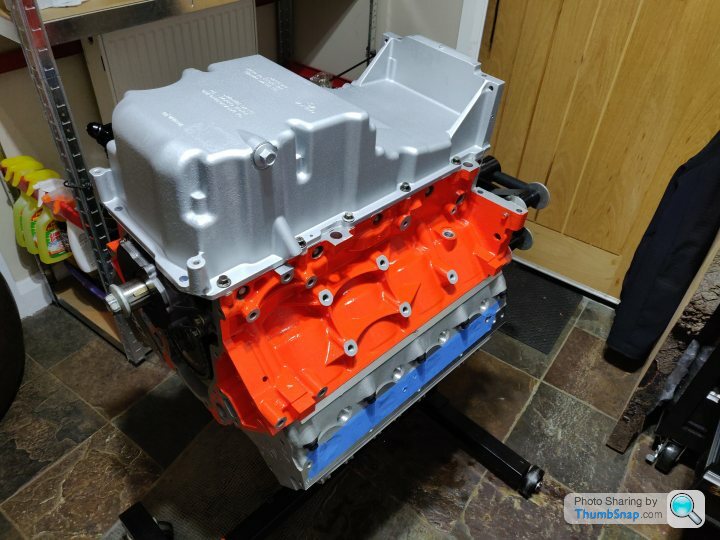
So finally, sump on!
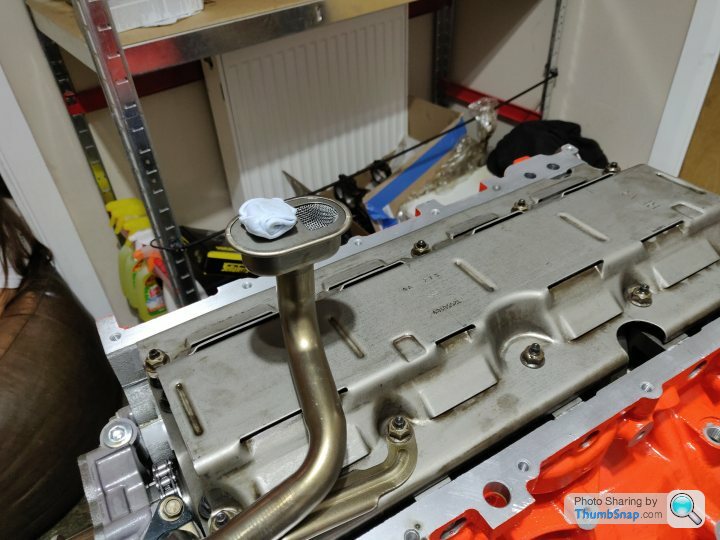
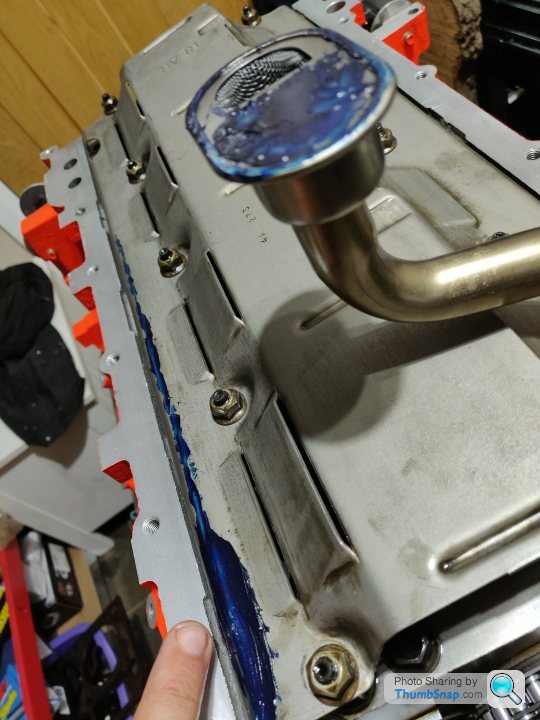
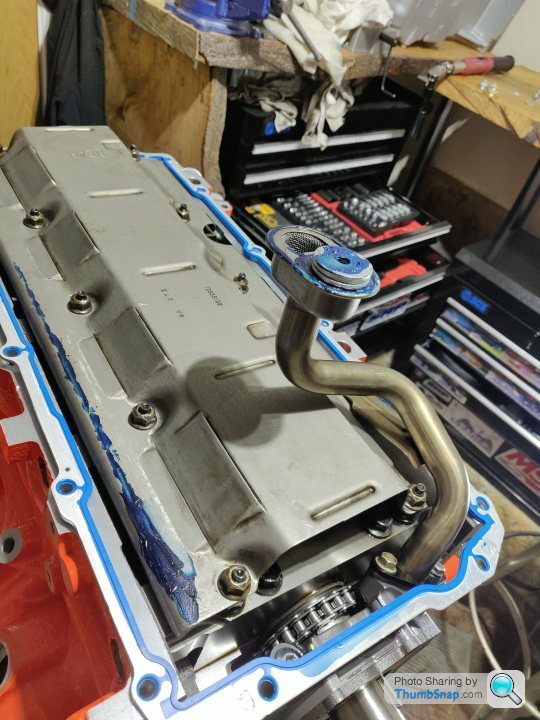
Valley cover has little gaskets to block off the Displacement on Demand towers that aren't used, so these were replaced just for completeness. Again, big oil pressure loss if these don't seal.
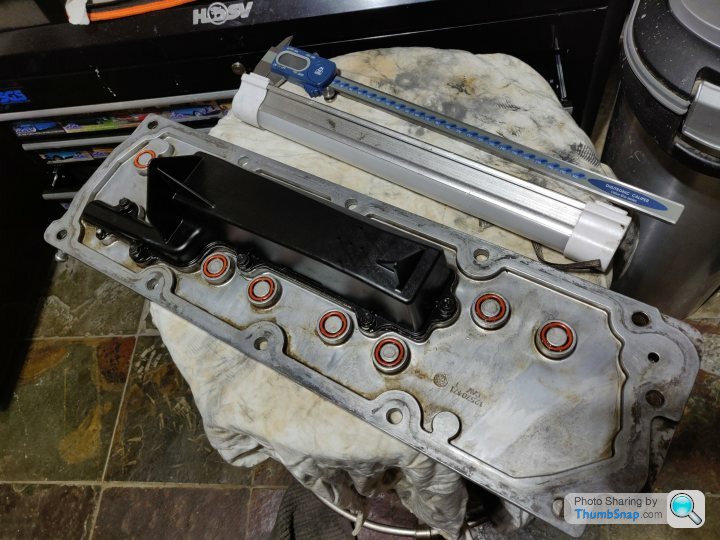
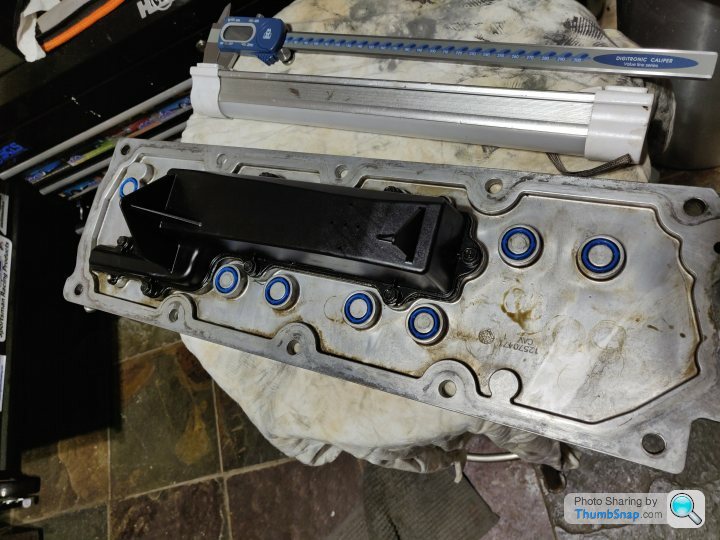
Bolted that down over the new valley cover gasket, something simple at last
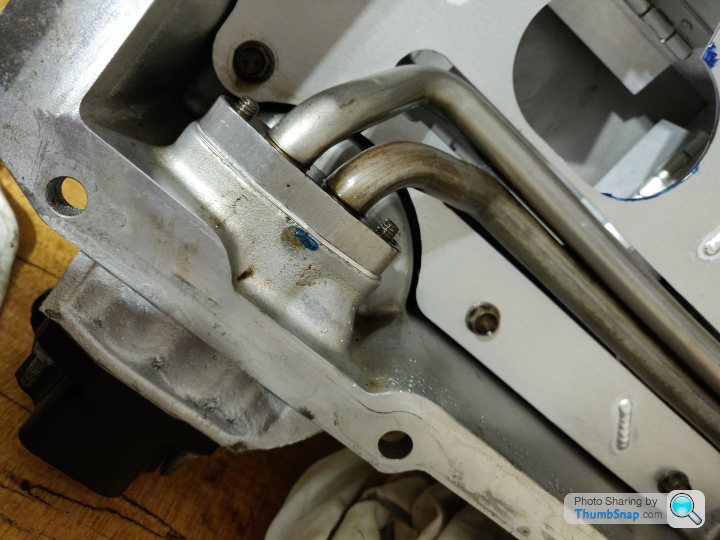
Next up I wanted to pack some assembly lube into the oil pump gears, this is just to help it generate some vacuum to suck the oil up from the pan on the first fire up. I'll probably find a way to pre-prime the oil system before fire up, but thought this couldn't hurt.
Took the cover off, squeezed in loads of the lube, couldn't get a picture of that as it was both messy, and running out of the gears, so wanted to get cover back on ASAP.
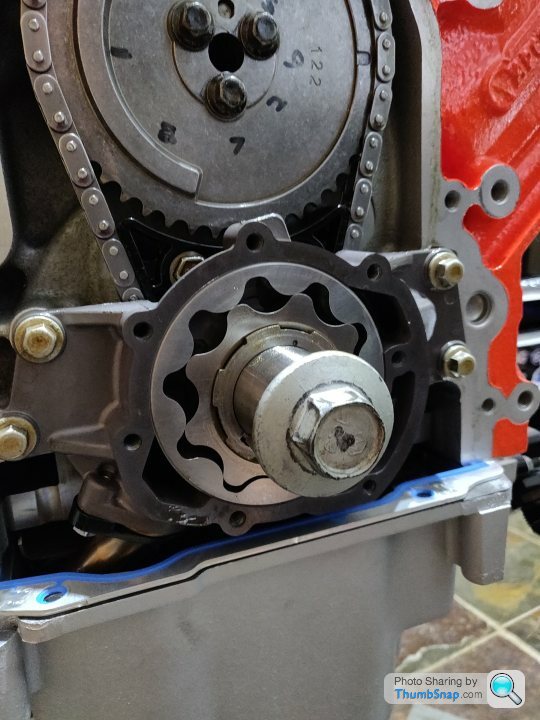
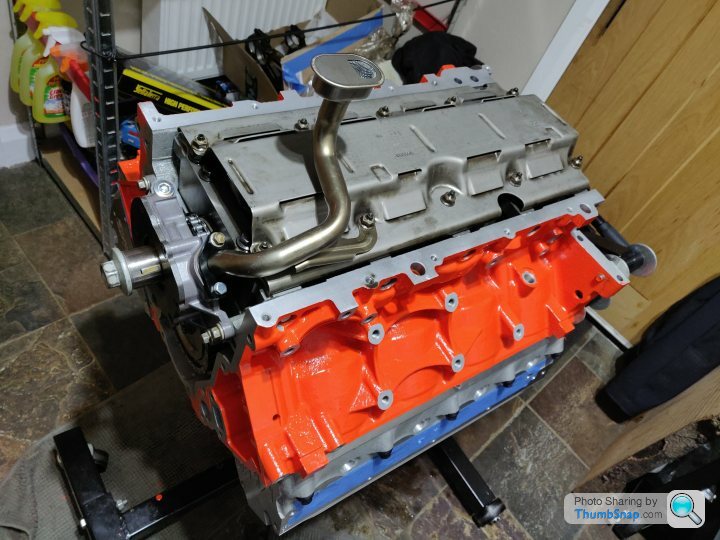
The timing cover (with new gasket of course) was snugged on, this needs the harmonic balancer hub on there to align the main seal properly, hence just snugged on for now.
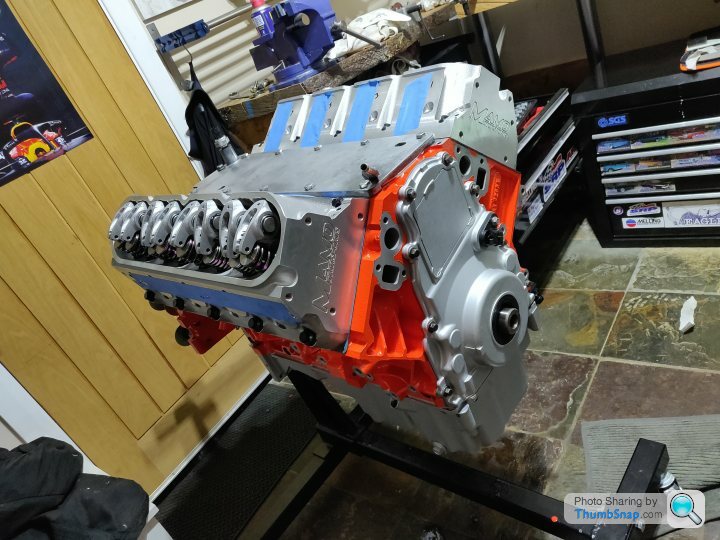
Looking much more like an engine now anyway, and more bits crossed off 'the list'
This is why you check again anyway!
Either way, shimmed it up a touch to get enough clearance and bolted it down. Much worklight usage was employed and general squinting. Needs at least 0.050" clearance ideally, so relatively easy to eyeball...
Then was a case of putting the oil pickup tube on, lots of lube around the o-ring, as this pinching causes a catastrophic lack of oil pressure.
Now, as there was a shim under the windage tray, then it's likely the pickup is slightly higher (so lower in the sump). It needs at least 0.250" of clearance to safely supply oil to the engine. So a test fit of the sump without the gasket on and with some blutack was in order to work out the clearance...
Or lack thereof as it turned out. Ended up sitting a little off the block on the left (as you look at the motor upside down from the front)
This led to a lot of faffing about as I tried to work out how much / little clearance I had, which seemed odd as there was only a tiny bit of shim under the tray.
After a few fits, it didn't seem to be hitting the pickup. So I slathered on (no exaggeration) the engineer's blue, and tried again...
Ah haa, it's just nicking it there. I thought I'd just try it with the gasket as it is pretty thick aluminium gasket with a captive gasket material inside. Stacked 0.250" of washers on the pickup, loads of blue, off we go again.
Great success. So I wanted to get a better feel for the clearance, so stacked another washer on, and this led to just a few tiny dots from the high points of the globs of blue, so I'm happy the clearance is at least more than 0.305"
So finally, sump on!
Valley cover has little gaskets to block off the Displacement on Demand towers that aren't used, so these were replaced just for completeness. Again, big oil pressure loss if these don't seal.
Bolted that down over the new valley cover gasket, something simple at last
Next up I wanted to pack some assembly lube into the oil pump gears, this is just to help it generate some vacuum to suck the oil up from the pan on the first fire up. I'll probably find a way to pre-prime the oil system before fire up, but thought this couldn't hurt.
Took the cover off, squeezed in loads of the lube, couldn't get a picture of that as it was both messy, and running out of the gears, so wanted to get cover back on ASAP.
The timing cover (with new gasket of course) was snugged on, this needs the harmonic balancer hub on there to align the main seal properly, hence just snugged on for now.
Looking much more like an engine now anyway, and more bits crossed off 'the list'
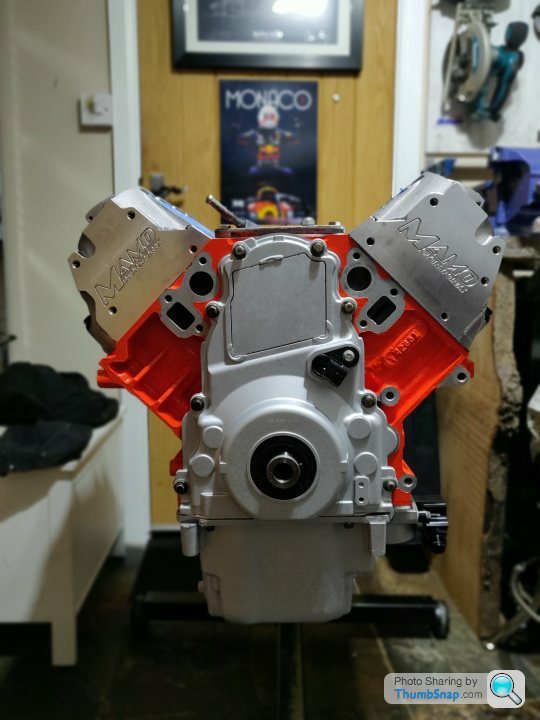
So the Tony Mamo ported FAST 102 has shipped, as well as an LS3 throttle body he's also ported. Do I 'need' these extra power making devices? No sir, I do not. Are they on their way anyway? Yes sir, they are.
It's at the point now where I'm just going all in on it and we'll see how it turns out, it's basically ended up that given I've spent so much time / money getting things right, leaving 'easy' power on the table doesn't sit right
The porting on the throttle body allegedly helps with throttle response and linearity (there's a bit of a step on the factory castings) and the porting to the manifold should help the power carry better past the peak, so from 6,300 to 7,000 or so.
It's all getting a bit silly, but hopefully it's going to be one hell of a build!
Moderator edit: no advertising please
SturdyHSV said:
So the Tony Mamo ported FAST 102 has shipped, as well as an LS3 throttle body he's also ported. Do I 'need' these extra power making devices? No sir, I do not. Are they on their way anyway? Yes sir, they are.
It's at the point now where I'm just going all in on it and we'll see how it turns out, it's basically ended up that given I've spent so much time / money getting things right, leaving 'easy' power on the table doesn't sit right
The porting on the throttle body allegedly helps with throttle response and linearity (there's a bit of a step on the factory castings) and the porting to the manifold should help the power carry better past the peak, so from 6,300 to 7,000 or so.
It's all getting a bit silly, but hopefully it's going to be one hell of a build!
I love this thread Sturdy, so much nice stuff! But do remember a running and driving car is infinitely faster than the broken car with a theoretical extra 10hp. It's at the point now where I'm just going all in on it and we'll see how it turns out, it's basically ended up that given I've spent so much time / money getting things right, leaving 'easy' power on the table doesn't sit right
The porting on the throttle body allegedly helps with throttle response and linearity (there's a bit of a step on the factory castings) and the porting to the manifold should help the power carry better past the peak, so from 6,300 to 7,000 or so.
It's all getting a bit silly, but hopefully it's going to be one hell of a build!


Gassing Station | Readers' Cars | Top of Page | What's New | My Stuff