Hold(en) my beer - Monaro, Ute and Commodore content
Discussion


Lincsls1 said:
Looks absolutely top draw, amazing standard!
Cheers, I'm excited to see it in the car and how the fuel rails finish it off 
seefarr said:
Looks awesome! Glad you didn't crack another sump too. 
Yeah, I gave it a go though 
djgritt said:
Looks great and oh so close to finished!
It’s also been shared by the V8UK page on Facey this morning - saw the Orange paint and huge reserves of Royal Purple in the background and instantly recognised it
Ahh yeah I saw that, a friend and I started V8UK in 2013 doing events and things, I sort of lost interest during a period of depression and haven't been involved for a few years now though, but Camaro on here is still keeping the Facebook page running It’s also been shared by the V8UK page on Facey this morning - saw the Orange paint and huge reserves of Royal Purple in the background and instantly recognised it

It's why the Monaro's plate is V8 UKS, S for Sturdy, we were going to all get V8 UKx with surname initial but I was the only one that did
I Am Milk said:
Bloody brilliant stuff, looking incredible!
Many thanks, I can't wait to hear how it sounds too 
My work for today:

Check some measurements as per those instructions, lap / grease the input shaft and clutch plates as per those other instructions, and then launch the engine through the door (there's a step) into the garage somehow.
Have heard back from the anodisers, rails are being done today so I've booked collection for tomorrow, will be with me Thursday
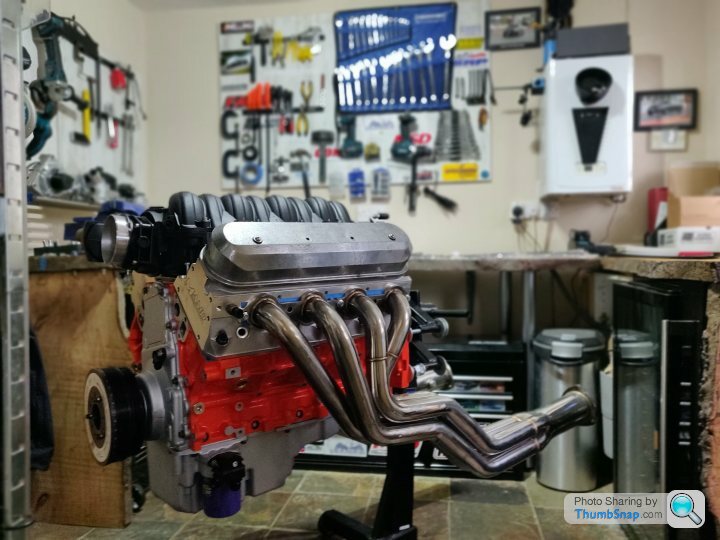
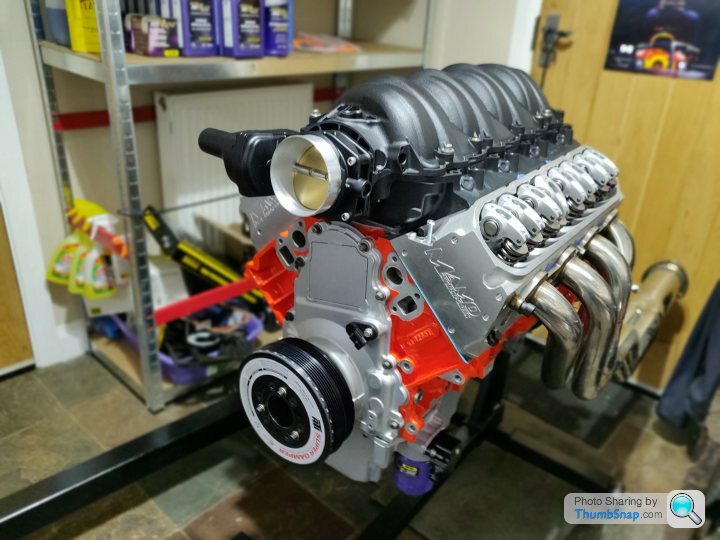
Took some more final pictures before taking the intake / exhaust back off ready to get on with it
Check some measurements as per those instructions, lap / grease the input shaft and clutch plates as per those other instructions, and then launch the engine through the door (there's a step) into the garage somehow.
Have heard back from the anodisers, rails are being done today so I've booked collection for tomorrow, will be with me Thursday
Took some more final pictures before taking the intake / exhaust back off ready to get on with it
Rushjob said:
That's a work of art
Art / pornography, the lines are blurry About 6 or 7 hours of work today, but worth it
So, mount clutch


Install bellhousing and measure the depth of the diaphragm fingers from the mounting face of the bellhousing. Needed some inventive measuring techniques
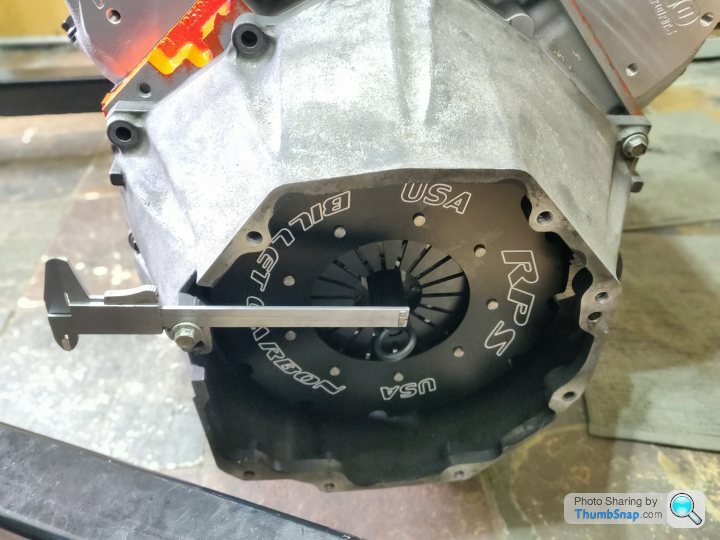
Then had to install the new slave, and compress it, then measure the depth of the release bearing face compared to the gearbox mounting face. I don't have any pictures of that as I ran out of hands.
Subtract one from the other to get a clearance measurement and fortunately it worked out in spec (as expected with the components used)
Next up, lapping in and greasing the gearbox input shaft and clutch discs.

Lapping compound on the input shaft and inside of the clutch plate, and slide up and down, just removes and burrs etc in the shaft / clutch plate, repeated for both friction discs and cleaned inbetween.
One lapped in input shaft

Then largely the same process, but with the supplied grease

One well greased shaft

Next up, engine into the garage through a stepped doorway. Much s
 thousery followed.

Eventually got there, then to collapse the crane, pull thar through the door, then reassemble it, and take the engine back off the stand...


Then time to finally install the clutch properly

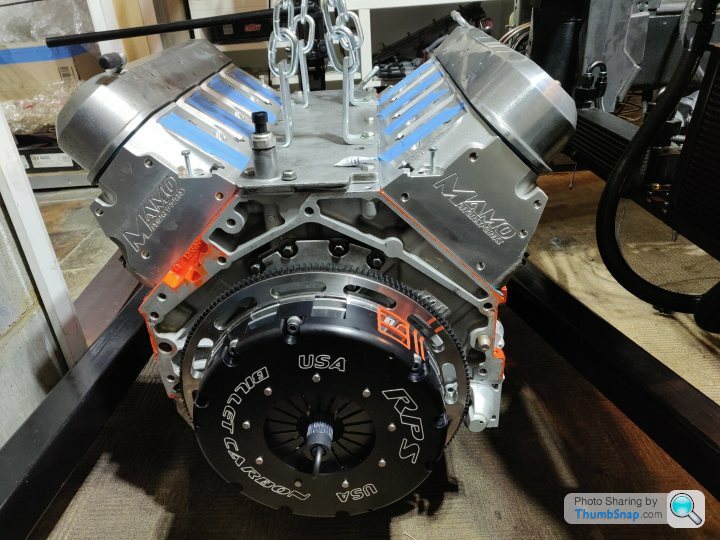
The sexiness of that clutch hasn't gotten old yet, I frankly need a transparent bellhousing
So that's where we end today, tomorrow the bellhousing / gearbox is getting bolted up and it's (probably) going in the car
Anodisers have confirmed rails will be done tomorrow morning, so collection is arranged and they'll be with me Thursday.
Oh I also bolted down tbe crank position sensor, knock sensors and the starter motor. Getting closer and closer!

So introducing the gearbox to the bellhousing is awkward when the gearbox weighs plenty, is awkwardly shaped to lift or rest down and is sat on a tyre. Oh there's also piss all room to move around and the tools are in a different room. This was a recipe for backache and I knew it

So I came up with what I thought was a pretty smart idea using some threaded rod I had laying around. In a most Clarkson esque fashion I even sent a picture to a mate explaining how the extent of my engineering genius knows no bounds...

I'd slowly rotate the nuts to pull it towards the bell housing and keep it aligned. This was going well, I got it close enough to swap to some long bolts in fact,about 35mm away from touchdown.

I was quite tired by this point, (23:40 that picture...) but was checking the input shaft was getting close to the clutch plates etc. and tightening around the various bolts.

Now, I thought from that view that the input shaft was a few mm away and a little low, this checked out as I measured the gaps and the bottom was a little further away than the top, so I set about tightening the lower bolts to try and angle the gearbox better. This was naturally pulling it off the tyre a bit, or so I assumed as to why it was a bit stiff to turn... And then I encounter what is now the annoyingly familiar sound of cast aluminium cracking. fksocks.
So I generally st myself and backed things off, having to desperately support the gearbox with one hand whilst undoing the bolts etc, terrified that the weight of the box would lay entirely on the clutch plate and crack it...
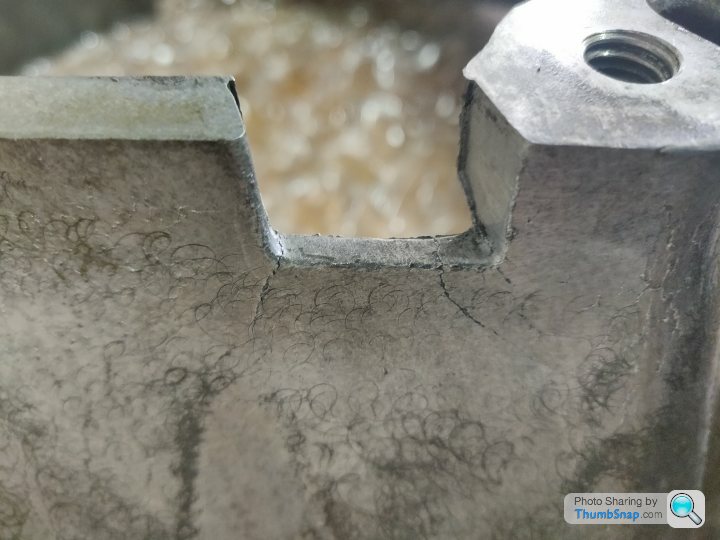
I got the two apart, nothing appeared obliterated inside but the bell housing had a couple of cracks in it, which I'd seen happen.
At this point I went to bed a disgruntled man!
Bellhousing off this morning and cleaned up, dropped off at a welder nearby and they'll be able to fix it for tomorrow for me, which is a big relief. In my tired grump the night before I'd actually just tried to order one from RockAuto just to start the process, and fortunately the payment randomly failed so I left it. Luck saved that £340 and 10 day delay!

After I'd dropped that off, it was time to put my brave trousers on and see if I'd also fked the clutch. This would put a big delay on things as I can't afford to replace it for some time, they aren't making them any more, and I'd probably be quite sad.
So I took the cover off and no chunks fell out at least. But I then noticed the reason I'd cracked the bellhousing, and it all fell into place how much of a ballsup I'd made of it last night...
As I'm sure you've guessed from the picture, I'd tightened the top ones too quickly, pointed the gearbox input shaft down a bit, and then basically used the bottom bolts to drive the input shaft hard into the clutch plate, smooshing the teeth a treat, and ultimately the bellhousing gave up first... What an oaf.
It's not so much the mistake, as the fact it would have been so easily avoided if I'd stopped to think a bit, it was a mistake born out of foolishness and little else

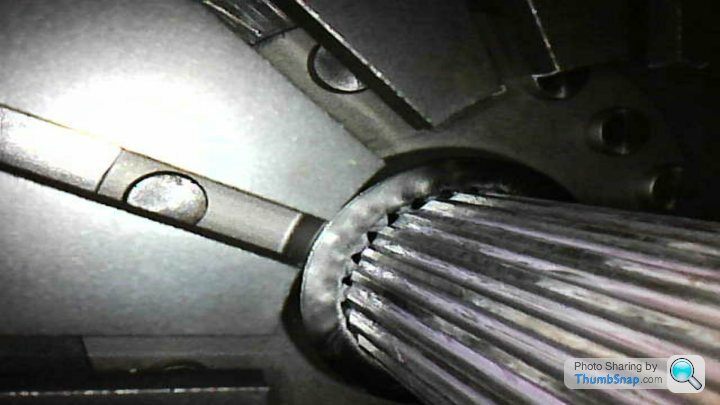
So yeah, that clutch plate obviously would not slide onto the gearbox input shaft, the rear is fine, but where I've brute forced the (thankfully not aluminium) gearbox input shaft into it has fked the teeth up a treat. 'Fortunately' I figured that 95% of the tooth surface is intact and straight, so if I could just tidy up this mangled edge, it'll still operate cleanly... Right?
As such, I sat in the garden for 90 minutes or so with a little triangular sectioned hand file and set about cleaning it up. After about an hour I tried it out and still no dice, but I could see it was getting there, so just carried on working off any rough edges or raised sections, and smoothed out the overall shape until, finally, it slides perfectly freely with no binding up. I think it's going to be OK

You can see the shiny sections where I've smoothed off material to get it back into an appropriate shape along the edges of the teeth.
Ultimately, it went back on, and bolted back together. Time will tell if it's OK. I think it would be possible to get a replacement plate as they're supposed to be rebuildable / extendable to a triple plate, but I really really hope it won't come to that.

So, possible disaster averted, or rather, contained, time for something therapeutic to relax a bit. The fuel rails arrived!

Being anodised aluminium, it's a bit more of a burnt amber type of orange than the almost luminous reddy orange of the block, but it's better than the previous red! My first impression was "maybe I should have just gone with black" but once on the car they'll hopefully work well.
So I thought I'd prepare the intake manifold. It has a front or rear port for the MAP sensor which you drill to your preference, I went with the rear this time as the front is a bit of a stretch on the cable, and I wanted to also hide more wiring out of the way. It also leaves it smooth internally at the throttle body which can't hurt airflow.

The metal strips were just as a barrier so if the drill shot through it wouldn't go into an intake runner (these are all individually removable for porting work etc, it's a nicely thought out piece)
Hole drilled and MAP sensor installed. It doesn't need bolting down (it's either under vacuum or atmospheric pressure at worst) but I did anyway.

Injector o-rings oiled and LSA injectors installed

Fuel rails squidged on and then bolted down

Throttle body and gasket torqued down

AN line and fuel pressure gauge installed and remaining gaskets

That was a nice satisfying and relaxing process to work through that helped put the previous disaster behind me I even put a silver screw into the (bronze) threaded insert for the unused front MAP port just so the non-matching colour of the insert wasn't visible...
Bed early tonight and then tackle the gearbox again tomorrow with a calmer and more refreshed head. Last night was the first time the awkwardness of the lack of space was starting to piss me off, as I kept either headbutting the crane or falling backwards against the wall from my half perch on the tyre astride the gearbox, I couldn't move or really reach either side to get a good look and had to keep clambering over everything to get a different bolt or what have you.
Still, nothing to it but to do it, as always, many thanks if you've read this far!
Glad I took so many pornographic photos of it on the stand to keep the motivation up!
So I came up with what I thought was a pretty smart idea using some threaded rod I had laying around. In a most Clarkson esque fashion I even sent a picture to a mate explaining how the extent of my engineering genius knows no bounds...
I'd slowly rotate the nuts to pull it towards the bell housing and keep it aligned. This was going well, I got it close enough to swap to some long bolts in fact,about 35mm away from touchdown.
I was quite tired by this point, (23:40 that picture...) but was checking the input shaft was getting close to the clutch plates etc. and tightening around the various bolts.
Now, I thought from that view that the input shaft was a few mm away and a little low, this checked out as I measured the gaps and the bottom was a little further away than the top, so I set about tightening the lower bolts to try and angle the gearbox better. This was naturally pulling it off the tyre a bit, or so I assumed as to why it was a bit stiff to turn... And then I encounter what is now the annoyingly familiar sound of cast aluminium cracking. f
ksocks.So I generally s
t myself and backed things off, having to desperately support the gearbox with one hand whilst undoing the bolts etc, terrified that the weight of the box would lay entirely on the clutch plate and crack it...I got the two apart, nothing appeared obliterated inside but the bell housing had a couple of cracks in it, which I'd seen happen.
At this point I went to bed a disgruntled man!
Bellhousing off this morning and cleaned up, dropped off at a welder nearby and they'll be able to fix it for tomorrow for me, which is a big relief. In my tired grump the night before I'd actually just tried to order one from RockAuto just to start the process, and fortunately the payment randomly failed so I left it. Luck saved that £340 and 10 day delay!
After I'd dropped that off, it was time to put my brave trousers on and see if I'd also f
ked the clutch. This would put a big delay on things as I can't afford to replace it for some time, they aren't making them any more, and I'd probably be quite sad.So I took the cover off and no chunks fell out at least. But I then noticed the reason I'd cracked the bellhousing, and it all fell into place how much of a ballsup I'd made of it last night...
As I'm sure you've guessed from the picture, I'd tightened the top ones too quickly, pointed the gearbox input shaft down a bit, and then basically used the bottom bolts to drive the input shaft hard into the clutch plate, smooshing the teeth a treat, and ultimately the bellhousing gave up first... What an oaf.
It's not so much the mistake, as the fact it would have been so easily avoided if I'd stopped to think a bit, it was a mistake born out of foolishness and little else
So yeah, that clutch plate obviously would not slide onto the gearbox input shaft, the rear is fine, but where I've brute forced the (thankfully not aluminium) gearbox input shaft into it has f
ked the teeth up a treat. 'Fortunately' I figured that 95% of the tooth surface is intact and straight, so if I could just tidy up this mangled edge, it'll still operate cleanly... Right? As such, I sat in the garden for 90 minutes or so with a little triangular sectioned hand file and set about cleaning it up. After about an hour I tried it out and still no dice, but I could see it was getting there, so just carried on working off any rough edges or raised sections, and smoothed out the overall shape until, finally, it slides perfectly freely with no binding up. I think it's going to be OK
You can see the shiny sections where I've smoothed off material to get it back into an appropriate shape along the edges of the teeth.
Ultimately, it went back on, and bolted back together. Time will tell if it's OK. I think it would be possible to get a replacement plate as they're supposed to be rebuildable / extendable to a triple plate, but I really really hope it won't come to that.
So, possible disaster averted, or rather, contained, time for something therapeutic to relax a bit. The fuel rails arrived!
Being anodised aluminium, it's a bit more of a burnt amber type of orange than the almost luminous reddy orange of the block, but it's better than the previous red! My first impression was "maybe I should have just gone with black" but once on the car they'll hopefully work well.
So I thought I'd prepare the intake manifold. It has a front or rear port for the MAP sensor which you drill to your preference, I went with the rear this time as the front is a bit of a stretch on the cable, and I wanted to also hide more wiring out of the way. It also leaves it smooth internally at the throttle body which can't hurt airflow.
The metal strips were just as a barrier so if the drill shot through it wouldn't go into an intake runner (these are all individually removable for porting work etc, it's a nicely thought out piece)
Hole drilled and MAP sensor installed. It doesn't need bolting down (it's either under vacuum or atmospheric pressure at worst) but I did anyway.
Injector o-rings oiled and LSA injectors installed
Fuel rails squidged on and then bolted down
Throttle body and gasket torqued down
AN line and fuel pressure gauge installed and remaining gaskets
That was a nice satisfying and relaxing process to work through that helped put the previous disaster behind me
I even put a silver screw into the (bronze) threaded insert for the unused front MAP port just so the non-matching colour of the insert wasn't visible... Bed early tonight and then tackle the gearbox again tomorrow with a calmer and more refreshed head. Last night was the first time the awkwardness of the lack of space was starting to piss me off, as I kept either headbutting the crane or falling backwards against the wall from my half perch on the tyre astride the gearbox, I couldn't move or really reach either side to get a good look and had to keep clambering over everything to get a different bolt or what have you.
Still, nothing to it but to do it, as always, many thanks if you've read this far!
Glad I took so many pornographic photos of it on the stand to keep the motivation up!
Janosh said:
Sorry if I missed it earlier in the thread, but why aren't you using your FAST intake... looks like you've gone back to OEM?
Tony will be very pleased with that comment, it is one of his ported and 'stealthed' FAST102s, he has shaved off the FAST LSX 102 logoing and filled in / painted the area to hide any evidence it was ever there.Why? Well I wanted one of his ported manifolds as I figured I could sell mine one here relatively easily (haven't yet though) and the 'stealth' mod was a no brainer as it just looks so clean
seefarr said:
You can now advertise it as having "customised, hand finished bespoke clutch plate".
Thanks for sharing the highs and lows!
Hand finished by F1 'engineer' no less Thanks for sharing the highs and lows!
Happy to share, I've always enjoyed these sorts of threads the most and it's really great to have the opportunity to give something similar back, and I know I'd want to see this stuff if it was me!
I think overcoming the lows is probably far more important than the high points as you always see all the high points in social media, it's helpful to put it in a bit of context, firstly that I'm no pro and will make mistakes / s
t will go wrong, but also that these things are fixable and can be overcome eventually. Glad you're enjoying it anyway!
Precision Welding in Northampton charged me £20 to fix the bell housing, cracking (no pun intended) welding job

Edited by SturdyHSV on Saturday 21st August 22:04
So made no additional progress that weekend, and didn't fancy getting back on with it. Managed to pick up coronavirus at some point around then, so am currently isolating at home.
Tried to make some progress over the bank holiday weekend but as soon as I did anything physical I was knackered and felt very shakey so decided to tactically give up before I got frustrated or cocked something up.
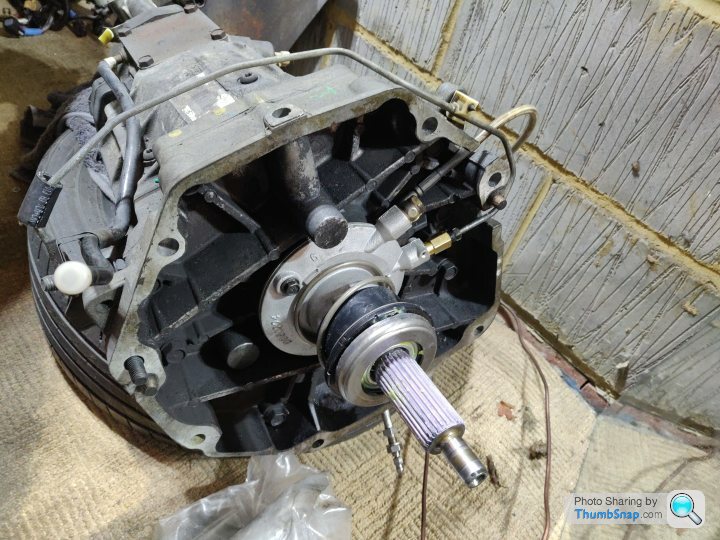
I'm having a nightmare trying to mate the gearbox to the engine again, just can't get the input shaft to line up cleanly.
I have got the box off the tyre and put a large board under engine / gearbox to support it at roughly the right height. Have tried using long smooth bolts just to support the box and give me a better chance of sliding it into place, as below

This isn't working though, I think as there's some margin in the bolt holes, it's realistically just supporting the gearbox slightly off where it needs to be, and as I'm not actually lifting it much, I'm not really getting anywhere trying to align it.
I got one of those little borescope cameras so that has been helpful to see inside, but not much further along despite looking very close a few times, tried rotating the engine over to line the teeth up etc, but ultimately the shaft isn't lined up properly so no dice.
I've taken it off the bolts for now, going to see if I can get some wood under it to try and get the relative heights right and then try again. Once I'm done isolating I'll likely get a mate over to help as it really needs 2 people lifting it I think as it's so awkward to pick up by the bellhousing and tailshaft with it on the floor too.
Will get there eventually!
Tried to make some progress over the bank holiday weekend but as soon as I did anything physical I was knackered and felt very shakey so decided to tactically give up before I got frustrated or cocked something up.
I'm having a nightmare trying to mate the gearbox to the engine again, just can't get the input shaft to line up cleanly.
I have got the box off the tyre and put a large board under engine / gearbox to support it at roughly the right height. Have tried using long smooth bolts just to support the box and give me a better chance of sliding it into place, as below
This isn't working though, I think as there's some margin in the bolt holes, it's realistically just supporting the gearbox slightly off where it needs to be, and as I'm not actually lifting it much, I'm not really getting anywhere trying to align it.
I got one of those little borescope cameras so that has been helpful to see inside, but not much further along despite looking very close a few times, tried rotating the engine over to line the teeth up etc, but ultimately the shaft isn't lined up properly so no dice.
I've taken it off the bolts for now, going to see if I can get some wood under it to try and get the relative heights right and then try again. Once I'm done isolating I'll likely get a mate over to help as it really needs 2 people lifting it I think as it's so awkward to pick up by the bellhousing and tailshaft with it on the floor too.
Will get there eventually!
Rolled the car outside, moved things around, gave it another go with some assistance, got the shaft into the clutch plate but wouldn't seat into the pilot bearing.
Will have another go at some point soon, just lost interest in it.


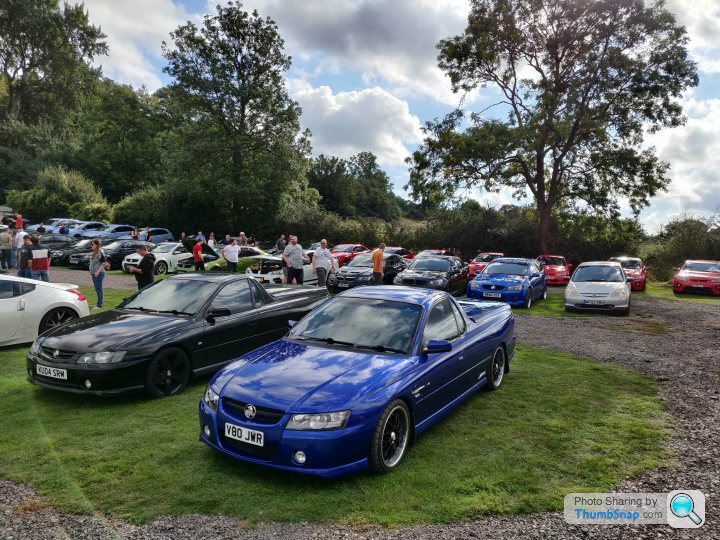
A bunch of the Holden lot are going to Caffeine & Machine on Saturday, I'll take the wagon down, looking like 30 odd so should be a noisy convoy at least
Will have another go at some point soon, just lost interest in it.
A bunch of the Holden lot are going to Caffeine & Machine on Saturday, I'll take the wagon down, looking like 30 odd so should be a noisy convoy at least


Looked a good day out - saw updates on the HSV FB Group and one of my mates was with you all with his Monaro - one of the red VXRs. The Convoy leaving the car park was a particular highlight - miss mine from seeing others about!
Sometimes seeing some similar metal out in flesh helps to rejuvinate the motivation. Sounds like this has had the same effect with you!
Sometimes seeing some similar metal out in flesh helps to rejuvinate the motivation. Sounds like this has had the same effect with you!
djgritt said:
Looked a good day out - saw updates on the HSV FB Group and one of my mates was with you all with his Monaro - one of the red VXRs. The Convoy leaving the car park was a particular highlight - miss mine from seeing others about!
Sometimes seeing some similar metal out in flesh helps to rejuvinate the motivation. Sounds like this has had the same effect with you!
Yeah, a mate came over and we had another punt at the gearbox, it was having none of it, so decided to take clutch apart to align it again.Sometimes seeing some similar metal out in flesh helps to rejuvinate the motivation. Sounds like this has had the same effect with you!
There was some vertical play with the alignment tool, so held it more central and torqued pressure plate down.
This was the difference, I think it must have sagged a bit when I torqued it up, as now the alignment tool and the input shaft slid in and out easily!
We had taken the bellhousing off to aid things so it's not together currently, but will be cracking on tomorrow and am confident it'll slide together easily enough now, it's night and day difference compared to before
seefarr said:
Good news Sturdy!  You've had some bad luck but hopefully it eases up for you now and we get that beast fired.
Made my own bad luck through incompetence really, but cheers You've had some bad luck but hopefully it eases up for you now and we get that beast fired. Feels like the end is in sight, I took the engine out in November last year, so would be nice to get it in again within a year! some bloke said:
Things are coming along nicely. I've had a quick scan 0f the last few pages but may have missed it - what paint did you use on the block? I have an alloy manifold I want to paint Chev Orange.
I used POR-15, goes on nicely, slopped it on fairly thick with a brush and foam brushes, it's somewhere in the thread in more detail, from old pictures it looks like I started painting on 2nd Jan, although soaking it in the etch primer was before that.Gassing Station | Readers' Cars | Top of Page | What's New | My Stuff