Hold(en) my beer - Monaro, Ute and Commodore content
Discussion


motomk said:
mmm.......What do we export from Melbourne?
Wheat? a wheat powered V8? maybe not... Wine? a grape powered V8? sounds more like it
I can exclusively confirm it is neither of those things Wheat? a wheat powered V8? maybe not... Wine? a grape powered V8? sounds more like it
 Meant to arrive Monday, UPS wouldn't leave it, left a card to fill out and "leave visible" and they'd leave it. Filled it out, taped it to the door, and nope, just left the same card again, telling me to fill it in and leave it visible...
Oh well, at home today so let's see how they try and avoid delivering it this time!
Also, was informed the wagon made an appearance in an AdamC video, remember seeing him at the time and he shared it on his Facebook page, but here we go, very complimentary, 1m16 ish.
Samjeev said:
I am wondering what the mystery parcel could be too!
That's a great clip in the adamc video, much better than his Car show leaving stuff :P
I managed to get my car in one earlier in the year for the whole 1 show I was able to attend before my engine rattled itself to death
around the 30:50 mark
Although order has been placed on my stroker kit so hopefully come spring..
It's such a cool car, real shame about the death rattle That's a great clip in the adamc video, much better than his Car show leaving stuff :P
I managed to get my car in one earlier in the year for the whole 1 show I was able to attend before my engine rattled itself to death
around the 30:50 mark
Although order has been placed on my stroker kit so hopefully come spring..

What kit did you go with, rolled the dice with a 4.000" or played it safe with 3.900"?
My mystery package has (finally) arrived!!
Dog included for scale...

Samjeev said:
Rolled the dice with the 4.000" couldn't pass it up, silly perhaps but screw it!
Purchased this one but it probably won't turn up until the new year:
https://cnc-motorsports.com/compstar-416-ls3-strok...
I'll get around to updating my silly thread at some point also bought some other goodies to delete my big brake booster so that should give a bunch more room for hoses/wiring/coil pack/spark plug removal
Fingers crossed for you with the 4.000", I got mine from CNC as well, was painless and arrived as expected etc. Purchased this one but it probably won't turn up until the new year:
https://cnc-motorsports.com/compstar-416-ls3-strok...
I'll get around to updating my silly thread at some point
also bought some other goodies to delete my big brake booster so that should give a bunch more room for hoses/wiring/coil pack/spark plug removalWhat goodies have you gone for brake booster wise? I have a Hydratech hydro-boost setup in the Ro, mostly for aesthetics but worked out fortuitously because it means clearance for those valve covers I've got, else I don't know if they've have fit!!
Pedal feel / braking is remarkable, but I'm not sure how much of that is the jump to the 6 pot APs up front, it has all new brake lines and braided flexi lines so yeah, feels really really good.
Samjeev said:
Yeah space to the valve covers is what i'm chasing, had to take a hammer to the booster just to get it all to fit as it is!
Basically just no booster at all, manual brakes with a correctly sized master and slightly adjustable pedal ratio if need be. Couple of companies in the states have made quite a niche kit to tick those boxes and then just ship it as a kit with a firewall adapter.
https://www.savageautoworks.shop/product-page/tand...
This being the kit in question, looks really quite simple but I could not find this master (nor a similar tilton, OEM, etc product) for love nor money in the UK so figured i'd just bite the bullet and rely on someone elses R&D, should save a ton of room compared to the old monstrous unit.
And cheers, leaving it all in the hands of the engineering shop this time so hopefully the engine has the best chance possible going forward
That kit looks great, and as you say nice when someone else has done the R&D!Basically just no booster at all, manual brakes with a correctly sized master and slightly adjustable pedal ratio if need be. Couple of companies in the states have made quite a niche kit to tick those boxes and then just ship it as a kit with a firewall adapter.
https://www.savageautoworks.shop/product-page/tand...
This being the kit in question, looks really quite simple but I could not find this master (nor a similar tilton, OEM, etc product) for love nor money in the UK so figured i'd just bite the bullet and rely on someone elses R&D, should save a ton of room compared to the old monstrous unit.
And cheers, leaving it all in the hands of the engineering shop this time so hopefully the engine has the best chance possible going forward
I'm sure what the 86 needs is 6.6 litres of torque mate, going to be hilarious fun
Had to shuffle cars around to get the Ro in the garage (once I've tidied it up...) so an angry cold chop video was inevitable... Secret package contents looking good
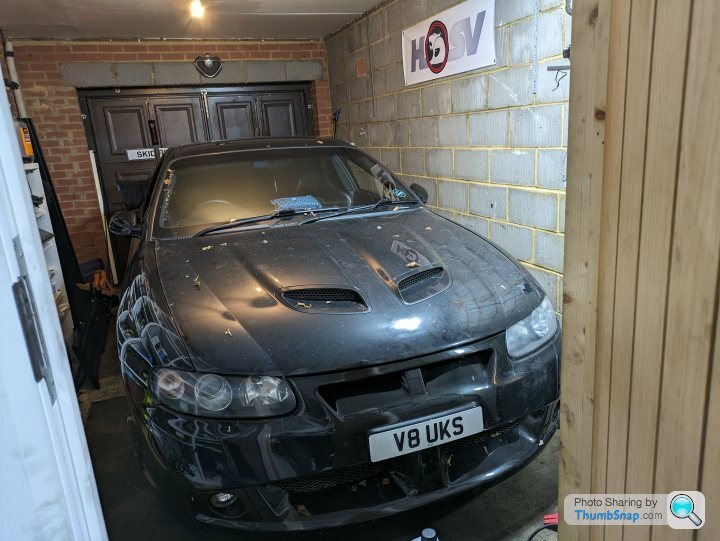
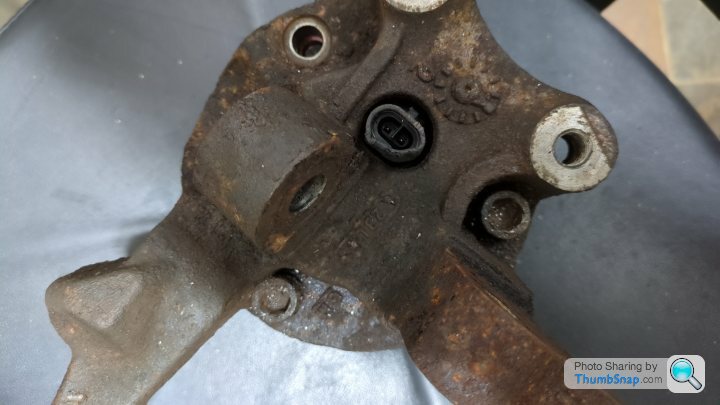
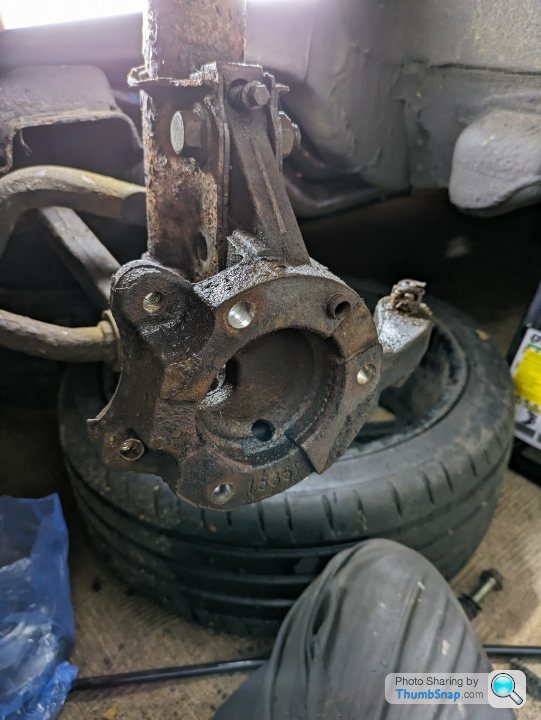
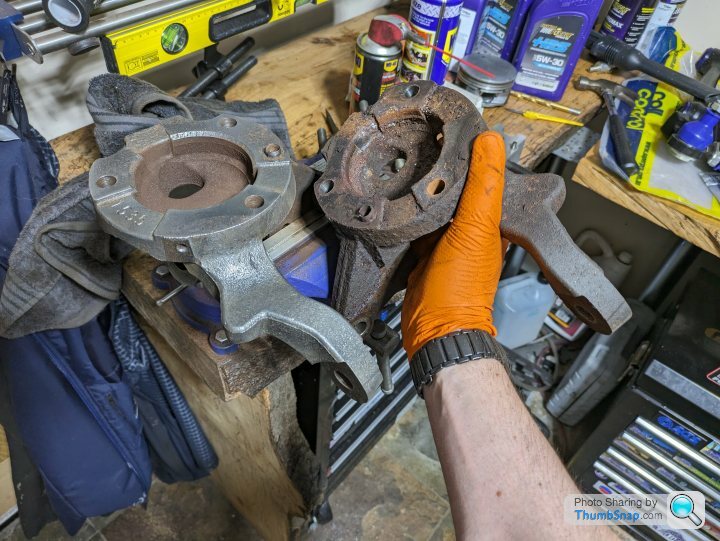
The Monaro is in the garage now, with the plan being to fit the box of parts that arrived from Australia (they're suspension parts...) and I figured whilst it was back in the garage (I know, it hasn't seen the road since coming out of the garage last time) I'd also try and investigate this ABS light further.
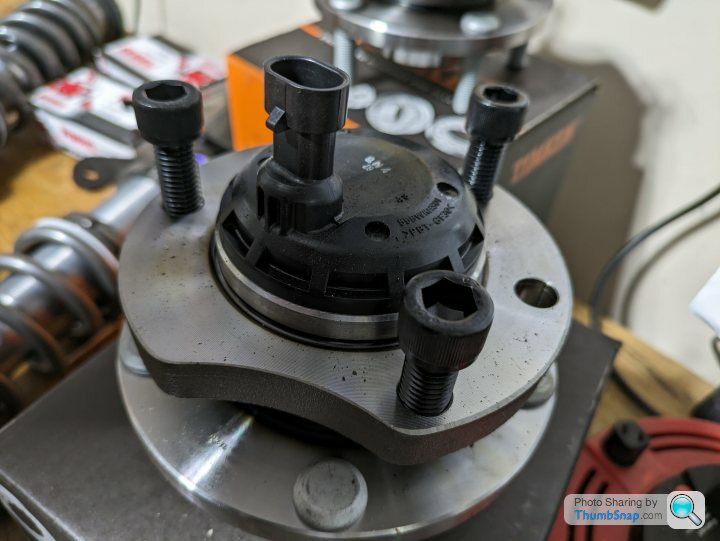
To that end, I have arbitrarily loaded the parts cannon with a pair of front wheel hub / bearings as the ABS sensor is integral to these. No, I don't particularly think that I need to replace the bearings, but it won't hurt to do them as the car has done 70,000 miles, and it will likely rule out the sensor as being the issue (and ensure focus remains on my dodgy wiring as it likely should be)
Worst case if I get them out cleanly then I have some passable spares for the Ute should that need front bearings in a hurry for some reason

So the Monaro is back in the garage and popped it up in the air last night. Those bearings ordered from RockAuto Wednesday evening are arriving TODAY which is just silly.
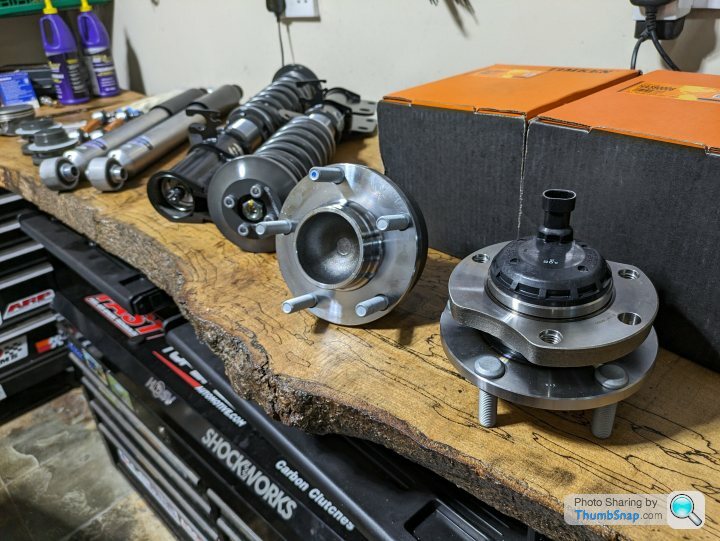
Measured my ride height at all 4 corners in preparation for fitting this array of goodies...
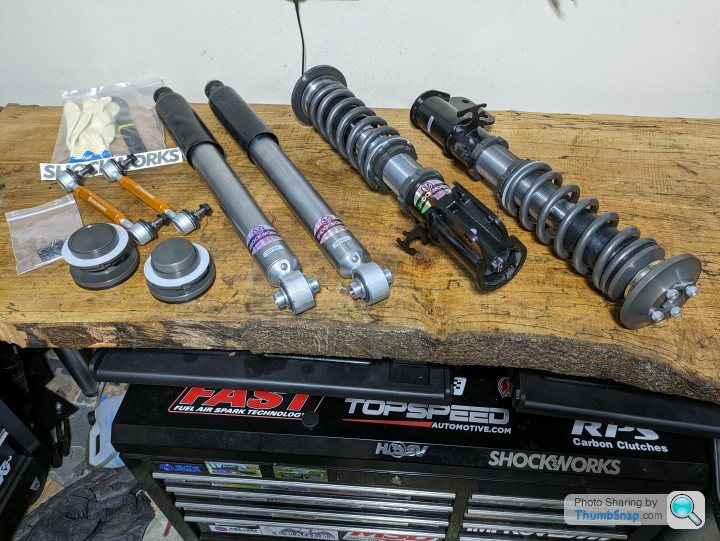
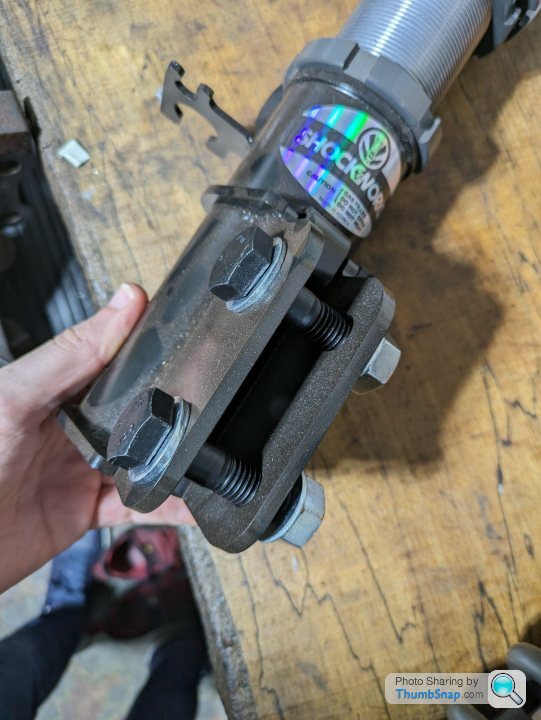
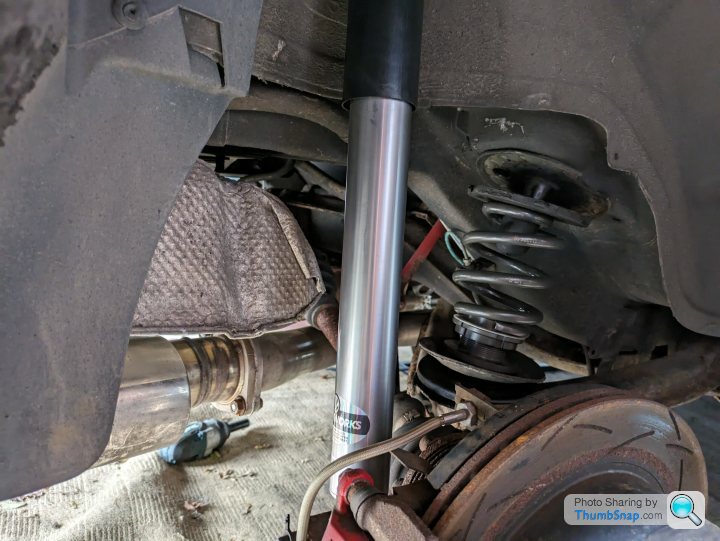
Full Shockworks coilover setup

People rave about how good these are on the VEs (including a few UK owners) and I've never heard or found a bad word said about them, so took the plunge. Chatted to them in advance (really helpful guys) and have had them valved for a fairly comfortable ride. The dampers are still adjustable so I can firm them up but I'm excited to see how they feel.
There'll be a pair of rear springs arriving in a few weeks, my rear ride height is a little higher than they usually do (and I can't / don't want to go lower due to looks / getting on/off the drive) so some taller springs are getting made.
Likely to be the only Monaro over here with this setup, couldn't find very much at all about VT-VZs with the Shockworks so looking forward to seeing how they feel!
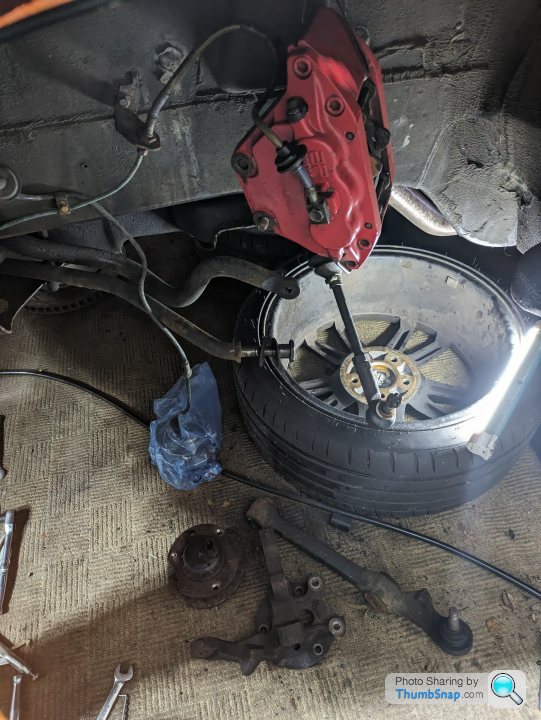
Made a bit of a start today, naturally some fun (but not unexpected) hurdles, in the familiar form of allen head bolts.
No, I don't need to change the front bearings / wheel hubs, but they're here now, they're shiny, so apart it comes.
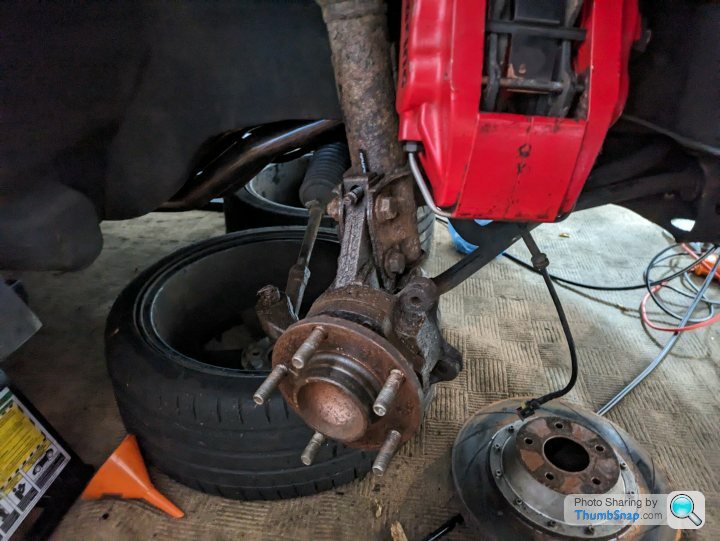
In theory though, because the three bolts that hold the bearing into the knuckle are 10mm allen heads. Which is great except of course they are corroded into oblivion, and red loctited too! Brilliant combo.
I got one of them out, the first one, so was feeling cautiously optimistic and then of course the 2nd one eventually rounds having not budged at all despite the blow torch, the penetrant and all sorts.
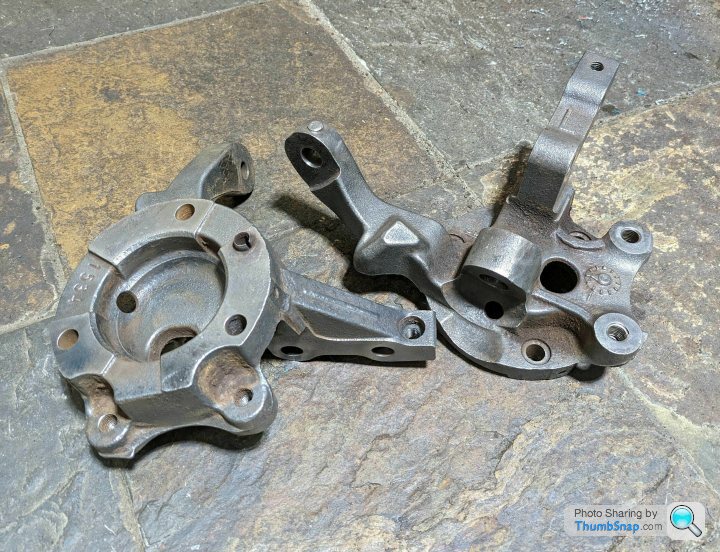
Decided to just take the knuckle out so I can get the bolts out using whatever means necessary (replacement knuckles are unobtainium it seems)
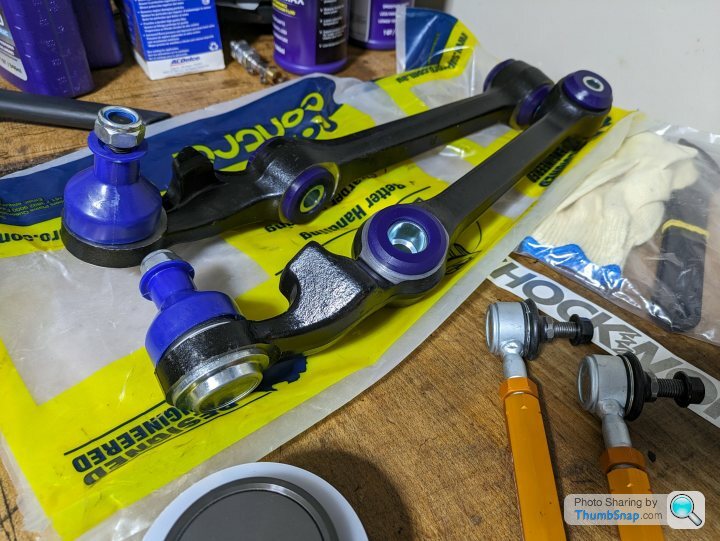
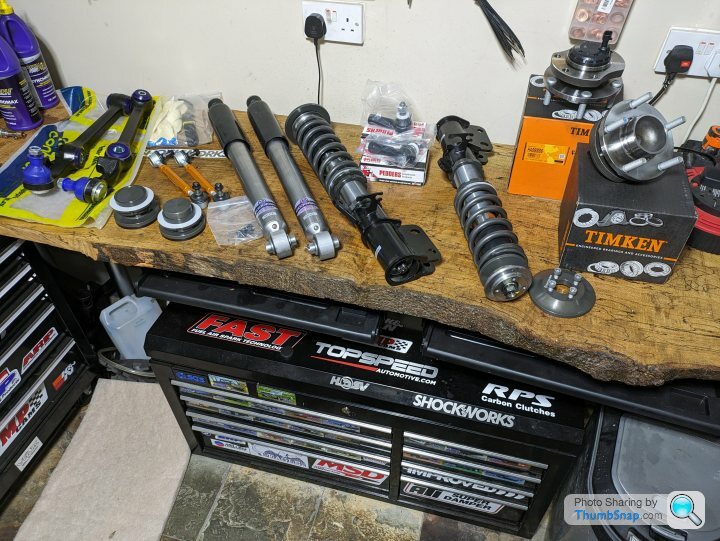
Not much else fought back which was nice, plenty needed heat but ultimately it came apart OK. Have ordered some SuperPro lower arms because why not, the ball joints will be old, there's a Pedders bush in the middle but it looked like possibly still a (black) factory original bush where it mounts to the subframe.
I was careless tapping the track rod end out of the knuckle and managed to chip the thread so the castle nut won't thread back on, but once again figured why not just replace them whilst it's apart, for the sake of £25 a side at this point... They're a bit worn out compared to new so it'll be a small improvement.
Can see the allens have been utterly obliterated now as I've tried all sorts to get them loose. Will get some of those bitey weapons or possibly drill them out or something. Going to be easier off the car anyway.
And no, honestly, it hasn't been recovered from the ocean floor.
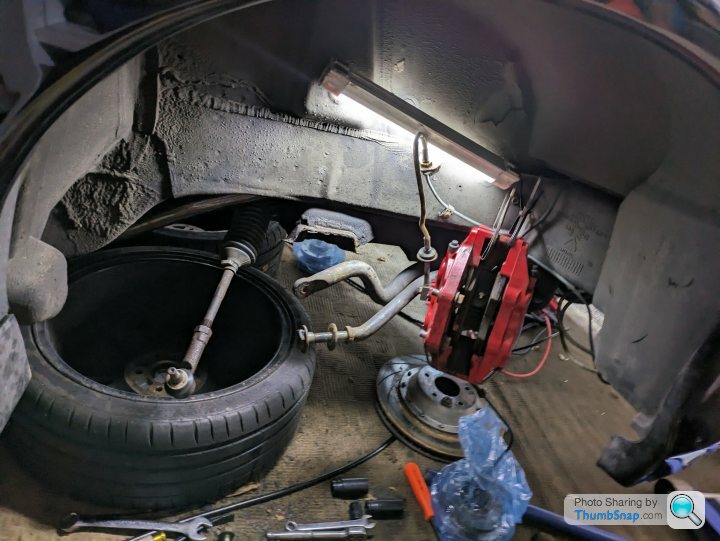
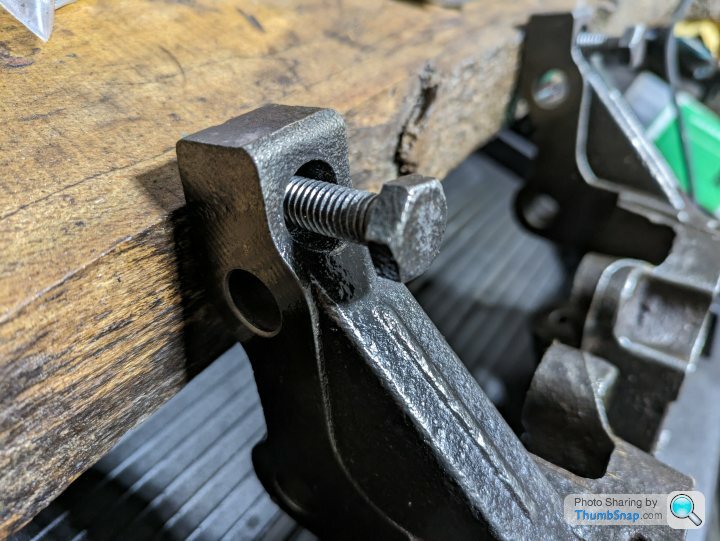
After a bit of a break, I set about the other side, and lo' and behold, bolts came out no problem on this side...
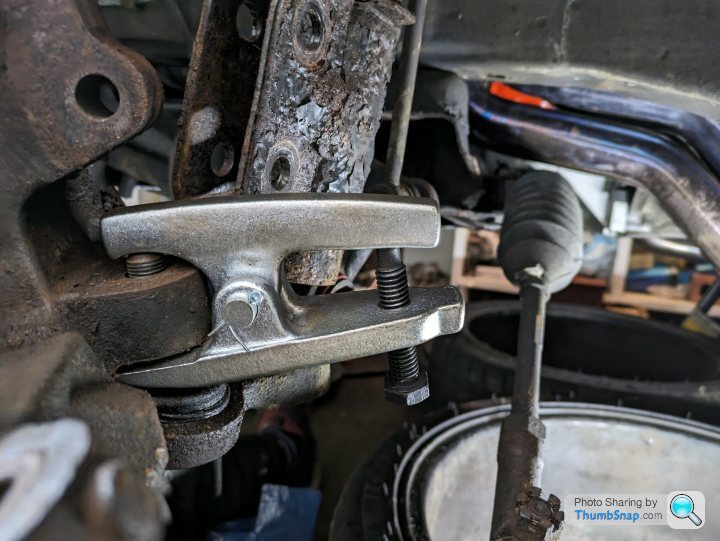
Still, opted to take it all apart as will replace the lower arm and so on. I got to use this ball joint splitter that I mistakenly bought about 12 years ago, but definitely saved my bacon today!
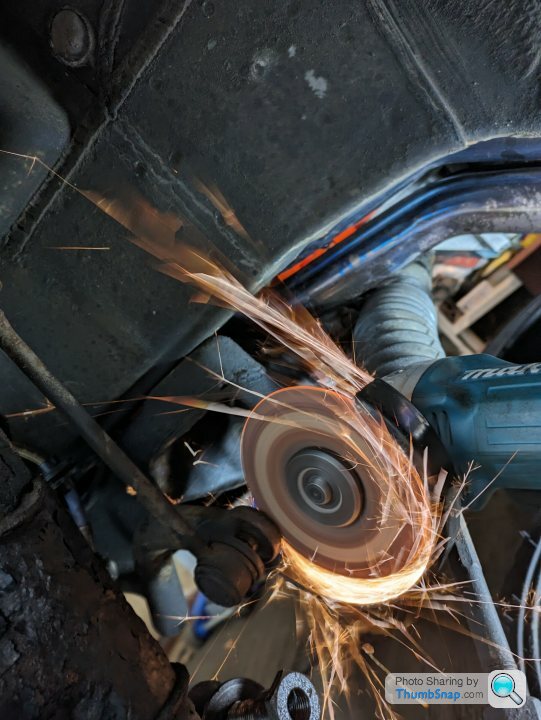
The drop link nuts were comically stuck as well, so the grinder came out to butcher the nut off. Not the most efficient method but naturally have replacement drop links that came with the Shockworks kit so no need to save the old ones!
Another pic of all the nice bits that'll be going in
The top mount cap on the Shockworks won't sit alongside the strut bar so will possibly swap it for a standard one, but not too fussed about that at the moment.
Passenger side also stripped apart, will wait for bits to arrive and generally butcher those bolts out.
Will measure some wire resistances and things next I think with regards the ABS fault, must try and get the tech2 software working again to actually get a proper reading of what it thinks is wrong...
No, I don't need to change the front bearings / wheel hubs, but they're here now, they're shiny, so apart it comes.
In theory though, because the three bolts that hold the bearing into the knuckle are 10mm allen heads. Which is great except of course they are corroded into oblivion, and red loctited too! Brilliant combo.
I got one of them out, the first one, so was feeling cautiously optimistic and then of course the 2nd one eventually rounds having not budged at all despite the blow torch, the penetrant and all sorts.
Decided to just take the knuckle out so I can get the bolts out using whatever means necessary (replacement knuckles are unobtainium it seems)
Not much else fought back which was nice, plenty needed heat but ultimately it came apart OK. Have ordered some SuperPro lower arms because why not, the ball joints will be old, there's a Pedders bush in the middle but it looked like possibly still a (black) factory original bush where it mounts to the subframe.
I was careless tapping the track rod end out of the knuckle and managed to chip the thread so the castle nut won't thread back on, but once again figured why not just replace them whilst it's apart, for the sake of £25 a side at this point... They're a bit worn out compared to new so it'll be a small improvement.
Can see the allens have been utterly obliterated now as I've tried all sorts to get them loose. Will get some of those bitey weapons or possibly drill them out or something. Going to be easier off the car anyway.
And no, honestly, it hasn't been recovered from the ocean floor.
After a bit of a break, I set about the other side, and lo' and behold, bolts came out no problem on this side...
Still, opted to take it all apart as will replace the lower arm and so on. I got to use this ball joint splitter that I mistakenly bought about 12 years ago, but definitely saved my bacon today!
The drop link nuts were comically stuck as well, so the grinder came out to butcher the nut off. Not the most efficient method but naturally have replacement drop links that came with the Shockworks kit so no need to save the old ones!
Another pic of all the nice bits that'll be going in
The top mount cap on the Shockworks won't sit alongside the strut bar so will possibly swap it for a standard one, but not too fussed about that at the moment.
Passenger side also stripped apart, will wait for bits to arrive and generally butcher those bolts out.
Will measure some wire resistances and things next I think with regards the ABS fault, must try and get the tech2 software working again to actually get a proper reading of what it thinks is wrong...
Krikkit said:
Good progress, I do the same these days - most crusty suspension bits just get cut off and new ones in their place.
For the Allen head bolts on the knuckles, have you access to a welder? Thing to do would be to fill the Allen cap with weld, then weld a big hex nut on the top. The heat will help loosen the loctite and corrosion, and the hex is a good surface to attack for removal.
I've tried the removal tools etc but this is the quickest and simplest way ime
I don't at the moment no, and have never welded, but I was thinking welding a nut to them would be probably the best solution...For the Allen head bolts on the knuckles, have you access to a welder? Thing to do would be to fill the Allen cap with weld, then weld a big hex nut on the top. The heat will help loosen the loctite and corrosion, and the hex is a good surface to attack for removal.
I've tried the removal tools etc but this is the quickest and simplest way ime
I may try the removal tools just until I can get to a mate that can weld
B'stard Child said:
Krikkit said:
fred bloggs said:
The welding thing rarely works, you cant weld to rust. Believe me, the multitude of motorcycle exhaust studs I've dealt with in my career always just come out with the drill.
Correct, you can't weld to rust, you just hit it with the grinder until you see steel... It works perfectly well and much quicker/easier than drilling.SuperPro lower arms have arrived, as have the Pedders track rod ends.
Quite the parts haul built up!
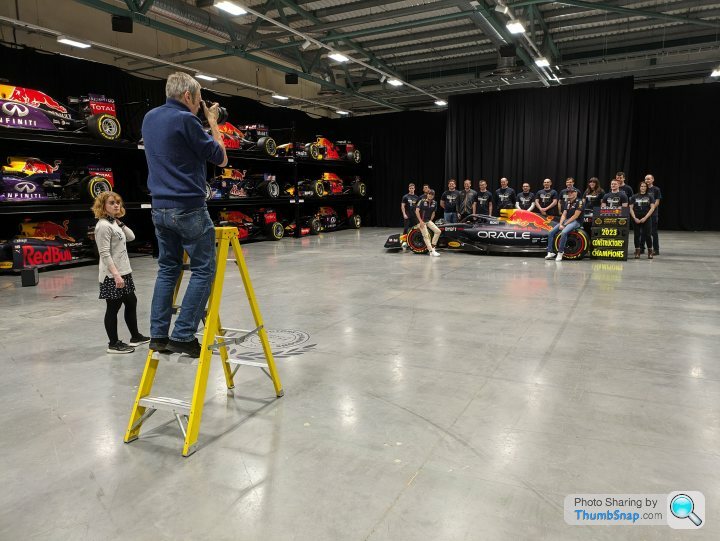
Not car related as such, but had team photos and things taken yesterday, a lot of celebration going on, so here's a photo of a photographer taking a photo

Great success!
I basically drilled a smaller hole down into the middle of the bolt and sacrificed a couple of halfords bits by basically hammering them right down into the newly made hole, then sent the impact gun at them at 1000Nm.
As we can see, one of them it just snapped the bolt in half where it had been drilled through, the other interestingly was actually another 10mm allen, but crucially this one was rusty and hammered in slightly off angle so it is now one with the bolt, but gripped enough that it broke the bolt loose and out it came!
Krikkit said:
Nice work! Good result.
Cheers, was a satisfying step, as at this point I think that's all of the likely obstacles out of the way, should be mostly downhill from here!TheAngryDog said:
Nice work! Getting rusty / crusty / s tty bolts out is always a PITA!
Sooooooooo, when do I bring the M5 around for fitting my coilovers? Seriously though, do you think I could pop round at some point to maybe make use of your ramp to do them please? I've never fitted them before but I'd like to give it a bash!
Yeah absolutely mate, you're very welcome!!tty bolts out is always a PITA!Sooooooooo, when do I bring the M5 around for fitting my coilovers?
Seriously though, do you think I could pop round at some point to maybe make use of your ramp to do them please? I've never fitted them before but I'd like to give it a bash!It's a bit awkward in the garage width wise so it might be something better done on the driveway, so I'd say it's probably mostly weather dependent depending on how hardy you're feeling at the time
I'm off between Christmas and New Year so if you're really keen (and on the assumption I've got somewhere to mount 4 wheels on the Monaro!) we could give it a punt then?
I'll have a bit of a google into the process on an E60 just in case there's some sort of magic tool needed or some evil German gotcha that'll mean I'm sadly stuck with a 680hp V10 on my drive
fred bloggs said:
Bolts in winter time. Mine came out when I pre heated them for 15 mins with a heat gun.
Annoyingly though, two X the offside replacement ones went noisy after a few thousand miles. The third one( a different brand) seems good.
Maybe I should have spent longer cooking them first time round, I had the torch on the exposed end of the thread and the general hub area where the loctite is for a good couple of minutes but certainly potential to get it hotter, soemthing to bear in mind.Annoyingly though, two X the offside replacement ones went noisy after a few thousand miles. The third one( a different brand) seems good.
Do you know what brands they were you had? I'm hoping going for Timken ones they'll be reasonable quality.
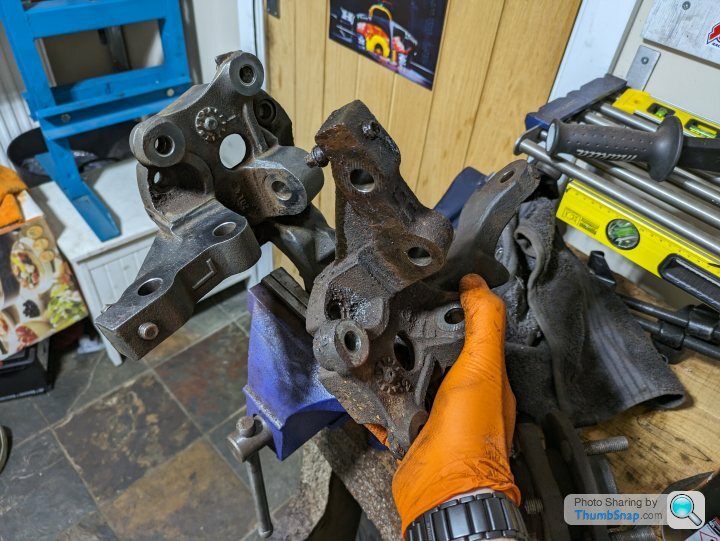
Got around to making a start on cleaning up the steering knuckles, not used a proper wire wheel before, it's very satisfying
Some comparisons during the process.
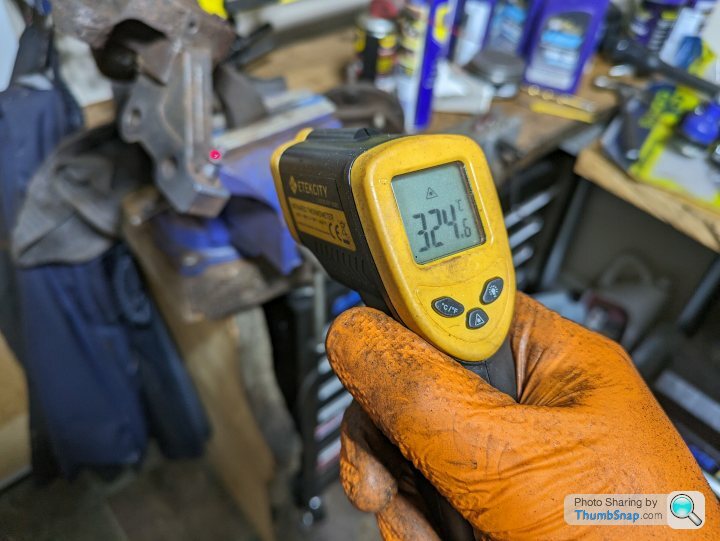
I also managed to get the camber bolts out. These have been soaking in penetrant for weeks which made little difference, so I cooked them until the bolt was glowing, my first 'Hi' reading on the thermometer. It was 500* plus but by the time I had the idea of taking a picture and got it focused it had dropped to a positively tepid 350ish.
Overall, satisfying but dusty work. I'm probably going to use a wire wheel attachment on the dremel to try and tidy up some of the smaller areas and where the bearing hub bolts seat etc.
Some comparisons during the process.
I also managed to get the camber bolts out. These have been soaking in penetrant for weeks which made little difference, so I cooked them until the bolt was glowing, my first 'Hi' reading on the thermometer. It was 500* plus but by the time I had the idea of taking a picture and got it focused it had dropped to a positively tepid 350ish.
Overall, satisfying but dusty work. I'm probably going to use a wire wheel attachment on the dremel to try and tidy up some of the smaller areas and where the bearing hub bolts seat etc.
Krikkit said:
If you want them really clean (for cheap) then home electrolysis is worth a look: https://www.instructables.com/Electrolytic-Rust-Re...
All you need is:
That's an interesting idea actually... All you need is:
- Sodium carbonate (£8 on Amazon: https://www.amazon.co.uk/Intralabs-Sodium-Carbonat...
- Big bucket
- 20A+ Battery charger
- Copper wire and sacrificial steel lump

As a bit of tinkering last night I thought I'd tidy up the not quite 8mm not quite 5/16 headed camber bolts.

These cleaned up OK, but given they're just M10 bolts I hunted around and found some crusty old exhaust bolts, cleaned those up and ran them through the threads with some Autosol and now at least when these seize in I've got a 17mm head to abuse to get them out!
Shall liberally copper grease them when it comes to assembly, they turn effortlessly by hand now, a pleasing little change.
99t said:
Nice work, I've fought a few rusty bolts on the Monaro recently so I know what a pain they can be!
I bought a cheap 1500w induction heater from China and I'm really impressed so far - the ability to heat just the fixing has really helped in a few cases - e.g. the LS1 harmonic damper bolt which my "big" impact wouldn't move when cold (and that is rarely beaten!). Time will tell what its durability is like.
Doesn't sound as though you are about to do so, but just a word of caution on reusing any fasteners that have been heated until glowing cherry red - they may no longer be the same grade that they were previously...
Oh yeah that harmonic damper bolt has a heat activated compound underneath the head, it is basically impossible to undo without heating it up first, then it comes off easily. My 1000Nm Makita was also defeated by it, but a bit of blow torch on it and it popped out no problem!I bought a cheap 1500w induction heater from China and I'm really impressed so far - the ability to heat just the fixing has really helped in a few cases - e.g. the LS1 harmonic damper bolt which my "big" impact wouldn't move when cold (and that is rarely beaten!). Time will tell what its durability is like.
Doesn't sound as though you are about to do so, but just a word of caution on reusing any fasteners that have been heated until glowing cherry red - they may no longer be the same grade that they were previously...
Yep fair point on the heat treating of the bolts, will keep it in mind
My plan is mostly to just clean things up a little and the associated threads in the hope of keeping things a little less seized now that it's all apart. To be fair with the wagon and the Ute also available, and putting 600hp through 255 rears, the Ro will probably see less wintery condtions than the previous 70,000 miles, so maybe it won't be that bad anyway!
Been a while, not done much with the cars over the winter but things are finally going back together again.
Replaced some of the rather more used bolts on the front end, not least because throwing 20 year old crusty bolts back in to all these nice clean parts just felt wrong
A friend and I put the rear springs / dampers in (spring isn't captive as the damper isn't attached in this pic)
I gave Shockworks the ride height measurements so it should be able to sit back where it was but my word it all looks / feels a bit firmer back there!
As I couldn't resist I hung a front coilover just to see how it looked, will likely chip away at the front over the next few days
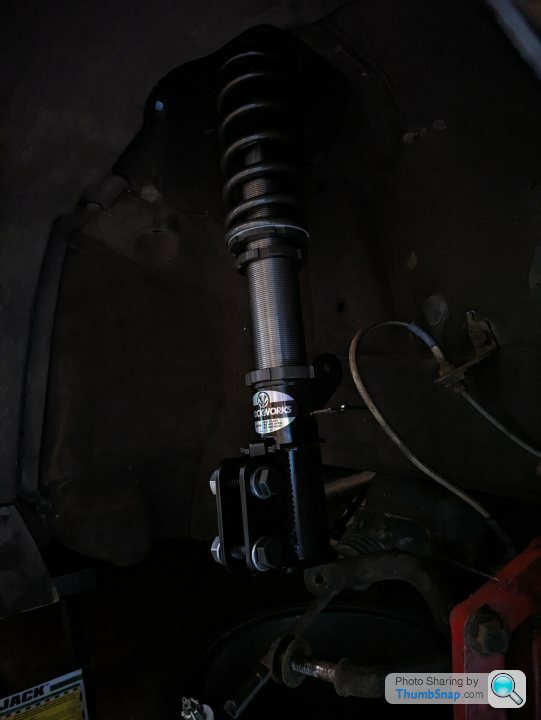
Strut brace won't fit with these top caps, the factory original one may do, but I don't have one to hand to find out, will see if I can swap mine with someone!

In other news, picked up a BRZ for the girlfriend. It already has coilovers and unequal length headers / exhaust, so it sounds great, drives great, genuinely wish I'd got one 10 years ago, it's a lot of fun and a great contrast to the big V8s.
This was prompted by the E36 water pump going. I have a replacement (from the original engine) but it's too cold to bother with changing it to be honest. If anyone wants a very cheap little project (minty clean underneath) shoot me a PM
Replaced some of the rather more used bolts on the front end, not least because throwing 20 year old crusty bolts back in to all these nice clean parts just felt wrong
A friend and I put the rear springs / dampers in (spring isn't captive as the damper isn't attached in this pic)
I gave Shockworks the ride height measurements so it should be able to sit back where it was but my word it all looks / feels a bit firmer back there!
As I couldn't resist I hung a front coilover just to see how it looked, will likely chip away at the front over the next few days
Strut brace won't fit with these top caps, the factory original one may do, but I don't have one to hand to find out, will see if I can swap mine with someone!
In other news, picked up a BRZ for the girlfriend. It already has coilovers and unequal length headers / exhaust, so it sounds great, drives great, genuinely wish I'd got one 10 years ago, it's a lot of fun and a great contrast to the big V8s.
This was prompted by the E36 water pump going. I have a replacement (from the original engine) but it's too cold to bother with changing it to be honest. If anyone wants a very cheap little project (minty clean underneath) shoot me a PM
Silly things but a quick dusting of paint over the strut towers where the old strut brace mounts had rubbed and left some paint / filth etc.
Again more to check fit etc, popped one of the lower control arms in. Cleaned up the threads on the forward arm (this has a name I can't remember) so it all goes together pretty cleanly now.

In terms of where to apply the supplied grease, only the bushing that goes into the subframe will be contacting any metal so I'm assuming that's where it should go, zero instructions :shrug:
Again more to check fit etc, popped one of the lower control arms in. Cleaned up the threads on the forward arm (this has a name I can't remember) so it all goes together pretty cleanly now.
In terms of where to apply the supplied grease, only the bushing that goes into the subframe will be contacting any metal so I'm assuming that's where it should go, zero instructions :shrug:
Got on with it this evening for a couple of hours, all went together really nicely (benefit of new / clean parts!) and was pretty enjoyable.
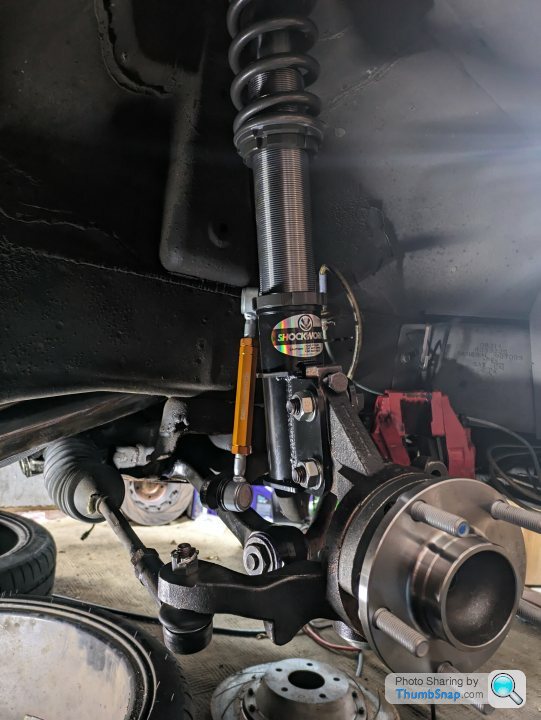
Things are copper slipped where possible and generally everything is pretty damn clean, so maybe it won't be such a nuisance to do bits in the future, we shall see!
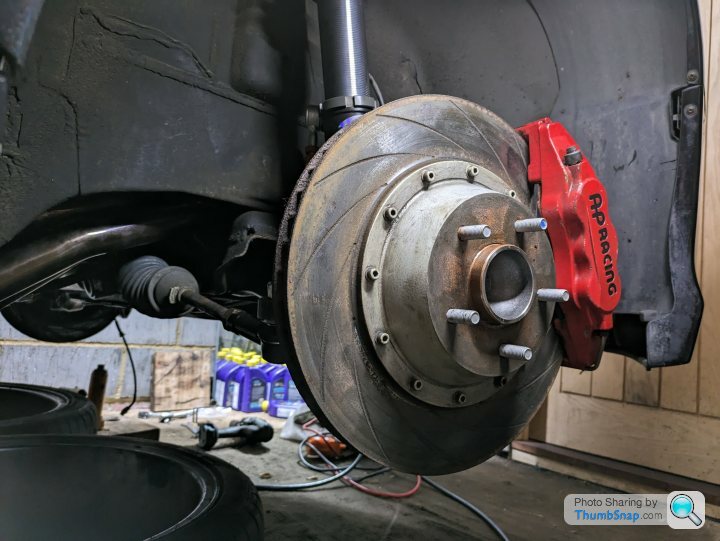
All concealed by the enormous APs of course.
Top mounts look tidy, I may be able to fit an original strut brace around them, I'll have to have a look at one at a meet and see if it looks like it'll clear.
Going to investigate the ABS fault as best I can, I may pop it down in its wheels to get an idea of height etc as there's going to be a lot of adjustment to do I suspect...
Things are copper slipped where possible and generally everything is pretty damn clean, so maybe it won't be such a nuisance to do bits in the future, we shall see!
All concealed by the enormous APs of course.
Top mounts look tidy, I may be able to fit an original strut brace around them, I'll have to have a look at one at a meet and see if it looks like it'll clear.
Going to investigate the ABS fault as best I can, I may pop it down in its wheels to get an idea of height etc as there's going to be a lot of adjustment to do I suspect...
Popped it back down on the wheels. I clearly went a bit cautious on front ride height

67.5cm currently, vs 59.5cm before
This is with the coilover set up physically about 25mm shorter than the previous spring / damper.
Out of curiosity I weighed things as I normally do, Shockworks front coilover and drop link was 8kg, vs Pedders spring / damper / drop link 12kg (with a lot of rust...!)
Not a bad drop in unspring weight at the front that, and combined with the fact the AP caliper was 0.6kg lighter than stock and the disc was 2.7kg lighter, talking over 7kg a corner!
Gassing Station | Readers' Cars | Top of Page | What's New | My Stuff