Hold(en) my beer - Monaro, Ute and Commodore content
Discussion


So I mostly just continued trying to tidy up the wiring, and some other little bits.
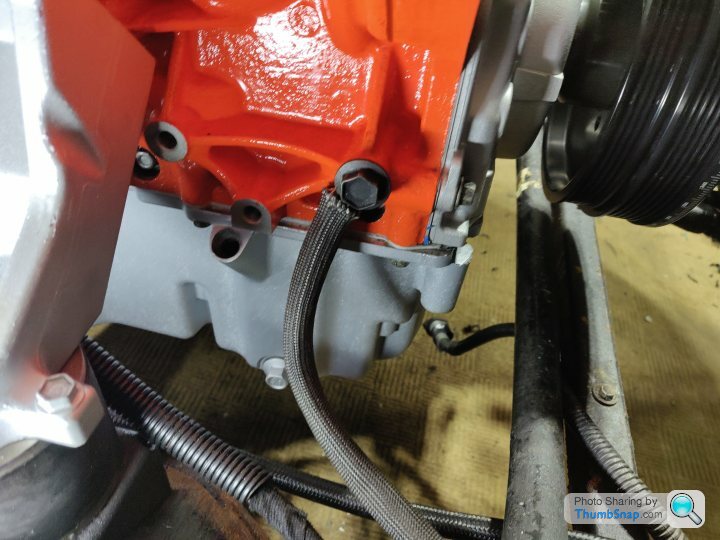
Swapped the coolant temp sensor from front right to back left
Will just be one less wire running to the front over the engine.
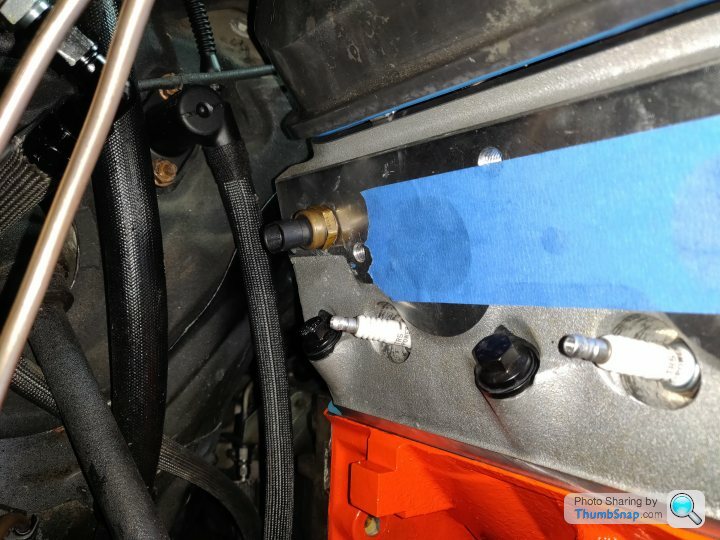
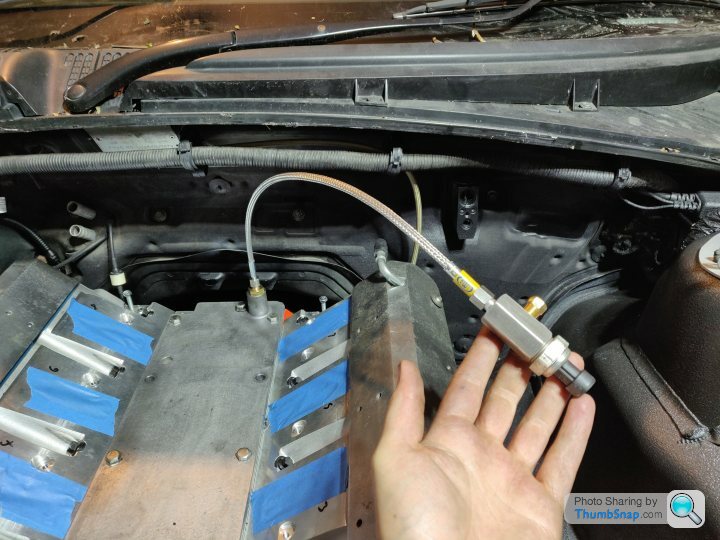
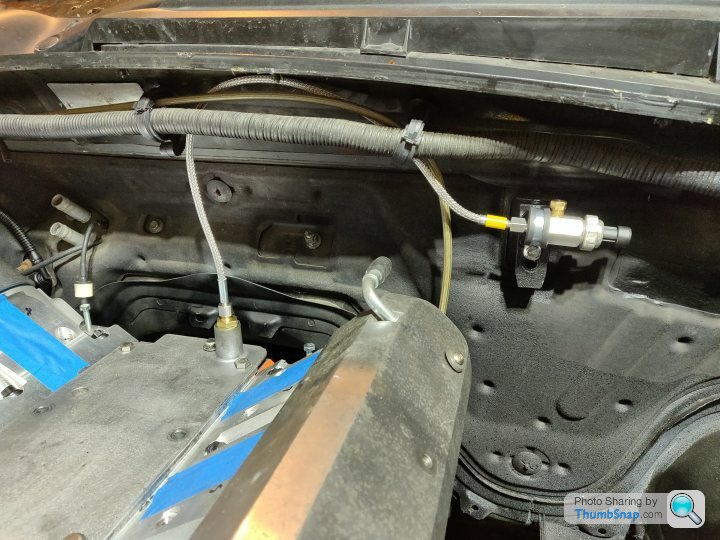
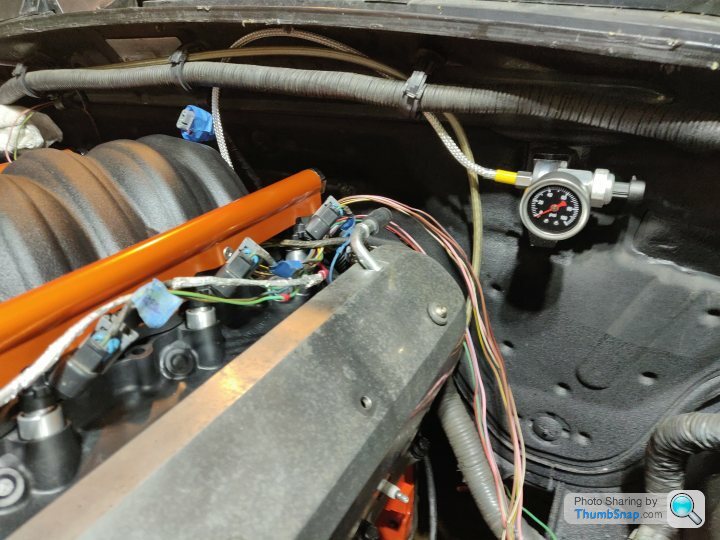
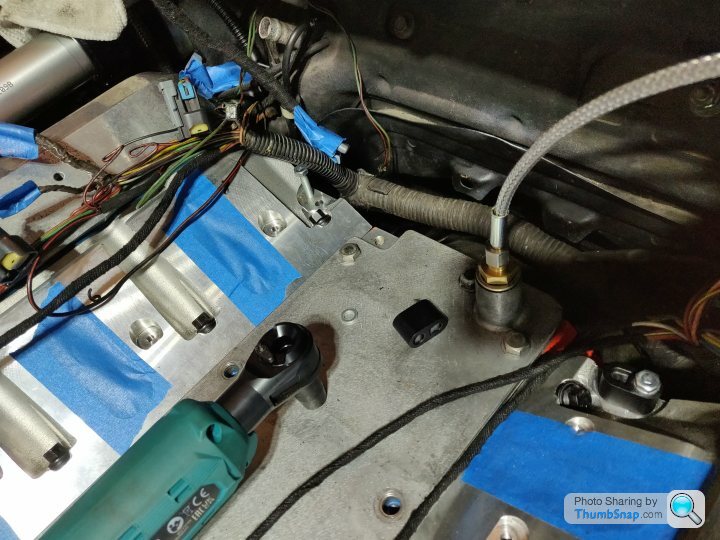
Also popped in this nice remote oil pressure sender line, which also gives me somewhere to mount a mechanical oil pressure gauge in the (currently capped) 1/8 NPT port.
Once again laid the wiring back in the car, routed almost all of it into position this time and it mostly fits quite easily.
There's still lots to do, just keeping checking it'll fit and what I need to separate out a little more etc to make sure there's length to reroute things etc.
I started thinking too far ahead with what's left to do at this point so thought I'd have a play with my next comical attempt at being creative...
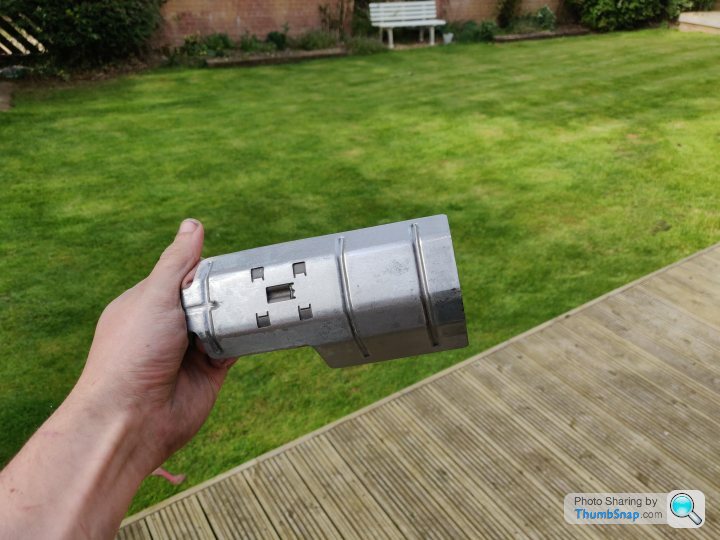
So the oil pump is driven by the crank, meaning you can't prime it without cranking the engine. GM say plugs out and let 'er eat is fine, but they recommend using a pressure priming tool thingy if you have one available.
Even the cheapest eBay version costs £60, so I thought I'd give it a punt with some cheap bits of amazon tat!
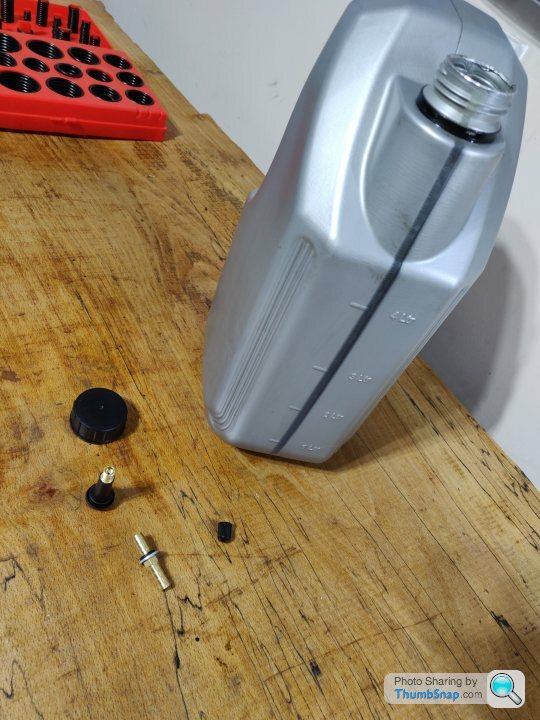
'pickup' that'll sit in the oil and then go through the lid and 'pump' the oil into the engine.
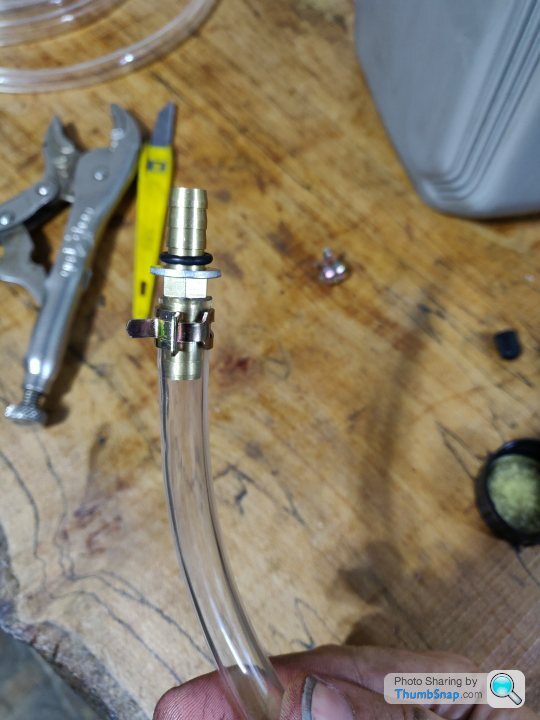
Schrader valve also in the lid to attach the air line to... And some hot glue to try and help it seal
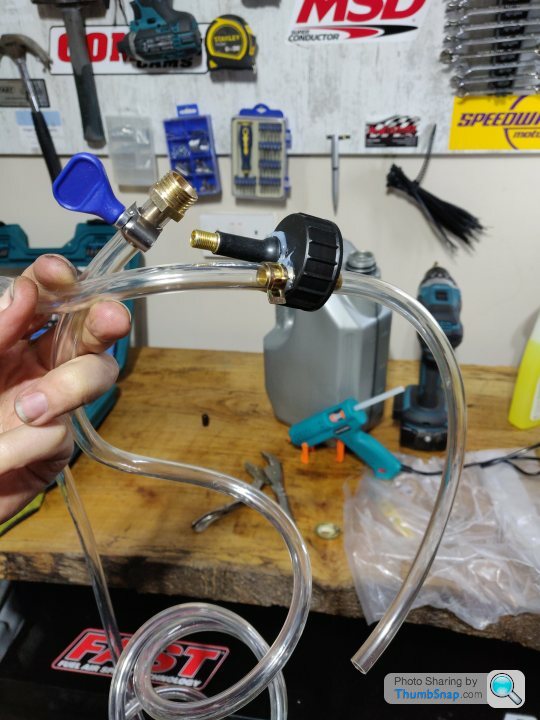
It got worryingly close to working first time
https://youtube.com/shorts/43aGu17x8Zc?feature=sha...
Swapped the coolant temp sensor from front right to back left
Will just be one less wire running to the front over the engine.
Also popped in this nice remote oil pressure sender line, which also gives me somewhere to mount a mechanical oil pressure gauge in the (currently capped) 1/8 NPT port.
Once again laid the wiring back in the car, routed almost all of it into position this time and it mostly fits quite easily.
There's still lots to do, just keeping checking it'll fit and what I need to separate out a little more etc to make sure there's length to reroute things etc.
I started thinking too far ahead with what's left to do at this point so thought I'd have a play with my next comical attempt at being creative...
So the oil pump is driven by the crank, meaning you can't prime it without cranking the engine. GM say plugs out and let 'er eat is fine, but they recommend using a pressure priming tool thingy if you have one available.
Even the cheapest eBay version costs £60, so I thought I'd give it a punt with some cheap bits of amazon tat!
'pickup' that'll sit in the oil and then go through the lid and 'pump' the oil into the engine.
Schrader valve also in the lid to attach the air line to... And some hot glue to try and help it seal
It got worryingly close to working first time
https://youtube.com/shorts/43aGu17x8Zc?feature=sha...
Edited by SturdyHSV on Friday 1st April 00:01


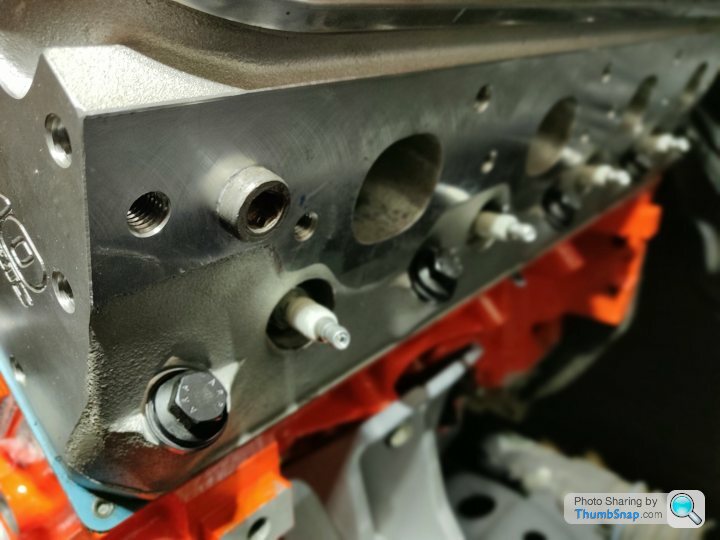
Just a small one, some replacement fittings have arrived for the fuel line, the rubber ring that goes around the gearstick, and the little mechanical oil pressure gauge, which I have fitted
Bit of PTFE tape around the threads, leaving some clean at the start.
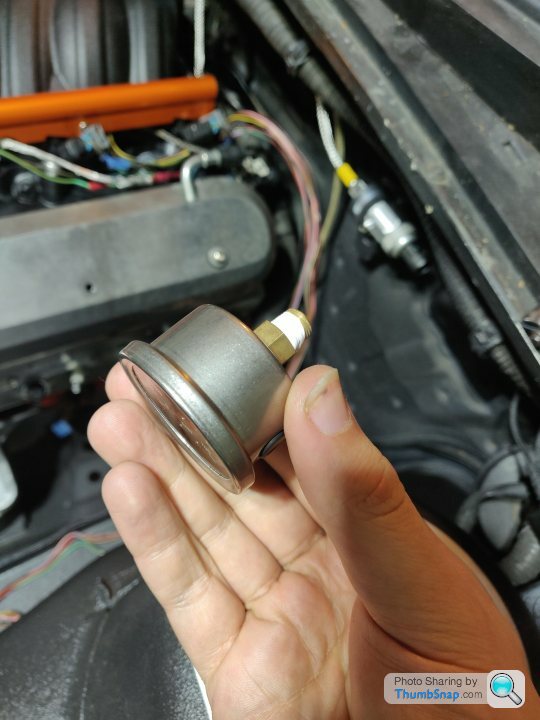
Rotated the plug around so it points away from the firewall, screwed it in and tightened until tight and upright
Will get on with some more progress over the weekend.
Bit of PTFE tape around the threads, leaving some clean at the start.
Rotated the plug around so it points away from the firewall, screwed it in and tightened until tight and upright
Will get on with some more progress over the weekend.
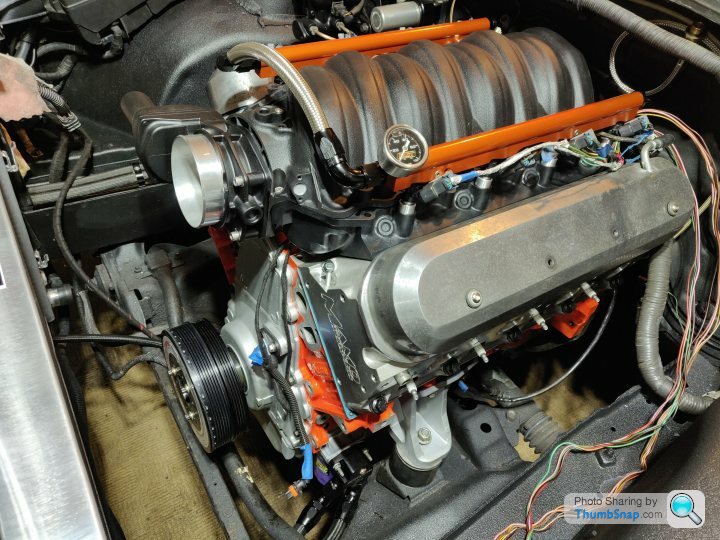
So I spent some time yesterday finishing off the 'tidying' of the engine harness. This was mostly separating bits out and rewrapping them so they could run separately where needed.
There were also a few snips to make to extend the odd wire to allow a connector to be folded out of the way etc.
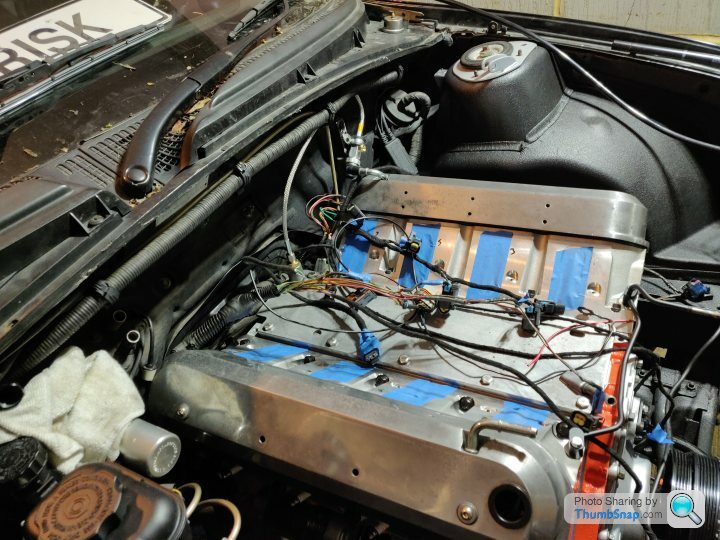
Bit of a mess, but sort of enjoyable in a methodical kind of way.
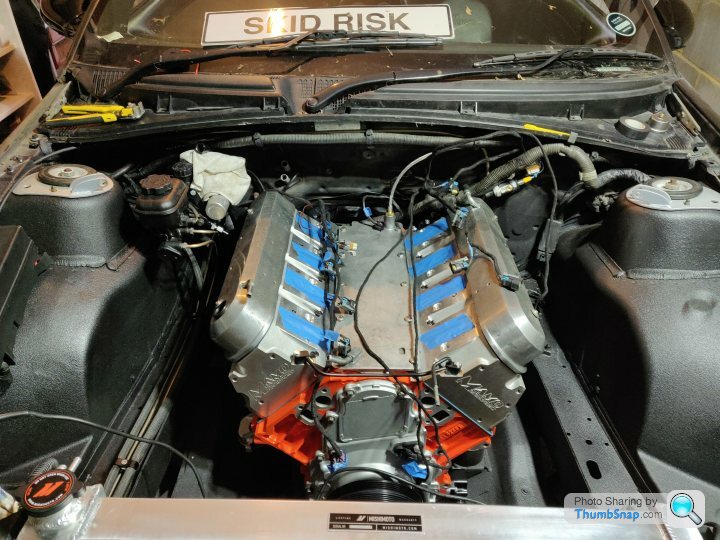
Happy that everything (probably) will now reach where it needs to go and the few bits at the front of the engine can run underneath the intake manifold.
For now the MAF connector will just run over the top, I plan to go to an SD tune (so no MAF) down the line, at which point I'll separate out the intake temp sensor wires and just run those to the IAT I have in the over the radiator intake.
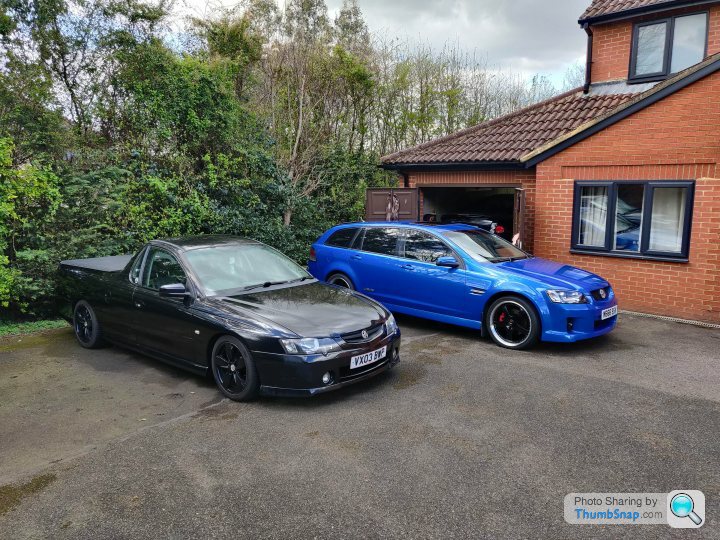
Some proof that the other cars still exist
Oh I also put on the steam port connector / plugs, which I'd cleaned up and painted black some time ago.
Today came the task of replacing those 2 leaky fuel line fittings and see if they solved the problem... I spoke to Torques who supplied them and they said, obviously, that they should be fine, they've never heard of any leaking and all they can say is if some debris had gotten in somehow that might have stopped the seal working.
I've used plenty of their fittings so gave them the benefit of the doubt and bought 2 replacements. I will see about sending the 2 that leaked back to them for a refund.
The fuel tank outlet has a quick disconnect fitting on. Which is quick if you can reach it, but really quite awkward if you can't
I managed to use my delicate computer nerd little fingers to fiddle it off, as I thought this time I'd install the whole lot onto the hose end in relative space, and then just clip the quick disconnect bit into place, which seems more sensible than applying any awkward forces to the fitting.

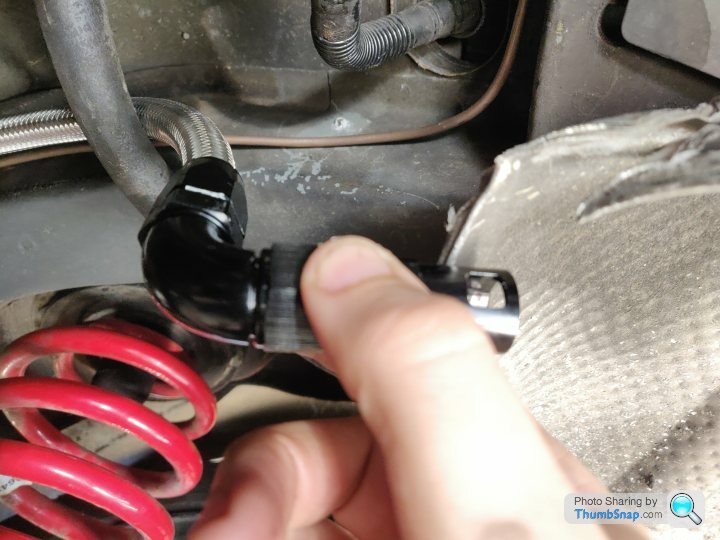

I didn't take as many in progress shots with the 45* fitting on the fuel rail, but again learning from possible mistake last time, I first secured the (previously leaking) bit onto the fuel rail, and then manipulated the fuel hose into position and fitted the end into the hose.
As always with torques' AN fittings this does seem to scuff up the 'anodising' a lot more than you'd imagine, despite using an aluminium AN spanner to tighten them.
So moment of truth, battery connected again, fuel pumo fuse back in, key turned and hear the whine of the pump...

Yay, fuel pressure, and no leaks!
I shall soldier on today and see what additional progress I can make.
There were also a few snips to make to extend the odd wire to allow a connector to be folded out of the way etc.
Bit of a mess, but sort of enjoyable in a methodical kind of way.
Happy that everything (probably) will now reach where it needs to go and the few bits at the front of the engine can run underneath the intake manifold.
For now the MAF connector will just run over the top, I plan to go to an SD tune (so no MAF) down the line, at which point I'll separate out the intake temp sensor wires and just run those to the IAT I have in the over the radiator intake.
Some proof that the other cars still exist
Oh I also put on the steam port connector / plugs, which I'd cleaned up and painted black some time ago.
Today came the task of replacing those 2 leaky fuel line fittings and see if they solved the problem... I spoke to Torques who supplied them and they said, obviously, that they should be fine, they've never heard of any leaking and all they can say is if some debris had gotten in somehow that might have stopped the seal working.
I've used plenty of their fittings so gave them the benefit of the doubt and bought 2 replacements. I will see about sending the 2 that leaked back to them for a refund.
The fuel tank outlet has a quick disconnect fitting on. Which is quick if you can reach it, but really quite awkward if you can't
I managed to use my delicate computer nerd little fingers to fiddle it off, as I thought this time I'd install the whole lot onto the hose end in relative space, and then just clip the quick disconnect bit into place, which seems more sensible than applying any awkward forces to the fitting.
I didn't take as many in progress shots with the 45* fitting on the fuel rail, but again learning from possible mistake last time, I first secured the (previously leaking) bit onto the fuel rail, and then manipulated the fuel hose into position and fitted the end into the hose.
As always with torques' AN fittings this does seem to scuff up the 'anodising' a lot more than you'd imagine, despite using an aluminium AN spanner to tighten them.
So moment of truth, battery connected again, fuel pumo fuse back in, key turned and hear the whine of the pump...
Yay, fuel pressure, and no leaks!
I shall soldier on today and see what additional progress I can make.
No 'spray fuel everywhere' leaks, but possibly a bit of a weep... I may not have tightened it down enough though so have given it a good snug and am keeping an eye on it. It's holding plenty of pressure so is at least a decent test.
I hooked up the power steering at last and got to hear my new power steering solution come to life for the first time. It sounded very Jetsons initially which I thought was kinda cool, but it just kept climbing in pitch and in all honesty, scared me that I'd messed something up
After many progressively longer trials, I eventually just let it eat and it finally settled at an actual pitch, before calming down ever so slightly...
Enjoy, see if you can guess when it's going to stop climbing!
So despite wailing like a drag race in the jetsons, it at least doesn't leak anywhere. I bled it as best I could, and then remembered the brakes are now also hydraulically assisted, so tried to bleed that too.
It's behaving oddly in that the pedal doesn't return when you lift off it, so have emailed Hydratech to see if I've likely cocked something up or perhaps more bleeding is in order. With no hydraulic assist the pedal returns instantly as you'd expect, so something is afoot.
So also set about some general boring tidying up, there was a ground that bolted to the air con bracket, I'm glad I taped off the various bolt faces when I painted so I now have plenty of nice clean grounding options.
Connected up the starter motor as well, I've removed the relay just in case I've messed something up given how much wiring I've messed about with
Naturally it transpired that the heat shield for the starter doesn't go on once the starter is in place, so I had to drop the starter motor, again.
To delay this I gave the shield a 'polish' involving a wide array of pointless dremel bits and various other weapons, it ended up better, if very much a five footer.

In place, looks tidy enough.

Thought I might as well connect the various electrical bits, everything seems to plug in fine, even the connector I ran over still clicked into place so that's a bonus.
For the initial firing I'm going to be running the MAF and also have the coil packs on the rocker covers as standard. It's not worth delaying firing it up to mess about with relocating them, I'm not convinced they'll fit behind the manifold up on the firewall so thought I'd get it running first before messing about.
The crank position sensor cable had clearly had a hard life as the plastic trunking had all gone brittle and crumbled in the hand, so I re-wrapped that and put a new (reused from elsewhere) sheath of the plastic trunking on.
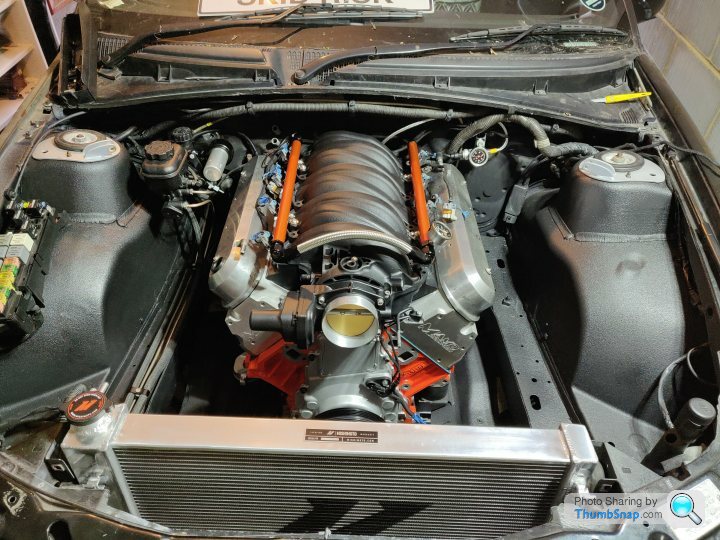
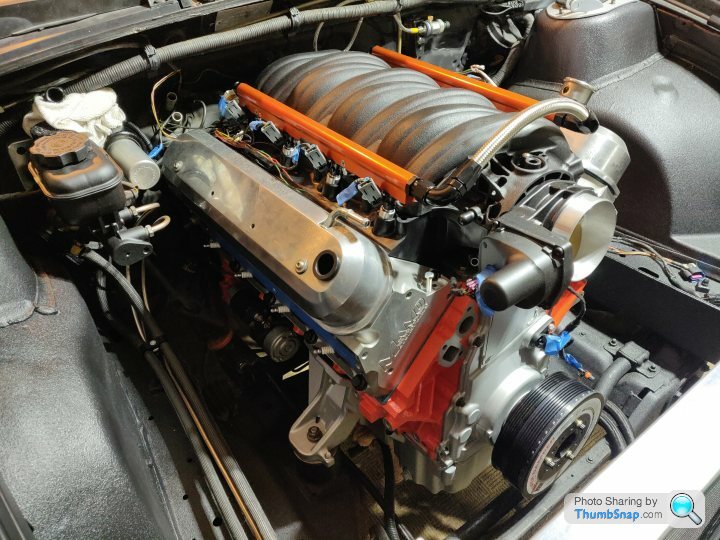
This is it basically wired up. I'm pleased with how clean it looks wiring wise, there's still some blue labels on things which will go, but overall, doesn't look too bad.
Coilpacks on the valve covers will ugly it up a bit, but a good foundation to work on.
So next up I'm going to put the exhaust manifolds on (headers...) and check cables aren't too close and so on. Will see if the O2 sensors reach to the new header locations, I expect they won't but extensions are available so no big deal.
At that point it's basically put the water pump and alternator on, put the intake / MAF on, fill with fluids and probably take a punt at firing it up
I hooked up the power steering at last and got to hear my new power steering solution come to life for the first time. It sounded very Jetsons initially which I thought was kinda cool, but it just kept climbing in pitch and in all honesty, scared me that I'd messed something up
After many progressively longer trials, I eventually just let it eat and it finally settled at an actual pitch, before calming down ever so slightly...
Enjoy, see if you can guess when it's going to stop climbing!
So despite wailing like a drag race in the jetsons, it at least doesn't leak anywhere. I bled it as best I could, and then remembered the brakes are now also hydraulically assisted, so tried to bleed that too.
It's behaving oddly in that the pedal doesn't return when you lift off it, so have emailed Hydratech to see if I've likely cocked something up or perhaps more bleeding is in order. With no hydraulic assist the pedal returns instantly as you'd expect, so something is afoot.
So also set about some general boring tidying up, there was a ground that bolted to the air con bracket, I'm glad I taped off the various bolt faces when I painted so I now have plenty of nice clean grounding options.
Connected up the starter motor as well, I've removed the relay just in case I've messed something up given how much wiring I've messed about with
Naturally it transpired that the heat shield for the starter doesn't go on once the starter is in place, so I had to drop the starter motor, again.
To delay this I gave the shield a 'polish' involving a wide array of pointless dremel bits and various other weapons, it ended up better, if very much a five footer.
In place, looks tidy enough.
Thought I might as well connect the various electrical bits, everything seems to plug in fine, even the connector I ran over still clicked into place so that's a bonus.
For the initial firing I'm going to be running the MAF and also have the coil packs on the rocker covers as standard. It's not worth delaying firing it up to mess about with relocating them, I'm not convinced they'll fit behind the manifold up on the firewall so thought I'd get it running first before messing about.
The crank position sensor cable had clearly had a hard life as the plastic trunking had all gone brittle and crumbled in the hand, so I re-wrapped that and put a new (reused from elsewhere) sheath of the plastic trunking on.
This is it basically wired up. I'm pleased with how clean it looks wiring wise, there's still some blue labels on things which will go, but overall, doesn't look too bad.
Coilpacks on the valve covers will ugly it up a bit, but a good foundation to work on.
So next up I'm going to put the exhaust manifolds on (headers...) and check cables aren't too close and so on. Will see if the O2 sensors reach to the new header locations, I expect they won't but extensions are available so no big deal.
At that point it's basically put the water pump and alternator on, put the intake / MAF on, fill with fluids and probably take a punt at firing it up
Edited by SturdyHSV on Sunday 10th April 19:29
Polly Grigora said:
Jesus Mary and Joseph, that's loud, did sound like lift off imminent
Here's another loud one
Thanks for digging that up, glad it's not just mine that sounds so busy!Here's another loud one
Was thinking my slow brake pedal return might be that the low pressure return is perhaps either pinched in one of the clips that run along the chassis rail, or possibly just where I'm T'ing the two low pressure returns together, perhaps it's not flowing so well. I've ordered a Y shaped join instead of the T which should hopefully promote more sensible flow.
Have heard back from the guys at Hydratech who made the hydraulic brake booster, apparently the symptoms I'm seeing are typically indicative of air / micro bubbles trapped in the lines. They say it can take 100 - 150 miles to get all the bubbles out, so I'm not too worried about that at the moment.
They also said to be careful with Y fittings as they can tend to get smaller on the inside and cause back pressure. The low pressure return is just a 'spitter' apparently and only flows when you let off the pedal, and if it's got too much back pressure it'll cause it to self apply or drag the brakes, so something to keep an eye on, the front wheels spin freely so I don't think it's self applying the brakes at least.
Also, in place of the faff of relocating the coilpacks, I'm weighing up getting some of the Holley 2 piece valve covers that hide the coilpacks underneath. This keeps things OEM (desirable when I've changed so much other stuff) and keeps a nice clean look (desirable when I've changed so much stuff in the pursuit of looks!)
This leaves me with a style choice that I'll throw open to the floor, whereby it shall remain a democracy until I make up my mind Choices are either Chevrolet script or a finned finish (not interested in the Holley logo being on there), and then either natural or polished silver to match the heads / how it looks now, chevy orange to match the block, or black to match the intake manifold.
I'm sort of liking all the colour options, but I may have a leaning towards finned orange...
Natural

Polished

Orange

Black

Would love to hear people's thoughts...
They also said to be careful with Y fittings as they can tend to get smaller on the inside and cause back pressure. The low pressure return is just a 'spitter' apparently and only flows when you let off the pedal, and if it's got too much back pressure it'll cause it to self apply or drag the brakes, so something to keep an eye on, the front wheels spin freely so I don't think it's self applying the brakes at least.
Also, in place of the faff of relocating the coilpacks, I'm weighing up getting some of the Holley 2 piece valve covers that hide the coilpacks underneath. This keeps things OEM (desirable when I've changed so much other stuff) and keeps a nice clean look (desirable when I've changed so much stuff in the pursuit of looks!)
This leaves me with a style choice that I'll throw open to the floor, whereby it shall remain a democracy until I make up my mind
Choices are either Chevrolet script or a finned finish (not interested in the Holley logo being on there), and then either natural or polished silver to match the heads / how it looks now, chevy orange to match the block, or black to match the intake manifold.I'm sort of liking all the colour options, but I may have a leaning towards finned orange...
Natural
Polished
Orange
Black
Would love to hear people's thoughts...
Edited by SturdyHSV on Tuesday 12th April 10:14
Out of curiosity I put a poll together over in the HSV & Monaro section, here as can't create one in line...
https://www.pistonheads.com/gassing/topic.asp?h=0&...

I did think about on the inner wings, but I think it's too tidy on there for me to want to put stuff on them. I at least already have the harness extensions from the last time I mounted them on the fronts of the wings.
https://www.pistonheads.com/gassing/topic.asp?h=0&...
Rushjob said:
Finned orange for me....
Jader1973 said:
Finned orange for me too.
Appreciated, that is where I was initially leaning, although it won't match the fuel rails, might look a bit crap. Definitely thinking I should have gone black with the rails now... gweaver said:
I think you can have too much orange. Natural or black for me.
That's a fair point, I think the natural finish would tie in better than the polished, will blend in with the heads nicely, but yeah I like the contrast of the black and how it'd tie in to the manifold and so on....fred bloggs said:
I mounted the coils on the inner wings, just above the chassis rails. The standard length leads will reach.
When I put the new oil pump,in mine, I packed the pump with vaseline before shimming it up. It primed perfectly.
Yeah I packed mine with assembly lube but hadn't heard the vaseline trick before I'd put it all together. I'm happy I'll be able ot prime it with my cobbled together pump tool, which also has the benefit that I can check for oil leaks before things fire up as well (in theory...)When I put the new oil pump,in mine, I packed the pump with vaseline before shimming it up. It primed perfectly.
I did think about on the inner wings, but I think it's too tidy on there for me to want to put stuff on them. I at least already have the harness extensions from the last time I mounted them on the fronts of the wings.
Samjeev said:
Personally I'd say black myself  Never been a fan of the chevy orange.
Going to pick up either some basic cast Ali ones and have them splashed in candy red or just go for black/wrinkle black for my own.
Sacrilege! Never been a fan of the chevy orange.Going to pick up either some basic cast Ali ones and have them splashed in candy red or just go for black/wrinkle black for my own.
Despite most suggestions to the contrary, I'm actually now leaning towards the 'natural' finish as it'll likely blend with the cylinder heads fairly unnoticeably, and won't be introducing too much other colour, as I'm already fairly happy with how it looks...
I'll perhaps stick a header on this evening to see whether the addition of more shiny bits sways my mind one way or another... Will ask the girlfriend too, she's a bit of an artist so will hopefully have a useful opinion on engine bay composition.


Gassing Station | Readers' Cars | Top of Page | What's New | My Stuff