Hold(en) my beer - Monaro, Ute and Commodore content
Discussion


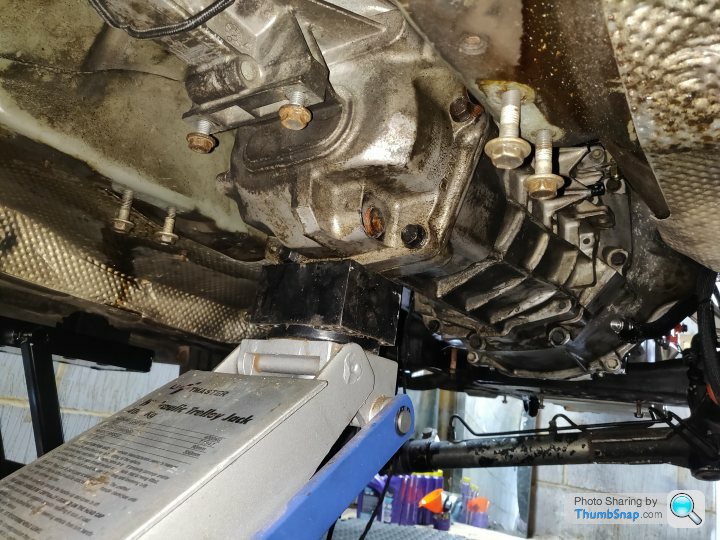
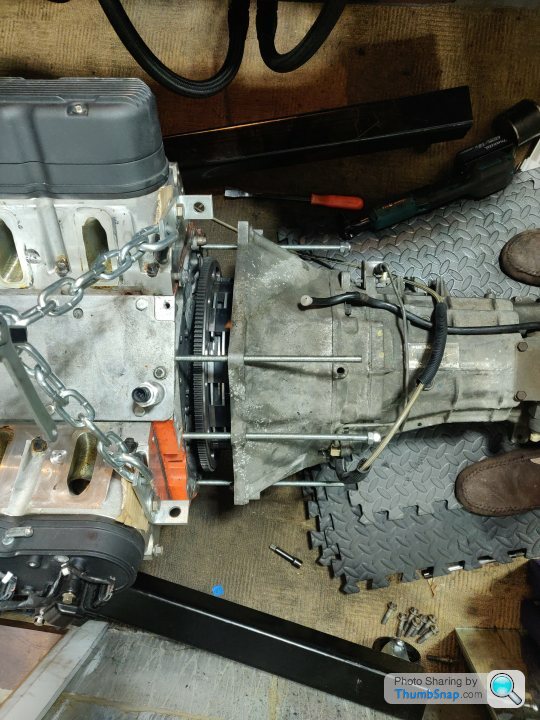
Progress once more, although always slower than I expect. Gearbox supported (emotionally and physically)
Crane unfurled and attached
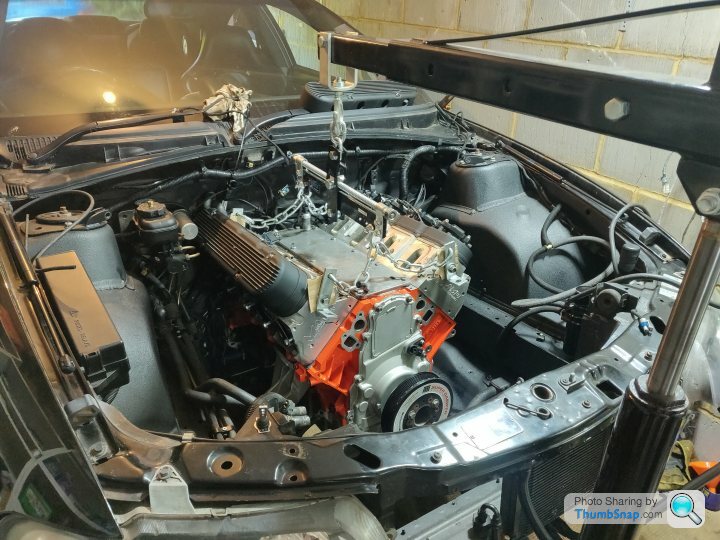
Lifting commences, and after this naturally it got a bit too busy for pictures
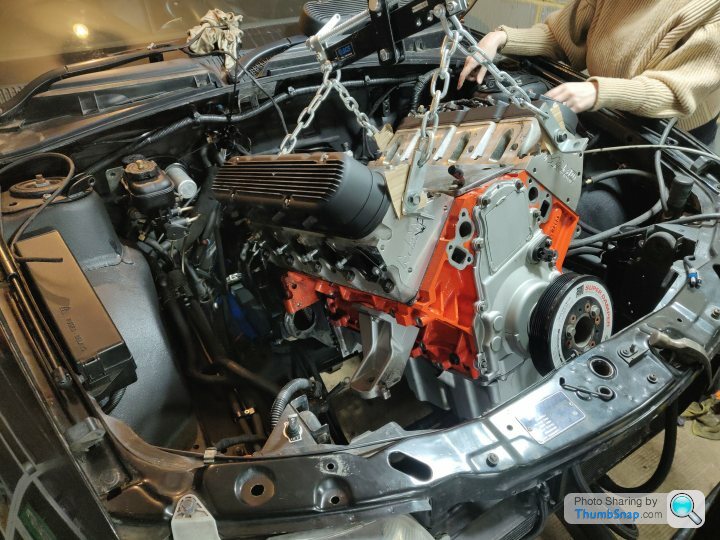
Needless to say, it is definitely now out
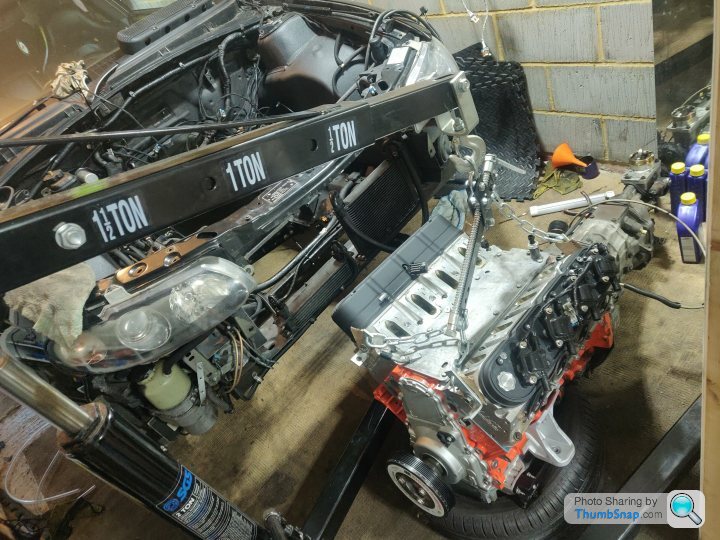
Doing this in a garage with no room to move the crane is still awkward. Gearbox getting separation anxiety, doing my best to support it in this difficult time with threaded rod.
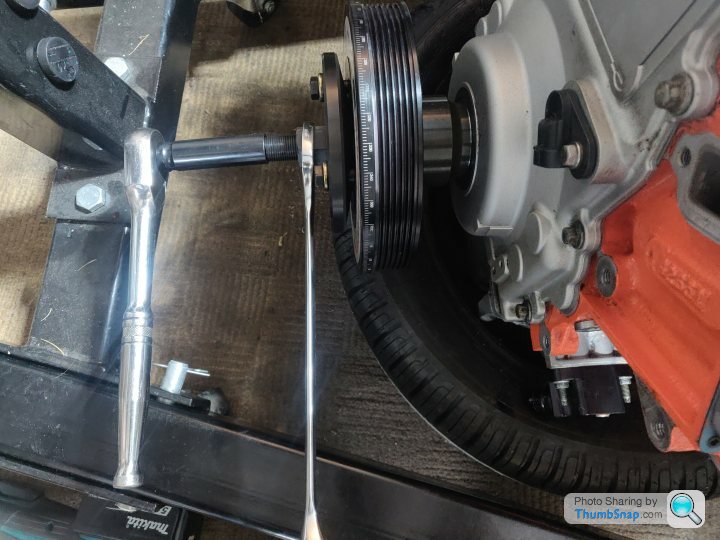
The ATI puller is overpriced but very effective, at this point I'm glad I spent the money.
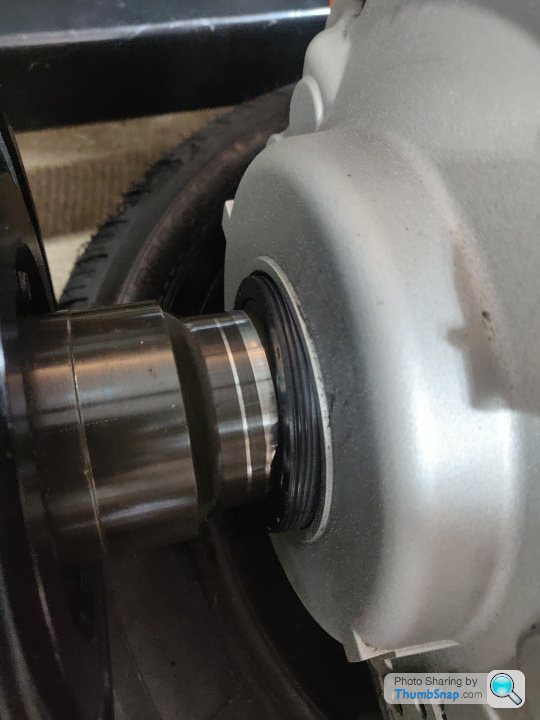
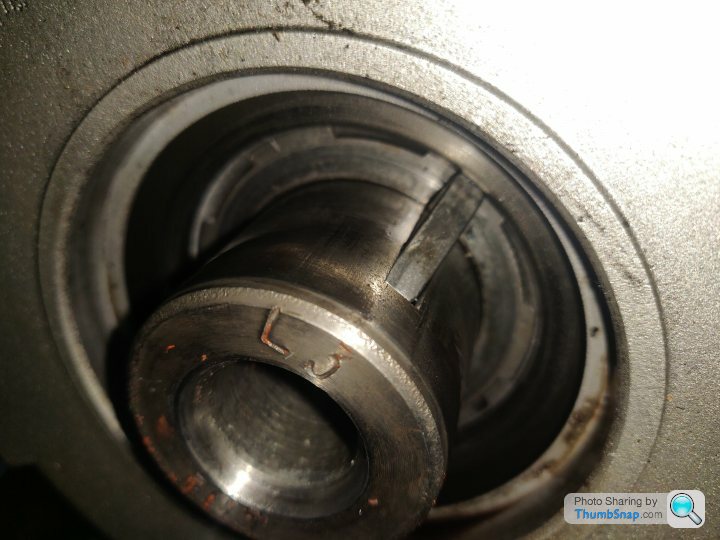
That's odd, the seal is coming out with it...
Well jesus I f ked that right up eh!
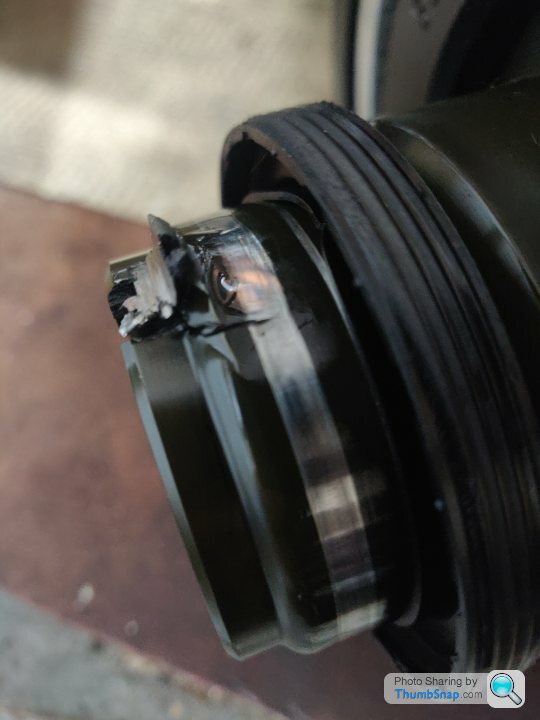
I can only assume the keyway was slightly off the crank pin and it's pushed it up like this.
That's going to make getting the oil pump off a bit of a laugh. I wonder if that has ended up pressing that gear up against the rear of the oil pump housing
That's enough disasters for one day, will move on to trying to wrestle the engine onto the stand and up the step into the workshop tomorrow for actual disassembly.
It would have definitely taken some force to make such a mess of the damper there, there were a couple of cracking sounds when tightening it down, but in my defence there were when taking it off as well when it finally cracked loose or moved significantly, so I just assumed that was it moving in to place.
Certainly the actual installation of the pulley was a breeze in comparison to the first time, I can only assume it was the "torque to 240lb ft with an old bolt to seat the pulley" that provided enough force to make that much of a mess.
This bodes well for the level of catastrophe inside the engine!
Crane unfurled and attached
Lifting commences, and after this naturally it got a bit too busy for pictures
Needless to say, it is definitely now out
Doing this in a garage with no room to move the crane is still awkward. Gearbox getting separation anxiety, doing my best to support it in this difficult time with threaded rod.
The ATI puller is overpriced but very effective, at this point I'm glad I spent the money.
That's odd, the seal is coming out with it...
Well jesus I f
ked that right up eh! I can only assume the keyway was slightly off the crank pin and it's pushed it up like this.
That's going to make getting the oil pump off a bit of a laugh. I wonder if that has ended up pressing that gear up against the rear of the oil pump housing
That's enough disasters for one day, will move on to trying to wrestle the engine onto the stand and up the step into the workshop tomorrow for actual disassembly.
It would have definitely taken some force to make such a mess of the damper there, there were a couple of cracking sounds when tightening it down, but in my defence there were when taking it off as well when it finally cracked loose or moved significantly, so I just assumed that was it moving in to place.
Certainly the actual installation of the pulley was a breeze in comparison to the first time, I can only assume it was the "torque to 240lb ft with an old bolt to seat the pulley" that provided enough force to make that much of a mess.
This bodes well for the level of catastrophe inside the engine!
SturdyHSV said:
That's odd, the seal is coming out with it...
Well jesus I fked that right up eh!
I can only assume the keyway was slightly off the crank pin and it's pushed it up like this.
Ouch, that doesnt look fun at all!Well jesus I f
ked that right up eh! I can only assume the keyway was slightly off the crank pin and it's pushed it up like this.
I suppose atleast it was on there, not likely to come off any time soon until you had to take it off that is!
And I suppose the ATI dampers are servicable so should just be able to replace part of it?
Samjeev said:
Ouch, that doesnt look fun at all!
I suppose atleast it was on there, not likely to come off any time soon until you had to take it off that is!
And I suppose the ATI dampers are servicable so should just be able to replace part of it?
Yep should be able to just get than centre bit, which looks to be 115 dollars or so on Summit. Will wait until it's apart to put together a shopping list.I suppose atleast it was on there, not likely to come off any time soon until you had to take it off that is!
And I suppose the ATI dampers are servicable so should just be able to replace part of it?
Lemme know if you need anything adding to the basket mate!
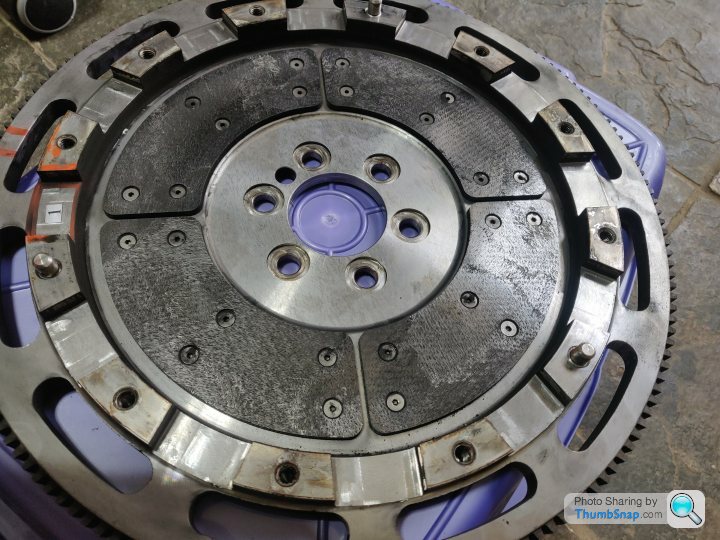
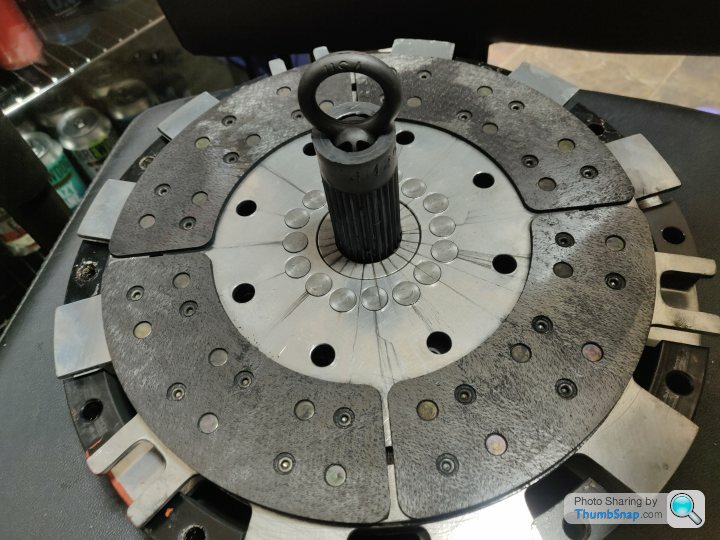
One positive of taking things apart is I get to see this sexy clutch again
not really much dust on it and it doesn't look like it's changed at all since going in wear wise. 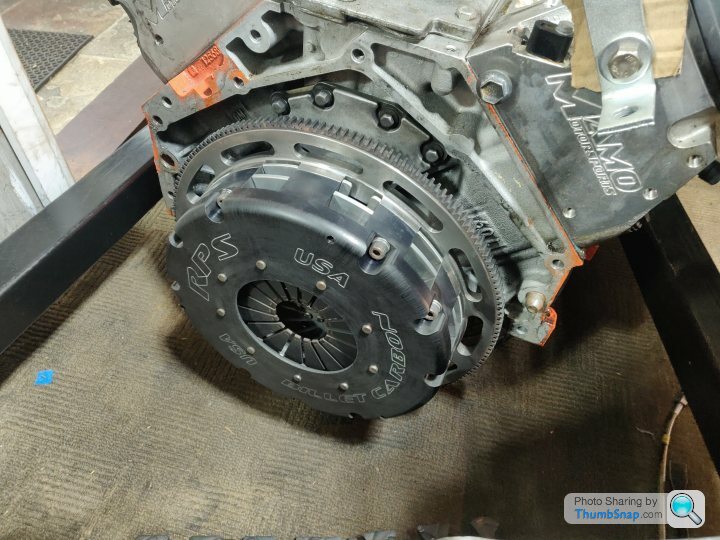
Rear main doesn't look to have leaked which is nice as I didn't have the alignment tool.
I don't recall if the barbell sat proud like that when I installed it
it didn't move when prodded though so it's not loose. I'll have a picture anyway somewhere and I'll ask Improved Racing about it. 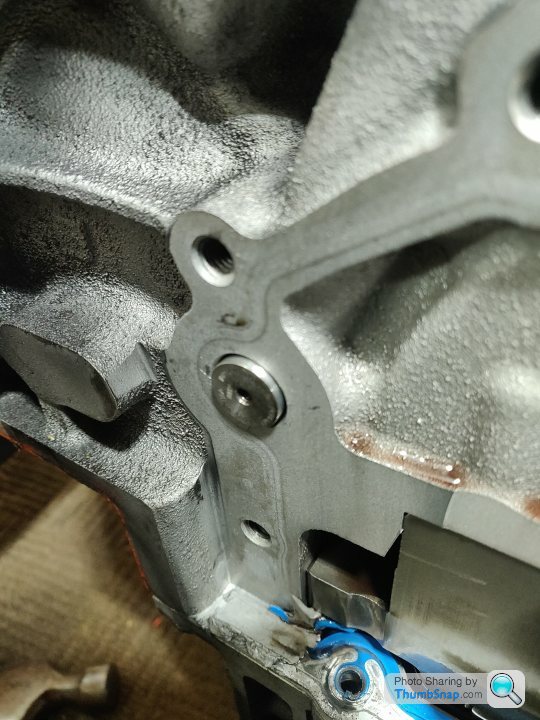
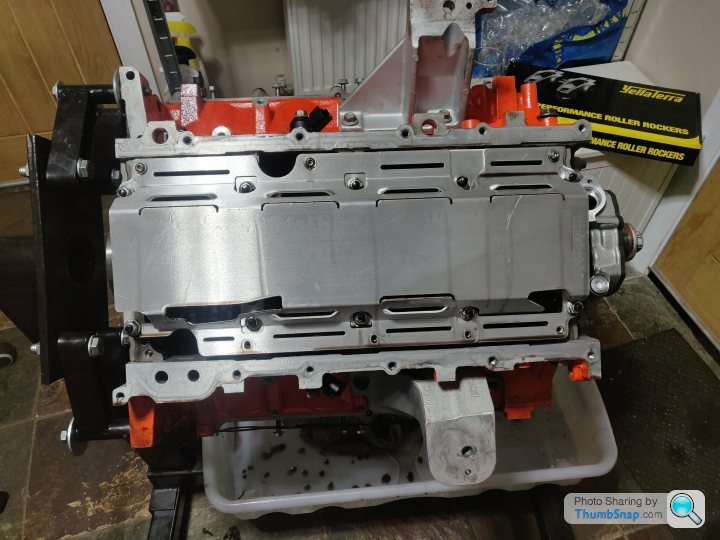
Rocker covers off, all looked very clean and roller tips all immaculate except a slight line on one of them, although couldn't feel it with a finger / nail

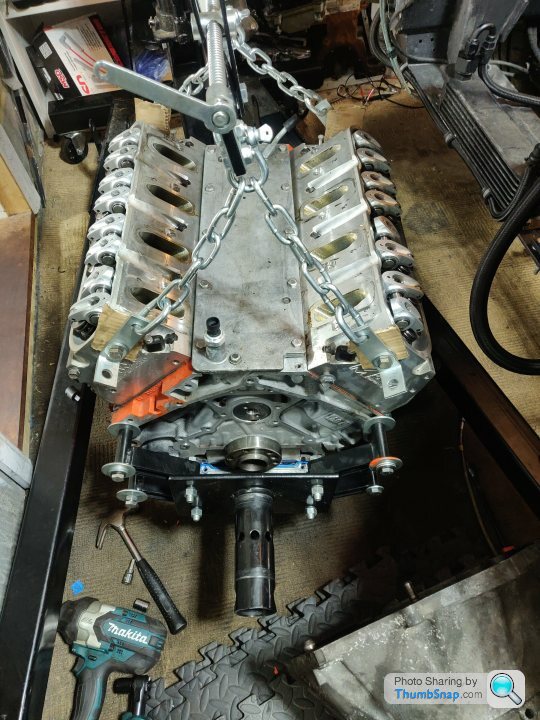
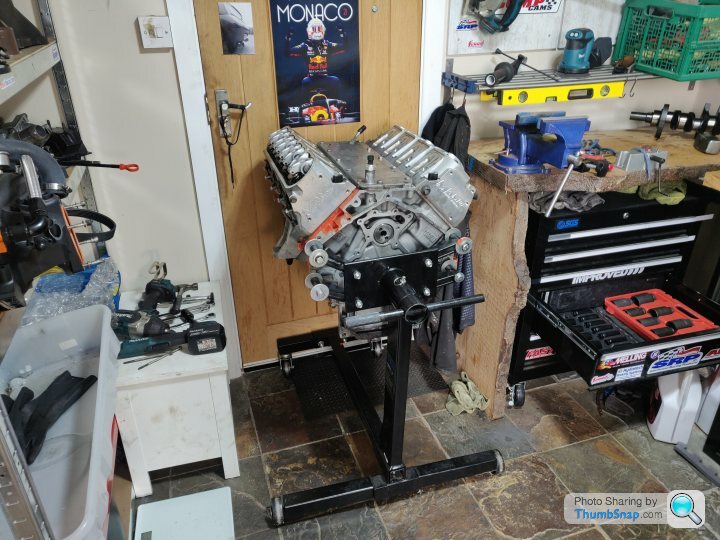
Before going much further I decided it was time for the worst bit... Getting the thing up the step into the workshop.
All ready to go on the stand, then it was time for a quick break for lunch / grand prix
Then back to the s
thousery. Everything was in the way of everything else, and it was all heavy, awkward, expensive, or a car. 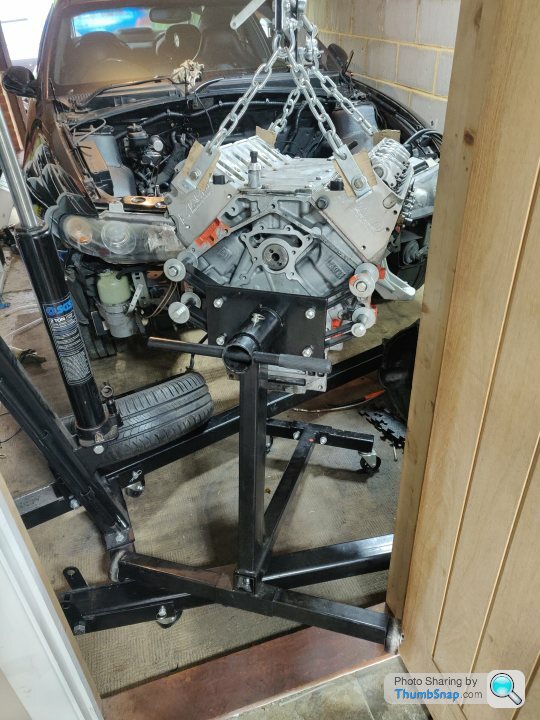
This isn't the right angle annoyingly, the left wheel has to come out first as the stand is too wide for the doorway. If I could weld, I would narrow the stand by 5cm so it could go through square.
But finally it's in the workshop. At which point I stopped for a Guinness (alcohol free, honestly, it's fantastic).
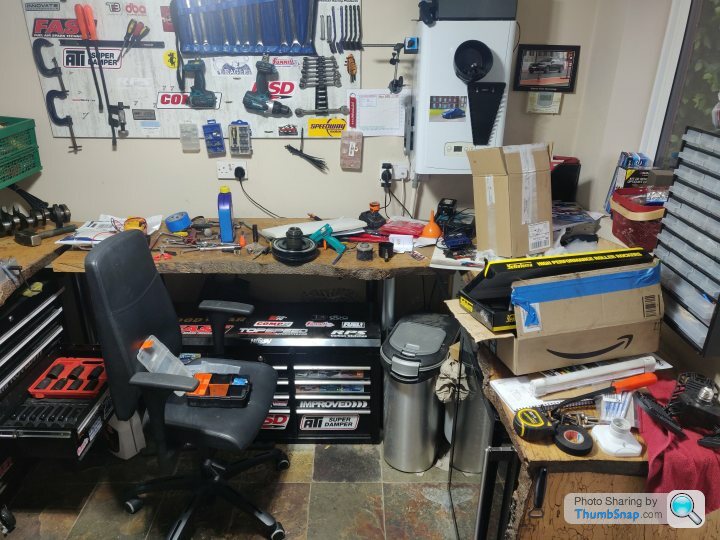
I need to tidy up some worktop space because it's a mess of tools and bits and such. Both for my own sanity and so that I have space to lay things out in order to keep them organised. The pushrods are all measured for each location and paired with the rockers etc remember
I kept the boxes for most of the parts so will be marking those up to keep everything together in order.
See what I mean by needing to tidy up first?
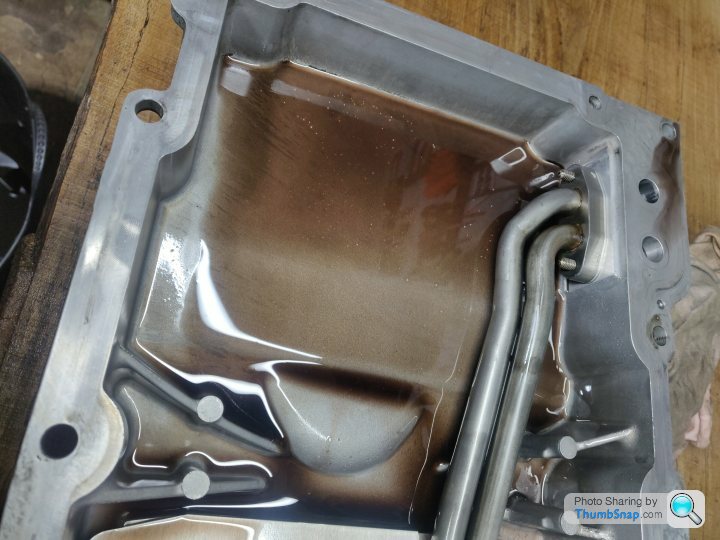
So after a spring clean, the engine was just sat there and I thought I might as well take the sump off and see if there's metal in it.
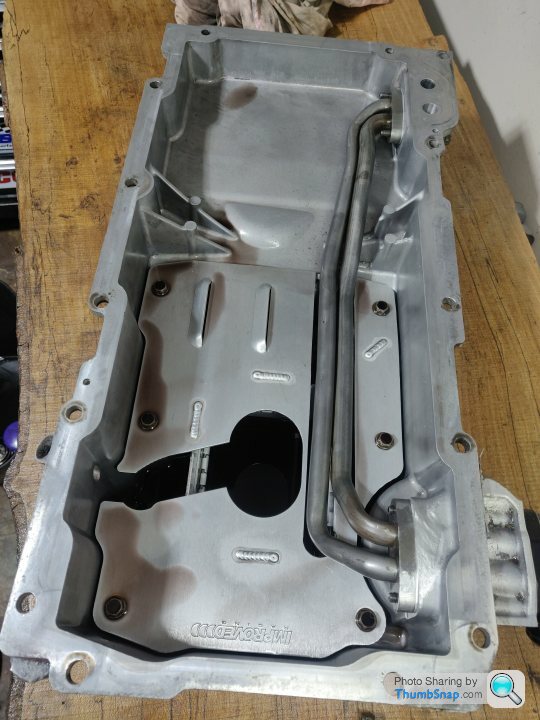
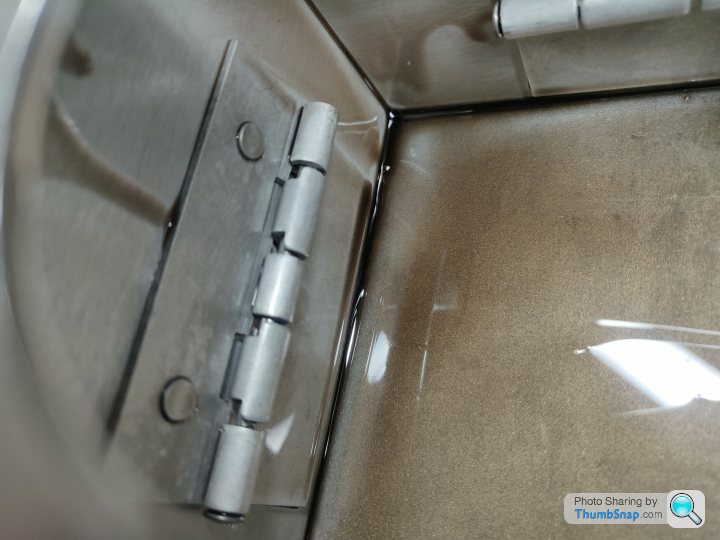
Nothing obvious, drained most of the oil out and had a look at it with a torch etc. using the shallow part of the sump as a sort of inspection tray. There are some casting dimples in the sump and also some coolant specs (where it's splashed in from it going everywhere constantly whenever the engine moves)
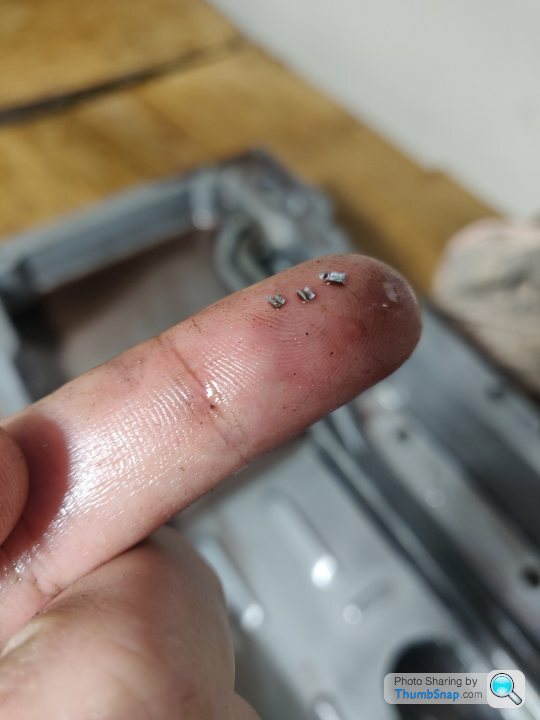
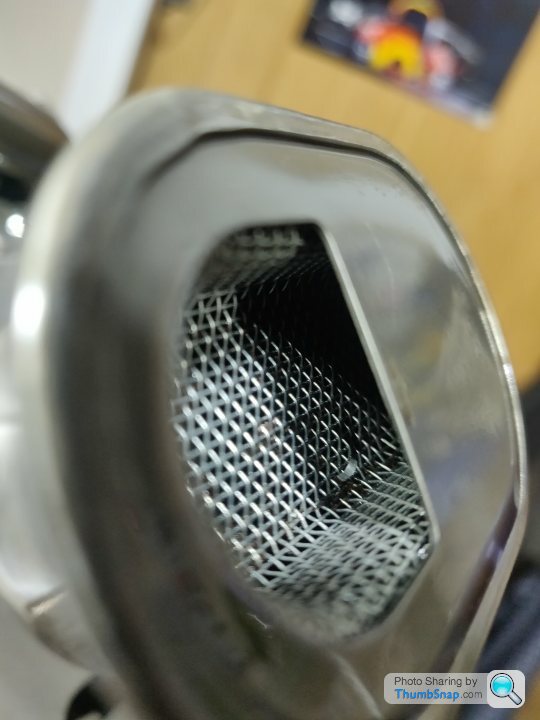
I did spot these little fellas though
Same as in the filter, sort of milled off curled scrapings, not magnetic so presumably aluminium.
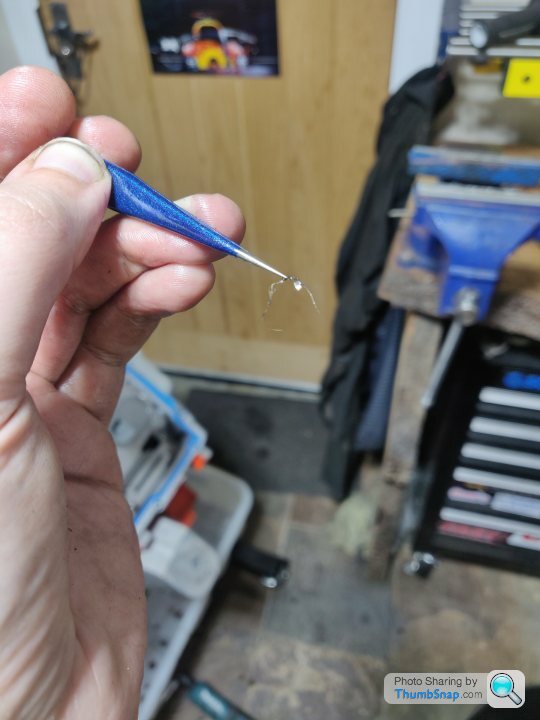
Found a fibre and a handful more scrapings inside the oil pickup mesh
So far, nothing overly surprising, not nice to see such large shavings in the sump but that's why we're here...!
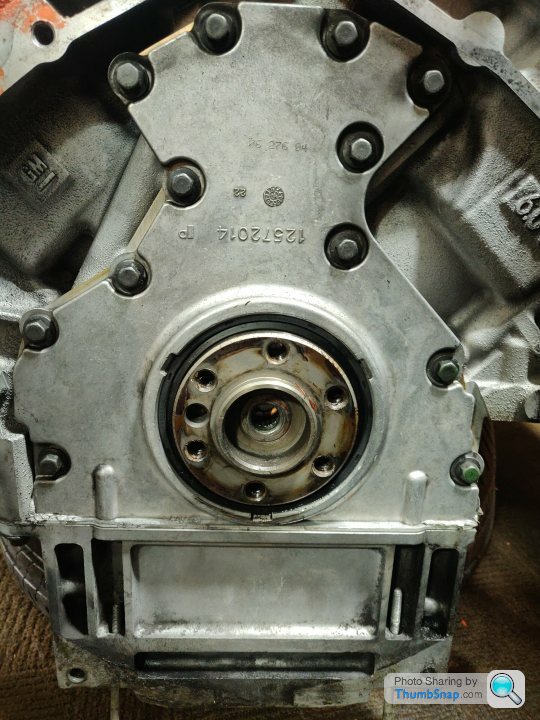
At this point I thought I might as well take the front timing cover off too whilst I was here.
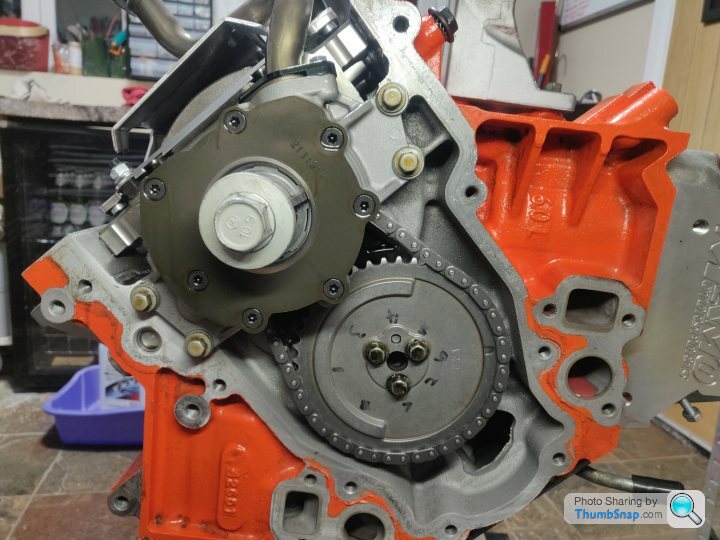
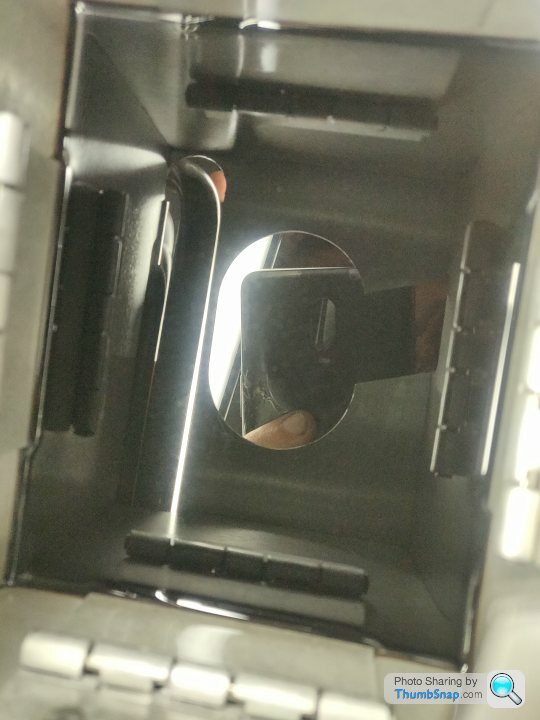
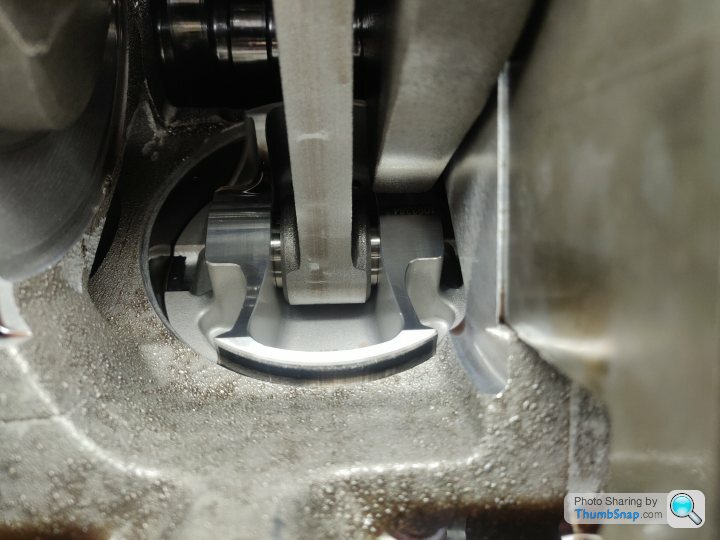
All very clean still, and a closer look at that crank key. Turns out it isn't touching the oil pump gear. It's also not touching the outside of the pump that I can see, hard to photograph though
I suppose I might as well take the pickup off and the windage tray to see if the crank scraper has been milled at 7000rpm
I set about checking clearances between the rods and the scraper. Some were closer than I recall, especially when you take into account how the crank thrust movement and the rod's side to side movement.
Only about 0.015" clearance there

I spent some time clearancing this when I installed it, but ultimately, I think installing it in the car was a mistake, I'd have had much better visibility in the workshop. Obviously the scraper was a "while I'm in there" afterthought whilst upgrading the oil pump, but perhaps not a wise choice.
I spotted this position where a rod was even closer
And sure enough you can just see a little nick in the aluminium (billet ally vs forged steel, looks like the steel won)
No doubt that produced some material, but I couldn't find evidence of any other instances of this, and I don't think that would have produced as much material as I've found :shrug:
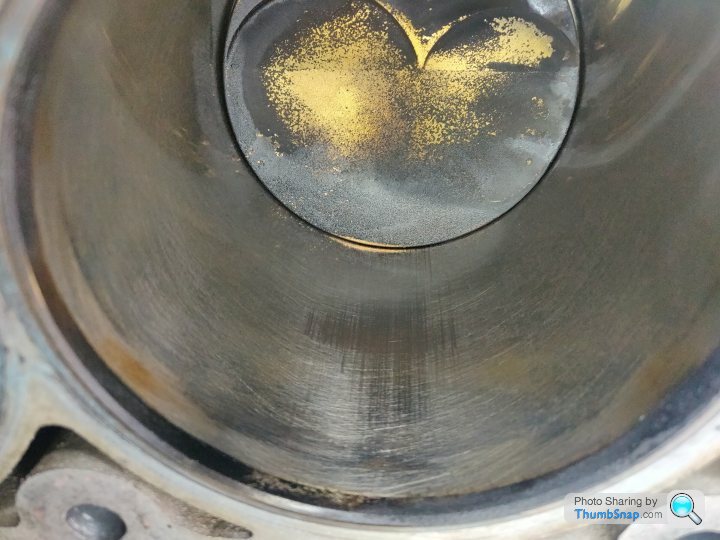
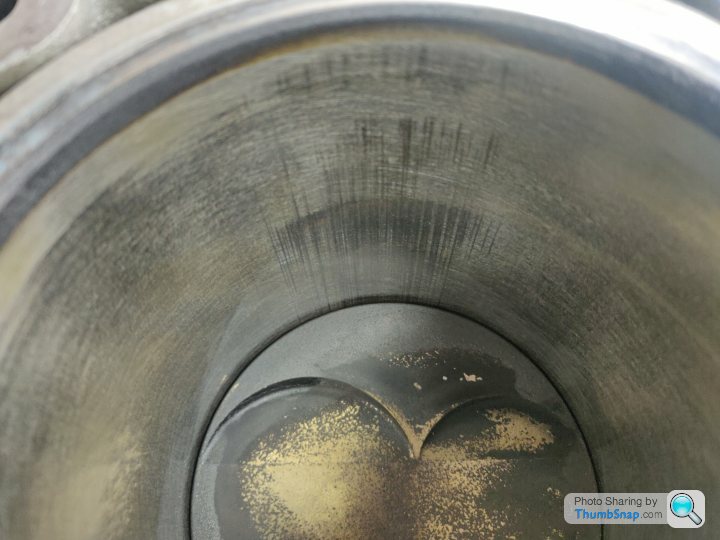
So I had a bit of an inspection at the pistons...
You can see how far the skirts are pulled out, but they look absolutely intact, the machining lines look clean and consistent. It looks like the coating may be a bit worn, but it's hard to tell with them in situ.
The bores look scuffed vertically right to the bottom, so I am presuming it isn't necessarily the rings doing the scuffing as they don't travel that far down, unless they are butting up, shedding material and that is riding up and down between the skirt / cylinder wall.
Hard to get good pictures of it. I cannot feel the scratches under my finger / nail at all.
So not hugely conclusive so far? I'm sort of disappointed in a way as things look sort of 'fine' (apart from the metal I've found), they don't look catastrophic enough to quite convince me to order the dry sleeves just yet, but clealy something is going on.
I am pleased with how bloody clean everything looks at least, the cam lobes look immaculate, the whole engine is immaculate (as it should be...)so it's sort of pleasing at the same time and it's pleasant to work on.
More tomorrow!
So after a spring clean, the engine was just sat there and I thought I might as well take the sump off and see if there's metal in it.
Nothing obvious, drained most of the oil out and had a look at it with a torch etc. using the shallow part of the sump as a sort of inspection tray. There are some casting dimples in the sump and also some coolant specs (where it's splashed in from it going everywhere constantly whenever the engine moves
)I did spot these little fellas though
Same as in the filter, sort of milled off curled scrapings, not magnetic so presumably aluminium.
Found a fibre and a handful more scrapings inside the oil pickup mesh
So far, nothing overly surprising, not nice to see such large shavings in the sump but that's why we're here...!
At this point I thought I might as well take the front timing cover off too whilst I was here.
All very clean still, and a closer look at that crank key. Turns out it isn't touching the oil pump gear. It's also not touching the outside of the pump that I can see, hard to photograph though
I suppose I might as well take the pickup off and the windage tray to see if the crank scraper has been milled at 7000rpm
I set about checking clearances between the rods and the scraper. Some were closer than I recall, especially when you take into account how the crank thrust movement and the rod's side to side movement.
Only about 0.015" clearance there
I spent some time clearancing this when I installed it, but ultimately, I think installing it in the car was a mistake, I'd have had much better visibility in the workshop. Obviously the scraper was a "while I'm in there" afterthought whilst upgrading the oil pump, but perhaps not a wise choice.
I spotted this position where a rod was even closer
And sure enough you can just see a little nick in the aluminium (billet ally vs forged steel, looks like the steel won)
No doubt that produced some material, but I couldn't find evidence of any other instances of this, and I don't think that would have produced as much material as I've found :shrug:
So I had a bit of an inspection at the pistons...
You can see how far the skirts are pulled out, but they look absolutely intact, the machining lines look clean and consistent. It looks like the coating may be a bit worn, but it's hard to tell with them in situ.
The bores look scuffed vertically right to the bottom, so I am presuming it isn't necessarily the rings doing the scuffing as they don't travel that far down, unless they are butting up, shedding material and that is riding up and down between the skirt / cylinder wall.
Hard to get good pictures of it. I cannot feel the scratches under my finger / nail at all.
So not hugely conclusive so far? I'm sort of disappointed in a way as things look sort of 'fine' (apart from the metal I've found), they don't look catastrophic enough to quite convince me to order the dry sleeves just yet, but clealy something is going on.
I am pleased with how bloody clean everything looks at least, the cam lobes look immaculate, the whole engine is immaculate (as it should be...)so it's sort of pleasing at the same time and it's pleasant to work on.
More tomorrow!
wormus said:
Good news although you were definitely right to take it apart and that metal is coming from somewhere. I’d also have the pistons out as the skirts may tell a different story.
Yeah it's coming completely apart regardless at this point, then get some opinions hopefully on what's going on, if it's still not obvious where that metal is coming from.Will be back at it shortly

f
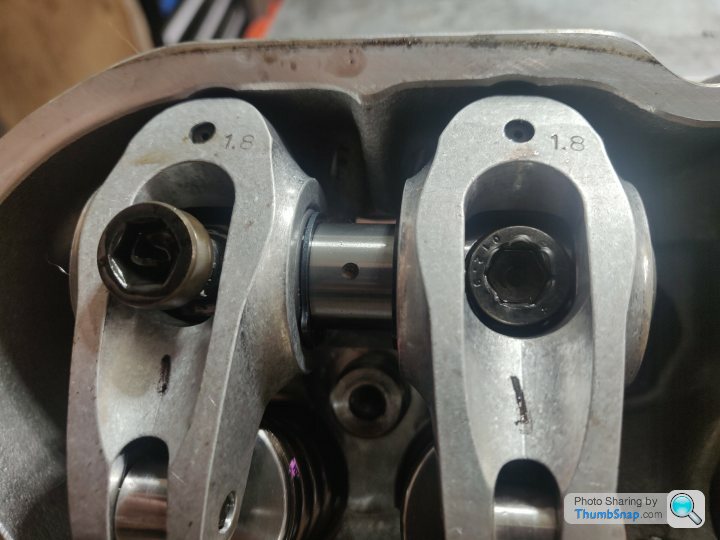
king Allen heads, why the fk does anything use them? All they ever do is round off and then you're fked.f
k's sake.As you can see, second bolt, of 16, and yep, rounded off immediately. So I'm not getting that rocker pair off, joy. Do I even bother trying the others, or is trying the same thing over and over and expecting a different outcome...

They're only torqued to 30lb ft or so for f
k's sake. 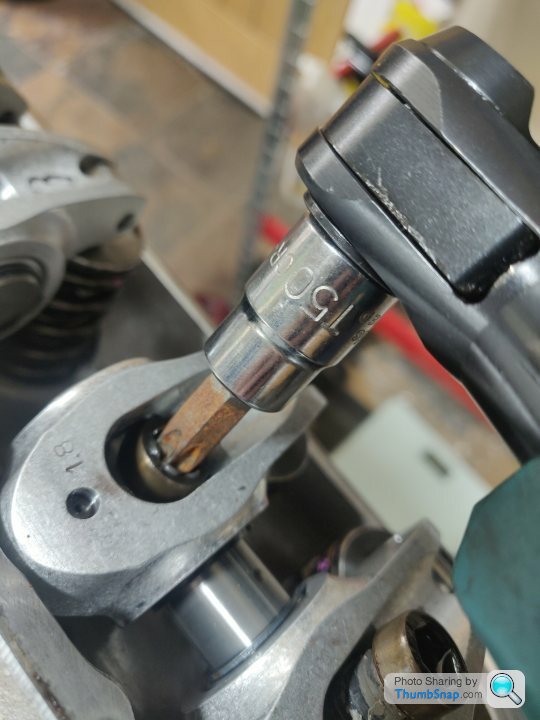
SturdyHSV said:
f
king Allen heads, why the fk does anything use them? All they ever do is round off and then you're fked.f
k's sake.As you can see, second bolt, of 16, and yep, rounded off immediately. So I'm not getting that rocker pair off, joy. Do I even bother trying the others, or is trying the same thing over and over and expecting a different outcome...
They're only torqued to 30lb ft or so for f
k's sake. Otherwise weld in an Allen key, the heat will help disturb the Allen screw.
Cheers for the suggestions, fortunately battering a T50 in there did the trick!
In hindsight it must have just been my incompetence as the other 14 all required similar levels of force to break free (the exhaust sides more than the intake). I suspect there was some oil in the allen head which helped both lubricate the slip, and also feasibly stop the key pressing right down into the head. My own fault basically, I switched to a different Allen key, wiped down the insides of them all and applied a lot more downward pressure whilst turning and they all cracked loose without further drama.
So with that dramatic flop out of the way, grab yourself a large beverage, sit comfortably and I shall begin / continue...
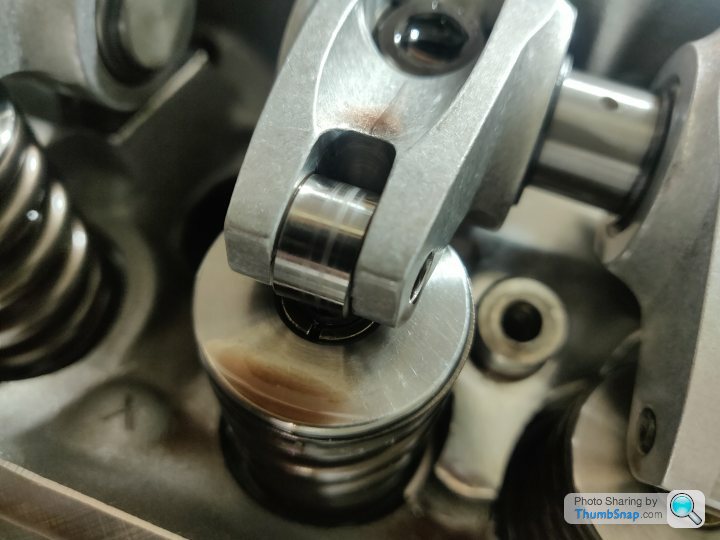
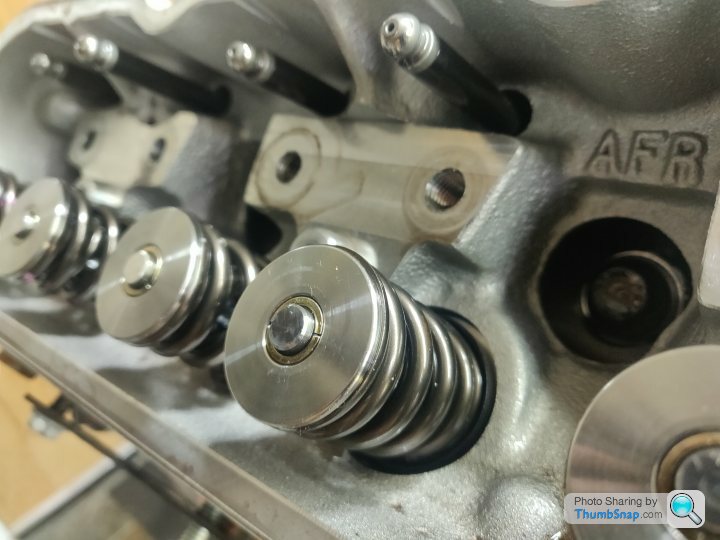
With all the rockers off, I noticed the (very slight) wear marks on the valve tips were perfectly central. This was pleasing, but largely impossible to photograph.
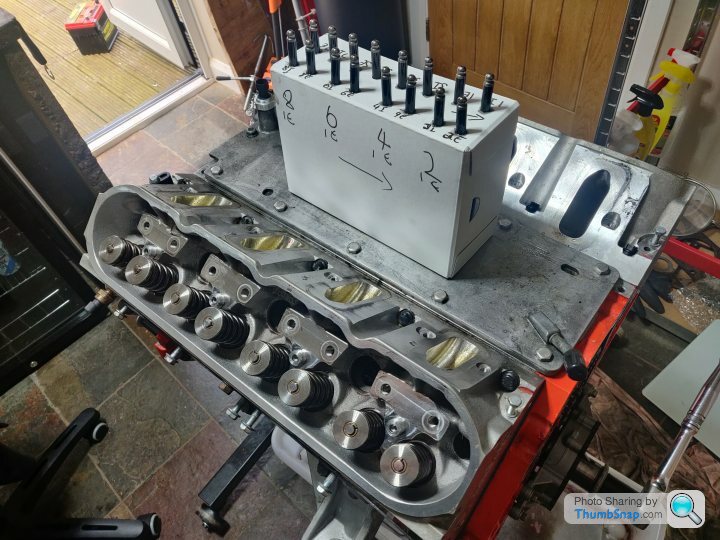
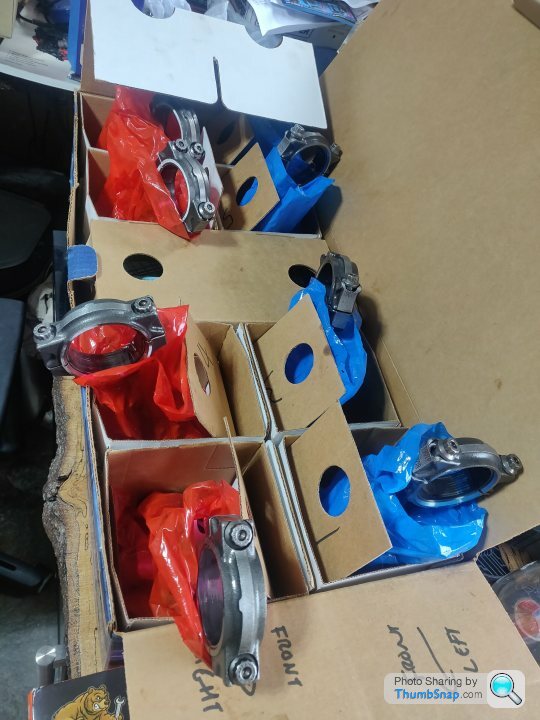
Reused an old box to store the various length pushrods. The rockers and their pedestals and shims are all boxed away and marked.
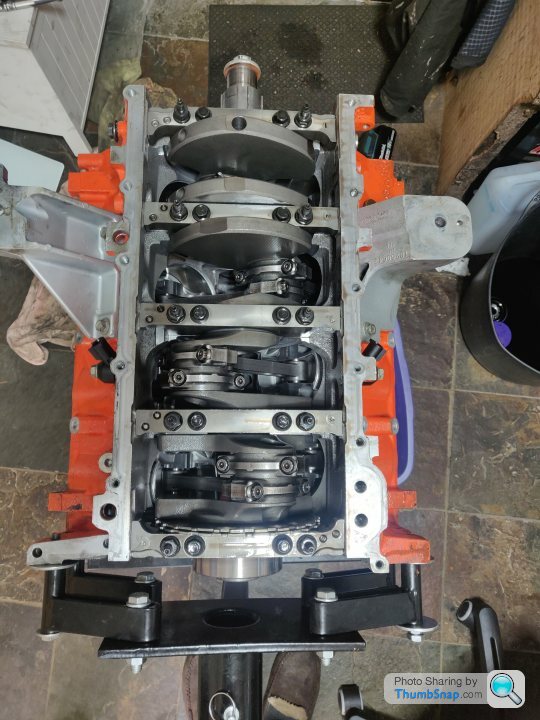
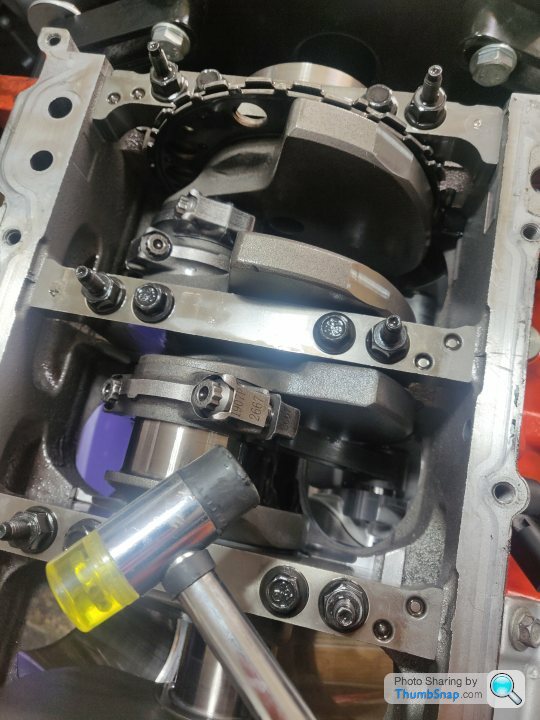
Heads off and nothing untoward to behold.
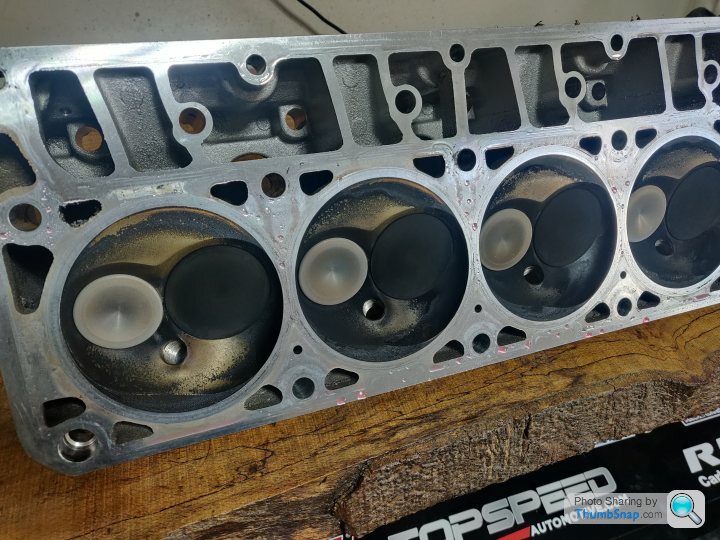
I took pictures of all of the bores top and bottom, somewhat unnecessary as the pistons are coming out shortly but nonetheless... They all looked basically the same, decent amount of wear / scuffing, some of which you could feel under your fingertip, not enough to catch a nail, but you can feel the difference in texture.
Lifters out (and naturally boxed up in marked positions). There's scoring on these, but not severe and with the amount of metal that seems to have been through the engine, to be expected...

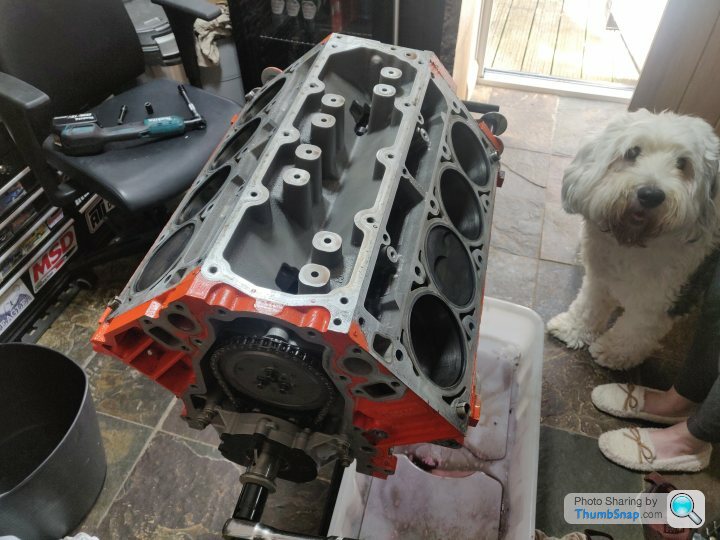
Nothing jumping out yet. At this point a helper arrived, and the dog. The dog wisely opted to investigate the garden instead.
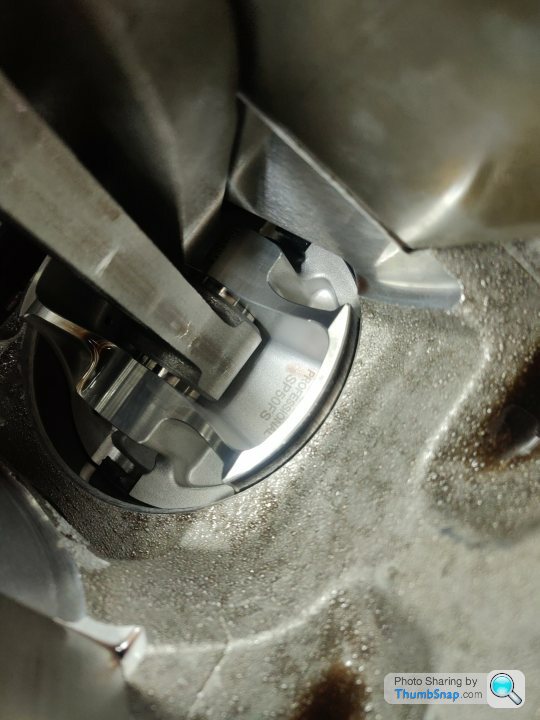
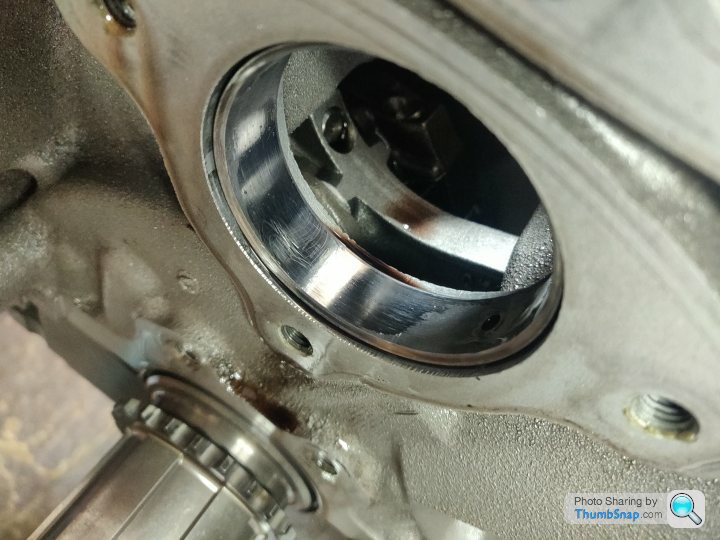
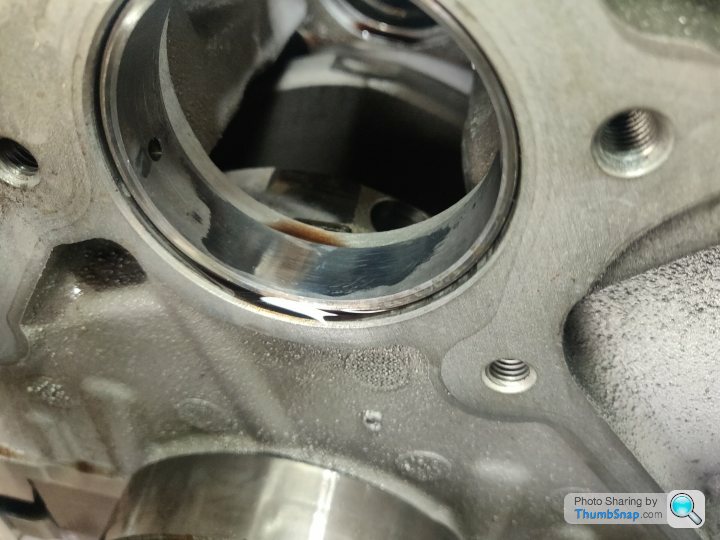
So, what sort of a mess has that crank key made? Took the cover off the oil pump.
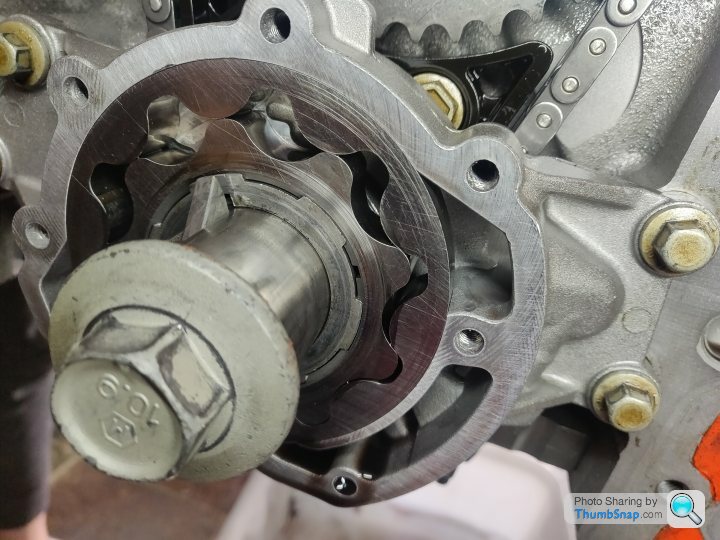
Can see that's had a little bit of wear, but I'm going to assume this is related to my messed up damper install.
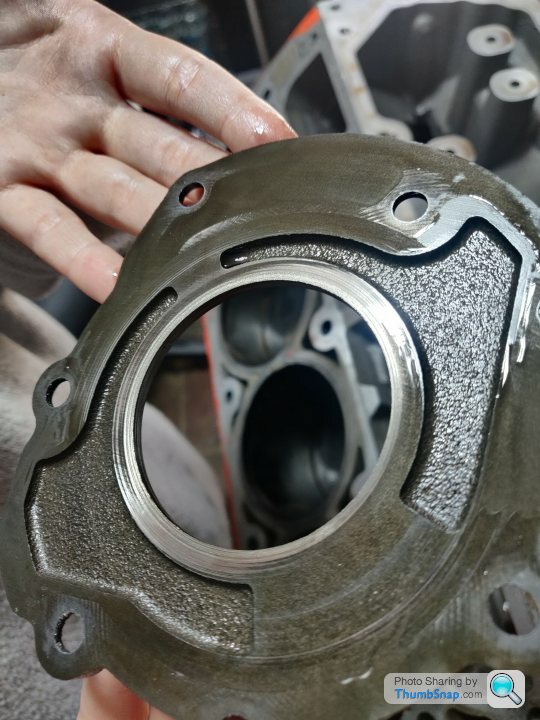
Some loving taps with a hammer and a little punch got the key back into position and the pump removed.
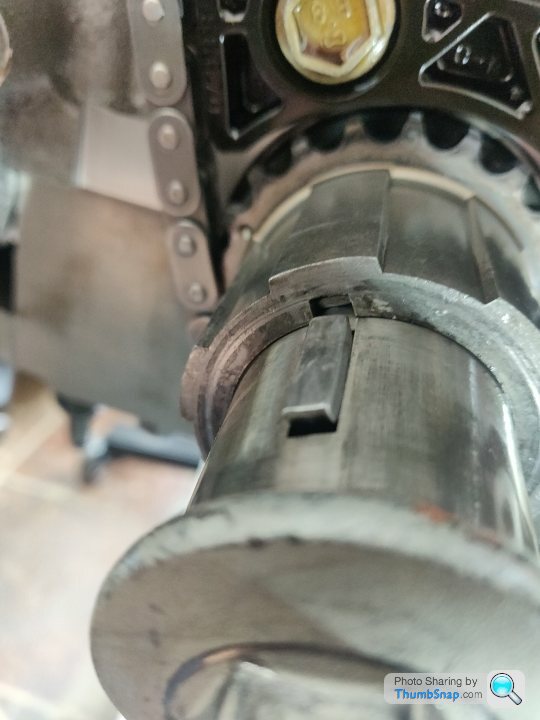
Like it never happened...
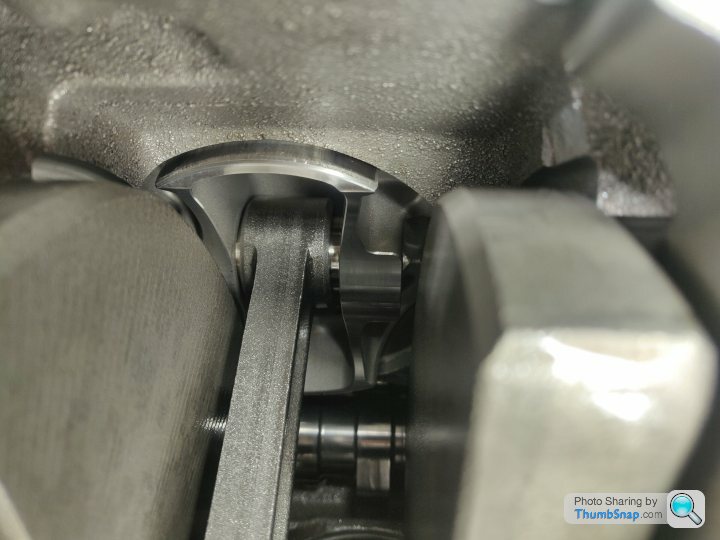
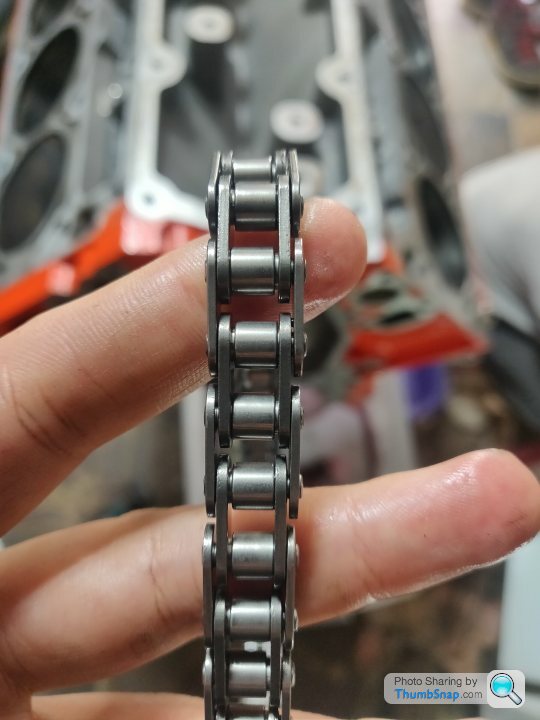
Took the cam gear off and the chain. The chain looks fine, feels fine (no play in the links etc)
Slid the cam out. This also looks fine, the inevitable slight polishing where the lifter rollers ride on it, but all smooth and clean.
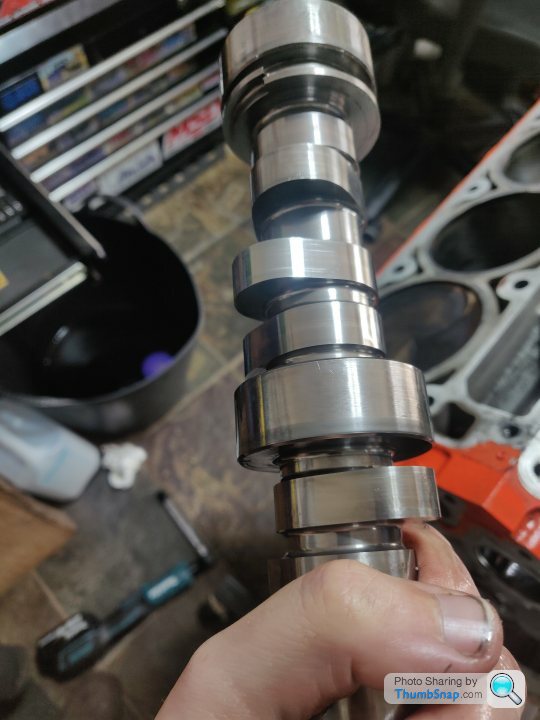
The cam bearings are polished on the bottom, largely as you'd expect as there's only ever downward force acting on it! They look pretty fine some scratches on the front one but they look to be from installation / removal.
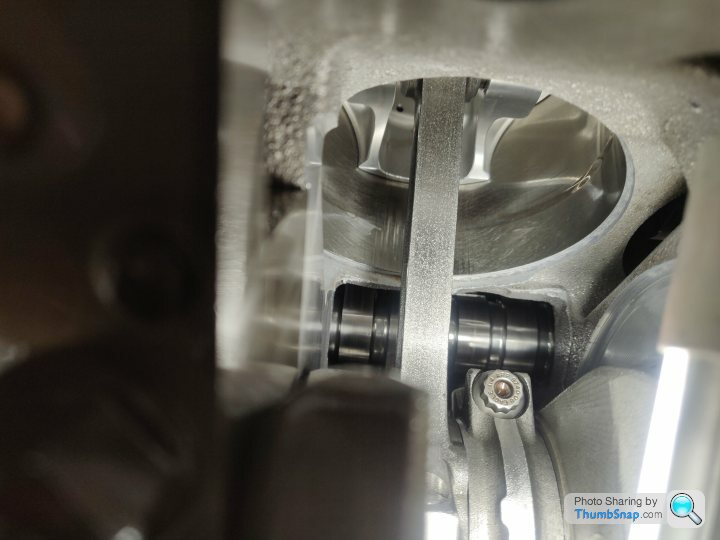
Time to take some pistons out!
They were easier to remove than I expected, took roughly 60lb ft to break the rod bolts free, then back them out a few turns and tap the bolts with a soft mallet to push the rods off the dowels.
Once the cap is off, push to rod out the bottom
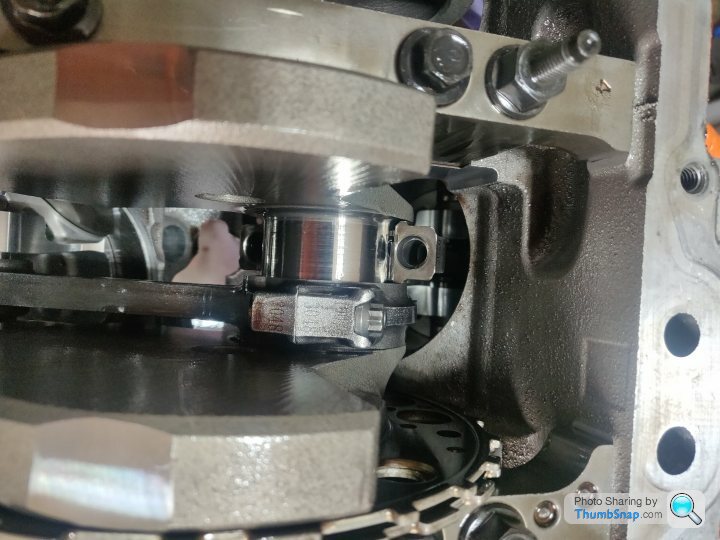
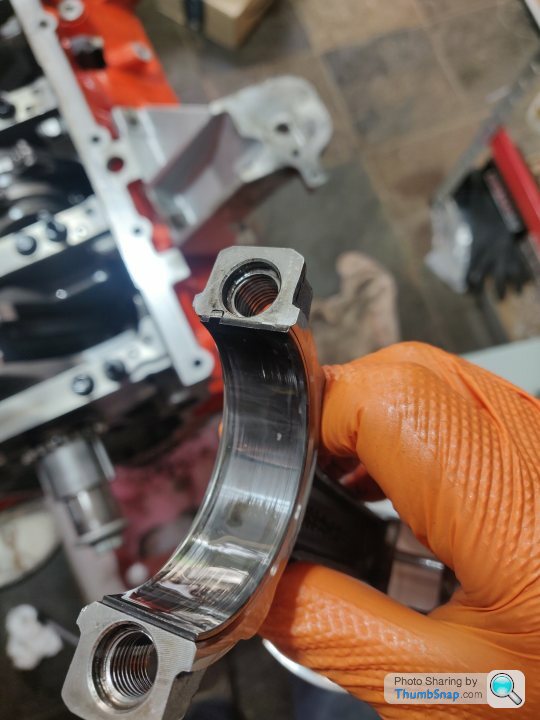
Once again, given the amount of metal in the filter, it's no surprise to see some score marks on the bearings but otherwise they look pretty alright, no serious uneven wear, no copper showing etc.
This is about the worst of it, on the pressure side (the rod side bearing) it's worn through the initial black coating on the bearing, and there are the score marks presumably from debris.
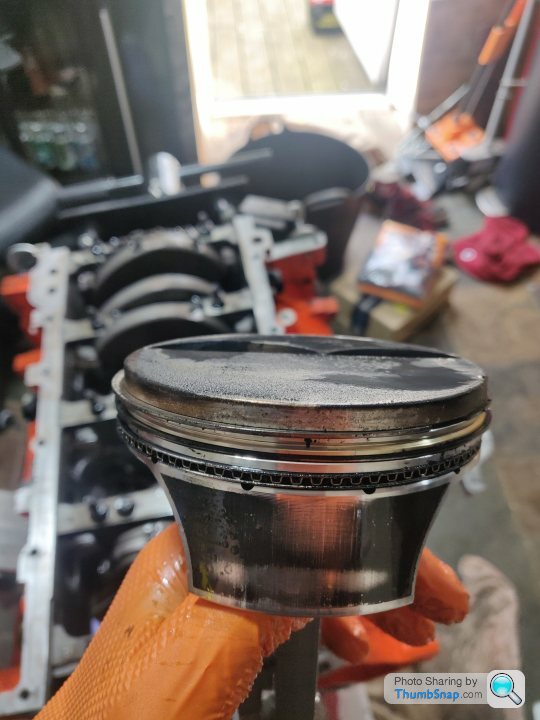
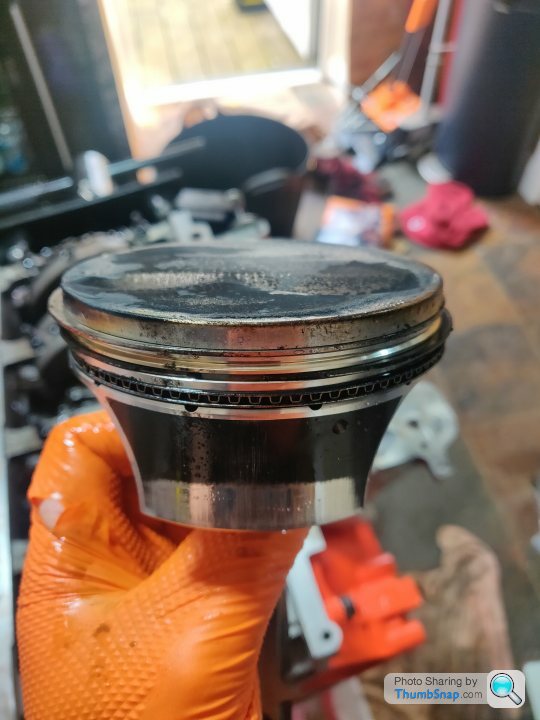
The piston skirts all look completely intact, albeit with a lot of wear to the skirt coating, especially after so few miles. Some of this is inevitable with the longer stroke increasing the rod angle but I'm not sure how much is normal / inevitable... All of them have the same wear pattern, here is each side of one piston.
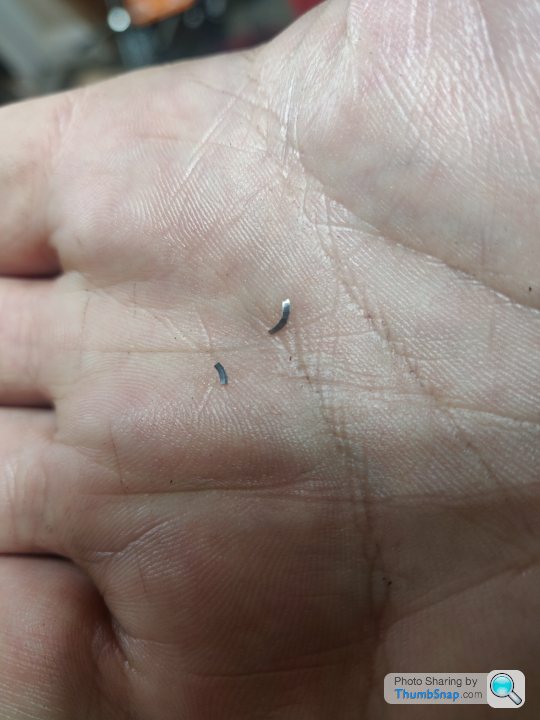
The first piston we removed had this little shaving in the snap ring. We thought maybe this was our answer, could it be the snap rings are gouging into the grooves somehow?
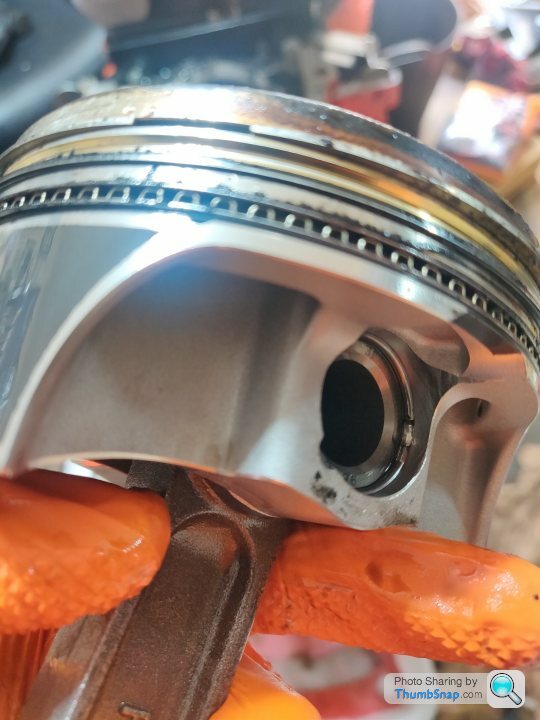
This was the piece removed, it was one curled shaving but it split in half when I was handling it. One side is shiny and the other darker.
This was however the only piece found, and no real evidence of anything similar anywhere else.
All 8 pistons removed, and ultimately fairly inconclusive... The piston rings all looked 'fine', they edges still looked straight and as I'd filed them, although if there is something more I can look for in more detail I'm very open to suggestions / thoughts, if there's any pictures that would help etc let me know.
The shavings are all aluminium (or at least, non-magnetic).
The crank, rods, cylinder walls are all steel / iron, so very much magnetic.
As such I'm stuck with the conclusion so far that the metal shavings are either:
Any ideas / observations appreciated
In hindsight it must have just been my incompetence as the other 14 all required similar levels of force to break free (the exhaust sides more than the intake). I suspect there was some oil in the allen head which helped both lubricate the slip, and also feasibly stop the key pressing right down into the head. My own fault basically, I switched to a different Allen key, wiped down the insides of them all and applied a lot more downward pressure whilst turning and they all cracked loose without further drama.
So with that dramatic flop out of the way, grab yourself a large beverage, sit comfortably and I shall begin / continue...
With all the rockers off, I noticed the (very slight) wear marks on the valve tips were perfectly central. This was pleasing, but largely impossible to photograph.
Reused an old box to store the various length pushrods. The rockers and their pedestals and shims are all boxed away and marked.
Heads off and nothing untoward to behold.
I took pictures of all of the bores top and bottom, somewhat unnecessary as the pistons are coming out shortly but nonetheless... They all looked basically the same, decent amount of wear / scuffing, some of which you could feel under your fingertip, not enough to catch a nail, but you can feel the difference in texture.
Lifters out (and naturally boxed up in marked positions). There's scoring on these, but not severe and with the amount of metal that seems to have been through the engine, to be expected...
Nothing jumping out yet. At this point a helper arrived, and the dog. The dog wisely opted to investigate the garden instead.
So, what sort of a mess has that crank key made? Took the cover off the oil pump.
Can see that's had a little bit of wear, but I'm going to assume this is related to my messed up damper install.
Some loving taps with a hammer and a little punch got the key back into position and the pump removed.
Like it never happened...
Took the cam gear off and the chain. The chain looks fine, feels fine (no play in the links etc)
Slid the cam out. This also looks fine, the inevitable slight polishing where the lifter rollers ride on it, but all smooth and clean.
The cam bearings are polished on the bottom, largely as you'd expect as there's only ever downward force acting on it! They look pretty fine some scratches on the front one but they look to be from installation / removal.
Time to take some pistons out!
They were easier to remove than I expected, took roughly 60lb ft to break the rod bolts free, then back them out a few turns and tap the bolts with a soft mallet to push the rods off the dowels.
Once the cap is off, push to rod out the bottom
Once again, given the amount of metal in the filter, it's no surprise to see some score marks on the bearings but otherwise they look pretty alright, no serious uneven wear, no copper showing etc.
This is about the worst of it, on the pressure side (the rod side bearing) it's worn through the initial black coating on the bearing, and there are the score marks presumably from debris.
The piston skirts all look completely intact, albeit with a lot of wear to the skirt coating, especially after so few miles. Some of this is inevitable with the longer stroke increasing the rod angle but I'm not sure how much is normal / inevitable... All of them have the same wear pattern, here is each side of one piston.
The first piston we removed had this little shaving in the snap ring. We thought maybe this was our answer, could it be the snap rings are gouging into the grooves somehow?
This was the piece removed, it was one curled shaving but it split in half when I was handling it. One side is shiny and the other darker.
This was however the only piece found, and no real evidence of anything similar anywhere else.
All 8 pistons removed, and ultimately fairly inconclusive... The piston rings all looked 'fine', they edges still looked straight and as I'd filed them, although if there is something more I can look for in more detail I'm very open to suggestions / thoughts, if there's any pictures that would help etc let me know.
The shavings are all aluminium (or at least, non-magnetic).
The crank, rods, cylinder walls are all steel / iron, so very much magnetic.
As such I'm stuck with the conclusion so far that the metal shavings are either:
- piston material, possibly from the snap rings gouging into them?
- crank scraper being hit by rods. This has definitely happened at least once but minimal further evidence.
- block material, but can't see any visual evidence of where it could have come from.
- Oil cooler, maybe badly made and full of swarf or just deteriorating?
- I've missed something else...!
Any ideas / observations appreciated
Oneball said:
Are the shavings not off the damper? It looks like it’s been pushed up and then that’s been shaved off.
Piston wear is very odd even stroked there shouldn’t be that much wear on the skirt.
I'm 99% sure (will double check when home) that the hub is steel, so don't think the shavings are from that. The key in the snout wasn't moving in relation to the crank timing gear behind it, so I don't think there's actually anything for it to have made contact with or anything around that area that would have produced the shavings Piston wear is very odd even stroked there shouldn’t be that much wear on the skirt.
Hopefully I've correctly interpreted what you meant there!Oneball said:
I think your piston skirt wear maybe because not enough of the piston is support at BDC. Looks like some of your liners might be shorter than others too, are they the ones with the worst wear?
I'd be willing to bet 100% it is lack of support at BDC, the stock liners are roughly 5.5" long (not a consistent length across manufacturing), so with a 4 inch stroke, piston compression height of 1.110", the gauge point of the piston (which as I understand it is the widest point after which it tapers, and is ultimately the key position that needs to be supported) ends up being very very close to the bottom of the liner.From all I read, this is just the reality of strokers builds with standard liners. They will rough up the skirts a bit. I had assumed that this meant they were getting milled to death against the edges of the liners (which JE advise you to chamfer slightly to reduce the wear, which I did, but perhaps not enough, there's no guidance) but alas, structurally, they look fine, the coating has taken some abuse but the pistons themselves look undamaged.
For reference, these are the pistons.
https://auto.jepistons.com/pistons-329370
It's an interesting point about varying liner length vs wear, I'll take a bit of a look later but really most of the piston wear looks very much the same as the one photographed above (with the same wear patterns on each side)
Oneball said:
Yep, you got what I was saying. Some ATI dampers are alloy.
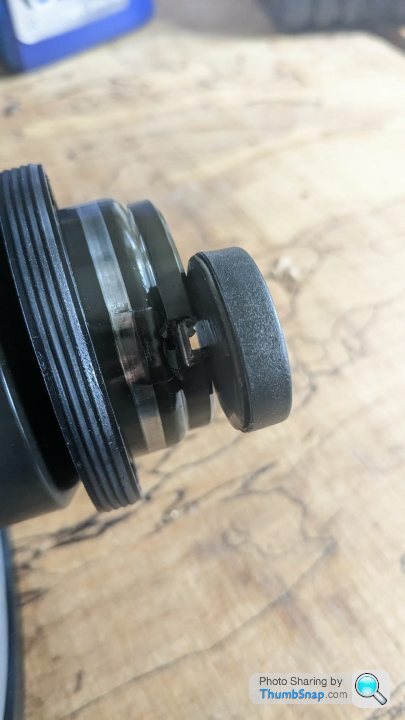
It looks to me like the key has deformed the pulley and the the oil pump faceplate has ground the deformed part way, producing this square notch.
Ahhhh I see what you mean! I hadn't given much thought to how the pulley hub had ended up deformed in the odd shape it is, but that makes a lot of sense...! It looks to me like the key has deformed the pulley and the the oil pump faceplate has ground the deformed part way, producing this square notch.
I will offer things up and have a look at the inner edges of the oil pump faceplate as you say. Thank you for that, good thinking!
We could be back up and running for a few hundred dollars here
Gf is at home so got her to check, the hub is definitely magnetic
The oil pump is somewhat buried to try the front cover of that, but we shall see.
Have ordered bearings / bolts / replacement hub from summit, sadly I suspect the duty payment will hold up delivery so won't get it before the weekend
The oil pump is somewhat buried to try the front cover of that, but we shall see.
Have ordered bearings / bolts / replacement hub from summit, sadly I suspect the duty payment will hold up delivery so won't get it before the weekend
Bit of lunchtime research and I've stumbled across this little nugget:
"Some engine builders chamfer the ends of the round wire clips to prevent gouging the wrist pin bore." from here:
https://auto.jepistons.com/blog/evaluating-used-pi...
I've never read that mentioned anywhere else. Why isn't it mentioned as standard if it's a possibility? It seems so many of these sorts of tips / clues you only stumble across after the fact
FedEx are of the mind that the bearings et al will be arriving Thursday (tomorrow). We shall see!
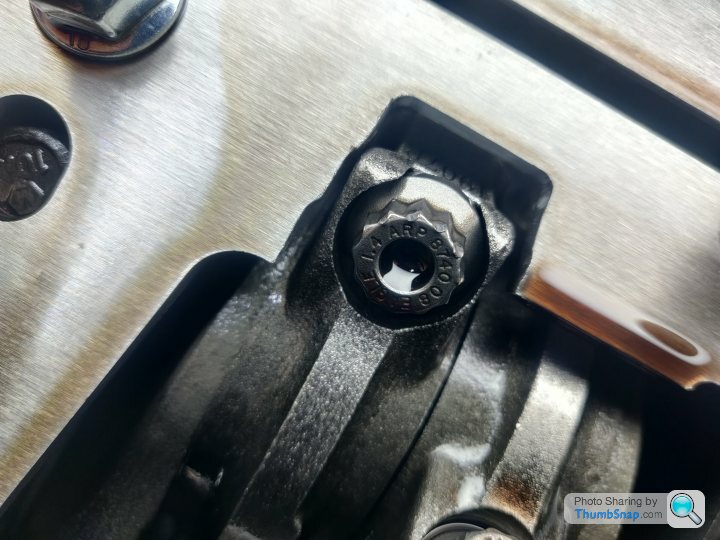
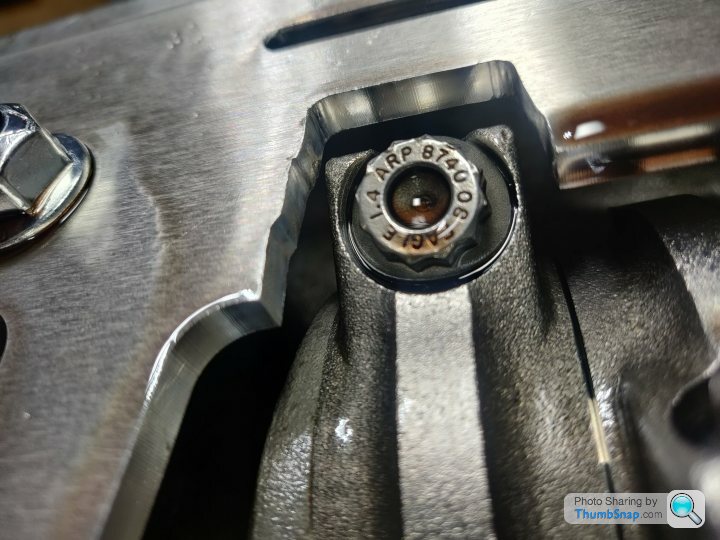
Spoke to Yella Terra who confirmed the rocker studs are SAE Grade 8, so a 10.9 or above bolt will be as strong / slightly stronger. I got a bit excited and ordered a bunch of 12.9 high tensile steel bolts I'll no doubt find that that was a mistake as it will then cause me some other problem, but for 60p each they'll be fun to have around if nothing else. I got 20 of them so I may replace all of the bolts just so it's consistent
Ute track rod ends (I'll just replace both as if one has gone, the other will be on its way too) are arriving today from Pedders (great service as always) to sort for the MOT.
I'm going to inspect the piston ring ends, and likely re-measure them and possibly gap them an extra thou or so, especially if they look polished which apparently means they've been touching.
Plan is to get the car to Caffeine & Machine on Sunday. Place your bets!
Spoke to Yella Terra who confirmed the rocker studs are SAE Grade 8, so a 10.9 or above bolt will be as strong / slightly stronger. I got a bit excited and ordered a bunch of 12.9 high tensile steel bolts
I'll no doubt find that that was a mistake as it will then cause me some other problem, but for 60p each they'll be fun to have around if nothing else. I got 20 of them so I may replace all of the bolts just so it's consistent Ute track rod ends (I'll just replace both as if one has gone, the other will be on its way too) are arriving today from Pedders (great service as always) to sort for the MOT.
I'm going to inspect the piston ring ends, and likely re-measure them and possibly gap them an extra thou or so, especially if they look polished which apparently means they've been touching.
Plan is to get the car to Caffeine & Machine on Sunday. Place your bets!
Gassing Station | Readers' Cars | Top of Page | What's New | My Stuff