Kelvinators TVR Tasmin
Discussion


Stick Legs said:
I guess you heard about Oliver Winterbottom passing away in November.
He'd have been delighted with the way you have looked after this!
Yes, its a terrible loss. I believe he was quite active with the Wedge clubs over there, often showing up at the Big Bad Wedge Fest meets. He sure knew how to pen a fine wedge.He'd have been delighted with the way you have looked after this!
On the home wedge front, the TVR passed another WOF. Clean sheet other than the same advisory as last time, adjust the front wheels bearings (oops, didnt do it last time either so no surprise).
Guess its time to finally whip the front brakes off, replace the rotors and hoses and reset the front wheel bearings.
Six months have passed, which means it's WOF time again. The good news is that the TVR passed first time with a clean sheet, the bad news is that the inspector noted play in one of the front wheel bearings.
This wasn't completely unexpected, he mentioned it last time too, but this time it's bad enough I should do something about it. The inspector advised I just nip them up to take out the play. "Nipping up" isn't my style, at the very least I want to repack the bearings with new grease and then set them correctly. This gives me the chance to replace the front rotors too, since they were undersized when I got the car and I've had the replacements sitting around for ages now.
I was starting with this. Being old, the rotor is behind the hub (unlike modern cars with the rotor ahead of the hub), which makes replacing it a bit more of a pain. On the flip side I'd need to adjust the bearings when refitting anyway, so two birds with one stone.

The first step in removal is to pop the dust cap off with a chisel and hammer, and then remove the split pin and locking ring from the nut.

Next, the caliper has to come off. This is held on with two bolts at the back, and should have locking tabs bent up against the bolt heads, so they will need to be hammered back first.
With the caliper safely supported and not hanging by its hose, undo and remove the hub nut. With the hub nut and washer behind it removed the hub/rotor can be removed. Be careful though as the outer wheel bearing is just sitting in place and can fall out of the hub during removal.

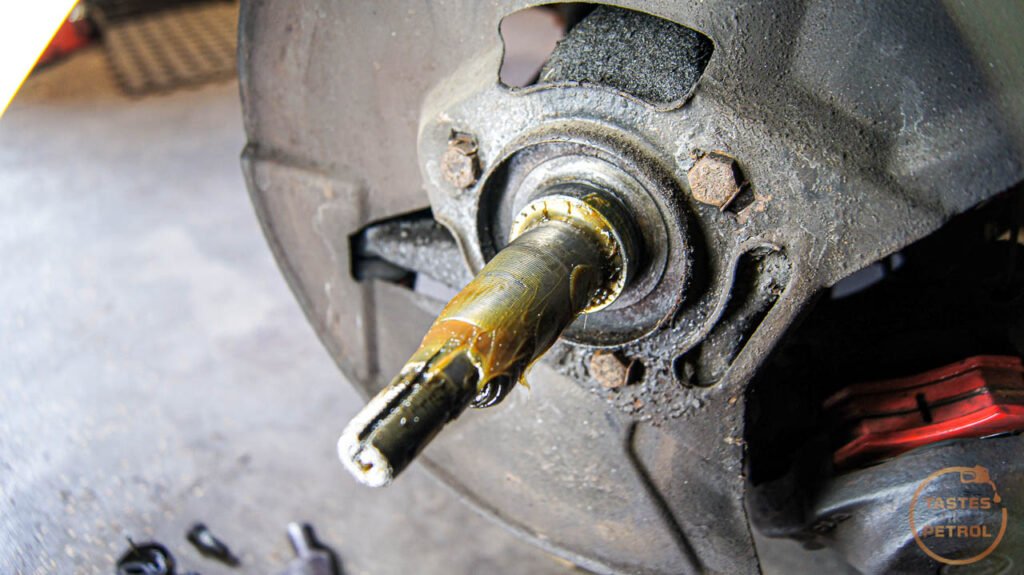

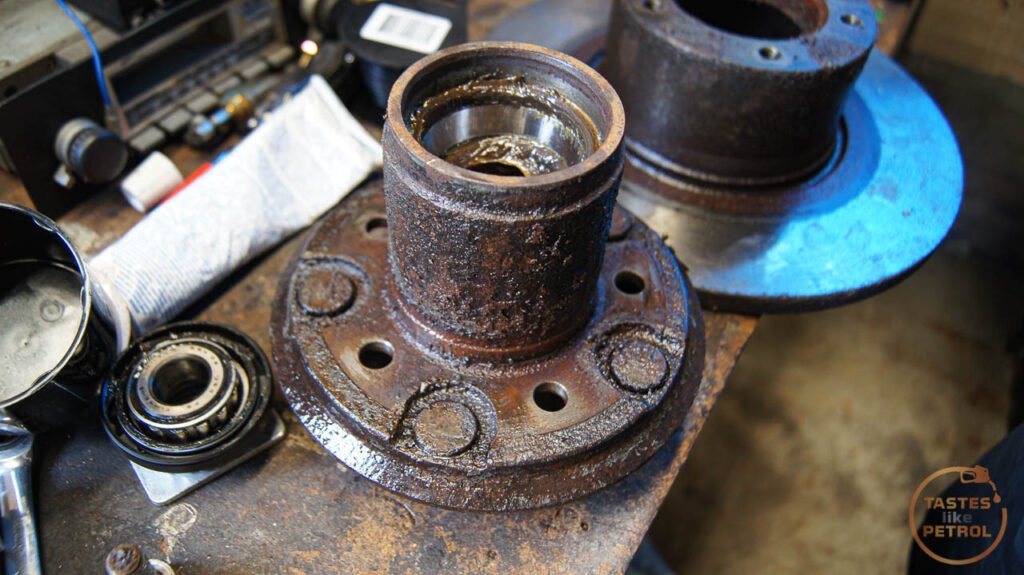
The outer bearing race wasn't looking good. Clear signs of wear or excess heat (discoloured outer race), and the grease had turned black around the bearing
The inner bearing looked OK, as did the seal. Looking at the state of the outer bearing though I chose to source replacements for all the bearings and just refresh the lot.

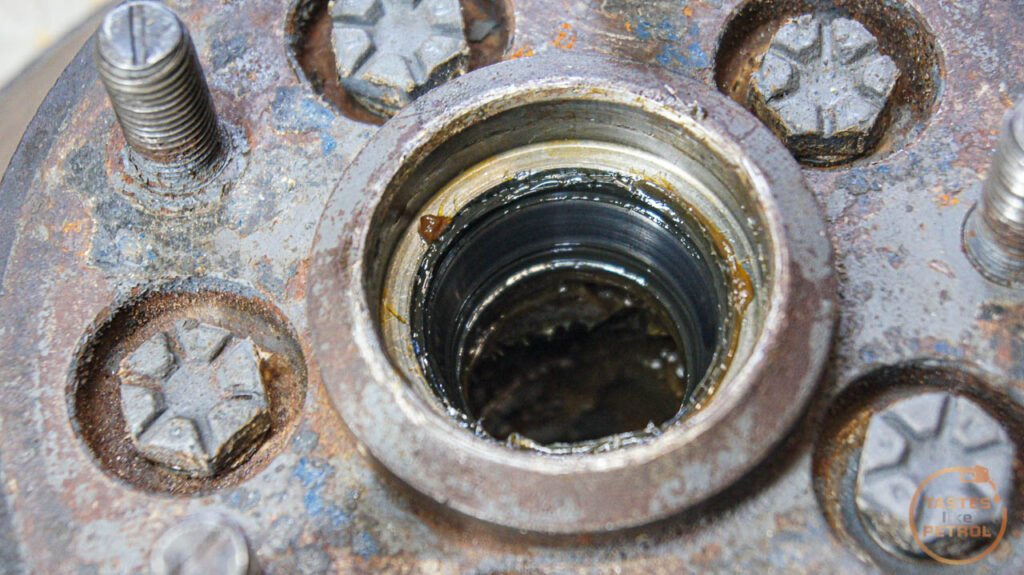
Before I could do anything further though I needed to split the rotor from the hub. With the bolts through the hub removed I suddenly realised that the hub and rotor were rust welded together. Awesome. Well, I know what sorts that; A big chisel and an even bigger hammer, with lots of penetrating fluid. Hammering the chisel into the gaps where the studs are slowly but surely cracked the rotor free. An old Honda rotor made a good support whilst bashing it.

You can see where the rust was holding it. It was particularly bad around the center hole.
With the hub free, I removed the oil seal and inner bearing. A small pry bar was used to pop the seal out and then the bearing just pulls out by hand. The inner and outer races take a bit more force, and a punch and hammer were carefully employed to drift the races out of the hub. In my case, the bearings were a TIMKEN L45449/L45410 and the other is TIMKEN LM11749/LM11710. The seal is 40X55X8, and I believe these were originally from a Ford Granada.

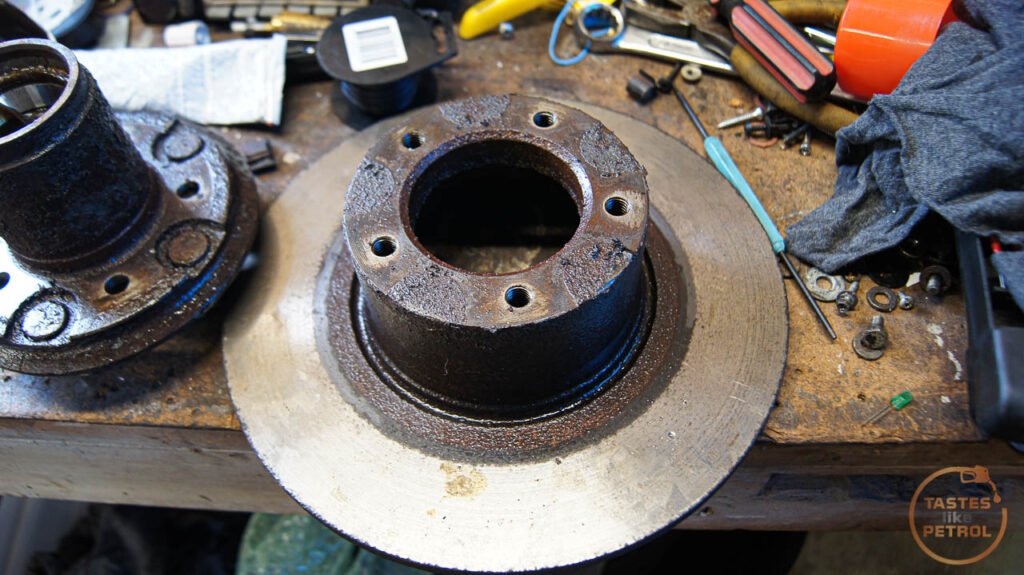
The new rotor next to the old one. The old one is below minimum thickness so needs to be replaced (although with the few Miles the car does each year it would take many years to become an issue, but that's not my style). The new one was supplied by Mtec Brakes in the UK and is both slotted and dimpled, because racecar.

Since I was stuck waiting for new bearings to arrive I decided to move onto another upgrade that I have been sitting on for a while; braided brake hoses.

First I had to remove the old hoses. That was fun. One side came off easy, the other side had a deformed thread locking nut on the chassis side, with limited access and a weird size. That took ages to remove...
And then I discovered that someone has previously replaced the front brake hoses with locally made hoses.... and for some reason decided that they should be M10 on the chassis end, as the original hoses, but the caliper end should be imperial, with custom hard lines made up to match, meaning my new hoses with original M10 thread on each end wouldn't fit. I can only presume someone got mad hookups with some random hoses off the shelf from some obscure old Holden or something.
So, off came the old hard lines on the calipers, and I had a local specialist make new ones up to suit the new hoses. Not a hard thing to have done, but damn I didn't need that mess around or cost.

The new pipes work a treat though and the front hoses went on as expected. Some tweaking and I had them lined up nicely.

The next day, with bearings in hand, I cleaned the hubs up with a wire brush to remove all the rust and crust, and degreaser to remove the old grease. The faces where the rotor mounts got a thin coating of copper grease to aid removal in future.

Then it was a matter of using one of my favourite now tools, my 12 Ton press, to press the new races into the hub. Sockets of various sizes were used to drive the race into place


Of course I couldnt miss the chance for a test fit. Mmmm pretty.

Since the races were in place I packed the new bearings with grease, installed them and installed the oil seals. As per the manual, the seals were also packed with grease.

Now it was just a case of installing the lot back onto the cleaned spindle. The manual recommended some grease at the base of the spindle where the seal will run, so I did that and fit the hub with rotor attached. The rotor bolts were nipped up with the rattle gun on the bench but cant be torqued up until they are on the car as the setting is quite high.
With the hub on the spindle, the outer bearing, washer and nut can be refitted. Now its time to set the bearings. First whilst spinning the hub counter-clockwise with one hand torque the hub nut up to 27 FT LBS. Now back the nut off slowly until there is 0.025-0.076mm (0.001-0.003") end float when measured with a dial gauge.
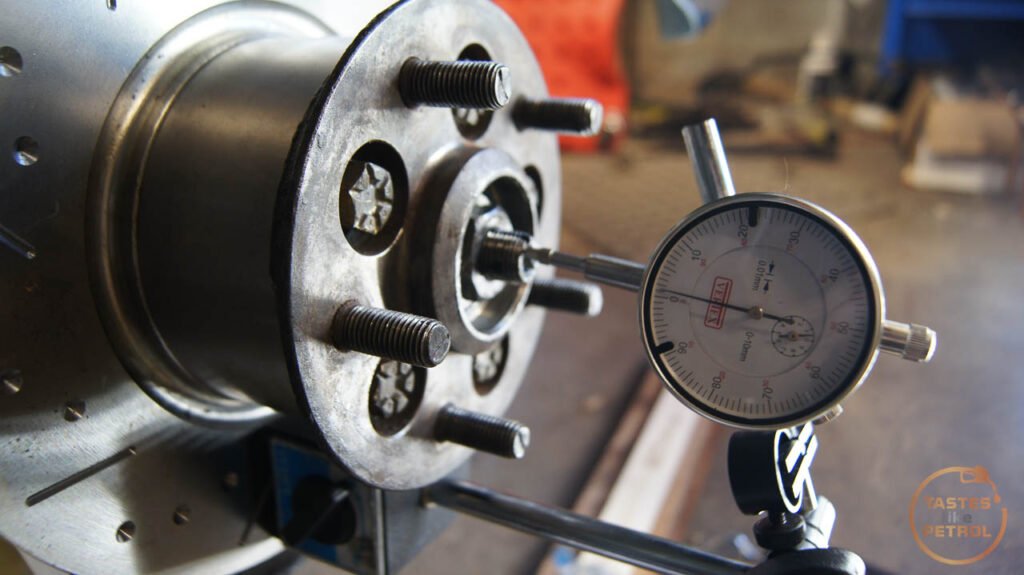
To measure the end float you have to push and pull the rotor to its limits. I set that one in the photo to almost 0.03mm, but the photo was taken with no pull on the rotor.
Some people talk of just setting it by turning the nut "one flat back", which for one side was about correct, but the other was more than one flat which means it would have been too tight otherwise.
Just for interest, before I undid the nut originally I measured the end float on both sides to see what it was set to, and there was no measurable end float at all, which means the bearings were too tight (and probably explains why the outer bearings had worn and failed as they had).
The last thing to do on the front was to torque the rotor bolts, which needed my big bar to hold the rotor from turning

And then it was a case of fitting the caliper again, making sure to bend the locking tabs back into place

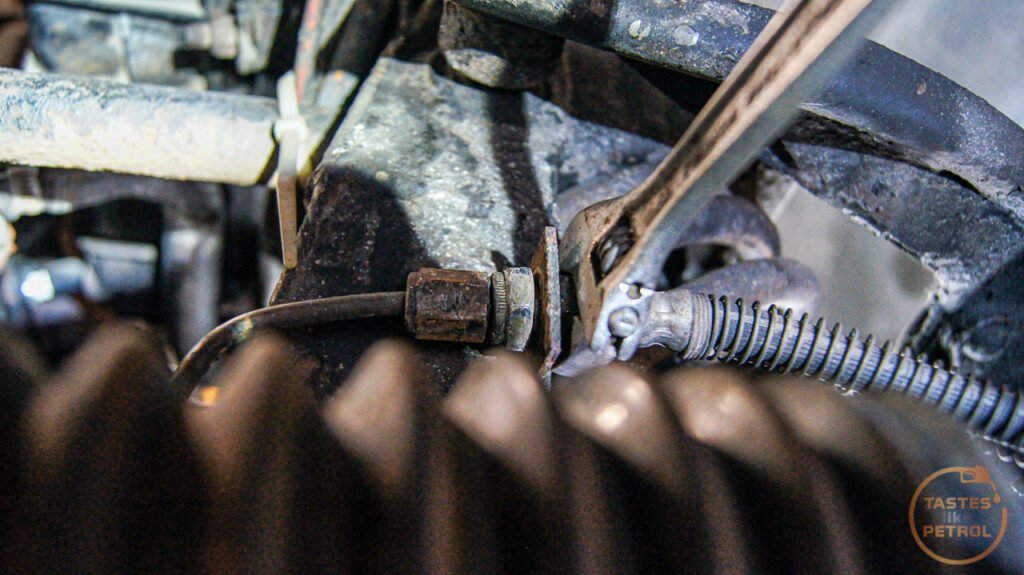
Before bleeding the brakes there was still one obvious job looming over my head; the rear brake hose. I had previously inspected when I had the diff out and deemed it crap. Thankfully when I had good access two days before the hoses arrived I freed all the fixings on the hose up and made it easy to undo, since now I was doing it almost blind, and with limited space. I don't have photos of doing this because it sucked, but it looks nice and I know its a good hose now.
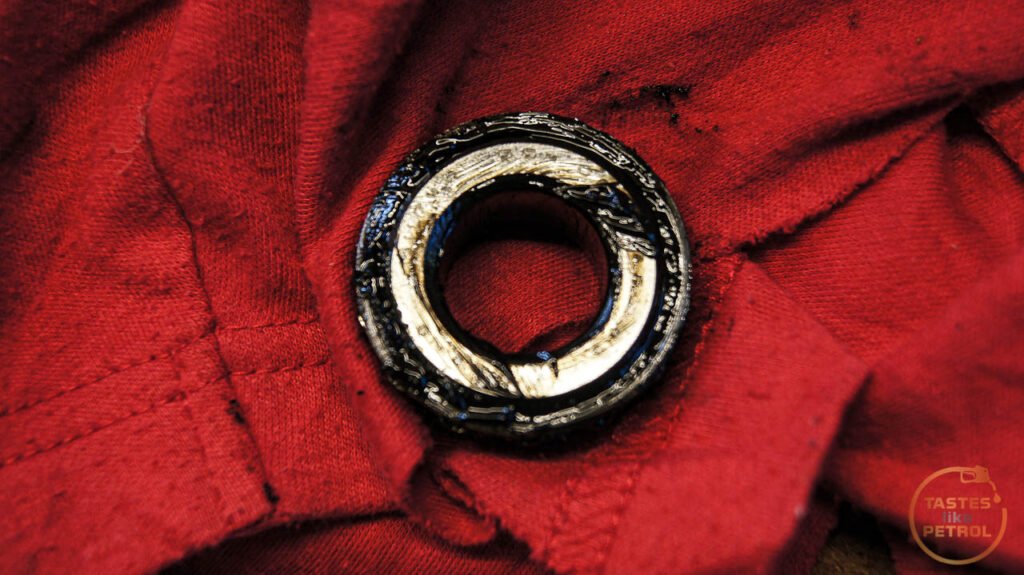
The old hose had seen some s t. The rubber was still OK, but the metal fixings were quite rusted


Pretty

Now it was time to pump some alien juice through the system and get the air out


Thats not all though, since the car was in the air and level there was one last thing I wanted to do, and that was to try and reduce the amount of gear oil the gearbox is leaking. When I was last under the car it certainly looked like the output seal on the gearbox was leaking, so thats where I started.
I ordered a seal ages ago from the UK with a shipment of other parts, but it was a matter of actually accessing the thing. Being a space frame there isnt a lot of freedom to access things like the gearbox, but I worked out I should have enough space and just went for it.
The first thing to do was to disconnect the driveshaft from the diff and slide it back to remove it from the back of the gearbox. Once it was free I slid it back as far as I could, up over the diff and out of the way.

Now I could see the back of the gearbox, with the seal in question. Might be some oil here.

Getting it out was a mission. First I tried a bunch of prybars and screwdrivers to lever it out, but got nowhere. In the end I went out and purchased a proper seal puller, and it took a matter of seconds to pop the seal out.


The new seal was a matter of pressing it into place by hand and then using a socket and hammer tapping it into place. There isnt a lot of room to swing a hammer, but a few careful whacks got it there

You can see how little space I have to work with here. Its right above the cross brace, and surrounded by tubes.

But with the new seal in place the end of the driveshaft got lubricated and refitted into the gearbox, and onto the diff again.
Since I didn't know how much had leaked out (it looked like a lot on the trays under the car) I drained and refilled the gearbox. I could've saved myself about $40 though, as it was only about 100ml low, so could have been topped up instead, but at least now I know its full.
I'll keep monitoring the gearbox, but for now it seems to be holding fluid better than it was. Its a British car though, so it wont be perfect.
With all that work done the only thing left to do was to take the car for a thrash bed in the new rotors with some hard stops. The brakes seem to work as good as they did, so thats a good sign I guess.
Good excuse to take some photos too


Shes looking pretty good now, and driving great. British Car Day at Trentham is in a couple of weeks, so with a quick waterless wash she will be on show again there this year, where hopefully someone will fall in love and pay me good money to drive her away.
This wasn't completely unexpected, he mentioned it last time too, but this time it's bad enough I should do something about it. The inspector advised I just nip them up to take out the play. "Nipping up" isn't my style, at the very least I want to repack the bearings with new grease and then set them correctly. This gives me the chance to replace the front rotors too, since they were undersized when I got the car and I've had the replacements sitting around for ages now.
I was starting with this. Being old, the rotor is behind the hub (unlike modern cars with the rotor ahead of the hub), which makes replacing it a bit more of a pain. On the flip side I'd need to adjust the bearings when refitting anyway, so two birds with one stone.
The first step in removal is to pop the dust cap off with a chisel and hammer, and then remove the split pin and locking ring from the nut.
Next, the caliper has to come off. This is held on with two bolts at the back, and should have locking tabs bent up against the bolt heads, so they will need to be hammered back first.
With the caliper safely supported and not hanging by its hose, undo and remove the hub nut. With the hub nut and washer behind it removed the hub/rotor can be removed. Be careful though as the outer wheel bearing is just sitting in place and can fall out of the hub during removal.
The outer bearing race wasn't looking good. Clear signs of wear or excess heat (discoloured outer race), and the grease had turned black around the bearing
The inner bearing looked OK, as did the seal. Looking at the state of the outer bearing though I chose to source replacements for all the bearings and just refresh the lot.
Before I could do anything further though I needed to split the rotor from the hub. With the bolts through the hub removed I suddenly realised that the hub and rotor were rust welded together. Awesome. Well, I know what sorts that; A big chisel and an even bigger hammer, with lots of penetrating fluid. Hammering the chisel into the gaps where the studs are slowly but surely cracked the rotor free. An old Honda rotor made a good support whilst bashing it.
You can see where the rust was holding it. It was particularly bad around the center hole.
With the hub free, I removed the oil seal and inner bearing. A small pry bar was used to pop the seal out and then the bearing just pulls out by hand. The inner and outer races take a bit more force, and a punch and hammer were carefully employed to drift the races out of the hub. In my case, the bearings were a TIMKEN L45449/L45410 and the other is TIMKEN LM11749/LM11710. The seal is 40X55X8, and I believe these were originally from a Ford Granada.
The new rotor next to the old one. The old one is below minimum thickness so needs to be replaced (although with the few Miles the car does each year it would take many years to become an issue, but that's not my style). The new one was supplied by Mtec Brakes in the UK and is both slotted and dimpled, because racecar.
Since I was stuck waiting for new bearings to arrive I decided to move onto another upgrade that I have been sitting on for a while; braided brake hoses.
First I had to remove the old hoses. That was fun. One side came off easy, the other side had a deformed thread locking nut on the chassis side, with limited access and a weird size. That took ages to remove...
And then I discovered that someone has previously replaced the front brake hoses with locally made hoses.... and for some reason decided that they should be M10 on the chassis end, as the original hoses, but the caliper end should be imperial, with custom hard lines made up to match, meaning my new hoses with original M10 thread on each end wouldn't fit. I can only presume someone got mad hookups with some random hoses off the shelf from some obscure old Holden or something.
So, off came the old hard lines on the calipers, and I had a local specialist make new ones up to suit the new hoses. Not a hard thing to have done, but damn I didn't need that mess around or cost.
The new pipes work a treat though and the front hoses went on as expected. Some tweaking and I had them lined up nicely.
The next day, with bearings in hand, I cleaned the hubs up with a wire brush to remove all the rust and crust, and degreaser to remove the old grease. The faces where the rotor mounts got a thin coating of copper grease to aid removal in future.
Then it was a matter of using one of my favourite now tools, my 12 Ton press, to press the new races into the hub. Sockets of various sizes were used to drive the race into place
Of course I couldnt miss the chance for a test fit. Mmmm pretty.
Since the races were in place I packed the new bearings with grease, installed them and installed the oil seals. As per the manual, the seals were also packed with grease.
Now it was just a case of installing the lot back onto the cleaned spindle. The manual recommended some grease at the base of the spindle where the seal will run, so I did that and fit the hub with rotor attached. The rotor bolts were nipped up with the rattle gun on the bench but cant be torqued up until they are on the car as the setting is quite high.
With the hub on the spindle, the outer bearing, washer and nut can be refitted. Now its time to set the bearings. First whilst spinning the hub counter-clockwise with one hand torque the hub nut up to 27 FT LBS. Now back the nut off slowly until there is 0.025-0.076mm (0.001-0.003") end float when measured with a dial gauge.
To measure the end float you have to push and pull the rotor to its limits. I set that one in the photo to almost 0.03mm, but the photo was taken with no pull on the rotor.
Some people talk of just setting it by turning the nut "one flat back", which for one side was about correct, but the other was more than one flat which means it would have been too tight otherwise.
Just for interest, before I undid the nut originally I measured the end float on both sides to see what it was set to, and there was no measurable end float at all, which means the bearings were too tight (and probably explains why the outer bearings had worn and failed as they had).
The last thing to do on the front was to torque the rotor bolts, which needed my big bar to hold the rotor from turning
And then it was a case of fitting the caliper again, making sure to bend the locking tabs back into place
Before bleeding the brakes there was still one obvious job looming over my head; the rear brake hose. I had previously inspected when I had the diff out and deemed it crap. Thankfully when I had good access two days before the hoses arrived I freed all the fixings on the hose up and made it easy to undo, since now I was doing it almost blind, and with limited space. I don't have photos of doing this because it sucked, but it looks nice and I know its a good hose now.
The old hose had seen some s
t. The rubber was still OK, but the metal fixings were quite rustedPretty
Now it was time to pump some alien juice through the system and get the air out
Thats not all though, since the car was in the air and level there was one last thing I wanted to do, and that was to try and reduce the amount of gear oil the gearbox is leaking. When I was last under the car it certainly looked like the output seal on the gearbox was leaking, so thats where I started.
I ordered a seal ages ago from the UK with a shipment of other parts, but it was a matter of actually accessing the thing. Being a space frame there isnt a lot of freedom to access things like the gearbox, but I worked out I should have enough space and just went for it.
The first thing to do was to disconnect the driveshaft from the diff and slide it back to remove it from the back of the gearbox. Once it was free I slid it back as far as I could, up over the diff and out of the way.
Now I could see the back of the gearbox, with the seal in question. Might be some oil here.
Getting it out was a mission. First I tried a bunch of prybars and screwdrivers to lever it out, but got nowhere. In the end I went out and purchased a proper seal puller, and it took a matter of seconds to pop the seal out.
The new seal was a matter of pressing it into place by hand and then using a socket and hammer tapping it into place. There isnt a lot of room to swing a hammer, but a few careful whacks got it there
You can see how little space I have to work with here. Its right above the cross brace, and surrounded by tubes.
But with the new seal in place the end of the driveshaft got lubricated and refitted into the gearbox, and onto the diff again.
Since I didn't know how much had leaked out (it looked like a lot on the trays under the car) I drained and refilled the gearbox. I could've saved myself about $40 though, as it was only about 100ml low, so could have been topped up instead, but at least now I know its full.
I'll keep monitoring the gearbox, but for now it seems to be holding fluid better than it was. Its a British car though, so it wont be perfect.
With all that work done the only thing left to do was to take the car for a thrash bed in the new rotors with some hard stops. The brakes seem to work as good as they did, so thats a good sign I guess.
Good excuse to take some photos too
Shes looking pretty good now, and driving great. British Car Day at Trentham is in a couple of weeks, so with a quick waterless wash she will be on show again there this year, where hopefully someone will fall in love and pay me good money to drive her away.
Thanks for taking the time once again to write such an accessible and comprehensive post, it makes it very enjoyable to read.
I have a couple of questions (as per usual )
)
- why didn't you capture the gearbox oil and re-use it, rather than replacing the lot?
- with regards to British cars... it is really a case of 'whack-a-mole' with regards to leaks, as a result of poor componentry, or it is simply the case that the more you replace (properly), the fewer leaks will occur?
I have a couple of questions (as per usual
)- why didn't you capture the gearbox oil and re-use it, rather than replacing the lot?
- with regards to British cars... it is really a case of 'whack-a-mole' with regards to leaks, as a result of poor componentry, or it is simply the case that the more you replace (properly), the fewer leaks will occur?
bolidemichael said:
Thanks for taking the time once again to write such an accessible and comprehensive post, it makes it very enjoyable to read.
I have a couple of questions (as per usual )
- why didn't you capture the gearbox oil and re-use it, rather than replacing the lot?
- with regards to British cars... it is really a case of 'whack-a-mole' with regards to leaks, as a result of poor componentry, or it is simply the case that the more you replace (properly), the fewer leaks will occur?
To be honest I didn't capture it as I was expecting the fluid to be quite low, thus working harder so quite dirty. I didn't expect that it would still be almost full and in good shape.I have a couple of questions (as per usual
)- why didn't you capture the gearbox oil and re-use it, rather than replacing the lot?
- with regards to British cars... it is really a case of 'whack-a-mole' with regards to leaks, as a result of poor componentry, or it is simply the case that the more you replace (properly), the fewer leaks will occur?
I presume the cars came from the factory with no leaks, though that might be a bit optimistic for a TVR, so if you take the time to replace all seals on everything one would think it might stop leaking at some point. It just seems to be the norm that British cars leak oil, whether its average tolerances or cheap gaskets, who knows. It is still 40 years old afterall. The goal is to reduce the leak to be less dramatic with less risk of running low.
KelvinatorNZ said:
bolidemichael said:
Thanks for taking the time once again to write such an accessible and comprehensive post, it makes it very enjoyable to read.
I have a couple of questions (as per usual )
- why didn't you capture the gearbox oil and re-use it, rather than replacing the lot?
- with regards to British cars... it is really a case of 'whack-a-mole' with regards to leaks, as a result of poor componentry, or it is simply the case that the more you replace (properly), the fewer leaks will occur?
To be honest I didn't capture it as I was expecting the fluid to be quite low, thus working harder so quite dirty. I didn't expect that it would still be almost full and in good shape.I have a couple of questions (as per usual
)- why didn't you capture the gearbox oil and re-use it, rather than replacing the lot?
- with regards to British cars... it is really a case of 'whack-a-mole' with regards to leaks, as a result of poor componentry, or it is simply the case that the more you replace (properly), the fewer leaks will occur?
I presume the cars came from the factory with no leaks, though that might be a bit optimistic for a TVR, so if you take the time to replace all seals on everything one would think it might stop leaking at some point. It just seems to be the norm that British cars leak oil, whether its average tolerances or cheap gaskets, who knows. It is still 40 years old afterall. The goal is to reduce the leak to be less dramatic with less risk of running low.

MarkwG said:
I was told they never leak - they mark their territory
Lol, that's what my old Vitesse did when we bought this house. Had to pull it into the garage to make sure the driveway and garage were suitable before making an offer. Drove the car out again and sure enough, a small circle of oil where the car had been. Had to buy the house then, the car told me so.TVR got another nice waterless wash with Carpro Ech2o ahead of British Car Day tomorrow. I like this stuff a lot. Easy to work with, no scratching, and shines well. I wouldnt want to use it on a properly dirty car, but this car is mostly just dusty from the floorboards above it and a small amount of driving.

Well, love it or hate it I now own a BMW 650i. Its with a somewhat heavy heart I said goodbye to the TVR but it needed to be done. I cant just keep it tucked up in the garage not being used, and with the Marina i need the space and money. The offers I had on the TVR were just a waste of time and people were happy to contact me, ask me a bunch of questions, and then either ghost me or offer me way below my asking price. Only one person bothered to view and they were viewing on behalf of someone that ended up buying an SR20 powered Lotus 7 rep.
This was a straight trade and a strategic move as the market will be bigger, so once I give it a good clean up, replace a couple of things it needs, and give it a service it will be ready for sale and hopefully sells reasonably well. It runs and drives great, and doesnt seem to be afflicted by the usual engine or trans issues these have.


Its a giant barge this thing. Makes the TVR look tiny.

This was a straight trade and a strategic move as the market will be bigger, so once I give it a good clean up, replace a couple of things it needs, and give it a service it will be ready for sale and hopefully sells reasonably well. It runs and drives great, and doesnt seem to be afflicted by the usual engine or trans issues these have.
Its a giant barge this thing. Makes the TVR look tiny.

So if I'm reading this correctly, you swapped the TVR for the E63 650i?
There's an active thread on one that may be of interest to you.
There's an active thread on one that may be of interest to you.
bolidemichael said:
I owned a 645Ci manual and whilst I willed it to be a large version of my E30, I found that it was necessary to turn off the traction in order to make the ride more playful. Swapping out the run flats is something that a lot of owners do, but I kept the RFTs as they were practical.
Oh god the traction control is so intrusive! Probably didn't help I had the narrow tyres on the rear (since swapped over but not yet driven since) but even trying to leave an intersection briskly it would bog down with the light flashing wildly in the dash. Didn't stop the rear end jumping about when corning hard over a hill though. The car feels kinda playful when you drive it hard, but its also really nice to just waft along in with minimal noise and fuss.This doesn't have runflats, but it does have cheap black circles on the wheels. More than enough to sell the car on though.
bolidemichael said:
So no thread and no titivation on this one? That's a very smart tactical move in that case, as you say.
Did you advertise the wedge as for sale or exchange? The new owner has inherited one well sorted TVR!
Hopefully no thread. If there is a thread it means its turned into a lemon and now a "project" O_ODid you advertise the wedge as for sale or exchange? The new owner has inherited one well sorted TVR!
It needs some minor work, like new badges (because a previous owner changed them to horrible fake silver carbon badges and now they're discoloured and bubbling. $70NZD for the rear badge!!), new windscreen rubber surround because its perished and missing bits, and a damn good clean because it's festy. There will be a couple of updates on my site about it, but no thread here because it'd end up being about 2 posts long (hopefully).
Wedge was listed for sale with no real bites, so extended it to trades for "something interesting like an MGB GT" and ended up with this. Its a very well sorted TVR but im a little worried the owner doesn't have the skills to maintain a classic TVR, but oh well, its done now. Probably see it for sale again soon, where it'll sell.
Gassing Station | Readers' Cars | Top of Page | What's New | My Stuff