Kelvinators TVR Tasmin
Discussion


Since I'm still waiting on the pressure testing kit to arrive, I got impatient and did some more testing.
I wanted to remove the injectors and see if any of them were leaking and what the spray pattern is.
The intake plenum needs to come off. before this can be removed though, the coolant block on the front needs to be unbolted. Unbolting this saves disconnecting the coolant hoses.

All the other hoses got removed, and the 7th injector was removed from the plenum. The plenum is held down with eight long bolts that go into the inlet manifold. Just a note, these bolts aren't sealed off from the inside of the plenum, so will need sealant on them upon reassembly.

With everything disconnected and unbolted, the plenum just lifts off

Removing the injectors is fairly simple. The clamp on the pipes (which goes above, below and between the pipes), as visible in the lower Lh corner of the above photo, has to be removed to allow enough slack in the pipes, but otherwise its a case of removing the single bolt per injector, and then pulling it free from the manifold. They are meant to be sealed in, but mine came out suspiciously easily.

The rubber collar is weird. I presume/hope there is a normal O-Ring under it, as that is what all the parts manuals say it should have, and there seems to be no part for that rubber collar. I'll have to carefully remove and reuse the collar.

All the injectors look pretty rough, but I guess thats what 39 years of sitting in the intake looks like. The ends all look clean enough, with no obvious buildup. I did note that cylinder 6 was very wet upon removal, and a couple of others were damp. The engine has been off and cold for about a week, with no pressure in the lines.
Testing them isnt rocket surgery, just pop them all into jars, fire up the pump and see if they produce any fuel (which they all did to some degree), which indicates either the fuel plunger is letting excess fuel through, or the injectors are leaking. Further investigations show its probably a 50:50 on leaking or adjustment causing it.

With the pump running, lift the sensor plate in the AFM to its stop and observe the flow and pattern from the injectors. All mine seem to flow roughly the same, but the flow pattern out of all of them appeared to be rubbish, with minimal misting and heading off in all directions. That's good, it confirms that buying a whole set of replacement injectors was the right decision!
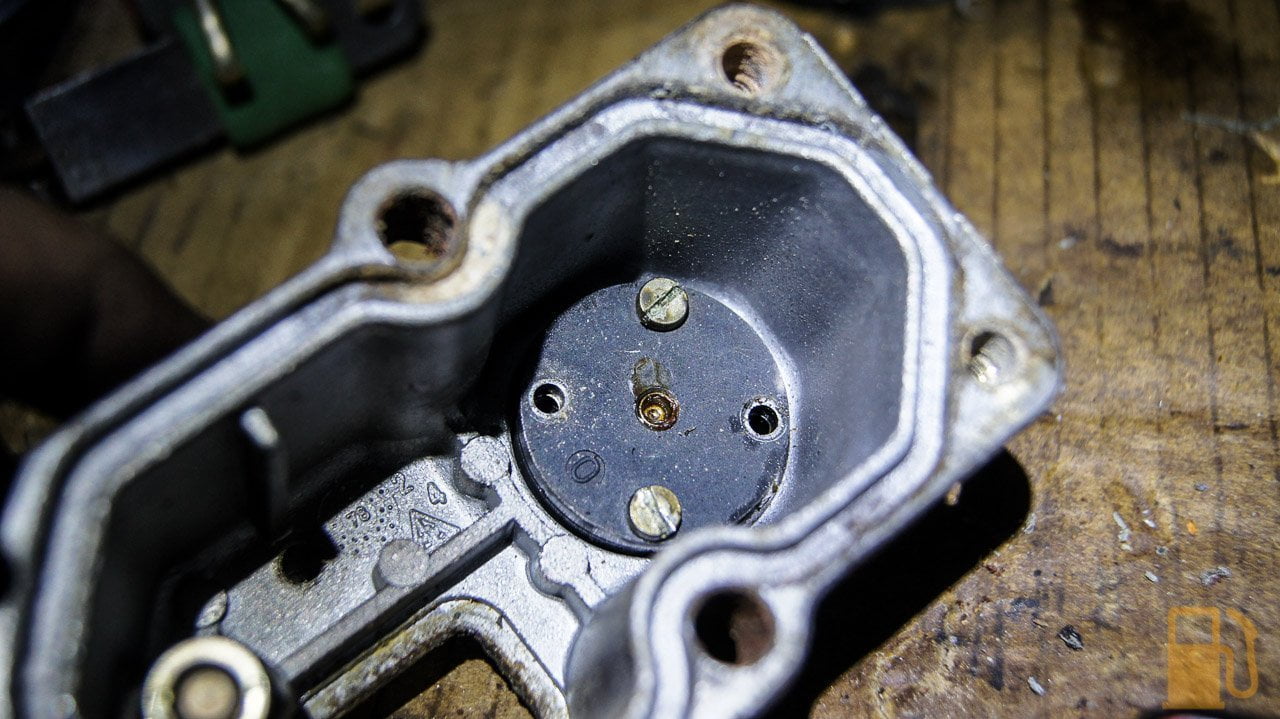
One other thing that has been bugging me, was the sensor plate in the AFM. This is meant to be a finely calibrated instrument, but I think someone has mucked with mine before.

You can see in the above photo that it looks like the sensor plate (the disk in the middle of the cone) is sitting high with a gap under it. Well, it is.
From the below diagram, you can see the sensor plate sits at the bottom of a cone. As air comes in from the filter at the bottom, it comes in under the plate and a combination of that air coming in, and engine vacuum in the intake, lifts the plate to allow air into the intake. Lifting the plate also lifts the fuel plunger, increasing fuel flow.

The plate should be set to a specific height, which is more or less with the highest point of the plate flush with the lip at the bottom of the cone (before where it tapers outwards again, under the plate).

Mine was clearly sitting a lot higher than that. Not to mention the other issue...

The plate was off-centre. I even thought the plate was too big to fit through the opening, but it was just because it was off-centre.
I carefully backed off the center bolt, and centered the plate (this should be done with feeler gauges, but I did it by eye this time)

Now it fits through the opening

It was still sitting too high though

There is a spring under the plate that sets the height. The manual says to adjust it with pliers, but I'm damned if I can bend the thing.

I'll keep at it and see if I can tweak it.
The other thing I noticed is that you can hear and feel the plunger moving when you manipulate the sensor plate. I'm not sure how normal it is, but my plunger seems very slow to return to the zero position. It doesn't seem to bind and it moves smoothly, it's just slow to return. I'll be removing and cleaning this in the future anyway.
So that's where I'm at. I'm waiting for a set of new injectors to arrive, and I need to remove the fuel distributor and WUR to clean them out. I'm planning on setting everything up from zero since I have no idea what's been done to this by previous bodgers.
I wanted to remove the injectors and see if any of them were leaking and what the spray pattern is.
The intake plenum needs to come off. before this can be removed though, the coolant block on the front needs to be unbolted. Unbolting this saves disconnecting the coolant hoses.

All the other hoses got removed, and the 7th injector was removed from the plenum. The plenum is held down with eight long bolts that go into the inlet manifold. Just a note, these bolts aren't sealed off from the inside of the plenum, so will need sealant on them upon reassembly.

With everything disconnected and unbolted, the plenum just lifts off

Removing the injectors is fairly simple. The clamp on the pipes (which goes above, below and between the pipes), as visible in the lower Lh corner of the above photo, has to be removed to allow enough slack in the pipes, but otherwise its a case of removing the single bolt per injector, and then pulling it free from the manifold. They are meant to be sealed in, but mine came out suspiciously easily.

The rubber collar is weird. I presume/hope there is a normal O-Ring under it, as that is what all the parts manuals say it should have, and there seems to be no part for that rubber collar. I'll have to carefully remove and reuse the collar.

All the injectors look pretty rough, but I guess thats what 39 years of sitting in the intake looks like. The ends all look clean enough, with no obvious buildup. I did note that cylinder 6 was very wet upon removal, and a couple of others were damp. The engine has been off and cold for about a week, with no pressure in the lines.
Testing them isnt rocket surgery, just pop them all into jars, fire up the pump and see if they produce any fuel (which they all did to some degree), which indicates either the fuel plunger is letting excess fuel through, or the injectors are leaking. Further investigations show its probably a 50:50 on leaking or adjustment causing it.

With the pump running, lift the sensor plate in the AFM to its stop and observe the flow and pattern from the injectors. All mine seem to flow roughly the same, but the flow pattern out of all of them appeared to be rubbish, with minimal misting and heading off in all directions. That's good, it confirms that buying a whole set of replacement injectors was the right decision!
One other thing that has been bugging me, was the sensor plate in the AFM. This is meant to be a finely calibrated instrument, but I think someone has mucked with mine before.

You can see in the above photo that it looks like the sensor plate (the disk in the middle of the cone) is sitting high with a gap under it. Well, it is.
From the below diagram, you can see the sensor plate sits at the bottom of a cone. As air comes in from the filter at the bottom, it comes in under the plate and a combination of that air coming in, and engine vacuum in the intake, lifts the plate to allow air into the intake. Lifting the plate also lifts the fuel plunger, increasing fuel flow.

The plate should be set to a specific height, which is more or less with the highest point of the plate flush with the lip at the bottom of the cone (before where it tapers outwards again, under the plate).

Mine was clearly sitting a lot higher than that. Not to mention the other issue...

The plate was off-centre. I even thought the plate was too big to fit through the opening, but it was just because it was off-centre.
I carefully backed off the center bolt, and centered the plate (this should be done with feeler gauges, but I did it by eye this time)

Now it fits through the opening

It was still sitting too high though

There is a spring under the plate that sets the height. The manual says to adjust it with pliers, but I'm damned if I can bend the thing.

I'll keep at it and see if I can tweak it.
The other thing I noticed is that you can hear and feel the plunger moving when you manipulate the sensor plate. I'm not sure how normal it is, but my plunger seems very slow to return to the zero position. It doesn't seem to bind and it moves smoothly, it's just slow to return. I'll be removing and cleaning this in the future anyway.
So that's where I'm at. I'm waiting for a set of new injectors to arrive, and I need to remove the fuel distributor and WUR to clean them out. I'm planning on setting everything up from zero since I have no idea what's been done to this by previous bodgers.

Mikeeb said:
The rubber top hat buses should be soft. They are the seal to stop air leaks. Always replace them.
I would, if I could find a part number or source for them! Been through two parts guides for the Cologne and haven't spotted them, and parts interpretation is what I do for a living. Either I'm blind, or they aren't in the guides.They're still soft, and in good shape, so can be reused, this time.
Mikeeb said:
The rubber top hat buses should be soft. They are the seal to stop air leaks. Always replace them.
Further to this, some more investigation has revealed why the parts guide only shows standard O-Rings and not a rubber bush... Its not a rubber bush at all, but a plastic sleeve sitting on the normal injector O-Ring. Mine are just very compressed, so it looks like its part of the plastic sleeve.New O-Rings were already en route, so that's a win.
Its been a while since the last post; almost exactly a month. Although it's been quiet on here, work has been slowly progressing on the TVR.
Unfortunately I've been suffering serious issues with motivation recently, and getting down into the garage to work on the car just wasn't happening often. It hasn't helped that for every little scrap of success I've been having with the car, I would get a big wad of failure dumped on me. It seems like a constant battle at times.
When I could get into the garage and plug away at the TVR I did. I have done a lot of testing, cleaning and investigation into the K-Jetronic system trying to chase down the running issue it has. This will be the subject of a post in the near future, but I'm learning a lot about the system and how it works. Hopefully that knowledge will lead to me getting it working correctly, and helping others along the way.
In the meantime, I did have a couple of small successes. One was the gas struts for the bonnet and boot. The old ones were well poked, and held nothing, so other means of support were employed. The bonnet and boot may be fibreglass, but they sure ain't light; I didn't want to take one of them to the noggin.


Not flash, but they worked. The boot had the wood plank, and the bonnet had an aluminium tube.
I did some ringing around and research into the option of having the existing struts regassed, as finding a set of struts in the correct length and with the low pressure they require (100NM) locally didn't seem possible, but the cost of regassing the struts, if even possible, wasnt much less than a new set of struts from SGS Engineering in the UK.
The old ones appear to be the original Stabilus Lift-O-Mat struts, as the date mark on them is 04/80. They did pretty well to get this far!

Upon removing them, three had some pressure, although minimal, and one of the bonnet ones was completely dead. Removal was easy. The old ones had plastic locking pins that needed to be removed and then the ends could be popped off the ball with a long screwdriver. All of the ball joints had to be removed to replace with the new shiny ones, which is easily done with the appropriate spanners.
The replacements are lovely and shiny, I'm glad I went for the new option as the old ones just never would've cleaned up as well. They are Nitrolift branded, and gassed to the correct 100NM. It appears SGS custom build these for each order.

The ends are particularly nice

They fit and work perfectly. Much better.


For the money spent, its a great upgrade from the saggy old struts.
Moving on, the second win I had was finally working out what the ashtrays are in the early Tasmin.
My old ones were badly rusted and falling to bits. They weren't useable and looked terrible. I suspect this was from rainwater coming in the window due to the failed/damaged seals. The front was literally being pushed off by rust, on the driver's side.


There had been a lot of information/discussion on the internet about the ashtrays being from a Jaguar XJ6. I can dispel this myth now, they are not. You could probably make them fit, but they aren't the original ashtrays.
I purchased a pair of ashtrays from an XJ6, and when compared to the TVR ones the difference is subtle, but there. Jag on the left, TVR on the Right. The Jaguar ones are rounded on the sides, and slightly taller. The mounting tabs for the ashtray into the housing are completely different too.

Speaking of the housing, that also differs from the TVR one. TVR Left, Jag Right. Jag is slightly smaller in all directions except depth. Its slightly deeper and has a sloped back on it, whilst the TVR one is flat on the back. The mounting hole also doesn't line up.

So, with that bitter disappointment, and waste of money, I kept digging. I eventually found that the 2 Door Range Rover Classic used the same ashtray as the TVR, but finding one of those was proving impossible. It wasn't until a member on the TVR Wedges Facebook page pointed it out, that it was suddenly obvious where the ashtrays came from. I almost felt embarrassed I didn't notice it... they're from a Series 1 Rover SD1!

There it goes, sitting there, in the door. Finding one of these was a lot easier, albeit blue is a rare colour so I have ended up with a pair of tan, like the above photo.

It turns out that TVR modified the Rover part slightly, by removing the foam tape off the back of the housing, and bashing the mounting hole with a hammer to flatten it off (sits proud normally, and the ashtray won't sit flush in the door).

They aren't perfect, due to the tan, but I'm keeping an eye out for a blue pair, but will give dying these a go at some point. Better than rusty old ones falling out of the door!


So once again, I've been left with some small victories, which are better than nothing, but the KJet system continues to fight me. More on that later though, as thats been a big, ugly, process.
Another small job I wanted to take on whilst the car was in bits, was to check the valve clearances. I had no history of it being done, and its a fairly important thing to check on these engines, and not hard to do.
Valve clearance is the small gap that must exist between the rocker arm and the top of the valve stem. This gap allows for expansion of the parts as they heat up (mainly the valve), so that there isn't either excessive space between the two (valve won't open as far or as long, and will make a loud tapping noise) or too little (valve may not close, and can result in a burnt valve).
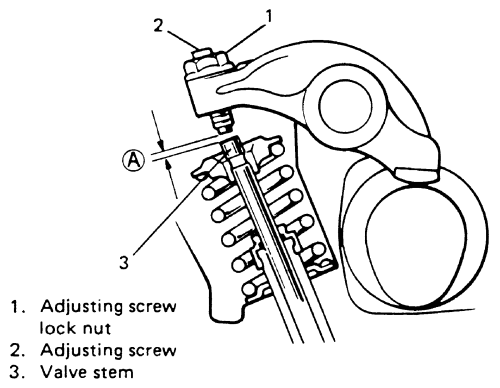
Some engines have the means to self adjust, usually via a hydraulic lifter (those things that make Mitsis go "tick tick tick"), but on these older engines (and even some modern engines, like Hondas) the clearances were a scheduled service item and needs to be checked and corrected.
On this engine it's nice and easy to access with the intake piping out of the way. It's just a matter of removing the valve covers, of which mine were leaking anyway.

It turns out that a few of the valve cover bolts weren't even finger tight, so no wonder the oil was getting through the gasket!

With the covers off, you need to use a socket and ratchet to rotate the engine so that the crank timing mark lines up with TDC on the front pointer. If its correct, you should find that No 5 cylinder valves are "rocking" and this is when you measure No 1 cylinder clearances. "Rocking" is the term for when you watch the rockers on that cylinder and you will see the both are at the same height, but if you rock the crank one way, one rocker will push down slightly, and if you rock it the other way, the other rocker will push down.
Ford Cologne engines are a little special, so the layout isn't quite what you expect. Take note of the layout of the intake and exhaust valves, they aren't always in the same order.

The clearances should be as follows. These are done on a cold engine (about 20c ideally). The exhaust has a bigger clearance due to the additional heat the valve is subjected to.

When checked with a feeler gauge, there should be a slight drag on the blade, but not too tight, or too loose. You kinda just do it by feel and get to know what it should feel like

When one cylinder is done, check the list to see what rockers will be rocking next and turn the crank (in the direction of normal rotation) until those rockers rock, and check the clearances on the opposing cylinder in the list. Easy.
If any of them need adjusting, there will be a screw on the opposite end of the rocker, that either needs to be loosened or tightened to open or close the gap. Most cars have a locking nut to stop it rotating, but the Cologne doesn't, so turning the screw will adjust it, and it self locks. Mine were very tight, so I used a six sided socket and rachet to turn them. A little goes a long way though, so sometimes even a slight tweak of the screw will be the difference between loose, and the right amount of drag.

Five of six cylinders had valves that were too tight to get the blade into, and one cylinder was loose as a goose. I don't know what this means, hopefully it isn't a sign of valve recession due to a lack of lead, but time will tell. It could also just be bad adjustment from a previous mechanic....
Valve clearance is the small gap that must exist between the rocker arm and the top of the valve stem. This gap allows for expansion of the parts as they heat up (mainly the valve), so that there isn't either excessive space between the two (valve won't open as far or as long, and will make a loud tapping noise) or too little (valve may not close, and can result in a burnt valve).

Some engines have the means to self adjust, usually via a hydraulic lifter (those things that make Mitsis go "tick tick tick"), but on these older engines (and even some modern engines, like Hondas) the clearances were a scheduled service item and needs to be checked and corrected.
On this engine it's nice and easy to access with the intake piping out of the way. It's just a matter of removing the valve covers, of which mine were leaking anyway.

It turns out that a few of the valve cover bolts weren't even finger tight, so no wonder the oil was getting through the gasket!

With the covers off, you need to use a socket and ratchet to rotate the engine so that the crank timing mark lines up with TDC on the front pointer. If its correct, you should find that No 5 cylinder valves are "rocking" and this is when you measure No 1 cylinder clearances. "Rocking" is the term for when you watch the rockers on that cylinder and you will see the both are at the same height, but if you rock the crank one way, one rocker will push down slightly, and if you rock it the other way, the other rocker will push down.
Ford Cologne engines are a little special, so the layout isn't quite what you expect. Take note of the layout of the intake and exhaust valves, they aren't always in the same order.
The clearances should be as follows. These are done on a cold engine (about 20c ideally). The exhaust has a bigger clearance due to the additional heat the valve is subjected to.
When checked with a feeler gauge, there should be a slight drag on the blade, but not too tight, or too loose. You kinda just do it by feel and get to know what it should feel like

When one cylinder is done, check the list to see what rockers will be rocking next and turn the crank (in the direction of normal rotation) until those rockers rock, and check the clearances on the opposing cylinder in the list. Easy.
If any of them need adjusting, there will be a screw on the opposite end of the rocker, that either needs to be loosened or tightened to open or close the gap. Most cars have a locking nut to stop it rotating, but the Cologne doesn't, so turning the screw will adjust it, and it self locks. Mine were very tight, so I used a six sided socket and rachet to turn them. A little goes a long way though, so sometimes even a slight tweak of the screw will be the difference between loose, and the right amount of drag.

Five of six cylinders had valves that were too tight to get the blade into, and one cylinder was loose as a goose. I don't know what this means, hopefully it isn't a sign of valve recession due to a lack of lead, but time will tell. It could also just be bad adjustment from a previous mechanic....
Well yeah, Bosch K-Jetronic.... I now understand why it's so widely hated.
This will be a rather large post, as this covers about 6 weeks of work.
The TVR has been out of commission for a while now, since the running issue was getting worse to the point it wasn't able to make it down the road anymore.
The last update regarding the engine saw me remove the plenum and injectors to test them. This lead to the discovery that the flow was there, but the pattern was rubbish, so new injectors were sourced.
New Bosch injectors for the cologne are big money, and I'm trying to sort this issue for minimal cost (within reason). There is a lot of discussion online about using Mercedes injectors in various KJet powered cars (mainly VW), and it all seems good, and the injectors are much cheaper. I found one single blog post on a foreign website, that once translated confirmed that the Merc injectors do indeed work on the Cologne V6. Good enough for me.
The injectors in question are Bosch part number 0437502047, and I also got new seals, Febi 034133557E. I sourced both from FCP Euro.
The Bosch boxes made me laugh. MECHANIC ONLY!

You can see the obvious difference here. The new injectors are shorter, both in the overall length, but also in the hex part at the top.

I can now confirm that these do indeed fit, and if you check the link to the other blog above, you can see that the injector does stick out into the intake tract less, but won't be an issue (and some say is better for intake flow).
You can see the shorter hex here

These are the plastic retainers. These sit on top of the O-ring, and appear to be what actually holds the injector into the manifold, by the metal retainer pushing down on the plastic retainer, which pressed down on the O-ring. The tapered face visible in the first photo is what sits against the O-ring.


Due to the replacement injectors having a shorter hex, you cannot fit the retainer and O-ring, and then still have space to tighten the injector pipe. I found it easiest to slip the plastic retainer, O-ring and metal retainer on, leave them at the bottom of the injector, and then fit and tighten the pipe on the car. Once tight, then you slip the retainer and O-ring up into place.


So that finally solves the mystery of the injector seal. It's a normal KJet O-ring, with a plastic retainer on it.
With the new injectors sorted, they all got refitted into the manifold and secured with the metal retainer and screw.
Next was to remove and clean the fuel distributor. This is the big weird thing on top of the air box, which feeds all the injectors. This has a plunger inside it, which the sensor plate presses up on as it opens. This plunger is known to get sticky when cars are left sitting. Mine was slow to return, and wasn't moving as free as it should.

Carefully crack off all of the banjo fittings, including the feed and return on the side, and then remove the banjo bolts. Take care to collect all the copper washers, as there will be two on each banjo fitting. With the fuel lines disconnected this gives access to the three flat head screws that secure the unit to the air filter housing. Remove these screws. Now the distributor can be CAREFULLY removed. Make sure to slip a hand under it and stop the plunger from dropping right out. If it falls out and gets damaged, the whole distributor is a write-off!

You can see the plunger in the center of the unit.

With the unit on the bench you can turn it over and let the plunger slip out. If it doesn't freely drop out, it may need some compressed air in the top fuel fitting to push it out. Mine dropped out OK. Be VERY careful handling the plunger, and keep it very clean.

I cleaned the plunger and its cylinder in the main unit, and sprayed and soaked all fuel ports with carb and brake cleaner.
In the injector outlets there are individual filter baskets. I used a long, thin screw to gently screw into them, and then a sharp pull freed them


They all had some traces of dirt on them, but nothing major. I soaked them in brake clean overnight and then refitted them

The regulator was the last part to clean and overhaul. This resides on the side and is a 5/8" hex. I ordered a replacement seal kit from Delorean GO as they use the same part in their Kjet setup.
The regulator kit is PN 102807A and I also got a new seal for between the fuel distributor and airbox, PN 102855

I used a small pick to remove the old seals, and replaced them with the new green ones. The old ones looked in good shape, I wonder if they had been replaced recently to try and fix the issue? Be careful handling the regulator too, just above the o-ring in the below photo are two very small shims. These set the fuel pressure, so don't lose them! You can add or subtract shims to increase or decrease system pressure.

I also did the o-ring on the regulator piston, but no photo of that.
That's about all I could do with the distributor without splitting it, and that is a risky job that could result in further damage or leaks.
The next part to clean out was the (incorrectly named) Warm Up Regulator. This is the main control pressure regulator (the one above only controls the system pressure), and controls how rich or lean the engine runs. It has two bolts holding it down, two fuel banjo fittings, a power connector, and a vacuum hose.

Mine was pretty grotty. A lot of parts on the engine have been badly painted grey, which is flaking off and being ugly. I'll deal with that another time.


I could see some dirt in the inlet mesh already, so not a good start.

There isn't a lot to break on these, but take care taking it apart. Opening it up is easy; there are four screws on the bottom, which when removed will split the two halves.


There are a few things of interest inside the top half
[LIST]
[*]Orange Arrow - Adjustment pin for COLD pressure
[*]Green Arrow - Heater element
[*]Blue Arrow - Bimetallic Strip
[*]Red Arrow - "Mexican Hat" and pin

[/LIST]
Bascially, when the engine is cold it needs a richer mixture, like a choke on a carb. A LOWER control pressure will give this result. The springs in the bottom half press on the mexican hat, which pushes on the pin, which then places pressure on the diaphragm via a little cup. This force is countered by the bimetallic strip, which pushes down on the mexican hat when cold, reducing the internal restriction. Of course you couldn't run that rich all the time, so to lean it out when warm, the WUR is warmed by both engine ambient heat, and by a 12v heating element. This heat causes the bimetallic strip to slowly bow upwards, which releases pressure against the mexican hat, allowing it to rise up and towards the diaphragm, creating an internal restriction, raising the control pressure, and leaning the mixture. The cold pressure is set by adjusting how much the bimetallic strip pushes down on the mexican hat when cold. This is done by moving the adjustment pin up and down.... with a hammer and punch.
Anyway, to continue disassembly you need to remove the clip that retains the heater connector. A large screwdriver to lever it out does the trick

And then remove the 10mm nut from the bimetallic strip and remove it. Take note of the washer placement

This is the fuel unit containing the cup and diaphragm. I have removed two of the screws already. The cup is in the middle, filled with grease (to lubricate and retain the pin)
CAREFULLY remove the disk and diaphragm. Don't damage the diaphragm as its hard to get a replacement (although there are some rebuild kits on eBay now which may work).
Removing these gives you access to the o-ring and fuel ports. One of them has a very fine five-layer mesh filter in it. Internet wisdom says to clean it, but not to remove it as it can cause issues with pressures if you do (reduces restriction). I hosed it from inside out with brake clean, and got a whole heap of what I can only describe as a fine sand from it. There was heaps.


After much testing, I eventually went back and actually threw the disassembled top half into my ultrasonic cleaner, which seemed to clean the filter out well. I tested it by shining a light through it, and there were some big differences in how much light came through. There was almost no light passing through at first, before cleaning.
Cool moody shot from that night

I refit the distributor and WUR, and refit the fuel pipes

I also plumbed in the fuel pressure testing kit, between the fuel distributor and WUR.

The system pressure was a little low, it should be over 5BAR

But the cold control pressure was crazy. It should be about 0.5BAR, not 3.6BAR!

Keep in mind this is after only cleaning, but without any adjustments. No wonder the car was leaning out hard. Remember, higher pressure is a leaner mixture.
This triggered the next couple of weeks messing with the system trying to iron out the pressures. I tried many things, including running the WUR naked, with no internals

And setting the pressure with the adjustment pin, located here

Then it all started to turn to custard, and the system pressure was low at about 4BAR, and wouldn't come up even with additional shims in the regulator. This lead to buying a replacement fuel pump.

The old pump is pretty easy to remove. Four bolts hold the mount to the car, two hoses, and two wires need to be removed.

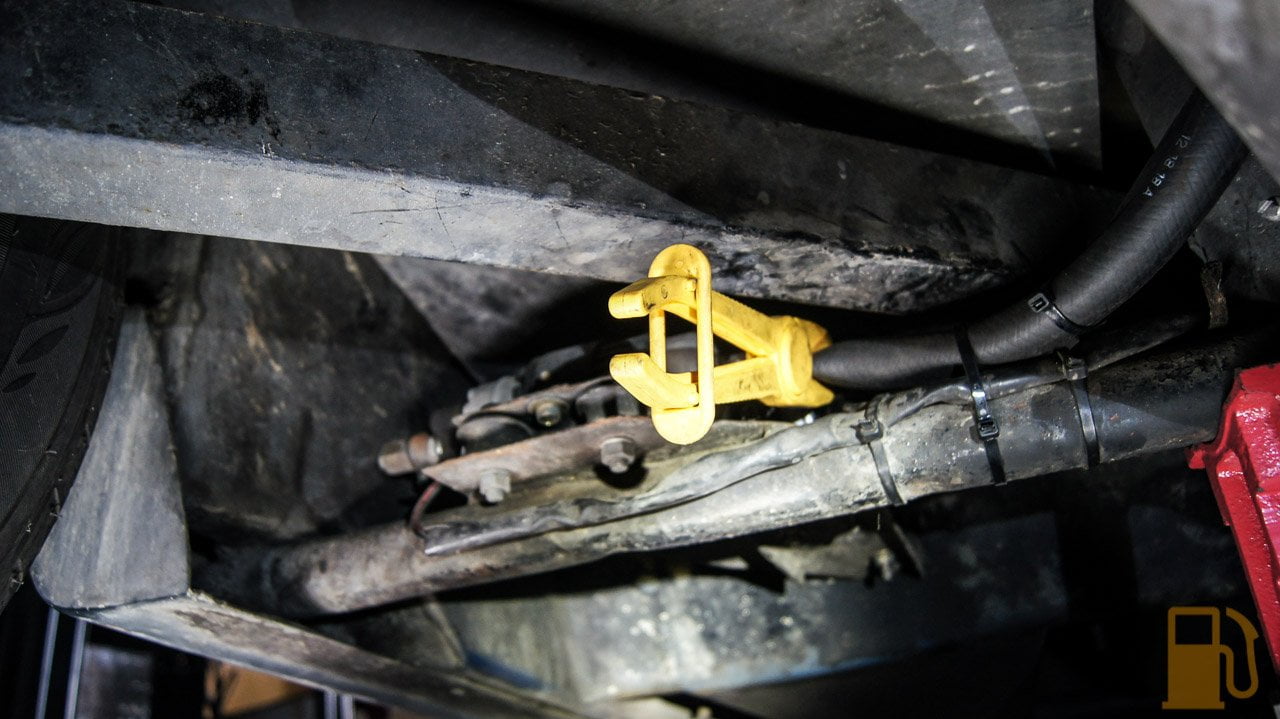
I clamped the feed hose as the tanks had fuel in them now and set about removing the pump
Pump on the bench

The pump has an inlet filter in it, and this is what came out of that filter. It's not rust, which is good, but almost looks like fluff, some organic matter (bits of leaf?) and a lump of metal, which kinda looks like lead or solder. I might get a pre-pump filter.


The new pump is bigger and slightly longer, but otherwise a direct replacement. I couldn't reuse the sleeve from the old pump, but reused the rubber insulator


The old pump was a Bosch 0580464125. A good pump, but mine wasn't having a good time anymore. The replacement is a generic pump which met the required criteria (high flow, and up to 8BAR pressure).
The new pump sounds nicer, but the system pressure hasn't changed much at all. I tried adding a whopping great washer as a shim on the regulator and finally got 5BAR pressure, but I'm sure that isn't right. I have had the WUR open so many times now that I can open it in about 30 seconds for adjustment, but I'm still getting weird results.
Right now, the system pressure is around 5BAR with the extra shims. The cold control pressure should be about 0.5BAR (as that's what I dropped it down to after resetting the pin) but either it's very slow to rise on the gauge, or doesn't rise at all now. Warm pressure is about 2BAR, 0.9BAR too low.
The new pump can obviously do the pressure, but its either being restricted or bled off somewhere. There are no leaks, and the fuel filter was replaced when I got the car (although I do now wonder about it after the pump packing a sad).
Anyway, I reassembled the intake today, and removed the pressure tester
And fired the car into life. It had some issues at first, but tweaking the mixture screw sorted that out and it idled OK, albeit a bit lumpy and revved on about 5 cylinders. The more I ran the car, the more it was happy to pick up all the cylinders and rev again. I set the idle by ear, and so far I have taken it for a dodgy run back and forth along my road, which it seemed OK. I haven't been brave enough to take it further yet as I might take a support car with me just in case it dies in the middle of the road again.

I still want to know what the pressures are doing, but I suspect there is an issue with my pressure tester. Either that or I have a weird issue in my KJet system. I'm trying to source a second testing setup now to compare and see what happens. If I can set the pressures correctly, in theory I should be able to get a nice happy running car. Fingers crossed.
Oh, it wouldn't be my car if it didn't spill some coolant. Thankfully I believe this is just from me overfilling the radiator, as it was from the overflow. Looks like it'll need a flush at some point too.

This will be a rather large post, as this covers about 6 weeks of work.
The TVR has been out of commission for a while now, since the running issue was getting worse to the point it wasn't able to make it down the road anymore.
The last update regarding the engine saw me remove the plenum and injectors to test them. This lead to the discovery that the flow was there, but the pattern was rubbish, so new injectors were sourced.
New Bosch injectors for the cologne are big money, and I'm trying to sort this issue for minimal cost (within reason). There is a lot of discussion online about using Mercedes injectors in various KJet powered cars (mainly VW), and it all seems good, and the injectors are much cheaper. I found one single blog post on a foreign website, that once translated confirmed that the Merc injectors do indeed work on the Cologne V6. Good enough for me.
The injectors in question are Bosch part number 0437502047, and I also got new seals, Febi 034133557E. I sourced both from FCP Euro.
The Bosch boxes made me laugh. MECHANIC ONLY!

You can see the obvious difference here. The new injectors are shorter, both in the overall length, but also in the hex part at the top.

I can now confirm that these do indeed fit, and if you check the link to the other blog above, you can see that the injector does stick out into the intake tract less, but won't be an issue (and some say is better for intake flow).
You can see the shorter hex here

These are the plastic retainers. These sit on top of the O-ring, and appear to be what actually holds the injector into the manifold, by the metal retainer pushing down on the plastic retainer, which pressed down on the O-ring. The tapered face visible in the first photo is what sits against the O-ring.


Due to the replacement injectors having a shorter hex, you cannot fit the retainer and O-ring, and then still have space to tighten the injector pipe. I found it easiest to slip the plastic retainer, O-ring and metal retainer on, leave them at the bottom of the injector, and then fit and tighten the pipe on the car. Once tight, then you slip the retainer and O-ring up into place.


So that finally solves the mystery of the injector seal. It's a normal KJet O-ring, with a plastic retainer on it.
With the new injectors sorted, they all got refitted into the manifold and secured with the metal retainer and screw.
Next was to remove and clean the fuel distributor. This is the big weird thing on top of the air box, which feeds all the injectors. This has a plunger inside it, which the sensor plate presses up on as it opens. This plunger is known to get sticky when cars are left sitting. Mine was slow to return, and wasn't moving as free as it should.

Carefully crack off all of the banjo fittings, including the feed and return on the side, and then remove the banjo bolts. Take care to collect all the copper washers, as there will be two on each banjo fitting. With the fuel lines disconnected this gives access to the three flat head screws that secure the unit to the air filter housing. Remove these screws. Now the distributor can be CAREFULLY removed. Make sure to slip a hand under it and stop the plunger from dropping right out. If it falls out and gets damaged, the whole distributor is a write-off!

You can see the plunger in the center of the unit.

With the unit on the bench you can turn it over and let the plunger slip out. If it doesn't freely drop out, it may need some compressed air in the top fuel fitting to push it out. Mine dropped out OK. Be VERY careful handling the plunger, and keep it very clean.

I cleaned the plunger and its cylinder in the main unit, and sprayed and soaked all fuel ports with carb and brake cleaner.
In the injector outlets there are individual filter baskets. I used a long, thin screw to gently screw into them, and then a sharp pull freed them


They all had some traces of dirt on them, but nothing major. I soaked them in brake clean overnight and then refitted them

The regulator was the last part to clean and overhaul. This resides on the side and is a 5/8" hex. I ordered a replacement seal kit from Delorean GO as they use the same part in their Kjet setup.
The regulator kit is PN 102807A and I also got a new seal for between the fuel distributor and airbox, PN 102855

I used a small pick to remove the old seals, and replaced them with the new green ones. The old ones looked in good shape, I wonder if they had been replaced recently to try and fix the issue? Be careful handling the regulator too, just above the o-ring in the below photo are two very small shims. These set the fuel pressure, so don't lose them! You can add or subtract shims to increase or decrease system pressure.

I also did the o-ring on the regulator piston, but no photo of that.
That's about all I could do with the distributor without splitting it, and that is a risky job that could result in further damage or leaks.
The next part to clean out was the (incorrectly named) Warm Up Regulator. This is the main control pressure regulator (the one above only controls the system pressure), and controls how rich or lean the engine runs. It has two bolts holding it down, two fuel banjo fittings, a power connector, and a vacuum hose.

Mine was pretty grotty. A lot of parts on the engine have been badly painted grey, which is flaking off and being ugly. I'll deal with that another time.


I could see some dirt in the inlet mesh already, so not a good start.

There isn't a lot to break on these, but take care taking it apart. Opening it up is easy; there are four screws on the bottom, which when removed will split the two halves.


There are a few things of interest inside the top half
[LIST]
[*]Orange Arrow - Adjustment pin for COLD pressure
[*]Green Arrow - Heater element
[*]Blue Arrow - Bimetallic Strip
[*]Red Arrow - "Mexican Hat" and pin

[/LIST]
Bascially, when the engine is cold it needs a richer mixture, like a choke on a carb. A LOWER control pressure will give this result. The springs in the bottom half press on the mexican hat, which pushes on the pin, which then places pressure on the diaphragm via a little cup. This force is countered by the bimetallic strip, which pushes down on the mexican hat when cold, reducing the internal restriction. Of course you couldn't run that rich all the time, so to lean it out when warm, the WUR is warmed by both engine ambient heat, and by a 12v heating element. This heat causes the bimetallic strip to slowly bow upwards, which releases pressure against the mexican hat, allowing it to rise up and towards the diaphragm, creating an internal restriction, raising the control pressure, and leaning the mixture. The cold pressure is set by adjusting how much the bimetallic strip pushes down on the mexican hat when cold. This is done by moving the adjustment pin up and down.... with a hammer and punch.
Anyway, to continue disassembly you need to remove the clip that retains the heater connector. A large screwdriver to lever it out does the trick

And then remove the 10mm nut from the bimetallic strip and remove it. Take note of the washer placement

This is the fuel unit containing the cup and diaphragm. I have removed two of the screws already. The cup is in the middle, filled with grease (to lubricate and retain the pin)

CAREFULLY remove the disk and diaphragm. Don't damage the diaphragm as its hard to get a replacement (although there are some rebuild kits on eBay now which may work).
Removing these gives you access to the o-ring and fuel ports. One of them has a very fine five-layer mesh filter in it. Internet wisdom says to clean it, but not to remove it as it can cause issues with pressures if you do (reduces restriction). I hosed it from inside out with brake clean, and got a whole heap of what I can only describe as a fine sand from it. There was heaps.


After much testing, I eventually went back and actually threw the disassembled top half into my ultrasonic cleaner, which seemed to clean the filter out well. I tested it by shining a light through it, and there were some big differences in how much light came through. There was almost no light passing through at first, before cleaning.
Cool moody shot from that night

I refit the distributor and WUR, and refit the fuel pipes

I also plumbed in the fuel pressure testing kit, between the fuel distributor and WUR.

The system pressure was a little low, it should be over 5BAR

But the cold control pressure was crazy. It should be about 0.5BAR, not 3.6BAR!

Keep in mind this is after only cleaning, but without any adjustments. No wonder the car was leaning out hard. Remember, higher pressure is a leaner mixture.
This triggered the next couple of weeks messing with the system trying to iron out the pressures. I tried many things, including running the WUR naked, with no internals

And setting the pressure with the adjustment pin, located here

Then it all started to turn to custard, and the system pressure was low at about 4BAR, and wouldn't come up even with additional shims in the regulator. This lead to buying a replacement fuel pump.

The old pump is pretty easy to remove. Four bolts hold the mount to the car, two hoses, and two wires need to be removed.

I clamped the feed hose as the tanks had fuel in them now and set about removing the pump

Pump on the bench

The pump has an inlet filter in it, and this is what came out of that filter. It's not rust, which is good, but almost looks like fluff, some organic matter (bits of leaf?) and a lump of metal, which kinda looks like lead or solder. I might get a pre-pump filter.


The new pump is bigger and slightly longer, but otherwise a direct replacement. I couldn't reuse the sleeve from the old pump, but reused the rubber insulator


The old pump was a Bosch 0580464125. A good pump, but mine wasn't having a good time anymore. The replacement is a generic pump which met the required criteria (high flow, and up to 8BAR pressure).
The new pump sounds nicer, but the system pressure hasn't changed much at all. I tried adding a whopping great washer as a shim on the regulator and finally got 5BAR pressure, but I'm sure that isn't right. I have had the WUR open so many times now that I can open it in about 30 seconds for adjustment, but I'm still getting weird results.
Right now, the system pressure is around 5BAR with the extra shims. The cold control pressure should be about 0.5BAR (as that's what I dropped it down to after resetting the pin) but either it's very slow to rise on the gauge, or doesn't rise at all now. Warm pressure is about 2BAR, 0.9BAR too low.
The new pump can obviously do the pressure, but its either being restricted or bled off somewhere. There are no leaks, and the fuel filter was replaced when I got the car (although I do now wonder about it after the pump packing a sad).
Anyway, I reassembled the intake today, and removed the pressure tester

And fired the car into life. It had some issues at first, but tweaking the mixture screw sorted that out and it idled OK, albeit a bit lumpy and revved on about 5 cylinders. The more I ran the car, the more it was happy to pick up all the cylinders and rev again. I set the idle by ear, and so far I have taken it for a dodgy run back and forth along my road, which it seemed OK. I haven't been brave enough to take it further yet as I might take a support car with me just in case it dies in the middle of the road again.

I still want to know what the pressures are doing, but I suspect there is an issue with my pressure tester. Either that or I have a weird issue in my KJet system. I'm trying to source a second testing setup now to compare and see what happens. If I can set the pressures correctly, in theory I should be able to get a nice happy running car. Fingers crossed.
Oh, it wouldn't be my car if it didn't spill some coolant. Thankfully I believe this is just from me overfilling the radiator, as it was from the overflow. Looks like it'll need a flush at some point too.

Great write-up, thanks for taking the time to share with the rest of us - I'm enjoying watching this project unfold, and admire your tenacity! I dream of having the skills and knowledge to tackle something like this one day, and until then I'll just have to make do with living vicariously through PH threads such as this one 
Don’t get me wrong, I love older cars and TVRs, but this shows how a little electrickery can be a good thing. It seems there are so many mechanical components with fine tolerances in this engine. It will be worth the reward when it’s all right.
It’s delightful to see that this one has made it into caring and knowledgable hands, keep up the good work!
It’s delightful to see that this one has made it into caring and knowledgable hands, keep up the good work!
Blanco92 said:
Don’t get me wrong, I love older cars and TVRs, but this shows how a little electrickery can be a good thing. It seems there are so many mechanical components with fine tolerances in this engine. It will be worth the reward when it’s all right.
It’s delightful to see that this one has made it into caring and knowledgable hands, keep up the good work!
Oh gosh, if it was EFI it'd be running like a dream right now. Blardy KJet!It’s delightful to see that this one has made it into caring and knowledgable hands, keep up the good work!


Gassing Station | Readers' Cars | Top of Page | What's New | My Stuff