Kelvinators TVR Tasmin
Discussion


bolidemichael said:
Another fab update from the Kelvinator; great balls on the WOF, it's a rolling project now and perhaps you'll get to enjoy it over your summer until you plot the next project for our information and entertainment. It's also great to see the return of the choice GIFs 
This disciple has a couple of questions and observations, respectfully:
- The placard in the 3/4 images of the TVR is poorly places and detracts from the photo (x2)
- How on earth do you convince your lovely assistant to come and assist you? Please tell me that she berates you after.
- What is the 'run out' and what are you measuring on with the tool/gauge on the flat rotor? Is it the amount of side to side rotation when spun?
- NEXENs may be appropriate for the level of relative, for which the car was designed originally. I always like my cars to give a little when pushed... a bit of squirming makes it more involving to drive in a spirited manner than out and out grip.
This was a great blog - well paced and detailed; I imagine that this calmness of mind is conducive to tackling mechanical conundrums too; I suspect that you secretly knew there were more underlying issues with the TVR, but you're a glutton for punishment and love saving cars from bodgers!
ps the link to the previous post about the rotors disnae work pal
Thanks. If you jump back to page 5, the first post goes into more detail of the issue of my rotor runout and how it's measured. Runout means the rotor is wobbling laterally, which causes the horrible shaking when braking, and can be caused by a few things (warped rotors, pad material buildup on the rotors, or in my case, an uneven surface the rotor is mounted on).This disciple has a couple of questions and observations, respectfully:
- The placard in the 3/4 images of the TVR is poorly places and detracts from the photo (x2)
- How on earth do you convince your lovely assistant to come and assist you? Please tell me that she berates you after.
- What is the 'run out' and what are you measuring on with the tool/gauge on the flat rotor? Is it the amount of side to side rotation when spun?
- NEXENs may be appropriate for the level of relative, for which the car was designed originally. I always like my cars to give a little when pushed... a bit of squirming makes it more involving to drive in a spirited manner than out and out grip.
This was a great blog - well paced and detailed; I imagine that this calmness of mind is conducive to tackling mechanical conundrums too; I suspect that you secretly knew there were more underlying issues with the TVR, but you're a glutton for punishment and love saving cars from bodgers!
ps the link to the previous post about the rotors disnae work pal
Lol, yeah I didnt notice that sign in the photos. Did the same thing with the last photos I took there too. It's very inconvenient, the council should remove it.
Would it shock you to know my lovely assistant asked to help? She's not afraid to get her hands dirty.
As you say, the Nexen probably work in the car's favour in a couple of ways. I imagine having too much rear grip wouldn't be good for a weakly designed rear trailing arm setup, so having the slip is preferable.
I love taking cars that others have more or less given up on, and getting them back on the road. I'm not the most patient of people, but I seem to be able to just plod away on a car methodically and get it done. I knew there would be more to this car than expected, but when the specialist who has been looking after the car for 3 years says "all it needs is a WOF, and it's good to go. I'd take it myself if I had time" you kinda expect it to be better than this.
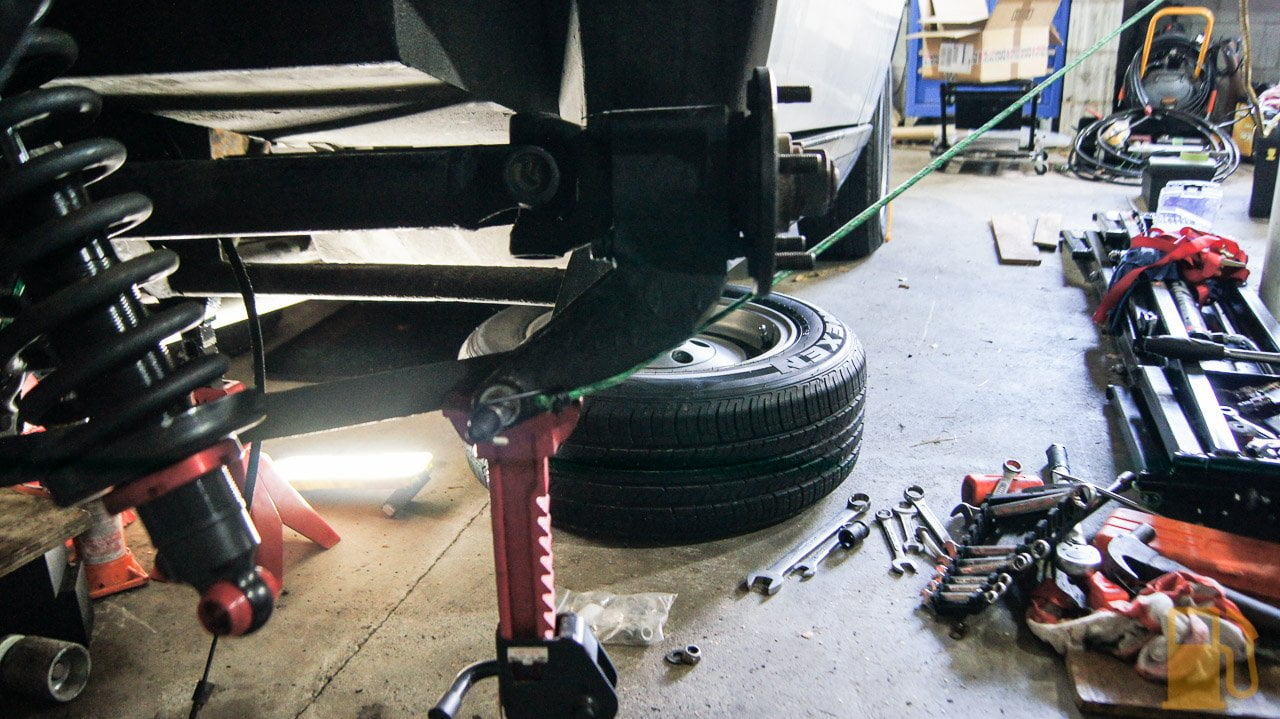
With show day now only a couple of days away, the rush was on. I had a car on stands, with a diff on the ground. Not ideal.
Having found the shims to be ruined in the last post I ordered a set with a few different sizes from SNG Barratt in the UK, which arrived in record time. At the same time, I also decided that since the diff was on the ground, and I didn't want to have to pull it out again I would (stupidly) replace the diff output oil seal as that was leaking a few drops every now and then, so ordered a set of new seals.
You can see the aftermath of the seal leaking here. All down the side of the diff. Also note the sweet two battery method for supporting the diff. This thing weighs a ton, so making sure it's well supported and stable is important.

I did a lot of research into disassembly and reassembly of the output shaft, but by far the best resource was this Youtube video.
http://youtu.be/5i6R0oEq8QQ
The output shaft takes a bit of work to remove. After draining the diff, remove the lock wire and then the bolts holding the flange to the housing. With them removed its a case of using a soft hammer and a pry bar to lever the output shaft assembly out of the housing. I found it easiest to rotate the assembly and lever off the ears with the bolt holes. Eventually it will pop out.

Looking a bit gross

It looks like oil was bypassing the O-Ring, and leaking from the shaft seal.
Disassembly of the assembly isn't hard. If you want to reuse the bearings and crush tube you will need to mark the nut and shaft (the shaft is SUPER hard and instantly rounded off the end of all my punches) and count the turns as the nut is removed. This is so you can tighten the nut to the same preload.

Next tap down the locking tab, and remove the nut.

The nut is HUGE and will be tight. I used a massive adjustable spanner. The nut requires a 1-7/8" or 48mm spanner. I happened to end up with both. The ring spanner is a couple of foot long.


With the nut removed, its time to tap the shaft out. Support the assembly upside down (studs pointing down) from the mounting flange. Now carefully tap the end of the shaft with a soft hammer. This should start by freeing up the inner bearing, which can be removed, and then, in theory, should push the shaft out through the outer bearing, taking the seal with it. In my case this didn't go as planned, and the outer bearing more or less exploded and all the rollers decided they didn't want to be part of this anymore.
This ruins any plans of reusing the bearings and crush tube.


So with that in mind, I shot off a quick order to my Jag parts suppliers ( Rodney Jaguar Rover Spares) and ordered some new bearings and a couple of crush sleeves.
It turns out this b d is the reason the bearing came apart

That old crusty thing is the dust shield over the oil seal. Both that shield, and the oil seal were thoroughly rusted in place, so of course couldn't be popped out with the bearing as it should have. You cant see the state of this with the shaft/flange in place. I used a chisel to remove both


One warning, that dust shield is obsolete now and unable to be supplied. After much research I'm of the opinion it's not needed, hence why Jag stopped making them and no one remade them. Some other models that use the same diff, and some later cars, don't seem to use them either. I guess if you can reuse yours, use it, otherwise I went without.
One last thing I needed to do was remove the outer races of the bearings. I used a punch to tap these out

While I waited for parts everything got a good clean in the parts washer. I didn't bother to strip off the old paint, as I wasn't going to do the rest of the diff either.
A couple of days later, with new bearings and seals in hand, I set about refitting the new bearings. As mentioned in the video, I too ground down the old outer race and used that to press the new race in. This took off just enough that the old race wouldn't stick in the housing.

I taped the race to a big socket and used this in the vice to press it in place


And the inner race

Next I packed the new outer bearing and insert it into the housing


Followed by the oil seal. This was a prick to get into the housing.

And then the shaft gets dropped through the bearing and seal, and then it needs to be tapped through the bearing. This takes a bit of whacking. It pays to check against the other output shaft as to how far you need to tap it down. I found it needs to go further down than you would expect, but if you don't go far enough it will upset everything from the flange outwards (brake disk sitting central in the caliper, and camber). If you go too far I suspect you will get binding on the housing, so take care.

Once the shaft is in, flip it over and drop the new crush tube down the shaft

and then the grease packed inner bearing goes in, followed by the locking plate and nut. Now its time to crush that tube. This takes a hell of a lot of force to do. The spanner I had was too short to get the required leverage, so I used my jack handle instead by placing the nut in the vice and using the studs on the flange to turn it. I protected the studs with some tube offcuts.

In terms of setting the preload I will recommend you watch the above video as he goes into how to correctly set it, using a spring scale. Its not rocket science, but easier to just watch him do it.
Once the tube is crushed and the preload is set, lock down the nut, install the new O-Ring and you're done.


Reinstall the assembly in the diff. This will take some force with a soft hammer to tap it back in, just make sure the splines line up first.
Now it was time to look at the nice new shims.


Mmm, clean. They come covered in oil, but I chose to also slather them in copper grease to help stop them rusting or sticking in future. I went with the same stack on the right side, which was perfect for disk placement (central in the caliper), but the left side ended up needing another 0.10 shim to align the disk. I'm not sure if maybe it wasn't centered before I pulled it apart, or if the new rotor is slightly different.
I test fitted the disks with the new shims and still got great runout readings, so proceeded with installing the calipers for the final time. I'm pissed off I have to reuse the old rubber flexi hose. I have a set of nice braided lines en route, but they have gone missing somewhere between the UK and NZ. They'll probably show up tomorrow...

And the handbrake calipers went on next. I had some nice new brass springs to fit but I just couldn't free the old ones up, so gave in and fitted as they were. I did replace the two pins that were fitted dry as they had pitting and scoring. New locking tabs were fitted also.

Now it was time for one of the worst jobs I've had to do on a car for a long time. Reinstalling the diff.
If the exhaust hadn't been designed by an idiot it would have been fine, but instead, it had been built in such a way that there isn't quite enough space to slip the diff with brakes fitted between the two pipes, and it has no flanges, and the two pipes are welded to a bracket.... but we had to try anyway.
On the jack it went (for now)

And into the boot went a bunch of weights (to try and hold the back of the car down since there was no weight in it anymore)

And then the struggle began. First, we tried to just lift it into place. Nope. No go. Wouldnt even get under the car on the jack. After much pissing around (including taking the diff off the jack, and realising we couldn't get it back on the jack under the car) we eventually wiggled it in on an angle, from the side, on the jack. It got pretty hairy.
Then I tried to lift just the front so I could get the front mount in and use that to pivot the rear into place. Nope. Started to lift the car off the axle stands. Not good.


We had been at this for a couple of hours now and getting pretty tired of it. Everything was fighting us. Even the damn arms were getting in the way. This one ended up being held forward by an axle stand and steadied by a couple of bungee cords attached to the house.

Finally, plan B came into play. I tried to resist, but it just wasn't going to happen otherwise.

Out came the reciprocating saw. It was cutting time.

With the exhaust now in two pieces, things were looking up

Now we had ample space for the brake calipers to clear the exhaust, and without much more faffing about, the whole lot slid nicely into place. Unfortunately, we kinda ran out of interest here, so sorry for the lack of photos.

We bolted everything back together, and I sent my awesome helper/wife out to get some exhaust sealing tape and cement. She's a keeper for sure, not only did she return with what I needed, but also brought back some much needed sustenance.
The idea was to use a clamp I purchased earlier for this purpose (always have a plan B), and clamp over the exhaust tape. The tape was to seal the gap, and the clamp to support the pipe and hold it in place. This plan worked well, and it seems we have an exhaust that is in one piece again and doesn't leak. The longish term plan is to have the exhaust redone anyway as it sits way too low, its too loud, and doesn't link the two banks so sounds weird.
So, with everything buttoned back up, diff full of oil, rear brakes bled, it was time for a test run.
The brakes are a little spongy, I suspect there is air in the front (the master cylinder level got a bit low in the couple of weeks of sitting without brakes), so will bleed that tomorrow, but the shudder is completely gone. Just smooth (if vague) braking.

Obviously the worst was in the rear brakes, but I still need to replace the front rotors as they have worn undersize and still have excessive runout. Plus, who doesn't want flash slotted rotors?

Everything seems to be working as it should too, which is promising. At this rate, it will be a push to get the car ready for Sunday, but since we are rolling, and driving again, that's a big weight off my shoulders. We can do it, it's so close.
Having found the shims to be ruined in the last post I ordered a set with a few different sizes from SNG Barratt in the UK, which arrived in record time. At the same time, I also decided that since the diff was on the ground, and I didn't want to have to pull it out again I would (stupidly) replace the diff output oil seal as that was leaking a few drops every now and then, so ordered a set of new seals.
You can see the aftermath of the seal leaking here. All down the side of the diff. Also note the sweet two battery method for supporting the diff. This thing weighs a ton, so making sure it's well supported and stable is important.

I did a lot of research into disassembly and reassembly of the output shaft, but by far the best resource was this Youtube video.
http://youtu.be/5i6R0oEq8QQ
The output shaft takes a bit of work to remove. After draining the diff, remove the lock wire and then the bolts holding the flange to the housing. With them removed its a case of using a soft hammer and a pry bar to lever the output shaft assembly out of the housing. I found it easiest to rotate the assembly and lever off the ears with the bolt holes. Eventually it will pop out.

Looking a bit gross

It looks like oil was bypassing the O-Ring, and leaking from the shaft seal.
Disassembly of the assembly isn't hard. If you want to reuse the bearings and crush tube you will need to mark the nut and shaft (the shaft is SUPER hard and instantly rounded off the end of all my punches) and count the turns as the nut is removed. This is so you can tighten the nut to the same preload.

Next tap down the locking tab, and remove the nut.

The nut is HUGE and will be tight. I used a massive adjustable spanner. The nut requires a 1-7/8" or 48mm spanner. I happened to end up with both. The ring spanner is a couple of foot long.


With the nut removed, its time to tap the shaft out. Support the assembly upside down (studs pointing down) from the mounting flange. Now carefully tap the end of the shaft with a soft hammer. This should start by freeing up the inner bearing, which can be removed, and then, in theory, should push the shaft out through the outer bearing, taking the seal with it. In my case this didn't go as planned, and the outer bearing more or less exploded and all the rollers decided they didn't want to be part of this anymore.
This ruins any plans of reusing the bearings and crush tube.


So with that in mind, I shot off a quick order to my Jag parts suppliers ( Rodney Jaguar Rover Spares) and ordered some new bearings and a couple of crush sleeves.
It turns out this b
d is the reason the bearing came apart
That old crusty thing is the dust shield over the oil seal. Both that shield, and the oil seal were thoroughly rusted in place, so of course couldn't be popped out with the bearing as it should have. You cant see the state of this with the shaft/flange in place. I used a chisel to remove both


One warning, that dust shield is obsolete now and unable to be supplied. After much research I'm of the opinion it's not needed, hence why Jag stopped making them and no one remade them. Some other models that use the same diff, and some later cars, don't seem to use them either. I guess if you can reuse yours, use it, otherwise I went without.
One last thing I needed to do was remove the outer races of the bearings. I used a punch to tap these out

While I waited for parts everything got a good clean in the parts washer. I didn't bother to strip off the old paint, as I wasn't going to do the rest of the diff either.
A couple of days later, with new bearings and seals in hand, I set about refitting the new bearings. As mentioned in the video, I too ground down the old outer race and used that to press the new race in. This took off just enough that the old race wouldn't stick in the housing.

I taped the race to a big socket and used this in the vice to press it in place


And the inner race

Next I packed the new outer bearing and insert it into the housing


Followed by the oil seal. This was a prick to get into the housing.

And then the shaft gets dropped through the bearing and seal, and then it needs to be tapped through the bearing. This takes a bit of whacking. It pays to check against the other output shaft as to how far you need to tap it down. I found it needs to go further down than you would expect, but if you don't go far enough it will upset everything from the flange outwards (brake disk sitting central in the caliper, and camber). If you go too far I suspect you will get binding on the housing, so take care.

Once the shaft is in, flip it over and drop the new crush tube down the shaft

and then the grease packed inner bearing goes in, followed by the locking plate and nut. Now its time to crush that tube. This takes a hell of a lot of force to do. The spanner I had was too short to get the required leverage, so I used my jack handle instead by placing the nut in the vice and using the studs on the flange to turn it. I protected the studs with some tube offcuts.

In terms of setting the preload I will recommend you watch the above video as he goes into how to correctly set it, using a spring scale. Its not rocket science, but easier to just watch him do it.
Once the tube is crushed and the preload is set, lock down the nut, install the new O-Ring and you're done.


Reinstall the assembly in the diff. This will take some force with a soft hammer to tap it back in, just make sure the splines line up first.
Now it was time to look at the nice new shims.


Mmm, clean. They come covered in oil, but I chose to also slather them in copper grease to help stop them rusting or sticking in future. I went with the same stack on the right side, which was perfect for disk placement (central in the caliper), but the left side ended up needing another 0.10 shim to align the disk. I'm not sure if maybe it wasn't centered before I pulled it apart, or if the new rotor is slightly different.
I test fitted the disks with the new shims and still got great runout readings, so proceeded with installing the calipers for the final time. I'm pissed off I have to reuse the old rubber flexi hose. I have a set of nice braided lines en route, but they have gone missing somewhere between the UK and NZ. They'll probably show up tomorrow...

And the handbrake calipers went on next. I had some nice new brass springs to fit but I just couldn't free the old ones up, so gave in and fitted as they were. I did replace the two pins that were fitted dry as they had pitting and scoring. New locking tabs were fitted also.

Now it was time for one of the worst jobs I've had to do on a car for a long time. Reinstalling the diff.
If the exhaust hadn't been designed by an idiot it would have been fine, but instead, it had been built in such a way that there isn't quite enough space to slip the diff with brakes fitted between the two pipes, and it has no flanges, and the two pipes are welded to a bracket.... but we had to try anyway.
On the jack it went (for now)

And into the boot went a bunch of weights (to try and hold the back of the car down since there was no weight in it anymore)

And then the struggle began. First, we tried to just lift it into place. Nope. No go. Wouldnt even get under the car on the jack. After much pissing around (including taking the diff off the jack, and realising we couldn't get it back on the jack under the car) we eventually wiggled it in on an angle, from the side, on the jack. It got pretty hairy.
Then I tried to lift just the front so I could get the front mount in and use that to pivot the rear into place. Nope. Started to lift the car off the axle stands. Not good.


We had been at this for a couple of hours now and getting pretty tired of it. Everything was fighting us. Even the damn arms were getting in the way. This one ended up being held forward by an axle stand and steadied by a couple of bungee cords attached to the house.


Finally, plan B came into play. I tried to resist, but it just wasn't going to happen otherwise.
Out came the reciprocating saw. It was cutting time.

With the exhaust now in two pieces, things were looking up

Now we had ample space for the brake calipers to clear the exhaust, and without much more faffing about, the whole lot slid nicely into place. Unfortunately, we kinda ran out of interest here, so sorry for the lack of photos.

We bolted everything back together, and I sent my awesome helper/wife out to get some exhaust sealing tape and cement. She's a keeper for sure, not only did she return with what I needed, but also brought back some much needed sustenance.
The idea was to use a clamp I purchased earlier for this purpose (always have a plan B), and clamp over the exhaust tape. The tape was to seal the gap, and the clamp to support the pipe and hold it in place. This plan worked well, and it seems we have an exhaust that is in one piece again and doesn't leak. The longish term plan is to have the exhaust redone anyway as it sits way too low, its too loud, and doesn't link the two banks so sounds weird.
So, with everything buttoned back up, diff full of oil, rear brakes bled, it was time for a test run.
The brakes are a little spongy, I suspect there is air in the front (the master cylinder level got a bit low in the couple of weeks of sitting without brakes), so will bleed that tomorrow, but the shudder is completely gone. Just smooth (if vague) braking.
Obviously the worst was in the rear brakes, but I still need to replace the front rotors as they have worn undersize and still have excessive runout. Plus, who doesn't want flash slotted rotors?

Everything seems to be working as it should too, which is promising. At this rate, it will be a push to get the car ready for Sunday, but since we are rolling, and driving again, that's a big weight off my shoulders. We can do it, it's so close.
Speed 3 said:
Great read.
Really, really, really dumb question time: why couldn't you just remove the exhaust and refit when the diff was back in ?

Because some idiot thought it would be a great idea to make the whole system one piece, with the only flanges at the manifolds. I only jacked the back of the car up and cant get the jack under the front unless I jack the front up first, so no way to get the exhaust out if i wanted. Looking at it im not even convinced the exhaust was made in such a way that it will come out anyway. I hate the exhaust, if you didn't notice Really, really, really dumb question time: why couldn't you just remove the exhaust and refit when the diff was back in ?

Speed 3 said:
Great read.
Really, really, really dumb question time: why couldn't you just remove the exhaust and refit when the diff was back in ?
Oh the greatest part? The tailpipes that run through the rear valance... They're welded on and don't fit through the valance so I can't even drop the rear section! Really, really, really dumb question time: why couldn't you just remove the exhaust and refit when the diff was back in ?
Its running pretty well now tbh. Starts first turn of the key most times, hot or cold, and idles nicely.
Not sure what to do with the exhaust. I have an idea of what I want, but ill need to go chat to someone that is good at gluing pipes together, and see what they think. I still have some more work to do before I get to that point.
Not sure what to do with the exhaust. I have an idea of what I want, but ill need to go chat to someone that is good at gluing pipes together, and see what they think. I still have some more work to do before I get to that point.
Time ran out. The Diff went in on the Thursday, Sunday was the show. Since we were back together and running, all that was left was a final push to get the car looking as good as it should.
The first thing I needed to do was wash the car. I'm ashamed to admit that for the six months I have owned the car, I've never cleaned it. Not once, so it was still covered in the muck from sitting around for a couple of years, and from the trip down on the back of a truck. Oops.

So with that in mind, after work Friday I pulled the car out of the garage and into the steep driveway for a wash. The paint came up well, but I noticed the front end felt pretty rough (its the original paint, the rear was painted after but of a shunt years ago), so out came my CarPro clay towel to remove the contaminants on the paint. The clay towel worked great, the paint is nice and slick now. After a quick dry, I left the car overnight, ready to start with the machine polish.
Saturday was machine polish day. The whole front of the car was cloudy and dull with almost no shine. The rear was better, but still needed some attention.
This is what I was working with


Flat as anything.
A quick test spot using my favourite combo of a green Hexlogic pad and Ultimate Compound showed promise though

It took a bit of work, but it was cutting through the oxidation and bringing the metallic silver paint back.
Unfortunately, the paint isn't great (although it is 40 years old now!). There is this large patch in the bonnet where the paint is discoloured

And a couple of similar spots on the sides behind the front wheels. Strangely I did find a shadow behind the front wheels of where a TVR sticker would have been on each side

The paint isn't perfect but for a 40 year old car I think it's doing OK. It shined up well and is showing a lot more gloss and flake now.

Oh, guess what showed up whilst I was polishing the car... the bloody braided lines. Only two days too late.

The real test was on Sunday when she was unveiled at the British and Euro Car Day show. This is the third time I have brought a car to one of these shows. I like to try and bring someone special each year if I can.
British Car Day doesn't often have many TVRs. At most there tends to be one lonely TVR sitting off to the side, or bundled in with another group (that's where I found the 350i wedge back in 2016). This year, the lone TVR found a friend. Sadly there was a (not so) Mini between us, but I parked up nearby this lovely looking Griffith.


This thing makes the Wedge look massive!
The Wedge looked great out in the sun, and a lot of people were showing an interest in it. Kids especially seem attracted to its sweet 80s style


The TVR was in good company too. The turnout at the show was good, although I'm not so fussed on all the new euro stuff clogging up the field.
There was another TVR with weird doors that seemed to get all the attention


A Morgan with gorgeous paint


This cute little Auto Union DKW

An awesome looking Renault Alpine that was parked next to some garish red and yellow things


Plenty of Fords were in attendance

Including this sleeper with a Lotus twin cam engine


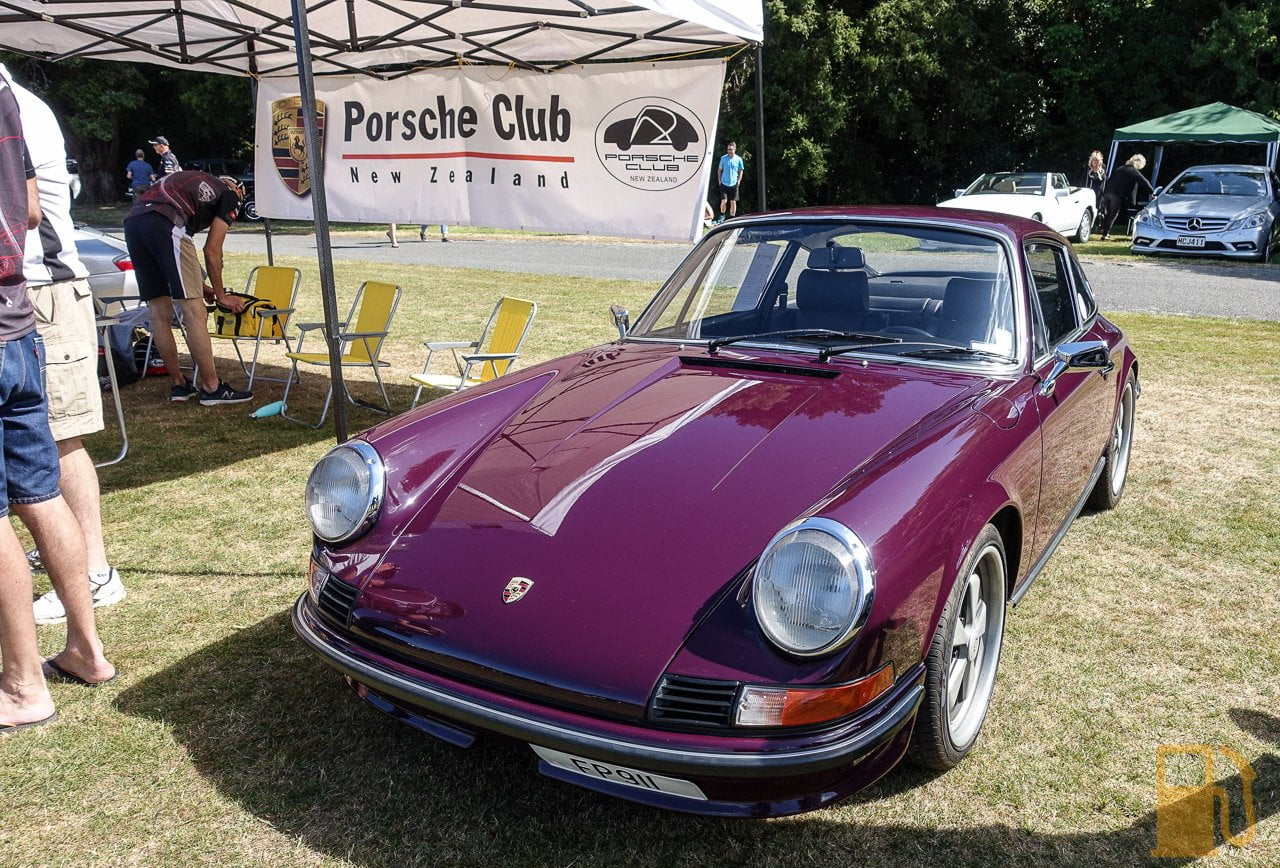
Of course, the Porsche crowed had a decent turnout. Most of it was boring to me, except for these two which stood out

And I was starting to get worried, but eventually, a lone SD1 arrived. This one has been at the show before, but good to see it again, out and about

Anyway, enough of that, back to the Wedge. After we left the show we went for a bit of a hoon to see if there was anywhere nearby that was an interesting spot to take photos. We found this old Ministry of Defence building down a back road


That wasn't the end of the car being out and about this week. It was a lovely evening the other day, so since I had a fully road legal TVR, we took it out for the longest run since I've had it. It was about a 60km round trip, which uncovered a few things about the car.
Firstly, it's surprisingly comfortable and easy to drive. It loves taking sweeping curves at speed, and makes some great pops and bangs on deceleration. The brakes have a nice firm feel to them now with no shudder.
Unfortunately its not all roses. There is an annoying misfire at low RPM cruise. I think it's possibly the ignition system playing up a bit, or it could be running a bit lean at cruise. The only other real issues are the steering being super heavy at low speeds, and the exhaust is excessively loud to the point of being annoying. Nothing too major.
I did get some photos in the sunset though


There is still work to be done, but in the meantime, I think I will just enjoy being able to jump into the car, fire up the V6, and take it for a drive. I have spent so much time working on the car that I haven't had a chance to enjoy and bond with the car, it gets tiresome sometimes.
The first thing I needed to do was wash the car. I'm ashamed to admit that for the six months I have owned the car, I've never cleaned it. Not once, so it was still covered in the muck from sitting around for a couple of years, and from the trip down on the back of a truck. Oops.
So with that in mind, after work Friday I pulled the car out of the garage and into the steep driveway for a wash. The paint came up well, but I noticed the front end felt pretty rough (its the original paint, the rear was painted after but of a shunt years ago), so out came my CarPro clay towel to remove the contaminants on the paint. The clay towel worked great, the paint is nice and slick now. After a quick dry, I left the car overnight, ready to start with the machine polish.
Saturday was machine polish day. The whole front of the car was cloudy and dull with almost no shine. The rear was better, but still needed some attention.
This is what I was working with


Flat as anything.
A quick test spot using my favourite combo of a green Hexlogic pad and Ultimate Compound showed promise though

It took a bit of work, but it was cutting through the oxidation and bringing the metallic silver paint back.
Unfortunately, the paint isn't great (although it is 40 years old now!). There is this large patch in the bonnet where the paint is discoloured

And a couple of similar spots on the sides behind the front wheels. Strangely I did find a shadow behind the front wheels of where a TVR sticker would have been on each side

The paint isn't perfect but for a 40 year old car I think it's doing OK. It shined up well and is showing a lot more gloss and flake now.

Oh, guess what showed up whilst I was polishing the car... the bloody braided lines. Only two days too late.

The real test was on Sunday when she was unveiled at the British and Euro Car Day show. This is the third time I have brought a car to one of these shows. I like to try and bring someone special each year if I can.
British Car Day doesn't often have many TVRs. At most there tends to be one lonely TVR sitting off to the side, or bundled in with another group (that's where I found the 350i wedge back in 2016). This year, the lone TVR found a friend. Sadly there was a (not so) Mini between us, but I parked up nearby this lovely looking Griffith.


This thing makes the Wedge look massive!
The Wedge looked great out in the sun, and a lot of people were showing an interest in it. Kids especially seem attracted to its sweet 80s style


The TVR was in good company too. The turnout at the show was good, although I'm not so fussed on all the new euro stuff clogging up the field.
There was another TVR with weird doors that seemed to get all the attention


A Morgan with gorgeous paint


This cute little Auto Union DKW

An awesome looking Renault Alpine that was parked next to some garish red and yellow things


Plenty of Fords were in attendance

Including this sleeper with a Lotus twin cam engine


Of course, the Porsche crowed had a decent turnout. Most of it was boring to me, except for these two which stood out


And I was starting to get worried, but eventually, a lone SD1 arrived. This one has been at the show before, but good to see it again, out and about

Anyway, enough of that, back to the Wedge. After we left the show we went for a bit of a hoon to see if there was anywhere nearby that was an interesting spot to take photos. We found this old Ministry of Defence building down a back road


That wasn't the end of the car being out and about this week. It was a lovely evening the other day, so since I had a fully road legal TVR, we took it out for the longest run since I've had it. It was about a 60km round trip, which uncovered a few things about the car.
Firstly, it's surprisingly comfortable and easy to drive. It loves taking sweeping curves at speed, and makes some great pops and bangs on deceleration. The brakes have a nice firm feel to them now with no shudder.
Unfortunately its not all roses. There is an annoying misfire at low RPM cruise. I think it's possibly the ignition system playing up a bit, or it could be running a bit lean at cruise. The only other real issues are the steering being super heavy at low speeds, and the exhaust is excessively loud to the point of being annoying. Nothing too major.
I did get some photos in the sunset though


There is still work to be done, but in the meantime, I think I will just enjoy being able to jump into the car, fire up the V6, and take it for a drive. I have spent so much time working on the car that I haven't had a chance to enjoy and bond with the car, it gets tiresome sometimes.

XOcette said:
I saw your car and popped over a couple of times but you were obviously wandering. Then I saw you leave :-(
So it'll have to be a virtual kia ora from me, owner of the other silver plastic V6 (french) thing!
Kia Ora to you too. Yes, I spent a lot of time wandering and checking out the sights, its hard not to get lost amongst it all!So it'll have to be a virtual kia ora from me, owner of the other silver plastic V6 (french) thing!
Unless I missed another one, was the Renault Alpine yours?
I'm a little behind on posting this, as I did this work a couple of weeks ago, but since I'm now stuck at home in a COVID-19 Lockdown, I thought I would give a quick update.
When I first got the car there was a brand new Bosch GT40 coil fitted. This concerned me for two reasons, first, this isn't a coil designed to work with an ignition system that is fitted with a ballast resistor (which the TVR has. Bosch makes the GT40R for this use), and secondly, although they are great coils they are known to have issues with electronic ignition and prefer to be triggered by points (the TVR has an electronic ignition). Fail.


At first, I tried to replace it with the 40 year old original Ford coil that came with the car

Although this worked, when this didn't fix the issue I was having (knowing what I know now, it never would have anyway) I tried swapping it for a slightly newer known good coil from my SD1 spares (SD1 has both electronic ignition and a resistor, like the TVR). This worked fine and has been in the car until now, but being that it's from about 1983 its no spring chicken, so I looked for an alternate option.

I've been chasing a slight misfire/stumble when at cruise at operating temp, which I'm hoping is ignition and not fuelling, so the three things in the firing line were plugs, coil and ballast resistor.
The plugs that came in the car were a bit old and had seen some st during my initial attempts to get the car running, so replacing them wasn't a bad idea. A new set of NGK plugs went in.
I went back and forth regarding the ballast resistor and coil. Was it best to keep the system as is and just replace the coil with another resistor coil, or bypass the resistor and fit a 12v coil instead?
In the end, it was the resistor it's self that made the decision for me. In the TVR/Ford use of it, its a section of resistance wire, not a traditional resistor. I believe in the Ford applications its run in a single length and kept in the air stream, but in the instance of my TVR, it was just a coil of wire floating around on the fibreglass wing behind the air box, with little to no airflow. This had obviously taken its toll over the 40 years of its life, as the coil of wire was looking worse for wear with sections where it had clearly melted the insulation (and zip ties). Keep in mind that a resistor generates heat by nature; This wire would get too hot to touch when the engine was running.


A plan was hatched. I would get a 12v coil and bypass the resistor. The resistor wire is joined into the loom via two bullet terminals, so that was easy to do.

Just get a short section of decent gauge wire, crimp two terminals on it, and plug it in.


Now that there is a solid 12v heading for the coil it was time to fit a replacement. I went with a Lucas Gold Sports coil, DLB105. I know not everyone is a fan of them, but it was a reasonable price, and would do what I needed.

This was basically plug and play. Remove the old coil, Check the terminals are around the right way on the new coil, bolt it to the car and wire it up with the existing wiring.


The car starts, runs and drives OK, so I guess that's a win. I haven't had a chance to get the car up to operating temp and see if it still stumbles, and won't for about a month now thanks to this pesky virus forcing the whole country into lockdown. Oh well, that gives me time to do a few more jobs on the TVR that I have been putting off, like front brakes and carpet. No excuses now.
When I first got the car there was a brand new Bosch GT40 coil fitted. This concerned me for two reasons, first, this isn't a coil designed to work with an ignition system that is fitted with a ballast resistor (which the TVR has. Bosch makes the GT40R for this use), and secondly, although they are great coils they are known to have issues with electronic ignition and prefer to be triggered by points (the TVR has an electronic ignition). Fail.


At first, I tried to replace it with the 40 year old original Ford coil that came with the car

Although this worked, when this didn't fix the issue I was having (knowing what I know now, it never would have anyway) I tried swapping it for a slightly newer known good coil from my SD1 spares (SD1 has both electronic ignition and a resistor, like the TVR). This worked fine and has been in the car until now, but being that it's from about 1983 its no spring chicken, so I looked for an alternate option.

I've been chasing a slight misfire/stumble when at cruise at operating temp, which I'm hoping is ignition and not fuelling, so the three things in the firing line were plugs, coil and ballast resistor.
The plugs that came in the car were a bit old and had seen some s
t during my initial attempts to get the car running, so replacing them wasn't a bad idea. A new set of NGK plugs went in.I went back and forth regarding the ballast resistor and coil. Was it best to keep the system as is and just replace the coil with another resistor coil, or bypass the resistor and fit a 12v coil instead?
In the end, it was the resistor it's self that made the decision for me. In the TVR/Ford use of it, its a section of resistance wire, not a traditional resistor. I believe in the Ford applications its run in a single length and kept in the air stream, but in the instance of my TVR, it was just a coil of wire floating around on the fibreglass wing behind the air box, with little to no airflow. This had obviously taken its toll over the 40 years of its life, as the coil of wire was looking worse for wear with sections where it had clearly melted the insulation (and zip ties). Keep in mind that a resistor generates heat by nature; This wire would get too hot to touch when the engine was running.


A plan was hatched. I would get a 12v coil and bypass the resistor. The resistor wire is joined into the loom via two bullet terminals, so that was easy to do.

Just get a short section of decent gauge wire, crimp two terminals on it, and plug it in.


Now that there is a solid 12v heading for the coil it was time to fit a replacement. I went with a Lucas Gold Sports coil, DLB105. I know not everyone is a fan of them, but it was a reasonable price, and would do what I needed.

This was basically plug and play. Remove the old coil, Check the terminals are around the right way on the new coil, bolt it to the car and wire it up with the existing wiring.


The car starts, runs and drives OK, so I guess that's a win. I haven't had a chance to get the car up to operating temp and see if it still stumbles, and won't for about a month now thanks to this pesky virus forcing the whole country into lockdown. Oh well, that gives me time to do a few more jobs on the TVR that I have been putting off, like front brakes and carpet. No excuses now.
Once again, it has been a bleeding long time since the last post, but of course, I haven't just been sitting around doing nothing. It may be a whole new world out there thanks to the current chaos, but the free time I suddenly had was enough to kick start work on the TVR.
Way back before Christmas last year I ordered new carpet and underlay. Until now it's been sitting in the garage waiting for me to get around to pulling the old carpet out and replacing it. It's not a job I was looking forward to. I'm not a huge fan of working in interiors due to cramped access and lots of kneeling on the ground.
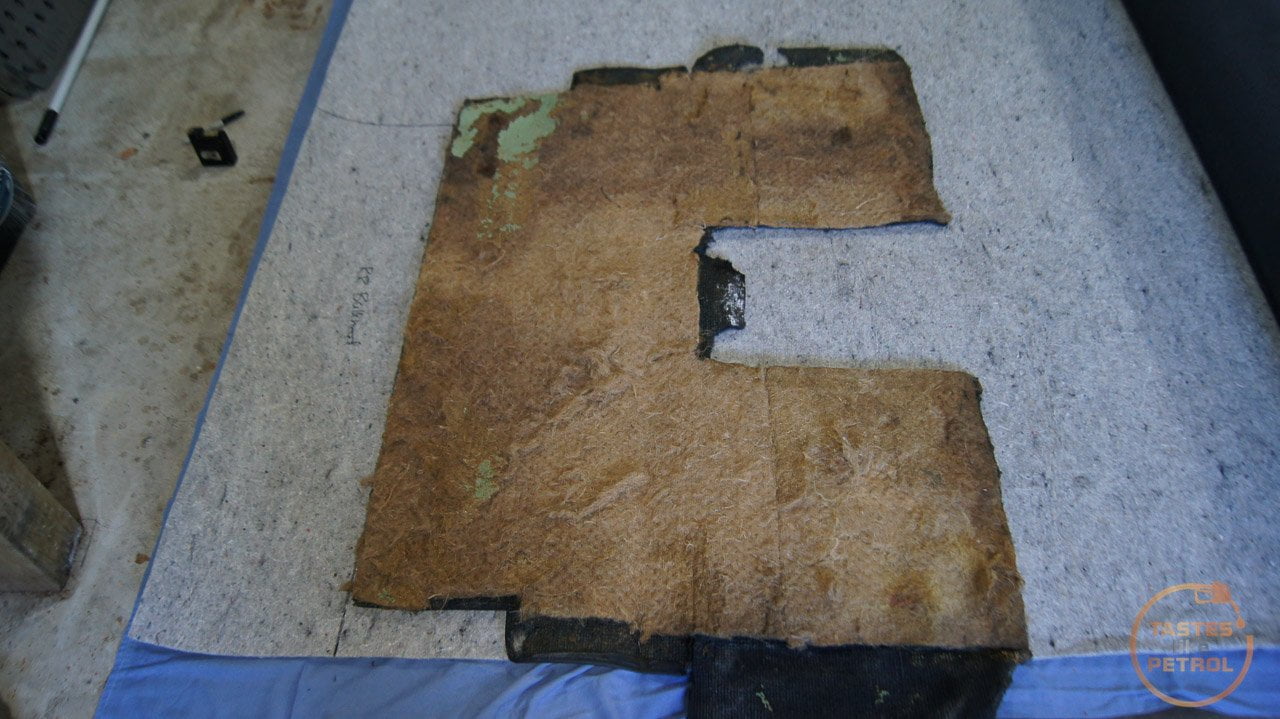
This is what I was dealing with. Old faded carpet which had started to come apart, especially in the footwells, due to being exposed to moisture for long periods of time.


When I got the car the whole floor pan was soaked in water and had been for a while I suspect. Even after trying the carpet out it always had a certain smell, and the carpet was dry and crunchy to the touch.
What I didn't realise until later was that the carpet wasn't mean to be that tan colour, it actually used to be dark blue. There were some spots, like this section in front of the hand brake and under the center console, that hadn't seen the sun and were still the original blue (albeit in this case, filthy and squished).


The first task was to remove the center console. First the surround on the center stack has to be removed, then the gear knob comes off, and there are three screws holding the console in. One at the back under the flap of carpet in the cubby, and two behind the radio in the cubby. Don't forget to disconnect and remove the switches too. It was pretty dirty under the console, with lots of shredded bits of insulation floating around.


Lots of black wiring and heat wrap


Next, the seats should be removed. I tried to remove the rails from the floor but had real issues. The rails are held in with two bolts, one on each end, which go through the floor and are secured with nuts from under the car. A combination of a little rust buildup on the threads, and a bolt head that isn't captive but is also inaccessible (no space for a socket or spanner) with the seat in place almost made me rage quit. I got a couple of the nuts off but got stuck fast on the passengers side, where the whole bolt was just spinning. The usual method is to jam the bolt head with a screwdriver to stop it spinning and wind the nut off, but this bolt wasn't having a bar of it. I rounded the head off quite nicely.

Thankfully, as is good practice, I walked away and left it for a bit, and when I came back I had a new game plan; remove the seats from the rails. This is FAR quicker than messing with the rails, as there are four bolts under the seats, easily accessible with a 13mm ratcheting spanner, and then the seat just lifts off.

One last thing that needs to come out are the roof struts. They are held in with a nut on the top hoop of the roof, and then nut/bolts through into the boot. Since the roof will not stay up without them, a couple of bungee cords were employed to keep it erect. One went between the two bolts on the hoop, and another from the wiper spindle to the cord between the bolts. A third was later added to hold the rear edge of the soft top up against the hoop for better access to the parcel shelf and rear bulkhead. I quickly added some offcut underlay under the cord where it touches the top of the windscreen frame to stop it damaging the paint.


Now it was just a case of pulling, tearing and cutting the old carpet out (but keeping the sections in one piece). The carpet on the sides of the tunnel was barely stuck on, but some of the other carpet like the parcel shelf was a real prick to remove since it had really thick jute underlay. I don't think this was the original carpet, there were a few telltale signs it had been replaced at least once before, but obviously a long time ago, and not that well.


This was a real time consuming and back-breaking process. Once all the carpet was off I needed to try and remove as much old adhesive as I could. This was done with a mixture of a wire brush and a grinder with a twist cup on it. It was very messy but quick to strip the glue off without damaging the body.
As each section of carpet was removed I tagged them all with a paint pen, according to the official layout in the parts guide. This was so I always knew where the sections came from and where to refit them.


With the carpet out it was time to start the job of measuring, cutting and fitting the new underlay and carpet. First was to lay out the underlay and trace the sections I would be fitting it to.
The underlay I purchased although isn't waterproof (yeah, I know, but I was struggling to find any decent padded waterproof underlay and this car now has a phobia of water, so shouldn't be an issue), should work well. Its sold in 1.8m sections, and in the end I only needed to use 1.8x2m total (I'm not sure why it's slightly longer than advertised but I ain't complaining).

I wasn't going to pad the whole car, only select sections, which were the inner tunnel walls, footwells, rear bulkhead and parcel shelf. Mainly places that will be touched, pressed or rested upon. I used the removed carpet sections as templates to trace around. All sections were also numbered with their identifier (or named for the obvious bits like bulkhead), and if needed, an arrow to show direction.


We also got our first glimpse of the new carpet colour. TBH its not as dark or as "blue" as I had hoped, but it ended up looking better than I was expecting.

Cutting the underlay with scissors literally tore my hands to bits. I ended up with a couple of gnarly blisters from the effort needed, as this underlay does not cut well. Regardless, I pushed on.
Once the sections were cut, they were test fitted and trimmed


Once I was happy with the fit, they were glued on with copious amounts of Ados high temp F38 contact adhesive, applied by a large brush. This stuff stinks (You MUST use a decent respirator as this stuff will get you as high as a kite before you get too far), but flashes off quickly and is as sticky as anything. I initially got two tins of this but had to buy two more later on as I ran out (and if I didn't change to spray adhesive for the rest of the work I would have needed a fifth tin). Work quick and get it in the right place first time as this glue isn't here to fornicate arachnids and sticks quick and sticks hard.


The underlay didn't need to be perfect as the carpet was going to cover it anyway, but any bumps, creases and edges in the underlay will show in the carpet over the top of it. The bumps in the sections behind the seats are from the wires and fuel tank brace strap that reside there; they do end up showing as bumps in the carpet too, but not much I can do about that.
Next was to trace and cut the carpet sections. This is where I made a fairly major whoopsie. I had been told to make sure my carpet "grain" was always going in the same direction on each part otherwise sections will look "shaded" as the grain will be going in different directions. Well, guess who immediately forgot this advice, and instead used his awesome Tetris skills to make all the carpet fit into the smallest space possible?

Sigh. By the time I realised what I had done, I had cut all the sections out and couldn't start over.
But hey, I got it all onto the carpet with some spare!
As you can see in the later photos its not that big of an issue but might look a little more obvious if I had used a thicker pile carpet.
I used engineers chalk to mark the back of the carpet, which was quick and easy to see. Everything was marked slightly oversize as it's far easier to trim it down than to make it bigger. A combo of scissors and a brand new knife were used to cut the carpet.


Slight colour difference

Trial fit, and then some trimming

On went the glue. I did this in two sections so I could ensure it was all lined up front to back. Before these side sections went on there are little sections on the floor that cover the humps inside and out, these were fitted too.


The corresponding outer section went on too. This was a real prick to do. I wondered why it was in two sections (split just aft of the A-pillar) when I removed it and thought "oh I'll just make it one piece, how hard can it be?", well, it didn't work and I had to cut my section into two pieces too as I just couldn't get it to line up at all. Working up under the dash and into the A-pillar space wasn't much fun either. The little strips of green tape behind the seat rails is to indicate the position of the now covered seatbelt mounting holes on each side, so I could cut the carpet in the right place later.

Both sides had their inner and outer sections glued on, and then the front bulkhead, under seat and footwell sections went in


Now, keep in mind this looks easy and seems to be progressing quickly, but in reality, the work was slow, painful and very hard to motivate myself to keep going. I also couldn't do too much in one go as I needed to wait for other sections to cure before moving forward with the next part. Stripping the carpet was about four days work, there were about ten days between finishing the underlay and fitting the first piece of carpet, and the last piece of carpet was fitted almost a month later.
Anyway, with the footwell and tunnel done it was only the rear bulkhead and parcel shelf to do. These were never going to be fun due to their location and size.
Before the bulkhead went in I had to fit the little sections that cover the arches. Now, I thought it was doing this right, and it looked right, until I later went to fit the interior trim panels, and found that I had placed them in the wrong order, but not until I had already screwed screws through them.
I had glued the carpet to the arches


Which was bad when the trim went on


But what needed to happen was to have the trim panel screwed into the arch and then the carpet glued in over the top of that, not the other way around. It's obvious now but wasn't at the time.


Now the parcel shelf carpet can go in. I did this in a couple of stages. First I trial fit it, trimmed and then using the Ados high temp I ran a strip of adhesive along the very back edge, making sure it butted up nicely against the bulkhead carpet. After 24 hours I came back and using ultra strong spray adhesive (which I had moved to for the footwell carpets and bulkhead due to ease of use and speed, but not needing the high temp for those sections) sprayed the top section

This allowed me to place the top section perfectly, and then once that was cured to move onto doing the lower section on each side.

In the very unflattering light, the bumps in the carpet behind the seats from the wiring/bracing is very obvious but in person, it's not that bad and is mostly hidden by the seat backs.
But that was it. I had finally glued in the last section of the carpet! This is about the point where I was finally starting to feel happy with the work I had done, as getting the parcel shelf carpet in really tied it all together and made the difference. Before this, I just wasn't really feeling it and wondered if it had even been worth the effort.


Now it was a case of refitting the seats, after a quick clean. I also cleaned and greased the rails.


There has been a lot of other work going in during this. Since I had the center console out the switches got overhauled, various bits got painted, the shifter got rebuilt, and new shift and handbrake boots are being made. There will be another post on that work later.
Today I decided to see what the carpet looked like out in the real world, not from under the harsh cold lights and out in the overcast day.
I connected the battery up, primed the fuel system and turned the key for the first time in about two months. The engine turned and sprang into life. I still can't believe how well it starts and runs hot or cold.
Reverse gear was selected, and I slowly backed out of the garage into the driveway.
This is what I had done. Enjoy. I know I did.


It's not perfect; there are still some bits I'm not 100% happy with, but overall I'm pleased. My first time working with carpet, and not even having a pre-cut or moulded carpet to work with. It was hard work, but the transformation from the old carpet is huge.
Way back before Christmas last year I ordered new carpet and underlay. Until now it's been sitting in the garage waiting for me to get around to pulling the old carpet out and replacing it. It's not a job I was looking forward to. I'm not a huge fan of working in interiors due to cramped access and lots of kneeling on the ground.
This is what I was dealing with. Old faded carpet which had started to come apart, especially in the footwells, due to being exposed to moisture for long periods of time.


When I got the car the whole floor pan was soaked in water and had been for a while I suspect. Even after trying the carpet out it always had a certain smell, and the carpet was dry and crunchy to the touch.
What I didn't realise until later was that the carpet wasn't mean to be that tan colour, it actually used to be dark blue. There were some spots, like this section in front of the hand brake and under the center console, that hadn't seen the sun and were still the original blue (albeit in this case, filthy and squished).


The first task was to remove the center console. First the surround on the center stack has to be removed, then the gear knob comes off, and there are three screws holding the console in. One at the back under the flap of carpet in the cubby, and two behind the radio in the cubby. Don't forget to disconnect and remove the switches too. It was pretty dirty under the console, with lots of shredded bits of insulation floating around.


Lots of black wiring and heat wrap


Next, the seats should be removed. I tried to remove the rails from the floor but had real issues. The rails are held in with two bolts, one on each end, which go through the floor and are secured with nuts from under the car. A combination of a little rust buildup on the threads, and a bolt head that isn't captive but is also inaccessible (no space for a socket or spanner) with the seat in place almost made me rage quit. I got a couple of the nuts off but got stuck fast on the passengers side, where the whole bolt was just spinning. The usual method is to jam the bolt head with a screwdriver to stop it spinning and wind the nut off, but this bolt wasn't having a bar of it. I rounded the head off quite nicely.

Thankfully, as is good practice, I walked away and left it for a bit, and when I came back I had a new game plan; remove the seats from the rails. This is FAR quicker than messing with the rails, as there are four bolts under the seats, easily accessible with a 13mm ratcheting spanner, and then the seat just lifts off.

One last thing that needs to come out are the roof struts. They are held in with a nut on the top hoop of the roof, and then nut/bolts through into the boot. Since the roof will not stay up without them, a couple of bungee cords were employed to keep it erect. One went between the two bolts on the hoop, and another from the wiper spindle to the cord between the bolts. A third was later added to hold the rear edge of the soft top up against the hoop for better access to the parcel shelf and rear bulkhead. I quickly added some offcut underlay under the cord where it touches the top of the windscreen frame to stop it damaging the paint.


Now it was just a case of pulling, tearing and cutting the old carpet out (but keeping the sections in one piece). The carpet on the sides of the tunnel was barely stuck on, but some of the other carpet like the parcel shelf was a real prick to remove since it had really thick jute underlay. I don't think this was the original carpet, there were a few telltale signs it had been replaced at least once before, but obviously a long time ago, and not that well.


This was a real time consuming and back-breaking process. Once all the carpet was off I needed to try and remove as much old adhesive as I could. This was done with a mixture of a wire brush and a grinder with a twist cup on it. It was very messy but quick to strip the glue off without damaging the body.
As each section of carpet was removed I tagged them all with a paint pen, according to the official layout in the parts guide. This was so I always knew where the sections came from and where to refit them.


With the carpet out it was time to start the job of measuring, cutting and fitting the new underlay and carpet. First was to lay out the underlay and trace the sections I would be fitting it to.
The underlay I purchased although isn't waterproof (yeah, I know, but I was struggling to find any decent padded waterproof underlay and this car now has a phobia of water, so shouldn't be an issue), should work well. Its sold in 1.8m sections, and in the end I only needed to use 1.8x2m total (I'm not sure why it's slightly longer than advertised but I ain't complaining).

I wasn't going to pad the whole car, only select sections, which were the inner tunnel walls, footwells, rear bulkhead and parcel shelf. Mainly places that will be touched, pressed or rested upon. I used the removed carpet sections as templates to trace around. All sections were also numbered with their identifier (or named for the obvious bits like bulkhead), and if needed, an arrow to show direction.


We also got our first glimpse of the new carpet colour. TBH its not as dark or as "blue" as I had hoped, but it ended up looking better than I was expecting.

Cutting the underlay with scissors literally tore my hands to bits. I ended up with a couple of gnarly blisters from the effort needed, as this underlay does not cut well. Regardless, I pushed on.
Once the sections were cut, they were test fitted and trimmed


Once I was happy with the fit, they were glued on with copious amounts of Ados high temp F38 contact adhesive, applied by a large brush. This stuff stinks (You MUST use a decent respirator as this stuff will get you as high as a kite before you get too far), but flashes off quickly and is as sticky as anything. I initially got two tins of this but had to buy two more later on as I ran out (and if I didn't change to spray adhesive for the rest of the work I would have needed a fifth tin). Work quick and get it in the right place first time as this glue isn't here to fornicate arachnids and sticks quick and sticks hard.


The underlay didn't need to be perfect as the carpet was going to cover it anyway, but any bumps, creases and edges in the underlay will show in the carpet over the top of it. The bumps in the sections behind the seats are from the wires and fuel tank brace strap that reside there; they do end up showing as bumps in the carpet too, but not much I can do about that.
Next was to trace and cut the carpet sections. This is where I made a fairly major whoopsie. I had been told to make sure my carpet "grain" was always going in the same direction on each part otherwise sections will look "shaded" as the grain will be going in different directions. Well, guess who immediately forgot this advice, and instead used his awesome Tetris skills to make all the carpet fit into the smallest space possible?
Sigh. By the time I realised what I had done, I had cut all the sections out and couldn't start over.
But hey, I got it all onto the carpet with some spare!
As you can see in the later photos its not that big of an issue but might look a little more obvious if I had used a thicker pile carpet.
I used engineers chalk to mark the back of the carpet, which was quick and easy to see. Everything was marked slightly oversize as it's far easier to trim it down than to make it bigger. A combo of scissors and a brand new knife were used to cut the carpet.


Slight colour difference

Trial fit, and then some trimming

On went the glue. I did this in two sections so I could ensure it was all lined up front to back. Before these side sections went on there are little sections on the floor that cover the humps inside and out, these were fitted too.


The corresponding outer section went on too. This was a real prick to do. I wondered why it was in two sections (split just aft of the A-pillar) when I removed it and thought "oh I'll just make it one piece, how hard can it be?", well, it didn't work and I had to cut my section into two pieces too as I just couldn't get it to line up at all. Working up under the dash and into the A-pillar space wasn't much fun either. The little strips of green tape behind the seat rails is to indicate the position of the now covered seatbelt mounting holes on each side, so I could cut the carpet in the right place later.

Both sides had their inner and outer sections glued on, and then the front bulkhead, under seat and footwell sections went in


Now, keep in mind this looks easy and seems to be progressing quickly, but in reality, the work was slow, painful and very hard to motivate myself to keep going. I also couldn't do too much in one go as I needed to wait for other sections to cure before moving forward with the next part. Stripping the carpet was about four days work, there were about ten days between finishing the underlay and fitting the first piece of carpet, and the last piece of carpet was fitted almost a month later.
Anyway, with the footwell and tunnel done it was only the rear bulkhead and parcel shelf to do. These were never going to be fun due to their location and size.
Before the bulkhead went in I had to fit the little sections that cover the arches. Now, I thought it was doing this right, and it looked right, until I later went to fit the interior trim panels, and found that I had placed them in the wrong order, but not until I had already screwed screws through them.
I had glued the carpet to the arches


Which was bad when the trim went on


But what needed to happen was to have the trim panel screwed into the arch and then the carpet glued in over the top of that, not the other way around. It's obvious now but wasn't at the time.


Now the parcel shelf carpet can go in. I did this in a couple of stages. First I trial fit it, trimmed and then using the Ados high temp I ran a strip of adhesive along the very back edge, making sure it butted up nicely against the bulkhead carpet. After 24 hours I came back and using ultra strong spray adhesive (which I had moved to for the footwell carpets and bulkhead due to ease of use and speed, but not needing the high temp for those sections) sprayed the top section

This allowed me to place the top section perfectly, and then once that was cured to move onto doing the lower section on each side.

In the very unflattering light, the bumps in the carpet behind the seats from the wiring/bracing is very obvious but in person, it's not that bad and is mostly hidden by the seat backs.
But that was it. I had finally glued in the last section of the carpet! This is about the point where I was finally starting to feel happy with the work I had done, as getting the parcel shelf carpet in really tied it all together and made the difference. Before this, I just wasn't really feeling it and wondered if it had even been worth the effort.


Now it was a case of refitting the seats, after a quick clean. I also cleaned and greased the rails.


There has been a lot of other work going in during this. Since I had the center console out the switches got overhauled, various bits got painted, the shifter got rebuilt, and new shift and handbrake boots are being made. There will be another post on that work later.
Today I decided to see what the carpet looked like out in the real world, not from under the harsh cold lights and out in the overcast day.
I connected the battery up, primed the fuel system and turned the key for the first time in about two months. The engine turned and sprang into life. I still can't believe how well it starts and runs hot or cold.
Reverse gear was selected, and I slowly backed out of the garage into the driveway.
This is what I had done. Enjoy. I know I did.


It's not perfect; there are still some bits I'm not 100% happy with, but overall I'm pleased. My first time working with carpet, and not even having a pre-cut or moulded carpet to work with. It was hard work, but the transformation from the old carpet is huge.
shalmaneser said:
Always a treat when this thread is updated!
Looks like an excellent job, you really can't see the difference WRT to the 'grain' of the carpet. I assume you're going to pop some floor mats into the footwells? Have you got enough excess to make some matching ones?
I love the way this has got BL pedal rubbers but a Ford motor!
Yes I have enough spare carpet that I intend on making some nice edged mats with heel pads on them for the footwells, but I'm waiting on my new sewing machine to arrive (and to sew the new shifter and hand brake boots).Looks like an excellent job, you really can't see the difference WRT to the 'grain' of the carpet. I assume you're going to pop some floor mats into the footwells? Have you got enough excess to make some matching ones?
I love the way this has got BL pedal rubbers but a Ford motor!
These cars are very much a "bitsa" from various parts bins. Looks like I might have a source for new brake and clutch plughole pedal pads, but I'm having issues with the accelerator pad. I got one from Racetech (listed as a Tasmin pedal pad) but it looks too narrow for my pedal.
Waynester said:
What a great way to start a lazy Sunday, reading a well written thread on a lovely old Wedge 
These cars can certainly get under your skin. I have owned 5 V8 Wedges in the last 17 years..
350i ,2 x 400SE, 450 SEAC, 420 SEAC. I did purchase a ‘curvy’ 450 Chimeara in between the 2 SEACs, but the lure of the Wedge brought me back.
Lovely cars you have had, and I'm very jealous. I'd love any of the V8 wedges, but they are rare and expensive here, which means ownership is unlikely. A SEAC is almost an impossibility unless I imported one myself from the UK.These cars can certainly get under your skin. I have owned 5 V8 Wedges in the last 17 years..
350i ,2 x 400SE, 450 SEAC, 420 SEAC. I did purchase a ‘curvy’ 450 Chimeara in between the 2 SEACs, but the lure of the Wedge brought me back.
jamesson said:
Wow, what a pig of a job that was! Well done though. You made a far better job of that than I would have. I doubt I'd have even attempted it so hats off to you.
Thanks. I spent 90% of the time regretting starting the job, but the results are worth it. Its not a job I would do again in a hurry, especially without having a pre-cut or moulded carpet set to use.vixen1700 said:
Have you done anything with the exhaust yet?
I have an S2 with the same Cologne V6 and with an ACT stainless-steel system, it does sound epic and not just loud for loud's sake.
The Tasmin looks great by the way.
No, unfortunately the car has been off the road for a while now and the exhaust has been pushed down the to-do list a bit. I have an S2 with the same Cologne V6 and with an ACT stainless-steel system, it does sound epic and not just loud for loud's sake.
The Tasmin looks great by the way.
The final piece of the puzzle for getting the interior finished was the gear and hand brake boots. The old ones were worn out, torn and manky. I couldn't refit them, they're letting the team down.
[SIZE=5]Old Gross Stuff[/SIZE]
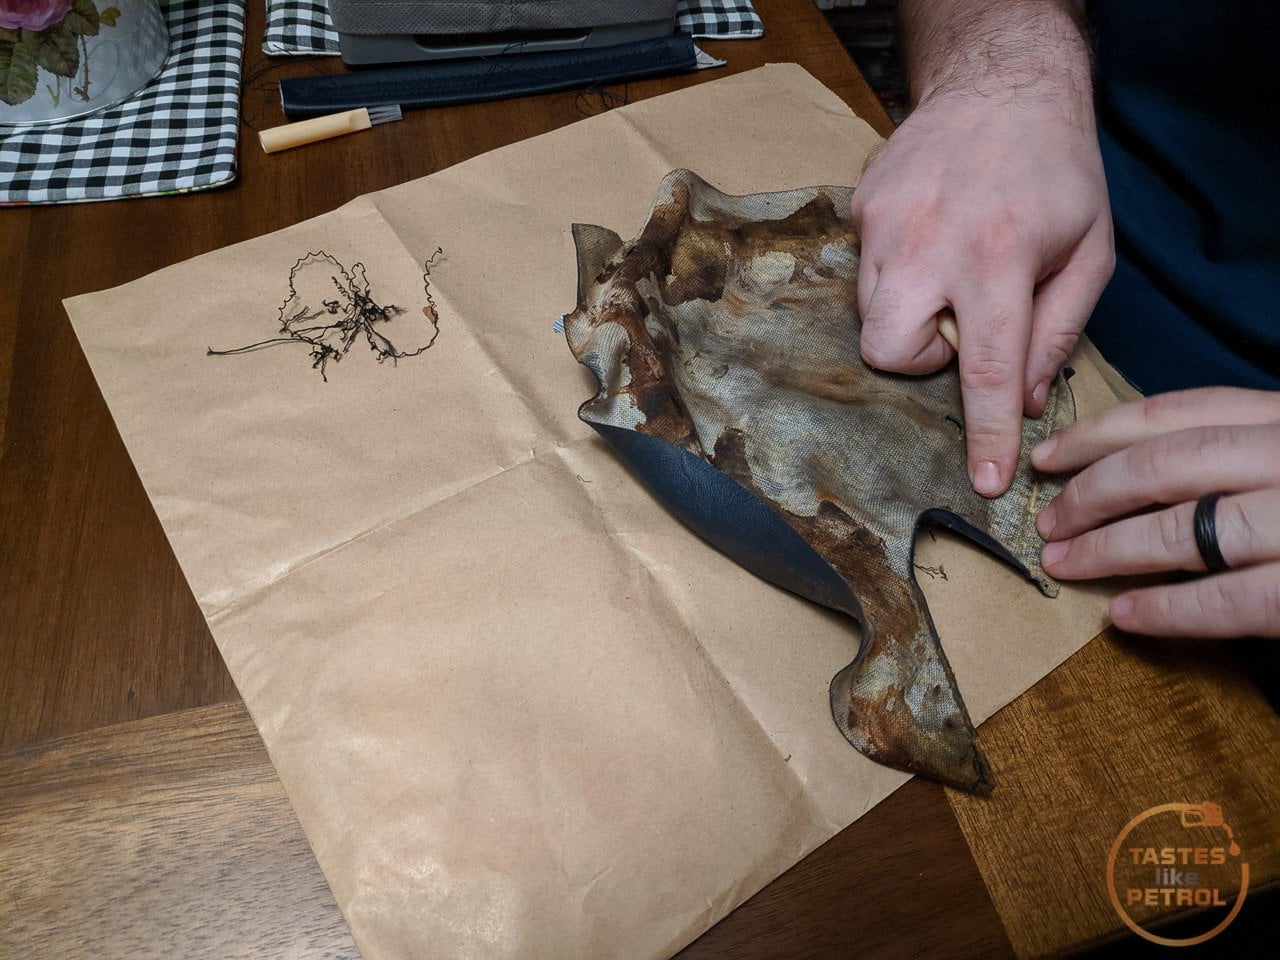
From day one I wasn't really happy with the boots and knew I was going to have to do something about them. The shift boot in particular just looks gross, all loose and full of splits and holes. The top of it didn't seem to fit either.


And the hand brake boot was old and hard, with a big split down the back. Not to mention it was glued to some of the worst looking carpet in the car


So I knew what I had to do. I could hardly just buy these off the shelf, so it was up to me to make replacements.
[SIZE=5]Singing Machine[/SIZE]
The first step was to decide on a sewing machine and obtain one. We were lucky enough to use our Airpoints to get this, so didn't cost us any "real" money. Its a Singer Heavy Duty 4411

Its still a consumer machine, but its meant to be gruntier than your average dinky little white plastic thing.
At the advice of my sewing pro Sister in Law, I also purchased a teflon coated plastic foot, some "leather" needles and heavy-duty dark blue thread. These items are highly recommended when sewing vinyl as its quite thick and hard, but will also stick to a metal foot if used.
Automotive upholstery grade vinyl was obtained from Trademe cheap, as someone that had redone their interior had some leftover. This was perfect as it was dark blue and cheap.
I did some initial practice on an offcut of the vinyl, just to see what the machine could do. It seems as long as I get the settings right, it actually does pretty well through multiple layers. Its been probably 20+ years since I last touched a sewing machine, but hey, I still kinda know what to do.

[SIZE=5]Grotty Tracing[/SIZE]
In order to make copies of the old pieces I needed to unpick all the existing stitching and flatten them out for tracing around. I started with the hand brake boot as I thought this would be easier as there are only a couple of stitches.


It was pretty gross. To be fair, most of it is old contact adhesive (why there is so much INSIDE the boot, well, who even knows?)

This is the template I made on brown paper. I flattened the original out as much as possible, including the folded over edges.

I then traced this onto vinyl, cut it out and whacked a needle through it a few times. The trial fit actually came out looking pretty decent


The shift boot was more complex. For a start, it was all one piece, not four panels stitched together. This is the one real join, the rest are all just "fake" stitches.


Eww, grotty.
This resulted in a weird looking template

Which I decided was too hard, so turned it into four panels, two short and two long (as the recess in the center console is rectangular). In hindsight I would make these from scratch instead of tracing the original, as it ended up with those weird looking shapes.

[SIZE=5]Stitch Up[/SIZE]
With the templates traced up and cut out of the vinyl, it was time to get sewing.


The trick here was to sew the inside seam of the two pieces, to join them together, and then stitch the outside to reinforce them, and give it a nice external stitch like the original had.


If I didn't do that external stitch, you just get this ugly fold


With all four sides stitched, and only a couple of issues (probably user error), it was time to trial fit

The top didn't look right, so I tried folding it over and attaching it to the rubber boot under the shift boot


It was better, although still needed some tweaking at the top. Unfortunately, the new vinyl is thicker than the old stuff so appears bulkier. It also needs a lot of free and loose material as the throw of the shifter is so long into 4th gear that the boot gets quite tight when shifted. This was an issue with the original boot too.
A little bit of tweaking at the top and we had an OK result. I was planning on remaking it, but tbh its OK as it is and I would probably make it worse if I did it again

All that was left to do was to staple the boot to the underside of the console, glue the carpet and board to the handbrake boot and install it all. One note is that the handbrake boot cannot be attached to the console, otherwise it wouldn't be possible to install it all in one go (or it appears that way anyway, the old one shows no signs of being attached previously).


Jobs a good 'un.
[SIZE=5]Old Gross Stuff[/SIZE]
From day one I wasn't really happy with the boots and knew I was going to have to do something about them. The shift boot in particular just looks gross, all loose and full of splits and holes. The top of it didn't seem to fit either.


And the hand brake boot was old and hard, with a big split down the back. Not to mention it was glued to some of the worst looking carpet in the car


So I knew what I had to do. I could hardly just buy these off the shelf, so it was up to me to make replacements.
[SIZE=5]Singing Machine[/SIZE]
The first step was to decide on a sewing machine and obtain one. We were lucky enough to use our Airpoints to get this, so didn't cost us any "real" money. Its a Singer Heavy Duty 4411

Its still a consumer machine, but its meant to be gruntier than your average dinky little white plastic thing.
At the advice of my sewing pro Sister in Law, I also purchased a teflon coated plastic foot, some "leather" needles and heavy-duty dark blue thread. These items are highly recommended when sewing vinyl as its quite thick and hard, but will also stick to a metal foot if used.
Automotive upholstery grade vinyl was obtained from Trademe cheap, as someone that had redone their interior had some leftover. This was perfect as it was dark blue and cheap.
I did some initial practice on an offcut of the vinyl, just to see what the machine could do. It seems as long as I get the settings right, it actually does pretty well through multiple layers. Its been probably 20+ years since I last touched a sewing machine, but hey, I still kinda know what to do.

[SIZE=5]Grotty Tracing[/SIZE]
In order to make copies of the old pieces I needed to unpick all the existing stitching and flatten them out for tracing around. I started with the hand brake boot as I thought this would be easier as there are only a couple of stitches.


It was pretty gross. To be fair, most of it is old contact adhesive (why there is so much INSIDE the boot, well, who even knows?)

This is the template I made on brown paper. I flattened the original out as much as possible, including the folded over edges.

I then traced this onto vinyl, cut it out and whacked a needle through it a few times. The trial fit actually came out looking pretty decent


The shift boot was more complex. For a start, it was all one piece, not four panels stitched together. This is the one real join, the rest are all just "fake" stitches.


Eww, grotty.
This resulted in a weird looking template

Which I decided was too hard, so turned it into four panels, two short and two long (as the recess in the center console is rectangular). In hindsight I would make these from scratch instead of tracing the original, as it ended up with those weird looking shapes.

[SIZE=5]Stitch Up[/SIZE]
With the templates traced up and cut out of the vinyl, it was time to get sewing.


The trick here was to sew the inside seam of the two pieces, to join them together, and then stitch the outside to reinforce them, and give it a nice external stitch like the original had.


If I didn't do that external stitch, you just get this ugly fold


With all four sides stitched, and only a couple of issues (probably user error), it was time to trial fit

The top didn't look right, so I tried folding it over and attaching it to the rubber boot under the shift boot


It was better, although still needed some tweaking at the top. Unfortunately, the new vinyl is thicker than the old stuff so appears bulkier. It also needs a lot of free and loose material as the throw of the shifter is so long into 4th gear that the boot gets quite tight when shifted. This was an issue with the original boot too.
A little bit of tweaking at the top and we had an OK result. I was planning on remaking it, but tbh its OK as it is and I would probably make it worse if I did it again

All that was left to do was to staple the boot to the underside of the console, glue the carpet and board to the handbrake boot and install it all. One note is that the handbrake boot cannot be attached to the console, otherwise it wouldn't be possible to install it all in one go (or it appears that way anyway, the old one shows no signs of being attached previously).


Jobs a good 'un.
bolidemichael said:
That's made a really positive difference and it seems are though there are many strings to your bow!
Now that the interior is so tidy, my eye is drawn to the scar in the centre console in front of the gearknob... what's going on there?
Argh, that. The vinyl on that surround is shrinking (or has shrunk), so a previous owner in their wisdom filled the gap between the two ends of the fabric where they pulled apart, with glue. That's the white stuff. I've had to trim the fabric in various places on that surround to make it fit properly, but short of redoing all that vinyl (which then won't match the rest of the console) there isn't a lot I can do.Now that the interior is so tidy, my eye is drawn to the scar in the centre console in front of the gearknob... what's going on there?
Thanks for all the kind words, everyone.
With the last parts of the interior reinstalled today, I could finally test a couple of other jobs I did as "while I'm here" things when the interior was apart. One of those jobs was to rebuild the rather floppy shifter.
I rebuilt this a while back, as I was doing other work in the interior. There is no better time to do it than when the center console is already out, otherwise its bit of a pain to get to.
The shifter on the TVR, like the Classic Mini, isn't a sprung gate, so it doesn't self return to the center of the neutral gate, instead, it just chills out where you left it (either on the left between 1st and 2nd or on the right between 3rd and 4th). I kinda just got used to this feel and adapted to its vagueness thinking it was normal. It had a large amount of lateral play when in gear (to the point you could think it was in neutral).
I had missed gears a couple of times when driving due to this vagueness, but hey, its a 40 year old car with 40+ year old technology, how good is it meant to be?
Well, its meant to be a lot better than that. The interwebs indicate it should be fairly direct and tight.
[SIZE=5]Removal[/SIZE]
This is what the shifter looks like on the gearbox (note this shifter is back to front, the offset should be towards the front of the car)

That offset, and top of the shifter, is a TVR Engineering special. The original Capri gear lever looks like this

Removal is as easy as unscrewing the large cap that covers everything. It sounds easy in theory, but it took a bloody long time and lots of swearing to get it undone. I tried everything I could throw at it until I got mad and used a long flat blade as a chisel and a BFH to smack it off. It seems this is the only real way to crack it off as there isn't enough room around it to actually get much else on the cap. The only access to it is through the small, jagged hole in the fibreglass tub, which will happily shred your wrists if you arent careful. I have the scars to prove it.


Once the cap is undone the whole shifter will just pull up and out. Just as a note, don't bother trying to undo the three bolts on the turret and remove the shifter that way, it's not possible due to the shift rod.
[SIZE=5]The Problem and the Bodge[/SIZE]
With the shifter out it was immediately obvious something wasn't quite right.
This is what I had


And this is what I should have

Yup, I'm completely missing that large inverted mushroom bush. This bush is what locates the shifter and stops it from being moved around in the turret. The ball on the bottom of the shifter locates in a plastic bush in the selector rod (which you should check whilst the shifter is out as its also prone to failure; mine was OK). Having the base located, but not the middle of the shifter leads to a lot of excess movement.
[SIZE=5]The Fix[/SIZE]
This is the replacement nylon bush from Racetech

Under the large cap there is a smaller dome which is forced upwards by a couple of washers and a spring pushing against that mushroom bush. This creates the nice solid shift feel, and stops any upwards movement whilst allowing the shifter to move as it should (without the spring and dome the whole shifter could be lifted upwards and disengaged from the selector rod).
The spring and dome create the friction needed to give a firm shift and not be floppy. As the cap screws down onto the turret, it's pressing against this dome and spring, compressing it.

Now, this is where I discovered the bodge. I suspect at some point someone has had this shifter out, noticed the mushroom bush was in pieces and removed the remains of the bush. This resulted in the cross pin taking all the forces and load. This bent the pin, as well as wearing into the sides of the cap, as it normally wouldn't be able to move far enough sideways to touch the cap.
In order to fit the new bush I had to remove this bent pin, which I did with a hammer and punch

The rubber visible above the dome is another bodge. Its a section of rubber hose (heater hose?) that has been fitted in order to compress the spring and take out some of the play.
The mushroom bush can now be fitted and the pin replaced. I straightened the pin in the vice first and then tried to fit the bush. This is where I struck my biggest issue. I managed to get it all together (with much effort) but it was super tight, the spring was heavily compressed, and it was damn near impossible to refit the cap and screw it down as the dome was pushing it away from the turret with more force than I could push down. Far too much time was spent trying to do this; shredding my wrists on the fibreglass and wearing the skin raw until I rage quit and left it.
I did some research and noticed something. My spring was sitting on top of the stem of the mushroom, instead of over it like the example a couple of photos above. This means the spring was being compressed about twice as much as it needed to be. I tried to alter it and see if the spring would fit over the stem, but not a chance, the stem was too thick. In the end I cut the stem down to half its length and tried to fit it

This actually worked, I could screw the cup down and it all went together, but by golly was the shifter tight and stiff to work. It almost felt good to use, every movement was deliberate, but two things concerned me. One, the wear on the cap and dome would be excessive due to the friction of the two being forced together hard. Two, there was zero play in the shifter, which meant when you slotted it into gear it didn't move by its self at all. If you're familiar with manual shifting you will know that when you shift into a gear the shifter kinda moves its self slightly and finds its happy place (which is usually not hard up against the end of the gate, but slightly towards the neutral gate). This wasn't happening, and I didn't want to risk the excessive wear on the shifter forks or synchros.
So out it all came. This time I cut the stem almost completely off

This was much better. The spring didn't need to be compressed to fit the bush and pin, and there was just a little play before the spring touched the bush.


Refitting was a breeze, and the shifter had what I would consider the right amount of free play in it. It now popped nicely into gear, had zero lateral movement when in gear, no vertical movement, but was easy to move and shift. I had also added a coating of grease to the pivot points and to the top of the dome just to keep everything sliding nicely.
[SIZE=5]The Result[/SIZE]
It took a while to get the rest of the interior finished so I haven't been able to drive the car until today, and the results were immediately obvious.
The shifter is now very direct and it's hard to miss the gates. You can shift it quite quickly now too as it inspires confidence.
The shifter just by the nature of its design is a bit strange. Because of the offset, when shifted into 1st and 3rd it dips down, whilst 2nd and 4th the shifter actually raises slightly, and the throw into 4th especially is quite long. All part of the TVR charm I guess.
A worthy repair, and something other 280i owners should check if they have an excess play in their shifter.
Gassing Station | Readers' Cars | Top of Page | What's New | My Stuff