Kelvinators TVR Tasmin
Discussion


The final part of the interior job was to recondition a few of the switches. The window, panel and headlight switches all needed an overhaul.
It was pretty obvious just by looking at the window switches why they needed a strip down and clean


It's no surprise that the windows were a tad slow, and the connectors had taken a real beating with excessive resistance melting the plastic around a couple of the pins. A sure sign of bad contact.

I decided to start with one of the window switches. These were filthy, having soaked up any fluff and muck that has been in the center console for years.
Start by removing the top casing from the bottom, using a small screwdriver to unhook the clips on each side. Before I removed it, I marked the top of the switch so I could refit the casing in the same orientation.

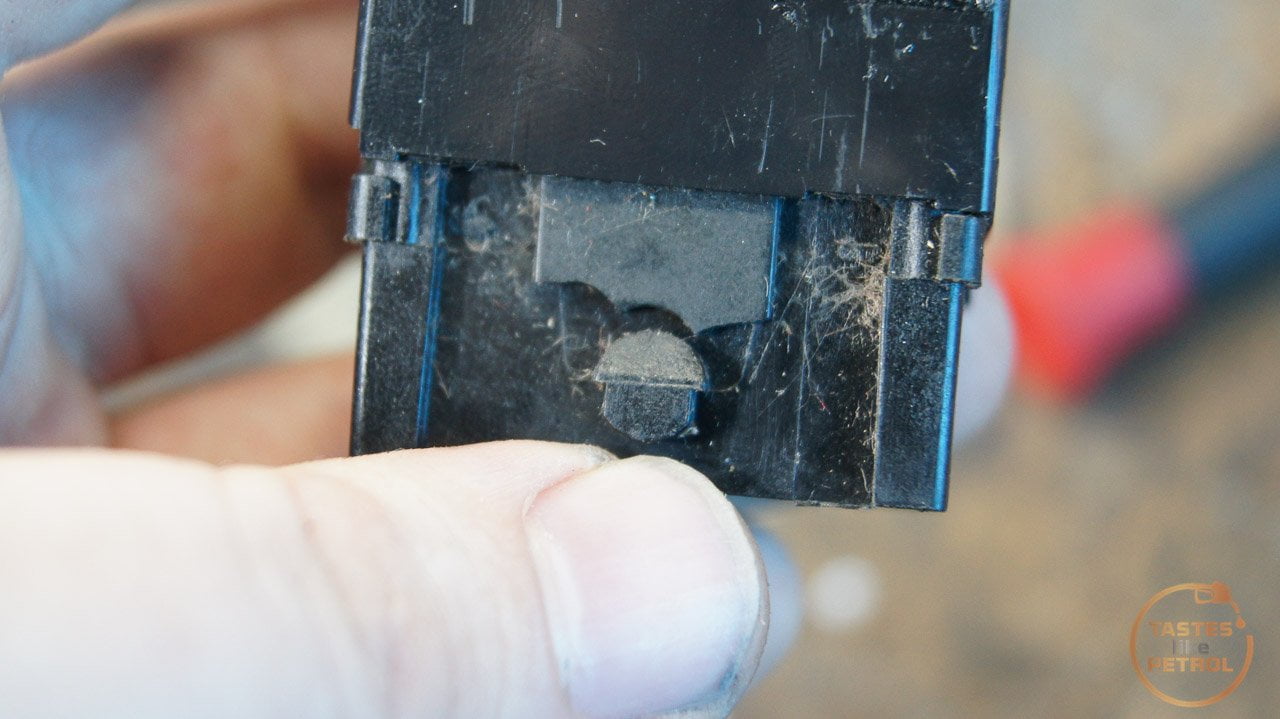
With the top casing off you can see the switch guts

Using that same small screwdriver carefully lever the toggle legs off their pins and lift the toggle up off the base. Take care, as under the toggle are two small plastic spring loaded pogo pins. Don't let these ping away.
After a quick wipe down to remove the dust and dirt, this is what we have


Make sure to note which way the metal strips go as they aren't all the same.
These are the little pogo pins in the toggle. They should face the other way with the spring going first into the toggle.

Remove the strips and inspect the contacts. Mine were coated in old dry grease and corrosion

I took the time to clean both the contacts and the strips and then using fine sandpaper give them all a good polish

The outer casing was given a good degrease and clean inside and out


The holes the pogo pins go into in the toggle had to be scraped out as old grease had solidified in there too. The pogo pins didn't escape the cleaning, they carefully had all the grease removed. They needed it.

Once everything was clean it was time to reassemble. The strips and contacts got a thin coating of dielectric grease, as did the pogo pins and the toggle was refitted to the base. The casing was reinstalled and we were ready to go.


The action was now quite nice and solid. The muck in it previously must have been dampening the feel.
The other window switch wasn't any better, so that got the same treatment.


Next was the panel light brightness switch. Unfortunately, this was in a pretty sorry state, with cracks and missing plastic in various places. Thankfully with switch doesn't get a lot of use.


The contacts and strips in this were disgusting


Everything got cleaned up as much as possible

The cracks in the casing were glued up, and it was refitted.
The headlight switch was the last one I wasn't to overhaul. The connector was in very bad shape, so I wanted to be sure the switch wasn't causing it. Looking at how clean the switch was, I suspect it was recently replaced with a New Old Stock item.


This was mostly just old congealed grease. All that got cleaned out and the contacts polished


And that's the switches done. Easy to strip down and clean, with minimal moving parts. They are quite a reliable design, but let down by not having the housing a bit better sealed, and the old grease drying out.
Before I could refit the center console and switches I had to do some quick repairs to the connectors on a couple of the switches. The headlight switch, in particular, had an issue with one terminal falling out as the plastic had melted from around the pin.

I had obtained replacement plugs from Minispares (Part PM03) as they sell a kit to replace the connectors for the Classic Mini hazard light switch. The plug isn't identical, as it's missing the locking tabs the TVR has, but it's a nice tight fit regardless and shouldn't fall out.
The kit comes with new pins too, but as my pins were OK I chose to reuse the existing ones in the new housings. Using a small flat blade I pushed the locking tabs on each side of the pin in and slipped it out the back of the housing. Flip the tabs back out again, and into the new housing it goes. The big white plug is the old one, the black one is the new one.


The only other one I needed to replace was the blower fan switch, as for some reason this didn't even have a plug at all, just bare terminals stuck on the pins and wrapped in tape! Bodge city.

This was as easy as just transferring the pins into the housing in the correct order


The center console went in next, and it was finally time to refit the switches into their freshly wrinkle-painted panel


The radio blank needs to be stuck in, but it looks good with the rest of the console

The switch panel looks a damn sight better than the old peeling and rusty look

The windows are still slow, I'll need to get in there and clean and grease the runners as I did for my SD1 (same regulator), but the blower fan and headlight switches work more reliably, and it appears I've gained a new full brightness setting on my dash lights.
All in all a good achievement, even just to know the switches will keep working for a bit longer.
It was pretty obvious just by looking at the window switches why they needed a strip down and clean


It's no surprise that the windows were a tad slow, and the connectors had taken a real beating with excessive resistance melting the plastic around a couple of the pins. A sure sign of bad contact.

I decided to start with one of the window switches. These were filthy, having soaked up any fluff and muck that has been in the center console for years.
Start by removing the top casing from the bottom, using a small screwdriver to unhook the clips on each side. Before I removed it, I marked the top of the switch so I could refit the casing in the same orientation.

With the top casing off you can see the switch guts

Using that same small screwdriver carefully lever the toggle legs off their pins and lift the toggle up off the base. Take care, as under the toggle are two small plastic spring loaded pogo pins. Don't let these ping away.
After a quick wipe down to remove the dust and dirt, this is what we have


Make sure to note which way the metal strips go as they aren't all the same.
These are the little pogo pins in the toggle. They should face the other way with the spring going first into the toggle.

Remove the strips and inspect the contacts. Mine were coated in old dry grease and corrosion

I took the time to clean both the contacts and the strips and then using fine sandpaper give them all a good polish

The outer casing was given a good degrease and clean inside and out


The holes the pogo pins go into in the toggle had to be scraped out as old grease had solidified in there too. The pogo pins didn't escape the cleaning, they carefully had all the grease removed. They needed it.

Once everything was clean it was time to reassemble. The strips and contacts got a thin coating of dielectric grease, as did the pogo pins and the toggle was refitted to the base. The casing was reinstalled and we were ready to go.


The action was now quite nice and solid. The muck in it previously must have been dampening the feel.
The other window switch wasn't any better, so that got the same treatment.


Next was the panel light brightness switch. Unfortunately, this was in a pretty sorry state, with cracks and missing plastic in various places. Thankfully with switch doesn't get a lot of use.


The contacts and strips in this were disgusting


Everything got cleaned up as much as possible

The cracks in the casing were glued up, and it was refitted.
The headlight switch was the last one I wasn't to overhaul. The connector was in very bad shape, so I wanted to be sure the switch wasn't causing it. Looking at how clean the switch was, I suspect it was recently replaced with a New Old Stock item.


This was mostly just old congealed grease. All that got cleaned out and the contacts polished


And that's the switches done. Easy to strip down and clean, with minimal moving parts. They are quite a reliable design, but let down by not having the housing a bit better sealed, and the old grease drying out.
Before I could refit the center console and switches I had to do some quick repairs to the connectors on a couple of the switches. The headlight switch, in particular, had an issue with one terminal falling out as the plastic had melted from around the pin.

I had obtained replacement plugs from Minispares (Part PM03) as they sell a kit to replace the connectors for the Classic Mini hazard light switch. The plug isn't identical, as it's missing the locking tabs the TVR has, but it's a nice tight fit regardless and shouldn't fall out.
The kit comes with new pins too, but as my pins were OK I chose to reuse the existing ones in the new housings. Using a small flat blade I pushed the locking tabs on each side of the pin in and slipped it out the back of the housing. Flip the tabs back out again, and into the new housing it goes. The big white plug is the old one, the black one is the new one.


The only other one I needed to replace was the blower fan switch, as for some reason this didn't even have a plug at all, just bare terminals stuck on the pins and wrapped in tape! Bodge city.

This was as easy as just transferring the pins into the housing in the correct order


The center console went in next, and it was finally time to refit the switches into their freshly wrinkle-painted panel


The radio blank needs to be stuck in, but it looks good with the rest of the console

The switch panel looks a damn sight better than the old peeling and rusty look

The windows are still slow, I'll need to get in there and clean and grease the runners as I did for my SD1 (same regulator), but the blower fan and headlight switches work more reliably, and it appears I've gained a new full brightness setting on my dash lights.
All in all a good achievement, even just to know the switches will keep working for a bit longer.
bolidemichael said:
Such good work - you inherited soooo many issues with this vehicle.
I have a couple of questions, if I may:
1) How did you trim back the stem on the mushroom for the gear pivot? btw, it is fascinating to know how this located, nice work in explaining -nice-and-simply!
2) How did you 'wrinkle-paint' the panel for the switches?
I'm a simple man, with simple solutions....I have a couple of questions, if I may:
1) How did you trim back the stem on the mushroom for the gear pivot? btw, it is fascinating to know how this located, nice work in explaining -nice-and-simply!
2) How did you 'wrinkle-paint' the panel for the switches?
1) With a reciprocating saw lol
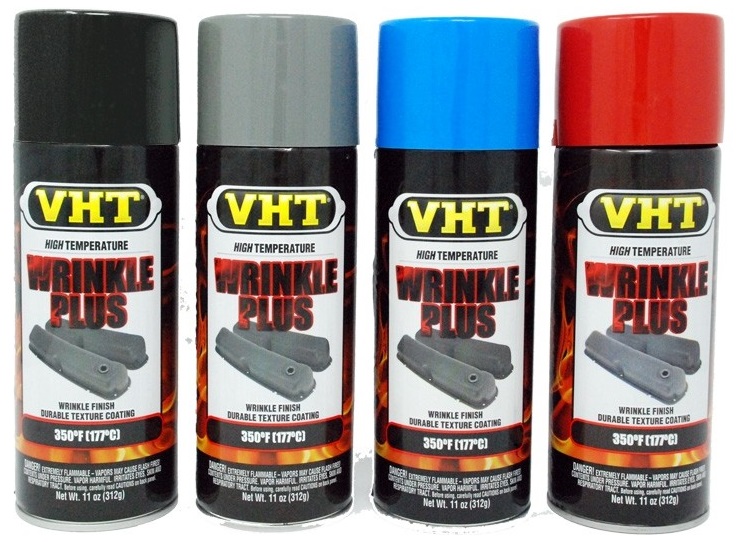
2) I'm not sure if its an NZ brand, but VHT Wrinkle Plus is my go to for wrinkles. Works real good on valve covers and the likes too.
Wow, it's been almost six months since I got this back on the road and warranted. Took it in for its WOF (MOT) check today, and passed with a clean sheet. Good feels.
I better get my arse into gear and do more than the 186 miles I've done in the last 6 month period!
Before the WOF I thought I had better take it for a quick shakedown, so went out for a hoon last night.
https://youtu.be/jSfq3_sakD8
https://youtu.be/tM-7Fp-nNe0
https://www.instagram.com/p/CCLCZ8Wl2yA/?utm_sourc...
With old cars, it always seems to feel like you're taking it for a WOF. Six monthly WOFs for old cars is a bit mean, but I wouldn't trust it any other way, with the state of the rubbish on our roads.
So its been almost six months since http://www.tasteslikepetrol.net/2020/01/tvr-tasmin... my first WOF inspection after getting the car on the road, and according to the previous WOF sheet, I've done a grand total of 186 Miles in that time. That's almost embarrassing, but in my defence, we did have COVID lockdown, and carpet replacement in that time.
With the car sitting for as long as it had, with minimal driving, I noticed last time I drove it that the tyres had gone a little out of round and the car shook quite badly at speed. This was to be expected, apparently on lower pressure big sidewall tyres like these they can get a flat spot from sitting on concrete, in about a month.
To fix this, and check the car was ready for its date with my WOF guy on Saturday, we took the car out for a decent run around the back roads. Mid-winter with the top down, a clear sky, and rugged up from the cold, its always an experience. An assault on the senses. My Wife is incredibly understanding sometimes.
Sure enough, the shakes quickly went away and the car ran and drove better than ever. Pulling well in all gears, and just a pleasure to drive. The improved shifter feel is great; very direct.

After that shakedown I was pretty happy, and ready for the WOF the next day.
Of course, if everything went to plan, it wouldn't be my car.
Driving along the motorway, just cruising along, not a care in the world as I head in for my WOF. I get to a set of traffic lights, and as they go green and I pull away with some gusto, BAM, the engine starts to splutter and cut out. As I back off it comes right again.
That was weird, so I give it another squirt, and sure enough, it's spluttering and cutting out. Oh no, I look around and assess my options just in case I need to pull over if it dies. I don't want to be that guy, stuck at the side of the motorway.
But then I had a thought, I remembered something.... I have just under a quarter of a tank left.
The wise words of my Wife pop into my head; "Does it have petrol in it?"
Yes, but once again, no. Its the http://www.tasteslikepetrol.net/2019/12/tvr-tasmin... same issue I encountered early on, cutting out under acceleration as the fuel sloshes away from the pickups. Stupid design.
I carefully nurse the car along, and it has no more issues along the way. I fill both the tanks, Fitting a total of 37L in before it starts ejecting from the opposite side filler. With a 60L capacity, It leaves me with about 10 litres or so in each tank. It's not a problem if the tanks are half full, but its maybe an issue I will need to look into later, by adding a swirl tank or the likes (as TVR did in later production).
Anyway, the car gets inspected for its WOF, and comes away with a new sticker and a clean sheet. My WOF guy is very impressed with the car, and the work I've done since the last WOF.
Because my WOF guy is awesome I was allowed to pop under the car and take some photos of its general condition and get some reference photos for where the exhaust could be run. Its a bit dirty, and oily, but otherwise very good. Certainly none of the rust issues these cars are known for in the UK.
The rear diff and brakes are looking good still. Nice even wear on the rotors, and the diff has nowhere near as much oil on it as it used to. There appears to still be a small leak, as there was some moisture near the drain plug, but very minor. Nothing from the output shafts anymore.


These are the main pipes, hanging down under the chassis. I'm quickly wearing down the front of these due to a lack of ground clearance

Its a bit oily under the engine and box, but I've had worse. A good degrease would probably help, but I'm running it in an honest, "Its British" condition instead of pretending it doesn't leak.

Up front looks pretty good too, although I really should clean up the mess from previous radiator overflows/burps


And finally, a shot of the exhaust, back to front, including ugly clamp fitted when I cut the exhaust to refit the diff.

I need to talk to a real good exhaust maker, and see if there is any way they could redo the exhaust so it would fit into the chassis backbone, instead of hanging down. There isn't much space, but I think I might know how it can be done, and not above the gearbox either.
In the meantime, the car is still road legal, so I best make the most of it, and try and put more than 186 Miles on it in the next 6 months.
Bit of a quick followup. Its been almost 6 months since the last post, so I guess its almost WOF time again.
Not much has been happening. The car, when I've driven it, has been completely reliable, starting first turn of the key. Unfortunately due to COVID, weather and general lack of effort I doubt I will have exceeded the 186 Mile/6 month target I was hoping to beat. I've barely driven the car at all. There are some "nice to do" things I can do to the car, like the braided brake lines, but I havent had the motivation to do it, but otherwise its needed no work at all.
The car is for sale, and I've had some bites, but I've also had some bites from people that seem to think they can get the car for damn near half of what I'm asking for it because its the "undesirable" model. To that I have to say, Jog on. If I don't get what I want for it (which is a very reasonable price in my opinion, considering its already 7K cheaper than the next cheapest TVR, which is the same model as mine), I will just keep it.
I did manage to get it out of the garage the other day after giving it a waterless wash, and its looking pretty damn good. Carpro Ech2o has impressed me.
C70R said:
I guess the size of your potential target market for this thing is pretty small, so it's going to pay to be patient if you are holding out for a value.
This is indeed very true, but I'm also in no hurry to move it on, so will keep the top down, put my hat on to cover the bald spot, and get out and enjoy the sun.Hell, it might motivate me to do some of the "nice to do" work I've had planned.
You have to WANT to a TVR to own a TVR. Its not something you can just pick up as a spare car to beat around in. Its quirks will kill the fun pretty quickly if you arent prepared to live with them. I still haven't got used to the quirks and I've owned the car for a bit now. I tried to fill it with fuel the other day and ended up pumping it in the hole on one side, and out the hole on the other side straight onto the ground >_< You cant help but laugh.


Stick Legs said:
I guess you heard about Oliver Winterbottom passing away in November.
He'd have been delighted with the way you have looked after this!
Yes, its a terrible loss. I believe he was quite active with the Wedge clubs over there, often showing up at the Big Bad Wedge Fest meets. He sure knew how to pen a fine wedge.He'd have been delighted with the way you have looked after this!
On the home wedge front, the TVR passed another WOF. Clean sheet other than the same advisory as last time, adjust the front wheels bearings (oops, didnt do it last time either so no surprise).
Guess its time to finally whip the front brakes off, replace the rotors and hoses and reset the front wheel bearings.
Six months have passed, which means it's WOF time again. The good news is that the TVR passed first time with a clean sheet, the bad news is that the inspector noted play in one of the front wheel bearings.
This wasn't completely unexpected, he mentioned it last time too, but this time it's bad enough I should do something about it. The inspector advised I just nip them up to take out the play. "Nipping up" isn't my style, at the very least I want to repack the bearings with new grease and then set them correctly. This gives me the chance to replace the front rotors too, since they were undersized when I got the car and I've had the replacements sitting around for ages now.
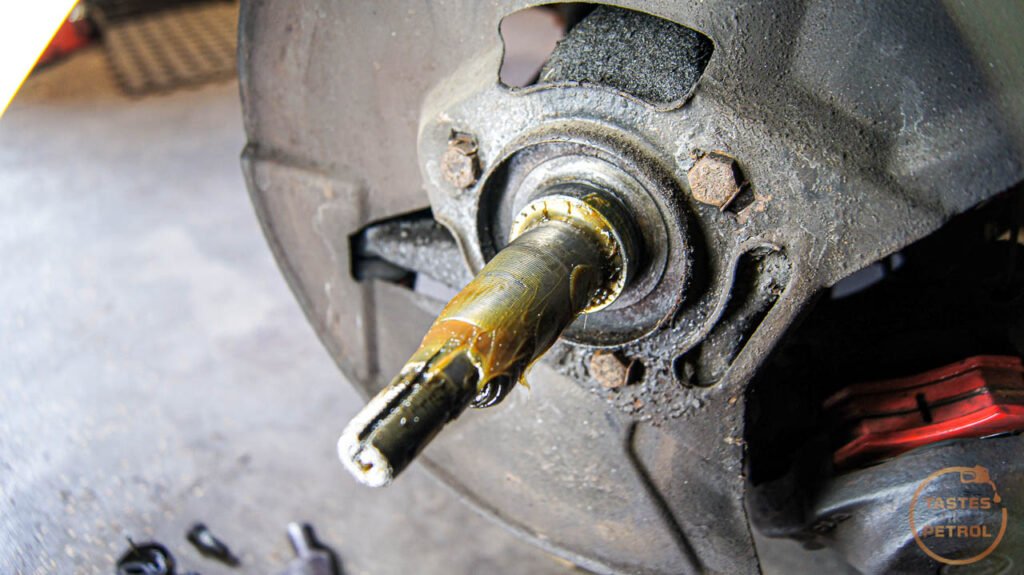
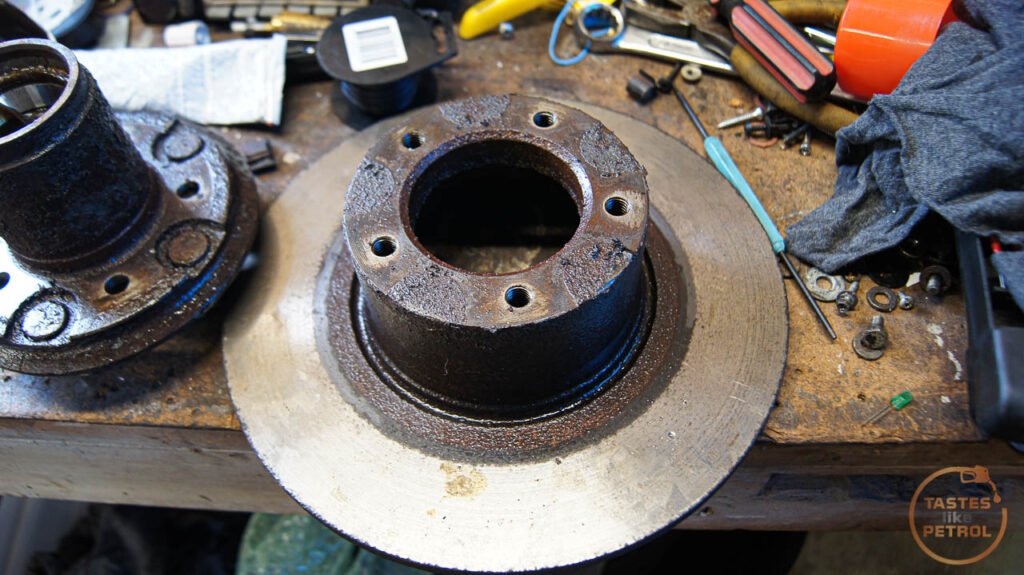
I was starting with this. Being old, the rotor is behind the hub (unlike modern cars with the rotor ahead of the hub), which makes replacing it a bit more of a pain. On the flip side I'd need to adjust the bearings when refitting anyway, so two birds with one stone.

The first step in removal is to pop the dust cap off with a chisel and hammer, and then remove the split pin and locking ring from the nut.

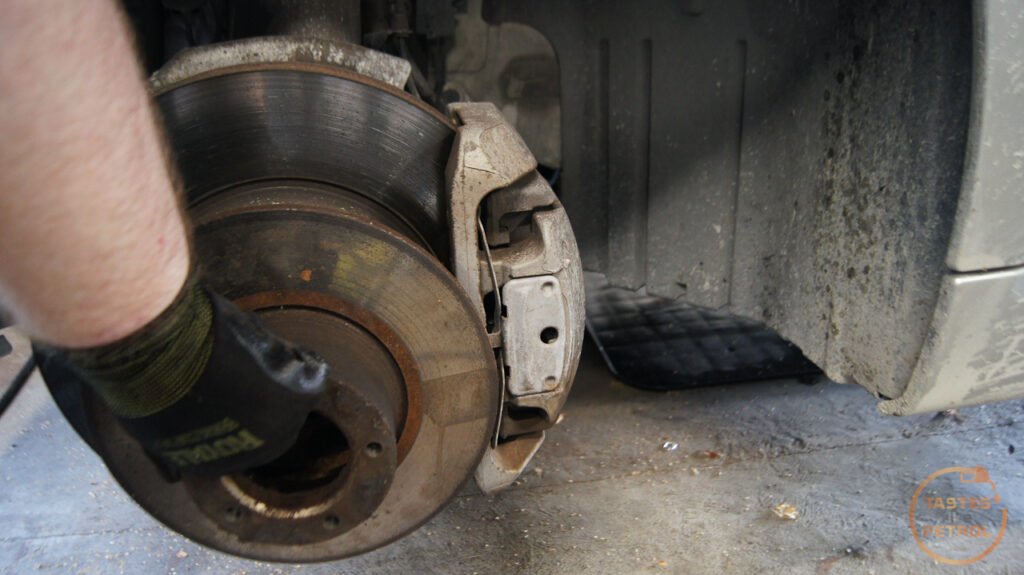
Next, the caliper has to come off. This is held on with two bolts at the back, and should have locking tabs bent up against the bolt heads, so they will need to be hammered back first.
With the caliper safely supported and not hanging by its hose, undo and remove the hub nut. With the hub nut and washer behind it removed the hub/rotor can be removed. Be careful though as the outer wheel bearing is just sitting in place and can fall out of the hub during removal.


The outer bearing race wasn't looking good. Clear signs of wear or excess heat (discoloured outer race), and the grease had turned black around the bearing
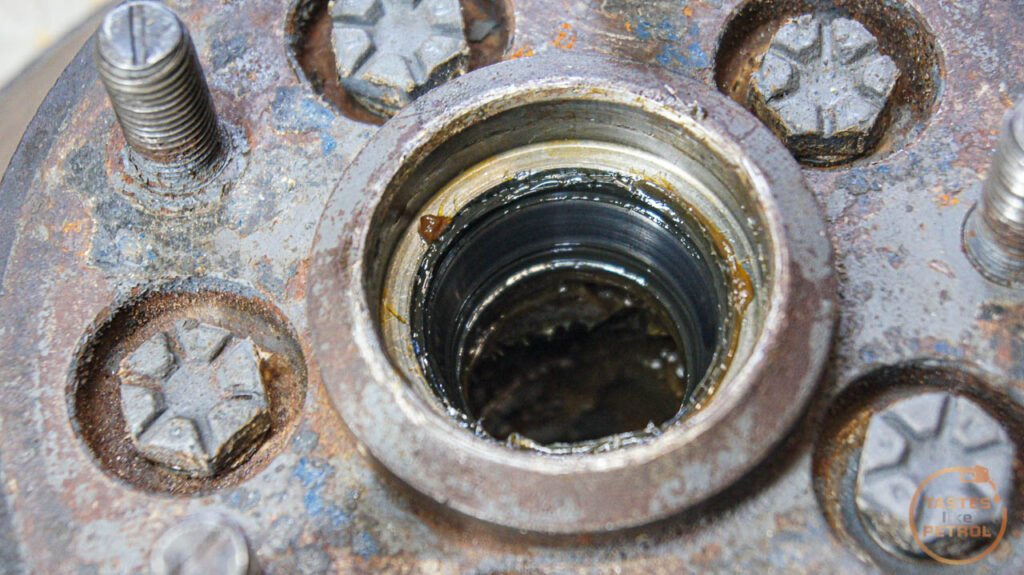
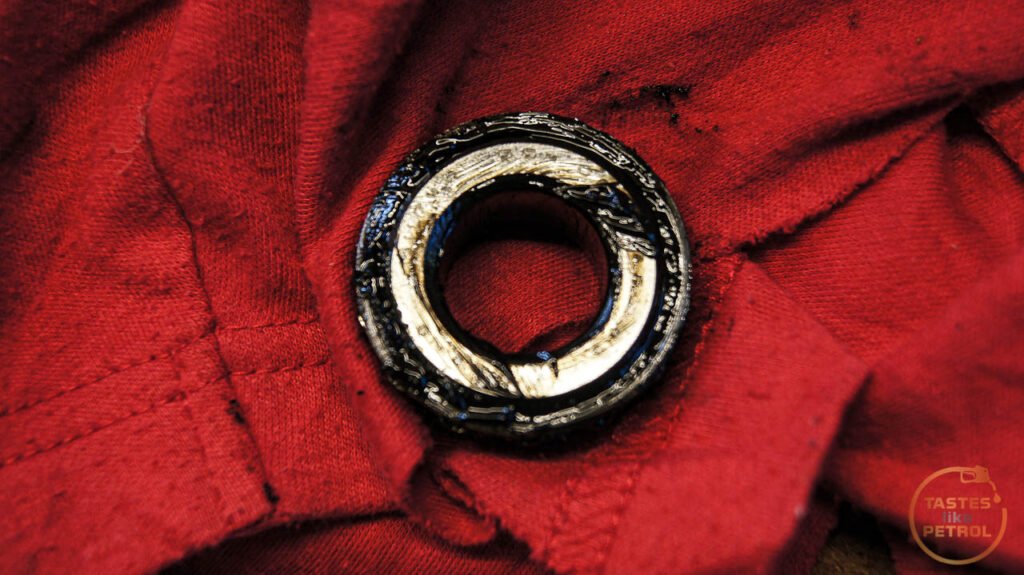
The inner bearing looked OK, as did the seal. Looking at the state of the outer bearing though I chose to source replacements for all the bearings and just refresh the lot.

Before I could do anything further though I needed to split the rotor from the hub. With the bolts through the hub removed I suddenly realised that the hub and rotor were rust welded together. Awesome. Well, I know what sorts that; A big chisel and an even bigger hammer, with lots of penetrating fluid. Hammering the chisel into the gaps where the studs are slowly but surely cracked the rotor free. An old Honda rotor made a good support whilst bashing it.

You can see where the rust was holding it. It was particularly bad around the center hole.
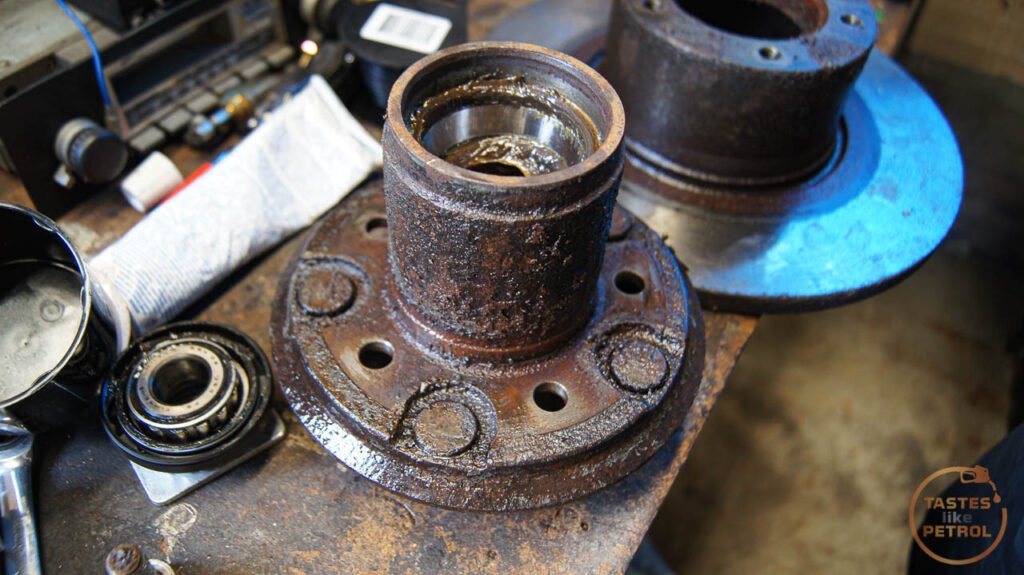
With the hub free, I removed the oil seal and inner bearing. A small pry bar was used to pop the seal out and then the bearing just pulls out by hand. The inner and outer races take a bit more force, and a punch and hammer were carefully employed to drift the races out of the hub. In my case, the bearings were a TIMKEN L45449/L45410 and the other is TIMKEN LM11749/LM11710. The seal is 40X55X8, and I believe these were originally from a Ford Granada.

The new rotor next to the old one. The old one is below minimum thickness so needs to be replaced (although with the few Miles the car does each year it would take many years to become an issue, but that's not my style). The new one was supplied by Mtec Brakes in the UK and is both slotted and dimpled, because racecar.

Since I was stuck waiting for new bearings to arrive I decided to move onto another upgrade that I have been sitting on for a while; braided brake hoses.

First I had to remove the old hoses. That was fun. One side came off easy, the other side had a deformed thread locking nut on the chassis side, with limited access and a weird size. That took ages to remove...
And then I discovered that someone has previously replaced the front brake hoses with locally made hoses.... and for some reason decided that they should be M10 on the chassis end, as the original hoses, but the caliper end should be imperial, with custom hard lines made up to match, meaning my new hoses with original M10 thread on each end wouldn't fit. I can only presume someone got mad hookups with some random hoses off the shelf from some obscure old Holden or something.
So, off came the old hard lines on the calipers, and I had a local specialist make new ones up to suit the new hoses. Not a hard thing to have done, but damn I didn't need that mess around or cost.

The new pipes work a treat though and the front hoses went on as expected. Some tweaking and I had them lined up nicely.

The next day, with bearings in hand, I cleaned the hubs up with a wire brush to remove all the rust and crust, and degreaser to remove the old grease. The faces where the rotor mounts got a thin coating of copper grease to aid removal in future.

Then it was a matter of using one of my favourite now tools, my 12 Ton press, to press the new races into the hub. Sockets of various sizes were used to drive the race into place


Of course I couldnt miss the chance for a test fit. Mmmm pretty.

Since the races were in place I packed the new bearings with grease, installed them and installed the oil seals. As per the manual, the seals were also packed with grease.

Now it was just a case of installing the lot back onto the cleaned spindle. The manual recommended some grease at the base of the spindle where the seal will run, so I did that and fit the hub with rotor attached. The rotor bolts were nipped up with the rattle gun on the bench but cant be torqued up until they are on the car as the setting is quite high.
With the hub on the spindle, the outer bearing, washer and nut can be refitted. Now its time to set the bearings. First whilst spinning the hub counter-clockwise with one hand torque the hub nut up to 27 FT LBS. Now back the nut off slowly until there is 0.025-0.076mm (0.001-0.003") end float when measured with a dial gauge.
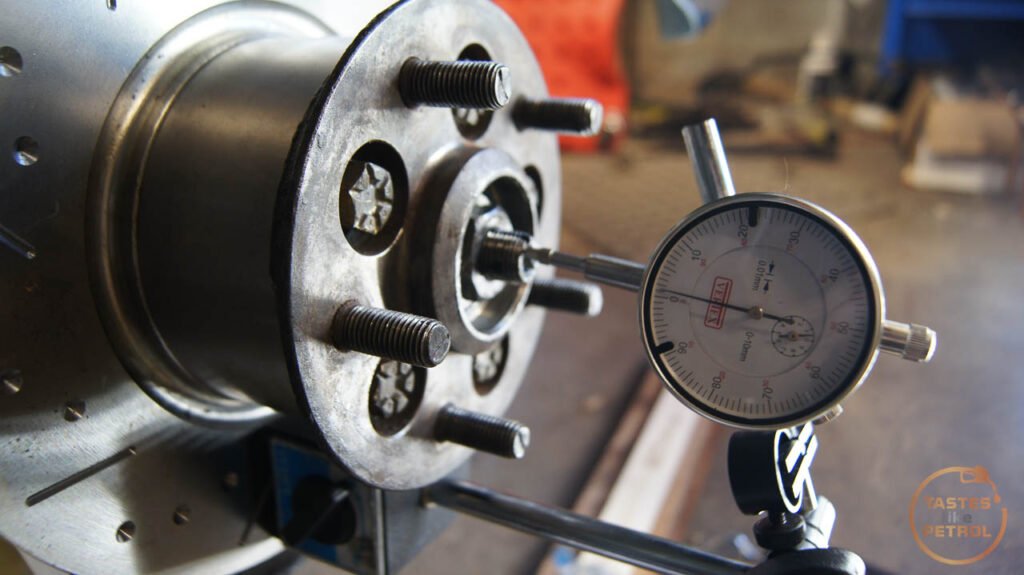
To measure the end float you have to push and pull the rotor to its limits. I set that one in the photo to almost 0.03mm, but the photo was taken with no pull on the rotor.
Some people talk of just setting it by turning the nut "one flat back", which for one side was about correct, but the other was more than one flat which means it would have been too tight otherwise.
Just for interest, before I undid the nut originally I measured the end float on both sides to see what it was set to, and there was no measurable end float at all, which means the bearings were too tight (and probably explains why the outer bearings had worn and failed as they had).
The last thing to do on the front was to torque the rotor bolts, which needed my big bar to hold the rotor from turning

And then it was a case of fitting the caliper again, making sure to bend the locking tabs back into place

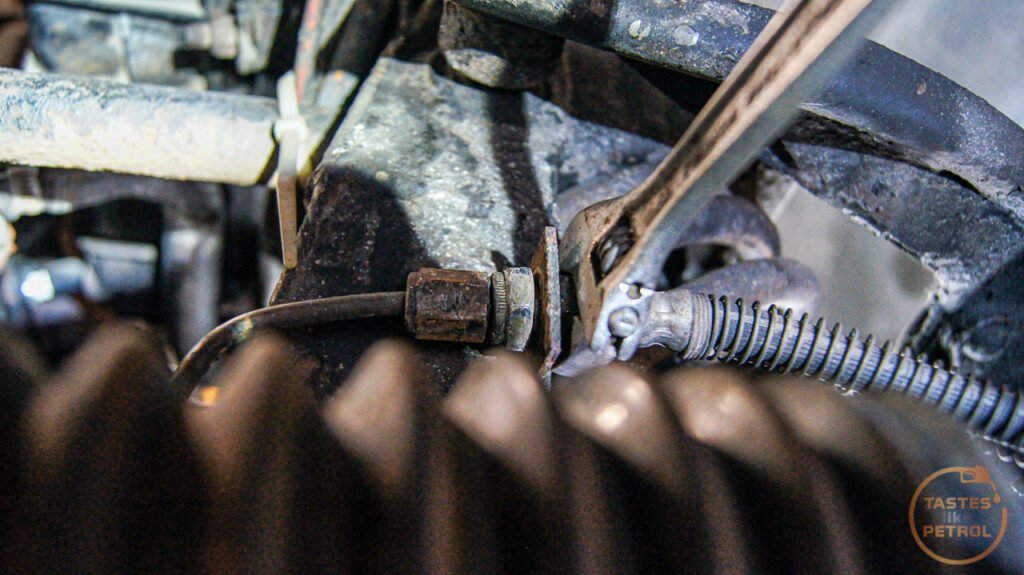
Before bleeding the brakes there was still one obvious job looming over my head; the rear brake hose. I had previously inspected when I had the diff out and deemed it crap. Thankfully when I had good access two days before the hoses arrived I freed all the fixings on the hose up and made it easy to undo, since now I was doing it almost blind, and with limited space. I don't have photos of doing this because it sucked, but it looks nice and I know its a good hose now.
The old hose had seen some s t. The rubber was still OK, but the metal fixings were quite rusted


Pretty

Now it was time to pump some alien juice through the system and get the air out


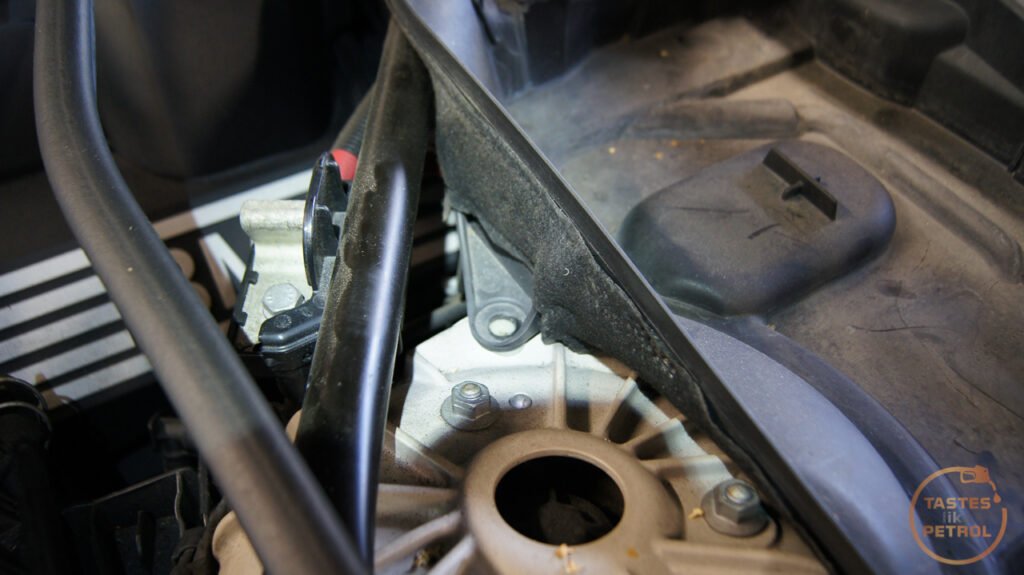
Thats not all though, since the car was in the air and level there was one last thing I wanted to do, and that was to try and reduce the amount of gear oil the gearbox is leaking. When I was last under the car it certainly looked like the output seal on the gearbox was leaking, so thats where I started.
I ordered a seal ages ago from the UK with a shipment of other parts, but it was a matter of actually accessing the thing. Being a space frame there isnt a lot of freedom to access things like the gearbox, but I worked out I should have enough space and just went for it.
The first thing to do was to disconnect the driveshaft from the diff and slide it back to remove it from the back of the gearbox. Once it was free I slid it back as far as I could, up over the diff and out of the way.

Now I could see the back of the gearbox, with the seal in question. Might be some oil here.

Getting it out was a mission. First I tried a bunch of prybars and screwdrivers to lever it out, but got nowhere. In the end I went out and purchased a proper seal puller, and it took a matter of seconds to pop the seal out.


The new seal was a matter of pressing it into place by hand and then using a socket and hammer tapping it into place. There isnt a lot of room to swing a hammer, but a few careful whacks got it there

You can see how little space I have to work with here. Its right above the cross brace, and surrounded by tubes.

But with the new seal in place the end of the driveshaft got lubricated and refitted into the gearbox, and onto the diff again.
Since I didn't know how much had leaked out (it looked like a lot on the trays under the car) I drained and refilled the gearbox. I could've saved myself about $40 though, as it was only about 100ml low, so could have been topped up instead, but at least now I know its full.
I'll keep monitoring the gearbox, but for now it seems to be holding fluid better than it was. Its a British car though, so it wont be perfect.
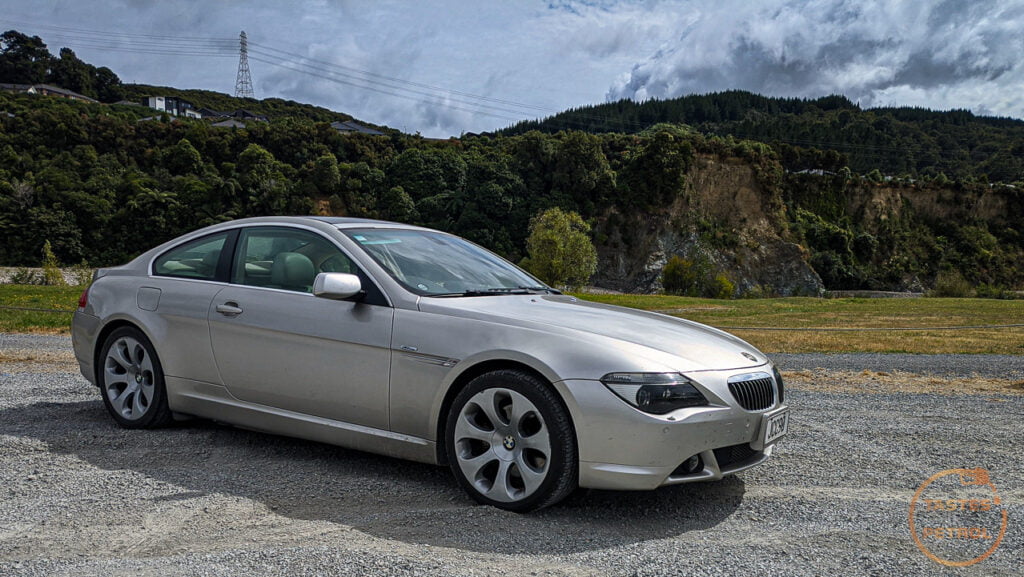
With all that work done the only thing left to do was to take the car for a thrash bed in the new rotors with some hard stops. The brakes seem to work as good as they did, so thats a good sign I guess.
Good excuse to take some photos too


Shes looking pretty good now, and driving great. British Car Day at Trentham is in a couple of weeks, so with a quick waterless wash she will be on show again there this year, where hopefully someone will fall in love and pay me good money to drive her away.
This wasn't completely unexpected, he mentioned it last time too, but this time it's bad enough I should do something about it. The inspector advised I just nip them up to take out the play. "Nipping up" isn't my style, at the very least I want to repack the bearings with new grease and then set them correctly. This gives me the chance to replace the front rotors too, since they were undersized when I got the car and I've had the replacements sitting around for ages now.
I was starting with this. Being old, the rotor is behind the hub (unlike modern cars with the rotor ahead of the hub), which makes replacing it a bit more of a pain. On the flip side I'd need to adjust the bearings when refitting anyway, so two birds with one stone.
The first step in removal is to pop the dust cap off with a chisel and hammer, and then remove the split pin and locking ring from the nut.
Next, the caliper has to come off. This is held on with two bolts at the back, and should have locking tabs bent up against the bolt heads, so they will need to be hammered back first.
With the caliper safely supported and not hanging by its hose, undo and remove the hub nut. With the hub nut and washer behind it removed the hub/rotor can be removed. Be careful though as the outer wheel bearing is just sitting in place and can fall out of the hub during removal.
The outer bearing race wasn't looking good. Clear signs of wear or excess heat (discoloured outer race), and the grease had turned black around the bearing
The inner bearing looked OK, as did the seal. Looking at the state of the outer bearing though I chose to source replacements for all the bearings and just refresh the lot.
Before I could do anything further though I needed to split the rotor from the hub. With the bolts through the hub removed I suddenly realised that the hub and rotor were rust welded together. Awesome. Well, I know what sorts that; A big chisel and an even bigger hammer, with lots of penetrating fluid. Hammering the chisel into the gaps where the studs are slowly but surely cracked the rotor free. An old Honda rotor made a good support whilst bashing it.
You can see where the rust was holding it. It was particularly bad around the center hole.
With the hub free, I removed the oil seal and inner bearing. A small pry bar was used to pop the seal out and then the bearing just pulls out by hand. The inner and outer races take a bit more force, and a punch and hammer were carefully employed to drift the races out of the hub. In my case, the bearings were a TIMKEN L45449/L45410 and the other is TIMKEN LM11749/LM11710. The seal is 40X55X8, and I believe these were originally from a Ford Granada.
The new rotor next to the old one. The old one is below minimum thickness so needs to be replaced (although with the few Miles the car does each year it would take many years to become an issue, but that's not my style). The new one was supplied by Mtec Brakes in the UK and is both slotted and dimpled, because racecar.
Since I was stuck waiting for new bearings to arrive I decided to move onto another upgrade that I have been sitting on for a while; braided brake hoses.
First I had to remove the old hoses. That was fun. One side came off easy, the other side had a deformed thread locking nut on the chassis side, with limited access and a weird size. That took ages to remove...
And then I discovered that someone has previously replaced the front brake hoses with locally made hoses.... and for some reason decided that they should be M10 on the chassis end, as the original hoses, but the caliper end should be imperial, with custom hard lines made up to match, meaning my new hoses with original M10 thread on each end wouldn't fit. I can only presume someone got mad hookups with some random hoses off the shelf from some obscure old Holden or something.
So, off came the old hard lines on the calipers, and I had a local specialist make new ones up to suit the new hoses. Not a hard thing to have done, but damn I didn't need that mess around or cost.
The new pipes work a treat though and the front hoses went on as expected. Some tweaking and I had them lined up nicely.
The next day, with bearings in hand, I cleaned the hubs up with a wire brush to remove all the rust and crust, and degreaser to remove the old grease. The faces where the rotor mounts got a thin coating of copper grease to aid removal in future.
Then it was a matter of using one of my favourite now tools, my 12 Ton press, to press the new races into the hub. Sockets of various sizes were used to drive the race into place
Of course I couldnt miss the chance for a test fit. Mmmm pretty.
Since the races were in place I packed the new bearings with grease, installed them and installed the oil seals. As per the manual, the seals were also packed with grease.
Now it was just a case of installing the lot back onto the cleaned spindle. The manual recommended some grease at the base of the spindle where the seal will run, so I did that and fit the hub with rotor attached. The rotor bolts were nipped up with the rattle gun on the bench but cant be torqued up until they are on the car as the setting is quite high.
With the hub on the spindle, the outer bearing, washer and nut can be refitted. Now its time to set the bearings. First whilst spinning the hub counter-clockwise with one hand torque the hub nut up to 27 FT LBS. Now back the nut off slowly until there is 0.025-0.076mm (0.001-0.003") end float when measured with a dial gauge.
To measure the end float you have to push and pull the rotor to its limits. I set that one in the photo to almost 0.03mm, but the photo was taken with no pull on the rotor.
Some people talk of just setting it by turning the nut "one flat back", which for one side was about correct, but the other was more than one flat which means it would have been too tight otherwise.
Just for interest, before I undid the nut originally I measured the end float on both sides to see what it was set to, and there was no measurable end float at all, which means the bearings were too tight (and probably explains why the outer bearings had worn and failed as they had).
The last thing to do on the front was to torque the rotor bolts, which needed my big bar to hold the rotor from turning
And then it was a case of fitting the caliper again, making sure to bend the locking tabs back into place
Before bleeding the brakes there was still one obvious job looming over my head; the rear brake hose. I had previously inspected when I had the diff out and deemed it crap. Thankfully when I had good access two days before the hoses arrived I freed all the fixings on the hose up and made it easy to undo, since now I was doing it almost blind, and with limited space. I don't have photos of doing this because it sucked, but it looks nice and I know its a good hose now.
The old hose had seen some s
t. The rubber was still OK, but the metal fixings were quite rustedPretty
Now it was time to pump some alien juice through the system and get the air out
Thats not all though, since the car was in the air and level there was one last thing I wanted to do, and that was to try and reduce the amount of gear oil the gearbox is leaking. When I was last under the car it certainly looked like the output seal on the gearbox was leaking, so thats where I started.
I ordered a seal ages ago from the UK with a shipment of other parts, but it was a matter of actually accessing the thing. Being a space frame there isnt a lot of freedom to access things like the gearbox, but I worked out I should have enough space and just went for it.
The first thing to do was to disconnect the driveshaft from the diff and slide it back to remove it from the back of the gearbox. Once it was free I slid it back as far as I could, up over the diff and out of the way.
Now I could see the back of the gearbox, with the seal in question. Might be some oil here.
Getting it out was a mission. First I tried a bunch of prybars and screwdrivers to lever it out, but got nowhere. In the end I went out and purchased a proper seal puller, and it took a matter of seconds to pop the seal out.
The new seal was a matter of pressing it into place by hand and then using a socket and hammer tapping it into place. There isnt a lot of room to swing a hammer, but a few careful whacks got it there
You can see how little space I have to work with here. Its right above the cross brace, and surrounded by tubes.
But with the new seal in place the end of the driveshaft got lubricated and refitted into the gearbox, and onto the diff again.
Since I didn't know how much had leaked out (it looked like a lot on the trays under the car) I drained and refilled the gearbox. I could've saved myself about $40 though, as it was only about 100ml low, so could have been topped up instead, but at least now I know its full.
I'll keep monitoring the gearbox, but for now it seems to be holding fluid better than it was. Its a British car though, so it wont be perfect.
With all that work done the only thing left to do was to take the car for a thrash bed in the new rotors with some hard stops. The brakes seem to work as good as they did, so thats a good sign I guess.
Good excuse to take some photos too
Shes looking pretty good now, and driving great. British Car Day at Trentham is in a couple of weeks, so with a quick waterless wash she will be on show again there this year, where hopefully someone will fall in love and pay me good money to drive her away.
bolidemichael said:
Thanks for taking the time once again to write such an accessible and comprehensive post, it makes it very enjoyable to read.
I have a couple of questions (as per usual )
)
- why didn't you capture the gearbox oil and re-use it, rather than replacing the lot?
- with regards to British cars... it is really a case of 'whack-a-mole' with regards to leaks, as a result of poor componentry, or it is simply the case that the more you replace (properly), the fewer leaks will occur?
To be honest I didn't capture it as I was expecting the fluid to be quite low, thus working harder so quite dirty. I didn't expect that it would still be almost full and in good shape.I have a couple of questions (as per usual
)- why didn't you capture the gearbox oil and re-use it, rather than replacing the lot?
- with regards to British cars... it is really a case of 'whack-a-mole' with regards to leaks, as a result of poor componentry, or it is simply the case that the more you replace (properly), the fewer leaks will occur?
I presume the cars came from the factory with no leaks, though that might be a bit optimistic for a TVR, so if you take the time to replace all seals on everything one would think it might stop leaking at some point. It just seems to be the norm that British cars leak oil, whether its average tolerances or cheap gaskets, who knows. It is still 40 years old afterall. The goal is to reduce the leak to be less dramatic with less risk of running low.
MarkwG said:
I was told they never leak - they mark their territory 
Lol, that's what my old Vitesse did when we bought this house. Had to pull it into the garage to make sure the driveway and garage were suitable before making an offer. Drove the car out again and sure enough, a small circle of oil where the car had been. Had to buy the house then, the car told me so.TVR got another nice waterless wash with Carpro Ech2o ahead of British Car Day tomorrow. I like this stuff a lot. Easy to work with, no scratching, and shines well. I wouldnt want to use it on a properly dirty car, but this car is mostly just dusty from the floorboards above it and a small amount of driving.

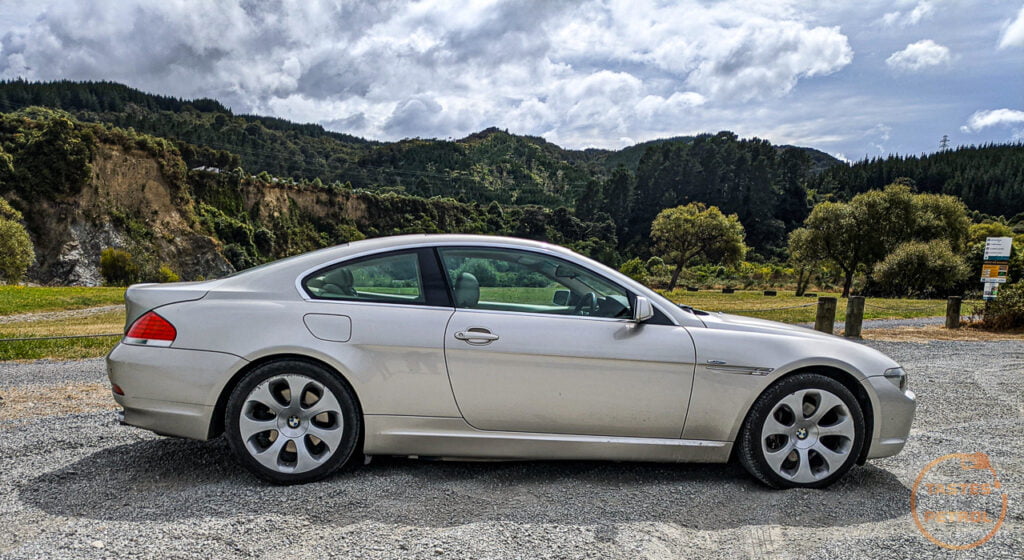
Well, love it or hate it I now own a BMW 650i. Its with a somewhat heavy heart I said goodbye to the TVR but it needed to be done. I cant just keep it tucked up in the garage not being used, and with the Marina i need the space and money. The offers I had on the TVR were just a waste of time and people were happy to contact me, ask me a bunch of questions, and then either ghost me or offer me way below my asking price. Only one person bothered to view and they were viewing on behalf of someone that ended up buying an SR20 powered Lotus 7 rep.
This was a straight trade and a strategic move as the market will be bigger, so once I give it a good clean up, replace a couple of things it needs, and give it a service it will be ready for sale and hopefully sells reasonably well. It runs and drives great, and doesnt seem to be afflicted by the usual engine or trans issues these have.


Its a giant barge this thing. Makes the TVR look tiny.

This was a straight trade and a strategic move as the market will be bigger, so once I give it a good clean up, replace a couple of things it needs, and give it a service it will be ready for sale and hopefully sells reasonably well. It runs and drives great, and doesnt seem to be afflicted by the usual engine or trans issues these have.
Its a giant barge this thing. Makes the TVR look tiny.
bolidemichael said:
I owned a 645Ci manual and whilst I willed it to be a large version of my E30, I found that it was necessary to turn off the traction in order to make the ride more playful. Swapping out the run flats is something that a lot of owners do, but I kept the RFTs as they were practical.
Oh god the traction control is so intrusive! Probably didn't help I had the narrow tyres on the rear (since swapped over but not yet driven since) but even trying to leave an intersection briskly it would bog down with the light flashing wildly in the dash. Didn't stop the rear end jumping about when corning hard over a hill though. The car feels kinda playful when you drive it hard, but its also really nice to just waft along in with minimal noise and fuss.This doesn't have runflats, but it does have cheap black circles on the wheels. More than enough to sell the car on though.
bolidemichael said:
So no thread and no titivation on this one? That's a very smart tactical move in that case, as you say.
Did you advertise the wedge as for sale or exchange? The new owner has inherited one well sorted TVR!
Hopefully no thread. If there is a thread it means its turned into a lemon and now a "project" O_ODid you advertise the wedge as for sale or exchange? The new owner has inherited one well sorted TVR!
It needs some minor work, like new badges (because a previous owner changed them to horrible fake silver carbon badges and now they're discoloured and bubbling. $70NZD for the rear badge!!), new windscreen rubber surround because its perished and missing bits, and a damn good clean because it's festy. There will be a couple of updates on my site about it, but no thread here because it'd end up being about 2 posts long (hopefully).
Wedge was listed for sale with no real bites, so extended it to trades for "something interesting like an MGB GT" and ended up with this. Its a very well sorted TVR but im a little worried the owner doesn't have the skills to maintain a classic TVR, but oh well, its done now. Probably see it for sale again soon, where it'll sell.
bolidemichael said:
You may as well continue to update this thread in that case and close the circle!
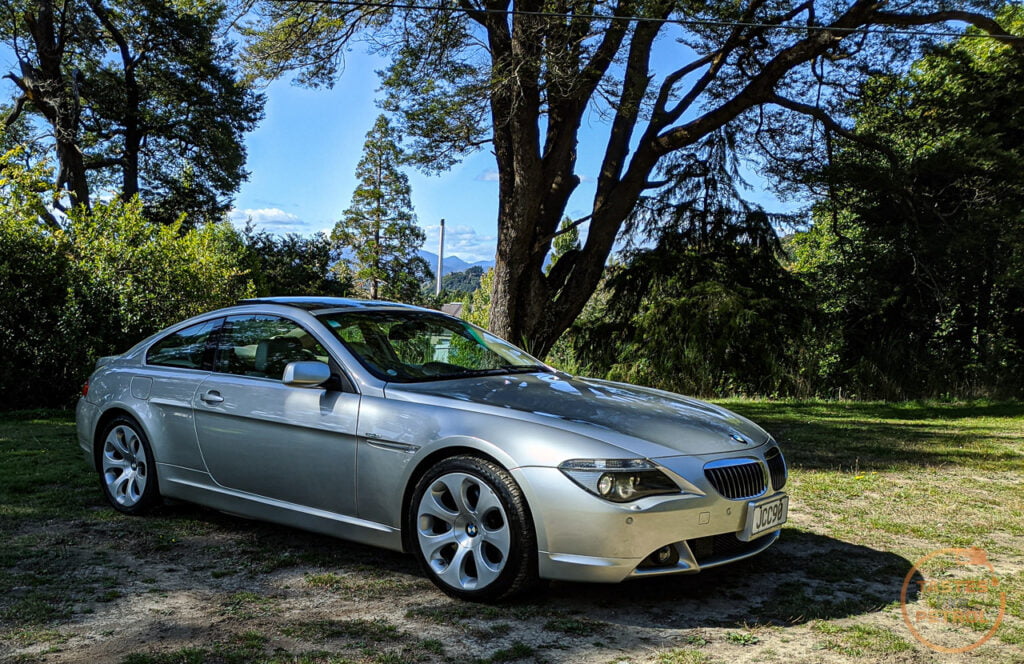
As requested.Well, it's been a little while in the making but the BMW is finally ready for its time in the spotlight.
I alluded to the BMW not being all roses in my TVR Finale post, and I wasn't kidding. Before getting to the issues, what is the car?
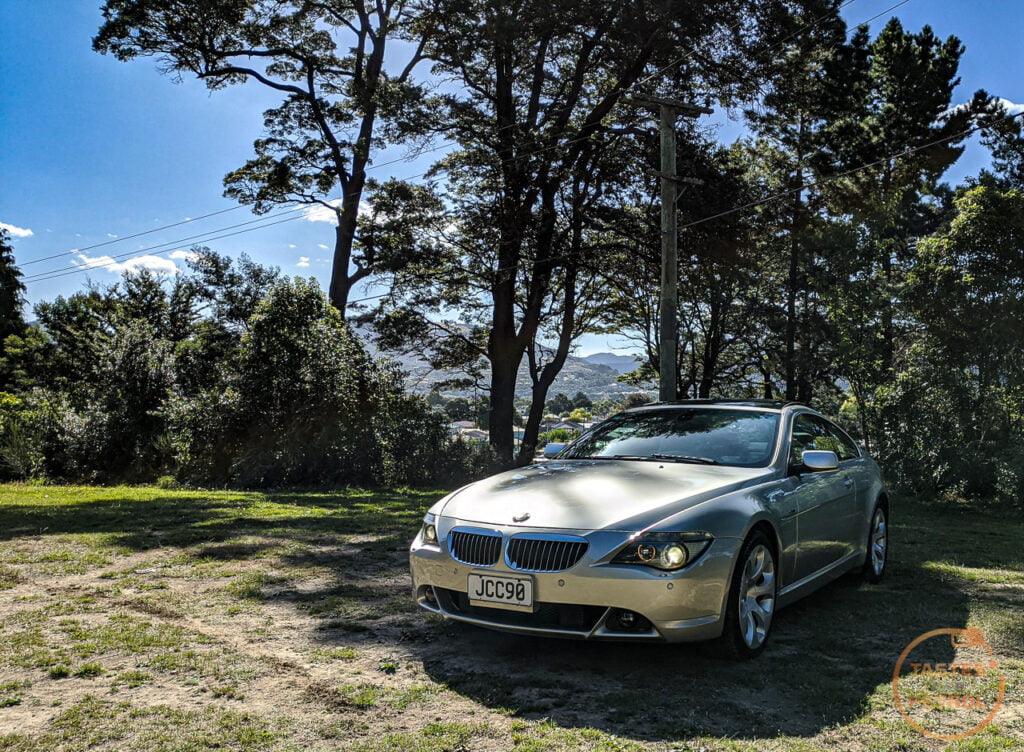
Its a 2007 BMW 650i, of the E63 chassis range. It has a 360HP 4.8L V8 engine, a 6-speed tip-tronic auto and puts that power to the rear wheels.
It's pretty well equipped, as you expect a top-spec 6 Series to be. They were expensive cars in their day.
Cruise Control
Adaptive xenon headlights (turn with the steering wheel to follow corners)
Dynamic Drive (hydraulic anti-roll bars to keep the car flat when cornering)
Active Steering (Light and quick when parking, but weighs up at speed or at the press of a button)
Panoramic Glass Roof
Electric Memory Seats
Park Distance Control (front and rear)
Automatic lights and wipers
AUX and CD changer
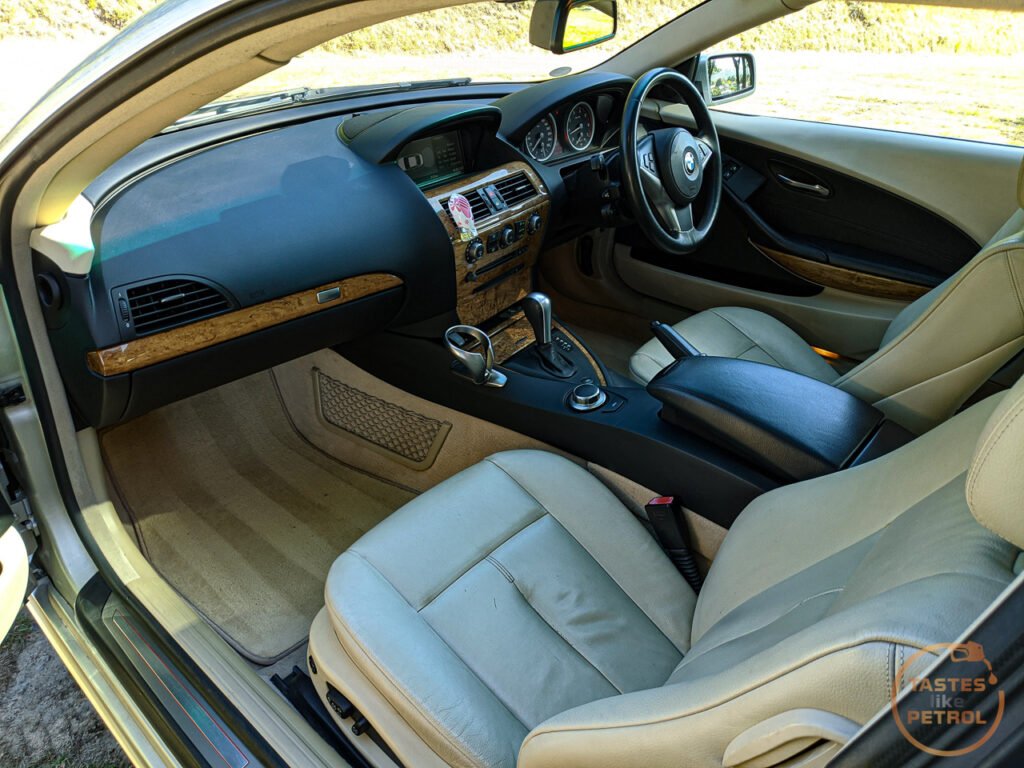
This one is painted in Mineral Silver, and has a "creambeige" Dakota leather interior.
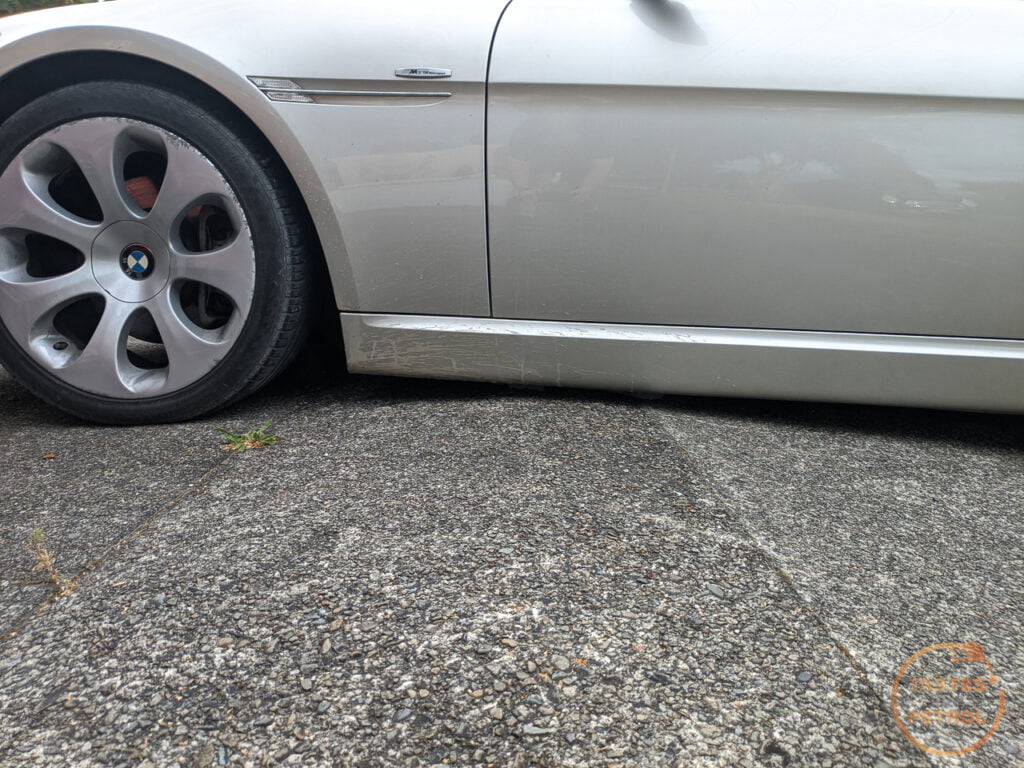
From the moment I got the car home, I started to make a list of issues. The first, and biggest, was the fact that the front and rear tyres had been swapped around. On a normal car like the Corolla or Fit, this wouldn't really matter, but on the BMW it has staggered wheels and tyres.
The front wheels are 8.5" wide and run 245 width tyres, whilst the rears are half an inch wider at 9" and run much wider 275 width tyres. This meant the front suddenly had all the grip, and the rear was a bit on the slippery side. The poor traction/stability control was working hard to keep it all under control.
The previous owner didn't even notice until it was mentioned at the WOF just before he drove the car down to meet with me. I'm guessing someone tried to rotate the tyres at some point and didn't realise they were staggered.
Swapping them over was easy enough. Up on the Quickjacks, remove the center caps, and remove and swap the wheels over. Done.
She's a big girl though, since the Quickjacks move the car backwards when lifting it only just cleared the garage door. It's hard to tell in this photo but the bumper is outside the garage.
The front brakes are the biggest of any cars I've owned. They are simply HUGE. Hand for scale.

And old TVR front rotor for a laugh. Its slightly bigger than the center hat of the BMW rotor
Guess you need big rotors to slow this Autobahn stormer down from maximum velocity.
With the wheels around the right way, it finally made a bit more sense. The car was controllable when accelerating, especially if you threw cornering into the mix.
It also looked a bit less weird as the rear wheels were too wide for the front guards

It's lower than it looks. Scrapes a little at the breakover of my driveway
The long wheelbase won't help. The 650i is 30cm longer overall than my old E91 wagon, and the wheelbase is 2cm longer in the 650i.
So what else is wrong with it?
Well,
It needs an oil change (overdue based on the OBC and black on the dipstick). Thankfully so far during testing, it hasn't shown any signs of the N62 valve stem seal issue though; no smoking.
The rest is cosmetic;
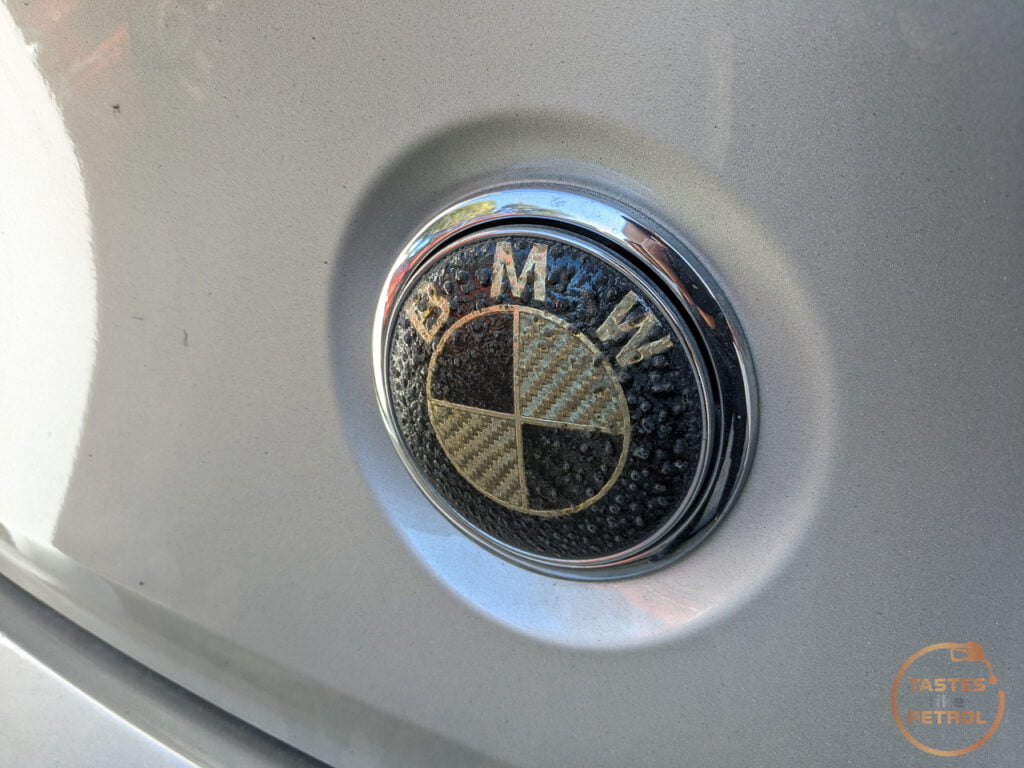
The front and rear roundels are aftermarket and have some sort of growth going on

The fake ///M badge on the boot is doing the same

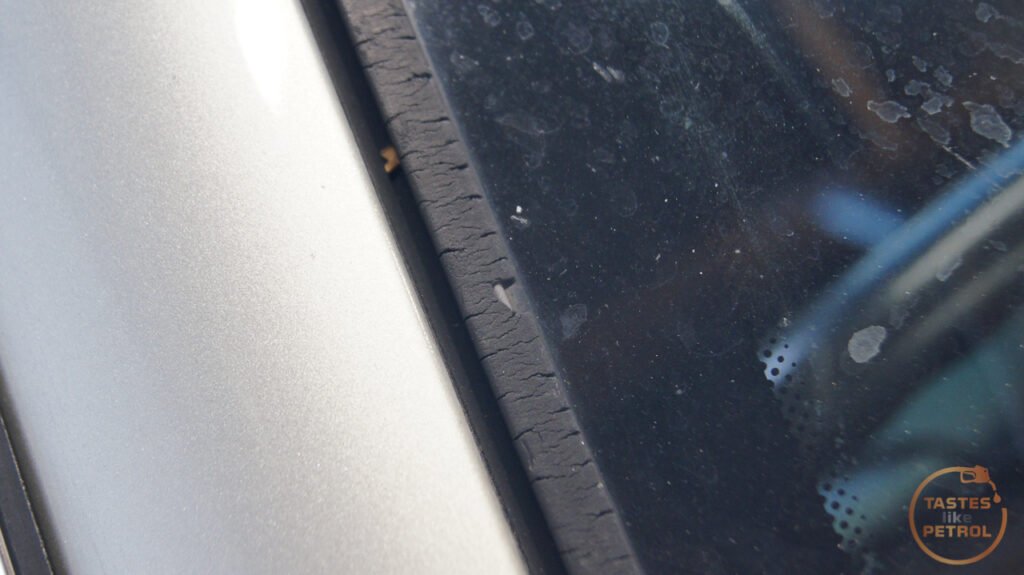
The trim around the windscreen is perished and falling to bits

And it generally just needs a damn good clean because the light interior leaves nowhere to hide
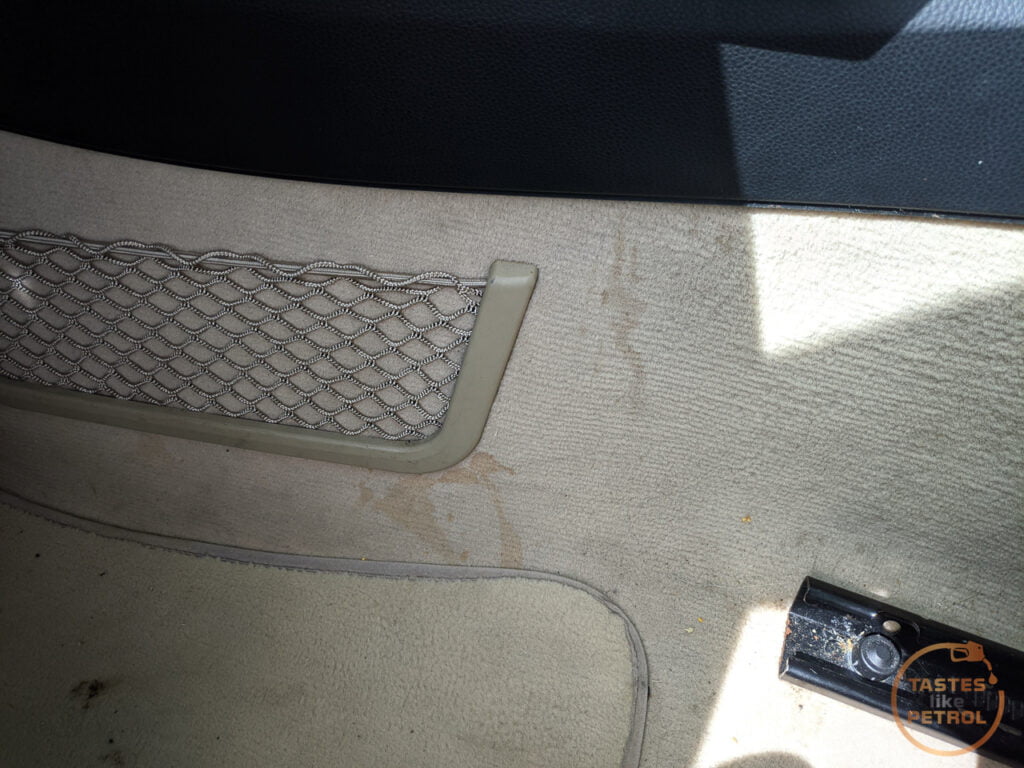
That's from this stupid junk idea of a cup holder. Yes, this thing is factory, and it was a very expensive option at that. It holds cups really well but has no way to stop any leaks/dribbles from going all over the carpet.


The exterior was covered in a thick coating of bugs from its travels south.
One of the first fixes to the interior was a free and easy one. Remove the roundel that someone has stuck onto the top of the i-Drive knob.

This came off easily with no damage, and little did I know that, unlike the E91 which has a similar knob, the E63 has leather on top of the button, but just silver plastic. Luxury!

Why anyone would cover that, who knows.
At this point, I took some photos of the car. Still filthy. I won't lie, there was something sadistically pleasing about driving around in such a big, imposing and expensive-looking BMW that was covered in dead bugs, bird poo, and mud.


It's a cool looking car. I know the Bangle Butt isn't everyone's cup of tea (and its not really mine, if I'm honest), but the front and side profiles are very good (until you get to the back). Nice sweeping curves, and a big angry front. Make no mistake, this isn't a small car.
I needed some parts to do anything else to the car, so I ordered up what I needed. The last thing I could really do in the meantime was to convert the i-Drive radio frequency from the useless JDM setting to the NZ frequency. I don't listen to the radio much, because it's usually rubbish and Spotify is better, but since the AUX in this car is all done via cable it's easier to sometimes not plug in and just have the radio as background noise.
Being that I've had a few BMWs now I still have all the software set up on a spare laptop, so I hooked that up and following this guide, I hax0rd my way in and coded the radio. It's pretty easy to do, but also very easy to mess up and brick a module.

After a couple of weeks of waiting patiently (and not watching the tracking, which took a couple of days from Dubai to NZ and then almost two weeks of sitting in AKL before finally being left on my front doorstep in full view of a busy street, beneath a "do not leave parcels here" sign. Sigh) the parts arrived.
First up was to change the oil. This was harder than expected. Both because the engine is set so far back that if the car is on ramps you need to reach waaaay back, and secondly, because some monkey before me had over tightened everything.
Slowly eased the big girl up the ramps

This is the small panel you remove to access the drain plug and filter housing.

You don't think about it, but the drain plug and filter are at the very back of the engine, so they are almost behind the front wheel line, which makes it miles away from the front of the car. In hindsight, I would use the Quickjack next time.
No photos of this process because it was messy. Usually, you can remove a drain plug on the bottom of the filter housing and drain that before removal, but someone had over tightened and stripped that, so I had to remove the filter housing with it full of oil.
This guide is pretty good at showing how the job is done
https://youtu.be/woTGvS8eyiY
Strangely despite having the i-Drive oil level check, my engine also has a dip stick.


Next was to clean the cabin filter drains. I had previously cleaned the top drains when I got the car, since I knew it would be living outside, and they had quite a few leaves in them
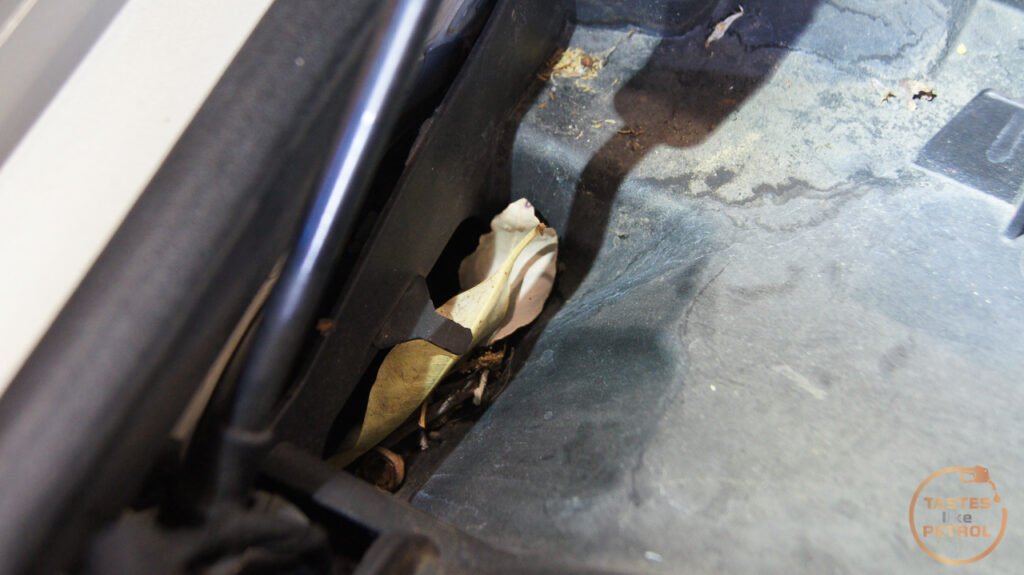
I didn't remove the trays under the filters though, and I had read that the drain under the brake master cylinder can block and cause water to back up and eventually flow into the cabin. Thankfully I haven't seen any leaks, but I wanted to check anyway.
The cabin filter housings are held in with a 13mm plastic nut and a metal clip. Undo the clip and turn the plastic nut about 90 degrees counterclockwise to free the housing.
Remove the housing (or place the RH side one with the sensors on it carefully on top of the engine) and you will have the trays and top drains

There is a small plastic cover over the drains. This just lifts out
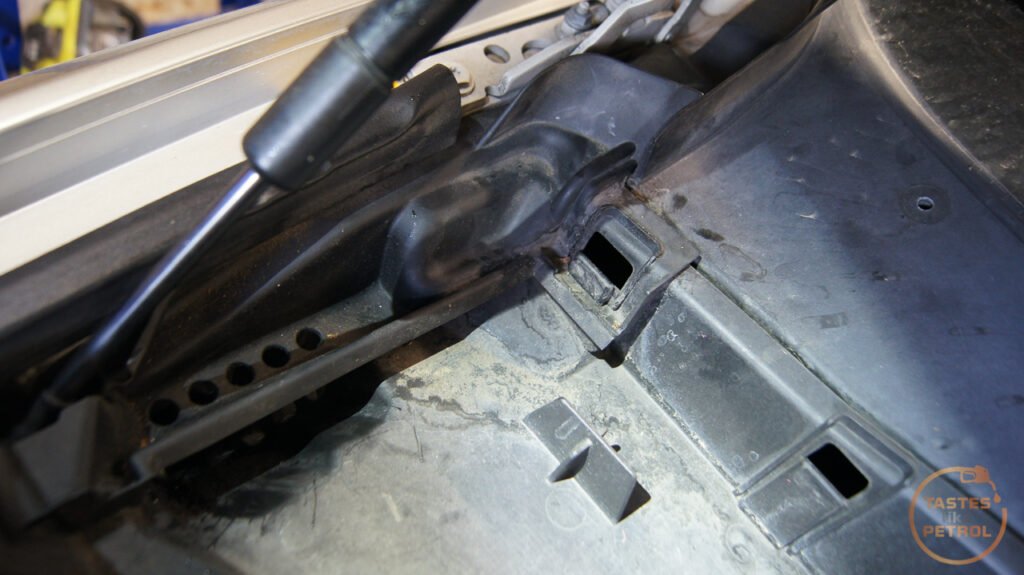
The trays are held in more of those 13mm plastic nuts, as well as a torx screw each. Torx screw is removed in the photo below.
You also need to remove the rubber seal from the front, which just pulls off, and then this weird joiner which has a tab on the top you lift whilst sliding the contraption to the LH side of the car


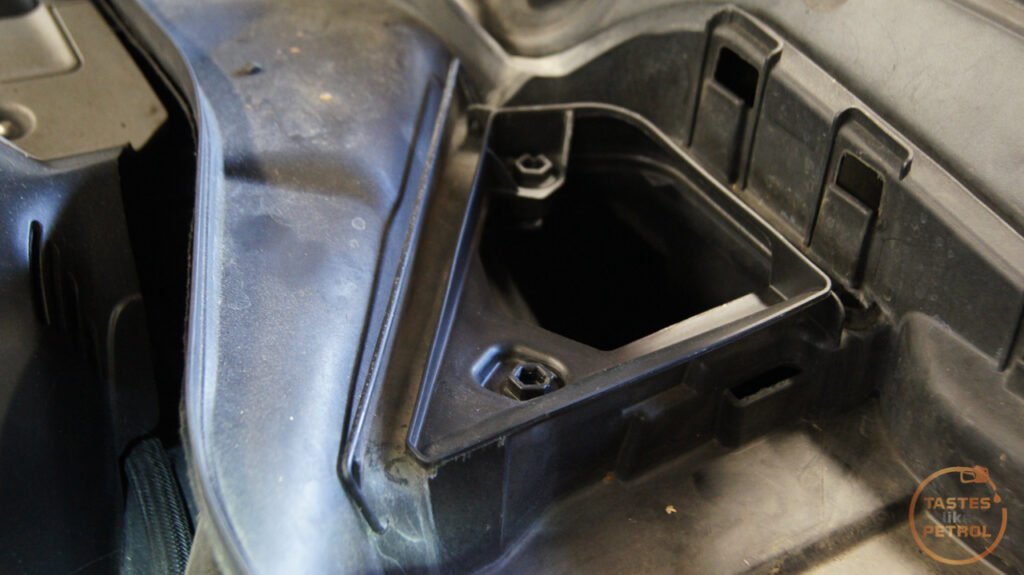
There is another 13mm plastic nut under that thing, and then the trays lift out to expose the DME box, and the brake master cylinder.
Its hard to see, but there was a couple of mm water sitting in the bottom of this compartment. The drain, which is under the brake master, was blocked and not flowing water.

I tried a few things to clear the drain, but nothing worked, so in the end, I shoved a big flatblade screwdriver into the drain and pushed until the rubber tube pushed through, and suddenly all the water drained out. It drains out into the space behind the arch liner, so if I took that off I could retrieve the tube, but it'll be fine for now. The water can just freely bugger off like its meant to.

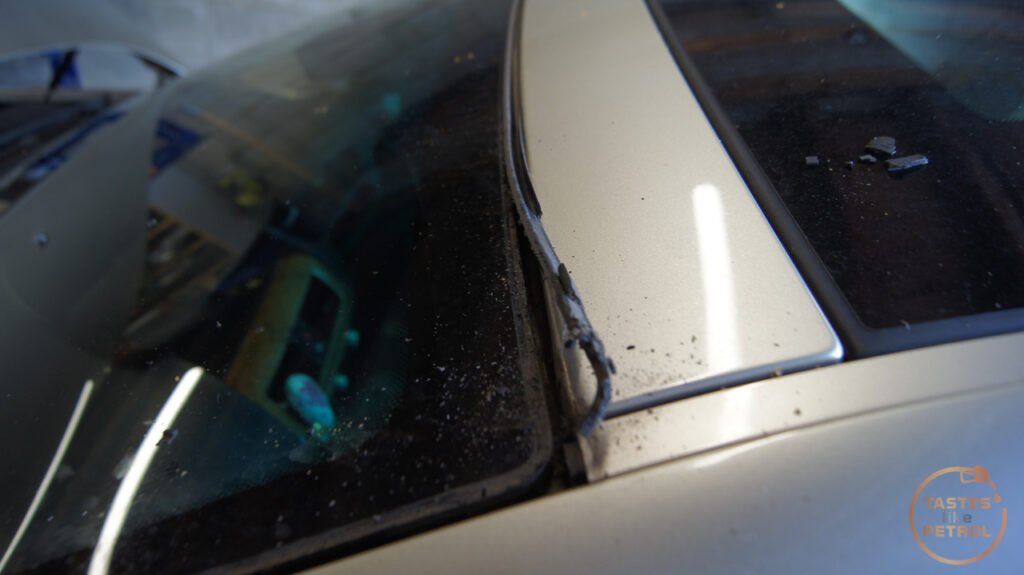
With all the drains cleared I reassembled and moved onto the next job, which was to replace the windscreen trim/seal.
I watched a few videos on how to do this, but really it's as simple as pulling the old one out and pressing the new one in. The old seal will have a metal section inside it, so pliers can help remove it. Be super careful using any metal tools around the glass as the exposed edges of the glass are the weakest part.
A lot of people started at the top corners, but I started at the bottom, grabbing the strip and pulling it up. Once you get to the top corners it will tear away since there is no metal backing there. The thing to know is that the metal in the trim clips around and under the windscreen glass.
The top strip was a little harder to get started but with needle nose pliers and using the trim tool as leverage, I pried the trim out.

Vacuum up all the broken rubber that will be everywhere, and then carefully clean the dirt out of the channel the trim sits in. With it clean, you want to lubricate the trim and body/glass with lots of window cleaner and press the seal in by hand.
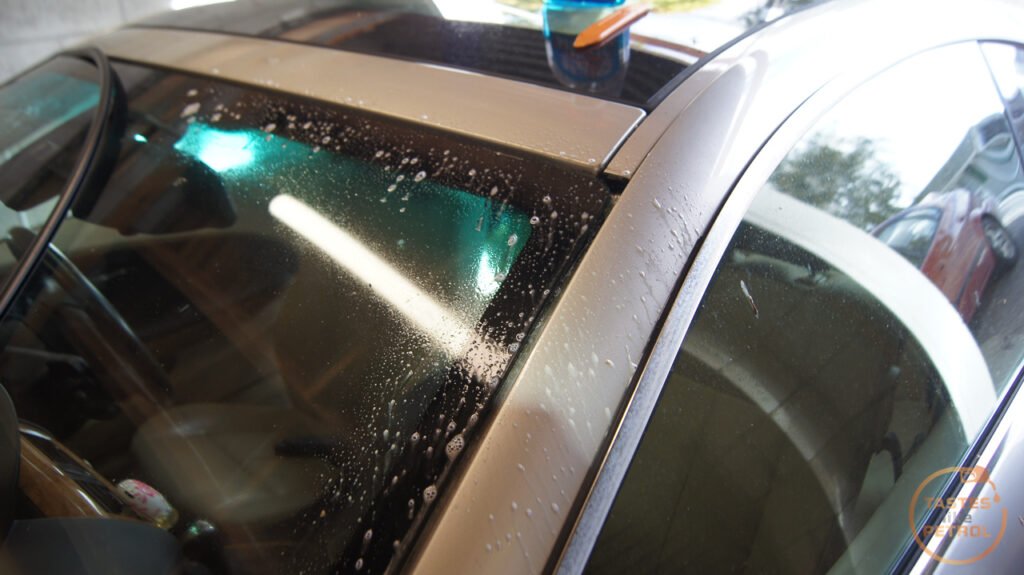
Remember there is a C shape to it that needs to hook under the glass. I started at one top corner, worked my way down that pillar, and then loosely went across the top (just to make both corners reach without having the trim arching in the middle) to the other corner and pressed that and that A-pillar into place before pressing the top section in properly. Its a bit fiddly, but not hard to do. It is hard on your fingers though!
Down the A pillars there needs to be a gap down the middle of the trim, and it needs to seat under the glass properly. I found using a flat trim tool worked well just by inserting it into the gap and pushing and pulling the tool back and forward a bit, moving up and down the pillar until the trim is in place.

The difference the new trim makes though, phew, its good.


Better than the old ruined one

With the new trim in place, everything got a clean. Starting with under the bonnet. I used some 303 Aerospace Protectant here, which gives the trim a nice look without being too glossy and wet like silicone does.

The stainless trim around the side windows is tarnished, So I gave that a quick buff using PlastX and a foam ball on the drill. I didn't want to go too hard here as I didn't want to risk damage to the trim. This took the top layer of oxidisation off. Left is before, right is after.

Surprisingly, the grilles were really tarnished too, so they got a good buff by hand. RH side done.

Half/half.

Whats the point in giant chrome grilles if you cant blind everyone?

And finally, the front roundel. The old one was held on with some weak as tape and pulled off easily. I cleaned it up and inserted the new grommets to hold the new badge in.

And a new badge. You have no idea how much of a difference this made as soon as I clipped that badge in place. My brain suddenly clicked and I felt a lot different about how the car looked from the front. That old badge really ruined the look. I think a big part of it was that the old badge had no gloss.

New and old. Ugh.

Oh yeah, one last bit before I backed the car out to clean it. The shifter knob. The old one has an exclusive chrome finish, which was peeling and letting the team down. I had a rare moment of wisdom, that since the chrome ones were rare and expensive, I'd go to Pick A Part and grab one from the E90 they had there. Sure, it's silver, not chrome, but its also not peeling.
Other than the finish, they are identical. To remove them, you just press the shifter button and pull up on the knob with force.


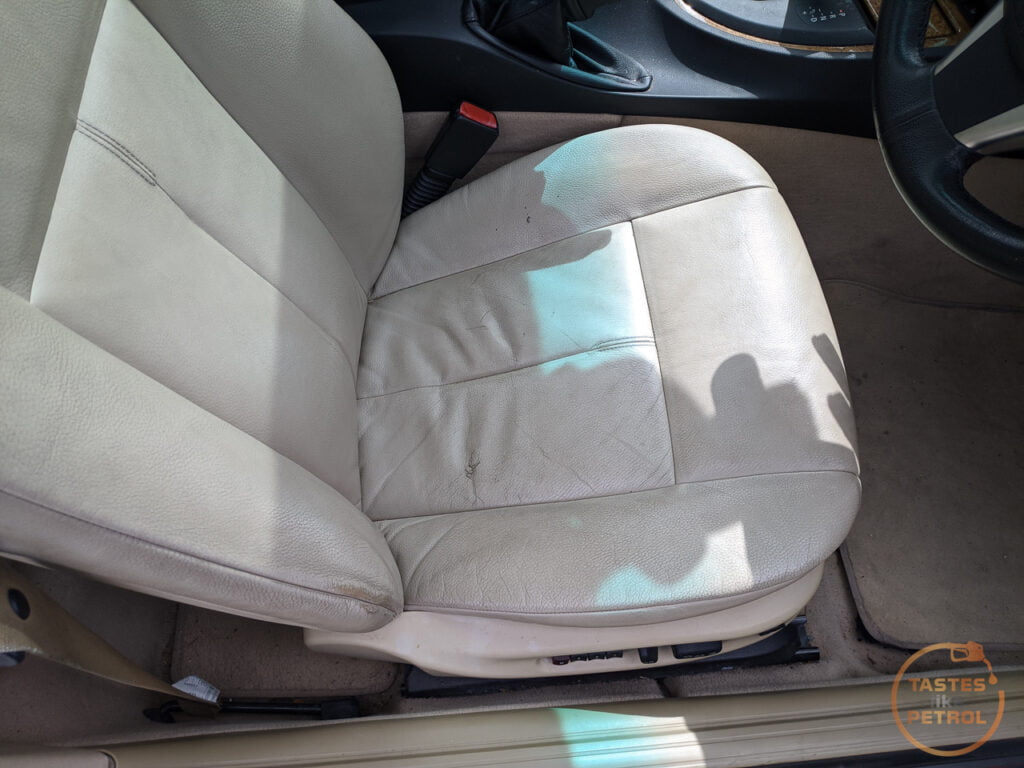
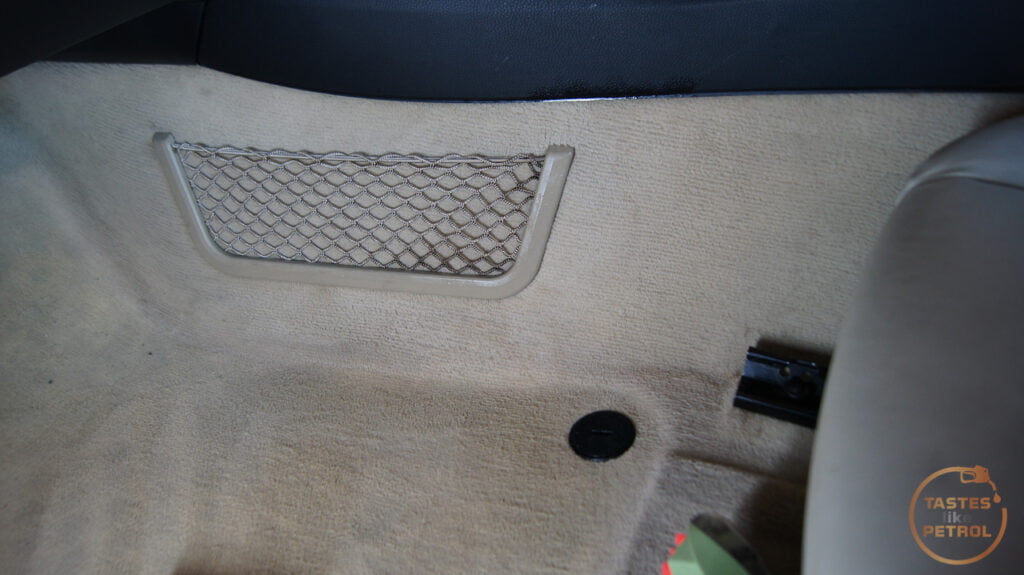
Now the car got a wash and moved back into the garage so I could clean the interior. As shown above, there was mostly just some localised grot in the footwells, and the seats had some human filth in places. The drivers door card had also had some abuse and taken a few shoes to the trim.
A good vacuum made a decent start in the foot wells

The door trim needed some hard core scrubbing with APC and a rag

It came up well though

The drivers seat was pretty grotty. I used the same cleaner and brush as I did on my old MX5 seats. The dirt was mostly in the texture of the leather.

The back is a slightly lighter colour afterwards

And you can see the two different shades on the base as a before/after

I could've worked the seat a bit more and got it a bit cleaner, but there is a fair bit of damage to the leather as it is and I didn't want to make it worse. The seat really needs a re-dye to fix it.
The floor mats got a much needed clean too. I sprayed a bunch of stain remover on these and then blasted them with the hose before using the Little Green Machine to pull the water back out. They turned out really well, even with some of that pro-detailer stripe going on.

They needed a good overnight dry near the dehumidifier to fully dry out.

The footwell carpets got a go over with the vacuum and Little Green too, especially the passengers side where coffee had been spilt on the carpet from the cup holder.
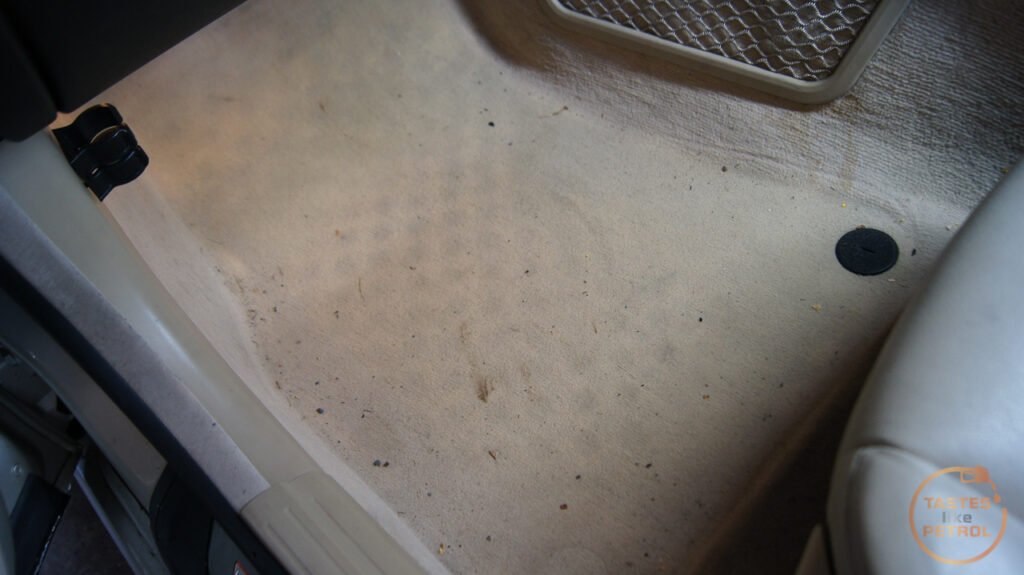

Such filth. Much clean.

Mmm, human filth juice.

That was the big bits of the carpet done. I waited until the next day to finish cleaning the interior trim, and condition the seats. The last thing for the day was to fit the new roundel sticker to the center cap ($20 for a damn sticker!). This went awol during a drive a couple of days after I got the car.

The next day (today) I gave the whole interior a good wipe down with APC, and used the brush attachment on the Dyson to get all the dirt out of the crevices, and then conditioned the seats with leather conditioner. I left this to soak into the leather whilst I worked on the exterior and then buffed it off.

One note is that the door seals have a felt sort of texture to them. Obviously this catches a bit of dust and fibres over time and discolours them. They aren't really that dirty though, they just need the fibres and dust removed. I found the easiest way to do this was to rub the trim with the palm of your hand to ball the fibres up and then pull them off. Made a big difference in a short period of time.

Since the exterior was nice and clean, but I didn't want to go the full hog and machine polish and wax it, I decided to give the Carpro Ech2o a shot. This is the waterless wash that I was using on the TVR, and I was impressed with that. I figured that since it leaves a fine ceramic coating on the surface it should help protect the paint while it lives outside until it sells. I went over the whole car; spray on, wipe off, buff off.
This left one last thing to do to the exterior; remove the ///M badge. It turns out this was easier than expected. I had the car parked in such a way that the sun was heating the badge up, and a quick prod with a trim tool soon had the s
tty badge off, just leaving the adhesive behind. The metal badge was barely attached to the adhesive.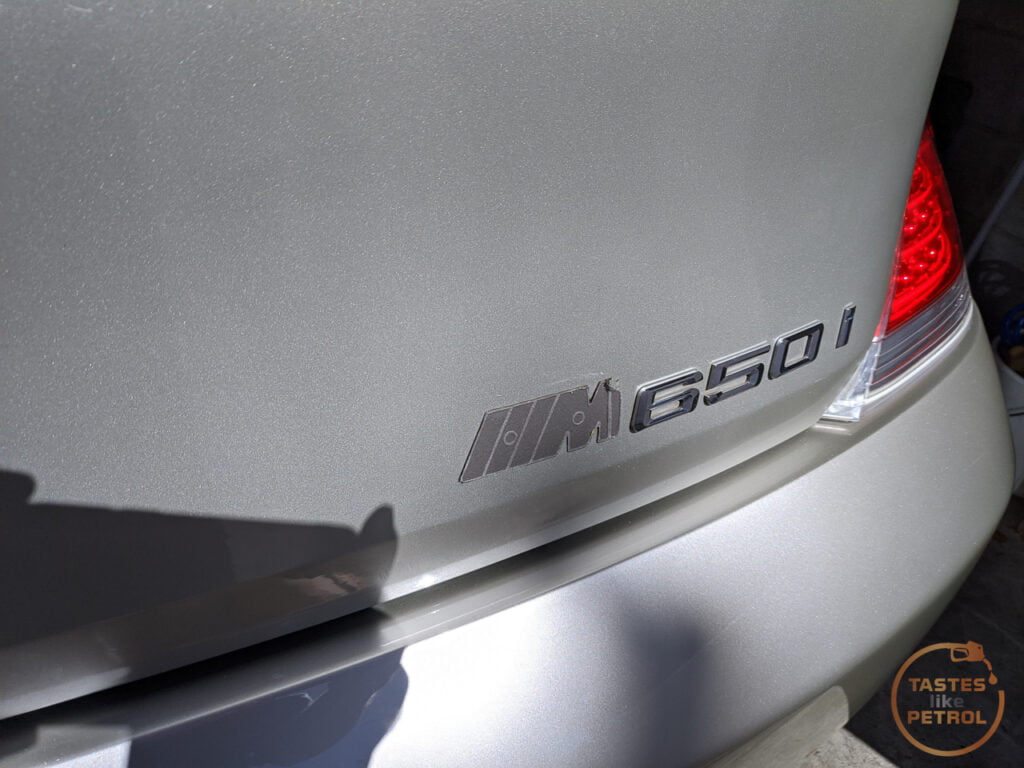
A couple more minutes of peeling and all the adhesive came off too. A wipe with Ech2o, and you'd never know that atrocity had been committed.

I still need to replace the rear roundel, but unfortunately it hasn't arrived yet.
The leather got a buff, and the mats went back in. Looking much better already.

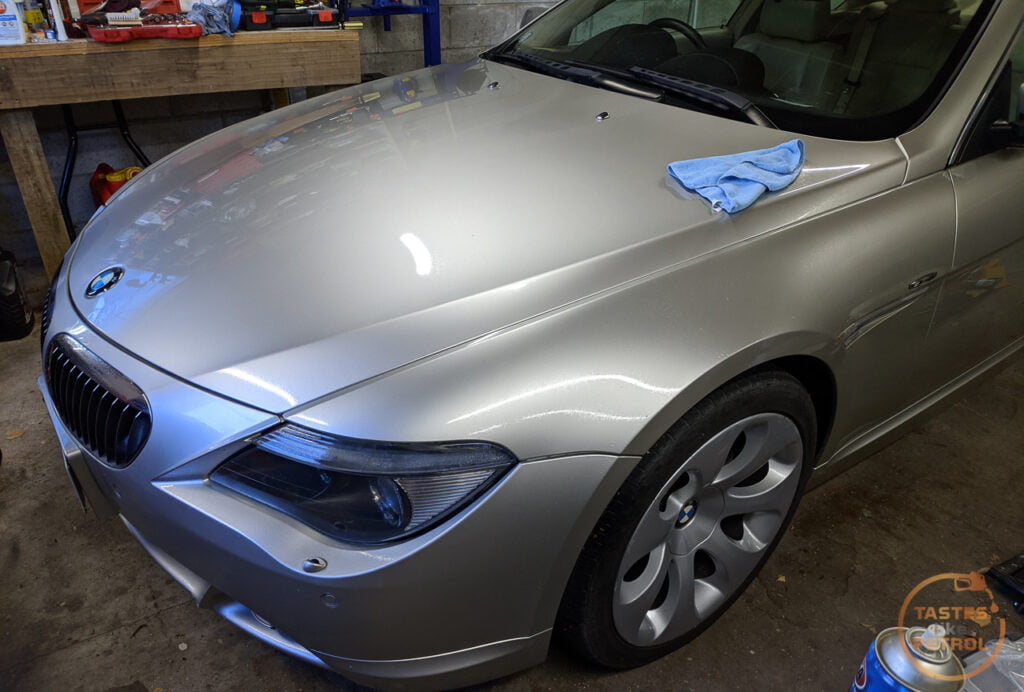
All that was left to do was to take the car out, and grab some glamour shots. So thats what I did.


I'm very impressed with the gloss and shine from the Ech2o. I'll be using that on the Honda next for sure, that poor thing is well overdue for some love.
I've advertised the car on Facebook first, and will see what happens there (nothing, I'm sure), and then will go to Trademe soon. Someone will fall in love with it, it's a properly nice car. With any luck, this will be the one and only post on this car.
bolidemichael said:
Thanks for the update; it is a nice car and so much better for the new roundels and glass rubbers. It's incredible that some buffoon switched the alloys around.
I loved to polish the exhaust tips on mine and then protect them with something like FinishKare 1000p Hi-Temp paste wax. You'll never believe how much it sets off the rear end - someone will definitely fall in love with it then, as the oval tips that are specific to the 645Ci and 650i look so good.
I did have a quick go at polishing the tips but unfortunately they seem to be tarnished or something and Autosol metal polish didn't really do much. I'm sure with some more effort they would come up better, but my supplies of effort had run out.I loved to polish the exhaust tips on mine and then protect them with something like FinishKare 1000p Hi-Temp paste wax. You'll never believe how much it sets off the rear end - someone will definitely fall in love with it then, as the oval tips that are specific to the 645Ci and 650i look so good.
bolidemichael said:
They may well be tarnished in places, particularly the inner lip, which is a pain. I did mine with a dremel (or some attachment to a drill that had the same effect). It was good enough from a few pages, which is all you need.
I'm totally buying a Bissell after your threads. However, the Little Green Machine has now been superseded. They also offer a hand held steam jet, which seems quite handy.
Did you use Aerospace 303 to both clean and polish the plastics in the engine bay?
I think the Little Green has been replaced with the SpotClean. I have a steam cleaner, but haven't actually bothered to use it for anything. I can't rave about the little green enough; anything that can save the light coloured carpet in our house from staining after my Wife spills cranberry juice on it, twice, is a win in my books.I'm totally buying a Bissell after your threads. However, the Little Green Machine has now been superseded. They also offer a hand held steam jet, which seems quite handy.
Did you use Aerospace 303 to both clean and polish the plastics in the engine bay?
I did nothing to the engine bay but spray on the 303 and wipe it around a bit. It was fairly clean to start with, just with a coating of dust. It leaves a much nicer finish than silicone and is meant to protect and treat the plastics.
Gassing Station | Readers' Cars | Top of Page | What's New | My Stuff