Another VW Golf Mk2 16v
Discussion


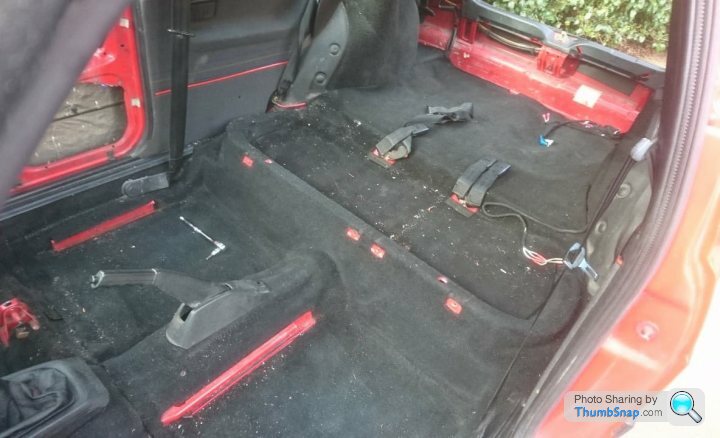
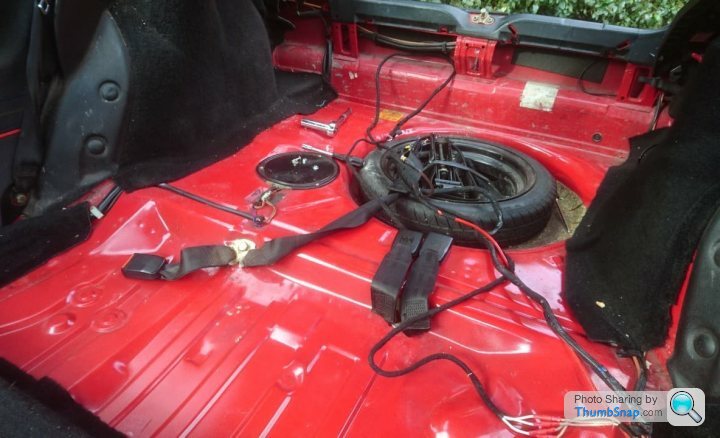
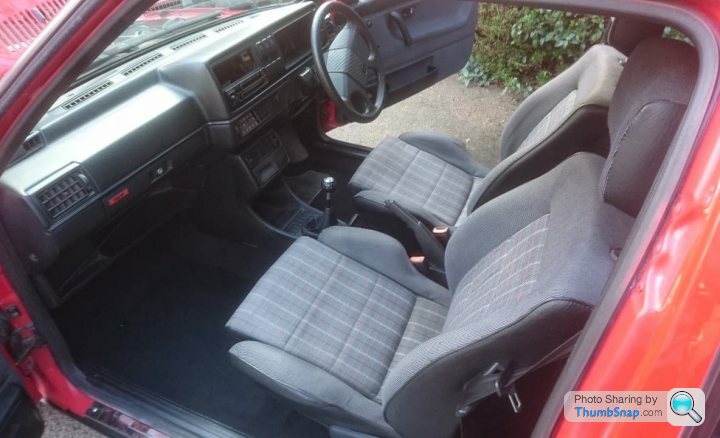
Swapped the interior today. Some might think this a retrograde step, but the seats remain really comfortable and suit the car so much better in my view. Looking pretty much stock now (except the exhaust!).
No nasty surprises within, the shell is in great condition under the carpets. Took the opportunity to give it a really good clean.
Doorcards and seats in as would have originally been fitted to the car. The only difference is the car came with a split-fold seat and the replacement is a one piece item - you can't have everything.
Really happy with the way it's looking now and I even got the old stereo in - not wired up yet though. Did pull out all the amplifier wiring and assorted cables. That was a right mess, with scotch blocks and all sorts. Will tidy that up at some point, but for now the car is looking pretty much like it did in the 1980s. Onwards we go!
Apologies for the bad phone pics, waiting for better weather to get a decent camera out.


Cheers,
Drew.
No nasty surprises within, the shell is in great condition under the carpets. Took the opportunity to give it a really good clean.
Doorcards and seats in as would have originally been fitted to the car. The only difference is the car came with a split-fold seat and the replacement is a one piece item - you can't have everything.
Really happy with the way it's looking now and I even got the old stereo in - not wired up yet though. Did pull out all the amplifier wiring and assorted cables. That was a right mess, with scotch blocks and all sorts. Will tidy that up at some point, but for now the car is looking pretty much like it did in the 1980s. Onwards we go!
Apologies for the bad phone pics, waiting for better weather to get a decent camera out.
Cheers,
Drew.
pistolpedro said:
I was never one to get too hung up on originality you should definitely go with what you like best, they're an easy cheap thing to add should you ever decide to sell / show the car in the future.
Agreed. I'm not going to be anal about it, I just want to ensure I have all the bits I need to make it 100% stock. Cheers,
Drew.
A bit more work on the old girl. We're getting there.
Spent yesterday morning fighting the with the locking wheels nuts (no key!). Pistonheads advice bang on (literally) as normal. We used the Imperial bolt technique with application of hammer. Got there in the end.
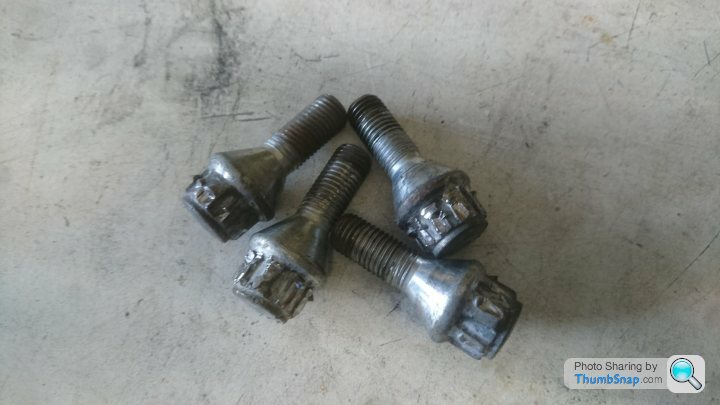
For anyone else who needs to do this. An 11/16 is the one you need.
After that, we spent a bit of time trying to figure out why the rear suspension was clonking. Identified the coilovers as "V-Maxx Autosports". Perhaps the cognescenti can comment on what these are like as a long term proposition. Right now I'm giving them 2/10 for ride, don't know about handling yet.
https://prodigymotorsport.co.uk/v-maxx-coilovers/6...
They seem to be almost brand new based on appearance. We have wound them up to their maximum height at the rear (god knows what they look like lower down!)

Took the shelves out of the way in order to access the rear shocks...

Quickly discovered the reason for the clonk. Rear lower suspension bushes were knackered. Looks like the previous owner put new coilovers in without replacing them. A bit weird. Fortunately I had spares.

Fitting is the reverse of removal etc.

The ride is a little better now, it's still very jiggly to my way of thinking, but I wonder whether these shocks have done any miles at looking at the state of them, and whether it'll just be best to give them a bit of time to settle in - though a quick look on internet reviews seem to indicate they're not great and my experience is about par for the course.
Cheers,
Drew.
Spent yesterday morning fighting the with the locking wheels nuts (no key!). Pistonheads advice bang on (literally) as normal. We used the Imperial bolt technique with application of hammer. Got there in the end.
For anyone else who needs to do this. An 11/16 is the one you need.
After that, we spent a bit of time trying to figure out why the rear suspension was clonking. Identified the coilovers as "V-Maxx Autosports". Perhaps the cognescenti can comment on what these are like as a long term proposition. Right now I'm giving them 2/10 for ride, don't know about handling yet.
https://prodigymotorsport.co.uk/v-maxx-coilovers/6...
They seem to be almost brand new based on appearance. We have wound them up to their maximum height at the rear (god knows what they look like lower down!)
Took the shelves out of the way in order to access the rear shocks...
Quickly discovered the reason for the clonk. Rear lower suspension bushes were knackered. Looks like the previous owner put new coilovers in without replacing them. A bit weird. Fortunately I had spares.
Fitting is the reverse of removal etc.
The ride is a little better now, it's still very jiggly to my way of thinking, but I wonder whether these shocks have done any miles at looking at the state of them, and whether it'll just be best to give them a bit of time to settle in - though a quick look on internet reviews seem to indicate they're not great and my experience is about par for the course.
Cheers,
Drew.
Edited by drewwa on Sunday 23 February 11:08
Investigating a few bits and pieces today, replacing wrong screws with the right ones - small detail but satisfying.
Also, delved into the speaker wiring. Turns out the original wiring for the car speakers is all in place and mostly unbutchered, which was a nice surprise. It's pre ISO connectors though, so took a while to figure out what went where.
The front pair of speakers have been replaced with a half decent set of Alpine components, but they weren't wired in for some reason. The rear pair are the original paper VW ones, but the wiring is yet to be located.
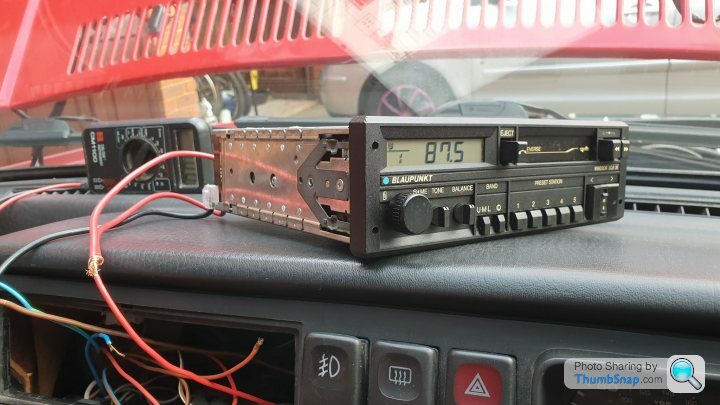
Managed to figure out the wiring for the Blaupunkt after a bit of judicious voltage and continuity checking,. This was bought in an uncertain condition from ebay, but pleased to discover that it worked and even played a cassette. Back to the 80s indeed.
The Golf mk2 doesn't have a switched live, but the Blaupunkt (unlike modern stereos) can actually be switched 'off' - very old skool.
Next step to solder everything in properly and heat shrink the wiring.
And then.... tape the TOP 40 off the radio... we can still do that, right?
Cheers,
Drew.
Also, delved into the speaker wiring. Turns out the original wiring for the car speakers is all in place and mostly unbutchered, which was a nice surprise. It's pre ISO connectors though, so took a while to figure out what went where.
The front pair of speakers have been replaced with a half decent set of Alpine components, but they weren't wired in for some reason. The rear pair are the original paper VW ones, but the wiring is yet to be located.
Managed to figure out the wiring for the Blaupunkt after a bit of judicious voltage and continuity checking,. This was bought in an uncertain condition from ebay, but pleased to discover that it worked and even played a cassette. Back to the 80s indeed.
The Golf mk2 doesn't have a switched live, but the Blaupunkt (unlike modern stereos) can actually be switched 'off' - very old skool.
Next step to solder everything in properly and heat shrink the wiring.
And then.... tape the TOP 40 off the radio... we can still do that, right?
Cheers,
Drew.
Edited by drewwa on Wednesday 18th March 17:48
Gallons Per Mile said:
You should have a switched live, I definitely did on my MK2 and that was 1987 vintage. It came with a hole in the dash where a head unit should be so I put a free cd player in and, of course, tidied the existing wiring up a bit. You may require a new ignition switch.
Interesting... I'll have more of a poke around then. I've only found a permanent live so far. My son's 88 Golf CL didn't have one that we could find either.Cheers,
Drew.
Edited by drewwa on Wednesday 18th March 19:06


A few more jobs on what has become known as "Florence" ... yes, I know. F-reg you see.
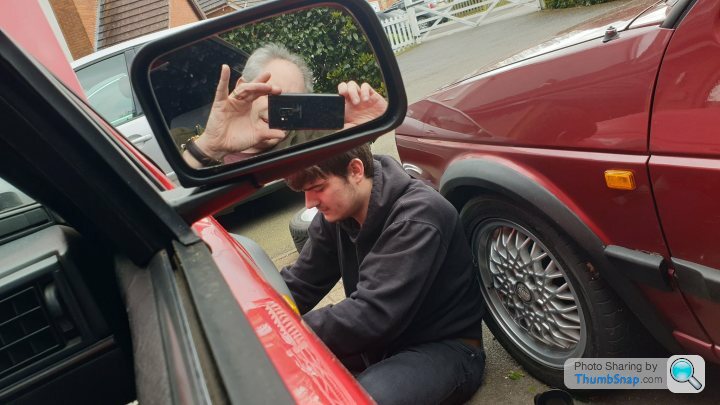
First up, brake fluid change. This was properly manky, so a good job done and flushed through with new DOT-4. I did the heavy lifting by pressing the brake pedal, whilst my son did the easy bit with the spanners.
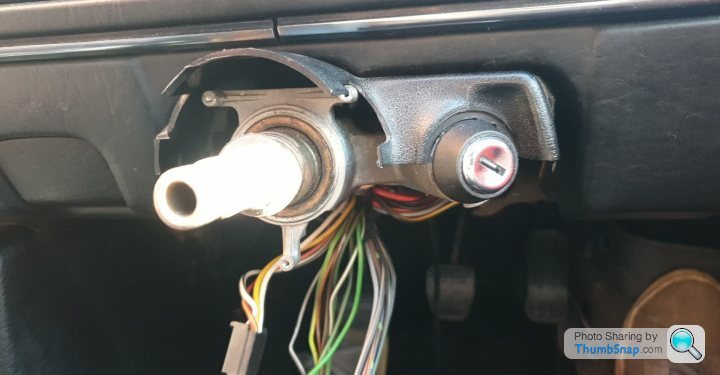
With that done we turned our attention to replacing the ignition barrel. We've already done the door locks, but it was going to be nice to have the car working from one key plus the existing ignition barrel was decidedly knackered...
... this is a horrible job on the Mk2. The ignition barrel is a spring fit and wasn't designed to be replaceable. You have to dismantle most of the electrics on the steering column to get at the barrel and you have to drill a small hole in it to 'ping' the retaining spring for the old barrel out of the way. Fitting is the reverse of removal as always.

In our travels we discovered a nice bodge.
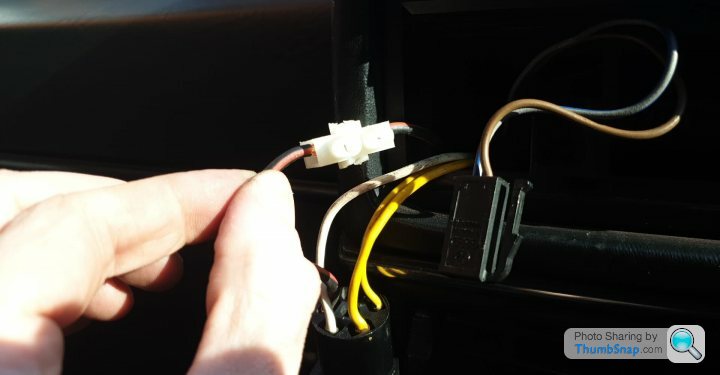
So that was fixed with the soldering iron and some shrink wrap. The rest of the wiring appears to be in good order, though a few lights are mysteriously missing from the clips in the dash... who removes the old busted lights but doesn't replace them with new? Weird.
The interior door lock pin came off in my hand too and this was traced to a broken retaining clip - on order.
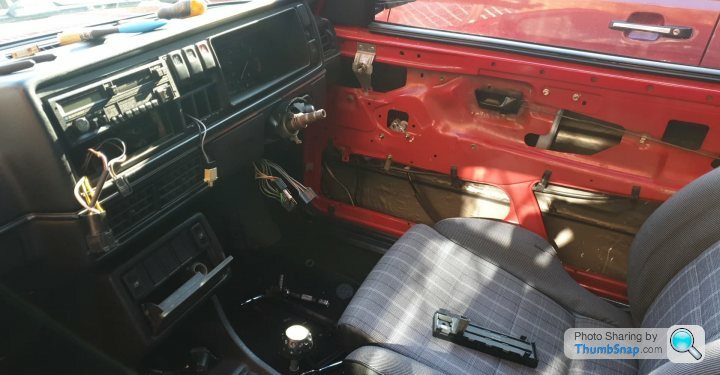
With the door card off we found that the car is fitted with (defunct at present) central locking. This appears to be factory stock and we traced a pump to the boot below the nearside rear light. Something to investigate in the future.
Just got to reassemble the dash again at some point!
Cheers,
Drew.
First up, brake fluid change. This was properly manky, so a good job done and flushed through with new DOT-4. I did the heavy lifting by pressing the brake pedal, whilst my son did the easy bit with the spanners.
With that done we turned our attention to replacing the ignition barrel. We've already done the door locks, but it was going to be nice to have the car working from one key plus the existing ignition barrel was decidedly knackered...
... this is a horrible job on the Mk2. The ignition barrel is a spring fit and wasn't designed to be replaceable. You have to dismantle most of the electrics on the steering column to get at the barrel and you have to drill a small hole in it to 'ping' the retaining spring for the old barrel out of the way. Fitting is the reverse of removal as always.
In our travels we discovered a nice bodge.
So that was fixed with the soldering iron and some shrink wrap. The rest of the wiring appears to be in good order, though a few lights are mysteriously missing from the clips in the dash... who removes the old busted lights but doesn't replace them with new? Weird.
The interior door lock pin came off in my hand too and this was traced to a broken retaining clip - on order.
With the door card off we found that the car is fitted with (defunct at present) central locking. This appears to be factory stock and we traced a pump to the boot below the nearside rear light. Something to investigate in the future.
Just got to reassemble the dash again at some point!
Cheers,
Drew.
Edited by drewwa on Tuesday 31st March 17:32
A few steps forward and one step back. Typically for an old car!
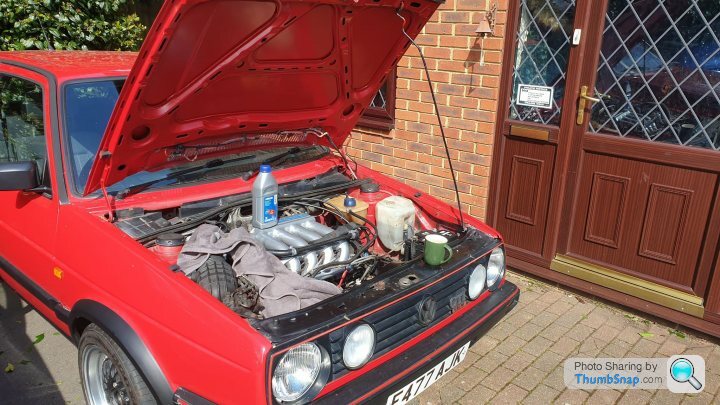
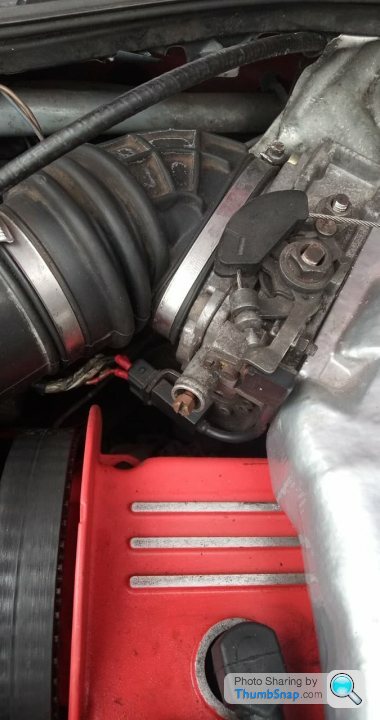
Three new sensors arrived in the post today, so we set to work plugging those in. However two of the sensors already on the car were the wrong ones and had oversized bolts, meaning that to remove them we had to take off the coolant flange and... discovered the internal o-ring had perished. Tried a bit of gasket sealant... lasted all of 5 mins.
However, it did hold together long enough for us to ascertain that the new sensors were working... the temp gauge in the dash came to life... and the car started idling way too high.
More investigations required as it seems the previous owner had bodged the idle to work with the ISV getting a duff signal from the sensor. Now the sensor is working the ISV is revving the car at 2,000 rpm from cold - confirmed by unplugging the ISV.
Online searching reveals setting the idle on the 16v is a bit involved, so research is ongoing. We probably need to check the timing is good as well.
We can't run the car until a new o-ring appears (probably saturday) so going to turn our attention back to the interior (part for the door pull arrived).
One small bonus is that we managed to get the lower valance plastic trim for both of our Golfs for £7.50 each (genuine VW part) when the pattern part was listed for £27.50. Not quite sure how that happened, but not arguing!
Edited by drewwa on Wednesday 1st April 21:45
We're making progress!
Managed to seal up the coolant system, topped up with water and fired the old girl up.
She runs!
Timing was off, set at 4 degrees, so we adjusted to 6. Idling smoothly now and throttle response much improved.

We also have a working temperature gauge now that the car has the right sensors. Coolant system seems good and the fan is cutting in and out as expected.

Cheers,
Drew.
Managed to seal up the coolant system, topped up with water and fired the old girl up.
She runs!
Timing was off, set at 4 degrees, so we adjusted to 6. Idling smoothly now and throttle response much improved.
We also have a working temperature gauge now that the car has the right sensors. Coolant system seems good and the fan is cutting in and out as expected.
Cheers,
Drew.
Yep. The timing mark on the crank pulley is clear and visible and we did disconnect the red wire from the coil.
Even more progress, we've just managed to fix the central locking too. Both doors now lock and unlock on the key... though the boot doesn't as yet. Pretty pleased thus far! Dismantled the plastic scuttle tray and gave that a good clean out. Ticking off the bits one by one!
Cheers,
Drew.
Even more progress, we've just managed to fix the central locking too. Both doors now lock and unlock on the key... though the boot doesn't as yet. Pretty pleased thus far! Dismantled the plastic scuttle tray and gave that a good clean out. Ticking off the bits one by one!
Cheers,
Drew.
Edited by drewwa on Monday 6th April 18:17
Defintely will check the fuel next. Interesting note on extra advance too! I will investigate the WUR as it may be causing another problem...
Yesterday we had one of those "backward" days.
Buoyed by our success on Monday we confidently went out to the car today, plugged in the battery and went to start it. It churned, over and over again, but refused to catch. Looking a bit puzzled we went over everything we had tweaked in case we hadn't put something back together properly. Everything was secure. Checked dizzy, ECU, sensors, connectors, vacuum hoses... everything. Nothing was wrong.
Sat back and thought about it for a moment.
Used the light gun to check for a spark at each of the leads. All working. Popped the dizzy off to look at the insides. All good. Checked the fuel pump and ISV were buzzing as expected. All good. Checked earth straps. All good.
Tried again. Churn, nothing.
Popped off the inlet hoses and checked the engine was sucking air. All good. Has fuel, has spark, has air. Brewed cup of tea and glared at the car for 10 minutes a bit bemused. Popped the spark plugs out and checked for compression. All good. Examined the plugs. They were sooty (but car has only been run at idle). Then we noticed they were damp. Sniff. Petrol.
Engine flooded.
Took the fuel pump relay out and cranked the car over. Eventually it fired, ran for a few seconds and cut out.
Put the fuel pump relay back and and.... magic! Working again.
We went through various procedures, but we now think that a combination of the WUR/5th Injector is overfuelling the car at cold start, flooding the engine. With the 5th injector electrically disconnected everything is peachy, except idling high at 1,200 rpm at present.
Investigations ongoing!
Cheers,
Drew.
I will investigate the WUR as it may be causing another problem...Yesterday we had one of those "backward" days.
Buoyed by our success on Monday we confidently went out to the car today, plugged in the battery and went to start it. It churned, over and over again, but refused to catch. Looking a bit puzzled we went over everything we had tweaked in case we hadn't put something back together properly. Everything was secure. Checked dizzy, ECU, sensors, connectors, vacuum hoses... everything. Nothing was wrong.
Sat back and thought about it for a moment.
Used the light gun to check for a spark at each of the leads. All working. Popped the dizzy off to look at the insides. All good. Checked the fuel pump and ISV were buzzing as expected. All good. Checked earth straps. All good.
Tried again. Churn, nothing.
Popped off the inlet hoses and checked the engine was sucking air. All good. Has fuel, has spark, has air. Brewed cup of tea and glared at the car for 10 minutes a bit bemused. Popped the spark plugs out and checked for compression. All good. Examined the plugs. They were sooty (but car has only been run at idle). Then we noticed they were damp. Sniff. Petrol.
Engine flooded.
Took the fuel pump relay out and cranked the car over. Eventually it fired, ran for a few seconds and cut out.
Put the fuel pump relay back and and.... magic! Working again.
We went through various procedures, but we now think that a combination of the WUR/5th Injector is overfuelling the car at cold start, flooding the engine. With the 5th injector electrically disconnected everything is peachy, except idling high at 1,200 rpm at present.
Investigations ongoing!
Cheers,
Drew.
Edited by drewwa on Wednesday 8th April 10:48
Gallons Per Mile said:
Probably leaky 5th injector. Disconnect it and it might solve the problem completely.
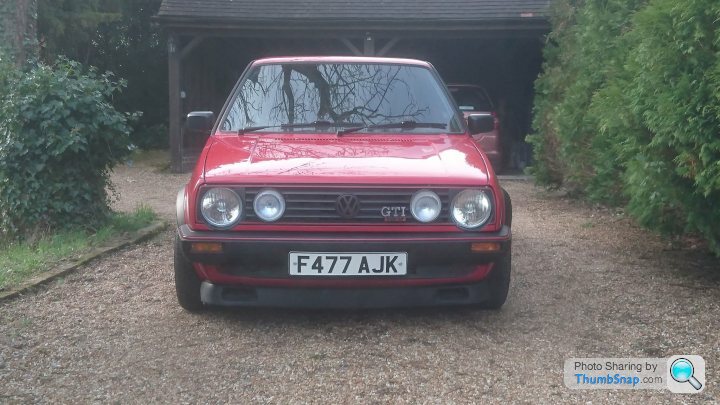
I think you're right. Started up fine this morning without it! DIdn't fancy faffing about with the engine today, so did a few cosmetic bits. New spoiler/splitter and a shiny GTI badge.
Really lifts the front end.


We also need a new 21 relay, as the original is flashing the indicators so slowly that you're wondering if they're ever going to... oh, yes, there they go.
Cheers,
Drew.
So... several steps forward and quite a few back...
New 21 relay arrived for the indicators. Easy job. Indicators flash quickly. Nice. Next up was the LCD for the MFA, which had the infamous 'bleed' problem, but appeared to still be working.
DIsmantled dashboard to get at the MFA (Multi-Function-Actuator?) LCD screen. Fiddly but got there in the end.

Managed, with quite a bit of swearing, to get the dashpod out. Two electrical connections on this early car, with the speedo drive and a vacuum pipe (presumably for the MFA MPG calculation)
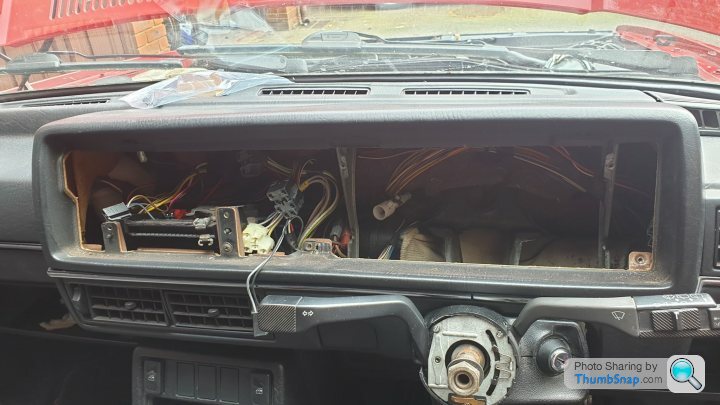
With that done, we could start dismantling the pod itself. This was also quite fiddly, with a disconcerting amount of leverage required to remove the tacho needle.
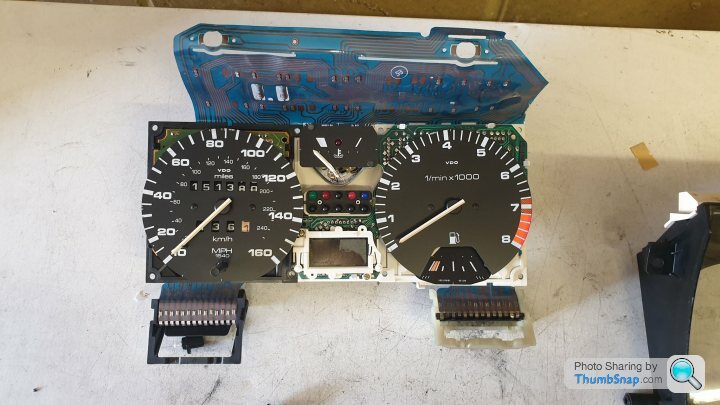
However, using two handy spoons as leverage, we managed it and got to the motherboard underneath, slowly taking it apart to get at the LCD panel itself. This is held in by two weird little rubber supports that somehow also convey the electrical signals to the LCD.

Fitting is the reverse of removal of course.
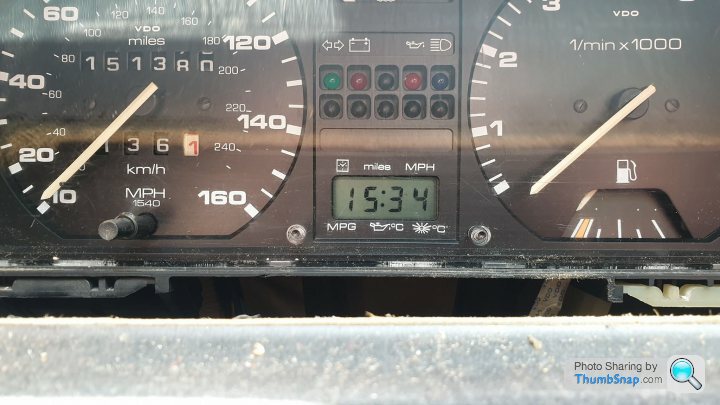
However, upon plugging the battery back in... it came to life... and even better, the controls for the MFA worked (time, distance, mpg, oil temp etc). The only one that looked a bit odd was the external temperature, the MFA thinks it's -40 outside for some reason.
So, to test that we'd put the tacho needle back in the right place we thought we'd fire up the car.
And.... nothing. Turning over... nothing.
Head scratching ensued once more. Pulled the fuel pump incase we'd flooded it... but no joy. Plugged in the timing lamp to see if we were getting a spark... and no spark. Ok, that explains why it's not running.... but why no spark?
Checked the coil. Good (It's handy having another Golf nearby to swap components over to!
Checked the TCI-H thingy (on top of the ECU). Good.
Traced wires down to the hall sender connector on the dizzy and found this...
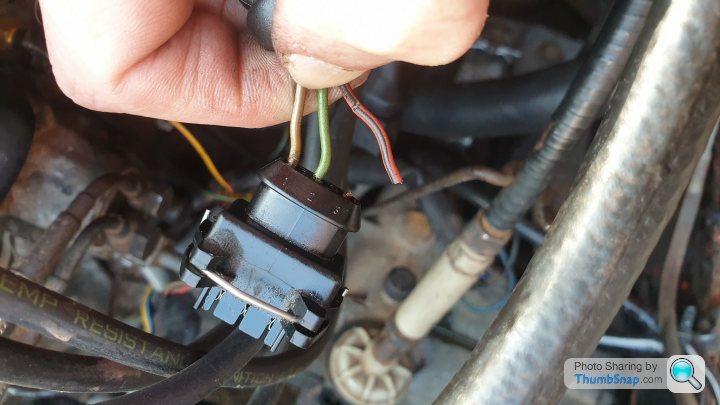
An obvious culprit, which looks like it's been waiting to happen for a while. Trick is though - how to fix this? It's broken so close to the plug housing it's impossible to get at.
Plug looks like this from head on. Any suggestions on how to pull these pins out?
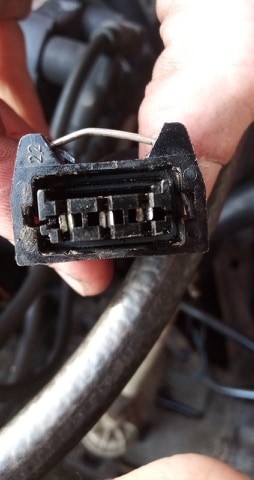
Cheers,
Drew.
New 21 relay arrived for the indicators. Easy job. Indicators flash quickly. Nice. Next up was the LCD for the MFA, which had the infamous 'bleed' problem, but appeared to still be working.
DIsmantled dashboard to get at the MFA (Multi-Function-Actuator?) LCD screen. Fiddly but got there in the end.
Managed, with quite a bit of swearing, to get the dashpod out. Two electrical connections on this early car, with the speedo drive and a vacuum pipe (presumably for the MFA MPG calculation)
With that done, we could start dismantling the pod itself. This was also quite fiddly, with a disconcerting amount of leverage required to remove the tacho needle.
However, using two handy spoons as leverage, we managed it and got to the motherboard underneath, slowly taking it apart to get at the LCD panel itself. This is held in by two weird little rubber supports that somehow also convey the electrical signals to the LCD.
Fitting is the reverse of removal of course.
However, upon plugging the battery back in... it came to life... and even better, the controls for the MFA worked (time, distance, mpg, oil temp etc). The only one that looked a bit odd was the external temperature, the MFA thinks it's -40 outside for some reason.
So, to test that we'd put the tacho needle back in the right place we thought we'd fire up the car.
And.... nothing. Turning over... nothing.
Head scratching ensued once more. Pulled the fuel pump incase we'd flooded it... but no joy. Plugged in the timing lamp to see if we were getting a spark... and no spark. Ok, that explains why it's not running.... but why no spark?
Checked the coil. Good (It's handy having another Golf nearby to swap components over to!
Checked the TCI-H thingy (on top of the ECU). Good.
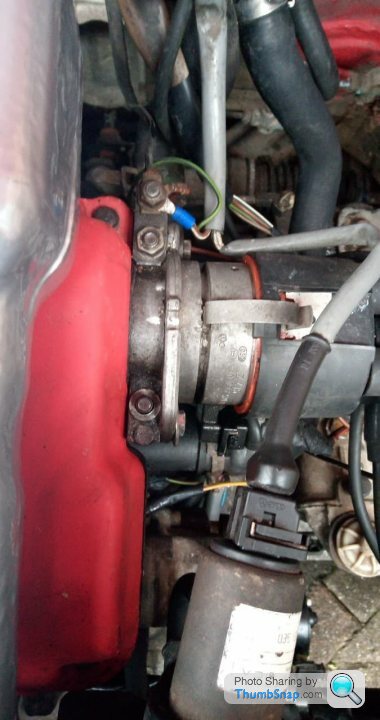
Traced wires down to the hall sender connector on the dizzy and found this...
An obvious culprit, which looks like it's been waiting to happen for a while. Trick is though - how to fix this? It's broken so close to the plug housing it's impossible to get at.
Plug looks like this from head on. Any suggestions on how to pull these pins out?
Cheers,
Drew.
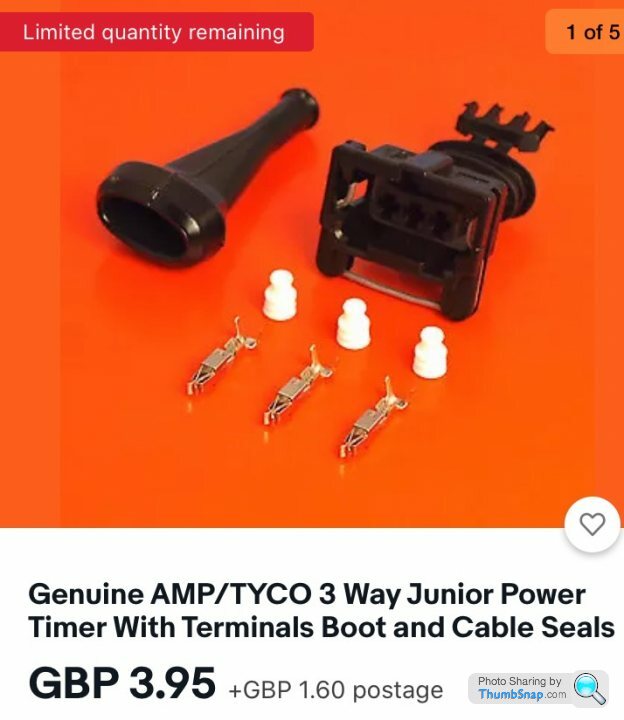
Thanks to the top tips above we were able to fix the hall sender wiring, we also found a busted earth so fixed that too.
Quick test of the hall sender followed (Ignition on, main lead to dizzy disconnected, dizzy off and turned by hand to see if you get a spark) - result!
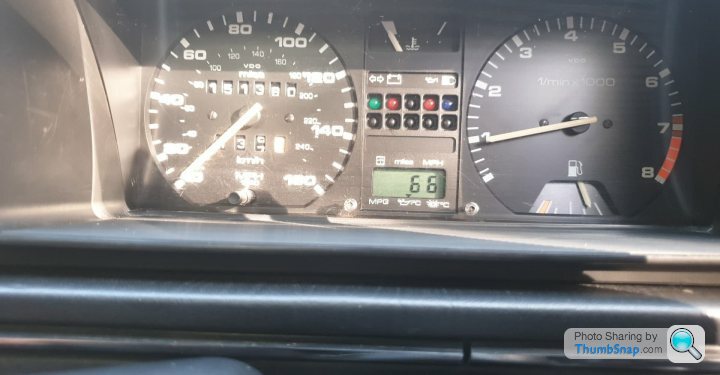
Bolted it all back up and it started! Yes. Fixed a few other bits and pieces, including the rear wiper.
Ran it up to temperature to ensure it was happy and all looks good, the MFA is now working correctly (reading both exterior temp and oil temp). We're not sure if the dash lights are working through, so will pop out later to have a look - difficult to see in the sun.
Other than replacing the front discs we're nearly ready for a run.... ah... well. Yeah...
Pretty pleased with progress now. Will reset the timing and see if we can tweak the CO2 as the engine is hunting a little at idle. We also have a sticky throttle cable to adjust. Otherwise - good to go!
Cheers,
Drew.
Quick test of the hall sender followed (Ignition on, main lead to dizzy disconnected, dizzy off and turned by hand to see if you get a spark) - result!
Bolted it all back up and it started! Yes.
Fixed a few other bits and pieces, including the rear wiper. Ran it up to temperature to ensure it was happy and all looks good, the MFA is now working correctly (reading both exterior temp and oil temp). We're not sure if the dash lights are working through, so will pop out later to have a look - difficult to see in the sun.
Other than replacing the front discs we're nearly ready for a run.... ah... well. Yeah...
Pretty pleased with progress now. Will reset the timing and see if we can tweak the CO2 as the engine is hunting a little at idle. We also have a sticky throttle cable to adjust. Otherwise - good to go!
Cheers,
Drew.
Excellent - my son's Golf needs a new one too, so we'll get a set.
Report on the dashboard illumination - there wasn't any. Pretty sure that was working before we started dicking about with the dashpod, so must have upset something... hopefully won't have to dismantle the dash again...!
Cheers,
Drew.
Report on the dashboard illumination - there wasn't any. Pretty sure that was working before we started dicking about with the dashpod, so must have upset something... hopefully won't have to dismantle the dash again...!
Cheers,
Drew.
Gallons Per Mile said:
Good stuff! Make sure when you change the cable that you set up the idle microswitch correctly (on the throttle body).
I've probably got spare dash bulbs in the garage somewhere. Let me know if you need any and I'll post them to you
Many thanks - much appreciated! I suspect we've dislodged a wire or blown a fuse somewhere as all dash illumination is off at the moment. Will start checking when I have a chance. I've probably got spare dash bulbs in the garage somewhere. Let me know if you need any and I'll post them to you
Cheers,
Drew.
Night time illumination status:
Dashpod - No
Hazard switch - Yes
Rear demister switch - No
Foglight switch - Yes
Heater Controls - No
Dismantled the dash and did some voltage checking. Good news, all circuits are getting power, so it looks like blown bulbs. Virtually all of the buggers.
The dashpod has three - continuity checked them and they're all open circuit. Mystery solved.

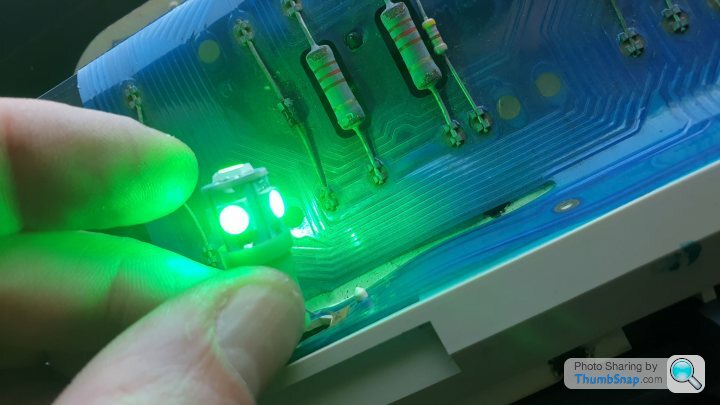
There is illumination power to the pod and it seems to be ok with a test LED.
Can't figure out how to dismantle the heater control illumination holder, seems to be very tightly clipped together. The grey plastic bit needs to come out of the black plastic surround to get at the bulb, but I'm missing a technique somehow - clues welcome!

Gallons Per Miles - Have sent you a PM about bulbs!
Cheers,
Drew.
Dashpod - No
Hazard switch - Yes
Rear demister switch - No
Foglight switch - Yes
Heater Controls - No
Dismantled the dash and did some voltage checking. Good news, all circuits are getting power, so it looks like blown bulbs. Virtually all of the buggers.
The dashpod has three - continuity checked them and they're all open circuit. Mystery solved.
There is illumination power to the pod and it seems to be ok with a test LED.
Can't figure out how to dismantle the heater control illumination holder, seems to be very tightly clipped together. The grey plastic bit needs to come out of the black plastic surround to get at the bulb, but I'm missing a technique somehow - clues welcome!
Gallons Per Miles - Have sent you a PM about bulbs!
Cheers,
Drew.
Gassing Station | Readers' Cars | Top of Page | What's New | My Stuff