Maserati Gransport (aka the wedding dress)
Discussion


psi310398 said:
Yes, but on the windscreen of my L322 Range Rover. This had the patented Ford heated screen.
The otherwise very discreet filaments became much more visible when the heat was on and funny (but marginal with regards to overall visibility) things happened with the optics. I'd regularly treat it with Rain-X if that might explain it.
I had a mk1 mondo with the same tech, It was absolutely brilliant. The otherwise very discreet filaments became much more visible when the heat was on and funny (but marginal with regards to overall visibility) things happened with the optics. I'd regularly treat it with Rain-X if that might explain it.

Another simple, routine job.
Change the aux belt and the MAF.??In all fairness, changing the aux belt wasn’t that hard. Access is limited, but it could be worse I suppose;
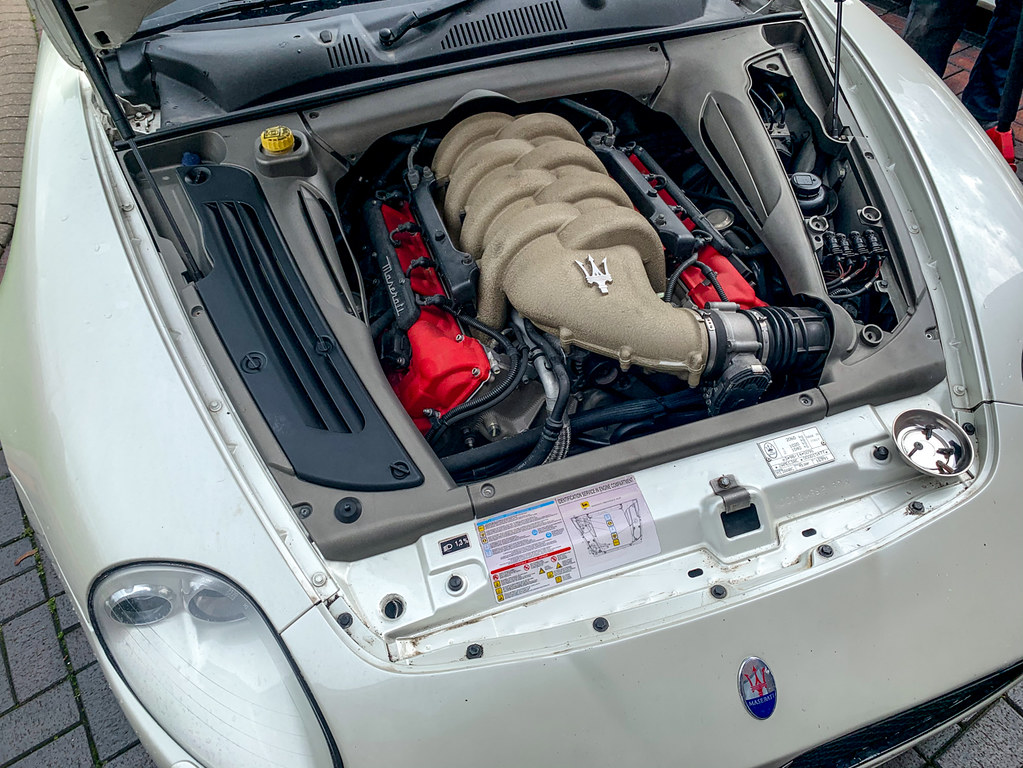 IMG_4667 by Chris, on Flickr
 IMG_4668 by Chris, on Flickr??You have to remove the under tray which is held in place with a plethora of fastenings, but, the main problem is there isn’t enough clearance between the pulleys and the pipes (EGR and Cold start air pump) across the front of the engine to get the belt in/out.
 IMG_4727 by Chris, on Flickr
It wasn’t the end of the world though just need to disconnect the two pipes and looses a couple of brackets to get enough clearance.?
New v’s old belt, even though it didn’t come in a Maserati box, it’s the same thing…
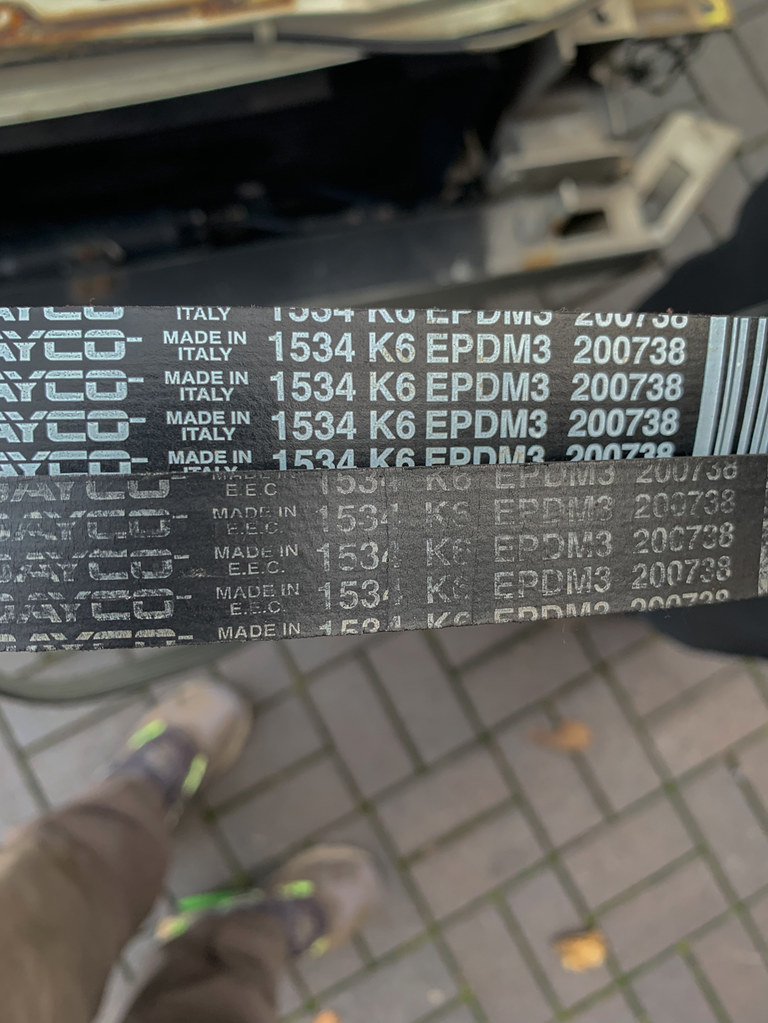 IMG_4731 by Chris, on Flickr
It needed changing too:
 IMG_4732 by Chris, on Flickr??Fitting the new belt was simple enough with the pipes out of the way - It has a conventional belt tensioner.
Next up on the to-do list was the MAF - My Dad had found a genuine new one on eBay going cheap so, with them technically being a service item, we thought we’d change that.
We could have just swapped the sensor element out by removing the 2 anti tamper screws that hold it in the MAF body but I wanted to check the condition of the air filter.
Which is where things started to fall apart, both fugitively and literally.
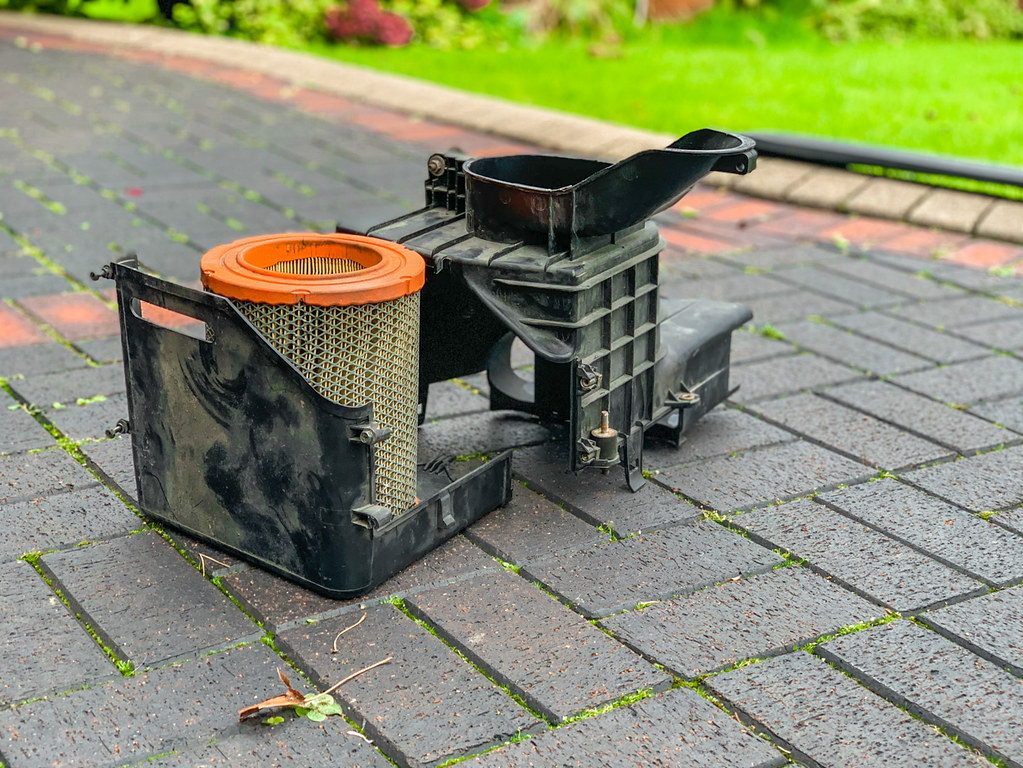
The removable panel you gain access to the filter wouldn’t come off as the retaining screws were seized;
 IMG_4676 by Chris, on Flickr??Meaning that the whole air box needed to come out for repair.?
Of course, that wasn’t a simple task either as it’s mounted to the shell using threaded rubbers bushes. Half of which were also seized, meaning that the air box wouldn’t come out either.
It was at this point we realised that the outlet from the air box to the MAF was also broken. (Insert several expletives here…)
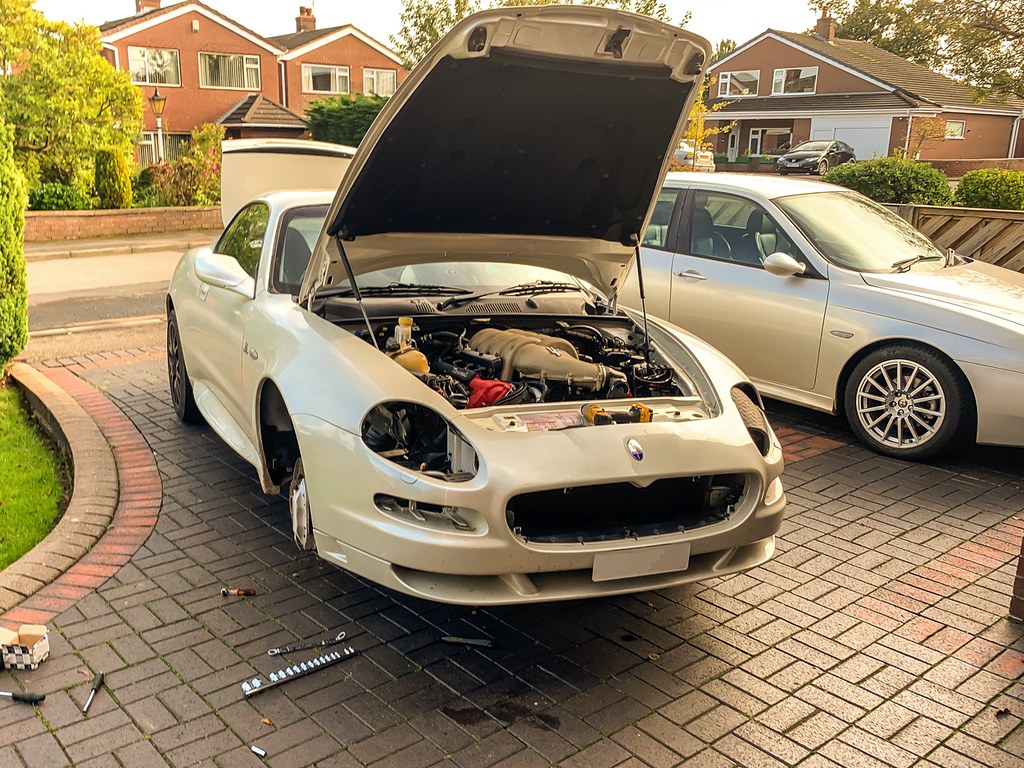
The solution to getting it out was to loosen the front bumper on the one side and the head light / foglight to give enough clearance to get it out. Oh and the front grill. And the wheel arch liner…
 IMG_4689 by Chris, on Flickr
 IMG_4679 by Chris, on Flickr
 IMG_4685 by Chris, on Flickr
 IMG_4684 by Chris, on Flickr
The air box looks like it had been repaired (badly) before. But, using some (expensive) epoxy super glue, my Dad was able to fix it, whilst also repairing all the corroded fastenings
 IMG_4680 by Chris, on Flickr??
  IMG_4735 by Chris, on Flickr
There was no way the airbag was going back in with the bumper in place though. It may be possible but the risk of breaking something was too great. My Dad have been there, done that before.
 IMG_4718 by Chris, on Flickr
 IMG_4722 by Chris, on Flickr
 IMG_4755 by Chris, on Flickr
 IMG_4723 by Chris, on Flickr
Going back to the MAF.??The new MAF (body) which came in a genuine box bearing the PN…
? IMG_4745 by Chris, on Flickr
Which is the same as the MAF that was on the car;
 IMG_4738 by Chris, on Flickr
However, the sensors themselves have different PN’s:
Old one:
 IMG_4740 by Chris, on Flickr
New Sensor:
 IMG_4742-2 by Chris, on Flickr
Given that the new sensor is a genuine part, it should be the right PN but the car doesn’t seem to like it when it’s cold. Feck knows what’s going on there, if anyone could shed any light on this, it would be appreciated.??This effectively concludes the 3 day saga that was the simple job of replacing the MAF and Aux belt….
Except it doesn’t…
Change the aux belt and the MAF.??In all fairness, changing the aux belt wasn’t that hard. Access is limited, but it could be worse I suppose;
IMG_4667 by Chris, on FlickrIMG_4668 by Chris, on Flickr??You have to remove the under tray which is held in place with a plethora of fastenings, but, the main problem is there isn’t enough clearance between the pulleys and the pipes (EGR and Cold start air pump) across the front of the engine to get the belt in/out.IMG_4727 by Chris, on FlickrIt wasn’t the end of the world though just need to disconnect the two pipes and looses a couple of brackets to get enough clearance.?
New v’s old belt, even though it didn’t come in a Maserati box, it’s the same thing…
IMG_4731 by Chris, on FlickrIt needed changing too:
IMG_4732 by Chris, on Flickr??Fitting the new belt was simple enough with the pipes out of the way - It has a conventional belt tensioner.Next up on the to-do list was the MAF - My Dad had found a genuine new one on eBay going cheap so, with them technically being a service item, we thought we’d change that.
We could have just swapped the sensor element out by removing the 2 anti tamper screws that hold it in the MAF body but I wanted to check the condition of the air filter.
Which is where things started to fall apart, both fugitively and literally.
The removable panel you gain access to the filter wouldn’t come off as the retaining screws were seized;
IMG_4676 by Chris, on Flickr??Meaning that the whole air box needed to come out for repair.?Of course, that wasn’t a simple task either as it’s mounted to the shell using threaded rubbers bushes. Half of which were also seized, meaning that the air box wouldn’t come out either.
It was at this point we realised that the outlet from the air box to the MAF was also broken. (Insert several expletives here…)
The solution to getting it out was to loosen the front bumper on the one side and the head light / foglight to give enough clearance to get it out. Oh and the front grill. And the wheel arch liner…
IMG_4689 by Chris, on FlickrIMG_4679 by Chris, on FlickrIMG_4685 by Chris, on FlickrIMG_4684 by Chris, on FlickrThe air box looks like it had been repaired (badly) before. But, using some (expensive) epoxy super glue, my Dad was able to fix it, whilst also repairing all the corroded fastenings
IMG_4680 by Chris, on Flickr?? IMG_4735 by Chris, on FlickrThere was no way the airbag was going back in with the bumper in place though. It may be possible but the risk of breaking something was too great. My Dad have been there, done that before.
IMG_4718 by Chris, on FlickrIMG_4722 by Chris, on FlickrIMG_4755 by Chris, on FlickrIMG_4723 by Chris, on FlickrGoing back to the MAF.??The new MAF (body) which came in a genuine box bearing the PN…
?
IMG_4745 by Chris, on FlickrWhich is the same as the MAF that was on the car;
IMG_4738 by Chris, on FlickrHowever, the sensors themselves have different PN’s:
Old one:
IMG_4740 by Chris, on FlickrNew Sensor:
IMG_4742-2 by Chris, on FlickrGiven that the new sensor is a genuine part, it should be the right PN but the car doesn’t seem to like it when it’s cold. Feck knows what’s going on there, if anyone could shed any light on this, it would be appreciated.??This effectively concludes the 3 day saga that was the simple job of replacing the MAF and Aux belt….
Except it doesn’t…
Edited by Zombie on Sunday 18th October 01:45
The 3 day saga didn't stop with the planned work as we spotted another problem.
 IMG_4784 by Chris, on Flickr
I didn't think to take a pic to frame what that is so kudos to anyone who recognises it as the nearside steering rack boot. We replaced the track rod last year but not the boot, which I'll admit was something we should have considered.
However, it seemed to be in good condition at the time, they only come in pairs, they're £70 and they're know for failing... i.e. being crap.
I decided that I wasn't going to pay that kind of money for an inferior part and went on the hunt for a replacement. This started with taking some measurements:
 IMG_4769 by Chris, on Flickr
 IMG_4781 by Chris, on Flickr
The overall length is about 192mm. After scratching about on eBay, I found a Volvo part that closely matched the measurements I'd taken. The ID of the rack end is slightly smaller for the Volvo part, but I felt it was worth risking it as a pair of boots was less than £16 delivered.
 IMG_4796 by Chris, on Flickr
Here's the PN for future reference - AFAIK, it should fit all 4200 Masers.
 IMG_4798 by Chris, on Flickr
On mine, it turned out to be a perfect fit (I used to silicone lube) and seems to be made of a more robust material. Result.
Obviously, with the front end apart, we took the opportunity to clean and upgrade what we could. Side lights being an obvious starting point as they're part of the fog light cluster. The standard filament bulb isn't even a halogen job and is basically s t
t
 IMG_4764 by Chris, on Flickr
It was replaced with a higher output LED version:
 IMG_4763 by Chris, on Flickr
With the whole arch liners out, they were shown the pointy end of the pressure washer and some soap. The inner arches weren't that dad but were given a more sympathetic clean with a stiff brush engine degreaser and a hose pipe.
Before;
 IMG_4758 by Chris, on Flickr
 IMG_4757 by Chris, on Flickr
After;
 IMG_4766 by Chris, on Flickr
 IMG_4767 by Chris, on Flickr
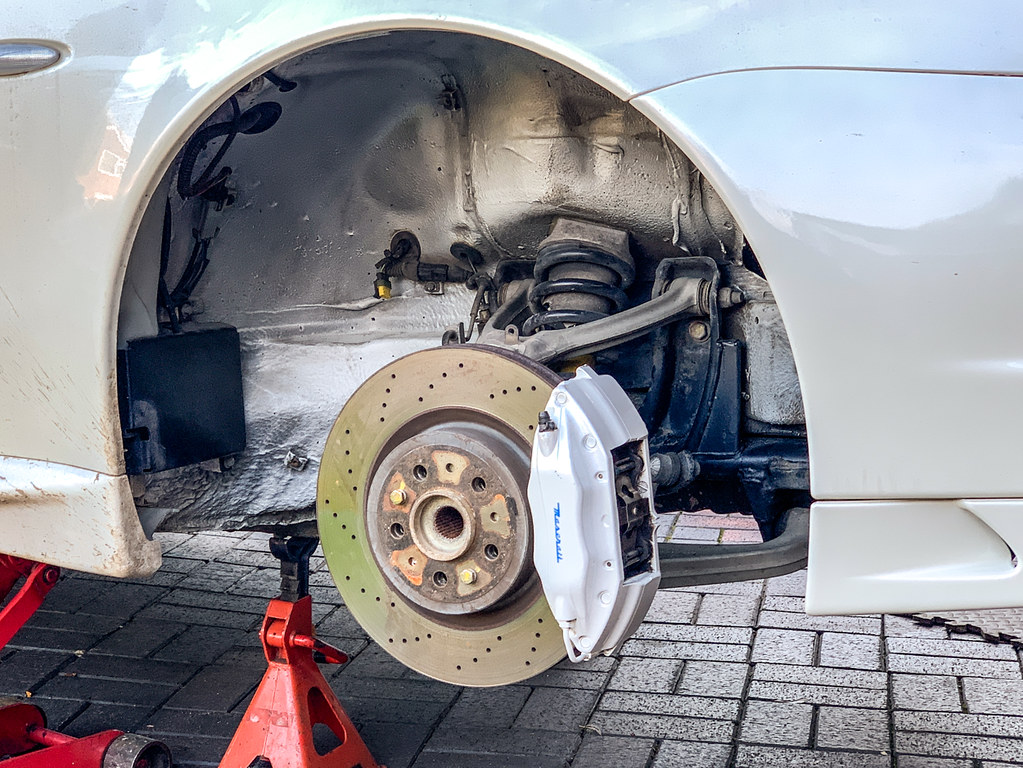
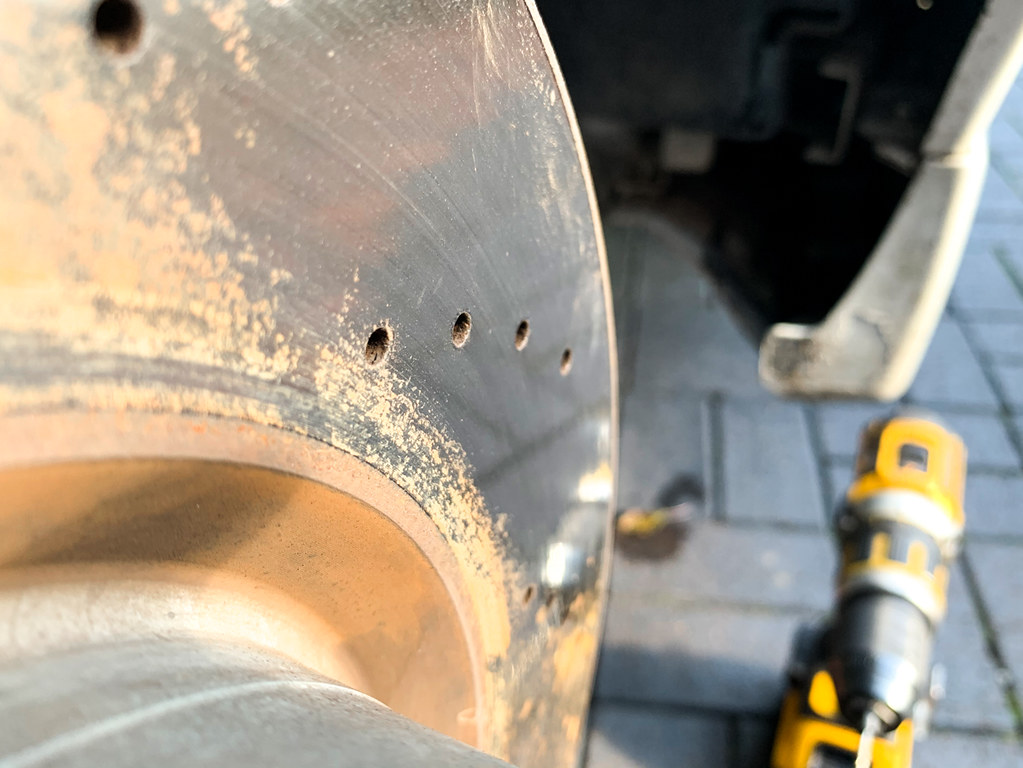
Finally, noting that the holes in the discs were blocked with brake pad material I used a slightly undersized 3.5mm drill bit to clean them out. I didn't think it's make much of a difference but it has curbed the slight rumble that was prevalent under hard braking.
 IMG_4760 by Chris, on Flickr
IMG_4784 by Chris, on FlickrI didn't think to take a pic to frame what that is so kudos to anyone who recognises it as the nearside steering rack boot. We replaced the track rod last year but not the boot, which I'll admit was something we should have considered.
However, it seemed to be in good condition at the time, they only come in pairs, they're £70 and they're know for failing... i.e. being crap.
I decided that I wasn't going to pay that kind of money for an inferior part and went on the hunt for a replacement. This started with taking some measurements:
IMG_4769 by Chris, on FlickrIMG_4781 by Chris, on FlickrThe overall length is about 192mm. After scratching about on eBay, I found a Volvo part that closely matched the measurements I'd taken. The ID of the rack end is slightly smaller for the Volvo part, but I felt it was worth risking it as a pair of boots was less than £16 delivered.
IMG_4796 by Chris, on FlickrHere's the PN for future reference - AFAIK, it should fit all 4200 Masers.
IMG_4798 by Chris, on FlickrOn mine, it turned out to be a perfect fit (I used to silicone lube) and seems to be made of a more robust material. Result.
Obviously, with the front end apart, we took the opportunity to clean and upgrade what we could. Side lights being an obvious starting point as they're part of the fog light cluster. The standard filament bulb isn't even a halogen job and is basically s
tIMG_4764 by Chris, on FlickrIt was replaced with a higher output LED version:
IMG_4763 by Chris, on FlickrWith the whole arch liners out, they were shown the pointy end of the pressure washer and some soap. The inner arches weren't that dad but were given a more sympathetic clean with a stiff brush engine degreaser and a hose pipe.
Before;
IMG_4758 by Chris, on FlickrIMG_4757 by Chris, on FlickrAfter;
IMG_4766 by Chris, on FlickrIMG_4767 by Chris, on FlickrFinally, noting that the holes in the discs were blocked with brake pad material I used a slightly undersized 3.5mm drill bit to clean them out. I didn't think it's make much of a difference but it has curbed the slight rumble that was prevalent under hard braking.
IMG_4760 by Chris, on FlickrExcellent, well thought out upgrades! You're doing a brilliant job as usual. I love it when your threads pop up with an update  I'm not usually one for LED upgrade bulbs but it really looks correct for your sidelights and it modernises the look just perfectly. I might consider doing the same to the DRLs on my M3 as the light is fairly yellow as per your old sidelights. Slightly whiter gives a fresher, newer look
I'm not usually one for LED upgrade bulbs but it really looks correct for your sidelights and it modernises the look just perfectly. I might consider doing the same to the DRLs on my M3 as the light is fairly yellow as per your old sidelights. Slightly whiter gives a fresher, newer look I work on these for a living so thought I'd offer a few bits of advice..
- Check the wishbones carefully where the bushes attach to the chassis. They frequently crack on the casting line. In some cases the wishbone will detach from the car. You'll need a little dentist mirror.
- These cars are full of rounded socket cap bolts. Get yourself a set of these: https://www.ebay.co.uk/itm/184474333713 They are so good I bought everyone in my workshop a set. They save us hours.
- Please torque that oil filter up to 30Nm. It will spin off if it's not tight enough. They are tight for a very good reason.
- You do not need to remove the wiper motor to do the pollen filter. Undo the two M6 bolts and it'll move out of the way.
- The aux belt is much easier to do from underneath, no need to remove anything.
- The airboxes on these always have broken fastenings (and a rotten filter as nobody ever changes them). The box will go in/out with just that corner of the bumper undone - you can ease the bumper forward to give you the clearance.
- Your cold start running problem is going to be the MAF. Immediately after a cold start, the ECU uses a fixed amount of fuel per the reading from the MAF. If this signal is wrong then the engine wont run properly. Easy to check - either disconnect the MAF (the ECU will revert to a map based on throttle angle) or put your old insert back in.
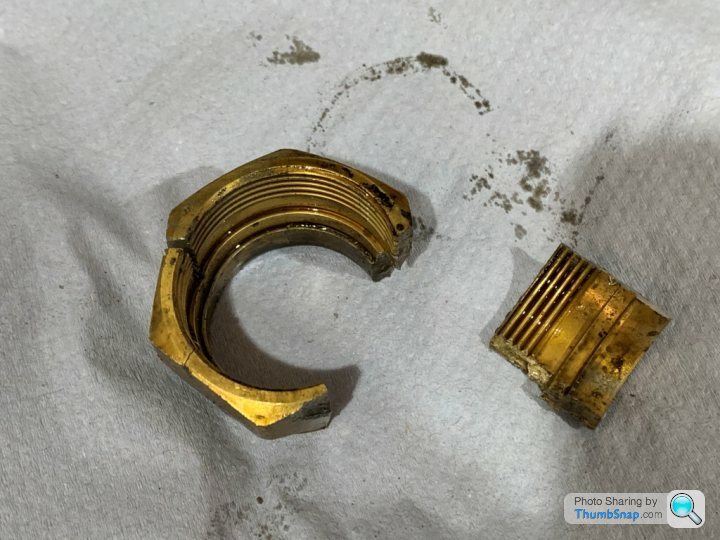
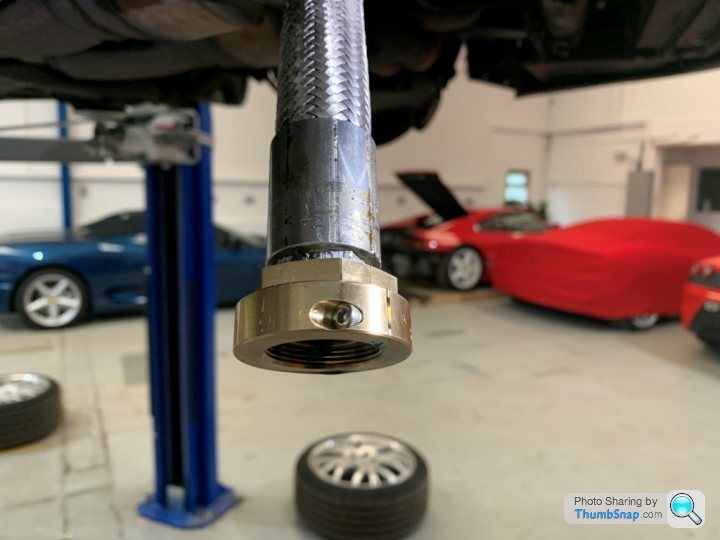
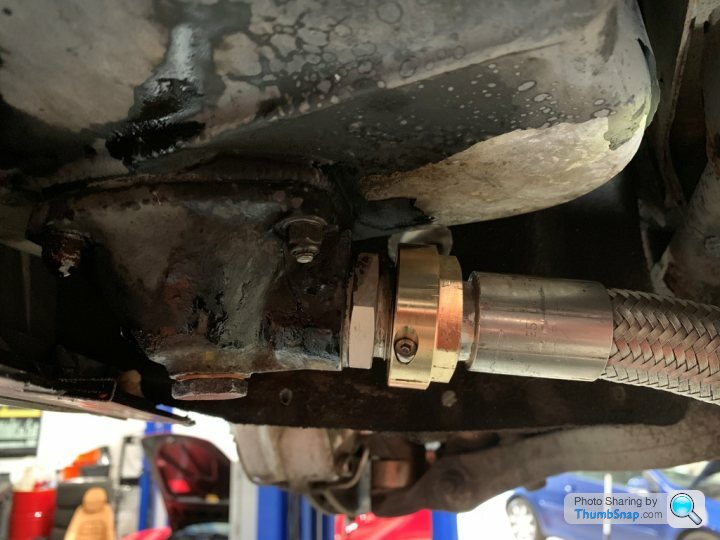
- Check the nut on the oil pipe at the bottom of the dry sump tank carefully - they like to split and you can say goodbye to your engine if the pipe comes off. I developed a split nut solution that allows easy replacement (changing the whole pipe is an absolute bh).

- Check the wishbones carefully where the bushes attach to the chassis. They frequently crack on the casting line. In some cases the wishbone will detach from the car. You'll need a little dentist mirror.
- These cars are full of rounded socket cap bolts. Get yourself a set of these: https://www.ebay.co.uk/itm/184474333713 They are so good I bought everyone in my workshop a set. They save us hours.
- Please torque that oil filter up to 30Nm. It will spin off if it's not tight enough. They are tight for a very good reason.
- You do not need to remove the wiper motor to do the pollen filter. Undo the two M6 bolts and it'll move out of the way.
- The aux belt is much easier to do from underneath, no need to remove anything.
- The airboxes on these always have broken fastenings (and a rotten filter as nobody ever changes them). The box will go in/out with just that corner of the bumper undone - you can ease the bumper forward to give you the clearance.
- Your cold start running problem is going to be the MAF. Immediately after a cold start, the ECU uses a fixed amount of fuel per the reading from the MAF. If this signal is wrong then the engine wont run properly. Easy to check - either disconnect the MAF (the ECU will revert to a map based on throttle angle) or put your old insert back in.
- Check the nut on the oil pipe at the bottom of the dry sump tank carefully - they like to split and you can say goodbye to your engine if the pipe comes off. I developed a split nut solution that allows easy replacement (changing the whole pipe is an absolute b
h).
Gallons Per Mile said:
Excellent, well thought out upgrades! You're doing a brilliant job as usual. I love it when your threads pop up with an update I'm not usually one for LED upgrade bulbs but it really looks correct for your sidelights and it modernises the look just perfectly. I might consider doing the same to the DRLs on my M3 as the light is fairly yellow as per your old sidelights. Slightly whiter gives a fresher, newer look
Thanks, appreciate it. I'm not usually one for LED upgrade bulbs but it really looks correct for your sidelights and it modernises the look just perfectly. I might consider doing the same to the DRLs on my M3 as the light is fairly yellow as per your old sidelights. Slightly whiter gives a fresher, newer look I think it would be worthwhile, mine looked a mess with the HID headlights and the dirty yellow sides.
voicey said:
I work on these for a living so thought I'd offer a few bits of advice..
Thanks for taking the time to respond to my thread, much appreciated.voicey said:
- Check the wishbones carefully where the bushes attach to the chassis. They frequently crack on the casting line. In some cases the wishbone will detach from the car. You'll need a little dentist mirror.
Wishbones...  Okaaaay, that's a bit worrying and it wasn't something I was aware of. Is this caused by the bushes corroding and thus expanding in the arm causing it to crack? If so Would it be worth replacing the bushes given their small cost relative to the stupid cost of the arms? I think the ones for the rear are around £15 / each?
voicey said:
- These cars are full of rounded socket cap bolts. Get yourself a set of these: https://www.ebay.co.uk/itm/184474333713 They are so good I bought everyone in my workshop a set. They save us hours.
Bought! And add a like for buying people in the workshop a set, I've worked in a garage and, based on my experience of it, I know some owners can be utter tools when it to their staff. You sound like the opposite. :thumbs:I've lost count of the number of times we could've used something like this. Thanks.
voicey said:
- Please torque that oil filter up to 30Nm. It will spin off if it's not tight enough. They are tight for a very good reason.
Noted. Suitable tool bought, I'll retorque it when it arrives, don't want that coming undone!voicey said:
You do not need to remove the wiper motor to do the pollen filter. Undo the two M6 bolts and it'll move out of the way.
I thought it might be possible that was but I didn't want to break anything!voicey said:
- The aux belt is much easier to do from underneath, no need to remove anything.
I did back off the tensioner and remove it from underneath but it wasn't easy with it being on the floor rather than a lift.... We probably allowed access being available through the headlight space to influence the way I went about it though.voicey said:
- The airboxes on these always have broken fastenings (and a rotten filter as nobody ever changes them). The box will go in/out with just that corner of the bumper undone - you can ease the bumper forward to give you the clearance.
Some of the rubber mounts came off with the filter housing rather than staying with the car making things more difficult but I take your point. Just being overly cautious with it, again to avoid breaking anything!Yeah, the filter in mine isn't looking great but I've been looking at other options not that I know the housing will come apart. £60 for an air filter is just taking the p
s... What mod you think of the BMC filters? I'm dubious that they offer any addition air flow but having used similar aftermarket filters in the past I have found they provide a bit more induction noise. However, I've also hear that their filtration characters aren't as good as an OEM filter?
voicey said:
- Your cold start running problem is going to be the MAF. Immediately after a cold start, the ECU uses a fixed amount of fuel per the reading from the MAF. If this signal is wrong then the engine wont run properly. Easy to check - either disconnect the MAF (the ECU will revert to a map based on throttle angle) or put your old insert back in.
Hmm, it's in for an MOT today so, in consultation with my Dad on your advice, I'm going to change it back to the original MAF as it doesn't seem to like the one that's in it and hope the ECU learns to adjust the feeling on the way over to the testing station...voicey said:
- Check the nut on the oil pipe at the bottom of the dry sump tank carefully - they like to split and you can say goodbye to your engine if the pipe comes off. I developed a split nut solution that allows easy replacement (changing the whole pipe is an absolute bh).
I was aware of this and it was one of the first things I checked. But realising, as I type this, it was you who came up with the split nut solution (which I was also aware of) I just wanted to say that it was a brilliant piece of lateral thinking on your part. I was genuinely impressed with it when I saw it and added it to the wish list along with a solid state relay for the gearbox pump...h).As well as being difficult to replace isn't the pipe stupid expensive as well?
Thanks again.

Edited by Zombie on Monday 19th October 01:08
Zombie said:
Wishbones... Okaaaay, that's a bit worrying and it wasn't something I was aware of. Is this caused by the bushes corroding and thus expanding in the arm causing it to crack? If so Would it be worth replacing the bushes given their small cost relative to the stupid cost of the arms? I think the ones for the rear are around £15 / each?
It's just poor manufacturing/material selection. If this car is a keeper, get a pair of good used rear upper wishbones. New ones are no longer available and the supply of good used is dwindling. Okaaaay, that's a bit worrying and it wasn't something I was aware of. Is this caused by the bushes corroding and thus expanding in the arm causing it to crack? If so Would it be worth replacing the bushes given their small cost relative to the stupid cost of the arms? I think the ones for the rear are around £15 / each?Zombie said:
What mod you think of the BMC filters? I'm dubious that they offer any addition air flow but having used similar aftermarket filters in the past I have found they provide a bit more induction noise. However, I've also hear that their filtration characters aren't as good as an OEM filter?
I am not a fan of performance air filters, even less so of those that need to be oiled (as the MAF can get contaminated). The performance gain is negligible. I'd spend my money on an x-pipe.Zombie said:
As well as being difficult to replace isn't the pipe stupid expensive as well?
Yes but I don't really care about the cost as I'm not paying - my main motivation was to never have to do the job again as it's difficult, time consuming and you get covered in oil!voicey said:
Zombie said:
Wishbones... Okaaaay, that's a bit worrying and it wasn't something I was aware of. Is this caused by the bushes corroding and thus expanding in the arm causing it to crack? If so Would it be worth replacing the bushes given their small cost relative to the stupid cost of the arms? I think the ones for the rear are around £15 / each?
It's just poor manufacturing/material selection. If this car is a keeper, get a pair of good used rear upper wishbones. New ones are no longer available and the supply of good used is dwindling. Okaaaay, that's a bit worrying and it wasn't something I was aware of. Is this caused by the bushes corroding and thus expanding in the arm causing it to crack? If so Would it be worth replacing the bushes given their small cost relative to the stupid cost of the arms? I think the ones for the rear are around £15 / each?k. that's not encouraging. I have a "spare" set that are structurally sound but the ball joints are shagged. I can't see how they can be replaced refurbed either,voicey said:
Zombie said:
What mod you think of the BMC filters? I'm dubious that they offer any addition air flow but having used similar aftermarket filters in the past I have found they provide a bit more induction noise. However, I've also hear that their filtration characters aren't as good as an OEM filter?
I am not a fan of performance air filters, even less so of those that need to be oiled (as the MAF can get contaminated). The performance gain is negligible. I'd spend my money on an x-pipe. voicey said:
Zombie said:
As well as being difficult to replace isn't the pipe stupid expensive as well?
Yes but I don't really care about the cost as I'm not paying - my main motivation was to never have to do the job again as it's difficult, time consuming and you get covered in oil!Edited by Zombie on Tuesday 20th October 22:14
I've been fairly seriously considering one of these for a while now, but I think the last few posts have scared me off for good.
With my limited spanner skills, parts prices, labour rates and few specialists in Australia, it's just not a viable ownership proposition for me.
I'll have to vicariously live the ownership pain through this thread. I'm out
With my limited spanner skills, parts prices, labour rates and few specialists in Australia, it's just not a viable ownership proposition for me.
I'll have to vicariously live the ownership pain through this thread. I'm out
romeodelta said:
I've been fairly seriously considering one of these for a while now, but I think the last few posts have scared me off for good.
With my limited spanner skills, parts prices, labour rates and few specialists in Australia, it's just not a viable ownership proposition for me.
I'll have to vicariously live the ownership pain through this thread. I'm out
I'm somewhat disappointed to hear that but what would you expect? It's not far removed from being Ferrari F430, albeit in a front engined frock. With my limited spanner skills, parts prices, labour rates and few specialists in Australia, it's just not a viable ownership proposition for me.
I'll have to vicariously live the ownership pain through this thread. I'm out
As a low volume, hand built car, it's going to be expensive to run. Having said that, I've had it over a year now and the most expensive job was the upper rear arms. Taking that out of the equation it's cost less than £1k over the year and that includes rear tyres.
It's always (very) special to drive though - Especially with traction control off. I Had it "over rotating" rear tyres in 4th gear at 70mph on a slightly damp but warm slip road the last time I drove it....
Edited by Zombie on Friday 23 October 02:34
Thread update.
MOT passed, No advisories.
 Screenshot 2020-10-24 at 01.43.38 by Chris, on Flickr
Pleased with that.
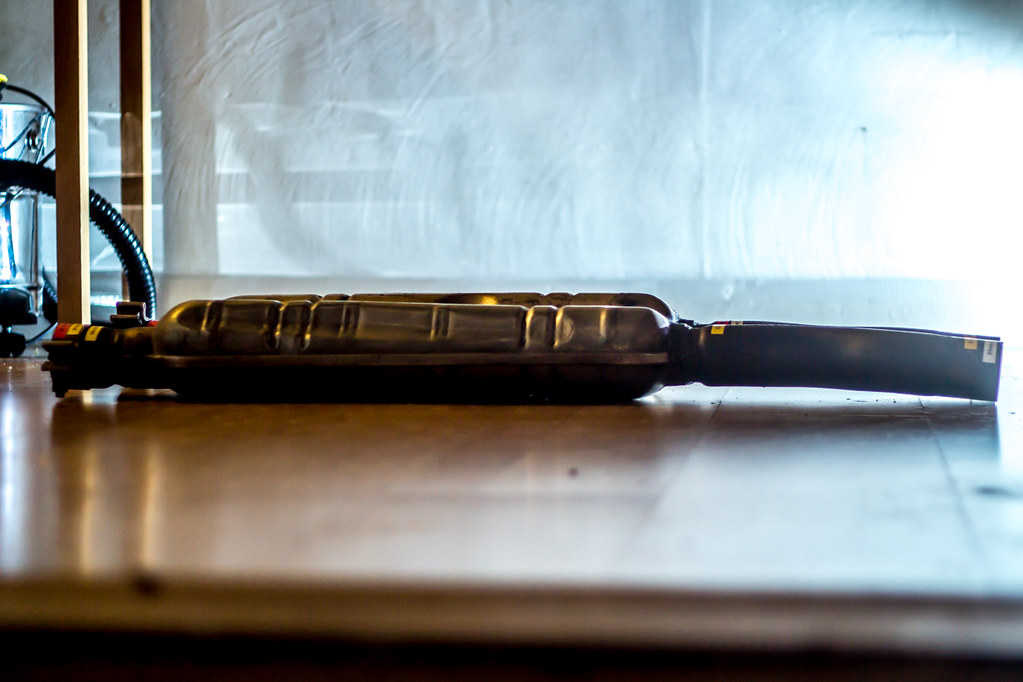
And as I alluded to in one of my recent posts, I've had the exhaust modified.
This thought process started shortly after I acquired the car, I was offered a Larini 'x' pipe for £350. I went off and researched it and found that most people regard it as a worthwhile, almost essential change.
However, nicely welded, the larini part is, in my view it is not worth the asking price, new or 2nd hand. Thusly, I decided to embark on a voyage of welding discovery...
I have a MIG welder that I've not really mastered but I investigated welding Stainless steel using it and, based on internet advice, dismissed it as unviable. I'm not sure why but IIRC it's difficult to get a decent weld and the gas is expensive?
Anyhoo, I decided to buy the cheapest centre box I could find on eBay with the intention of chopping it up for £65. I figured I could chop off the X pipe section and remake the rest using sleeved joints, some straight pipe and some clamps.
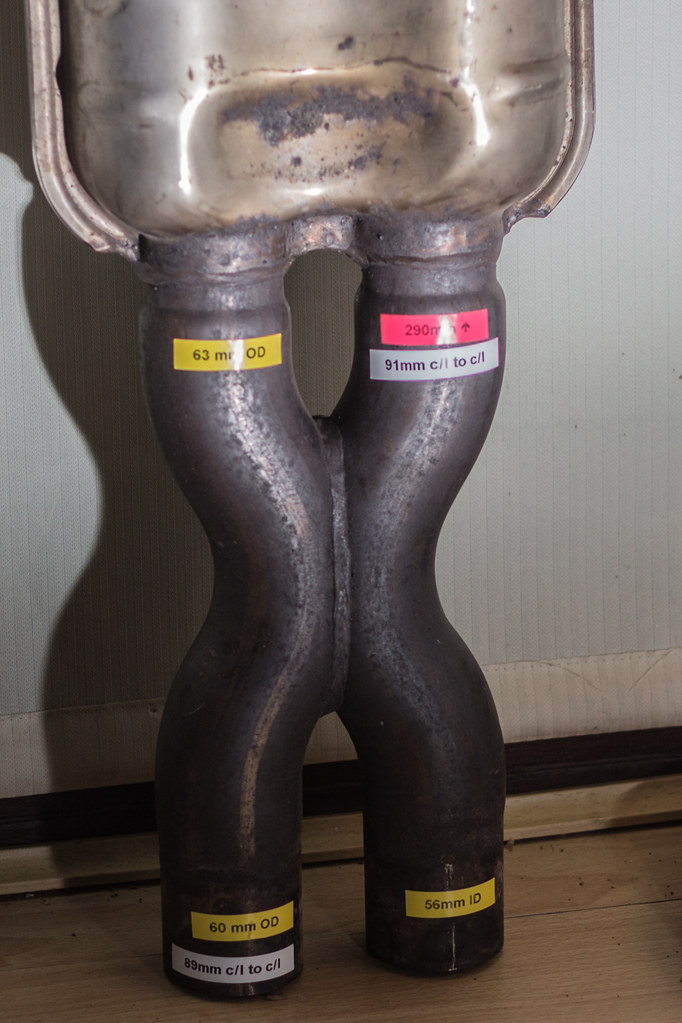
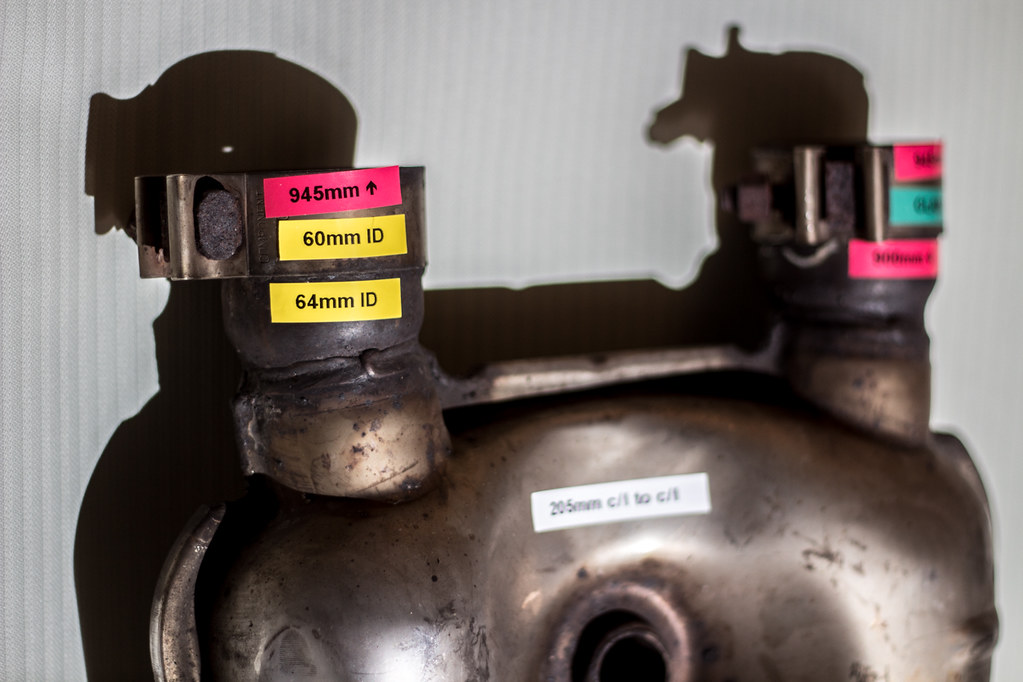
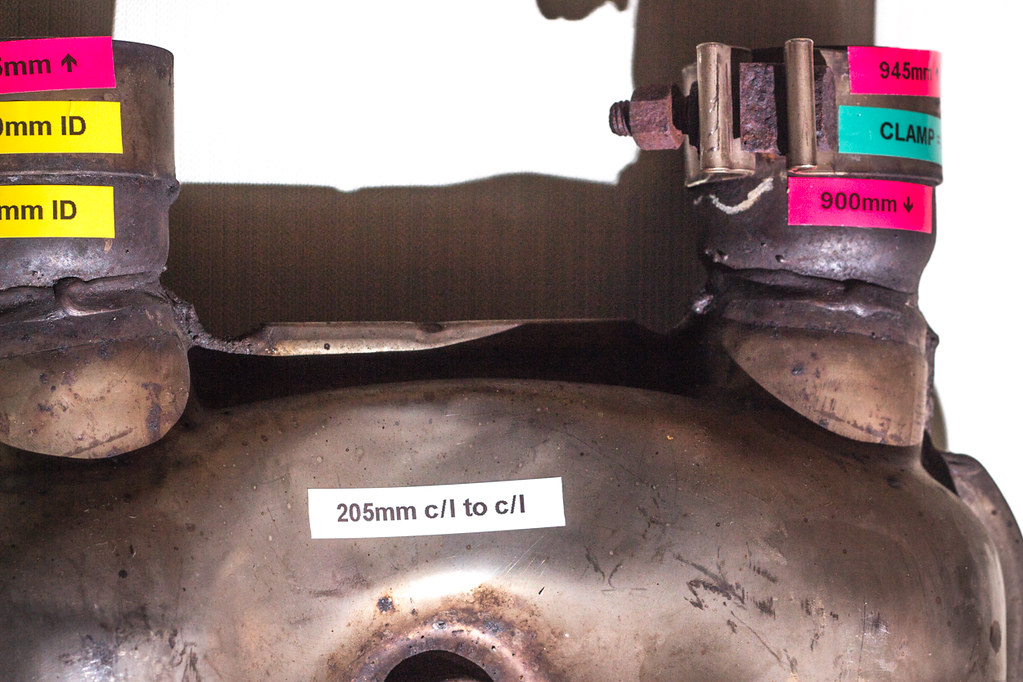
I started off by taking some measurements and labelling the exhaust up (using the base of the x pipe as a datum for length) IDs, ODs and CL distances (Thank you Bad Obsession M/sport for showing us how to accurately find the CL distance)...
 IMG_0788 by Chris, on Flickr
 IMG_0799 by Chris, on Flickr
 IMG_0796-2 by Chris, on Flickr
 IMG_0789 by Chris, on Flickr
 IMG_0792 by Chris, on Flickr
 IMG_0794 by Chris, on Flickr
At this point, I was feeling confident I could make something up as planned using an eBay pipe bender like this;
https://www.ebay.co.uk/itm/Heavy-Duty-Hydraulic-Ma...
However, I the realised it's not just the C/L difference end to end that I'd have to account for in the horizontal plane, it's also convex, bending upwards in the vertical plane, presumably to gain ground clearance;
 IMG_0806 by Chris, on Flickr
 IMG_0818 by Chris, on Flickr
Placing it upside down probably shows this better?
 IMG_0810 by Chris, on Flickr
 IMG_0817 by Chris, on Flickr
At this point, I stated questioning whether it was viable in the practical sense and worthwhile financially. Yes I'd gain a pipe bender out of it butIt'd be a PITA to store and it wouldn't be something I'd use often.
Coincidentally, my Dad had taken my mother's Brera to an exhaust fabricator for a new centre section as they can't be sourced easily in the meanwhile. I ended up chatting with the Farbicators about their cars and decided to ask then for a quote to remake the centre box with straight pipes for me.
I ended up going with this option as it cost £130. Bringing the total cost to £200. But I also have the original centre box should I choose to revet back to standard. I could sell this for around £100 if I chose to.
Sound wise, it's not much louder, as the internet suggested. What I really like is that the exhaust crackles are now more pronounced - valve overlap, as an engine should sound, not the pretend (obviously fake) manufactured nonsense most fast VAG products have.
I'm really pleased with the result in spite of the fact I chickened out out on making it myself.
MOT passed, No advisories.
Screenshot 2020-10-24 at 01.43.38 by Chris, on FlickrPleased with that.
And as I alluded to in one of my recent posts, I've had the exhaust modified.
This thought process started shortly after I acquired the car, I was offered a Larini 'x' pipe for £350. I went off and researched it and found that most people regard it as a worthwhile, almost essential change.
However, nicely welded, the larini part is, in my view it is not worth the asking price, new or 2nd hand. Thusly, I decided to embark on a voyage of welding discovery...
I have a MIG welder that I've not really mastered but I investigated welding Stainless steel using it and, based on internet advice, dismissed it as unviable. I'm not sure why but IIRC it's difficult to get a decent weld and the gas is expensive?
Anyhoo, I decided to buy the cheapest centre box I could find on eBay with the intention of chopping it up for £65. I figured I could chop off the X pipe section and remake the rest using sleeved joints, some straight pipe and some clamps.
I started off by taking some measurements and labelling the exhaust up (using the base of the x pipe as a datum for length) IDs, ODs and CL distances (Thank you Bad Obsession M/sport for showing us how to accurately find the CL distance)...
IMG_0788 by Chris, on FlickrIMG_0799 by Chris, on FlickrIMG_0796-2 by Chris, on FlickrIMG_0789 by Chris, on FlickrIMG_0792 by Chris, on FlickrIMG_0794 by Chris, on FlickrAt this point, I was feeling confident I could make something up as planned using an eBay pipe bender like this;
https://www.ebay.co.uk/itm/Heavy-Duty-Hydraulic-Ma...
However, I the realised it's not just the C/L difference end to end that I'd have to account for in the horizontal plane, it's also convex, bending upwards in the vertical plane, presumably to gain ground clearance;
IMG_0806 by Chris, on FlickrIMG_0818 by Chris, on FlickrPlacing it upside down probably shows this better?
IMG_0810 by Chris, on FlickrIMG_0817 by Chris, on FlickrAt this point, I stated questioning whether it was viable in the practical sense and worthwhile financially. Yes I'd gain a pipe bender out of it butIt'd be a PITA to store and it wouldn't be something I'd use often.
Coincidentally, my Dad had taken my mother's Brera to an exhaust fabricator for a new centre section as they can't be sourced easily in the meanwhile. I ended up chatting with the Farbicators about their cars and decided to ask then for a quote to remake the centre box with straight pipes for me.
I ended up going with this option as it cost £130. Bringing the total cost to £200. But I also have the original centre box should I choose to revet back to standard. I could sell this for around £100 if I chose to.
Sound wise, it's not much louder, as the internet suggested. What I really like is that the exhaust crackles are now more pronounced - valve overlap, as an engine should sound, not the pretend (obviously fake) manufactured nonsense most fast VAG products have.
I'm really pleased with the result in spite of the fact I chickened out out on making it myself.
Edited by Zombie on Sunday 25th October 01:16
Zombie said:
romeodelta said:
I've been fairly seriously considering one of these for a while now, but I think the last few posts have scared me off for good.
With my limited spanner skills, parts prices, labour rates and few specialists in Australia, it's just not a viable ownership proposition for me.
I'll have to vicariously live the ownership pain through this thread. I'm out
I'm somewhat disappointed to hear that but what would you expect? It's not far removed from being Ferrari F430, albeit in a front engined frock. With my limited spanner skills, parts prices, labour rates and few specialists in Australia, it's just not a viable ownership proposition for me.
I'll have to vicariously live the ownership pain through this thread. I'm out
As a low volume, hand built car, it's going to be expensive to run. Having said that, I've had it over a year now and the most expensive job was the upper rear arms. Taking that out of the equation it's cost less than £1k over the year and that includes rear tyres.
It's always (very) special to drive though - Especially with traction control off. I Had it "over rotating" rear tyres in 4th gear at 70mph on a slightly damp but warm slip road the last time I drove it....
Edited by Zombie on Friday 23 October 02:34
Congrats on the MOT. Why is it in km, is it an import?
romeodelta said:
Oh yes, being expensive to run is accepted and expected, it's just the number of niggly issues which would take the shine off it for me at at least $1k a pop.
Congrats on the MOT. Why is it in km, is it an import?
Yup. From Hong Kong.Congrats on the MOT. Why is it in km, is it an import?
It doesn't have much in the way of service history afaik but that's because it's in Cantonese. I'm not worried about that as i'm 99% sure it has been looked after in terms of servicing. Plus, by working on it myself I'm not adversely affecting the car's valley failing to maintain its service history. I also know for sure that the work has actually been done.
However, one major advantage of it being an import is that it doesn't have any corrosion underneath - which is a known issue;
https://www.sportsmaserati.com/index.php?threads/q...
Edited by Zombie on Sunday 25th October 23:57
Edited by Zombie on Sunday 25th October 23:59
Gassing Station | Readers' Cars | Top of Page | What's New | My Stuff