2002 Toyota Mark II Blit
Discussion


Deadbod said:
If you've got Google Chrome you can add Google translate as an extension and it will just do it for you. Searching can be annoying, you need to basically just search the chassis code ("jzx110" for my car for example) and kind of search through pages for what you want.
Bidding is more complicated since you need a Japanese address in order to create an account. This is why you need to use a Japanese agent to bid for you; there's plenty out there but I use Jesse Streeter as he seems like the safest/most reputable and the two orders I've made so far have been really straight forward.
another vote for jessie Bidding is more complicated since you need a Japanese address in order to create an account. This is why you need to use a Japanese agent to bid for you; there's plenty out there but I use Jesse Streeter as he seems like the safest/most reputable and the two orders I've made so far have been really straight forward.
 Have had no problems getting parts through him.
giblet said:
Daft question but what do you use to access and bid on Yahoo Japan auctions in English?
Set up a Buyee account to use YAJ, i've brought quite a lot of stuff over for my bB since xmas. They're reliable and you can consolidate multiple items into one shipment from Japan to the UK.gareth_r said:
I'll say they are! BC51NWT doesn't (yet) show up on the online registration database or the online MOT database.
Although BC51NWS and BC51NWU (also imports) do, and with extended MOTs.
The MOT expiry date should be extended automatically just before the original date.
They did eventually update it, but I just chucked it in for an MOT last Saturday anyway so it's got a full year now! No advisories, as expected, although I am still getting a bit of a knocking noise from the front passenger coilover. Tempted to switch the top mounts to rubber ones instead as I'm convinced this is the source of it! Although BC51NWS and BC51NWU (also imports) do, and with extended MOTs.
The MOT expiry date should be extended automatically just before the original date.
Edited by gareth_r on Monday 6th July 00:41
I also think I need even stiffer springs; the Blit weighs a good 120kg more than the saloon so its still a little on the soft side in my opinion.
Got my optional utility box in the post today. Properly nerdy but it's just nice to have all the optional stuff they sold for it.
Its simply a foldable box that slots into the rails in the boot


So now with the boot liner and parcel shelf, its all optioned up!

Next up, I want to do the rear subframe bushes and the diff bushes and maybe give it a coat of Dinitrol while the sunframe is off. Priced up re-bushing the rear arms which is going to be considerably more than the front so that might have to wait a while...
Update time.
I managed to get to the bottom of why the front end was still knocking and it wasn't the pillow ball top mounts like I originally suspected. It actually turned out to be a blown damper! Driftworks were excellent to deal with and a replacement HSD damper has sorted it.
New one with a fresh coat of copper grease on the right

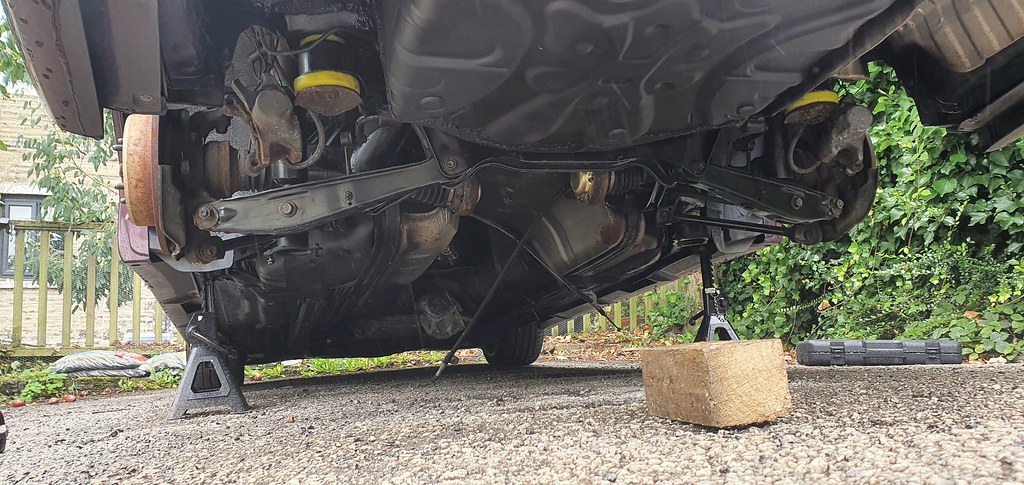
With the front end now feeling really good, the rear end is definitely in need of some attention. There’s always been a good amount of squidge and there was always a good “Thunk” when putting it into Drive while stationary – a very common thing with all variations of JZX.
I discovered the rear subframe bushes were looking a little worse for wear so decided replacing those would be a great place to start trying to get it feeling a bit tighter.
I wanted to use polybushes for these due to their much longer service life and the fact that they’re a bit stiffer than OEM rubber – a good thing in my opinion… why would you want movement in the subframe?
After searching the usual brands, it soon became apparent that this wasn’t a common mod amongst IS200’s, so had to go with the only available brand: Strong Flex.

Yellow subframe bushes on the left, red front diff bushes on the right (I didn’t end up using these just yet)
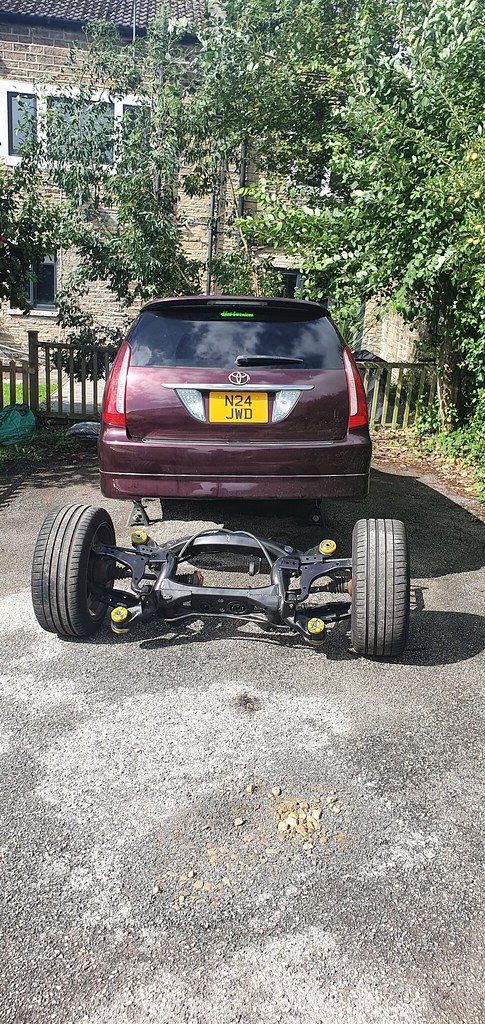
I set about removing the subframe, it was pretty straight forward. First remove the exhaust, driveshaft, handbrake cables, rear calipers and coilovers. Then just 4x 19mm bolts holding the subframe to the car.

I made the mistake of leaving the diff attached to the subframe, I’d recommend to anyone thinking of doing this to their JZX or IS2000 to remove the diff first! It makes the whole thing extremely heavy and awkward to manoeuvre, I thought it was going to knock the car off the axle stands at one point!
Into the garage to inspect the bushes..

The rear diff bushes are quite clearly perished, cracked and in need of replacement – I had OEM rubber ones to replace these to try and keep transmission NVH to a minimum.

The subframe bushes didn’t look much better either!

I gave it a going over with a wire wheel and a few coats of hammerite, no time for powder coating unfortunately but it still doesn’t look bad!

I decided while this was drying it was a good time to underseal the shell. I’d used Dinitrol before and love the finish so decided to order an MX5 kit which turned out to be a really decent amount for this car surprisingly!

I snow foamed the underside to try and get rid of any dirt and grease before applying the underseal, it was already quite clean due to how little I drive the thing!


Applied above where the subframe would be

And side skirts removed to get to the sills properly


Cavity wax injected inside the chassis rails and on top of the fuel tank. I’ve really tried to get everywhere covered in some way or another! Really happy with the overall finish, can’t recommend Dinitrol enough!
Back onto the subframe, I didn’t take too many pictures of removing the bushes due to how difficult it was to begin with! I started by trying to press them out, but the rubber centres came away from the outer race. A lot of chopping and hammering later and they eventually came out – I found the best technique was to pop the rubber centre out using a press, and then a hammer and big flat head screwdriver was enough to deform the outer race and remove it. Same applies for the rear diff bushes.
Inserting the new polybushes was a dream, apply grease and push them in by hand! Easy. They fit really well too which was a relief – it can sometimes be a problem with cheaper brands not fitting properly.
All ready to go back in the car


I was dreading re-fitting the subframe after how awkardly it came out, but it was actually really easy, mostly down to removing the diff this time.
I’ve been for a drive and it’s a huge improvement; feels really solid and tight when cornering and over bumps. I would definitely recommend these Strong Flex bushes if you’ve got a JZX, IS200 or any RWD Toyota/Lexus that uses this set up! At £100 they're really good value
And finally, a free “mod” I’ve been wanting to try for a while; re-circ delete plate… Yes, it’s a bit chavy but it’s only a couple of bolts and maybe 3 minutes to remove if I get sick of it!


CLICK, on Flickr
Click above for a video!
I managed to get to the bottom of why the front end was still knocking and it wasn't the pillow ball top mounts like I originally suspected. It actually turned out to be a blown damper! Driftworks were excellent to deal with and a replacement HSD damper has sorted it.
New one with a fresh coat of copper grease on the right
With the front end now feeling really good, the rear end is definitely in need of some attention. There’s always been a good amount of squidge and there was always a good “Thunk” when putting it into Drive while stationary – a very common thing with all variations of JZX.
I discovered the rear subframe bushes were looking a little worse for wear so decided replacing those would be a great place to start trying to get it feeling a bit tighter.
I wanted to use polybushes for these due to their much longer service life and the fact that they’re a bit stiffer than OEM rubber – a good thing in my opinion… why would you want movement in the subframe?
After searching the usual brands, it soon became apparent that this wasn’t a common mod amongst IS200’s, so had to go with the only available brand: Strong Flex.
Yellow subframe bushes on the left, red front diff bushes on the right (I didn’t end up using these just yet)
I set about removing the subframe, it was pretty straight forward. First remove the exhaust, driveshaft, handbrake cables, rear calipers and coilovers. Then just 4x 19mm bolts holding the subframe to the car.
I made the mistake of leaving the diff attached to the subframe, I’d recommend to anyone thinking of doing this to their JZX or IS2000 to remove the diff first! It makes the whole thing extremely heavy and awkward to manoeuvre, I thought it was going to knock the car off the axle stands at one point!
Into the garage to inspect the bushes..
The rear diff bushes are quite clearly perished, cracked and in need of replacement – I had OEM rubber ones to replace these to try and keep transmission NVH to a minimum.
The subframe bushes didn’t look much better either!
I gave it a going over with a wire wheel and a few coats of hammerite, no time for powder coating unfortunately but it still doesn’t look bad!
I decided while this was drying it was a good time to underseal the shell. I’d used Dinitrol before and love the finish so decided to order an MX5 kit which turned out to be a really decent amount for this car surprisingly!
I snow foamed the underside to try and get rid of any dirt and grease before applying the underseal, it was already quite clean due to how little I drive the thing!
Applied above where the subframe would be
And side skirts removed to get to the sills properly
Cavity wax injected inside the chassis rails and on top of the fuel tank. I’ve really tried to get everywhere covered in some way or another! Really happy with the overall finish, can’t recommend Dinitrol enough!
Back onto the subframe, I didn’t take too many pictures of removing the bushes due to how difficult it was to begin with! I started by trying to press them out, but the rubber centres came away from the outer race. A lot of chopping and hammering later and they eventually came out – I found the best technique was to pop the rubber centre out using a press, and then a hammer and big flat head screwdriver was enough to deform the outer race and remove it. Same applies for the rear diff bushes.
Inserting the new polybushes was a dream, apply grease and push them in by hand! Easy. They fit really well too which was a relief – it can sometimes be a problem with cheaper brands not fitting properly.
All ready to go back in the car
I was dreading re-fitting the subframe after how awkardly it came out, but it was actually really easy, mostly down to removing the diff this time.
I’ve been for a drive and it’s a huge improvement; feels really solid and tight when cornering and over bumps. I would definitely recommend these Strong Flex bushes if you’ve got a JZX, IS200 or any RWD Toyota/Lexus that uses this set up! At £100 they're really good value
And finally, a free “mod” I’ve been wanting to try for a while; re-circ delete plate… Yes, it’s a bit chavy but it’s only a couple of bolts and maybe 3 minutes to remove if I get sick of it!
CLICK, on Flickr
Click above for a video!

quigonjay said:
So you removed the recirculating valve altogether?
Don't think it sounds chavy at all, it is the vent to atmosphere valves that sounds chavy, compressor surge makes it sound like a rally car (until it blows your turbo)
It’s all still attached, you wouldn’t know looking at it. The plate sits between the recirc valve and the turbo intake “J” pipe. It’s all after the MAF so it all still runs fine, just with more turbo noises! And the turbo is probably due for a refresh anyway if it hasn’t already had one.Don't think it sounds chavy at all, it is the vent to atmosphere valves that sounds chavy, compressor surge makes it sound like a rally car (until it blows your turbo)
Gassing Station | Readers' Cars | Top of Page | What's New | My Stuff