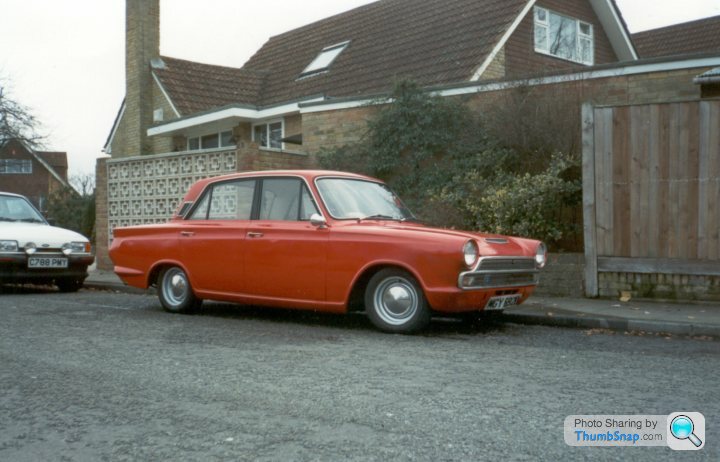
1966 Mk1 Cortina GT
Discussion


Just spotted this thread, then on reading though realised I have watched some of the build on You tube.
Will keep an eye out for more updates, reminds me of the four door super i used to have. It had a 1600cc crossflow and lowered on Lotus steels
Will keep an eye out for more updates, reminds me of the four door super i used to have. It had a 1600cc crossflow and lowered on Lotus steels
Edited by jeremyc on Monday 2nd March 11:41
Cotty said:
Just spotted this thread, then on reading though realised I have watched some of the build on You tube
Will keep an eye out for more updates, reminds me of the four door super i used to have. It had a 1600cc crossflow and lowered on Lotus steels
Hi Cotty - you beat me by 1 post! I was about to come onto the Youtube thing! Your super looked lovely, I do like the Lotus steels but what crossflow did you have? Was is a 681F or a 711M and what engine mounts did you use?Will keep an eye out for more updates, reminds me of the four door super i used to have. It had a 1600cc crossflow and lowered on Lotus steels
Whilst the shell was away I had room to start getting some parts out of my various hiding places with the intention. of tidying them up and then fitting them to the Cortina for the last time, one of my hiding places was the shed which was only lightly frowned upon by Mrs. Jim because the spiders congregate at the back of the shed so parts can go there too!
As it turns out the work I did to the fuel tank did not go to plan and the sealant inside the tank hadn't adhered to the the metal, I followed the instructions but I don't know when the chap who supplied the kit with the tanks had purchased it so I believe that it might have been passed it prime - bugger
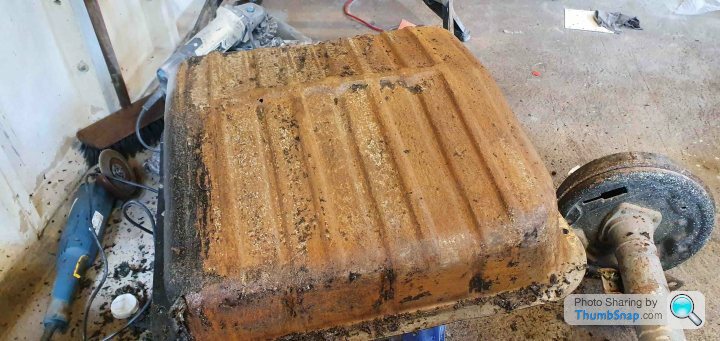
There's no point crying over it and I'll use my original tank albeit after some fabrication work but I'm procrastingating on that job with an intention of actually getting the rest of the car built to the point I actually need a vessel that can hold fuel!
When the Cortina went to the body shop the front frame worked fine but the rear shat the bed basically - it was only designed to go forwards and backwards 9ft and was not trailer friendly so given that I would have to send the Cortina back in what I was lead to believe 6 weeks I'd start with the rear end and then the front.

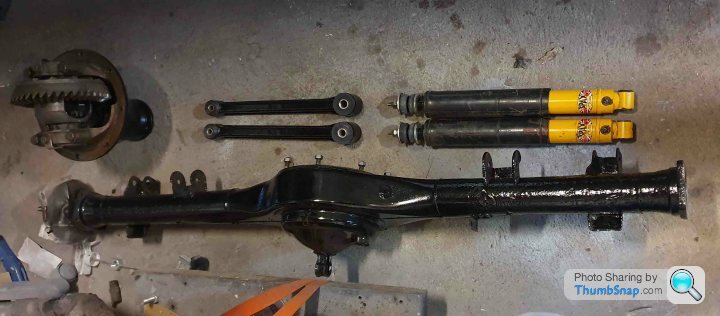
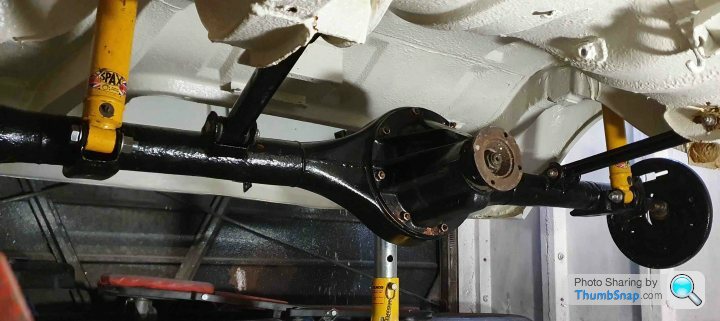
Not long after I bought the Cortina the rear struts were replaced with Spax dampers as the originals had lost their oil and were looking a bit dogeared so these were cleaned and rebushed, back in 2009 when I was trying to get the Cortina road legal for Le Mans I was working at VWR in Milton Keynes building and tuning mk5 Golf GTI's. We used to order bushes from superflex and when making a bulk order I asked if the did bushes for the Mk1 - they did and because we were putting though such a larger order anyway I was given a 10% discount and free postage! I did fit these back in 2009 but the hammerite I used on the arms had fallen off so this was quickly rectified.
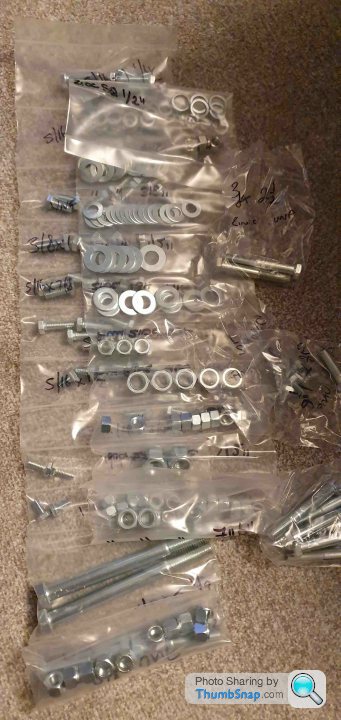
Whilst tidying these parts up I had a realisation; How was I going to fit these parts if I didn't have any fasteners???
A bit of research in my genuine ford Mk1 Cortina parts manual gave me the exact fasteners I needed and a few orders later this lot arrived.
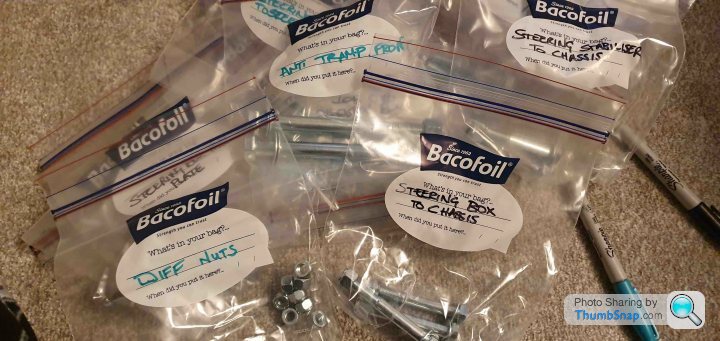
An evening of sorting had the lot kitted out and ready to fit - Mrs. Jim was unaware I had the potential to be this organised!
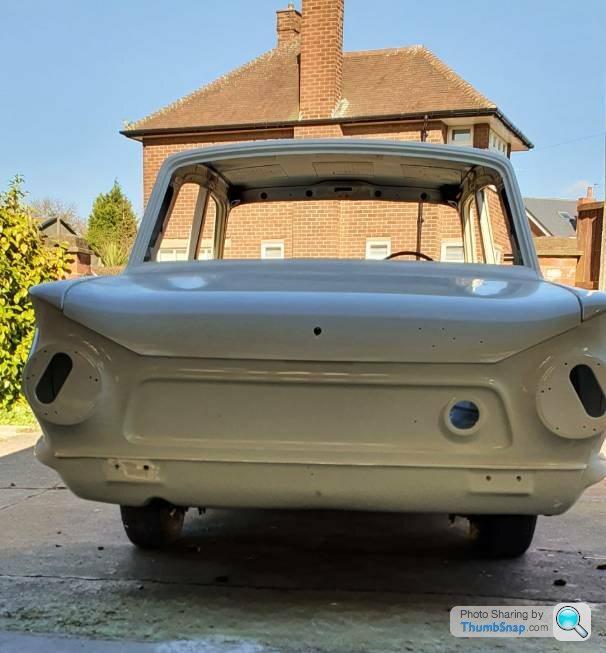
The time had come for the shell to be dropped off (the door inners were being finished at the body shop)

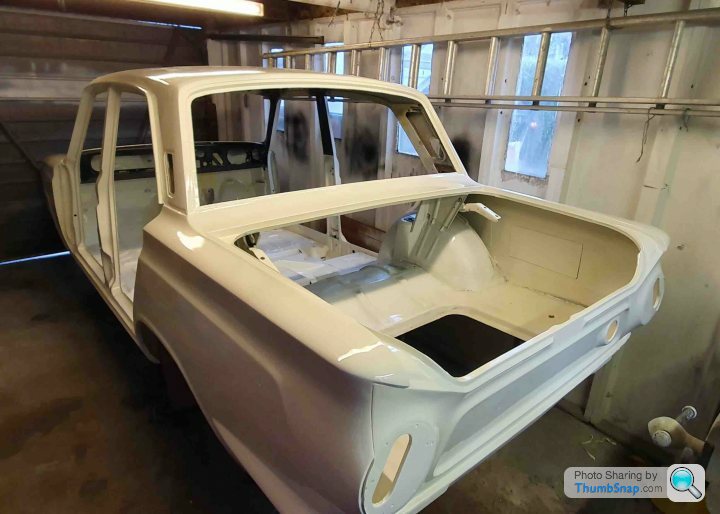
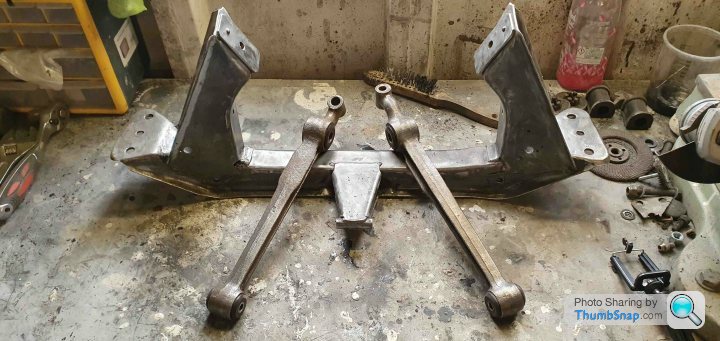
Whilst the temptation to start fitting the axle was unbearable I needed to keep the shell rolling for when the panels were delivered so I could fit them as I didn't want to store them somewhere where they could be damaged.
So I made a start on the leaf springs, I had done my research on these and I checked them for cracks and signs of sagging which I'm pleased to say they had neither so I refurbished them myself. Keeping one leaf assembled as a reference I eased the shackles open enough to release the leafs and finish crack inspection and start tidying them.

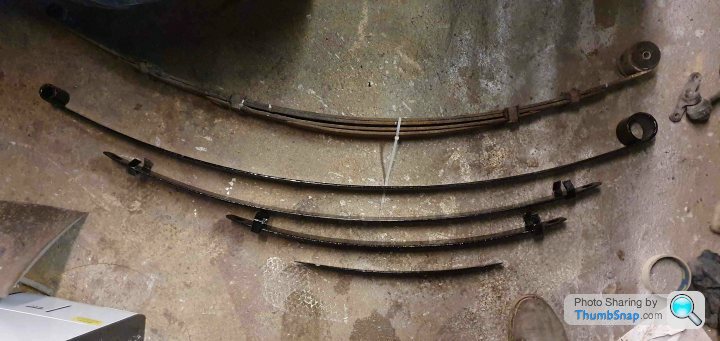
The anti squeal shims had bitten the dust, they were heavily compressed and they pretty much disintegrated in my hand so I have some replacements made out of Nylon 6 which has a shore hardness similar to the Polybushes that had been fitted, the rubber for the shackles is the same as mk1 escorts though.


Now it's a case of rinse and repeat for the other leaf.
With the panels returned I spun the shell around 180 because the majority of the work I'll be doing is at the front and drivers side and that also meant I could start fitting the rear axle.

It was at this time I had decided to try something new and start recording my exploits for Youtube. I like restorations, cars and videos but I find some videos to be reliant on a plethora of tools and cash thrown at a car is the only way these things get finished. My intentions are to show that these cars can be built using basic tools, and a modest budget at home.
I'll apologise now because I don't have a face for film, I'm still not used to talking on camera and I'm learning as I go!
With that shameless plug out of the way I'll get bak to the axle
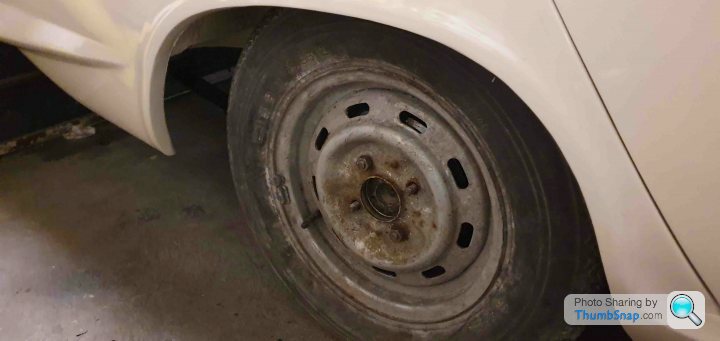
And for then back on it's wheels which aren't staying, these and just to keep the Cortina rolling - I have a set of original Dunlop D1's that'll I'll refurb ready for
Moderator edit: no YouTube promotion please
Edited by jeremyc on Monday 2nd March 11:46
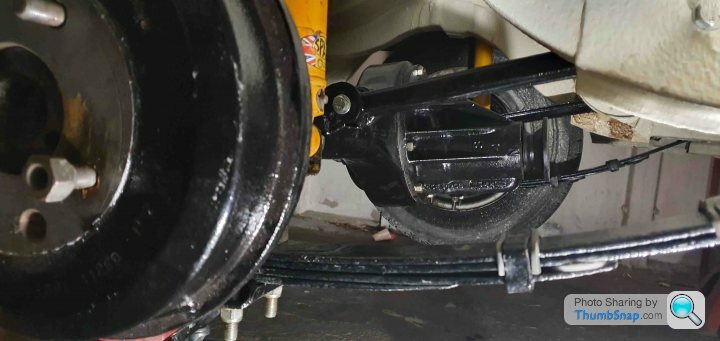
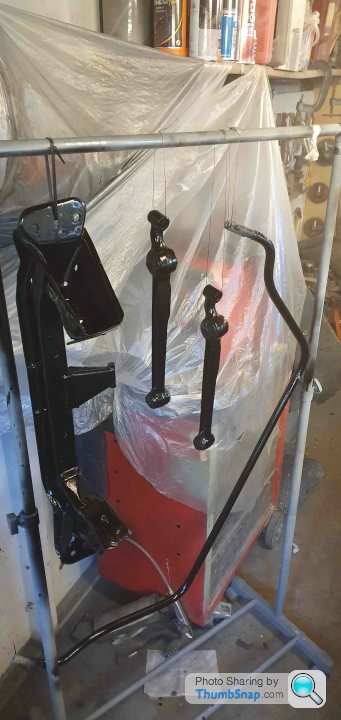
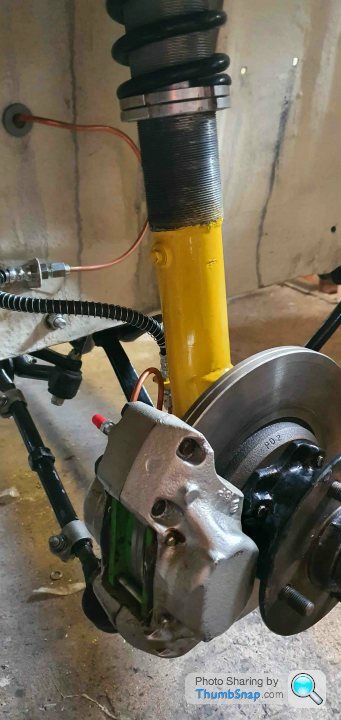
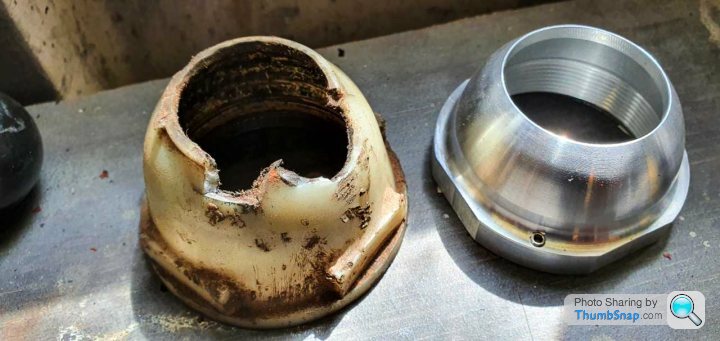
Now I had to make the front match the rear! Again going back to 2009 when looking at the original struts I found that the spring cup was rusted and the damper stanchion had been gouged by something so not safe for road use - so I had to get the converted to adjustable coilovers for safety....
So on with the photos!

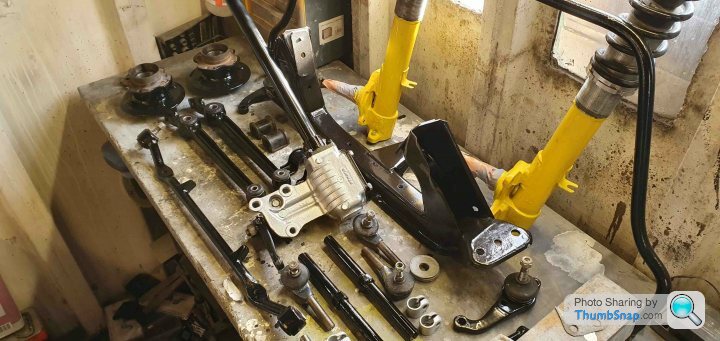
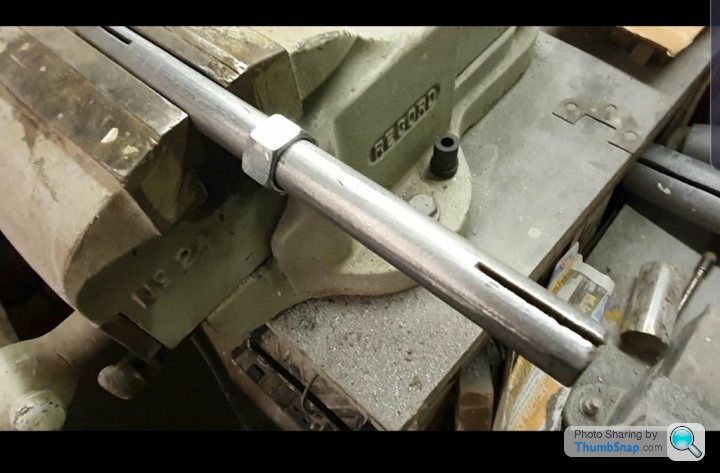
The steering arms are a bugger to adjust because the threads get pinched at the ends and they let road filth in so to make adjusting them easier I bored out an M18 nut and welded it in place - after fitting I'm finding the threads are very tight so I think I'll make some new steering arms using hex bar - I believe they're 9/16" UNF thread so not to difficult to make with 1 LH thread and the other RH.
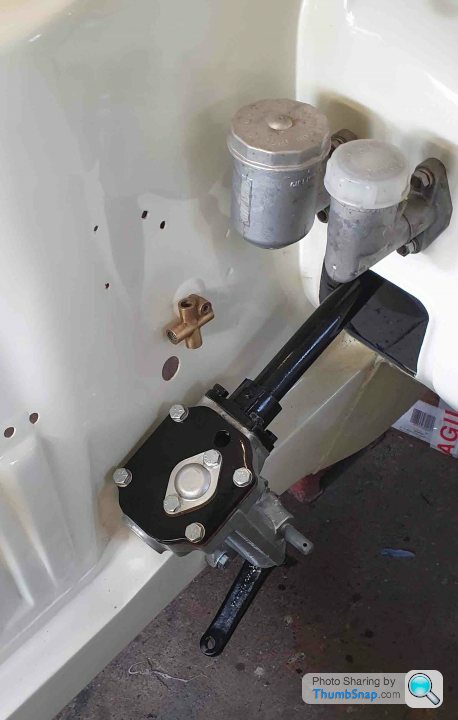
The steering box was inspected and because it was well within ford's tolerance for float I opted to leave it as it was because these are difficult to strip at home and can actually cause more harm than good.
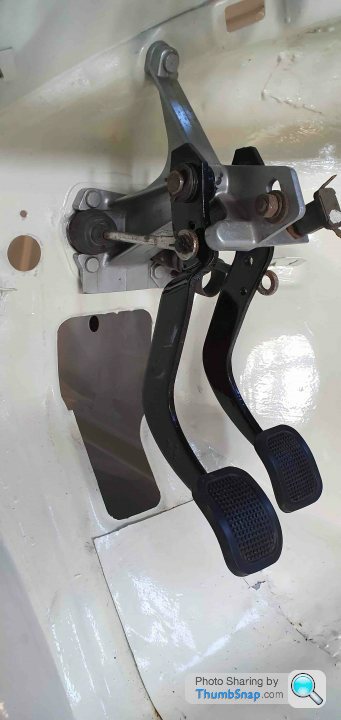
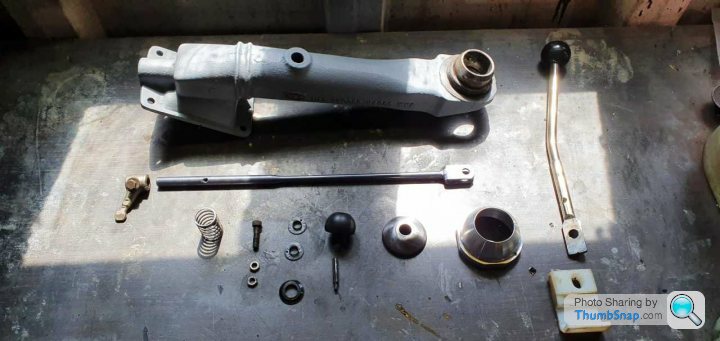
I put the pedal box on because the column mounts to it and it's better to get the pedals in first but I'll come back to that.


Some eagle eyed of you will notice that I'd put the struts on the wrong way round - the callipers should be at the back not the front!
So on with the photos!
The steering arms are a bugger to adjust because the threads get pinched at the ends and they let road filth in so to make adjusting them easier I bored out an M18 nut and welded it in place - after fitting I'm finding the threads are very tight so I think I'll make some new steering arms using hex bar - I believe they're 9/16" UNF thread so not to difficult to make with 1 LH thread and the other RH.
The steering box was inspected and because it was well within ford's tolerance for float I opted to leave it as it was because these are difficult to strip at home and can actually cause more harm than good.
I put the pedal box on because the column mounts to it and it's better to get the pedals in first but I'll come back to that.
Some eagle eyed of you will notice that I'd put the struts on the wrong way round - the callipers should be at the back not the front!
Retro_Jim said:
Hi Cotty - you beat me by 1 post! I was about to come onto the Youtube thing! Your super looked lovely, I do like the Lotus steels but what crossflow did you have? Was is a 681F or a 711M and what engine mounts did you use?
I am not sure of the engine, I bought the car as you see it. That was 30 years ago and it was just a old car, not restored or anything.Cotty said:
I am not sure of the engine, I bought the car as you see it. That was 30 years ago and it was just a old car, not restored or anything.
No worries Cotty, I had read on a forum that the 2 crossflow blocks have different width mounts - but that could be an old wives tale!
I'm in no rush to start building the supercharged engine and the more I look at issues like fuelling and ignition I'd forgo some headaches later on and try to build a fuel injection system and mapped ignition for it.
I digress...
The Cortina was back on 4 wheels and rolling just in time for new year, so naturally I decided to take the wheels off and start working on the brakes.
The rear drums proved to be problematic as all the manuals I have are for 63-mid 65 and in late 65 the drum design was changed to a self adjusting system and I had removed the back plates without making where they should go! A bit of head scratching and a few cups of tea later it was all together.
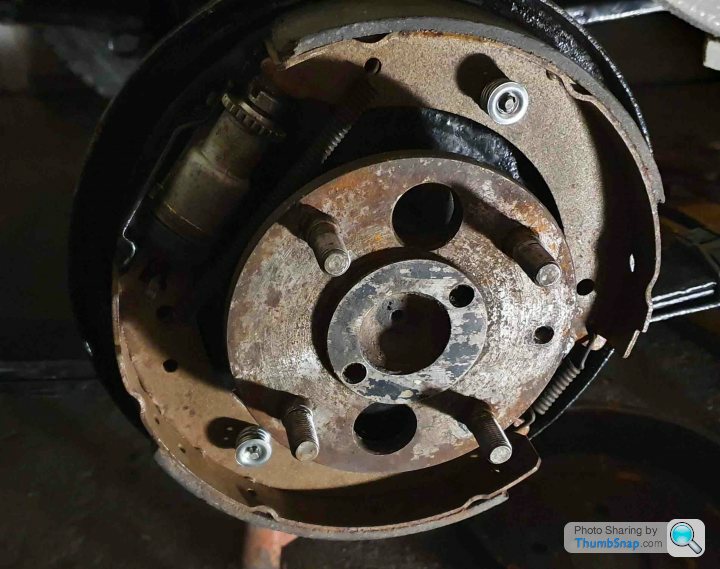
As a side note - I found the photos I took before I stripped the axle down many moons ago when sorting photos for the thread!
The fronts needed a bit more work, in my infinite wisdom I sold my callipers years ago with the intention of fitting larger discs etc when I was going to fit the zetec which I changed my mind on - this was stupid in all honesty but easily remedied. A few auctions on eBay I managed to source these P16's which are the correct type for the 66 Cortina.
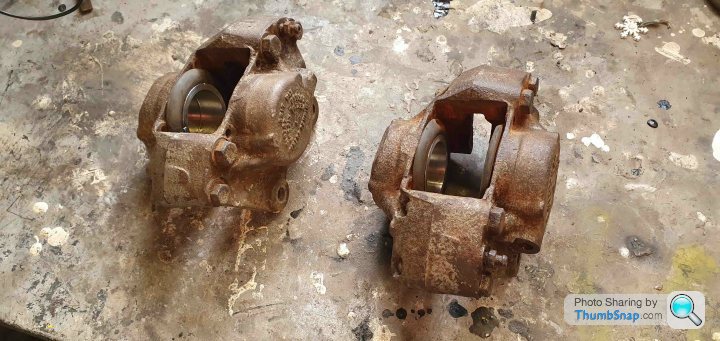
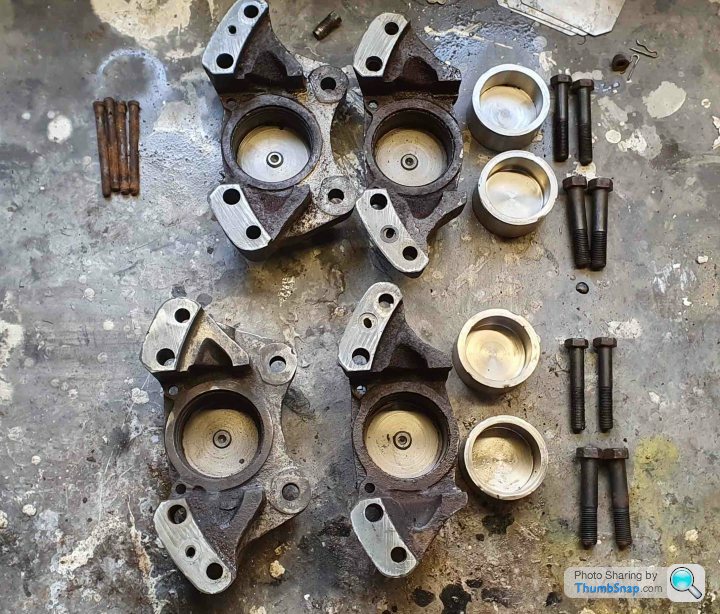
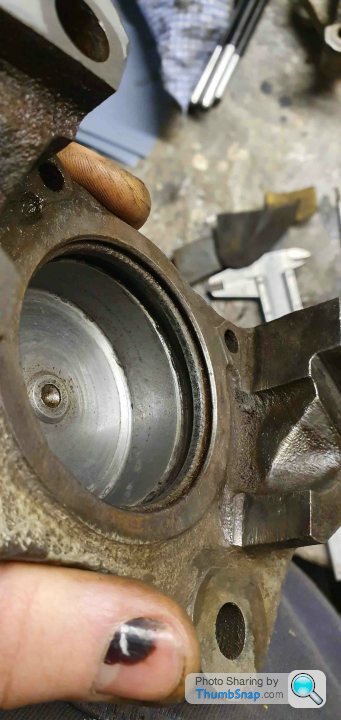
The seals looked a little tired but as luck would have it the previous owner had used stainless steel pistons which saved me the hassle of replacing them.


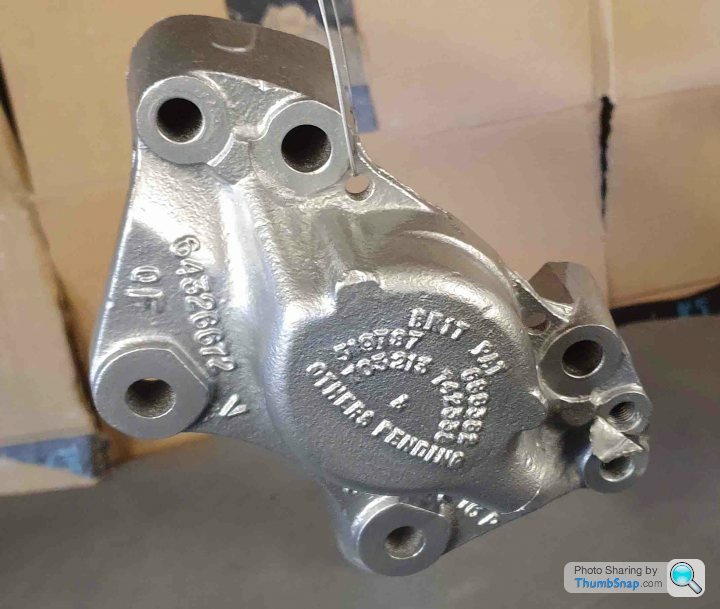

I have filmed this if anyone is looking to do the same with their callipers it can be found online. I had the green stuff pads for the Cortina since it was on the road - I never got a chance to fit them!
I removed the master cylinder as it had been stored since 2009 and not only was the piston a little slow to react the aluminium had light corrosion so I cleaned it up and gave it a coat of high temp silver so it should keep its clean look till I pour brake fluid over it!
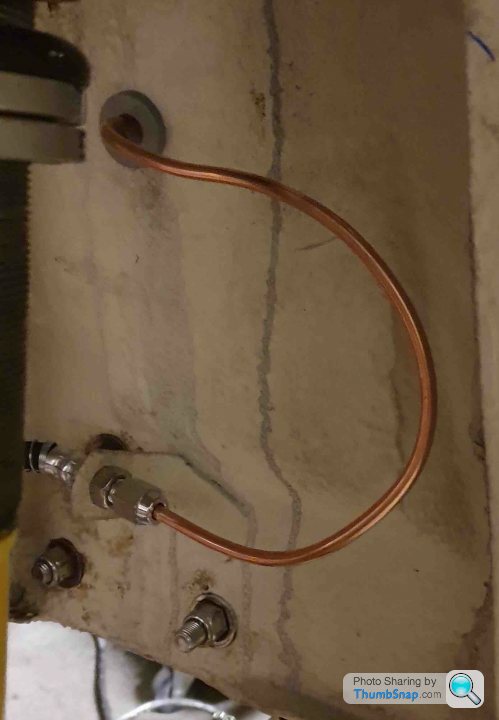
With these parts in place I made up the brake lines, I had bought a kit of pre made lengths for a mk1 Cortina that as it turns out only 50% was correct! the lines that were too long were easily shortened but the engine bay ones were too short. I would understand that short by a few mm is down to me making incorrect radius bends but we were talking 30-60mm approx which is a supplier issue. These have been sat on a shelf for years so pointless getting upset about it and I could borrow a decent flaring tool from one of the chaps at work.

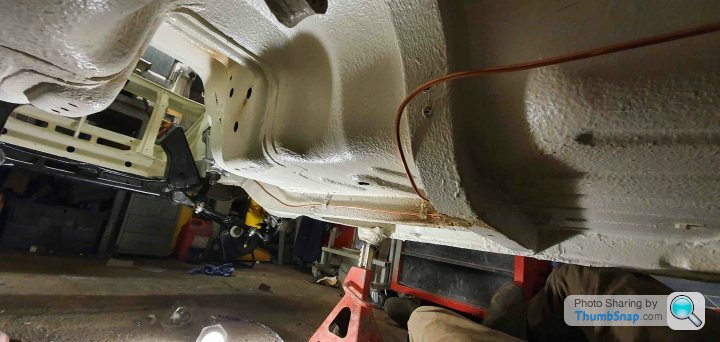

The brown marks under the car is cavity wax, whilst doing the chassis legs I sprayed areas that are known water and road filth traps such as the suspension mounts and the fuel and brake line supports.
The inner wings is from when I tried to wet and dry the engine bay - easily fixed.
All I need to do now is bleed the brakes but I'm a tad concerned about leaving them too long before they're used. I'm hoping to have the car MOT ready later this year but will the brakes be ok as long as they're bled and pumped a few times every week??
Also has anyone used the brake fluid that's meant to be nicer to paintwork?
Retro_Jim said:
Also has anyone used the brake fluid that's meant to be nicer to paintwork?
You mean silicone. Sold by Automec & developed for the US army. Used it in a few classics with no issue & also knew someone who raced a Caterham with it. It works well, can give a slightly spongy pedal but certainly A. doesn't destroy paint & B. isn't hydroscopic so doesn't absorb water, which with lots of expensive wheel cylinders & parts makes a big difference. tr7v8 said:
You mean silicone. Sold by Automec & developed for the US army. Used it in a few classics with no issue & also knew someone who raced a Caterham with it. It works well, can give a slightly spongy pedal but certainly A. doesn't destroy paint & B. isn't hydroscopic so doesn't absorb water, which with lots of expensive wheel cylinders & parts makes a big difference.
That's the stuff - I remember seeing it advertised but I hadn't paid that much attention! Seeing as I have a dry system and all new components I'm in a decent position to try new fluid as opposed to flushing out existing stuff and cross contaminating.Last week to postpone doing wiring as I loathe it I stripped the wiper system down as it's lathargic and needing some love. Somebody had tried to do something with it as one of the bolts that hold the motor together was sheared, this was easily removed but hard to replace as it was an 8-32 thread and 85mm long which would mean I'd have to make a new bolt and quite frankly not worth doing.
Fortunately the drill size is just under that of an M5 so I carefully drilled the hole and tapped it M5 - great!
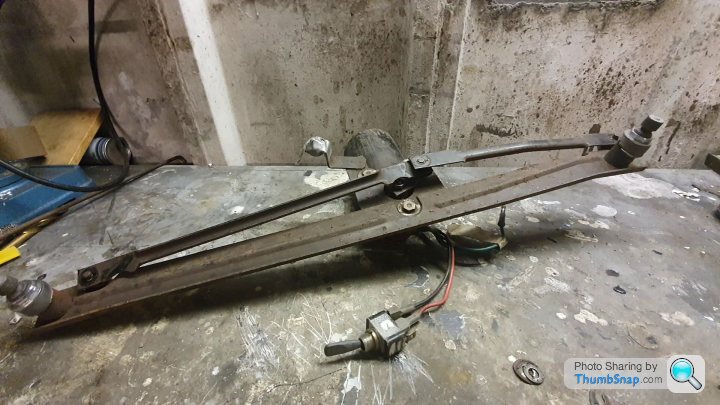
Once stripped it was clear that the armature has had a life, the brushes were surprisingly in good order so a quick clean up and recut the grooves was all it needed.
Everything else was cleaned and painted before reassembly
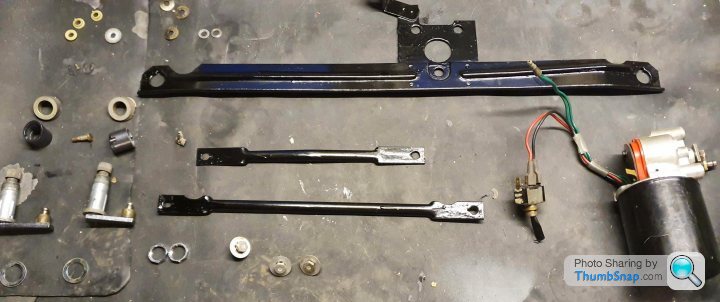
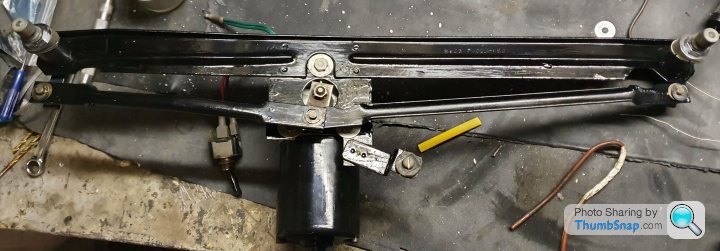
The speed has increased and seems smoother in it's operation I just need to order some gaskets for the bulkhead. I had made a video of this if you're looking to do the same which can be found on Youtube and as an added bonus I don't actually talk on it!
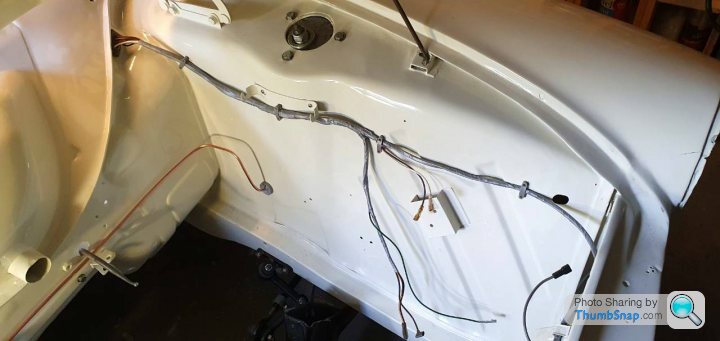
This is the point my posts will slow down as we're up to date! I will endeavour to post as frequently as possible. I've been taping the loom this morning so most of it can be fitted soon.
I'll firstly apologise for my absence, with what's happening in the world I have been fortunate to keep working albeit from home so I have spent most of my days on the computer so I haven't had the motivation to spend the evenings on it too.
This hasn't stopped me working on the Cortina - if anything I have a good excuse to use working in the garage as a break from work and doomsday news reports!
After finishing the wipers they were mounted under the dash which gave me enough reason to pull the loom out of storage and give it a full test and inspection before wrapping and fitting. I had assumed it would go in easily enough but had earthing issues which lead me to pull the loom all together and mount it as I had after I set it on fire.
Mrs. Jim was rather cordial and allowed the loom to be rigged up inside so my office also became a workshop extension!
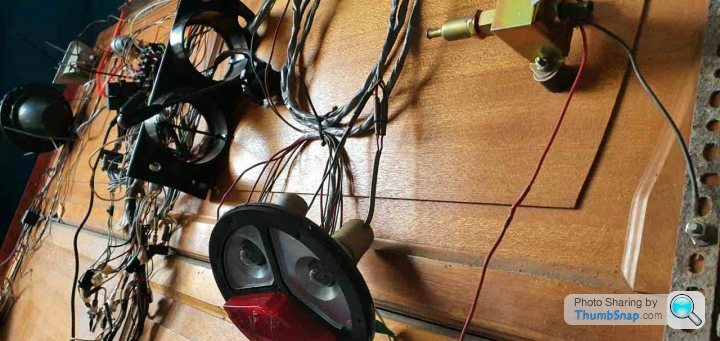
This worked in my favour as I could hardwire the stereo in along with hazard warning lights - let's face it, it'll need them more than most cars on the road!
I spent about a fortnight on the loom mainly waiting for parts to arrive but once I was satisfied with the work I'd done it was quickly taken back into the garage and wrapped
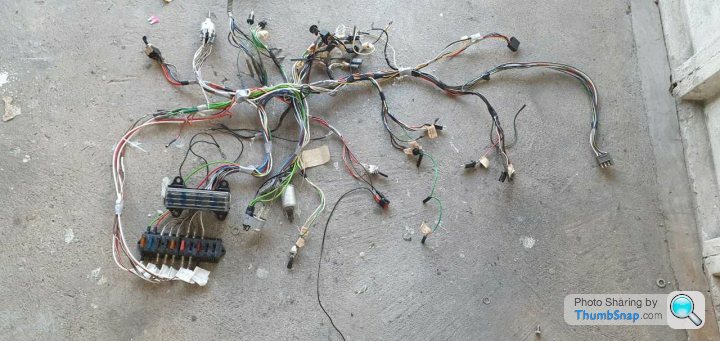
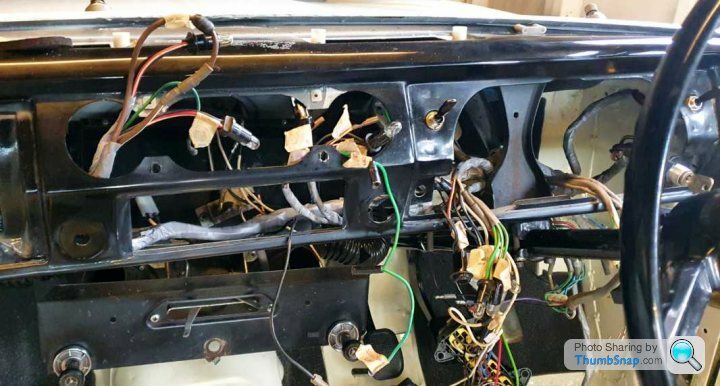
This was back in early April when we had some amazing weather so I decided to treat myself and fit the loom outside - the simple joys of lockdown!
 [url]
[url]
 |https://thumbsnap.com/ETJPYArc[/url]
This hasn't stopped me working on the Cortina - if anything I have a good excuse to use working in the garage as a break from work and doomsday news reports!
After finishing the wipers they were mounted under the dash which gave me enough reason to pull the loom out of storage and give it a full test and inspection before wrapping and fitting. I had assumed it would go in easily enough but had earthing issues which lead me to pull the loom all together and mount it as I had after I set it on fire.
Mrs. Jim was rather cordial and allowed the loom to be rigged up inside so my office also became a workshop extension!
This worked in my favour as I could hardwire the stereo in along with hazard warning lights - let's face it, it'll need them more than most cars on the road!
I spent about a fortnight on the loom mainly waiting for parts to arrive but once I was satisfied with the work I'd done it was quickly taken back into the garage and wrapped
This was back in early April when we had some amazing weather so I decided to treat myself and fit the loom outside - the simple joys of lockdown!
[url]|https://thumbsnap.com/ETJPYArc[/url]Whilst the loom was being finished indoors I pulled my gearboxes out as this was going to need some planning and ordering of parts which I wanted to have them ready so I didn't lose any small parts!
If anyone has driven an original GT they'll understand what I mean by this but basically the gearbox is a weak point, not for taking torque but because it's got rubbish ratios. 2nd gear isn't right.
1st is a standard 1st gear driven normally you'll use it to get to 15 - 20mph
2nd is a really short ratio and will get you to 30mph when driven in the same way
3rd is a little longer than usual 3rd gears so you when going through the gears to get to 70mph you have to rinse 2nd to not lose all momentum when you go into 3rd - it's engineered turbo lag!
To get around this you can change the gearing from a 2000e gearbox but use the original housings so that you keep the remote selector and negate having to cut another hole in the floor as the later 2000e gearboxes have the selector at the rest or the tail housing.
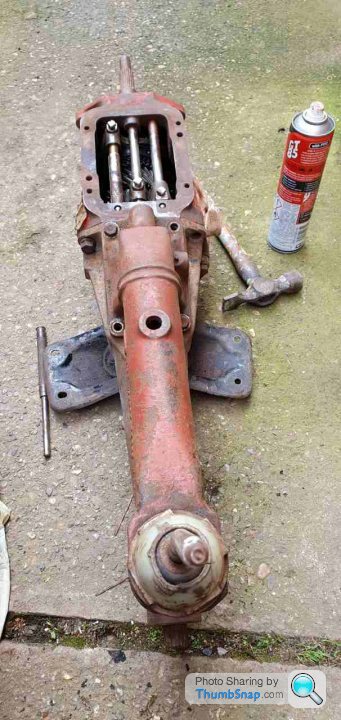
This is an original 1500 box that I bought for the selector arms as I had sold the original box back when I was going to fit a zetec as I figured I would use a type 9 and have 5 gears.
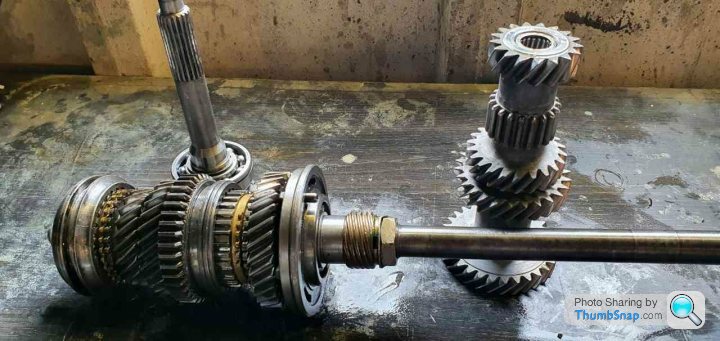
This is the gears from a mk1 Lotus (I did check it several times). These gears are from different gearboxes as I bought 1 which had a stripped layshaft but the main shaft was ok and I can't remember where I acquired the layshaft from but essentially it took 3.5 gearboxes to build my 1 gearbox! The photo about is after the whole lot was washed, stripped, cleaned again, inspected, cleaned then rebuilt and then cleaned.
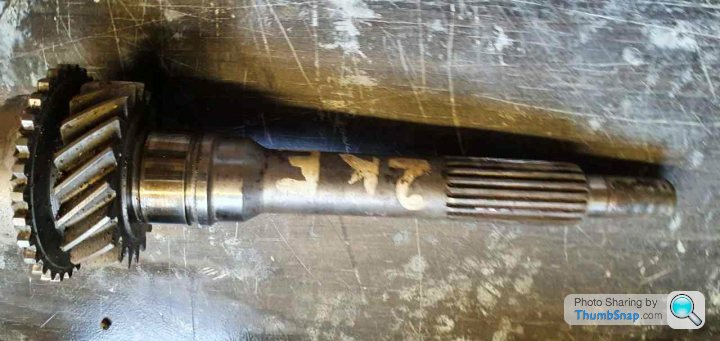

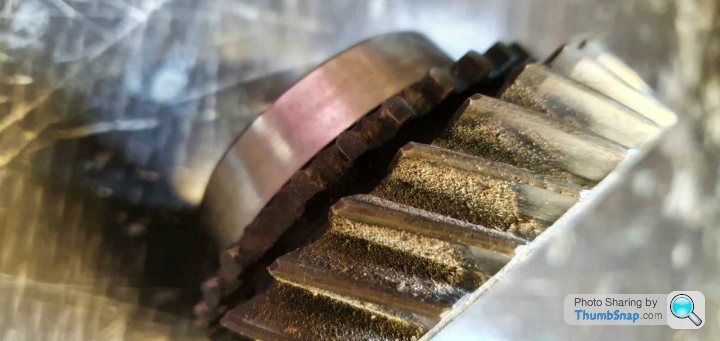
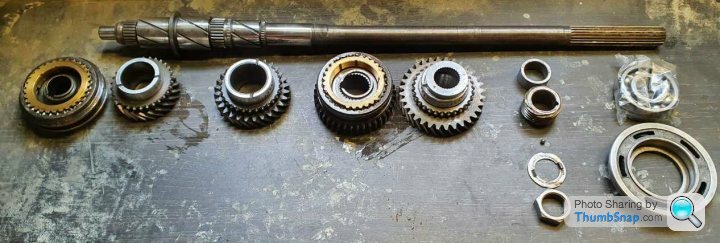
It was filthy but in a surprisingly good condition.
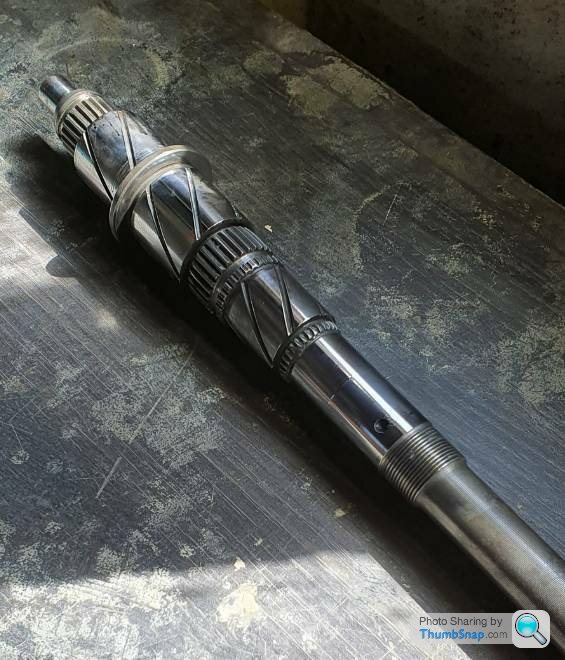
My record vice came in handy for holding the casing whilst I threw this lot back in as it's a fidly job that requires you to lift the layshaft with string up to the main shaft whilst driving the layshaft shaft through the casing without moving the needle bearings inside the layshaft and having a nervous breakdown!
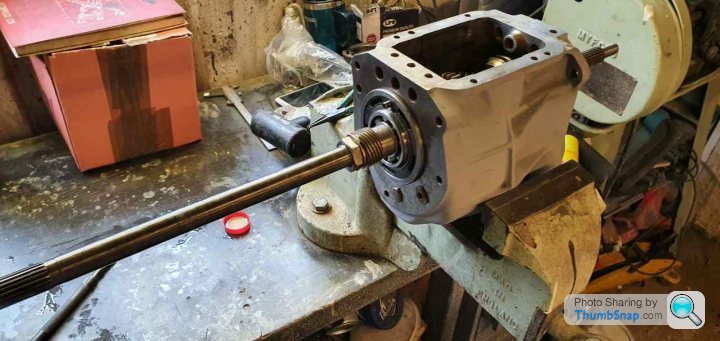
This wasn't the first time of doing one of these gearboxes as I had to replace the syncros when the Cortina was on the road but that time it took 2hrs. As I was still scarred by that experience I cut an original layshaft shaft down so it would hold the needle bearings in place and be driven out by the new shaft - it worked and the whole process took 20 mins.
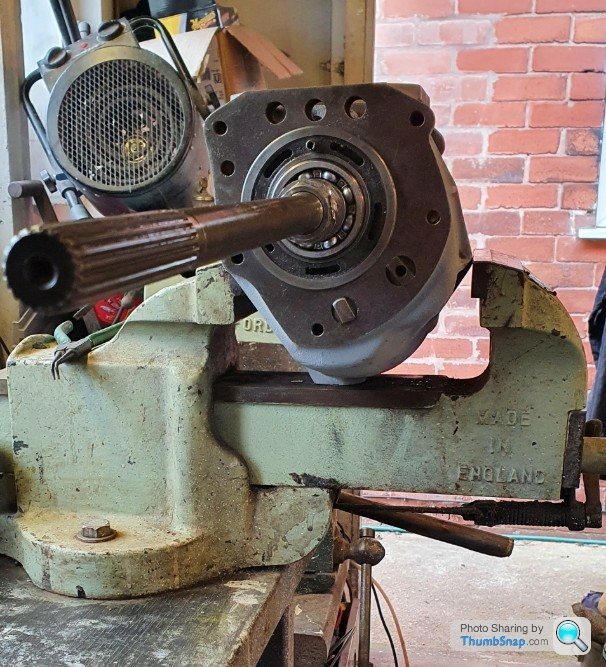
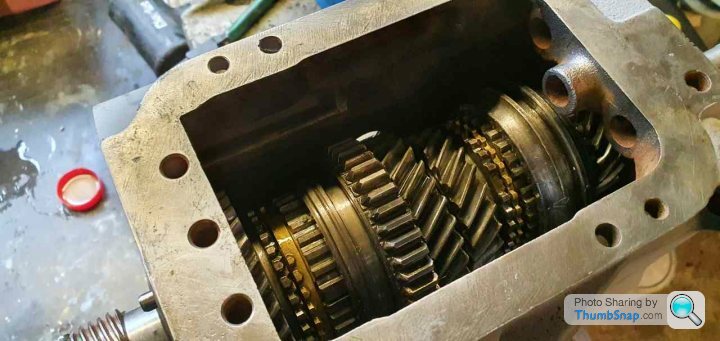
to test that everything was as it should be I threw the tail housing on along with the shifting rods etc and spun the gearbox by hand and checked it all shifted

All was good with the gearbox so I made a start on the selector. The main parts for these are made from plastic and had seen better days, the cups are a pain to get hold of and the MK1 OC don't carry them anymore but they are the same part as the ones used on the Elan's so I treated myself to a shiny aluminium one.
The other bushes have been replaced with nylon equivalents and the original linkage was cleaned and inspected.
I left the gearbox unpainted for the time being because I wanted to get the engine prepped and ready to fit along with the gearbox as 1 unit. I knew I'd have to work around it so figured I'd paint it the once a day or 2 before I was to fit it.
If anyone has driven an original GT they'll understand what I mean by this but basically the gearbox is a weak point, not for taking torque but because it's got rubbish ratios. 2nd gear isn't right.
1st is a standard 1st gear driven normally you'll use it to get to 15 - 20mph
2nd is a really short ratio and will get you to 30mph when driven in the same way
3rd is a little longer than usual 3rd gears so you when going through the gears to get to 70mph you have to rinse 2nd to not lose all momentum when you go into 3rd - it's engineered turbo lag!
To get around this you can change the gearing from a 2000e gearbox but use the original housings so that you keep the remote selector and negate having to cut another hole in the floor as the later 2000e gearboxes have the selector at the rest or the tail housing.
This is an original 1500 box that I bought for the selector arms as I had sold the original box back when I was going to fit a zetec as I figured I would use a type 9 and have 5 gears.
This is the gears from a mk1 Lotus (I did check it several times). These gears are from different gearboxes as I bought 1 which had a stripped layshaft but the main shaft was ok and I can't remember where I acquired the layshaft from but essentially it took 3.5 gearboxes to build my 1 gearbox! The photo about is after the whole lot was washed, stripped, cleaned again, inspected, cleaned then rebuilt and then cleaned.
It was filthy but in a surprisingly good condition.
My record vice came in handy for holding the casing whilst I threw this lot back in as it's a fidly job that requires you to lift the layshaft with string up to the main shaft whilst driving the layshaft shaft through the casing without moving the needle bearings inside the layshaft and having a nervous breakdown!
This wasn't the first time of doing one of these gearboxes as I had to replace the syncros when the Cortina was on the road but that time it took 2hrs. As I was still scarred by that experience I cut an original layshaft shaft down so it would hold the needle bearings in place and be driven out by the new shaft - it worked and the whole process took 20 mins.
to test that everything was as it should be I threw the tail housing on along with the shifting rods etc and spun the gearbox by hand and checked it all shifted
All was good with the gearbox so I made a start on the selector. The main parts for these are made from plastic and had seen better days, the cups are a pain to get hold of and the MK1 OC don't carry them anymore but they are the same part as the ones used on the Elan's so I treated myself to a shiny aluminium one.
The other bushes have been replaced with nylon equivalents and the original linkage was cleaned and inspected.
I left the gearbox unpainted for the time being because I wanted to get the engine prepped and ready to fit along with the gearbox as 1 unit. I knew I'd have to work around it so figured I'd paint it the once a day or 2 before I was to fit it.
Just re read all of this thread... amazing dedication you have !
I see that you mention the box ratios are not ideal...IIRC my Elan had the same/similar 4 speed box, and the ratios could have been better spaced out. Some folk converted Elans to a 5 speed ( from the Austin Maxi I seem to remember), but it was not that good to use. There were a handful ( literally 5or6 ) factory Elan Sprints fitted with a five speed box and folklore suggests they were the last ones built.
All I know is my Elan was not suited to motorway driving as 4th was too low really, and the noise levels at 80 leptons on the Autoroutes got a bit weary !!
By the way, does your Cortina have a single circuit braking system ?
My Elan did and if there was a dual circuit kit available I would have fitted it/or more likely had it done. I did install a low level brake fluid warning sensor kit as my S4 did not have one.
The Lotus five speed gear box used in later Elans and early Eclats and Elites was not an Austin Maxi gearbox. It was a box that Lotus made but using the same cogs as used in the Maxi gearbox. It's not a bad box - I had one in an Elan Plus Two. It was better than the Renault five speed used in the Europa. It was a bit overpowered by the 900 series engine used in the Eclat and Elite, which got a Getrag box for their second series.
OP, great thread , and cool car.
OP, great thread , and cool car.
Thank you for the kind words.
After all the crawling around on the floor it was rather nice to sit at my bench and build the gearbox whilst drinking tea and listening to music!
I discovered the Elan 5 speed gearbox after getting the bits via an elan specialist, I've looked at photos of the box and it bolts directly to the engine which means it'll fit to mine. after that it should be an elan clutch and figure out the prop but worth thinking about. When I come to build the supercharged engine I had considered MX5 gearboxes as they're 10 a penny.
I have been tripping over the engine for the last year, it was strapped to a wooden board with some caster screwed to it so I could move it out of the way when I needed space but now was the time to sort it out!
The engine had run before I removed it but I hand't done a great job of the sump gasket and using the garage as a body shop plus moving the engine around had taken its toll - it looked rough. I have an engine stand and even now I can't work out how I lifted the engine onto it, on my own at 6:30am without making a sound or having a hernia!
My video on the engine https://www.youtube.com/watch?v=Wy4GS0GSY2Q but I'll share some parts that weren't filmed
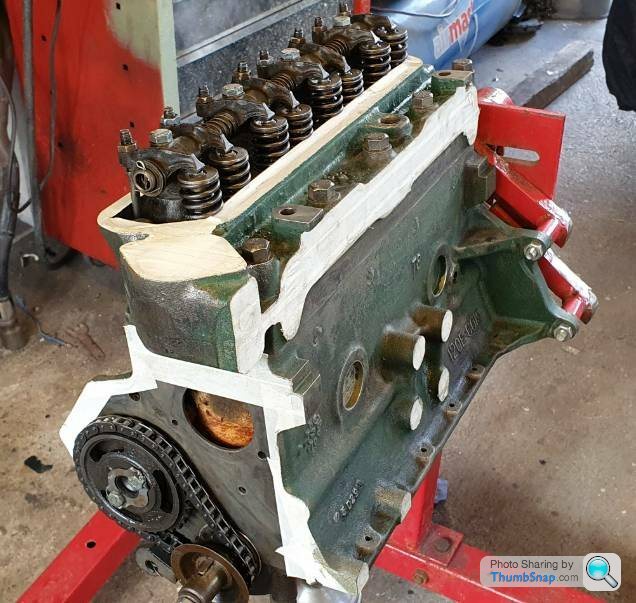
This was after I stripped everything off and masked off the mating faces.
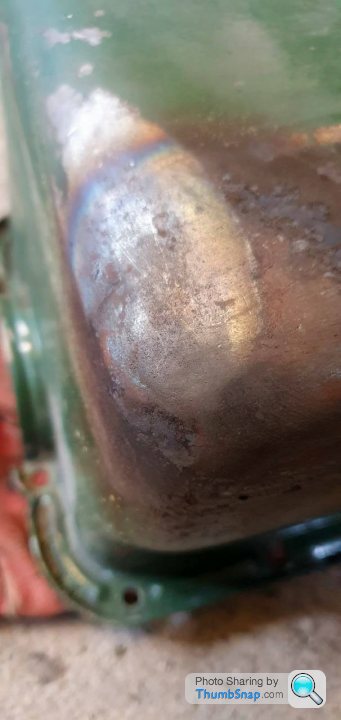
The sump has a front bowl which is great for bashing against high kerbs or squirrels that haven't ducked in time!
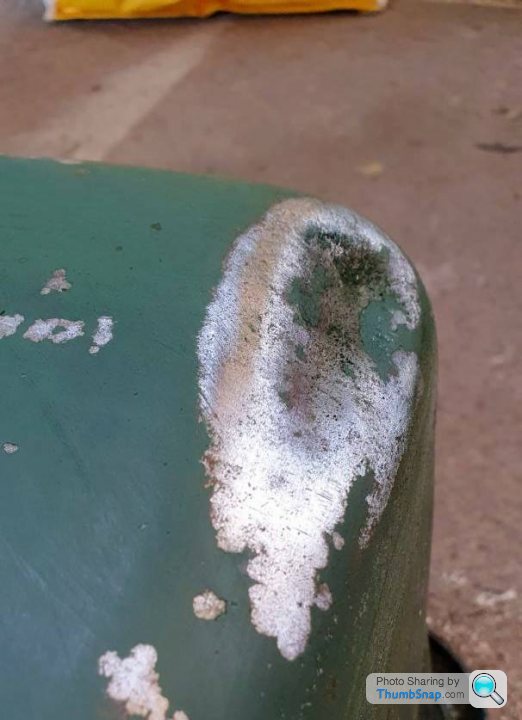
It's not structural and it's not visible once fitted but knowing I could have fixed it and didn't would annoy me no end. With some heat, a percussion adjustment tool and colourful language the dent was significantly reduced.
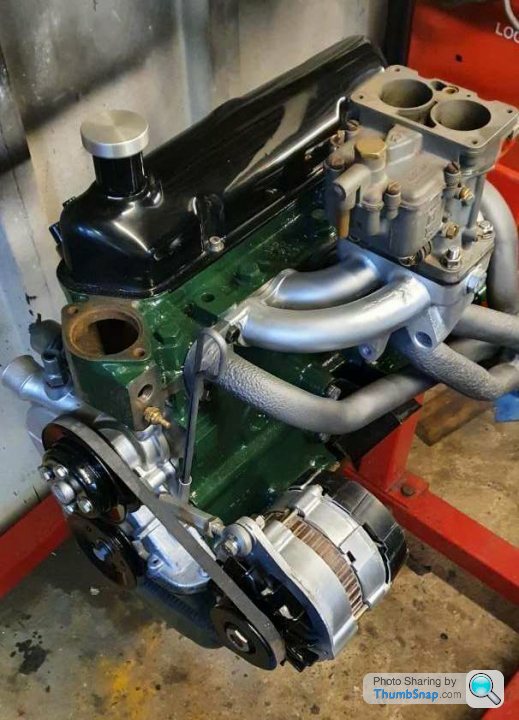
When the Cortina was crafted in Dagenham the engines were painted green and from what I could see the paint suppliers debate of what shade that is so I had a bit of artistic licence and went with British racing green. I've kept the aluminium parts silver but used satin high temp paint to keep a consistent finish and the exhaust is painted in anthracite high temp paint to give the illusion it's not rusty.
I'll admit that I was impressed with what I had achieved - something I don't usually say about my work.
Things went rather quickly from here, I was fortunate enough to borrow an engine crane from work so not wanting to take liberties the engine was dropped back onto the ground so I could fit the flywheel and clutch, the gearbox was painted to match the engine and the next day they were mated. This was the saturday when Borris said we could visit people so long we kept our distance so I managed to do a socially distanced engine fit with the help of my father and Mrs. Jim making tea.

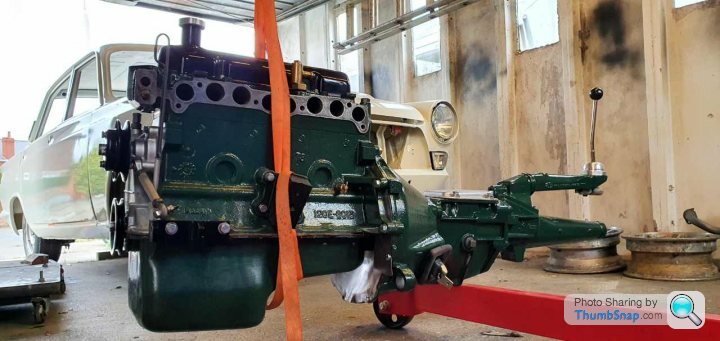
It was a fairly quick job but physically draining given the area and maintaining distance but communication was good. I was elated - I still am 3 weeks later I haven't had a functional engine and gearbox in the Cortina since Cadillac arrest in 2006.
After all the crawling around on the floor it was rather nice to sit at my bench and build the gearbox whilst drinking tea and listening to music!
I discovered the Elan 5 speed gearbox after getting the bits via an elan specialist, I've looked at photos of the box and it bolts directly to the engine which means it'll fit to mine. after that it should be an elan clutch and figure out the prop but worth thinking about. When I come to build the supercharged engine I had considered MX5 gearboxes as they're 10 a penny.
I have been tripping over the engine for the last year, it was strapped to a wooden board with some caster screwed to it so I could move it out of the way when I needed space but now was the time to sort it out!
The engine had run before I removed it but I hand't done a great job of the sump gasket and using the garage as a body shop plus moving the engine around had taken its toll - it looked rough. I have an engine stand and even now I can't work out how I lifted the engine onto it, on my own at 6:30am without making a sound or having a hernia!
My video on the engine https://www.youtube.com/watch?v=Wy4GS0GSY2Q but I'll share some parts that weren't filmed
This was after I stripped everything off and masked off the mating faces.
The sump has a front bowl which is great for bashing against high kerbs or squirrels that haven't ducked in time!
It's not structural and it's not visible once fitted but knowing I could have fixed it and didn't would annoy me no end. With some heat, a percussion adjustment tool and colourful language the dent was significantly reduced.
When the Cortina was crafted in Dagenham the engines were painted green and from what I could see the paint suppliers debate of what shade that is so I had a bit of artistic licence and went with British racing green. I've kept the aluminium parts silver but used satin high temp paint to keep a consistent finish and the exhaust is painted in anthracite high temp paint to give the illusion it's not rusty.
I'll admit that I was impressed with what I had achieved - something I don't usually say about my work.
Things went rather quickly from here, I was fortunate enough to borrow an engine crane from work so not wanting to take liberties the engine was dropped back onto the ground so I could fit the flywheel and clutch, the gearbox was painted to match the engine and the next day they were mated. This was the saturday when Borris said we could visit people so long we kept our distance so I managed to do a socially distanced engine fit with the help of my father and Mrs. Jim making tea.
It was a fairly quick job but physically draining given the area and maintaining distance but communication was good. I was elated - I still am 3 weeks later I haven't had a functional engine and gearbox in the Cortina since Cadillac arrest in 2006.
That looks very good indeed, OP, and fingers crossed as the project moves ahead.
The power of swearing in car repairs and DIY engineering work is, I think, a bit underestimated. I learned how to swear in the 1970s by listening to my dad, who could not be seen, because he was lying on the driveway of our suburban semi underneath some truly knackered car. The car was often some sort of Hillman, but occasionally it was some sort of Ford. Meanwhile oil slowly spread across the tarmac of the drive. Sadly, I did not also learn how to fix cars, but I am still ace at swearing, and can sometimes get a recalcitrant 1970s car to start by swearing at it. I am not sure that I have 1960s car-swearing powers.
The power of swearing in car repairs and DIY engineering work is, I think, a bit underestimated. I learned how to swear in the 1970s by listening to my dad, who could not be seen, because he was lying on the driveway of our suburban semi underneath some truly knackered car. The car was often some sort of Hillman, but occasionally it was some sort of Ford. Meanwhile oil slowly spread across the tarmac of the drive. Sadly, I did not also learn how to fix cars, but I am still ace at swearing, and can sometimes get a recalcitrant 1970s car to start by swearing at it. I am not sure that I have 1960s car-swearing powers.
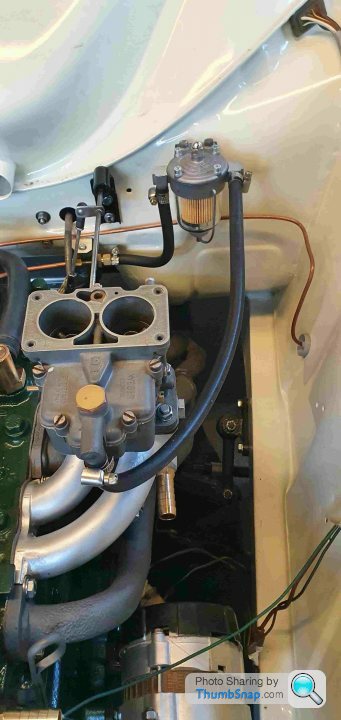
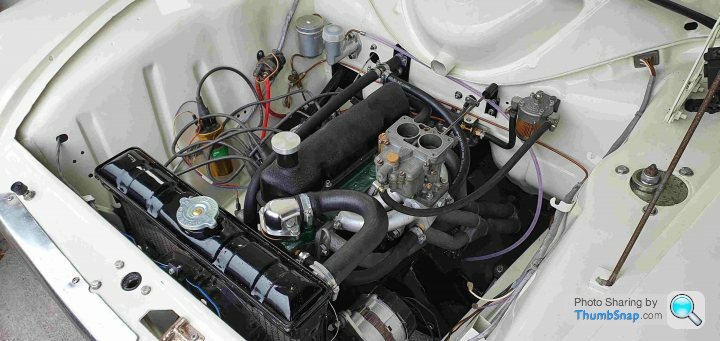
Amazing to see the carb almost sitting on top of the exhaust manifold....!!
Not ideal for quite a few reasons, but that is how they were designed I guess.
Heat soak would affect the fuel temperature was my first thought when I saw that picture pre-paint !
Good progress and very impressive thread.
Not ideal for quite a few reasons, but that is how they were designed I guess.
Heat soak would affect the fuel temperature was my first thought when I saw that picture pre-paint !
Good progress and very impressive thread.
Paul S4 said:
Amazing to see the carb almost sitting on top of the exhaust manifold....!!
Not ideal for quite a few reasons, but that is how they were designed I guess.
Heat soak would affect the fuel temperature was my first thought when I saw that picture pre-paint !
Good progress and very impressive thread.
I still find it bizarre but it does work - I don't need to worry so much about icing plus I have a coolant line that runs through the bottom of the manifold .Not ideal for quite a few reasons, but that is how they were designed I guess.
Heat soak would affect the fuel temperature was my first thought when I saw that picture pre-paint !
Good progress and very impressive thread.
for the moment I'm not going for full on performance but when I start to look at the super charger inlet temperature will be a concern but manageable.
RobXjcoupe said:
Just spent the last couple of hours reading through. Made me smile but a job well done. 
Thank you Rob, I'm glad it made you smile - it usually cures my wife's insomnia when I talk about the intricacies or the weber 28/36 DCD or UNC vs UNF threads. Having seen the engine built up on the stand it was a rinse and repeat process of throwing it all back on, I did however catch the rocket cover when lifitng the engine in so that needed to be repainted - I tried wrinkle paint as I'd nailed orange peel and runs I thought I'd take on a real challenge and go for a consistent finish.

I made a miss calculation in my painting abilities and ended with smooth and the sides and rough up top - it's the rocker cover equivalent to a mullet! I'll wait for a rainy day to take this one on again!
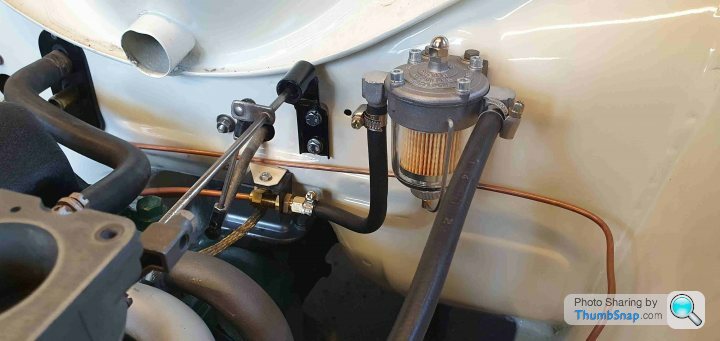
To move away from painting woes I went back to making brackets to fit things and the new challenge was to find a home for the fuel pressure regulator, I went with a glass bowl because the look cool and the original fuel pump had a glass top to it and a diagphram that's prone to splitting and filling the sump with petrol altering the internal combustion from inside the cylinder to the block!
I was fine with making the bracket right up to the point I had to mount it as this meant I had to drill the freshly painted bulk head - It's a good job I used my steady hand otherwise that would have been a disaster. All in all I think it fits in the bay nicely and almost like it should be there.
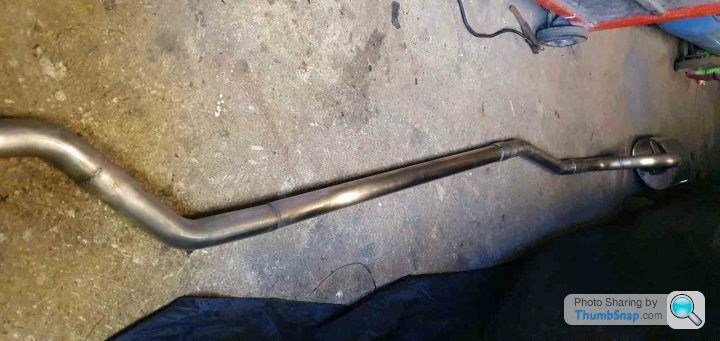
When doing the dry build many, many moons ago I initially ran the Cortina without an exhaust because it won't be that loud surely?!
This is another example of me being very wrong and unfortunately won't be the last time as Mrs. Jim was rather upset when it fired up and spooked her, our cat, some chickens next door and who know's what else! To avoid being forced to socially distance in the garage for a few days (that punishment wouldn't prevent me reoffending!) I figured as I had made an exhaust I better fit it.
 [url]
[url]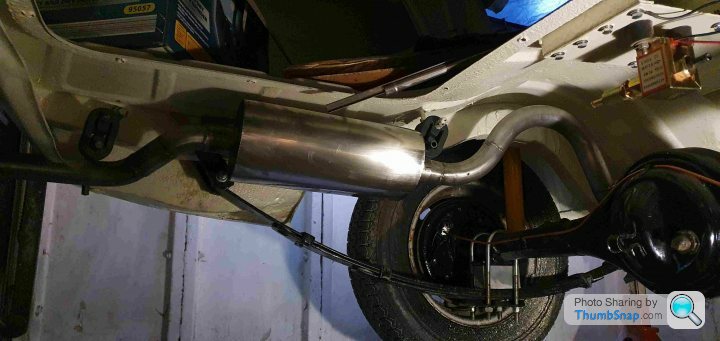 |https://thumbsnap.com/SNGCQ44M[/url][url]
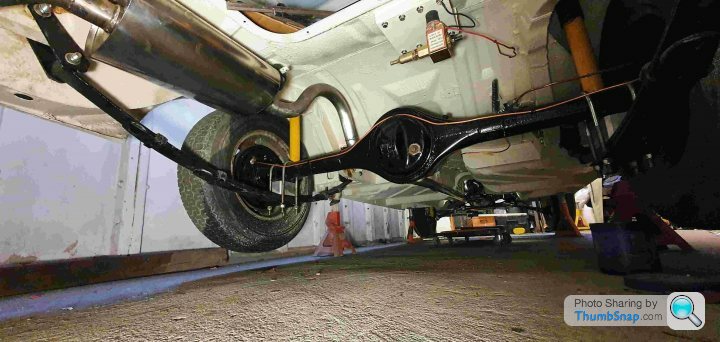 |https://thumbsnap.com/kH7H9STg[/url]
There was enough fitted to make the engine run so I figured why not!
Breadvan72 said:
What's the general plan now, Retro Jim? Any idea when you will have the car back on the road? Best of luck as the project proceeds - the car will be fab when done.
I actually drove it for the first time since 2006 last week - it was a bit of a saga in all honesty which I'll come on to. The body shop I used have decided that they don't want to reskin the door even though they were paid to do it (not worth pursuing) so I think I have found someone who can help me, so many restorers who want the work but never get back to me is astounding.
With all 4 doors I can get on and put the seals and glass etc in,
Sort the interior and fit it.
Full mechanical overview and sort, I have little niggles as all builds do that I'd like to hit before going to MOT and seeing as we're at the cold end of the year I might as well spend winter and get the majority. Once I believe the Cortina will behave and is safe I'll use the MOT to become legitimate or use it as a to do list.
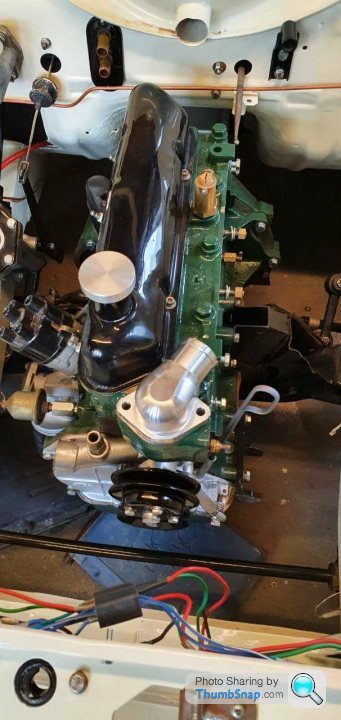
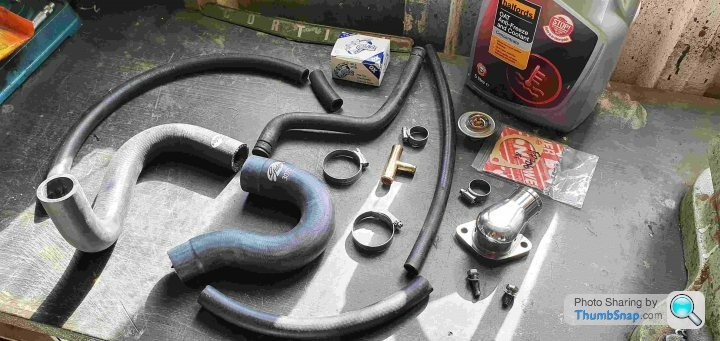
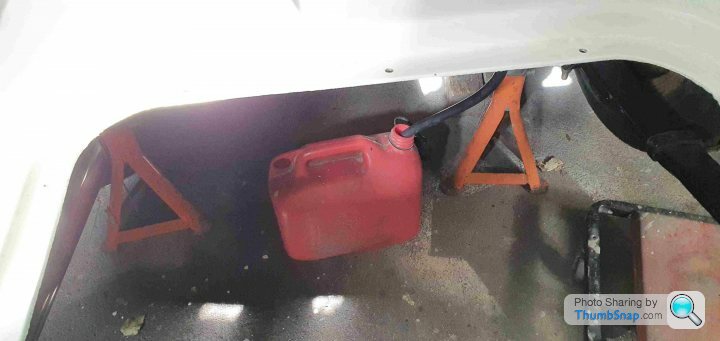
Once I had the engine running albeit without coolant and a small fuel can I wanted to make a concerted push towards actual motion, I couldn't order anything from the owners club for 6 weeks because they were overhauling the website - trying to find specific coolant hoses became an ordeal in itself!
So I started with the easy bits - the clutch system hasn't been altered from standard apart from the clutch and pressure plate which are AP units for fast road because they're cheaper than standard units and contain a lot less asbestos.
The prop has also escaped being messed with so it was treated to a set of UJ's and some paint.

All mounted I finally had the coolant hoses sorted.
Then things took a turn...

The core plug between the block and gearbox was leaking - when it rains...
This meant all that work was undone, prop, clutch slave, gearbox, starter, clutch and flywheel had to come off. On my back with now lifting equipment - a tall order, the gearbox knocked the wind out of me when it landed on me. The last time I had something that hefty on top of me was the result of poor night club lighting!


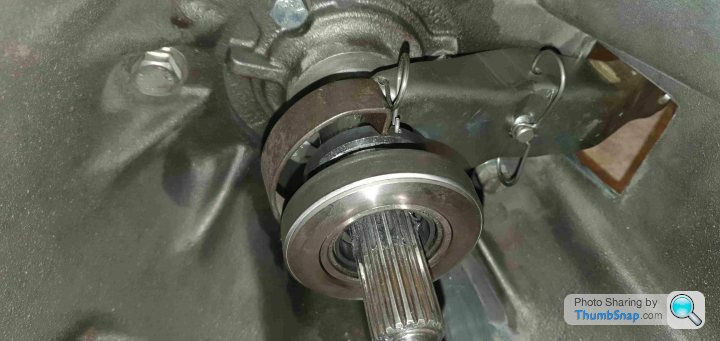
I had a spare coreplug that should have been switched out but when reviewing the clutch I found that the release bearing wasn't reaching the pressure plate so this would have had to come out regardless. The clutch mentioned above isn't as tall as the original which protrudes into the gearbox by some way, after speaking to Burton Power I was informed I needed a bearing extension but that clutch is no longer manufactured (that's a problem for future me).
It's a little hard to see the difference but the bearing is now extended by 20mm
All put back in - which was much easier than anticipated.
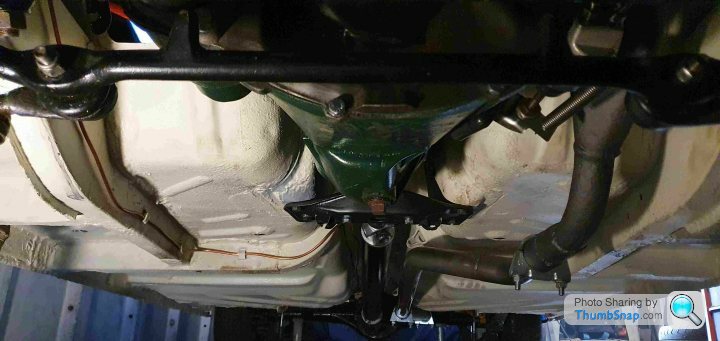
The fuel tank...
I may have shown my fuel tanks were both corroded and beyond help, I was waiting for the Retro ford units to go back into manufacture when I saw a classified add on the owners club page on facebook (the only thing I look at on there). It even came with a new sender - a deal was made and this is what I recieved.


I just wanted a safe option than the one I had at the time
 |https://thumbsnap.com/JNcENuCz[/url]
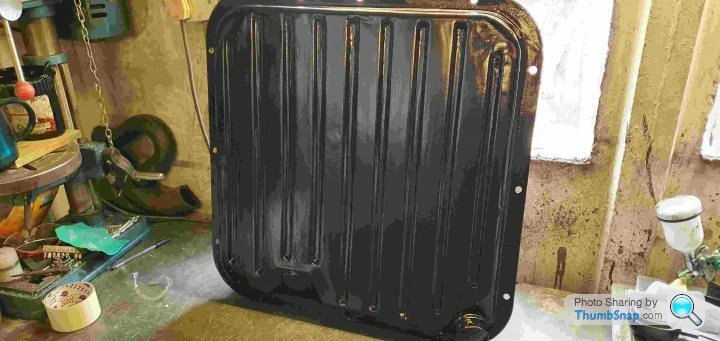
The inside had surface rust and I found a few pinholes that I soldered and then applied a chemical seal before painting and the spraying black with UPOL raptor top and bottom as the tank forms part of the boot floor.
 [url]
[url]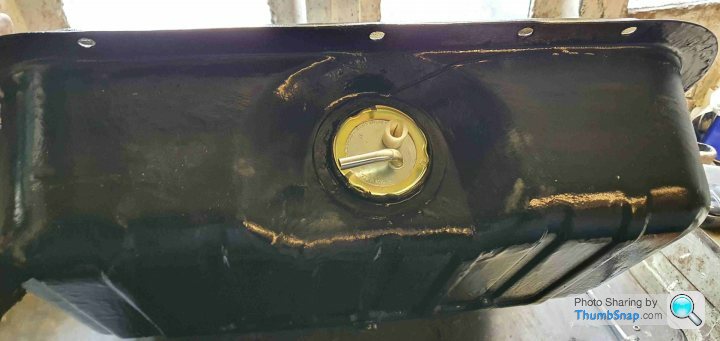 |https://thumbsnap.com/E3vcyMHa[/url][url]
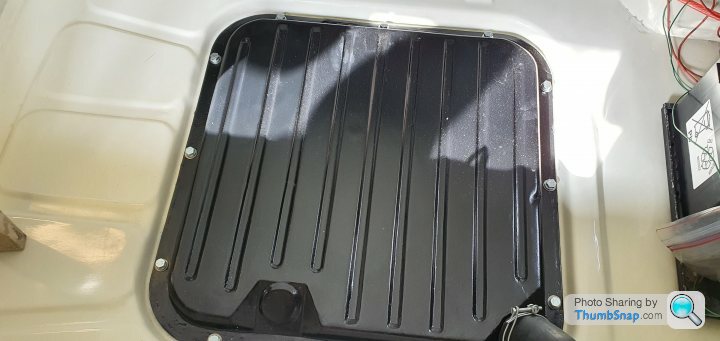 |https://thumbsnap.com/MLwnuyK6[/url][url]
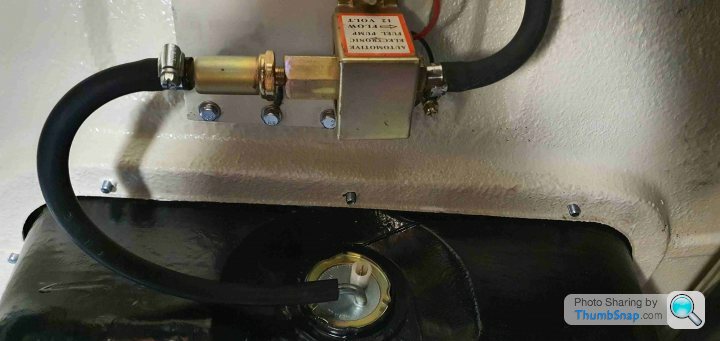 |https://thumbsnap.com/BVAPjRE5[/url][url]
But after all that I got to drive the Cortina, granted it's out of the garage and reverse back in but it's further than it's been driven in a long time!
The fuel filter looks factory fit. I was thinking to do something similar with my 70’s xj6. Usually boot mounted but looks more interesting in the engine bay .
The learning of unc and unf thread sizes is painful having grown up with metric. Then getting to grips with those I found a near complete one off thread on the brake servo. Went through bsf, bsw sizes also and then randomly tried a metric size and it was metric! Arrrr! Lol still done now
.The learning of unc and unf thread sizes is painful having grown up with metric. Then getting to grips with those I found a near complete one off thread on the brake servo. Went through bsf, bsw sizes also and then randomly tried a metric size and it was metric! Arrrr! Lol still done now
Gassing Station | Readers' Cars | Top of Page | What's New | My Stuff