R5GTT project - off the road from 1998 to 2014
Discussion


Hello Folks,
It's getting to look a lot like... it's my birthday - all over again
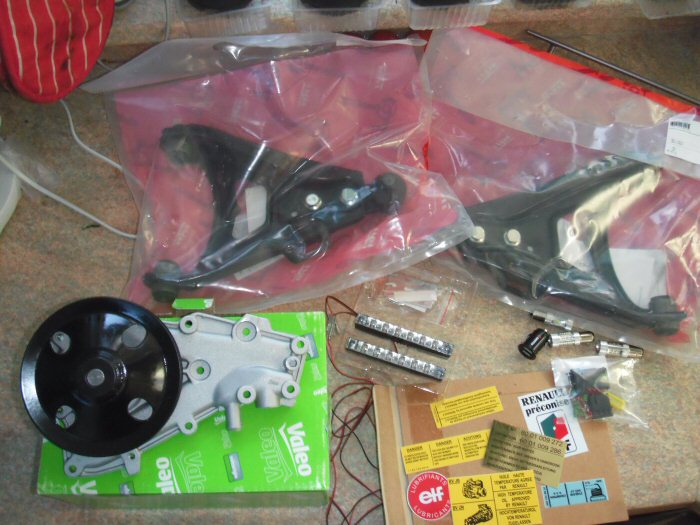
More parts have arrived and a load more spending done too. The brand new
driver's door has arrived, with hinge kits and is all paid for. The brake calipers
have come back from blast-cleaning looking brand new and ready for primer.
I'm dead pleased with the wishbones purchase. It worked out that just the
two main bushes on their own would cost £24 a side, that's without the third
one that joins to the hub. Yet, for £65 I could purchase complete wishbones,
and these are the OE TRW ones to boot! Much appreciation from Karl too as
getting the old bits out requires much obscene language; allegedly...
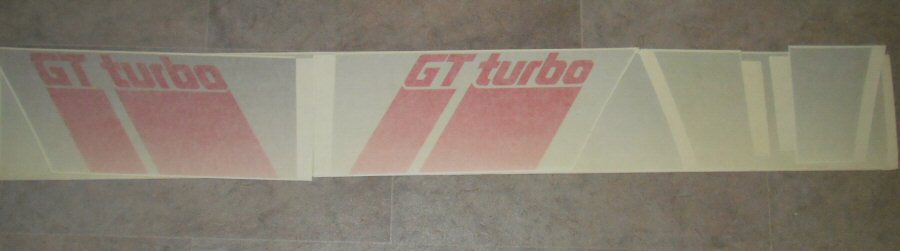
I've also taken delivery of OE side panel graphics at slightly less than cost of
copies. This means that when the time comes, I'll be ensuring that the paint
will be getting some special attention.
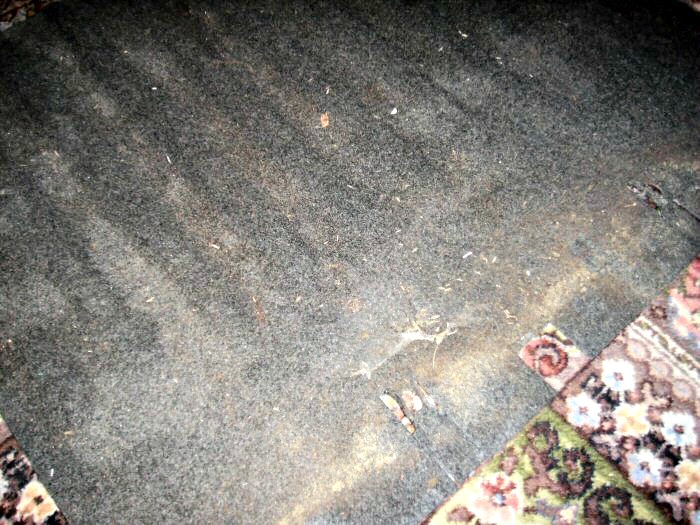
I'm almost done with cleaning the carpet. Will give it another go before a final
clean with the Scotch-Gard foam. Speaking of which, the seats have now had
their SG treatment and have come up like new. All the ghosting marks from
the mould have totally disappeared
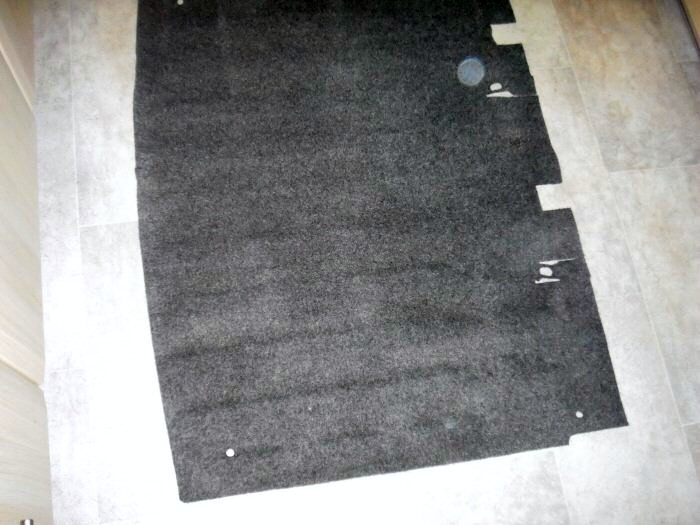
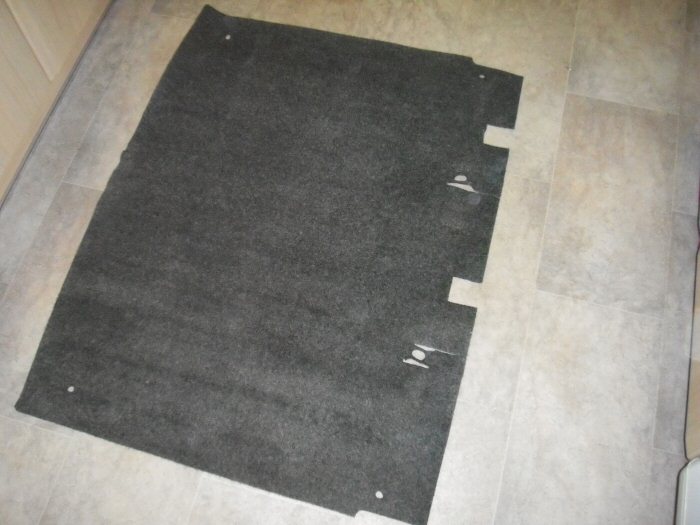
For my next pics I'll be doing a mockup of the interior with seats in position
and the new floor mats in place. I just need to source some locating buttons
for the new mats. (Anyone?) There is a single set supplied with the mats I
bought, but they don't look too sturdy, especially considering how I'm likely
to shuffle about with my unsteady gait.
I'm really getting quite cheesed-off with the flash on my camera! No matter
what I do, it either makes the seats look completely filthy when they are
really clean and sweet-smelling, or the pictures get covered in various size
reflection dots of indeterminate cause, or of course, both! Grrrrrrrrrr...
My lounge faces North so it's impossible to take photos in there without the
flash. If the weather is fine enough tomorrow, I might try again in the garden.
So, here's some pics, despite my cussin'...
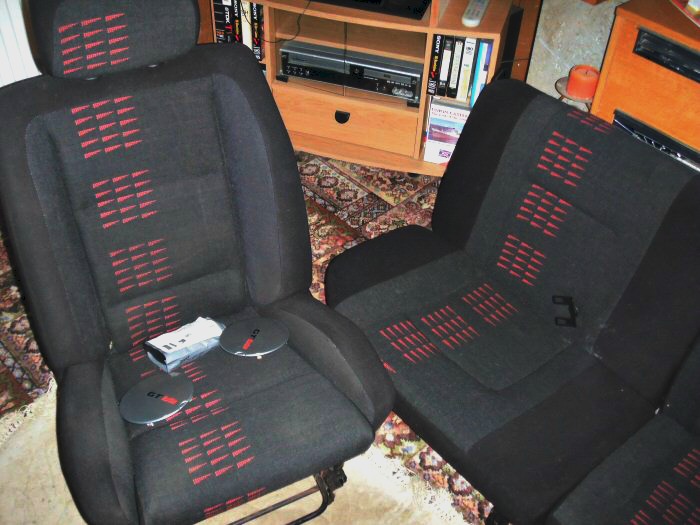
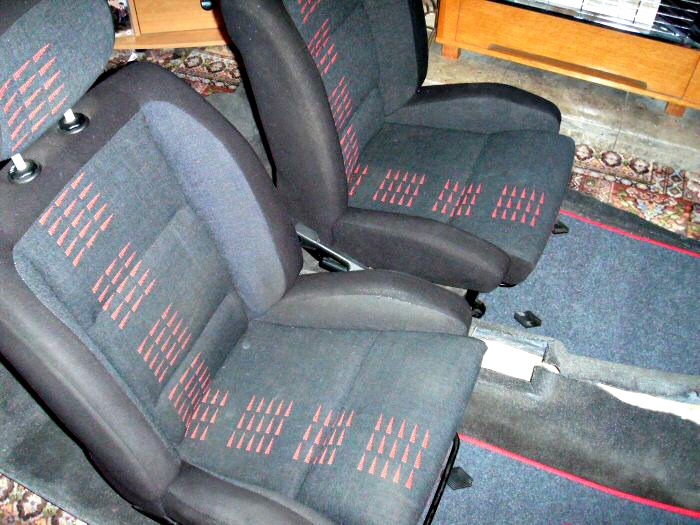
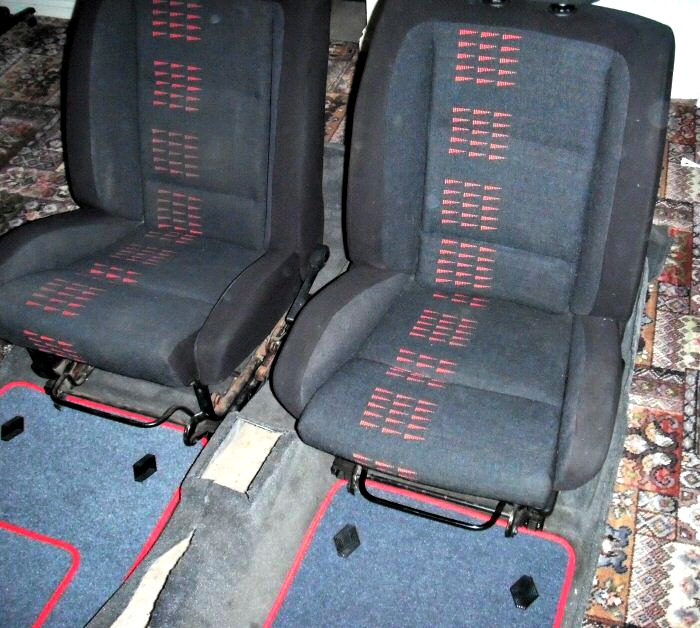
Even the new mats look blue when they are very definitely grey!!
Passenger side of the carpet has yet to be finished with the steamer and
then all of it will be treated with Scotch-Gard... The 1980's style Renault
diamonds will go over the carpet locating clips.
Regards,
Steve
It's getting to look a lot like... it's my birthday - all over again
More parts have arrived and a load more spending done too. The brand new
driver's door has arrived, with hinge kits and is all paid for. The brake calipers
have come back from blast-cleaning looking brand new and ready for primer.
I'm dead pleased with the wishbones purchase. It worked out that just the
two main bushes on their own would cost £24 a side, that's without the third
one that joins to the hub. Yet, for £65 I could purchase complete wishbones,
and these are the OE TRW ones to boot! Much appreciation from Karl too as
getting the old bits out requires much obscene language; allegedly...
I've also taken delivery of OE side panel graphics at slightly less than cost of
copies. This means that when the time comes, I'll be ensuring that the paint
will be getting some special attention.
I'm almost done with cleaning the carpet. Will give it another go before a final
clean with the Scotch-Gard foam. Speaking of which, the seats have now had
their SG treatment and have come up like new. All the ghosting marks from
the mould have totally disappeared
For my next pics I'll be doing a mockup of the interior with seats in position
and the new floor mats in place. I just need to source some locating buttons
for the new mats. (Anyone?) There is a single set supplied with the mats I
bought, but they don't look too sturdy, especially considering how I'm likely
to shuffle about with my unsteady gait.
I'm really getting quite cheesed-off with the flash on my camera! No matter
what I do, it either makes the seats look completely filthy when they are
really clean and sweet-smelling, or the pictures get covered in various size
reflection dots of indeterminate cause, or of course, both! Grrrrrrrrrr...
My lounge faces North so it's impossible to take photos in there without the
flash. If the weather is fine enough tomorrow, I might try again in the garden.
So, here's some pics, despite my cussin'...
Even the new mats look blue when they are very definitely grey!!
Passenger side of the carpet has yet to be finished with the steamer and
then all of it will be treated with Scotch-Gard... The 1980's style Renault
diamonds will go over the carpet locating clips.
Regards,
Steve
Many thanks for the generous comments guys
January 2014
Yeah, that's if Karl or Jason are working on Saturday - car isn't on my premises atm.
Don't knock it - it's a combination of that and a dry, but well ventilated, garage that
means I have the car in such fantastic base condition. I've no doubt that you have some
similar patience - I reckon that's a given with these cars
for that "looked-after" look. If people didn't utter words like immaculate when I'd done,
then I'd not done the job properly. Old habits really do die hard, even when you have
disabled hands...
In its day this was a top of the range motor, so it isn't too difficult to restore it to its
former glory. At least, it defies all the nay-saying badge-snobs...
I settled on Falkens size 185/60/13 which loses 10mm of overall tyre width, but only
about 6mm of tread from the standard tyres. I'm hoping that they'll be as good as those
I've fitted to my Coupé; I'm so glad to see the back of the Bridgestone Potenzas.
Regards,
Steve
January 2014
A said:
More awesome work there Steve,...looking forward to taking a peak if I may on Saturday.
Hi A.Yeah, that's if Karl or Jason are working on Saturday - car isn't on my premises atm.
A said:
Can't wait for the 4 day exterior detailing on this beasty
plus 1 - but that probably won't be until after I take it off the road again next September.R said:
Steve, you're like an obsessive 'cleaning pervert' 
I honestly don't know how you have the patience for it but it certainly seems to pay off
Hi Ross,I honestly don't know how you have the patience for it but it certainly seems to pay off
Don't knock it - it's a combination of that and a dry, but well ventilated, garage that
means I have the car in such fantastic base condition. I've no doubt that you have some
similar patience - I reckon that's a given with these cars
R said:
I'm more of a 'bucket of soapy water' kind of guy which shows really.
Believe it or not, that's where I started too. Only thing is that I've always tended to gofor that "looked-after" look. If people didn't utter words like immaculate when I'd done,
then I'd not done the job properly. Old habits really do die hard, even when you have
disabled hands...
In its day this was a top of the range motor, so it isn't too difficult to restore it to its
former glory. At least, it defies all the nay-saying badge-snobs...
R said:
Great work on resurrecting this car. It'll be something special when it's completed.
I may have just missed it but what size and brand tyres did you opt for in the end?
Thanks. I wish I could take a much more hands-on approach, but Karl is doing me proud! I may have just missed it but what size and brand tyres did you opt for in the end?
I settled on Falkens size 185/60/13 which loses 10mm of overall tyre width, but only
about 6mm of tread from the standard tyres. I'm hoping that they'll be as good as those
I've fitted to my Coupé; I'm so glad to see the back of the Bridgestone Potenzas.
Regards,
Steve
January 2014
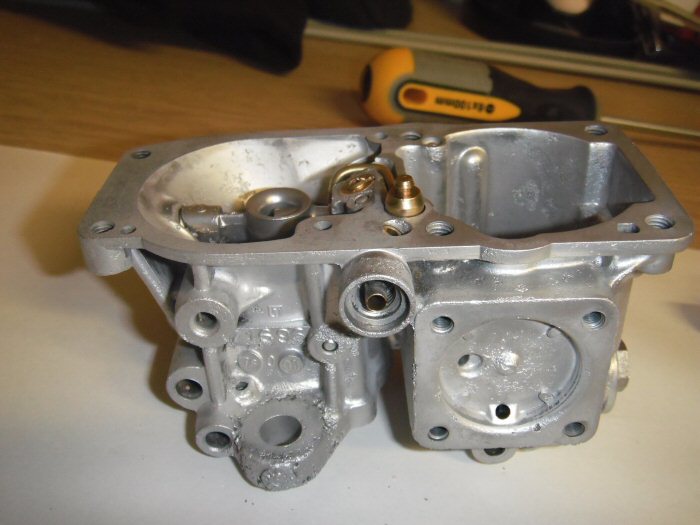
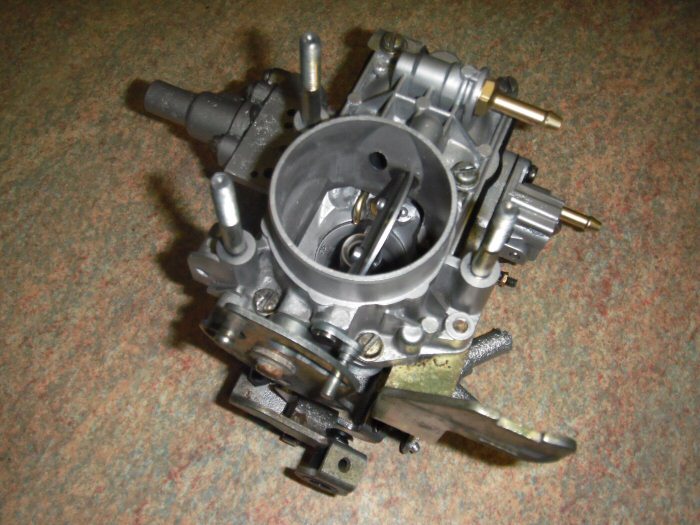
You Know You've Had A Good Day When...
...it eventually turns out like this
Actually, it has been a fascinating afternoon! After a few false starts, thinking
that I might need to send my carburettor away somewhere for cleaning, I
eventually landed upon Suffolk Blast Services, or better put, Darren. After an
initial enquiry when I had intimated that I'd rather like to witness the process,
an appointment was made for this afternoon.
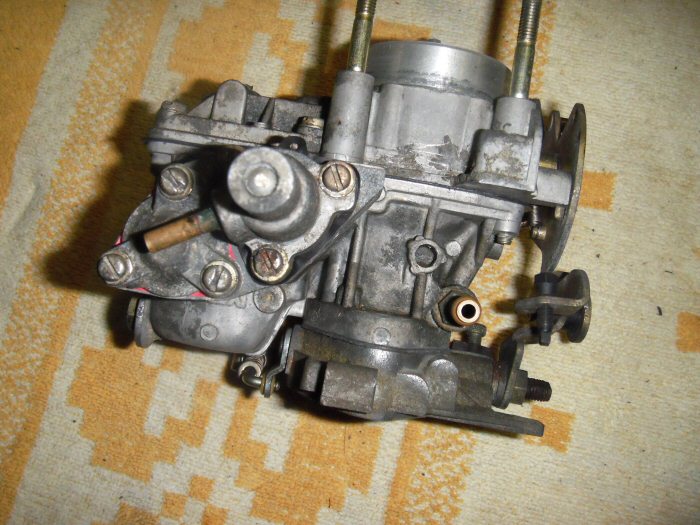
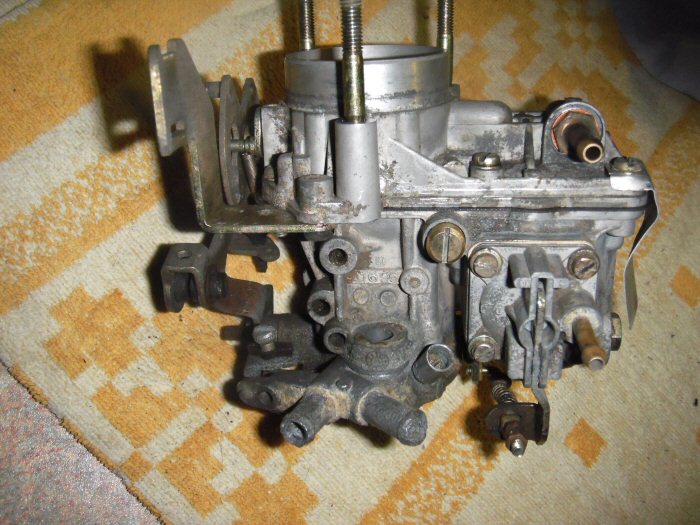
Well, a carb in that state won't pass muster, will it?
Having chatted to Darren, with me not really understanding the processes
involved, I had imagined that he was going to blast the outside clean first
and then take it apart for treatment in the ultrasonic machine. I did get a bit
confuzzled, but then that's easily achieved by me just lately
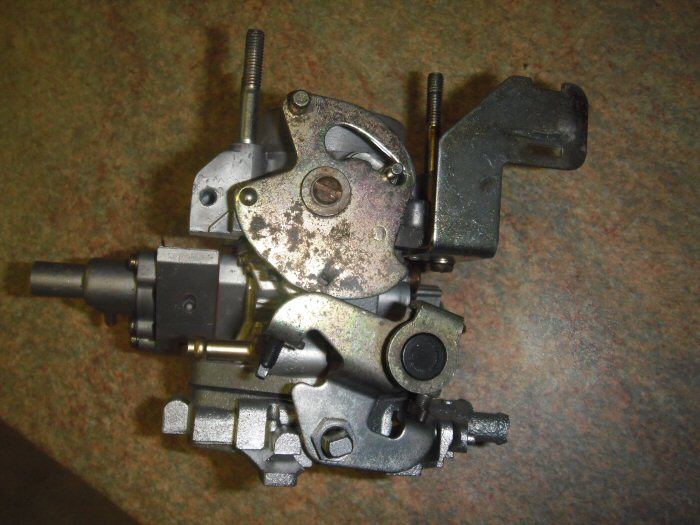
Actually, no. We would need to completely dismantle the carb because he
needed to ensure that the water would flow freely through every tiny orifice
once he got it into the vapour blaster. Curiouser and curiouser...
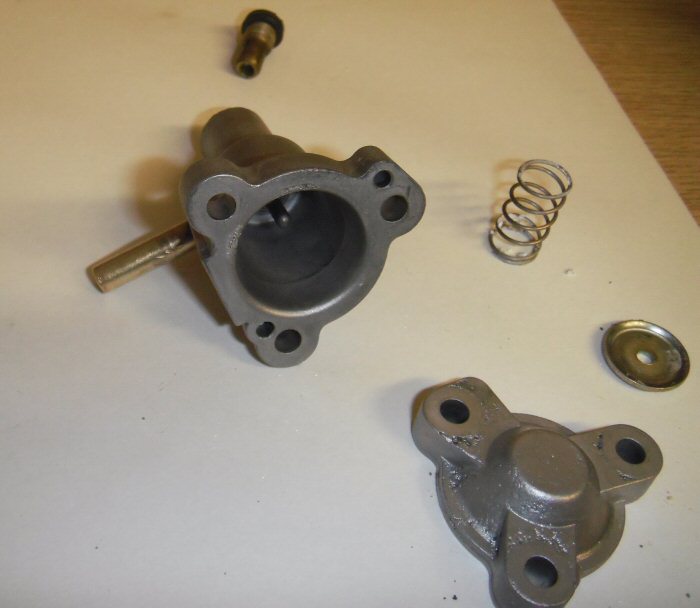
So, the dismantling began
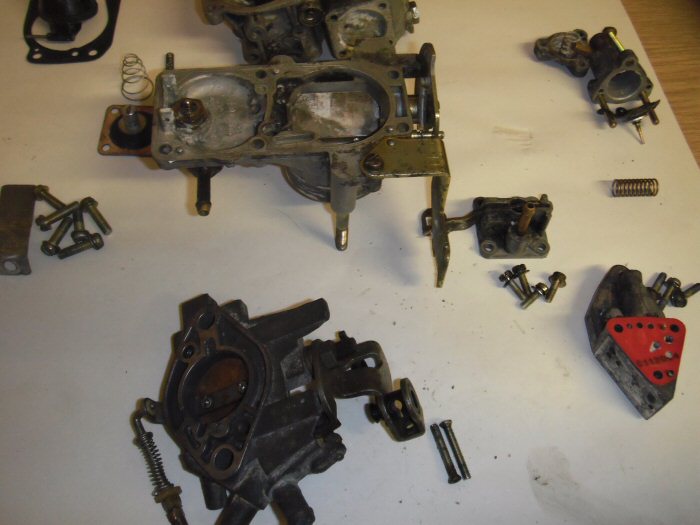
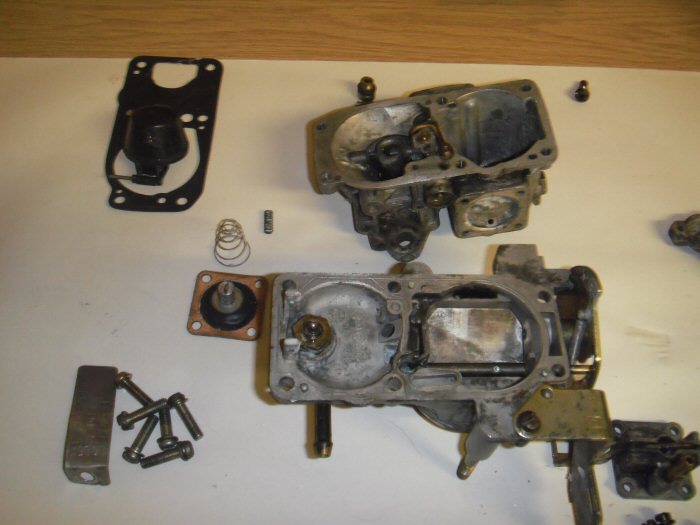
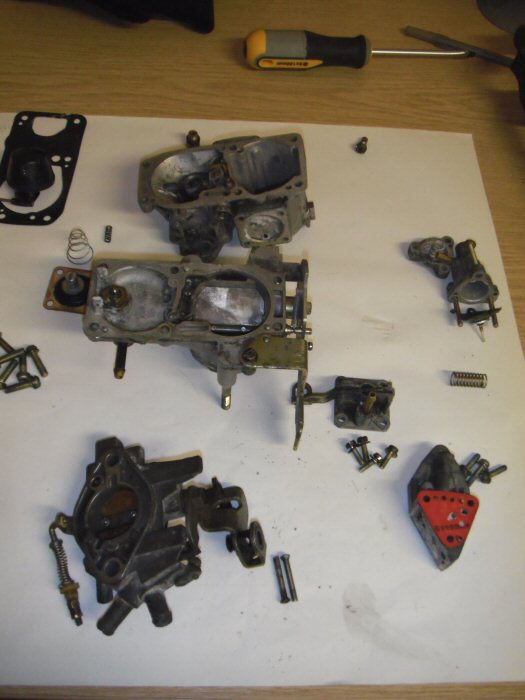
All a tad grotty, both inside and out n'est ce pas?
Then came something that was a complete revelation to me. Looking a like
a green robot with a glass screen, complete with wiper blade, the key machine
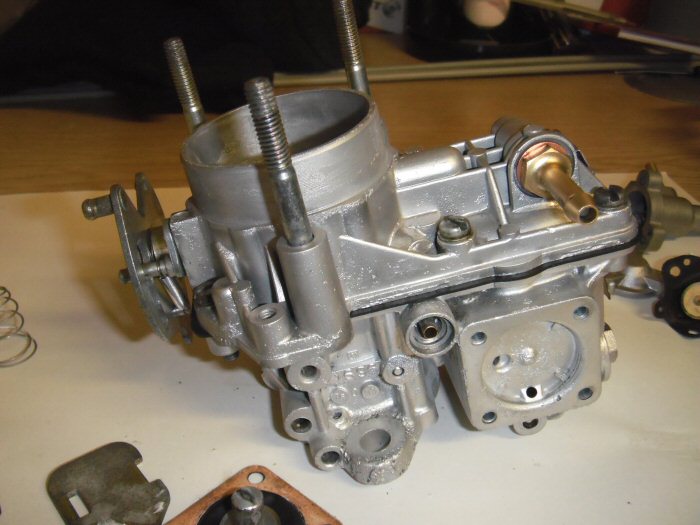
hove into view. I've managed to get one picture of the process...
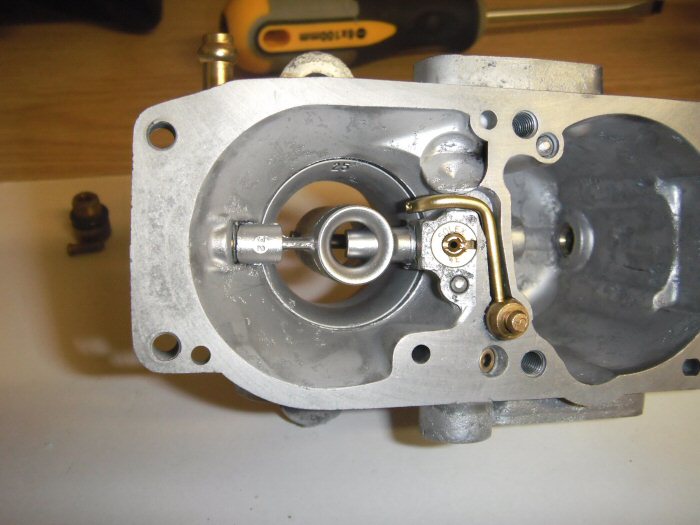
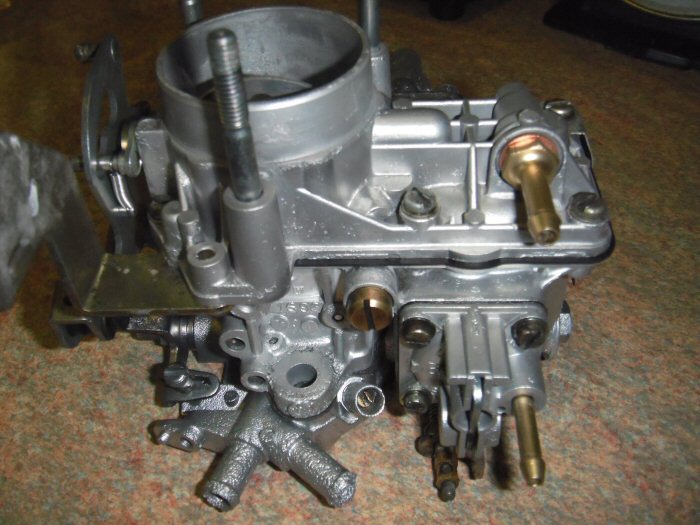
That's the underside of the main body, which came out looking like this, once
it had been thoroughly dried...
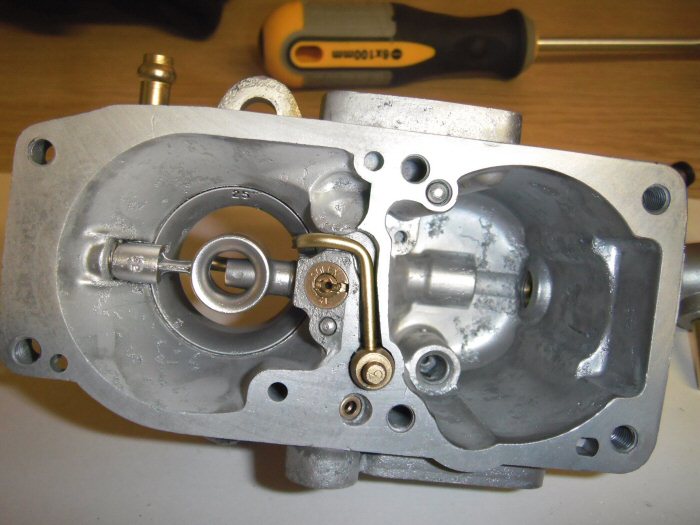
This is the accelerator jet assembly now cleaned...
Top and bottom now reunited...
From that point, we both got a bit confused over which spring went where,
so all the remaining pieces were packed securely in the box I'd taken for the
purpose. The last thing I wanted was either a bit left over, or worse a
completely missing piece.
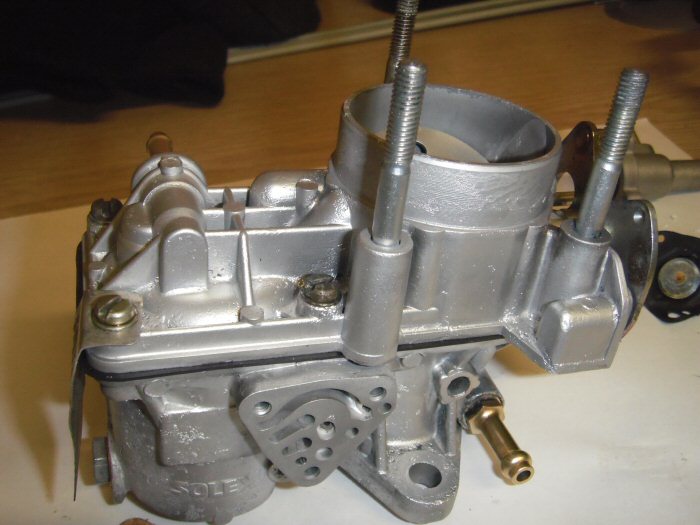
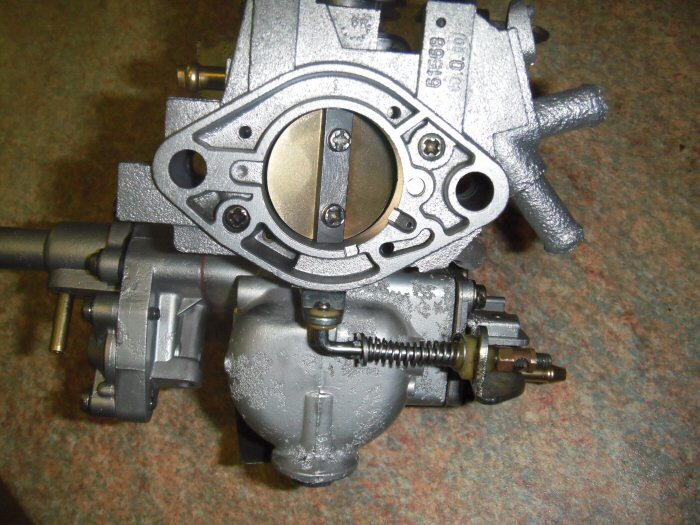
The remaining pictures show the fully reassembled carburettor. I'm completely
thrilled with the result. My thanks to Darren for his forebearance. Allowing me
to be involved meant a great deal to me

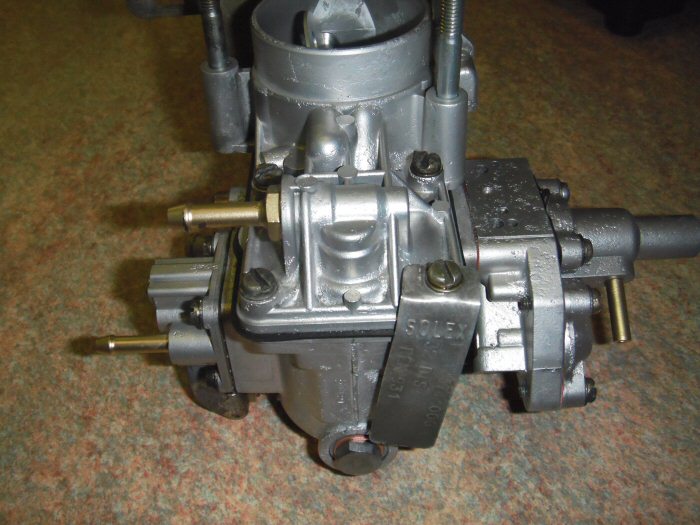
OK, am I allowed to get excited yet? You know that I am already, don't you?
Regards,
Steve
You Know You've Had A Good Day When...
...it eventually turns out like this
Actually, it has been a fascinating afternoon! After a few false starts, thinking
that I might need to send my carburettor away somewhere for cleaning, I
eventually landed upon Suffolk Blast Services, or better put, Darren. After an
initial enquiry when I had intimated that I'd rather like to witness the process,
an appointment was made for this afternoon.
Well, a carb in that state won't pass muster, will it?
Having chatted to Darren, with me not really understanding the processes
involved, I had imagined that he was going to blast the outside clean first
and then take it apart for treatment in the ultrasonic machine. I did get a bit
confuzzled, but then that's easily achieved by me just lately
Actually, no. We would need to completely dismantle the carb because he
needed to ensure that the water would flow freely through every tiny orifice
once he got it into the vapour blaster. Curiouser and curiouser...
So, the dismantling began
All a tad grotty, both inside and out n'est ce pas?
Then came something that was a complete revelation to me. Looking a like
a green robot with a glass screen, complete with wiper blade, the key machine
hove into view. I've managed to get one picture of the process...
That's the underside of the main body, which came out looking like this, once
it had been thoroughly dried...
This is the accelerator jet assembly now cleaned...
Top and bottom now reunited...
From that point, we both got a bit confused over which spring went where,
so all the remaining pieces were packed securely in the box I'd taken for the
purpose. The last thing I wanted was either a bit left over, or worse a
completely missing piece.
The remaining pictures show the fully reassembled carburettor. I'm completely
thrilled with the result. My thanks to Darren for his forebearance. Allowing me
to be involved meant a great deal to me
OK, am I allowed to get excited yet? You know that I am already, don't you?
Regards,
Steve
January 2014
If you have it already stripped down and can ensure that there are no blockages for the
beads to gather in, then it'll be cheaper. Prices start @£25 in that case.
It's water, high-pressure air and tiny glass beads. I might enquire about the zinc replating...
was very self-evident! All the parts were blown through twice, once before a spell in
the drying oven, and again afterwards.
What I've found is that it's the bike restorers who go with the specialist services.
Aerocoat I believe are #1 for them and Darren is well into 1950s scooters, as original
as possible! He had an aluminium engine case there looking like a work of art!
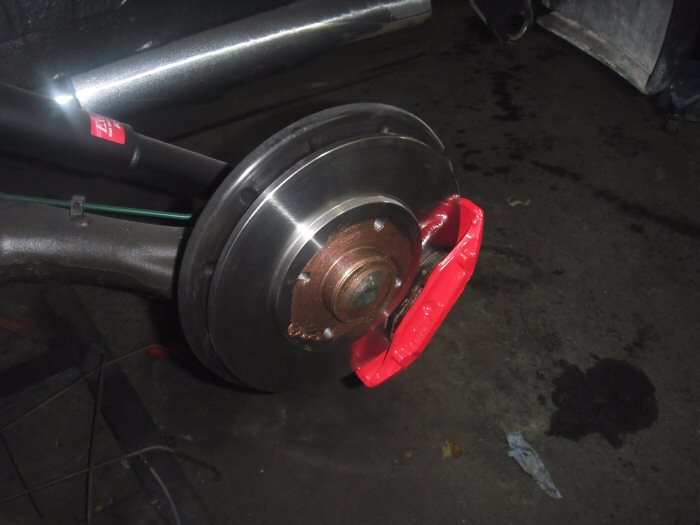
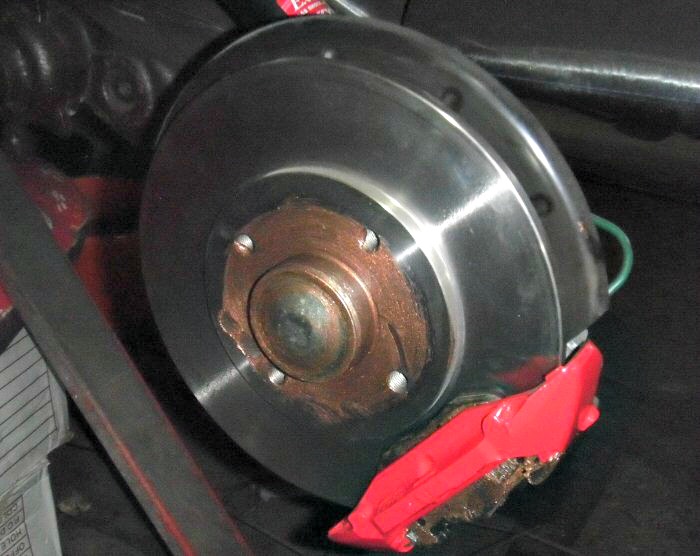
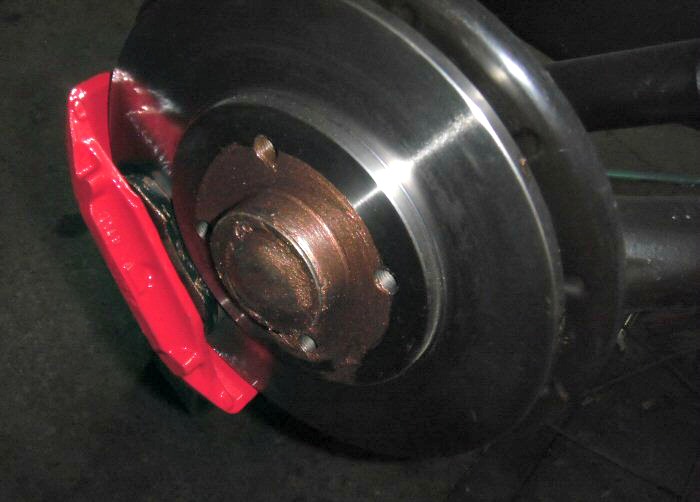
What's next? Well, it's a refurb of the front suspension and brakes. Last time I went
round to see the car, the brake calipers were hanging out to dry in all their bright red
repainted glory.
There are bits off to Aerocoat, pulley wheel, springs and rocker box cover to do in red.
Tops off the suspension mounts are going too, to be done in black.
There's plenty yet to keep me poor - resto cost comes out at £3K so far...
Regards,
Steve
M said:
Excellent that is. So how much was that process Steve?
Extraordinary good value really - just £40 If you have it already stripped down and can ensure that there are no blockages for the
beads to gather in, then it'll be cheaper. Prices start @£25 in that case.
It's water, high-pressure air and tiny glass beads. I might enquire about the zinc replating...
T said:
Steve it's attention to detail like this, that has made me re read this thread time and time again. That carb looks a million bucks again! I might suggest to you is use a high pressure air gun (from an air compressor) over each piece before you reassemble, just in case there might be any small foreign bodies of glass.
Absolutely, that's why I was happy to pay Darren for his work. His attention to detail was very self-evident! All the parts were blown through twice, once before a spell in
the drying oven, and again afterwards.
What I've found is that it's the bike restorers who go with the specialist services.
Aerocoat I believe are #1 for them and Darren is well into 1950s scooters, as original
as possible! He had an aluminium engine case there looking like a work of art!
What's next? Well, it's a refurb of the front suspension and brakes. Last time I went
round to see the car, the brake calipers were hanging out to dry in all their bright red
repainted glory.
There are bits off to Aerocoat, pulley wheel, springs and rocker box cover to do in red.
Tops off the suspension mounts are going too, to be done in black.
There's plenty yet to keep me poor - resto cost comes out at £3K so far...
Regards,
Steve
G said:
You'll have to go off roading in mud just so you can get back on the OCD watch list at the local hospital. 
Heheheheh, I did laugh out loud, but... You've given yourself away... do you only do your own restorations half-ar5ed?
Shall I start a book?
As for the mud, I have my own source - the track to and from my garage. Puddles and mud
on wet days and a good'ol dust-bowl on dry ones. I was only thinking the other day...

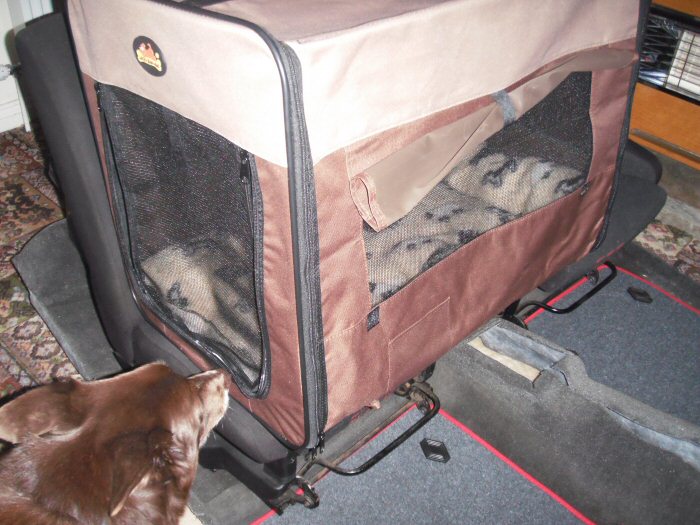
Oh, the dog's transport arrangements arrived today. She's already commandeered it...
T said:
Did you know if that red stripe was original from the car showroom?
No. What happened was that the car was keyed - like no panel inc roof, back door and bonnet left untouched, just weeks after I bought it. The car was resprayed at insurer's
cost, and they asked me if I'd like a coachline. Seemed to be all the rage of the day. The
red was selected to pick up the red motif from the colour combo of the seats. It'll be
replaced when I get the car repainted this coming October. I've already bought the tape
A said:
LOL, he tried to clean Fluffy when I popped over to sort an electrical problem out for him. I ran away.
Tsk... I was only going to show you how easy it is to use a clay cloth on the roof. Whateveryou do, don't go anywhere near that paint with a machine until I've shown you how easy
that process is. Machining paint is darned hard work and if you don't know how much
clearcoat you have, you could do more harm than good.
A said:
Just to say - I had a quick butchers at Steve's 5 and I have got to say, this is a work of art, he's sparing no expense and it's coming along nicely.
You're a credit to the Club Steve.
Cheers, kind words indeed You're a credit to the Club Steve.
With the car being in such good original metal, Ibelieve that it's well worthwhile spending some hard-earned on it. However, it's not
going to look like the finished article until after I've had my summer fun in it...
Once the weather warms up, and you've rewired the garage for me, we can have a
detailing meet for the East Coast massive. Starting with a certain black R5 as the test
mule...

Regards,
Steve
Edited by LowiePete on Wednesday 8th April 17:00
January 2014
Hello Folks,
Another small update...
More parts gathered. The new bodywork graphics in store for when the car
gets repainted later this year...
...and more goodies, including locking wheel bolts and expansion tank.
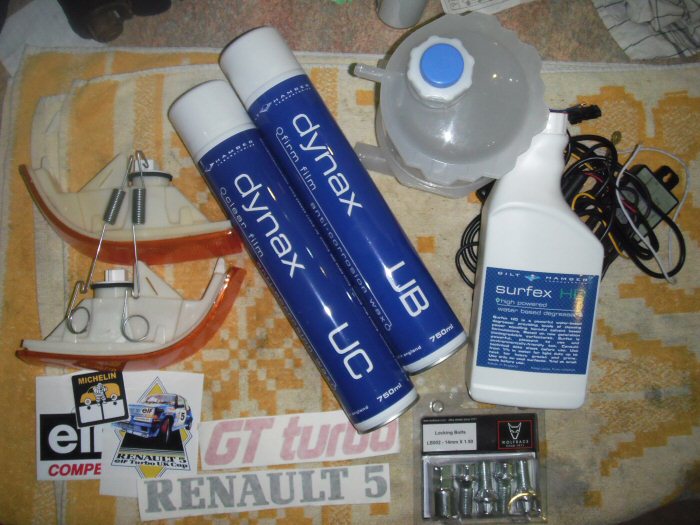
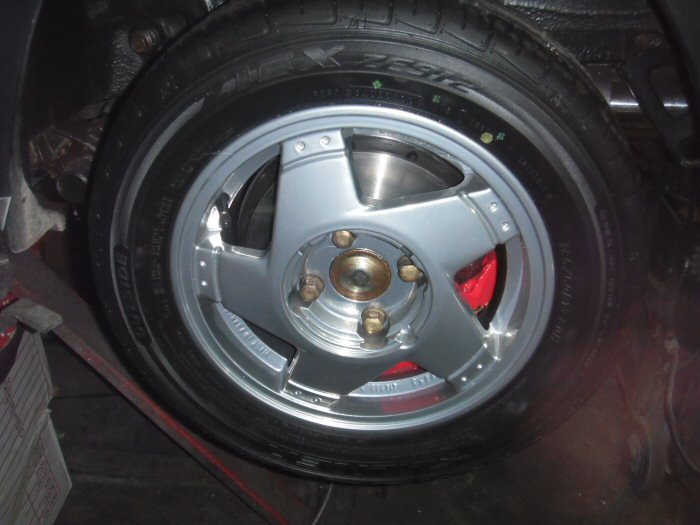
The bolts come at the right time because the back wheels can now go back
on the car...
I'll be returning the wheels for refitting tomorrow.
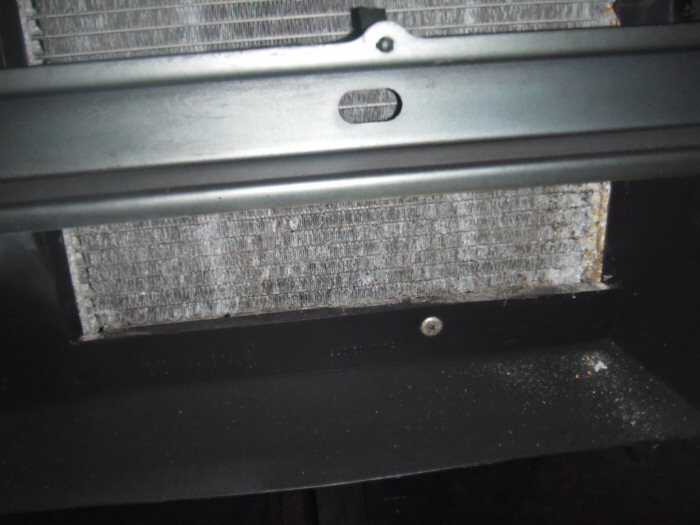
There's a question mark hanging over the radiator. Should I be looking
to replace it..?
Regards,
Steve
Hello Folks,
Another small update...
More parts gathered. The new bodywork graphics in store for when the car
gets repainted later this year...
...and more goodies, including locking wheel bolts and expansion tank.
The bolts come at the right time because the back wheels can now go back
on the car...
I'll be returning the wheels for refitting tomorrow.
There's a question mark hanging over the radiator. Should I be looking
to replace it..?
Regards,
Steve
A said:
That needs changing for sure. Valeo don't make them anymore so you may need to find an aftermarket item. NOS are pricey if you can find one.
Cheers Alex,There's a Valeo NOS one on ebay for £75 - so that's a goer
K said:
What was hiding under the new parts, see a fair few wires? 
You're far too observant Karl  I'm hoping to fit some DRLs. Don't worry, I'm insisting
 on making them as stealthy as I can. I just want to be seen...
Regards,
Steve
Edited by LowiePete on Friday 3rd April 09:20
Hello Folks,
Yet more supplies...
The rear wheels temporarily in place...

...and more dismantling, getting parts ready to take for powder coating
It looks like I have sourced a replacement radiator - an OEM product by
Valeo- should be here at the end of next week. It's sometimes useful to have
relatives living abroad
I cannot believe Mr-Auto.co.uk!! Most of the (expensive) parts I have bought
from them have been despatched from, wait for it, France. Mr-Auto.com
(same company, but in France), who also sell on ebay France, steadfastly
refuse to despatch to the UK from there. Indeed, their ebay listing insists
that this is impossible!
Considering my previous purchase history, I think it's astonishing, especially as
they could offer me no proper reason for their decision. It's making me think
twice about buying more stuff from them
Karl about it and although we'll need to change the rbg this time round - the
cover is going for powder coating in signal red - it should come off once more
without gasket replacement if we need to delve deeper. The car is staying as
standard. I'm looking for similar reliability as I had when it was first on the road.
Regards,
Steve
Yet more supplies...
The rear wheels temporarily in place...
...and more dismantling, getting parts ready to take for powder coating
It looks like I have sourced a replacement radiator - an OEM product by
Valeo- should be here at the end of next week. It's sometimes useful to have
relatives living abroad
I cannot believe Mr-Auto.co.uk!! Most of the (expensive) parts I have bought
from them have been despatched from, wait for it, France. Mr-Auto.com
(same company, but in France), who also sell on ebay France, steadfastly
refuse to despatch to the UK from there. Indeed, their ebay listing insists
that this is impossible!
Considering my previous purchase history, I think it's astonishing, especially as
they could offer me no proper reason for their decision. It's making me think
twice about buying more stuff from them
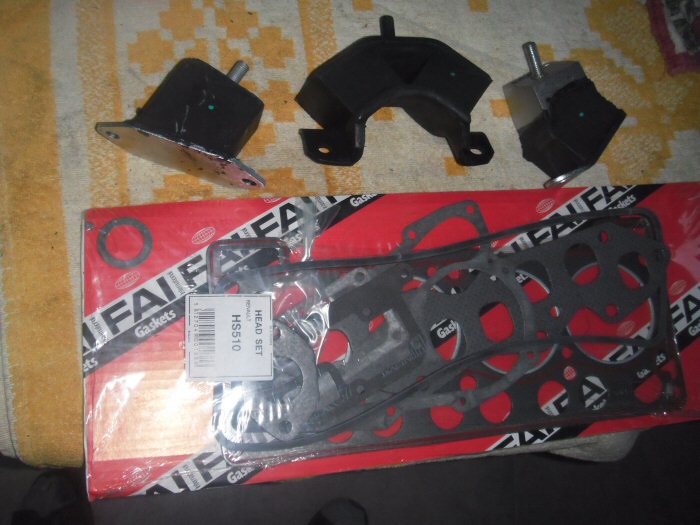
K said:
See you've got a headgasket set, are you planning on running standard boost only? 
Well, the seller had a rocker box gasket @ £9 or complete set @ £35 - spoke toKarl about it and although we'll need to change the rbg this time round - the
cover is going for powder coating in signal red - it should come off once more
without gasket replacement if we need to delve deeper. The car is staying as
standard. I'm looking for similar reliability as I had when it was first on the road.
Regards,
Steve
Edited by LowiePete on Friday 3rd April 09:26
NotNormal said:
Great read, thanks for posting, will follow with interest.
Not sure on the DRL's in the pics buy hey, your car, your rules. Nice to see the car will see the road again and will be in fine fettle from what we've seen so far.
The DRL idea is to try and overcome a modern problem. I have no intentionNot sure on the DRL's in the pics buy hey, your car, your rules. Nice to see the car will see the road again and will be in fine fettle from what we've seen so far.
of drastically changing the look of the car. However, despite it still being a
pocket-rocket, there are some blithering idiots out there who think "Oh, it's
an old car, I'll just pull out..." - this regardless of any thought of safety! It's
a good job the brakes work because there's been more than one close call...
stuthem0ng said:
This is a TRUE PHer thread.
More pics & video of it cranking please
Thanks - glad you're enjoying it More pics & video of it cranking please
Link to my video playlist is in the OP
Regards,
Steve
Edited by LowiePete on Friday 3rd April 09:40
Edited by LowiePete on Friday 3rd April 09:42
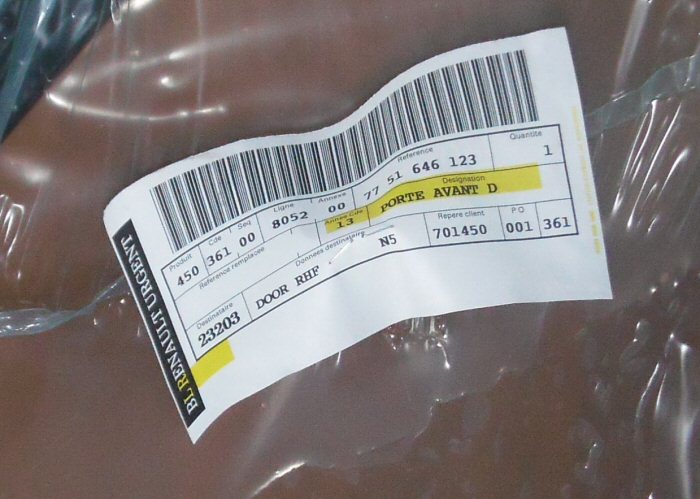
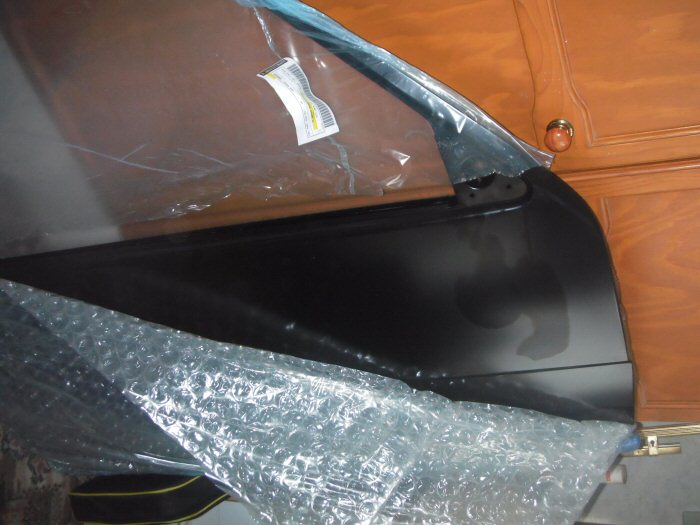
Hello Folks,
The very last brand new R5GTT door in the world...
Curious though that it has a 2013 stocking code...
With some of the wrapping peeled back...
Preparation for the Powder Coaters
This is the spare wheel carrier. It's amazing that it's so solid! I'm looking at
getting this coated in signal red...

More bits that will be coated black, except for the springs which will also be
coated signal red. Missing from here are the rocker box cover and the bottom
pulley wheel, both of which will also end up red...
The garage is also getting some love. Pics to follow later today.
Regards,
Steve
The very last brand new R5GTT door in the world...
Curious though that it has a 2013 stocking code...
With some of the wrapping peeled back...
Preparation for the Powder Coaters
This is the spare wheel carrier. It's amazing that it's so solid! I'm looking at
getting this coated in signal red...
More bits that will be coated black, except for the springs which will also be
coated signal red. Missing from here are the rocker box cover and the bottom
pulley wheel, both of which will also end up red...
The garage is also getting some love. Pics to follow later today.
Regards,
Steve
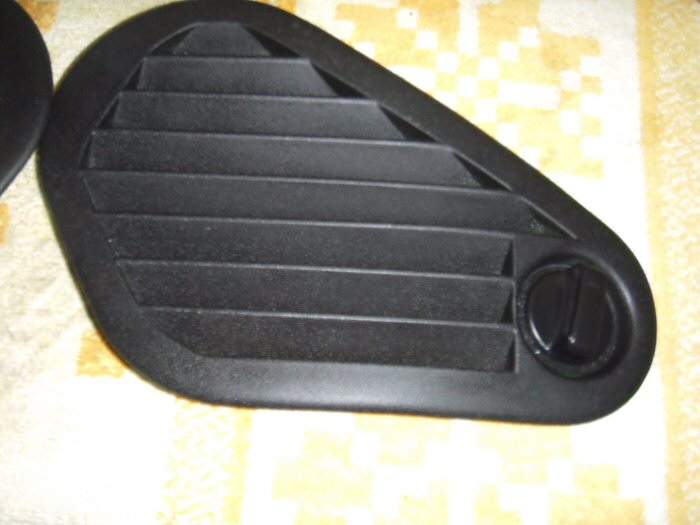
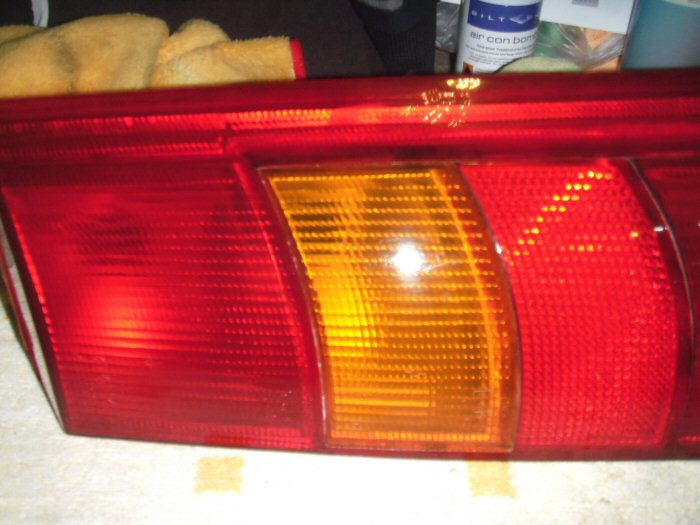
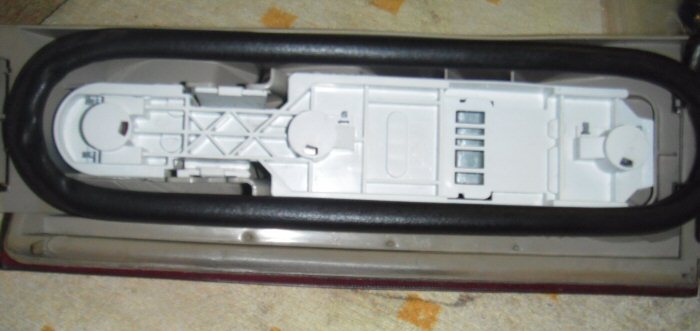
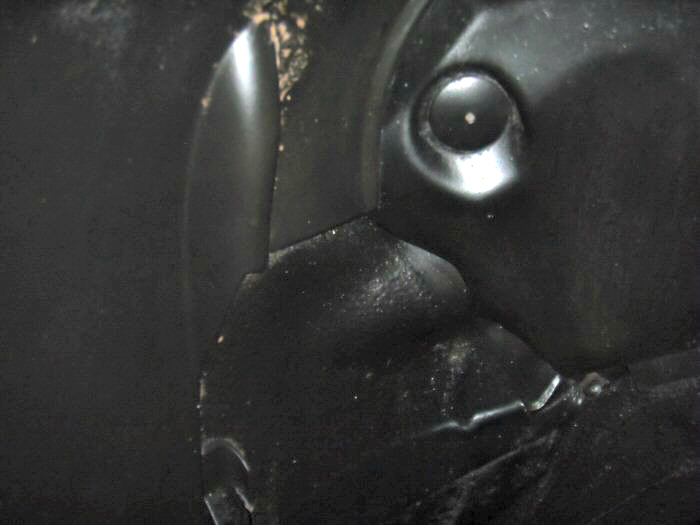
Hello Folks,
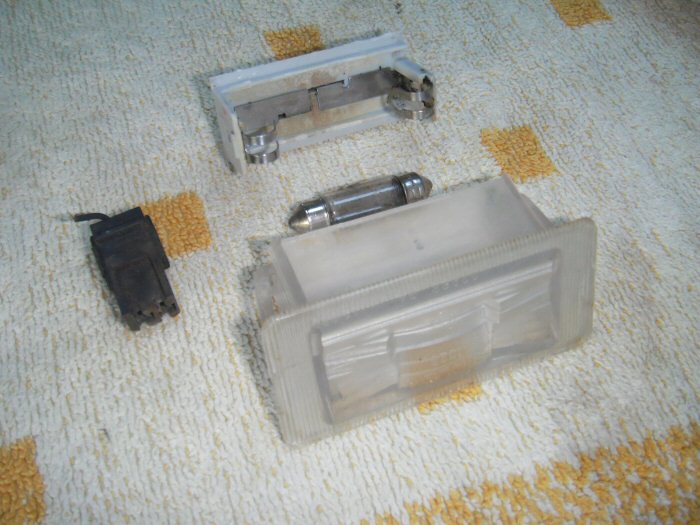
I can't believe the replacement cost of the rear number plate light
inserts - no less than £19.99 each plus delivery! So, when this 2nd
hand one came up for a fiver delivered...
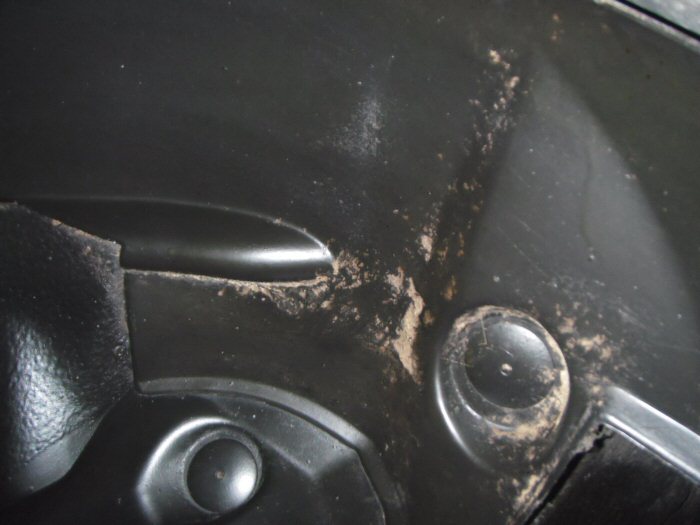
...it was in fairly good order, but not fit for muster

So, some APC and a sonic brush cleaning, followed by a couple of goes with
Xerapol, aided the first time by the sonic brush, here we have something now
awaiting its new bulb...
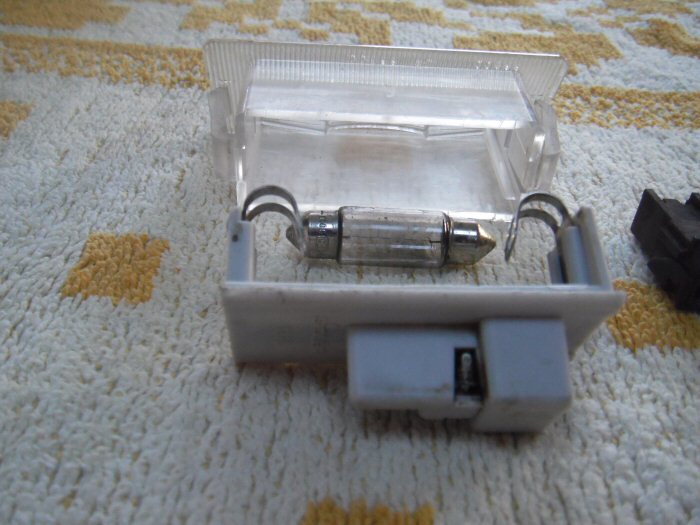
The ones on the car looked a bit delicate, so if we break one, it can be
replaced, else I will have a spare
Regards,
Steve
I can't believe the replacement cost of the rear number plate light
inserts - no less than £19.99 each plus delivery! So, when this 2nd
hand one came up for a fiver delivered...
...it was in fairly good order, but not fit for muster
So, some APC and a sonic brush cleaning, followed by a couple of goes with
Xerapol, aided the first time by the sonic brush, here we have something now
awaiting its new bulb...
The ones on the car looked a bit delicate, so if we break one, it can be
replaced, else I will have a spare
Regards,
Steve
February 2014
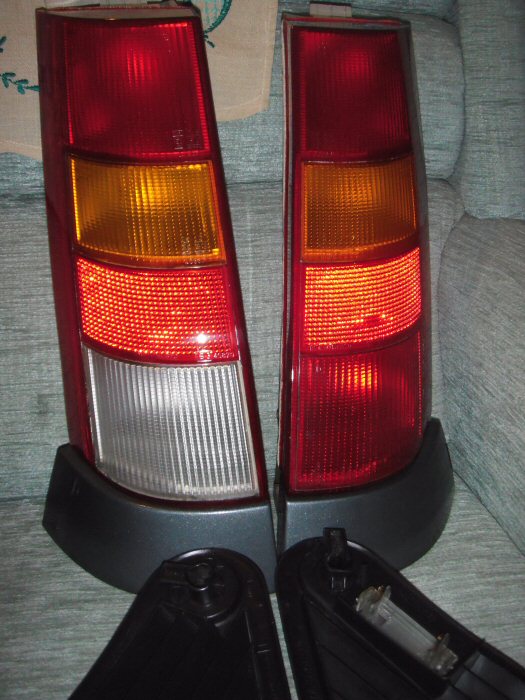
A Bit More Cleaning
Hello Folks,
So, while I await the return of the powder coated items, I asked Karl to
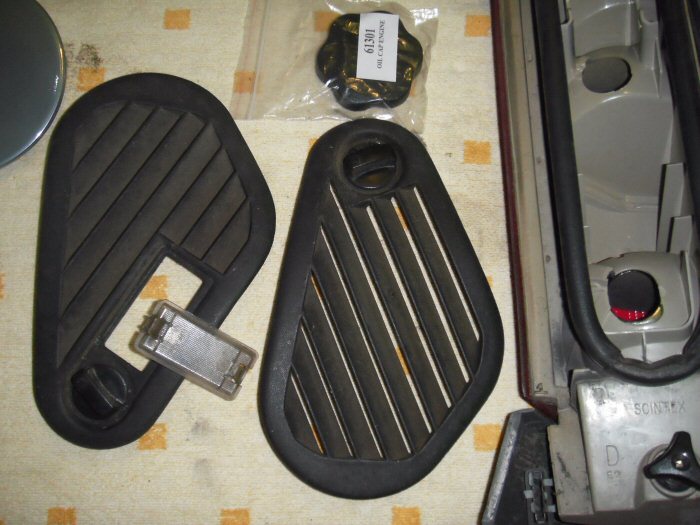
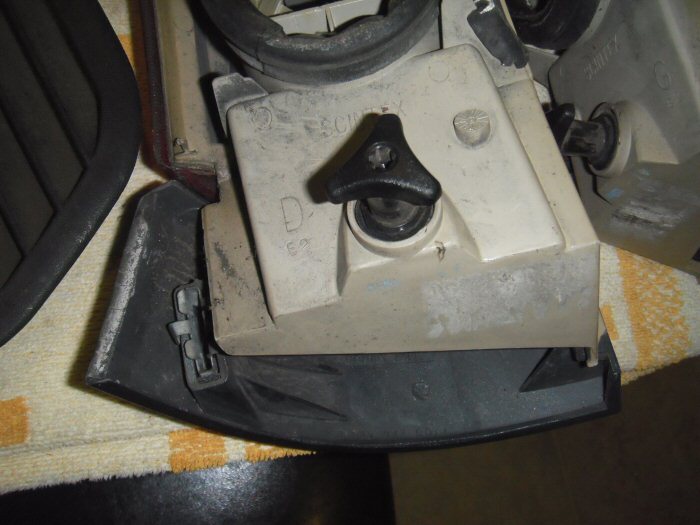
remove a few more items from the car. So, the rear light clusters, boot vent
covers and boot carpet came home with me. Some APC in hot water in the
sink, agitated well with the sonic scrubber removed a fair bit of dirt. I had to
replenish after doing just the vents!
Some befores...


...and afters. These black plastic covers treated with ADS Nano Gloss Paint
Sealant, also applied with the sonic scrubber.

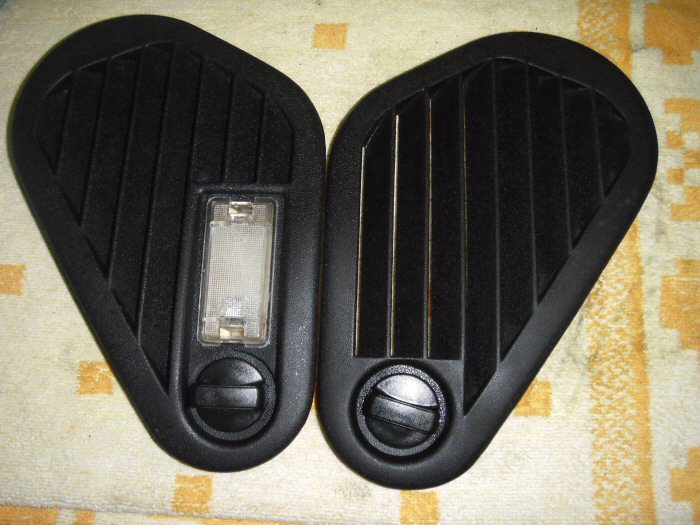
This is a poor attempt at a 50/50. The cleaning done with some Xerapol also
applied with the sonic scrubbing tool. Getting into the deeper crevices was
with a paint brush, part of a recent Aldi offer. I'm quite impressed with the
latest synthetic bristles, which made cleaning a breeze!
The nearest aperture has yet to be treated...
Some afters...

The lenses were finally waxed with ADS Obsidian Wax applied by fingers.
Apart from the indicators, all the replacement bulbs will be LED based.
The carpet I have yet to tackle. For some reason it presently stinks! So, it
will go for a good soak before I put it into the washing machine.
Regards,
Steve
A Bit More Cleaning
Hello Folks,
So, while I await the return of the powder coated items, I asked Karl to
remove a few more items from the car. So, the rear light clusters, boot vent
covers and boot carpet came home with me. Some APC in hot water in the
sink, agitated well with the sonic scrubber removed a fair bit of dirt. I had to
replenish after doing just the vents!
Some befores...
...and afters. These black plastic covers treated with ADS Nano Gloss Paint
Sealant, also applied with the sonic scrubber.
This is a poor attempt at a 50/50. The cleaning done with some Xerapol also
applied with the sonic scrubbing tool. Getting into the deeper crevices was
with a paint brush, part of a recent Aldi offer. I'm quite impressed with the
latest synthetic bristles, which made cleaning a breeze!
The nearest aperture has yet to be treated...
Some afters...
The lenses were finally waxed with ADS Obsidian Wax applied by fingers.
Apart from the indicators, all the replacement bulbs will be LED based.
The carpet I have yet to tackle. For some reason it presently stinks! So, it
will go for a good soak before I put it into the washing machine.
Regards,
Steve
February 2014
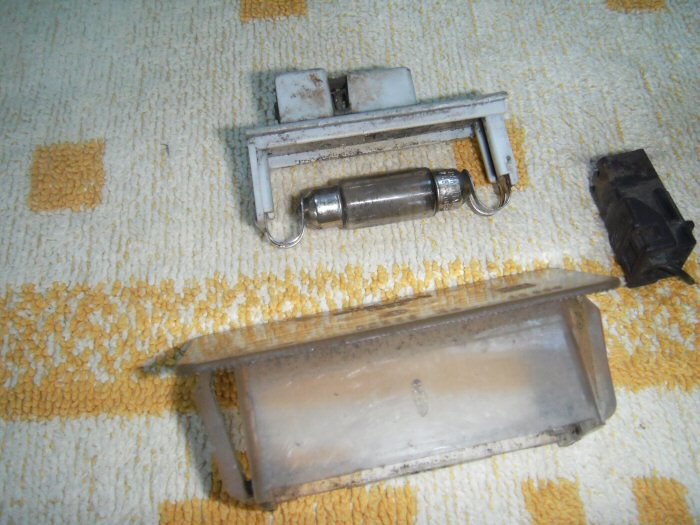
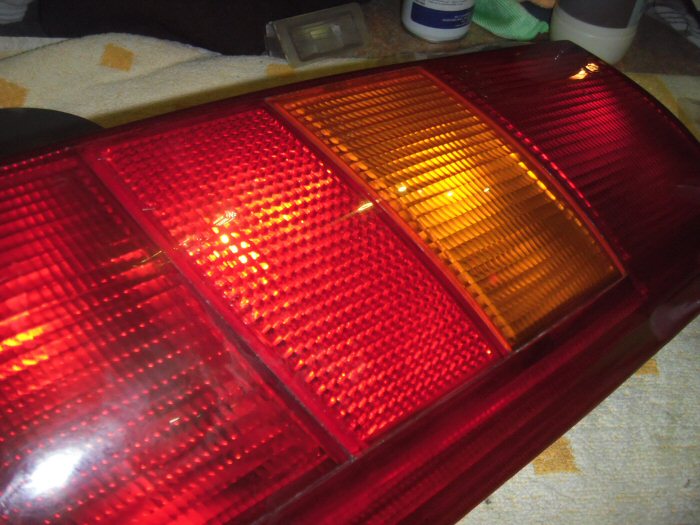
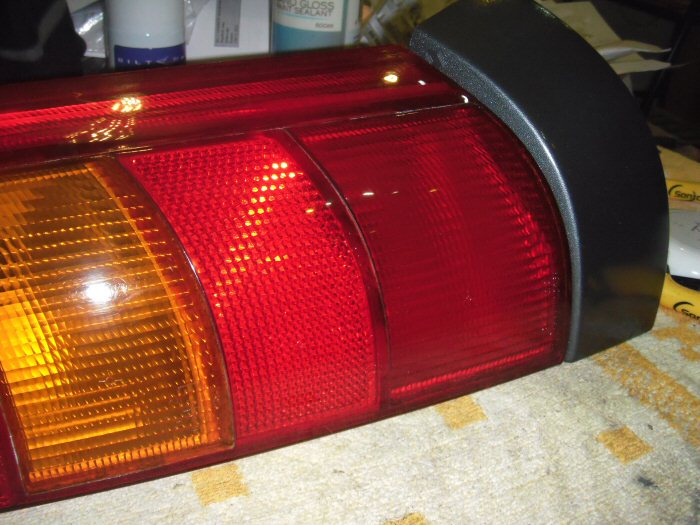
Rear Lights Re-visited
Hello Folks,
Well, I guess that I'm being led by photos as I have decided to have a second
go at those rear light clusters. The one on the left of the last photo didn't
quite hit the mark. In the meantime, I've replenished my stock of Xerapol
which comes with 2 small sheets of 1,500 grit wet & dry paper.
Trying to get a decent shot during the process, without the camera flash
getting in the way, proved quite difficult. So, this is one of the units having
been gently rubbed back using some ADS Nano Gloss Paint Sealant (diluted
5:1 with water) as the lubricant.

This is a different kind of 50/50 - only one of these units has been through
the wet sanding process...

This is both units now completed and rewaxed with ADS Obsidian...
Now to the Boot Carpet
After 15 years of standing, this carpet was in quite a state! The biggest of
the problems being that it stunk - the pong was going to be quite a
challenge to nullify. This became the first task for my £19.99 wet/dry vac
that had arrived in time for the weekend...
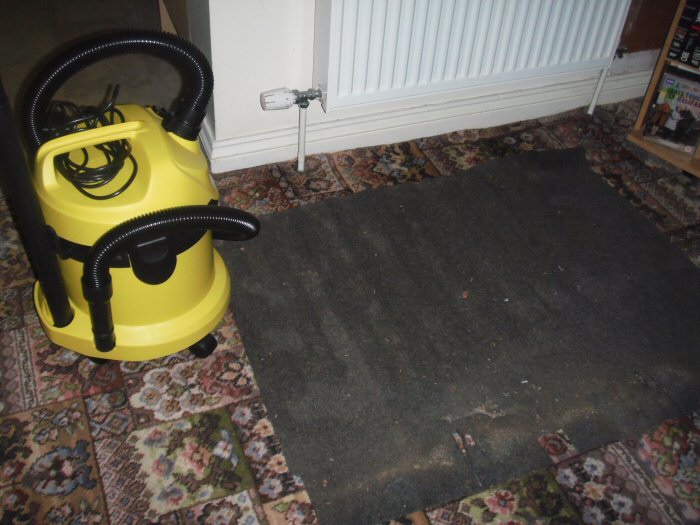
This is another casualty of the camera flash, with it highlighting the pile with
a false impression of the dirt. While there are some stains, they are nowhere
near as bad as indicated!
These two photos show the results. What I did was to use the wet/dry vac,
then my normal machine with a beating action just to see what else could be
removed - more or less nothing - then I sprayed it with Scotch Gard. I then
worked that in well, then used the wet vac to remove the foam...
The colour differences are where the carpet follows the corrugation of the
boot floor...
Only a few more days to go before the powder coated parts come back. Time
for a little more excitement. Everything will be in place for reassembling a
rolling vehicle, so we can then concentrate on the engine and getting it
started.
Regards,
Steve
Rear Lights Re-visited
Hello Folks,
Well, I guess that I'm being led by photos as I have decided to have a second
go at those rear light clusters. The one on the left of the last photo didn't
quite hit the mark. In the meantime, I've replenished my stock of Xerapol
which comes with 2 small sheets of 1,500 grit wet & dry paper.
Trying to get a decent shot during the process, without the camera flash
getting in the way, proved quite difficult. So, this is one of the units having
been gently rubbed back using some ADS Nano Gloss Paint Sealant (diluted
5:1 with water) as the lubricant.
This is a different kind of 50/50 - only one of these units has been through
the wet sanding process...
This is both units now completed and rewaxed with ADS Obsidian...
Now to the Boot Carpet
After 15 years of standing, this carpet was in quite a state! The biggest of
the problems being that it stunk - the pong was going to be quite a
challenge to nullify. This became the first task for my £19.99 wet/dry vac
that had arrived in time for the weekend...
This is another casualty of the camera flash, with it highlighting the pile with
a false impression of the dirt. While there are some stains, they are nowhere
near as bad as indicated!
These two photos show the results. What I did was to use the wet/dry vac,
then my normal machine with a beating action just to see what else could be
removed - more or less nothing - then I sprayed it with Scotch Gard. I then
worked that in well, then used the wet vac to remove the foam...
The colour differences are where the carpet follows the corrugation of the
boot floor...
Only a few more days to go before the powder coated parts come back. Time
for a little more excitement. Everything will be in place for reassembling a
rolling vehicle, so we can then concentrate on the engine and getting it
started.
Regards,
Steve
Hello Folks,
Guess who's a happy, but poor, bunny? Thanks to Phil & Ann "sur le continong",
this arrived at lunchtime today...


I'm rather amazed at its small size. It's no wonder that people avoid copper
varieties of this rad, 'coz it gets too warm...
is priceless because while I could find plenty of stockists, even one in Calais(!),
no-one would ship one to the UK. The rad was actually made in Spain!
Bits should be back from the powder coaters early next week.
Regards,
Steve
Guess who's a happy, but poor, bunny? Thanks to Phil & Ann "sur le continong",
this arrived at lunchtime today...
I'm rather amazed at its small size. It's no wonder that people avoid copper
varieties of this rad, 'coz it gets too warm...
K said:
Wow must be Christmas again! lol Rad looks great, where did you source it from? hope there wasnt too much 'wallet damage' :agree:
It had to be bought in France, it was then brought over to the UK for me. That bitis priceless because while I could find plenty of stockists, even one in Calais(!),
no-one would ship one to the UK. The rad was actually made in Spain!
Bits should be back from the powder coaters early next week.
Regards,
Steve
Edited by LowiePete on Friday 3rd April 10:04
B said:
Out of interest what was the cost of it all in the end?
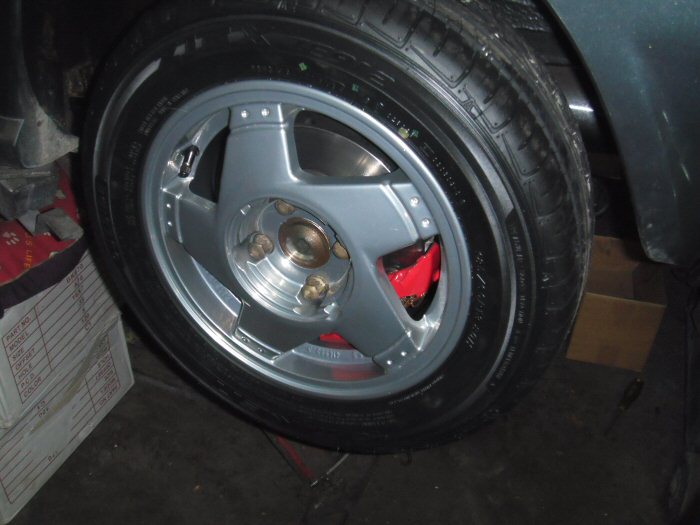
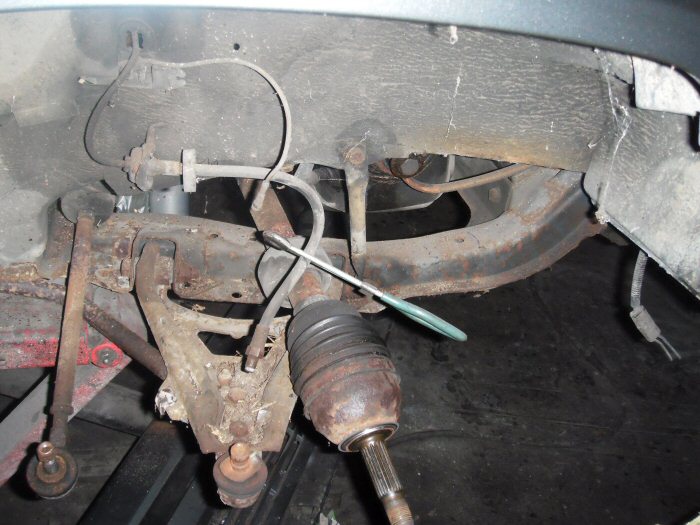
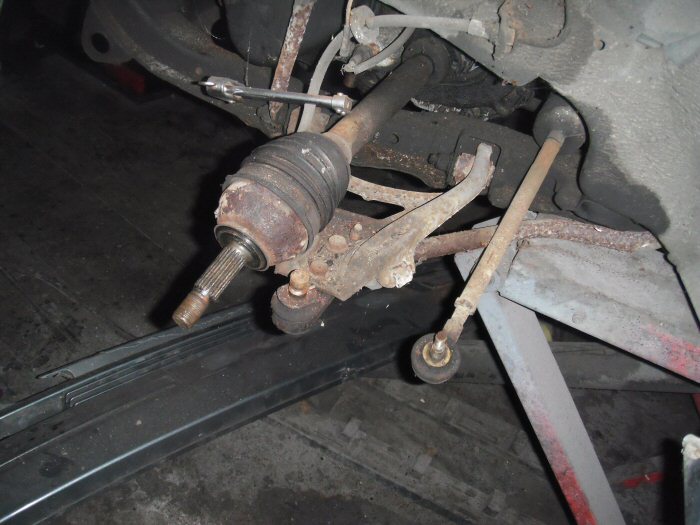
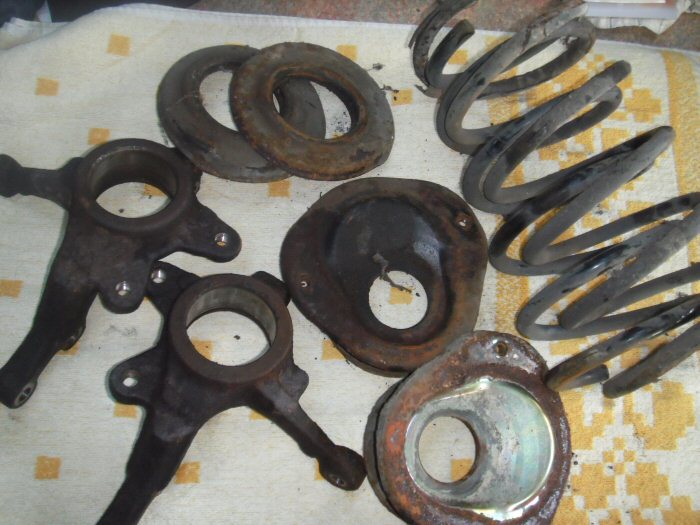
About £150...More Work Done
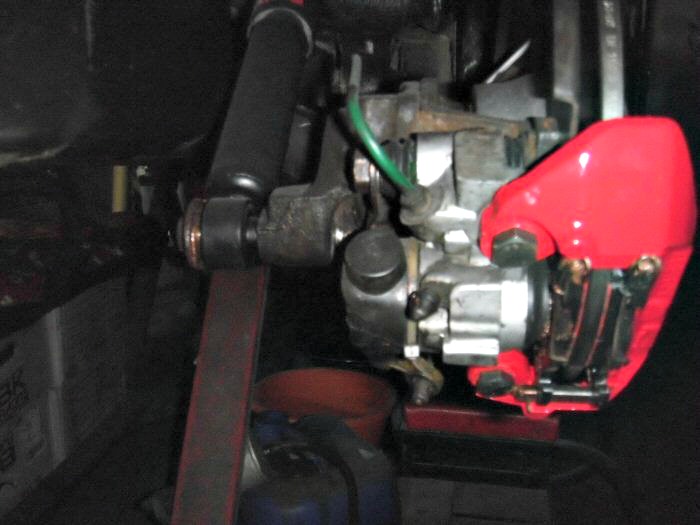
So, in preparation for the front suspension and hubs to be rebuilt, Karl has
been busy tidying up under the front wings...
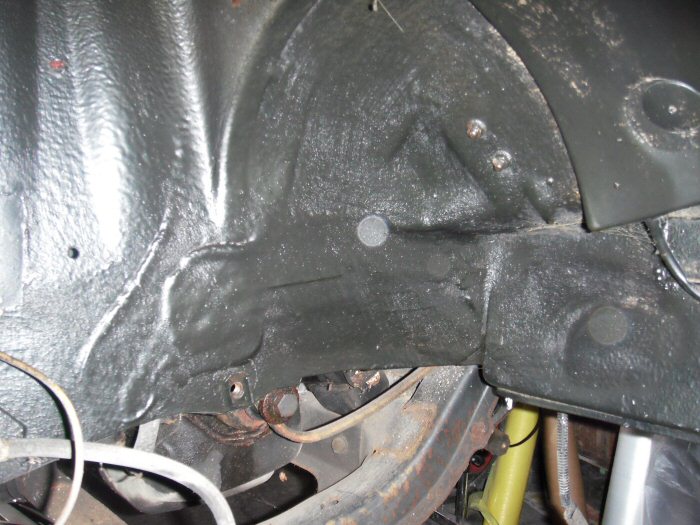
The strap in which is looking a bit iffy is going to get sorted...
Hopefully, the car should be back on its wheels next week. Two jobs will get
priority - getting the engine started, just temporarily for a listen. We'll then
decide from there what the next stage will be. The other job will be very
much scarier!
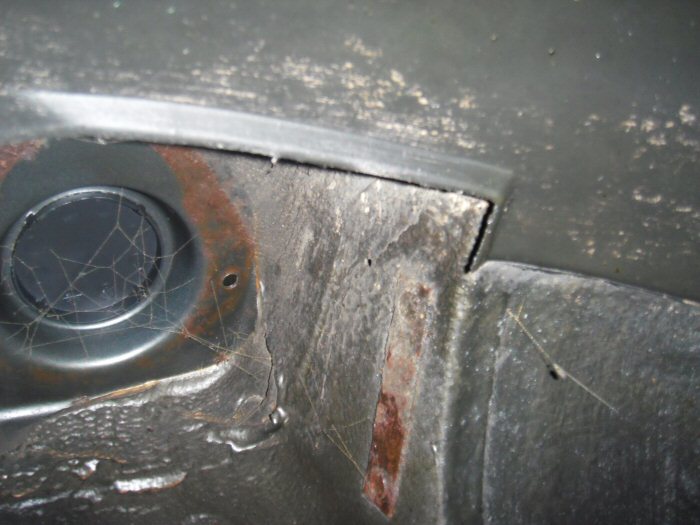
While there are lots of small and annoying spots of rust all over the place,
most are just surface rust. However, we've taken a sneaky peek behind the
rubber holding in the windscreen and the news there might not be quite so
good. It's by no means clean, so the screen is going to come out so we can
properly assess what's going on.
This might be a time needing a sharp intake of breath...
Regards,
Steve
21 February 2014
Hello Folks,
So, a trip to Aerocoat today and some more superb work from them.
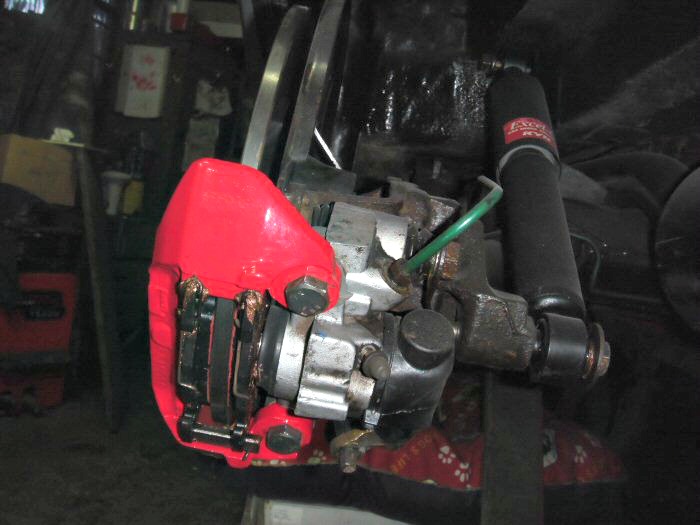
First the red bits...
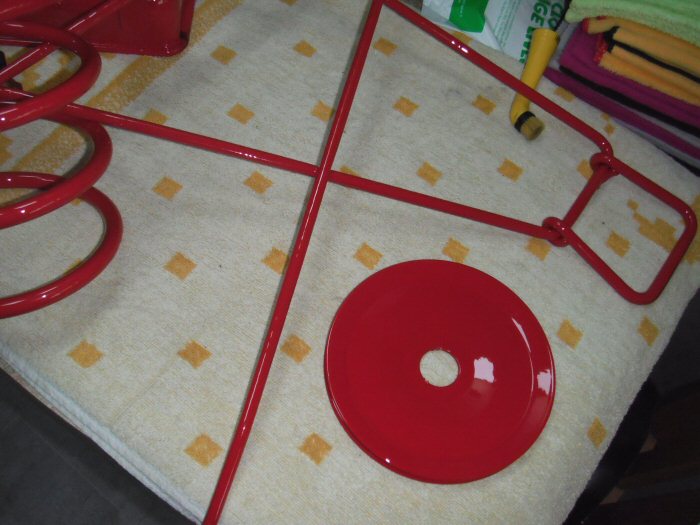
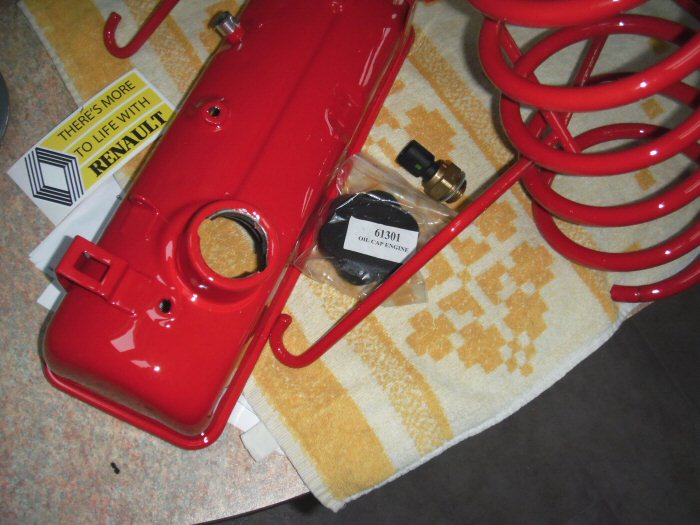
Karl was a bit surprised at my choice of red for the rocker box cover, which
should be black, but he did agree that with all that pipework under the bonnet,
the engine does get a bit lost
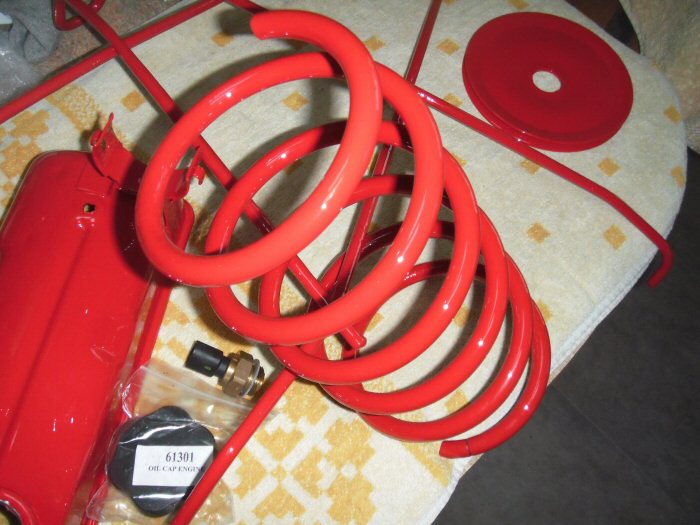
...and then to the black bits.
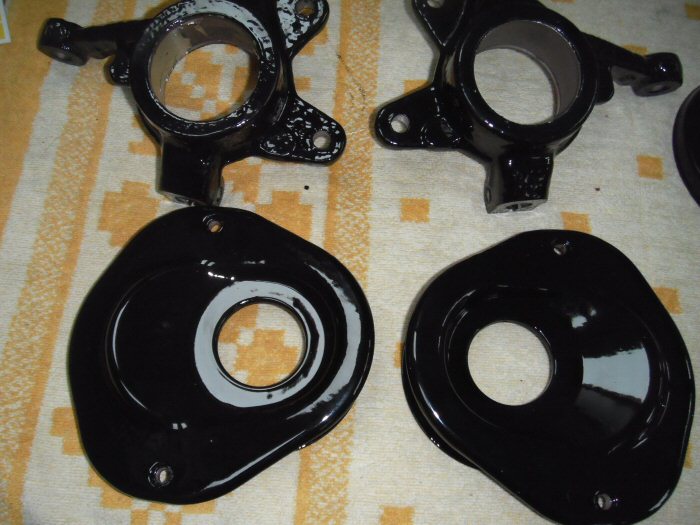

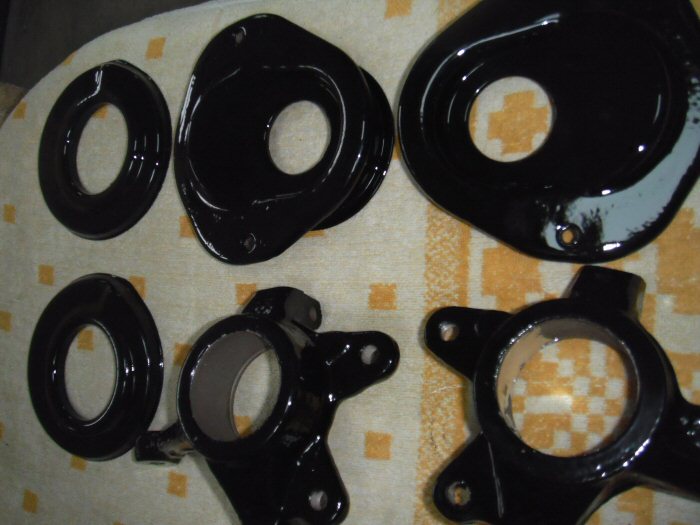
I'll be taking some photos of the re-assembled suspension units before they go
back on. We're now all systems go with getting the car back onto its wheels
I can possibly get it. Another reason for going for a red rocker box is that it'll show
its cleanliness, or not. Same principle as having lights that show up every mark...
I'm thrilled with the finish that Aerocoat have given these bits. They even gave the
inside of the rocker box a bead blast. Can't recommend their work highly enough
I'm making good progress with the internal works of the car's garage at home. It
should all be tidy ready for the electrics re-install in about 10 days time...
Regards,
Steve
Hello Folks,
So, a trip to Aerocoat today and some more superb work from them.
First the red bits...
Karl was a bit surprised at my choice of red for the rocker box cover, which
should be black, but he did agree that with all that pipework under the bonnet,
the engine does get a bit lost
...and then to the black bits.
I'll be taking some photos of the re-assembled suspension units before they go
back on. We're now all systems go with getting the car back onto its wheels
K said:
Are you keeping oe black hoses in the bay? Nice work again Steve
Cheers Karl, everything else under the bonnet is remaining as close to standard asI can possibly get it. Another reason for going for a red rocker box is that it'll show
its cleanliness, or not. Same principle as having lights that show up every mark...
I'm thrilled with the finish that Aerocoat have given these bits. They even gave the
inside of the rocker box a bead blast. Can't recommend their work highly enough
I'm making good progress with the internal works of the car's garage at home. It
should all be tidy ready for the electrics re-install in about 10 days time...
Regards,
Steve
Edited by LowiePete on Friday 3rd April 10:15
Gassing Station | Readers' Cars | Top of Page | What's New | My Stuff