Rover Mini Cooper MPI - Pandemic Restoration
Discussion


I purchased this car at the beginning of June because it was offered at a price I couldn’t refuse and after 3 months of being locked down I needed something to get me out the house and my wife was equally delighted to have some time without me.
I also had an empty garage, lots of annual leave to take and by not commuting into London at great expense I had some spare cash to chuck at a project.
I was also only able to do this with the help of a very close friend who unfortunately was winding up his car spraying business and had just a couple of weeks left in his unit, so we were up against it with time! Becauae of the time constraints this was never going to be a nut and bolt restoration, but the plan was to get rid of any rust, repair the entire body, give it a new paint job and revert it back to as close as when it left the factory.
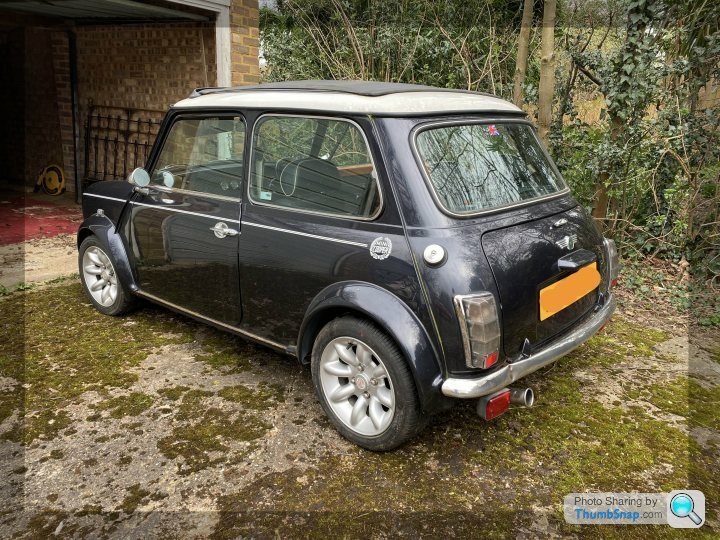
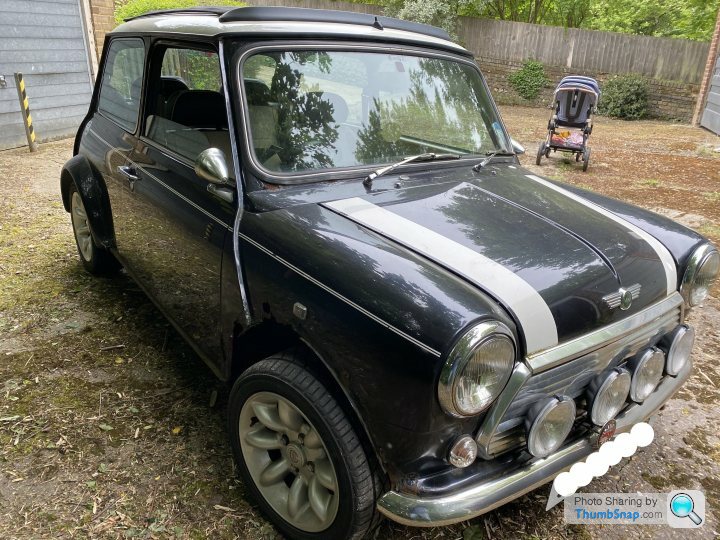
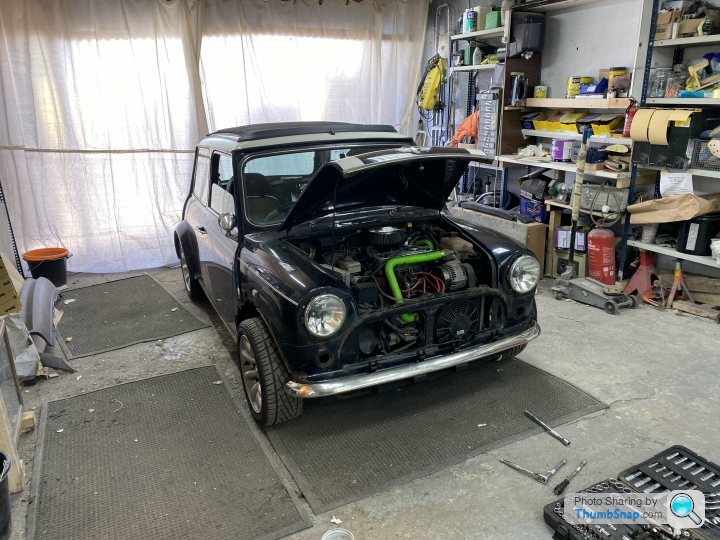
The car is a 1998 Mini Cooper MPI Sportpack and it had been sitting for 12 years before I took ownership. In that time it's done less than 200 miles! The previous owner had good intentions, but after 12 years and never doing anything with it he wanted it gone.
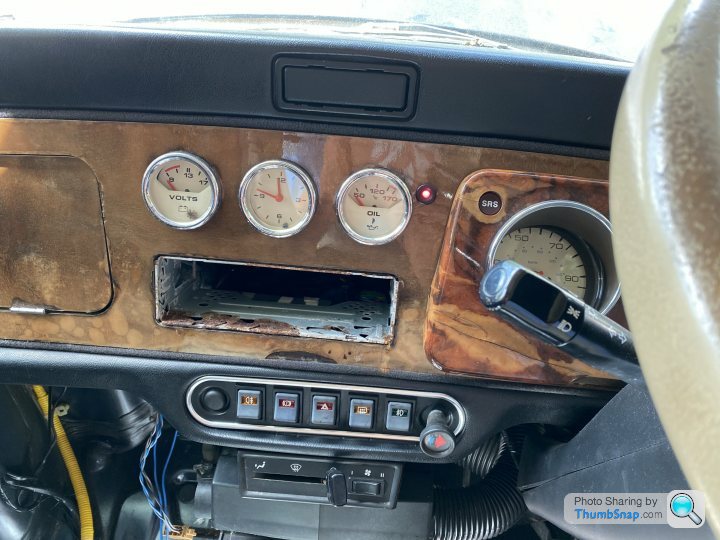
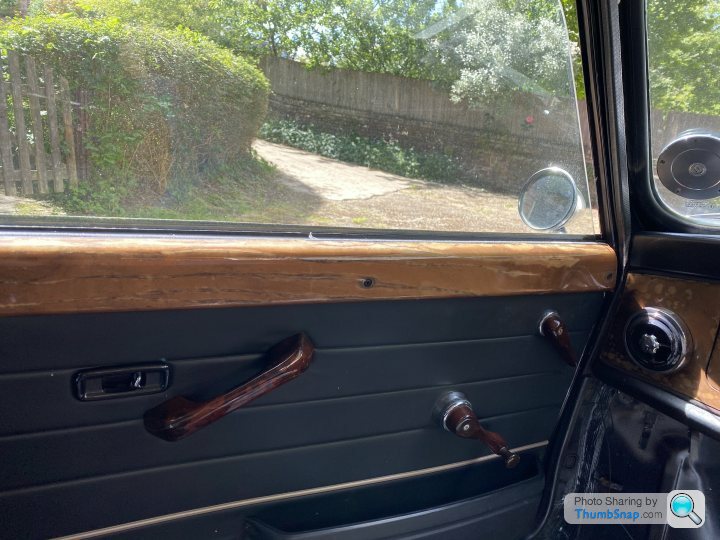
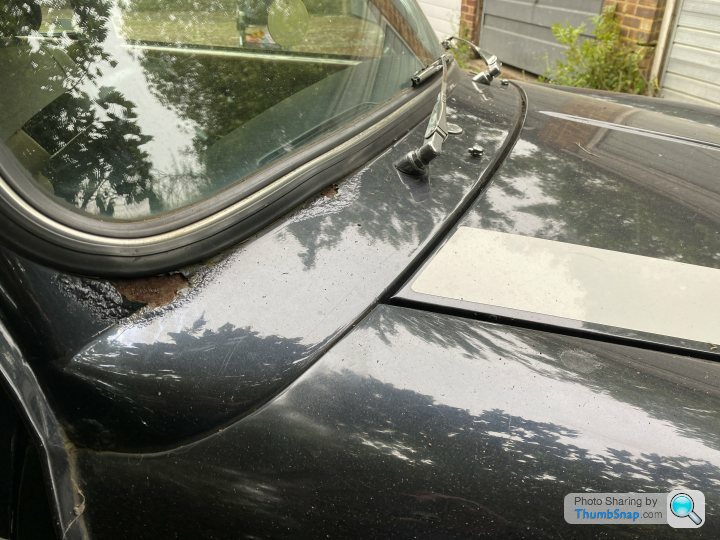
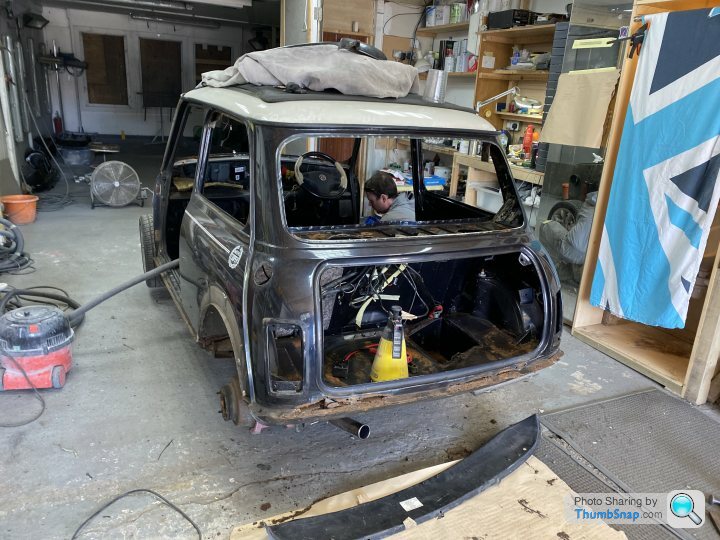
It had a badly rusted front end, the back end by the boot hinges was pretty bad and the webasto roof had shrunk and seized. The tyres were flat spotted and cracking, the coolant system wouldn’t hold pressure, it had a terrible oil leak and the interior was full of moisture and mould which also reeked havoc with the electrics and wrecked the wood veneer.
On the upside and rather amazingly the floor pan, sills, inner wings and bulkhead were totally solid. The car had never been in a crash nor had it ever seen paint. The boot, bonnet and doors were also original and almost totally rot free. It had all its original glass and mechanically it was pretty sound; and just needed recommissioning.
We ended up completing the job in 10 days so I’ll try and do a post to show the progress from each day.
Since completing the build and getting it home I have also given it a full service, fitted new brakes, brand new tyres all round, fitted a decent stereo, greased all the suspension points, fitted an entirely new coolant system including water pump, replaced the driveshaft seals which cured the oil leak and taken it for MOT which it passed with no advisories. It now looks and drives like a brand new car and to top it off it only cost £97 to insure!.
Here is the car when I got it. I’ll try update this thread as I sift through the photos.
From a distance the car doesn't look to bad
until you get round to the front


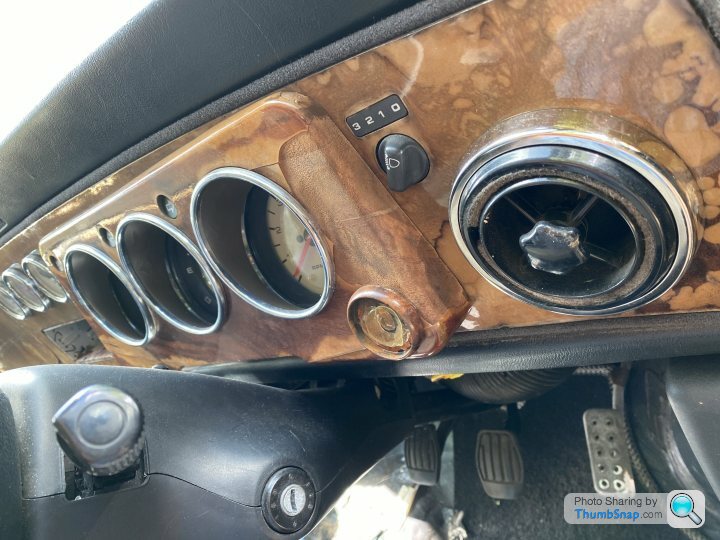
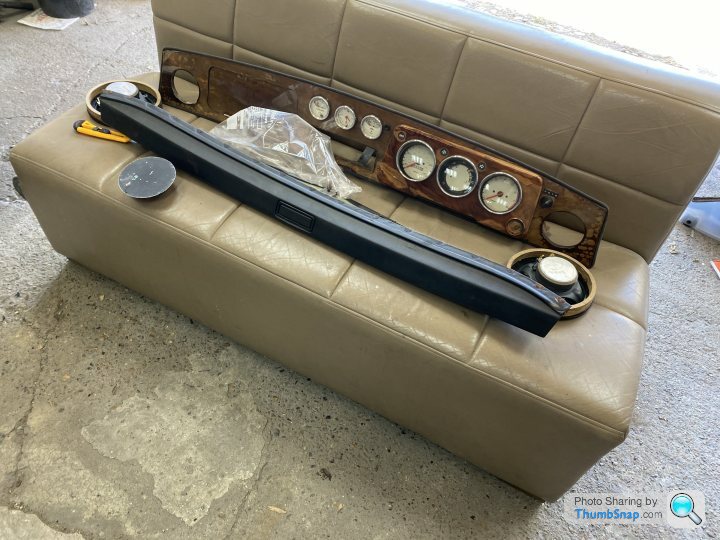
Dash and door cappings are not looking great
Scuttle actually looks worse than it is. although very rusted it was pretty solid
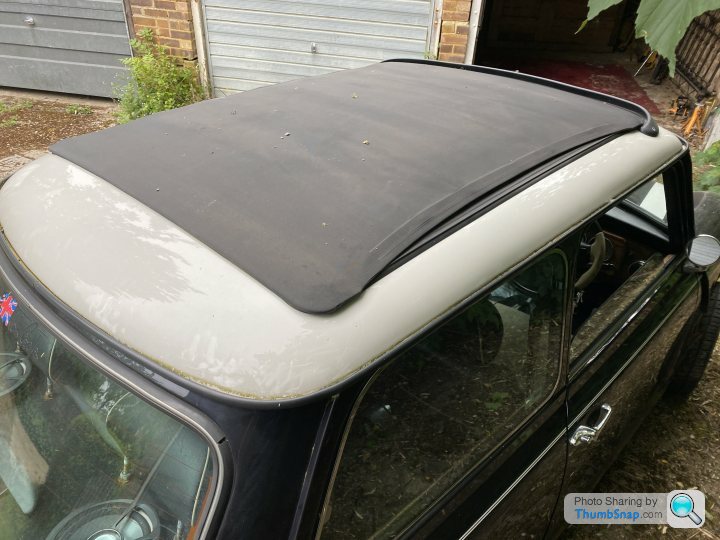
and the sunroof, although original had shrunk and wouldn't open. The roof itself was in very good shape though and didn't need painting, just a good polish
I also had an empty garage, lots of annual leave to take and by not commuting into London at great expense I had some spare cash to chuck at a project.
I was also only able to do this with the help of a very close friend who unfortunately was winding up his car spraying business and had just a couple of weeks left in his unit, so we were up against it with time! Becauae of the time constraints this was never going to be a nut and bolt restoration, but the plan was to get rid of any rust, repair the entire body, give it a new paint job and revert it back to as close as when it left the factory.
The car is a 1998 Mini Cooper MPI Sportpack and it had been sitting for 12 years before I took ownership. In that time it's done less than 200 miles! The previous owner had good intentions, but after 12 years and never doing anything with it he wanted it gone.
It had a badly rusted front end, the back end by the boot hinges was pretty bad and the webasto roof had shrunk and seized. The tyres were flat spotted and cracking, the coolant system wouldn’t hold pressure, it had a terrible oil leak and the interior was full of moisture and mould which also reeked havoc with the electrics and wrecked the wood veneer.
On the upside and rather amazingly the floor pan, sills, inner wings and bulkhead were totally solid. The car had never been in a crash nor had it ever seen paint. The boot, bonnet and doors were also original and almost totally rot free. It had all its original glass and mechanically it was pretty sound; and just needed recommissioning.
We ended up completing the job in 10 days so I’ll try and do a post to show the progress from each day.
Since completing the build and getting it home I have also given it a full service, fitted new brakes, brand new tyres all round, fitted a decent stereo, greased all the suspension points, fitted an entirely new coolant system including water pump, replaced the driveshaft seals which cured the oil leak and taken it for MOT which it passed with no advisories. It now looks and drives like a brand new car and to top it off it only cost £97 to insure!.
Here is the car when I got it. I’ll try update this thread as I sift through the photos.
From a distance the car doesn't look to bad
until you get round to the front
Dash and door cappings are not looking great
Scuttle actually looks worse than it is. although very rusted it was pretty solid
and the sunroof, although original had shrunk and wouldn't open. The roof itself was in very good shape though and didn't need painting, just a good polish
Edited by croissant on Wednesday 12th August 09:20
Thanks! It's a hoot to drive and it gets a lot more attention than I ever imagined it would. It really makes people smile.
When I first got it I thought the car was a dark grey. Turns out it's blue and after not being washed for so long it had a haze of filth masking the original colour.
As for the sunroof, I restored that also with new vinyl. I'll post details on that later. It's electric and I got it to function properly. It's great in the hot weather!
DAY 1
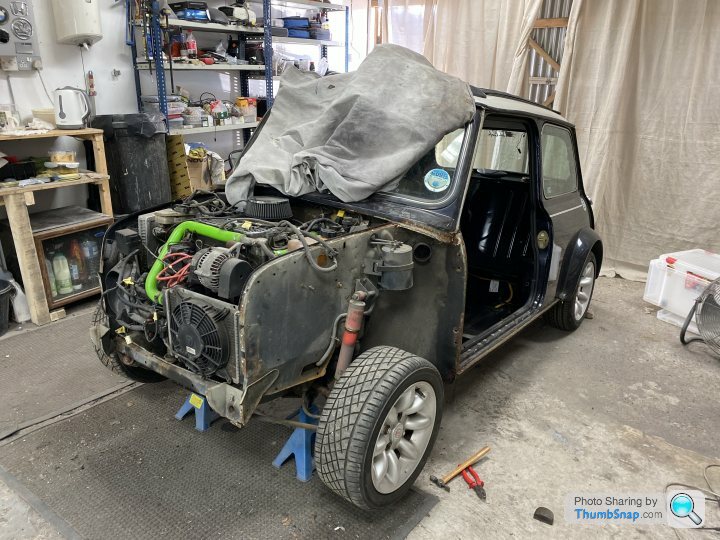
Before I took the car to the workshop I stripped out the interior and drove it there with just the dash, steering wheel, driver seat and seat belt.
It didn’t take long to remove the brightwork and we got straight on with cutting the front end off so that we could get a good idea of what we were truly dealing with.
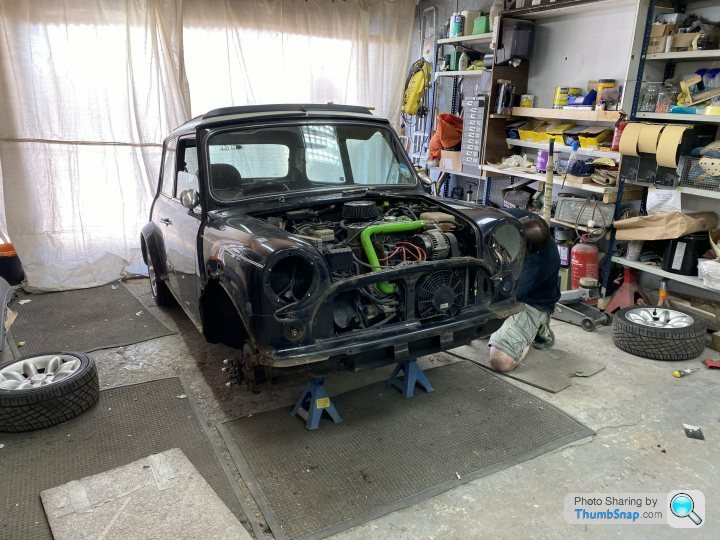
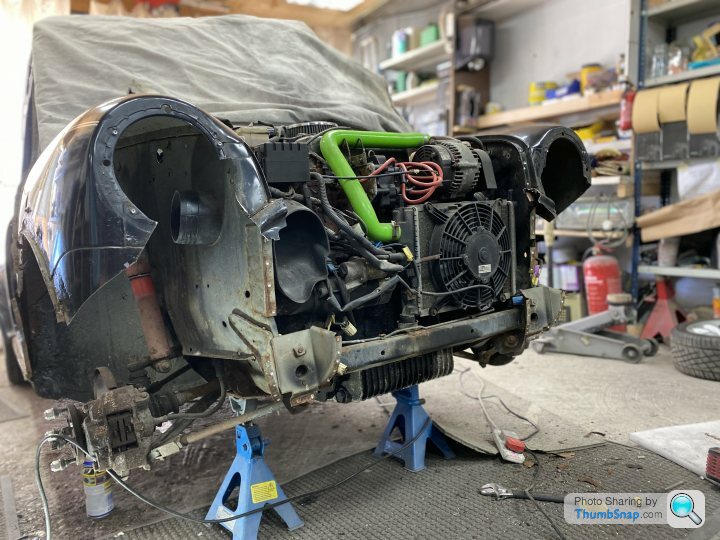
With the front cut off we were delighted that the inner wings were 100% solid, and they hadn’t even cracked or stressed like they’re prone to doing. It seems these later cars came with no rust prevention on the front wings and front panel from the factory hence all these MPI models falling into this state.
Although we were up against it with time we were going to rebuild it with proper rust prevention and seam sealing so this doesn’t happen again.
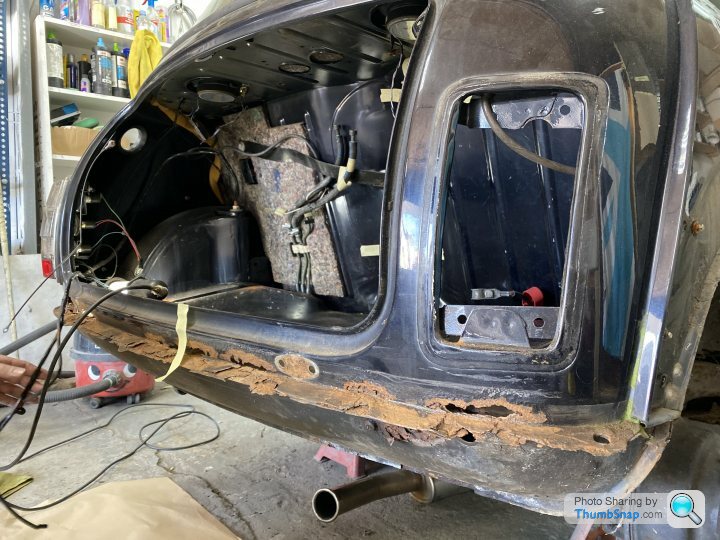
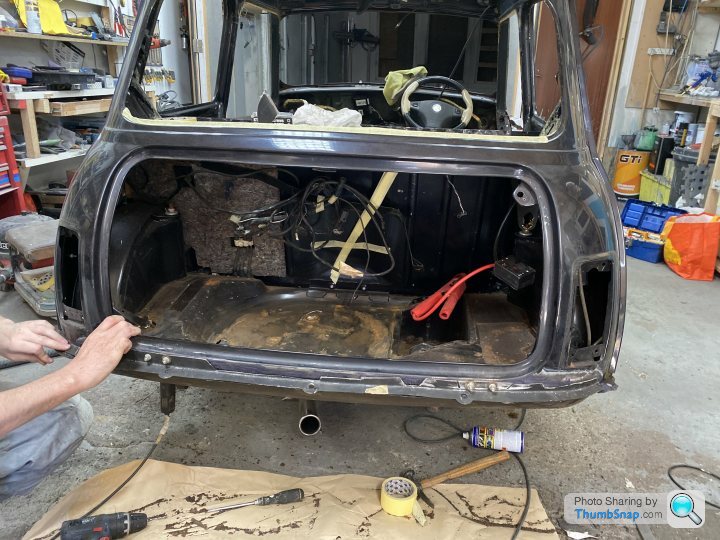
At the back things were looking pretty bad and a bit worse than we anticipated. Saying that, the lower valance was largely good with just some rot where the fog light mounts and everything from the boot hinge line up was good, so it was just that area that needed major attention.
It looks a lot worse in the pictures and the area where the boot hinges mount was still intact so we had a cunning plan on how to repair this section.
We also took the fuel tank out which also showed the boot floor and importantly where subframe mounts to be in good shape. After skurfing it back we could see there was nothing untward in there.
We were pretty methodical about bagging up parts with associated hardware and thankfully only snapped a few bolts along the way. One of the weird things about these cars is the complete mish mash of metric and imperial!
The great thing about restoring a mini is that absolutely everything was available and delivered fast. It was very satisfying writing great lists of what we’d need, buying it all online and receiving packages of goodies the next day. There wasn't a single thing we couldn't get.
Before I took the car to the workshop I stripped out the interior and drove it there with just the dash, steering wheel, driver seat and seat belt.
It didn’t take long to remove the brightwork and we got straight on with cutting the front end off so that we could get a good idea of what we were truly dealing with.
With the front cut off we were delighted that the inner wings were 100% solid, and they hadn’t even cracked or stressed like they’re prone to doing. It seems these later cars came with no rust prevention on the front wings and front panel from the factory hence all these MPI models falling into this state.
Although we were up against it with time we were going to rebuild it with proper rust prevention and seam sealing so this doesn’t happen again.
At the back things were looking pretty bad and a bit worse than we anticipated. Saying that, the lower valance was largely good with just some rot where the fog light mounts and everything from the boot hinge line up was good, so it was just that area that needed major attention.
It looks a lot worse in the pictures and the area where the boot hinges mount was still intact so we had a cunning plan on how to repair this section.
We also took the fuel tank out which also showed the boot floor and importantly where subframe mounts to be in good shape. After skurfing it back we could see there was nothing untward in there.
We were pretty methodical about bagging up parts with associated hardware and thankfully only snapped a few bolts along the way. One of the weird things about these cars is the complete mish mash of metric and imperial!
The great thing about restoring a mini is that absolutely everything was available and delivered fast. It was very satisfying writing great lists of what we’d need, buying it all online and receiving packages of goodies the next day. There wasn't a single thing we couldn't get.
I'm looking at the photos thinking ''I've taxed worse...'' 
Looking back, the only thing I didn't like about my Sportspack was the twitchiness on the 13'' wheel and tyre combo, but then I'm probably biased as I much prefer the original 10'' set up.
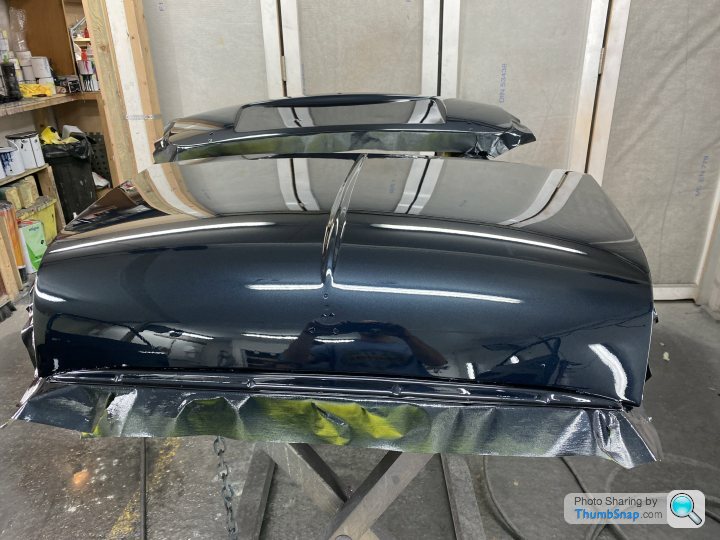
That Tahiti Blue body colour should come up very nicely when it's all finished.
Looking back, the only thing I didn't like about my Sportspack was the twitchiness on the 13'' wheel and tyre combo, but then I'm probably biased as I much prefer the original 10'' set up.
That Tahiti Blue body colour should come up very nicely when it's all finished.
P5BNij said:
I'm looking at the photos thinking ''I've taxed worse...''
Looking back, the only thing I didn't like about my Sportspack was the twitchiness on the 13'' wheel and tyre combo, but then I'm probably biased as I much prefer the original 10'' set up.
That Tahiti Blue body colour should come up very nicely when it's all finished.
Oh yeah, I've taxed worse also. I was able to check it over thoroughly and fire it up and run it round the block before buying so I knew it's potential before taking the plunge. Looking back, the only thing I didn't like about my Sportspack was the twitchiness on the 13'' wheel and tyre combo, but then I'm probably biased as I much prefer the original 10'' set up.
That Tahiti Blue body colour should come up very nicely when it's all finished.
I actually find it drives pretty well with very minimal tramlining. At motorway speeds it's a bit noisy, but it has a RC40 exhaust. It otherwise drives straight and true and feels really good especially with new brakes and tyres.
The colour is anthracite which is actually a very dark blue. Don't see may in this colour but with fresh paint it looks fantastic and really smart.
Here's a little teaser of the final colour
Very nice, suits it perfectly. When I was having my Mk2 S restored a few years back I considered painting it very dark blue but went for a very dark metallic purple in the end. Not factory spec and it's caused a few funny comments from the rivet counters!
I'm on the cusp of selling the cherry red Mini 30 I bought for something to play with a week before lockdown (got my eye on something more exotic) but part of me wants to carry on turning it into a Radford / W&P lookalike, if I had more room I'd keep it.
I'm on the cusp of selling the cherry red Mini 30 I bought for something to play with a week before lockdown (got my eye on something more exotic) but part of me wants to carry on turning it into a Radford / W&P lookalike, if I had more room I'd keep it.

DAY 2 Pt1
Next thing to do was remove all the glass which was an easy job all round. We also needed to unbolt the arches which we could now do as the fuel tank was out.
The arches have studs which rust and need replacing. Purchasing new studs was the only truly poor value item on this build. Everything else was dirt cheap for what it was but each arch need five studs at £5 each! We managed to salvage all the rear studs at least so only needed to purchase 10.
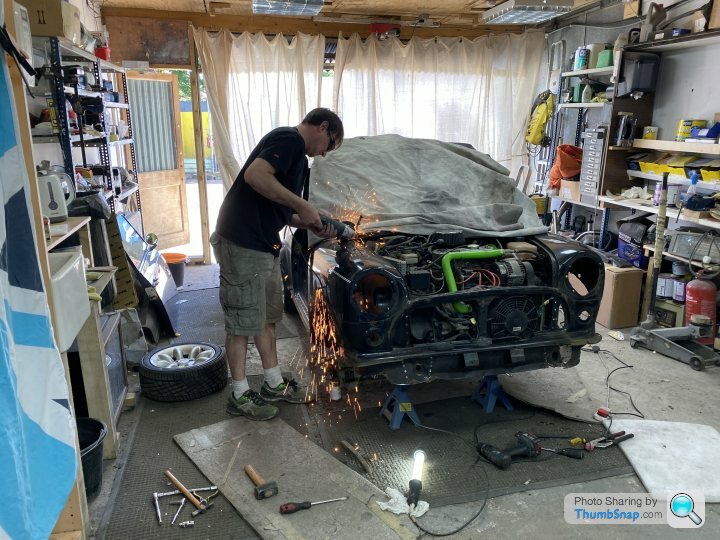
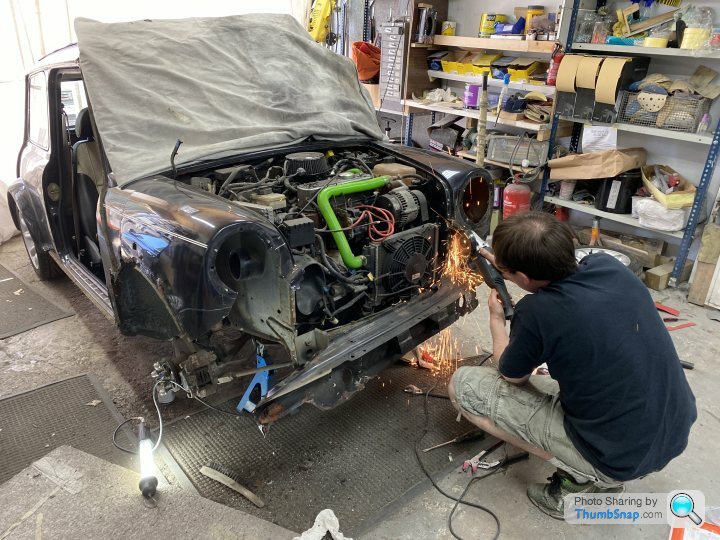
You’ll notice in the pic above the panel on the floor. That’s a replacement lower valance which we were going to flip upside down and use to repair the area around the boot hinges. Ideally, we would have got a proper repair panel, but you can only get the entire back end and that’s one heck of a job to replace and time we didn’t have.
With a bit of persuasion and cutting we got it into a decent shape to tack in place. We seam sealed it properly from the inside also and it’s as good as proper job. I honestly couldn’t be happier with how we did this.

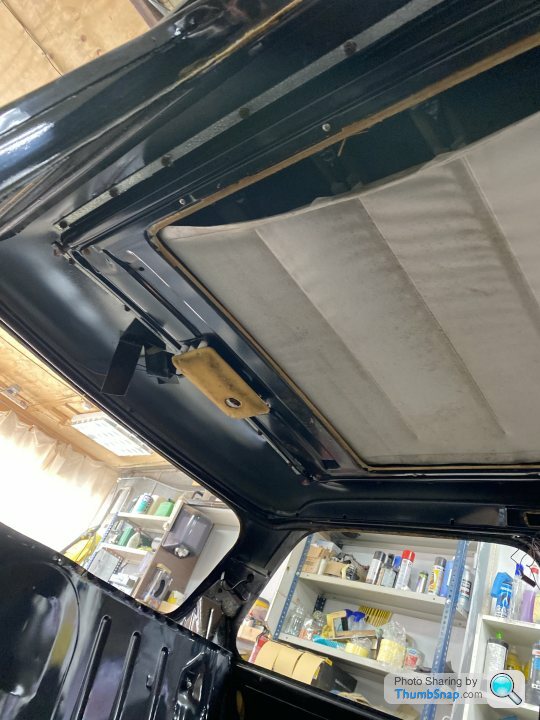
Next up was getting the dash out which took all of 3 minutes and then onto the sunroof.
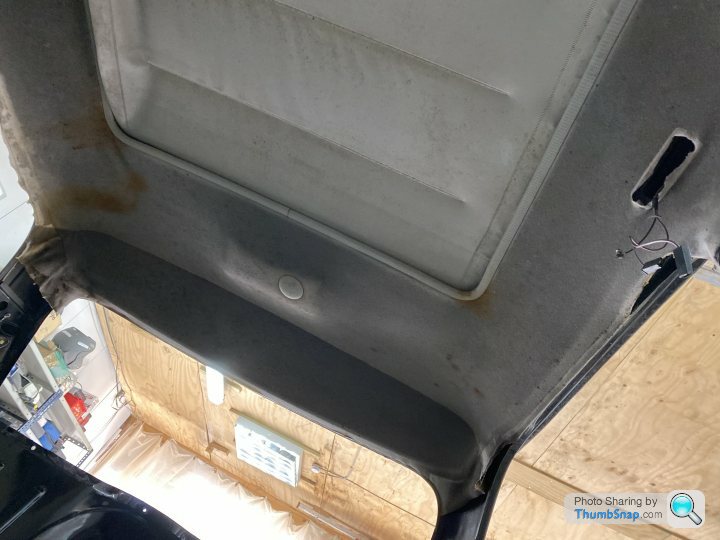
The head lining was in a really bad state and would need replacing. The moisture had got to it and totally ruined any chance of saving it. Unfortunately, you can’t buy these so we had to make our own once the car was painted. More on that later.
With the headliner pulled off we could undo the 40 bolts holding the roof in place. After breaking the weather seal it popped straight out.
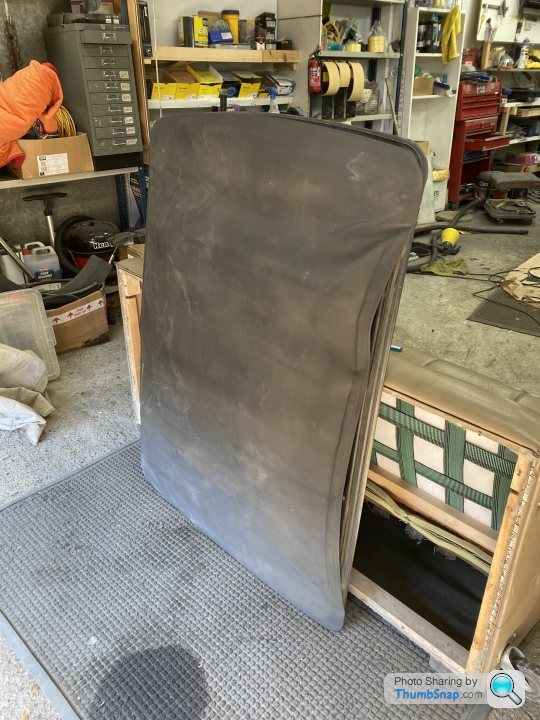
I managed to find a place in Bristol who made replacement vinyls for British classics and they sold me one cut and stitched to size, with all the adhesives, cables and sealants needed to do a restoration. The kit cost £200 which wasn’t bad considering the cheapest quote I got from specialists to fix this was £1200.
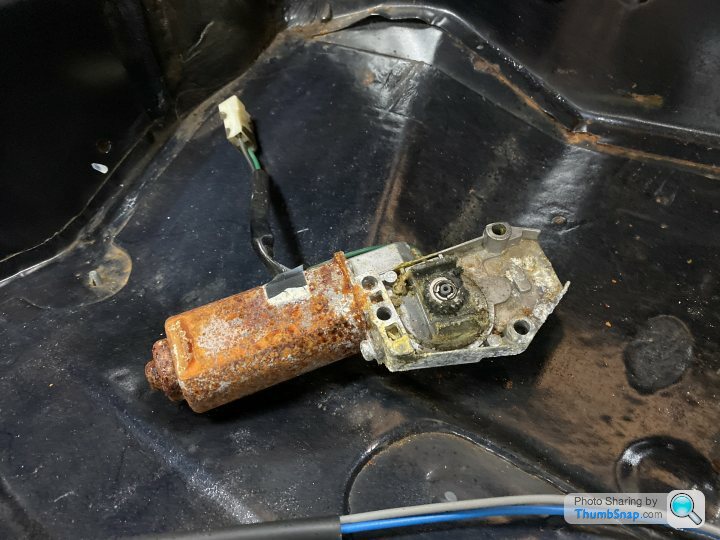
It turned out one of the runners had jammed and after freeing it up and bending everything back into line it all moved smoothly. The motor also looked in a very terrible state, but when I put power to it, it ran smooth as silk. Looks can be deceiving! I thought I’d need to replace the motor and these are impossible to get hold of. A bit of grease and the motor was good to go.
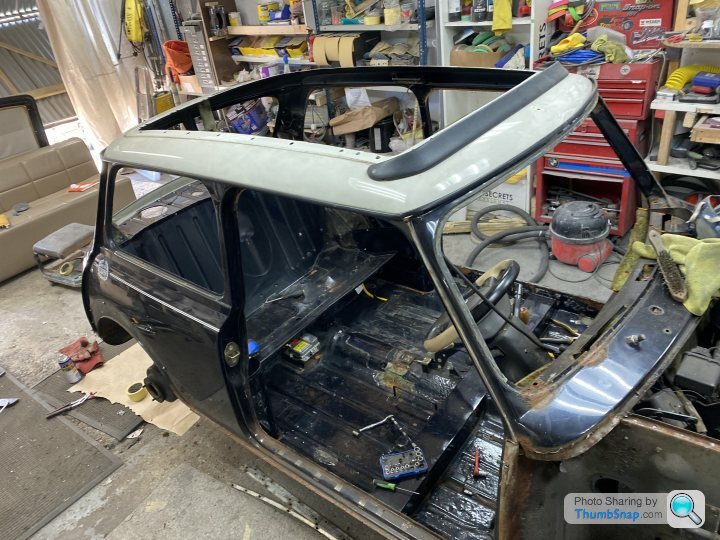
The car is starting to look pretty naked by this stage!
You’ll notice there’s some rust on the dash rail, but it was structurally solid and gets covered up by the dash pad so this wasn’t a priority. Ideally, we would have cut the rail and scuttle out, but with our time constraints and considering there was plenty of strength we opted to repair these.
Next thing to do was remove all the glass which was an easy job all round. We also needed to unbolt the arches which we could now do as the fuel tank was out.
The arches have studs which rust and need replacing. Purchasing new studs was the only truly poor value item on this build. Everything else was dirt cheap for what it was but each arch need five studs at £5 each! We managed to salvage all the rear studs at least so only needed to purchase 10.
You’ll notice in the pic above the panel on the floor. That’s a replacement lower valance which we were going to flip upside down and use to repair the area around the boot hinges. Ideally, we would have got a proper repair panel, but you can only get the entire back end and that’s one heck of a job to replace and time we didn’t have.
With a bit of persuasion and cutting we got it into a decent shape to tack in place. We seam sealed it properly from the inside also and it’s as good as proper job. I honestly couldn’t be happier with how we did this.
Next up was getting the dash out which took all of 3 minutes and then onto the sunroof.
The head lining was in a really bad state and would need replacing. The moisture had got to it and totally ruined any chance of saving it. Unfortunately, you can’t buy these so we had to make our own once the car was painted. More on that later.
With the headliner pulled off we could undo the 40 bolts holding the roof in place. After breaking the weather seal it popped straight out.
I managed to find a place in Bristol who made replacement vinyls for British classics and they sold me one cut and stitched to size, with all the adhesives, cables and sealants needed to do a restoration. The kit cost £200 which wasn’t bad considering the cheapest quote I got from specialists to fix this was £1200.
It turned out one of the runners had jammed and after freeing it up and bending everything back into line it all moved smoothly. The motor also looked in a very terrible state, but when I put power to it, it ran smooth as silk. Looks can be deceiving! I thought I’d need to replace the motor and these are impossible to get hold of. A bit of grease and the motor was good to go.
The car is starting to look pretty naked by this stage!
You’ll notice there’s some rust on the dash rail, but it was structurally solid and gets covered up by the dash pad so this wasn’t a priority. Ideally, we would have cut the rail and scuttle out, but with our time constraints and considering there was plenty of strength we opted to repair these.
Edited by croissant on Wednesday 12th August 19:13
Looks great wish I had a friend to do the bodywork in 10 days! I was given an Anthracite Mpi last year, 1 owner and 39k from new but fairly rotten. We enthusiastically stripped it to a shell, delivered it to a recommended body work guy and 9 months later it’s still there.......
I’ve got the subframes rebuilt, new tie bars, arms, bushes, dampers, cones etc but nothing to put them on. My worry now is remembering how it goes back together!

I’ve got the subframes rebuilt, new tie bars, arms, bushes, dampers, cones etc but nothing to put them on. My worry now is remembering how it goes back together!
Great work OP - can you explain how you removed the dash please? I'd like to remove the one in my Mini 30 and can't work out how to uaccess the nuts on the right hand end where the instruments are...... looking inside the glove compartment it's obvious where the nut is at the left hand end, but not at the other end - cheers.
Edited by P5BNij on Wednesday 12th August 19:48
Rsdop said:
Looks great wish I had a friend to do the bodywork in 10 days! I was given an Anthracite Mpi last year, 1 owner and 39k from new but fairly rotten. We enthusiastically stripped it to a shell, delivered it to a recommended body work guy and 9 months later it’s still there.......
I’ve got the subframes rebuilt, new tie bars, arms, bushes, dampers, cones etc but nothing to put them on. My worry now is remembering how it goes back together!

Oh snap! I bet you're looking forward to getting your project done, although I'll never understand why garages keep hold of cars for so long. You'd think they'd want to turn around a job and get paid sooner rather than later. I’ve got the subframes rebuilt, new tie bars, arms, bushes, dampers, cones etc but nothing to put them on. My worry now is remembering how it goes back together!
These cars are very easy to assemble and if you're ever stuck when putting it back together let me know.
Edited by croissant on Thursday 13th August 10:19
P5BNij said:
Great work OP - can you explain how you removed the dash please? I'd like to remove the one in my Mini 30 and can't work out how to uaccess the nuts on the right hand end where the instruments are...... looking inside the glove compartment it's obvious where the nut is at the left hand end, but not at the other end - cheers.
Thanks! Edited by P5BNij on Wednesday 12th August 19:48
There's another nut on the drivers side in the same place. You have to access it blind from under the dash. Get your hand under there and feel around. You may have to remove the air vent piping to get to it. Once you get a socket onto it, it'll come off easy. There's also a nut in the centre under the stereo.
I found the tricky part was the speedo cable. There's no slack and you have to pull the dash back and squeeze your hand in to remove it from the cluster

croissant said:
Oh snap! Is yours a sportpack also? I bet you're looking forward to getting your project done, although I'll never understand why garages keep hold of cars for so long. You'd think they'd want to turn around a job and get paid sooner rather than later.
These cars are very easy to assemble and if you're ever stuck when putting it back together let me know.
Thanks, I did take lots of photos but may take you up on that. Mine isn’t a Sportspack, just a standard Cooper. These cars are very easy to assemble and if you're ever stuck when putting it back together let me know.
To be fair to my bodywork guy, I did say I was in no rush but was hoping to get it built up for this summer! Looks like next year now I guess. He’s an old skool guy working on a farm unit, his work is amazing and it’s going to cost a lot less than going to a proper body shop so hopefully be worth the wait.
Gassing Station | Readers' Cars | Top of Page | What's New | My Stuff