Kelvinators "boring car" - 1998 Corolla Liftback Project
Discussion


320d is all you need said:
Out of interest for a old shed , how much extra in time and money have you spent over the initial purchase price ?
To me it seems you'd have been better of buying a better condition manual one if you look at your time as say $30 an hour, not to mention the parts spend, although, you wouldn't have had the fun in the process
In terms of the manual conversion, the cost is quite minimal. I would've paid more for a good manual 1.8 because they are rare. We only got two options here, the 1.6 4AFE and the 1.8 7AFE. The 1.6 is everywhere, but I wanted that extra torque. The real expense is in the suspension and brake mods that I would be doing to a "nicer" car too, so the low starting price of this one has been a real help.To me it seems you'd have been better of buying a better condition manual one if you look at your time as say $30 an hour, not to mention the parts spend, although, you wouldn't have had the fun in the process
This car is a good car under all the filth, its just a matter of uncovering it.


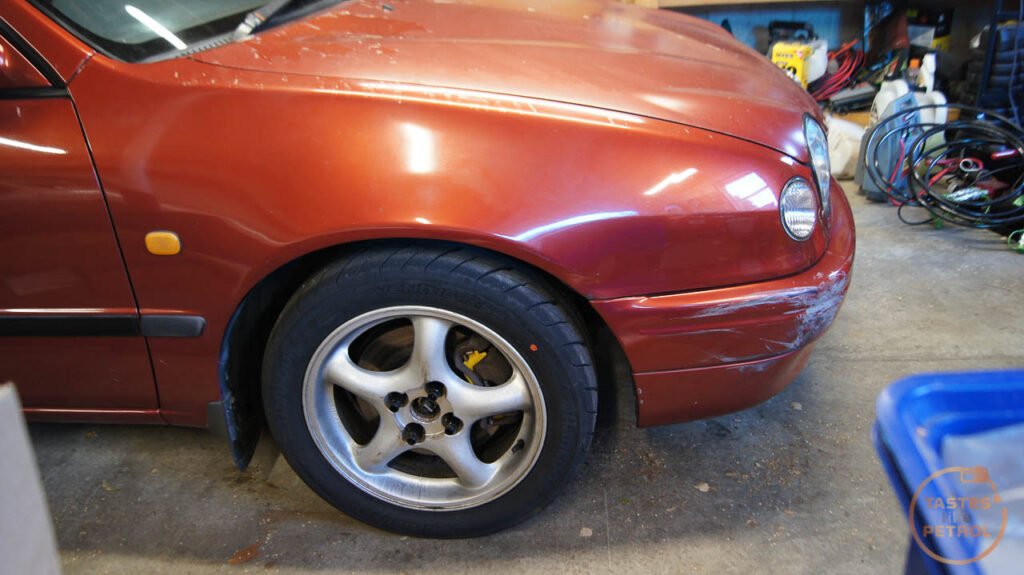
You're all correct. MX5 wheels and lowered.
The manual swap wasn't the only improvement on the cards for this car. Whats a sporty weekend/track car without some handing and braking upgrades?
Thankfully knowing a couple of other fast Corolla owners means that a lot of the heavy lifting on the work I was about to do has already been done. I more or less knew what parts I needed to get to make it all work together. It's all Toyota Lego.
The plan was to upgrade the brakes, suspension, wheels and tyres. This is what I went with
[SIZE=5]Brakes[/SIZE]
Front
7/8" Brake Master Cylinder from an AE111 Levin BZR (with Super Strut)
Znoelli 275x25mm Front Rotors from a ZZE123 Corolla Fielder
Big single-piston calipers from an ST202 Celica
EBC YellowStuff pads
NICE Products NS381 wheels studs (48.4mm long)
3mm alloy spacer behind the rotor hat
Rear
Rear disk brake conversion from an AE101 BZ Touring Wagon (hubs/carriers/handbrake cables/calipers/brake hoses)
Stock replacement pads and rotors
Stock AE112R Corolla front studs moved to rear hubs
[SIZE=5]Suspension[/SIZE]
KYB Excel-G Shocks
Vogtland 35mm Lowering Springs
New front top mounts
16mm rear swaybar from AE101 BZ Touring Wagon
New swaybar links front and rear
Polybushed link arms, trailing arms, and rear swaybar D bushes
Changed solid link arms for adjustable arms
[SIZE=5]Wheels and Tyres[/SIZE]
NB MX5 15x6 et40 Alloys
Hankook Ventus RS4 195/50R15
Black steel open ended wheel nuts
Not a bad list. There is still some other work to be done, like fitting poly bushes to the front arms, but funds were starting to run low, and this was the most work I could do at one time.
With the car in the garage and on the QuickJack, the first part of the job to be done was to remove as much brake fluid from the system as possible and remove the old master cylinder.
The old fluid was very manky. Clearly hadn't been changed in a while. I used a big syringe to suck the fluid out of the master, and drained each caliper with a bleeding bottle.

In order to completely drain the master, the filter needs to be removed. This rotates counter-clockwise and then it can be removed


With the master drained, it was a case of undoing a couple of bolts that hold it to the booster, removing the two lines, disconnecting the wiring and out it comes. Refitting is the reverse.

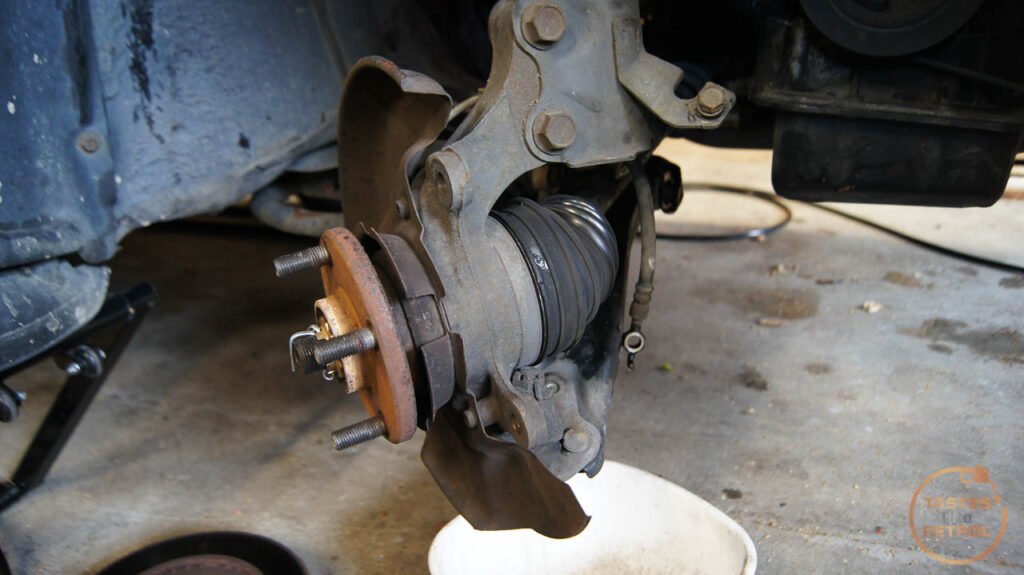
Now its time to remove the wheels, and start stripping the front brakes down. Off came the small stock calipers and rotors.
Here's a comparison of old vs new. Old caliper (with bracket) on the left, replacement on the right (without bracket). The old caliper is a 51-18, which is a 51mm piston to suit an 18mm thick rotor. The replacement is 57-28, a 57mm piston for a 28mm thick rotor.

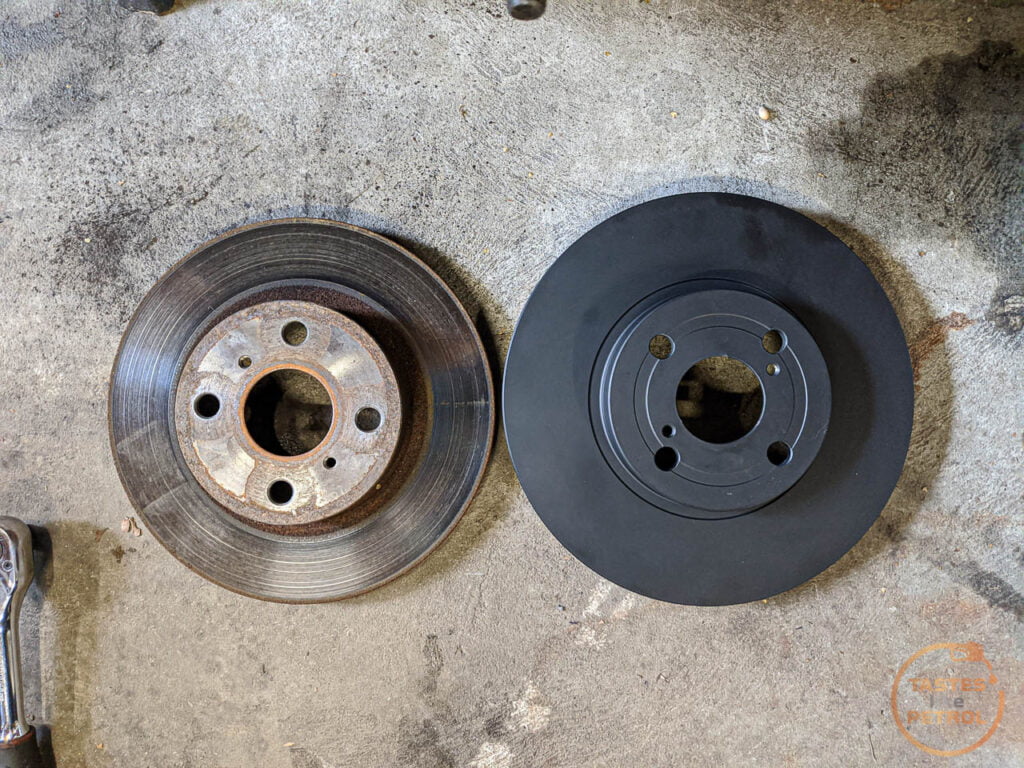
Stock 258x18mm rotor against the 275x25mm on the right. Both are vented, but the stock rotor is significantly thinner.

Before the new brakes could go on I had to replace the front studs with slightly longer ones. Due to the 3mm spacer behind the rotor, there wouldn't be sufficient thread engagement with the stock studs. You can see the difference in this helpful photo I stole from a friends build thread. Left to right are Aftermarket stud (going in front), stock front (going in rear) and stock rear stud (going in bin).

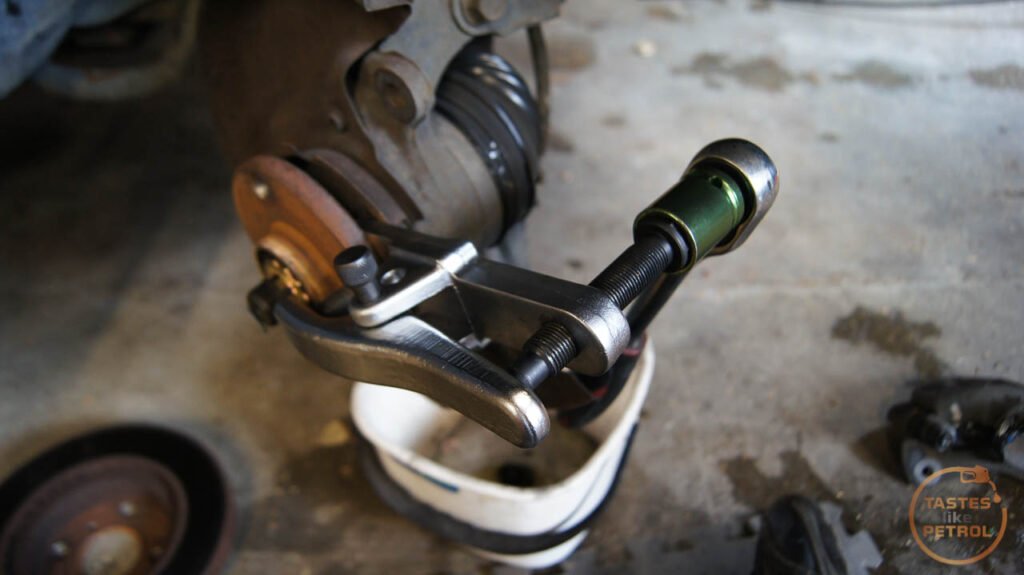
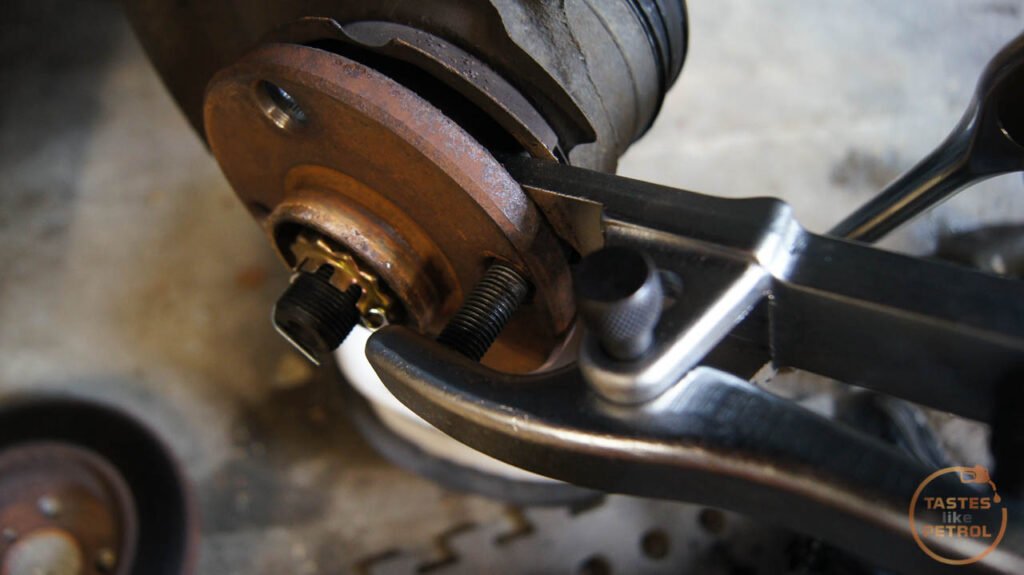
Pressing the old studs out is easy. You can either use a big hammer and bash them out, or if you intend to reuse the studs and don't want to risk damaging the end of them, use a balljoint press.

I honed this method by first pressing the studs out of the rear hubs on the bench.
The new studs have a slightly larger diameter base, which makes pulling them into the hubs quite a workout, but using one of the new nuts that came with the studs, a big breaker bar and my long pry bar to counter hold, I managed to wind them in all.

I had a pair of 3mm thick alloy spacers machined down to fit within the hat of the rotor, which pushes the rotor out away from the hub by 3mm. This centers the rotor in the Celica caliper carrier.


After cleaning the hub face up the spacer and rotor were fitted

On went the bracket

Pads fitted
And finally the caliper, with a test fit of the stock hose (which is a perfect fit)

Next on the list was to pull the strut out. Three bolts on the strut tower, and two through the knuckle and the whole thing falls out. Remember to disconnect the ABS wiring first.

Compress the spring and zip the top piston nut off

Unfortunately this is about where I confirmed the old top mount, which I intended on reusing, was poked. Lots of play in the bearing, and feels rough to spin. A quick call around and I had some ready for collection the next day.

The new Vogtland springs are so pretty

The old shocks were beyond stuffed. No resistance to pushing the piston down by hand, and no rebound of the piston. You push it down, it stays there. It was basically doing nothing, no wonder the car lurched around like an old Jag. The dust shields and bump stops were in pieces and useless.

The original shocks were old KYBs, which I guess is one of the "upgrades" the NZDM cars got. Toyota has/had a history of upgrading NZDM cars to better suit our roads and driving style. The famous racing driver Chris Amon was instrumental in tuning and tweaking NZDM cars for a few years, and there were a few limited "Chris Amon Edition" cars, from Corollas, Coronas, and even the GT86.
The next day, with new strut mounts in hand, I began to assemble the new strut.
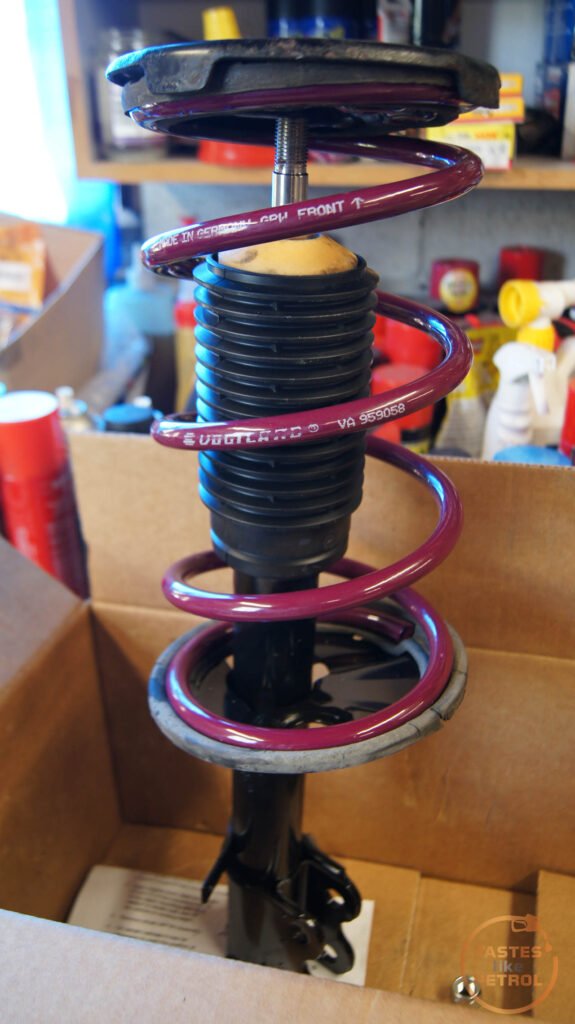
As a note, when reassembling, the top spring retainer has to be indexed a certain way. On the top "OUT" is stamped into the metal. This arrow needs to line up with the lower knuckle mounting tabs on the bottom of the strut.

One new strut, with new spring and new top mount. Only parts reused were the top spring retainer plate and spring rubbers.

Back in the car again
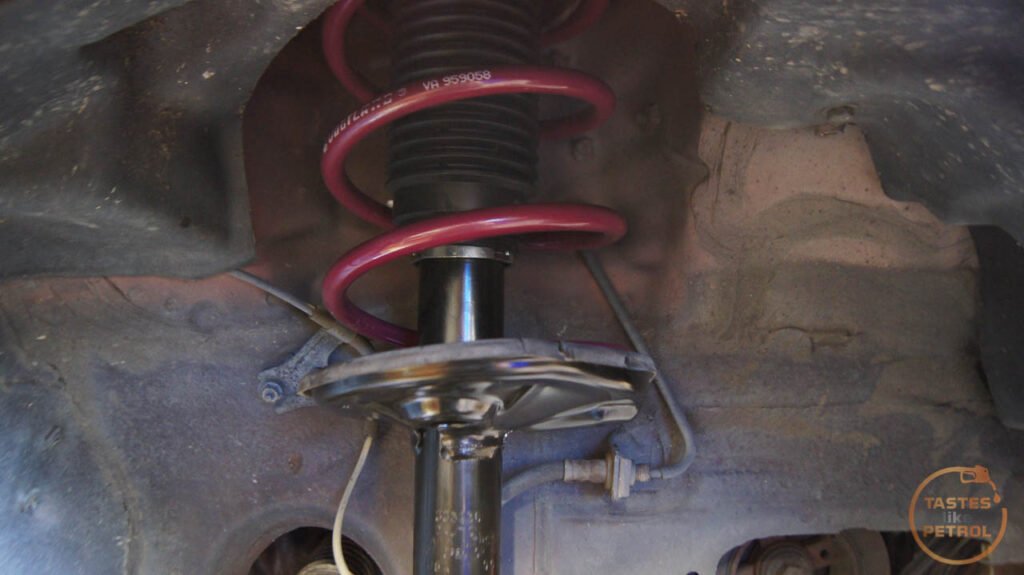
This is the height difference in the lowering springs. Its about 1 whole coil less on the Vogtlands but the Vogtlands are a thicker coil

One last little thing to change before moving to the other side was the swaybar link. The old ones were stuffed. I will eventually change the front swaybar bushes too, but haven't got that far.


I rinsed and repeated on the other side of the car

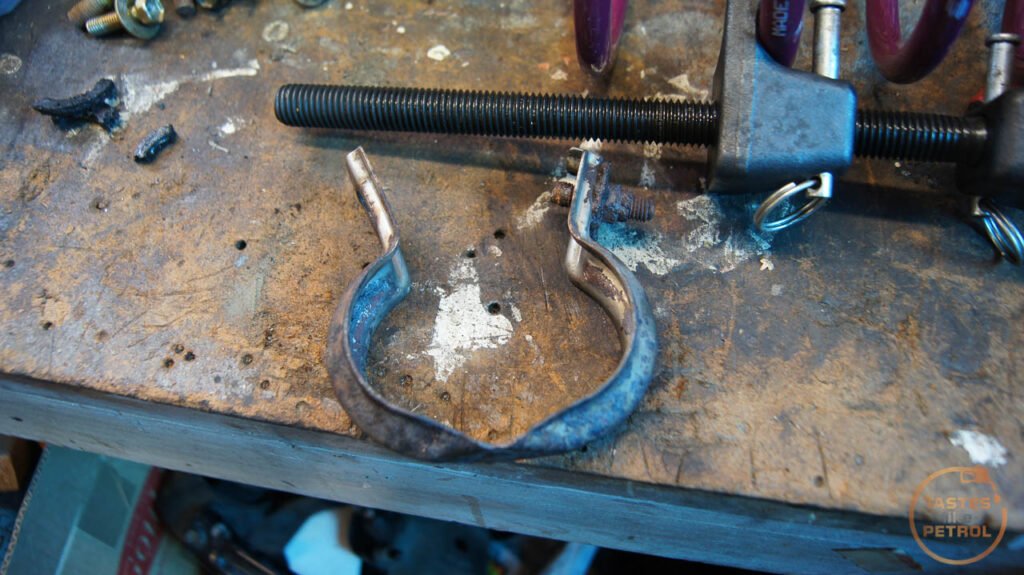
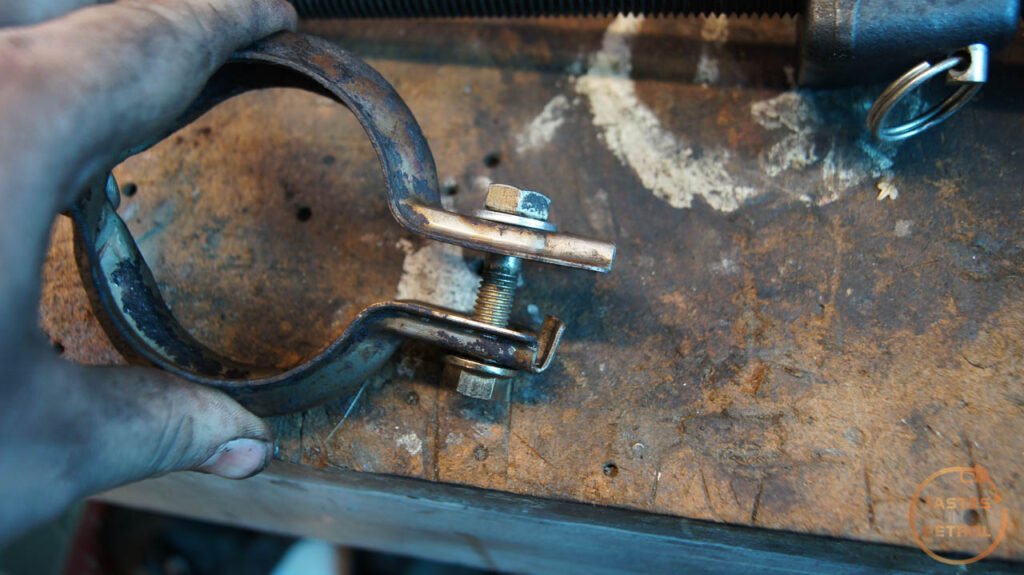
Now it was time to turn my attention to the rear of the car. Before I could do any work there though I needed to drop the exhaust, as it runs below the crossmember that I need to drop. This is held in with one mount on the rear muffler, and a clamp joining it to the front pipe. The fixing on the clamp was well rusty, so the angle grinder was employed to cut it off so I could remove the clamp.
The remainder of the stud turned out to be spot welded to the bracket, but nothing a BFH and some percussive persuasion couldn't fix.
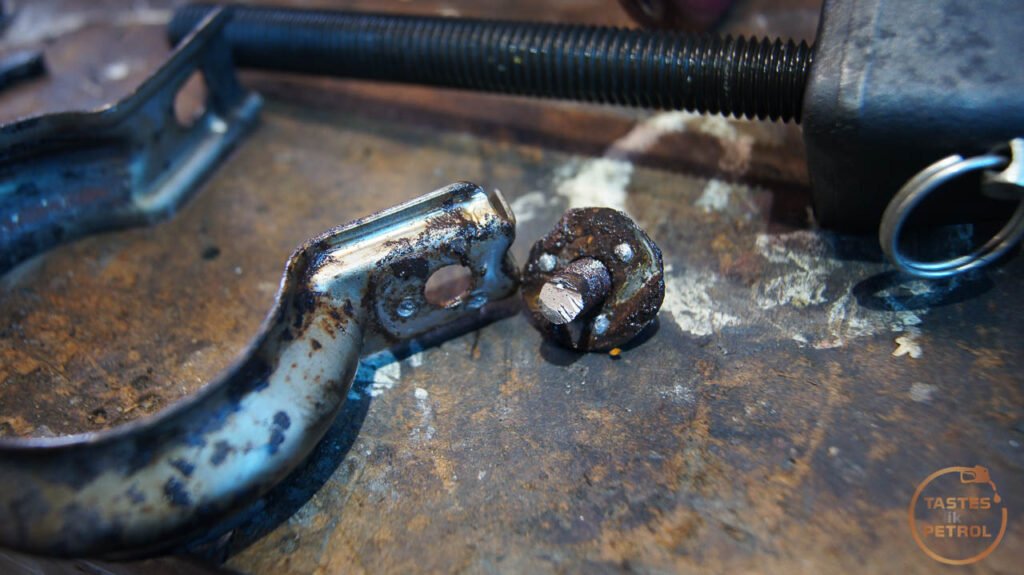
I replaced the whole rusty lot with a new bolt and nut
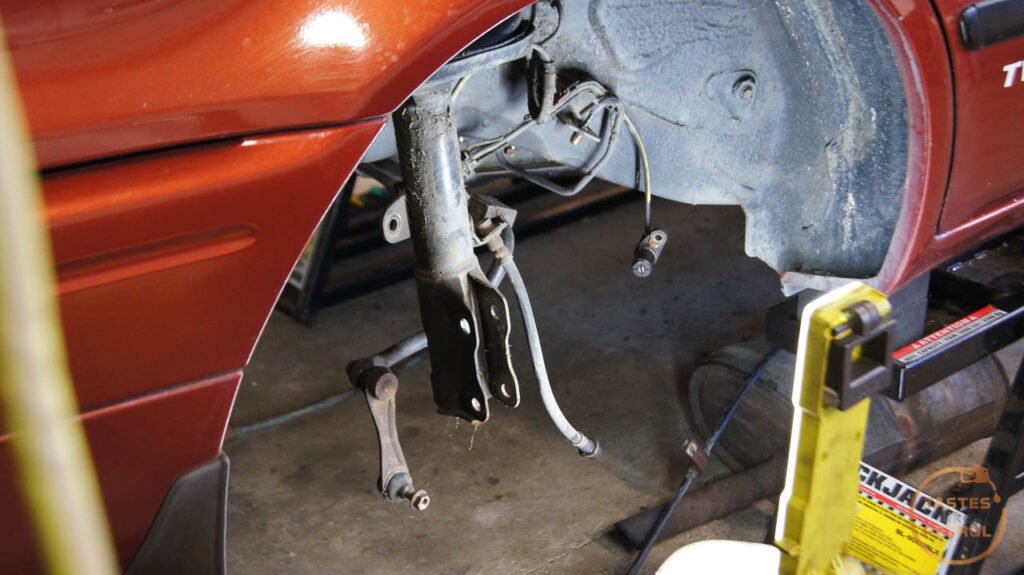
Now it was time to drop the rear subframe. First I had to disconnect the handbrake cables, trailing arms and brake pipes. I chose to split the struts from the knuckles, but you could drop the whole lot as one if you wanted.


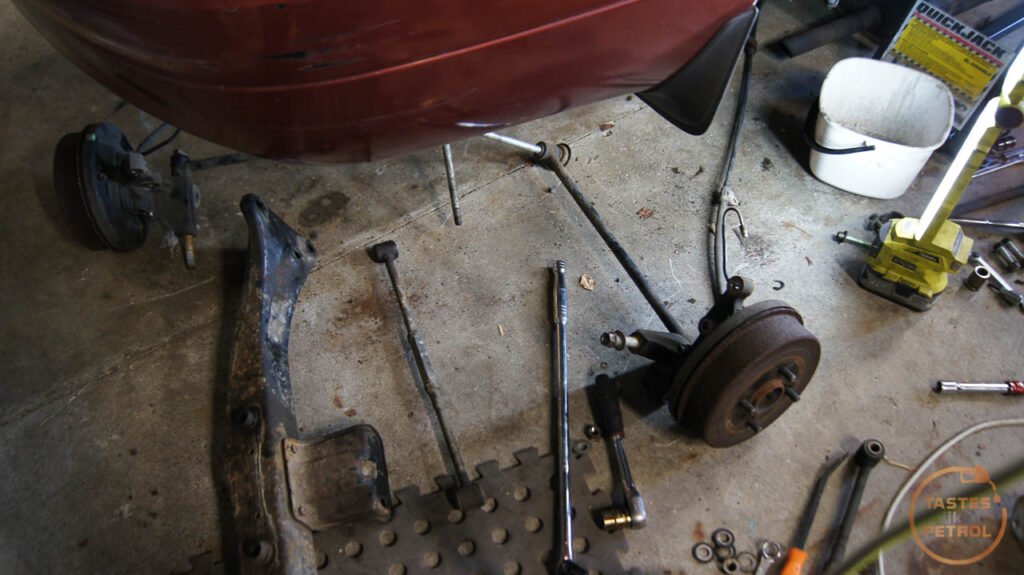
And then it was a case of turning it all into an exploded diagram
With the rear end out I took the time to wire brush and rust treat the surface rust that had been noticed during its WOF inspection, especially the surface rust on the fuel hard line I had an advisory for. Once the rust treatment was dry I gave it all a good coating of an epoxy-based black zinc paint. This should keep the rust at bay, and it looks a lot better under there.
The next day I had the help of a friend to knock out of jobs on the rear suspension. Two people made light work of it.
First on the list for the day was to strip the adjustable arms that were removed from the car ready for lubricating and polybushing. First I used them as a guide to set up the other set of adjustable arms I had already lubed and polybushed previously so that the alignment would at least be similar to what was on the car already and I wasn't starting blind.
These are the arms after being stripped, bushes pressed out, new polybushes pressed in and heaps of copper grease on the adjuster threads

The other arms had a similar treatment (and damn the lock nuts and adjusters were tight. Very dry threads and obviously hadn't been touched in a long time. I was swinging on the spanner with all my considerable weight to crack them), and were set up to match the length of the old fixed arms. The whole lot was then attached loosely to the subframe, ready for fitting to the car.

The reason for lowering the subframe for this job was due to the long through bolts for the link arms not clearing the fuel tank, so the arms cannot be removed in situ.
The reason I'm using two pairs of adjustable arms instead of the stock pair of adjustable and pair of fixed is that you can adjust the two arms on each side together to adjust the rear camber. The stock configuration only allows for toe adjustment.
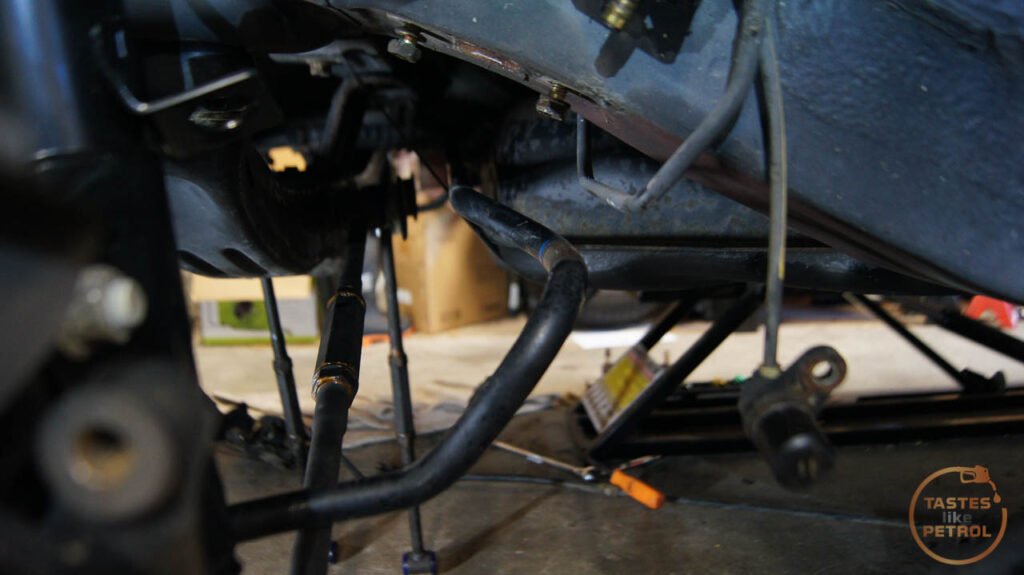
Before fitting the subframe we used a jack to support the fuel tank, undid the RH strap and wriggled the old 15mm swaybar out, and slid the replacement 16mm bar into place. This is best done with the subfame out of the way, and disconnecting the tank strap allows you to turn the swaybar towards the rear of the car so it clears the fuel filler hose.
The rear shocks didnt miss out on the same treatment as the front. These needed to be removed too. To remove them all you need to do is pop off the speaker panels via the small notch on the leading edge, and bam, there you go.
Undo the three 12mm bolts and the shock drops out. Once again they were filthy and stuffed. Similar to the fronts they had no pressure in them at all. No signs of leaking through, so technically still able to pass a WOF inspection, which is scary.

The top mounts on these are able to be retained. Do note when reassembling the strut, that like the fronts, the top mount needs to be indexed to the knuckle mounting tabs too. This is done by lining up the letter moulded into the mount with the tabs. Of course, I only found this out after initial reassembly, and then proceeded to make a mess of it and end up jamming my ratcheting spanner on one of the spring compressors, and since it isn't reversible the only way to remove it was with a big pry bar to pop the spanner off.
The rear subframe looks weird with the arms hanging down

The trailing arms were polybushed and refitted

With all the arms in place again and all the bushes replaced, it was time to offer up the knuckles and hubs for the rear disk setup.

And join all the arms to the knuckle
Everything was fitted loosely as the bushes need to be tightened when at about ride height. I used a jack to simulate this and used it to lift the bottom of the knuckle up, and then everything for torqued to spec.

With everything torqued down, I pressed the old front studs into the rear hubs, fit the new rotors and caliper brackets

Before I could proceed further I needed to strip the calipers down, clean them up, wind back the pistons and remove the handbrake cables to make them easier to fit.
Unfortunately this showed some issues, such as this lovely rusty bleed nipple. Thankfully they are the same as the old front calipers I pulled out, so I swapped them over the cleaner one.

The other issue I encountered was one of the handbrake cables was seized solid. I tried to free it up but in the end I had to do a mad dash to Pick A Part and relieve this AE111 Levin of its cable. This car is super crusty underneath, so much fun was had removing the cable, with clouds of rust falling in my face constantly.
With that slight issue out of the way, the cables were fitted without further problems. I also took this time to refit the exhaust and new swaybar links and bushes.

The rear pads and calipers got assembled, and the rear brakes were done

That was it. I was done. All that was left was to bleed the brakes, fit the wheels and see what happens when it's on the ground.
In order to get fluid through the completely empty system, I had to use my pressure bleeder. I hardly use this as I get better results from the normal little one-man bleeder bottle with a valve in it (which is also what I used to complete the bleeding on this car), but needed the suction to pull fluid through.

According to the manual, the bleed sequence is a bit weird too. Start on the LH FR, followed by RH FR, LH RR and RH RR.
Once I had sucked about half a litre of fluid through the system I moved to the one-man bleeder and bled the system until there were no signs of bubbles.
And then for the first time, the MX5 wheels were fitted. Thankfully they fit and even clear the big brakes (which is the reason for the 15s, the 14s don't clear the caliper).

On the ground again

Looks pretty good so far. The springs haven't settled yet, but I could still get the QuickJack out without jacking the car up.
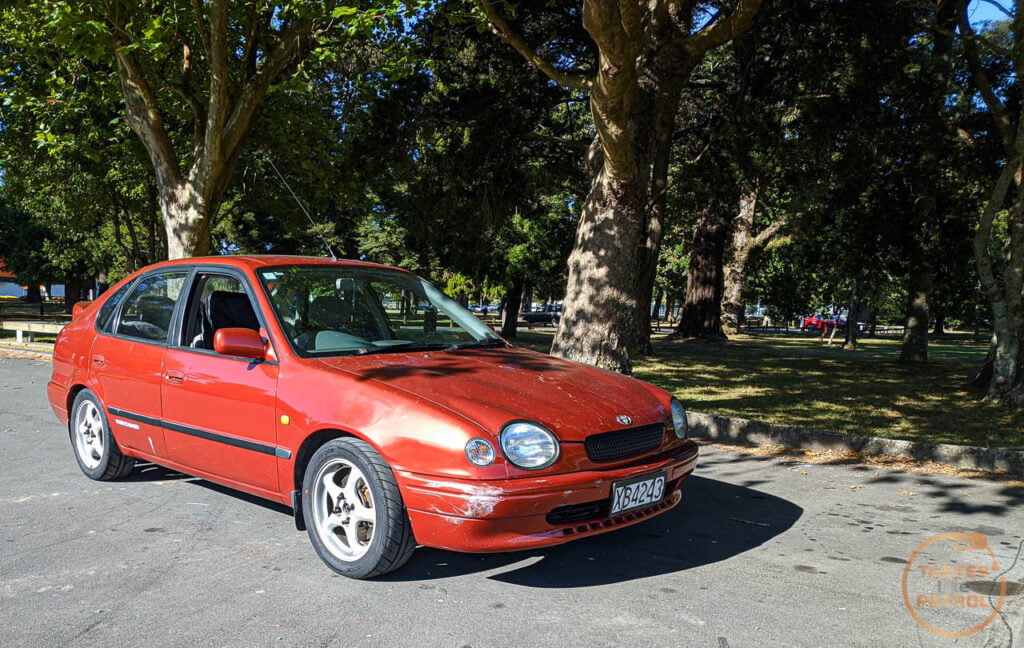
This is how far it settled after a drive.
The first drive went OK for the most part. I did a few laps of the blocks around my house bedding the brakes in and removing the protective coatings. The pedal feel is getting better each time.
All was going well until I stopped to take some photos. Thankfully I thought to take the torque wrench along for a ride, as three of the four nuts on the LH FR wheel had come completely loose. I torqued them back up again, but that was a worry. I can only think that maybe the studs on that wheel haven't quite completely seated. Will monitor it and see what happens.
In regards to the ride; the car no longer rolls and lurches like a drunk. The ride is still quite plush and compliant over bumps, but you can now feel the dampers actually doing something. I'll see how it feels when driving the car hard, but so far I'm happy with the Vogtland springs. The height is OK too, although it'll be nice if the front settles just a little more as it's going for a slight reverse rake at the moment with the rear being lower.
Without further ado, photos.


I'll drive the car again some more today and see if the wheel keeps trying to fall off or not. If it does I'll need to remove the brakes and wail on the stud some more to pull it in harder, if not, I'll book it for a wheel alignment later this week.
The manual swap wasn't the only improvement on the cards for this car. Whats a sporty weekend/track car without some handing and braking upgrades?
Thankfully knowing a couple of other fast Corolla owners means that a lot of the heavy lifting on the work I was about to do has already been done. I more or less knew what parts I needed to get to make it all work together. It's all Toyota Lego.
The plan was to upgrade the brakes, suspension, wheels and tyres. This is what I went with
[SIZE=5]Brakes[/SIZE]
Front
7/8" Brake Master Cylinder from an AE111 Levin BZR (with Super Strut)
Znoelli 275x25mm Front Rotors from a ZZE123 Corolla Fielder
Big single-piston calipers from an ST202 Celica
EBC YellowStuff pads
NICE Products NS381 wheels studs (48.4mm long)
3mm alloy spacer behind the rotor hat
Rear
Rear disk brake conversion from an AE101 BZ Touring Wagon (hubs/carriers/handbrake cables/calipers/brake hoses)
Stock replacement pads and rotors
Stock AE112R Corolla front studs moved to rear hubs
[SIZE=5]Suspension[/SIZE]
KYB Excel-G Shocks
Vogtland 35mm Lowering Springs
New front top mounts
16mm rear swaybar from AE101 BZ Touring Wagon
New swaybar links front and rear
Polybushed link arms, trailing arms, and rear swaybar D bushes
Changed solid link arms for adjustable arms
[SIZE=5]Wheels and Tyres[/SIZE]
NB MX5 15x6 et40 Alloys
Hankook Ventus RS4 195/50R15
Black steel open ended wheel nuts
Not a bad list. There is still some other work to be done, like fitting poly bushes to the front arms, but funds were starting to run low, and this was the most work I could do at one time.
With the car in the garage and on the QuickJack, the first part of the job to be done was to remove as much brake fluid from the system as possible and remove the old master cylinder.
The old fluid was very manky. Clearly hadn't been changed in a while. I used a big syringe to suck the fluid out of the master, and drained each caliper with a bleeding bottle.
In order to completely drain the master, the filter needs to be removed. This rotates counter-clockwise and then it can be removed
With the master drained, it was a case of undoing a couple of bolts that hold it to the booster, removing the two lines, disconnecting the wiring and out it comes. Refitting is the reverse.
Now its time to remove the wheels, and start stripping the front brakes down. Off came the small stock calipers and rotors.
Here's a comparison of old vs new. Old caliper (with bracket) on the left, replacement on the right (without bracket). The old caliper is a 51-18, which is a 51mm piston to suit an 18mm thick rotor. The replacement is 57-28, a 57mm piston for a 28mm thick rotor.
Stock 258x18mm rotor against the 275x25mm on the right. Both are vented, but the stock rotor is significantly thinner.
Before the new brakes could go on I had to replace the front studs with slightly longer ones. Due to the 3mm spacer behind the rotor, there wouldn't be sufficient thread engagement with the stock studs. You can see the difference in this helpful photo I stole from a friends build thread. Left to right are Aftermarket stud (going in front), stock front (going in rear) and stock rear stud (going in bin).
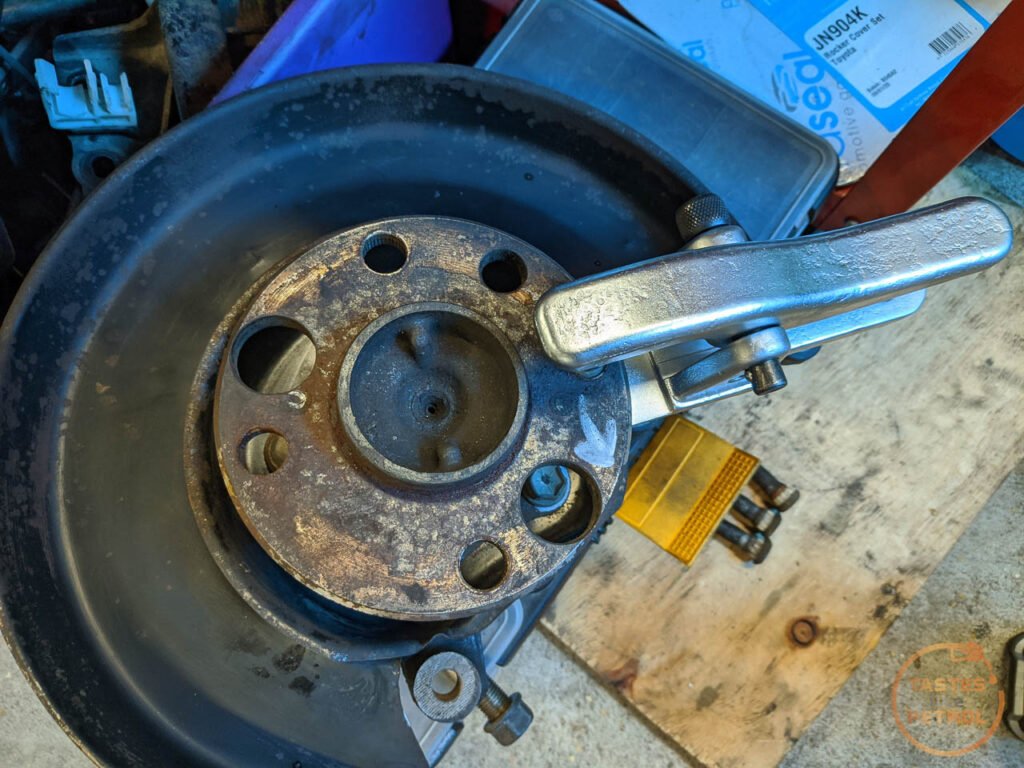
Pressing the old studs out is easy. You can either use a big hammer and bash them out, or if you intend to reuse the studs and don't want to risk damaging the end of them, use a balljoint press.
I honed this method by first pressing the studs out of the rear hubs on the bench.
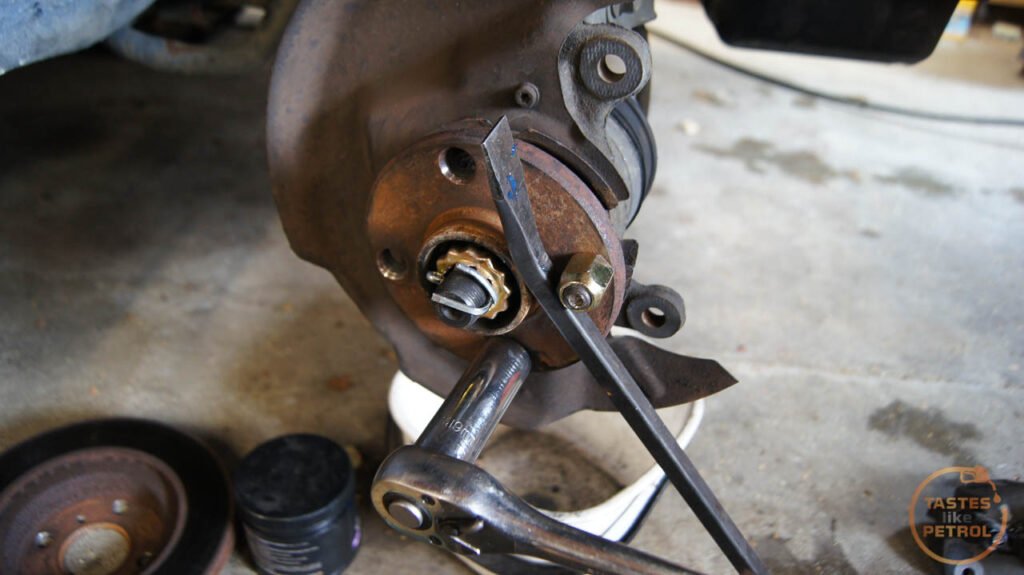
The new studs have a slightly larger diameter base, which makes pulling them into the hubs quite a workout, but using one of the new nuts that came with the studs, a big breaker bar and my long pry bar to counter hold, I managed to wind them in all.
I had a pair of 3mm thick alloy spacers machined down to fit within the hat of the rotor, which pushes the rotor out away from the hub by 3mm. This centers the rotor in the Celica caliper carrier.
After cleaning the hub face up the spacer and rotor were fitted
On went the bracket
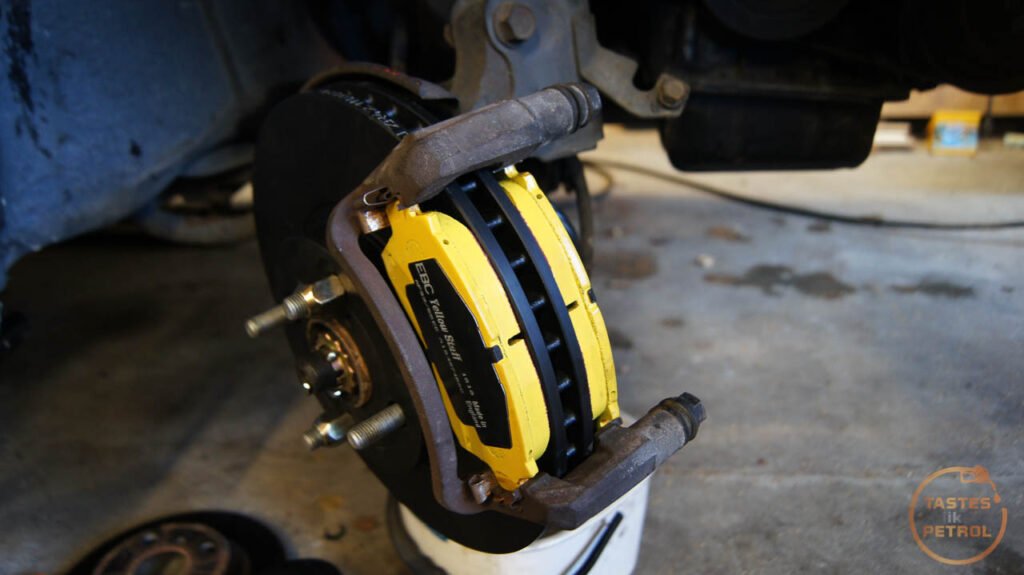
Pads fitted
And finally the caliper, with a test fit of the stock hose (which is a perfect fit)
Next on the list was to pull the strut out. Three bolts on the strut tower, and two through the knuckle and the whole thing falls out. Remember to disconnect the ABS wiring first.
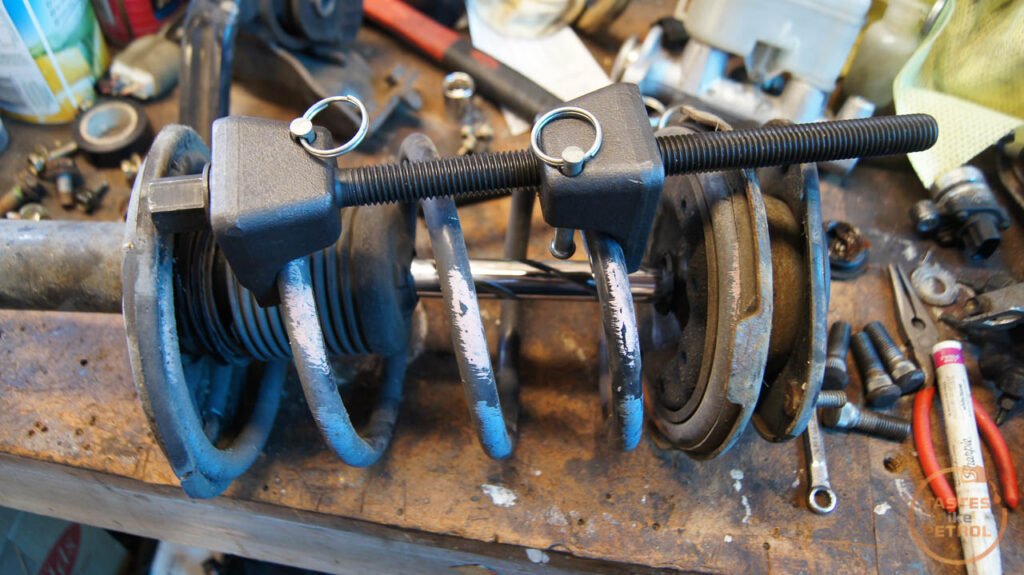
Compress the spring and zip the top piston nut off
Unfortunately this is about where I confirmed the old top mount, which I intended on reusing, was poked. Lots of play in the bearing, and feels rough to spin. A quick call around and I had some ready for collection the next day.
The new Vogtland springs are so pretty
The old shocks were beyond stuffed. No resistance to pushing the piston down by hand, and no rebound of the piston. You push it down, it stays there. It was basically doing nothing, no wonder the car lurched around like an old Jag. The dust shields and bump stops were in pieces and useless.
The original shocks were old KYBs, which I guess is one of the "upgrades" the NZDM cars got. Toyota has/had a history of upgrading NZDM cars to better suit our roads and driving style. The famous racing driver Chris Amon was instrumental in tuning and tweaking NZDM cars for a few years, and there were a few limited "Chris Amon Edition" cars, from Corollas, Coronas, and even the GT86.
The next day, with new strut mounts in hand, I began to assemble the new strut.
As a note, when reassembling, the top spring retainer has to be indexed a certain way. On the top "OUT" is stamped into the metal. This arrow needs to line up with the lower knuckle mounting tabs on the bottom of the strut.
One new strut, with new spring and new top mount. Only parts reused were the top spring retainer plate and spring rubbers.
Back in the car again
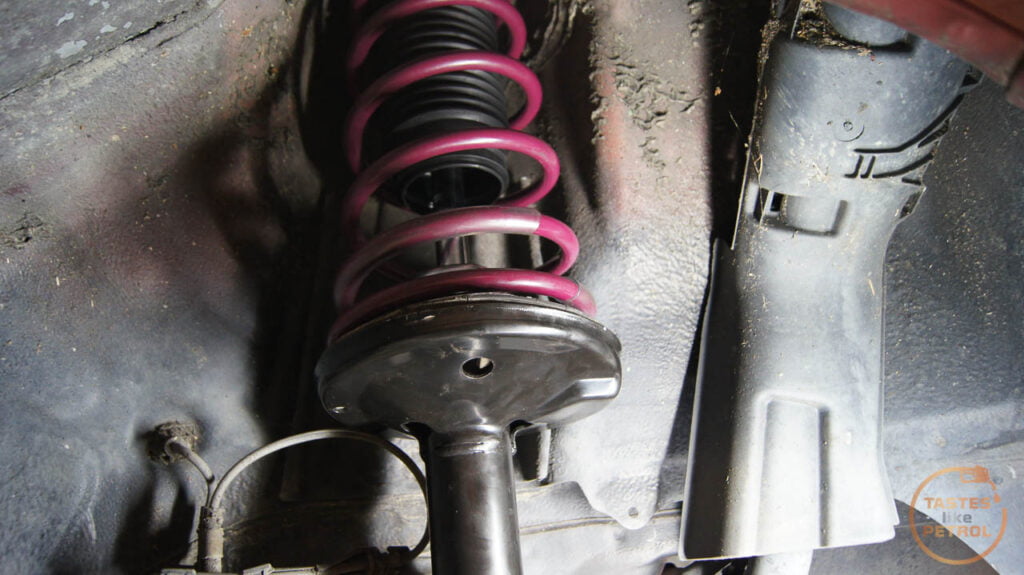
This is the height difference in the lowering springs. Its about 1 whole coil less on the Vogtlands but the Vogtlands are a thicker coil
One last little thing to change before moving to the other side was the swaybar link. The old ones were stuffed. I will eventually change the front swaybar bushes too, but haven't got that far.
I rinsed and repeated on the other side of the car
Now it was time to turn my attention to the rear of the car. Before I could do any work there though I needed to drop the exhaust, as it runs below the crossmember that I need to drop. This is held in with one mount on the rear muffler, and a clamp joining it to the front pipe. The fixing on the clamp was well rusty, so the angle grinder was employed to cut it off so I could remove the clamp.
The remainder of the stud turned out to be spot welded to the bracket, but nothing a BFH and some percussive persuasion couldn't fix.
I replaced the whole rusty lot with a new bolt and nut
Now it was time to drop the rear subframe. First I had to disconnect the handbrake cables, trailing arms and brake pipes. I chose to split the struts from the knuckles, but you could drop the whole lot as one if you wanted.
And then it was a case of turning it all into an exploded diagram
With the rear end out I took the time to wire brush and rust treat the surface rust that had been noticed during its WOF inspection, especially the surface rust on the fuel hard line I had an advisory for. Once the rust treatment was dry I gave it all a good coating of an epoxy-based black zinc paint. This should keep the rust at bay, and it looks a lot better under there.
The next day I had the help of a friend to knock out of jobs on the rear suspension. Two people made light work of it.
First on the list for the day was to strip the adjustable arms that were removed from the car ready for lubricating and polybushing. First I used them as a guide to set up the other set of adjustable arms I had already lubed and polybushed previously so that the alignment would at least be similar to what was on the car already and I wasn't starting blind.
These are the arms after being stripped, bushes pressed out, new polybushes pressed in and heaps of copper grease on the adjuster threads
The other arms had a similar treatment (and damn the lock nuts and adjusters were tight. Very dry threads and obviously hadn't been touched in a long time. I was swinging on the spanner with all my considerable weight to crack them), and were set up to match the length of the old fixed arms. The whole lot was then attached loosely to the subframe, ready for fitting to the car.
The reason for lowering the subframe for this job was due to the long through bolts for the link arms not clearing the fuel tank, so the arms cannot be removed in situ.
The reason I'm using two pairs of adjustable arms instead of the stock pair of adjustable and pair of fixed is that you can adjust the two arms on each side together to adjust the rear camber. The stock configuration only allows for toe adjustment.
Before fitting the subframe we used a jack to support the fuel tank, undid the RH strap and wriggled the old 15mm swaybar out, and slid the replacement 16mm bar into place. This is best done with the subfame out of the way, and disconnecting the tank strap allows you to turn the swaybar towards the rear of the car so it clears the fuel filler hose.
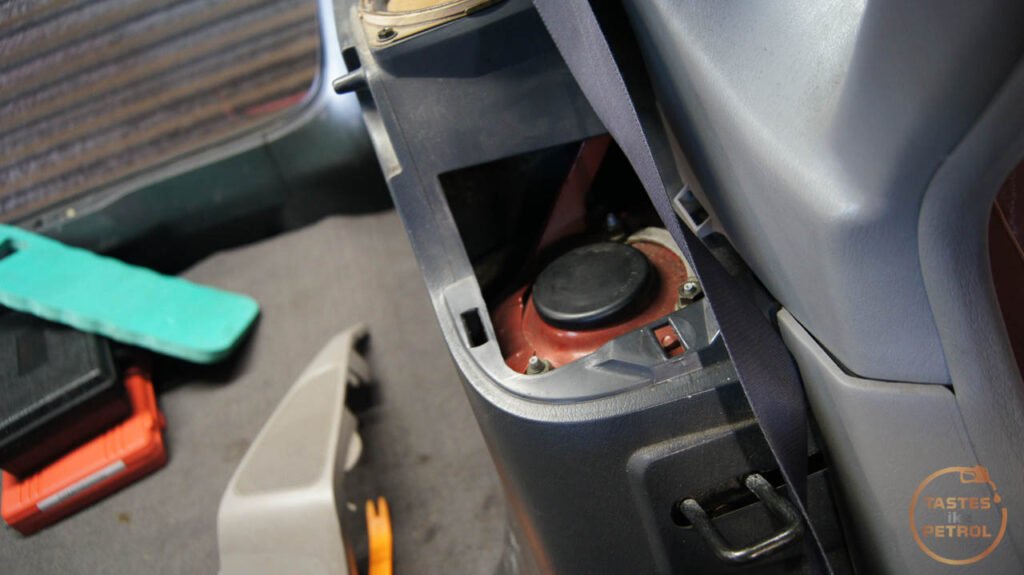
The rear shocks didnt miss out on the same treatment as the front. These needed to be removed too. To remove them all you need to do is pop off the speaker panels via the small notch on the leading edge, and bam, there you go.
Undo the three 12mm bolts and the shock drops out. Once again they were filthy and stuffed. Similar to the fronts they had no pressure in them at all. No signs of leaking through, so technically still able to pass a WOF inspection, which is scary.
The top mounts on these are able to be retained. Do note when reassembling the strut, that like the fronts, the top mount needs to be indexed to the knuckle mounting tabs too. This is done by lining up the letter moulded into the mount with the tabs. Of course, I only found this out after initial reassembly, and then proceeded to make a mess of it and end up jamming my ratcheting spanner on one of the spring compressors, and since it isn't reversible the only way to remove it was with a big pry bar to pop the spanner off.
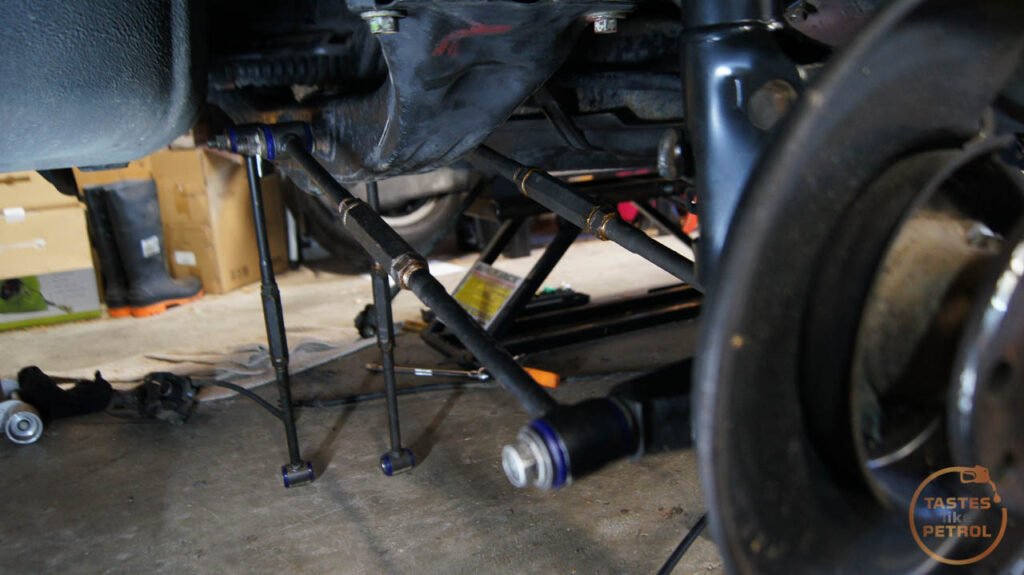
The rear subframe looks weird with the arms hanging down
The trailing arms were polybushed and refitted
With all the arms in place again and all the bushes replaced, it was time to offer up the knuckles and hubs for the rear disk setup.
And join all the arms to the knuckle
Everything was fitted loosely as the bushes need to be tightened when at about ride height. I used a jack to simulate this and used it to lift the bottom of the knuckle up, and then everything for torqued to spec.
With everything torqued down, I pressed the old front studs into the rear hubs, fit the new rotors and caliper brackets
Before I could proceed further I needed to strip the calipers down, clean them up, wind back the pistons and remove the handbrake cables to make them easier to fit.
Unfortunately this showed some issues, such as this lovely rusty bleed nipple. Thankfully they are the same as the old front calipers I pulled out, so I swapped them over the cleaner one.
The other issue I encountered was one of the handbrake cables was seized solid. I tried to free it up but in the end I had to do a mad dash to Pick A Part and relieve this AE111 Levin of its cable. This car is super crusty underneath, so much fun was had removing the cable, with clouds of rust falling in my face constantly.
With that slight issue out of the way, the cables were fitted without further problems. I also took this time to refit the exhaust and new swaybar links and bushes.
The rear pads and calipers got assembled, and the rear brakes were done
That was it. I was done. All that was left was to bleed the brakes, fit the wheels and see what happens when it's on the ground.
In order to get fluid through the completely empty system, I had to use my pressure bleeder. I hardly use this as I get better results from the normal little one-man bleeder bottle with a valve in it (which is also what I used to complete the bleeding on this car), but needed the suction to pull fluid through.
According to the manual, the bleed sequence is a bit weird too. Start on the LH FR, followed by RH FR, LH RR and RH RR.
Once I had sucked about half a litre of fluid through the system I moved to the one-man bleeder and bled the system until there were no signs of bubbles.
And then for the first time, the MX5 wheels were fitted. Thankfully they fit and even clear the big brakes (which is the reason for the 15s, the 14s don't clear the caliper).
On the ground again
Looks pretty good so far. The springs haven't settled yet, but I could still get the QuickJack out without jacking the car up.
This is how far it settled after a drive.
The first drive went OK for the most part. I did a few laps of the blocks around my house bedding the brakes in and removing the protective coatings. The pedal feel is getting better each time.
All was going well until I stopped to take some photos. Thankfully I thought to take the torque wrench along for a ride, as three of the four nuts on the LH FR wheel had come completely loose. I torqued them back up again, but that was a worry. I can only think that maybe the studs on that wheel haven't quite completely seated. Will monitor it and see what happens.
In regards to the ride; the car no longer rolls and lurches like a drunk. The ride is still quite plush and compliant over bumps, but you can now feel the dampers actually doing something. I'll see how it feels when driving the car hard, but so far I'm happy with the Vogtland springs. The height is OK too, although it'll be nice if the front settles just a little more as it's going for a slight reverse rake at the moment with the rear being lower.
Without further ado, photos.
I'll drive the car again some more today and see if the wheel keeps trying to fall off or not. If it does I'll need to remove the brakes and wail on the stud some more to pull it in harder, if not, I'll book it for a wheel alignment later this week.
Thought I'd be responsible and instead of waiting and seeing, took the front wheels, and brakes off again and wanged the studs up to eleventy. There was definitely some movement there, even though I'm sure i bottomed them out previously. Not sure if movement and heat (from bedding in brakes) caused them to find some extra space, or just didn't go full hulk.
Took it for a run over a nearby hill and around some of the back roads. Checked the torque a few times and it didn't budge, even when I threw it hard into some corners. Pretty sure its sussed now, but will monitor it still.
Guess I need to book an alignment now.
Took it for a run over a nearby hill and around some of the back roads. Checked the torque a few times and it didn't budge, even when I threw it hard into some corners. Pretty sure its sussed now, but will monitor it still.
Guess I need to book an alignment now.
KelvinatorNZ said:
Thought I'd be responsible and instead of waiting and seeing, took the front wheels, and brakes off again and wanged the studs up to eleventy. There was definitely some movement there, even though I'm sure i bottomed them out previously. Not sure if movement and heat (from bedding in brakes) caused them to find some extra space, or just didn't go full hulk.
Took it for a run over a nearby hill and around some of the back roads. Checked the torque a few times and it didn't budge, even when I threw it hard into some corners. Pretty sure its sussed now, but will monitor it still.
Guess I need to book an alignment now.
What a great update! This car is going to hopefully pay back the time investment when you get it out on track.Took it for a run over a nearby hill and around some of the back roads. Checked the torque a few times and it didn't budge, even when I threw it hard into some corners. Pretty sure its sussed now, but will monitor it still.
Guess I need to book an alignment now.
On the subject of the studs, I couldn't quite tell but are they threaded where they insert into the hubs? If so, isn't there just a torque number required to make them 'safe'? When I converted my track car to studs (well, I didn't do it myself - but you know what I mean), it was just a case of adding loctite to the threads and torquing them to spec.
C70R said:
What a great update! This car is going to hopefully pay back the time investment when you get it out on track.
On the subject of the studs, I couldn't quite tell but are they threaded where they insert into the hubs? If so, isn't there just a torque number required to make them 'safe'? When I converted my track car to studs (well, I didn't do it myself - but you know what I mean), it was just a case of adding loctite to the threads and torquing them to spec.
Nah, that's too easy. Because this car has studs normally they are of the spline type, where they have a spline at the end to stop them turning and you have to pull them through the hub until the shoulder bottoms out. On the subject of the studs, I couldn't quite tell but are they threaded where they insert into the hubs? If so, isn't there just a torque number required to make them 'safe'? When I converted my track car to studs (well, I didn't do it myself - but you know what I mean), it was just a case of adding loctite to the threads and torquing them to spec.
Interesting technique on the studs. I need to get hold of one of those joint splitters. I only have one of the fork types that has a terrible habit of destroying the ball joint rubber boot.
I have an MX5 that I need to straighten the studs on. They're not bent, just all angled towards the middle of the hub. I suspect by using a collection of 18, 19, 20 and 21mm random nuts instead of proper chamfered wheel nuts, the PO bent the studs. How much force do you reckon it would take to straighten them? Are we talking 1 man and a hefty grunt or am I better of battering them out with a BFH and fitting new ones?
I have an MX5 that I need to straighten the studs on. They're not bent, just all angled towards the middle of the hub. I suspect by using a collection of 18, 19, 20 and 21mm random nuts instead of proper chamfered wheel nuts, the PO bent the studs. How much force do you reckon it would take to straighten them? Are we talking 1 man and a hefty grunt or am I better of battering them out with a BFH and fitting new ones?
RazerSauber said:
Interesting technique on the studs. I need to get hold of one of those joint splitters. I only have one of the fork types that has a terrible habit of destroying the ball joint rubber boot.
I have an MX5 that I need to straighten the studs on. They're not bent, just all angled towards the middle of the hub. I suspect by using a collection of 18, 19, 20 and 21mm random nuts instead of proper chamfered wheel nuts, the PO bent the studs. How much force do you reckon it would take to straighten them? Are we talking 1 man and a hefty grunt or am I better of battering them out with a BFH and fitting new ones?
I think replacing those sounds like a much better option than bending them back!I have an MX5 that I need to straighten the studs on. They're not bent, just all angled towards the middle of the hub. I suspect by using a collection of 18, 19, 20 and 21mm random nuts instead of proper chamfered wheel nuts, the PO bent the studs. How much force do you reckon it would take to straighten them? Are we talking 1 man and a hefty grunt or am I better of battering them out with a BFH and fitting new ones?
Yeah I agree, just pop them all out and replace them. They're the only thing holding the wheel on, and you don't want to weaken them further by bending them back. If you don't want to keep the old studs just give them a good sharp whack with a hammer.
In regards to my car, I had it aligned yesterday and now it drives much straighter. No surprise really, when you see the sheet. Keep in mind I didn't touch the front tracking at all, and the rear was set up fairly close to what it was when I got the car. The back was going one way, the front the other. No wonder the steering wheel was off center.

Looks like I need some camber bolts for the front, but other than that I'm pretty happy with it. Took the car for a real good hard thrash over some back roads and although it now sticks to corners, the limiting factor is how brave I am, and how far out of my seat I'm going to slide.
In regards to my car, I had it aligned yesterday and now it drives much straighter. No surprise really, when you see the sheet. Keep in mind I didn't touch the front tracking at all, and the rear was set up fairly close to what it was when I got the car. The back was going one way, the front the other. No wonder the steering wheel was off center.
Looks like I need some camber bolts for the front, but other than that I'm pretty happy with it. Took the car for a real good hard thrash over some back roads and although it now sticks to corners, the limiting factor is how brave I am, and how far out of my seat I'm going to slide.
I seem to remember the 3SGE is not much work to fit in one of these by mixing Toyota parts bin items. You have already sorted out the chassis. A 172 BHP 2.0 litre engine would be the icing on the cake. I also didn't realise these have a fully independent rear end which is pretty cool.
Edited by BricktopST205 on Friday 5th February 09:01

Unfortunately the rust came back. Bad. Within 4 months it bad gone from rust treated, solid, weldable metal, to this.

Which turned into this with a bit of poking

And some more poking

My repair is the solid metal to the right, and above the holes. The rust is almost surrounding the repair I made. Keep in mind this was solid metal I had treated with a rust convertor before welding the patch in.
In this instance I didn't want to weld it again. The metal is too thin, and too close to the windscreen. My only real options were to have some professionally fix it at a large cost (and removing/replacing the windscreen), or to fill it with a fibreglass/metal body filler. I did the latter. Not before absolutely filling the area inside and out with rust converter, and then a zinc rich epoxy paint. The filler is a rust inhibitor too, so there are three things trying to stop the rust there now.

I don't feel great about it, but its only enough to keep the car in one piece.
I sanded it all down and used some normal filler to level it out before paint.

I didn't work so hard on getting the paint to look good this time, so there are some sanding and masking marks this time around, but it looks better than a rusty bubble or holes.

This does now mean the Liftback is on borrowed time. The rust will be back. The plan is to source a replacement Corolla for a reasonable price, swap all my good bits between the cars, and sell the Liftback on at auction for someone as a cheap runabout until it becomes too bad to keep on the road. Yes, the rust will be disclosed in the auction, I'm not going to try hide anything.
I wont be replacing the Liftback with the same thing, as there is kinda no point as I've already had the Liftback I want, so I'm looking for one of the platforms that have a 4AGE in it, for a bit more power.
Which turned into this with a bit of poking
And some more poking
My repair is the solid metal to the right, and above the holes. The rust is almost surrounding the repair I made. Keep in mind this was solid metal I had treated with a rust convertor before welding the patch in.
In this instance I didn't want to weld it again. The metal is too thin, and too close to the windscreen. My only real options were to have some professionally fix it at a large cost (and removing/replacing the windscreen), or to fill it with a fibreglass/metal body filler. I did the latter. Not before absolutely filling the area inside and out with rust converter, and then a zinc rich epoxy paint. The filler is a rust inhibitor too, so there are three things trying to stop the rust there now.
I don't feel great about it, but its only enough to keep the car in one piece.
I sanded it all down and used some normal filler to level it out before paint.
I didn't work so hard on getting the paint to look good this time, so there are some sanding and masking marks this time around, but it looks better than a rusty bubble or holes.
This does now mean the Liftback is on borrowed time. The rust will be back. The plan is to source a replacement Corolla for a reasonable price, swap all my good bits between the cars, and sell the Liftback on at auction for someone as a cheap runabout until it becomes too bad to keep on the road. Yes, the rust will be disclosed in the auction, I'm not going to try hide anything.
I wont be replacing the Liftback with the same thing, as there is kinda no point as I've already had the Liftback I want, so I'm looking for one of the platforms that have a 4AGE in it, for a bit more power.
Following on from the last post, this happened.
Because I'm insane, I've just hit Buy Now on the 5th car in the fleet. Pick it up next weekend.
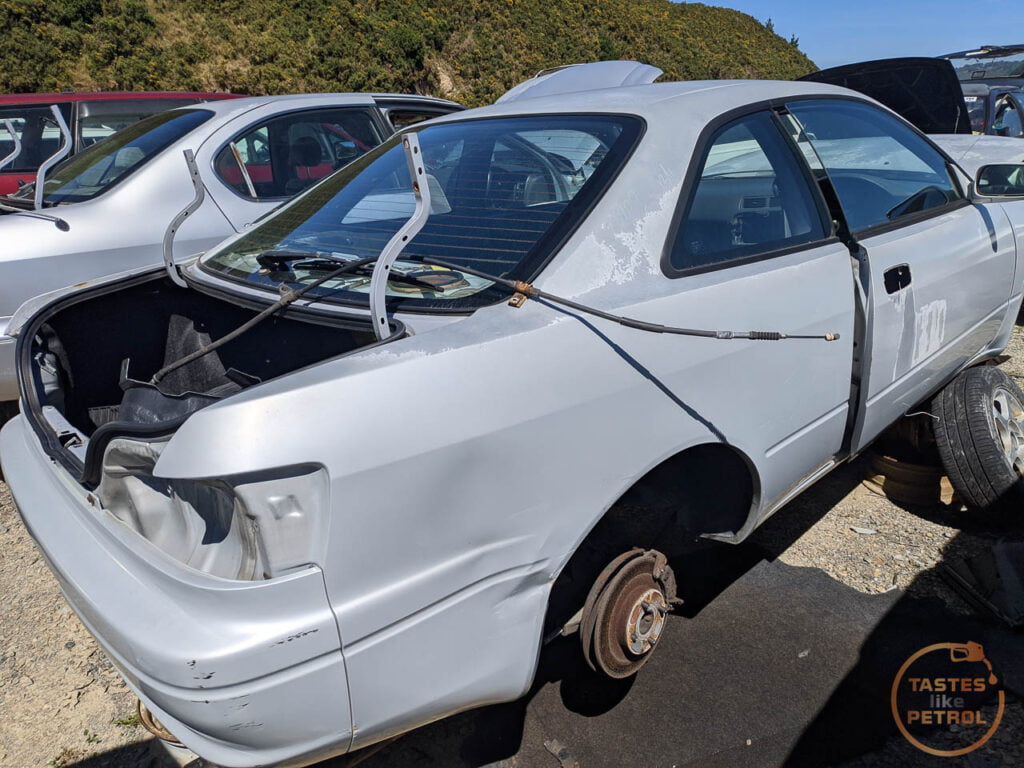
The Liftback was always on borrowed time once that rust came back, I just didn't expect this to pop up so soon. Who turns down a BZ Touring Carib for $1500 ($800 quid)?

This is the reason for the change from the E11 Liftback platform.

The trusty old Blacktop 4AGE, backed by a 5 Speed manual. Yes, it's done over a quarter million KM, yes it will probably drink oil, but I love a 4AGE. I had a Silvertop in my old AE101 FXGT years ago, and that thing was so much fun to thrash.
I figured that if I was having to replace the Liftback I wanted something with a bit more umph, which meant changing platforms. I was stuck with an FXGT, or BZ Touring in either Corolla or Carib form as that's about all the 4AGE came in that wasn't a small coupe.
So, once this car arrives, it has a bunch of pretty dumb stuff it failed its WOF on, so will need to sort that. Most of which will be sorted by swapping all the suspension, brakes, wheels and tyres from the Liftback over.
Now to sell the 650i (dear god please go away soon), pick the Carib up, swap the bits over, sell the Liftback and then ill be down to the proper 3 cars again.
Because I'm insane, I've just hit Buy Now on the 5th car in the fleet. Pick it up next weekend.
The Liftback was always on borrowed time once that rust came back, I just didn't expect this to pop up so soon. Who turns down a BZ Touring Carib for $1500 ($800 quid)?
This is the reason for the change from the E11 Liftback platform.
The trusty old Blacktop 4AGE, backed by a 5 Speed manual. Yes, it's done over a quarter million KM, yes it will probably drink oil, but I love a 4AGE. I had a Silvertop in my old AE101 FXGT years ago, and that thing was so much fun to thrash.
I figured that if I was having to replace the Liftback I wanted something with a bit more umph, which meant changing platforms. I was stuck with an FXGT, or BZ Touring in either Corolla or Carib form as that's about all the 4AGE came in that wasn't a small coupe.
So, once this car arrives, it has a bunch of pretty dumb stuff it failed its WOF on, so will need to sort that. Most of which will be sorted by swapping all the suspension, brakes, wheels and tyres from the Liftback over.
Now to sell the 650i (dear god please go away soon), pick the Carib up, swap the bits over, sell the Liftback and then ill be down to the proper 3 cars again.
As it stands im hoping to transfer the front hubs/brakes/shocks, rear crossmember/arms/shocks/hubs/brakes, wheels, towbar, radiator (liftback one is near new), radio, and steering wheel between the cars. The only thing im not sure about is the towbar, everything else should go straight in. The Carib has ABS, so swapping hubs should be OK.
Front control arms and swaybar will be polybushed at the time as that was the one thing I didn't polybush on the Liftback.
The liftback will then be rolling on the old Carib parts, and will be sold with the remainder of its WOF as a $1 reserve on Trademe, to try get some cash back. There are a couple of parts the Carib failed its WOF on that I'll need to pillage from the Pick A Part wrecker for the Liftback since I cant reuse them. This is the failure sheet.

Will also be replacing the Carib taillights with the nicer facelift ones with black trim, and keeping an eye out for some black facelift BZT headlights too. The black rubbing strip on the bumpers/doors will be painted Matty B to tidy them up.

Im kinda hyped for this next part of the project. I'll miss the little Liftback, I've grown rather fond of it.
Front control arms and swaybar will be polybushed at the time as that was the one thing I didn't polybush on the Liftback.
The liftback will then be rolling on the old Carib parts, and will be sold with the remainder of its WOF as a $1 reserve on Trademe, to try get some cash back. There are a couple of parts the Carib failed its WOF on that I'll need to pillage from the Pick A Part wrecker for the Liftback since I cant reuse them. This is the failure sheet.
Will also be replacing the Carib taillights with the nicer facelift ones with black trim, and keeping an eye out for some black facelift BZT headlights too. The black rubbing strip on the bumpers/doors will be painted Matty B to tidy them up.
Im kinda hyped for this next part of the project. I'll miss the little Liftback, I've grown rather fond of it.
Gassing Station | Readers' Cars | Top of Page | What's New | My Stuff