No.39 - 1995 BMW E34 M5 UK Limited Edition #39/50
Discussion


Moving onto the next chapter with No.39...
Following the completion of the rear end mechanical refresh I'm now in a position to carry out the same work to the front axle. Having moved out of my parents and bought my own house at the back end of last year, unfortunately I only have one parking space and no garage making working on cars and storing parts/tools/equipment near impossible. Fortunately I have a friend (Fred) with the ideal space required and I'm very grateful that he has allowed me to move the car into his barn for further work. He shall be repaid with much cheese for consumption.
Earlier this week I had the car transported by Robin of Hunters Car Transport Services, he's based in Cambridgeshire and specialists in what he calls 'enthusiast and collectors cars'. He has a 5 ton flat bed as well as covered and uncovered trailers for a range of different jobs, highly recommended;
http://www.car-transport-services.co.uk
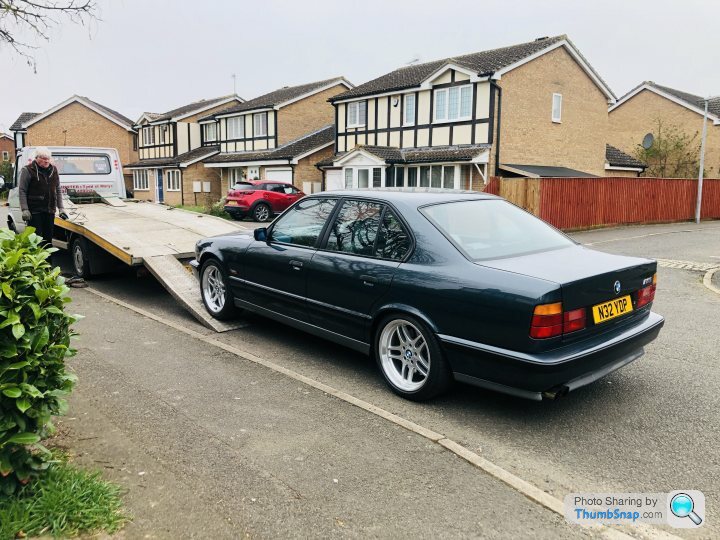
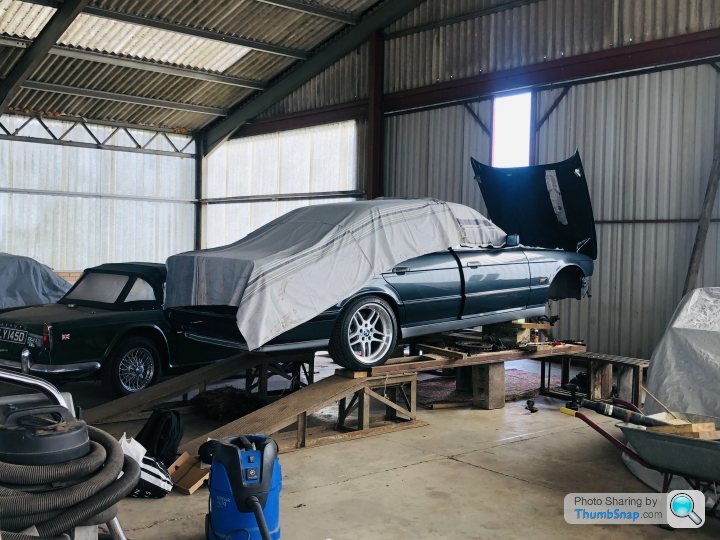
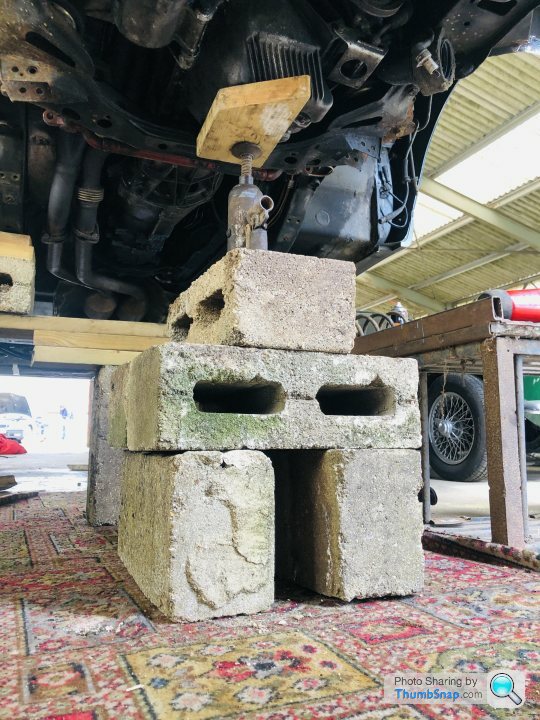
My plan with this car was to support the front end on the chassis rails in order to allow me to remove all suspension, brakes, steering, etc associated with the front axle for assessment and refurbishment/replacement if required. If possible I'd also like to remove the front subframe and steering box for the same purpose and carry out some work to the engine. Once everything is removed I'll also carry out some underbody cleaning and protecting. With the rear end work I had the car on axle stands which was fine but not ideal, Fred as usual however has a solution to make things a bit easier this time round in the form of drive on ramps! Not only will this make working on the car so much easier but it also provided the opportunity for me to show that BMW handbrakes can work!
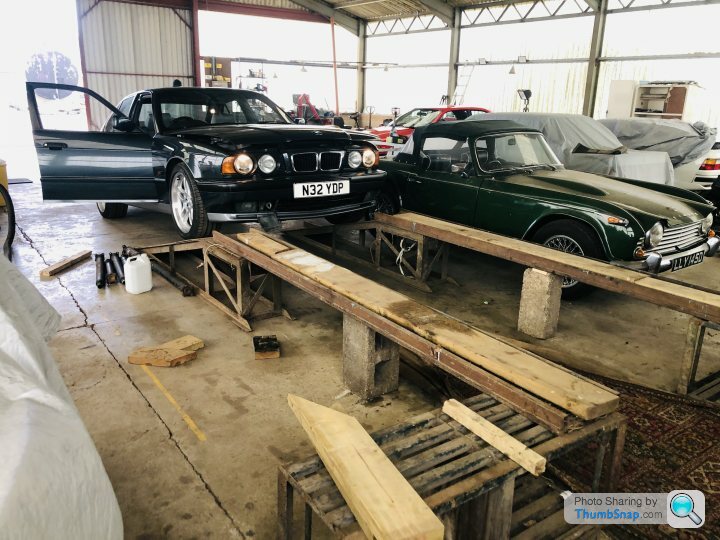
The whole contraption is made up of a pair of drive on angled ramps, a pair of large 'box/crate' sections and then a pair of rails that span the two. It might all look a little rickety in the photos however it's all very chunky metal reinforced in places making it much more confidence inspiring plus it held an E28 528i for months on end but just to be sure we added a couple of breeze blocks and also employed a lot of wooden planks to assist with both structure and clearance. The box sections we also decided to put at 90 degrees rather than length ways which will allow us to stand on them and work in the engine bay more easily.
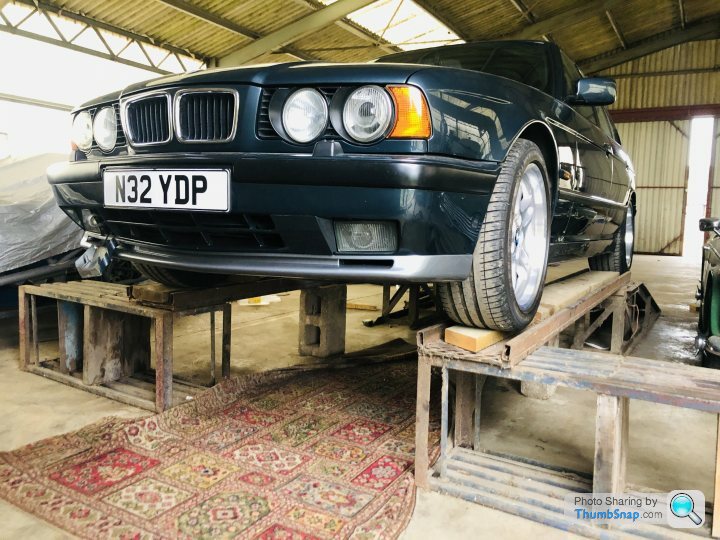
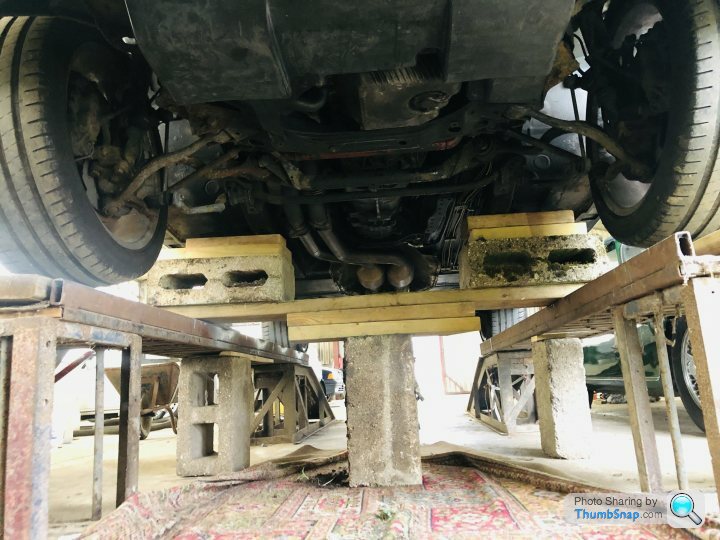
Once up on the air we built a small tower of breeze blocks and used a bottle jack and wood blocks to lift the front of the car on the subframe, then again built up a structure to support the car on the chassis rails as planned, complete with carpet for maximum luxury and comfort! This will hopefully provide brilliant access to everything I need to reach but most importantly seems very secure.
Of course we all know it's always the way with cars that something unplanned must go wrong, we managed to catch one of the new fuel pipes on the ramp which has bent it, frustratingly it really requires the rear subframe to come off again for replacement however I will likely replace just a section and live with it. The other problem was that I noticed clutch pressure was gradually seeping away making the task of getting on the ramps even more stressful...! From the drips of fluid it's clear to see my slave cylinder rebuild has not been successful, well worth a go for under £5 though. I suspect the pitting in the bore wall of the slave was just too much and that a replacement is the only solution now.
Next I'll start striping everything down, organising, documenting, labelling and bagging parts and fixings. Once I have everything stripped and laid out I'll create three sections of parts; clean up and reuse, refurbish, replace. Can't wait to get stuck in, updates to follow!
Following the completion of the rear end mechanical refresh I'm now in a position to carry out the same work to the front axle. Having moved out of my parents and bought my own house at the back end of last year, unfortunately I only have one parking space and no garage making working on cars and storing parts/tools/equipment near impossible. Fortunately I have a friend (Fred) with the ideal space required and I'm very grateful that he has allowed me to move the car into his barn for further work. He shall be repaid with much cheese for consumption.
Earlier this week I had the car transported by Robin of Hunters Car Transport Services, he's based in Cambridgeshire and specialists in what he calls 'enthusiast and collectors cars'. He has a 5 ton flat bed as well as covered and uncovered trailers for a range of different jobs, highly recommended;
http://www.car-transport-services.co.uk
My plan with this car was to support the front end on the chassis rails in order to allow me to remove all suspension, brakes, steering, etc associated with the front axle for assessment and refurbishment/replacement if required. If possible I'd also like to remove the front subframe and steering box for the same purpose and carry out some work to the engine. Once everything is removed I'll also carry out some underbody cleaning and protecting. With the rear end work I had the car on axle stands which was fine but not ideal, Fred as usual however has a solution to make things a bit easier this time round in the form of drive on ramps! Not only will this make working on the car so much easier but it also provided the opportunity for me to show that BMW handbrakes can work!
The whole contraption is made up of a pair of drive on angled ramps, a pair of large 'box/crate' sections and then a pair of rails that span the two. It might all look a little rickety in the photos however it's all very chunky metal reinforced in places making it much more confidence inspiring plus it held an E28 528i for months on end but just to be sure we added a couple of breeze blocks and also employed a lot of wooden planks to assist with both structure and clearance. The box sections we also decided to put at 90 degrees rather than length ways which will allow us to stand on them and work in the engine bay more easily.
Once up on the air we built a small tower of breeze blocks and used a bottle jack and wood blocks to lift the front of the car on the subframe, then again built up a structure to support the car on the chassis rails as planned, complete with carpet for maximum luxury and comfort! This will hopefully provide brilliant access to everything I need to reach but most importantly seems very secure.
Of course we all know it's always the way with cars that something unplanned must go wrong, we managed to catch one of the new fuel pipes on the ramp which has bent it, frustratingly it really requires the rear subframe to come off again for replacement however I will likely replace just a section and live with it. The other problem was that I noticed clutch pressure was gradually seeping away making the task of getting on the ramps even more stressful...! From the drips of fluid it's clear to see my slave cylinder rebuild has not been successful, well worth a go for under £5 though. I suspect the pitting in the bore wall of the slave was just too much and that a replacement is the only solution now.
Next I'll start striping everything down, organising, documenting, labelling and bagging parts and fixings. Once I have everything stripped and laid out I'll create three sections of parts; clean up and reuse, refurbish, replace. Can't wait to get stuck in, updates to follow!
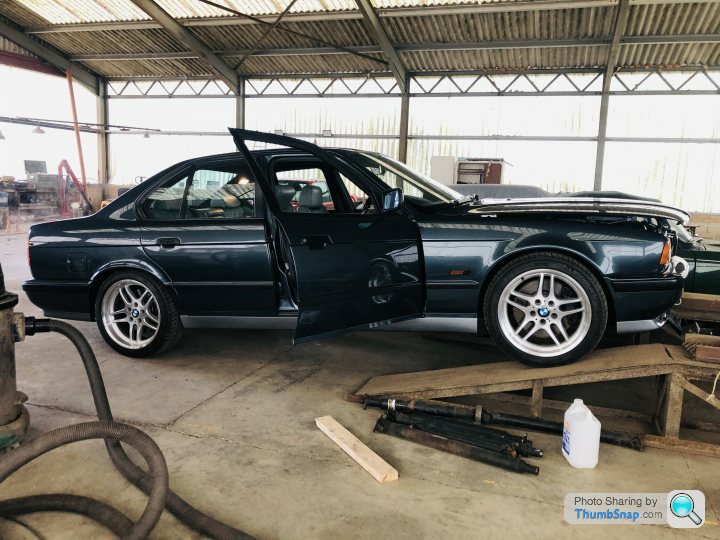
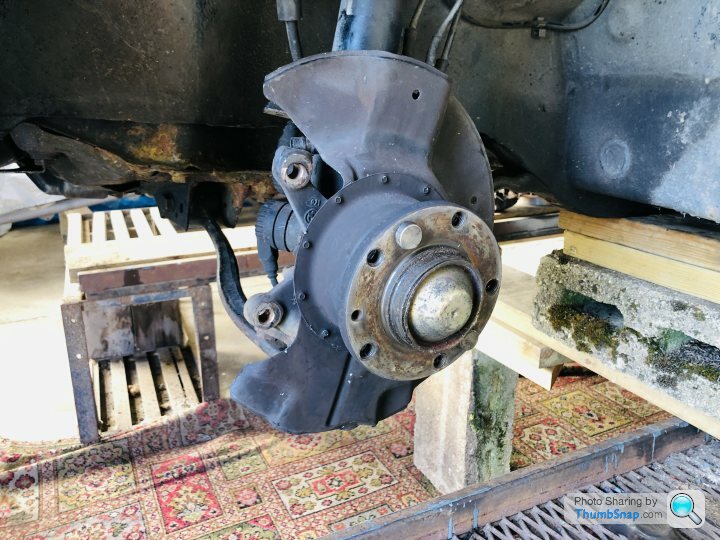
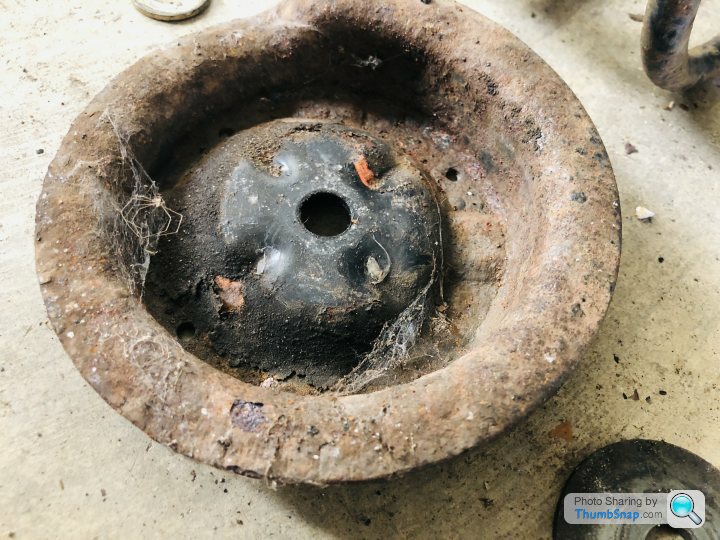
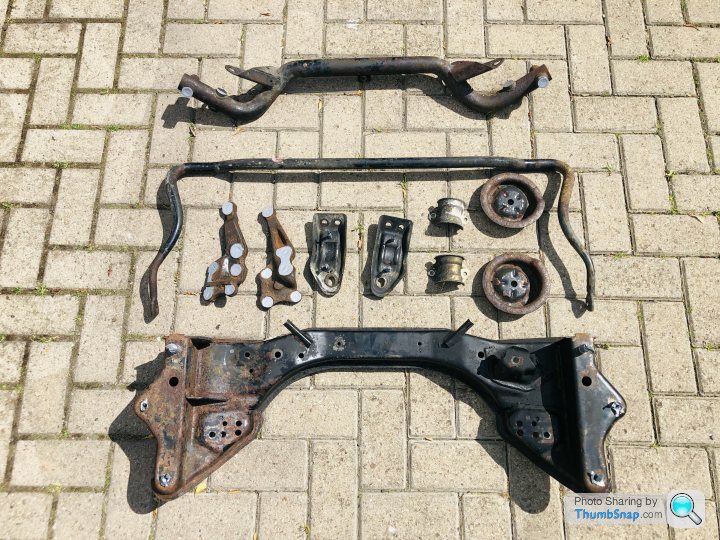
Firstly some images of the current condition, a vast contrast when compared to the work I've already done on the rear axle. If you crawl under the car from front to rear it's like some sort of bizarre time travelling experience back to it rolling out of the factory! From what I can see everything seems to be present and correct, whilst there's clearly a lot of surface corrosion it's nothing unexpected of a 27 year old car with 127,000 miles. I could see no nasty bodges, incorrect parts or heavy damage and having had a good old yank and pry on all the steering and suspension components everything seems very tight with no play! Something that does seem a little odd though is the near side suspension and steering arms are somehow less corroded than the off side, maybe they've all been replaced at some point, who knows!
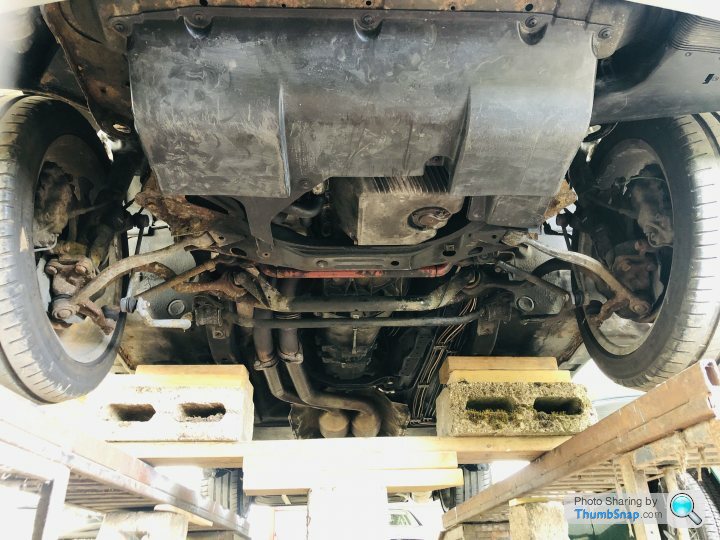
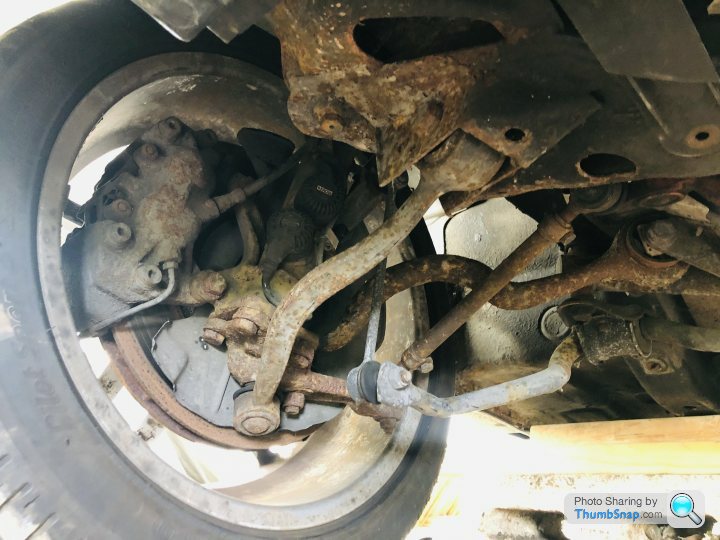

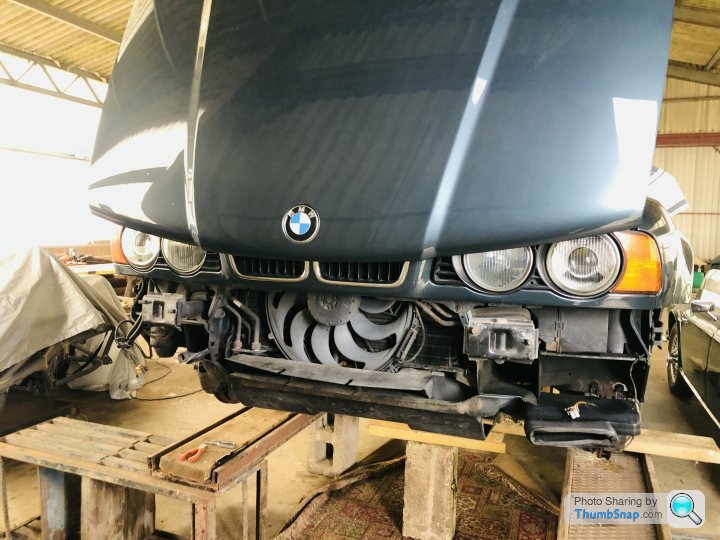
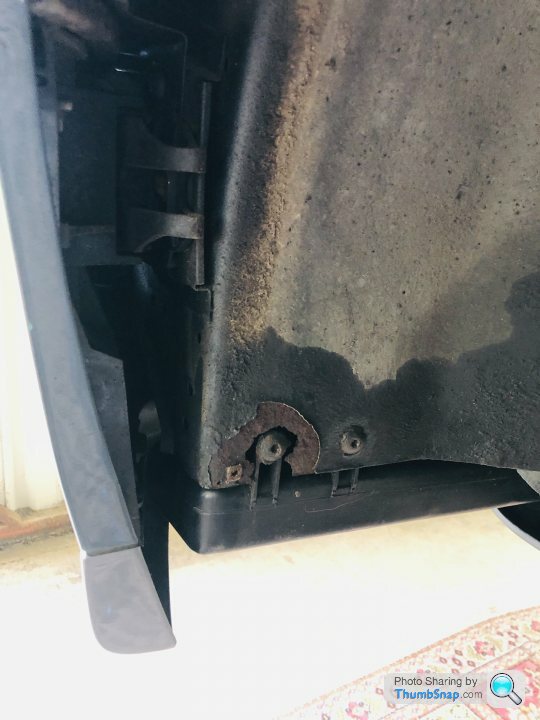
First job was to remove the remaining two under trays (there are three below the engine!) and remove the front bumper, which involves draining the washer fluid as the headlamp and fog lamp washers are all built in. 'Fog lamp washers' I hear you say! ...yes, it has little washers specifically for the front fogs, snazzy! Not sure I know of another car with those, maybe an E32 7-Series at a guess.
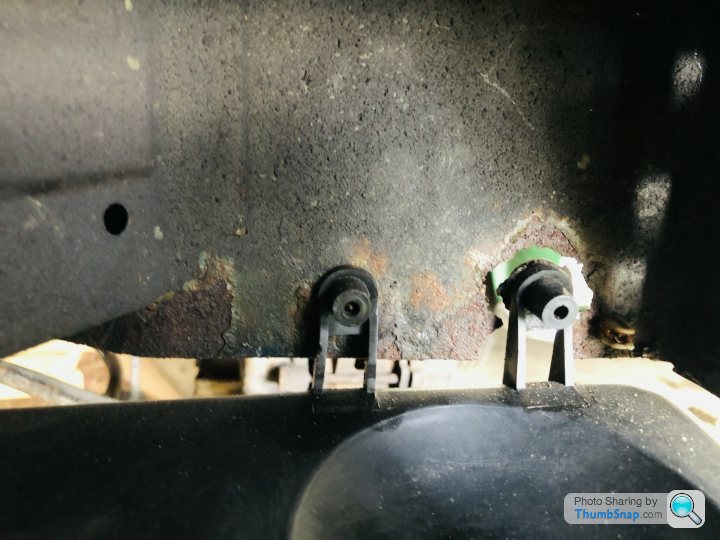
With the bumper and wheel arch liners removed it's clear to see there is some welding required on the NS wheel well where the alternator cooling duct mounts, there is good access however and it's not a complicated shape so hopefully not too tricky a job. Apart from that, the area behind the bumper isn't too bad, a little light surface corrosion to treat but nothing major to worry about so far.
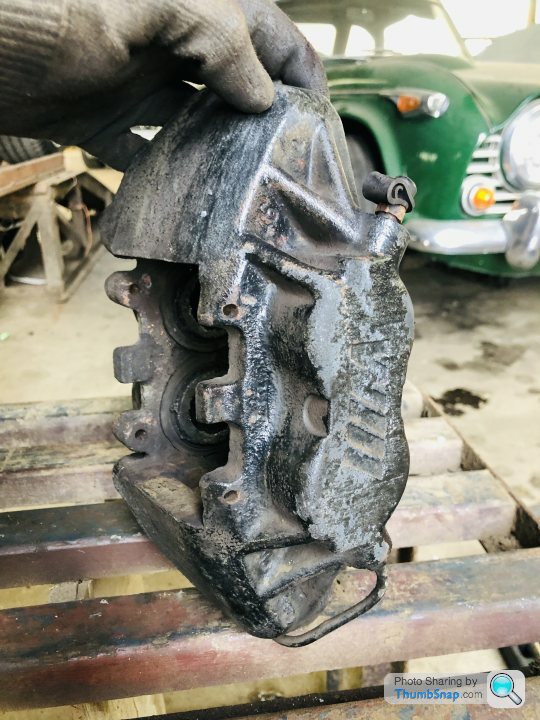
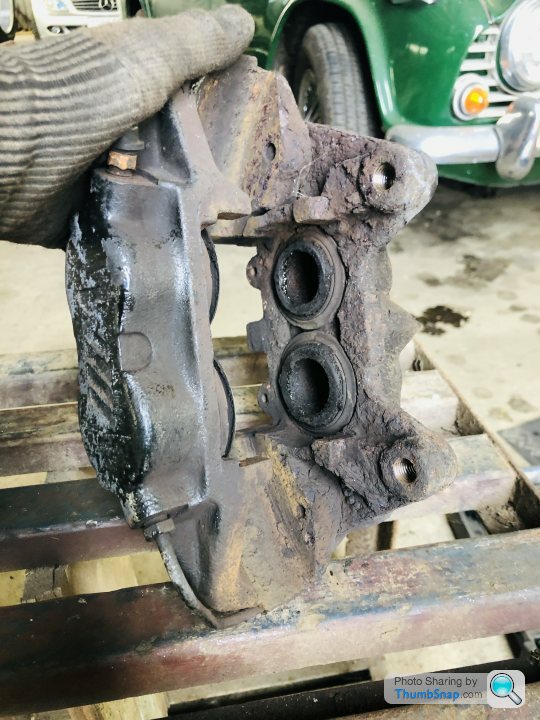
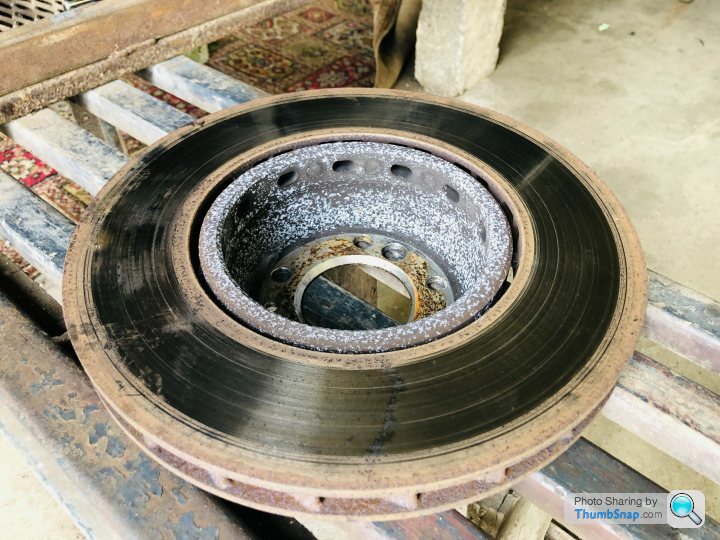
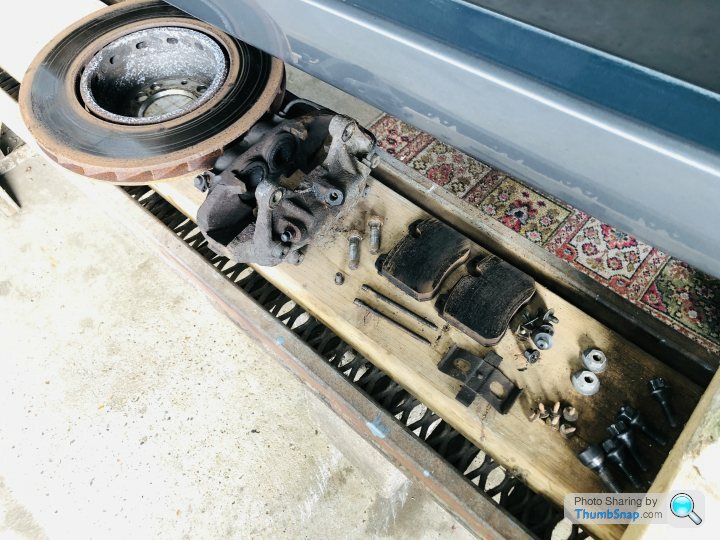
First mechanical components to remove were the front brakes which are unique to the E34 M5 6-Speed and E31 850CSI, and I believe were the first application of floating brake disks to any production road car. The brakes comprise of much more powerful 345mm diameter by 32mm thickness disks and 4-pot calipers, I have read these are regarded as so much of an upgrade over the 5-Speed smaller disks and single piston callipers that those who track 6-Speeds don't bother to upgrade them. I'm no track nut myself so have no experience in that regard to confirm or deny!
Believe it or not these front disks and pads have less than 10,000 miles on them as brakes on all four corners were replaced as part of the deal when I purchased the car. Despite appearances the disk surface is actually very smooth with practically zero noticeable lip hence I will clean these up and reuse them, yet to determine if they require resurfacing but that may be my next port of call if required as replacements are very expensive.
Anti roll bar was removed next...

Having removed the disks I was very pleasantly surprised at the condition of the backplates as the rears were very crispy and had to be replaced, not sure if these are a different material. They'll clean up nicely!
I should be back in the barn again in a few days time, at which point I plan to remove the suspension and possibly steering components. Must grab some penetrating fluid beforehand.
First job was to remove the remaining two under trays (there are three below the engine!) and remove the front bumper, which involves draining the washer fluid as the headlamp and fog lamp washers are all built in. 'Fog lamp washers' I hear you say! ...yes, it has little washers specifically for the front fogs, snazzy! Not sure I know of another car with those, maybe an E32 7-Series at a guess.
With the bumper and wheel arch liners removed it's clear to see there is some welding required on the NS wheel well where the alternator cooling duct mounts, there is good access however and it's not a complicated shape so hopefully not too tricky a job. Apart from that, the area behind the bumper isn't too bad, a little light surface corrosion to treat but nothing major to worry about so far.
First mechanical components to remove were the front brakes which are unique to the E34 M5 6-Speed and E31 850CSI, and I believe were the first application of floating brake disks to any production road car. The brakes comprise of much more powerful 345mm diameter by 32mm thickness disks and 4-pot calipers, I have read these are regarded as so much of an upgrade over the 5-Speed smaller disks and single piston callipers that those who track 6-Speeds don't bother to upgrade them. I'm no track nut myself so have no experience in that regard to confirm or deny!
Believe it or not these front disks and pads have less than 10,000 miles on them as brakes on all four corners were replaced as part of the deal when I purchased the car. Despite appearances the disk surface is actually very smooth with practically zero noticeable lip hence I will clean these up and reuse them, yet to determine if they require resurfacing but that may be my next port of call if required as replacements are very expensive.
Anti roll bar was removed next...
Having removed the disks I was very pleasantly surprised at the condition of the backplates as the rears were very crispy and had to be replaced, not sure if these are a different material. They'll clean up nicely!
I should be back in the barn again in a few days time, at which point I plan to remove the suspension and possibly steering components. Must grab some penetrating fluid beforehand.
Next I'd planned to remove all front suspension and steering, however 10th April didn't quite go as planned.
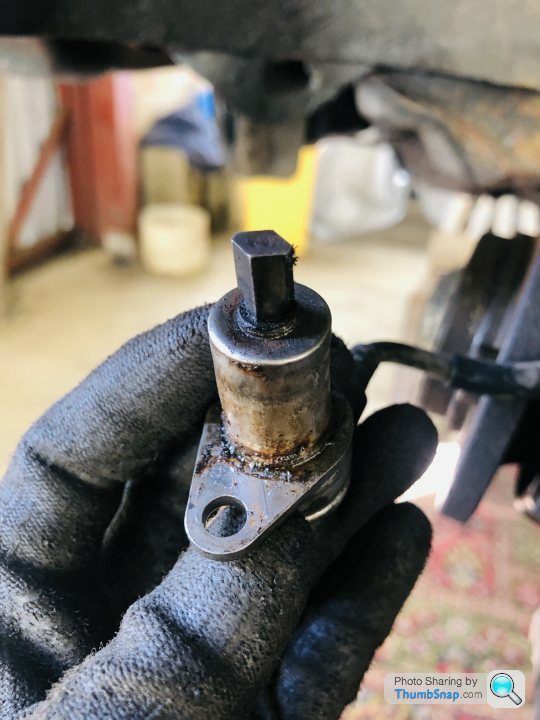
Firstly all cabling needed detaching from the struts, EDC wiring, pad sensors and the bizarre looking wheel speed sensors...
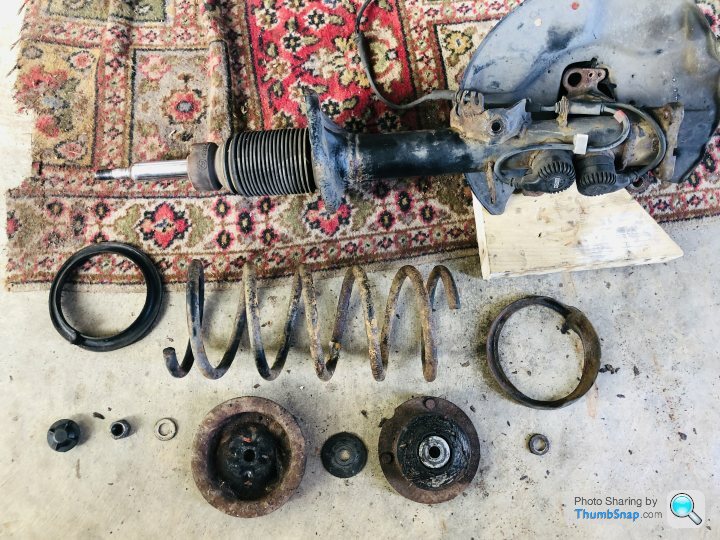
I planned to separate the hubs and strip dampers in order to send off to Nagengast, however having remembered they were all replaced with new units in 2011 I thought it worth checking the MOT history to see how many miles they've covered, which turns out to be just 15,000 miles! After removing the hubs I understand front bearings should not be reused and new parts fitted therefore assuming the front wheel bearings also have just 15,000 miles on them I wasn't surprised to find there there was zero sign of any play or wear. The hubs I believe are no longer available from BMW, and whilst Nagengast also have a solution for that with their own product I feel the circa £1,000 for damper refurbs and hubs on 15,000 mile parts is better spent elsewhere. I will however check the damper resistance and also test EDC voltages to ensure everything is as it should be.
Following the above I decided to remove the struts and hub assembly as one unit. A simple enough task, three nuts on top of the strut tower as usual, and the underneath there are three large bolts clamping the bottom of the damper to a plate which BMWFans calls a 'tie rod lever/arm'. This is why I'm so glad about having the car higher up in the air rather than on axle stands because there was quite a bit of force required with a breaker bar to release the lower bolts and having good access makes all the difference. With all fixings loose it was a case of using a pry bar to separate the damper and plate, then bobs your uncle the whole assembly can be manhandled out, nice and easy. Top tip before starting any of this by the way, administer a good dose of penetrating fluid to all fixings, in my case WD40 specialist penetrant.

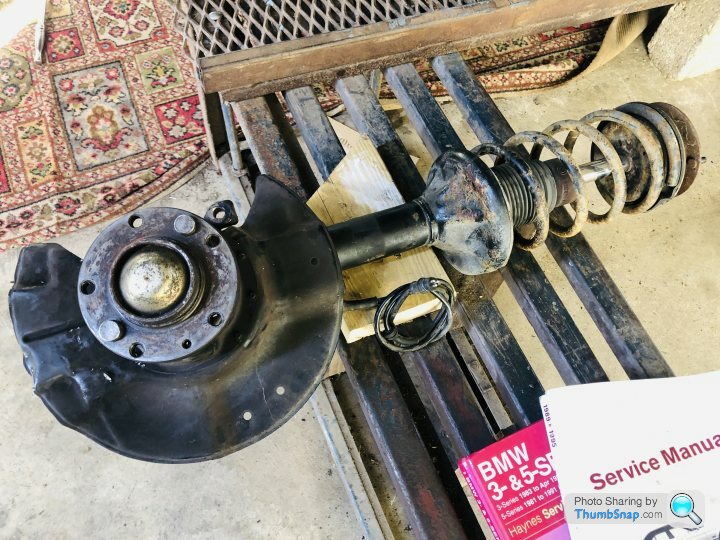
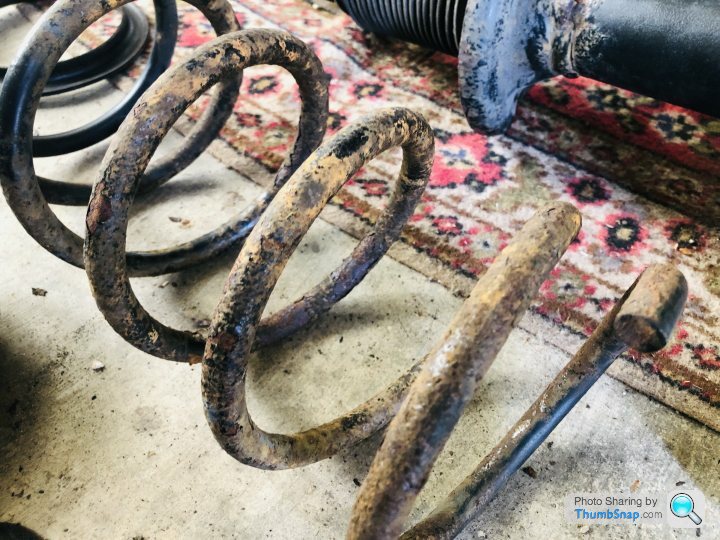
Looking at the components up close I believe it likely the springs and top mounts were not replaced in 2012 purely due to the amount of corrosion, and therefore assume these parts original.

From what I've read sourcing front springs can be a pain. Springs supplied by BMW are aparently of an incorrect spec somehow and will make the front of the car sit far too high, even after months they still don't settle to the correct height resulting in an excessive arch gap. There seems to be very few options available however a popular application are -30mm lowering springs from H&R, I don't want the car sitting too low but I'd rather that than look like it's on stilts. After a bit of research this really does seem to be the only solution. Another option would be to clean up and paint the current springs however I don't like the idea of that as surely the metal won't have the same properties it once did.
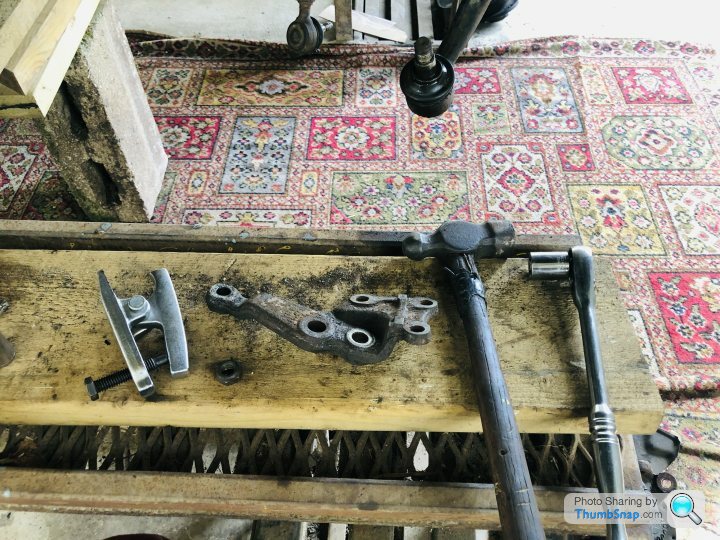
Moving on to the suspension and steering arm ball joints, I managed to get two out before the all joint splitter cracked in half on the third go which stopped me in my tracks. An abrupt finish to this update but that was that, luckily I have two more in my parents garage which I'll grab before the next spannering session along with spring compressors, and some freezer bags to start sorting and labelling parts and fixings.
For those interested in old Triumphs, we spent the rest of the day diagnosing a misfiring TR6, which we believe is due to three failed fuel injectors. New parts on the way.
Firstly all cabling needed detaching from the struts, EDC wiring, pad sensors and the bizarre looking wheel speed sensors...
I planned to separate the hubs and strip dampers in order to send off to Nagengast, however having remembered they were all replaced with new units in 2011 I thought it worth checking the MOT history to see how many miles they've covered, which turns out to be just 15,000 miles! After removing the hubs I understand front bearings should not be reused and new parts fitted therefore assuming the front wheel bearings also have just 15,000 miles on them I wasn't surprised to find there there was zero sign of any play or wear. The hubs I believe are no longer available from BMW, and whilst Nagengast also have a solution for that with their own product I feel the circa £1,000 for damper refurbs and hubs on 15,000 mile parts is better spent elsewhere. I will however check the damper resistance and also test EDC voltages to ensure everything is as it should be.
Following the above I decided to remove the struts and hub assembly as one unit. A simple enough task, three nuts on top of the strut tower as usual, and the underneath there are three large bolts clamping the bottom of the damper to a plate which BMWFans calls a 'tie rod lever/arm'. This is why I'm so glad about having the car higher up in the air rather than on axle stands because there was quite a bit of force required with a breaker bar to release the lower bolts and having good access makes all the difference. With all fixings loose it was a case of using a pry bar to separate the damper and plate, then bobs your uncle the whole assembly can be manhandled out, nice and easy. Top tip before starting any of this by the way, administer a good dose of penetrating fluid to all fixings, in my case WD40 specialist penetrant.
Looking at the components up close I believe it likely the springs and top mounts were not replaced in 2012 purely due to the amount of corrosion, and therefore assume these parts original.
From what I've read sourcing front springs can be a pain. Springs supplied by BMW are aparently of an incorrect spec somehow and will make the front of the car sit far too high, even after months they still don't settle to the correct height resulting in an excessive arch gap. There seems to be very few options available however a popular application are -30mm lowering springs from H&R, I don't want the car sitting too low but I'd rather that than look like it's on stilts. After a bit of research this really does seem to be the only solution. Another option would be to clean up and paint the current springs however I don't like the idea of that as surely the metal won't have the same properties it once did.
Moving on to the suspension and steering arm ball joints, I managed to get two out before the all joint splitter cracked in half on the third go which stopped me in my tracks. An abrupt finish to this update but that was that, luckily I have two more in my parents garage which I'll grab before the next spannering session along with spring compressors, and some freezer bags to start sorting and labelling parts and fixings.
For those interested in old Triumphs, we spent the rest of the day diagnosing a misfiring TR6, which we believe is due to three failed fuel injectors. New parts on the way.
nebpor said:
Love the updates thanks, just makes me wish I’d kept mine!
My 3.8 5-speed had AC Shnitzer springs and dampers to replace the EBC kit, which back then couldn’t be refurbished sadly
I gather it was quite common practise to delete the EDC and SLS systems on these cars back in the day when they weren't worth as much, as replacements were pretty steep. Mine were all replaced in 2012 at a cost of £6,600 for just the parts...! I was told that my car received the last ever set that were available in stock from BMW, but we're very lucky to have Nagengast for refurbishment now!My 3.8 5-speed had AC Shnitzer springs and dampers to replace the EBC kit, which back then couldn’t be refurbished sadly
What are bank holidays for if not working on cars? On Monday 18th April I got back in the barn armed with my own two balljoint splitters. All ball joints came free which was a relief.
I also found when removing the track rods that the steering box has a little play on centre, I never noticed it when driving as the steering on these cars is a little slow anyway however when centred I was able to pull the red steering rod from left to right with a noticeable couple of millimetres of play and a knock from the steering box itself. I believe there is an adjustment screw on the steering box however the play can only be adjusted out to a certain extent and should not be over tightened. Another little job for the list.
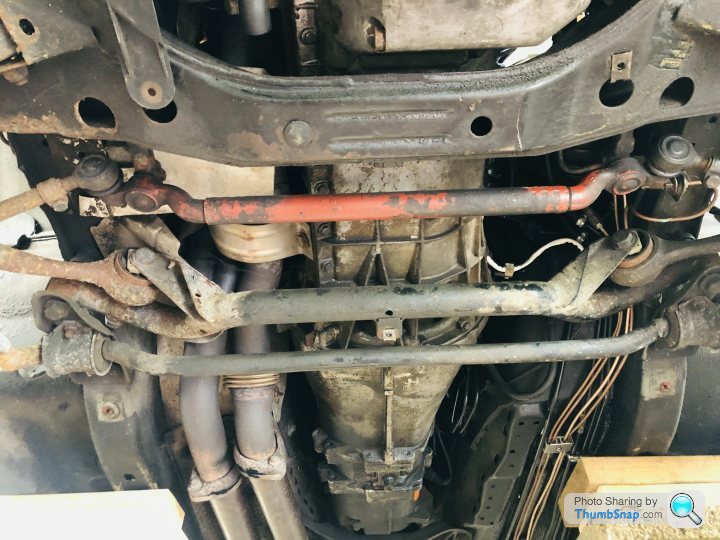
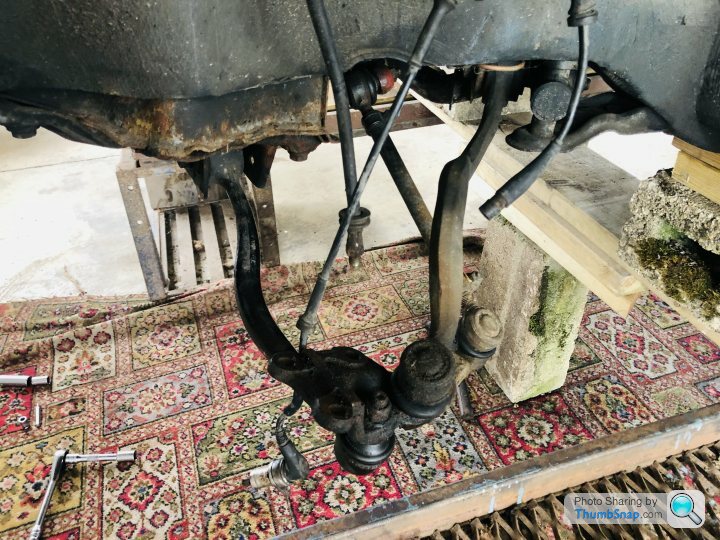
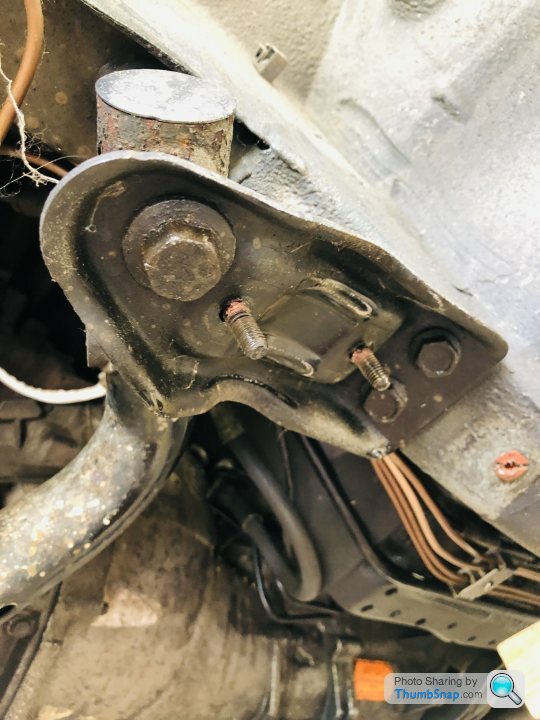
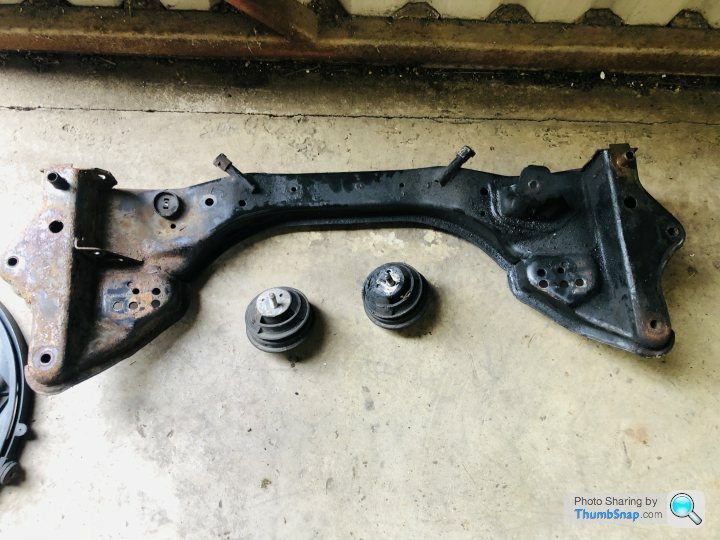
Next was removal of the large crossmember, I've always found this a slightly unusual design with it kind of acting like a second subframe as it's used as the mounting point for suspension arms and the anti roll bar. Anyway, it's functional. Removal is easy enough and self explanatory, although a breaker bar was needed for the larger bolts.
Quick stop for luncheon...
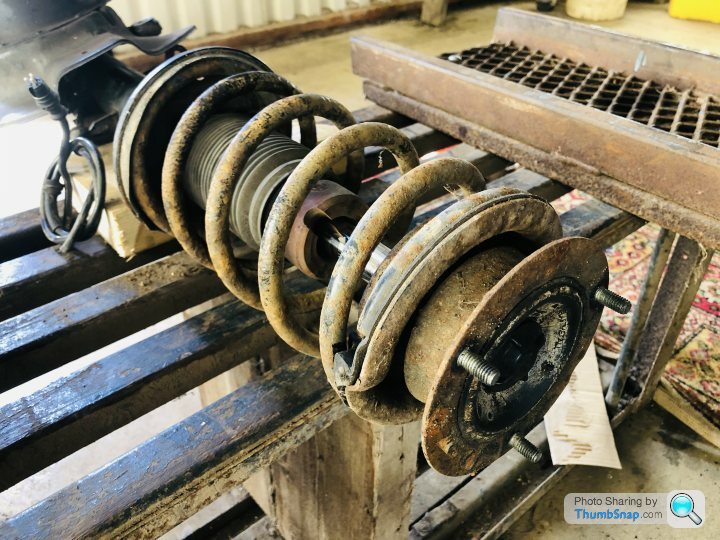
...then I could strip the struts. Immediately I encountered a problem though in that when trying to remove the 22mm top nut the shaft would just spin, there is a hex in the top of the shaft for an allen/hex key however I had no special sockets to put an allen/hex through and the nut was too deeply recessed for a swan neck spanner. An impact gun was the obvious answer however the only one I could find was an enormous 3/4 drive I assume used for agricultural and heavy plant applications...! My 1/2 drive socket obviously wouldn't fit it however I deployed some genius and found an old 12 point 3/4" imperial 1/2 drive socket, so I fitted it backwards onto the gun, then used a male to male 1/2 drive connector bit to attach the 1/2 drive 22mm socket. Top points for resoucefullness. With the compressor pumped up the new BMW special tool worked a treat and removed the nut perfectly!
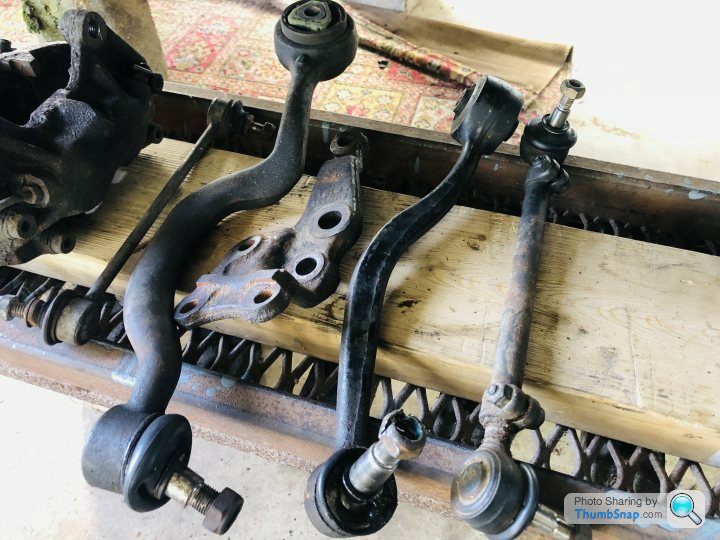
It's clear to see some of these parts are past their best, rubbers look pretty perished and whilst one of the top mount bearings seemed okay the other was very notchy and made an awful sound, odd as they both looked the same age. The spring pads were also very hard.

Lastly I spent some time sorting and labelling fixings into bags, I'll gradually work through these and work out what can be cleaned up and what needs replacing. Of course I've already started on an overcomplicated spreadsheet.

I also found when removing the track rods that the steering box has a little play on centre, I never noticed it when driving as the steering on these cars is a little slow anyway however when centred I was able to pull the red steering rod from left to right with a noticeable couple of millimetres of play and a knock from the steering box itself. I believe there is an adjustment screw on the steering box however the play can only be adjusted out to a certain extent and should not be over tightened. Another little job for the list.
Next was removal of the large crossmember, I've always found this a slightly unusual design with it kind of acting like a second subframe as it's used as the mounting point for suspension arms and the anti roll bar. Anyway, it's functional. Removal is easy enough and self explanatory, although a breaker bar was needed for the larger bolts.
Quick stop for luncheon...
...then I could strip the struts. Immediately I encountered a problem though in that when trying to remove the 22mm top nut the shaft would just spin, there is a hex in the top of the shaft for an allen/hex key however I had no special sockets to put an allen/hex through and the nut was too deeply recessed for a swan neck spanner. An impact gun was the obvious answer however the only one I could find was an enormous 3/4 drive I assume used for agricultural and heavy plant applications...! My 1/2 drive socket obviously wouldn't fit it however I deployed some genius and found an old 12 point 3/4" imperial 1/2 drive socket, so I fitted it backwards onto the gun, then used a male to male 1/2 drive connector bit to attach the 1/2 drive 22mm socket. Top points for resoucefullness. With the compressor pumped up the new BMW special tool worked a treat and removed the nut perfectly!
It's clear to see some of these parts are past their best, rubbers look pretty perished and whilst one of the top mount bearings seemed okay the other was very notchy and made an awful sound, odd as they both looked the same age. The spring pads were also very hard.
Lastly I spent some time sorting and labelling fixings into bags, I'll gradually work through these and work out what can be cleaned up and what needs replacing. Of course I've already started on an overcomplicated spreadsheet.
Edited by James Hay on Wednesday 20th April 23:17
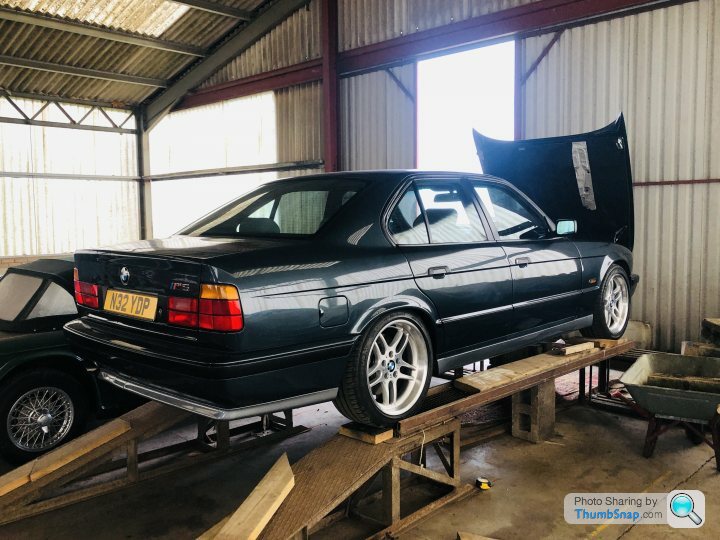
A few weeks since the last update but progress is gradually being made.
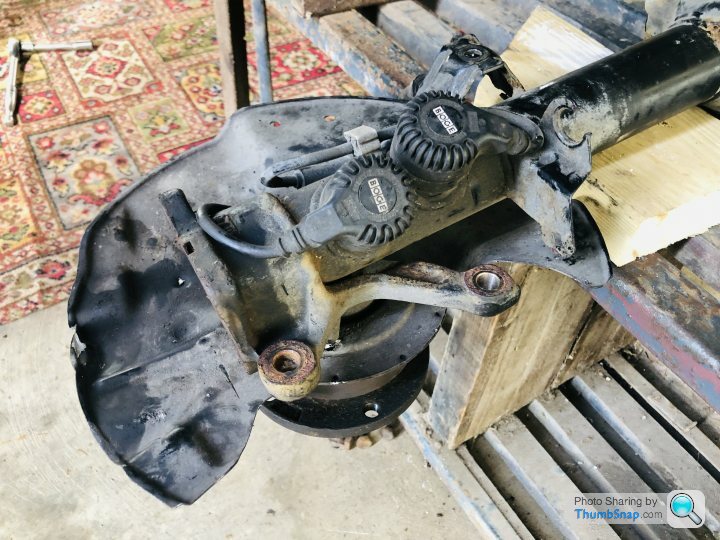
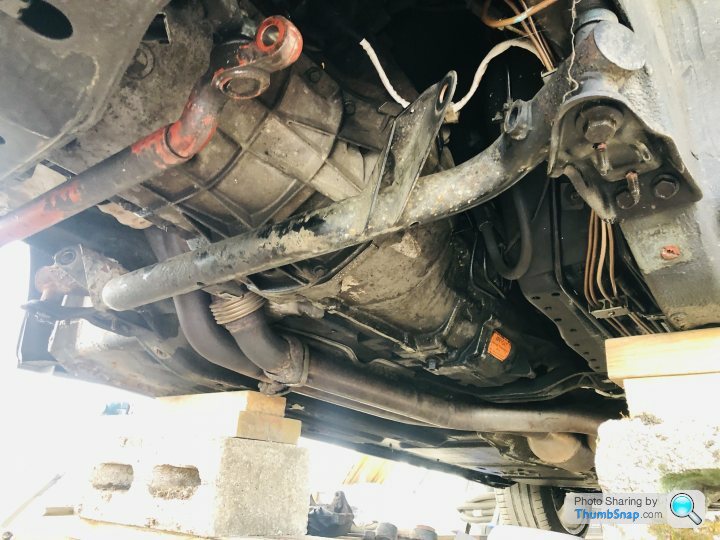
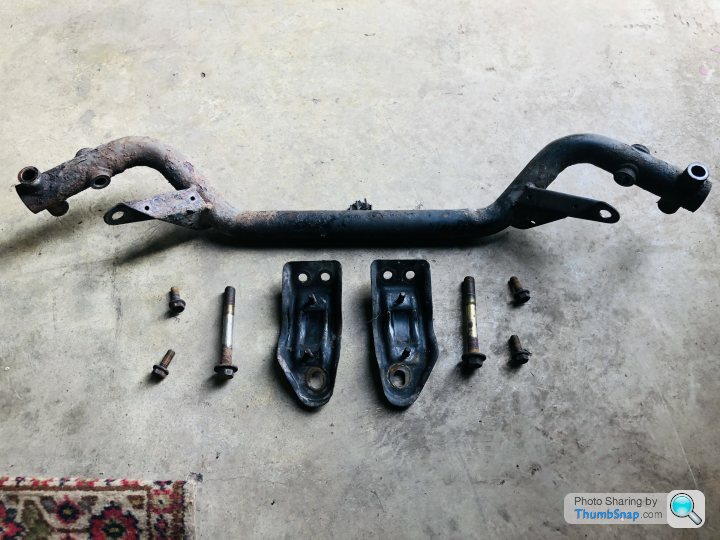
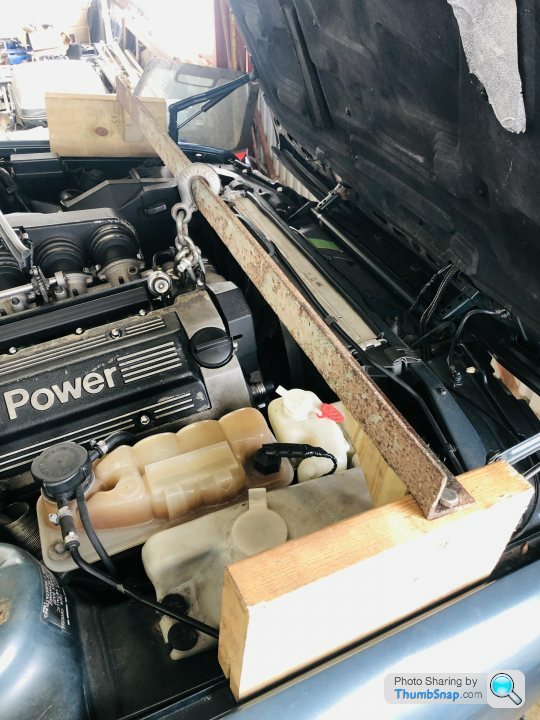
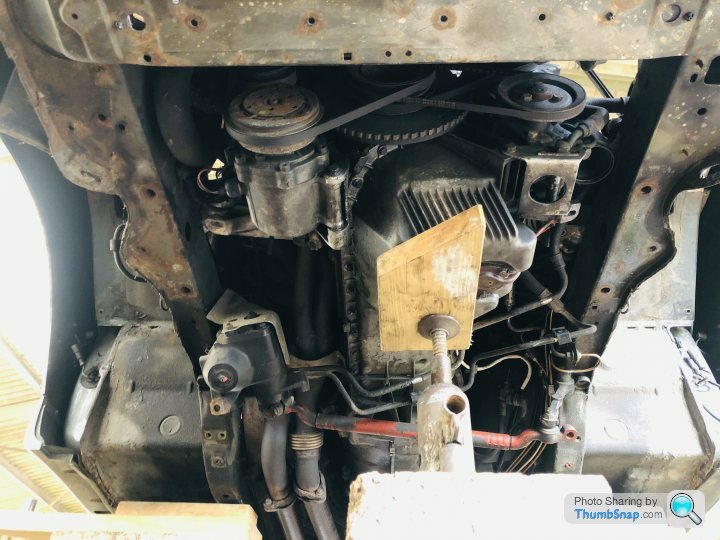
Next job was to remove the front subframe which meant supporting the engine. The initial idea was to support from the top using some sort of 'cross support' however I ended up using a bottle jack as the primary support then with a homemade cross support for backup.
The subframe came off pretty easily with a little persuasion required from a block of wood and hammer to the near side where the locating dowel was hanging on. The trickiest part was disconnecting the steering box, as the longer bolt and nut that sit horizontally are awkward to get to but with the help of a pry bar to take the strain off it and loads of jiggling it came free.
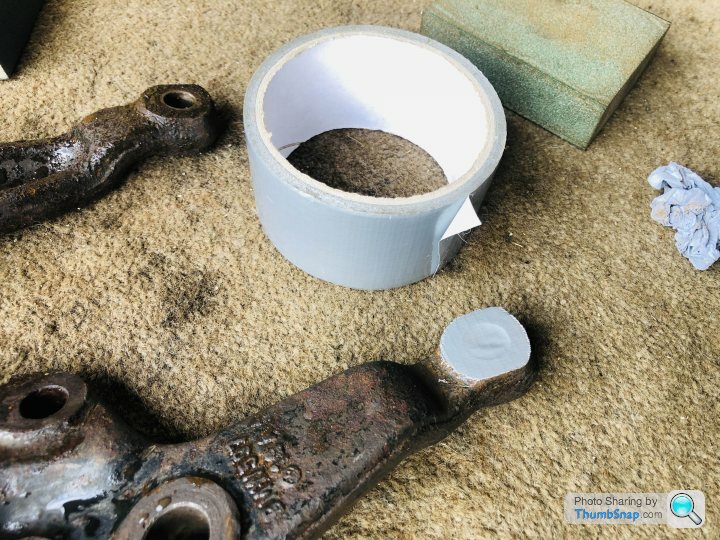
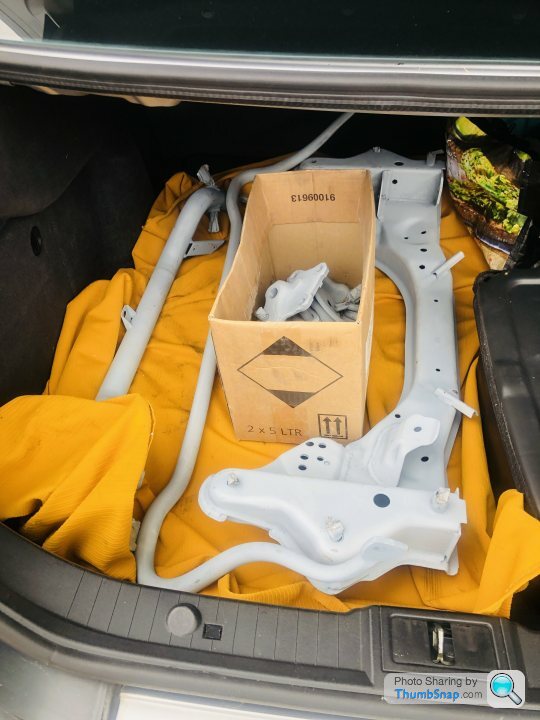
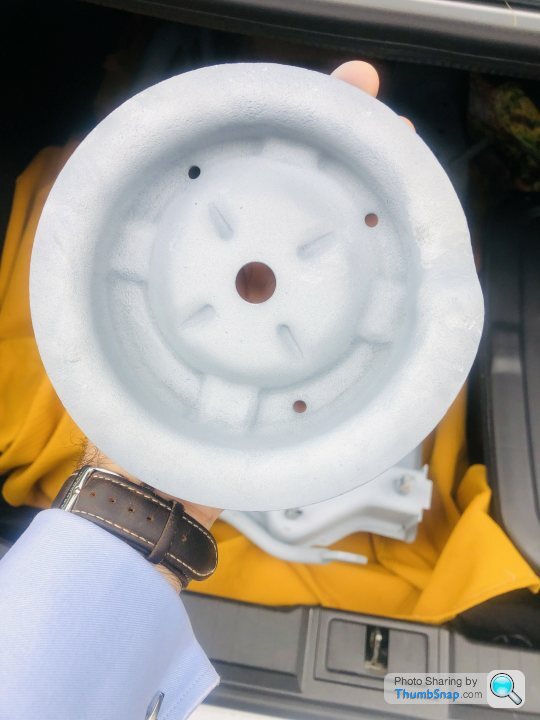
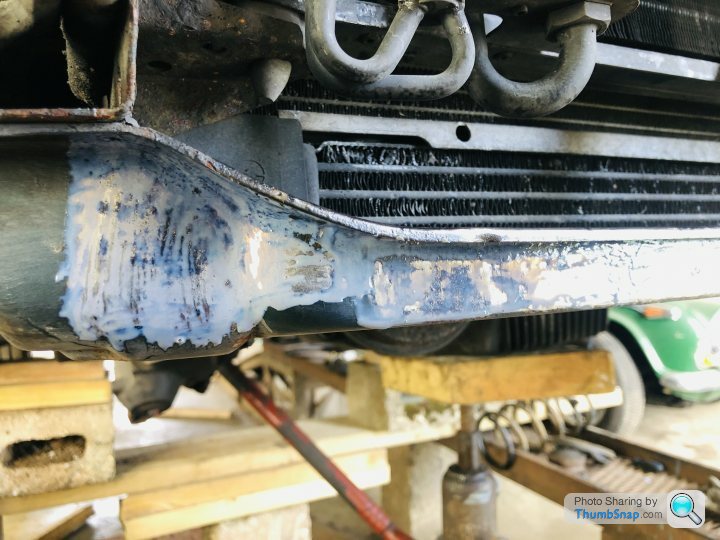
Next was to prep selected parts for blasting and zinc spraying, firstly a good clean with the pressure washer to expel any loose crud and then taping up ball join tapers and bolt holes etc...
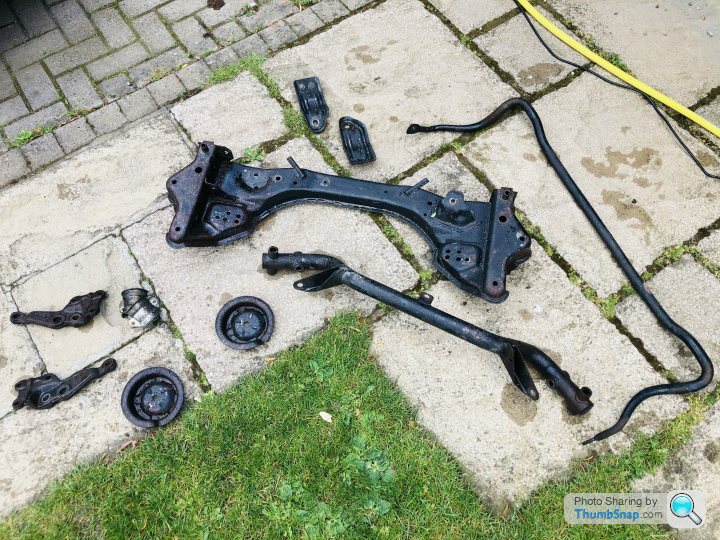
A few days later these parts all came back looking totally different. I went for zinc spraying partly because (as you may have seen) I also used this method for the rear subframe and associated components, but mostly due to the anticorrosive properties and the fact the finish is extremely hardwearing. It also provides a nice porous surface which is great for applying a final aesthetic finish.
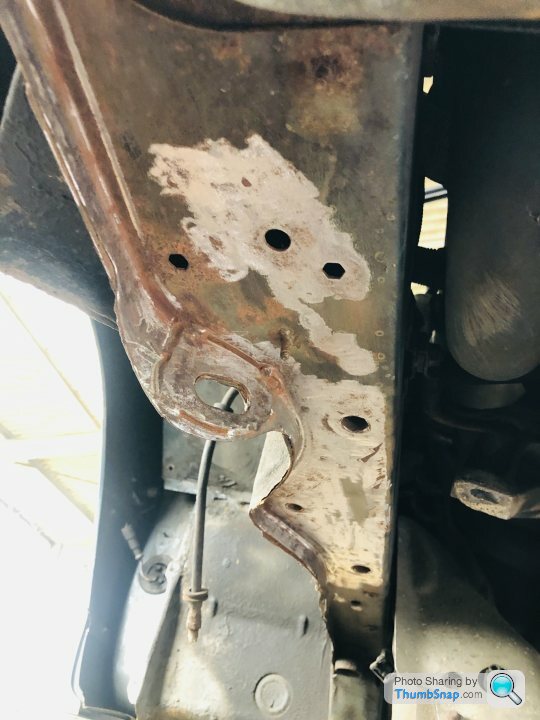
Before bolting on any shiny bits the underside required a little prep. There was nothing major here to attend to, mainly just attacking surface corrosion with a finger sander, after which I thoroughly cleaned and degreased the area and then applied Bilt Hamber Hydrate80 rust converter and zinc primer to provide the best chance of keeping any future corrosion at bay.
[/url]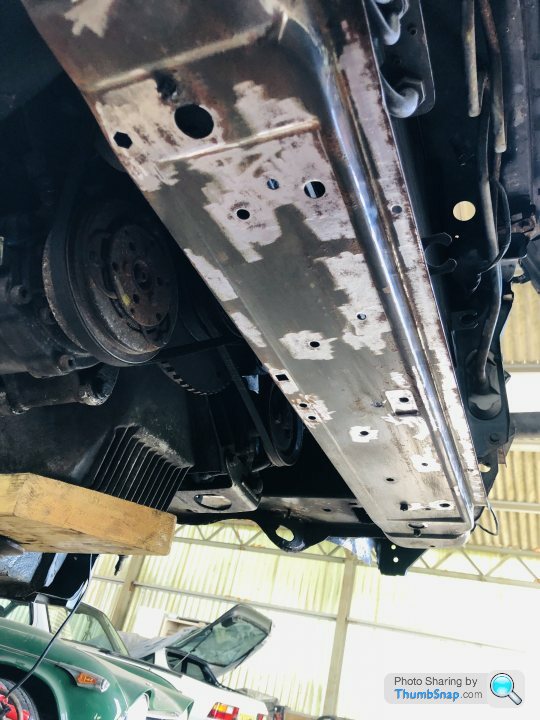

The only areas of fabrication required that I have found are a couple of areas on both sides where the wheel arch lining fixings sit, again I attacked these with the finger sander to see exactly what needed dealing with. I'll cut these areas out and make replacements for a friend to weld in.
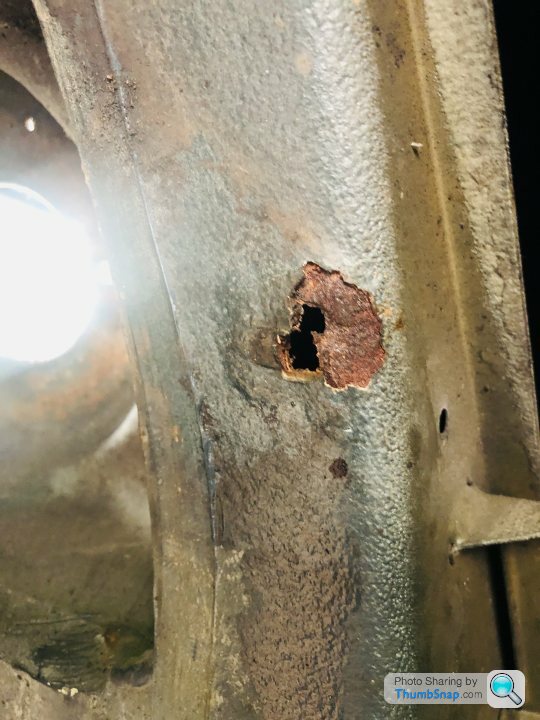
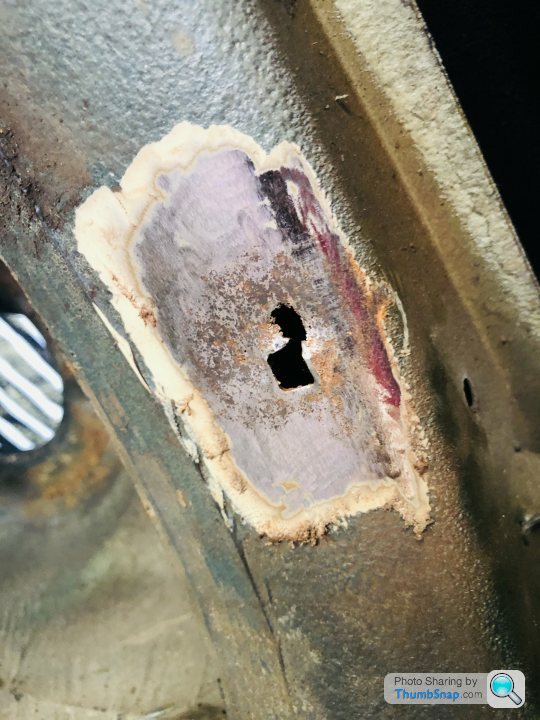
I also then attacked the corner of the inner arch mentioned in a previous post...

...in the words of Edd China, that's a job for another day!
Next job was to remove the front subframe which meant supporting the engine. The initial idea was to support from the top using some sort of 'cross support' however I ended up using a bottle jack as the primary support then with a homemade cross support for backup.
The subframe came off pretty easily with a little persuasion required from a block of wood and hammer to the near side where the locating dowel was hanging on. The trickiest part was disconnecting the steering box, as the longer bolt and nut that sit horizontally are awkward to get to but with the help of a pry bar to take the strain off it and loads of jiggling it came free.
Next was to prep selected parts for blasting and zinc spraying, firstly a good clean with the pressure washer to expel any loose crud and then taping up ball join tapers and bolt holes etc...
A few days later these parts all came back looking totally different. I went for zinc spraying partly because (as you may have seen) I also used this method for the rear subframe and associated components, but mostly due to the anticorrosive properties and the fact the finish is extremely hardwearing. It also provides a nice porous surface which is great for applying a final aesthetic finish.
Before bolting on any shiny bits the underside required a little prep. There was nothing major here to attend to, mainly just attacking surface corrosion with a finger sander, after which I thoroughly cleaned and degreased the area and then applied Bilt Hamber Hydrate80 rust converter and zinc primer to provide the best chance of keeping any future corrosion at bay.
[/url]
The only areas of fabrication required that I have found are a couple of areas on both sides where the wheel arch lining fixings sit, again I attacked these with the finger sander to see exactly what needed dealing with. I'll cut these areas out and make replacements for a friend to weld in.
I also then attacked the corner of the inner arch mentioned in a previous post...
...in the words of Edd China, that's a job for another day!
I bloody love these cars. Looks like you're doing a great job on the maintenance/restoration.
Maybe I missed it but are you 100% on keeping the electronic dampers? I've fitted bilstein b12 kits to my e46 and e36 m3 and have always been super impressed with the ride/handling compromise. I would have thought those boge shocks would be a bit past it by now?
Maybe I missed it but are you 100% on keeping the electronic dampers? I've fitted bilstein b12 kits to my e46 and e36 m3 and have always been super impressed with the ride/handling compromise. I would have thought those boge shocks would be a bit past it by now?
shalmaneser said:
I bloody love these cars. Looks like you're doing a great job on the maintenance/restoration.
Maybe I missed it but are you 100% on keeping the electronic dampers? I've fitted bilstein b12 kits to my e46 and e36 m3 and have always been super impressed with the ride/handling compromise. I would have thought those boge shocks would be a bit past it by now?
Thanks, I'm no professional technician but do the best I can! I've certainly learnt a lot along the way.Maybe I missed it but are you 100% on keeping the electronic dampers? I've fitted bilstein b12 kits to my e46 and e36 m3 and have always been super impressed with the ride/handling compromise. I would have thought those boge shocks would be a bit past it by now?
Yes I'll be keeping the current OEM dampers, they were all replaced in 2012 for new units and only have around 17,000 miles on them. I'm often openminded to upgrades however in this case the current suspension setup (whilst it can be temperamental) will be refreshed and kept in place. The only 'issue' I'm finding is getting hold of standard height front springs, as the ones from BMW are made to an incorrect spec and far t0o high and any available aftermarket seem to all be lowering springs.
James Hay said:
shalmaneser said:
I bloody love these cars. Looks like you're doing a great job on the maintenance/restoration.
Maybe I missed it but are you 100% on keeping the electronic dampers? I've fitted bilstein b12 kits to my e46 and e36 m3 and have always been super impressed with the ride/handling compromise. I would have thought those boge shocks would be a bit past it by now?
Thanks, I'm no professional technician but do the best I can! I've certainly learnt a lot along the way.Maybe I missed it but are you 100% on keeping the electronic dampers? I've fitted bilstein b12 kits to my e46 and e36 m3 and have always been super impressed with the ride/handling compromise. I would have thought those boge shocks would be a bit past it by now?
Yes I'll be keeping the current OEM dampers, they were all replaced in 2012 for new units and only have around 17,000 miles on them. I'm often openminded to upgrades however in this case the current suspension setup (whilst it can be temperamental) will be refreshed and kept in place. The only 'issue' I'm finding is getting hold of standard height front springs, as the ones from BMW are made to an incorrect spec and far t0o high and any available aftermarket seem to all be lowering springs.
Indeed I have an invoice for over £12,000, lucky it was done before my ownership...! Thankfully though if I have any issues in the future there is a company in Poland called Nagengast well known for refurbishing these types of SLS and EDC dampers for a much more reasonable cost. One of my rears was done by them due to a leak.
Those are the ones, H&R -30mm is what I'll likely go with. It doesn't look too bad in photos I've seen of other peoples cars.
Those are the ones, H&R -30mm is what I'll likely go with. It doesn't look too bad in photos I've seen of other peoples cars.
Gassing Station | Readers' Cars | Top of Page | What's New | My Stuff