1996 BMW E36 328i Coupe - we have history...
Discussion


At last I have had a chance to get some of my shiny new bits onto the car.
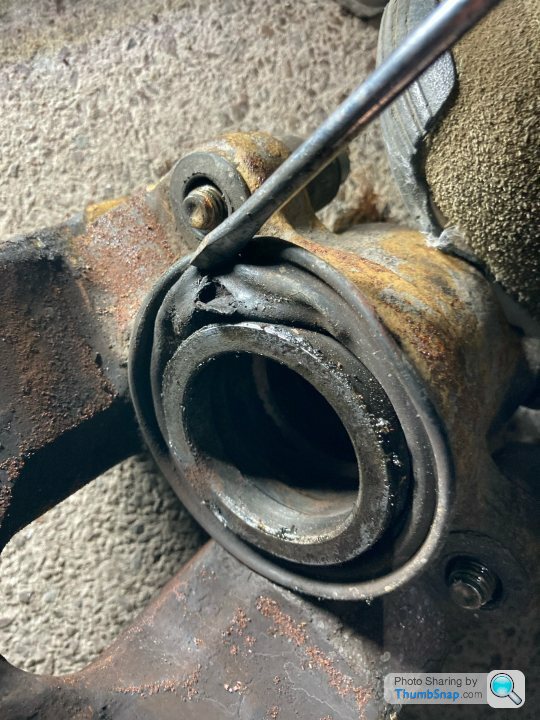
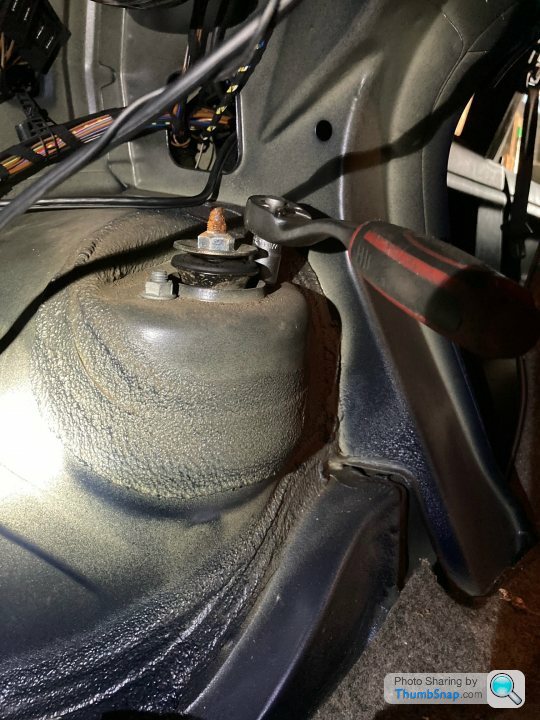
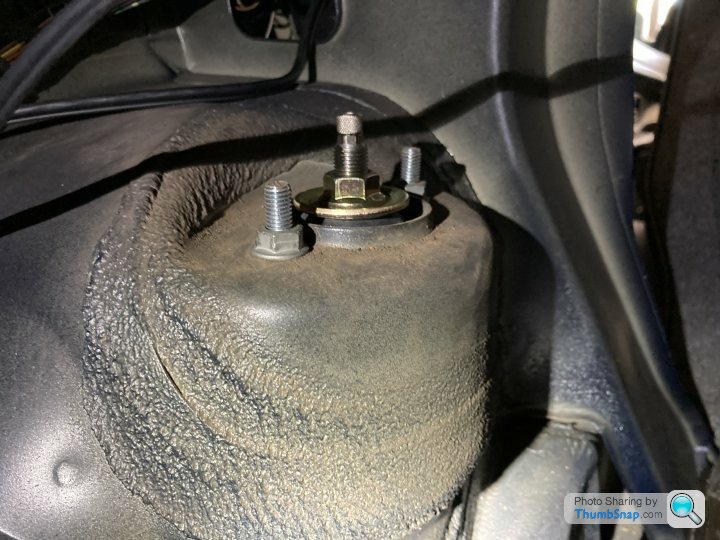
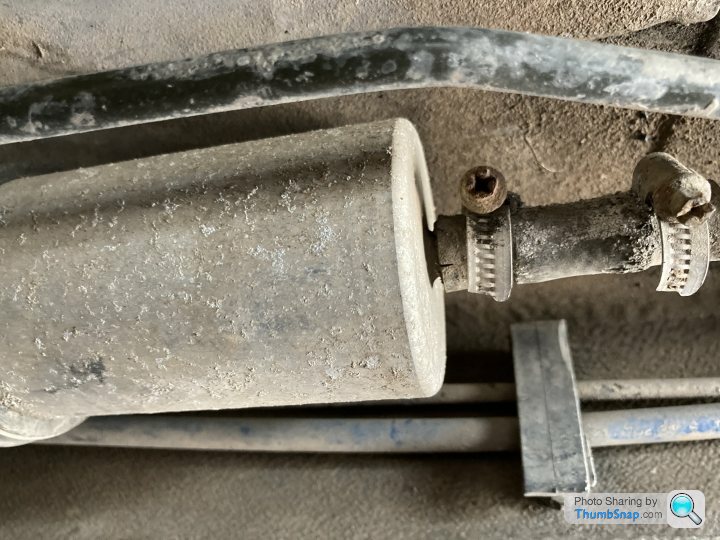
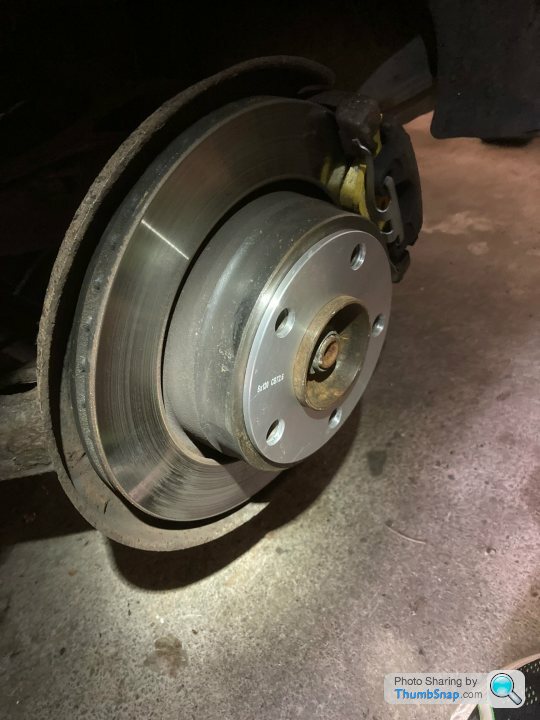
First up, as promised, a picture of that pesky piston boot that prompted today's work on the brakes.
So, I got my new calipers out of the box, to be greeted by a little tag that said 'PAGID Remanufactured Caliper' or somesuch. So not new then. Never mind, I guess that's probably why they were at the less expensive end of the market. I don't recall that being made obvious when I bought them though. I probably just wasn't paying attention. That would be pretty much in character for me. I don't really have any concerns. This project is not high-end, and remanufactured calipers suit me fine.
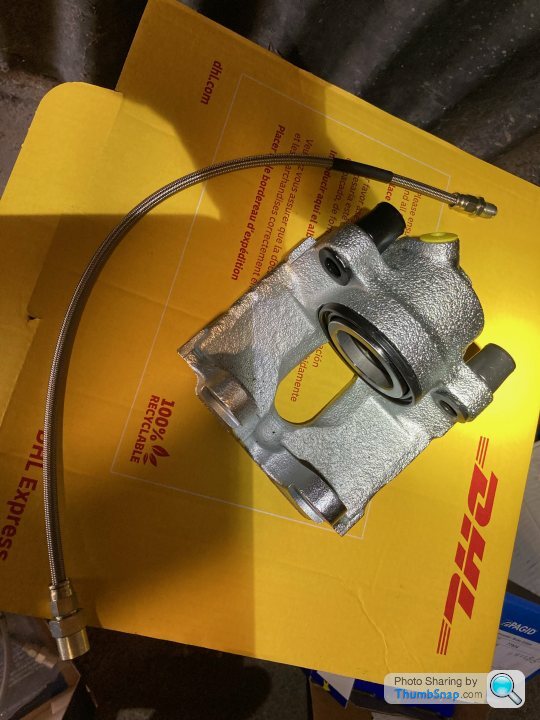
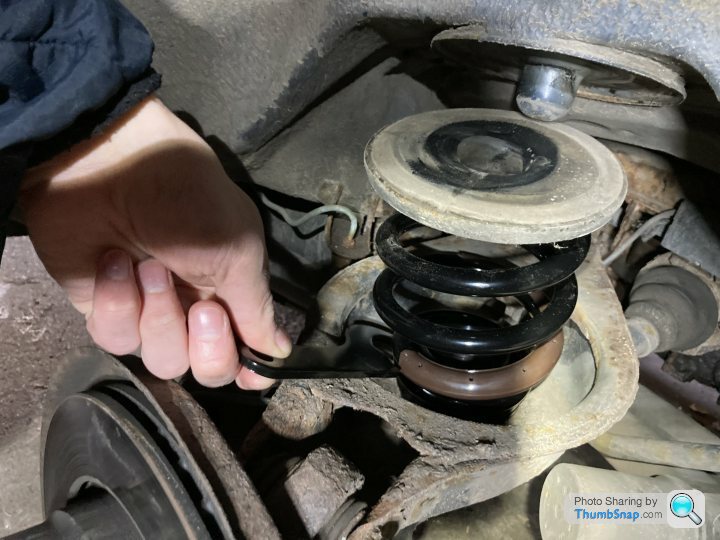
I also got my braided lines out. It's a six-line set because these cars have one on each side at the front, and two on each side at the rear. Also included in the box were four copper crush washers. I've not seen or heard of crush washers being used on this type of connection before (only on banjo bolts), but applied my logic to determine that since the six hoses had twelve ends, and of those ends eight were female and four were male (the caliper ends), the washers must go on the male ends. The result was this:
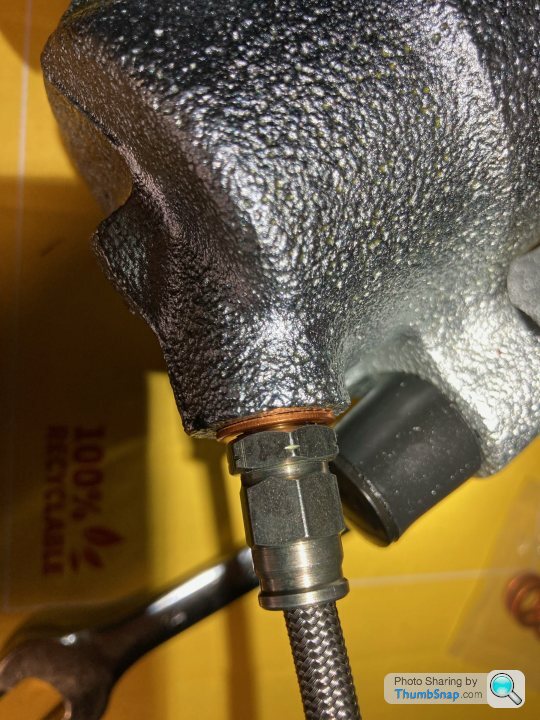
If you look closely, you can see that the flat part of the fitting above the thread has not even touched the washer, let alone crushed it. And that is screwed fully home. Confused. I did a bit of googling and determined that they probably weren't necessary, and if there were none on the old calipers/hoses (never a good indicator usually, I know), then I wouldn't bother with them. As it turned out, no washers were used in the making of this post.
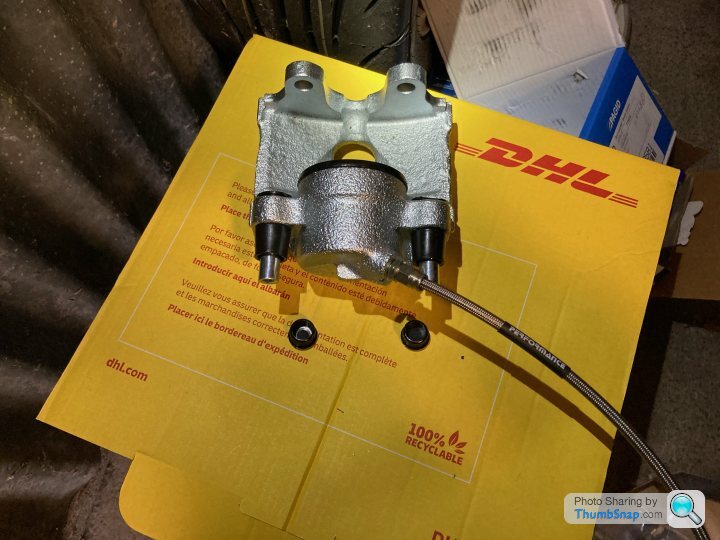
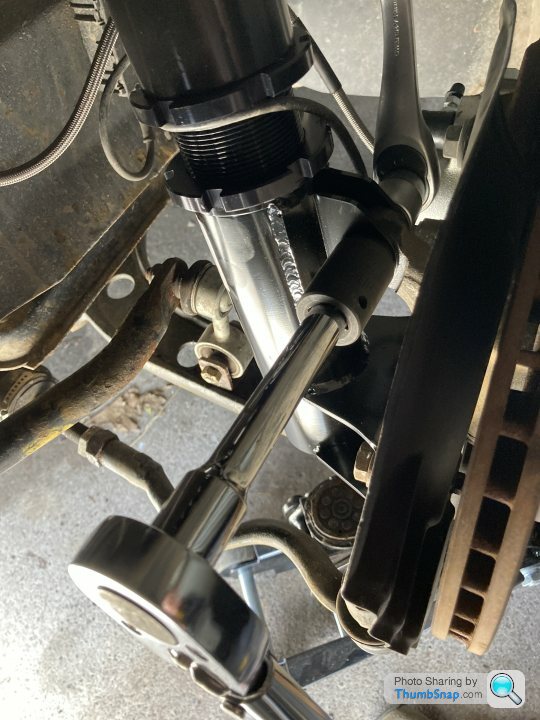
So, calipers built up, with hoses screwed in firmly and guide pins greased up and slid in (ooh err...). This is just one of them, but you get the idea.
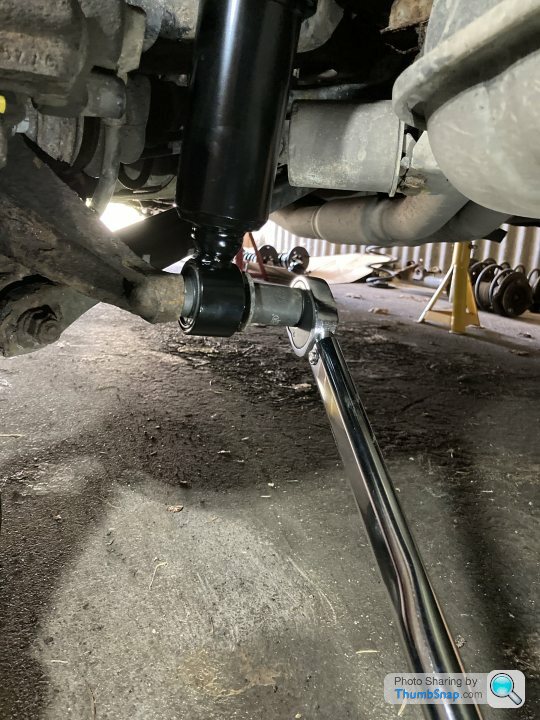
Now I have the ability to double-molegrip, I managed to undo the front right union between hard and soft lines. Actually I did this yesterday evening, so that I could sleep sound in the knowledge that I wouldn't have to start my day wrestling with stubborn nuts. I then failed to re-tighten it enough and was greeted this morning by a pool of brake fluid under one side of the car. Oops! Checked the level in the reservoir and fortunately it was ok, even though it looked like a pretty significant amount had successfully bid for freedom overnight.

It was then pretty straightforward to take one caliper off, put the other on, fully undo the union with the hard line and then screw in the new one. It was quite tricky to keep the end of the hard line out of the crud that surrounds the fitting (despite my best efforts to clean it up) whilst doing the switcheroo, so hopefully I haven't introduced any into the braking system. I guess I'll find out when I die a fiery death or become one with a tree (or not). Everything tightened up, covers and clips on.

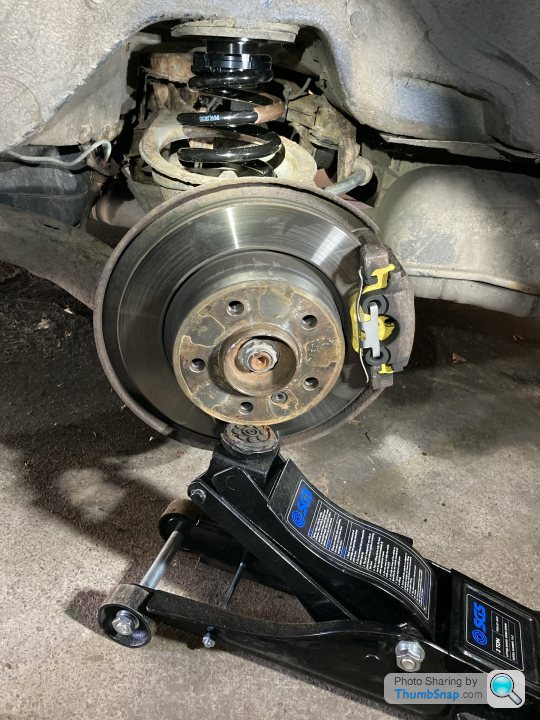
Same on the other side, and voila - two shiny calipers held by horrid rusty caliper carriers.

All that remained was to bleed the brakes, which I did with my Gunson pressure bleeder. I have used it before and was disappointed to find that the connector that went onto the valve of the spare tyre was useless at making an airtight seal (literally its only job). I have since replaced it with a lever-type clip on connector from the Bay, which works a treat. I didn't fill the bleeder bottle with brake fluid, just filled the reservoir to the brim and used the bleeder to apply air pressure. Once both sides were bled, the level in the reservoir was perfect. Sometimes these thing do just work out! I meant to take a picture of the Gunson in action but forgot. I'm sure you get the idea.
Once that was done, I tidied up, put the wheels back on and went for a test drive. The pedal feels a bit low (only a tiny bit really), but the brakes work fine and it stops in a straight line. Hopefully the pedal will come back up over time/miles. I got it back in the garage, back on the stands, wheels off to check for leaks. Front right looks fine, but there did seem to be a bit leaking from the hard/soft union on the left, so I gave it a nip up. I'll keep an eye on it.
By now time is getting on and I have other things to do, so the fuel filter can wait. I did scoot under the car for a look to see if anything was likely to cause me an issue when I do get to it, and whilst there noticed that the gearbox drain plug seemed a bit wet. There was a small amount of oil on the housing behind it. I cleaned it up and gave it an eighth of a turn or so. I don't want to overdo it. I'll keep an eye on that one too.
First up, as promised, a picture of that pesky piston boot that prompted today's work on the brakes.
So, I got my new calipers out of the box, to be greeted by a little tag that said 'PAGID Remanufactured Caliper' or somesuch. So not new then. Never mind, I guess that's probably why they were at the less expensive end of the market. I don't recall that being made obvious when I bought them though. I probably just wasn't paying attention. That would be pretty much in character for me. I don't really have any concerns. This project is not high-end, and remanufactured calipers suit me fine.
I also got my braided lines out. It's a six-line set because these cars have one on each side at the front, and two on each side at the rear. Also included in the box were four copper crush washers. I've not seen or heard of crush washers being used on this type of connection before (only on banjo bolts), but applied my logic to determine that since the six hoses had twelve ends, and of those ends eight were female and four were male (the caliper ends), the washers must go on the male ends. The result was this:
If you look closely, you can see that the flat part of the fitting above the thread has not even touched the washer, let alone crushed it. And that is screwed fully home. Confused. I did a bit of googling and determined that they probably weren't necessary, and if there were none on the old calipers/hoses (never a good indicator usually, I know), then I wouldn't bother with them. As it turned out, no washers were used in the making of this post.
So, calipers built up, with hoses screwed in firmly and guide pins greased up and slid in (ooh err...). This is just one of them, but you get the idea.
Now I have the ability to double-molegrip, I managed to undo the front right union between hard and soft lines. Actually I did this yesterday evening, so that I could sleep sound in the knowledge that I wouldn't have to start my day wrestling with stubborn nuts. I then failed to re-tighten it enough and was greeted this morning by a pool of brake fluid under one side of the car. Oops! Checked the level in the reservoir and fortunately it was ok, even though it looked like a pretty significant amount had successfully bid for freedom overnight.
It was then pretty straightforward to take one caliper off, put the other on, fully undo the union with the hard line and then screw in the new one. It was quite tricky to keep the end of the hard line out of the crud that surrounds the fitting (despite my best efforts to clean it up) whilst doing the switcheroo, so hopefully I haven't introduced any into the braking system. I guess I'll find out when I die a fiery death or become one with a tree (or not). Everything tightened up, covers and clips on.
Same on the other side, and voila - two shiny calipers held by horrid rusty caliper carriers.
All that remained was to bleed the brakes, which I did with my Gunson pressure bleeder. I have used it before and was disappointed to find that the connector that went onto the valve of the spare tyre was useless at making an airtight seal (literally its only job). I have since replaced it with a lever-type clip on connector from the Bay, which works a treat. I didn't fill the bleeder bottle with brake fluid, just filled the reservoir to the brim and used the bleeder to apply air pressure. Once both sides were bled, the level in the reservoir was perfect. Sometimes these thing do just work out! I meant to take a picture of the Gunson in action but forgot. I'm sure you get the idea.
Once that was done, I tidied up, put the wheels back on and went for a test drive. The pedal feels a bit low (only a tiny bit really), but the brakes work fine and it stops in a straight line. Hopefully the pedal will come back up over time/miles. I got it back in the garage, back on the stands, wheels off to check for leaks. Front right looks fine, but there did seem to be a bit leaking from the hard/soft union on the left, so I gave it a nip up. I'll keep an eye on it.
By now time is getting on and I have other things to do, so the fuel filter can wait. I did scoot under the car for a look to see if anything was likely to cause me an issue when I do get to it, and whilst there noticed that the gearbox drain plug seemed a bit wet. There was a small amount of oil on the housing behind it. I cleaned it up and gave it an eighth of a turn or so. I don't want to overdo it. I'll keep an eye on that one too.
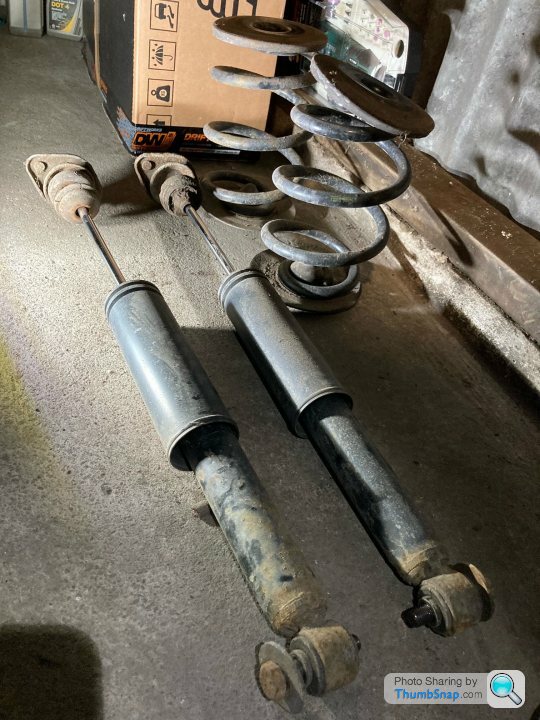
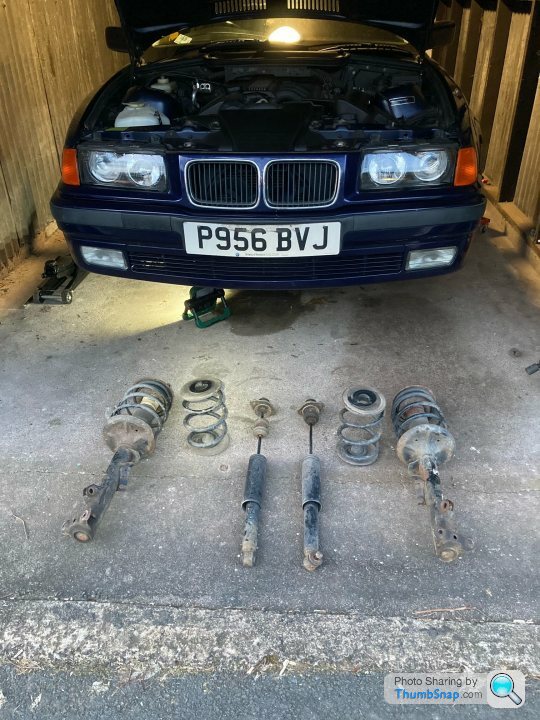
I managed to grab a bit of time after work before it got dark, so got the car up on stands in the garage with the intention of swapping the fuel filter. Once it was up, I decided I couldn't be bothered faffing with the filter, so I took off all the suspension instead. I am planning on installing the coilovers this weekend, so it wasn't a completely random act of spannering.
I knew the front struts would come off easy enough, as I'd had them both off last year (or maybe late 2019, I don't really know). The rear shocks I was less sure about, as I haven't touched them before. As it turned out, all of them came off without putting up a fight. When I saw the copper grease on the thread of the bolts at the bottom of the rear shocks, I was reminded that they had been replaced quite early in my ownership by a mechanic in Germany. He'd clearly sorted me right out and made this job nice and easy. (Not sure if thread-lock might have been a better idea on a suspension bolt... what do I know?)
Bottom bolt off

Top nuts off
Shocks and springs off the back
No rear suspension

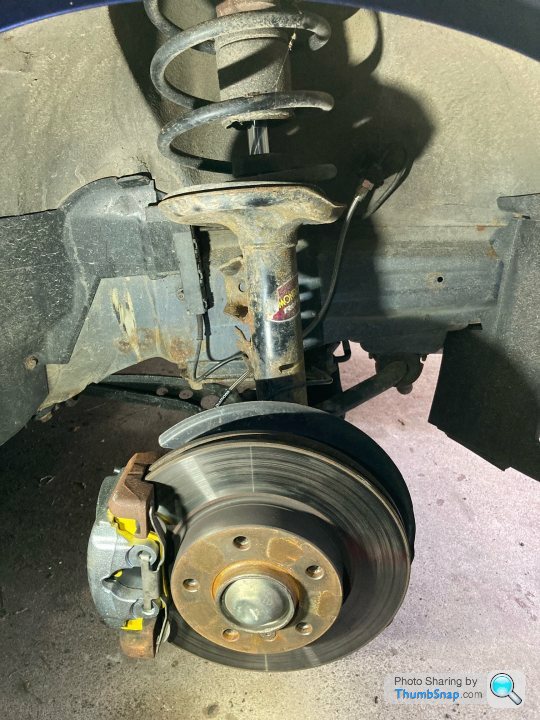
Front strut on
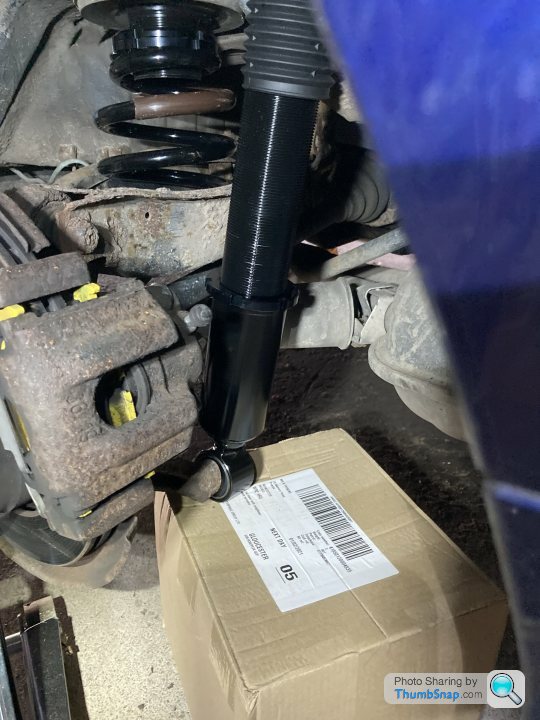
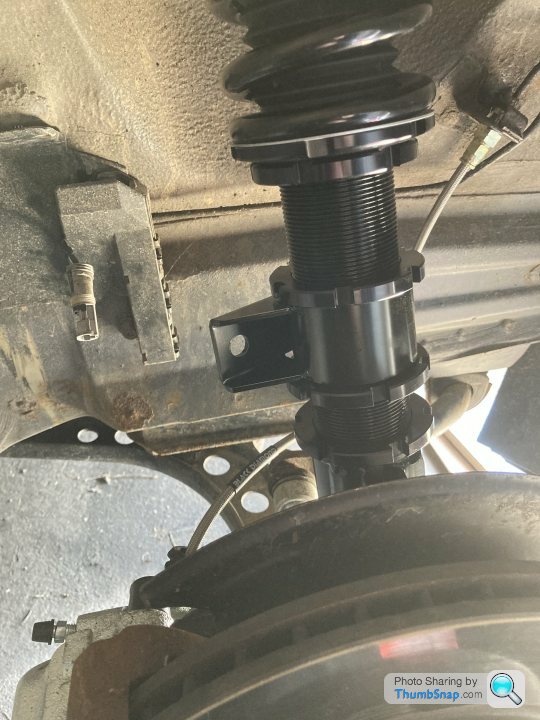
Front strut off. Cable ties saving the new brake hoses from taking the weight of the hubs.
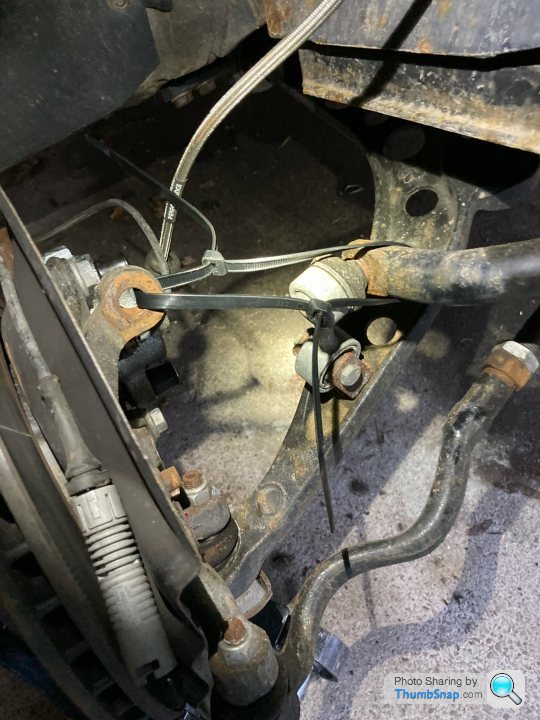
Et voila! I also disconnected the ARB from both front control arms to prevent torsion-based difficulties when installing the new struts.
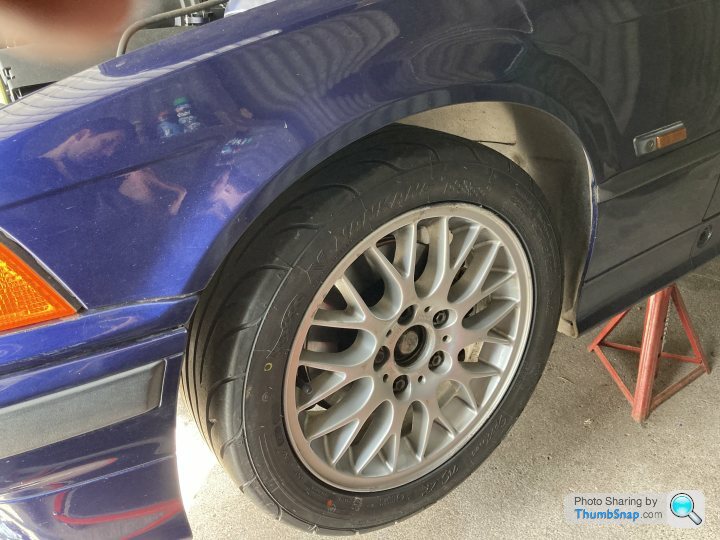
I gave the old girl a run out at the weekend, to help bed in the new pads. It was gratifying to see, when I took off the wheels today, that there were no leaks from the new hoses any more after my previous efforts.
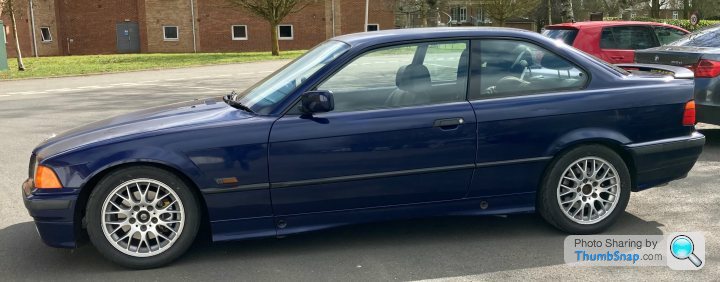
As I hadn't actually intended to take all the suspension off today, I didn't take 'before' pictures of the ridiculous arch gap, nor did I take any measurements before I jacked it up. Never mind, I think this will do as a 'before', and I'll try and take a comparable 'after' once it's 'stanced' or whatever.
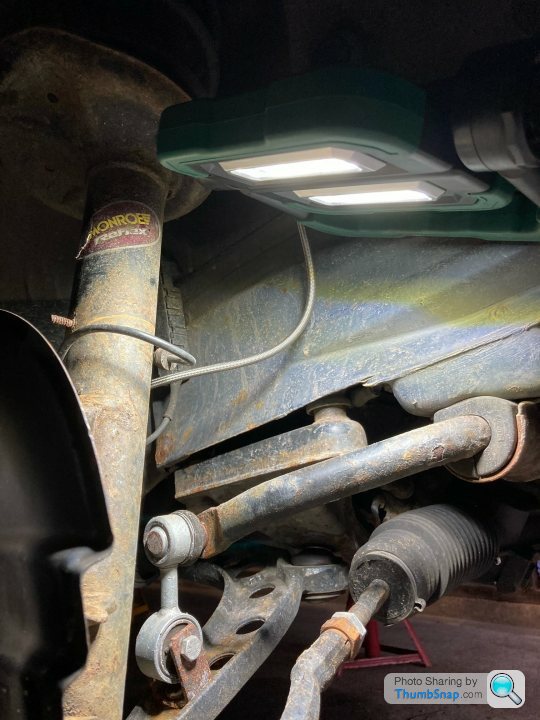
Oh, and an honourable mention for this little work light that I got from Lidl. It's pretty versatile, I like it.
I knew the front struts would come off easy enough, as I'd had them both off last year (or maybe late 2019, I don't really know). The rear shocks I was less sure about, as I haven't touched them before. As it turned out, all of them came off without putting up a fight. When I saw the copper grease on the thread of the bolts at the bottom of the rear shocks, I was reminded that they had been replaced quite early in my ownership by a mechanic in Germany. He'd clearly sorted me right out and made this job nice and easy. (Not sure if thread-lock might have been a better idea on a suspension bolt... what do I know?)
Bottom bolt off
Top nuts off
Shocks and springs off the back
No rear suspension
Front strut on
Front strut off. Cable ties saving the new brake hoses from taking the weight of the hubs.
Et voila! I also disconnected the ARB from both front control arms to prevent torsion-based difficulties when installing the new struts.
I gave the old girl a run out at the weekend, to help bed in the new pads. It was gratifying to see, when I took off the wheels today, that there were no leaks from the new hoses any more after my previous efforts.
As I hadn't actually intended to take all the suspension off today, I didn't take 'before' pictures of the ridiculous arch gap, nor did I take any measurements before I jacked it up. Never mind, I think this will do as a 'before', and I'll try and take a comparable 'after' once it's 'stanced' or whatever.
Oh, and an honourable mention for this little work light that I got from Lidl. It's pretty versatile, I like it.
Mardgee said:
Just read this start to finish. Good read thanks, really enjoyed it. I’ve recently sold my car and fancy buying something similar and replicating your journey of doing all the jobs. Bookmarked.
Thanks for commenting, glad you've enjoyed it. I have too!I keep a spreadsheet of how much I've spent on the car over the last couple of years and it adds up pretty quickly, even when you're just doing mostly OEM-equivalent replacement, not even performance upgrades (though I'm getting to that now).
That said, it's one of those things that you can spend money and time on when you have it, and when you don't, it will sit there quietly and not judge you (or empty your bank account).
Hoping to get it on track soon and enjoy the driving as well as the spannering!
Today's fun: fitting the coilovers. Yes, I'm aware that the rears aren't actually coilovers.
I went for HSD Dualtech (their cheaper range). I've explained my reasoning before, but to recap - an established brand so, hopefully, decent quality. Beginner track driver so no need for high-end race-spec mega-struts. The cost was £625 which I judged to be reasonable for what I was getting and what I wanted to achieve. Also, given that this car is mainly for playing on the track I went for a slightly stiffer than normal spring (10kg/mm all round) in an effort to not be disappointed with the softness after the first couple of track days. All guesswork, let's see how it pans out!
This is what we're dealing with:

It took me a while to figure out which front strut was which, as they weren't marked and the manual was silent on the matter. In the end I had to go by the orientation of the ARB link mounting brackets (for ARB links I don't have - mine bolt to the control arm rather than the strut). This will become clear later.
I also had a bit of thinking to do about the rear. First a quick comparison, new and old:

The way they are meant to go on, I believe, is for the adjustable spring seat to be bolted to the suspension arm at the bottom, like so:
The problem with that is that when you want to adjust them with the coilover spanners, you can't because they are buried deep inside the cups on the arms:
Fortunately, it is possible (whether it's advisable is an entirely different matter) to turn it upside down, as the rubber hat and butt-plug from the OEM spring fit in the adjustable spring seat and the other end of the spring respectively. This enables much easier access to the collars for adjustment. Whether it also leads to the suspension self-disassembling at high speed remains to be seen.
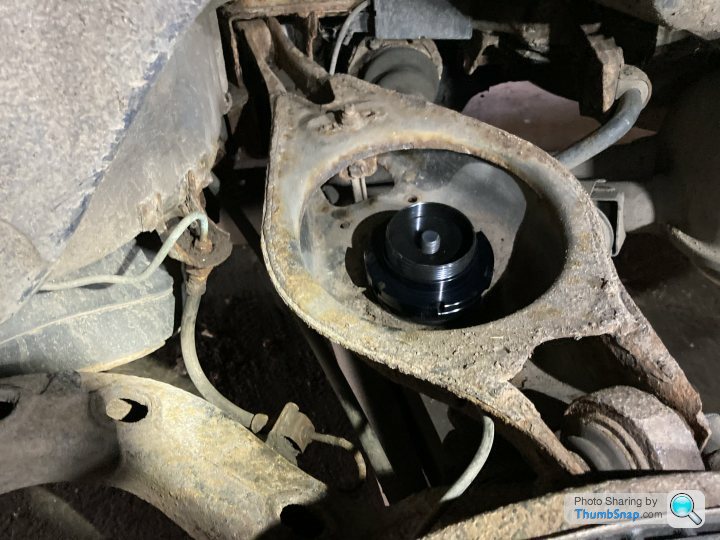
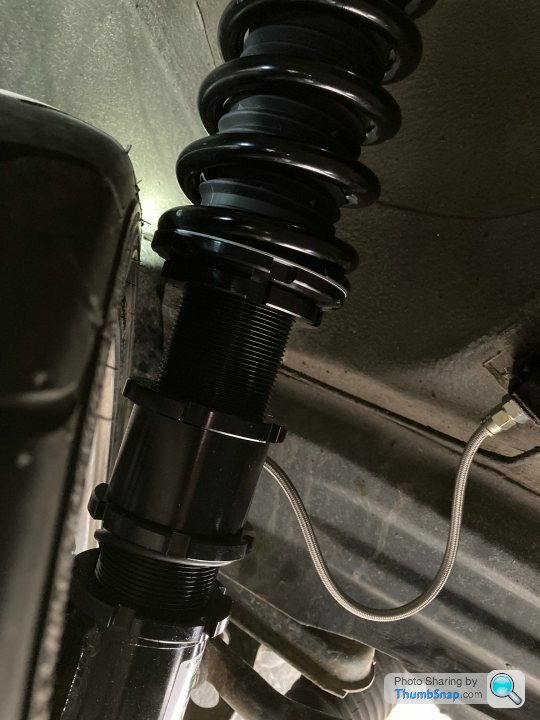
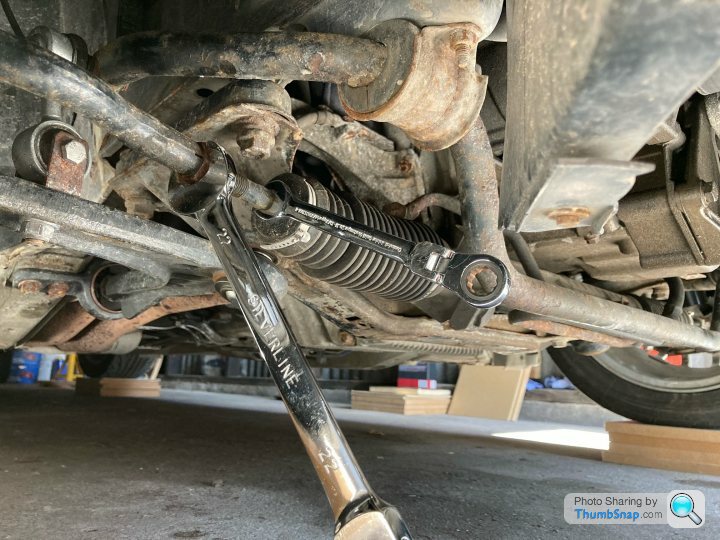
As per the supplied instructions, I jacked up the hub so that the spring was touching at both ends but not yet compressed, and then adjusted the damper to the correct length as defined by the distance between the top mounting point and where the bottom mounting point was now sitting. Damper bolted in (with assistance from my friend, Mr Box), and torqued appropriately. At this stage I am setting everything so it sits at the maximum ride height that this kit allows. I'm not going for low-rider status, but can always adjust downwards as required.

So that was the back done. On with the front.
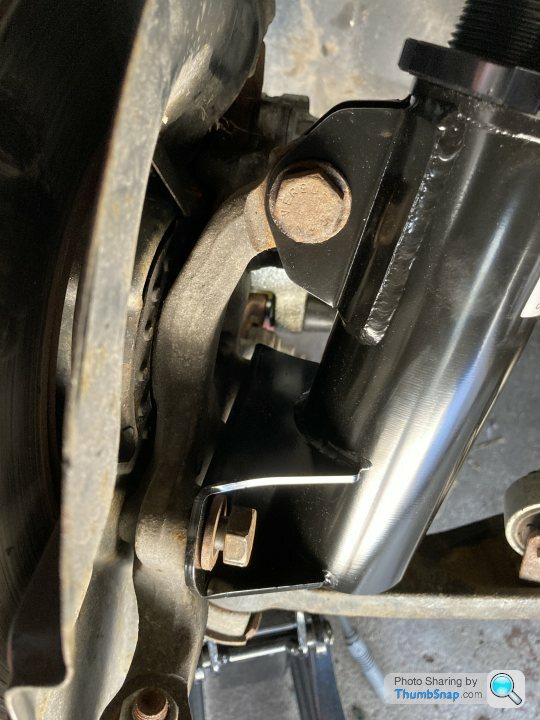
Here you can see the ARB link bracket that I mentioned. The flat face is supposed to sit towards the engine bay when the bracket is to the rear of the strut. That's the only way I could tell that this strut went on this side and the other on the other. I did at least five minutes of Googling to see if there was any other way... Although I don't need to attach drop links to them, they did come in handy for attaching brake hoses and wheel speed sensor cables to via the medium of cable ties. A bit 'council' perhaps, but as HSD didn't give me any other way of securing them to the strut, that was my solution. I did check full lock both ways to make sure nothing was being pulled or likely to get caught. Gotta love cable ties!
Torqued up:
Adjusting the camber is going to be interesting. I've seen this on other E36s. I think it's just a thing. If I swapped the struts over (drop link bracket aside) I'd still have the same problem.

Not much droop here.
And that takes us to the obligatory before and after shots:
So, the front is definitely lower, but the back hasn't dropped at all, which is a bit weird. I was going to take it for a drive, but when a worrying noise led me to get out and check the front wheels, I found that the tyres were rubbing on the locking collars on the coilovers. I very gingerly returned it to the garage and there it will stay until some wheel spacers arrive! I had no idea what size to go for, so have ordered a selection and will return whatever I don't use.
I have now lowered the rear from where it is in the photo, by winding both collars on each side up as far as they will go. It still looks a tad high in the garage, but I'll give it chance to settle once I can drive it and see what's what. I can get more drop if required by removing one or both collars completely.
Anyone who has been reading my previous posts may wonder when I'll get round to doing the fuel filter that I keep going on about. Well, I thought about it. I even went as far as taking some photos of it:
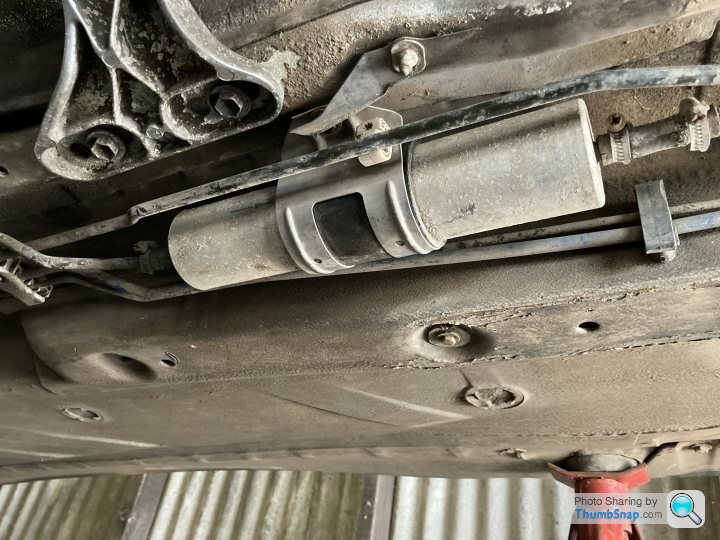
The short rubber sections look a bit suspect to me. There is at least one small split in one of them, as you can see. I think I'll order some new rubber hose before I tackle that. I don't fancy putting the old ones back on and have them fall apart on me.
So that's it for today. Next up is wheel spacers, when they arrive. I'd like to get the fuel filter done before my first track day on 22 April, but if I don't it's not a problem. I do want to put a few miles on the car before then though, to give the new bits a good shakedown and get everything nice and tight.
I went for HSD Dualtech (their cheaper range). I've explained my reasoning before, but to recap - an established brand so, hopefully, decent quality. Beginner track driver so no need for high-end race-spec mega-struts. The cost was £625 which I judged to be reasonable for what I was getting and what I wanted to achieve. Also, given that this car is mainly for playing on the track I went for a slightly stiffer than normal spring (10kg/mm all round) in an effort to not be disappointed with the softness after the first couple of track days. All guesswork, let's see how it pans out!
This is what we're dealing with:
It took me a while to figure out which front strut was which, as they weren't marked and the manual was silent on the matter. In the end I had to go by the orientation of the ARB link mounting brackets (for ARB links I don't have - mine bolt to the control arm rather than the strut). This will become clear later.
I also had a bit of thinking to do about the rear. First a quick comparison, new and old:
The way they are meant to go on, I believe, is for the adjustable spring seat to be bolted to the suspension arm at the bottom, like so:
The problem with that is that when you want to adjust them with the coilover spanners, you can't because they are buried deep inside the cups on the arms:
Fortunately, it is possible (whether it's advisable is an entirely different matter) to turn it upside down, as the rubber hat and butt-plug from the OEM spring fit in the adjustable spring seat and the other end of the spring respectively. This enables much easier access to the collars for adjustment. Whether it also leads to the suspension self-disassembling at high speed remains to be seen.
As per the supplied instructions, I jacked up the hub so that the spring was touching at both ends but not yet compressed, and then adjusted the damper to the correct length as defined by the distance between the top mounting point and where the bottom mounting point was now sitting. Damper bolted in (with assistance from my friend, Mr Box), and torqued appropriately. At this stage I am setting everything so it sits at the maximum ride height that this kit allows. I'm not going for low-rider status, but can always adjust downwards as required.
So that was the back done. On with the front.
Here you can see the ARB link bracket that I mentioned. The flat face is supposed to sit towards the engine bay when the bracket is to the rear of the strut. That's the only way I could tell that this strut went on this side and the other on the other. I did at least five minutes of Googling to see if there was any other way... Although I don't need to attach drop links to them, they did come in handy for attaching brake hoses and wheel speed sensor cables to via the medium of cable ties. A bit 'council' perhaps, but as HSD didn't give me any other way of securing them to the strut, that was my solution. I did check full lock both ways to make sure nothing was being pulled or likely to get caught. Gotta love cable ties!
Torqued up:
Adjusting the camber is going to be interesting. I've seen this on other E36s. I think it's just a thing. If I swapped the struts over (drop link bracket aside) I'd still have the same problem.
Not much droop here.
And that takes us to the obligatory before and after shots:
So, the front is definitely lower, but the back hasn't dropped at all, which is a bit weird. I was going to take it for a drive, but when a worrying noise led me to get out and check the front wheels, I found that the tyres were rubbing on the locking collars on the coilovers. I very gingerly returned it to the garage and there it will stay until some wheel spacers arrive! I had no idea what size to go for, so have ordered a selection and will return whatever I don't use.
I have now lowered the rear from where it is in the photo, by winding both collars on each side up as far as they will go. It still looks a tad high in the garage, but I'll give it chance to settle once I can drive it and see what's what. I can get more drop if required by removing one or both collars completely.
Anyone who has been reading my previous posts may wonder when I'll get round to doing the fuel filter that I keep going on about. Well, I thought about it. I even went as far as taking some photos of it:
The short rubber sections look a bit suspect to me. There is at least one small split in one of them, as you can see. I think I'll order some new rubber hose before I tackle that. I don't fancy putting the old ones back on and have them fall apart on me.
So that's it for today. Next up is wheel spacers, when they arrive. I'd like to get the fuel filter done before my first track day on 22 April, but if I don't it's not a problem. I do want to put a few miles on the car before then though, to give the new bits a good shakedown and get everything nice and tight.
Great thread OP thank you.
It's brilliant seeing somebody doing the work himself, especially on such a fabulous car as an E36.
The M50 manifold certainly seems to open the engine up a bit, to how it should have been from standard had it not been restricted.
A better intake and jobs a good one for an extra 35bhp ish.
I had a simota induction kit on mine, but the dave f kits are as good if you can find one.
https://i.imgur.com/qMIMk8w.jpg
https://i.imgur.com/2Hr0MkJ.jpg
Thanks, I appreciate your comment. They are great cars, fun to drive and easy to work on. Mine will never win any beauty contests but it gives me a lot of enjoyment.
I am looking forward to doing the manifold. I’ve got two track days booked in quick succession, so may look to do it after them so I can get a direct comparison of before and after. That’s only if there isn’t something more pressing to do, which is quite likely!
Thanks for the pointers on the induction kits. That’s another one of those things that I will get round to at some point. This is a slow-burn step-by-step kind of project, and I’ll probably be led by how it feels on the track. That is to say, at this stage, I don’t actually know what I want to do next!

buy_cheap_pay_later said:
Adjusting the camber is going to be interesting. I've seen this on other E36s. I think it's just a thing. If I swapped the struts over (drop link bracket aside) I'd still have the same problem.
How is this even a thing?? - Have you got a picture of the strut tower shock position before you put the coilovers on?? buy_cheap_pay_later said:
I don’t have a picture, but it was dead centre. Also, there are four screws for adjusting the camber. Two are now hiding under the skin of the shock tower so adjustment will involve dropping it out and then bolting it back in again.
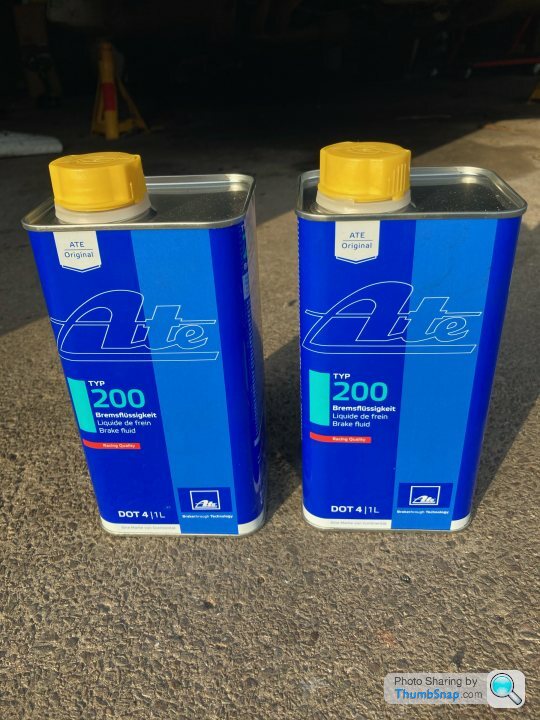
so the damper rod was dead centre in the hole - if I've got my directions right (front to rear) in fitting the coilovers you've added a lot of caster? I took advantage of what looks to be a very brief early hint of summer to get out and do a very straightforward job that I have been meaning to do but hadn't until now. That is, changing the brake fluid. The fluid that's in there hasn't been in for long (standard Comma DOT 4), but when I redid the brakes and bled them all through a year ago I had no intention of taking the car on the track and abusing it. I therefore felt the need to replace it all with ATE Type 200. It says 'Racing Quality' on the tin, which says all that needs saying, really!
Now, as I understand it, this stuff used to be blue, but that's now illegal or something. When replacing all the fluid in the system, it'd be really useful to have the replacement fluid be a different colour to the old. That way you can see when it starts coming through the bleed nipple. However, what we have to contend with now (can I still blame the EU? Immigrants? 5G?) is replacing fluid with another fluid that's the same colour. It's like painting a white wall white - you can't tell if you've got it all.
I can't remember what the nominal capacity for the system is, but a guy on the internet said 1 litre would be enough for a full flush. I got 2 litres, because. My plan was to overdo it, then I've got some level of confidence that all the old has been replaced with the new. I also wasn't sure if it was the done thing to bleed the clutch at the same time, but it seemed logical as that way there aren't two different types of fluid living in what is a common system.
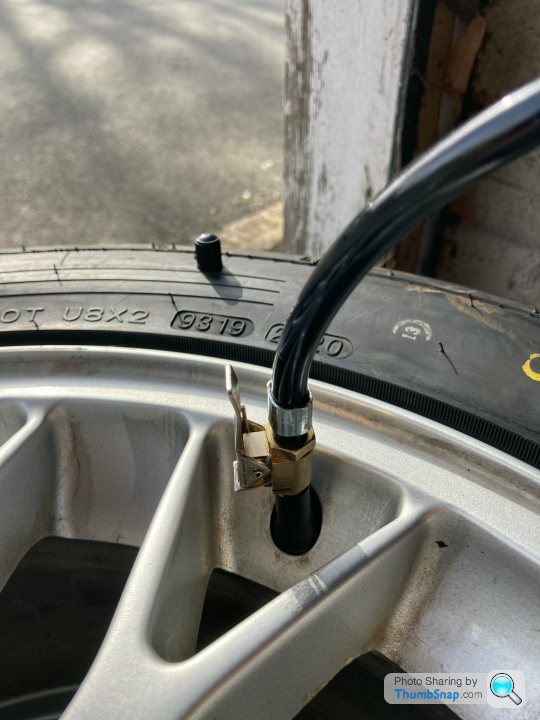
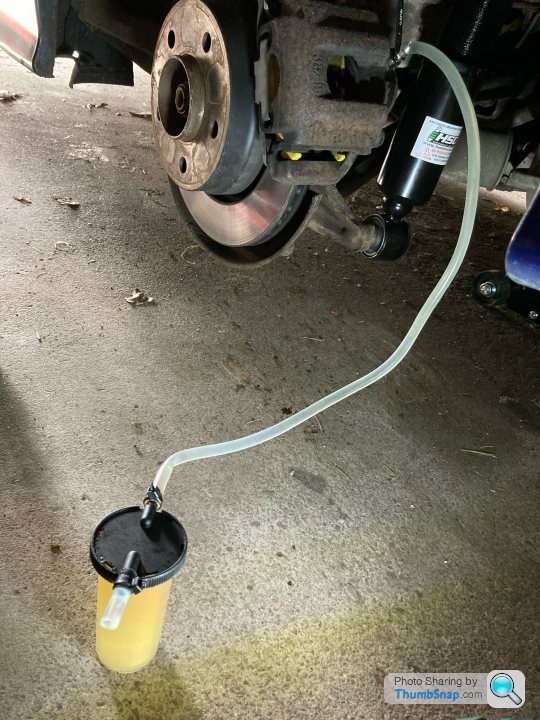
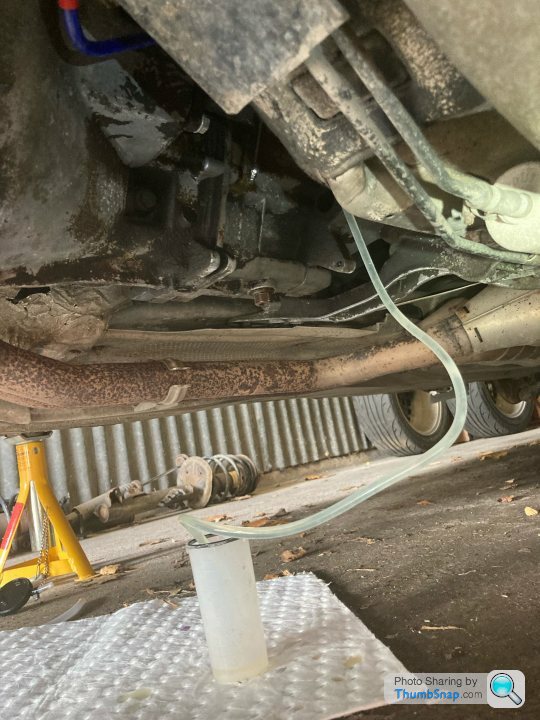
So I set up mu Gunson pressure bleeder. I've mentioned this before, but haven't yet treated you to a photo. I thought I better had in case you started thinking I was making it up and was actually bleeding my brakes by blowing down a hosepipe or something. I have also mentioned previously the connector that goes on the tyre valve, and how the one originally supplied was useless. My new connector was pennies from China and works a treat.

The Gunson system does say in large letters that the max pressure is 1.4 bar, but I couldn't be bothered de-pressurising my tyre for it, so I treated it to about 2.4 bar. It didn't explode.
I used a small container with capacity markings on to catch the fluid. That way I could easily keep track of how much I was taking from each corner.
I ended up taking approx 330ml out of each rear caliper, about 210ml out of each front caliper, and 360ml out of the clutch slave cylinder. By my maths that makes just shy of 1.5 litres. I'd say about 100-150ml was wastage: left in the bleeder, syringed out of the reservoir or dropped on the floor, as I've got between a third and a half of a litre left in one of the tins.
I didn't intend to take that much out of the clutch, but the first 120ml was really dark and cloudy, and the second lot was still pretty grotty, so I took a third 120ml and it looked much better. I only filled the system in Oct 20, when I put the manual box and the clutch in, and haven't done many miles since. I can only assume the old lines I used had some muck inside them. I'm glad I've flushed it now.
So that's done. Brakes are good to go. Tyres are good to go. Suspension is almost good to go - I just need the wheel spacers to stop it eating my front tyres.
Now, as I understand it, this stuff used to be blue, but that's now illegal or something. When replacing all the fluid in the system, it'd be really useful to have the replacement fluid be a different colour to the old. That way you can see when it starts coming through the bleed nipple. However, what we have to contend with now (can I still blame the EU? Immigrants? 5G?) is replacing fluid with another fluid that's the same colour. It's like painting a white wall white - you can't tell if you've got it all.
I can't remember what the nominal capacity for the system is, but a guy on the internet said 1 litre would be enough for a full flush. I got 2 litres, because. My plan was to overdo it, then I've got some level of confidence that all the old has been replaced with the new. I also wasn't sure if it was the done thing to bleed the clutch at the same time, but it seemed logical as that way there aren't two different types of fluid living in what is a common system.
So I set up mu Gunson pressure bleeder. I've mentioned this before, but haven't yet treated you to a photo. I thought I better had in case you started thinking I was making it up and was actually bleeding my brakes by blowing down a hosepipe or something. I have also mentioned previously the connector that goes on the tyre valve, and how the one originally supplied was useless. My new connector was pennies from China and works a treat.
The Gunson system does say in large letters that the max pressure is 1.4 bar, but I couldn't be bothered de-pressurising my tyre for it, so I treated it to about 2.4 bar. It didn't explode.
I used a small container with capacity markings on to catch the fluid. That way I could easily keep track of how much I was taking from each corner.
I ended up taking approx 330ml out of each rear caliper, about 210ml out of each front caliper, and 360ml out of the clutch slave cylinder. By my maths that makes just shy of 1.5 litres. I'd say about 100-150ml was wastage: left in the bleeder, syringed out of the reservoir or dropped on the floor, as I've got between a third and a half of a litre left in one of the tins.
I didn't intend to take that much out of the clutch, but the first 120ml was really dark and cloudy, and the second lot was still pretty grotty, so I took a third 120ml and it looked much better. I only filled the system in Oct 20, when I put the manual box and the clutch in, and haven't done many miles since. I can only assume the old lines I used had some muck inside them. I'm glad I've flushed it now.
So that's done. Brakes are good to go. Tyres are good to go. Suspension is almost good to go - I just need the wheel spacers to stop it eating my front tyres.
I had a car day today. That's not to say that I achieved a great deal, or anything of note, really, just that I spent the day in the vicinity of the car doing sort of car things.
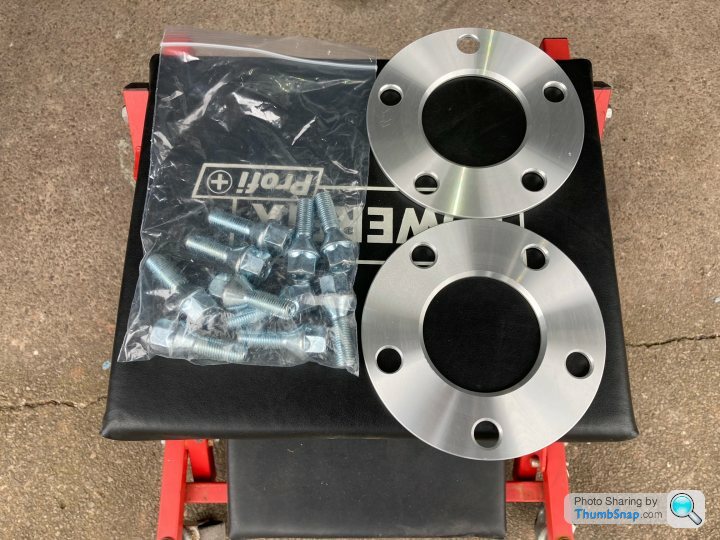
First up, wheel spacers. you may remember that my HSD coilovers that I just fitted had an appetite for my front tyres, so I needed to separate them to avoid turning my tyres into those rubber granules you get on artificial sports pitches. Not wanting to mess around with the geometry of the car too much, I decided to try the smallest ones I had first - the 5mm ones.

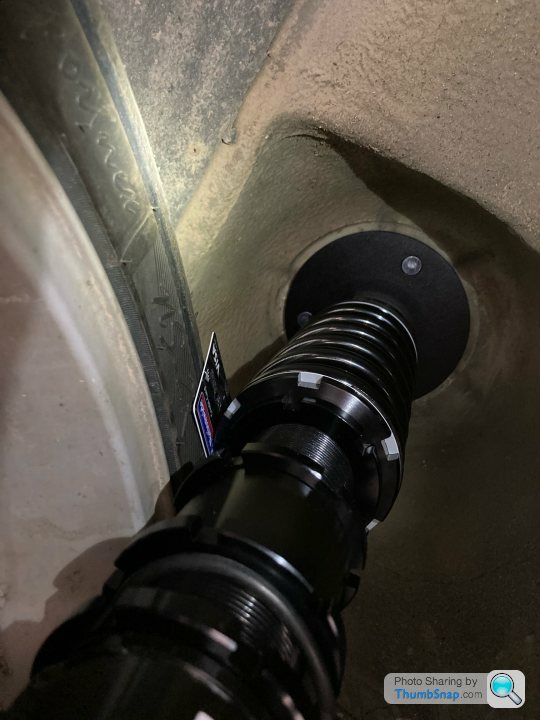
Clearance? Loads of it. You could get a sheet of graphene in there! The wheel spun freely without contact with the strut, however it was so close that when I put a single credit card in the gap, it stayed there, gripped between the tyre and the strut. That's less than 1mm. I'm no expert, but intuitively I feel that less than 1mm probably isn't enough.
So out came the 10mm spacers. I have read that you shouldn't use 10mm spacers on E36s, because the thickness of the spacer is sufficient to negate any load-bearing ability of the protrusion on the hub itself, but isn't thick enough to have its own protrusion of sufficient depth to support the wheel/vehicle. Well, I'd ordered these Bimec 10mm spacers and they look pretty well machined with a decent protrusion. I made the assumption that, as they weren't cheap, some thought had probably gone into making them work without breaking the vehicle, and if lots of people had broken their vehicle by using them they probably wouldn't sell them any more. All highly illogical - I've got them so I'll use them.


How about the clearance now?
I got 7 credit cards (or equivalent - I don't actually have 7 credit cards) in there this time, so just under 7mm of clearance. That feels a bit better than the gnat's fart that I had with the 5mm spacer.
I had looked up the front and rear track widths for my car on some sort of data website, which gave the front as 1408mm and the rear as 1421mm. What I had now done was make the front 1428mm by adding 10mm to each side. In order to at least keep the rear slightly wider than the front as BMW intended, I put the 5mm spacers on the rear.
I'm not sure why I added a photo of that - it looks exactly as you imagined it would. Anyway, in theory (if the data website was correct) I should now have a front track of 1428mm and a rear of 1431mm - almost square. Now that I have lowered the rear and the car is driveable, here are the before, after, and after after photos.
Stock suspension:
Straight after fitting HSDs:
Now with the rear lowered:

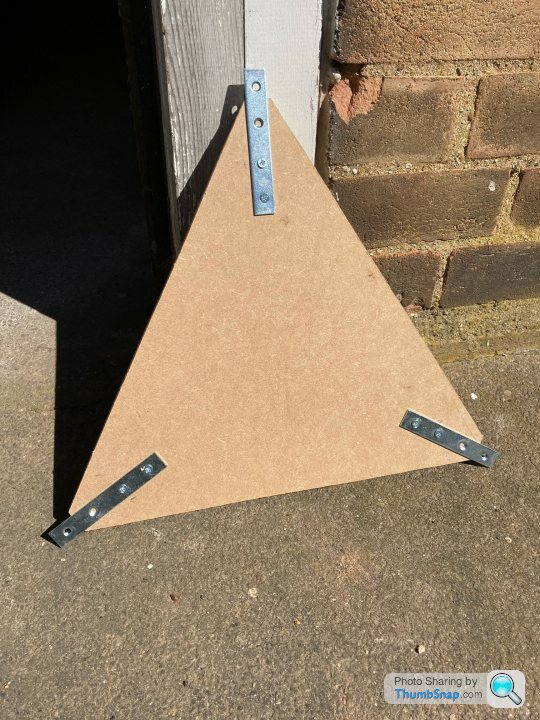
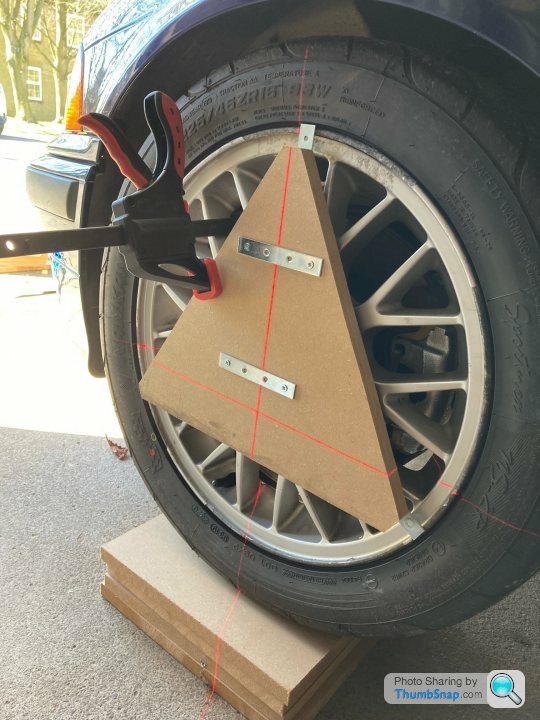
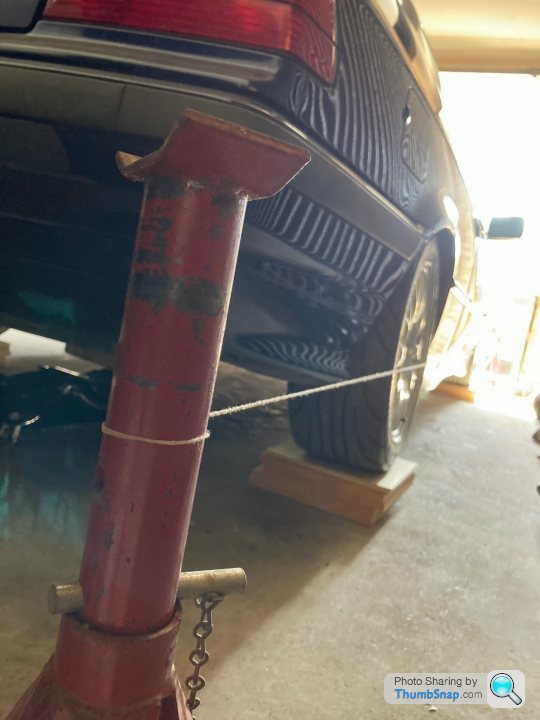
Now the fun (?) began. I've been reading up on wheel alignment, specifically DIY techniques. I found a forum with two Americans arguing about whether measuring camber with a triangular piece of wood and an iPhone inclinometer app was accurate, or whether it could be but only if you get your car completely level, on its wheels but raised up, first. I borrowed a bit of both. I cut a load of 30cm squares out of some left over MDF and hardboard the other day, and planned to use them under the wheels to level the car before measuring camber using an equilateral triangle (three points of contact on the rim, not the tyre) and my iPhone, and toe using string and a measuring tape. Here is the disco I ended up with.


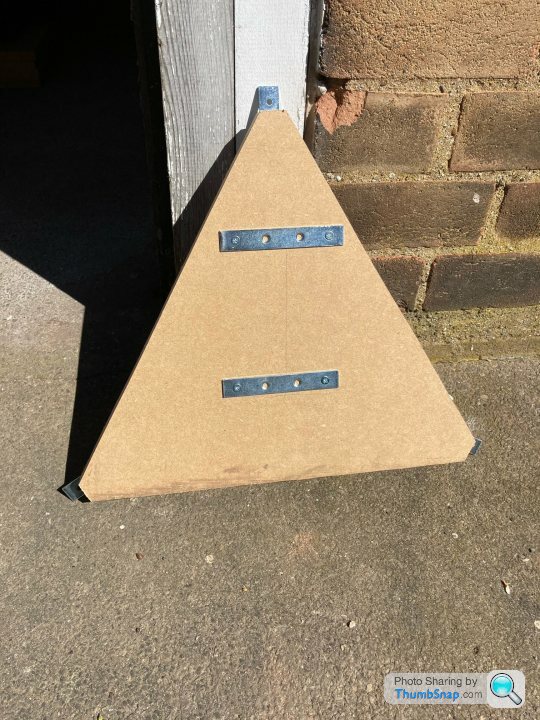
Initially I had made an equilateral triangle from MDF, made to measure for my rims using the factor supplied by the first argumentative American (radius x 1.732). It just about rested on the rim but was probably slightly smaller that would have been convenient, as it kept slipping off. I also noted that, as my iPhone has buttons on both sides, it wouldn't fit flush to the board, which would no doubt ruin my microscopically accurate readings. I therefore cut the corners off my triangle and modified it thusly. The two parallel brackets allow the phone to rest on the board without the volume buttons holding it off.
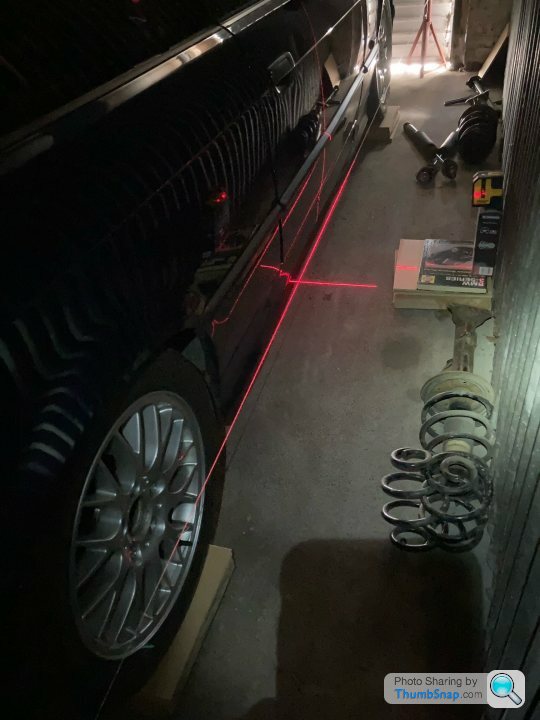
In use (also making use of the laser level, since I had it):
Funnily enough I didn't take any pictures of me using my phone as an inclinometer, as I also use it as my camera. The readings I got from it are as follows (all negative):
Front left: 3.0 deg
Front right: 2.5 deg
Rear left: 1.8 deg
Rear right 2.6 deg
As a sanity check, I then took the measurements again, but using a spirit level and a piece of wood of the correct length to span rim-to-rim and hold the level off the tyres. I found this method tricky as it involves holding everything in position whilst trying to look at the bubble in the level and the tape measure at the same time. It was all a bit wobbly and vague, but gave the following measurements:
Front left: 3.0 deg
Front right: 3.0 deg
Rear left: 2.2 deg
Rear right 2.7 deg
To be honest, I'm inclined to trust the first set of measurements more, as everything was a lot more stable and less reliant on my holding everything steady with my hands.
I decided to leave the camber alone. I seem to remember the rear camber bolts are seized solid and couldn't be bothered messing with them today. The front measurements are not as close to each other as I'd like, but both front struts are set to their central position on the camber plates and I don't want to start running them on different settings to each other on the strength of my probably fairly sketchy measurements. The maximum difference between them is 0.5 degrees, which is significant but not terrible. I'll see what the machine says when I get it done properly!
On to toe. This string method is a bit of a pain in the backside. I spent most of the afternoon chasing measurements around the car. Let's start at the beginning though.
I used the laser level to get the string level through the centres of each wheel. Also looked pretty cool.
Now, in theory, given the track width data that I had, the string should have been 1.5mm further from the centre of the front wheels on each side than it was from the centres of the rear wheels (making up the now 3mm difference in track width). Is that what happened? Of course not! I went round and round the car, chasing measurements, checking the string-to-string distance front and rear to make sure it was square, and ended up with between 7 and 9mm difference between front and rear on each side. No idea. But it was square, and the differences were the same, so I went with it.
Toe measurements:
Front Left: 0.4 deg toe out
Front Right: 0.2 deg toe in
Rear Left: 0 toe
Rear Right: 0.6 deg toe in
Again, I left the rear alone. I will un-seize all the bolts before taking it for a proper alignment.
Here's a photo to represent what happened next.
What actually happened next was that I adjusted the front toe without the steering lock on, and when I finally thought I'd sorted it (to 0 toe both sides), I drove off with the steering wheel on the piss by a quarter of a turn or so. Bum. Back up it went, and I tried again with the key out and steering lock on. The result wasn't quite perfect (steering wheel still not 100% straight) but better than it was, and quite frankly I've had enough of chasing probably inaccurate measurements around the car for hours. There's a reason why wheel alignment machines exist and why normal, sensible people pay for trained technicians to use them on their cars. It honestly isn't worth a day of your life obtaining and adjusting measurements that are almost certainly bulls t anyway. But you knew that. That's why you take your car to the wheel alignment specialist and sit down with a horrendous coffee whilst reading a seven-year-old Top Gear magazine and waiting for the young gentleman to fire frickin' lasers at your wheels.
What have I learned? My little camber triangle thing looks cool, but DIY alignment? Don't bother!
First up, wheel spacers. you may remember that my HSD coilovers that I just fitted had an appetite for my front tyres, so I needed to separate them to avoid turning my tyres into those rubber granules you get on artificial sports pitches. Not wanting to mess around with the geometry of the car too much, I decided to try the smallest ones I had first - the 5mm ones.
Clearance? Loads of it. You could get a sheet of graphene in there! The wheel spun freely without contact with the strut, however it was so close that when I put a single credit card in the gap, it stayed there, gripped between the tyre and the strut. That's less than 1mm. I'm no expert, but intuitively I feel that less than 1mm probably isn't enough.
So out came the 10mm spacers. I have read that you shouldn't use 10mm spacers on E36s, because the thickness of the spacer is sufficient to negate any load-bearing ability of the protrusion on the hub itself, but isn't thick enough to have its own protrusion of sufficient depth to support the wheel/vehicle. Well, I'd ordered these Bimec 10mm spacers and they look pretty well machined with a decent protrusion. I made the assumption that, as they weren't cheap, some thought had probably gone into making them work without breaking the vehicle, and if lots of people had broken their vehicle by using them they probably wouldn't sell them any more. All highly illogical - I've got them so I'll use them.
How about the clearance now?
I got 7 credit cards (or equivalent - I don't actually have 7 credit cards) in there this time, so just under 7mm of clearance. That feels a bit better than the gnat's fart that I had with the 5mm spacer.
I had looked up the front and rear track widths for my car on some sort of data website, which gave the front as 1408mm and the rear as 1421mm. What I had now done was make the front 1428mm by adding 10mm to each side. In order to at least keep the rear slightly wider than the front as BMW intended, I put the 5mm spacers on the rear.
I'm not sure why I added a photo of that - it looks exactly as you imagined it would. Anyway, in theory (if the data website was correct) I should now have a front track of 1428mm and a rear of 1431mm - almost square. Now that I have lowered the rear and the car is driveable, here are the before, after, and after after photos.
Stock suspension:
Straight after fitting HSDs:
Now with the rear lowered:
Now the fun (?) began. I've been reading up on wheel alignment, specifically DIY techniques. I found a forum with two Americans arguing about whether measuring camber with a triangular piece of wood and an iPhone inclinometer app was accurate, or whether it could be but only if you get your car completely level, on its wheels but raised up, first. I borrowed a bit of both. I cut a load of 30cm squares out of some left over MDF and hardboard the other day, and planned to use them under the wheels to level the car before measuring camber using an equilateral triangle (three points of contact on the rim, not the tyre) and my iPhone, and toe using string and a measuring tape. Here is the disco I ended up with.
Initially I had made an equilateral triangle from MDF, made to measure for my rims using the factor supplied by the first argumentative American (radius x 1.732). It just about rested on the rim but was probably slightly smaller that would have been convenient, as it kept slipping off. I also noted that, as my iPhone has buttons on both sides, it wouldn't fit flush to the board, which would no doubt ruin my microscopically accurate readings. I therefore cut the corners off my triangle and modified it thusly. The two parallel brackets allow the phone to rest on the board without the volume buttons holding it off.
In use (also making use of the laser level, since I had it):
Funnily enough I didn't take any pictures of me using my phone as an inclinometer, as I also use it as my camera. The readings I got from it are as follows (all negative):
Front left: 3.0 deg
Front right: 2.5 deg
Rear left: 1.8 deg
Rear right 2.6 deg
As a sanity check, I then took the measurements again, but using a spirit level and a piece of wood of the correct length to span rim-to-rim and hold the level off the tyres. I found this method tricky as it involves holding everything in position whilst trying to look at the bubble in the level and the tape measure at the same time. It was all a bit wobbly and vague, but gave the following measurements:
Front left: 3.0 deg
Front right: 3.0 deg
Rear left: 2.2 deg
Rear right 2.7 deg
To be honest, I'm inclined to trust the first set of measurements more, as everything was a lot more stable and less reliant on my holding everything steady with my hands.
I decided to leave the camber alone. I seem to remember the rear camber bolts are seized solid and couldn't be bothered messing with them today. The front measurements are not as close to each other as I'd like, but both front struts are set to their central position on the camber plates and I don't want to start running them on different settings to each other on the strength of my probably fairly sketchy measurements. The maximum difference between them is 0.5 degrees, which is significant but not terrible. I'll see what the machine says when I get it done properly!
On to toe. This string method is a bit of a pain in the backside. I spent most of the afternoon chasing measurements around the car. Let's start at the beginning though.
I used the laser level to get the string level through the centres of each wheel. Also looked pretty cool.
Now, in theory, given the track width data that I had, the string should have been 1.5mm further from the centre of the front wheels on each side than it was from the centres of the rear wheels (making up the now 3mm difference in track width). Is that what happened? Of course not! I went round and round the car, chasing measurements, checking the string-to-string distance front and rear to make sure it was square, and ended up with between 7 and 9mm difference between front and rear on each side. No idea. But it was square, and the differences were the same, so I went with it.
Toe measurements:
Front Left: 0.4 deg toe out
Front Right: 0.2 deg toe in
Rear Left: 0 toe
Rear Right: 0.6 deg toe in
Again, I left the rear alone. I will un-seize all the bolts before taking it for a proper alignment.
Here's a photo to represent what happened next.
What actually happened next was that I adjusted the front toe without the steering lock on, and when I finally thought I'd sorted it (to 0 toe both sides), I drove off with the steering wheel on the piss by a quarter of a turn or so. Bum. Back up it went, and I tried again with the key out and steering lock on. The result wasn't quite perfect (steering wheel still not 100% straight) but better than it was, and quite frankly I've had enough of chasing probably inaccurate measurements around the car for hours. There's a reason why wheel alignment machines exist and why normal, sensible people pay for trained technicians to use them on their cars. It honestly isn't worth a day of your life obtaining and adjusting measurements that are almost certainly bulls
t anyway. But you knew that. That's why you take your car to the wheel alignment specialist and sit down with a horrendous coffee whilst reading a seven-year-old Top Gear magazine and waiting for the young gentleman to fire frickin' lasers at your wheels.What have I learned? My little camber triangle thing looks cool, but DIY alignment? Don't bother!
buy_cheap_pay_later said:
What have I learned? My little camber triangle thing looks cool, but DIY alignment? Don't bother!
I enjoyed following the process 
I made a camber check guage for my track car years ago - spirit level with a spacer on one end that meant that when the bubble was central the camber was spot on.
But for a road car I take the car to a garage with a hunters rig
B'stard Child said:
I made a camber check guage for my track car years ago - spirit level with a spacer on one end that meant that when the bubble was central the camber was spot on.
That sounds sensible. A quick, easy check for a pre-determined measurement. One to bear in mind I think! 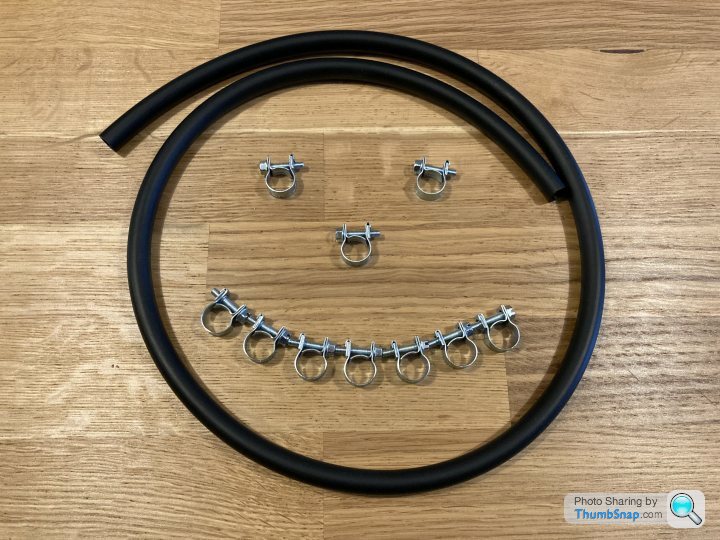

Gassing Station | Readers' Cars | Top of Page | What's New | My Stuff