E46 M3 (The money pit project) + 130i
Discussion


NotNormal said:
MattMF1 said:
Failing rear axle carrier panels I wouldn't put in general 20 year old car maintenance, nor would I put rod bearing replacement in this either.
Agreed, coming from someone who has not only had the floor repaired by BMW under warranty... to then have to recently revisit this work again myself. You are right, this is not a particularly good design and one I would advise you should definitely be cracking on withroadie said:
Your E46 looks stunning, I hope you get on top of all the issues!
As a fellow 130i owner I look forward to seeing updates on that. Mine is getting closer to how I want it after new wheels, a complete suspension refresh using the B12 kit and front Brembo brakes from the F2x cars. It is over 160k miles now and I am dreading doing anything to the oily parts!
I'd like to do that sort of thing in the future. I've also seen on the forums that people have modified a 135i rear silencer to fit the 130i which seems to give a nice boost in sound without being over the top. As a fellow 130i owner I look forward to seeing updates on that. Mine is getting closer to how I want it after new wheels, a complete suspension refresh using the B12 kit and front Brembo brakes from the F2x cars. It is over 160k miles now and I am dreading doing anything to the oily parts!
Have you got a picture of yours?
MattMF1 said:
Where did you get your RACP repaired / reinforced? Would be good to know some details on that if you don't mind sharing.
I did the 2nd round of work all myself. Like you, at least I then know it's done properly now  . For this, I purchased the Redish V2 reinforcement kit and welded in the strengthening plates on all four location points once the areas had been sorted out. I also stitch welded the entire carrier section which runs along each lower arch seam and round "whats left" of the spare wheel well. Hoping that should be nice and strong now
 NotNormal said:
Correct, the rod bearing thing was definitely an issue on the first early iteration of the cars and hence the recall. Over the years the internet has (rightly or wrongly) decided it applies to all cars...
As I said, great work and look forward to following your progress
I'm not sure BMW ever got to grips with the rod bearing issues - my Z4M Coupe is a 2006 but when I got them replaced last year at 77K miles they looked like this. As I said, great work and look forward to following your progress

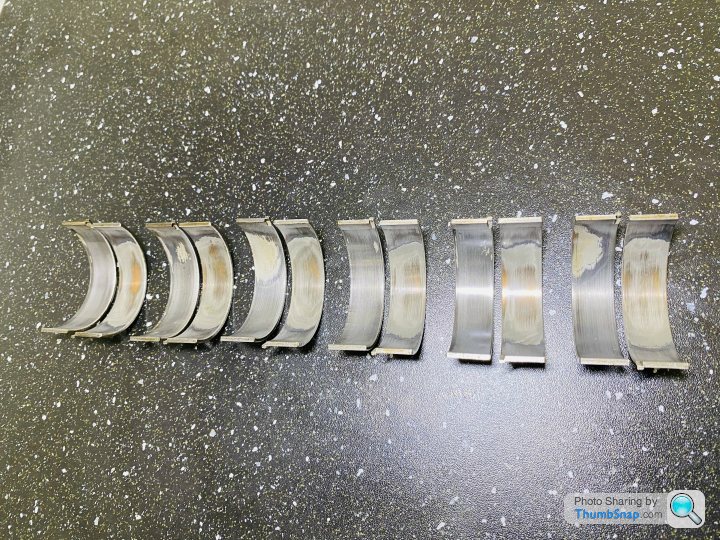
I think with the 10W/60 oil it's more about getting it properly warmed-up before being enthusiastic, but mine had 7 previous keepers and the 1st was BMW UK so it may have been thrashed from cold as a Company Car!
I'm just glad I had them (and the engine mounts) replaced last year - as well as an Inspection 2.
Mr Tidy said:
I'm not sure BMW ever got to grips with the rod bearing issues - my Z4M Coupe is a 2006 but when I got them replaced last year at 77K miles they looked like this.
I think with the 10W/60 oil it's more about getting it properly warmed-up before being enthusiastic, but mine had 7 previous keepers and the 1st was BMW UK so it may have been thrashed from cold as a Company Car!
I'm just glad I had them (and the engine mounts) replaced last year - as well as an Inspection 2.
I’ve been trying to research more about that 10w-60 oil. To me it doesn’t seem right how badly it varnishes the internals. MR Vanos won’t warranty his engine rebuilds unless you use Motul 300v. I think with the 10W/60 oil it's more about getting it properly warmed-up before being enthusiastic, but mine had 7 previous keepers and the 1st was BMW UK so it may have been thrashed from cold as a Company Car!
I'm just glad I had them (and the engine mounts) replaced last year - as well as an Inspection 2.
MattMF1 said:
roadie said:
Your E46 looks stunning, I hope you get on top of all the issues!
As a fellow 130i owner I look forward to seeing updates on that. Mine is getting closer to how I want it after new wheels, a complete suspension refresh using the B12 kit and front Brembo brakes from the F2x cars. It is over 160k miles now and I am dreading doing anything to the oily parts!
I'd like to do that sort of thing in the future. I've also seen on the forums that people have modified a 135i rear silencer to fit the 130i which seems to give a nice boost in sound without being over the top. As a fellow 130i owner I look forward to seeing updates on that. Mine is getting closer to how I want it after new wheels, a complete suspension refresh using the B12 kit and front Brembo brakes from the F2x cars. It is over 160k miles now and I am dreading doing anything to the oily parts!
As roadie as done, I have the B12 kit fitted on mine and it is well worth doing - if your suspension is original you will notice a huge difference in the quality of the damping and body control. E92 M3 lower control arms combined with the camber pin mod is another cheap mod which allows you to dial in some negative camber to sharpen up the front end.
It's easy to get carried away with mods on the 130i but they do make the car feel closer to an M-car, although I suppose you've already got one

MattMF1 said:
I'd like to do that sort of thing in the future. I've also seen on the forums that people have modified a 135i rear silencer to fit the 130i which seems to give a nice boost in sound without being over the top.
Have you got a picture of yours?
Oh yes my car also has a 135i back box which itself has been modified. The previous owner welded some perforations within and removed some of the sound dampening. Here's a poor picture. Have you got a picture of yours?
https://photos.app.goo.gl/7CXSsDiXU87qQxKw9
A big update, and the last update about head gasket repair on the M3. Following on from last time:
The next thing to do was to remove the Cam Sprocket screws. These are an allen type and have since been updated by BMW. As part of the repair, I bought new cam sprocket and VANOS hub screws.
Once these were removed, you are left with the chain. The oil pump sprocket at the bottom of the crank case has a clearance such that the chain cannot come off, this made my job a lot easier as I didn't need to keep it under tension!
There are two chain guides and a hydraulic tensioner to remove as the next step. The chain guide held by the hydraulic tensioner is prone to snap after mileage, which predictably had happened to mine also. Thankfully these don't usually make their way to the sump so I could retrieve the broken end quite easily.


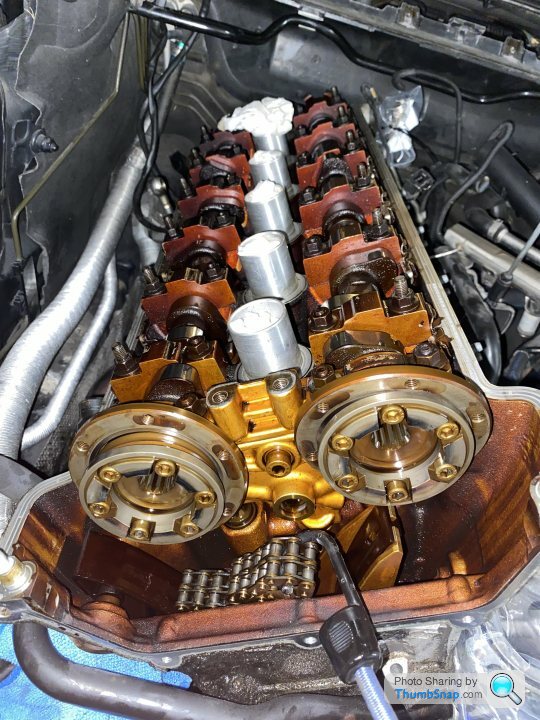
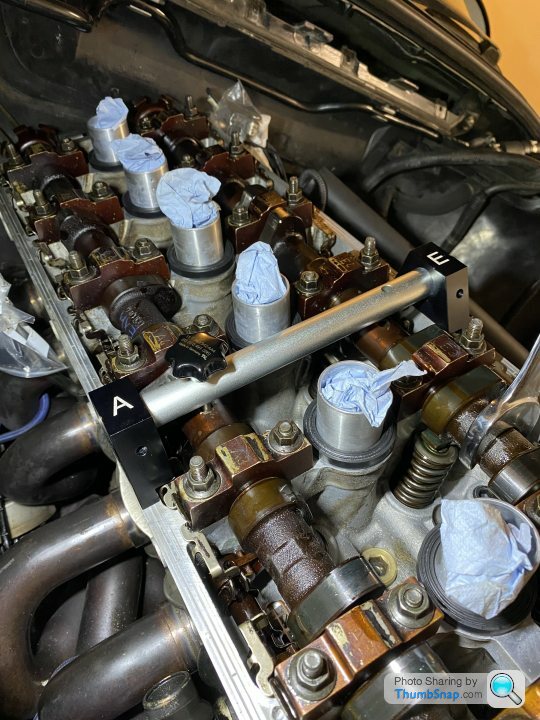
The next task was to remove the cams. Since they are hollow and apparently quite brittle there is a procedure for removing them properly. BMW have a tool specifically to do this which places equal load across the cams whilst you undo the caps. Since I don't have the BMW tool, there is a widely adopted procedure that allows you to remove the cams without breaking them, roughly as follows:
- Remove crank lock pin and rotate engine counter clockwise by approx 30 degrees (this prevents any valves clashing with pistons)
- Cams can now be moved independently due to removal of the timing chain
- Rotate both the exhaust and Intake cams to engage valves at E3 and E5 (intake), A3 and A5 (Exhaust) equally (if I can remember correctly!) (cam caps go from E1-E7)
- Once both sets of valves at E/A 3 and E/A 5 are engaged equally, cam caps E/A 2, E/A 4, E/A 6 and E/A 7 can be removed completely, leaving E/A 1 in place
- Start to undo Caps E3 and E5 1/4 turn working in a square. E1 is used to assess how well the cam is being lifted
- This is repeated for exhaust side
You are left with this


This procedure went fantastically, right up until the point where the final nut was removed on the exhaust cap A3!
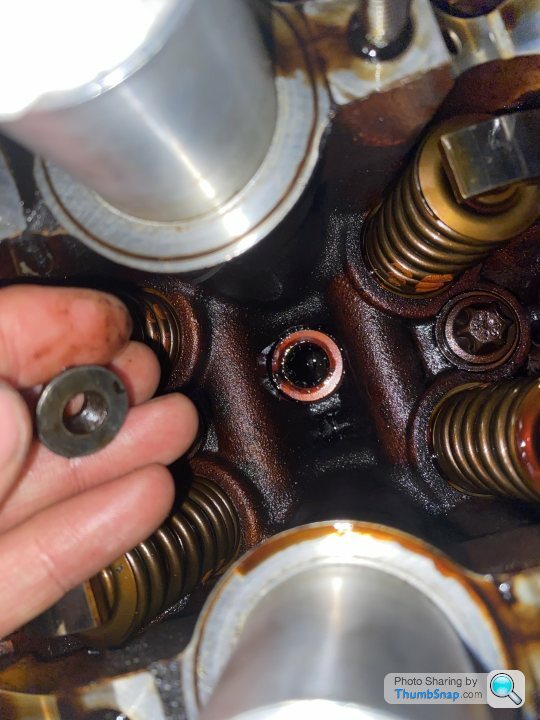
One side of the cam caps have a shorter thread for the nut to wind on to (no idea why). When you are removing the cams it is very difficult to predict exactly when this nut is going to run out of thread. When it does, it has a bit of force behind it as the valve springs are still partially engaged. For the final cap, the nut ran out of thread quicker than expected, popped off and completely disappeared!
My heart completely sank, not because I had lost the nut, but I had absolutely no idea where it had gone. As anyone who works on cars would know, when you drop a nut you can usually hear its general path and have good guess where it went. In this instance there was no sound whatsoever. This meant it was likely to be very close by or in the engine - Disaster!
After 30 minutes of looking everywhere in the top of the engine, I was beginning to think it must have fallen somewhere else. Before giving up, I got the magnet out and started fishing around aimlessly in the top of the head. A moment of pure relief occurred when the magnet finally clicked on to something.
The nut had popped off, turned upside down 'flange up', and sat perfectly inside a core plug. There was absolutely no way you would ever realise it was there. Below is a photo of the nut and the hole it found itself in - big relief!
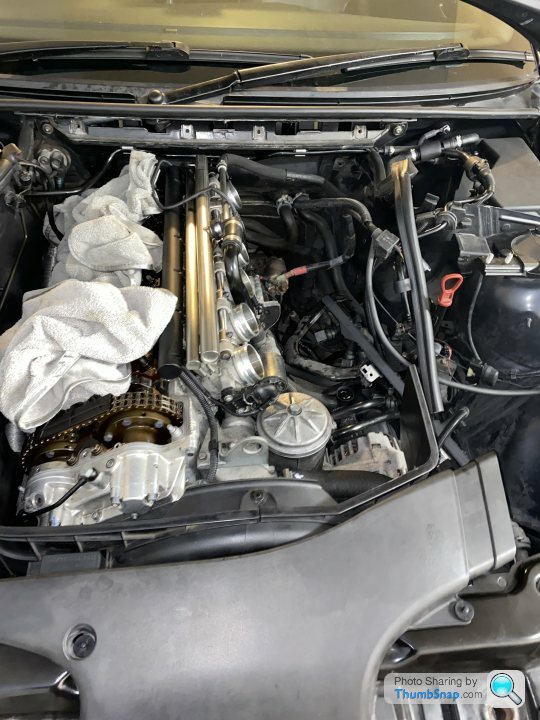
After this, it was just a case of getting the head off. I used the BMW removal sequence and it was ready to go. The cylinder head is pretty heavy but managed to get it off without damaging anything. With the head off I was presented with the results:

As suspected, the cylinder head gasket was completely split between 5 and 6 on all layers of the gasket, as well as partially split between cylinders 2 and 3. This was a good result as it meant that the head gasket was almost certainly the cause of low compression in these cylinders.

I then went back to inspect the block and found something a little questionable between cylinders 5 and 6.

I used some brake cleaner and microfiber to clean it up as it looked like carbon buildup initially.

Thankfully, it was clear there were no cracks or fractures in the block - which was the main thing. For this repair I bought a machined straight edge to see how good the block was.
For any that are unaware, you measure the block in these main directions (along bores, diagonally across bores, along both side of the block, and from side to side all the way down the block also). My target, based on the head gasket manufacturers guidance, was 2 thousands of an inch side to side, and 4 thousands of an inch longitudinally. Thankfully the block was within 1 thou side to side (including over the area of interest above) and within 2 thou longitudinally and diagonally - Result!
Next was the quite tedious job of removing all the gasket material. I probably spent in the order of 4-6 hours with a razor removing everything I could. I did a lot of research online before starting this procedure as there are many many different methods people use. However, this technical bulletin from General Motors was enough for me to make my mind up - https://static.nhtsa.gov/odi/tsbs/2016/MC-10082814...
Razor blades it was + a fingertip to detect any irregularities.
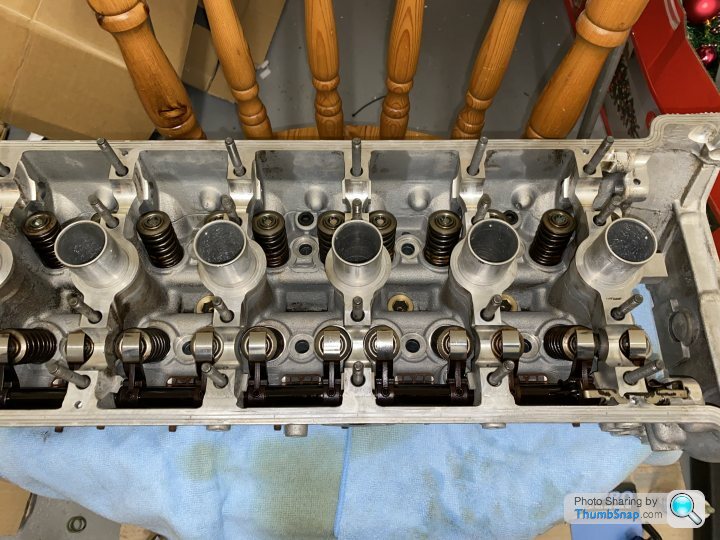
In the meantime, I also started stripping the head down ready to send off. This meant removing the camshaft position sensors, rocker arms and rockers. Quite time consuming but not too bad.
Before:

After:

The head was sent off for a refurb at Automotive Machine Services in Ditchling. Nick there was excellent from start to finish, I would trust him for any machining work in the future.
The summary of the work on the head was:
- Pressure test (all passed)
- Ultrasonic Clean
- New valve stem seals
- Skim (only 2 thou removed)
- Exhaust valves ground to remove light pitting
- All 24 valves lightly lapped in
Couldn't have been happier with the work Nick did and he said a 2 thou skim was very rare on these particular heads. It gave me confidence that the block had no damage whatsoever since the head had fared so well after 138k miles.
Head back from the machine shop, and rocker arms fitted:
Mr Vanos (who rebuilds these for a living) very kindly had a look at the markings on the block and confirmed it was completely common and nothing to worry about, which was good enough for me! The straight edge also confirmed no dip, so I was pretty confident all was well.
Onwards to fitting the head:

The installation actually started to move very quickly. I got the cams back in with no problems at all, spun them back round to the correct TDC position and removed the crank locking pin to set the pistons back to TDC also.
Cams installed and BMW timing bridge tool used to confirm cam position to crank:

I could then refit the cam sprockets with new screws, the hydraulic tensioner, both chain guides and the chain itself (All with new copper washers and sealing rings).
The next job was to overhaul the VANOS. I bought the required Beisan System parts from Hack Engineering, who again were excellent.
I also got Nick from AMS to machine the oil pump disk to the new spec. From factory the exhaust hub tabs are 9.7mm wide, with the exhaust hub machined holes at 10.7mm wide. This 1mm clearance has caused exhaust hub tabs to snap. Beisan systems recommend new holes to be machined at 9.8mm or thereabouts. Nick sorted this all out for me with the new holes as shown below:

I could then start replacing the various piston seals around the VANOS:
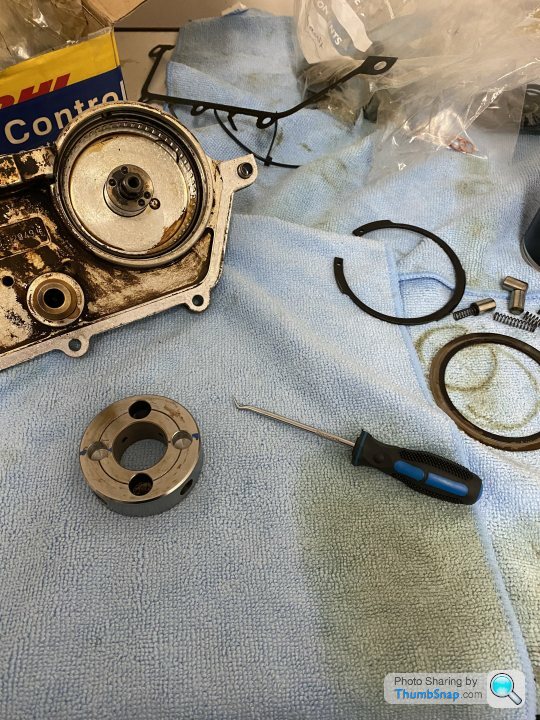

Whilst I was in there, I also fitted the Beisan Anti-Rattle kit to future proof it completely. When the VANOS gets a rattle or resonance between 2-3k revs, it is caused by axial play in the geared splines. Mine as showing very slight axial play in the intake gear, slightly less in the exhaust gear.
You are presented with two roller bearings, two washers and a bearing sleeve. The kit gives you ever so slightly thicker washers and new bearing sleeves to remove all the play. Once you have confirmed no play, you use high strength loctite and reassemble.

Vanos all ready to go back on:

Vanos Fitted back to engine:

Once this was fitted, I confirmed the engine timing hadnt changed and continued with the rebuild. Since the exhaust valves were ground and lapped, I rechecked and adjusted all of the shims in the rockers.
Quite a few had to be changed to get back to spec, all shims were ordered from BMW and the rest of the rebuild continued whilst I was waiting for them to arrive.
Exhaust side all done:

I was pleasantly surprised how quickly everything was going back together. I realised that I had spend a long time researching before each removal step, plus the time to bag and label every nut and bolt to make installation easier. I was glad I did!
Throttle bodies, injector harness, fuel and air rail, thermostat and coolant rails all installed with new o-rings and seals.
The valve shims then arrived which meant I could complete the engine and put the valve cover on.
I used Lucas assembly oil throughout the build to prevent dry start ups, so put a generous blob on all rockers and cam lobes before refitting the cover.
Air box was also moved into place, coil pack harness and CCV refitted with new seals where required.

Final parts left, the end was in sight!

At this point, it was time to do the first fire on the engine. I filled the car with coolant and refitted the old spark plugs, but left coil packs unplugged and fuel pump fuse removed. The idea of this was to do 6s cranking bursts for 30s to get the oil pressure back to various components.
I then refitted the fuel pump fuse and coil packs and started the car...
After a slightly lumpy initial start where the fuel rail was pressuring again, the car completely settled after a few seconds and sounded fantastic - Huge relief and celebration!
After a run up to temperature, all seemed well. No leaks, no funny noises. The car was then switched off for a final assessment to check all was in order. I then proceeded to do a hot compression check to get the final verdict:
Cylinder 1 - 200PSI
Cylinder 2 - 200PSI
Cylinder 3 - 200PSI
Cylinder 4 - 200PSI
Cylinder 5 - 200PSI
Cylinder 6 - 200PSI
Happy days!
Since I had already done a coolant flush and valve clearance adjustment, I thought I may as well do the rest of the inspection 2 service to make sure the car was tip top mechanically. This included the following parts:

Unfortunately, I didn't get any pictures of the various parts being fitted as I just wanted to get it all done.
After a quick test drive and coolant leak diagnosis (Hose clip for lower rad hose into thermostat was a bit loose), all was well and the car performed better than ever!
All covers refitted back for the last time:

Time for a beer
The next thing to do was to remove the Cam Sprocket screws. These are an allen type and have since been updated by BMW. As part of the repair, I bought new cam sprocket and VANOS hub screws.
Once these were removed, you are left with the chain. The oil pump sprocket at the bottom of the crank case has a clearance such that the chain cannot come off, this made my job a lot easier as I didn't need to keep it under tension!
There are two chain guides and a hydraulic tensioner to remove as the next step. The chain guide held by the hydraulic tensioner is prone to snap after mileage, which predictably had happened to mine also. Thankfully these don't usually make their way to the sump so I could retrieve the broken end quite easily.
The next task was to remove the cams. Since they are hollow and apparently quite brittle there is a procedure for removing them properly. BMW have a tool specifically to do this which places equal load across the cams whilst you undo the caps. Since I don't have the BMW tool, there is a widely adopted procedure that allows you to remove the cams without breaking them, roughly as follows:
- Remove crank lock pin and rotate engine counter clockwise by approx 30 degrees (this prevents any valves clashing with pistons)
- Cams can now be moved independently due to removal of the timing chain
- Rotate both the exhaust and Intake cams to engage valves at E3 and E5 (intake), A3 and A5 (Exhaust) equally (if I can remember correctly!) (cam caps go from E1-E7)
- Once both sets of valves at E/A 3 and E/A 5 are engaged equally, cam caps E/A 2, E/A 4, E/A 6 and E/A 7 can be removed completely, leaving E/A 1 in place
- Start to undo Caps E3 and E5 1/4 turn working in a square. E1 is used to assess how well the cam is being lifted
- This is repeated for exhaust side
You are left with this
This procedure went fantastically, right up until the point where the final nut was removed on the exhaust cap A3!
One side of the cam caps have a shorter thread for the nut to wind on to (no idea why). When you are removing the cams it is very difficult to predict exactly when this nut is going to run out of thread. When it does, it has a bit of force behind it as the valve springs are still partially engaged. For the final cap, the nut ran out of thread quicker than expected, popped off and completely disappeared!
My heart completely sank, not because I had lost the nut, but I had absolutely no idea where it had gone. As anyone who works on cars would know, when you drop a nut you can usually hear its general path and have good guess where it went. In this instance there was no sound whatsoever. This meant it was likely to be very close by or in the engine - Disaster!
After 30 minutes of looking everywhere in the top of the engine, I was beginning to think it must have fallen somewhere else. Before giving up, I got the magnet out and started fishing around aimlessly in the top of the head. A moment of pure relief occurred when the magnet finally clicked on to something.
The nut had popped off, turned upside down 'flange up', and sat perfectly inside a core plug. There was absolutely no way you would ever realise it was there. Below is a photo of the nut and the hole it found itself in - big relief!
After this, it was just a case of getting the head off. I used the BMW removal sequence and it was ready to go. The cylinder head is pretty heavy but managed to get it off without damaging anything. With the head off I was presented with the results:
As suspected, the cylinder head gasket was completely split between 5 and 6 on all layers of the gasket, as well as partially split between cylinders 2 and 3. This was a good result as it meant that the head gasket was almost certainly the cause of low compression in these cylinders.
I then went back to inspect the block and found something a little questionable between cylinders 5 and 6.
I used some brake cleaner and microfiber to clean it up as it looked like carbon buildup initially.
Thankfully, it was clear there were no cracks or fractures in the block - which was the main thing. For this repair I bought a machined straight edge to see how good the block was.
For any that are unaware, you measure the block in these main directions (along bores, diagonally across bores, along both side of the block, and from side to side all the way down the block also). My target, based on the head gasket manufacturers guidance, was 2 thousands of an inch side to side, and 4 thousands of an inch longitudinally. Thankfully the block was within 1 thou side to side (including over the area of interest above) and within 2 thou longitudinally and diagonally - Result!
Next was the quite tedious job of removing all the gasket material. I probably spent in the order of 4-6 hours with a razor removing everything I could. I did a lot of research online before starting this procedure as there are many many different methods people use. However, this technical bulletin from General Motors was enough for me to make my mind up - https://static.nhtsa.gov/odi/tsbs/2016/MC-10082814...
Razor blades it was + a fingertip to detect any irregularities.
In the meantime, I also started stripping the head down ready to send off. This meant removing the camshaft position sensors, rocker arms and rockers. Quite time consuming but not too bad.
Before:
After:
The head was sent off for a refurb at Automotive Machine Services in Ditchling. Nick there was excellent from start to finish, I would trust him for any machining work in the future.
The summary of the work on the head was:
- Pressure test (all passed)
- Ultrasonic Clean
- New valve stem seals
- Skim (only 2 thou removed)
- Exhaust valves ground to remove light pitting
- All 24 valves lightly lapped in
Couldn't have been happier with the work Nick did and he said a 2 thou skim was very rare on these particular heads. It gave me confidence that the block had no damage whatsoever since the head had fared so well after 138k miles.
Head back from the machine shop, and rocker arms fitted:
Mr Vanos (who rebuilds these for a living) very kindly had a look at the markings on the block and confirmed it was completely common and nothing to worry about, which was good enough for me! The straight edge also confirmed no dip, so I was pretty confident all was well.
Onwards to fitting the head:
The installation actually started to move very quickly. I got the cams back in with no problems at all, spun them back round to the correct TDC position and removed the crank locking pin to set the pistons back to TDC also.
Cams installed and BMW timing bridge tool used to confirm cam position to crank:
I could then refit the cam sprockets with new screws, the hydraulic tensioner, both chain guides and the chain itself (All with new copper washers and sealing rings).
The next job was to overhaul the VANOS. I bought the required Beisan System parts from Hack Engineering, who again were excellent.
I also got Nick from AMS to machine the oil pump disk to the new spec. From factory the exhaust hub tabs are 9.7mm wide, with the exhaust hub machined holes at 10.7mm wide. This 1mm clearance has caused exhaust hub tabs to snap. Beisan systems recommend new holes to be machined at 9.8mm or thereabouts. Nick sorted this all out for me with the new holes as shown below:
I could then start replacing the various piston seals around the VANOS:
Whilst I was in there, I also fitted the Beisan Anti-Rattle kit to future proof it completely. When the VANOS gets a rattle or resonance between 2-3k revs, it is caused by axial play in the geared splines. Mine as showing very slight axial play in the intake gear, slightly less in the exhaust gear.
You are presented with two roller bearings, two washers and a bearing sleeve. The kit gives you ever so slightly thicker washers and new bearing sleeves to remove all the play. Once you have confirmed no play, you use high strength loctite and reassemble.
Vanos all ready to go back on:
Vanos Fitted back to engine:
Once this was fitted, I confirmed the engine timing hadnt changed and continued with the rebuild. Since the exhaust valves were ground and lapped, I rechecked and adjusted all of the shims in the rockers.
Quite a few had to be changed to get back to spec, all shims were ordered from BMW and the rest of the rebuild continued whilst I was waiting for them to arrive.
Exhaust side all done:
I was pleasantly surprised how quickly everything was going back together. I realised that I had spend a long time researching before each removal step, plus the time to bag and label every nut and bolt to make installation easier. I was glad I did!
Throttle bodies, injector harness, fuel and air rail, thermostat and coolant rails all installed with new o-rings and seals.
The valve shims then arrived which meant I could complete the engine and put the valve cover on.
I used Lucas assembly oil throughout the build to prevent dry start ups, so put a generous blob on all rockers and cam lobes before refitting the cover.
Air box was also moved into place, coil pack harness and CCV refitted with new seals where required.
Final parts left, the end was in sight!
At this point, it was time to do the first fire on the engine. I filled the car with coolant and refitted the old spark plugs, but left coil packs unplugged and fuel pump fuse removed. The idea of this was to do 6s cranking bursts for 30s to get the oil pressure back to various components.
I then refitted the fuel pump fuse and coil packs and started the car...
After a slightly lumpy initial start where the fuel rail was pressuring again, the car completely settled after a few seconds and sounded fantastic - Huge relief and celebration!
After a run up to temperature, all seemed well. No leaks, no funny noises. The car was then switched off for a final assessment to check all was in order. I then proceeded to do a hot compression check to get the final verdict:
Cylinder 1 - 200PSI
Cylinder 2 - 200PSI
Cylinder 3 - 200PSI
Cylinder 4 - 200PSI
Cylinder 5 - 200PSI
Cylinder 6 - 200PSI
Happy days!
Since I had already done a coolant flush and valve clearance adjustment, I thought I may as well do the rest of the inspection 2 service to make sure the car was tip top mechanically. This included the following parts:
Unfortunately, I didn't get any pictures of the various parts being fitted as I just wanted to get it all done.
After a quick test drive and coolant leak diagnosis (Hose clip for lower rad hose into thermostat was a bit loose), all was well and the car performed better than ever!
All covers refitted back for the last time:
Time for a beer
From earlier in the thread

MattMF1 said:
On the last week before Christmas, boredom set in and I decided to buy myself a compression tester. The logic being that I could prove that the engine was in tip top heath and I needn't worry about its imminent failure. I could go home for Christmas and have a relaxing break knowing that good compression results were a prime example of the benefits of a comprehensive maintenance record.
Results:
Cylinder 1: 160PSI
Cylinder 2: 140PSI
Cylinder 3: 140PSI
Cylinder 4: 160PSI
Cylinder 5: 125PSI
Cylinder 6: 125PSI
s t
t
Knowing how common this is on higher mileage examples, I was 99% certain that there is a head gasket split between cylinders 5&6 and 2&3. I always wanted to have a car that I would feel confident in taking apart and putting back together. Perhaps this would be better practiced on an MX5 or Daewoo Matiz, however, I put the brave hat on and started researching over the Christmas break.
To thisResults:
Cylinder 1: 160PSI
Cylinder 2: 140PSI
Cylinder 3: 140PSI
Cylinder 4: 160PSI
Cylinder 5: 125PSI
Cylinder 6: 125PSI
s
tKnowing how common this is on higher mileage examples, I was 99% certain that there is a head gasket split between cylinders 5&6 and 2&3. I always wanted to have a car that I would feel confident in taking apart and putting back together. Perhaps this would be better practiced on an MX5 or Daewoo Matiz, however, I put the brave hat on and started researching over the Christmas break.
MattMF1 said:
After a slightly lumpy initial start where the fuel rail was pressuring again, the car completely settled after a few seconds and sounded fantastic - Huge relief and celebration!
After a run up to temperature, all seemed well. No leaks, no funny noises. The car was then switched off for a final assessment to check all was in order. I then proceeded to do a hot compression check to get the final verdict:
Cylinder 1 - 200PSI
Cylinder 2 - 200PSI
Cylinder 3 - 200PSI
Cylinder 4 - 200PSI
Cylinder 5 - 200PSI
Cylinder 6 - 200PSI
Happy days!
Nice work - well documented and a great thread to read - I bet you can feel the difference in performance with those before and after resultsAfter a run up to temperature, all seemed well. No leaks, no funny noises. The car was then switched off for a final assessment to check all was in order. I then proceeded to do a hot compression check to get the final verdict:
Cylinder 1 - 200PSI
Cylinder 2 - 200PSI
Cylinder 3 - 200PSI
Cylinder 4 - 200PSI
Cylinder 5 - 200PSI
Cylinder 6 - 200PSI
Happy days!
MattMF1 said:
Time for a beer
I'd say you've earned several beambeam1 said:
There are updates and then there are updates! Brilliantly written out, very detailed but easy even for an amateur with spanners to understand!
By far the hardest part was getting the BMW throttle body clamps back on with barely any clearance. I must have spent 2-3 hours getting 6 clips back on. I was convinced it couldn't be done about 2.5 hrs in The engine was genuinely great to work on and not particularly complicated once you figure out whats what.
Excellent engine build! My friend's just done the same on his car and even though his head gasket was fine it made a huge difference to how the car drives with a good refresh. He's getting ridiculously good mpg even, though he reckons he tweaked the timing so it was absolutely spot on rather than within the tolerance set by BMW... He did the same with the Vanos and got his kit from Hack Engineering too. Nice to see another car getting some good attention
Gassing Station | Readers' Cars | Top of Page | What's New | My Stuff