Your wallet wanna die? Go buy that cheap 745
Discussion


[quote=Pastie Bloater]No this is first gen idrive (NAVI01-NAVI03) on E65/E66 only, the process is:
Ignition on
Go to main menu
Press and hold control knob for 10 seconds
Clockwise 3 clicks
Anti-clockwise 3 clicks
Clockwise 1 click
Anti-clockwise 1 click
Clockwise 1 click
Press control knob
Thank you. Worth a try on mine anyway in the daytime!
Ignition on
Go to main menu
Press and hold control knob for 10 seconds
Clockwise 3 clicks
Anti-clockwise 3 clicks
Clockwise 1 click
Anti-clockwise 1 click
Clockwise 1 click
Press control knob
Thank you. Worth a try on mine anyway in the daytime!
Hmm so this is the difference between beige and my natural brown (naturbraun).
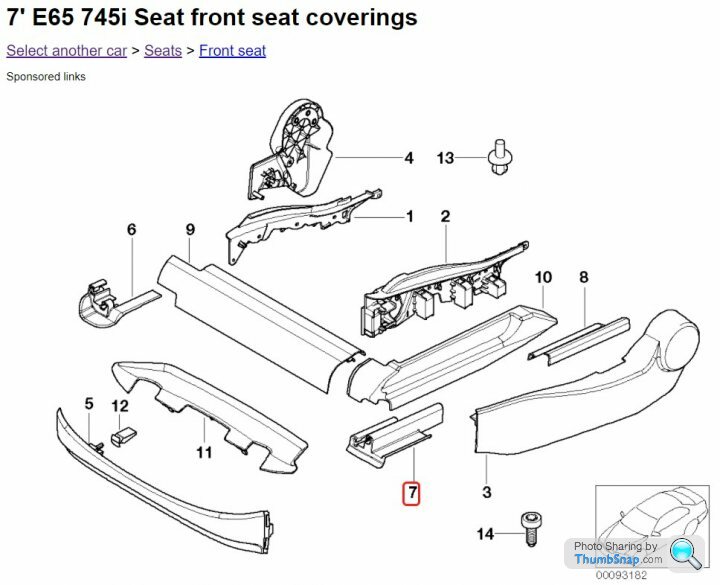
It's a seat rail trim, realoem says part numbers 52107015595 and 52107015601 respectively, but the part number on both is 52107007695.
Was £10 on eBay, new they're £50.
What's really useful is when breakers list the paint and interior colour codes, VIN etc.
This is one of the issues trying to buy used parts as there's that much variation and complexity.
I got some boot lining trims off eBay, turns out pre-facelift have a more velour texture, facelift is like typical fuzzy boot carpet.
I got sent a mix of both even though I ordered the right pre-facelift part numbers.
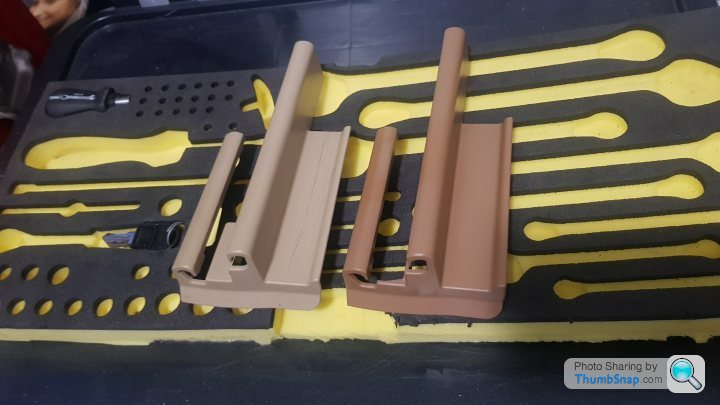
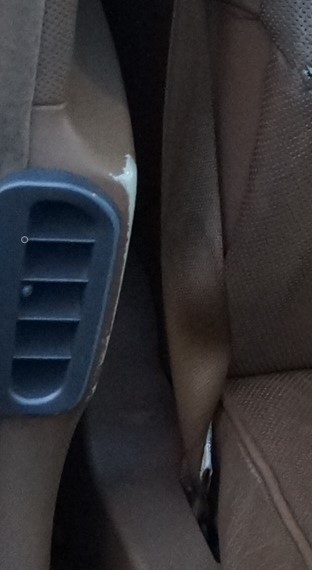
It's not so obvious in this photo but that left flap doesn't match

It's a seat rail trim, realoem says part numbers 52107015595 and 52107015601 respectively, but the part number on both is 52107007695.
Was £10 on eBay, new they're £50.
What's really useful is when breakers list the paint and interior colour codes, VIN etc.
This is one of the issues trying to buy used parts as there's that much variation and complexity.
I got some boot lining trims off eBay, turns out pre-facelift have a more velour texture, facelift is like typical fuzzy boot carpet.
I got sent a mix of both even though I ordered the right pre-facelift part numbers.
It's not so obvious in this photo but that left flap doesn't match
Edited by Pastie Bloater on Thursday 27th May 07:42
Pastie Bloater said:
Hmm so this is the difference between beige and my natural brown (naturbraun).
It's a seat rail trim, realoem says part numbers 52107015595 and 52107015601 respectively, but the part number on both is 52107007695.
Was £10 on eBay, new they're £50.
What's really useful is when breakers list the paint and interior colour codes, VIN etc.
This is one of the issues trying to buy used parts as there's that much variation and complexity.
I got some boot lining trims off eBay, turns out pre-facelift have a more velour texture, facelift is like typical fuzzy boot carpet.
I got sent a mix of both even though I ordered the right pre-facelift part numbers.
It's not so obvious in this photo but that left flap doesn't match
It doesn't match and it's frustrating. I don't understand how breakers cannot share a vin in order to ensure that the build code matches the interior colours. In many instances, it's simpler/cheaper to go through the dealer, though not in the case of your £50 vs £10 trim above.It's a seat rail trim, realoem says part numbers 52107015595 and 52107015601 respectively, but the part number on both is 52107007695.
Was £10 on eBay, new they're £50.
What's really useful is when breakers list the paint and interior colour codes, VIN etc.
This is one of the issues trying to buy used parts as there's that much variation and complexity.
I got some boot lining trims off eBay, turns out pre-facelift have a more velour texture, facelift is like typical fuzzy boot carpet.
I got sent a mix of both even though I ordered the right pre-facelift part numbers.
It's not so obvious in this photo but that left flap doesn't match
Edited by Pastie Bloater on Thursday 27th May 07:42
bolidemichael said:
It doesn't match and it's frustrating. I don't understand how breakers cannot share a vin in order to ensure that the build code matches the interior colours. In many instances, it's simpler/cheaper to go through the dealer, though not in the case of your £50 vs £10 trim above.
For a breakers it should be mandatory.Oddly my upper pillar trims and headliner are indeed beige, there's no brown version.
For the brown trim parts what I've found taking the interior apart recently is:
- Brown coloured plastic (e.g. seat rail trims above)
- Brown painted brown coloured plastic (e.g. sill plates)
- Brown painted white coloured plastic (e.g. lower B pillar)
Problem in finding a good eBay replacement is the doors and B pillar trims also have the cooled seat perforated leather

Only other solution I can think of is getting some interior trim paint like this in a close-enough colour
https://www.colorbondpaint.com/products/l-v-hp-ref...

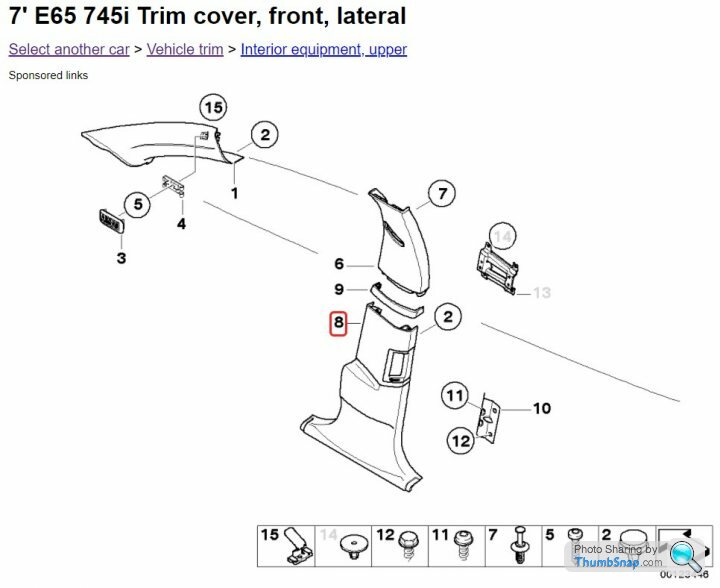
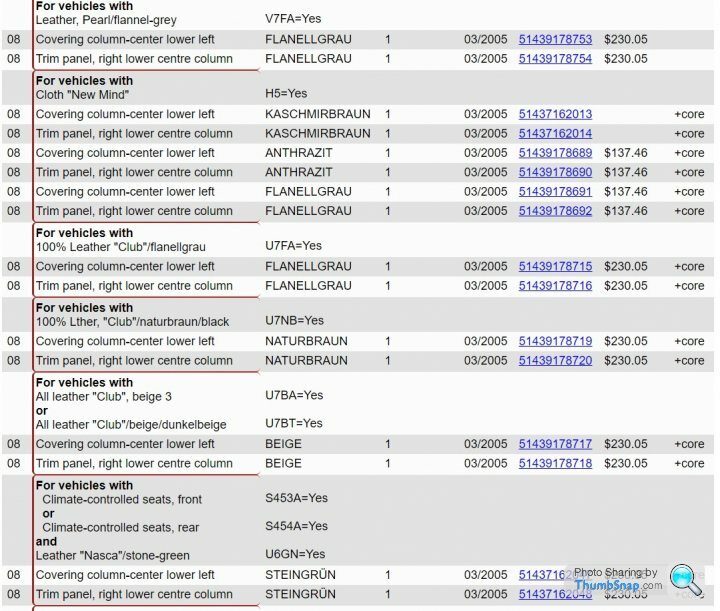
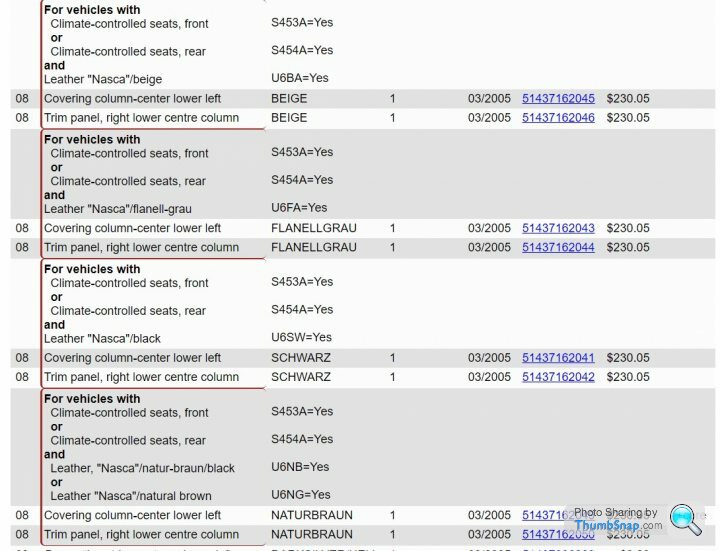
This is just another example of absurd complexity but look at all of these variations for just the lower B pillar trim.
Mine is U6NG so I know which one I need, but all you get on eBay is 'B pillar trim'. This is compounded when sometimes the parts don't even have the actual part number marked on them like above!

Thinking about trims the interiors hold up ok but there are a couple of really obvious wear points on these.
First the glove box, armrest cubby and tray cubby buttons, the silver comes off and they end up black.
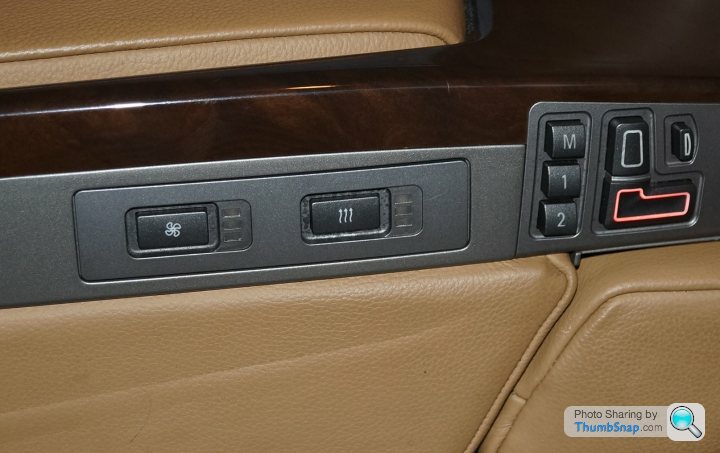
Secondly the seat switches and some others can get this odd dark pattern, mine's not bad at all but you can see it around my seat heating button here.
Not a big deal but if you look at E65s/E66s you'll notice they all do it.
I found the poverty spec photo at the bottom on eBay to show how bad it can get. As an aside think how crap that would look with 3 seat option blanking plugs and a lumbar one too.


First the glove box, armrest cubby and tray cubby buttons, the silver comes off and they end up black.
Secondly the seat switches and some others can get this odd dark pattern, mine's not bad at all but you can see it around my seat heating button here.
Not a big deal but if you look at E65s/E66s you'll notice they all do it.
I found the poverty spec photo at the bottom on eBay to show how bad it can get. As an aside think how crap that would look with 3 seat option blanking plugs and a lumbar one too.
Edited by Pastie Bloater on Saturday 29th May 18:05
Pastie Bloater said:
I'll explain how to test the crank case vacuum later, mine was ok. Inadequate crank case vacuum from faulty valves or say excessive blowby will cause oil leaks as the pressure pushes oil out of all the seals. Although my valves were ok when checked it might explain why I had so many leaks from places beyond the typical ones affected by 15 year old brittle gaskets.
The way I test crank case vacuum is using a modified engine oil filler cap and a digital manometer.I wouldn't even bother with a U-tube manometer like many online use, you're not gonna get accurate results and can't test while driving.
Ingredients:
- Oil filler cap - £5
- Digital manometer (mbar reading for direct comparison) - £30-35
- Some kind of nipple
- Epoxy glue
- Tube (should come with manometer)
Put the test cap connected to manometer on the engine before starting.
It can be measured at idle and is supposed to be the same at all engine operating conditions, you could extend the tube to inside if you want to test while driving.
Watch out for vacuum values quoted online as the SIB and spec values have been revised many, many times. People also inexplicably go off 'typical' values for other engines, but BMW engines themselves vary widely from 0 to 50 mbar. As an example N62 is 22 mbar but N62TU is 40 mbar.
So for mine:
Engine variant: N62
Specification: 22 mbar
Variation 10% = 19.8-24.2 mbar
Not outside +/- 5 mbar = 17-27 mbar


According to SI B11 03 08 dated October 2013:
SUBJECT
Crankcase Ventilation System Diagnosis and Measurement
MODEL
All
INFORMATION
All current BMW engines incorporate a pressure-controlled crankcase ventilation system. The crankcase ventilation systems use various different crankcase ventilation valves, depending on the engine type. Although the valves all look different, they function similarly, using a spring and diaphragm assembly to control the crankcase pressure. A properly functioning pressure control valve is designed to maintain a slight vacuum (underpressure) in the crankcase, which assures reliable crankcase venting during all engine operating conditions. Some of the causes and results of a malfunctioning crankcase ventilation system are listed below.
Causes of Excessive Overpressure (Pressure)
- Internal engine damage/wear
- Obstruction in the crankcase ventilation system
- Defective pressure control valve(s)
- Damage to the engine oil seals
- Increased engine oil consumption (can be misdiagnosed as a defective turbocharger)
- Excessive engine oil in the intake system
- Excessive engine oil in the charged intake tubes or the intercooler on turbocharged engines (can be misdiagnosed as a defective turbocharger)
- Engine oil dip stick is dislodged from the guide tube (if equipped)
- Defective pressure control valve
- Damage to the engine oil seals
- Increased engine oil consumption
- Excessive engine oil in the intake system
- Rough engine idling or engine misfire
- Whistling or howling noise from the engine (can be misdiagnosed as a defective turbocharger)
- Increased mixture adaptation values
The crankcase ventilation system utilized in these engines cannot be measured with consistency because the system does not incorporate a regulating valve (spring with diaphragm). The crankcase pressure is regulated by an orifice in the crankcase ventilation tubes, and the vacuum will vary with crankcase pressure changes. Checking the operation of this unregulated system can only be performed by visually inspecting for loose connections or cranks in the system components. Generally active leakages will have an oily residue surrounding that affected area. The use of a smoke machine may also be helpful when trying to locate leakages in this system.
All Other Engines
Attached to this Service Information bulletin is a procedure for measuring the crankcase ventilation system, using the ISID and IMIB diagnostic equipment
Specification and actual readings from the vehicle may vary by up to ±10%, but not more than 5.0 mBar.
Various measuring tools may provide results that are not within specification. All measurements below were recorded using the IMIB. See the attachment for IMIB connection hints.
Engine Variant Specification (mBar)
M42, M44, M52, M52TU, S52 ,M54, M60, M62, M62TU, M73 16
M57Y 0.0 +- 1.0
S54 0.0 +- 1.0
S62 0.0 +- 1.0
S65 0.0 +- 2.0
S85 0.0 +- 1.0
N20 and N26 35
N52 30
N51 and N52K 33
N52T 21
N54 17
N54T 14
N55 50.0 +/- 8.0
N62 22
N62TU 40
N73 30
Edited by Pastie Bloater on Saturday 29th May 11:59
This post covers Christmas 2015 up to June 2016, and 136,500 to 144,000 miles. The car ran fine through this period.
I did the remaining service jobs I'd put off, namely spark plugs, cabin filters and drive belts, as well as another oil change.
I found a bit of oil around the spark plugs (nothing compared to before) but just cleaned it out. I figured it was more of a weep than a proper leak but we'll come back to this later (dodgy Febi spark plug tubes).
I wanted to use the detachable towbar with a bike rack and light board. Apparently for cars with CAN bus you need a module that taps into the CAN bus so it can monitor all of the trailer bulbs, disables the rear parking sensors, adds an indicator buzzer etc. The one I got was a newer 13 pin / ISO 11446 socket that can also monitor LED caravan lights etc. and also came with a 13 to 7 pin adapter. I also bought a towbar wiring tester as I didn't have anything 13 pin.
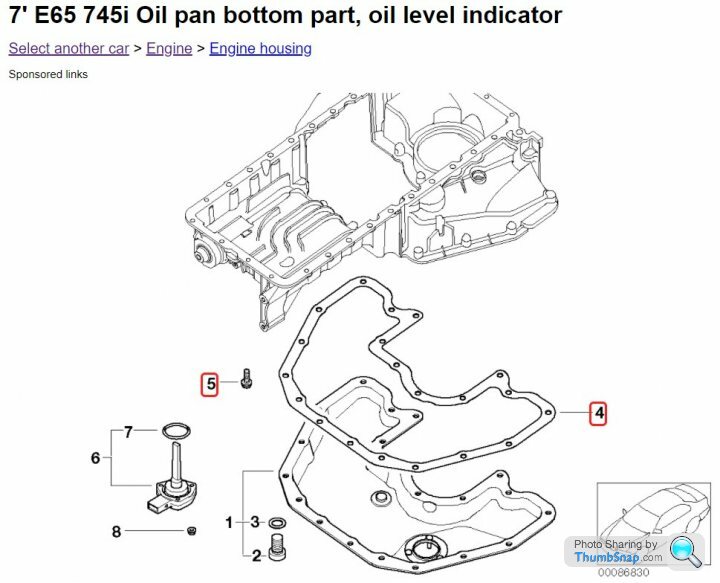
Out of the lower engine oil seals of alternator bracket gasket and upper/lower sump, only the lower sump can be dealt with without lowering the subframe so I replaced that one.
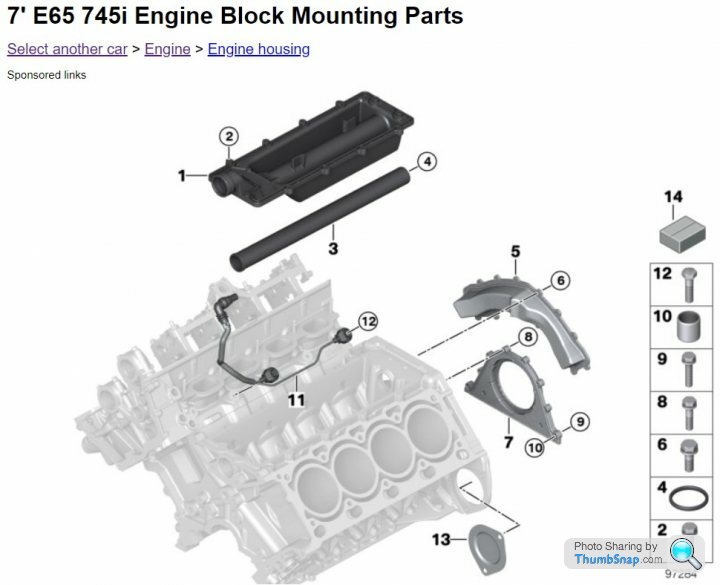
There didn't seem to be any visible coolant leaks but it was losing coolant slowly, so that points towards the coolant transfer pipe (a known issue). Basically a seal between the timing case and engine block goes and the coolant leaks out and evaporates out of a weep hole, leaving no trace.
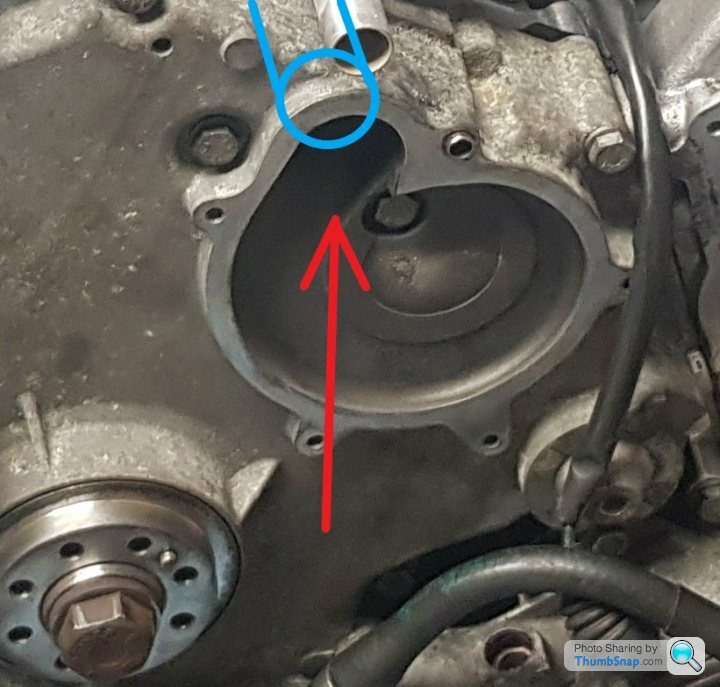
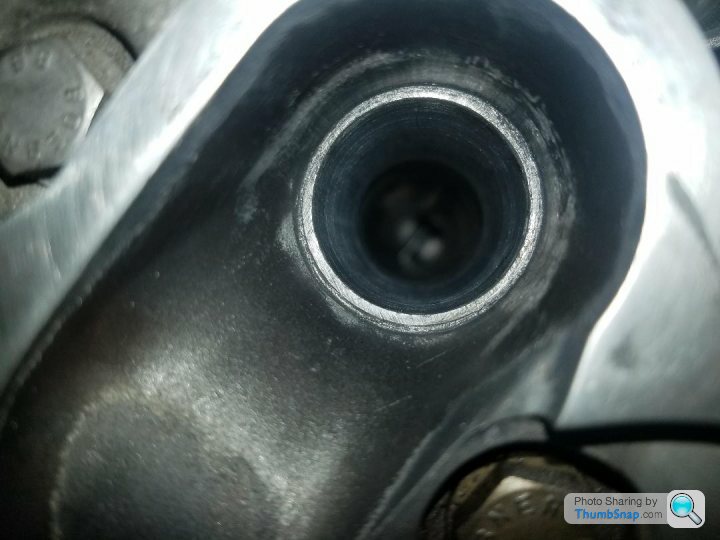
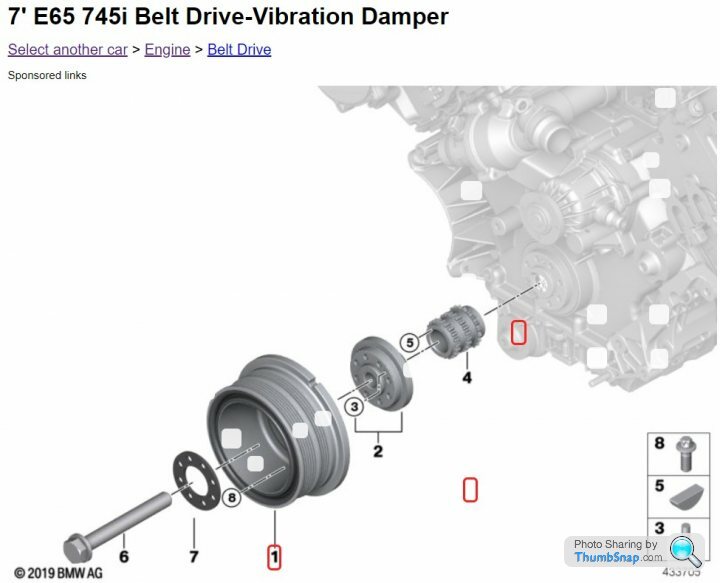
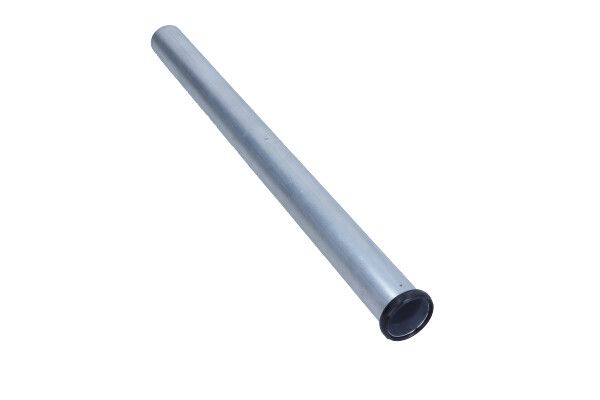
There a few solutions for this but the least invasive is a stent or 'aluminium toilet roll tube'. This is liberally covered in gasket maker and pushed in from the front after removing the water pump. It bridges the gap completely and stops the leak (see photos below). There are replacement coolant transfer pipes available but it involves removing the intake manifold and valley pan, cutting the old one out and expanding the new one in its place. To replace the pipe with an original one requires theengine out to remove the rear cover and insert a new pipe from back to front intake manifold and valley pan, as well as the lower timing case to be removed, which means main crank bolt has to come out, that would be a nightmare with the engine in the car.
The stent I got was just like a toilet roll tube shape, it looks like the newer ones are shaped to fit the water pump outlet/pipe inlet (not sure why). This fix worked fine and stopped the coolant leak completely. Got into a bit of a predicament with it as I'd pushed it in about halfway where it got stuck on the old seal, had to devise a way of pushing it in by putting the old crank pulley back on and levering gently off it, this was an urgent issue as I didn't want the sealant to start curing out of place and then push it into place.
For the drive belts I also replaced the tensioners and idler as they were very dry and noisy, and I didn't want them to fail at some point and cause a breakdown.
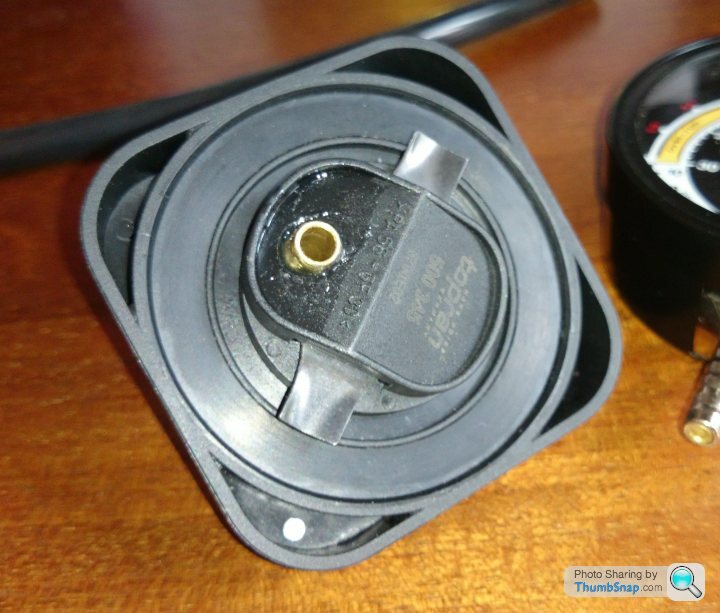
I also dealt with a few niggly issues including looping the sat nav out of the fibre optic loop (it was causing MOST bus crashes), replaced a faulty parking sensor, replaced the cig lighter socket as it was intermittent, put in a second oddments tray to replace the useless cordless phone, and replaced the broken glove box fuse box cover.
The total on this third lot of jobs is £1057
Running total is £5021
At this point I'd done 12,000 miles
I've still only covered 114 rows out of 380 on the spreadsheet
With the coolant transfer pipe leak fixed out of all the notorious jobs it 'only' left the valve stem seals and alternator bracket gasket.
Thinking back to the original big diagnosis list I'd only got these left:


I did the remaining service jobs I'd put off, namely spark plugs, cabin filters and drive belts, as well as another oil change.
I found a bit of oil around the spark plugs (nothing compared to before) but just cleaned it out. I figured it was more of a weep than a proper leak but we'll come back to this later (dodgy Febi spark plug tubes).
- Spark plugs NGK Iridium IX £55.60
- Cabin filters Hengst £35.00
- Engine oil Petronas Syntium 5000 AV £49.98
- Oil filter Mann £7.99
I wanted to use the detachable towbar with a bike rack and light board. Apparently for cars with CAN bus you need a module that taps into the CAN bus so it can monitor all of the trailer bulbs, disables the rear parking sensors, adds an indicator buzzer etc. The one I got was a newer 13 pin / ISO 11446 socket that can also monitor LED caravan lights etc. and also came with a 13 to 7 pin adapter. I also bought a towbar wiring tester as I didn't have anything 13 pin.
- Towbar wiring kit Right Connections £159.84
- Rear bumper screws x15 BMW £7.74
Out of the lower engine oil seals of alternator bracket gasket and upper/lower sump, only the lower sump can be dealt with without lowering the subframe so I replaced that one.
- Lower sump gasket BMW £18.84
- Lower sump bolts x20 BMW £13.92
There didn't seem to be any visible coolant leaks but it was losing coolant slowly, so that points towards the coolant transfer pipe (a known issue). Basically a seal between the timing case and engine block goes and the coolant leaks out and evaporates out of a weep hole, leaving no trace.
There a few solutions for this but the least invasive is a stent or 'aluminium toilet roll tube'. This is liberally covered in gasket maker and pushed in from the front after removing the water pump. It bridges the gap completely and stops the leak (see photos below). There are replacement coolant transfer pipes available but it involves removing the intake manifold and valley pan, cutting the old one out and expanding the new one in its place. To replace the pipe with an original one requires the
The stent I got was just like a toilet roll tube shape, it looks like the newer ones are shaped to fit the water pump outlet/pipe inlet (not sure why). This fix worked fine and stopped the coolant leak completely. Got into a bit of a predicament with it as I'd pushed it in about halfway where it got stuck on the old seal, had to devise a way of pushing it in by putting the old crank pulley back on and levering gently off it, this was an urgent issue as I didn't want the sealant to start curing out of place and then push it into place.
- Water pump + temperature sensor BMW £153.72
- Water pump pulley BMW £18.73
- Water pump pulley bolts x4 BMW £2.25
- Water pump return pipe BMW £12.25
- Water pump to alternator pipe BMW £10.26
- Thermostat Wahler £40.99
- Bimmerfix transfer pipe stent £213.82
- Coolant BMW £20.69 + deionized water Carplan £11.70
For the drive belts I also replaced the tensioners and idler as they were very dry and noisy, and I didn't want them to fail at some point and cause a breakdown.
- Drive belt Continental £12.56
- Drive belt tensioner INA £27.71
- Drive belt idler INA £17.57
- Air con belt Continental £4.49
- Air con belt tensioner INA £31.08
- Crank pulley/damper Febi £77.22
I also dealt with a few niggly issues including looping the sat nav out of the fibre optic loop (it was causing MOST bus crashes), replaced a faulty parking sensor, replaced the cig lighter socket as it was intermittent, put in a second oddments tray to replace the useless cordless phone, and replaced the broken glove box fuse box cover.
- Cigarette lighter socket BMW £2.61
- Fibre optic jumper (Logic 7 amp) BMW £15.75
- Parking sensor £32.00
- Phone oddments tray BMW £14.22
- Glove box fuse box cover BMW £21.22
The total on this third lot of jobs is £1057
Running total is £5021
At this point I'd done 12,000 miles
I've still only covered 114 rows out of 380 on the spreadsheet
With the coolant transfer pipe leak fixed out of all the notorious jobs it 'only' left the valve stem seals and alternator bracket gasket.
Thinking back to the original big diagnosis list I'd only got these left:
- Very heavy smoke when revved after idling, none while driving (valve stem seals).
- Heavy oil leaks from alternator bracket & (upper) sump.
- Minor power steering / dynamic drive fluid leak.
- Sometimes the stereo would go 'pop' and lose audio.
Edited by Pastie Bloater on Monday 31st May 10:16
Almost immediately after I'd done all of that work it bonged with a 'drive control system' error. It gave error codes for steering angle which is tied into the traction control, basically if it doesn't know where the steering wheel is the DSC refuses to work as it's a key input. The solution was a new steering wheel clock spring.
As I mentioned before I had to get this replaced by BMW as it needed to be programmed and coded to the car, which is not really a DIY job (especially for me).
Out of the £500 cost I believe the part was £400 and labour only £100.
It also needed new front tyres in 245/45R19 size.
Running total is £5940
As I mentioned before I had to get this replaced by BMW as it needed to be programmed and coded to the car, which is not really a DIY job (especially for me).
Out of the £500 cost I believe the part was £400 and labour only £100.
It also needed new front tyres in 245/45R19 size.
- Steering wheel clock spring BMW £500.00
- Front tyres Michelin Pilot Sport 3 £419.01
Running total is £5940
Gallons Per Mile said:
I like a good bit of engineering around a problem, nice fix! I'm amazed that bit of metal costs £200 but then I guess it's many multiples of that price to fix it with OEM parts so they can charge what they like!
If I'd had a lathe like I do now I'd have just made one myself.It is a bit pricey but the expanding pipe repair is a properly machined jobbie costing about £600 + import fees (at the time).
For a new original pipe you're looking at about £50 for the pipe (with new seal bonded to it) and 20+ hours labour to drop the engine out, so call it £2k minimum.
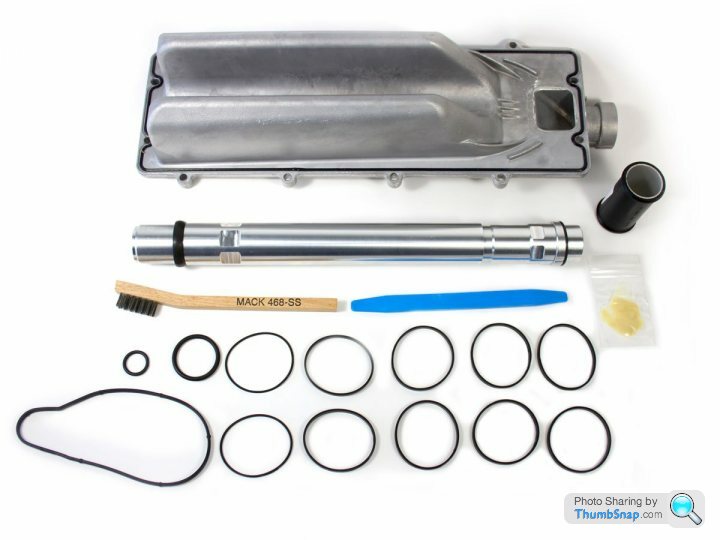
You do get a little kit so it looks like you're getting something for your $250

This new stent design looks to be about half the length of the old one.
Yes that is a wooden stick with sandpaper on it and a paint roller to clean the sanding dust out.

Expanding pipe, there are now versions that are threaded and others that push apart and use snap rings.
Original pipe
Edited by Pastie Bloater on Sunday 30th May 15:22
Gassing Station | Readers' Cars | Top of Page | What's New | My Stuff