'67 Camaro RS/SS - saved from the scrapman
Discussion


Oneball said:
Looks a really tidy job, you’ll be thinking about what colour to paint it soon 
 at the thought, and absolutely no idea on colour!
Bit of progress over the long weekend.
Glued and welded the rear deck panel into place.
Welds look messy because they were built up as a series of small "spot" welds alternating between areas to prevent heat build up. They'll flat back ok.

Alignment of new panel to original factory seams looks good - I'm looking at the seam running up the picture, above and below where my series of welds meets it.

Overview

I'll crack on with grinding back the welds soon enough, but wanted to get stuck into the other major panel replacement needed - the dash and scuttle panel.
This grotty looking section is where the lower edge of the windscreen bonds, and although appearing in similar condition to much of the rest of the car, I already knew that this one was coming through from inside rather than being pure surface rust.

A fairly gentle poke with a screwdriver confirmed what I already knew

Ground back a couple of stitch welds at the ends and then started unpicking the spot welds along the length

Pretty much as expected, but the top of the firewall and cowl section exposed is thick metal and solid despite appearances. Confident it will clean up and treat with minimal, if any, patching.

With the spot welds across the front removed, it was a simple matter of chopping through an under-dash bracket or three - there are five but the welds on two had already failed! Obviously I checked what came with the new dash panel before hacking away! I'll remove the remains of the old brackets as necessary now access in much better.

Old vs new (top view)

Old vs new (dash view) Note the additional face level vents on the new dash - I ordered an A/C dash rather than non-A/C as this is an upgrade I will definitely be making.

Finally, the inside of the firewall in "not too bad" condition. I'll clean, treat and paint it all whilst access is as good as it will ever get!


Oilchange said:
Cool thread mate.
 Thanks.
I said:
Confident it will clean up and treat with minimal, if any, patching
I shouldn't have been quite so confident, although most of it looks like it will clean up ok, upon closer inspection it does need at least one small patch before the new panel goes on.Passenger side cleaned up ok as below

But the end section highlighted above, but on the driver's side, was much frillier and had to go. Should be a straightforward patch though and 100% hidden when the new dash / cowl section is fitted.

The surface rust under the cutout is the outer top of the firewall. I'll give the bit I can see a bit of a clean up now as, being very narrow, it'll be hard to access later, most of the rest of it can be reached through the larger openings to the left.
Oneball said:
Still no nasty surprises, everywhere else in the world has a better climate!
My C10 and El Camino are both California imports whereas this has been in the UK since 1970. Certainly this has more rust than they do (it has had front floors for example, whilst theirs are minty fresh) but the window channel areas that I'm replacing are a weak spot on most US vehicles of this era almost regardless of climate.That said, one of the tales that came attached to the Camaro, is that one of the reasons it survived 50+ years in the UK climate so well (relatively at least) is because it spent much of the 1980's garaged, because its then owner was "shooting tigers"...
Apocryphal? Quite possibly but it would help explain how the sills, rear arches and rear quarters survived in such good order. It would also go some way to explaining why the non-original small block that came with the car has had its engine number ground off...


Patched and painted that little upper cowl section.

I was actually pleased to do that bit of welding as otherwise de-rusting continues at a steady if somewhat tedious pace. I've just started on the inner surfaces which are easily accessible with the dash removed. Not aiming for utterly pristine metal on inner / hidden surfaces, they've lasted 55 years already, a good clean up and treat should preserve them beyond my remaining lifetime!

My daily routine is "choose a small section / grind off paint and heaviest rust with surface cleaning disc / use finger sander on remaining rust patches / use Dremel with a diamond bit on pitted areas / apply acid and work into remaining pits / dry / apply Hydrate 80 / apply Electrox" Repeat ad nauseam.
I'm viewing this stage as my penance for letting it rot in a damp garage for too many years, a chore that must be completed before I can get to the more interesting parts of the build.
Inevitably whilst doing so the mind wanders and recently my musings have related to the car's original colour. Having established conclusively that the trim tag is not original to the car, it means the original colour was not necessarily Butternut Yellow as per the tag. So what was it?
I remembered that I had run a vehicle check on the car prior to purchase, perhaps that would show the colour at import?

No such luck. Plenty of previous keepers and colour changes recorded though, and they're just the ones recorded...
Much of the car has been in bare metal before, quite possibly more than once, so clues must be sought in areas that haven't been touched during previous paint jobs - of which there are a few, since the car has never been as fully stripped down as it is now.
Looking at the pile of panels removed from the car, the bootlid shows signs of red where the most recent respray, in black, has flaked off. One of the doors and the cowl panel also show signs of red - the cowl panel being the most convincing as to possibly being a factory finish rather than previous paint overspray.

That said the other door shows signs of blue inside it, although rubbing down the door jamb area (beside producing a pretty pattern ) suggests that this may be the remains of the most recent colour before black

Based on the rings, it appears to have had two resprays in black, one in a very spangly blue, then possibly a coat of sealant (brown) and maybe a yellow - which could be a high build layer but looks a bit bright for that? Under that is white and then the very thin coats are what I believe to be factory applied rust proofing coats.
So on that basis, white? I removed a door striker (one of the last things still bolted to the shell) and the result would suggest so.
Likewise the rear light openings, inner sill areas and patches under where the boot seal used to be. In all cases, removing the white reveals only a very thin coat of "red oxide" type coating which I believe is factory.


No evidence of red though. The cowl in particular looks a very factory finish on the underside, but the lack of red traces anywhere on the monocoque section suggests that the panel may simply be from another car...?
Who knows, it's all guesswork at this stage. Keeps a bored mind amused anyway
I was actually pleased to do that bit of welding as otherwise de-rusting continues at a steady if somewhat tedious pace. I've just started on the inner surfaces which are easily accessible with the dash removed. Not aiming for utterly pristine metal on inner / hidden surfaces, they've lasted 55 years already, a good clean up and treat should preserve them beyond my remaining lifetime!
My daily routine is "choose a small section / grind off paint and heaviest rust with surface cleaning disc / use finger sander on remaining rust patches / use Dremel with a diamond bit on pitted areas / apply acid and work into remaining pits / dry / apply Hydrate 80 / apply Electrox" Repeat ad nauseam.
I'm viewing this stage as my penance for letting it rot in a damp garage for too many years, a chore that must be completed before I can get to the more interesting parts of the build.
Inevitably whilst doing so the mind wanders and recently my musings have related to the car's original colour. Having established conclusively that the trim tag is not original to the car, it means the original colour was not necessarily Butternut Yellow as per the tag. So what was it?
I remembered that I had run a vehicle check on the car prior to purchase, perhaps that would show the colour at import?
No such luck. Plenty of previous keepers and colour changes recorded though, and they're just the ones recorded...
Much of the car has been in bare metal before, quite possibly more than once, so clues must be sought in areas that haven't been touched during previous paint jobs - of which there are a few, since the car has never been as fully stripped down as it is now.
Looking at the pile of panels removed from the car, the bootlid shows signs of red where the most recent respray, in black, has flaked off. One of the doors and the cowl panel also show signs of red - the cowl panel being the most convincing as to possibly being a factory finish rather than previous paint overspray.
That said the other door shows signs of blue inside it, although rubbing down the door jamb area (beside producing a pretty pattern
) suggests that this may be the remains of the most recent colour before blackBased on the rings, it appears to have had two resprays in black, one in a very spangly blue, then possibly a coat of sealant (brown) and maybe a yellow - which could be a high build layer but looks a bit bright for that? Under that is white and then the very thin coats are what I believe to be factory applied rust proofing coats.
So on that basis, white? I removed a door striker (one of the last things still bolted to the shell) and the result would suggest so.
Likewise the rear light openings, inner sill areas and patches under where the boot seal used to be. In all cases, removing the white reveals only a very thin coat of "red oxide" type coating which I believe is factory.
No evidence of red though. The cowl in particular looks a very factory finish on the underside, but the lack of red traces anywhere on the monocoque section suggests that the panel may simply be from another car...?
Who knows, it's all guesswork at this stage. Keeps a bored mind amused anyway
Getragdogleg said:
Has it still got the trim tag on the cowl by the wiper motor ?
It does have "a" trim tag, but it cannot be original to the car - there is too much of a gap between the tag and chassis numbers, over a month in terms of time based on CRG build numbers, and the gap is the wrong way round.What I mean by this - the trim tag dates the final assembly to late December '66, whilst the chassis number and various marking on some parts suggest the parts were only manufactured towards the end of January '67 - e.g. the rear quarters are stamped H4 which decodes as week 4 of the calendar year. Which ties up nicely with things like this on the headlamp mechanism.

There was a strike at the Norwood plant around January '67, so some build numbers are a bit screwy from that period, however the car simply cannot have been assembled before the parts were made!!

Getragdogleg said:
Interesting, does it have access holes to get to the bumper iron bolts in the front frame rails or are they clip in nuts?
Mine has a hole in one side and a clip nut the other which puts it as a late 66 car as they switched to clip nuts.
It has the later style access holes on both sides. Mine has a hole in one side and a clip nut the other which puts it as a late 66 car as they switched to clip nuts.
Also has mid-style "full telephone" indentation (plus five smaller indentations) in the door jamb areas, which again loosely date it between December and March '67.
Apologies to all other than Getragdogleg for the excessive Camaro beardage!!
99t said:
Getragdogleg said:
Interesting, does it have access holes to get to the bumper iron bolts in the front frame rails or are they clip in nuts?
Mine has a hole in one side and a clip nut the other which puts it as a late 66 car as they switched to clip nuts.
It has the later style access holes on both sides. Mine has a hole in one side and a clip nut the other which puts it as a late 66 car as they switched to clip nuts.
Also has mid-style "full telephone" indentation (plus five smaller indentations) in the door jamb areas, which again loosely date it between December and March '67.
Apologies to all other than Getragdogleg for the excessive Camaro beardage!!
I can reiterate the apology to everyone else for us putting on our anoraks !
Having said that... Does it have steel seat backs and any shiny inner roof rail trims ? does it have rocker spears on the outer sills ?
The CRG site is excellent but you really have to hunt out the info, I spent days on it finding out what my two were.
Getragdogleg said:
Having said that... Does it have steel seat backs and any shiny inner roof rail trims ? does it have rocker spears on the outer sills ?
Sadly it had lost its original interior and much of the external trim long before I took it on. I'm not sure about the inner roof rail trims, I don't recollect seeing them in any of the boxes of bits though.Rather overdue update...
To be honest, much of what I've been doing isn't very updateworthy - slow and steady de-rusting, treating and sealing the main bodyshell, inside and out, visible or otherwise.
Bits that start off looking like this (the black) are then stripped to reveal surface rust under the paint.

After mechanical cleaning followed by phosphoric it ends up looking like this, prior to being sealed and primed.

When I become bored doing that, I have started selecting random parts to refurb from the many, many boxes that contain the rest of the car.
The clutch and brake pedal assembly, for example, started off looking like this

And closer, like this

Started cleaning and painting some bits of it by hand...

...but it was taking hours and hours to do, and combined with the amount of parts needing attention it felt like an overwhelming task. The solution was to find a space for the blast cabinet I had bought a while back but had never assembled due to lack of room.
Having found a suitable spot outside the end of the garage, I built a basic but waterproof enclosure to house the cabinet, with two opening sides to allow access to the loading door, and gloves/screen. Sorry no pic of the cabinet itself but it is a decent size.

This meant the large main pressing of the pedal assembly could be transformed in minutes rather than hours.

Between last Autumn and early Summer, progress really halted as the construction of a house extension becoming all consuming so far as free time was concerned.
However in what little free time I had, I did start ordering some parts to assist the mechanical side in due course.
Holley LS1 into 67-69 F-body sump kit

Holley Blackheart mounting kit for the same application.

Hopefully using the same "brand" for both will reduce the likelihood of clearance issues as they state that they are designed to work together. We'll see...
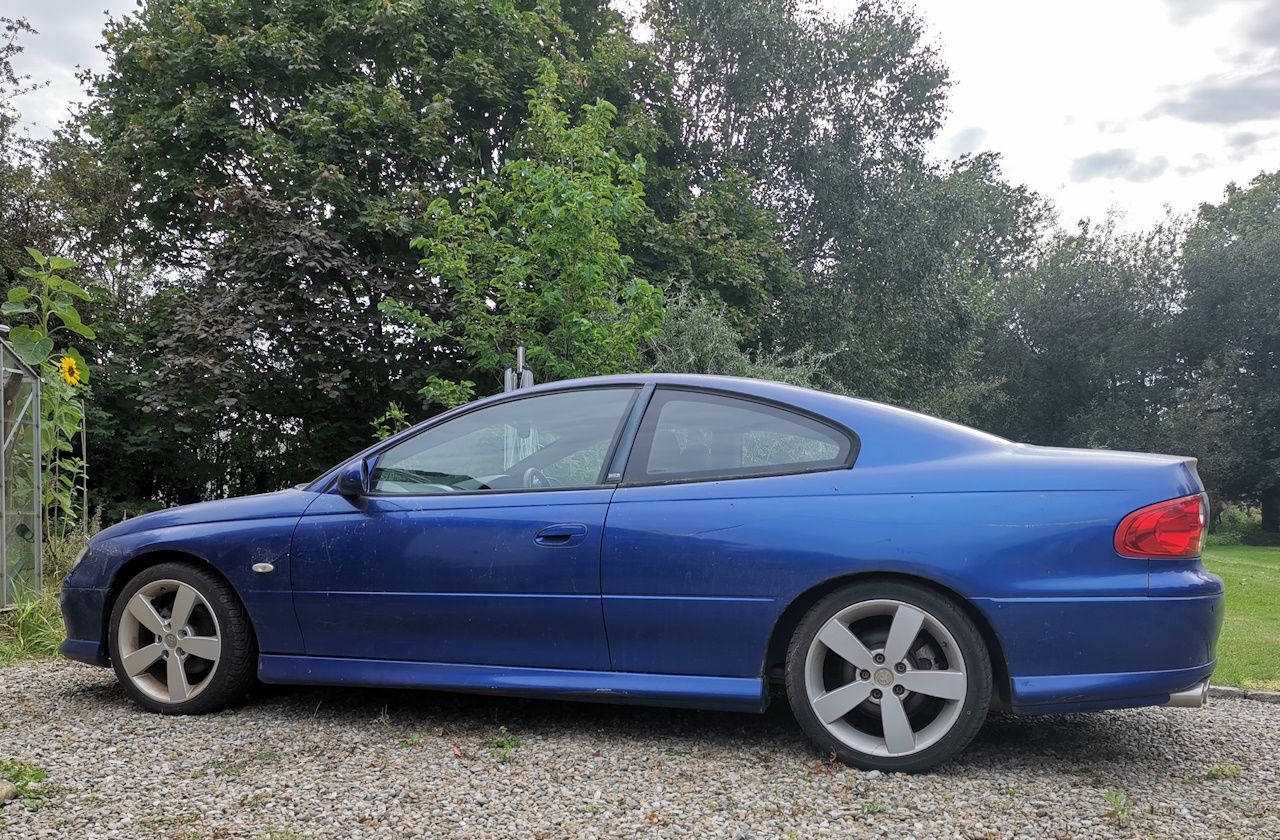
This week the driveline donor returned home, running well and sounding healthy. Don't let the picture fool you, other than the engine and box, pretty much everything else on this old girl is well worn, rusting away or just plain knackered!
The first job is to drain most of the fuel, since I brimmed the tank before putting it into storage. Obviously as the fuel is over three years old, I'll be selective what I use it in, but since the Monaro still seems to run happily enough on it, I'm sure it'll be fine in the mower and C10, both of which are sufficiently unstressed to run on almost anything vaguely flammable!
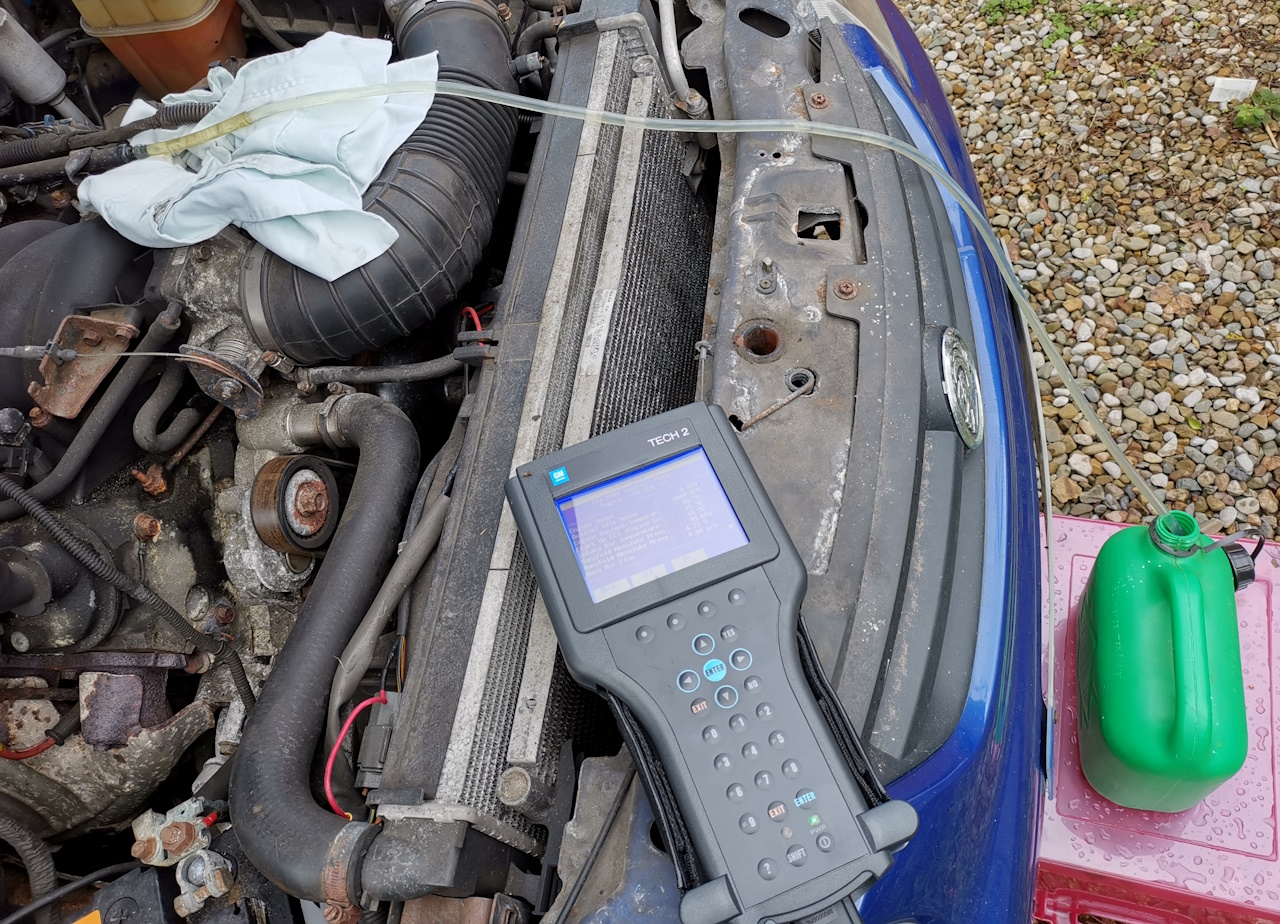
Not wishing to crawl under the car and start undoing pipes, which bitter experience tells me inevitably ends up in a petrol bath, I dug out the trusty Tech II, since I was sure I'd seen an option to "test" the fuel pump...
Sure enough

A little bit of bodgery later and I was ready to start filling fuel cans. Is it a stupid idea if it works?
I'll leave a bit of fuel in there for now because, whilst I still have a running vehicle, I want to disable the VATS anti-theft system which requires the chip-key to turn the immobiliser off.
I don't want to have to use the ugly plastic Monaro key in the Camaro, or resort to some sort of hidden key hybrid botch-up work around. At least whilst the car still runs, I can confirm the success or otherwise of my efforts - just awaiting a few bits to make a "desktop loom" to connect the PCM to...
To be honest, much of what I've been doing isn't very updateworthy - slow and steady de-rusting, treating and sealing the main bodyshell, inside and out, visible or otherwise.
Bits that start off looking like this (the black) are then stripped to reveal surface rust under the paint.
After mechanical cleaning followed by phosphoric it ends up looking like this, prior to being sealed and primed.
When I become bored doing that, I have started selecting random parts to refurb from the many, many boxes that contain the rest of the car.
The clutch and brake pedal assembly, for example, started off looking like this
And closer, like this
Started cleaning and painting some bits of it by hand...
...but it was taking hours and hours to do, and combined with the amount of parts needing attention it felt like an overwhelming task. The solution was to find a space for the blast cabinet I had bought a while back but had never assembled due to lack of room.
Having found a suitable spot outside the end of the garage, I built a basic but waterproof enclosure to house the cabinet, with two opening sides to allow access to the loading door, and gloves/screen. Sorry no pic of the cabinet itself but it is a decent size.
This meant the large main pressing of the pedal assembly could be transformed in minutes rather than hours.
Between last Autumn and early Summer, progress really halted as the construction of a house extension becoming all consuming so far as free time was concerned.
However in what little free time I had, I did start ordering some parts to assist the mechanical side in due course.
Holley LS1 into 67-69 F-body sump kit
Holley Blackheart mounting kit for the same application.
Hopefully using the same "brand" for both will reduce the likelihood of clearance issues as they state that they are designed to work together. We'll see...
This week the driveline donor returned home, running well and sounding healthy. Don't let the picture fool you, other than the engine and box, pretty much everything else on this old girl is well worn, rusting away or just plain knackered!
The first job is to drain most of the fuel, since I brimmed the tank before putting it into storage. Obviously as the fuel is over three years old, I'll be selective what I use it in, but since the Monaro still seems to run happily enough on it, I'm sure it'll be fine in the mower and C10, both of which are sufficiently unstressed to run on almost anything vaguely flammable!
Not wishing to crawl under the car and start undoing pipes, which bitter experience tells me inevitably ends up in a petrol bath, I dug out the trusty Tech II, since I was sure I'd seen an option to "test" the fuel pump...
Sure enough
A little bit of bodgery later and I was ready to start filling fuel cans. Is it a stupid idea if it works?
I'll leave a bit of fuel in there for now because, whilst I still have a running vehicle, I want to disable the VATS anti-theft system which requires the chip-key to turn the immobiliser off.
I don't want to have to use the ugly plastic Monaro key in the Camaro, or resort to some sort of hidden key hybrid botch-up work around. At least whilst the car still runs, I can confirm the success or otherwise of my efforts - just awaiting a few bits to make a "desktop loom" to connect the PCM to...
Monaro stripping is going well.
In addition to the engine and box and Powertrain Control Module (PCM), I plan to remove the entire wiring loom intact initially and then thin out the bits I want to keep. To that end, I have been concentrating on stripping the interior. However an ad on a well known action site has also resulted in a surprisingly brisk trade in parts, which has also guided and distracted my dismantling efforts in equal measure!

VATS removal - in order to use the factory PCM in the Camaro without the Monaro key, it is necessary to disable the standard security system.
There are a million tutorials on Youtube etc., some of which made it look quite straightforward. Armed with a little knowledge, on a "what's the worst that could happen?" basis, I made up a bench harness, downloaded some free software (PCM Hammer and Tuner Pro) and got it all to communicate, so far so good.

As a rank amateur at this sort of thing, I expected the service number on the PCM to match the installed software.


Umm, ok. This is important to get right since it is necessary to use the correct xdf file in Tuner Pro to interpret the PCM code into a human comprehensible format - using an incorrect version could well result in a corrupted PCM.
Logic dictated to use the xdf version being reported in the software, so that's what I did. It appeared to interpret the contents of the PCM correctly - I checked a few parameters and the reported values looked sensible although I fully appreciate there could be others that were completely wrong and I wouldn't have had a Scooby Doo...
The bit I'm interested in

Disabling it couldn't be much simpler

Back into PCM Hammer and write the calibration back into the PCM - it appeared to go without a glitch.
Time to see if I had succeeded?
Removed the security slip-ring from the ignition switch, so effectively using an uncoded key at this point. I knew that there was still further security within the Body Control Module (BCM) and so the engine wouldn't actually crank from the key, but in theory with the ignition on (and security light flashing) the engine should fire with power applied to the starter relay.
Easiest way to achieve that was simply to remove the relay cover and close the contacts manually...
One small but important step forward
In addition to the engine and box and Powertrain Control Module (PCM), I plan to remove the entire wiring loom intact initially and then thin out the bits I want to keep. To that end, I have been concentrating on stripping the interior. However an ad on a well known action site has also resulted in a surprisingly brisk trade in parts, which has also guided and distracted my dismantling efforts in equal measure!
VATS removal - in order to use the factory PCM in the Camaro without the Monaro key, it is necessary to disable the standard security system.
There are a million tutorials on Youtube etc., some of which made it look quite straightforward. Armed with a little knowledge, on a "what's the worst that could happen?" basis, I made up a bench harness, downloaded some free software (PCM Hammer and Tuner Pro) and got it all to communicate, so far so good.
As a rank amateur at this sort of thing, I expected the service number on the PCM to match the installed software.
Umm, ok. This is important to get right since it is necessary to use the correct xdf file in Tuner Pro to interpret the PCM code into a human comprehensible format - using an incorrect version could well result in a corrupted PCM.
Logic dictated to use the xdf version being reported in the software, so that's what I did. It appeared to interpret the contents of the PCM correctly - I checked a few parameters and the reported values looked sensible although I fully appreciate there could be others that were completely wrong and I wouldn't have had a Scooby Doo...
The bit I'm interested in
Disabling it couldn't be much simpler
Back into PCM Hammer and write the calibration back into the PCM - it appeared to go without a glitch.
Time to see if I had succeeded?
Removed the security slip-ring from the ignition switch, so effectively using an uncoded key at this point. I knew that there was still further security within the Body Control Module (BCM) and so the engine wouldn't actually crank from the key, but in theory with the ignition on (and security light flashing) the engine should fire with power applied to the starter relay.
Easiest way to achieve that was simply to remove the relay cover and close the contacts manually...
One small but important step forward
I have a holden hsv whitch had the ls1 b ecu .
I now run a haltech with a new loom as its x1000 easier to use and has great engine protection as well as dual widebands.
The car still has the factory immobilisor as it is a signal from the body conroll module that allows the ecu to fire the engine. If you could find which wire sends that signal from the body controll module and put 5v there you'd be rocking, No ?
I still have the factory ecu as a spare. Its mapped for a big cam and headers.
Edited by fred bloggs on Wednesday 11th October 12:06
fred bloggs said:
The car still has the factory immobilisor as it is a signal from the body control module that allows the ecu to fire the engine. If you could find which wire sends that signal from the body control module and put 5v there you'd be rocking, No ?
As I understand the PCM cuts fuel and the BCM cuts cranking. I hope to retain the BCM to a limited degree in the Camaro as I believe things like cruise control are done through that, which I would like to retain (happy to be corrected as I'm still very much sussing this stuff out...). So I will need to physically bypass the start inhibit side of things in that moduleNow the fuel cut is bypassed in the PCM, as you say all that is needed to start is voltage to the starter relay (plus permanent +ve and ignition +ve to the fuse box as required) which can all come from the Camaro's standard ignition switch.

I don't doubt that there will be some head scratching needed at some point however!
Gassing Station | Readers' Cars | Top of Page | What's New | My Stuff