1932 Rolls-Royce 20/25HP Park Ward Saloon - barnfind project
Discussion


Great thread and well done for injecting some life back into the old girl.
You clearly want to restore her back to her former glory and credit to you sir but I can't help thinking and unrestored but cleaned up body would look cool with the old patina. Providing it was all mechanically tickety-boo I reckon it would turn a few heads for different reasons. Sort of the 'rat look' for the gentry!
Just a thought...
I have just read the entire thread from the beginning. What a story.
I wish you all the luck possible in your restoration, and echo the comments above about the possibiity of repairing cracked engine blocks.
I am sure I saw it done in one of those popular car restoration programmes on TV., though perhaps not to the degree that yours looks to require.
I wish you all the luck possible in your restoration, and echo the comments above about the possibiity of repairing cracked engine blocks.
I am sure I saw it done in one of those popular car restoration programmes on TV., though perhaps not to the degree that yours looks to require.

Hi Andy
You may be interested, In Nov 2020 I bought a Hooper bodied 20/25 GPG81 of 1935. It was in similar perilous condition to yours except the front end was dismantled and mixed up in boxes.
Getting her back on all four wheels this July was a great feeling. The first time she's been on four wheels since 1985!
Much of my time like you has been stripping out and cleaning up trying to define what is missing. The wiring was shot and dangerous so I bit the bullet and stripped the lot out. My main task apart from the front end has been stripping back the chassis a bit at a time and refurbishing. It's almost done. I now have the petrol tank out and the inside was remarkable. The original tinning was still intact inside after cleaning, so I'm just refurbing the outside.
My big challenge in the future is the ash frame. It's rotted out over the rear arches causing the door gaps to open up. It's also rotted across the back under the boot although this will be challenging to replicate and repair it is not so structural.
I've given myself 5 years, so we shall see.
I'm happy to swap notes/pictures with you at any time.
Cheers
Tim
I've only just come across this thread, which stood out because only last night I watched an episode of Car SOS about a 1929 Rolls-Royce Doctor's coupe, probably available on catch up if you want to watch it.
Great news about the V5 and getting the matching key too. Shame about the block though, unless you can get it welded/stiched. They replaced the liners on the Car SOS episode, but the block must have been OK, though full of water due to a broken head bolt.
Like others on this thread I know very little about post war cars, but I find it fascinating reading about your progress and wish you well in getting it back on the road for it's 100th birthday.
Hello all,
I have found some time to write a much needed updated to my thread on the restoration of my 1932 Rolls-Royce 20/25. Looking back, it seems I have made lots of small steps forwards, but nothing yet is finished! So, this update will be Winter 2022 – 2023 – Part 1!
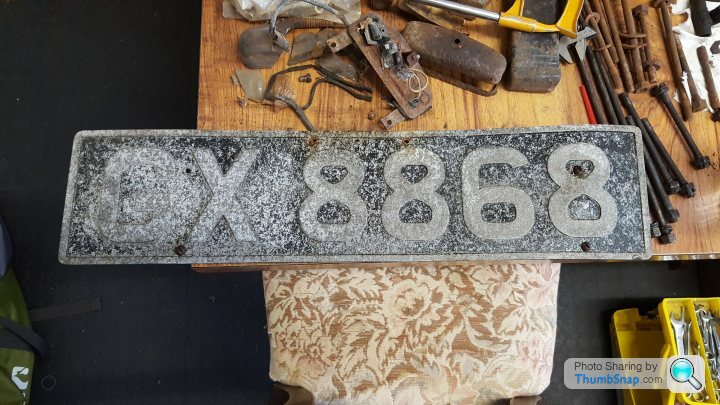
The first task was a temporary fitment of rear number plate now we had a V5C document and the car could rightly call itself “GX8868”. This was a relatively simple task of removing the rear valance, cutting off the old P bracket fixings, cleaning everything up and refitting the number plate (which if you remember from the original blog post, was found chucked inside the cabin, about where the rear seat should have been!).


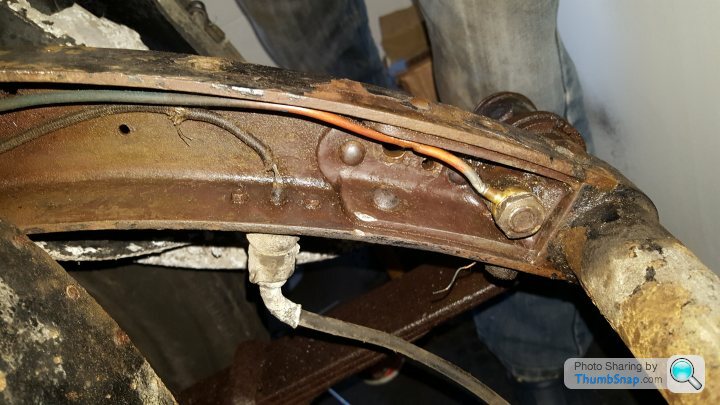
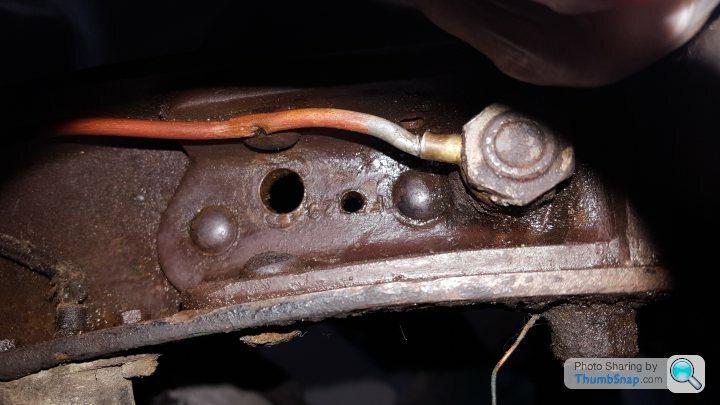
While I have the rear valance off, I took the chance to inspect inside rear chassis legs, which showed the remains of luggage rack fixings and some damage to the chassis lubrication system but fortunately little in the way of serious corrosion. I cleaned everything up and refitted the chassis cover plates with new stainless fixings.

It was all going too well! – and, as usual, something else then jumped out at me. Having cleaned up the chassis at the rear, it was clear that the rear spring hangers sat differently between left and right sides. On closer inspection, it showed that the bent rear cross member had actually caused damage to the rear left chassis longitudinal, pushing it outboard by about 5mm at the end and preventing the rear left spring shackle fixing from being done up. My guess is that this was damage when the car was being recovered – perhaps in the scrap yard in the 1960s – but it now meant that there would need to be some significant cutting and welding done to straighten it all out!
While I digested this news of another large obstacle in the restoration, I consoled myself with setting to work on some further investigations of different “systems” on the car, starting with the fuel system.
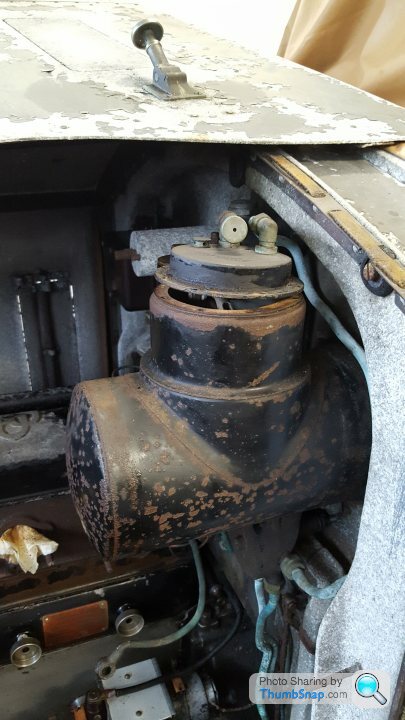
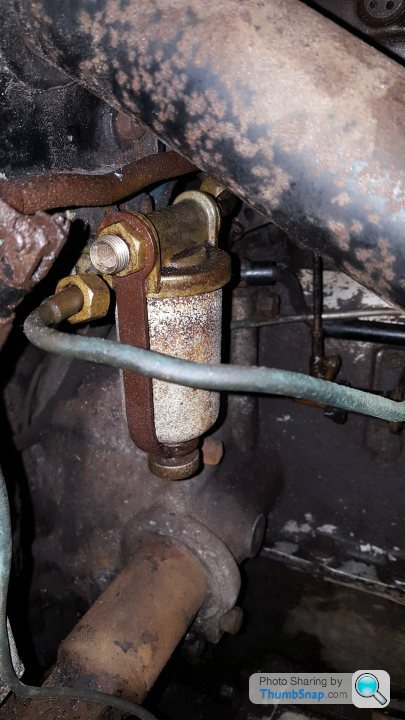
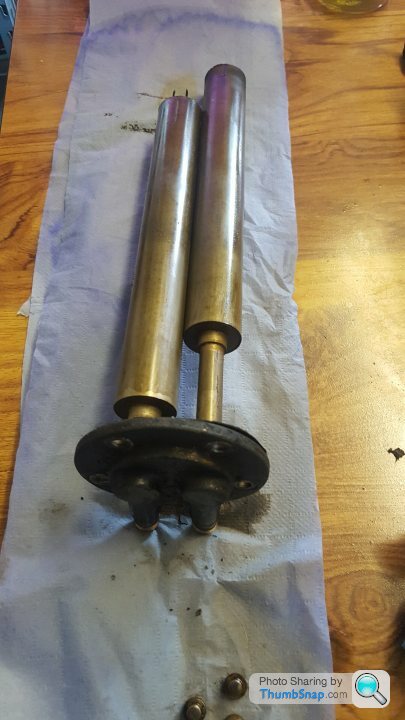
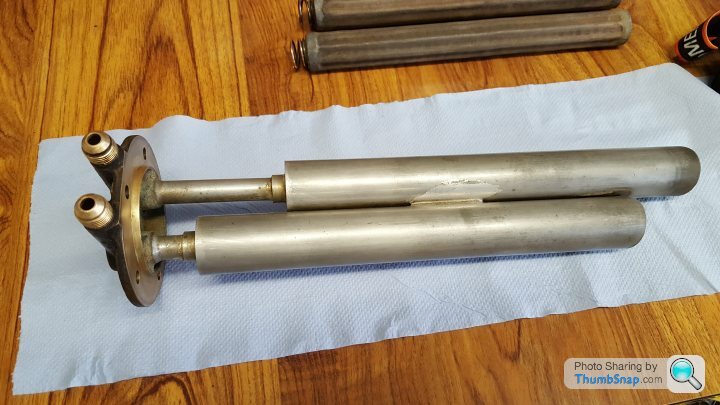
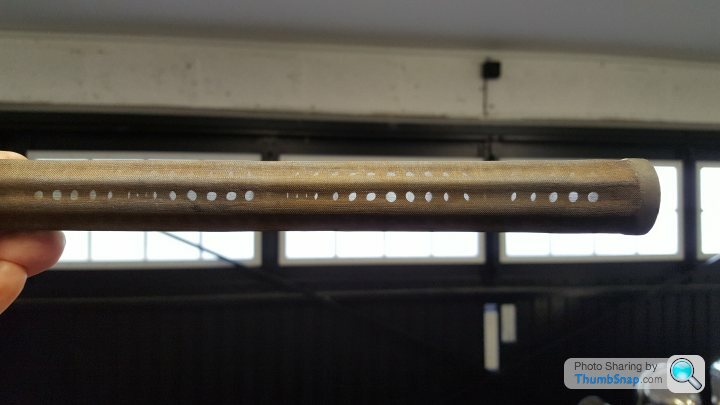
The fuel system on the 20/25 differs significantly from the modern practice, where fuel is fed to the engine bay by in-tank fuel pumps and then fed to the engine via a high pressure injection system. Here fuel is pulled from the tank by an Autovac – an ingenious contraption which is a cross between a vacuum pump and your bathroom toilet cistern! These mechanical pumps are still used in various applications today and are brilliant examples of simple sound engineering. What is even better is that the Autovac company still exists, and they are able to support you with parts and restoration services.
The autovac draws fuel from the fuel tank via intake vacuum, filling the inner tank inside the unit. As the tank fills, the float inside the inner tank raises up until it reaches the top, at which point the vacuum is released / vented to atmosphere and the fuel flows out of the inner tank into the outer tank. This outer tanks then acts as a small reservoir to fuel the car via the filter and carburettor, while the inner tank begins to fill on the next cycle – so no electronics, pumps or circuits here. Provided you had a sealed system and the engine turning over, the system will work!


Having disassembled my autovac, the positives were that the mechanism was in good condition and only needed a gentle clean. The less good news was that the old fuel had turned to varnish in the outer tank and had also caused extensive corrosion – you could see daylight through the bottom of the tank! I cleaned it all up and checked with Robin at Autovac – all was repairable and some modifications could be incorporated to make the unit work better with modern fuels.
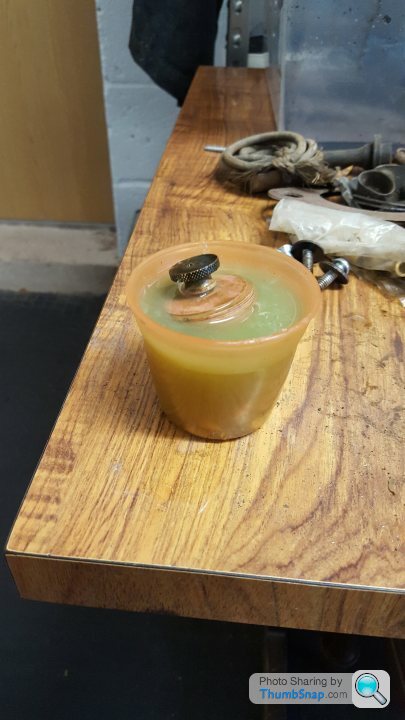
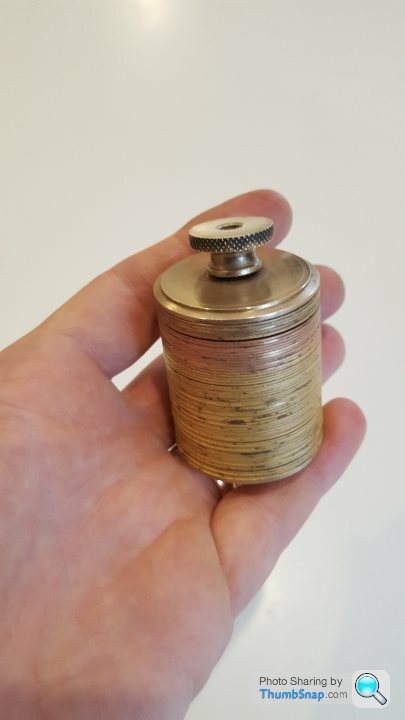
The next part of the fuel system was the bulkhead mounted Enots fuel filter. After much resistance, the filter finally came undone and I had read many wise words about how critical it was to get this clean, to ensure good running. The filter itself it rather different to our modern micro gauze type filters – here a series of plates are held tightly together, the plates themselves having tiny ridges on them. As a result, this creates a labyrinth for the fuel to pass through and collects any dirt in the voids created between the plates. The “wise old heads” of the R-R world informed me that the best way to clean the filter was lemon juice – the acidic action being a great way to cut through the old petrol varnish and muck. I was sceptical, but it worked like a charm! So one nicely cleaned filter!
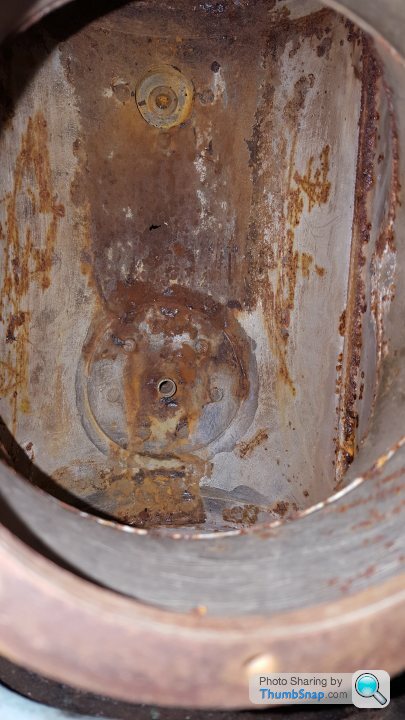
While thinking about filters, I turned my attention to the 2 filters located in the fuel tank. Once removed, it was clear that the car had been laid up almost empty of fuel – you could see the brown remains of the fuel in the bottom of the tank, along with a lot of crud and varnish. The filters needed some cleaning, but came up quite well – but it did add to the picture that the car had not been cared for very well in its final running years in the early 1960s, as the filters were filthy and had clearly not been cleaned for some time!
Moving back to the engine bay, the last key component of the fuel system – the carburettor. On GBT47, the car proudly carries the “Royce Carburettor” – a R-R in-house design, which originated on the earlier 20HP car. Later versions of the 20/25 use R-R versions of Zenith and SU carbs. The Royce carburettor is a beautiful item – a twin jet (low and high speed) up draft design, with an automatic compensation of air/fuel ratio at higher throttle openings / engine speeds, via a vacuum controlled piston. Added to this is a secondary starting carburettor, which provides the car with a rich air/fuel ratio for use when starting – much more complicated than at normal choke!
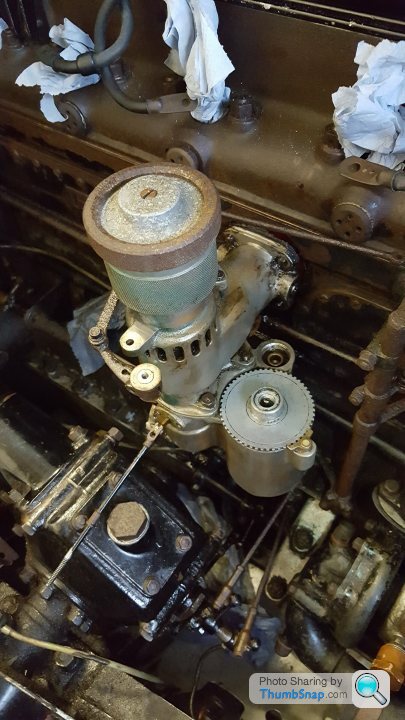
Removing the carburettor was something of a fiddle, where it was evident that it had been apart previously (noting the mismatched nuts and washers in places), but not “that” recently, as it was absolutely caked in carbon deposits, old fuel and general grime! I have been lucky so far that almost everything on the car has come undone ok, without any damage – the carburettor is where my luck ran out! The dissimilar metals used in the unit meant that galvanic corrosion had seized much of the main body of the unit. Soaking the unit in penetrating fluid and eventually the use of oil filter spanners resulted in the item coming apart, but with the addition of some tell tale marks on the knurled areas of the carburettor. Frustrating, but it would not come apart any other way. Adding to my frustrations was my breakage of the last section of fuel pipe, as it goes from the Enots fuel filter to the carburettor. However, it will be possible to replace the fuel pipe without too much drama.

Once I had got the carburettor apart and cleaned up, it became clear that the spring which controls the position of the low speed jet had broken – the remains being still inside the carb. Now, even the excellent pre-war Rolls-Royce suppliers couldn’t come up with a direct replacement – some people even suggesting using the spring from a ball point pen as an alternative. In the end, with help from the R-R enthusiasts world, I was able to define the specifications for the original spring and had a company in Nottingham make them for me! As I only needed 1 and they had a minimum order quantity of 10, if anyone else needs a spring for their low speed jet, please let me know! Finally, I put the carburettor back together, and was even able to find the original jet setting marks on the parts to give at least a nominal start point for when we get to running things.

Next up for an inspection and identification of condition was the cooling system. I flushed the radiator with a mixture of hot water and vinegar in an attempt to get rid of some of the corrosion which was clearly visible inside the neck of the radiator. After many cycles of hot water, vinegar, rinsing water with bicarbonate of soda (to neutralise the acid), the radiator did at least have clean water running free from the drain point at the bottom. The less good news was that the radiator clearly had a number of leaks – the two most obvious being the pin holes at the bottom which sprayed out all over the engine. On the plus side, having given the radiator vanes and the controlling calorstat (think of a normal car thermostat but linked to radiator vanes) a clean and some lubrication, it was good to see the vanes beginning to move open and closed as the water temperature was changed.
While working on the radiator, my attention was drawn to the bonnet and bonnet latches. With a little work – again vinegar being an excellent way of cutting through lots of grime and corrosion – I was able to get the bonnet latches to work again. I also found a small brass plaque on the bonnet confirming that it was original to the car, which was a nice touch. The final step was removing and straightening the radiator brace rod, which sits under the bonnet and had become bent over the years. Cleaned and straightened, with a nice stainless steel R clip to hold the rear pivot in place, the bonnet now fitted with something like its original design intent!
So, as I said at the beginning, some small progress. If you've managed to follow this so far, part 2 coming in a bit,
:-)
AF
I have found some time to write a much needed updated to my thread on the restoration of my 1932 Rolls-Royce 20/25. Looking back, it seems I have made lots of small steps forwards, but nothing yet is finished! So, this update will be Winter 2022 – 2023 – Part 1!
The first task was a temporary fitment of rear number plate now we had a V5C document and the car could rightly call itself “GX8868”. This was a relatively simple task of removing the rear valance, cutting off the old P bracket fixings, cleaning everything up and refitting the number plate (which if you remember from the original blog post, was found chucked inside the cabin, about where the rear seat should have been!).
While I have the rear valance off, I took the chance to inspect inside rear chassis legs, which showed the remains of luggage rack fixings and some damage to the chassis lubrication system but fortunately little in the way of serious corrosion. I cleaned everything up and refitted the chassis cover plates with new stainless fixings.
It was all going too well! – and, as usual, something else then jumped out at me. Having cleaned up the chassis at the rear, it was clear that the rear spring hangers sat differently between left and right sides. On closer inspection, it showed that the bent rear cross member had actually caused damage to the rear left chassis longitudinal, pushing it outboard by about 5mm at the end and preventing the rear left spring shackle fixing from being done up. My guess is that this was damage when the car was being recovered – perhaps in the scrap yard in the 1960s – but it now meant that there would need to be some significant cutting and welding done to straighten it all out!
While I digested this news of another large obstacle in the restoration, I consoled myself with setting to work on some further investigations of different “systems” on the car, starting with the fuel system.
The fuel system on the 20/25 differs significantly from the modern practice, where fuel is fed to the engine bay by in-tank fuel pumps and then fed to the engine via a high pressure injection system. Here fuel is pulled from the tank by an Autovac – an ingenious contraption which is a cross between a vacuum pump and your bathroom toilet cistern! These mechanical pumps are still used in various applications today and are brilliant examples of simple sound engineering. What is even better is that the Autovac company still exists, and they are able to support you with parts and restoration services.
The autovac draws fuel from the fuel tank via intake vacuum, filling the inner tank inside the unit. As the tank fills, the float inside the inner tank raises up until it reaches the top, at which point the vacuum is released / vented to atmosphere and the fuel flows out of the inner tank into the outer tank. This outer tanks then acts as a small reservoir to fuel the car via the filter and carburettor, while the inner tank begins to fill on the next cycle – so no electronics, pumps or circuits here. Provided you had a sealed system and the engine turning over, the system will work!
Having disassembled my autovac, the positives were that the mechanism was in good condition and only needed a gentle clean. The less good news was that the old fuel had turned to varnish in the outer tank and had also caused extensive corrosion – you could see daylight through the bottom of the tank! I cleaned it all up and checked with Robin at Autovac – all was repairable and some modifications could be incorporated to make the unit work better with modern fuels.
The next part of the fuel system was the bulkhead mounted Enots fuel filter. After much resistance, the filter finally came undone and I had read many wise words about how critical it was to get this clean, to ensure good running. The filter itself it rather different to our modern micro gauze type filters – here a series of plates are held tightly together, the plates themselves having tiny ridges on them. As a result, this creates a labyrinth for the fuel to pass through and collects any dirt in the voids created between the plates. The “wise old heads” of the R-R world informed me that the best way to clean the filter was lemon juice – the acidic action being a great way to cut through the old petrol varnish and muck. I was sceptical, but it worked like a charm! So one nicely cleaned filter!
While thinking about filters, I turned my attention to the 2 filters located in the fuel tank. Once removed, it was clear that the car had been laid up almost empty of fuel – you could see the brown remains of the fuel in the bottom of the tank, along with a lot of crud and varnish. The filters needed some cleaning, but came up quite well – but it did add to the picture that the car had not been cared for very well in its final running years in the early 1960s, as the filters were filthy and had clearly not been cleaned for some time!
Moving back to the engine bay, the last key component of the fuel system – the carburettor. On GBT47, the car proudly carries the “Royce Carburettor” – a R-R in-house design, which originated on the earlier 20HP car. Later versions of the 20/25 use R-R versions of Zenith and SU carbs. The Royce carburettor is a beautiful item – a twin jet (low and high speed) up draft design, with an automatic compensation of air/fuel ratio at higher throttle openings / engine speeds, via a vacuum controlled piston. Added to this is a secondary starting carburettor, which provides the car with a rich air/fuel ratio for use when starting – much more complicated than at normal choke!
Removing the carburettor was something of a fiddle, where it was evident that it had been apart previously (noting the mismatched nuts and washers in places), but not “that” recently, as it was absolutely caked in carbon deposits, old fuel and general grime! I have been lucky so far that almost everything on the car has come undone ok, without any damage – the carburettor is where my luck ran out! The dissimilar metals used in the unit meant that galvanic corrosion had seized much of the main body of the unit. Soaking the unit in penetrating fluid and eventually the use of oil filter spanners resulted in the item coming apart, but with the addition of some tell tale marks on the knurled areas of the carburettor. Frustrating, but it would not come apart any other way. Adding to my frustrations was my breakage of the last section of fuel pipe, as it goes from the Enots fuel filter to the carburettor. However, it will be possible to replace the fuel pipe without too much drama.
Once I had got the carburettor apart and cleaned up, it became clear that the spring which controls the position of the low speed jet had broken – the remains being still inside the carb. Now, even the excellent pre-war Rolls-Royce suppliers couldn’t come up with a direct replacement – some people even suggesting using the spring from a ball point pen as an alternative. In the end, with help from the R-R enthusiasts world, I was able to define the specifications for the original spring and had a company in Nottingham make them for me! As I only needed 1 and they had a minimum order quantity of 10, if anyone else needs a spring for their low speed jet, please let me know! Finally, I put the carburettor back together, and was even able to find the original jet setting marks on the parts to give at least a nominal start point for when we get to running things.
Next up for an inspection and identification of condition was the cooling system. I flushed the radiator with a mixture of hot water and vinegar in an attempt to get rid of some of the corrosion which was clearly visible inside the neck of the radiator. After many cycles of hot water, vinegar, rinsing water with bicarbonate of soda (to neutralise the acid), the radiator did at least have clean water running free from the drain point at the bottom. The less good news was that the radiator clearly had a number of leaks – the two most obvious being the pin holes at the bottom which sprayed out all over the engine. On the plus side, having given the radiator vanes and the controlling calorstat (think of a normal car thermostat but linked to radiator vanes) a clean and some lubrication, it was good to see the vanes beginning to move open and closed as the water temperature was changed.
While working on the radiator, my attention was drawn to the bonnet and bonnet latches. With a little work – again vinegar being an excellent way of cutting through lots of grime and corrosion – I was able to get the bonnet latches to work again. I also found a small brass plaque on the bonnet confirming that it was original to the car, which was a nice touch. The final step was removing and straightening the radiator brace rod, which sits under the bonnet and had become bent over the years. Cleaned and straightened, with a nice stainless steel R clip to hold the rear pivot in place, the bonnet now fitted with something like its original design intent!
So, as I said at the beginning, some small progress. If you've managed to follow this so far, part 2 coming in a bit,
:-)
AF
 but may be of use.
 Right, fortified with another large tea, here is Winter 2022 – 2023 – Part 2!
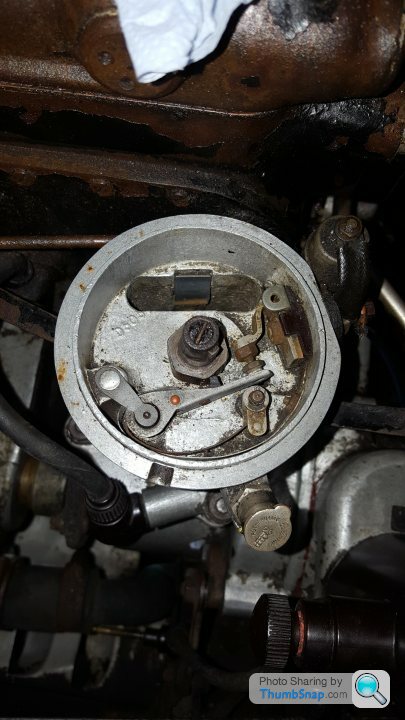
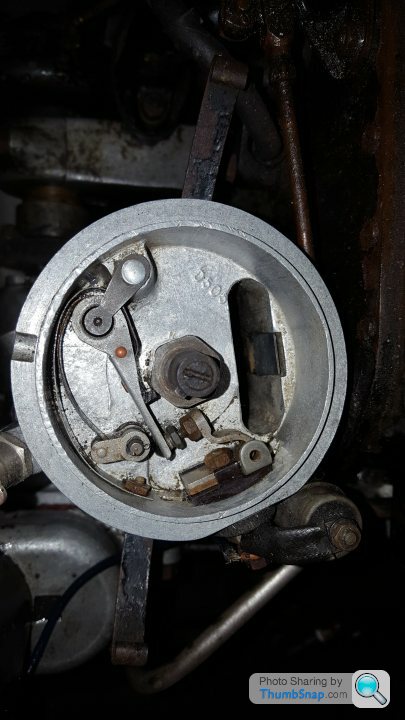
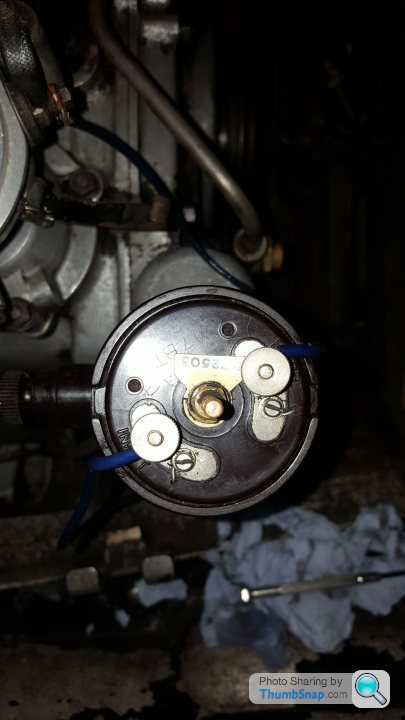
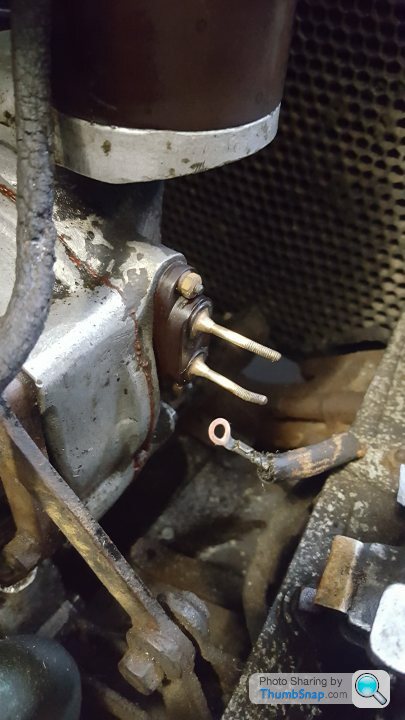
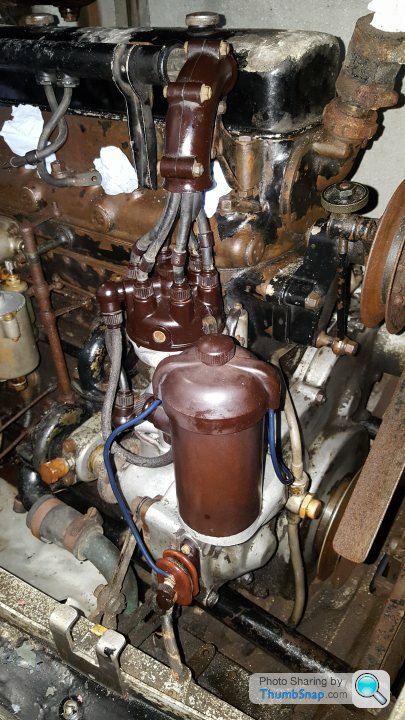
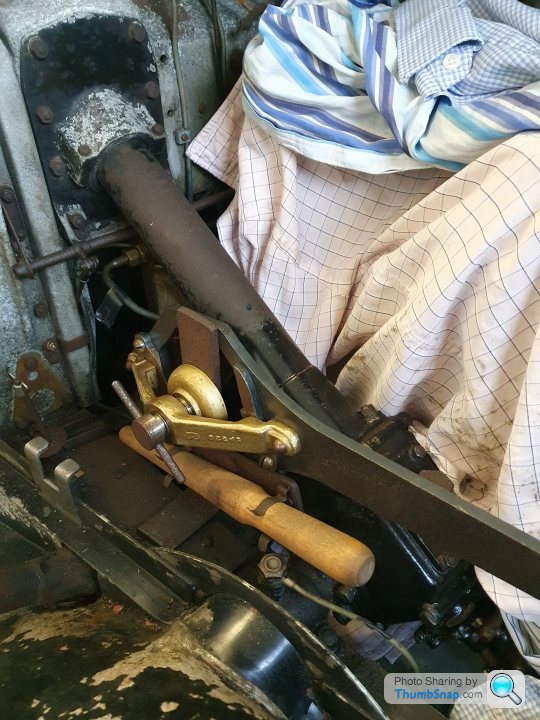
The next system for a thorough checking was the ignition. Previously I have discussed the coil and magneto set-up used here and how the magneto timing adjustment cam was seized. After some further thought, I took the magneto off the engine again and set about trying to get the timing adjustment cam to move. I struggled to find any images of a disassembled Watford R01 magneto, so it was a little difficult to work out what should come apart. With more penetrating oil and some light taps with a hammer / screwdriver, the cam came out and suddenly all was clear! It would seem that there is a small felt wiper under the cam, probably to retain oil and lubricate it, but this had long since dried out, become full of water and then caused the cam to rust into the housing. Once cleaned up, it moved smoothly. The bearings seem good too, so it will just need some new contacts to be fitted before it is used again. It is encouraging that it creates a nice powerful spark when flicked over.

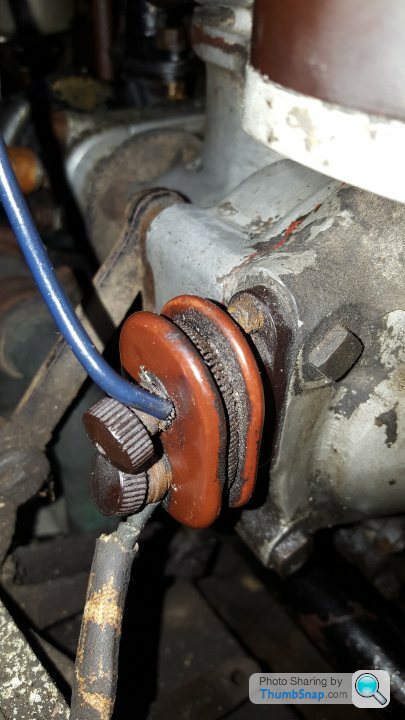
Moving on to the other side of the engine, I completed a detailed clean of the distributor and, in doing so, identified that a later replacement condenser had been fitted. This is to be expected and was something that was included in the R-R Technical Service Books. I cleaned the exterior of the coil and down to the ballast resistor. I checked the resistance of the part and the continuity. The mounting points seemed to have lived a hard life, but appeared to be intact! I also was able to confirm that the markings on the distributor matched the original build sheets.


For a bit of light relief, I continued sifting through the piles of spares which had come with the car and I had been dividing between this car (20/25) and the earlier 20HP (GLN76). One set of parts which confounded me were a set of curved cast aluminium sections, which clearly looked important, but I could not fathom out what they were.


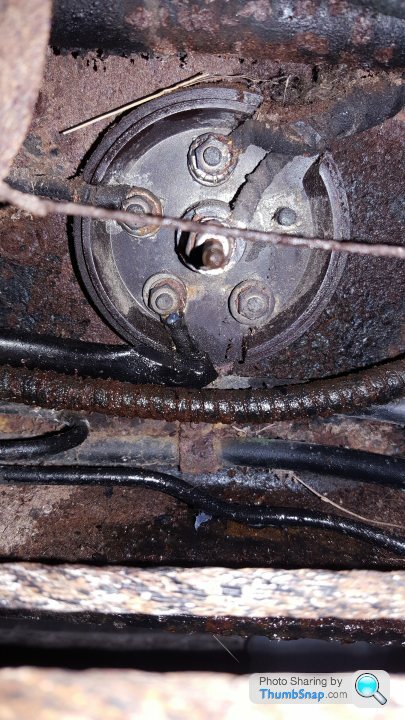
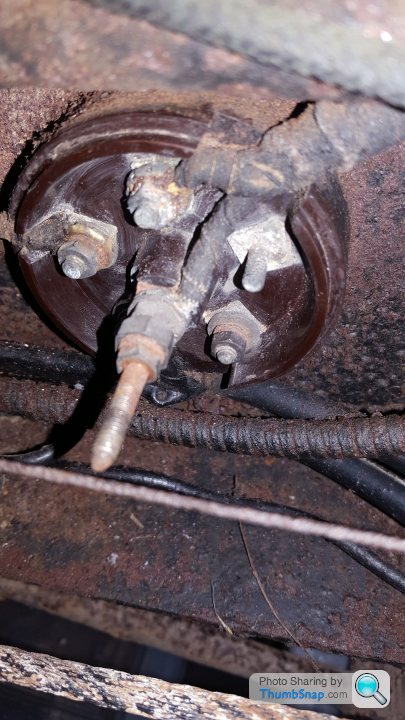
A chance close up image online of another 20/25 which was up for sale showed that these parts had something to do with the brakes – they seemed to be fitted around the outside of the brake drums. Some further digging showed that these were, in fact, anti squeal plates, fitted by R-R to improve the brake refinement of both front and rear brakes. Eventually these were replaced through design changes to the drums, including the incorporation of finned brake drums for better cooling performance and wall stiffness. The image below shows the front LH drum with the plates held in place with garden string! - a temporary solution, as a large coil spring holds them in place in service! Well, that was another puzzle solved!
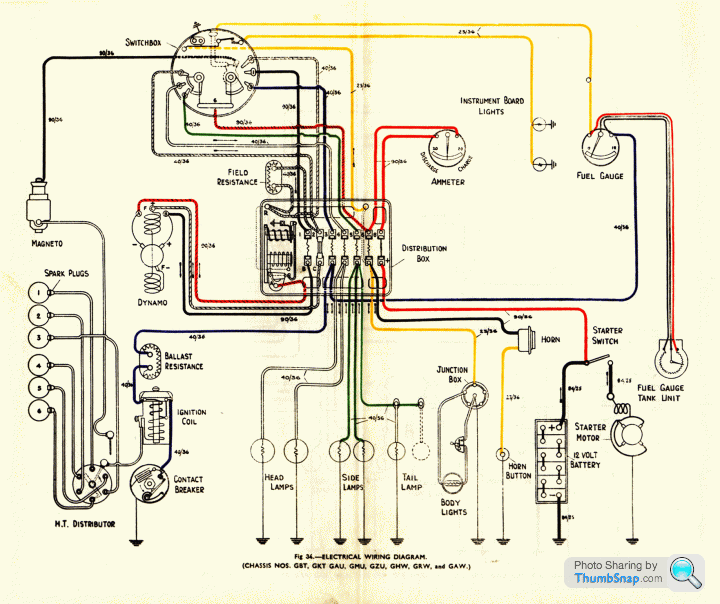
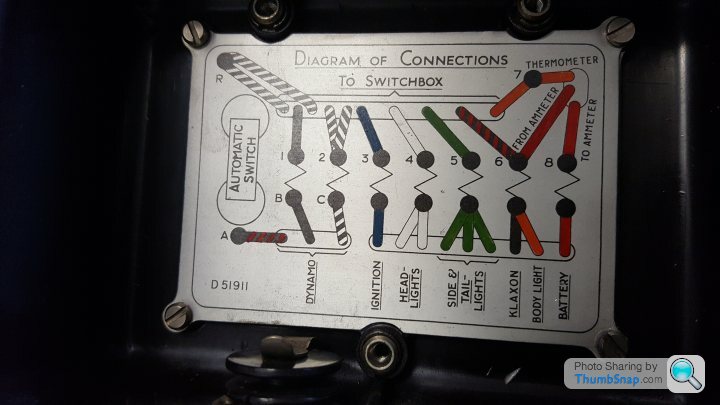
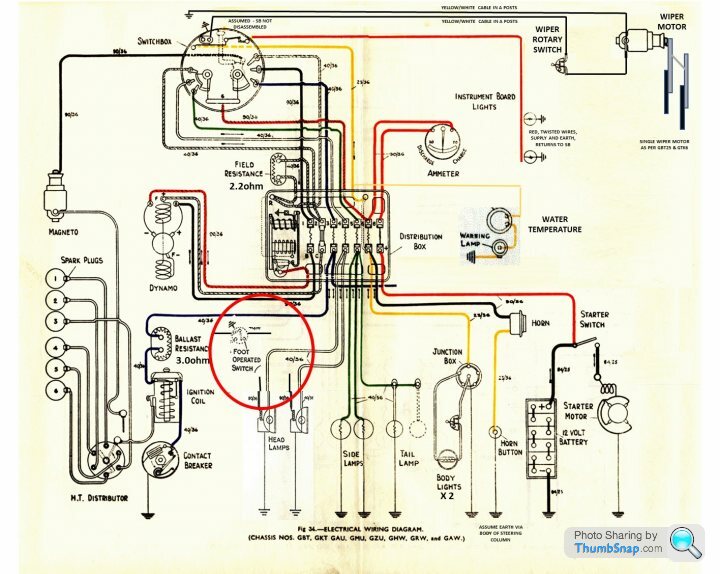
The last of the “systems” for investigation was the car’s electrical system. This was one of the real joys of the restoration so far, as it has been a great challenge getting my head around it all. Of course, you start with the “official” published wiring diagram for the car and then begin to check it against what you actually can find on the car. This yielded 2 immediate issues – firstly, the published diagram for my chassis series (GBT) did not actually match what was fitted and secondly, 90 years and 9 previous owners had plenty of opportunity to modify, bodge and generally mess about with everything!
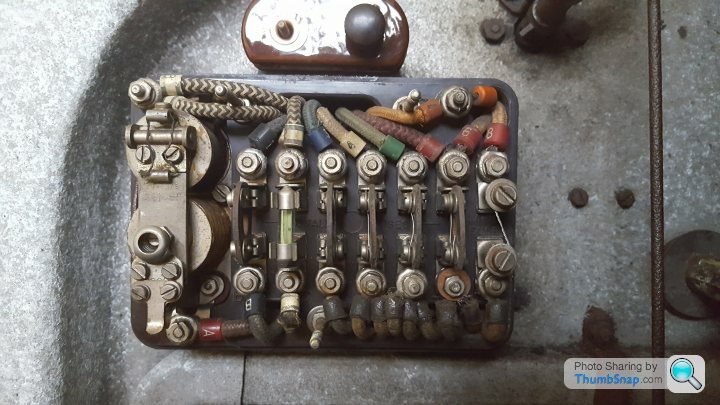
I started at the main electrical distribution box and fuse board, which looked in remarkably good condition. It was great to see the high quality R-R fitted fabric covered wiring, each wire with a clear identity marker on it and terminated with a Ross-Courtney circular fitting. It was then a process of following each of the circuits away from this junction box to the dashboard and the item that they connected to and controlled. This was where it got interesting.
Under the dash there was clearly a mix of R-R wiring and much later, low grade owner bodges and modifications. These included some spectacular items, such as the live feed from a switch which wound its way around the throttle pedal(!) – I think the final destination of the feed was some sort of driving lamp, once mounted on the front crossmember – and an odd twin wiper power supply, to replace the original single wiper motor set-up. I made copious notes on what I found and stripped out the “non-standard” wiring, leaving only the original R-R and Park Ward wiring in place. My thinking here being that it will all need a rewire during the rebuild, and at least now I have a “cleaned up” version of the loom to start with!

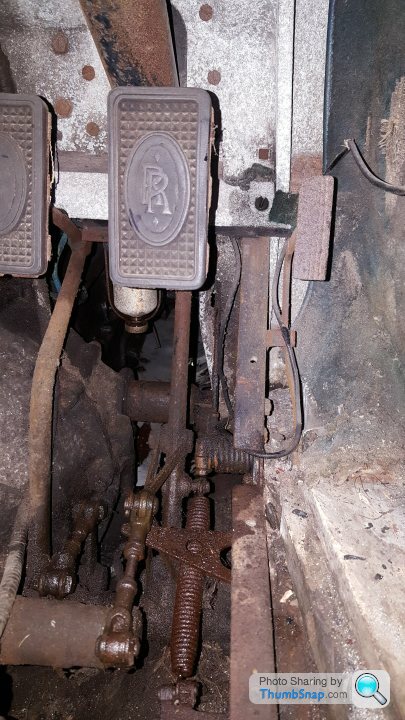
Further rearwards in the chassis, the main junction box on the LH chassis rail was easily identified and cleaned up, along with the retro fitted brake and rear lights. One thing that continues to puzzle me is exactly how the headlamp dipping system works. While the floor mounted dip switch is clear to see, as it the solenoid system for pulling the lamp reflectors in to the dipped position, the exact connection of these two remains a mystery. My hope is that once the engine is out, better access to the front chassis rails will allow this to be finally put to bed!

So, having put off dealing with the engine for as long as I could, it was time to confront the issues of the missing cylinder head and cracked block. With the very large bill for a full engine rebuild ringing in my ears, I gratefully accepted advice from other R-R owners to go back and have a much more detailed look at the engine, before condemning it all. The thinking here being that many small horsepower engines survive extremes of misuse and abuse very well and it could be possible that the bottom end of my engine (P2T) is salvageable. So the key question was – how bad was the engine really?
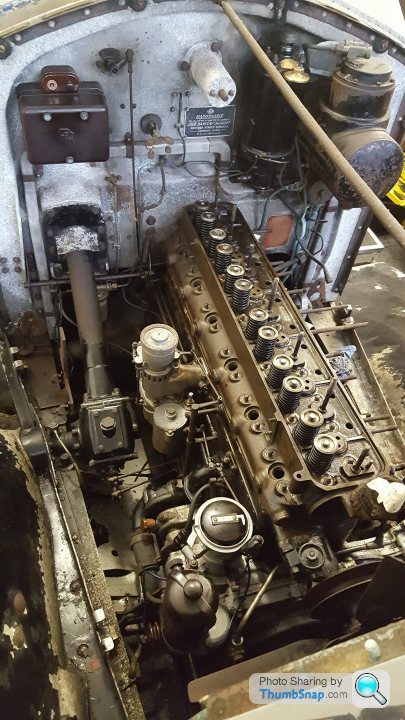
To this end, the plan was to strip the engine down in situ to be able to remove the block, seized pistons and sump, thus allowing inspection of the crankshaft, big end bearings and their surfaces, as well as the timing gear.

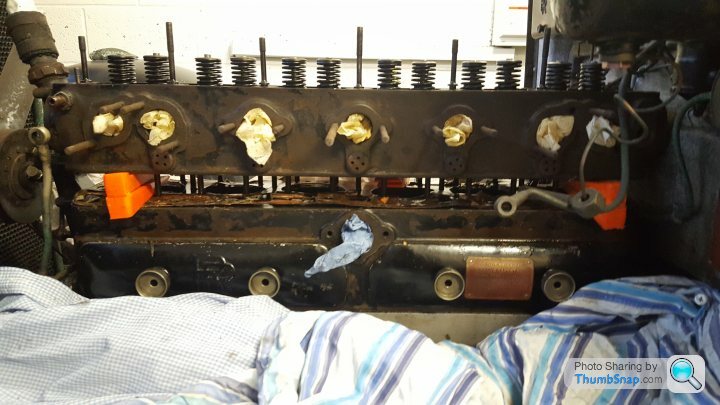

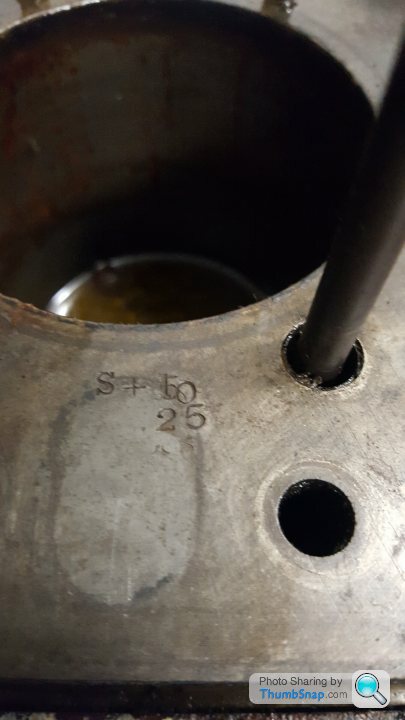
The first stage was to remove the old incorrectly fitted 20HP head. Unfortunately, in earlier attempts to remove this, it has been stuck solid. I was not keen to damage the fragile (and valuable) cast iron part, so after dosing everything with lots more penetrating oil I set about trying to split the head from the block using woodcutter plastic splitting wedges (apparently these are used when working with chain saws – the idea being that they are soft, so if they get snagged by the chainsaw while cutting, no damage is done!). They worked like a charm and I soon had the head off. Having cleaned up the top of the block, there were some lovely engine fitter’s marks (presumably from the R-R Hythe Road works), showing the series of overbores completed on the engine over the years.

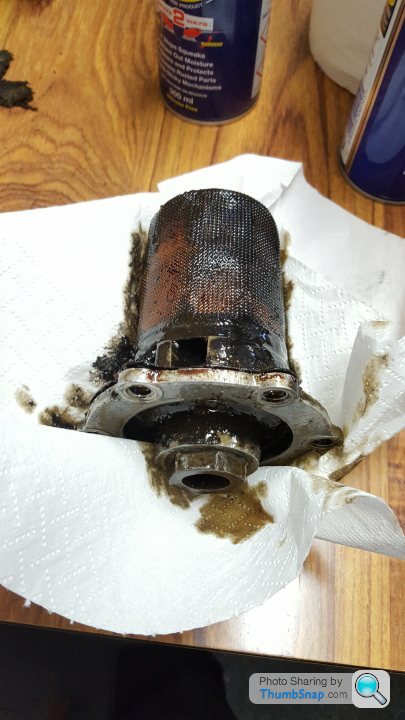
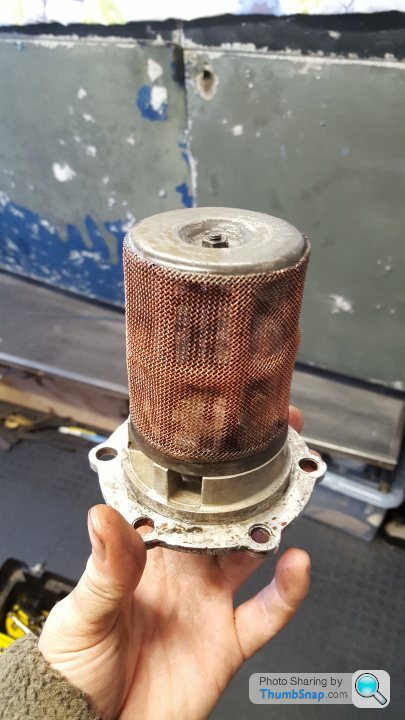
The next stage was to drain the sump and clean the oil strainer. After fighting with the gasket to get the strainer off, I eventually got the sump drained. Out came 50+ year old oil, diesel, penetrating oil and a fair amount of water! The strainer was caked in a fine oily sludge, which took an age to get rid of – and might give a clue as to the condition of the rest of the bottom of the engine! – but on the plus side there were no large lumps of metal evident in the mess. Once cleaned up, it was refitted to seal the sump back up again.


The last stage was to prepare for the sump removal. This required freeing off all the fixing for the radiator, the headlamps and the undersheets, so that they could be removed to allow the sump to be dropped and then the block lifted off. It was clear at this point that this level of disassembly would mean that the car would take up much more space than available, so thoughts turned to the piles of 20HP parts sat alongside the 20/25.
I have spent the early part of 2023 focussing on the clean up and sale of the 20HP parts, which is freeing up space and cash to help with the restoration of the 20/25. However, in the meantime I have been able to do a few small jobs on the 20/25.
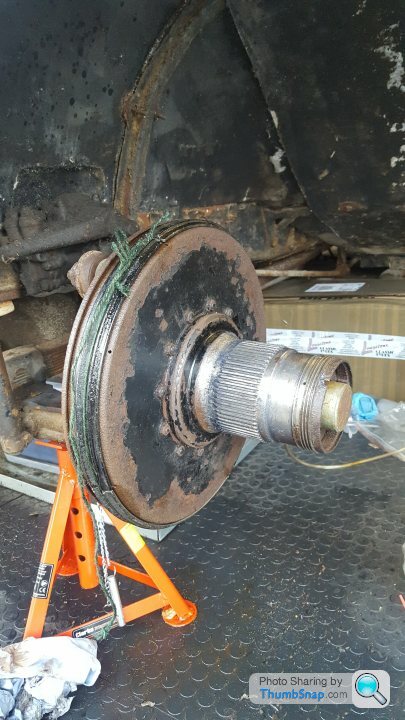
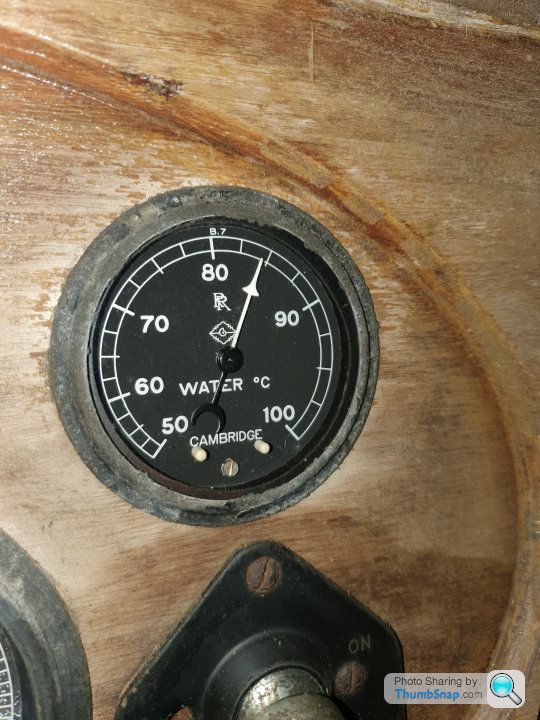
The first was to see if I could get more of the gauges working on the dash. I knew that the speedo and odometer / trip worked, as this had sprung back into life when I had been freeing up the rear axle. The next gauge that was easy to check was the water temperature gauge. I simply placed the temperature probe in the engine bay into a cup of hot water and, would you believe it, it worked first time, registering a healthy temperature! Further checks, using a digital thermometer, confirmed that it was reading to within a degree of the water temperature – not bad for a 90 year old part which hasn’t been used for 50+ years! I then tried to see if I could get the Hobson K-S Telegage fuel gauge to work, by adding some diesel to the fuel tank – but no dice. I think the small bore capillary tube in the dash is probably blocked, so that will need to come apart to be cleaned in due course.

Finally, and as a distraction for a period while I was laid low with a slipped disc in my back, I have been buying up and collecting together some of the missing items for the car. My purchases to date include a pair of bumper badges (one for the 6th Airborne parachute division and the Royal Army Medical Corps – in memory of the car’s 1st owner), some suitable Park Ward interior and exterior door handles. An rare, and slightly earlier, Elliot Ammeter – to be used as a donor or replacement for the rather battered ammeter in my car, a Dunlop folding jack handle, a Klaxon and a Boa-Constrictor bulb horn. These will need some fettling to fit and some small brackets making, and it is very satisfying to be able to knock off many of the hard to find elements which will be needed for the rebuild.
That brings us up to date – I hope you have enjoyed the story so far!
Take care,
AF
The next system for a thorough checking was the ignition. Previously I have discussed the coil and magneto set-up used here and how the magneto timing adjustment cam was seized. After some further thought, I took the magneto off the engine again and set about trying to get the timing adjustment cam to move. I struggled to find any images of a disassembled Watford R01 magneto, so it was a little difficult to work out what should come apart. With more penetrating oil and some light taps with a hammer / screwdriver, the cam came out and suddenly all was clear! It would seem that there is a small felt wiper under the cam, probably to retain oil and lubricate it, but this had long since dried out, become full of water and then caused the cam to rust into the housing. Once cleaned up, it moved smoothly. The bearings seem good too, so it will just need some new contacts to be fitted before it is used again. It is encouraging that it creates a nice powerful spark when flicked over.
Moving on to the other side of the engine, I completed a detailed clean of the distributor and, in doing so, identified that a later replacement condenser had been fitted. This is to be expected and was something that was included in the R-R Technical Service Books. I cleaned the exterior of the coil and down to the ballast resistor. I checked the resistance of the part and the continuity. The mounting points seemed to have lived a hard life, but appeared to be intact! I also was able to confirm that the markings on the distributor matched the original build sheets.
For a bit of light relief, I continued sifting through the piles of spares which had come with the car and I had been dividing between this car (20/25) and the earlier 20HP (GLN76). One set of parts which confounded me were a set of curved cast aluminium sections, which clearly looked important, but I could not fathom out what they were.
A chance close up image online of another 20/25 which was up for sale showed that these parts had something to do with the brakes – they seemed to be fitted around the outside of the brake drums. Some further digging showed that these were, in fact, anti squeal plates, fitted by R-R to improve the brake refinement of both front and rear brakes. Eventually these were replaced through design changes to the drums, including the incorporation of finned brake drums for better cooling performance and wall stiffness. The image below shows the front LH drum with the plates held in place with garden string! - a temporary solution, as a large coil spring holds them in place in service! Well, that was another puzzle solved!
The last of the “systems” for investigation was the car’s electrical system. This was one of the real joys of the restoration so far, as it has been a great challenge getting my head around it all. Of course, you start with the “official” published wiring diagram for the car and then begin to check it against what you actually can find on the car. This yielded 2 immediate issues – firstly, the published diagram for my chassis series (GBT) did not actually match what was fitted and secondly, 90 years and 9 previous owners had plenty of opportunity to modify, bodge and generally mess about with everything!
I started at the main electrical distribution box and fuse board, which looked in remarkably good condition. It was great to see the high quality R-R fitted fabric covered wiring, each wire with a clear identity marker on it and terminated with a Ross-Courtney circular fitting. It was then a process of following each of the circuits away from this junction box to the dashboard and the item that they connected to and controlled. This was where it got interesting.
Under the dash there was clearly a mix of R-R wiring and much later, low grade owner bodges and modifications. These included some spectacular items, such as the live feed from a switch which wound its way around the throttle pedal(!) – I think the final destination of the feed was some sort of driving lamp, once mounted on the front crossmember – and an odd twin wiper power supply, to replace the original single wiper motor set-up. I made copious notes on what I found and stripped out the “non-standard” wiring, leaving only the original R-R and Park Ward wiring in place. My thinking here being that it will all need a rewire during the rebuild, and at least now I have a “cleaned up” version of the loom to start with!
Further rearwards in the chassis, the main junction box on the LH chassis rail was easily identified and cleaned up, along with the retro fitted brake and rear lights. One thing that continues to puzzle me is exactly how the headlamp dipping system works. While the floor mounted dip switch is clear to see, as it the solenoid system for pulling the lamp reflectors in to the dipped position, the exact connection of these two remains a mystery. My hope is that once the engine is out, better access to the front chassis rails will allow this to be finally put to bed!
So, having put off dealing with the engine for as long as I could, it was time to confront the issues of the missing cylinder head and cracked block. With the very large bill for a full engine rebuild ringing in my ears, I gratefully accepted advice from other R-R owners to go back and have a much more detailed look at the engine, before condemning it all. The thinking here being that many small horsepower engines survive extremes of misuse and abuse very well and it could be possible that the bottom end of my engine (P2T) is salvageable. So the key question was – how bad was the engine really?
To this end, the plan was to strip the engine down in situ to be able to remove the block, seized pistons and sump, thus allowing inspection of the crankshaft, big end bearings and their surfaces, as well as the timing gear.
The first stage was to remove the old incorrectly fitted 20HP head. Unfortunately, in earlier attempts to remove this, it has been stuck solid. I was not keen to damage the fragile (and valuable) cast iron part, so after dosing everything with lots more penetrating oil I set about trying to split the head from the block using woodcutter plastic splitting wedges (apparently these are used when working with chain saws – the idea being that they are soft, so if they get snagged by the chainsaw while cutting, no damage is done!). They worked like a charm and I soon had the head off. Having cleaned up the top of the block, there were some lovely engine fitter’s marks (presumably from the R-R Hythe Road works), showing the series of overbores completed on the engine over the years.
The next stage was to drain the sump and clean the oil strainer. After fighting with the gasket to get the strainer off, I eventually got the sump drained. Out came 50+ year old oil, diesel, penetrating oil and a fair amount of water! The strainer was caked in a fine oily sludge, which took an age to get rid of – and might give a clue as to the condition of the rest of the bottom of the engine! – but on the plus side there were no large lumps of metal evident in the mess. Once cleaned up, it was refitted to seal the sump back up again.
The last stage was to prepare for the sump removal. This required freeing off all the fixing for the radiator, the headlamps and the undersheets, so that they could be removed to allow the sump to be dropped and then the block lifted off. It was clear at this point that this level of disassembly would mean that the car would take up much more space than available, so thoughts turned to the piles of 20HP parts sat alongside the 20/25.
I have spent the early part of 2023 focussing on the clean up and sale of the 20HP parts, which is freeing up space and cash to help with the restoration of the 20/25. However, in the meantime I have been able to do a few small jobs on the 20/25.
The first was to see if I could get more of the gauges working on the dash. I knew that the speedo and odometer / trip worked, as this had sprung back into life when I had been freeing up the rear axle. The next gauge that was easy to check was the water temperature gauge. I simply placed the temperature probe in the engine bay into a cup of hot water and, would you believe it, it worked first time, registering a healthy temperature! Further checks, using a digital thermometer, confirmed that it was reading to within a degree of the water temperature – not bad for a 90 year old part which hasn’t been used for 50+ years! I then tried to see if I could get the Hobson K-S Telegage fuel gauge to work, by adding some diesel to the fuel tank – but no dice. I think the small bore capillary tube in the dash is probably blocked, so that will need to come apart to be cleaned in due course.
Finally, and as a distraction for a period while I was laid low with a slipped disc in my back, I have been buying up and collecting together some of the missing items for the car. My purchases to date include a pair of bumper badges (one for the 6th Airborne parachute division and the Royal Army Medical Corps – in memory of the car’s 1st owner), some suitable Park Ward interior and exterior door handles. An rare, and slightly earlier, Elliot Ammeter – to be used as a donor or replacement for the rather battered ammeter in my car, a Dunlop folding jack handle, a Klaxon and a Boa-Constrictor bulb horn. These will need some fettling to fit and some small brackets making, and it is very satisfying to be able to knock off many of the hard to find elements which will be needed for the rebuild.
That brings us up to date – I hope you have enjoyed the story so far!
Take care,
AF
Hello all,
Many thanks for the kind comments!
@ Gary - it may well be some time before I get to repairing fuel pipes - but I will let you know when I do!
Just for completeness, I thought I'd share some pictures of the bits and pieces that I have bought for the car, but not yet fitted. Normally on PH, we post images of new brakes, suspension parts or shiny parts to be added.... these are a bit different!
Car badges - a change from the usual AA or RAC badges fitted to many pre war cars.
6th Airborne Division & Royal Army Medical Corps
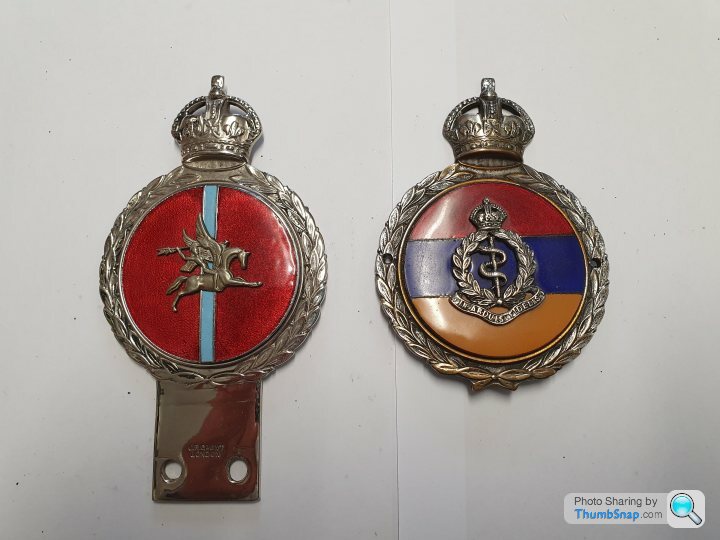
These are in memory of the car's first owner, Lt Col E I Bruce Harvey, who was CO of 225th Parachute Field Ambulance, attached to 5th Parachute Regiment, part of the 6th Airborne Division, who landed on D Day and was awarded the DSO for his actions in treating the wounded in the first days of the invasion. The picture below is one I have found of him crossing Pegasus Bridge in his jeep.

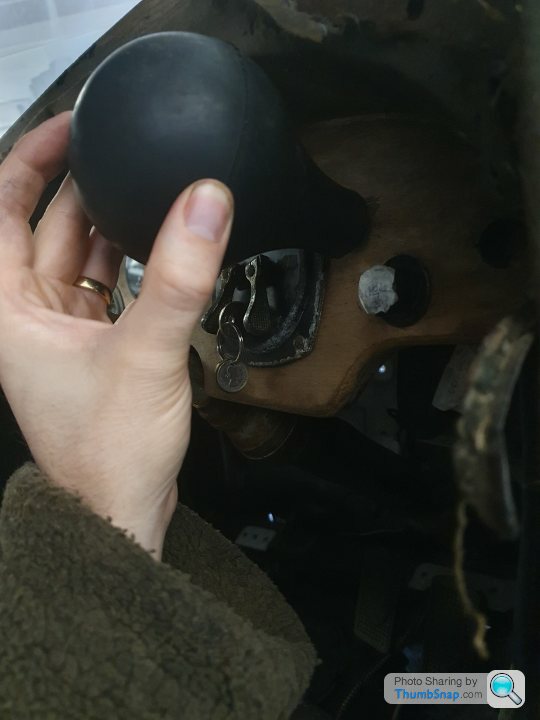
Dunlop No.10 jack handle.... just need to find a No.10 jack now!


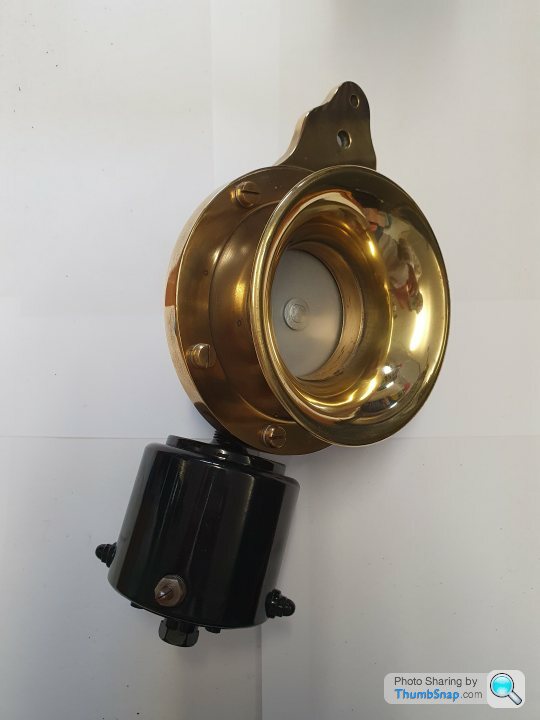
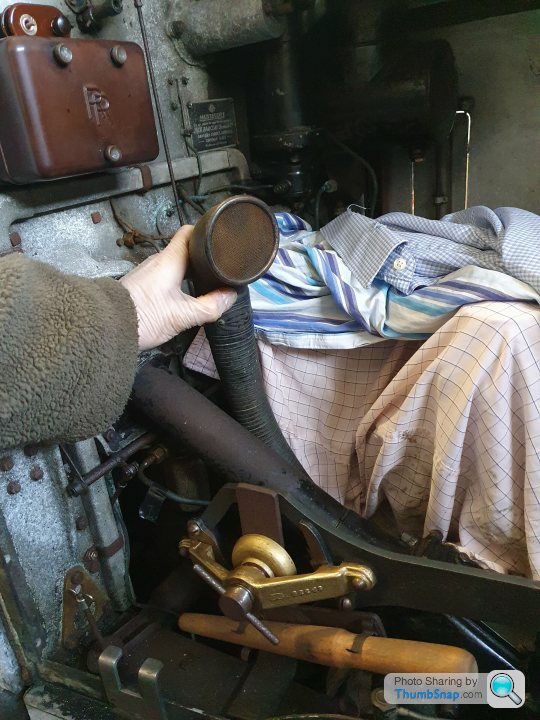
A1 Klaxon - the classic "awooga" type horn - this one was probably fitted to a Rolls-Royce Phantom 1 from late 1929, based on the fittings and the serial number, but with some modification, it will work fine on the 20/25
The other horn is a Boa-Constrictor bulb horn - the "honk-honk" horn. I will need to sort out some missing brackets for this one, but the original mounting points are fairly obvious on the body.
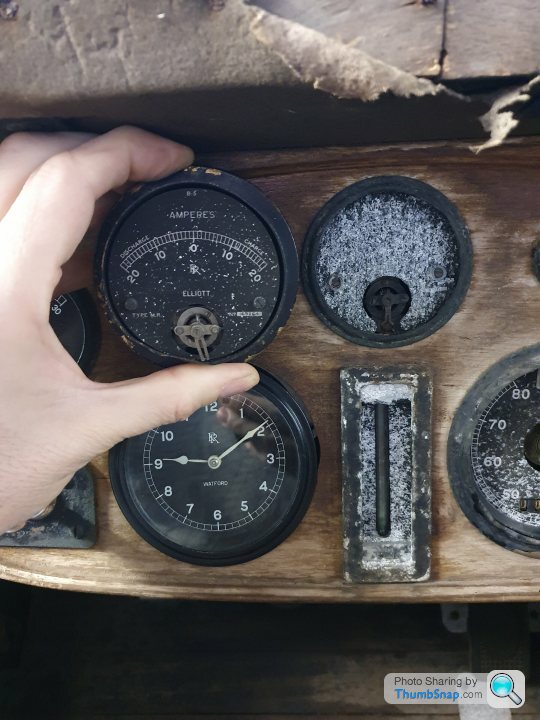
Inside the car, I have found an 8 day mechanical clock which is a good match for the rest of the dashboard. I think this is possibly slightly later than my car, but I have found some images of a car only a few months later fitted with such a clock, so it isn't too far out.


The badly damaged Elliot ammeter now has a potential donor - this time sourced from the nice people at the Real Car Company in north Wales. This one is earlier than mine, probably dating from around 1930.

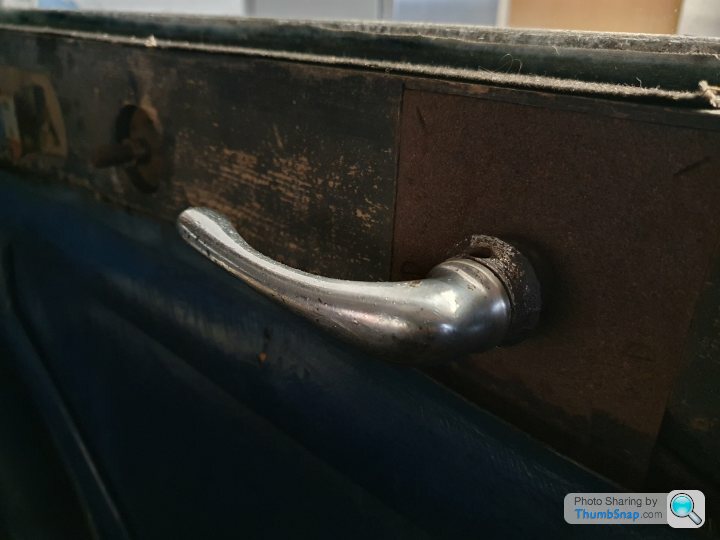
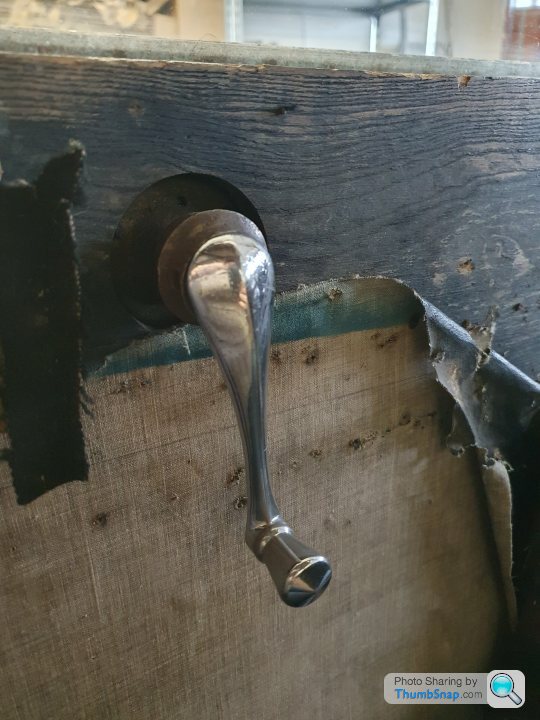
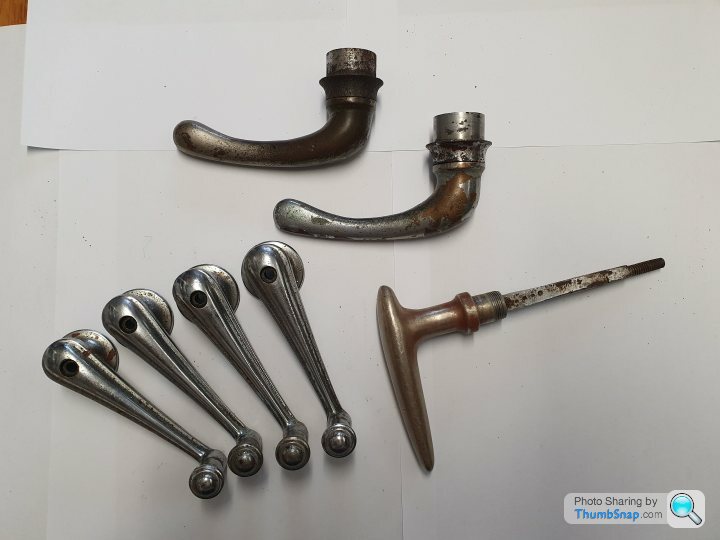
Getting the coachbuilder specific fittings will always be something of a challenge. So I was very pleased to be able to track down some Park Ward exterior and interior door handles and escutcheons. I almost have a full set now!!!
So that is now everything fully up to date!
Take care,
AF
Many thanks for the kind comments!
@ Gary - it may well be some time before I get to repairing fuel pipes - but I will let you know when I do!
Just for completeness, I thought I'd share some pictures of the bits and pieces that I have bought for the car, but not yet fitted. Normally on PH, we post images of new brakes, suspension parts or shiny parts to be added.... these are a bit different!
Car badges - a change from the usual AA or RAC badges fitted to many pre war cars.
6th Airborne Division & Royal Army Medical Corps
These are in memory of the car's first owner, Lt Col E I Bruce Harvey, who was CO of 225th Parachute Field Ambulance, attached to 5th Parachute Regiment, part of the 6th Airborne Division, who landed on D Day and was awarded the DSO for his actions in treating the wounded in the first days of the invasion. The picture below is one I have found of him crossing Pegasus Bridge in his jeep.
Dunlop No.10 jack handle.... just need to find a No.10 jack now!
A1 Klaxon - the classic "awooga" type horn - this one was probably fitted to a Rolls-Royce Phantom 1 from late 1929, based on the fittings and the serial number, but with some modification, it will work fine on the 20/25
The other horn is a Boa-Constrictor bulb horn - the "honk-honk" horn. I will need to sort out some missing brackets for this one, but the original mounting points are fairly obvious on the body.
Inside the car, I have found an 8 day mechanical clock which is a good match for the rest of the dashboard. I think this is possibly slightly later than my car, but I have found some images of a car only a few months later fitted with such a clock, so it isn't too far out.
The badly damaged Elliot ammeter now has a potential donor - this time sourced from the nice people at the Real Car Company in north Wales. This one is earlier than mine, probably dating from around 1930.
Getting the coachbuilder specific fittings will always be something of a challenge. So I was very pleased to be able to track down some Park Ward exterior and interior door handles and escutcheons. I almost have a full set now!!!
So that is now everything fully up to date!
Take care,
AF
Edited by andyfeaver on Monday 6th March 12:27
Gassing Station | Readers' Cars | Top of Page | What's New | My Stuff