Budget Vauxhall VX220
Discussion


I thought it was about time I gave another update
.
So late last year I was an idiot and impulse bought a Discovery 3 as my daily driver. I’ve had a couple of Discovery 2’s and loved them but I was getting tired of the agricultural way they drove, especially as I regularly did long motorway miles.
Having worked at JLR for 6 years and driven all of the product lineup I was hankering after one of the more modern cars and when this final model year of D3 came up for sale I had to take a look, and even though it has the potential to break in numerous spectacularly expensive ways I bought it anyway… and it’s fantastic, it’s not really a comparable car to the old D2 it’s that much of a step up but anyway onto the VX.

Buying the D3 meant that there were far too many cars on the drive and the D2 had to go before I could really start working on the suspension rebuild. Eventually I managed to shift the D2 which meant work could start on the VX.
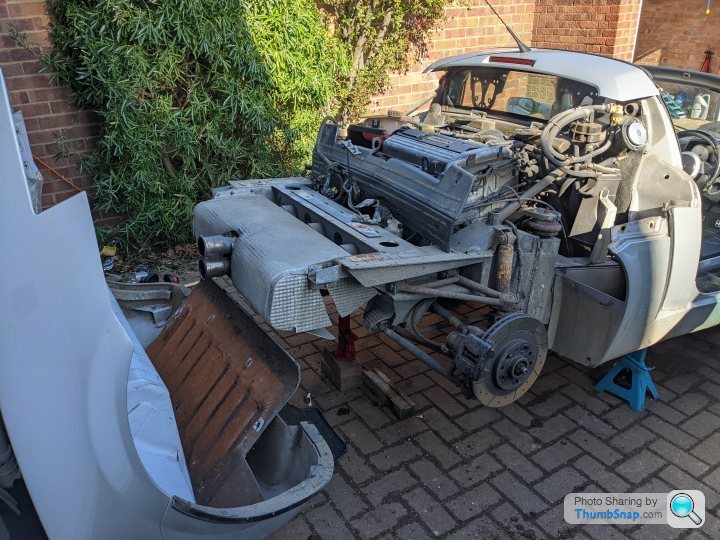
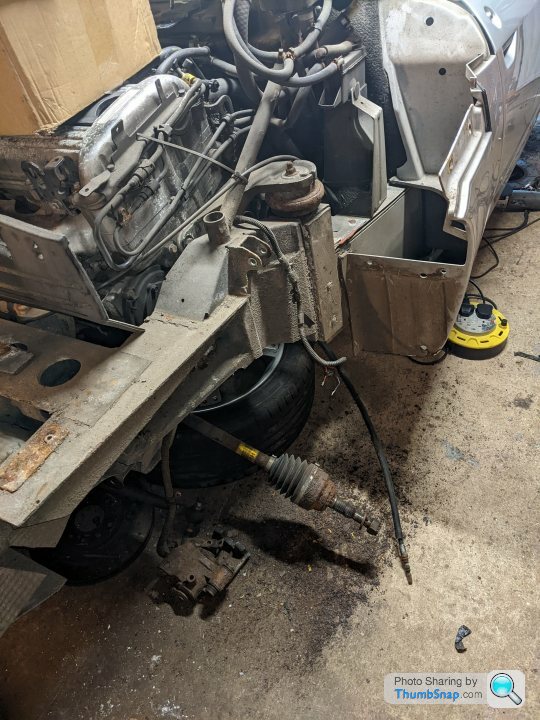
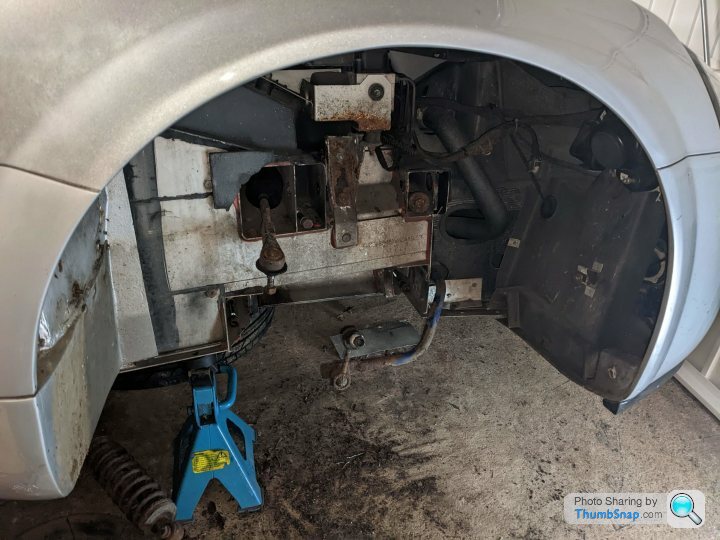
The first step was to get the rear clamshell off, for two reasons, one was that I wanted to swap the parp cannon silencer and secondly it just gives so much more access for getting to suspension especially in a single garage!
I found a handy guide on the VX220 forums and set to work, and very quickly got my first taste of just how bloody corroded everything on this car was. I seem to have a penchant for buying cars that like to self weight save, I own a rusty mk1 mx5 and there’s no such thing as a rust free Landrover so when I bought the VX I thought I was finally onto a winner, I mean it’s made from aluminium and plastic right?
Well I was so wrong removing the fixings that bolt the rear clam to the car was hideous, it was a mixture of snapped bolts, bolts that span their captive fixings from the inside, or bolts that had welded themselves to the glass fibre meaning that the only was they were coming out was with glass fibre attached. What was particularly painful was that it was clear someone had removed the rear clam in the past because none of the bolts, washers, anything matched it was clearly all just random bolts they’d cobbled together to stick it back on, and they were all knackered. The absolute best bit was the two main M8 bolts that bolt the clam to the bulkhead were missing, they just hadn’t bothered with them. Anyway I’ve ordered a full stainless fixing kit for the clam when it goes back together so in the future this job will be a doddle in comparison.
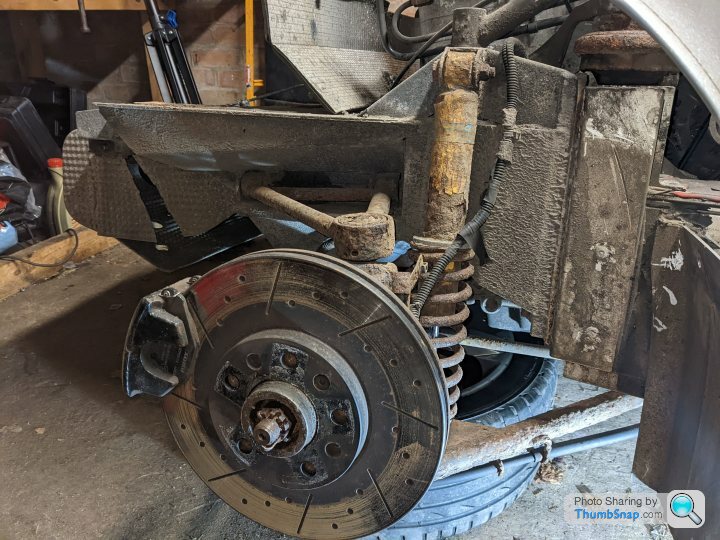
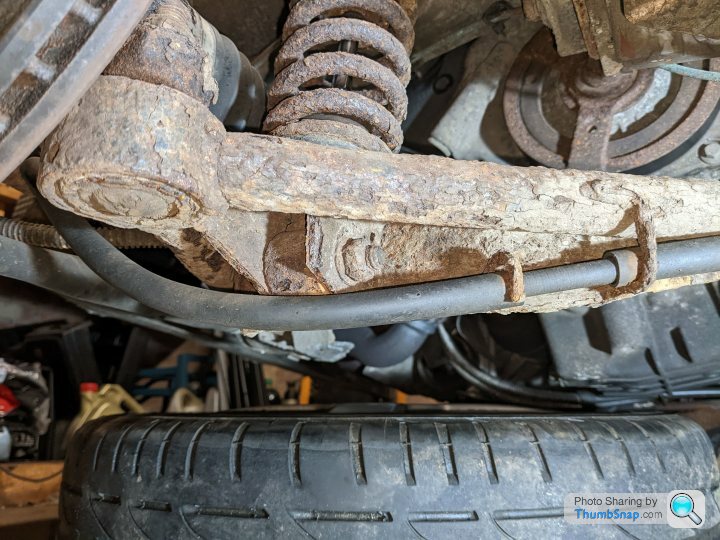
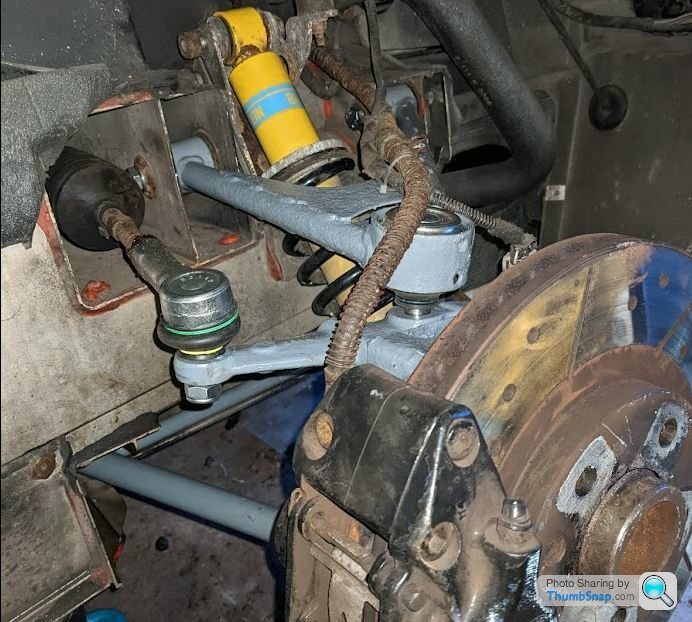
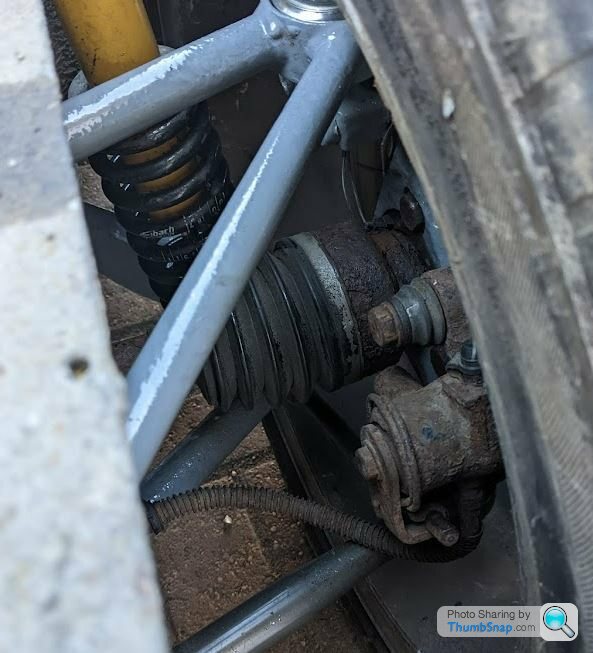
So finally I was able to remove the clam, it’s quite a site removing the rear clam on a lotus chassis, it’s not a structural member at all, in fact it’s all quite ‘race car’ with the suspension bolted to the backbone of the car. What greeted me when the clam was removed however was really quite shocking, I don’t know where this car has been used previously to me buying it but it’s like it’s been parked in salt water everyday for its whole life, the rear shocks in particular looked like they were ready to snap, the lower rear wishbones looked like a relics recovered from the Titanic. I posted a few pictures on the VX220 facebook group and everyone agreed they haven’t seen one this bad before, how splendid.
 [url]
[url]
 [url]
[url]
 |https://thumbsnap.com/7kcmBmaR[/url]
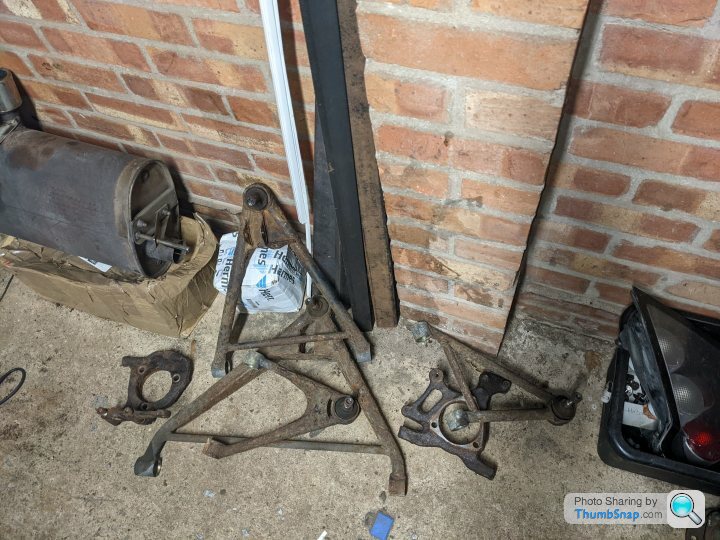
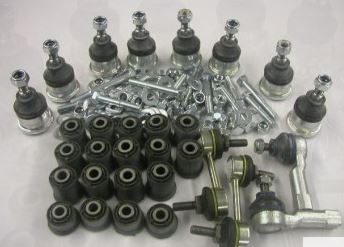
I had actually picked up a second hand set of the VX220 Bilsteins with the intention of fitting them whilst I sent the older ones back for refurbishment, however the old ones are clearly just way too far gone to ever get reused. I also ordered seriously Lotus’s full suspension rebuild kit which includes all new bushed, balljoints bolts etc, and then I set about pulling all the suspension apart There isn’t much to say about this really it’s a fairly simple job of just unbolting everything and despite the level of corrosion I didn’t really face any issues.
 [url] [url]
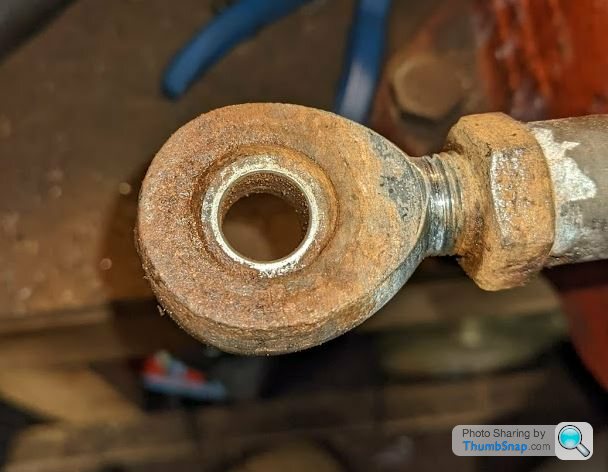
Once I had a pile of suspension arms and hubs, I decided to get them sandblasted, half expecting them to be so rusty that they would just dissolve into dust as he was doing them. However I got quite a nice surprise when I received them back, because whilst they initially looked horrendous, it was actually only cosmetic surface rust and he and I both agreed they were still structurally sound.
 [url]
[url]
 |https://thumbsnap.com/UrgjiLGL[/url]
Anyway that’s quite a long post as it stands. I'll do another update soon with the progress I’ve made rebuilding everything.
Thanks all.
.
So late last year I was an idiot and impulse bought a Discovery 3 as my daily driver. I’ve had a couple of Discovery 2’s and loved them but I was getting tired of the agricultural way they drove, especially as I regularly did long motorway miles.
Having worked at JLR for 6 years and driven all of the product lineup I was hankering after one of the more modern cars and when this final model year of D3 came up for sale I had to take a look, and even though it has the potential to break in numerous spectacularly expensive ways I bought it anyway… and it’s fantastic, it’s not really a comparable car to the old D2 it’s that much of a step up but anyway onto the VX.
Buying the D3 meant that there were far too many cars on the drive and the D2 had to go before I could really start working on the suspension rebuild. Eventually I managed to shift the D2 which meant work could start on the VX.
The first step was to get the rear clamshell off, for two reasons, one was that I wanted to swap the parp cannon silencer and secondly it just gives so much more access for getting to suspension especially in a single garage!
I found a handy guide on the VX220 forums and set to work, and very quickly got my first taste of just how bloody corroded everything on this car was. I seem to have a penchant for buying cars that like to self weight save, I own a rusty mk1 mx5 and there’s no such thing as a rust free Landrover so when I bought the VX I thought I was finally onto a winner, I mean it’s made from aluminium and plastic right?
Well I was so wrong removing the fixings that bolt the rear clam to the car was hideous, it was a mixture of snapped bolts, bolts that span their captive fixings from the inside, or bolts that had welded themselves to the glass fibre meaning that the only was they were coming out was with glass fibre attached. What was particularly painful was that it was clear someone had removed the rear clam in the past because none of the bolts, washers, anything matched it was clearly all just random bolts they’d cobbled together to stick it back on, and they were all knackered. The absolute best bit was the two main M8 bolts that bolt the clam to the bulkhead were missing, they just hadn’t bothered with them. Anyway I’ve ordered a full stainless fixing kit for the clam when it goes back together so in the future this job will be a doddle in comparison.
So finally I was able to remove the clam, it’s quite a site removing the rear clam on a lotus chassis, it’s not a structural member at all, in fact it’s all quite ‘race car’ with the suspension bolted to the backbone of the car. What greeted me when the clam was removed however was really quite shocking, I don’t know where this car has been used previously to me buying it but it’s like it’s been parked in salt water everyday for its whole life, the rear shocks in particular looked like they were ready to snap, the lower rear wishbones looked like a relics recovered from the Titanic. I posted a few pictures on the VX220 facebook group and everyone agreed they haven’t seen one this bad before, how splendid.
[url][url]|https://thumbsnap.com/7kcmBmaR[/url]I had actually picked up a second hand set of the VX220 Bilsteins with the intention of fitting them whilst I sent the older ones back for refurbishment, however the old ones are clearly just way too far gone to ever get reused. I also ordered seriously Lotus’s full suspension rebuild kit which includes all new bushed, balljoints bolts etc, and then I set about pulling all the suspension apart There isn’t much to say about this really it’s a fairly simple job of just unbolting everything and despite the level of corrosion I didn’t really face any issues.
[url] [url]Once I had a pile of suspension arms and hubs, I decided to get them sandblasted, half expecting them to be so rusty that they would just dissolve into dust as he was doing them. However I got quite a nice surprise when I received them back, because whilst they initially looked horrendous, it was actually only cosmetic surface rust and he and I both agreed they were still structurally sound.
[url]|https://thumbsnap.com/UrgjiLGL[/url]Anyway that’s quite a long post as it stands. I'll do another update soon with the progress I’ve made rebuilding everything.
Thanks all.
Edited by andrewc2102 on Thursday 19th May 15:10


Progress update
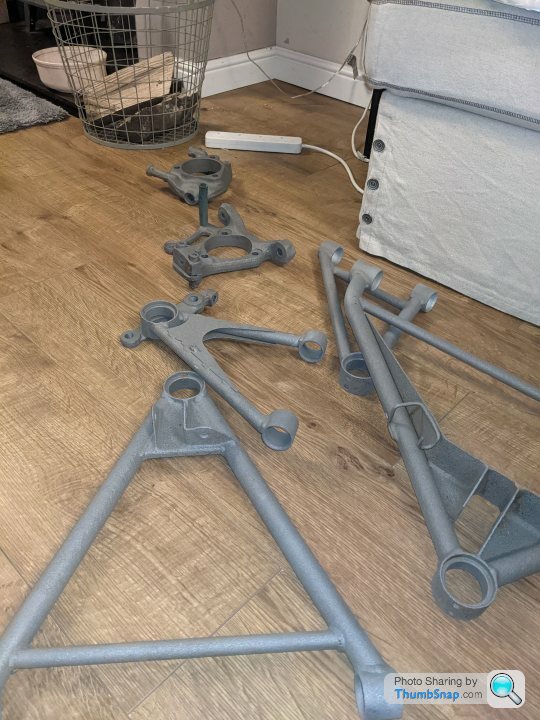
So once receiving the sandblasted arms back and determining that they’re actually still fit for purpose I needed to decided what finish I was going to have them done in.
After looking around at options like powdercoating I decided to paint them myself in the end for the following reasons:
1. I’m a tight northerer and it’s much cheaper
2. I like to DIY as much as I can and this meant I could straight away start work and not have to wait on someone else.
3. The car is garaged and will never see salty conditions again in my ownership so even if the finish is less effective it wasn’t really going to be an
issue.
In the end I decided to opt for a paint called POR15, a colleague put me onto this stuff a few years back and I’d used it on Landrovers and had been really impressed with the finish it gave, it sets rock hard and doesn’t leave brush marks. For some reason I decided to go with the grey, I was inspired by Project Binkey from youtube's fantastic grey finished suspension components however I think if I was to do this again I would go black as the grey hasn’t come out as nicely as I imaged, anyway I'll let you guys be the judge.
Along with 2 coats of POR15 for each component, I ordered seriously Lotus’s VX220 full rebuild kit which is fantastic. It has everything you need to totally refresh the whole car, including all new bushes, balljoints, trackrod ends and every single fixing.
It was then just a case of painting, pressing bushes, pressing balljoints, and just generally fitting shiny new parts to the car, very satisfying and enjoyable. Pictures below of the end results.
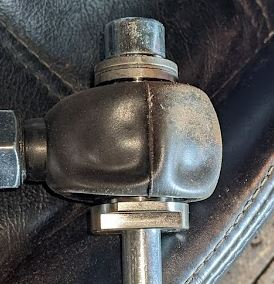
One other rusty surprise the car had up its sleeve was the rear toelinks. Anyone that knows the Elise chassis knows the rear toelinks are a weak point in the suspension and many people replace them with uprated versions. When I was pulling the suspension apart I was pleasantly surprised to see my car was fitted with uprated ‘spitfire’ rear toe links, however as with many of the other components on the car they ended up looking like they had been salt bathed! All 4 rose joints were totally seized and they must have been wreeking havoc to the suspension geometry when the wheels were moving up and down on the road.
Luckily the chap that makes these is a very helpful, he was able to sell me new rosejoints for each end of the toelink effectively making them brand new again, he did also express his shock at how rusty they were stating he’d never ever seen any that bad… that was nice to hear!
Rebuilt with new rosejoints and rubber covers.
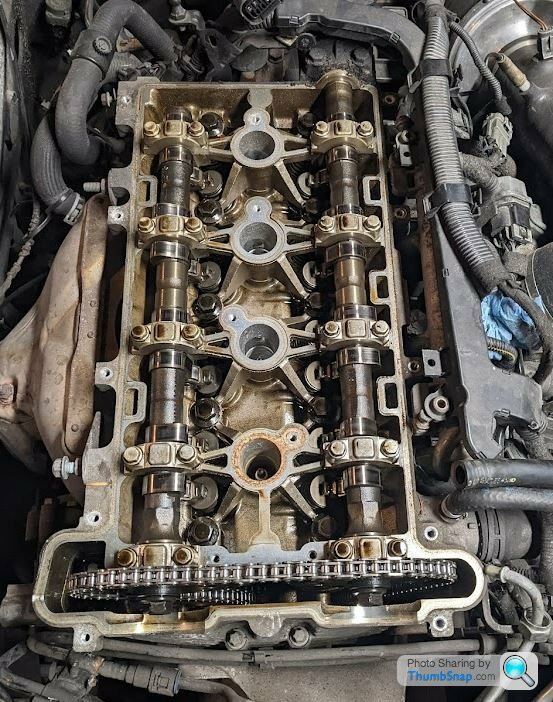
In between waiting for painted parts to dry I was able to get some other jobs done. One was removing the rocker cover and inspecting the camchain, I’m happy to report that the chain tension was nice and tight and the nylon guides looked basically brand new with no signs of wear on them. I decided to leave the chain for now as I genuinely don’t think it needs changing, it can be done with the rear clam fitted in the future anyway.
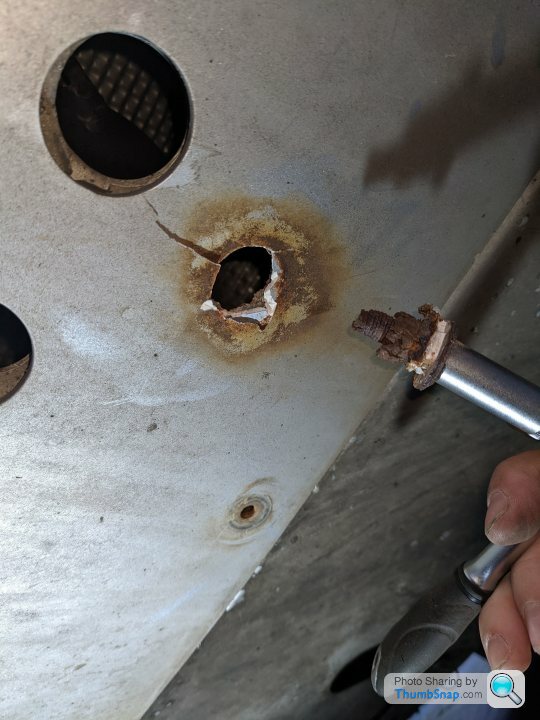
The other thing to do was to change the exhaust, I’m really not a fan of the aftermarket system that’s been fitted, it’s one of those exhausts that’s just loud, and that’s kind of it’s only trick. Ultimately it’s a 4 cylinder Vauxhall engine it’s never going to sound particularly good, and I’d rather it just sounded like Vauxhall intended when it came out of the factory. I’d already picked up a second hand standard backbox and hoped it would be a simple job of swapping the old for new, but the rust festooned b*****d that is my vx obviously had other ideas.
Rusty U bend to Cat joint
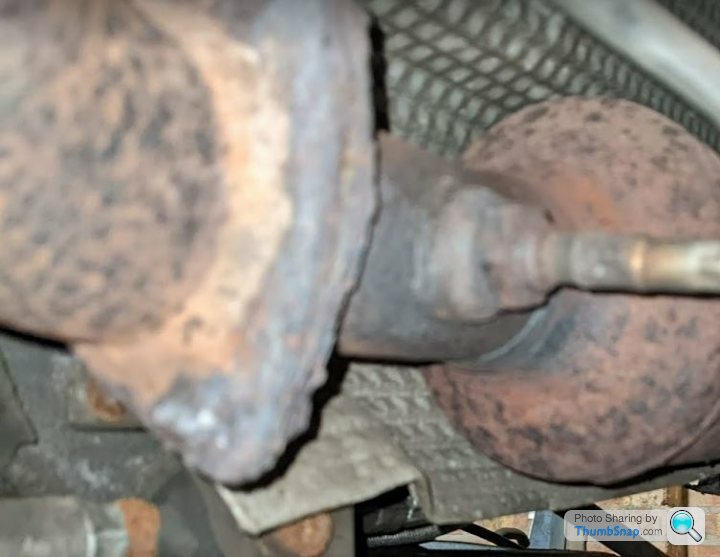
The standard VX220 exhaust system has an exhaust U bend that’s a separate piece whereas this aftermarket backbox had the U bend welded to it, this meant that the original U bend I required had long gone. Also the bolted joint between the U bend and the catalyst was a total mess and was never going to come apart and be re-useable. After some shopping around, it turns out the U bend isn’t sold anywhere new, in the end I came across a guy selling a sports catalyst and U bend and decided this was my best option. So basically the exhaust system has ended up being, standard manifold, sports cat, standard U bend and standard backbox I’m hoping this will be a good combo, I’m also hoping it gets through the MOT emissions test… the first startup was promising with it sounding buch less boomey.
Will get another update soon on refitting the rear clam and getting a full 4 wheel alignment.
Thanks for reading.
So once receiving the sandblasted arms back and determining that they’re actually still fit for purpose I needed to decided what finish I was going to have them done in.
After looking around at options like powdercoating I decided to paint them myself in the end for the following reasons:
1. I’m a tight northerer and it’s much cheaper
2. I like to DIY as much as I can and this meant I could straight away start work and not have to wait on someone else.
3. The car is garaged and will never see salty conditions again in my ownership so even if the finish is less effective it wasn’t really going to be an
issue.
In the end I decided to opt for a paint called POR15, a colleague put me onto this stuff a few years back and I’d used it on Landrovers and had been really impressed with the finish it gave, it sets rock hard and doesn’t leave brush marks. For some reason I decided to go with the grey, I was inspired by Project Binkey from youtube's fantastic grey finished suspension components however I think if I was to do this again I would go black as the grey hasn’t come out as nicely as I imaged, anyway I'll let you guys be the judge.
Along with 2 coats of POR15 for each component, I ordered seriously Lotus’s VX220 full rebuild kit which is fantastic. It has everything you need to totally refresh the whole car, including all new bushes, balljoints, trackrod ends and every single fixing.
It was then just a case of painting, pressing bushes, pressing balljoints, and just generally fitting shiny new parts to the car, very satisfying and enjoyable. Pictures below of the end results.
One other rusty surprise the car had up its sleeve was the rear toelinks. Anyone that knows the Elise chassis knows the rear toelinks are a weak point in the suspension and many people replace them with uprated versions. When I was pulling the suspension apart I was pleasantly surprised to see my car was fitted with uprated ‘spitfire’ rear toe links, however as with many of the other components on the car they ended up looking like they had been salt bathed! All 4 rose joints were totally seized and they must have been wreeking havoc to the suspension geometry when the wheels were moving up and down on the road.
Luckily the chap that makes these is a very helpful, he was able to sell me new rosejoints for each end of the toelink effectively making them brand new again, he did also express his shock at how rusty they were stating he’d never ever seen any that bad… that was nice to hear!
Rebuilt with new rosejoints and rubber covers.
In between waiting for painted parts to dry I was able to get some other jobs done. One was removing the rocker cover and inspecting the camchain, I’m happy to report that the chain tension was nice and tight and the nylon guides looked basically brand new with no signs of wear on them. I decided to leave the chain for now as I genuinely don’t think it needs changing, it can be done with the rear clam fitted in the future anyway.
The other thing to do was to change the exhaust, I’m really not a fan of the aftermarket system that’s been fitted, it’s one of those exhausts that’s just loud, and that’s kind of it’s only trick. Ultimately it’s a 4 cylinder Vauxhall engine it’s never going to sound particularly good, and I’d rather it just sounded like Vauxhall intended when it came out of the factory. I’d already picked up a second hand standard backbox and hoped it would be a simple job of swapping the old for new, but the rust festooned b*****d that is my vx obviously had other ideas.
Rusty U bend to Cat joint
The standard VX220 exhaust system has an exhaust U bend that’s a separate piece whereas this aftermarket backbox had the U bend welded to it, this meant that the original U bend I required had long gone. Also the bolted joint between the U bend and the catalyst was a total mess and was never going to come apart and be re-useable. After some shopping around, it turns out the U bend isn’t sold anywhere new, in the end I came across a guy selling a sports catalyst and U bend and decided this was my best option. So basically the exhaust system has ended up being, standard manifold, sports cat, standard U bend and standard backbox I’m hoping this will be a good combo, I’m also hoping it gets through the MOT emissions test… the first startup was promising with it sounding buch less boomey.
Will get another update soon on refitting the rear clam and getting a full 4 wheel alignment.
Thanks for reading.
Edited by andrewc2102 on Thursday 2nd June 21:14
With the exhaust silencer off, worth removing the mid section with cat and removing the pre-cat in the end of the standard pipe - you're not going to notice any big power gains, but it won't affect your MoT emissions test, and if you subsequently look to Supercharge the engine, its a big restriction to get rid off.
On wishbone coating, absolutely nothing wrong with POR15 - its more robust than a lot of powder coating and can easily be repaired with a paint brush. It may not look amazing but who cares really.. I done mine in black ~2 years ago and no sign of deterioration despite 2 year of all year use.
gofasterrosssco said:
With the exhaust silencer off, worth removing the mid section with cat and removing the pre-cat in the end of the standard pipe - you're not going to notice any big power gains, but it won't affect your MoT emissions test, and if you subsequently look to Supercharge the engine, its a big restriction to get rid off.
On wishbone coating, absolutely nothing wrong with POR15 - its more robust than a lot of powder coating and can easily be repaired with a paint brush. It may not look amazing but who cares really.. I done mine in black ~2 years ago and no sign of deterioration despite 2 year of all year use.
I changed the cat for a sports cat as there was no way I was separating the existing backbox and cat they were welded together with rust, the sports cat doesn't have the pre cat that you mention so that's good.On wishbone coating, absolutely nothing wrong with POR15 - its more robust than a lot of powder coating and can easily be repaired with a paint brush. It may not look amazing but who cares really.. I done mine in black ~2 years ago and no sign of deterioration despite 2 year of all year use.
Good to here some positive feedback on the POR15 paint, I was a bit concerned it wasn't the right route to go down!
andrewc2102 said:
I changed the cat for a sports cat as there was no way I was separating the existing backbox and cat they were welded together with rust, the sports cat doesn't have the pre cat that you mention so that's good.
Good to here some positive feedback on the POR15 paint, I was a bit concerned it wasn't the right route to go down!
Just to clarify, the pre-cat is integrated into the standard down pipe just after the manifold to downpipe flange. So if you replaced the whole down pipe / bend / primary cat then I'm sure it won't be there.Good to here some positive feedback on the POR15 paint, I was a bit concerned it wasn't the right route to go down!
Been a while since I have an update but partly because I’ve just been enjoying using the car!
So in the last post I had basically finished the suspension rebuild, and I refitted the rear clam using an all stainless steel fixing kit meaning that it should come off a lot easier if I ever need to again.
.
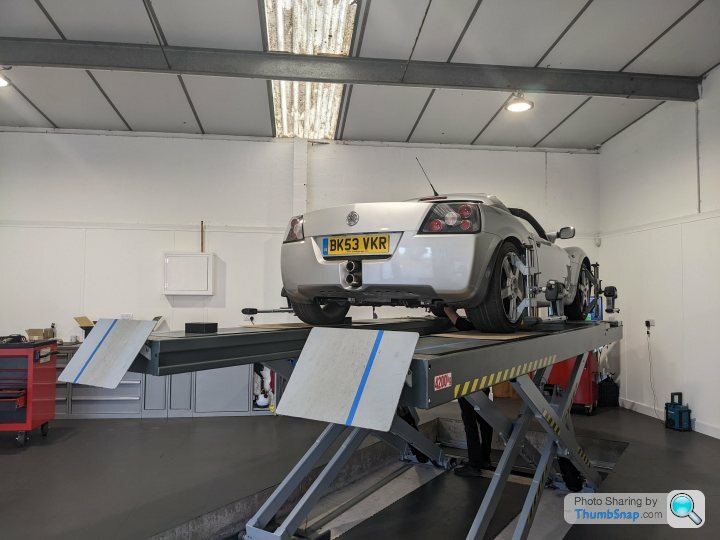
The next stop was getting the alignment done. I use a local guy whose business is solely setting up performance orientated vehicles, he is very thorough and can really transform the way a car drives.
Rather embarrassingly (for me) he always does a full MOT style check of each corner of the car before starting work, and I confidently announce that 'everything's brand new you won’t find any issues there'. So you can imagine my surprise when he tells me the front right (brand new!) trackrod has play in it. After a bit more investigation we work out it’s actually the inner tierod on the steering rack, one of the only bits I haven’t replaced.
Frustratingly this meant that until I’d sorted this there wasn’t much benefit in doing the alignment, so I re-booked for a couple of weeks time and then that evening ordered a steering rack rebuild kit from the original Lotus steering rack supplier.
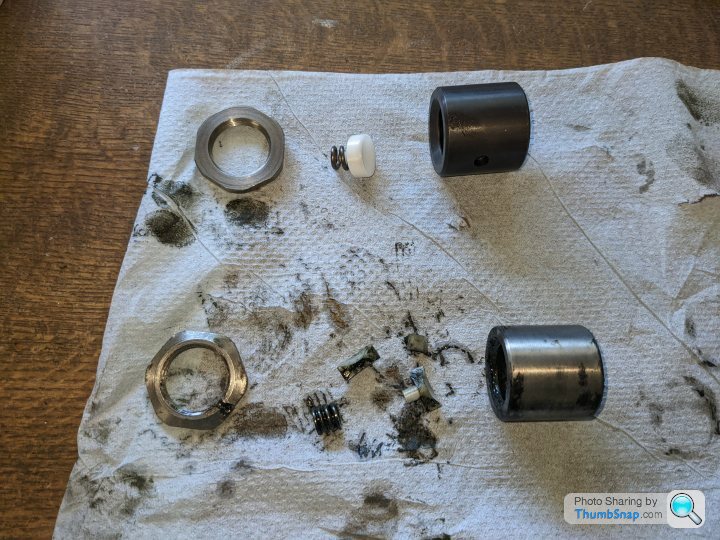
Unfortunately the inner tie rods aren’t a particularly good design, there’s a small Nylon cup that’s preloaded by a spring and the nylon cups fall apart after about 5 years, really the only way to rebuild them is to remove the whole rack from the car.
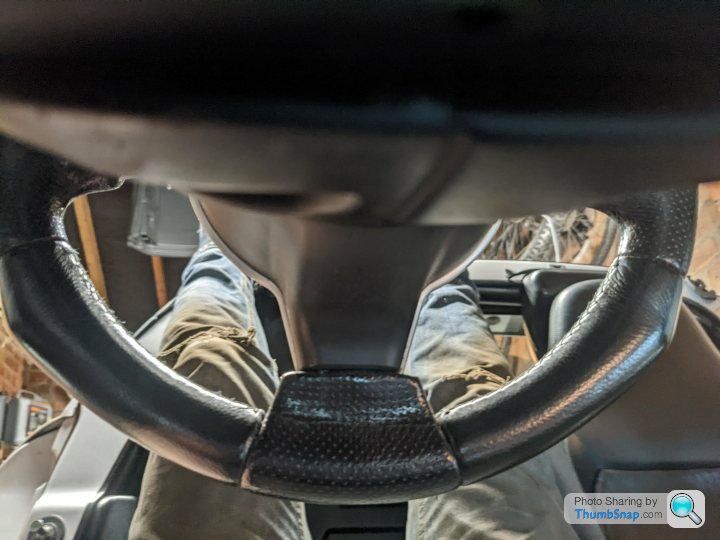
The main issue with this is access, especially the two universal joints under the dash,in the end I found the best way to access them was to remove the drivers seat and lie on the floor with my legs in the air, pretty uncomfortable and claustrophobic but I managed it.
Once out it was a case of drilling out locking pins and replacing the broken nylon cups, then the preload then has to be set by the locking nut and by hanging weights of the end of the trackrods until it holds.
Whilst I was there I decided to repack the rack with grease and re-do the rack preload because mine felt quite dry and notchy when turning in by hand. The preload is set by pulling the rack it’s full length and the force to pull it should be set to the specification, I actually ended up using travel luggage scales tied to one trackrod to do this which worked well. After greasing and resetting the preload the rack felt much nicer to turn.
It was then a case of putting the rack back in the car, and making sure the steering wheel wasn’t so far out there wasn’t enough adjustment in the track rods to adjust it during alignment. It was then back to the alignment place and this time he managed to get everything set exactly to the Vauxhall spec, this included having to add in a number of camber shims as it was previously setup with very aggressive levels of camber for the road.
The drive home was somewhat of a revelation, the car was compliant not crashy, it actually felt like it rolled more but this wasn’t a bad thing, the steering was massively improved, the turn in was way sharper and there was way less inclination to understeer, in short it felt like the car I expected it to in the first place.
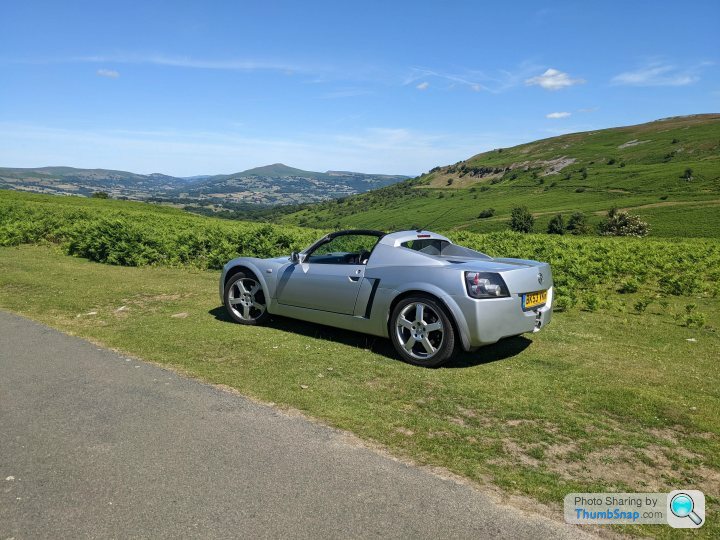
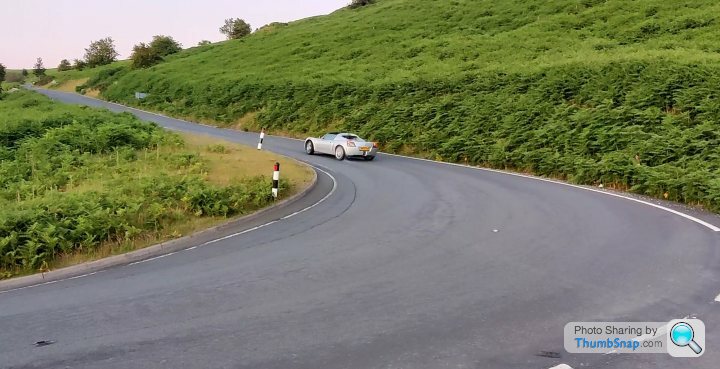
The next week it flew through its MOT with only a couple of advisories for tyres and since then I’ve just been using it as much as I can, including heading over to south wales to drive some of the road Chris Harris often using for filming in his videos.

For the rest of the summer I just intend to enjoy driving it, and then this winter make a start on some of the cosmetic improvements it very much needs.
Thanks for reading.
So in the last post I had basically finished the suspension rebuild, and I refitted the rear clam using an all stainless steel fixing kit meaning that it should come off a lot easier if I ever need to again.
.
The next stop was getting the alignment done. I use a local guy whose business is solely setting up performance orientated vehicles, he is very thorough and can really transform the way a car drives.
Rather embarrassingly (for me) he always does a full MOT style check of each corner of the car before starting work, and I confidently announce that 'everything's brand new you won’t find any issues there'. So you can imagine my surprise when he tells me the front right (brand new!) trackrod has play in it. After a bit more investigation we work out it’s actually the inner tierod on the steering rack, one of the only bits I haven’t replaced.
Frustratingly this meant that until I’d sorted this there wasn’t much benefit in doing the alignment, so I re-booked for a couple of weeks time and then that evening ordered a steering rack rebuild kit from the original Lotus steering rack supplier.
Unfortunately the inner tie rods aren’t a particularly good design, there’s a small Nylon cup that’s preloaded by a spring and the nylon cups fall apart after about 5 years, really the only way to rebuild them is to remove the whole rack from the car.
The main issue with this is access, especially the two universal joints under the dash,in the end I found the best way to access them was to remove the drivers seat and lie on the floor with my legs in the air, pretty uncomfortable and claustrophobic but I managed it.
Once out it was a case of drilling out locking pins and replacing the broken nylon cups, then the preload then has to be set by the locking nut and by hanging weights of the end of the trackrods until it holds.
Whilst I was there I decided to repack the rack with grease and re-do the rack preload because mine felt quite dry and notchy when turning in by hand. The preload is set by pulling the rack it’s full length and the force to pull it should be set to the specification, I actually ended up using travel luggage scales tied to one trackrod to do this which worked well. After greasing and resetting the preload the rack felt much nicer to turn.
It was then a case of putting the rack back in the car, and making sure the steering wheel wasn’t so far out there wasn’t enough adjustment in the track rods to adjust it during alignment. It was then back to the alignment place and this time he managed to get everything set exactly to the Vauxhall spec, this included having to add in a number of camber shims as it was previously setup with very aggressive levels of camber for the road.
The drive home was somewhat of a revelation, the car was compliant not crashy, it actually felt like it rolled more but this wasn’t a bad thing, the steering was massively improved, the turn in was way sharper and there was way less inclination to understeer, in short it felt like the car I expected it to in the first place.
The next week it flew through its MOT with only a couple of advisories for tyres and since then I’ve just been using it as much as I can, including heading over to south wales to drive some of the road Chris Harris often using for filming in his videos.
For the rest of the summer I just intend to enjoy driving it, and then this winter make a start on some of the cosmetic improvements it very much needs.
Thanks for reading.
andrewc2102 said:
The main issue with this is access, especially the two universal joints under the dash,in the end I found the best way to access them was to remove the drivers seat and lie on the floor with my legs in the air, pretty uncomfortable and claustrophobic but I managed it.
You can't call yourself a VX220 owner until you've been upside down in the footwell! 
Gassing Station | Readers' Cars | Top of Page | What's New | My Stuff