Aston martin V8 Vantage club sport type thing
Discussion


Thanks all, its frankly been a "bit" annoying at times
SO:
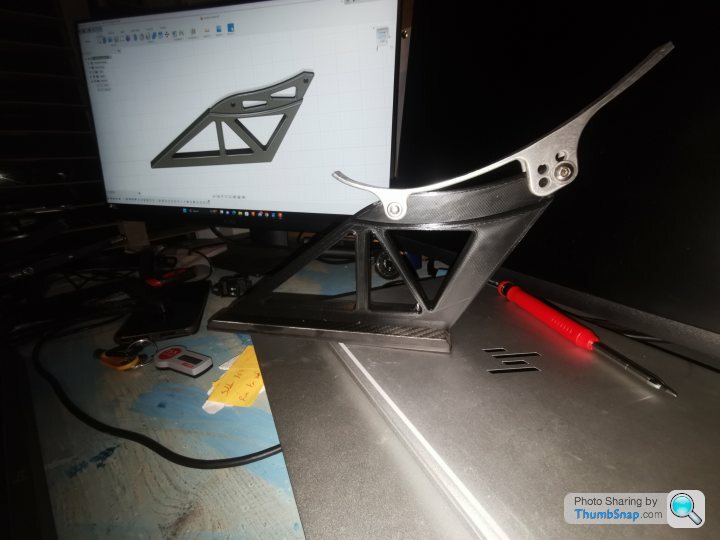
With the seat adjustment sorted i needed to make up a way tolhold all the switches into the dash, and the starter switch, and the gear surround etc. To be fair the Guy i got the console off supplies a few 3d printed bosses, but if i am honest, these were a bit $hit as they didnt fit the switch properly and were all bent where they had printed on a slant, also there were not enough to retain all the functions i wanted, oh and the starter switch is a different diameter. Apparently prodrive sell them but they are about 50 per boss so 360 quid in bosses, no, thank, you.
After some less brilliant prototypes (read many)
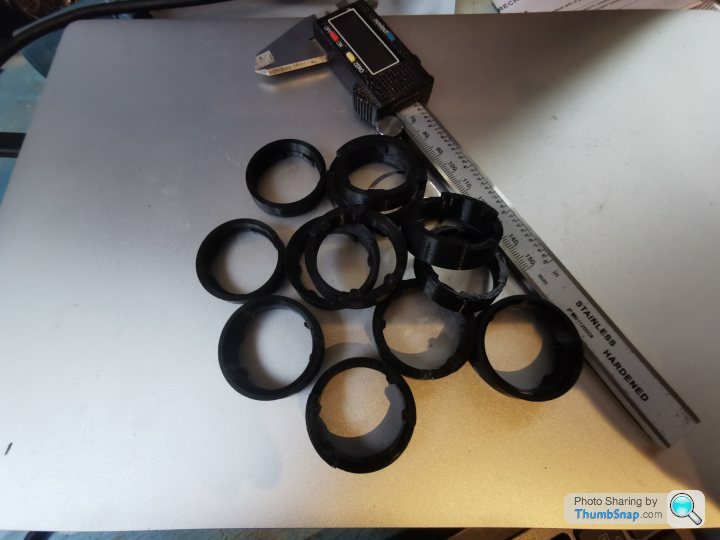
I ended up with a load of designs that worked for all the switches and connections I needed


Etc etc etc
At this point i need to get the drill out and bore some holes though 1600 quids worth of carbon fiber so i wanted to get it right, the reason for this was to retain the heated screens and the PDC. as always its easy to just lash this race car stuff in, but to make it work in a clubsport type thing is much more messing
I decided to mount these into the cutout that would normally house the GT4/N24 plaque.

This turned out to be a bit of an error as i then needed to relocate all the modules that were in the way, fortunately noting that a few small brackets couldnt resolve, more faffing.
it was about this time that i decided to call in professional help

Finally with some competant help i could really make progress and get it in for a bit of a better test fit.

The underlying dash structure needed a few small trims here and there to get a good fit but it was nothing significant, this was simply easier than trimming the carbon, and less upsetting.
With the test fit complete i finalised the wiring, the CAN data bypass was supplied by aston installations who had been hugely helpful and did suggest that i should just make it myself, but at the time i just didnt want to deal with yet another thing. Now i have a bit of a better grip of how it all works i am less phased by it all but the aston wiring diagrams are a joke in comparison to a major maker as are the stupid acronyms. The turning point in understanding really came from realising that what i had assumed was simply an HVAC module was a CAN gateway and actually body control module also. The absence of any working slack in the loom is also a source of unending annoyance, honestly its like they were trying to save on wire.
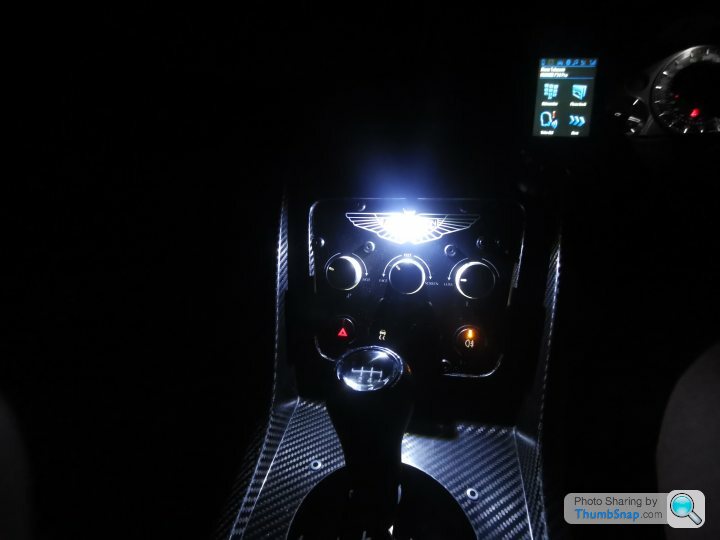
Cutting a long story short i them moved onto the final fit and bolted it all down and refitted all the decorative panels to the dash structure, with this done i drilled the holes for the Crutch straps and bonded the spreader plates to the underside of the car (prevent any water trapped between the plate and the allow causing galvanic corrosion) and fitted the passenger seat and harness. (again this was actually a complete ball ach due the power seat mech being in the way)

From that point on it was just a case of doing the same for the drivers side, and adding in printed gear surround that i had bonded the gaiter to.

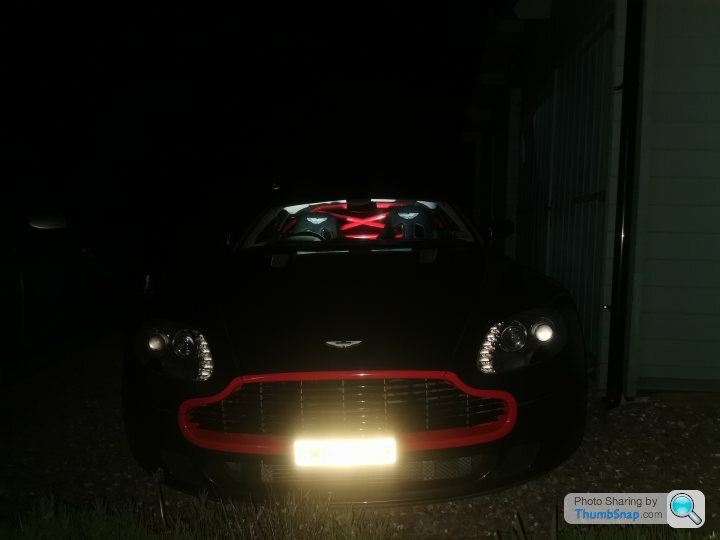
Few pictures to give a better idea of the fit


 [url]
[url]
 |https://thumbsnap.com/zL2pptaB[/url][url]
 |https://thumbsnap.com/kpvCaXzs[/url]
With that out of the way, i reapplied the expanding foam to all the sills the seal them, and re fitted the arch liners, while doing this i also fitted some new rear pads (very squeaky)

And removed the last of the infotainment (accessed though rear wheel arch, yes, really) which was bolted to some horrible bit of rusty steel and weighed a ton

This was too crusty and heavy to go back so i made up a replacement from some turnes stainless i had in the bin of many things

All that was left to do was mount the replacement infotainment, this now covers full Bluetooth handsfree and streaming as well as a host of other functions i will never use. crucially it means your not touching your phone while driving.

Sound quality is to be honest considerably better than the stock Aston system. with the amp being set to high pass filter the doors and low pass to the sub, works great.
Quite a bit more on the go at the moment, but pleased to have it all back up running and driving well, the weight removed was about 20kg of old volvo crap, but then of course some of that is back in with the harnesses and cage. overall i suspect i am slightly lighter net net.
SO:
With the seat adjustment sorted i needed to make up a way tolhold all the switches into the dash, and the starter switch, and the gear surround etc. To be fair the Guy i got the console off supplies a few 3d printed bosses, but if i am honest, these were a bit $hit as they didnt fit the switch properly and were all bent where they had printed on a slant, also there were not enough to retain all the functions i wanted, oh and the starter switch is a different diameter. Apparently prodrive sell them but they are about 50 per boss so 360 quid in bosses, no, thank, you.
After some less brilliant prototypes (read many)
I ended up with a load of designs that worked for all the switches and connections I needed
Etc etc etc
At this point i need to get the drill out and bore some holes though 1600 quids worth of carbon fiber so i wanted to get it right, the reason for this was to retain the heated screens and the PDC. as always its easy to just lash this race car stuff in, but to make it work in a clubsport type thing is much more messing
I decided to mount these into the cutout that would normally house the GT4/N24 plaque.
This turned out to be a bit of an error as i then needed to relocate all the modules that were in the way, fortunately noting that a few small brackets couldnt resolve, more faffing.
it was about this time that i decided to call in professional help
Finally with some competant help i could really make progress and get it in for a bit of a better test fit.
The underlying dash structure needed a few small trims here and there to get a good fit but it was nothing significant, this was simply easier than trimming the carbon, and less upsetting.
With the test fit complete i finalised the wiring, the CAN data bypass was supplied by aston installations who had been hugely helpful and did suggest that i should just make it myself, but at the time i just didnt want to deal with yet another thing. Now i have a bit of a better grip of how it all works i am less phased by it all but the aston wiring diagrams are a joke in comparison to a major maker as are the stupid acronyms. The turning point in understanding really came from realising that what i had assumed was simply an HVAC module was a CAN gateway and actually body control module also. The absence of any working slack in the loom is also a source of unending annoyance, honestly its like they were trying to save on wire.
Cutting a long story short i them moved onto the final fit and bolted it all down and refitted all the decorative panels to the dash structure, with this done i drilled the holes for the Crutch straps and bonded the spreader plates to the underside of the car (prevent any water trapped between the plate and the allow causing galvanic corrosion) and fitted the passenger seat and harness. (again this was actually a complete ball ach due the power seat mech being in the way)
From that point on it was just a case of doing the same for the drivers side, and adding in printed gear surround that i had bonded the gaiter to.
Few pictures to give a better idea of the fit
[url] |https://thumbsnap.com/zL2pptaB[/url][url] |https://thumbsnap.com/kpvCaXzs[/url] With that out of the way, i reapplied the expanding foam to all the sills the seal them, and re fitted the arch liners, while doing this i also fitted some new rear pads (very squeaky)
And removed the last of the infotainment (accessed though rear wheel arch, yes, really) which was bolted to some horrible bit of rusty steel and weighed a ton
This was too crusty and heavy to go back so i made up a replacement from some turnes stainless i had in the bin of many things
All that was left to do was mount the replacement infotainment, this now covers full Bluetooth handsfree and streaming as well as a host of other functions i will never use. crucially it means your not touching your phone while driving.
Sound quality is to be honest considerably better than the stock Aston system. with the amp being set to high pass filter the doors and low pass to the sub, works great.
Quite a bit more on the go at the moment, but pleased to have it all back up running and driving well, the weight removed was about 20kg of old volvo crap, but then of course some of that is back in with the harnesses and cage. overall i suspect i am slightly lighter net net.
IainWhy said:
and mount your switch, i decided to tuck it under the headlamp switch cover to make it as unobtrusive as possible and keep black plastic on black plastic (i.e. not drill through leather)
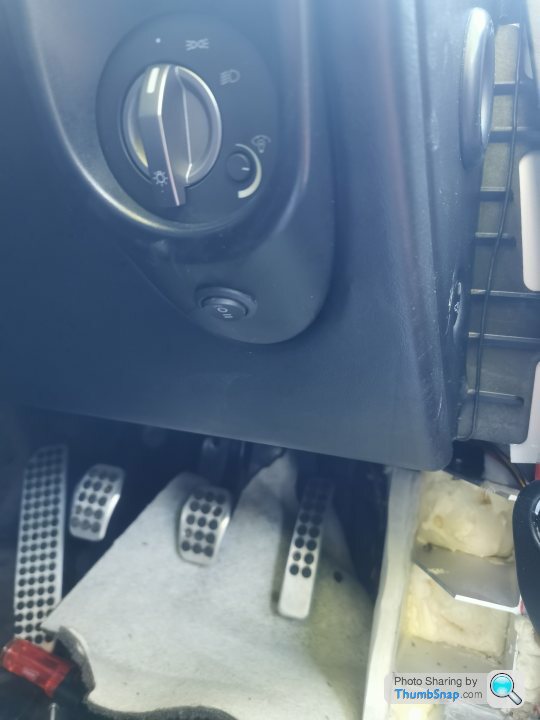
This looks really good under the light control knob - black on black plastic as if OEM.How does this bit of trim come off and is the plastic easy enough to drill a 20mm hole through without risk of damage?
Looking to do the same on my car but the wiring loom appears to be different on mine (MY14 DB9 with valve linked to Fuse 15). https://www.pistonheads.com/gassing/topic.asp?h=0&...
magycks said:
This looks really good under the light control knob - black on black plastic as if OEM.
How does this bit of trim come off and is the plastic easy enough to drill a 20mm hole through without risk of damage?
Looking to do the same on my car but the wiring loom appears to be different on mine (MY14 DB9 with valve linked to Fuse 15). https://www.pistonheads.com/gassing/topic.asp?h=0&...
Hi, thanks i think its a sensible location, you cant actually see the switch at all under normal circumstances. How does this bit of trim come off and is the plastic easy enough to drill a 20mm hole through without risk of damage?
Looking to do the same on my car but the wiring loom appears to be different on mine (MY14 DB9 with valve linked to Fuse 15). https://www.pistonheads.com/gassing/topic.asp?h=0&...
You need to remove the kick plate, this is 8 fixings on a vantage as the you need to remove the decorative plate to them remove the final two allens, whith that done there is a fit tree fitting, these just need to be pulled out, they can be re used but get a bit bent, they are a standard trim fitting for many makes and you can just buy boxes of them from ebay / motorfactors i replace most of them as as it just keeps things nice and tight, with the fitting out you can pull the door rubber down and move the trim over. I didnt actually completely remove it as i recall there was another section overlapping but you could generate plenty of space.
difficult to advise on a db9 as i have not tried it but there will be a diagram in the factory manual though the factory diagrams are to be honest $hite in my opinion., but better than nothing. There is nothgin to say you have to tap the circuit at this point, it just is near where you want the switch, you could tap it right at the compresser if you chose which i would assume is in the same place on a db9 (rear drivers wheel well behind the liner)
As to the hole just remove the whole drivers knee roll panel, it will probably make a hirrible snapping sound as the air temp probe pops off but it just snaps back on. unplug the light switch, disasemble the switch from the panel and drill away. you need to take it apart thpough or there is a high chance of doing into the headlight switch, you need to be fairly accurate.
olv said:
Amazing. Love it.
Have you reverted to the stop gearstick or will the long one you had go back in?
Thansk man, its been a pain having the car in quite so many bits for so long, but i am pretty pleased with the result.Have you reverted to the stop gearstick or will the long one you had go back in?
Gear lever is a work in progress, i was never happy with it and i then welded a 10mm pivot to it but a bit too far up (trying to make the throw too short) and ran out of adjustment on the main cable. I have made a new solution that i think will be much much better but just need a spot more time with a lathe on the weekend. i will write it up as it should be repeatable and will not rely on adjusting to pivot on the bell crank end.
seefarr said:
This thread is simply marvellous. It's got Astons, pisstaking, wiring, dogs: everything you could want.

Outragous, the dog is the one that does! 
 |https://thumbsnap.com/Ss3ywdEo[/url]
Snooglefinder said:
Superb work - excellent thread! Congrats on the work done so far.
Thanks dude 
Jhonno said:
Great work on the centre console! Nice 3D printed solutions too.. I approve! 3D printers are bloody handy and cool aren't they! Have you got a lightweight battery? Can't remember if you have..
3d printer wise, yea 100%, without one doing this would be very difficut, possibly even not viable given you would otherwise have to pay others. Its also been hugely helpful in terms of getting confidence in a design beofre making it properly. The mill has also been very useful in terms of making up the suspension components where 3Dp just doesnt hace the required strength. Battery wise i have a smaller one, its just one from a cooper S (same as an e46 csl) so its lighter than stock but not litium light. its on the cards, just not yet gotten round to deciding which one i want. EdmondDantes said:
Interior looks incredible now, cool dog!
Thanks mate!In terms of updates, nothing huge but some notable bits i suppose.
Firstly the 3Dp gear surround was only likely to be temporary, and so it turned out to be. I used a site called machining4u so solicit for some jobs, its a good site from my (limited) experience. in essence, you submit your job, get quotes, accept one and pay the money into their escrow. Once you get your part, you release the funds.
What this means is i had the gear surround made in t6061 (yes i know overkill to the Nth degree) bead blasted and chemically blacked. turned out well i think. Just need to bond the gaiter to it and fit it.

I also worked on the gear lever issue.
For me the stock lever is too short, too heavy and has too long a throw, not to mention i dont think much of the feel tbh.
Now the simple way to shorten the throw is to move the ball pin on the bell crank on the gearbox end. Getting the box out of these cars is simple given where its mounted, but not exactly convienient, and definately not convienient currently. so the other option is to increase the distance between the pivot and the cable attachment on the lever end.
This is what i have gone for and it could be done on any vantage at essentially no cost other than some time and effort.
This is the final combo fitted with an Audi sport knob (solid alloy and correct shift pattern), the audi knob is longer so brings the lever closer to your hand and is a fraction of the weight giving it a lighter less inertia laden feeling.

In this picture the pivot has moved downward by 13mm which is a 22% reduction in throw length,
This is done by pressing the rod from the pivot

Drilling and tapping the rod and counterboring the pivot ball

The drilling and tapping etc essentially allows the rod to remain fully secured without being fully in the pivot ball, though this took quite a few tons of pressure in a hydraulic press to move so if likely overkill really, but proper is proper.
With that done a printed stepped spaved can be pressed over the top of the shaft and the audi knob drilled and tapped and fitted with a small grub screw.

The end result is a considerable improvement. in terms of feed and throw... But could be shorter still and more direct, so it will remain on the project list, but its now much more acceptable (to me)

Finally i have also been working on a spoiler to fit the car, but this is still in very much prototype phase

Firstly the 3Dp gear surround was only likely to be temporary, and so it turned out to be. I used a site called machining4u so solicit for some jobs, its a good site from my (limited) experience. in essence, you submit your job, get quotes, accept one and pay the money into their escrow. Once you get your part, you release the funds.
What this means is i had the gear surround made in t6061 (yes i know overkill to the Nth degree) bead blasted and chemically blacked. turned out well i think. Just need to bond the gaiter to it and fit it.
I also worked on the gear lever issue.
For me the stock lever is too short, too heavy and has too long a throw, not to mention i dont think much of the feel tbh.
Now the simple way to shorten the throw is to move the ball pin on the bell crank on the gearbox end. Getting the box out of these cars is simple given where its mounted, but not exactly convienient, and definately not convienient currently. so the other option is to increase the distance between the pivot and the cable attachment on the lever end.
This is what i have gone for and it could be done on any vantage at essentially no cost other than some time and effort.
This is the final combo fitted with an Audi sport knob (solid alloy and correct shift pattern), the audi knob is longer so brings the lever closer to your hand and is a fraction of the weight giving it a lighter less inertia laden feeling.
In this picture the pivot has moved downward by 13mm which is a 22% reduction in throw length,
This is done by pressing the rod from the pivot
Drilling and tapping the rod and counterboring the pivot ball
The drilling and tapping etc essentially allows the rod to remain fully secured without being fully in the pivot ball, though this took quite a few tons of pressure in a hydraulic press to move so if likely overkill really, but proper is proper.
With that done a printed stepped spaved can be pressed over the top of the shaft and the audi knob drilled and tapped and fitted with a small grub screw.
The end result is a considerable improvement. in terms of feed and throw... But could be shorter still and more direct, so it will remain on the project list, but its now much more acceptable (to me)
Finally i have also been working on a spoiler to fit the car, but this is still in very much prototype phase
Also i did a bit of gentrification on the power steering venting, while the original solution was essentially factory and worked perfectly, it just lacked a bit of neatness.
so from here:

To Here:

I would say there is zero functional benefit, but it looks a bit nicer.
Its just a motorbik resevoir with some nylon tubing heated up and formed, but its reasonably tidy i think
so from here:
To Here:
I would say there is zero functional benefit, but it looks a bit nicer.
Its just a motorbik resevoir with some nylon tubing heated up and formed, but its reasonably tidy i think
IainWhy said:
Jhonno said:
Great work on the centre console! Nice 3D printed solutions too.. I approve! 3D printers are bloody handy and cool aren't they! Have you got a lightweight battery? Can't remember if you have..
3d printer wise, yea 100%, without one doing this would be very difficut, possibly even not viable given you would otherwise have to pay others. Its also been hugely helpful in terms of getting confidence in a design beofre making it properly. The mill has also been very useful in terms of making up the suspension components where 3Dp just doesnt hace the required strength. Battery wise i have a smaller one, its just one from a cooper S (same as an e46 csl) so its lighter than stock but not litium light. its on the cards, just not yet gotten round to deciding which one i want.SturdyHSV said:
This thread is brilliant, thanks for keeping it up 
Thanks dude, always keep an eye on your too Jhonno said:
I can recommend Deadweight! I and some mates run them.. Great chaps too, proper car guys, behind them.
INteresting call on deadweight, looks like the same battery that valient whitelabel. My instinct was to just use something cheap off ebay but potentially i should spend a bit more so i dont find myself in too many no start scenario's Cars being a dick now though as the rear indicator has died, i wouldnt mind but i have literally just dried it out and sealed it, f
 king thing!
IainWhy said:
Jhonno said:
I can recommend Deadweight! I and some mates run them.. Great chaps too, proper car guys, behind them.
INteresting call on deadweight, looks like the same battery that valient whitelabel. My instinct was to just use something cheap off ebay but potentially i should spend a bit more so i dont find myself in too many no start scenario's Cars being a dick now though as the rear indicator has died, i wouldnt mind but i have literally just dried it out and sealed it, f
king thing!The issue with cheap ones, is if they go flat it kills them. The Deadweight has a BMS which shuts the battery down to prevent cell damage.
Gassing Station | Readers' Cars | Top of Page | What's New | My Stuff