Aston martin V8 Vantage club sport type thing
Discussion


Jhonno said:
Just did a search (Valiant Ecosse) and yes, it is a Deadweight battery with their branding on.
The issue with cheap ones, is if they go flat it kills them. The Deadweight has a BMS which shuts the battery down to prevent cell damage.
I am going to come over as a smart are here so I apologies in advance, but pretty much all lithium packs will have some form of BMS to balance the cells and a lower limit voltage floor, I dont know what would be different from the "norm" in the deadweight ones. That said i looks like a decent product and it does look competitive VS the likes of antigravity, superbee etc etc they are definitely on my shortlist! The issue with cheap ones, is if they go flat it kills them. The Deadweight has a BMS which shuts the battery down to prevent cell damage.
olv said:
The wing looks pretty serious (but probably shouldn’t be surprised by this point…)
Funnily enough just ordered a Deadweight battery for mine. Feels a bit frivolous but mine still has the original battery at 16 years old the extra cost to change to save 20kg seemed vaguely justifiable
The wing is actually a really nice item, full carbon chord, very strong very light. It originally had some horrid mounts on it but i cut them off, for £150 I am really pleased with it Vs the GT4 or Reverie optionsFunnily enough just ordered a Deadweight battery for mine. Feels a bit frivolous but mine still has the original battery at 16 years old the extra cost to change to save 20kg seemed vaguely justifiable
IainWhy said:
Jhonno said:
Just did a search (Valiant Ecosse) and yes, it is a Deadweight battery with their branding on.
The issue with cheap ones, is if they go flat it kills them. The Deadweight has a BMS which shuts the battery down to prevent cell damage.
I am going to come over as a smart are here so I apologies in advance, but pretty much all lithium packs will have some form of BMS to balance the cells and a lower limit voltage floor, I dont know what would be different from the "norm" in the deadweight ones. That said i looks like a decent product and it does look competitive VS the likes of antigravity, superbee etc etc they are definitely on my shortlist! The issue with cheap ones, is if they go flat it kills them. The Deadweight has a BMS which shuts the battery down to prevent cell damage.
Jhonno said:
Not at all. I am pretty sure the cheaper ones don't have a BMS that prevents damage when the cell voltage drops too far.. I could be wrong, but I have heard of cheaper ones being killed by being allowed to go flat.
We melted a skyrich one a few years ago using a regular charger on it (logic being, it would be fine as it charges off a conventional alternator) it definately wasn't fine.I chipped open the melted plastic and there was quite a comprehensive BMS, but maybe the Deadweight ones are a bit more comprehensive, the ebay ones are certainly built to a price for sure
IainWhy said:
Jhonno said:
Not at all. I am pretty sure the cheaper ones don't have a BMS that prevents damage when the cell voltage drops too far.. I could be wrong, but I have heard of cheaper ones being killed by being allowed to go flat.
We melted a skyrich one a few years ago using a regular charger on it (logic being, it would be fine as it charges off a conventional alternator) it definately wasn't fine.I chipped open the melted plastic and there was quite a comprehensive BMS, but maybe the Deadweight ones are a bit more comprehensive, the ebay ones are certainly built to a price for sure

I think it is along those lines yes.. If they go flat you have to "wake them up". Either with a lithium charger or, just connecting it to a 12v car battery and leaving it for 20 mins or so. If you give them a shout I am sure they will explain better than me
OK, so will try and update this a bit, lots of things have been done but documented poorly. If anyone (unlikely) has any specific questions or wants any specific bits making happy to help but will try not to go into too much detail or i will never get anywhere.
So, prepping for another trip to Spa and Zolder (Meppen was also planned but more on that later)
First up was to stop messing about with the spoiler and just get it done, it will be painted in the fullness of time but its currently just in raw carbon complete with a few scuffs etc in it.
I didnt like the end pates that had come on the spoiler, tbh other than the actual foil i didn't use any of it, but the foil its self is a really quality item
Tried a few different designs amd CNC'd them out of cheap card, settled on this one and milled it out of 3mm carbon plate


With that done i had the brackets i had designed and printed made from 6061 and anodised grey, they are a fully integrated bracket that incorporates the foot of the mount for a gasket and the profild section at the top so that the entire upright is the same width, i.e. the mounting bracket on the spoiler side is flush. I should have had them shotblasted before anodising but, you live and learn!


I then just cut some simple gaskets from Viton to help the mount profile to the boot and seal any waster ingress

The brackets were bonded on using 3m 2 part structural adhesive (DP6310NS serious stuff) but because i am paranoid about things coming off i also added some rivnuts with wafer head screws to keep it high and tight

Next up was the bushings, powerflex make (at great cost) a full set of very nicely engineered black series race bushes for the Vantage, they are lots of money but genuinely fancy things. Fortunately a mate of mine was able to get me a deal, but it was still a notable cost just for the complete front bushings. At present i have only dont the front of the car, the reason being that at some point the back axle needs to come out and i dont really want to do a load of elements of that job twice. none of the OEM bushings are in bad condition so i have made that a problem for future Iain, fk that guy right?
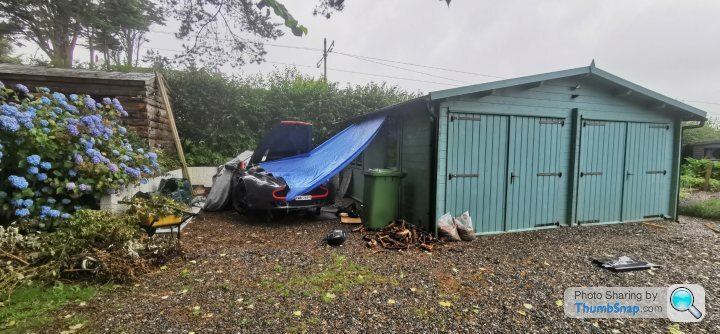
Probably because of this way of thinking i am still that guy with the half built immobile car taking upm his work space so had to recreate a Aleppo camp scene in my drive
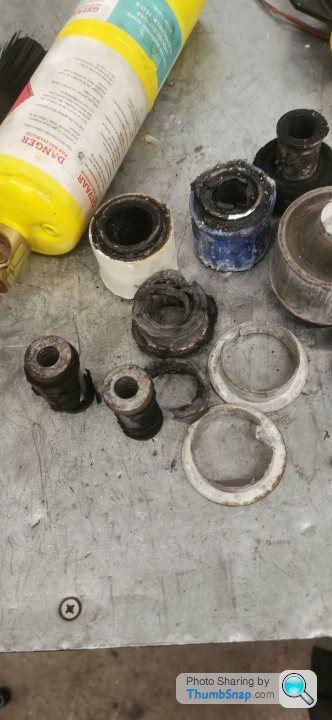
I pulled the entire front uprights off as single units as it was just a much simpler way of doing the job and allowed me to use a mates press to remove them. Something i was very glad of as it was a complete nob to do. The rear caster adjusted on the passenger side snapped off leaving the shank and had seized in the bolt and ultimately had to be sawn out on both sides. if your going to DIY this i suggest you ensure you have the following tools detailed in the below image (hope this helps!)

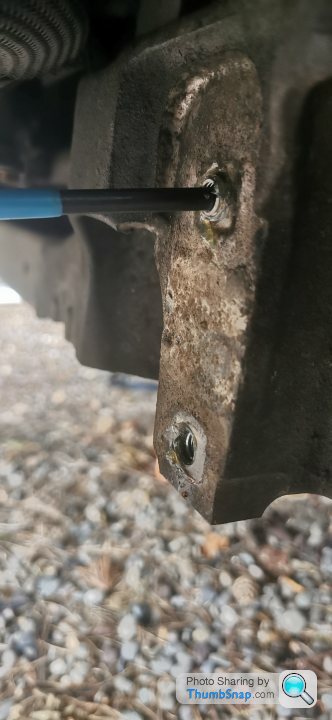
Ultimately you end up with two of these

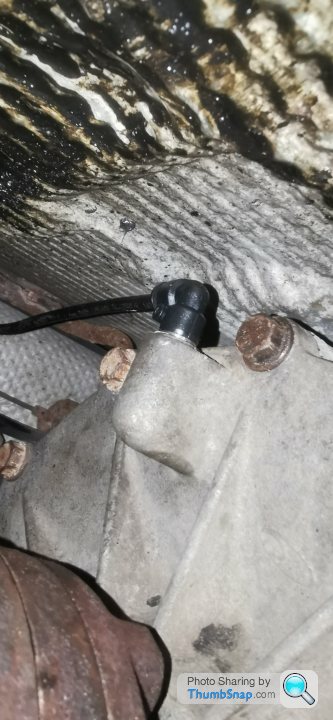
Which you then struggle with for a bit to remove these
Ending up with a pile of this

I also took the opportunity to remove the bearings from the uprights with the press, these were absolutely jammed in, hopefully this will make it easier should i find myself having to replace one in a hurry, optimism and all that..
The only other drama was that on the passenger side (again) the arb mounts pulled the thread inserts out with the bolts slightly on both the upper and lower mounts, rather than trying to fight to get them back to true i decided to just pull them out

And fit new ones

Just standard M8 helicoils (m8x1.25) in case its of use to anyone.
As my standard droplinks were looking a bit tired (though felt fine to be fair) I made up some adjustable ones using a tunbuckle universal kit and just cut them to size, this allowed me to set the rollbar without any preload at the adjusted ride height, simple and cheap

Putting it back together was delayed by the broken bolt but good service from Astonmartinbits.com who supplied the caster bolt for less than half the price of scudaria who want £40 plus vat for an m12 cam bolt ffs!
With it all together i eyeballed some geometry onto the front of the car and took it to be aligned and aircon gassed
No one really talks about track Geo on these from what i can see, or rather what i could see looked very weaksauce.
I was fairly conservative with the starting point but will add a bit more camber in and possibly look at moving to a fully neutral toe later (the rear left toe was corrected to 0.07 but i dot have the latter sheet to hand, the rear right camber was not corrected as they recon they couldn't get the angle, but looking at the adjusters they look set to minimum so i have no idea why, i will put the inclinometer on it at some point and just add a bit more now i know the starting numbers)

The result of all of the above was a really marked improvement in how connected the car felt and responded, immediately even just on my eyeballed alignment the responsiveness of the front end was an order of magnitude better. bearing in mind the stock bushes were actually not in terrible condition this was a good result. As with all things there is no fee lunch and using the hard black series bushes definitely increases the noise level a bit. the softer purples are likely a better bet if you would rather not make that compromise.
Lots more to write, but its late.....
So, prepping for another trip to Spa and Zolder (Meppen was also planned but more on that later)
First up was to stop messing about with the spoiler and just get it done, it will be painted in the fullness of time but its currently just in raw carbon complete with a few scuffs etc in it.
I didnt like the end pates that had come on the spoiler, tbh other than the actual foil i didn't use any of it, but the foil its self is a really quality item
Tried a few different designs amd CNC'd them out of cheap card, settled on this one and milled it out of 3mm carbon plate
With that done i had the brackets i had designed and printed made from 6061 and anodised grey, they are a fully integrated bracket that incorporates the foot of the mount for a gasket and the profild section at the top so that the entire upright is the same width, i.e. the mounting bracket on the spoiler side is flush. I should have had them shotblasted before anodising but, you live and learn!
I then just cut some simple gaskets from Viton to help the mount profile to the boot and seal any waster ingress
The brackets were bonded on using 3m 2 part structural adhesive (DP6310NS serious stuff) but because i am paranoid about things coming off i also added some rivnuts with wafer head screws to keep it high and tight
Next up was the bushings, powerflex make (at great cost) a full set of very nicely engineered black series race bushes for the Vantage, they are lots of money but genuinely fancy things. Fortunately a mate of mine was able to get me a deal, but it was still a notable cost just for the complete front bushings. At present i have only dont the front of the car, the reason being that at some point the back axle needs to come out and i dont really want to do a load of elements of that job twice. none of the OEM bushings are in bad condition so i have made that a problem for future Iain, fk that guy right?
Probably because of this way of thinking i am still that guy with the half built immobile car taking upm his work space so had to recreate a Aleppo camp scene in my drive
I pulled the entire front uprights off as single units as it was just a much simpler way of doing the job and allowed me to use a mates press to remove them. Something i was very glad of as it was a complete nob to do. The rear caster adjusted on the passenger side snapped off leaving the shank and had seized in the bolt and ultimately had to be sawn out on both sides. if your going to DIY this i suggest you ensure you have the following tools detailed in the below image (hope this helps!)
Ultimately you end up with two of these
Which you then struggle with for a bit to remove these
Ending up with a pile of this
I also took the opportunity to remove the bearings from the uprights with the press, these were absolutely jammed in, hopefully this will make it easier should i find myself having to replace one in a hurry, optimism and all that..
The only other drama was that on the passenger side (again) the arb mounts pulled the thread inserts out with the bolts slightly on both the upper and lower mounts, rather than trying to fight to get them back to true i decided to just pull them out
And fit new ones
Just standard M8 helicoils (m8x1.25) in case its of use to anyone.
As my standard droplinks were looking a bit tired (though felt fine to be fair) I made up some adjustable ones using a tunbuckle universal kit and just cut them to size, this allowed me to set the rollbar without any preload at the adjusted ride height, simple and cheap
Putting it back together was delayed by the broken bolt but good service from Astonmartinbits.com who supplied the caster bolt for less than half the price of scudaria who want £40 plus vat for an m12 cam bolt ffs!
With it all together i eyeballed some geometry onto the front of the car and took it to be aligned and aircon gassed
No one really talks about track Geo on these from what i can see, or rather what i could see looked very weaksauce.
I was fairly conservative with the starting point but will add a bit more camber in and possibly look at moving to a fully neutral toe later (the rear left toe was corrected to 0.07 but i dot have the latter sheet to hand, the rear right camber was not corrected as they recon they couldn't get the angle, but looking at the adjusters they look set to minimum so i have no idea why, i will put the inclinometer on it at some point and just add a bit more now i know the starting numbers)
The result of all of the above was a really marked improvement in how connected the car felt and responded, immediately even just on my eyeballed alignment the responsiveness of the front end was an order of magnitude better. bearing in mind the stock bushes were actually not in terrible condition this was a good result. As with all things there is no fee lunch and using the hard black series bushes definitely increases the noise level a bit. the softer purples are likely a better bet if you would rather not make that compromise.
Lots more to write, but its late.....
Edited by IainWhy on Wednesday 16th August 01:12
I'm glad I'm not the only one that ends up with a pile of tools on the floor at the end of every job.
Saw this on ebay...bit late though.
https://www.ebay.co.uk/itm/134609283636?mkcid=16&a...
Saw this on ebay...bit late though.
https://www.ebay.co.uk/itm/134609283636?mkcid=16&a...
trails said:
I'm glad I'm not the only one that ends up with a pile of tools on the floor at the end of every job.
Saw this on ebay...bit late though.
https://www.ebay.co.uk/itm/134609283636?mkcid=16&a...
Thanks dude, i have considered fitting pole positions as we have them in the Z4 race car and they are comfortable, but i think these are actually more supportive. I may re trip them in something a bit more in keeping with the rest of the interior though Saw this on ebay...bit late though.
https://www.ebay.co.uk/itm/134609283636?mkcid=16&a...
So, onward
Car with spoiler attached


Needs some painting and a few adjustments like changing the TI bolts to Tube nuts for a cleaner look but its well screwed on and i am personally happy with how it turned out. I simply didnt have time before the trip to mess about with the finer details.
Next up for addressing was the halfshaft CV joint boot that had failed and started venting oil, I did this the easy way by removing the rear hub and shaft in one go, pressing out the driveshaft and then removing the inner race cap and replacing the boot.


This was a quick and simple job but revealed annoyingly that the output shaft flange on the transaxle was leaking.
Fortunately, Scuderia actually quote the seal sizes on the parts page so i just ordered nice SKF viton ones for about 30% of the cost from aston

Now fitting this was supposed to be simple, there are no diagrams for the Graziano transaxle that i have yet found, they are fairly common in Audi R8's etc and used in a lot of prototype cars where they want the gearbox behind the engine but i am not well acquainted with them so it took a good bit of head scratching. Once you know its easy, until that point its a complete t t.
t.
You cant remove the output shaft flange as it runs on a double bearing and the circlip to secure it sits behind the first bearing. as such you need to remove the entire cover plate with the output shaft in one go, then you can remove the circlip and remove the flange from the cover plate (not sure i have ever written "flange" so frequently).

The below image is during reassembly as you can clearly see the new seal but you can see the cover plate on the side.
Because you have to remove this its a complete drain down of the axle and removal of the mounts and exhaust mid section to get to it. Crucially it also exposes the crown sheel and differential.
THe stof setup on these cars gives very little LSD effect on acceleration, them really don't feel like they have a diff in at all. I had read a long time ago that prodrive had in some cases reversed the differential but had filed it under "interesting shiz for another day" but given we were very much "in there" it seemed like as good a time as any to split the diff down and see what was what.
Its a decent diff, by eye i would say its probably a ZF unit in 4 plate configuration, i have taken the dimensions off the clutches and steels so will see what they correspond to when i get some time. what is interesting it that its structured as a 1.5 way, but set backwards to any conventional logic (i believe that this was changed in the later 4.7 cars) as such on power the diff meets a approx 80 degree ramp angle leading to very very little clutch engagement, however on deceleration meest a very shallow approx 30 degree angle producing a lot of lock. its weirdly arse about face.
diff out


Interestingly (if your as boring as i am) the crown is retained by the cover plate bolts, which is smart as you only need half the fixings
with the diff opened up you can see in the crappy picture below that the angles are hugely asymmetric, this is compounded further as unlike older ZF units the gear vales are also profiled to give better engagement on the ramp (another good idea as the round ones tended to dent the ramps)

The diff was rotated by simply switching the upper and lower drive plates to reverse the angles giving max lock on acceleration and and minimum on overrun.
Jumping ahead a bit this has completely changed the car, you really know you have a spicy diff in it, in corners you are able to control the car much more on the throttle to neutralise understeer and open up on the throttle does actually generate some turn in in the slower ones, i am personally very happy with the change, particularly as its essentially free.
Finally on the gearbox side the breather was completely rooted and of very poor quality to start with so was replaced with a better john guest type push fit that i have used on the nylon line in other applications.
With that done i noticed that the valves were rotting off the v12 backbox, they are absolutely crap quality mild steel, and were so badly gone i could simply pull them off by hand

they really are absolute st. fortunately the cheaper V8 uses much better stainless valves so i cut these off the old exhaust and Matt welded them onto the v12 box. Before fitting i fully threaded the actuator rods in the hope that it will allow me in the future to adjust how loud loud actually is.

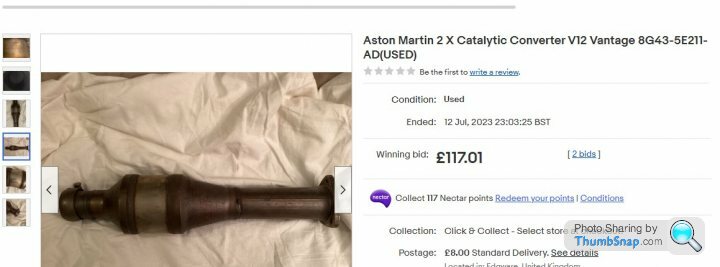
Finally running no cats on the current map was causing a lot of heat and a fair bit of fire out of the exhaust, this had started to distort the rear diffuser and was a source of constant emissions lights. I dodnt have time to mess about with another map to resolve this, but fortunately had spotted a set of v12 secondary cats on ebay.
I bought these for the huge sum of £117 and they met an angle grinder, drill and a welder to make some low cell count "race catz" nothign is quite plain sailing and they did mean that i needed to extend to looms on the post cat sensors, but that was just half an hours faff.

Still a fair bit more to cover i am afraid, but i will aim to get there in the next few days..... oh the excitement......
Car with spoiler attached
Needs some painting and a few adjustments like changing the TI bolts to Tube nuts for a cleaner look but its well screwed on and i am personally happy with how it turned out. I simply didnt have time before the trip to mess about with the finer details.
Next up for addressing was the halfshaft CV joint boot that had failed and started venting oil, I did this the easy way by removing the rear hub and shaft in one go, pressing out the driveshaft and then removing the inner race cap and replacing the boot.
This was a quick and simple job but revealed annoyingly that the output shaft flange on the transaxle was leaking.
Fortunately, Scuderia actually quote the seal sizes on the parts page so i just ordered nice SKF viton ones for about 30% of the cost from aston
Now fitting this was supposed to be simple, there are no diagrams for the Graziano transaxle that i have yet found, they are fairly common in Audi R8's etc and used in a lot of prototype cars where they want the gearbox behind the engine but i am not well acquainted with them so it took a good bit of head scratching. Once you know its easy, until that point its a complete t
t. You cant remove the output shaft flange as it runs on a double bearing and the circlip to secure it sits behind the first bearing. as such you need to remove the entire cover plate with the output shaft in one go, then you can remove the circlip and remove the flange from the cover plate (not sure i have ever written "flange" so frequently).
The below image is during reassembly as you can clearly see the new seal but you can see the cover plate on the side.
Because you have to remove this its a complete drain down of the axle and removal of the mounts and exhaust mid section to get to it. Crucially it also exposes the crown sheel and differential.
THe stof setup on these cars gives very little LSD effect on acceleration, them really don't feel like they have a diff in at all. I had read a long time ago that prodrive had in some cases reversed the differential but had filed it under "interesting shiz for another day" but given we were very much "in there" it seemed like as good a time as any to split the diff down and see what was what.
Its a decent diff, by eye i would say its probably a ZF unit in 4 plate configuration, i have taken the dimensions off the clutches and steels so will see what they correspond to when i get some time. what is interesting it that its structured as a 1.5 way, but set backwards to any conventional logic (i believe that this was changed in the later 4.7 cars) as such on power the diff meets a approx 80 degree ramp angle leading to very very little clutch engagement, however on deceleration meest a very shallow approx 30 degree angle producing a lot of lock. its weirdly arse about face.
diff out
Interestingly (if your as boring as i am) the crown is retained by the cover plate bolts, which is smart as you only need half the fixings
with the diff opened up you can see in the crappy picture below that the angles are hugely asymmetric, this is compounded further as unlike older ZF units the gear vales are also profiled to give better engagement on the ramp (another good idea as the round ones tended to dent the ramps)
The diff was rotated by simply switching the upper and lower drive plates to reverse the angles giving max lock on acceleration and and minimum on overrun.
Jumping ahead a bit this has completely changed the car, you really know you have a spicy diff in it, in corners you are able to control the car much more on the throttle to neutralise understeer and open up on the throttle does actually generate some turn in in the slower ones, i am personally very happy with the change, particularly as its essentially free.
Finally on the gearbox side the breather was completely rooted and of very poor quality to start with so was replaced with a better john guest type push fit that i have used on the nylon line in other applications.
With that done i noticed that the valves were rotting off the v12 backbox, they are absolutely crap quality mild steel, and were so badly gone i could simply pull them off by hand
they really are absolute s
t. fortunately the cheaper V8 uses much better stainless valves so i cut these off the old exhaust and Matt welded them onto the v12 box. Before fitting i fully threaded the actuator rods in the hope that it will allow me in the future to adjust how loud loud actually is.Finally running no cats on the current map was causing a lot of heat and a fair bit of fire out of the exhaust, this had started to distort the rear diffuser and was a source of constant emissions lights. I dodnt have time to mess about with another map to resolve this, but fortunately had spotted a set of v12 secondary cats on ebay.
I bought these for the huge sum of £117 and they met an angle grinder, drill and a welder to make some low cell count "race catz" nothign is quite plain sailing and they did mean that i needed to extend to looms on the post cat sensors, but that was just half an hours faff.
Still a fair bit more to cover i am afraid, but i will aim to get there in the next few days..... oh the excitement......
Really enjoy the updates as always.
Very interesting on the LSD ramp angles, it explains why years ago in a previous 4.3 I owned, on one very treacherous journey to Wales in heavy snow the rear axle would really easily lock up at slow speeds when downshifting for roundabouts. I'm keen to switch the diff over as you've done, what's not to like about that!
Very interesting on the LSD ramp angles, it explains why years ago in a previous 4.3 I owned, on one very treacherous journey to Wales in heavy snow the rear axle would really easily lock up at slow speeds when downshifting for roundabouts. I'm keen to switch the diff over as you've done, what's not to like about that!
200Plus Club said:
Very interesting thread!
DuncanM said:
Brilliant update, you seem to be having fun, and the car is looking serious, love it.
Thanks guys, feels like its starting to "get there" always more to do but not unhappy with how its turning out.olv said:
Really enjoy the updates as always.
Very interesting on the LSD ramp angles, it explains why years ago in a previous 4.3 I owned, on one very treacherous journey to Wales in heavy snow the rear axle would really easily lock up at slow speeds when downshifting for roundabouts. I'm keen to switch the diff over as you've done, what's not to like about that!
Yea its odd as a standard setup, i think its meant to stabilise the car when people come off throttle but i think its more likely to make the car difficult to turn in and/ or introduce oversteer on overrun which is contrary to how you would expect this type of car to behave.Very interesting on the LSD ramp angles, it explains why years ago in a previous 4.3 I owned, on one very treacherous journey to Wales in heavy snow the rear axle would really easily lock up at slow speeds when downshifting for roundabouts. I'm keen to switch the diff over as you've done, what's not to like about that!
Its not a difficult thing to do, the hardest part is pushing the transaxle over far enough the get the diff out past the subframe, but you could always just drop the transaxle if you didnt want to do that, its just a few more bolts, the other driveshaft, cooler lines and lever cables, but we were pressed for time so did it in situe using a small scissor jack to keep the axle pressed over.
Jhonno said:
That diff find is ingenious! Love it.. Also, I had never seen how ramp angles are done before, so also interesting there!
Look forward to the other updates.
Its a pretty standard diff unit to be honest, if you open up any bmw e30, e36, e46 you will find the same arrangement, some slight differences in terms of how the plates are actuated (e46 uses a shear pump to eliminate the need for a troque difference between axles) but th same concepts and in the case of the older bmw differentials, which are the same as the old Ford atlas axles they look exactly the same., to the point where i think parts could be interchangeable Look forward to the other updates.
Great updates, keep them coming!
Ricky from REPerformance is rated highly on the R8 / Gallardo platform. He's done a few gearbox teardown / build videos that may be of use if you need any more info. I think the automated manual is the same unit as the manual.
https://www.youtube.com/@REPerformanceUK/search?qu...
Ricky from REPerformance is rated highly on the R8 / Gallardo platform. He's done a few gearbox teardown / build videos that may be of use if you need any more info. I think the automated manual is the same unit as the manual.
https://www.youtube.com/@REPerformanceUK/search?qu...
seefarr said:
Great updates, keep them coming!
Ricky from REPerformance is rated highly on the R8 / Gallardo platform. He's done a few gearbox teardown / build videos that may be of use if you need any more info. I think the automated manual is the same unit as the manual.
https://www.youtube.com/@REPerformanceUK/search?qu...
Thank , i am actually a subscriber to that channel but hadnt really considered is as most of the stuff seems to be on the Audi Mechatronic, but its a fair shout. Ricky from REPerformance is rated highly on the R8 / Gallardo platform. He's done a few gearbox teardown / build videos that may be of use if you need any more info. I think the automated manual is the same unit as the manual.
https://www.youtube.com/@REPerformanceUK/search?qu...
I am going to see if i can locate a manual somewhere, they must be about as Graziano has had some shakups, be a bit surprised if a manual hasn't fallen out into the public domain somewhere along the line.
Sko77y said:
Nothing to add, except fantastic thread and really enjoying the updates.
Thanks dude, its always nice to know people actually get something out of my weird pursuits. Ok, so will try and smash out the last of the changes and get onto using the thing rather than taking it to bit constantly.
On my list of things to do, is to pull the rear axle out, there are a load of things that make sense to do at the same time and i done want to rush at that one so it will be on hold until i can free up my own ramp, and freeing up my own ramp is contingent on me building out a lean to to shelter the half built track car so its got a bit of a longer gestation period. The actual rear frame of the car is not too bad, bit brown but not in any way concerning, however the lower cross brace was absolutely rooted, so rooted I didn't even want to bother reconditioning it. so i got a really nice used one from aston martinbits and had it powder coated grey, seems that this is from a later car ass all the undertray fittings were m8 rather than M6 (so they are not all the same) howver this was no biggie as i just drilled the tray out to fit.

Like putting a dress on a pig really but the rest will get done at some point.
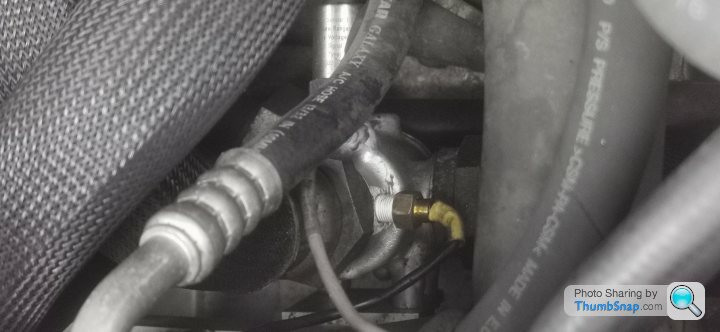
Next up was a big one for me. OEM instruments lie to you, they do not reflect the actual conditions in the engine until its far too late. to do anything about it. I had discussed this with a few people and the consensus seemed to be "we they dont blow up so its ok" that just doesn't work for me on any level. So I decided to fit a decent gauge to i could actually track pressure and temperature of the oil (i may change to just temp of oil and coolant but more on that later.
I had the genius ide of cutting holes into the dry sump thermostat welding in bosses and taking my readings from that. I knew that the pressure readings would be rubbish in terms of absolute pressures as the stat either vents to the tank or should force it through the cooler so the pressures would be low, however you just need to establish what the normal base line is and work off that (in theory) however its ideal to take temperature from and as its isolated from the engine its not subject to vibration etc so win win, in theory.
So the stat looks like this:

An elegant device, it is not, i am 99% sure its not much good and i fully intend to see wht i can do about it, but will get onto that later.
I bought a used one from ebay for a few quid, removed the original, drilled, tapped and welded to accommodate the temperature probe and pressure transducer.
Removing it is a bit of a faff as access is tricky, ended up bolting it to a bit bit of steel and then using a crows foot to get the fittings off. I later discovered an An20 pipe spanner is also a perfect fit.

Sensor and transducer fitted
Gauge fitted (yet another hole in the carbon!) I dont like the look of the gauge, its a great quality gauge that i nicked out of the track car, but the legibility is poor due to the dash angle getting loads of the light from the screen and it looks absolute toss, it will be getting changed, i think i may make something bespoke so its flush mounted but we will see.
 |https://thumbsnap.com/1dtTtQAC[/url]
Does it work? Does it fk. the temperature probe is perfect and accurately measures the temp of the oil as its leaving the sump, thats great the pressure gauge is useless. as the system doesn't put any oil to the cooler until about 100 degrees its literally just pumping out of a hose into a bucket, you get 0 to 1.5 psi registering lumpily. what's weirder is that the system doesnt show much over 100 degrees, this leads me to believe that the stat is not closing properly / fully so there is not complete flow to the cooler, that of the cooler has a much lower pressure drop than expected, which i think i struggle to believe.
Anyway, one out of two will on this occasion have to do, even if it does look a bit nasty.
I then wasted some time, effort and a little money buying a radiator and removing the current one from the car. The horrible OAT coolant always looks terrible in the header tank but i knew it was fresh as i changes it with the stat when i got the car, i dont know why they didnt use a transparent tank so you could actually visually check the condition, anyway, it was mint as i poured it all over my drive

With that removed (you can do it without removing the AC rad BTW) it was apparent that the original radiator was actually really robust and after a bit of a wash in excellent condition.

having had a really good look at both, i decided that on balance the original one was probably better made (a bit) than the replacement nissens unit, so decided that i was actually better off just giving it a really good clean, air lining it out and putting it back in. total waste of time.
I did find that the lower rad mounts had de bonded, so cleaned them up and bonded them back on with the correct 3m structural 2 part PU adhesive.
Being that was there I also looked at the belt, it was fked, fortunately i had found a ford USA replacement part a year or so back so had one on hand. I thought i was a clever tit having found the source part, however on removing the old one, it seems i was not the first to make this discovery 
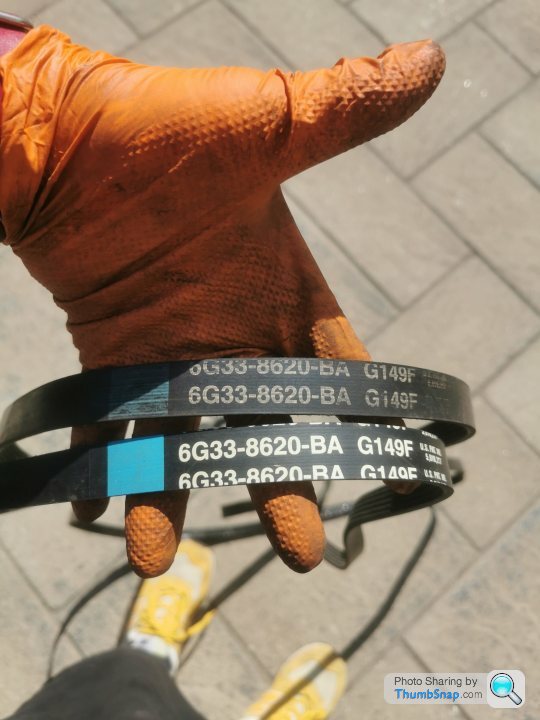
Part number in the picture if it helps at all.
What i also found is that all the idlers were horrible, stiff, nasty. They are also all metal and heavy perfect for inertia. either way they all have replaceable bearings which i have now ordered but didn't have at the time, as such, i owned them up, washed them out with brake cleaner and put them in a boiling sonic bath for a few hours.


Once cleaned out i repacked them all with redline CV2 and the difference was quite dramatic, noise i hadn't really noticed was noticeable by its absence whole engine was quieter and felt smoother. so i suppose at least that part of the job was a winner.
I have ordered a full set of new roller bearings but i am comfortable that this lot will last at the very least another belt.
the final bits of prep (i can hear the relief) was to revisit my old friend the cable clamp, this did me over at spa last year, but had been fine until i took the car for a rip over the mountain during TT where it fked me again. Fortunately i was carrying enough speed that i was able to coast all the way to the Creg Ny Baa pub at the bottom of the circuit and call the Mrs out with a jack to put it back on.
Either way it was obvious it didnt work correctly.
So clamp MK2!
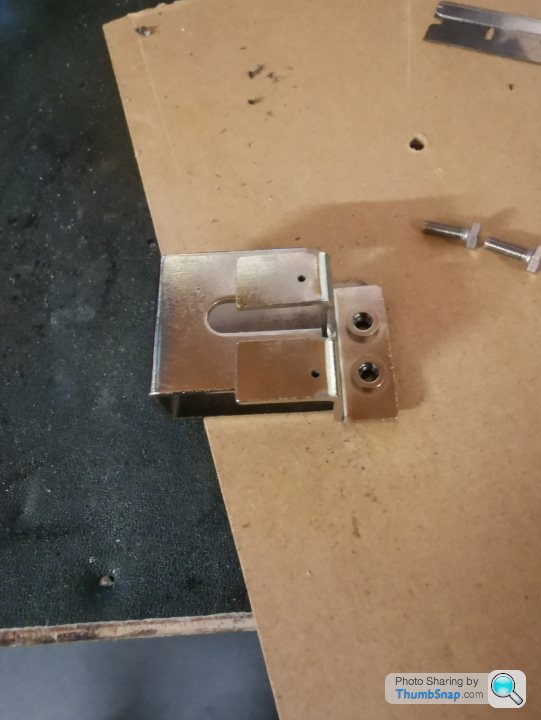
I know, an engineering marvel! anyway, this one seems to work properly. I have made it so it sits at 90 degrees to the cable action, as such it doesn't restrain the cable forward and aft just vertically.

This has now executed thousands of shifts without any issue, so i am cautiously optimistic.
After this i fitted my ebay fiberglass lip as seem previously, i was absolutely sure i would smash it off in a matter of hours but credit where its due, its still on and barring a few chips looks not bad IMO. This is all fitted in the original fixings, but i changed all the fastenings to chimney nuts and stainless bolts so its infinitely stronger.

See, still attached
Last bit was to print out a few of these out of ABS:

They stop the seatbelt gong going nuts when your wearing the harness's, guess how i found that out......[url]
On my list of things to do, is to pull the rear axle out, there are a load of things that make sense to do at the same time and i done want to rush at that one so it will be on hold until i can free up my own ramp, and freeing up my own ramp is contingent on me building out a lean to to shelter the half built track car so its got a bit of a longer gestation period. The actual rear frame of the car is not too bad, bit brown but not in any way concerning, however the lower cross brace was absolutely rooted, so rooted I didn't even want to bother reconditioning it. so i got a really nice used one from aston martinbits and had it powder coated grey, seems that this is from a later car ass all the undertray fittings were m8 rather than M6 (so they are not all the same) howver this was no biggie as i just drilled the tray out to fit.
Like putting a dress on a pig really but the rest will get done at some point.
Next up was a big one for me. OEM instruments lie to you, they do not reflect the actual conditions in the engine until its far too late. to do anything about it. I had discussed this with a few people and the consensus seemed to be "we they dont blow up so its ok" that just doesn't work for me on any level. So I decided to fit a decent gauge to i could actually track pressure and temperature of the oil (i may change to just temp of oil and coolant but more on that later.
I had the genius ide of cutting holes into the dry sump thermostat welding in bosses and taking my readings from that. I knew that the pressure readings would be rubbish in terms of absolute pressures as the stat either vents to the tank or should force it through the cooler so the pressures would be low, however you just need to establish what the normal base line is and work off that (in theory) however its ideal to take temperature from and as its isolated from the engine its not subject to vibration etc so win win, in theory.
So the stat looks like this:
An elegant device, it is not, i am 99% sure its not much good and i fully intend to see wht i can do about it, but will get onto that later.
I bought a used one from ebay for a few quid, removed the original, drilled, tapped and welded to accommodate the temperature probe and pressure transducer.
Removing it is a bit of a faff as access is tricky, ended up bolting it to a bit bit of steel and then using a crows foot to get the fittings off. I later discovered an An20 pipe spanner is also a perfect fit.
Sensor and transducer fitted
Gauge fitted (yet another hole in the carbon!) I dont like the look of the gauge, its a great quality gauge that i nicked out of the track car, but the legibility is poor due to the dash angle getting loads of the light from the screen and it looks absolute toss, it will be getting changed, i think i may make something bespoke so its flush mounted but we will see.
|https://thumbsnap.com/1dtTtQAC[/url]Does it work? Does it f
k. the temperature probe is perfect and accurately measures the temp of the oil as its leaving the sump, thats great the pressure gauge is useless. as the system doesn't put any oil to the cooler until about 100 degrees its literally just pumping out of a hose into a bucket, you get 0 to 1.5 psi registering lumpily. what's weirder is that the system doesnt show much over 100 degrees, this leads me to believe that the stat is not closing properly / fully so there is not complete flow to the cooler, that of the cooler has a much lower pressure drop than expected, which i think i struggle to believe. Anyway, one out of two will on this occasion have to do, even if it does look a bit nasty.
I then wasted some time, effort and a little money buying a radiator and removing the current one from the car. The horrible OAT coolant always looks terrible in the header tank but i knew it was fresh as i changes it with the stat when i got the car, i dont know why they didnt use a transparent tank so you could actually visually check the condition, anyway, it was mint as i poured it all over my drive
With that removed (you can do it without removing the AC rad BTW) it was apparent that the original radiator was actually really robust and after a bit of a wash in excellent condition.
having had a really good look at both, i decided that on balance the original one was probably better made (a bit) than the replacement nissens unit, so decided that i was actually better off just giving it a really good clean, air lining it out and putting it back in. total waste of time.
I did find that the lower rad mounts had de bonded, so cleaned them up and bonded them back on with the correct 3m structural 2 part PU adhesive.
Being that was there I also looked at the belt, it was f
ked, fortunately i had found a ford USA replacement part a year or so back so had one on hand. I thought i was a clever tit having found the source part, however on removing the old one, it seems i was not the first to make this discovery Part number in the picture if it helps at all.
What i also found is that all the idlers were horrible, stiff, nasty. They are also all metal and heavy perfect for inertia. either way they all have replaceable bearings which i have now ordered but didn't have at the time, as such, i owned them up, washed them out with brake cleaner and put them in a boiling sonic bath for a few hours.
Once cleaned out i repacked them all with redline CV2 and the difference was quite dramatic, noise i hadn't really noticed was noticeable by its absence whole engine was quieter and felt smoother. so i suppose at least that part of the job was a winner.
I have ordered a full set of new roller bearings but i am comfortable that this lot will last at the very least another belt.
the final bits of prep (i can hear the relief) was to revisit my old friend the cable clamp, this did me over at spa last year, but had been fine until i took the car for a rip over the mountain during TT where it f
ked me again. Fortunately i was carrying enough speed that i was able to coast all the way to the Creg Ny Baa pub at the bottom of the circuit and call the Mrs out with a jack to put it back on. Either way it was obvious it didnt work correctly.
So clamp MK2!
I know, an engineering marvel! anyway, this one seems to work properly. I have made it so it sits at 90 degrees to the cable action, as such it doesn't restrain the cable forward and aft just vertically.
This has now executed thousands of shifts without any issue, so i am cautiously optimistic.
After this i fitted my ebay fiberglass lip as seem previously, i was absolutely sure i would smash it off in a matter of hours but credit where its due, its still on and barring a few chips looks not bad IMO. This is all fitted in the original fixings, but i changed all the fastenings to chimney nuts and stainless bolts so its infinitely stronger.
See, still attached
Last bit was to print out a few of these out of ABS:
They stop the seatbelt gong going nuts when your wearing the harness's, guess how i found that out......[url]
Edited by IainWhy on Friday 18th August 17:20
IainWhy said:
Absolutely LOVE this - exactly my kind of build, exactly what I’d have in mind for a Vantage if I ever got my hands on one (although without the knowledge you’ve gained!) and, whilst I’m acutely aware my car’s not an AM, kind of where I’ve aimed for with the wagon (although family reasons mean all the seats are standard and present). 

Iain this has been a fantastic read, thank you, and I look forward to more. For some reason the pics of tha cage and seat above just sum the whole thing up for me - lovely!
Gassing Station | Readers' Cars | Top of Page | What's New | My Stuff