Discussion


What are you doing out here you stupid seal?
Car definitely won't be going rusty:
Couldn't see anything untoward in the oil, then I had the bright idea of attaching one of my samarium cobalt magnets to a screwdriver and sweeping inside the sump with it to make sure. It's an alloy sump, that will work fine, right?
Clink!
Oh. Magnet decided it liked the steel baffle more than it liked the screwdriver.
After some tmie poking a fatter, more attractive, screwdriver in there and still not catching it I studied the photos from the last whiteblock oil pressure related disaster and concluded that as it is no-where near the pickup, or any oil flow/return pipes etc, thats where it lives now. Its not like its going anywhere.
I've just increased the value of the car by £5.
I poked the seal back in place temporarily, threw enough oil in it to reach the dipstick and fired it up. It sounds absolutley fine.
Just messaged a volvo dealer for a price on the seal.
Also need a new timing belt since that one is oil contaminated.
I don't see any reason to replace the tensioner and idler, they have only done 11k, I'll remove and clean them up.
I'll need the camshaft locking tool to remove the pulley, and a 30mm socket.
And lots of blue towel and degreaser.
Hopefully I'll get this sorted for around £100 including the locking tool.
Glad its not the exhaust cam, at first I was thinking about doing that seal too while I am in there, but by all accounts once removed, the o-ring in the vvt hub would most likely leak (at high pressure) and need replacing, volvo don't sell them separately from the VVT and I haven't been able to find the o-ring for sale in the UK, or a definitive dimension for it.
Think its best left well alone.
As for why that seal has come out - who knows?
No doubt people will say poor PCV - but as I noted only a week ago, the car passed the glove test fine. To be sure I did it again on Sunday, it sucks inwards at idle and also at 2k rpm.
Once we have it functional I'll do the 'driving glove test' - pipe from dipstick into car with glove on it - and test under full boost. If it passes that then it'll just have to go down as one of those things.
Odd.
So a few bits have arrived:
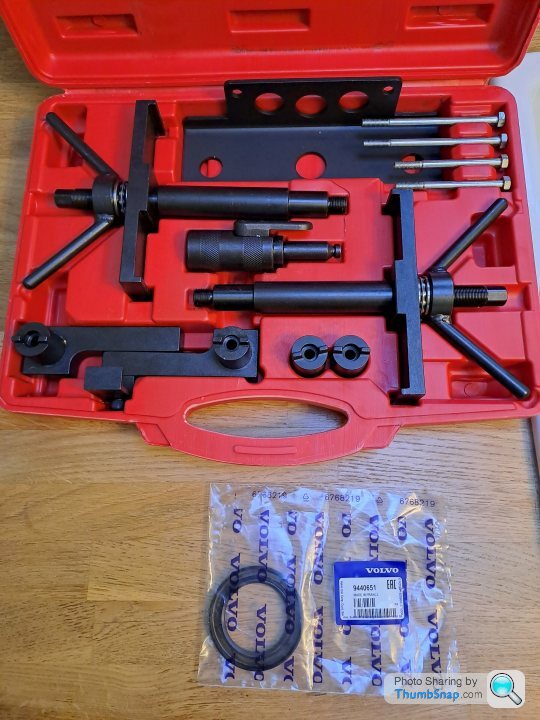
The chinese e-bay locking kit seems well made and feels substantial. There was a 'laser' branded one that was £15 cheaper, burt the welding between the brace and the prongs for the cams looked suspect on the pictures.
I don't actually know what the 2 spinny press like things are for, I assume for fitting cams to the head or something?
Still waiting on the cap for the other end of the intake cam, but that's not essential.
When I went to pick the cambelt up from Halfords (They were cheaper than Euro's despite that being where it all comes from, plus I get a 7% discount through work on top of that), the one that had been delivered was 38 teeth too short.
So thats had to be re-ordered. I get the feeling its going to turn up wrong again, but we'll see.
I'll probably go out there this weekend anyway and get it all stripped down, clean up all the mess, press the seal in and put the sprocket back on so when I finally have a cambelt that's not sized for a noddy car all I have to do is fit it.
The chinese e-bay locking kit seems well made and feels substantial. There was a 'laser' branded one that was £15 cheaper, burt the welding between the brace and the prongs for the cams looked suspect on the pictures.
I don't actually know what the 2 spinny press like things are for,
I assume for fitting cams to the head or something?Still waiting on the cap for the other end of the intake cam, but that's not essential.
When I went to pick the cambelt up from Halfords (They were cheaper than Euro's despite that being where it all comes from, plus I get a 7% discount through work on top of that), the one that had been delivered was 38 teeth too short.
So thats had to be re-ordered. I get the feeling its going to turn up wrong again, but we'll see.
I'll probably go out there this weekend anyway and get it all stripped down, clean up all the mess, press the seal in and put the sprocket back on so when I finally have a cambelt that's not sized for a noddy car all I have to do is fit it.
In the end, this weekend has been fairly constructive.
Halfords rang me while I was still in bed to say that the cambelt had arrived - and this time it was the right one, so I decided to brave the rain and the wind and make a start.
First off, Dad and I dragged their landlords knackered rotten trailer out of the barn and put some plywood down so I could get the front end under cover. That dealt with the rain, but I don't mind admitting I was bloody freezing it was 5 degrees and the coastal wind whipping through (barn totally open on both sides) did not make for a pleasant experience.
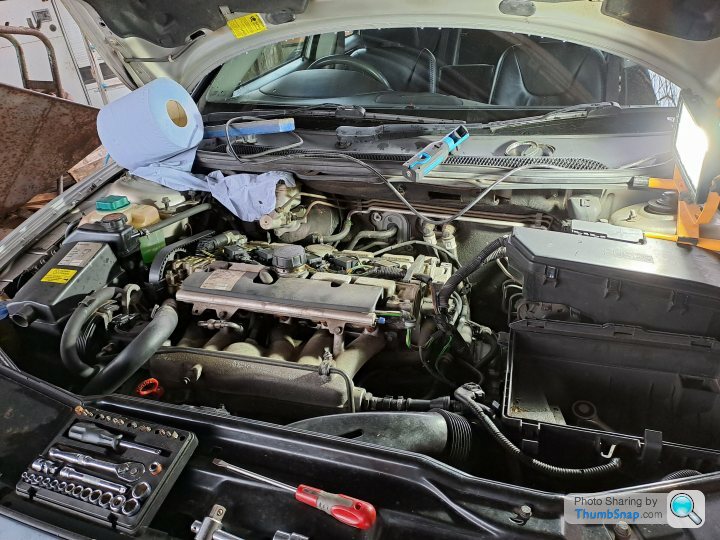
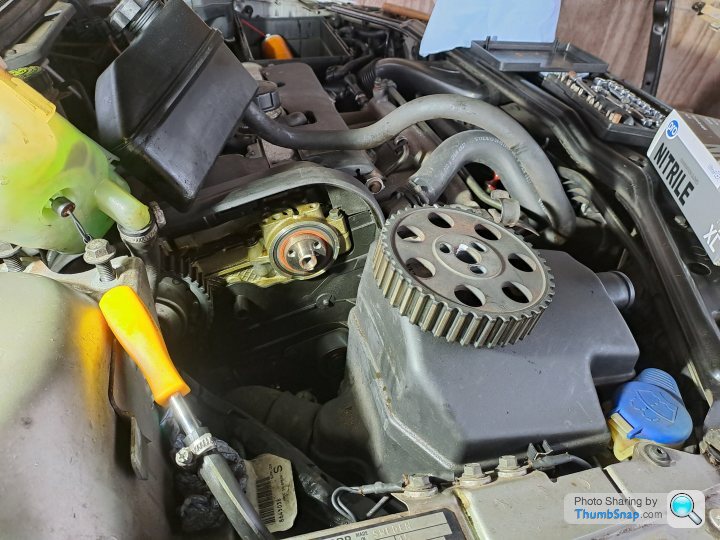
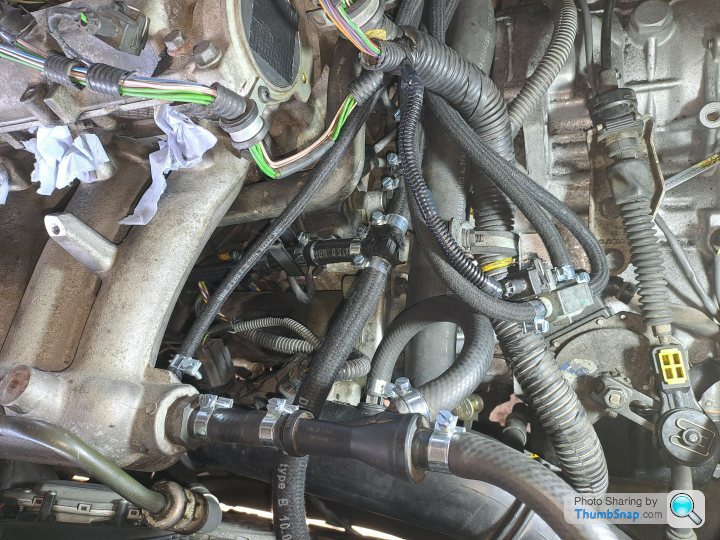
I needed to gain access to the rear ends of the cams for the locking tool, which meant first removing the engine cross stay, then the upper engine mount and lifting eye.
For some reason one of the engine mount bolts is hidden by the spark plug cover, so that has to come off.
But the charge air pipe covers two of the screws that holds the spark plug cover on, so that had to be removed also. I stretched a glove over the open turbo and intercooler pipes to prevent any unfortunate missing screws.
I also had to remove the intake pipe again to get clearance.
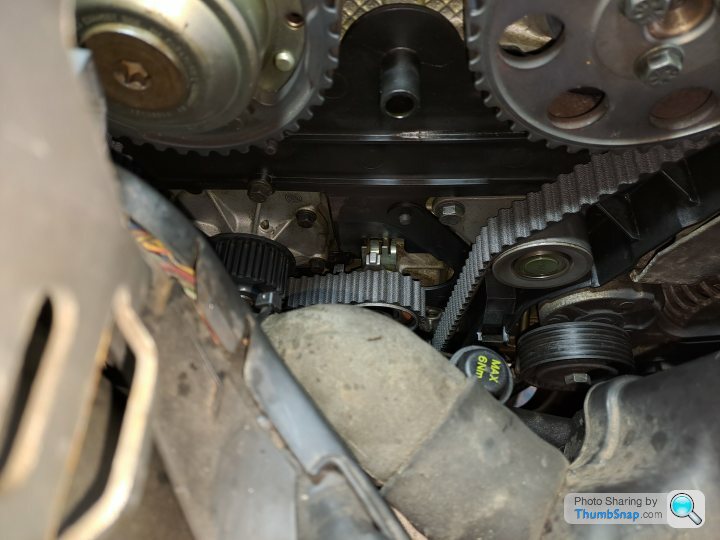
eventually, everything was removed:
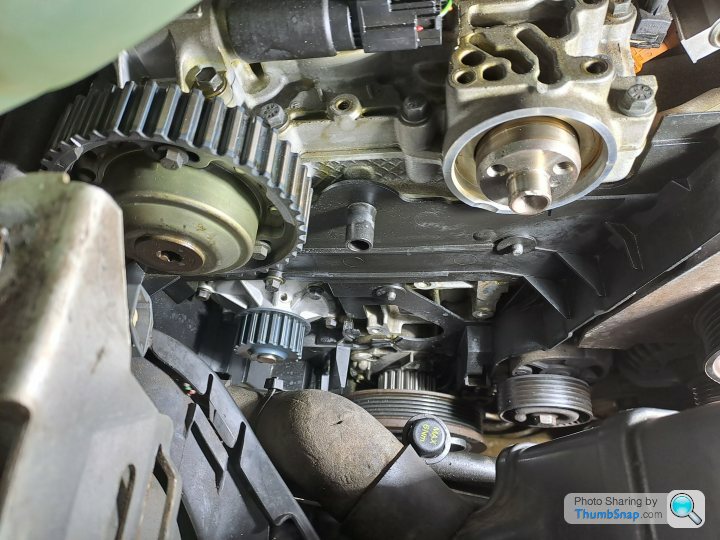
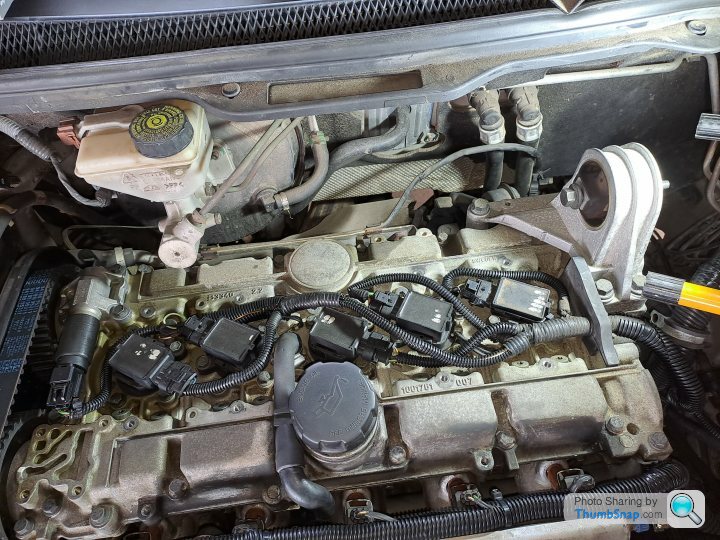
Then the exhast cam position sensor had to come off. In this picture I had already removed the wheel that the sensor reads:
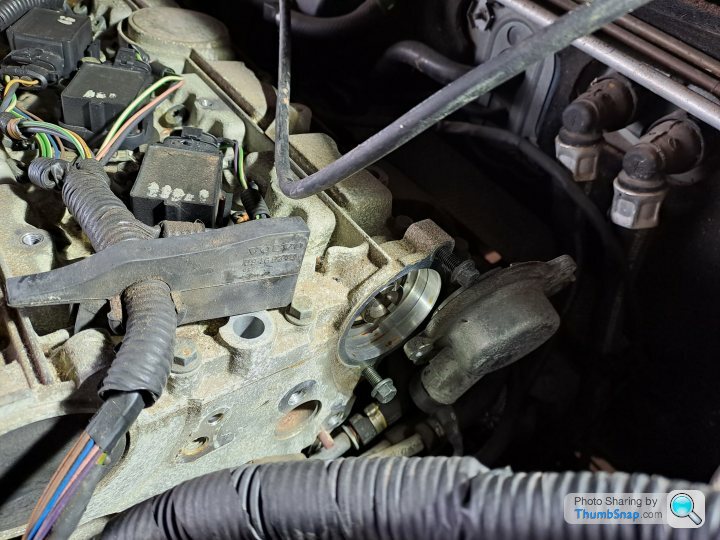
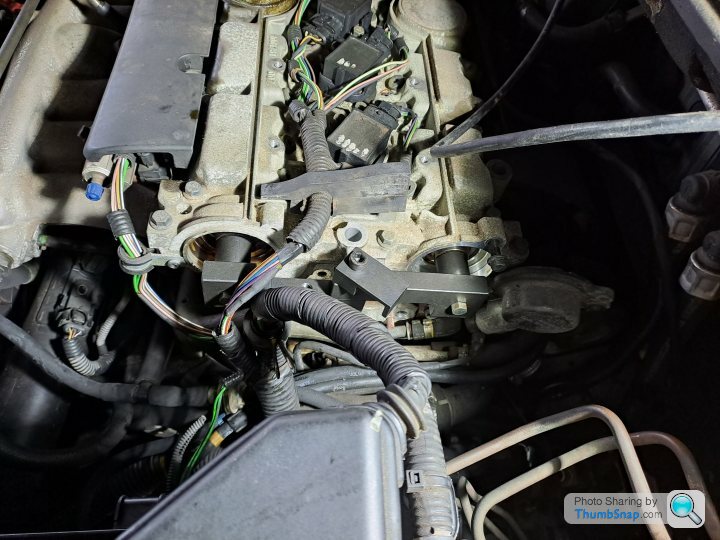
I now had access to the rear of the cams.
It was at this point that I discovered the exhaust cam (VVT) was slightly out of time. The VVT hub is spring loaded and when fitting a cambelt you put the belt round the intake sprocket first, then rotate the VVT hub against spring pressure and then put the belt over it. If the rear of the cam is not locked, rotating the hub can rotate the cam, which is what I assume happened at a previous cambelt change. I'm surprised it didn't set a code, but there must be some tolerance.
Certainly shows the benefit of doing belt changes by the book and locking the cams rather than shortcutting it.
In order to fix this, I had to remove the belt prior to locking the cams so I could rotate the exhaust cam back into time and fit the locking tool.
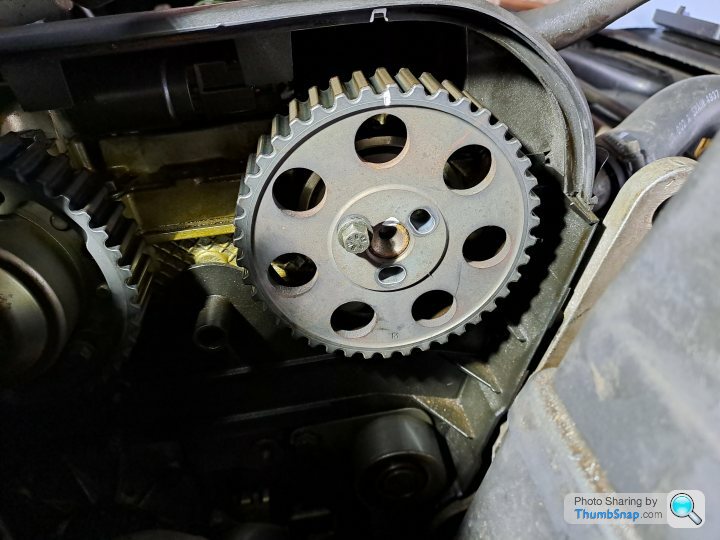
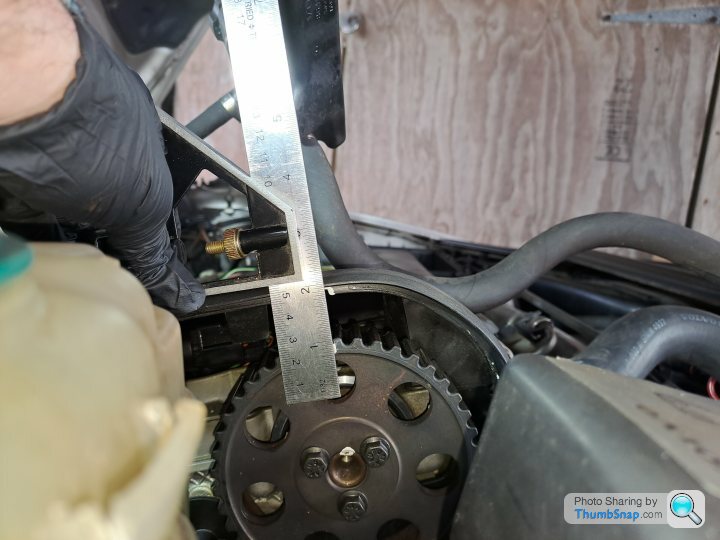
The crank timing marks aren't especially user friendly - you can't actually see them fully with the belt and tensioner in place. two of the teeth on the sprocket have marks on them, and these teeth must sit either side of a casting on the block that has a confusing 45 degree bed in it. This was the best picture I could get. It is dead on here, although perspective means it looks a touch off.

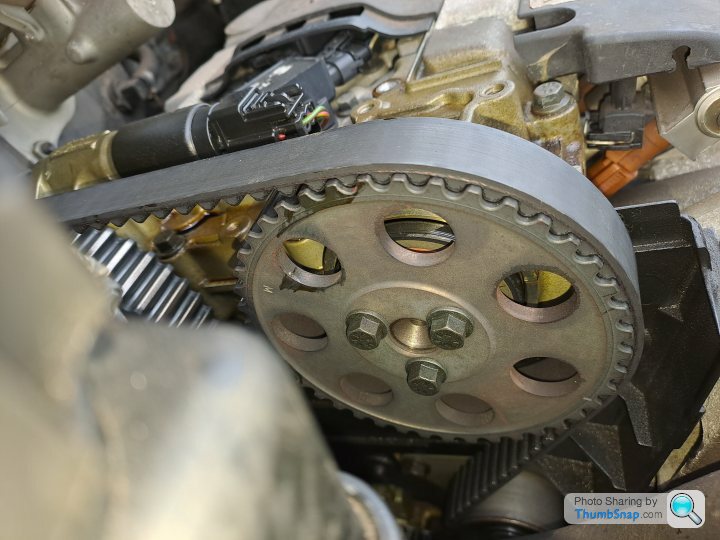
With the cams locked I can take the sprocket off. Note the holes are elongated.
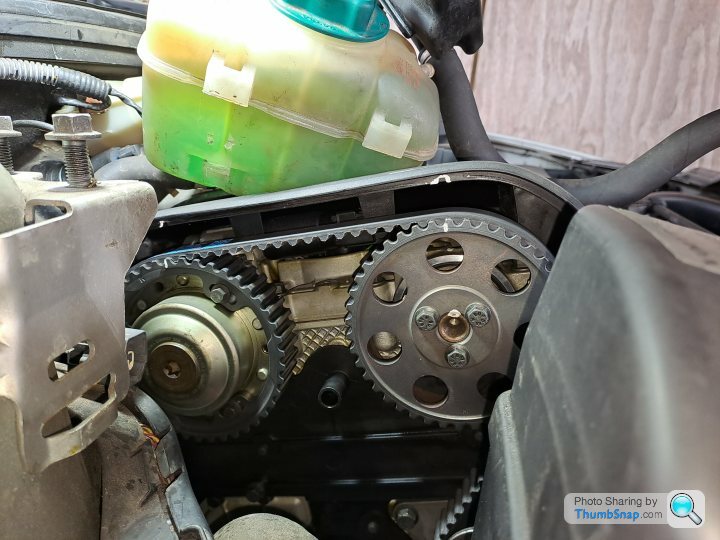
To get access to the belt etc, the coolant tank and power steering reservoir had to movee. A cheap scredriver handle fitted the coolant return line to stop the new head of water wasting all that volvo coolant.
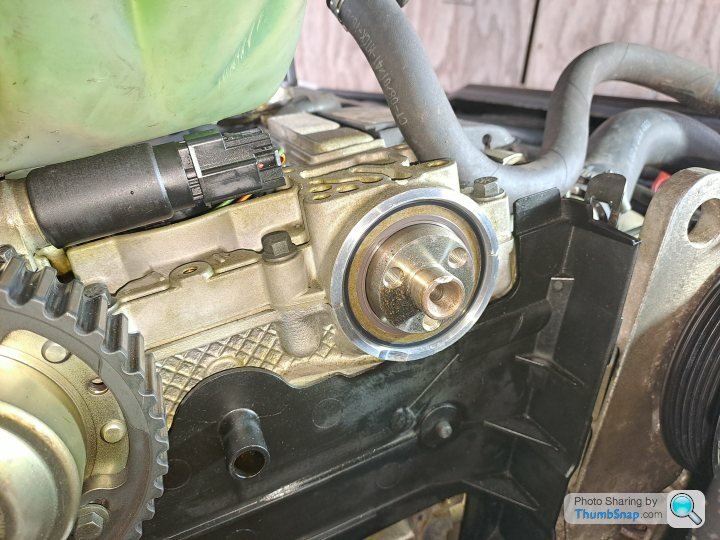
Despite going in with almost no resistance when I pushed it back into place last week, the old seal needed the screw trick to remove.

The next couple of hours was spent trying to clean an area that had about 5.5 litres of hot oil pumped through it a week prior.
Eventually I was in a position where I would feel comfortable fitting the new belt. The tensioner and ider (both INA parts with about 11-12k on them were removed for cleaning.
At that point the light was failing and I was shivering so I called it a day.
This morning was much nicer - I put the roof down on the C70 for the drive out there.
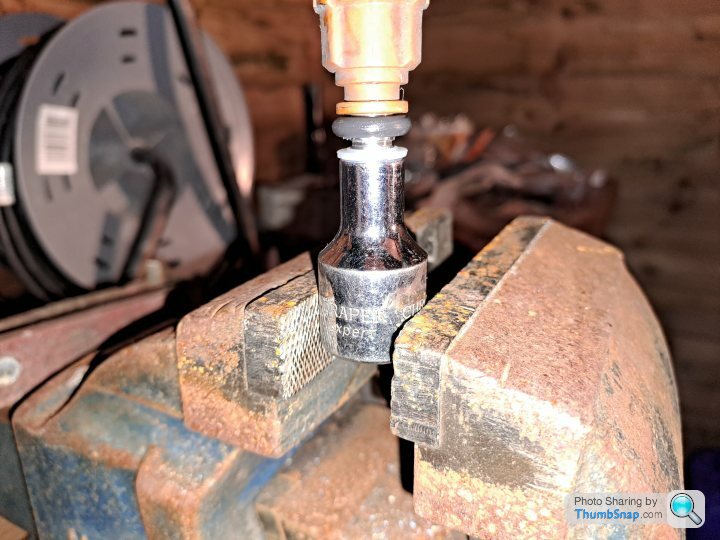
Volvo have a special tool for driving in the cam seals. As with so many things, it seems they are readily available in the states, not so much here. After studying some pictures I established that the volvo tool will drive the seal in until it is just past the chamfer in the opening, Using the old seal I gently tapped the new one in with a pin hammer.
Once the old one started to be held by the opening, I knew I was just past the chamfer.
Cleaned up sprocket bolted back up and in time.
I found the tensioner a bit awkward to set - you need to lightly bolt it in place and fit the belt, then using an allen key, rotate it so that the pointer moves all the way to the right, then rotate it back so the pointer is in a certain position according to the ambient air temp. it was about 15 degrees so I set it ever slightly left of the 20 degree point. You then need to hold the allen key and tighten the tensioner fully. when you start tightening the nut, the tensioner will start to tighten again towards the right. in order to counteract this, you need to turn the allen key in the opposite direction to whihch you were just holding it which is a tad awkward and requires you to time your change of direction just right.
I took a couple of goes at it before I was happy, pretty sure I could do it much quicker next time.
Tightened with a torque wrench to (iirc) 20 ft-lbs (its not very much, anyway).
Then rotate the engine through two revolutions and check it is still where it should be.
And that everything is still in time.
After that, refitting is the reverse of removal!
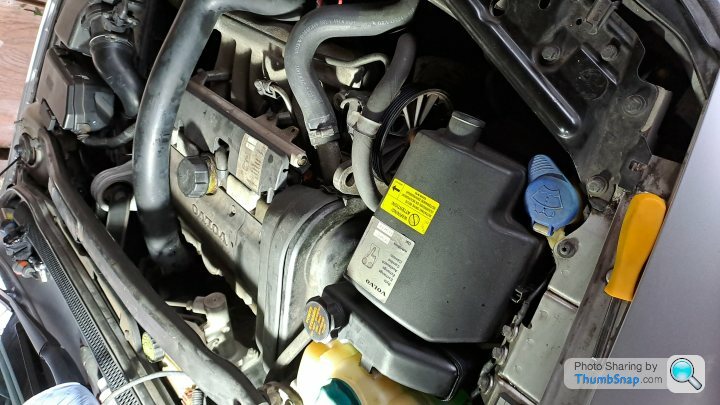
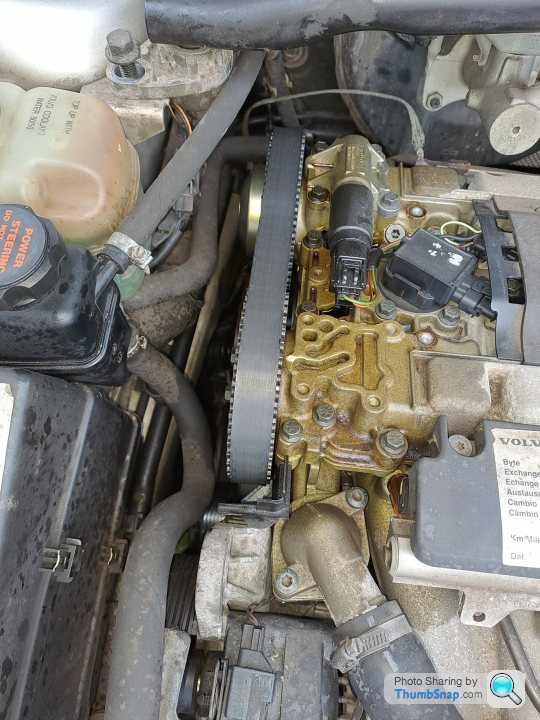
I then had the upper cover off again to check for leaks once the car was running. seems good so far.
I repeated the oil filler glove test. Fine at idle and 2krpm.
Then I set it up for a driving glove test.
The hose wouldn't reach into the cabin, so I had to have it in front of the windscreen.
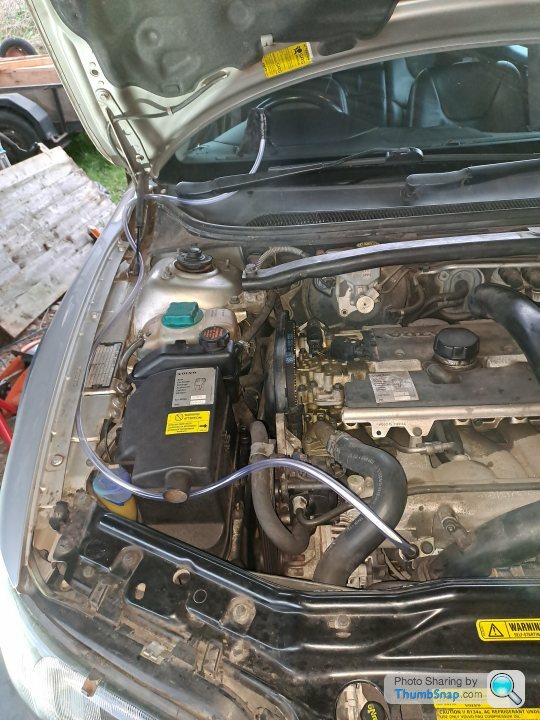
The glove inflates under boost So I gingerly drove it back and parked it up and took the C70 home again.
A bit of research later, it turns out that the early cars do pressurise the crankcase under boost; so given the idle and 2krpm tests, and the perfectly clear ptc nipple, I still think my PCV is operating as intended. It can be improved, however.
Apparently originally ( I guess on the P80 cars) the banjo bolt on the underside of the manifold had a non-retun valve in it that had a tendency to disintegrate and get sucked into the engine. The early P2 cars then had an open banjo bolt with no non-rturn valve, just a narrowed orifice in an attempt to limit the amount of pressure enting the crankcase to, anecdotally, about 2psi.
That might have been acceptable at the time, but now all the seals are 22 years old, maybe not so much...
Since 2014 there has been a further revision with a new design of non-return valve, which will again stop the crankcase being filled with boost pressure.
Volvopartstrade on e-bay had one for sale for £15 delivered so I have ordered it.
Hopefully that will prevent the crankcase getting pressured and the rest of the seals will stay where I would like them.
It is a bit of a pain to replace though, by all accounts. We'll see.
Halfords rang me while I was still in bed to say that the cambelt had arrived - and this time it was the right one, so I decided to brave the rain and the wind and make a start.
First off, Dad and I dragged their landlords knackered rotten trailer out of the barn and put some plywood down so I could get the front end under cover. That dealt with the rain, but I don't mind admitting I was bloody freezing it was 5 degrees and the coastal wind whipping through (barn totally open on both sides) did not make for a pleasant experience.
I needed to gain access to the rear ends of the cams for the locking tool, which meant first removing the engine cross stay, then the upper engine mount and lifting eye.
For some reason one of the engine mount bolts is hidden by the spark plug cover, so that has to come off.
But the charge air pipe covers two of the screws that holds the spark plug cover on, so that had to be removed also. I stretched a glove over the open turbo and intercooler pipes to prevent any unfortunate missing screws.
I also had to remove the intake pipe again to get clearance.
eventually, everything was removed:
Then the exhast cam position sensor had to come off. In this picture I had already removed the wheel that the sensor reads:
I now had access to the rear of the cams.
It was at this point that I discovered the exhaust cam (VVT) was slightly out of time. The VVT hub is spring loaded and when fitting a cambelt you put the belt round the intake sprocket first, then rotate the VVT hub against spring pressure and then put the belt over it. If the rear of the cam is not locked, rotating the hub can rotate the cam, which is what I assume happened at a previous cambelt change. I'm surprised it didn't set a code, but there must be some tolerance.
Certainly shows the benefit of doing belt changes by the book and locking the cams rather than shortcutting it.
In order to fix this, I had to remove the belt prior to locking the cams so I could rotate the exhaust cam back into time and fit the locking tool.
The crank timing marks aren't especially user friendly - you can't actually see them fully with the belt and tensioner in place. two of the teeth on the sprocket have marks on them, and these teeth must sit either side of a casting on the block that has a confusing 45 degree bed in it. This was the best picture I could get. It is dead on here, although perspective means it looks a touch off.
With the cams locked I can take the sprocket off. Note the holes are elongated.
To get access to the belt etc, the coolant tank and power steering reservoir had to movee. A cheap scredriver handle fitted the coolant return line to stop the new head of water wasting all that volvo coolant.
Despite going in with almost no resistance when I pushed it back into place last week, the old seal needed the screw trick to remove.
The next couple of hours was spent trying to clean an area that had about 5.5 litres of hot oil pumped through it a week prior.
Eventually I was in a position where I would feel comfortable fitting the new belt. The tensioner and ider (both INA parts with about 11-12k on them were removed for cleaning.
At that point the light was failing and I was shivering so I called it a day.
This morning was much nicer - I put the roof down on the C70 for the drive out there.
Volvo have a special tool for driving in the cam seals. As with so many things, it seems they are readily available in the states, not so much here. After studying some pictures I established that the volvo tool will drive the seal in until it is just past the chamfer in the opening, Using the old seal I gently tapped the new one in with a pin hammer.
Once the old one started to be held by the opening, I knew I was just past the chamfer.
Cleaned up sprocket bolted back up and in time.
I found the tensioner a bit awkward to set - you need to lightly bolt it in place and fit the belt, then using an allen key, rotate it so that the pointer moves all the way to the right, then rotate it back so the pointer is in a certain position according to the ambient air temp. it was about 15 degrees so I set it ever slightly left of the 20 degree point. You then need to hold the allen key and tighten the tensioner fully. when you start tightening the nut, the tensioner will start to tighten again towards the right. in order to counteract this, you need to turn the allen key in the opposite direction to whihch you were just holding it which is a tad awkward and requires you to time your change of direction just right.
I took a couple of goes at it before I was happy, pretty sure I could do it much quicker next time.
Tightened with a torque wrench to (iirc) 20 ft-lbs (its not very much, anyway).
Then rotate the engine through two revolutions and check it is still where it should be.
And that everything is still in time.
After that, refitting is the reverse of removal!
I then had the upper cover off again to check for leaks once the car was running. seems good so far.
I repeated the oil filler glove test. Fine at idle and 2krpm.
Then I set it up for a driving glove test.
The hose wouldn't reach into the cabin, so I had to have it in front of the windscreen.
The glove inflates under boost
So I gingerly drove it back and parked it up and took the C70 home again.A bit of research later, it turns out that the early cars do pressurise the crankcase under boost; so given the idle and 2krpm tests, and the perfectly clear ptc nipple, I still think my PCV is operating as intended. It can be improved, however.
Apparently originally ( I guess on the P80 cars) the banjo bolt on the underside of the manifold had a non-retun valve in it that had a tendency to disintegrate and get sucked into the engine. The early P2 cars then had an open banjo bolt with no non-rturn valve, just a narrowed orifice in an attempt to limit the amount of pressure enting the crankcase to, anecdotally, about 2psi.
That might have been acceptable at the time, but now all the seals are 22 years old, maybe not so much...
Since 2014 there has been a further revision with a new design of non-return valve, which will again stop the crankcase being filled with boost pressure.
Volvopartstrade on e-bay had one for sale for £15 delivered so I have ordered it.
Hopefully that will prevent the crankcase getting pressured and the rest of the seals will stay where I would like them.
It is a bit of a pain to replace though, by all accounts. We'll see.
More Parts:
I decided to do the whole PCV system, much like nuking the entire site from orbit, it's the only was to be sure
And the special banjo bolt with a non-return valve in it, that for some reason costs £15!
First the manofold has to come off.
Noteable that you will require an extra long 1/4" extension to feed through a tiny gap to reach the bottom left bolt. Luckily my Halfords set allows you to use the screwdriver part as an extension in addition to the nomal extension
You can just about reach in fromthe right hand side to get the other lower ones.
Made a 'special tool' out of the metallic part of a wine bottle top in order to depress all four catches to disconnect the fuel line quick release.
Taking off the throttle body - hmmm, this looks oddly shiny...
Result!!
For those that don't know, that is a genuine Volvo remanufactured throttle body with contactless sensors. Manufacture date on it of Feb 2018. I had assumed when I peered in at it previously that as it had a white label, it was the original Magnetti Marelli rubbish.
The last year of history from when the old man had it was missing (hence why I had the cambelt done when we bought it, then found another sticker under the bonnet saying it had been done not long before. The replacement of the throttle body must also have been done around the same time.
Thats a potential bill we won't need to worry about any more.
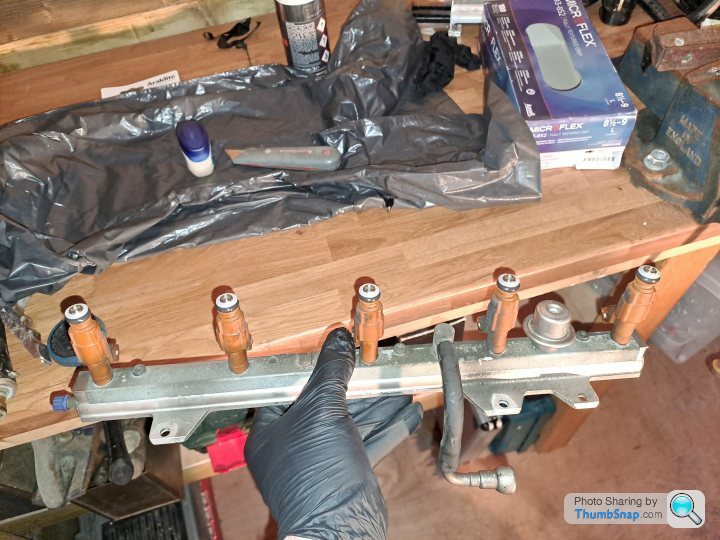
To get the manifold all the way off and remove the banjo bolt on the underneath of it the alternator has to come off as there is literally mm's of clearance.
I also had to remove the fuel rail to get the manifold off as the hard line that comes through the manifold simply would not clear otherwise. Even then, the manifold had to be rotated 90 degrees to maneuver it off.
I notice that my '04 C70 doesn't have the 90deg bend in the hard line, so the manifold would lift striaght off with the fuel rail in place.
In taking the rail off, one of the pintle caps broke and fell onto one of the (thankfully closed) intake valves Managed to suck it out with the vacuum cleaner.
All stripped off:

For some reason I don't have any pictures of the PCV box and hoses going back on, think I was on a bit of a mission.
When I did the cam seal I noted that the aux belt tensioner had quite a bit of wobble to it. The new INA tensioner has a slightly different design in that to release the tension you use a big torx bit on the body, rather than a 14mm spanner on the pulley. The new design is actually easier.
All nestled away in its new home.
I discovered that one of the non-return valves on the EVAP system wasn't working properly - at one point I could blow through it in both directions, and the next in neither!
I couldn't find them on any diagrams in VIDA, nor any correct part mubers online. They are 10mm in the inlet side, and 6mm on the outlet side so its hard to fit them incorrectly, but I couldn't find anything the same.
The solution:
EvEn MoRe Parts!
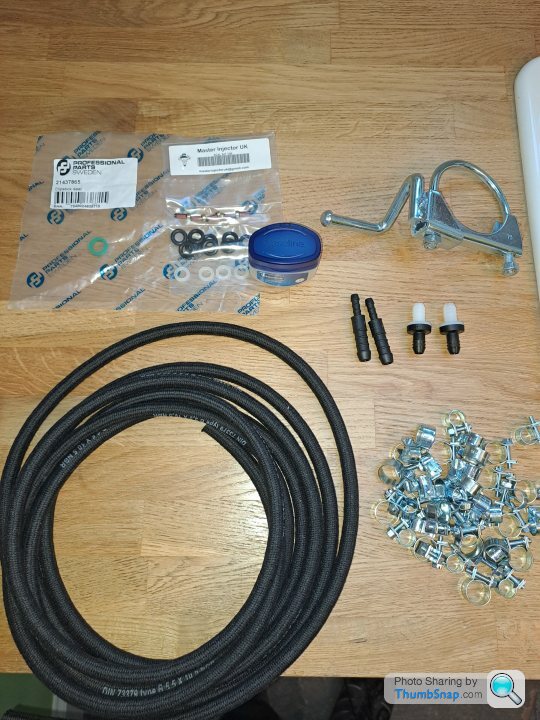
Some non-return valves with 10mm ports, and some separate 10mm-6mm reducers. Also some new injector seals and pintle caps, a new disptick seal and the repair bracket for the rearmost point of the exhaust that I have yet to fit.
To fit the pintle caps I chose the smallest socket that would still fit over the injector tips, clamped it in the vice, positioned the cap on it then gently pressed the injector into it.
All five fitted along with new seals:
The vacuum lines had seen better days, they had turned into sponges and one split when I touched it.
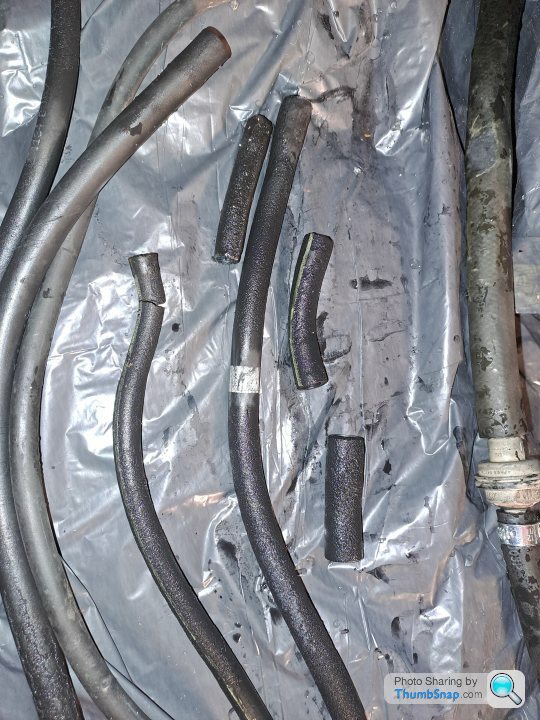
Every single vacuum line and hose clamp replaced, and the new non-return valves and reducers etc fitted.
There was also a join in the hard plastic line just back from the engine bay under the car. The line runs back to the fuel pressure regulator next to the filter.
One of the ends of the pipe was cut at a 45 degree angle, I'm not entirely convinced this is a factory joint, although the rubber pipe that was on it was in a similar state to everything else so it has been like it for a long time.
Yes, it is oily down there!
All the plastic covering over the wiring to the injectors and the coil packs had disintegrated with age, along with the covering of the wiring to the tubo contol solenoid. The sheathing on the wiring itself was fine, however.
I spent some time recovering the wiring with some new high-temperature sleeving.
I notice that the coil packs are marked 1 through 5 with tippex, but aren't on their corresponding cylinders. Perhaps someone was chasing a misfire at some point in the past?
The connector on number 5 is broken so I have added a cable tie to make sure it doesn't come loose.
After that it was just a case of putting it back together. I have noticed that the very short rubber pipe between the turbo and the over engine boost pipe is a bit overly soft. Its not urgent, but I will replace that at some point.
And....It lives!!
Despite the PCV hoses and oil trap that I removed being clear, a glove over the filler neck is sucked in much more than before.
Fuel trims down to +5/6. I was hoping for a bit lower now that every vacuum hose is new, but given that a month or so ago they were >+20 its not an awful result.
I still think the MAF is reading a touch low at 9-10kg/hr at idle when VIDA says it should be 12-14; but I'd quite like to properly diagnose if it is failing rather than just loading the parts cannon.
The other possibility is fuel pressure. I did notice when I depressurised the rail - I had already disconnected so much at the point I remembered I would need to do this that I couldn't start it with the fuel pump fuse removed, so I just turned my face away and prodded the schraeder valve with a screwdriver - that there was 'some' pressure in it, but not as much as I was expecting. it didn't come flying out. This after having been run for about 3 minutes about 1 1/2 hours previously. Since that assessment is not exactly highly scientific I might see if I can borrow a fuel pressure tester to rule it out as a problem.
Regardless, about 45 miles successfully travelled in it this evening, and all the oil is still where it should be.
It has to earn its keep now...
I decided to do the whole PCV system, much like nuking the entire site from orbit, it's the only was to be sure
And the special banjo bolt with a non-return valve in it, that for some reason costs £15!
First the manofold has to come off.
Noteable that you will require an extra long 1/4" extension to feed through a tiny gap to reach the bottom left bolt. Luckily my Halfords set allows you to use the screwdriver part as an extension in addition to the nomal extension
You can just about reach in fromthe right hand side to get the other lower ones.
Made a 'special tool' out of the metallic part of a wine bottle top in order to depress all four catches to disconnect the fuel line quick release.
Taking off the throttle body - hmmm, this looks oddly shiny...
Result!!
For those that don't know, that is a genuine Volvo remanufactured throttle body with contactless sensors. Manufacture date on it of Feb 2018. I had assumed when I peered in at it previously that as it had a white label, it was the original Magnetti Marelli rubbish.
The last year of history from when the old man had it was missing (hence why I had the cambelt done when we bought it, then found another sticker under the bonnet saying it had been done not long before. The replacement of the throttle body must also have been done around the same time.
Thats a potential bill we won't need to worry about any more.
To get the manifold all the way off and remove the banjo bolt on the underneath of it the alternator has to come off as there is literally mm's of clearance.
I also had to remove the fuel rail to get the manifold off as the hard line that comes through the manifold simply would not clear otherwise. Even then, the manifold had to be rotated 90 degrees to maneuver it off.
I notice that my '04 C70 doesn't have the 90deg bend in the hard line, so the manifold would lift striaght off with the fuel rail in place.
In taking the rail off, one of the pintle caps broke and fell onto one of the (thankfully closed) intake valves
Managed to suck it out with the vacuum cleaner.All stripped off:
For some reason I don't have any pictures of the PCV box and hoses going back on, think I was on a bit of a mission.
When I did the cam seal I noted that the aux belt tensioner had quite a bit of wobble to it. The new INA tensioner has a slightly different design in that to release the tension you use a big torx bit on the body, rather than a 14mm spanner on the pulley. The new design is actually easier.
All nestled away in its new home.
I discovered that one of the non-return valves on the EVAP system wasn't working properly - at one point I could blow through it in both directions, and the next in neither!
I couldn't find them on any diagrams in VIDA, nor any correct part mubers online. They are 10mm in the inlet side, and 6mm on the outlet side so its hard to fit them incorrectly, but I couldn't find anything the same.
The solution:
EvEn MoRe Parts!
Some non-return valves with 10mm ports, and some separate 10mm-6mm reducers. Also some new injector seals and pintle caps, a new disptick seal and the repair bracket for the rearmost point of the exhaust that I have yet to fit.
To fit the pintle caps I chose the smallest socket that would still fit over the injector tips, clamped it in the vice, positioned the cap on it then gently pressed the injector into it.
All five fitted along with new seals:
The vacuum lines had seen better days, they had turned into sponges and one split when I touched it.
Every single vacuum line and hose clamp replaced, and the new non-return valves and reducers etc fitted.
There was also a join in the hard plastic line just back from the engine bay under the car. The line runs back to the fuel pressure regulator next to the filter.
One of the ends of the pipe was cut at a 45 degree angle, I'm not entirely convinced this is a factory joint, although the rubber pipe that was on it was in a similar state to everything else so it has been like it for a long time.
Yes, it is oily down there!
All the plastic covering over the wiring to the injectors and the coil packs had disintegrated with age, along with the covering of the wiring to the tubo contol solenoid. The sheathing on the wiring itself was fine, however.
I spent some time recovering the wiring with some new high-temperature sleeving.
I notice that the coil packs are marked 1 through 5 with tippex, but aren't on their corresponding cylinders. Perhaps someone was chasing a misfire at some point in the past?
The connector on number 5 is broken so I have added a cable tie to make sure it doesn't come loose.
After that it was just a case of putting it back together. I have noticed that the very short rubber pipe between the turbo and the over engine boost pipe is a bit overly soft. Its not urgent, but I will replace that at some point.
And....It lives!!
Despite the PCV hoses and oil trap that I removed being clear, a glove over the filler neck is sucked in much more than before.
Fuel trims down to +5/6. I was hoping for a bit lower now that every vacuum hose is new, but given that a month or so ago they were >+20 its not an awful result.
I still think the MAF is reading a touch low at 9-10kg/hr at idle when VIDA says it should be 12-14; but I'd quite like to properly diagnose if it is failing rather than just loading the parts cannon.
The other possibility is fuel pressure. I did notice when I depressurised the rail - I had already disconnected so much at the point I remembered I would need to do this that I couldn't start it with the fuel pump fuse removed, so I just turned my face away and prodded the schraeder valve with a screwdriver - that there was 'some' pressure in it, but not as much as I was expecting. it didn't come flying out. This after having been run for about 3 minutes about 1 1/2 hours previously. Since that assessment is not exactly highly scientific I might see if I can borrow a fuel pressure tester to rule it out as a problem.
Regardless, about 45 miles successfully travelled in it this evening, and all the oil is still where it should be.
It has to earn its keep now...

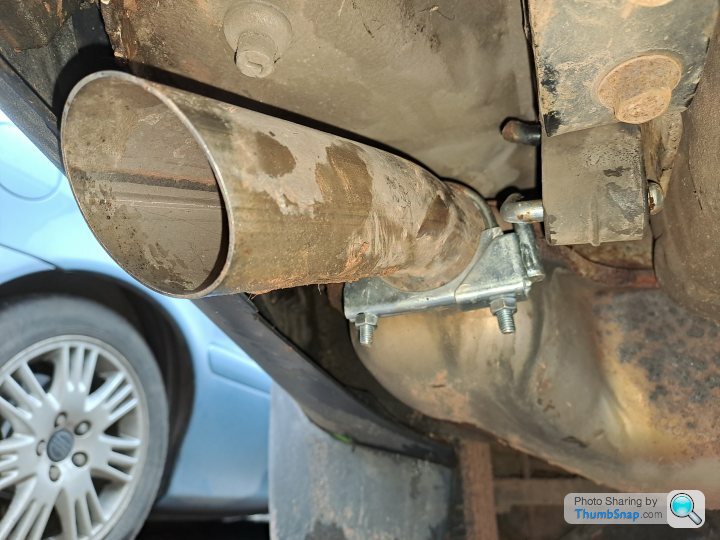
Ticked off one of the MOT advisories this morning, the rearmost exhaust bracket had rusted off the tailpipe
It was just a five minute job to remove the rusted part and bolt on the repair clamp, didn't even need to jack the car up.
I also replaced the passenger side mirror that I broke last November and had the replacement in the glovebox since then.
When I say I broke it, I just touched someones black bin in the dark and the rain on a single cars width street letting someone past, just enough to fold in the mirror housing and the glass dropped slightly. Literally just as I got to a position that I could stop safely to push it back out, the glass fell onto the floor and cracked in half diagonally.
It was only able to fall to the floor because at some point someone had cut off the wires for the heating elements (which would explain the code in Vida).
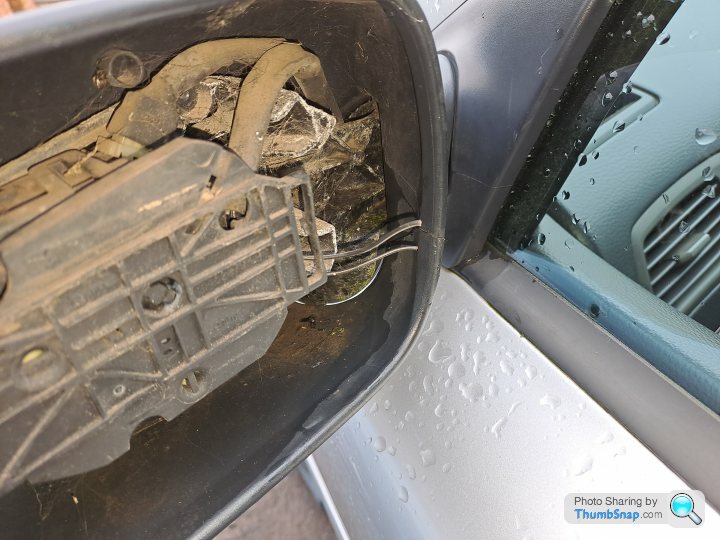
A couple of spade connectors and a squeeze with Aldi's finest crimping tool and the new heated glass was clipped back in, in theory, the only code in Vida should now be the ubiquitous air quality sensor.

It was just a five minute job to remove the rusted part and bolt on the repair clamp, didn't even need to jack the car up.
I also replaced the passenger side mirror that I broke last November and had the replacement in the glovebox since then.
When I say I broke it, I just touched someones black bin in the dark and the rain on a single cars width street letting someone past, just enough to fold in the mirror housing and the glass dropped slightly. Literally just as I got to a position that I could stop safely to push it back out, the glass fell onto the floor and cracked in half diagonally.
It was only able to fall to the floor because at some point someone had cut off the wires for the heating elements (which would explain the code in Vida).
A couple of spade connectors and a squeeze with Aldi's finest crimping tool and the new heated glass was clipped back in, in theory, the only code in Vida should now be the ubiquitous air quality sensor.
The torque converter in the twice rebuilt gearbox continues to shudder. I syringed out 300ml of fluid and threw in a 300ml bottle of Lubegard Platinum prior to a trip down to Cornwall and seemingly all was well during the week, but no sooner had we reteurned it was up to it's old tricks again.
And back to the gearbox 'specialists' we went...
This time they had it for a week, and their assessment was "it's your viscous coupling on the rear axle binding up sir".
Not entirely convinced by that (not convinced at all, in fact), I went and collected the car, and that very night removed the propshaft at the side of the road. In doing so I found that they had totally mangled one of the allen headed bolts when they were fiddling with it.
I didn't particularly like how I had to lift it in order to get it off - it had to have both wheels on the same side up in the air in order for the prop to rotate to get at all the bolts.
I think I am going to see if I can borrow some time on a lift when it comes time to put it back on again.
So now we have a 2WD car with a shuddering torque converter
At this point I don't really want to take it back to them again, its been incredibly stressful and I have lost faith in their ability to get it right or even diagnose correctly. At the same time I don't want them to 'get away' with our money..
I said earlier I don't understand how people can not realise the AWD isn't working - it now lights up the front tyres very easily - went to overtake a lorry on a long Motorway sliproad and it started spinning the wheels on dry tarmac at about 25mph. Perhaps the mapping is different on the later ones?
My daughter thought the wheelspin was quite fun, the boost control solenoid decided it wasn't. It made a horrible chattering buzzing noise at startup and shutdown (which to be fair I had heard before from it) for a couple of days, then stopped functioning altogether.
Luckily I was able to find a Pierburg replacement on Amazon for £32. It was sold by Amazon themselves and appears to be genuine. Fitting was a two minute job, one pipe at a time so as not to mix them up
And we were back to full booooost.
I have discovered that when driving the car in geartronic mode, the torque converter doesn't shudder. It locks up with a single definite 'bump'. I'm assuming that in geartronic mode the slip function of the lockup is deactivated.
I'm the only one driving it for the moment as Mrs1roll has broken her ankle, and have successfully done about 600 miles like that so far with no shuddering. It's not a fix, but a workaround to stop it grinding itself to bits.
We've got a trip to Wales coming up next week, and after that I think I'm going to change the gearbox oil for the 16 litres of JWS3309 I still have sat in the shed, on the chance they have put the wrong fluid in it and the lubegard wasn't able to compensate. Failing that if we can use the workaround it until this time next year, I'll have a go at the torque converter myself.
Well, I didn't want to 'call it' until I was sure, but I think its long enough now to say that I have fixed the TC judder by... PUTTING THE CORRECT FLUID IN IT!

Having done it as a series of drain and fills, the first drain was black, with a little debris stuck to the magnetic plug. The second was much much cleaner with no debris evident, and at that point it would have had ~74% new correct fluid so we started driving it in automatic mode again. It hasn't juddered once since then, with almost 3 thousand miles done.
I've done a total of 4 changes now, which takes us to 92% new fluid.
Just goes to show - yet again - that if I want anything done properly, I should do it myself!
Obviously the concern is how much damage has been done by ~2-2.5k miles of driving with the wrong stuff in there, but there's not much I can do about that now.
With that buttoned down, I decided it was actually worth servicing the car - the light was on (due to time) since March, but given that it had an impromptu oil change etc when the cam seal went, and that it was no-where near the 10k limit due to being off the road for ages with all the buggering about I was comfortable running it on a bit.
The fuel filter and air filters were changed last time so the Plan was oil + filter, plugs, and a final drain and fill to get to ~96%new fluid with a single D+F each service thereafter.
Also to investigate the leaking driveshaft boot.
I didn't end up taking as may photos as I intended as I was covered in oil and grease.
Managed to get the front end under a bit of shade, but I was still soaking wet by the end of it.
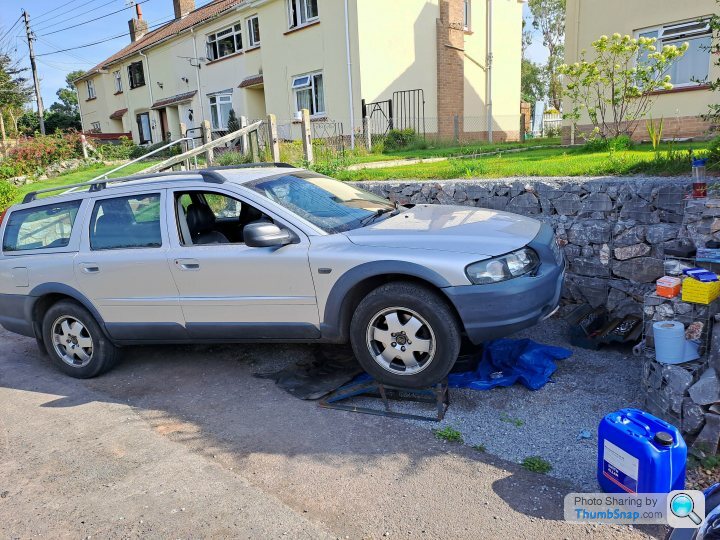
The filter housing was filled with 'coffee grinds' but given this was the first filter change I have done, I doubt any garage will have cleaned it out previously. A good few doses of brake cleaner and repeated wiping out and it was sparkling, so a new Mahle filter was then fitted, which was a much tighter fit than the Mann filter that was in there - inspection shows that the centre bore on the Mahle filter was smaller (and thus there will be more surface area on the pleats) and fitted much more tightly. Given I believe Mahle make the Volvo filters I suspect this is how it is supposed to be. I will remember this for future changes and keep an eye on the state of the filter.
Threw in 5 1/4 litres of Smith and Allans A3/B4 5w-40 Full Synthetic (after much deliberation I decided this will be fine, Opie oils still say 10w-40 which is really out of date info, VIDA says 0w-30 which I can't find in A3 spec for a sensible price - only A5/B5, and most places just bung a basic 5w-30 in everything!) and got it back down on the ground so I could do the plugs.
Can you tell which one was loose?
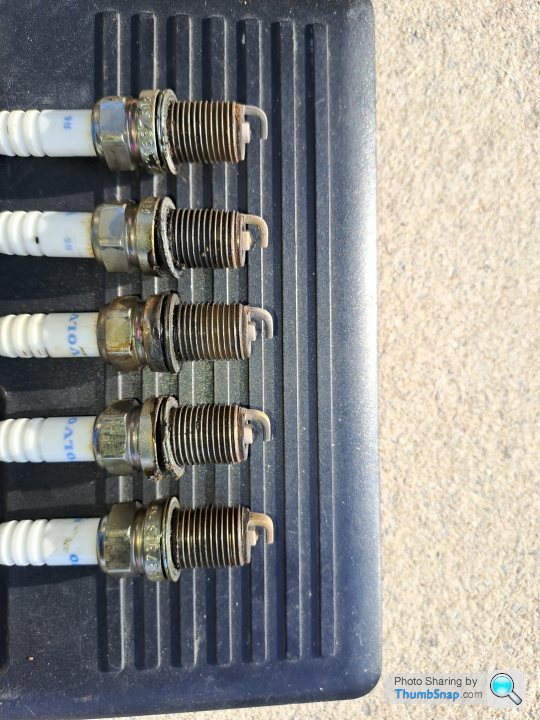
They had been in for about 35k. The volvo plugs come pre-gapped to 0.75mm, (range 0.7 - 0.8) and on checking they were a shade over 0.8 (I really need to get a feeler guage to go below 0.05mm). I suspect if they did the full 60k they are alleged to be good for, they'd be well out.
A new set of Volvo plugs was fitted - all were bang-on 0.75mm.
Once the oil had time to settle, I checked and topped up to the max with the remainder of the total 5.8 litre fill.
I didn't do the last gearbox drain and fill, as I spotted a weep from the cooler return line seal on the box (again, if you want it done properly..) so I will save the fluid until I replace that.
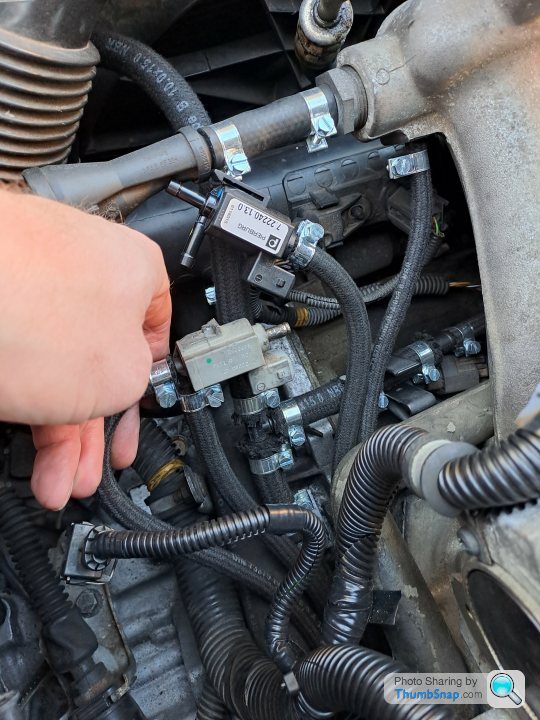
Then I fitted a new-old-stock MAF sensor. We had been experiencing an intermittent surging at a constant speed - as if driving into very high wind - given that the ETM is new volvo, I have replaced every single vaccuum hose and the PCV the MAF was next on the list - in fact xemodex's ETM flowcharts say replace the maf, and it was reading low at idle compared to the vida specs.
The BOSCH part number is NLA so I took a flyer on this one actually being genuine and working. It came in the old-style yellow box.
It reads higher than the old one at idle and the STFT was then almost precisely opposite the LTFT at idle before I reset it all, so it's definitely doing something different.
It remains to be seen if it will fix the surging as it might not do it for ages before doing it constantly for days.
Last up was to investigate the driveshaft boot.
I literally can't see where it is leaking from. It isn't split. I cleaned all the grease up so it was spotless and then gave it a good squeeze and felt all around where it seals to the the yoke housing etc and it remained clean. In the end I noticed the ear clip had a bit more squeeze available to it, so I crimped that up so the two sides were touching and will have to just monitor and see if that stops it.
If not then I'll have to get a boot kit and pull the shaft out.
We're still propshaftless at present, a little while ago I had a piece of flint pierce precisely in the middle of the tread on the OSR tyre, creating an irreperable split in the inside.
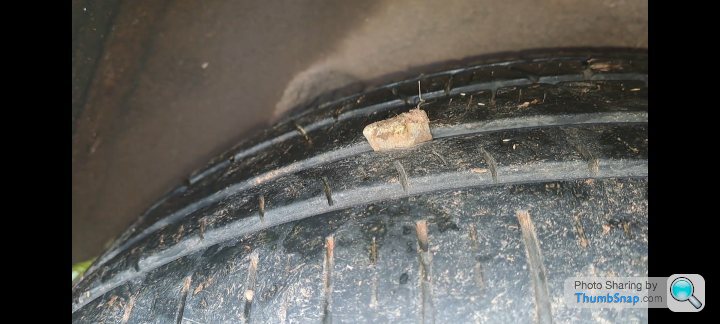
since all the tyres were between 4 and 5 mm, this would have meant 4 new tyres if I wanted to put the prop back on and not destroy the viscous coupling, so at the moment it has a cheap and nasty accelera on there that Dad had lying around.
The fronts are going to wear very quickly in 2WD mode, so once they get down to below 3mm I'll put 4 new on at that point.
Having done it as a series of drain and fills, the first drain was black, with a little debris stuck to the magnetic plug. The second was much much cleaner with no debris evident, and at that point it would have had ~74% new correct fluid so we started driving it in automatic mode again. It hasn't juddered once since then, with almost 3 thousand miles done.
I've done a total of 4 changes now, which takes us to 92% new fluid.
Just goes to show - yet again - that if I want anything done properly, I should do it myself!
Obviously the concern is how much damage has been done by ~2-2.5k miles of driving with the wrong stuff in there, but there's not much I can do about that now.
With that buttoned down, I decided it was actually worth servicing the car - the light was on (due to time) since March, but given that it had an impromptu oil change etc when the cam seal went, and that it was no-where near the 10k limit due to being off the road for ages with all the buggering about I was comfortable running it on a bit.
The fuel filter and air filters were changed last time so the Plan was oil + filter, plugs, and a final drain and fill to get to ~96%new fluid with a single D+F each service thereafter.
Also to investigate the leaking driveshaft boot.
I didn't end up taking as may photos as I intended as I was covered in oil and grease.
Managed to get the front end under a bit of shade, but I was still soaking wet by the end of it.
The filter housing was filled with 'coffee grinds' but given this was the first filter change I have done, I doubt any garage will have cleaned it out previously. A good few doses of brake cleaner and repeated wiping out and it was sparkling, so a new Mahle filter was then fitted, which was a much tighter fit than the Mann filter that was in there - inspection shows that the centre bore on the Mahle filter was smaller (and thus there will be more surface area on the pleats) and fitted much more tightly. Given I believe Mahle make the Volvo filters I suspect this is how it is supposed to be. I will remember this for future changes and keep an eye on the state of the filter.
Threw in 5 1/4 litres of Smith and Allans A3/B4 5w-40 Full Synthetic (after much deliberation I decided this will be fine, Opie oils still say 10w-40 which is really out of date info, VIDA says 0w-30 which I can't find in A3 spec for a sensible price - only A5/B5, and most places just bung a basic 5w-30 in everything!) and got it back down on the ground so I could do the plugs.
Can you tell which one was loose?
They had been in for about 35k. The volvo plugs come pre-gapped to 0.75mm, (range 0.7 - 0.8) and on checking they were a shade over 0.8 (I really need to get a feeler guage to go below 0.05mm). I suspect if they did the full 60k they are alleged to be good for, they'd be well out.
A new set of Volvo plugs was fitted - all were bang-on 0.75mm.
Once the oil had time to settle, I checked and topped up to the max with the remainder of the total 5.8 litre fill.
I didn't do the last gearbox drain and fill, as I spotted a weep from the cooler return line seal on the box (again, if you want it done properly..) so I will save the fluid until I replace that.
Then I fitted a new-old-stock MAF sensor. We had been experiencing an intermittent surging at a constant speed - as if driving into very high wind - given that the ETM is new volvo, I have replaced every single vaccuum hose and the PCV the MAF was next on the list - in fact xemodex's ETM flowcharts say replace the maf, and it was reading low at idle compared to the vida specs.
The BOSCH part number is NLA so I took a flyer on this one actually being genuine and working. It came in the old-style yellow box.
It reads higher than the old one at idle and the STFT was then almost precisely opposite the LTFT at idle before I reset it all, so it's definitely doing something different.
It remains to be seen if it will fix the surging as it might not do it for ages before doing it constantly for days.
Last up was to investigate the driveshaft boot.
I literally can't see where it is leaking from. It isn't split. I cleaned all the grease up so it was spotless and then gave it a good squeeze and felt all around where it seals to the the yoke housing etc and it remained clean. In the end I noticed the ear clip had a bit more squeeze available to it, so I crimped that up so the two sides were touching and will have to just monitor and see if that stops it.
If not then I'll have to get a boot kit and pull the shaft out.
We're still propshaftless at present, a little while ago I had a piece of flint pierce precisely in the middle of the tread on the OSR tyre, creating an irreperable split in the inside.
since all the tyres were between 4 and 5 mm, this would have meant 4 new tyres if I wanted to put the prop back on and not destroy the viscous coupling, so at the moment it has a cheap and nasty accelera on there that Dad had lying around.
The fronts are going to wear very quickly in 2WD mode, so once they get down to below 3mm I'll put 4 new on at that point.
Edited by chris1roll on Sunday 10th September 13:25
sherbertdip said:
Reading this thread brings back memories of our 2005XC70 (5 pot diesel), I think we did the right thing selling at 10 years old. Yours is a love/hate relationship by looks of it.
The first 2 years all we had to do was service it, put fuel in it and wash it. The first six months of this year have been a f
 king nightmare!
Hopefully we're through that now, since I can't see what else we would have instead -has to be an estate, we don't want an SUV, my Dad had an E class before but I find the Volvo a much nicer place to be so we'd likely just end up with another one!
Mrs1roll came back from work yesterday and asked "why is my car faster?"
I took our daughter to football in it last night, and it really is quicker!
So the combination of new, tightened plugs and the nos MAF sensor have definitely improved something.
I had a quick check underneath yesterday evening and the drives haft boot appears to have stopped leaking, for now at least, so that's a result
Circumstances have meant that this week it's only been doing short journeys with Mrs1roll driving it, so the average mpg is below 20
I'm hoping that will return to normal or better once our normal routine is resumed!
Circumstances have meant that this week it's only been doing short journeys with Mrs1roll driving it, so the average mpg is below 20
I'm hoping that will return to normal or better once our normal routine is resumed!
The return line oil seal arrived this weekend, so I have changed that.
Last drain of the gearbox fluid, still red now.:

Once the pan was empty , upon popping the line out it was evident that the seal was damaged


I'm not convinced this was actually replaced when the gearbox was rebuilt.
I also noted the wetness on that torx bolt holding the valve body cover on, so I thought I might just tweak up the bolts a bit.
They weren't much more than finger tight, I could easily turn all of them with a short torx key...
With the extra fluid that came out of the cooler line and the orifice in the box, I needed to replace 3.7 litres of fluid, bringing it up to 96% of the new, correct fluid, and less than a litre left in the bottom of the 20l drum.
I can't do any more for the gearbox now, it'll have to either live, or not!
I also replaced the oil filler cap seal that I noted was cracked when I did the service. The original was so hardened it snapped like a piece of plastic when removed.

While it was up on the ramps I was able to slide under the back and measure the rear anti-roll bar (16mm) so I can work on finding some bushes for it. Volvo don't sell the bushes separately from the bar, so an aftermarket solution is required.
Last drain of the gearbox fluid, still red now.:
Once the pan was empty , upon popping the line out it was evident that the seal was damaged
I'm not convinced this was actually replaced when the gearbox was rebuilt.
I also noted the wetness on that torx bolt holding the valve body cover on, so I thought I might just tweak up the bolts a bit.
They weren't much more than finger tight, I could easily turn all of them with a short torx key...
With the extra fluid that came out of the cooler line and the orifice in the box, I needed to replace 3.7 litres of fluid, bringing it up to 96% of the new, correct fluid, and less than a litre left in the bottom of the 20l drum.
I can't do any more for the gearbox now, it'll have to either live, or not!
I also replaced the oil filler cap seal that I noted was cracked when I did the service. The original was so hardened it snapped like a piece of plastic when removed.
While it was up on the ramps I was able to slide under the back and measure the rear anti-roll bar (16mm) so I can work on finding some bushes for it. Volvo don't sell the bushes separately from the bar, so an aftermarket solution is required.
2 steps forward and 2 steps back.
After keeping an eye out on ebay etc, I finally found someone selling a 215/65/16 Pirelli Scorpion Verde with 5mm of tread to match the others on my wifes facebook. (they were clearly on another XC being broken)
Sounds a bit but it beats spending the best part of £500 on 4 new tyres when 3 of them are perfectly good, and it would mean we could get the prop back on for the winter.
Unfortunately Evri happened.
Having decided to get it delivered to work to ensure someone was there, they decided that they were unable to find a business address that has literally lorry loads of stuff going in and out of it every day, and rather than use the what three words code, or google plus code I sent them, and despite the address being 100% correct decided instead to ignore all that and return it to the sender (not giving them any option to redirect either) which for some ungodly reason they have decided could take 2 weeks.
Whilst I was ranting to one of my colleagues about that, my wife rang.
"I've got a puncture"
Of course it would be one of the pirellis and not the cheapy we are looking to replace
740 to the rescue:

It was at this point I realised my near side foglight has failed again, not that I have ever used them apart from for illuminating this nocturnal tyre change.
Still, at least this puncture is repairable - screw right in the middle of the tread.
After keeping an eye out on ebay etc, I finally found someone selling a 215/65/16 Pirelli Scorpion Verde with 5mm of tread to match the others on my wifes facebook. (they were clearly on another XC being broken)
Sounds a bit
but it beats spending the best part of £500 on 4 new tyres when 3 of them are perfectly good, and it would mean we could get the prop back on for the winter.Unfortunately Evri happened.
Having decided to get it delivered to work to ensure someone was there, they decided that they were unable to find a business address that has literally lorry loads of stuff going in and out of it every day, and rather than use the what three words code, or google plus code I sent them, and despite the address being 100% correct decided instead to ignore all that and return it to the sender (not giving them any option to redirect either) which for some ungodly reason they have decided could take 2 weeks.
Whilst I was ranting to one of my colleagues about that, my wife rang.
"I've got a puncture"
Of course it would be one of the pirellis and not the cheapy we are looking to replace
740 to the rescue:
It was at this point I realised my near side foglight has failed again, not that I have ever used them apart from for illuminating this nocturnal tyre change.
Still, at least this puncture is repairable - screw right in the middle of the tread.
chris1roll said:
2 steps forward and 2 steps back.
After keeping an eye out on ebay etc, I finally found someone selling a 215/65/16 Pirelli Scorpion Verde with 5mm of tread to match the others on my wifes facebook. (they were clearly on another XC being broken)
Sounds a bit but it beats spending the best part of £500 on 4 new tyres when 3 of them are perfectly good, and it would mean we could get the prop back on for the winter.
Unfortunately Evri happened.
Having decided to get it delivered to work to ensure someone was there, they decided that they were unable to find a business address that has literally lorry loads of stuff going in and out of it every day, and rather than use the what three words code, or google plus code I sent them, and despite the address being 100% correct decided instead to ignore all that and return it to the sender (not giving them any option to redirect either) which for some ungodly reason they have decided could take 2 weeks.
Whilst I was ranting to one of my colleagues about that, my wife rang.
"I've got a puncture"
Of course it would be one of the pirellis and not the cheapy we are looking to replace
740 to the rescue:
It was at this point I realised my near side foglight has failed again, not that I have ever used them apart from for illuminating this nocturnal tyre change.
Still, at least this puncture is repairable - screw right in the middle of the tread.
Classic Evri escapades! It really is so hit and miss. Glad car rolling again and hopefully, tyre situation solved soon! I need a new pair of tyres on the XC70 pretty soon I think. I’ve got a full set of Scorpion Verdes at the moment and will stick with them, seem to do a good job!After keeping an eye out on ebay etc, I finally found someone selling a 215/65/16 Pirelli Scorpion Verde with 5mm of tread to match the others on my wifes facebook. (they were clearly on another XC being broken)
Sounds a bit
but it beats spending the best part of £500 on 4 new tyres when 3 of them are perfectly good, and it would mean we could get the prop back on for the winter.Unfortunately Evri happened.
Having decided to get it delivered to work to ensure someone was there, they decided that they were unable to find a business address that has literally lorry loads of stuff going in and out of it every day, and rather than use the what three words code, or google plus code I sent them, and despite the address being 100% correct decided instead to ignore all that and return it to the sender (not giving them any option to redirect either) which for some ungodly reason they have decided could take 2 weeks.
Whilst I was ranting to one of my colleagues about that, my wife rang.
"I've got a puncture"
Of course it would be one of the pirellis and not the cheapy we are looking to replace
740 to the rescue:
It was at this point I realised my near side foglight has failed again, not that I have ever used them apart from for illuminating this nocturnal tyre change.
Still, at least this puncture is repairable - screw right in the middle of the tread.
guitarcarfanatic said:
Classic Evri escapades! It really is so hit and miss. Glad car rolling again and hopefully, tyre situation solved soon! I need a new pair of tyres on the XC70 pretty soon I think. I’ve got a full set of Scorpion Verdes at the moment and will stick with them, seem to do a good job!
Yes I was quite impressed with how they coped off road.A cheaper option I was considering if I had to get 4 was the Yokohama Geolander G015. Dad has been running them on his XC90. Good off road and on, and he's been getting 40k + out of a set.
One thing to check - I know yours is _considerably_ more tolerant of rolling radius front to back, but I believe there is still a recommended maximum difference to prevent overloading the angle gear sleeve.
Edited by chris1roll on Sunday 12th November 17:44
No more tyre shredding!
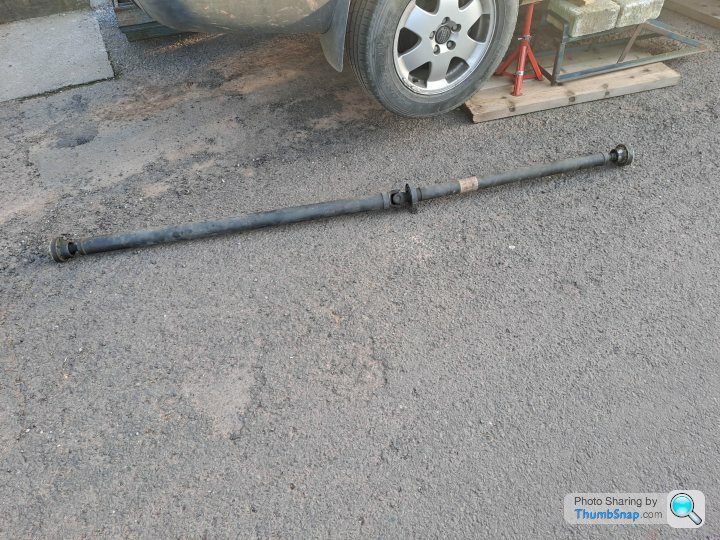
Tyre finally turned up on 6th January, so once I had had that swapped onto the correct wheel, it was time to put the driveline back together.
Once I got the propshaft down from its storage location in the shed, I noticed first, that the centre mounting rubber had taken on a slightly different angle, and also that the front CV joint had a few tight/bindy spots. The front one does tend to get the grease cooked up by the exhaust so I decided to see if dismantling it and regreasing would help.
The front cap just taps off, and then there is a circlip somewhere under all the grease.

Bit of a jumpcut here as of course I didn't want to get CV grease all over the phone, but I made use of my new task lighting over my workbench to completely dismantle the joint and clean up all the parts:


Hmm, a couple of the balls have lost their silvering:

and one of the edges on the centre bit you could feel catching on the ball as you passed it over it.
I gave the edge a very light pass with a diamond stone so the balls felt free, but of course couldn't do anything about the balls themselves.
Packed it full of grease and reassembled, and...
It was still binding up in a couple positions just the same. Oh well, it was worth a try.
So I bought a new joint for the princely sum of £45... It actually seems well made, there was no swarf or anything in it which I have had with cheap ones before, and there is no chance of me spending the £300+ that Volvo want for just the joint

(jump cut due to greasiness!)

Thats all I can do to the prop - the centre bearing is not removable, the centre UJ is staked closed rather than built with circips and the rear joint is the same as the front (but Volvo say you can't replace it.
The carrier bearing did go "tsssssss" when I spun it, but nothing I can do bar replacing the whole thing. (des shelley shafts do an affordable replacement, which is actually rebuildable going forwards, the way it should have been in the first place)
Time to get it back on then...
I was starting to struggle a bit with my little Halfords jack and cheapy axle stands - when I took the prop off it took ages to get the car up and secured given at least 3 wheels had to be free to turn. I still didn't feel 100% safe so I was wedging all sorts underneath it. Jacking up my Dads XC90 takes almost as long as any job I've done on it, so last weekend we took the 740 down to Exeter and exhanged a couple of hundred quid for a 2.5t low entry, high lift jack and 2 pairs of chunky 3t axle stands. At 31kg the jack is a bit of a beast to get down the steps to the front of the house but it is so worth it, I should have done this ages ago - it made the whole thing much quicker and considerably less deadly.
Ramp under one rear wheel and then axles stands under the other corners - car literally wouldnt move when I grabbed it and yanked it around.
Jack only has half the bar on it here:


I was MUCH happier getting under there.
I threaded the prop back into position, and fitted with some new high tensile bolts since the 'gearbox specialists' had rounded most of them out.

Front first, then the back. I had to enlist Mrs1rolls help to depress the brakes to do the final tightening.
Then I rotated the wheels a few times by hand to let the centre mount find it's happy place, before tightening the mounting bolts.
After a test drive I'm please to report there is no vibration, so the mounting rubber must have found its original position. I can hear the carrier bearing slightly, but that's going to have to stay like it for a while - if we can get another year/10kish out of it as is then I might consider replacing the prop. I was also driving it with the boot floor removed which would let more sound though.
No more wheelspin, and no more torque steer, I floored the throttle coming off a nice empty roundabout and it just squatted at the back and fked off.
Then I knocked off one more of the MOT advisories from last year - the rear antiroll bar mount bushes.
I mentioned before, Volvo don't sell the bushes, insisting you replace the whole anti roll bar...
I bought a pair of bushes from Latvia or Lithuania or somewhere like that on E-bay, which seems to be the go-to solution.
Once the bolts were loose I used my special "hammery chisel" to split the mounting apart:


The old bush could then be cut off.
Th new bushes seemed like they were never going to fit in the mounting - I started off with a g-clamp on it, but while it compressed the bush enough to in theory line the holes up, the outer part of the mount was so splayed out I couldn't get it together to hold itself shut, so I resorted to putting it in position and putting the (small) jack under it until I could get the bolt back in:


The other side was much the same, but due to the tension on the bar due to one side being on a ramp and the other hanging free, I had a lot of trouble getting the jack in the right place. This very old scissor jack did the trick:


The last advisory last year was for one of the inner track rods. I've got a Meyle one to go on there, but the wind was seriously starting to pick up by this point and was blowing my plastic tray around into the road even with the small trolley jack on it so that will have to wait for another weekend.
Then we'll be all ready for them to find some more advisories at the MOT in late Februrary!
This time round I'll feel its worth dealing with them much more quickly.
Tyre finally turned up on 6th January, so once I had had that swapped onto the correct wheel, it was time to put the driveline back together.
Once I got the propshaft down from its storage location in the shed, I noticed first, that the centre mounting rubber had taken on a slightly different angle, and also that the front CV joint had a few tight/bindy spots. The front one does tend to get the grease cooked up by the exhaust so I decided to see if dismantling it and regreasing would help.
The front cap just taps off, and then there is a circlip somewhere under all the grease.
Bit of a jumpcut here as of course I didn't want to get CV grease all over the phone, but I made use of my new task lighting over my workbench to completely dismantle the joint and clean up all the parts:
Hmm, a couple of the balls have lost their silvering:
and one of the edges on the centre bit you could feel catching on the ball as you passed it over it.
I gave the edge a very light pass with a diamond stone so the balls felt free, but of course couldn't do anything about the balls themselves.
Packed it full of grease and reassembled, and...
It was still binding up in a couple positions just the same. Oh well, it was worth a try.
So I bought a new joint for the princely sum of £45... It actually seems well made, there was no swarf or anything in it which I have had with cheap ones before, and there is no chance of me spending the £300+ that Volvo want for just the joint
(jump cut due to greasiness!)
Thats all I can do to the prop - the centre bearing is not removable, the centre UJ is staked closed rather than built with circips and the rear joint is the same as the front (but Volvo say you can't replace it.
The carrier bearing did go "tsssssss" when I spun it, but nothing I can do bar replacing the whole thing. (des shelley shafts do an affordable replacement, which is actually rebuildable going forwards, the way it should have been in the first place)
Time to get it back on then...
I was starting to struggle a bit with my little Halfords jack and cheapy axle stands - when I took the prop off it took ages to get the car up and secured given at least 3 wheels had to be free to turn. I still didn't feel 100% safe so I was wedging all sorts underneath it. Jacking up my Dads XC90 takes almost as long as any job I've done on it, so last weekend we took the 740 down to Exeter and exhanged a couple of hundred quid for a 2.5t low entry, high lift jack and 2 pairs of chunky 3t axle stands. At 31kg the jack is a bit of a beast to get down the steps to the front of the house but it is so worth it, I should have done this ages ago - it made the whole thing much quicker and considerably less deadly.
Ramp under one rear wheel and then axles stands under the other corners - car literally wouldnt move when I grabbed it and yanked it around.
Jack only has half the bar on it here:
I was MUCH happier getting under there.
I threaded the prop back into position, and fitted with some new high tensile bolts since the 'gearbox specialists' had rounded most of them out.
Front first, then the back. I had to enlist Mrs1rolls help to depress the brakes to do the final tightening.
Then I rotated the wheels a few times by hand to let the centre mount find it's happy place, before tightening the mounting bolts.
After a test drive I'm please to report there is no vibration, so the mounting rubber must have found its original position. I can hear the carrier bearing slightly, but that's going to have to stay like it for a while - if we can get another year/10kish out of it as is then I might consider replacing the prop. I was also driving it with the boot floor removed which would let more sound though.
No more wheelspin, and no more torque steer, I floored the throttle coming off a nice empty roundabout and it just squatted at the back and f
ked off. Then I knocked off one more of the MOT advisories from last year - the rear antiroll bar mount bushes.
I mentioned before, Volvo don't sell the bushes, insisting you replace the whole anti roll bar...
I bought a pair of bushes from Latvia or Lithuania or somewhere like that on E-bay, which seems to be the go-to solution.
Once the bolts were loose I used my special "hammery chisel" to split the mounting apart:
The old bush could then be cut off.
Th new bushes seemed like they were never going to fit in the mounting - I started off with a g-clamp on it, but while it compressed the bush enough to in theory line the holes up, the outer part of the mount was so splayed out I couldn't get it together to hold itself shut, so I resorted to putting it in position and putting the (small) jack under it until I could get the bolt back in:
The other side was much the same, but due to the tension on the bar due to one side being on a ramp and the other hanging free, I had a lot of trouble getting the jack in the right place. This very old scissor jack did the trick:
The last advisory last year was for one of the inner track rods. I've got a Meyle one to go on there, but the wind was seriously starting to pick up by this point and was blowing my plastic tray around into the road even with the small trolley jack on it so that will have to wait for another weekend.
Then we'll be all ready for them to find some more advisories at the MOT in late Februrary!
This time round I'll feel its worth dealing with them much more quickly.
Gassing Station | Readers' Cars | Top of Page | What's New | My Stuff