Facel Vega HK500. A childhood dream or a nightmare?
Discussion


B'stard Child said:
I'd have bought a crate 383 and stamped the original numbers on it 
Whilst nobody else might know it was not the original engine, I would...and therein lies the problem!!As someone who is interested in C2 (1963-67) Corvettes, re-stamping of blocks is a major issue, as many people flipping cars for a quick profit have done just that. The value of a C2 with its original engine is significantly more than one with a re-stamp, so a whole industry has sprung up around authenticating engine stamps!
However, your suggestion would have been the cheapest solution.

Mercdriver said:
Happiness is a painted re bored block, new pistons, rings and bearings, an oil can and a bottle of beer.
Very satisfying and you know it has been done correctly.
Next episode asap please
^^^^Very satisfying and you know it has been done correctly.
Next episode asap please
This...and next episode soon! It could actually bring us up to date, at which point I fear your patience will be required!
Mercdriver, thanks for the continued encouragement.
BSSBMW said:
Over the last few days I have read the entire thread dipping in and out when I have a spare half hour or so.
As someone who restores cars for a living and cars of my own as my hobby I can relate to many aspects of what can only be described as pure dedication and commitment on your part to persevere with brining what I gather to be a signifiant part of Facels history here in the UK.
I have never seen a Facel of any sort in person and hadn't even heard of them until about 15 years or so ago when during a conversation about classic cars in general, a friend of mine educated me on what they are.
Kudos to you theadman and looking forward to seeing it progress!
P.S, black over red is sub zero cool!
BSSBMW, thank you for your kind words. I always worry when someone who restores cars for a living reads the thread, as this story is almost a case study in how not to go about it! As someone who restores cars for a living and cars of my own as my hobby I can relate to many aspects of what can only be described as pure dedication and commitment on your part to persevere with brining what I gather to be a signifiant part of Facels history here in the UK.
I have never seen a Facel of any sort in person and hadn't even heard of them until about 15 years or so ago when during a conversation about classic cars in general, a friend of mine educated me on what they are.
Kudos to you theadman and looking forward to seeing it progress!
P.S, black over red is sub zero cool!

Hopefully, the car will look cool when it's finished. However, for me there was no real option over the colour scheme; it had to be as it left the factory.
Rumdoodle said:
A convertible? https://www.gallery-aaldering.com/facel-vega-fv3-1...
According to the books I have, there were 11 factory produced V8 engined convertibles, only one of which was an FV3. My info also suggests that all FV3s had a 4.5 litre engine, so if the engine really is a 6.3 litre (383 cu in) it must have been installed sometime in the intervening years, as it was launched in 1959, two years after the advertised car was built. I wonder if it has been re-stamped?!!Most of the four cylinder cars were convertibles.
theadman said:
B'stard Child said:
I'd have bought a crate 383 and stamped the original numbers on it
Whilst nobody else might know it was not the original engine, I would...and therein lies the problem!!As someone who is interested in C2 (1963-67) Corvettes, re-stamping of blocks is a major issue, as many people flipping cars for a quick profit have done just that. The value of a C2 with its original engine is significantly more than one with a re-stamp, so a whole industry has sprung up around authenticating engine stamps!
However, your suggestion would have been the cheapest solution.
theadman said:
Mercdriver said:
Happiness is a painted re bored block, new pistons, rings and bearings, an oil can and a bottle of beer.
Very satisfying and you know it has been done correctly.
Next episode asap please
^^^^Very satisfying and you know it has been done correctly.
Next episode asap please
This...and next episode soon! It could actually bring us up to date, at which point I fear your patience will be required!
Mercdriver, thanks for the continued encouragement.
Continuing the story...
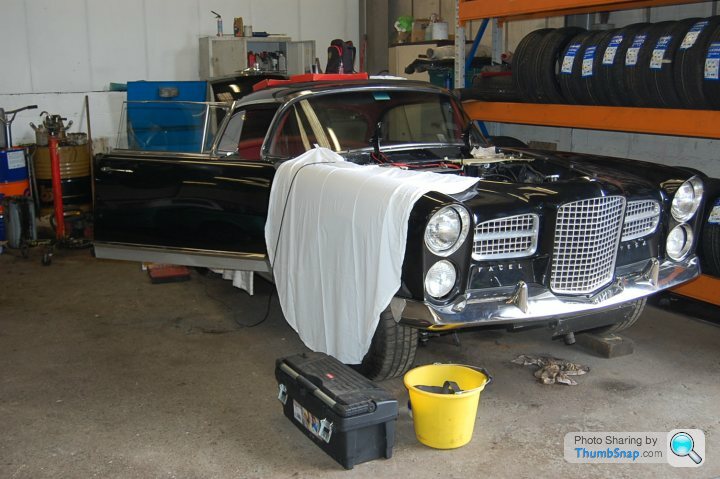
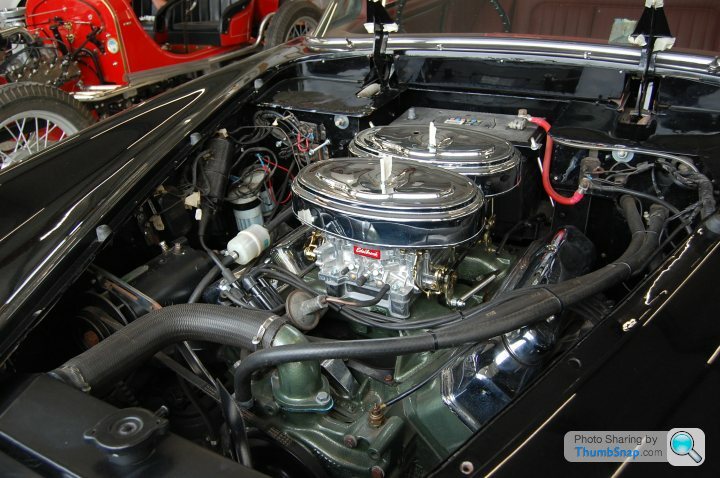
Whilst the engine was out of the car being rebuilt, work progressed in other areas. As we haven't had a picture of the whole car for quite a while, this is it sitting patiently, waiting for its shiny, refreshed motor...
At the other end of the car, the issues continued to emerge. The wiring loom to the back of the car had been bodged to an unbelievable extent, probably in the late 1960s or early '70s, in an attempt to keep the car on the road. It is safe to say whoever had completed the work was clueless! In their defence, all the wires from the factory were sheathed in black, with coloured collars at each end, most of which had disappeared over the years. Here is an email I received at the time, that clearly illustrates the point!
[i]Having trouble trying to work out that when we press the brake pedal , the reversing lights come on ! And no matter what we do , we cannot get to the bottom of it , I remembered there’s a bunch of connections by the factory in behind the left hand kick panel ,
Look what we uncovered , some really bad soldering and nasty joins !
Photo on its way
All the best
Ian[/i]
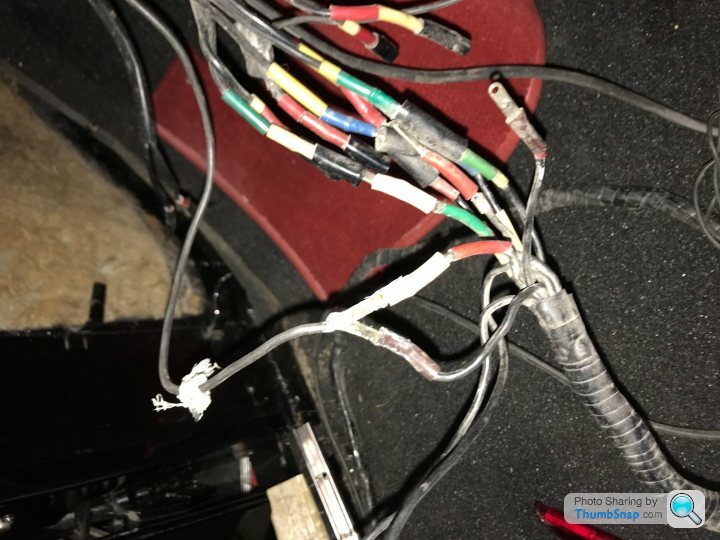
The rear loom was removed from a point behind the dashboard and then stretched out over a convenient truck chassis which was the only thing long enough for the job. This revealed a number of new wires that had been added to circumvent faults, but sadly the feeds had been taken from the wrong places. The result was random things happening when current was applied to a particular circuit. In essence, the rear loom was remade the way it should have been.
This cured all the faults except the fact that when the right indicator was activated, the left front one also wanted to join in the fun. The issue was traced to the indicator boss on the steering column and that was bad news. The indicators are controlled by a piece of 1950s bakelite enshrouded hardware that was probably designed by Satan. 60 years on, not only is it fiendishly complicated, but it is brittle and fragile as well. Part of the complexity is that the front indicators actually use the fog lights, so the indicator circuit has to override the fog lights if they are in use.
The dashboard has four warning lights for ignition, high beam, indicators and low fuel level. As far as I know, these had never functioned and were proving obstinate. A potential reason was found in the fuse box...
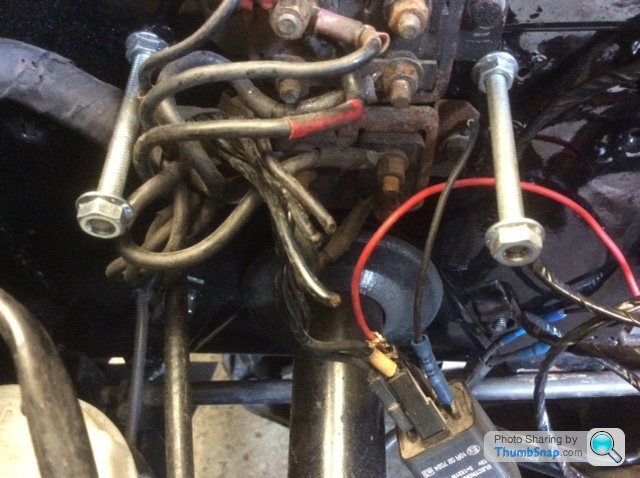
The three cut wires were duly traced back, but progress wasn't as swift as it might have been due to the critical part of the wiring diagram being missing on the photocopy we were using! Despite this the warning lights were finally made to function with the exception of the low fuel one as the sender was found to be seized solid.
Sorry for the relatively short update this evening!
Whilst the engine was out of the car being rebuilt, work progressed in other areas. As we haven't had a picture of the whole car for quite a while, this is it sitting patiently, waiting for its shiny, refreshed motor...
At the other end of the car, the issues continued to emerge. The wiring loom to the back of the car had been bodged to an unbelievable extent, probably in the late 1960s or early '70s, in an attempt to keep the car on the road. It is safe to say whoever had completed the work was clueless! In their defence, all the wires from the factory were sheathed in black, with coloured collars at each end, most of which had disappeared over the years. Here is an email I received at the time, that clearly illustrates the point!
[i]Having trouble trying to work out that when we press the brake pedal , the reversing lights come on ! And no matter what we do , we cannot get to the bottom of it , I remembered there’s a bunch of connections by the factory in behind the left hand kick panel ,
Look what we uncovered , some really bad soldering and nasty joins !
Photo on its way
All the best
Ian[/i]
The rear loom was removed from a point behind the dashboard and then stretched out over a convenient truck chassis which was the only thing long enough for the job. This revealed a number of new wires that had been added to circumvent faults, but sadly the feeds had been taken from the wrong places. The result was random things happening when current was applied to a particular circuit. In essence, the rear loom was remade the way it should have been.
This cured all the faults except the fact that when the right indicator was activated, the left front one also wanted to join in the fun. The issue was traced to the indicator boss on the steering column and that was bad news. The indicators are controlled by a piece of 1950s bakelite enshrouded hardware that was probably designed by Satan. 60 years on, not only is it fiendishly complicated, but it is brittle and fragile as well. Part of the complexity is that the front indicators actually use the fog lights, so the indicator circuit has to override the fog lights if they are in use.
The dashboard has four warning lights for ignition, high beam, indicators and low fuel level. As far as I know, these had never functioned and were proving obstinate. A potential reason was found in the fuse box...
The three cut wires were duly traced back, but progress wasn't as swift as it might have been due to the critical part of the wiring diagram being missing on the photocopy we were using! Despite this the warning lights were finally made to function with the exception of the low fuel one as the sender was found to be seized solid.
Sorry for the relatively short update this evening!
theadman said:
B'stard Child said:
I'd have bought a crate 383 and stamped the original numbers on it
Whilst nobody else might know it was not the original engine, I would...and therein lies the problem!!As someone who is interested in C2 (1963-67) Corvettes, re-stamping of blocks is a major issue, as many people flipping cars for a quick profit have done just that. The value of a C2 with its original engine is significantly more than one with a re-stamp, so a whole industry has sprung up around authenticating engine stamps!
However, your suggestion would have been the cheapest solution.
you could have rebuilt that over time with opportunistic purchases - it would just have been quicker unless you are enjoying the whole pleasure pain thing over 20 years or however long it’s been I’d have got frustrated with the whole project and I say that with a historic rally car shell in the garage that I’ve been colkecting parts for over the last 10 years!!!!!
Mercdriver said:
Surely if you buy a crate motor the serial number will have been teeped onto the block, so how can you overstamp the original number over the top of it?
Unless you grind the area first then stamp it, but would not look iffy? What about the warranty?
That’s exactly what you would do - well machine off the old number to same finish and then re-stampUnless you grind the area first then stamp it, but would not look iffy? What about the warranty?
So, on with the story...only another five years left until we are up to date!
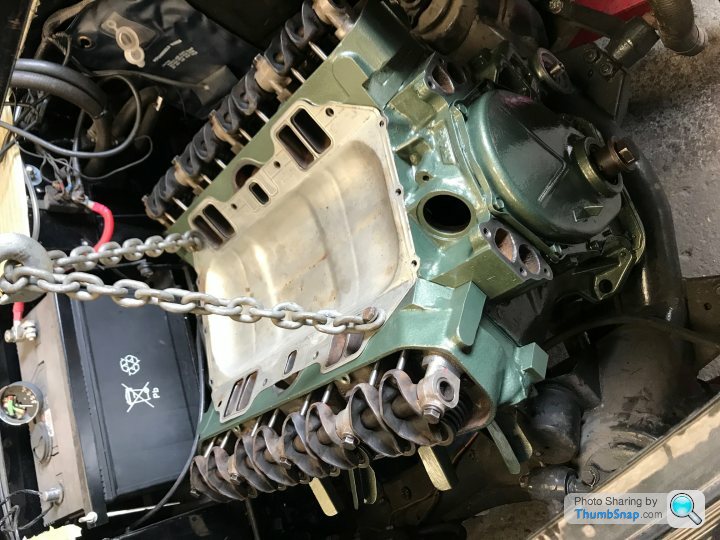
By May 2018 the engine rebuild was well on the way to being complete and the block and heads were back in the car.
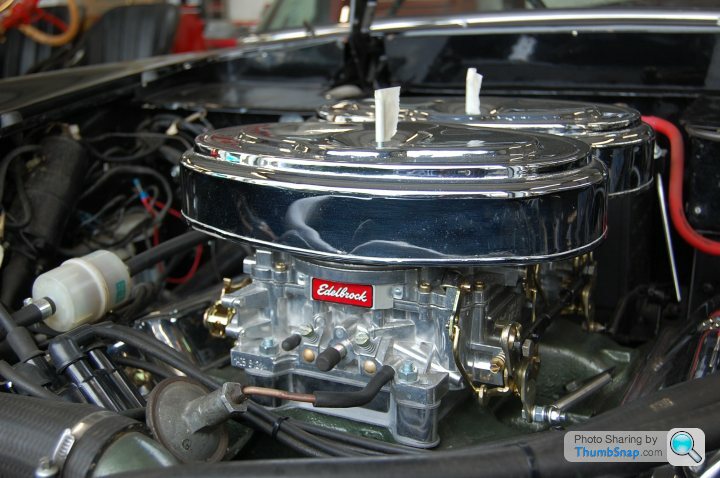
The carburettors had been soda blasted and then refreshed with new rebuild kits, but some of the linkage and the choke mechanism were missing. At the stage the engine was started in late 2017 (when the need for a rebuild became apparent), Ian let me know that, even though they had been rebuilt, the carbs were leaking fuel.
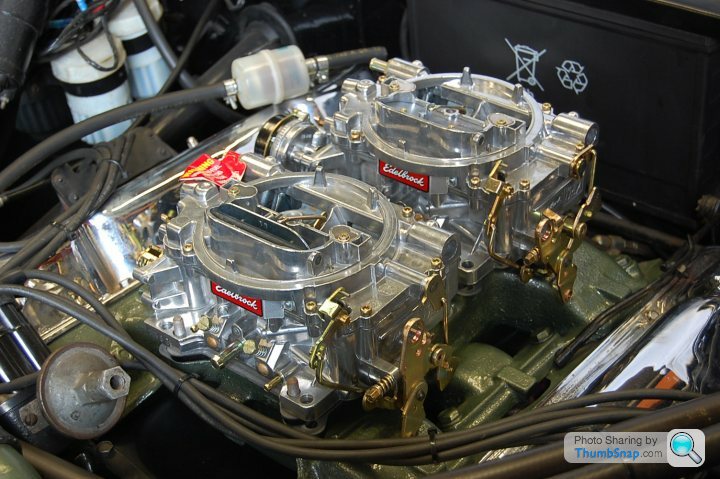
The option was to persevere with the original Carter carbs or to buy brand new replacement Edelbrocks. Carter no longer make the AFB (aluminium four barrel) carburettors that were standard on so many American performance engines in the 1950s and '60s. I assume that they sold the licence to Edelbrock as they manufacture a carbon copy of the carb.
Normally, I would opt to stick with the Carters, but the issue was that they had already been rebuilt once and this had not cured the fuel leak issues. It was therefore probable that the problem wasn't in the seals, but in the spindles and shafts that had become worn. On that basis, trying to make them fuel tight could have ended up burning a significant number of man hours with no guarantee of success.
At around £330 per carb going the Edelbrock route seemed like the sensible idea. It also solved the issue of linkages and choke, as both were readily available off the shelf. In fact, Edelbrock was able to reproduce the exact pairing of carbs that were used originally on manual HK500s. Trying to replicate this in the Carter universe had already taken me more than a year without a successful outcome.
As we were being very specific, it took a while to source exactly the right components, but eventually they turned up from The States and were fitted to the car in September.
Hopefully, with the exception of the seized fuel sender, we now had a reliable delivery of petrol to the engine.
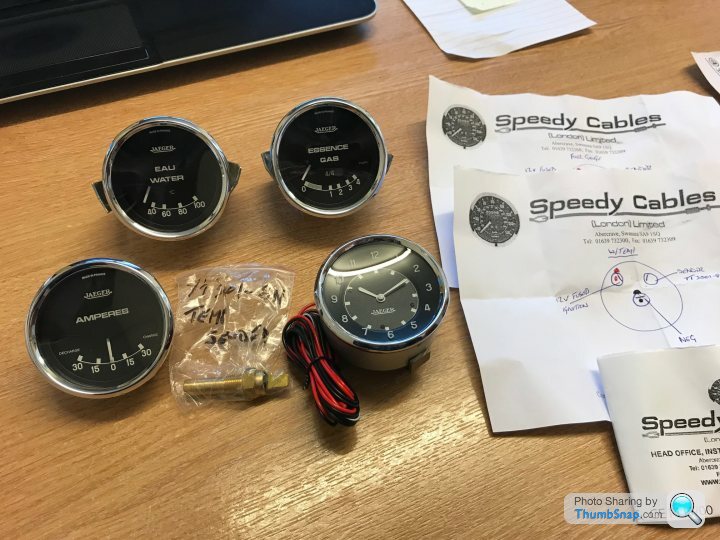
Shortly after the 2017 NEC Classic Car Show had finished we had had a discussion about the quality and functionality of the minor gauges that sit in centre of the dash. The clock was knackered and the condition of the water temperature, ammeter and fuel gauges was unknown. Given the level to which the rest of the interior was being restored, I was a bit concerned that the gauges might look a a bit below par. All Facel gauges have white painted/stencilled numerals on a black background. Some of the numerals are painted on the gauge in the traditional way, but in some instances they are actually painted onto the rear of the glass, as here on the speedo.

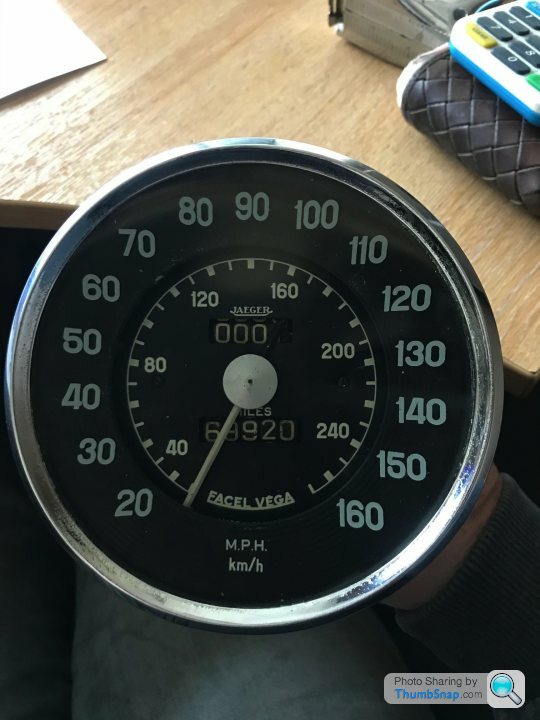
Over time the white paint has dried out and become powder, adhering to the gauge by the skin of its teeth. Simply touch it and it will fall off.
Most restoration companies won't touch gauges as they are so fragile and easy to mess up. The one exception in the UK is Speedy Cables who have a first class restoration service. The problem is, that whilst they might be speedy in their cable manufacture, they are anything but when it comes to gauges. I was warned that there was a 26 week turn around time. Given that the only other option was to send them off to mainland Europe, which could be subject to the same sort of wait, the gauges went to Speedy Cables.
Six months came and went. Follow up phone calls were met with woolly replies.
Eight months in, it became clear something was wrong. After more phone calls, it became apparent that whilst the gauges were on site, they didn't appear to have been placed in the work queue! Nothing was offered in the way of an explanation, nor an apology, it was a simple choice of have the gauges back or wait for them to be completed! There was no option, but to wait.
A possible explanation became clear shortly after. Ian was contacted by Speedy Cables as the technician needed to know the ohms reading from the fuel sender, so he could correctly calibrate the gauge. To do this meant rebuilding the sender and coaxing it to work, as in the intervening years it had seized solid. Maybe work never started as the information Speedy Cables needed was incomplete?
In the end it took 14 months. The gauges suddenly appeared in the post on 26th February 2019, having been sent to Speedy Cables in December 2017! This is why restoring a car can take years longer than it should!
It might have taken forever, but the end result was brilliant! The cost seemed pretty reasonable too, given the amount of intricate work required. The clock was converted to a quartz mechanism so should be more reliable from this point on.
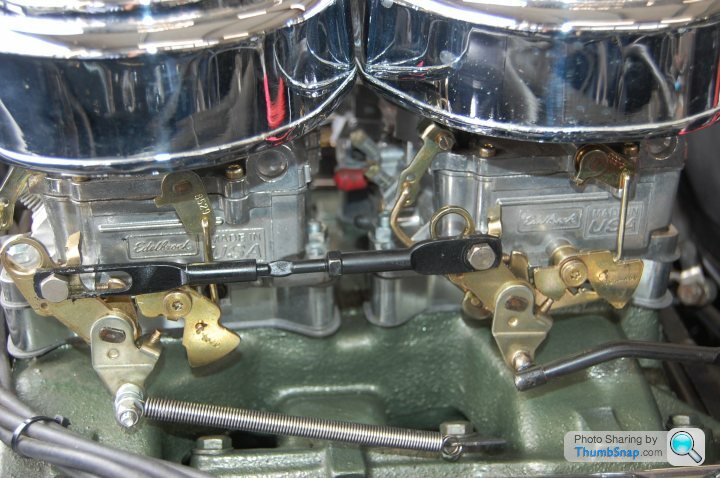
In the meantime, there were some fun and games with the new carbs. Although they were meant to be a pattern part for the Carter AFB, when the air filter bases were offered up, they didn't fit. Given that the AFB was in production for nearly 60 years, it is natural to assume that it was gradually modified and improved over that period. Whilst the carb body was identical to the Carters that Facel specified, the diameter of the flange where the air intake fitted was different. This meant remaking the base of the air filters to accommodate the larger diameter as adapting the old ones wasn't feasible.
The spacers that fit between the carbs and the inlet manifold were also incorrect, as the air filters were in danger of fouling the bonnet when it was shut. Whilst it was a simple case of sending the spacers back and specifying the size of the ones that were needed, this all took time. In Ian's defence, as the Edelbrocks were meant to be a direct replacement for the Carters, it was reasonable to assume that the original spacers and air filter bodies would be a straight fit.
However, this hassle should be offset against the issues that probably would have been encountered if we had tried to save the original Carters. All the mechanism was worn in each carb and the availability of the new or reconditioned parts required to properly rebuild them was questionable. Then there was the missing linkage and choke, where we had no pattern to work to as what was on the car had been cobbled together in the past.
Finally, the carbs were on the car and looking good!
When the time came to fit the centre console gauges back into the dashboard, more fiddling was required. The original loom only allowed about 2 inches (5 cm for you younger people!) of free play between the centre console and the main dashboard, making it virtually impossible to wire up the gauges. Having persevered for a while, it became obvious that more space was needed to complete the job. So, each wire was cut, a new length soldered in place and then heat shrunk to allow enough of a gap. Whilst this was a faff, it will enable anyone in the future to connect and disconnect the gauges easily.
Here is work in progress...don't worry, we haven't added the amount of additional wire the picture might suggest!
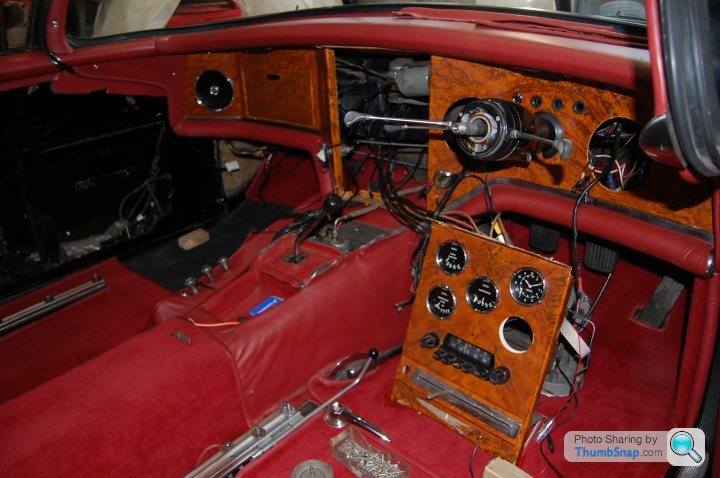
All this work was needed as Ian wanted to have all the electrics behind the dashboard in place before firing up the engine, to ensure the risk of fire was minimised. There is precious little space behind the dashboard when everything is in place and so ensuring the wiring loom doesn't foul the wiper arms and that the back of the ammeter is properly isolated are key trouble spots (and fire hazards) on an HK500.
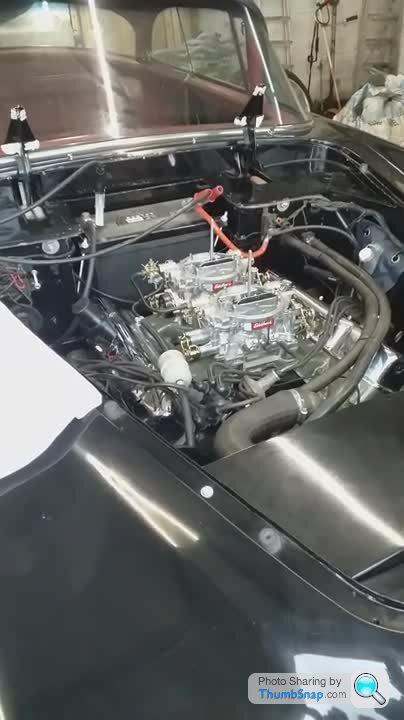
Given everything that needed to be done, it wasn't until late 2019 that the engine was first fired up. I have the momentous occasion captured. Clicking on the image should run the clip...
By May 2018 the engine rebuild was well on the way to being complete and the block and heads were back in the car.
The carburettors had been soda blasted and then refreshed with new rebuild kits, but some of the linkage and the choke mechanism were missing. At the stage the engine was started in late 2017 (when the need for a rebuild became apparent), Ian let me know that, even though they had been rebuilt, the carbs were leaking fuel.
The option was to persevere with the original Carter carbs or to buy brand new replacement Edelbrocks. Carter no longer make the AFB (aluminium four barrel) carburettors that were standard on so many American performance engines in the 1950s and '60s. I assume that they sold the licence to Edelbrock as they manufacture a carbon copy of the carb.
Normally, I would opt to stick with the Carters, but the issue was that they had already been rebuilt once and this had not cured the fuel leak issues. It was therefore probable that the problem wasn't in the seals, but in the spindles and shafts that had become worn. On that basis, trying to make them fuel tight could have ended up burning a significant number of man hours with no guarantee of success.
At around £330 per carb going the Edelbrock route seemed like the sensible idea. It also solved the issue of linkages and choke, as both were readily available off the shelf. In fact, Edelbrock was able to reproduce the exact pairing of carbs that were used originally on manual HK500s. Trying to replicate this in the Carter universe had already taken me more than a year without a successful outcome.
As we were being very specific, it took a while to source exactly the right components, but eventually they turned up from The States and were fitted to the car in September.
Hopefully, with the exception of the seized fuel sender, we now had a reliable delivery of petrol to the engine.
Shortly after the 2017 NEC Classic Car Show had finished we had had a discussion about the quality and functionality of the minor gauges that sit in centre of the dash. The clock was knackered and the condition of the water temperature, ammeter and fuel gauges was unknown. Given the level to which the rest of the interior was being restored, I was a bit concerned that the gauges might look a a bit below par. All Facel gauges have white painted/stencilled numerals on a black background. Some of the numerals are painted on the gauge in the traditional way, but in some instances they are actually painted onto the rear of the glass, as here on the speedo.
Over time the white paint has dried out and become powder, adhering to the gauge by the skin of its teeth. Simply touch it and it will fall off.
Most restoration companies won't touch gauges as they are so fragile and easy to mess up. The one exception in the UK is Speedy Cables who have a first class restoration service. The problem is, that whilst they might be speedy in their cable manufacture, they are anything but when it comes to gauges. I was warned that there was a 26 week turn around time. Given that the only other option was to send them off to mainland Europe, which could be subject to the same sort of wait, the gauges went to Speedy Cables.
Six months came and went. Follow up phone calls were met with woolly replies.
Eight months in, it became clear something was wrong. After more phone calls, it became apparent that whilst the gauges were on site, they didn't appear to have been placed in the work queue! Nothing was offered in the way of an explanation, nor an apology, it was a simple choice of have the gauges back or wait for them to be completed! There was no option, but to wait.
A possible explanation became clear shortly after. Ian was contacted by Speedy Cables as the technician needed to know the ohms reading from the fuel sender, so he could correctly calibrate the gauge. To do this meant rebuilding the sender and coaxing it to work, as in the intervening years it had seized solid. Maybe work never started as the information Speedy Cables needed was incomplete?
In the end it took 14 months. The gauges suddenly appeared in the post on 26th February 2019, having been sent to Speedy Cables in December 2017! This is why restoring a car can take years longer than it should!
It might have taken forever, but the end result was brilliant! The cost seemed pretty reasonable too, given the amount of intricate work required. The clock was converted to a quartz mechanism so should be more reliable from this point on.
In the meantime, there were some fun and games with the new carbs. Although they were meant to be a pattern part for the Carter AFB, when the air filter bases were offered up, they didn't fit. Given that the AFB was in production for nearly 60 years, it is natural to assume that it was gradually modified and improved over that period. Whilst the carb body was identical to the Carters that Facel specified, the diameter of the flange where the air intake fitted was different. This meant remaking the base of the air filters to accommodate the larger diameter as adapting the old ones wasn't feasible.
The spacers that fit between the carbs and the inlet manifold were also incorrect, as the air filters were in danger of fouling the bonnet when it was shut. Whilst it was a simple case of sending the spacers back and specifying the size of the ones that were needed, this all took time. In Ian's defence, as the Edelbrocks were meant to be a direct replacement for the Carters, it was reasonable to assume that the original spacers and air filter bodies would be a straight fit.
However, this hassle should be offset against the issues that probably would have been encountered if we had tried to save the original Carters. All the mechanism was worn in each carb and the availability of the new or reconditioned parts required to properly rebuild them was questionable. Then there was the missing linkage and choke, where we had no pattern to work to as what was on the car had been cobbled together in the past.
Finally, the carbs were on the car and looking good!
When the time came to fit the centre console gauges back into the dashboard, more fiddling was required. The original loom only allowed about 2 inches (5 cm for you younger people!) of free play between the centre console and the main dashboard, making it virtually impossible to wire up the gauges. Having persevered for a while, it became obvious that more space was needed to complete the job. So, each wire was cut, a new length soldered in place and then heat shrunk to allow enough of a gap. Whilst this was a faff, it will enable anyone in the future to connect and disconnect the gauges easily.
Here is work in progress...don't worry, we haven't added the amount of additional wire the picture might suggest!
All this work was needed as Ian wanted to have all the electrics behind the dashboard in place before firing up the engine, to ensure the risk of fire was minimised. There is precious little space behind the dashboard when everything is in place and so ensuring the wiring loom doesn't foul the wiper arms and that the back of the ammeter is properly isolated are key trouble spots (and fire hazards) on an HK500.
Given everything that needed to be done, it wasn't until late 2019 that the engine was first fired up. I have the momentous occasion captured. Clicking on the image should run the clip...
HawthornBowTie said:
Brilliant job, congrats for bringing back to life such a beauty !
Thanks HawthornBowTie.jimbobs said:
The wood of the dash is just beautiful and even the carbs and filters are works of art!
The dash is made of aluminium and painted with wood effect. Jimbobs, finding someone who could paint the dash was a challenge. The first person was a specialist in the antique field and the result was far from spectacular. The lady who came up trumps was actually one of the team who create film props at Pinewood Studios!
tonyvid said:
Awesome work! Those carbs are like fuel buckets. The level of detail work is 
Thanks Tony, much appreciated! In my view, there is only one way to do a job...and that's properly (or to the best level possible). There are some occasions when a lack of parts limits what is possible or what is economically viable.Gassing Station | Readers' Cars | Top of Page | What's New | My Stuff