1972 Saab 99 L - Green
Discussion


jeremyc said:
Off topic, but a reminder that it's the Southside Hustle meeting in Wimbledon tomorrow. 
You'll just have to bring another of the fleet.
Sorry, I kept my unbroken record of missing it!You'll just have to bring another of the fleet.
I hauled the 99 out of the garage yesterday to breakdown the cooling system - the colour of what I can see - think Beverly Hills Cop II incriminating brick red - convinced me to take the whole system out.
Radiator hoses loosened, water drained...

Three 1/2in bolts later, the radiator came out - just the electronic fan power to disconnect.


Despite the front-opening bonnet, access was good - lovely car to work on.

That whole front slam panel should probably come out to stop any rust - you may remember I did the same for the 900 Turbo a few years ago and it was the right decision while the radiator was out. This has the bonnet mechanism but also the light mounts... I may wait for warmer weather.
Not exactly appetising...

I really like the design of the fan and radiator. I'm aiming to get this recored rather than go aluminium - anyone recommed a good place in the London/SW area? I was looking at Raysons in Yeovil as they are near my parents.


No wonder the fan went off randomly - the sensor was likely completely gummed.

Expansion tank was just two screws and a few hoses.

Mmmm lovely...


Scope creep ahoy - this bracket and surrounding area need preventative rust treatment...

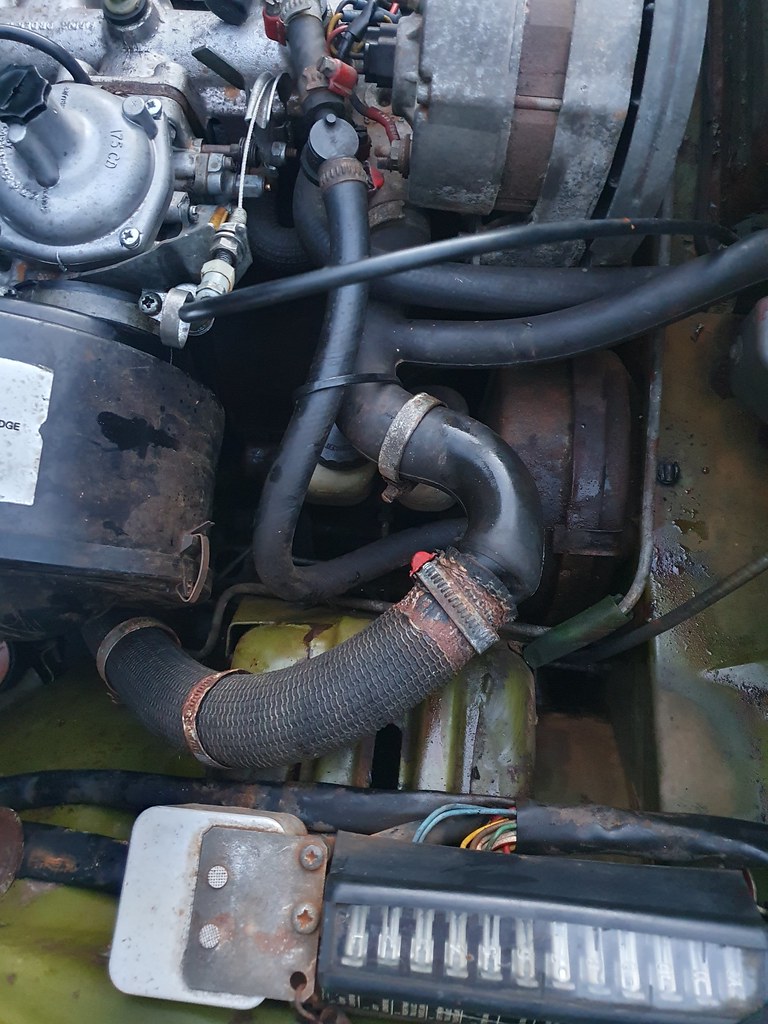
Thermostat housing looked ok on the outside...

...but was clearly suffering underneath.

Completely seized... one symptom down.

Repurposed some old hoses to try a but of a flush of the block. Not especially successful, but orange came out.
Right, that's a start!
Radiator - to be recored.
Expansion tank - I was looking at aluminium ones but I may try some sort of deep clean and then a new cap to reuse it and keep original. It is plastic, for some reason I had thought it was mild steel.
Thermostat - Bin.
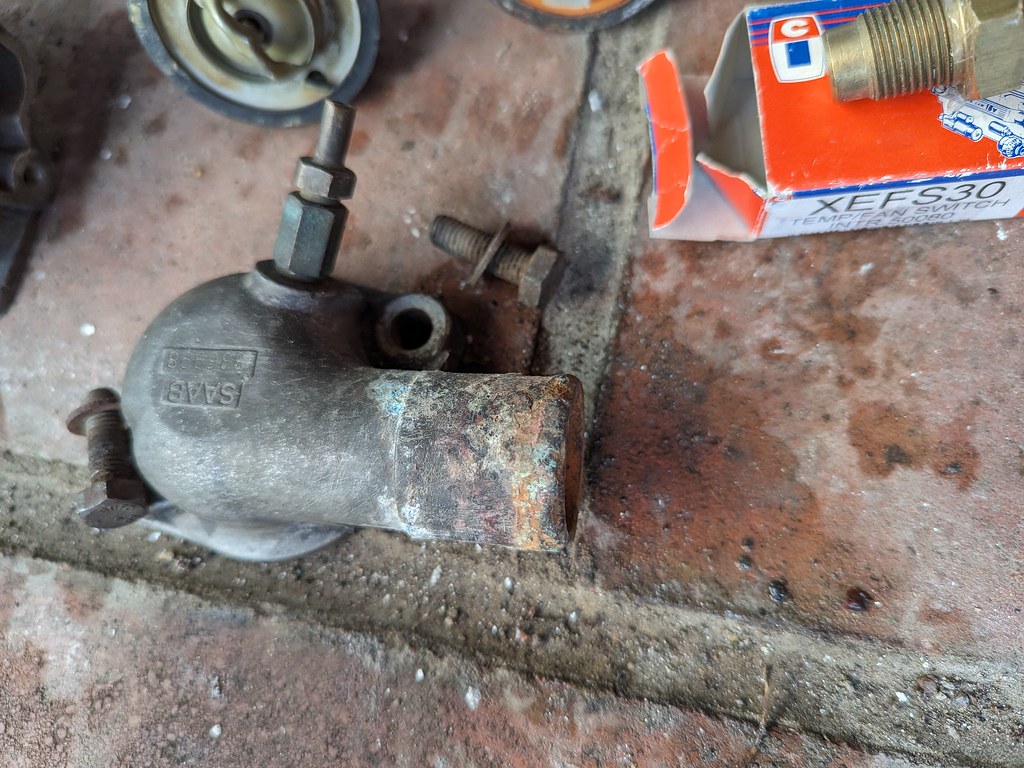
Thermostat housing - pipe end corrosion not salvageable, but I spotted the complete unit on, of all places for a Saab, ebay Italy. 2 minutes after clicking 'watch' an offer of €18 was made, so I accepted. It even included a thermostat that looks respectable.
While that gets sorted out I'll remove a load of these brackets and mounting points for derustification and paint.
My concern is the red rust soup is in the heating matrix too... maybe I should open up some hoses and try some more flushing?
Any advice from the Saab sect of PH?
Good work. Former 1976 99GL and 1979 99Turbo owner here. What you're doing looks like what my 17 year old self should have done to the 99GL.
If you're aiming to get the cooling up to snuff, I'd take the plunge and change the water pump - not an easy job but we'll worth doing - and would also flush the heater matrix.
The other thing I would say is that, if you are stripping out the slam-panel and bonnet, do the clutch at the same time
If you're aiming to get the cooling up to snuff, I'd take the plunge and change the water pump - not an easy job but we'll worth doing - and would also flush the heater matrix.
The other thing I would say is that, if you are stripping out the slam-panel and bonnet, do the clutch at the same time
Express Radiator Services in Norwood used to be able to do these... I would try there first as I've had one done by them before.
https://maps.app.goo.gl/aRnehqCtiGmxLkxd9
https://maps.app.goo.gl/aRnehqCtiGmxLkxd9
If your heater valve is working and not leaking and the matrix isn't leaking / produces heat, I would say flush gently but otherwise leave well alone.
You may well open up a world of hurt otherwise.
Yes I know prevention is better than cure, but experience combined with seeing how crusty your cooling system is, tells me that the odds of any of the hoses on the heater side coming apart without breakage of hose or connector are slim. Plus if you try to remove the matrix, all the foam seals in the heater box will disintegrate.
Maybe a job for summer when you don't need the heater and can bypass if need be. Collect parts and materials in advance and assume most of what you have will be junk...
Thanks all - yes 99T agreed, parts hoarding is in motion.
I'll concentrate on gettong the engine actually cooling reliably and no leaks, which will take long enough.
The water pump sadly is a ridiculously complicated job that required specific tools, troll blood and some sort of Lovecraftian ritual. It doea leak a little at startup BUT the water that came out was clear. I think the tanks, rad and thermostat are the main Orangina carriers.
I had a quote from Jim at Alloy Racing Fabricators for a new tank at 130 quid. I'm going to take a proper look at the old one and its guts to see if it is salvageable and will accomodate a new cap.
To be continued...
If your existing plastic header tank is in ok shape and not cracked or split, I'd be inclined to clean it out, put on a new cap and reuse it. It's an original part after all.
Then you can put the 130 quid you would have spent on a new one towards parts for sorting out the heater when the weather warms up a bit;)
Love this thread. My favourite on PH at the moment. You see old 900s from time to time but such an original and unmolested 99 is a real treat.
Then you can put the 130 quid you would have spent on a new one towards parts for sorting out the heater when the weather warms up a bit;)
Love this thread. My favourite on PH at the moment. You see old 900s from time to time but such an original and unmolested 99 is a real treat.
Nice work investigating the cooling system - even though if what comes out is thoroughly undesirable... Defintely a case of better out than in when it comes to the orange gunk that should be, well, anything but.
Is it too much of a time consuming pain to run repeated flushes with clear water to get as much out as possible before re-assembling, or do you think it would be neverending task?
Here's to better weather and easier outside working!
Is it too much of a time consuming pain to run repeated flushes with clear water to get as much out as possible before re-assembling, or do you think it would be neverending task?
Here's to better weather and easier outside working!
Having been in a similar position I would try and flush the system through with clean water a few times. Once I had it pretty clean I removed the rear core plug from the block and fished out what left over sediment I could then agitated the remainder with the hose.
It's laborious and wet but I haven't had any issues since.
It's laborious and wet but I haven't had any issues since.
Parts have trickled in over the past few weeks, and with some sun creeping in for April it was time to get the 99 back together. Here's a catch up, not necessarily in order:
The expansion tank brackets were given a damn good power sand/wire wheel, Bilt Hamber treatment and then Electrox primer and some satin blakc in my makeshift paintbooth.


The engine bay had a similar gentle rust prevention - I don't want to get into full stripdown territory yet but anything obvious brown was sanded and Bilt Hambered. Note the hose bracket in the bottom right came off for the full treatment.


In the intervening weeks the radiator went to Raysons in Yeovil for a rebuild. Pricey but keen to keep the originality - top notch service, communication and quality.

I managed to source a better thermostat housing as the outlet on ours had significantly deteriorated. Thanks to Saab for relentlessly putting parts numbers on things.

Nearly new thermostat wiht the correct temp sourced, tested on the hob and rubber surround replaced.

New fan switch sensor found - we will come back to this...

Added with a bit of effort - I put a big spanner on it and of course the radiator neck started moving! Crisis averted, narrowly.

Cleaned up the rad bolts and tested the bracketry before a final Bilt Hamber coat.

Now on to a truly tasty part! Jim at Alloy Racing Fabrications made up a copy of the plastic expansion tank - and it is glorious! It looks delightful and will likely prompt mode engine bay titivation.
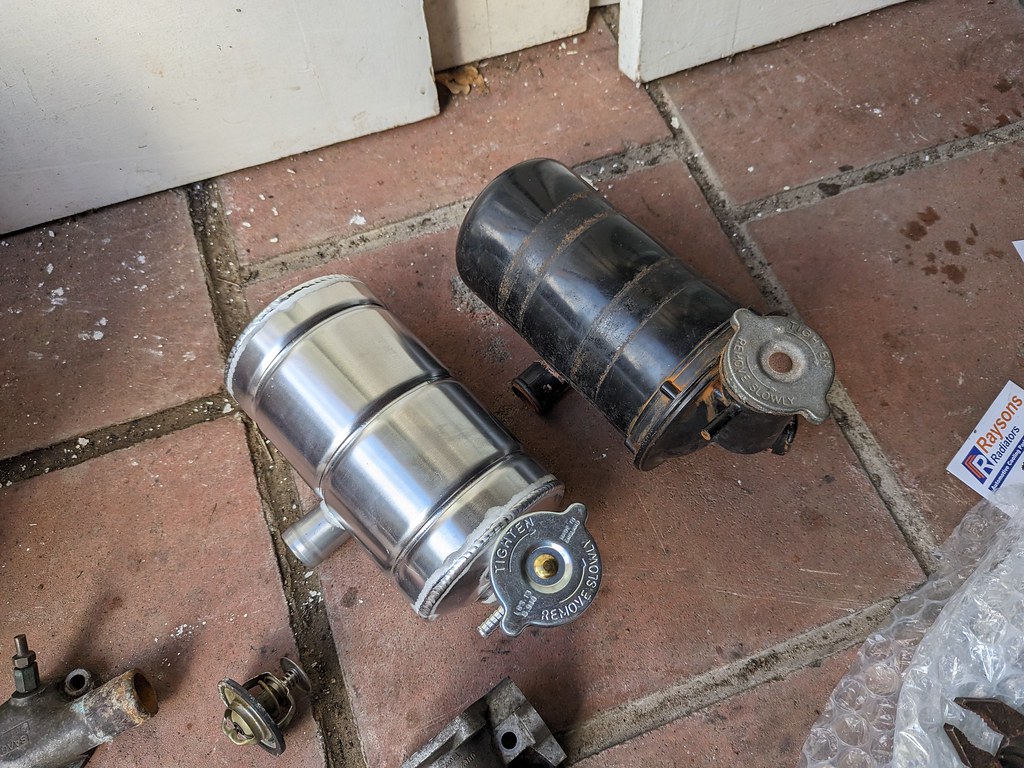
New correct pressure cap sourced from SaabBits.

After the rad was in I realised the fan should have been fitted beforehand - cue a 30 minute 'obstinancy session' where I refused to take the rad back out and sort it easily, and instead persisted with blind socketry and screwdriver fumbling...

Screws, washers and bolts tidied throughout...

Tank test fit to ensure the bonnet closes and hoses line up - all good. The bottom left hose will need to be replaced ASAP but no exact match is easily available. It may entail a trip to Raysons to make up a little set.
Throughout all this - primers and many coats to bits are added...

New theremstat in, after some cleanup of the receiving area. Also cue my finding all tubes of Hylomar had solidified so I had to wait another day for some gasket sealant...

New bolts, copper slip and all ok.

Binky officianados will appreciate some good bracketry.


Success.

Key in... maybe 3 months since the last start and... instantly caught and fired. Good thing too after all the work last year!
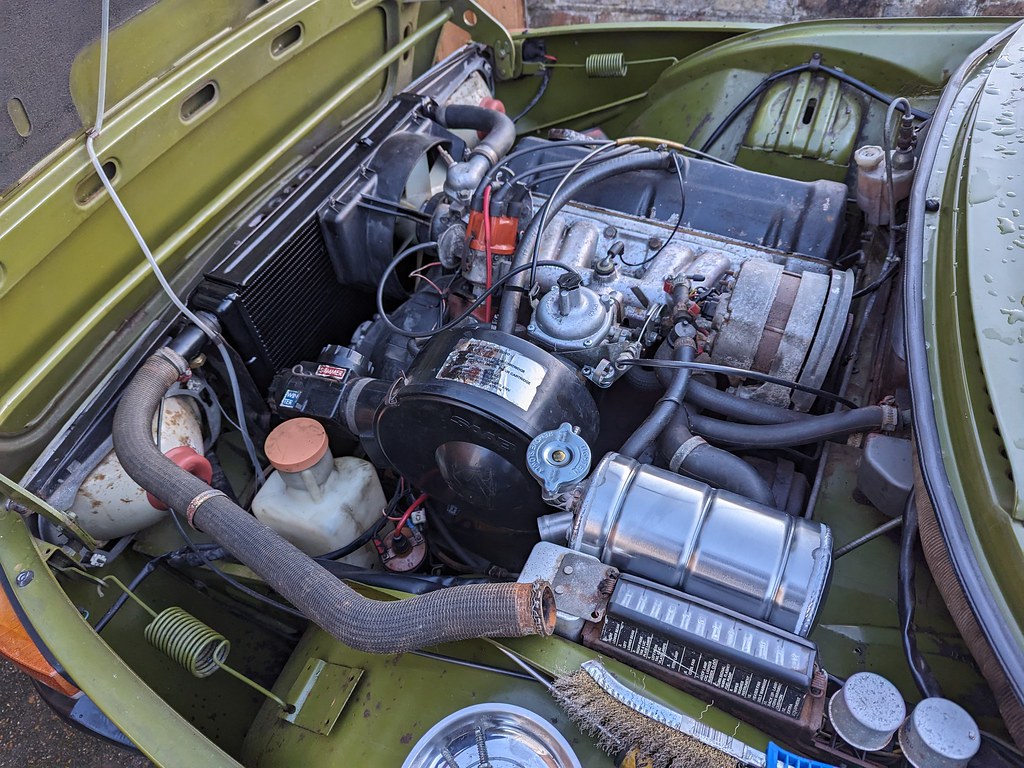
Careful topping up and bleeding ensued, and the 99 is back up to temperature and mobile!


Sister in law helped to spot some leaks and tighten the jubilee clips...

Unfortunately the fan did not kick in as expected - so some invstigation required on the new switch, the water level perhaps being a bit low or (more likely) I need to take the radiator and fan out and put it back together with the earth wire in the right position following my persistent blind bulldozer assembly session.
Next up - will it make it to Bicester Sunday Scramble?
The expansion tank brackets were given a damn good power sand/wire wheel, Bilt Hamber treatment and then Electrox primer and some satin blakc in my makeshift paintbooth.
The engine bay had a similar gentle rust prevention - I don't want to get into full stripdown territory yet but anything obvious brown was sanded and Bilt Hambered. Note the hose bracket in the bottom right came off for the full treatment.
In the intervening weeks the radiator went to Raysons in Yeovil for a rebuild. Pricey but keen to keep the originality - top notch service, communication and quality.
I managed to source a better thermostat housing as the outlet on ours had significantly deteriorated. Thanks to Saab for relentlessly putting parts numbers on things.
Nearly new thermostat wiht the correct temp sourced, tested on the hob and rubber surround replaced.
New fan switch sensor found - we will come back to this...
Added with a bit of effort - I put a big spanner on it and of course the radiator neck started moving! Crisis averted, narrowly.
Cleaned up the rad bolts and tested the bracketry before a final Bilt Hamber coat.
Now on to a truly tasty part! Jim at Alloy Racing Fabrications made up a copy of the plastic expansion tank - and it is glorious! It looks delightful and will likely prompt mode engine bay titivation.
New correct pressure cap sourced from SaabBits.
After the rad was in I realised the fan should have been fitted beforehand - cue a 30 minute 'obstinancy session' where I refused to take the rad back out and sort it easily, and instead persisted with blind socketry and screwdriver fumbling...
Screws, washers and bolts tidied throughout...
Tank test fit to ensure the bonnet closes and hoses line up - all good. The bottom left hose will need to be replaced ASAP but no exact match is easily available. It may entail a trip to Raysons to make up a little set.
Throughout all this - primers and many coats to bits are added...
New theremstat in, after some cleanup of the receiving area. Also cue my finding all tubes of Hylomar had solidified so I had to wait another day for some gasket sealant...
New bolts, copper slip and all ok.
Binky officianados will appreciate some good bracketry.
Success.
Key in... maybe 3 months since the last start and... instantly caught and fired. Good thing too after all the work last year!
Careful topping up and bleeding ensued, and the 99 is back up to temperature and mobile!
Sister in law helped to spot some leaks and tighten the jubilee clips...
Unfortunately the fan did not kick in as expected - so some invstigation required on the new switch, the water level perhaps being a bit low or (more likely) I need to take the radiator and fan out and put it back together with the earth wire in the right position following my persistent blind bulldozer assembly session.
Next up - will it make it to Bicester Sunday Scramble?
General call out for info - the temperature sensor for the fan (working befroe this work) isnt kicking in, but only has a single connector. On more modern cars I can bridge the two connectors on the sensor to trigger the fan - what is the best way to test the circuit with this 'single connector' setup? Bridge to earth?
Spinakerr said:
General call out for info - the temperature sensor for the fan (working befroe this work) isnt kicking in, but only has a single connector. On more modern cars I can bridge the two connectors on the sensor to trigger the fan - what is the best way to test the circuit with this 'single connector' setup? Bridge to earth?
It can work in two ways, either on/off thermal switch, or as a thermistor, so the warmer it gets, the less resistance and the faster the fan spins. The sensor is effectively a heat driven switch. I don't know the specifics of this sensor, however single connector switches have 12V in and complete thge circuit to ground through the switch body. So the tests are do you have 12V, can the switch body connect to earth, do the fans work when the circuit is made, and does the switch actually work?With ignition on, check you have 12V at the Female connector (voltmeter or test light). If you don't, check the relevant fuse
If/when you have 12V, short the female connector (wire end) to ground briefly and the fan should spin. If it doesn't then you have a wiring fault. It will probably use a relay so look at the fan wiring/connectors first (as you've touched those) and then the relay.
Next check that the body of the switch has a route to earth It earths through the radiator it is in - as many radiators are on rubber bobbins and have rubber hoses connected (and your has fresh paint) the earth can be a problem. Use a voltmeter on resistance (ohm) setting between the switch body and either battery negative or somewhere unpainted on the engine block. There should be almost zero resistance. If it isn't the check the radiator earth (which might mean removing some of the paint where it screws/bolts into the body).
If the fan still doesn't spin after all that the switch is suspect. Get the engine up to temperature, disconnect the wire and measure resistance between the spade and the switch body. It should show some resistance but probably not much, just a few ohms. If it doesn't the switch is the problem. You can test the switch in a pan of water whilst measuring the resistance as above.
Good luck - it is all easier than it sounds.
Gassing Station | Readers' Cars | Top of Page | What's New | My Stuff