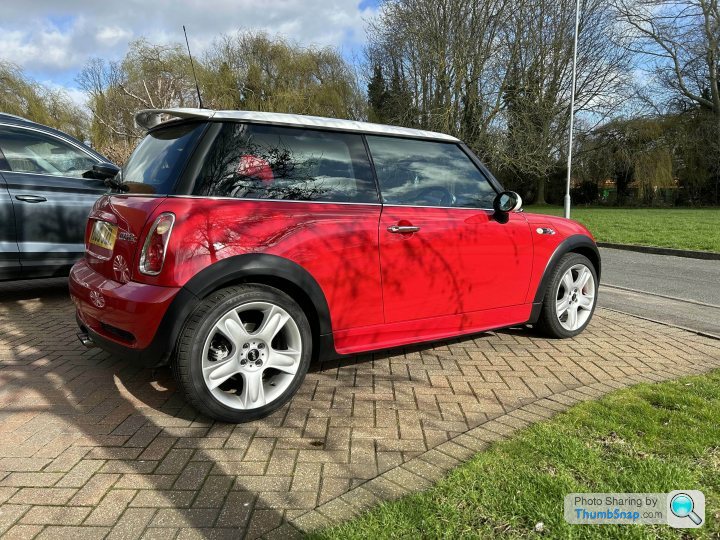
A MINI (R53 Cooper S) Adventure
Discussion


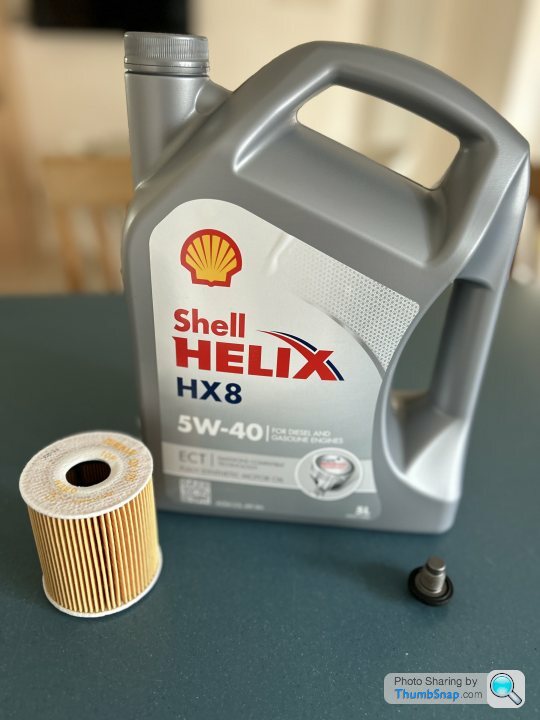
Oil changed. Only a year and 2,500 miles old but no idea what the old oil was. Oil filter housing took an alarming amount of leaning on a 4’ breaker to crack and was a t
 t to refit without cross-threading. Never mind!
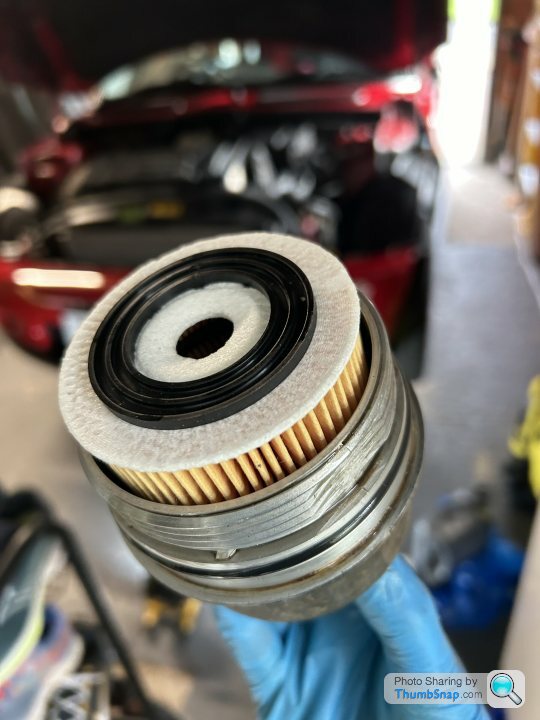
The oil which came out looked very much like used oil but nothing particularly untoward , similar for the old filter. Still I’m fascinated to see what the Millers oil analysis returns.

80 ml sampled and ready to go!

So, the great aero skirt restoration happened.
First, separate the mounting plates from the skirts and clean 20 years of grime off both parts. Then strip the old fixing tape with heat and a vinyl tool:

Next epoxy the broken brackets back on:

Touch in and relacquer the stone chipped leading edges:

Now one can spend ages masking off the body coloured parts:
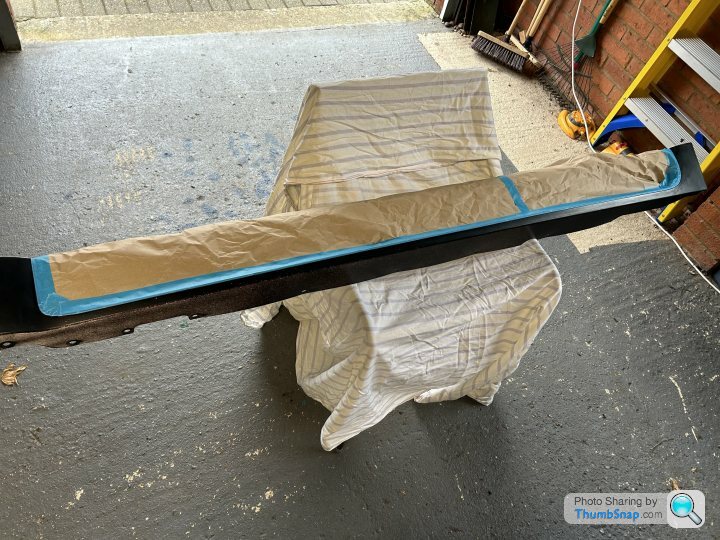
So finally the textured black parts can be attacked with a can of this stuff:

The utterly worn undersides looking much better:

And all that time spent carefully masking looks to have paid off!

With some nice new clips and fresh double sided tape, that’s resto completed. I’ve even managed to get one fitted. Once t’others done I’ll get an outside picture for the full effect!
First, separate the mounting plates from the skirts and clean 20 years of grime off both parts. Then strip the old fixing tape with heat and a vinyl tool:
Next epoxy the broken brackets back on:
Touch in and relacquer the stone chipped leading edges:
Now one can spend ages masking off the body coloured parts:
So finally the textured black parts can be attacked with a can of this stuff:
The utterly worn undersides looking much better:
And all that time spent carefully masking looks to have paid off!
With some nice new clips and fresh double sided tape, that’s resto completed. I’ve even managed to get one fitted. Once t’others done I’ll get an outside picture for the full effect!
tallpaul26 said:
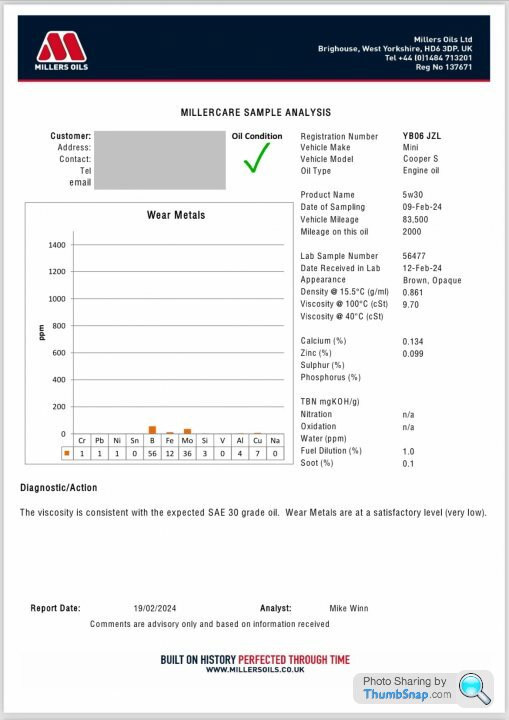
Results of the oil analysis landed today. Good to see low levels of wear metals and no traces of coolant mixing. I didn’t suspect any issue but nice to have a document showing normal engine wear!
Disappointing they don’t do an oil cleanliness analysis.I work in the hydraulics industry and testing to ISO4406 is a pre-requisite to determining the level of contamination within the system.
Whilst it’s good to know what other materials are held in the oil, not knowing the quantity and particle size, renders the analysis a bit meaningless.
wobert said:
Disappointing they don’t do an oil cleanliness analysis.
I work in the hydraulics industry and testing to ISO4406 is a pre-requisite to determining the level of contamination within the system.
Whilst it’s good to know what other materials are held in the oil, not knowing the quantity and particle size, renders the analysis a bit meaningless.
Sorry to hear of your disappointment! I work in the hydraulics industry and testing to ISO4406 is a pre-requisite to determining the level of contamination within the system.
Whilst it’s good to know what other materials are held in the oil, not knowing the quantity and particle size, renders the analysis a bit meaningless.

tallpaul26 said:
wobert said:
Disappointing they don’t do an oil cleanliness analysis.
I work in the hydraulics industry and testing to ISO4406 is a pre-requisite to determining the level of contamination within the system.
Whilst it’s good to know what other materials are held in the oil, not knowing the quantity and particle size, renders the analysis a bit meaningless.
Sorry to hear of your disappointment! I work in the hydraulics industry and testing to ISO4406 is a pre-requisite to determining the level of contamination within the system.
Whilst it’s good to know what other materials are held in the oil, not knowing the quantity and particle size, renders the analysis a bit meaningless.

In engineering terms they’ve given you half the story.
Without knowing the contamination level within the oil, what they provided is almost meaningless.
The oil is brown and opaque. Really, I would never have guessed!
wobert said:
Lol
In engineering terms they’ve given you half the story.
Without knowing the contamination level within the oil, what they provided is almost meaningless.
The oil is brown and opaque. Really, I would never have guessed!
The report shows PPM levels of boron, iron and molybdenum and concludes their amounts are very low. Also shows minimal fuel dilution and that the oil was still appropriately viscose at 100degC (so was doing its job). What else should I have got for £40?In engineering terms they’ve given you half the story.
Without knowing the contamination level within the oil, what they provided is almost meaningless.
The oil is brown and opaque. Really, I would never have guessed!
tallpaul26 said:
wobert said:
Lol
In engineering terms they’ve given you half the story.
Without knowing the contamination level within the oil, what they provided is almost meaningless.
The oil is brown and opaque. Really, I would never have guessed!
The report shows PPM levels of boron, iron and molybdenum and concludes their amounts are very low. Also shows minimal fuel dilution and that the oil was still appropriately viscose at 100degC (so was doing its job). What else should I have got for £40?In engineering terms they’ve given you half the story.
Without knowing the contamination level within the oil, what they provided is almost meaningless.
The oil is brown and opaque. Really, I would never have guessed!

Its the qty and size of the particles which is critical, ppm in this respect means nothing, you need the absolute figure, as the test sample oil volume isn’t recorded.
ISO4406 uses a standardise test procedure.
Edited by wobert on Monday 19th February 15:12
Edited by wobert on Monday 19th February 15:14
wobert said:
An ISO coding to ISO4406 showing the size and qty of contaminants in the oil.
Its the qty and size of the particles which is critical, ppm in this respect means nothing, you need the absolute figure, as the test sample oil volume isn’t recorded.
ISO4406 uses a standardise test procedure.
Err, PPM is a concentration and is equal to mg/kg. The test notes the specific gravity of the oil at room temp to be 0.861 therefore 1 kg of oil would contain e.g. 65 mg of boron. Millers in their infinite wisdom deem that ‘very low’. I’m not sure why I need particle size, but I’ll estimate it to be somewhere in the range of teeny weeny; not sure what ISO code that is though! Its the qty and size of the particles which is critical, ppm in this respect means nothing, you need the absolute figure, as the test sample oil volume isn’t recorded.
ISO4406 uses a standardise test procedure.
Edited by wobert on Monday 19th February 15:12
Edited by wobert on Monday 19th February 15:14
tallpaul26 said:
wobert said:
An ISO coding to ISO4406 showing the size and qty of contaminants in the oil.
Its the qty and size of the particles which is critical, ppm in this respect means nothing, you need the absolute figure, as the test sample oil volume isn’t recorded.
ISO4406 uses a standardise test procedure.
Err, PPM is a concentration and is equal to mg/kg. The test notes the specific gravity of the oil at room temp to be 0.861 therefore 1 kg of oil would contain e.g. 65 mg of boron. Millers in their infinite wisdom deem that ‘very low’. I’m not sure why I need particle size, but I’ll estimate it to be somewhere in the range of teeny weeny; not sure what ISO code that is though! Its the qty and size of the particles which is critical, ppm in this respect means nothing, you need the absolute figure, as the test sample oil volume isn’t recorded.
ISO4406 uses a standardise test procedure.
Edited by wobert on Monday 19th February 15:12
Edited by wobert on Monday 19th February 15:14
Engines naturally self-generate debris at both the start of their life and at the end.
ISO4406 uses a specific sample size and generates a coding based on particle count at 4, 6 and 14 microns. You may regard this as “teeny-weeny” but in system terms if there’s a lot of them it will be detrimental to longevity.
Anyhow, we digress, are the side skirts on?


i have read this thread before I bought an R53, read it since buying mine and read it again now for inspiration given what lies ahead for me.... 
Amazing work has gone in to yours, it looks spot on and must drive the same.
I have now approx £1100 worth of running gear parts to go on mine... full front and back inc subframes etc...
Dont suppose you have a spreadsheet or some document with the part numbers for all the various fixings and ancillaries you have replaced?
I also read somewhere else last night that the rear front subframe bolts are self tapping and you have to re use the originals or re tap the hole? is that correct? sounds madness to me.... haven't read about that or heard on any vids i have watched.
cheers!
rickygolf83 said:
i have read this thread before I bought an R53, read it since buying mine and read it again now for inspiration given what lies ahead for me....
Amazing work has gone in to yours, it looks spot on and must drive the same.
I have now approx £1100 worth of running gear parts to go on mine... full front and back inc subframes etc...
Dont suppose you have a spreadsheet or some document with the part numbers for all the various fixings and ancillaries you have replaced?
I also read somewhere else last night that the rear front subframe bolts are self tapping and you have to re use the originals or re tap the hole? is that correct? sounds madness to me.... haven't read about that or heard on any vids i have watched.
cheers!
Actually, I do have a spreadsheet! Not every part has been OEM so I haven’t recorded part numbers for aftermarket items but have for orders from BMW. I get all my part number from RealOEM,com using my VIN number but if there’s anything particular you can’t find or are unsure of just post here or the ‘R53 Owners Club’ Facebook group is brilliant and full of helpful people. Amazing work has gone in to yours, it looks spot on and must drive the same.
I have now approx £1100 worth of running gear parts to go on mine... full front and back inc subframes etc...
Dont suppose you have a spreadsheet or some document with the part numbers for all the various fixings and ancillaries you have replaced?
I also read somewhere else last night that the rear front subframe bolts are self tapping and you have to re use the originals or re tap the hole? is that correct? sounds madness to me.... haven't read about that or heard on any vids i have watched.
cheers!
Many of the subframe/suspension bolts are self-tapping so you do need to be a bit cautious not to strip any threads. Any that I was nervous of I first turned in carefully without the fixture just to take sure it didn’t cross-thread before actually mounting and torquing down and it was fine. Good luck!
Thanks, I'll be replacing as much as possible for new, will get on there and start compiling a long list.... 
When I bought this as a stop gap while one of my golf's was receiving a new subframe and rear axle.... I didn't expect to be doing the same to this so soon
Subframes and r56 rear arms arrived today.... Not ordering anymore bits until I have stripped the rear end and prepped the area, soften the financial blow a bit..
Enjoy getting out in yours now the weather is getting better
After the remidial work to get my MOT pass I was left with two advisories, one for the reverse light and the other for the third brake light.
The reverse lights were easy, both bulbs had blown! Third brake light? Less simple.
Quick test for power at the plug revealed that continuity was missing somewhere in the wiring. Arse. I ignored this for a few weeks but decided to go hunting today, luckily the break was in the cable conduit between the boot lid and bodyshell:

One pair of spade connectors, some dodgy soldering, several wraps of electrical tape and a couple of zip ties to try and stop the join from rebreaking and boom!

The reverse lights were easy, both bulbs had blown! Third brake light? Less simple.
Quick test for power at the plug revealed that continuity was missing somewhere in the wiring. Arse. I ignored this for a few weeks but decided to go hunting today, luckily the break was in the cable conduit between the boot lid and bodyshell:
One pair of spade connectors, some dodgy soldering, several wraps of electrical tape and a couple of zip ties to try and stop the join from rebreaking and boom!
A nice little job completed today… I’ve always had a bit of a flat spot that’s made pulling away smoothly a pain. I was unconvinced of it being a ‘classic’ symptom of the divertor/BPV valve but decided it was worth a punt for a few quid, so bought a ‘Rooster Racing’ BPV which has a 25% firmer spring and the butterfly valve position setup correctly.
The BPV is easy enough to reach but involves removal of the intercooler, throttle body and nearside IC ‘horn’ which the valve is actually bolted to. The only fiddly bit is removing the horn/valve assembly due to the short hose connecting the BPV to the supercharger inlet pipe, care is needed not to dislodge the inlet gasket at the other end as sorting that involves pulling the front of the car off.
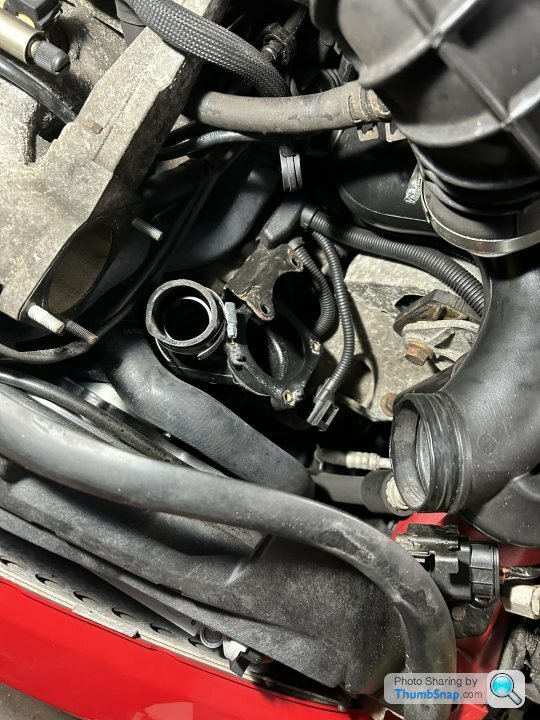
Not much to compare between the old and new valves, the spring actually felt ok in the old one but not as stiff as the new and there was a tiny bit of slack in the initial travel.

It all went back together just fine. I used a heat gun to carefully warm the short hose to the SC inlet to make it more pliable and the BPV seated without fuss.
So, did it work? YES! No hesitancy at all coming on throttle and sharp exits from junctions are much more smoothly despatched. Very pleased indeed
The BPV is easy enough to reach but involves removal of the intercooler, throttle body and nearside IC ‘horn’ which the valve is actually bolted to. The only fiddly bit is removing the horn/valve assembly due to the short hose connecting the BPV to the supercharger inlet pipe, care is needed not to dislodge the inlet gasket at the other end as sorting that involves pulling the front of the car off.
Not much to compare between the old and new valves, the spring actually felt ok in the old one but not as stiff as the new and there was a tiny bit of slack in the initial travel.
It all went back together just fine. I used a heat gun to carefully warm the short hose to the SC inlet to make it more pliable and the BPV seated without fuss.
So, did it work? YES! No hesitancy at all coming on throttle and sharp exits from junctions are much more smoothly despatched. Very pleased indeed
Gassing Station | Readers' Cars | Top of Page | What's New | My Stuff