Discussion


Renn Sport said:
I have D90 and am also looking to get some use out of it. Gary I must say I am impressed with your shots. Good composition.
Your car is looking great.
Did you get get any shots on the black beast 911 without the naked dude standing in the way?
Thanks again Your car is looking great.
Did you get get any shots on the black beast 911 without the naked dude standing in the way?
I must admit to later cropping that shot down as it is in the directory I use for my screen saver pictures and it was freaking me out!
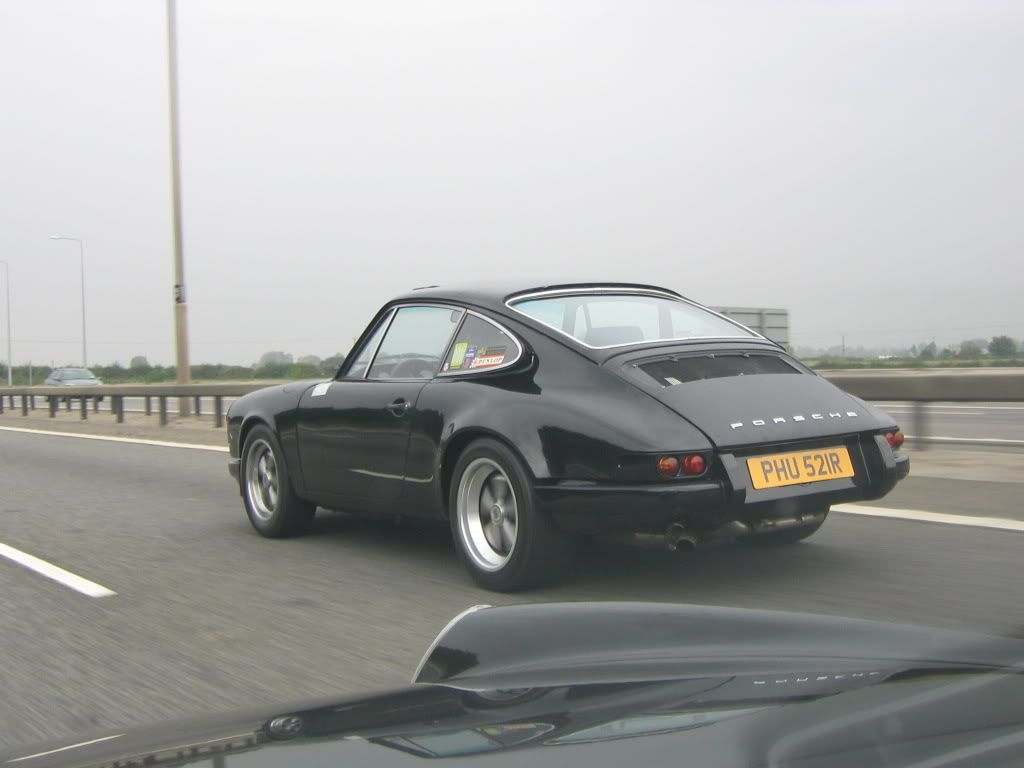
The black car is a '77 Carrera 3.0 that has been backdated to an early look with a few outlaw touches and a 3.2 engine!
I haven't any other pictures myself, but this is one I borrowed from DDK. It's owned by a true petrol head and throughly decent bloke (not the naked dude, although he is as well having a '74 Carrera!)
 t then
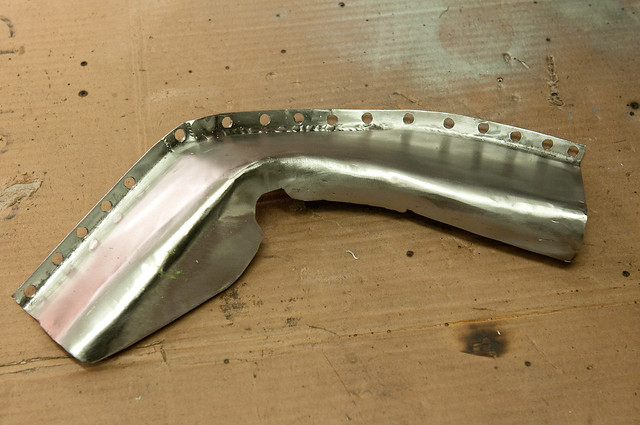
 Many happy hours of metal bashing later it's finally coming together.
After beating this bit of 1.5mm steel into this complex 3D shape those pressed repair panels you can buy look good value now Still where's the satisfaction in that?
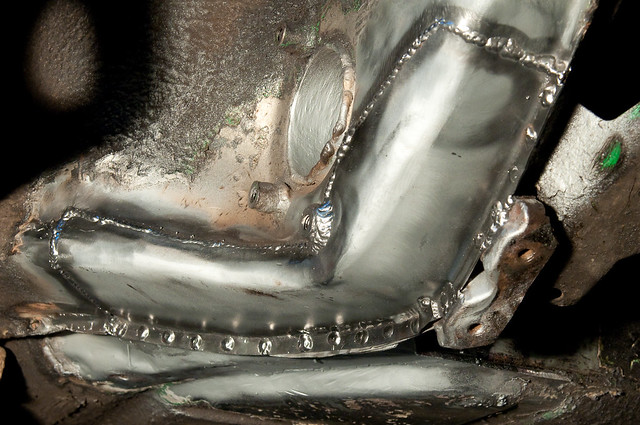
Final trial fit.

Now all painted up inside and out and drying off overnight before final welding tomorrow.
I need to make the bush backstop flange for inside the torsion tube and then get back to the jobs I should have been doing this winter...
After beating this bit of 1.5mm steel into this complex 3D shape those pressed repair panels you can buy look good value now
Still where's the satisfaction in that? Final trial fit.
Now all painted up inside and out and drying off overnight before final welding tomorrow.
I need to make the bush backstop flange for inside the torsion tube and then get back to the jobs I should have been doing this winter...
Edited by gary71 on Thursday 16th December 22:39
Finally finished all that horrible welding and grinding and covered all my work in muck!

Suspension is now back on the nearside:

Next job is to pull the gearbox off and start on that. Fix the reversing light microswitch, new clutch, split case and reseal, and maybe 2nd gear dog ring / selector ring depending on what I find as I can beat the syncro relatively easily, and the syncro itself is new (ish!)
One day I may even get it back together
Suspension is now back on the nearside:
Next job is to pull the gearbox off and start on that. Fix the reversing light microswitch, new clutch, split case and reseal, and maybe 2nd gear dog ring / selector ring depending on what I find as I can beat the syncro relatively easily, and the syncro itself is new (ish!)
One day I may even get it back together
Now the suspension is back on I needed to take something else apart!
So an hour later and the acrid smell of box oil fresh in the nostrils it's apart.
I'm probably going to change the 1st/2nd selector ring as that shift is poor and always crunches if you try it above 4000rpm.
The dog teeth are somewhat less than sharp (round!)


So an hour later and the acrid smell of box oil fresh in the nostrils it's apart.
I'm probably going to change the 1st/2nd selector ring as that shift is poor and always crunches if you try it above 4000rpm.
The dog teeth are somewhat less than sharp (round!)
Edited by gary71 on Thursday 3rd August 18:25
MadRob6 said:
That welding job looks very tidy all finished.
You wouldn't catch me pulling my gearbox apart, I don't have a clue how the magic in there works. Scary stuff.
Thanks for the compliment! You wouldn't catch me pulling my gearbox apart, I don't have a clue how the magic in there works. Scary stuff.
First time I did the box it scared the crap out of me and took forever! This is the second time I've been in this far and it's all familiar now so I can rip it apart without instructions!
I've now collected all the parts I need, and tonight was spent pulling the input shaft apart.
I've never been one to let the lack of the correct tooling stop progress... Tonight was time for the input shaft to come apart. It wouldn't fit in the press at work without modifying it, so I've had to improvise!
Studding would have been better, but big coach bolts were the best B&Q could come up with. So with the welder set to 'kill' a few minutes later I had this and it was apart.
Now to clean everything up and put it back together
Thanks, I've got a price list somewhere, I'll dig it out and post up the answer.
The car is still in bits at the moment!
Jobs now complete:
- Gearbox rebuild
- Valve clearances
- 'turbo' rocker covers (stiffer design to try and keep some of the oil on the inside!)
- Carbs stripped and sent off for vapour blasting and ultrasonic cleaning.
- Carb spindle bushes machined to accept a sealed roller bearing
- Discreet iPhone / amp / speaker set up
Jobs still to do:
- 3.2 Carrera front brakes. Calipers are now refurbished, just waiting for the 'S' spec front strut housings to show up.
- Rebuild carbs
- Put the engine and box back in!
- Remove, clean and reseal the fuel tank (grotty job...)
...and all the other stuff I've forgetten
Keeps me out of trouble.
Thanks for the positive comments
A few photos of the latest bits and pieces:
iPhone dock in the ashtray:

iPhone dock by Suggs, on Flickr
Then the big job of punching a period looking hole pattern in the vinyl to let the sound out of the new Alpine speakers. I didn't want ugly grills, so this was the way to make it as discreet as possible. I had to paint the speakers silver so they didn't show through.
I sacrificed a paper hole punch and welded it to the end of a long bolt. Then with the aid of some paper with the design on spent best part of this morning knocking all these little holes in it!
Not too bad I think, and with the door closed in the car completely invisible!

That took a while... by Suggs, on Flickr
This weekend I intend to get the wiring done and the period radio installed:

A few photos of the latest bits and pieces:
iPhone dock in the ashtray:
iPhone dock by Suggs, on Flickr
Then the big job of punching a period looking hole pattern in the vinyl to let the sound out of the new Alpine speakers. I didn't want ugly grills, so this was the way to make it as discreet as possible. I had to paint the speakers silver so they didn't show through.
I sacrificed a paper hole punch and welded it to the end of a long bolt. Then with the aid of some paper with the design on spent best part of this morning knocking all these little holes in it!
Not too bad I think, and with the door closed in the car completely invisible!
That took a while... by Suggs, on Flickr
This weekend I intend to get the wiring done and the period radio installed:
Edited by gary71 on Thursday 3rd August 18:27
Latest update:
Engine and gearbox are now all back together with Turbo rockers to try and keep some of the oil on the inside!

Inspired by a friends stunning work on some Webers I thought I would apply just an element of that to my Zeniths through vapour blasting and ultrasonic cleaning.
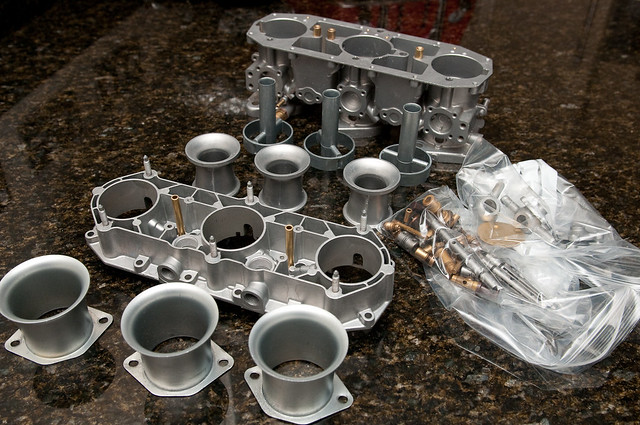
They certainly look the part and hopefully the new sealed bearings and the ultrasonic cleaning will make them run better.
Now to put them back together!
I've also obtained some 3.5" spacing strut housings:

...and had some very elderly 3.2 calipers brought back to life by Classiccar:

And also purchased from one of our suppliers the bulkhead materials used on the current Range Rover to knock a dB or two from the interior noise:

I still have to finish the radio install and seal the fuel tank so will be busy for a few evenings yet!
Engine and gearbox are now all back together with Turbo rockers to try and keep some of the oil on the inside!
Inspired by a friends stunning work on some Webers I thought I would apply just an element of that to my Zeniths through vapour blasting and ultrasonic cleaning.
They certainly look the part and hopefully the new sealed bearings and the ultrasonic cleaning will make them run better.
Now to put them back together!
I've also obtained some 3.5" spacing strut housings:
...and had some very elderly 3.2 calipers brought back to life by Classiccar:
And also purchased from one of our suppliers the bulkhead materials used on the current Range Rover to knock a dB or two from the interior noise:
I still have to finish the radio install and seal the fuel tank so will be busy for a few evenings yet!
Thanks again for the positive comments!
This is the plan for the carb spindle bearings:
I'm only sealing the end bearing by the throttle quadrant as it is the only one that shows any movement. The other reason is the bearing seals inevitably add some sticktion to the shafts and I didn't want to introduce more problems than I solved. I tested the idea on an old set first before committing!

I removed the bushes from my old spares bin set of Zeniths and a friend machined them down to suit the size of the new roller bearing.

I wanted to maintain the machined surface inside the throat so the tricky bit was putting them back in lined up to get one surface again! After a couple of goes it was sorted.
I used a bearing sealant on the outer surface to hold it in place then pulled the roller bearing with a bolt.


Rebuild commences tomorrow!
This is the plan for the carb spindle bearings:
I'm only sealing the end bearing by the throttle quadrant as it is the only one that shows any movement. The other reason is the bearing seals inevitably add some sticktion to the shafts and I didn't want to introduce more problems than I solved. I tested the idea on an old set first before committing!
I removed the bushes from my old spares bin set of Zeniths and a friend machined them down to suit the size of the new roller bearing.
I wanted to maintain the machined surface inside the throat so the tricky bit was putting them back in lined up to get one surface again! After a couple of goes it was sorted.
I used a bearing sealant on the outer surface to hold it in place then pulled the roller bearing with a bolt.
Rebuild commences tomorrow!
Edited by gary71 on Thursday 3rd August 19:21
northandy said:
Love the refurbed calipers, bet they weren't cheap.
From rusty seized borderline scrap to fully plated, blasted cleaned, new stainless pistons, seals, cross bolts for £160. Sounds a bargain to me
They were done by Classiccar in Chelford. No website, looks properly backstreet and does a fantastic job. Used by everyone in the classic restoration trade.

Tonight I have decided I need a bigger hammer. The front struts just aren't playing ball.
Anyway the rear suspension is finally finished so the engine can go back in. It only took 4 months and 10 phone calls for the damper bushes to turn up from Bilstein. Then they didn't fit. So I 'adjusted' them. Such is life.
Engine back in tomorrow night I think, at least I'll feel like I'm making progress! Although I've noticed all the fuel hoses looked perished despite only being 2 years old, so it may have to wait until I've replaced them...
Gassing Station | Readers' Cars | Top of Page | What's New | My Stuff