Discussion


Penguinracer said:
Gary, was your car originally green?
What colour are going with?
Yes, originally green and will be returning to it. A classic 70's shade of viper green. What colour are going with?
Luckily up to '73 Porsche painted the engine bay, luggage bay and inside black (badly) over a dusting of body colour so I have no need to spend too much time or money trying to make it all shiny.
I had plans for today but got distracted so fixed the little hole at the top corner and took the afternoon to fiddle with bits that will be rarely seen...
Although professionally assembled the cosmetics of 1/4 to slam were (intentionally) not fully done so spent a few hours working both sides to be the same, have the right radii etc. Still need filler as I'm not god, but they are straight and symmetrical.

I tipped up the shell to let the Hydrate 80 run into the seams around the 1/4 to slam panel joins. A typical 911 rust hot spot due to it's complexity so I'm trying to stall it coming back!


Today was a long painful slog, but finally put some paint on something!
I replaced a few of the tabs around the engine bay and touched in a few welds that were OK at the time but my standards have moved on in the two years since I started!
Then it was hour after hour of wire wheels, sandpaper, scotch brite, then several goes over with panel wipe.

Finally a coat of 2k epoxy goes on, certainly an improvement and seals everything for now, but needs another coat for completion.

I need to work out the painting sequence from now on to get the seam sealing, stonechip, and top coat in the right order thinking about the various areas of the car to avoid too much masking.
I replaced a few of the tabs around the engine bay and touched in a few welds that were OK at the time but my standards have moved on in the two years since I started!
Then it was hour after hour of wire wheels, sandpaper, scotch brite, then several goes over with panel wipe.
Finally a coat of 2k epoxy goes on, certainly an improvement and seals everything for now, but needs another coat for completion.
I need to work out the painting sequence from now on to get the seam sealing, stonechip, and top coat in the right order thinking about the various areas of the car to avoid too much masking.

6 hours of cleaning with 5 wire brushes, a box of scotch brite and a litre of panel wipe later:

And then 1 hour of painting: 2K epoxy.


Next step will be seam sealer and a second coat together with localised application of Raptor.
Really happy with the finish. I know it’s not factory, but it’s all covered up, and most importantly there is no rust, and it’s sealed in a rock hard 2K paint.
And then 1 hour of painting: 2K epoxy.
Next step will be seam sealer and a second coat together with localised application of Raptor.
Really happy with the finish. I know it’s not factory, but it’s all covered up, and most importantly there is no rust, and it’s sealed in a rock hard 2K paint.
Cheers Mark, and happy new year to you.
Yes, knowing it’s ‘done’ is a great place to start the new year.
There’s always rust, even on a restoration that goes this deep. My plan is for rigorous application of modern materials to stop it coming back too fast!
Just been in the garage and found an area on the inside I completely missed... guess it was in a shadow!
Boring painting saga episode 3:
Another day (or two) another painted bit (or two)
One inner wing done:

Do you think there is a link between the bits that are hardest to prep and paint being the ones that rust...


See that little white bit right in the middle? That’s the top of the rear 1/4 between the side and rear windows that’s normally got a lump of foam in it.
And can you reach it? Can you hell.
Got there today with the foam from a mini gloss roller tie wrapped to the end of a long rod. Not particularly scientific, but it’s got paint on now! It will get more once I spray Raptor and then again with Dinitrol etc etc.
Then the area around the torsion bar. A proper fiddly area, but got there in the end.
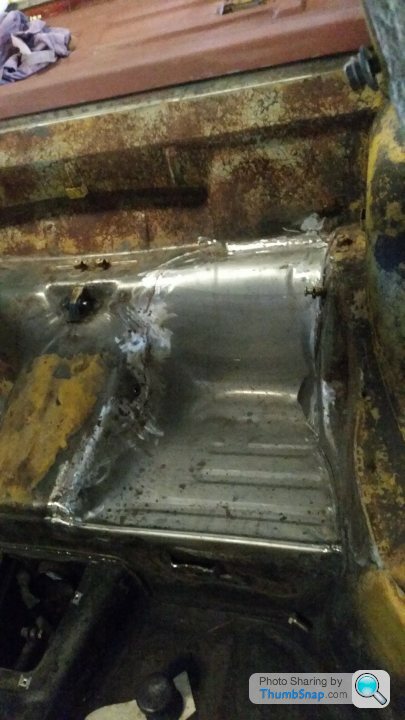
If I was doing this again I’d replace the LH seat base rather than patch it as it looks like something from Frankensteins lab.


Plan for tomorrow is (a big day!) to get the rest of the underside into epoxy before heading back to work so the pace will slow somewhat from then.
Another day (or two) another painted bit (or two)
One inner wing done:
Do you think there is a link between the bits that are hardest to prep and paint being the ones that rust...
See that little white bit right in the middle? That’s the top of the rear 1/4 between the side and rear windows that’s normally got a lump of foam in it.
And can you reach it? Can you hell.
Got there today with the foam from a mini gloss roller tie wrapped to the end of a long rod. Not particularly scientific, but it’s got paint on now! It will get more once I spray Raptor and then again with Dinitrol etc etc.
Then the area around the torsion bar. A proper fiddly area, but got there in the end.
If I was doing this again I’d replace the LH seat base rather than patch it as it looks like something from Frankensteins lab.
Plan for tomorrow is (a big day!) to get the rest of the underside into epoxy before heading back to work so the pace will slow somewhat from then.

Finally got some time back on the car. Complete underside, arches and engine bay now painted with the second coat and seam sealer.
What a mess it is. Mainly on the floor
It’s got a generous coat (or two) and I’m happy there’s no bare steel anywhere. Painting the inner lip of the arch is difficult as my gun is too big.
I’m going to buy a mini gun and do this area again as it’s so critical before doing the Raptor, even though I’ve already brushed it.
Next job is the luggage bay, but I’ll need to get some more epoxy as my gun settings seem to have gone from ‘spot dusting’ to ‘absolutely layer it on’ and it’s whipped though a good litre and half today.

One thing doing this has reinforced is that there is absolutely no way I’m doing any painting that requires skill or technique
What a mess it is. Mainly on the floor
It’s got a generous coat (or two) and I’m happy there’s no bare steel anywhere. Painting the inner lip of the arch is difficult as my gun is too big.
I’m going to buy a mini gun and do this area again as it’s so critical before doing the Raptor, even though I’ve already brushed it.
Next job is the luggage bay, but I’ll need to get some more epoxy as my gun settings seem to have gone from ‘spot dusting’ to ‘absolutely layer it on’ and it’s whipped though a good litre and half today.
One thing doing this has reinforced is that there is absolutely no way I’m doing any painting that requires skill or technique
Gassing Station | Readers' Cars | Top of Page | What's New | My Stuff