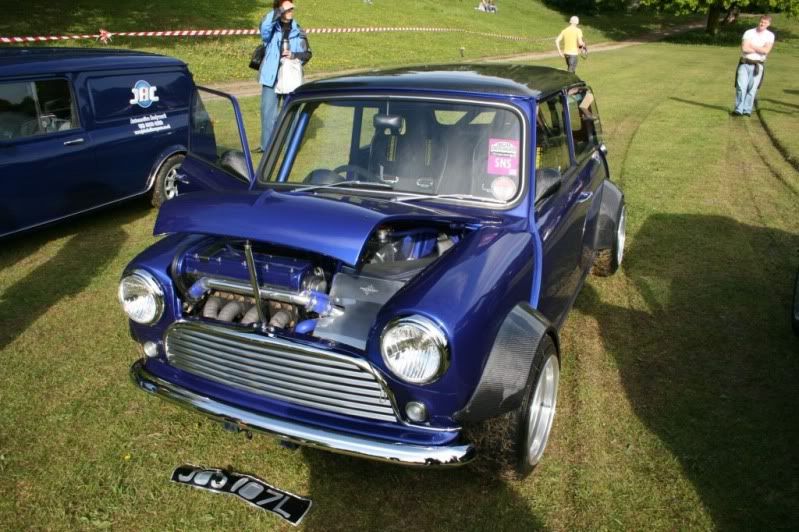
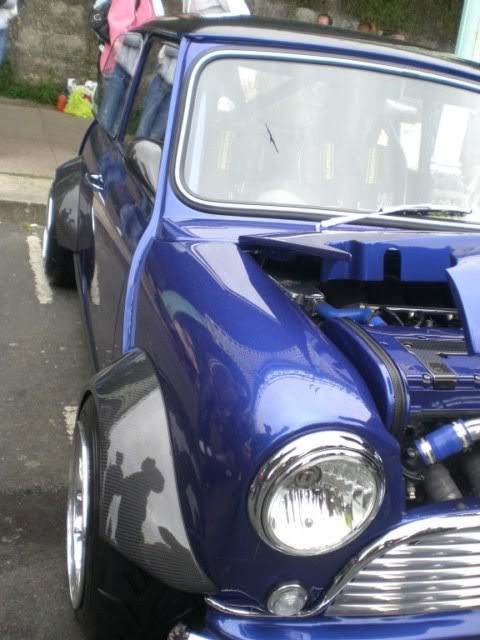
Carbon '72 Mini C20XE Including Build Details
Discussion


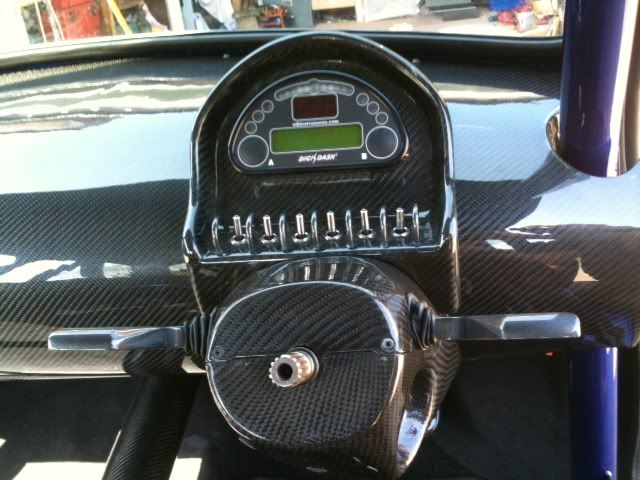
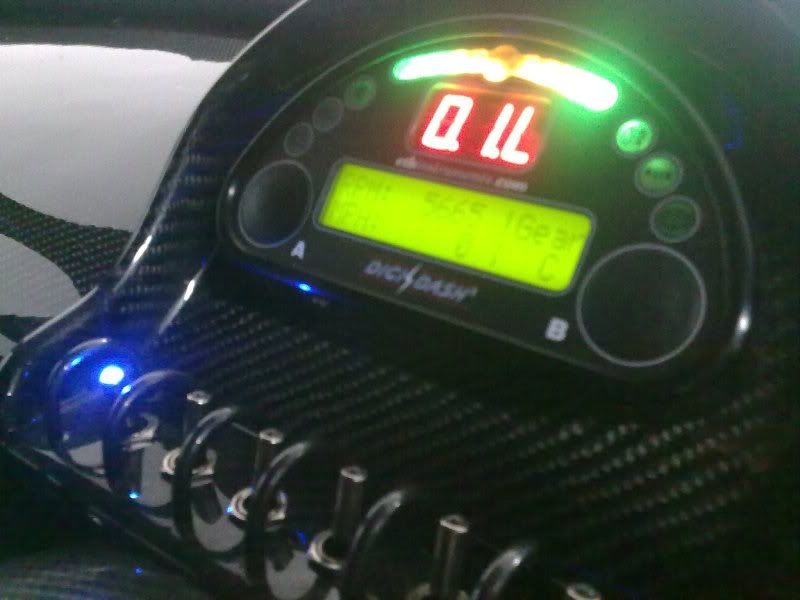
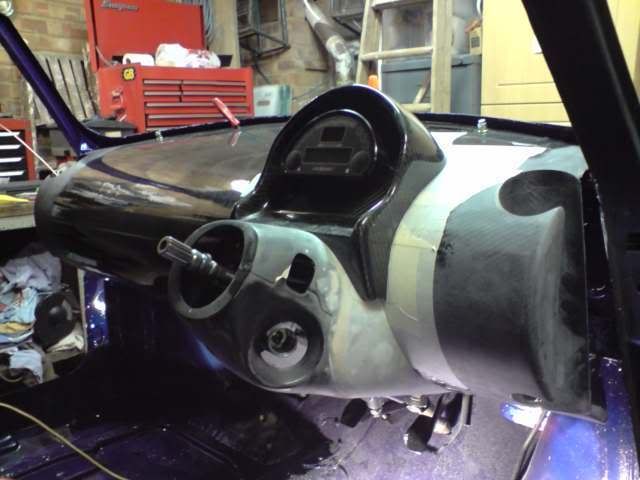
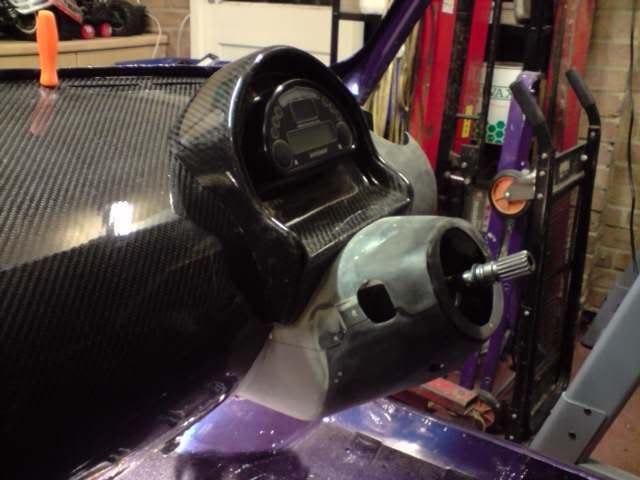
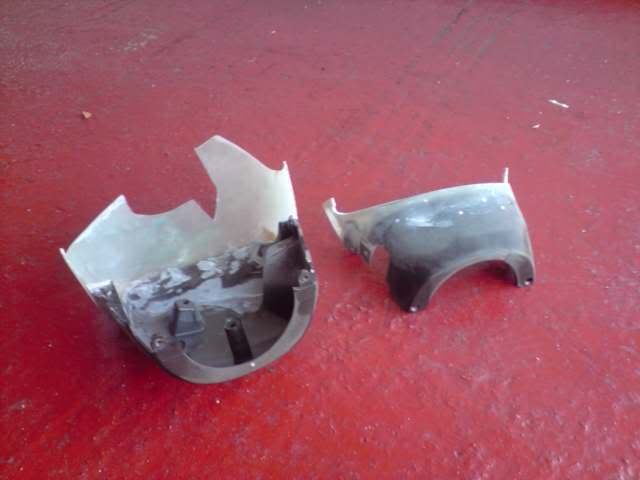
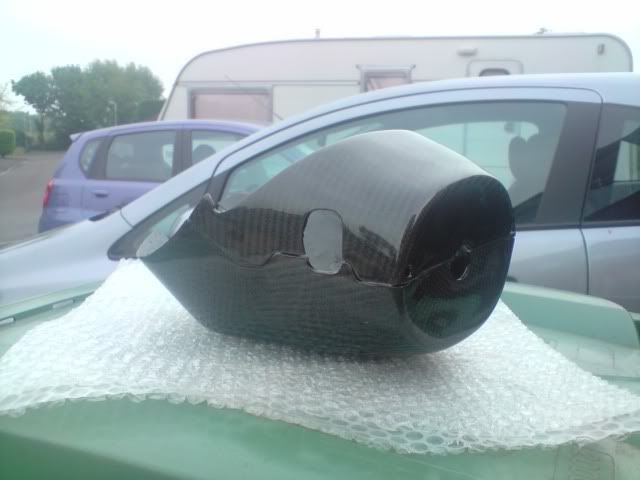
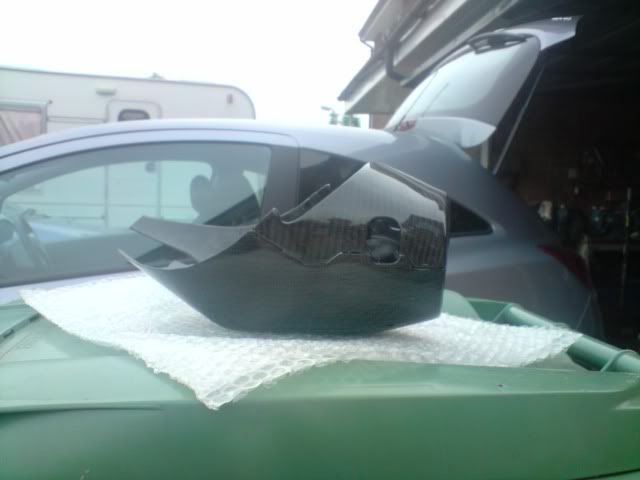
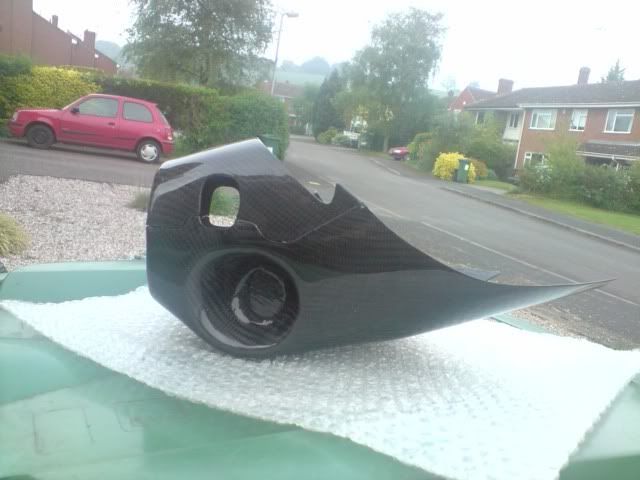
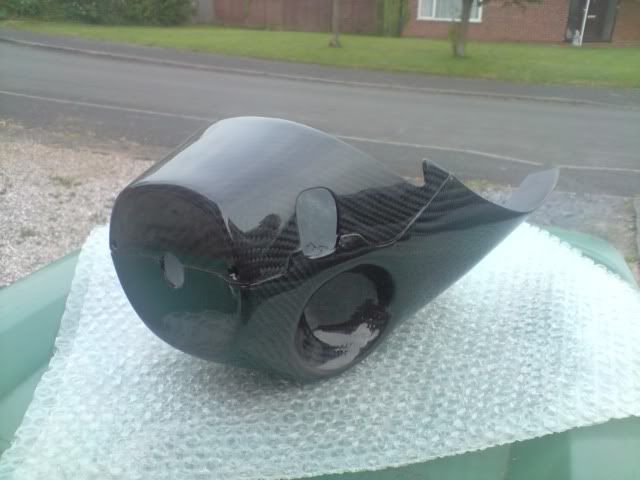
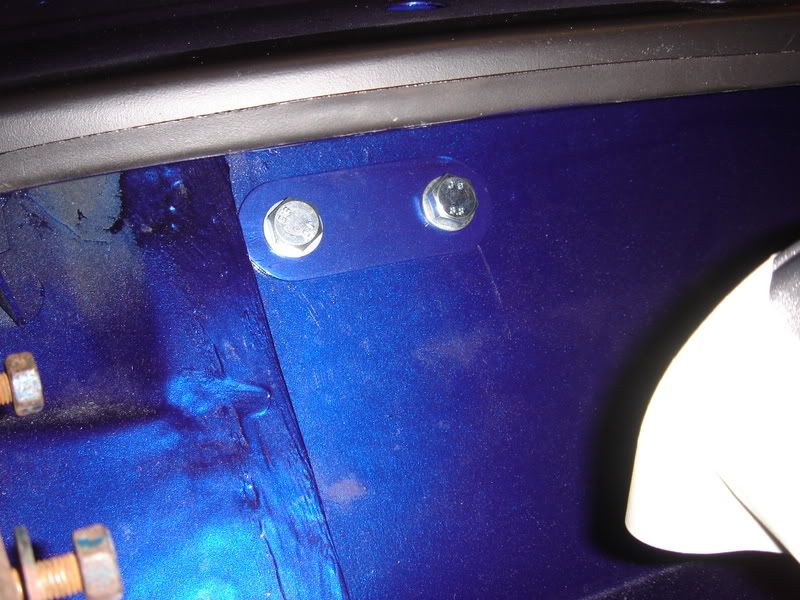
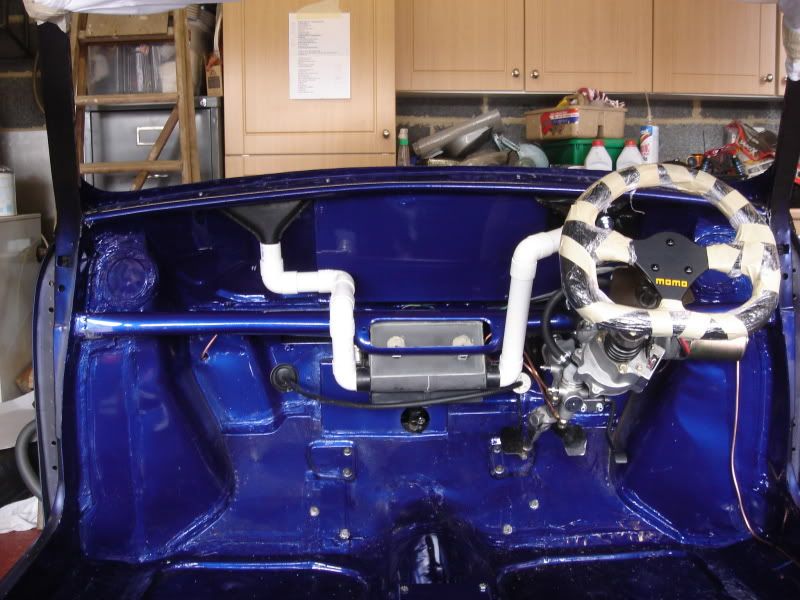
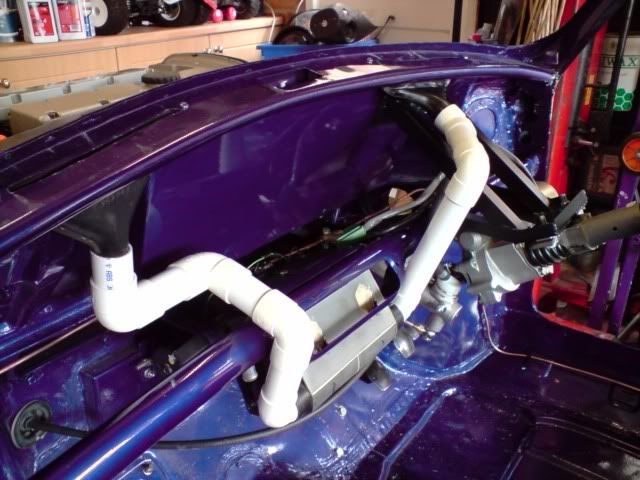
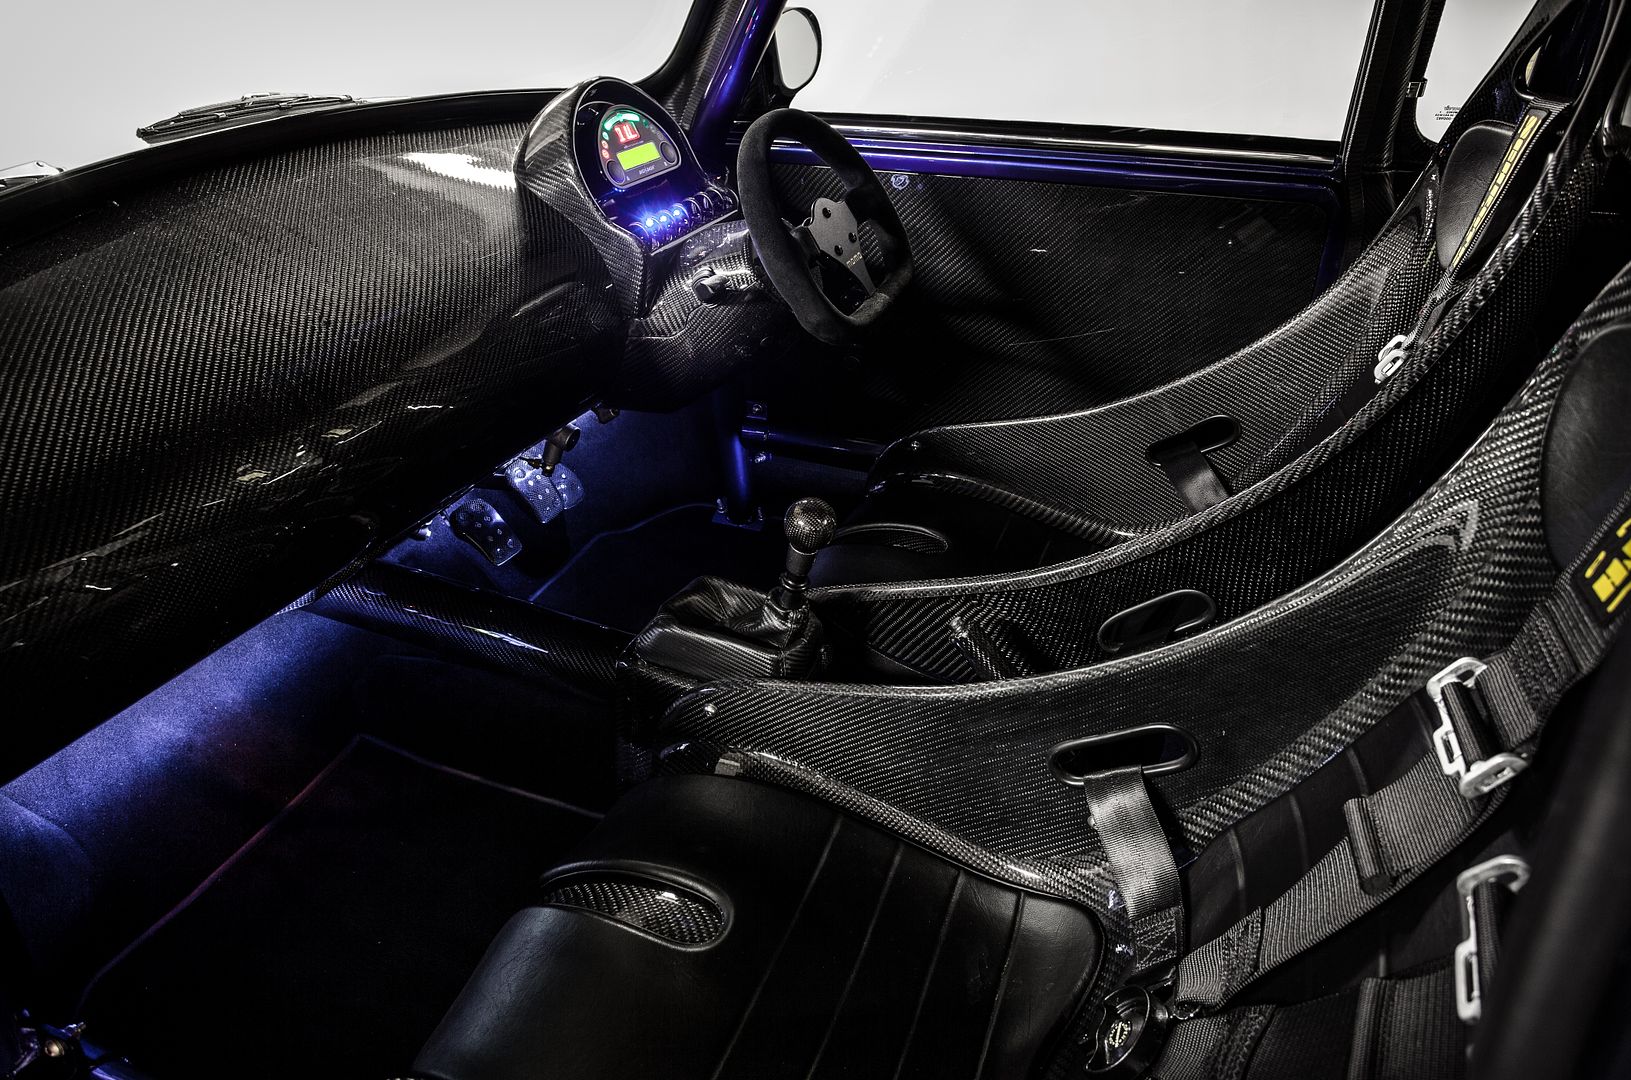
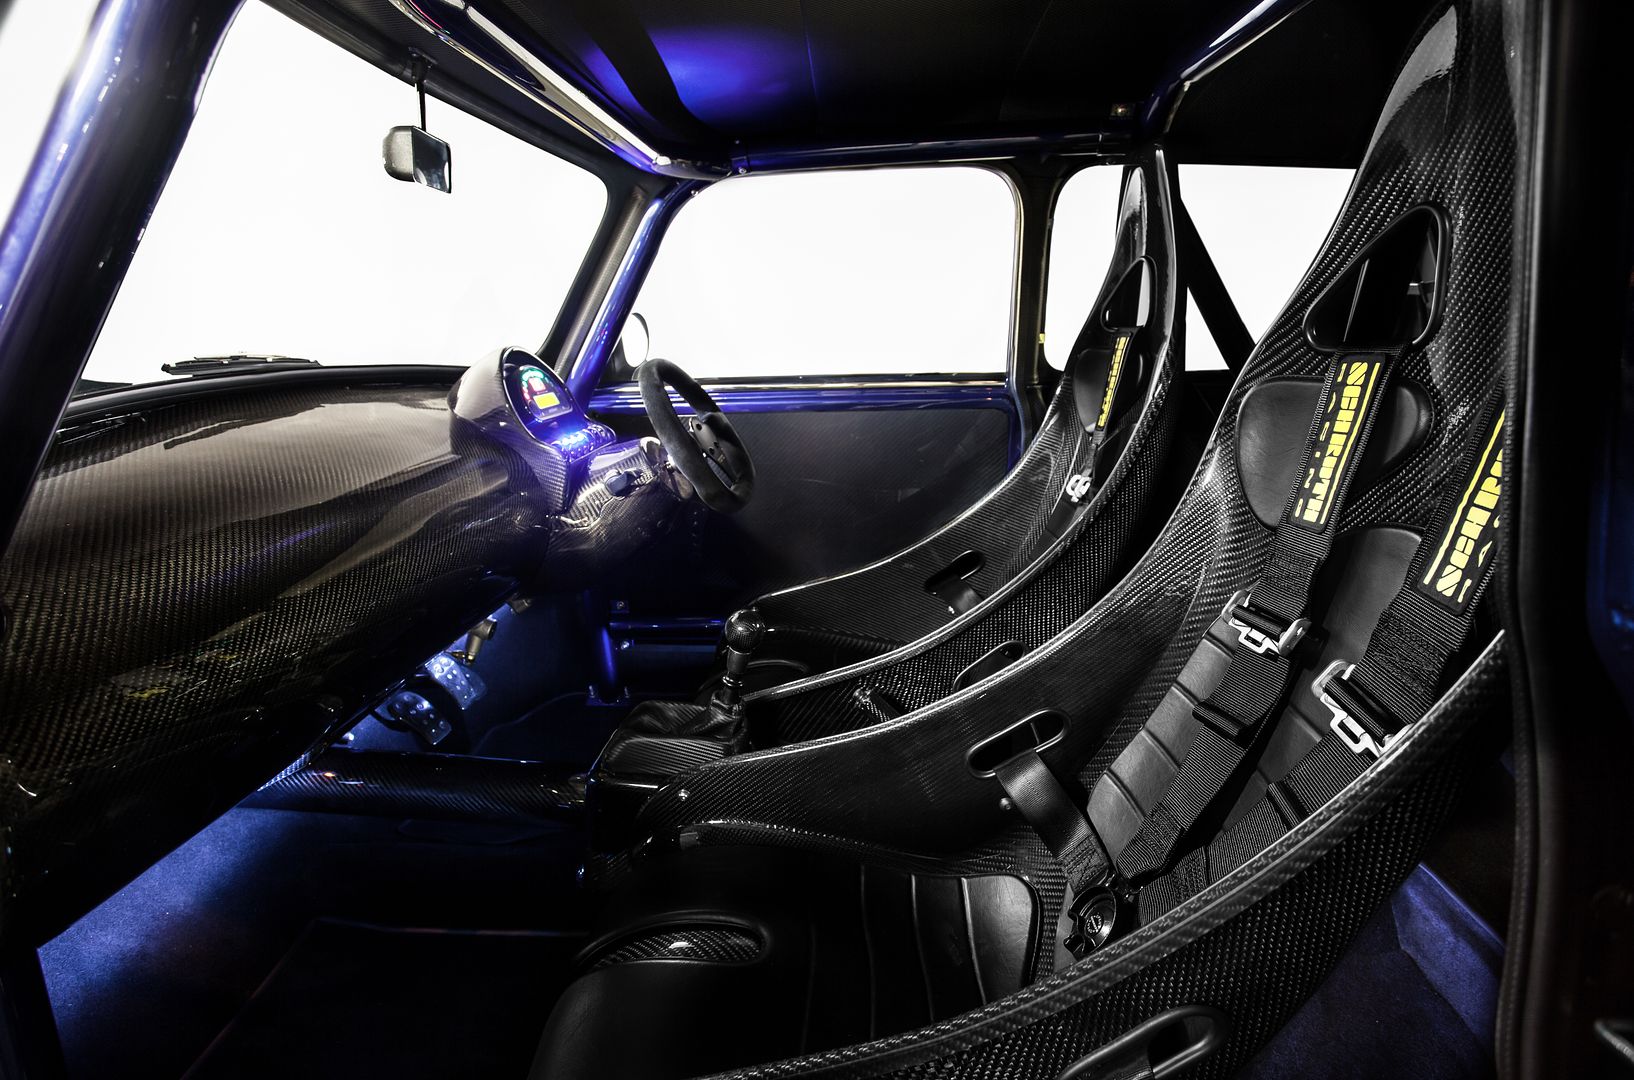
Digi Dash Binnacle/Switch Holder
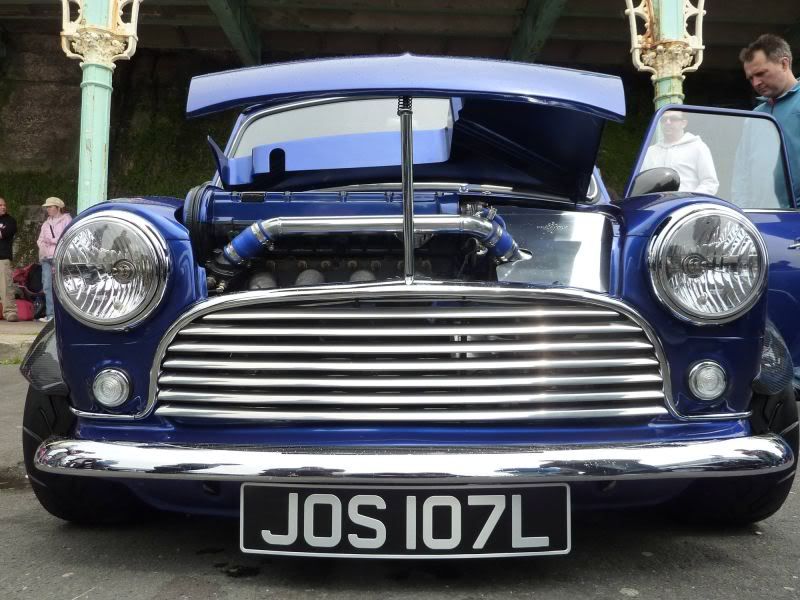
We wanted a modern Digi Dash to give us all the modern accurate readings we needed, plus we still needed switches to activate the electrics, so the ETB digi Dash was chosen, it’s got so much on it you wouldn't believe! From this the carbon binnacle was purchase, it came about twice the size that you see in the pics! We spent a few hours then shrinking it down to size to get it as small as possible, and the key here was to keep it at the same angle as the steering wheel, which we did which worked out perfectly. Again Rich insisted on hidden fixings to keep that modern look.
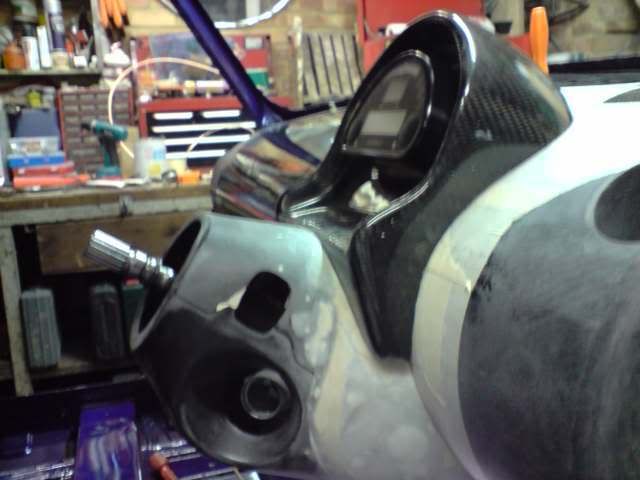
We then mounted the 7 new style mini hoops that separate the 6 switches that operated the Ignition/Horn/Hazzards/Heater/Side Lights/Main Beam. The wipers, Full Beam and indicators were via the TVR stalks on the column as Vauxhall intended.
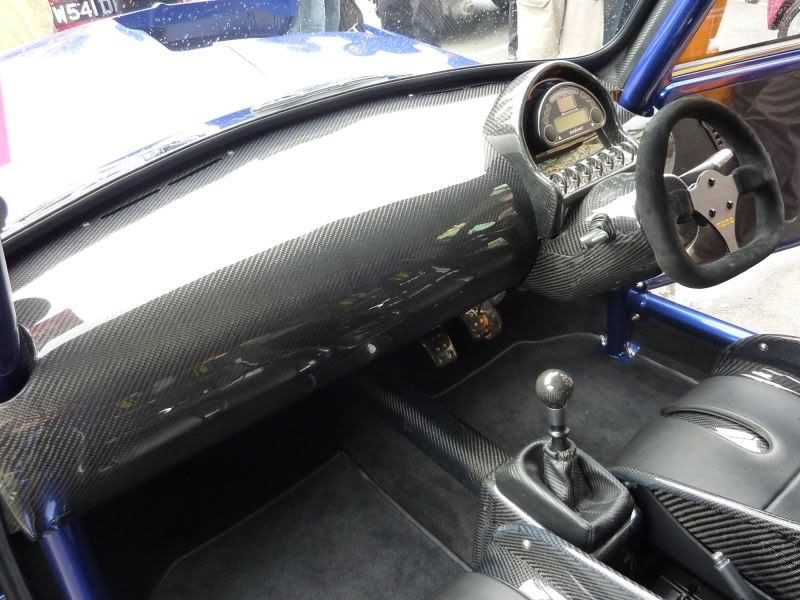
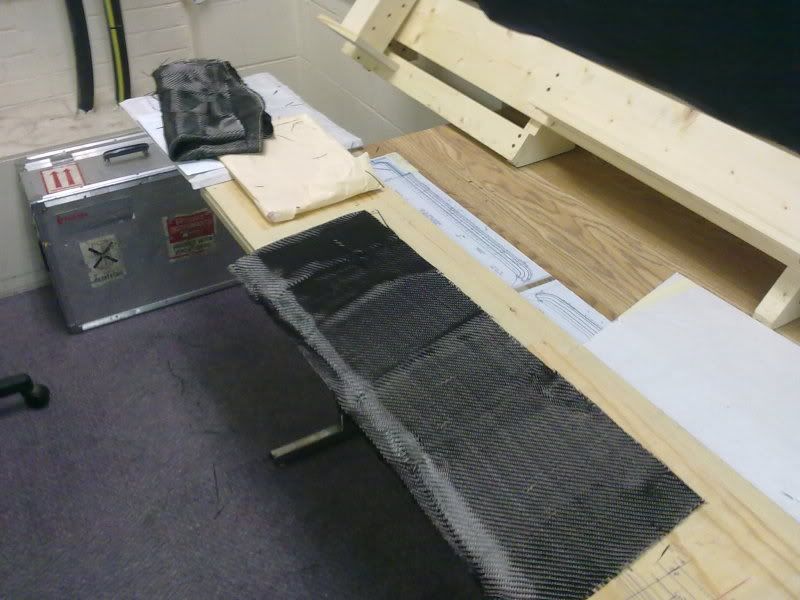
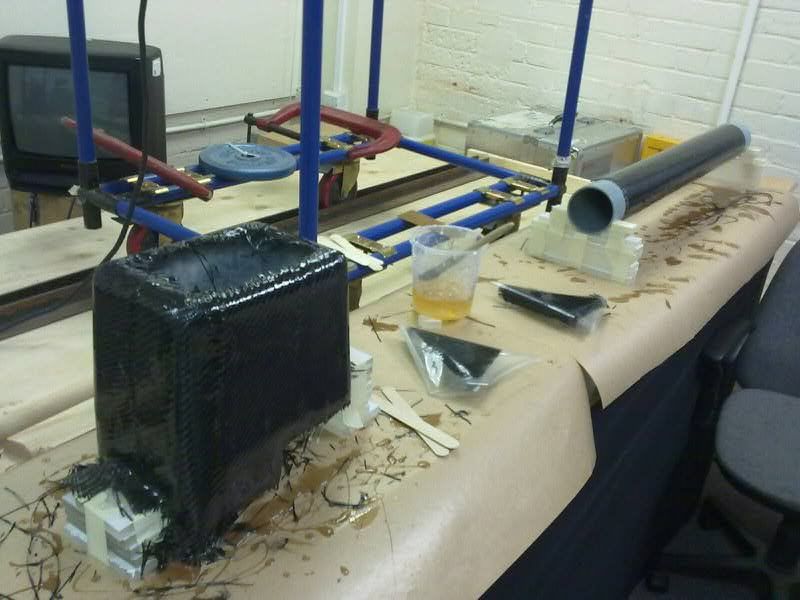
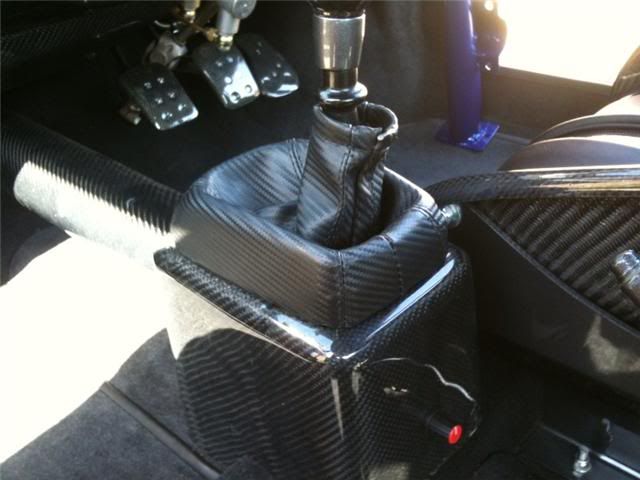
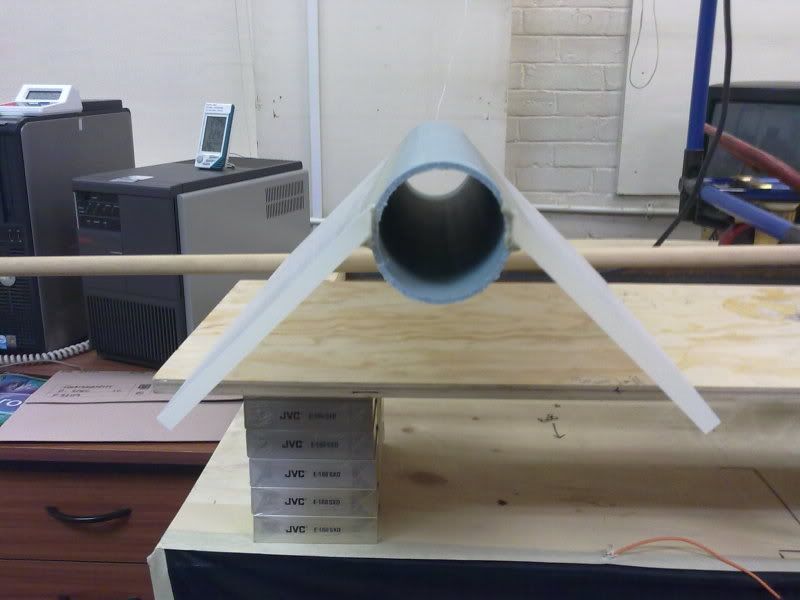
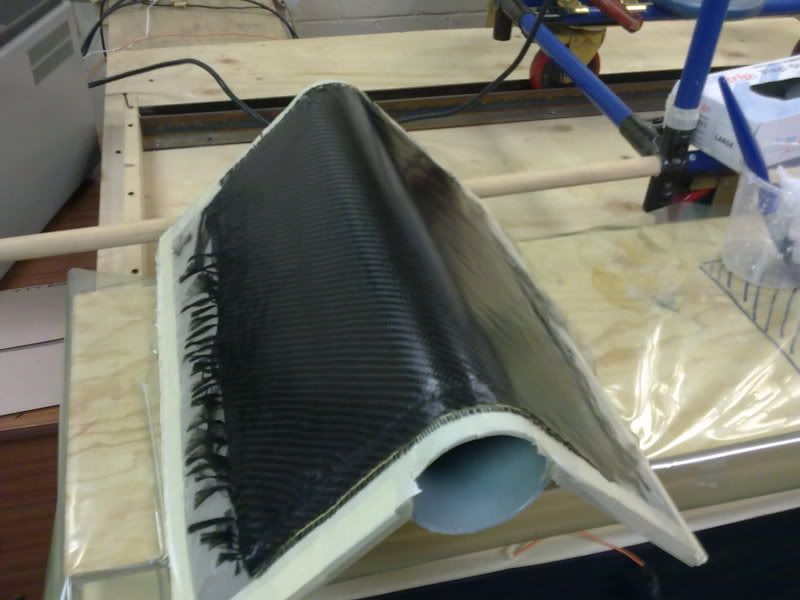
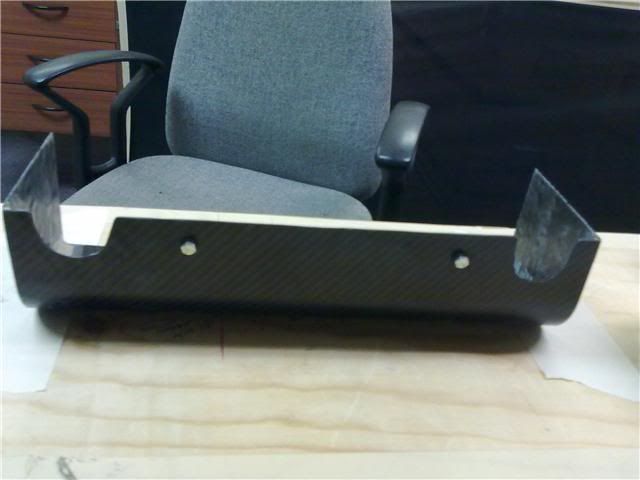
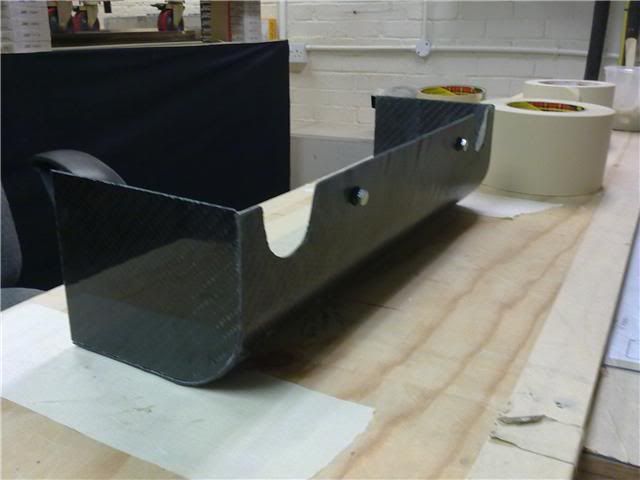
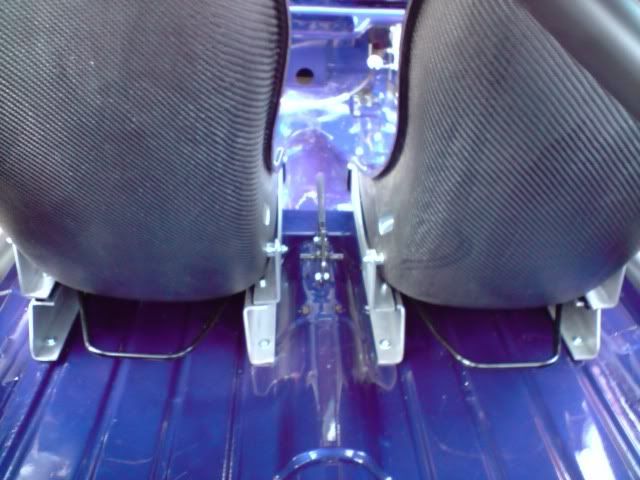
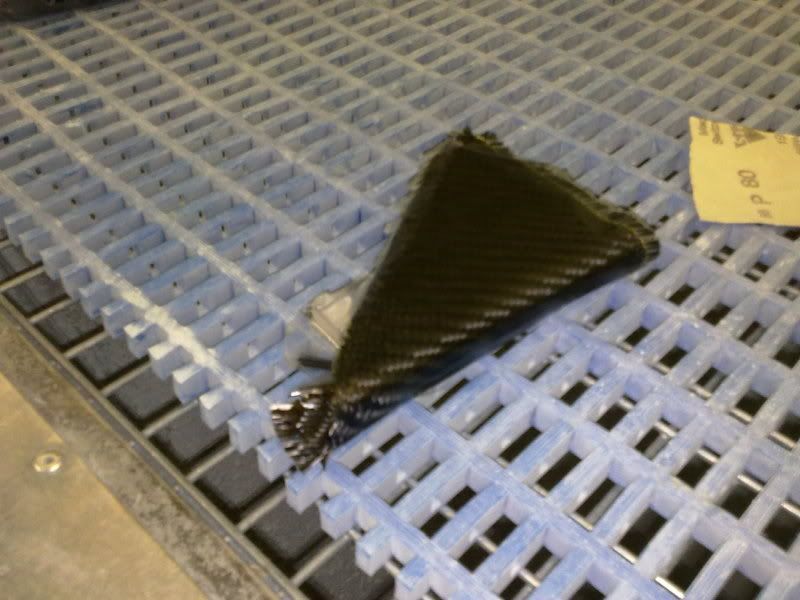
Carbon Gear Lever Surround & Linkage Cover
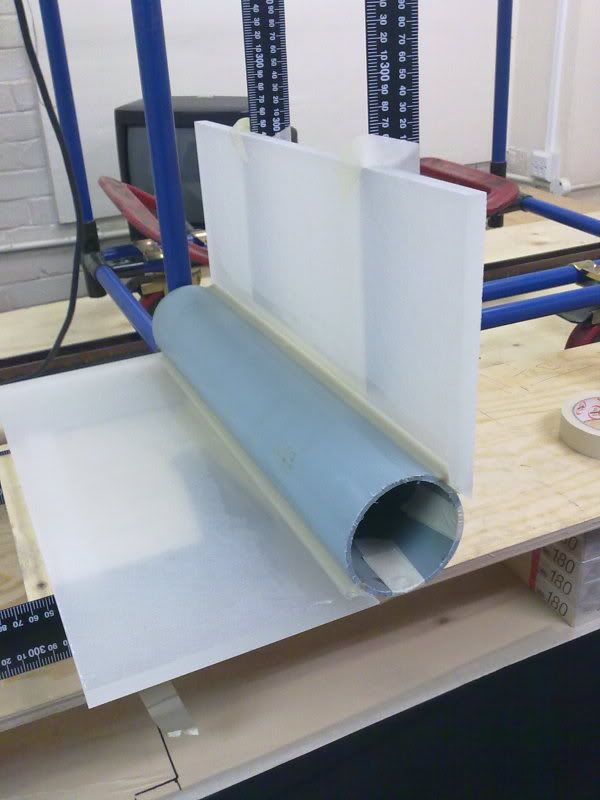
For those of you that know a little about mini XE conversions you'll know that the Vauxhall gear linkage would normally be visible and bolted to the floor with the shortened linkage joining the gearbox and gear lever just floating in mid air.
We knew we wouldn't be happy with this, so Rich got to work and started knocking up some more 1 off Carbon parts.
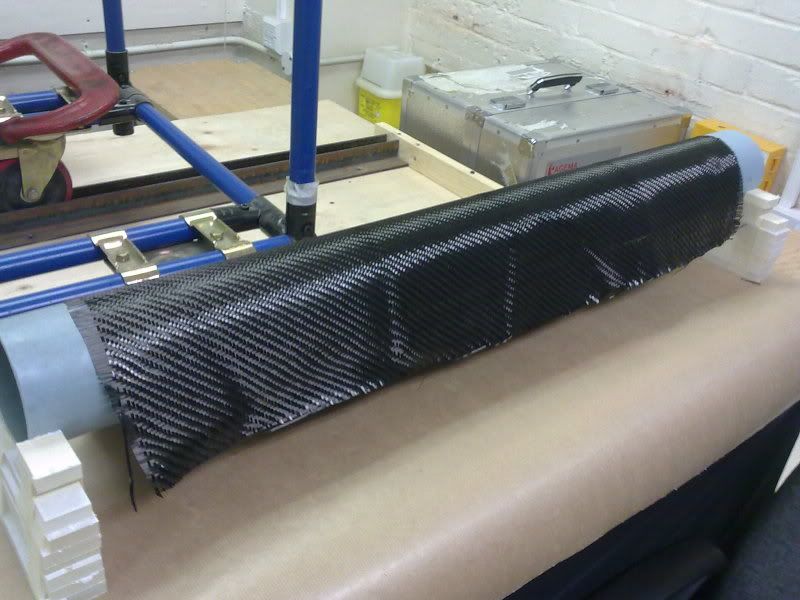
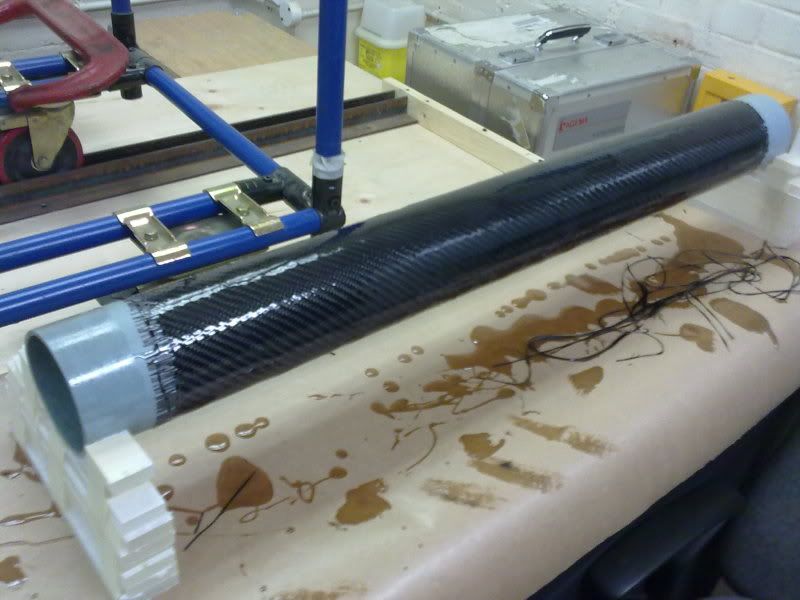
The cover for the gear lever assembly had to fit between the seats, accept the original gear lever gaiter, be a location for the power steering adjuster and have hidden fixings, so this was made from scratch. And the tube that went from this cover to the bulkhead had to sit in mid air with hidden fixings, so Rich used a 80mm pipe as a mould to wrap. Once the resin had cured the pipe was removed. We came up with these.
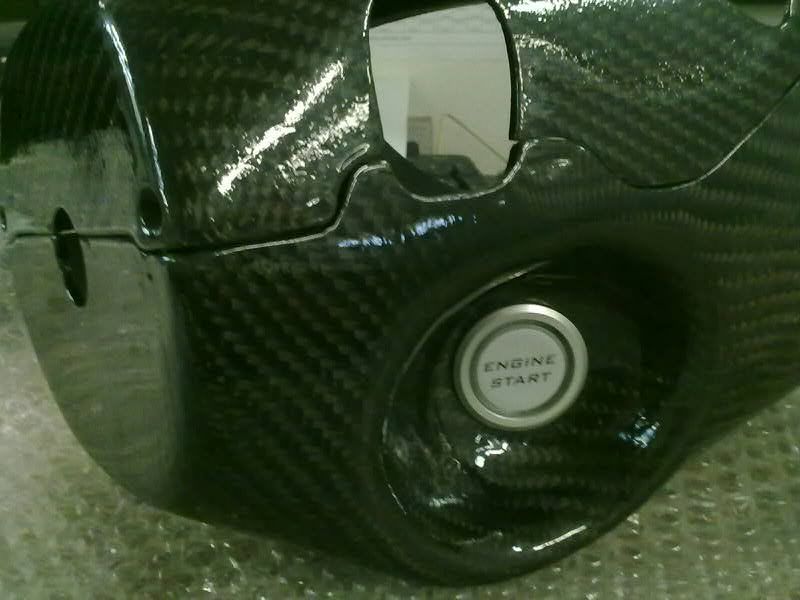
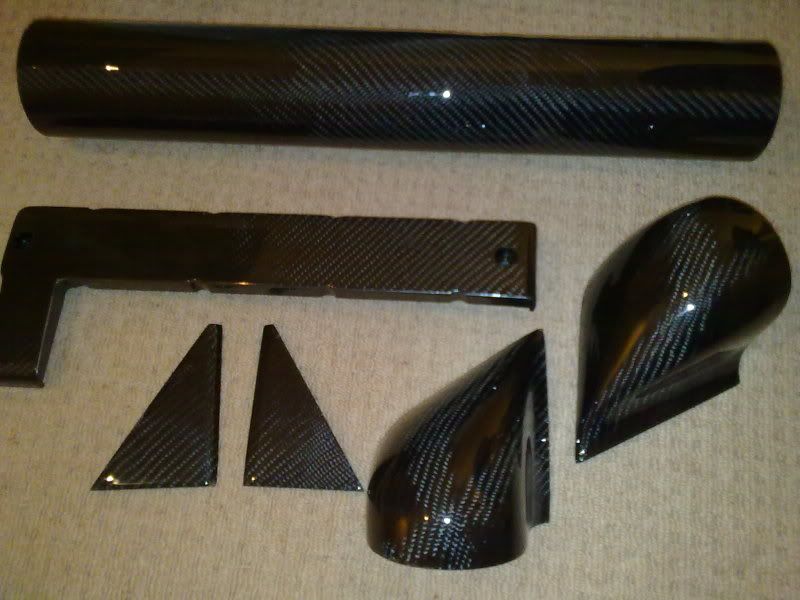
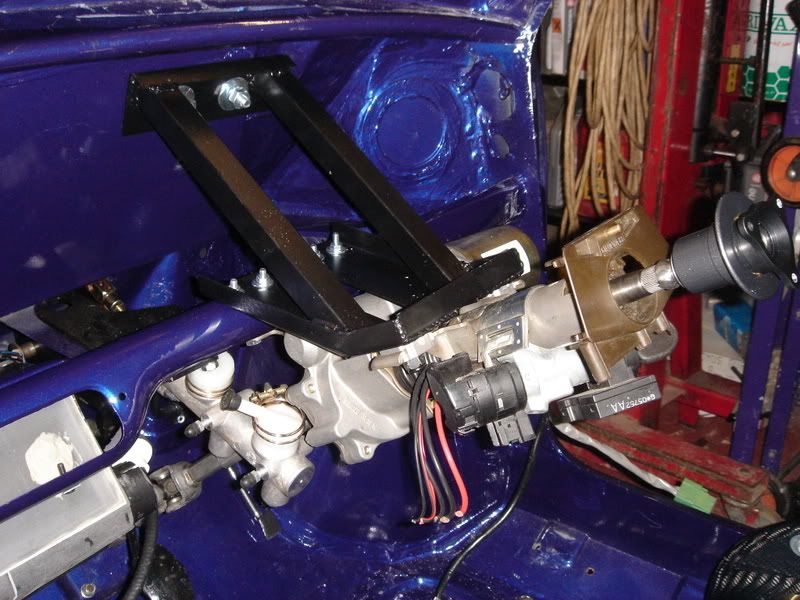
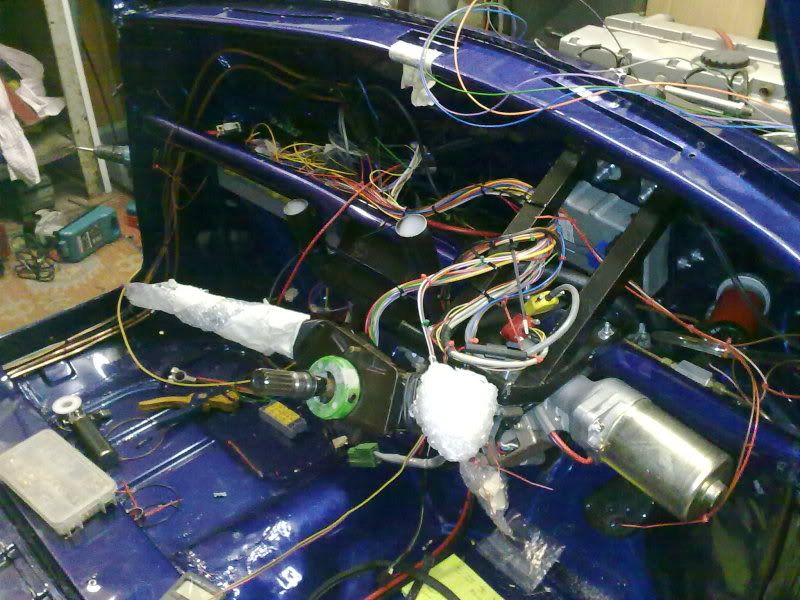
Carbon Steering Column Cover
As we were using Vauxhall Corsa C power steering, it was obvious to start life using the Corsa steering column shroud, but it didn't fit too good.
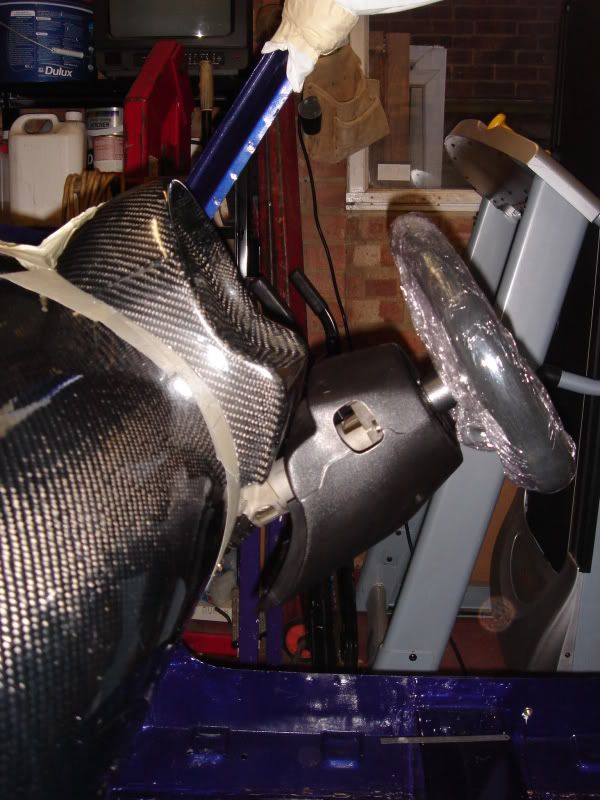
So again, rich had to get creative. So after numerous hours of playing and inventing, he came up with this.
But for us to be able to keep it useable, it had to be able to be removed, so we kept the original fixings and how it splits.
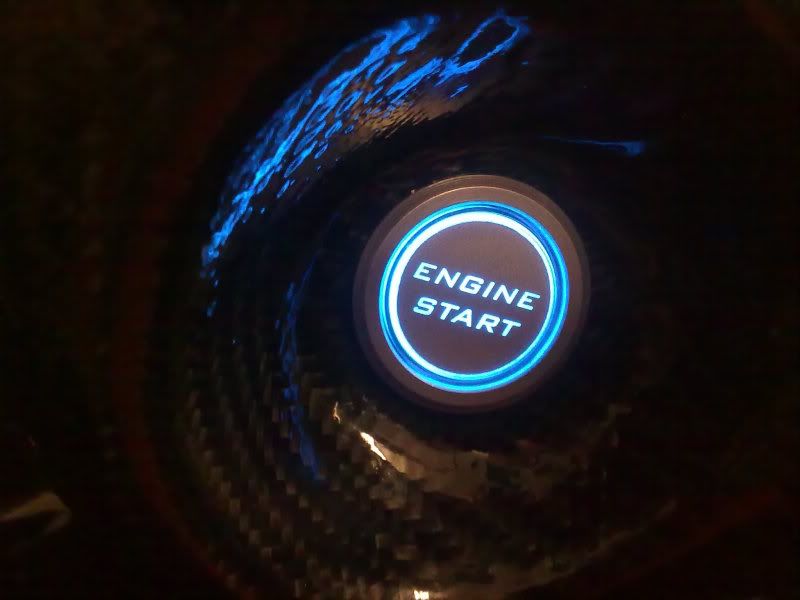
Then the area around the column had to be shrunk down do to the removable steering wheel, and also the addition of the push button start that replaced the key had to be blanked off.
Then the Carbon made another appearance and hey presto.
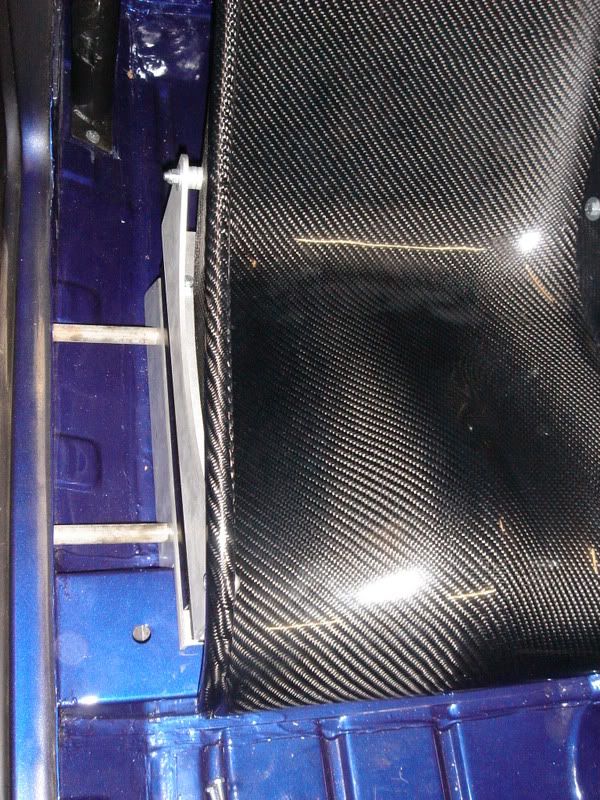
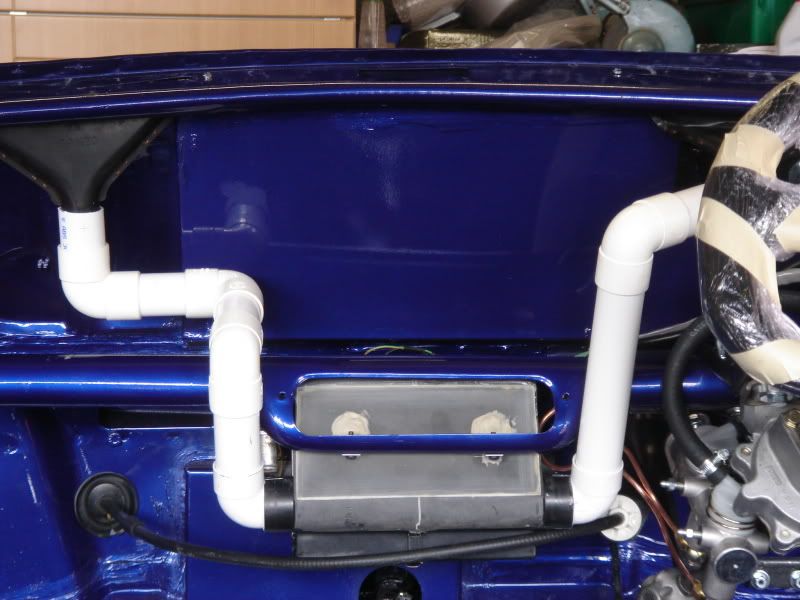
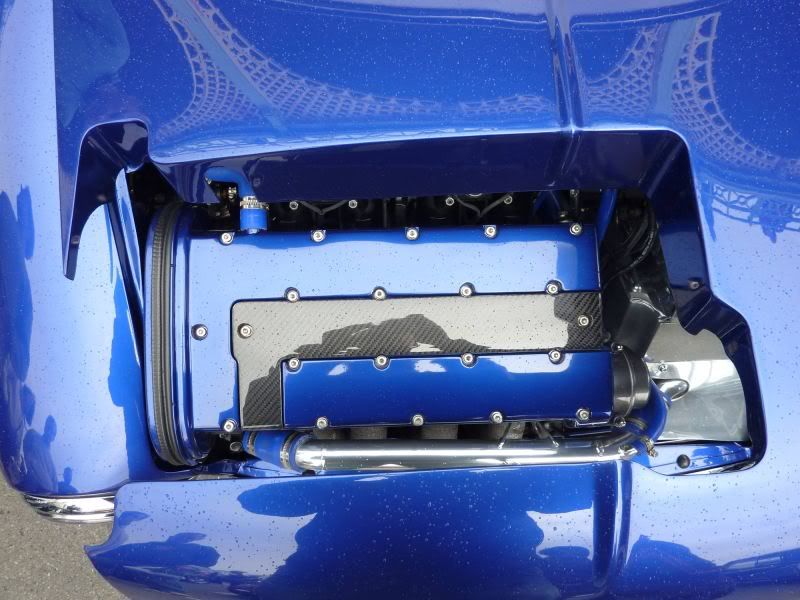
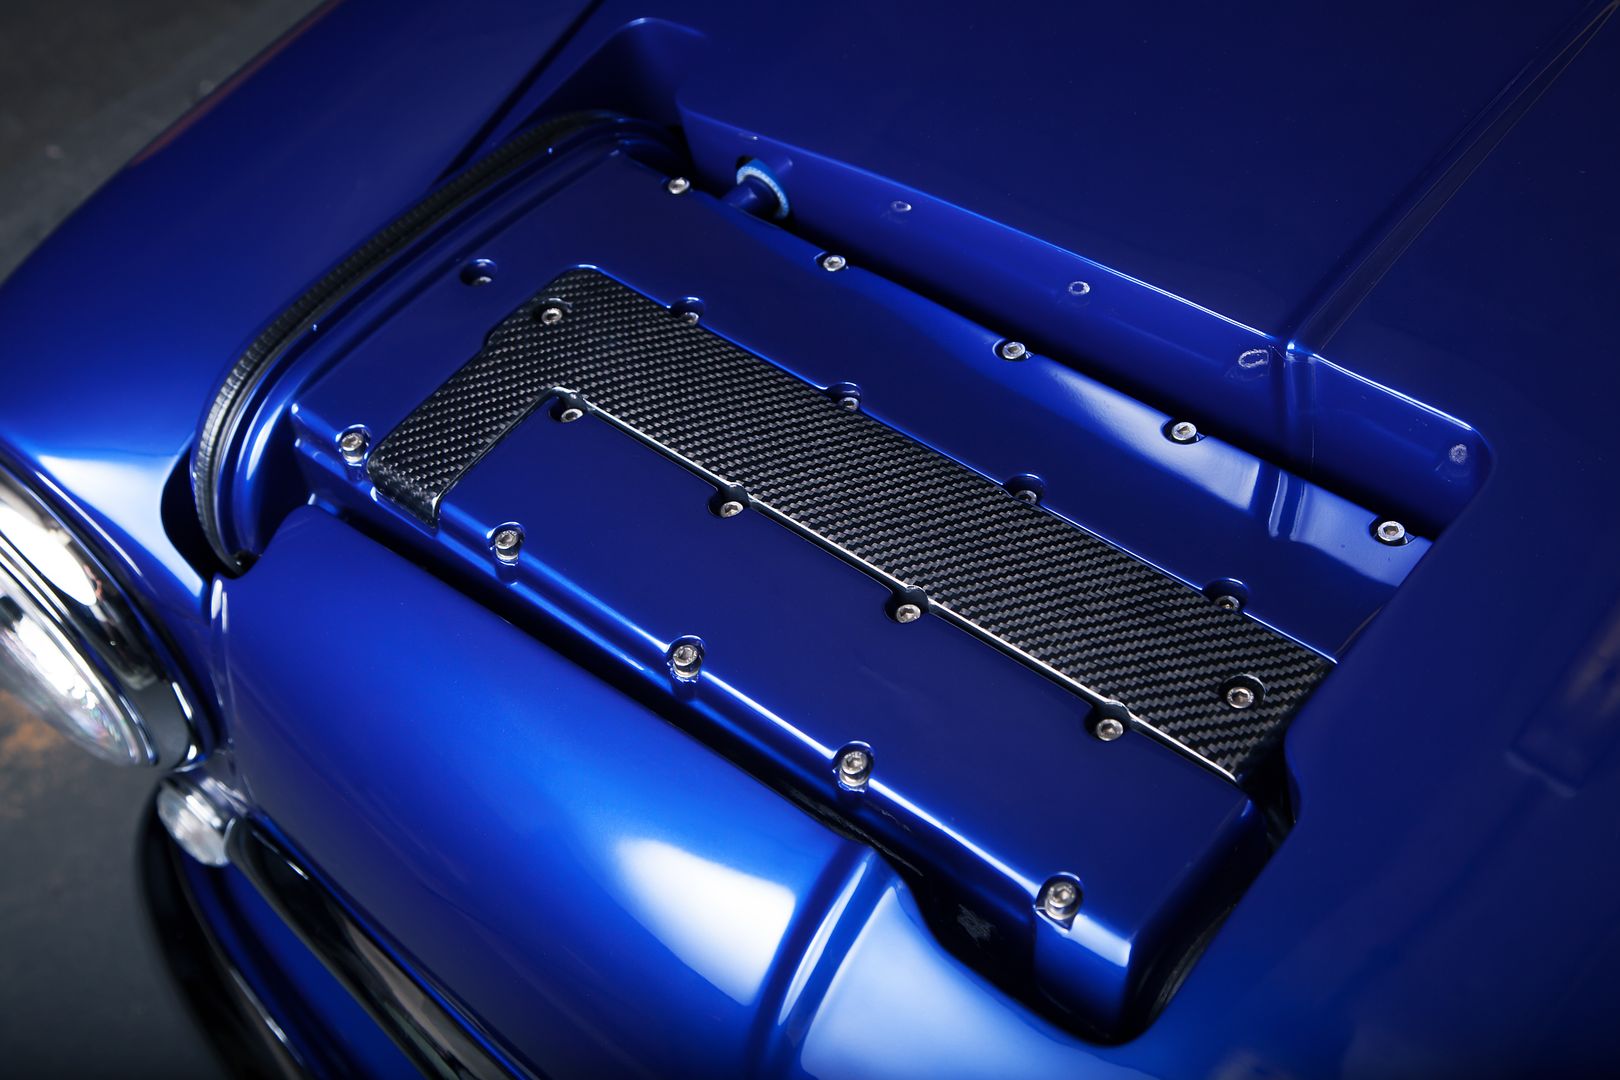
Carbon Heater Cover
With the newly positioned heater, as much as we tried to get it right up under the dash, you could just see the bottom of it, this wasn't acceptable. Also to keep the clutch cable with a smooth operation it looped around in front of the heater, so all this needed hiding. Rich knocked up a cover to sort this out, again out of carbon.
After making a 90deg jig with a radius corner.
This was then wrapped in Carbon.
And once cured some sides were made it was then trimmed down, resulting in this.
You can just see it under the dash in this picture.
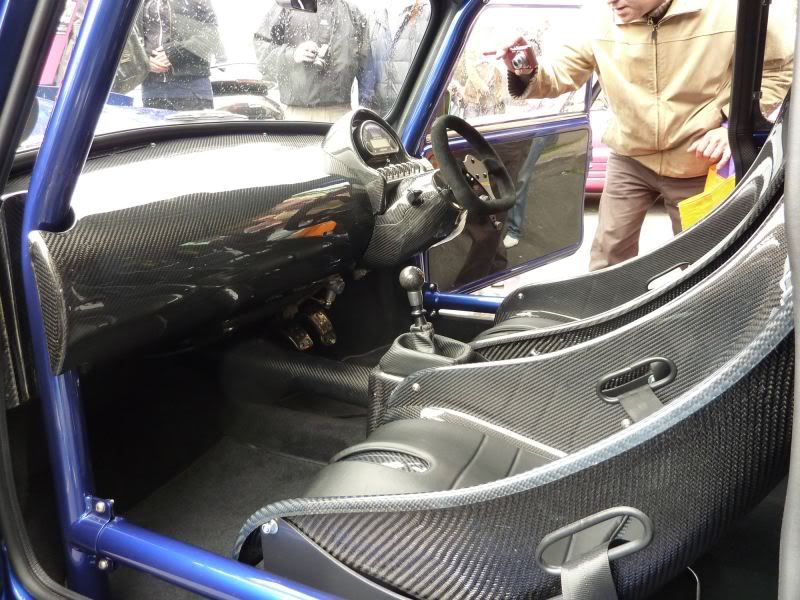
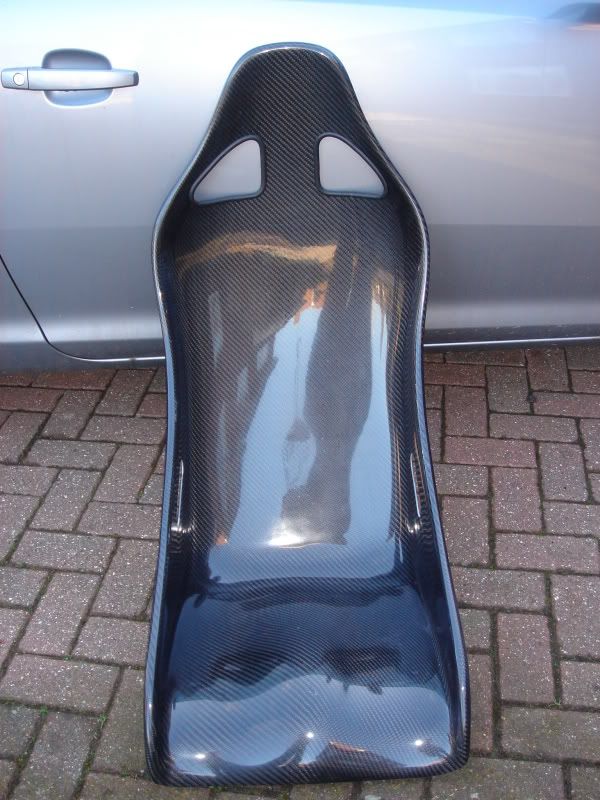
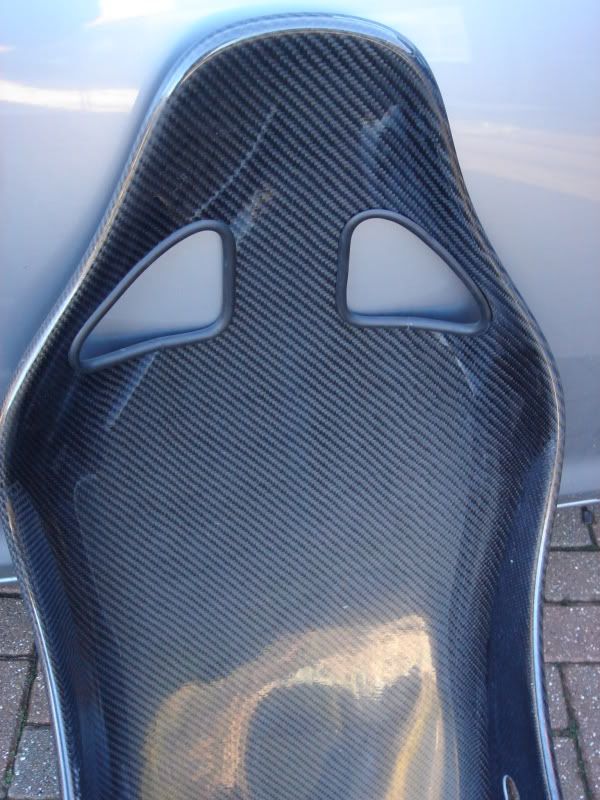
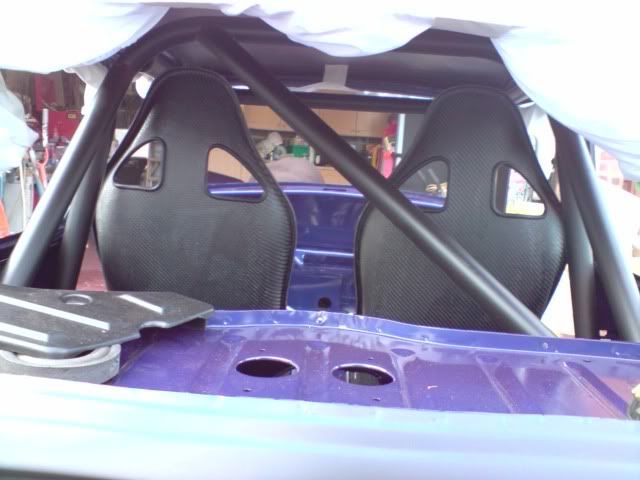
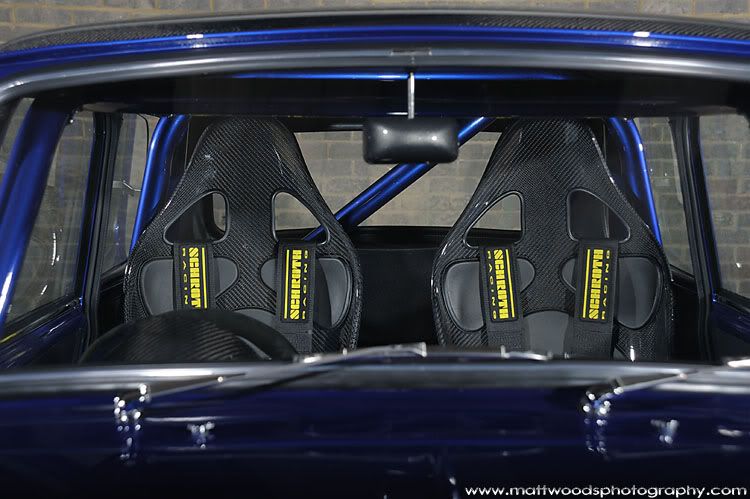
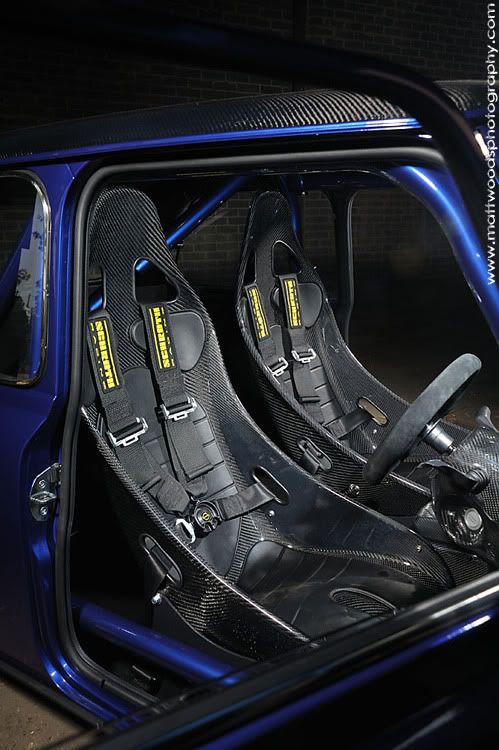
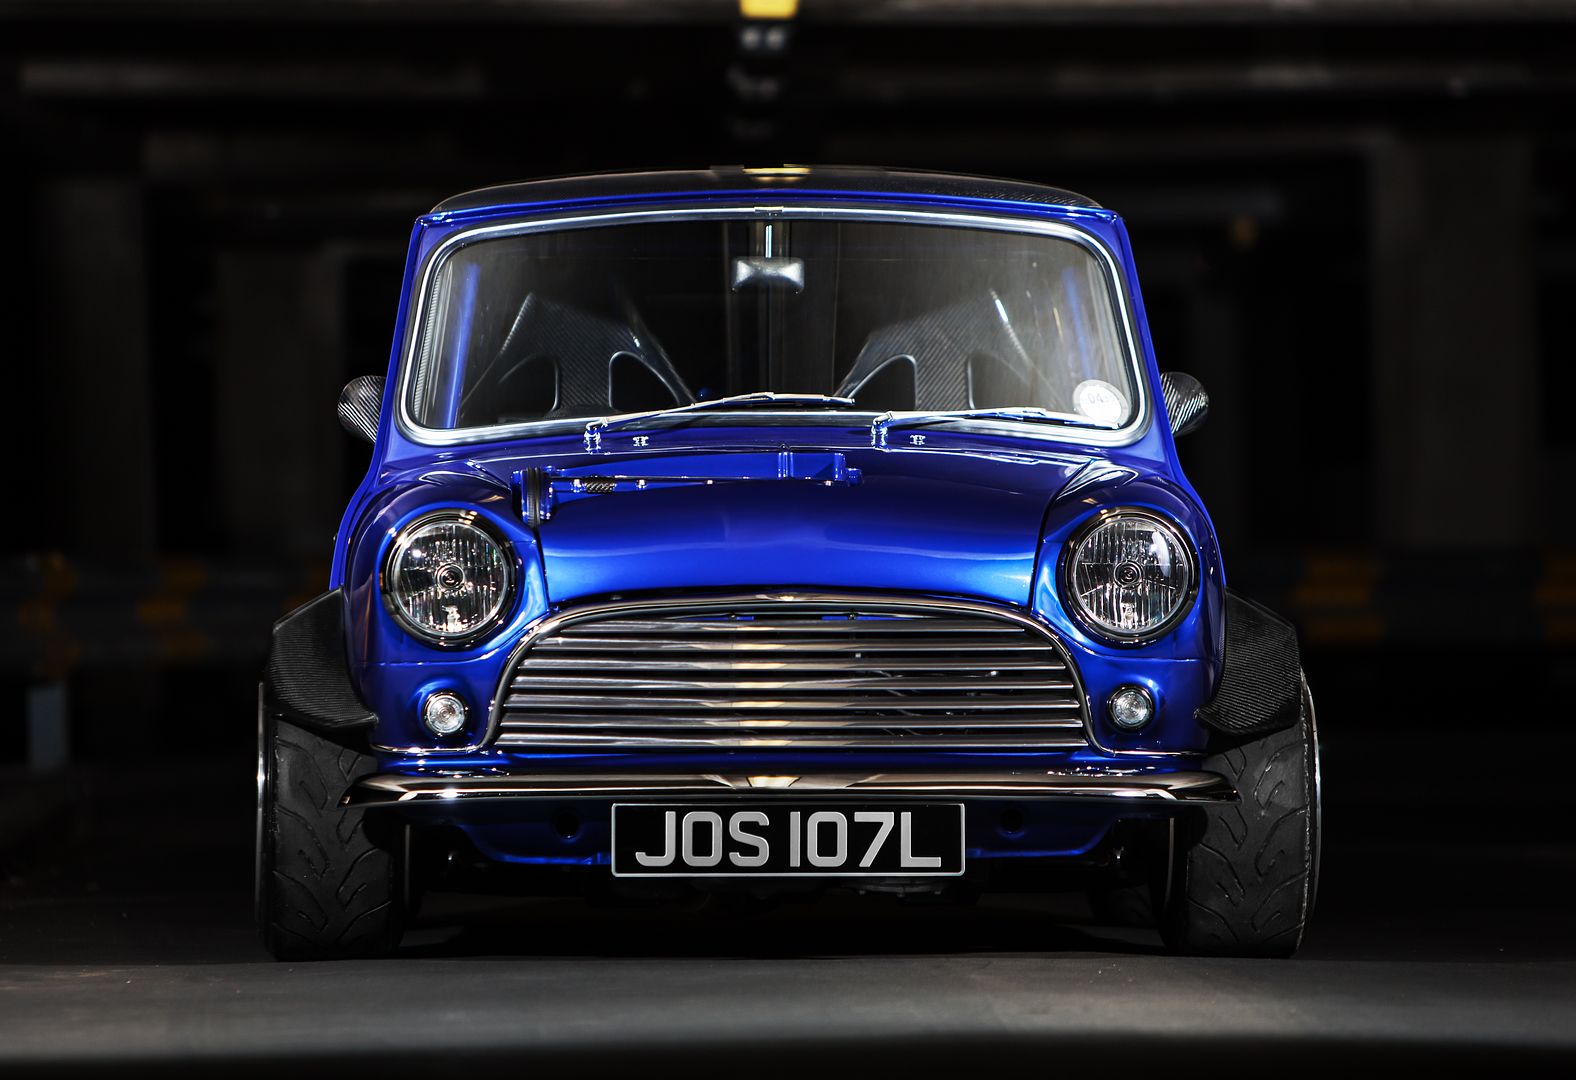
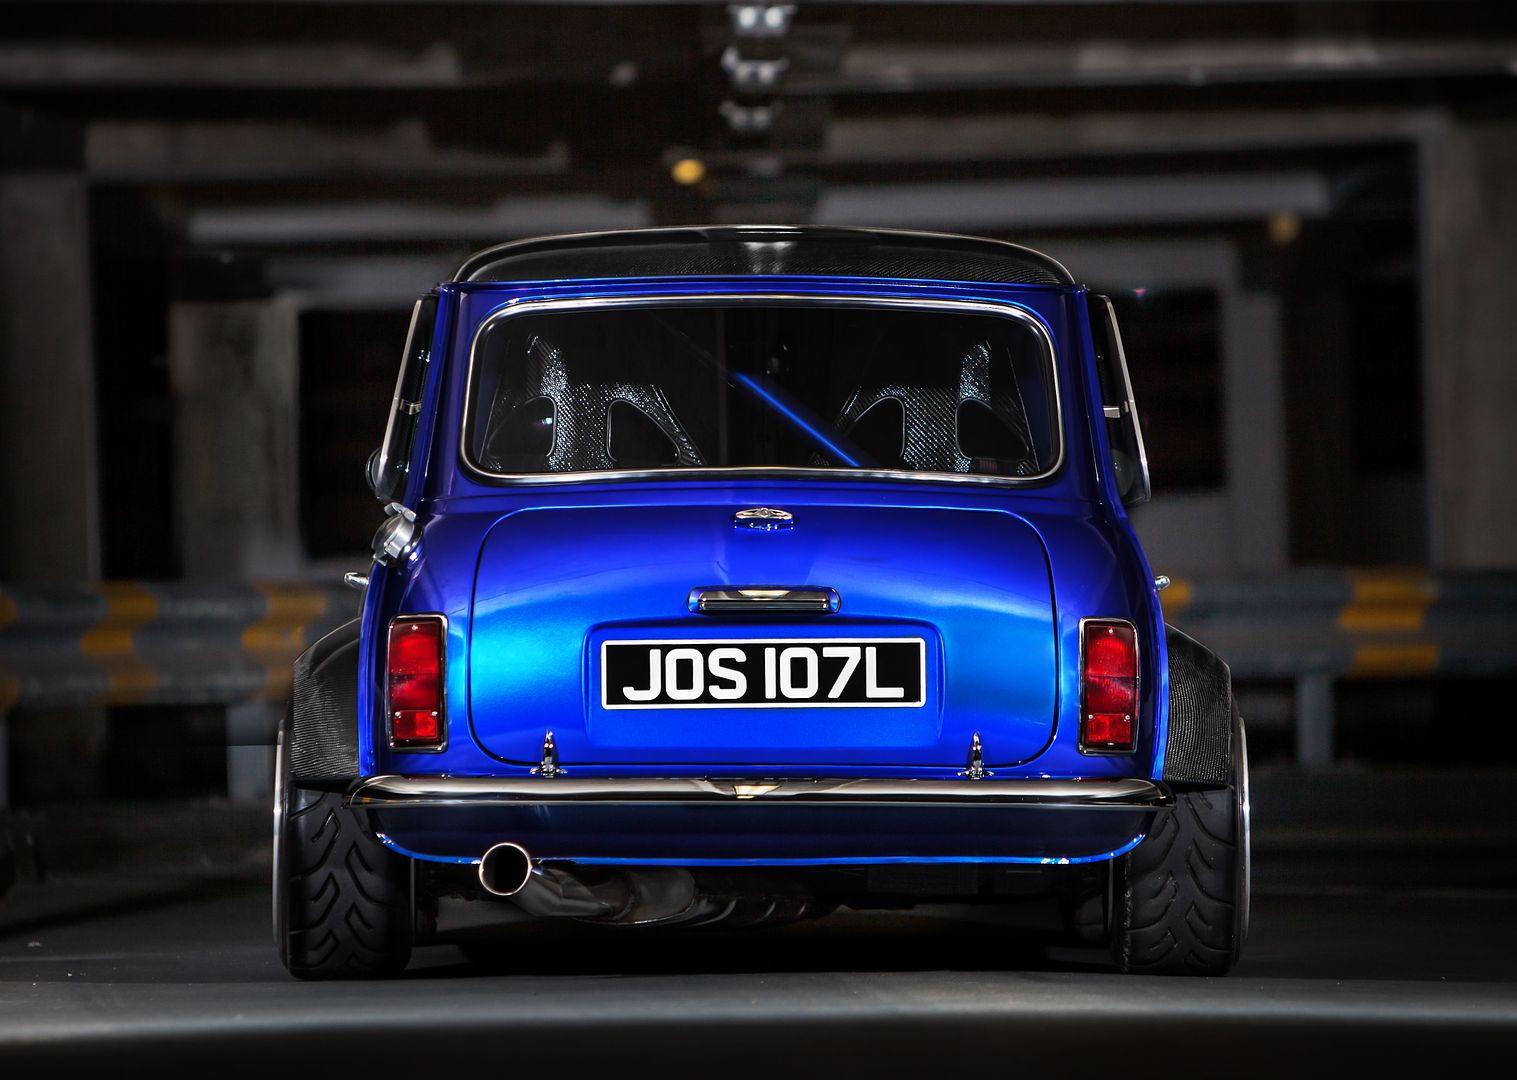
Carbon Seats
With the obvious Carbon theme developing both outside & inside the car, it was only right we tried to source some Carbon seats. This isn't that easy when you look at the size of the car and the space you have to squeeze 2 front seats in. There was never going to be rear seats so the task was on to find 2 front seats.
We came across the chosen seats originally in fibreglass. We loved the style, the size was right, but the finish wasn't. Luckily for Rich, the seats were sourced before the rest of the Carbon work had started so he got away with this particular project! We spoke to people who made the seats if they could do them in Carbon, they said they never had before but they'd be up for giving it a go. The result was stunning.

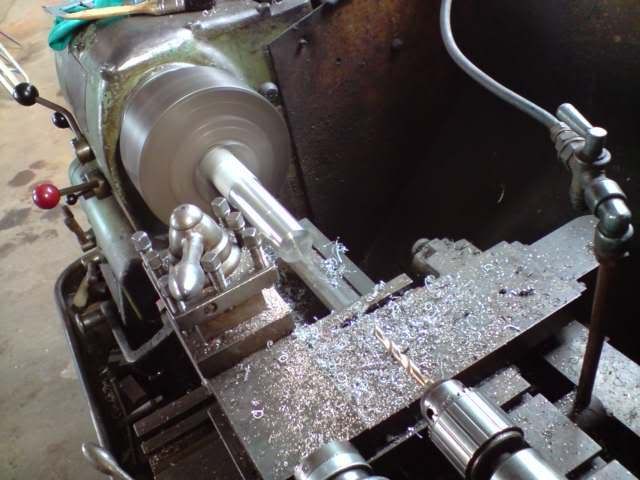
Now the fun was to start to how we'd get them to fit. We bought a set of seat frame supports and a pair of universal runners to get the ball rolling. After 3 of us trying out different seating positions with the new steering and gear lever position and to give rollcage and gear lever cover clearance, we agreed on where they should be. Before we could mount the frames to the seats we needed to make up some small spacers to keep the frames square although the seat tapered off at the back, so Rich done this on a lathe.
Now these were made we got the frames mounted to the seats, the runners mounted to the frames and then decided the final positions to where they would mount to the floor. Once mounted we noticed they were a little wobbly so made up some seat stiffeners to fix the frames to the inner sills. We then mounted the runner adjusters at the back of the seats to keep them tucked away from sight.

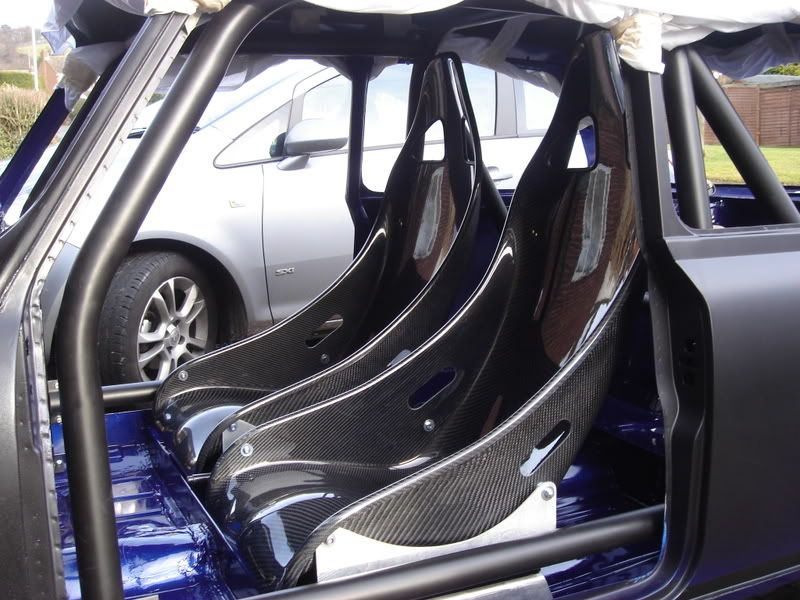
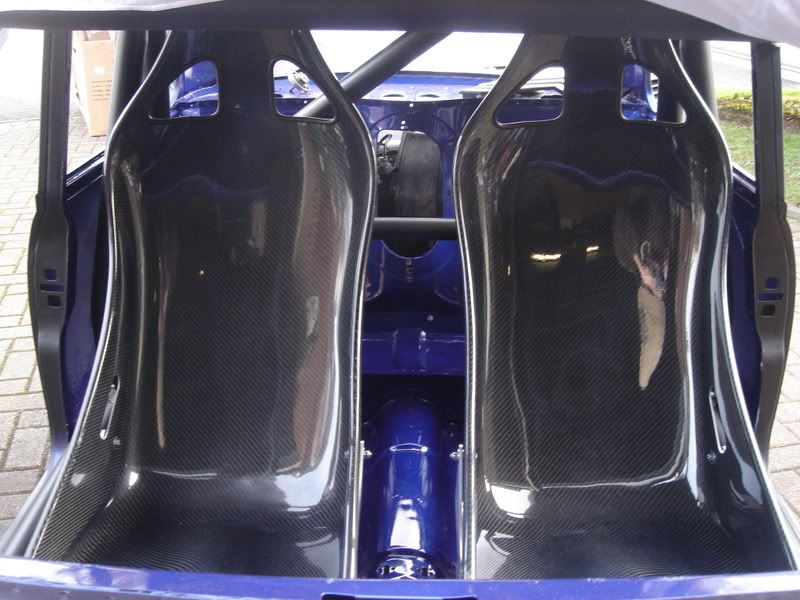
The original thought was to have the seats with no padding on to show off the carbon, but after Lee @ Crash Care Centre had spent a lot of time lacquering both the front and backs of the seats, we decided it was a sensible idea to use the pads provided mainly to stop scratches from clothing but also for comfort. For those who are wondering, the seats are comfy for about an hour, then you start feeling a little numb LOL
The seat frames were finished in the anthracite colour we used throughout the car.
Here they are in the car with the SCHROTH Racing 4 point harnesses.
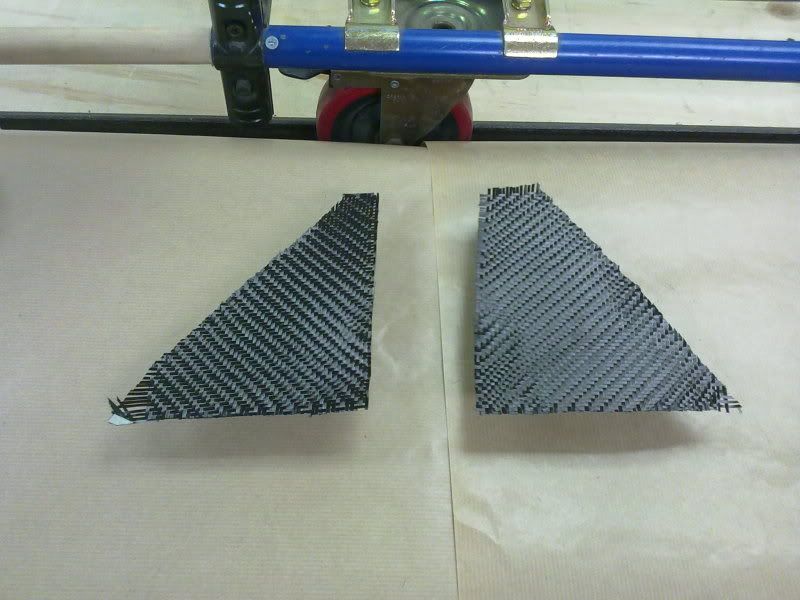
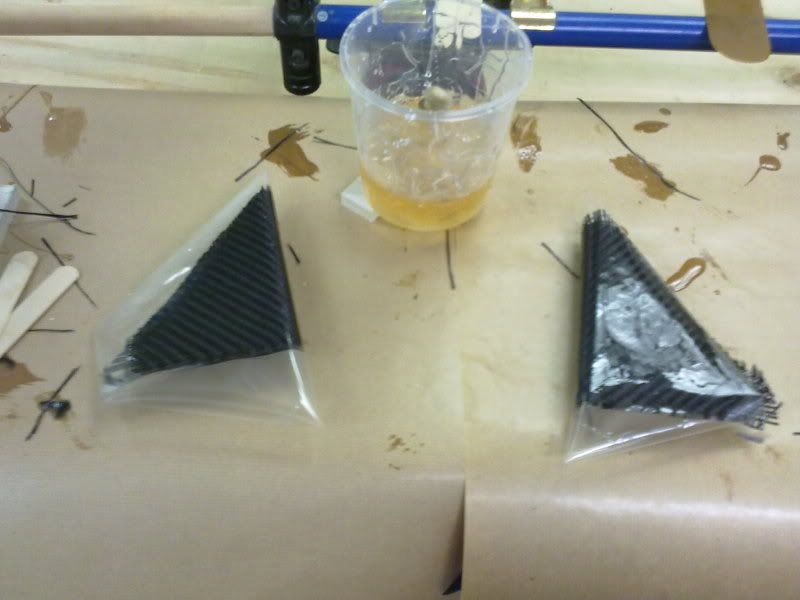
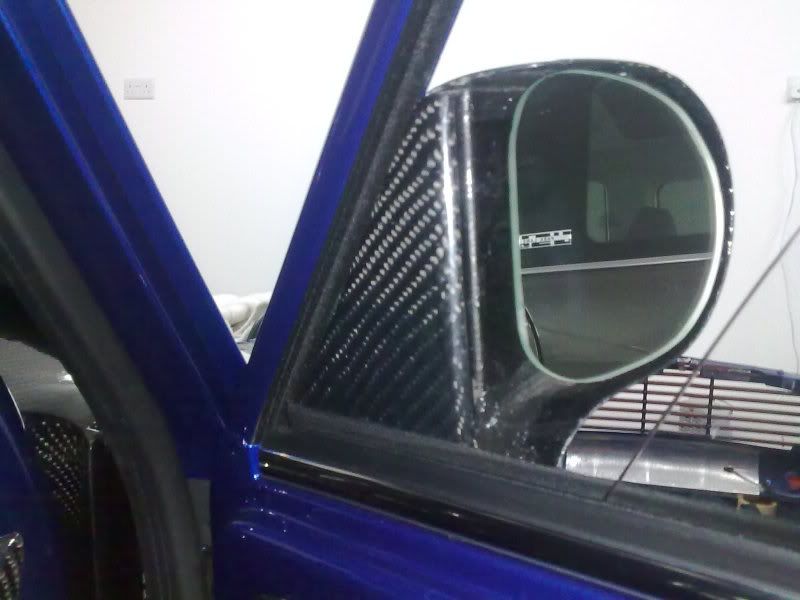
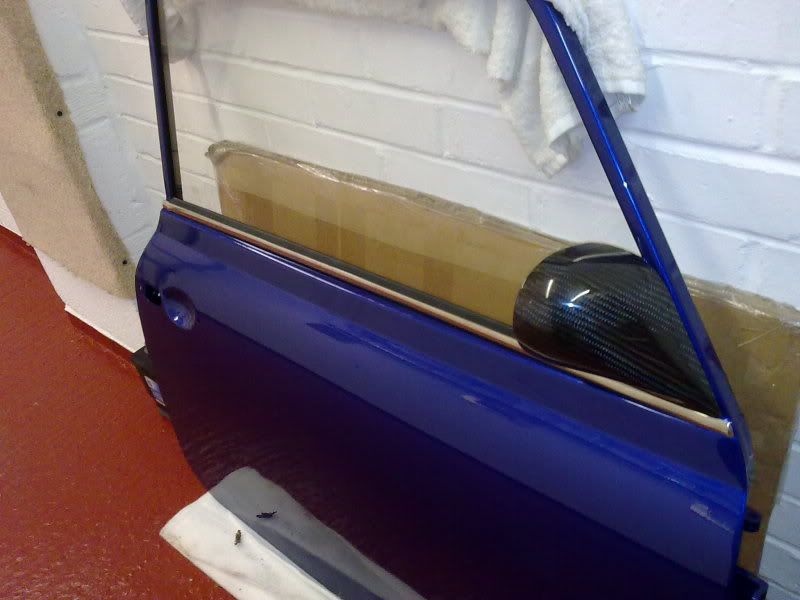
Carbon Mirrors
To continue the Carbon theme outside the car, I wanted some sort of small carbon mirrors. I considered bike or single seater mirrors, but none of them would have looked right. Then i stumbled across these that were designed for mini race cars and knew we could make them work.
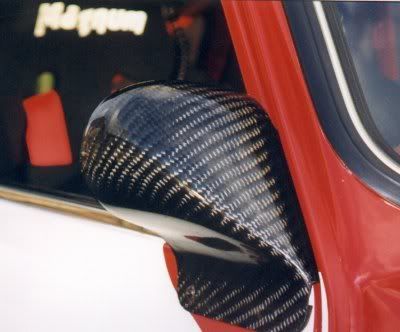
Once we'd had a look at them the questions was asked about the mounting and that there was no way that we'd be screwing them through the door as per the picture. So after a bit of cutting, some new internal hidden fixings and a new panel welded onto the door we ended up with these.
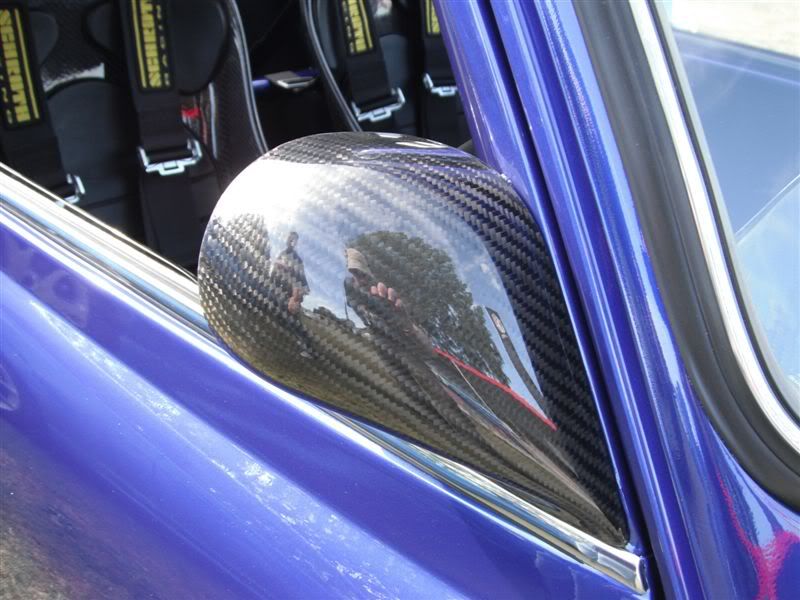
This left the fixings exposed on the inside of the door, so Rich knocked up some Carbon panels as any modern car would have which covered these up.
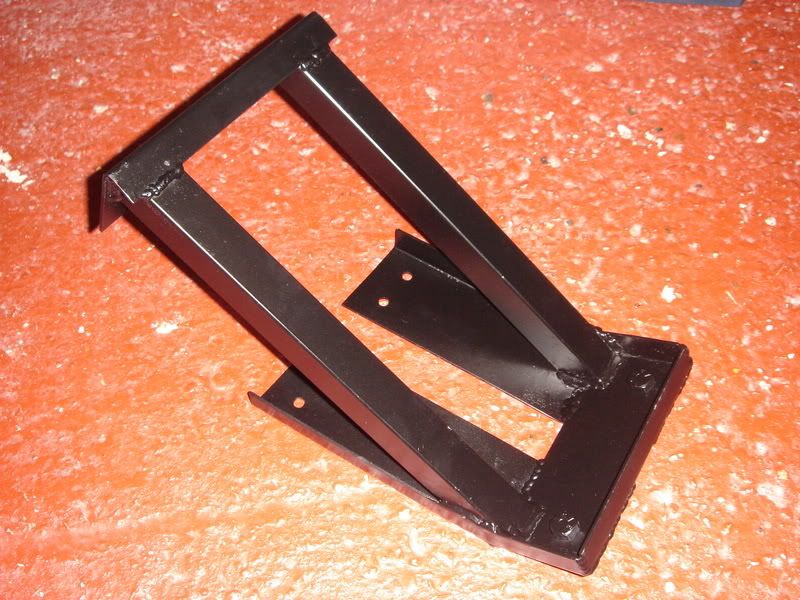
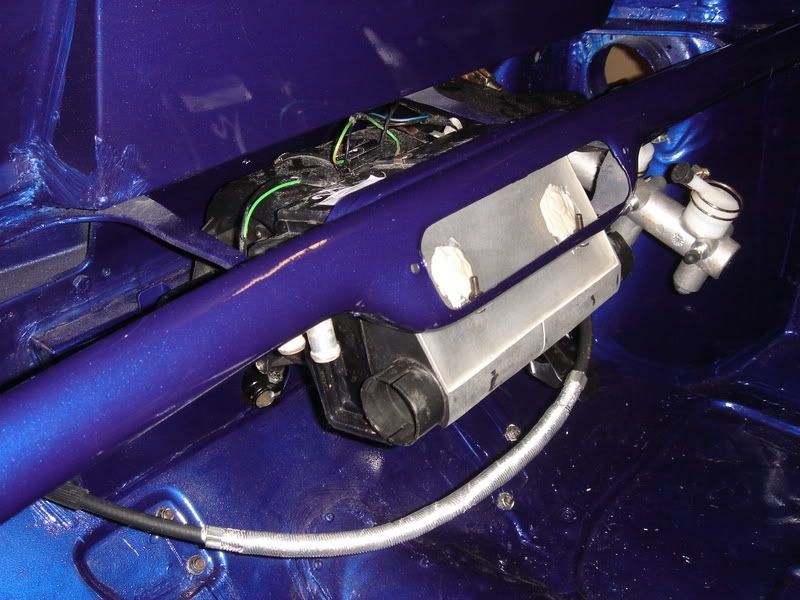
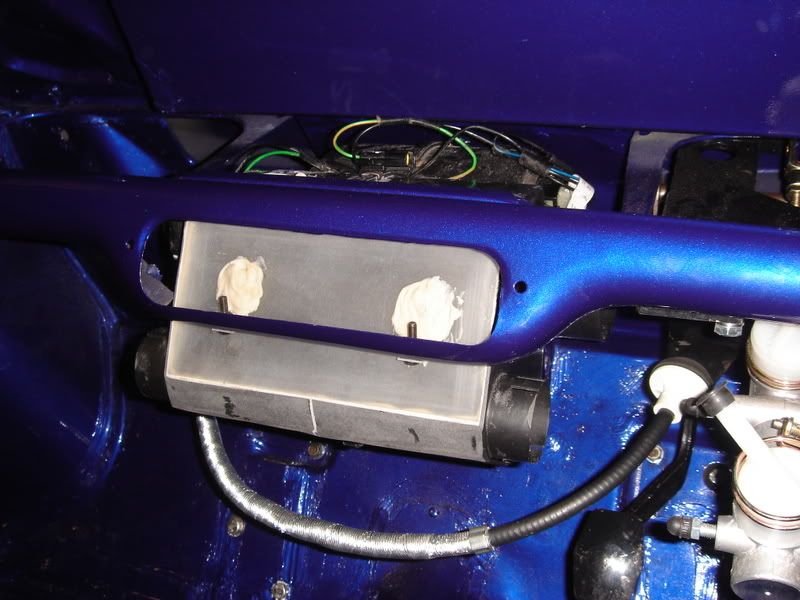
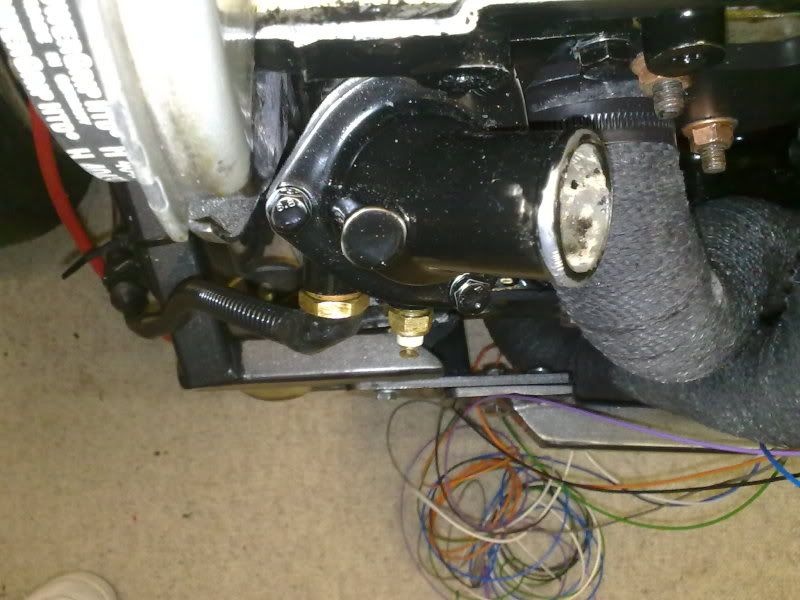
Power Steering
With 8x13 wheels & slammed stance, we knew that the steering was going to be heavy, so from the start we needed a solution. A quick scan across a few forums showed us that people were using a few different power steering options from other vehicles. With the engine being a Vauxhall item we seemed it only right to use the Corsa power steering option, of which we found even then there were a few options. Being Vauxhall boys by trade we knew a little about what was available. Early Corsa B's had pump driven power steering, where as later Corsa B's and all Corsa C's had electric power steering. So after trying both a Corsa B & C item, we opted for the Corsa B as it was lightly shorter which suited our set up better.
We then made a bracket to hold the column that bolted through the bulkhead and onto the standard crossbrace.
We then had the Corsa end welded onto the mini end that connects to the steering rack.
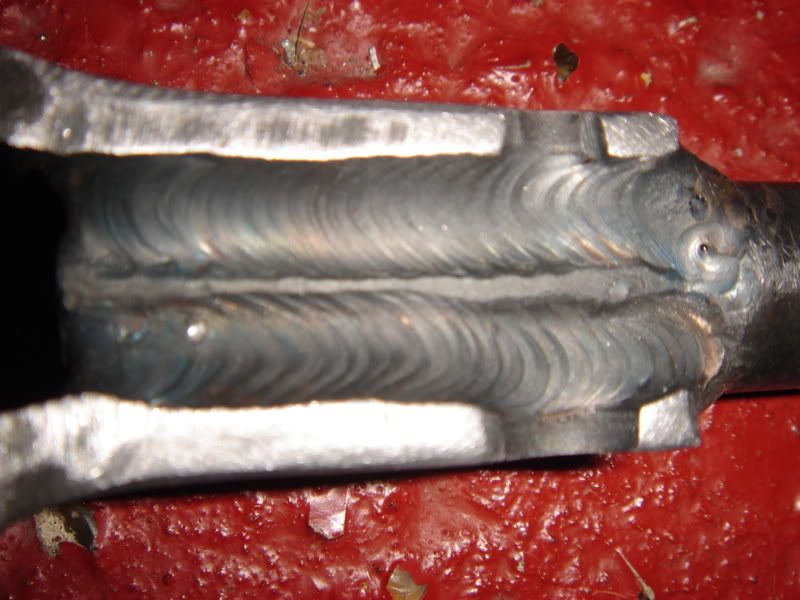
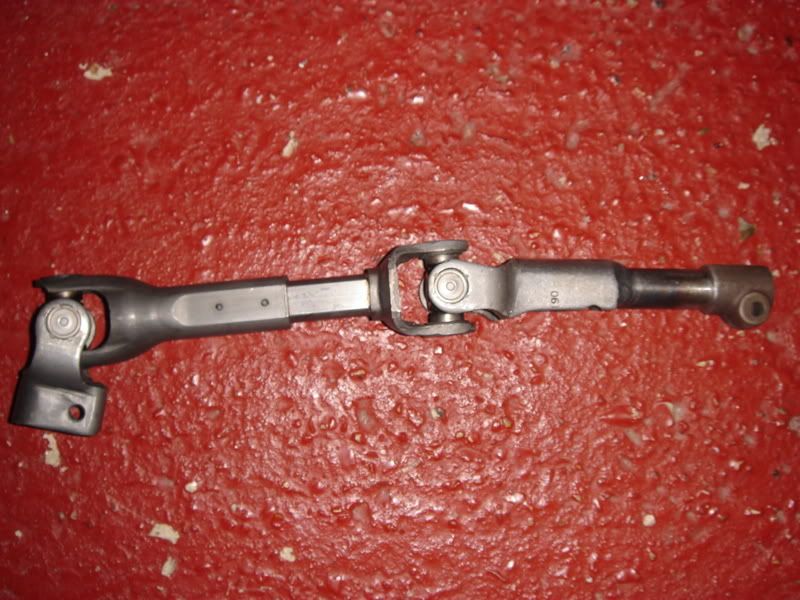
We then added in an adjuster on the back of the gear lever surround to allow us to lighten up the steering for when we were parking.
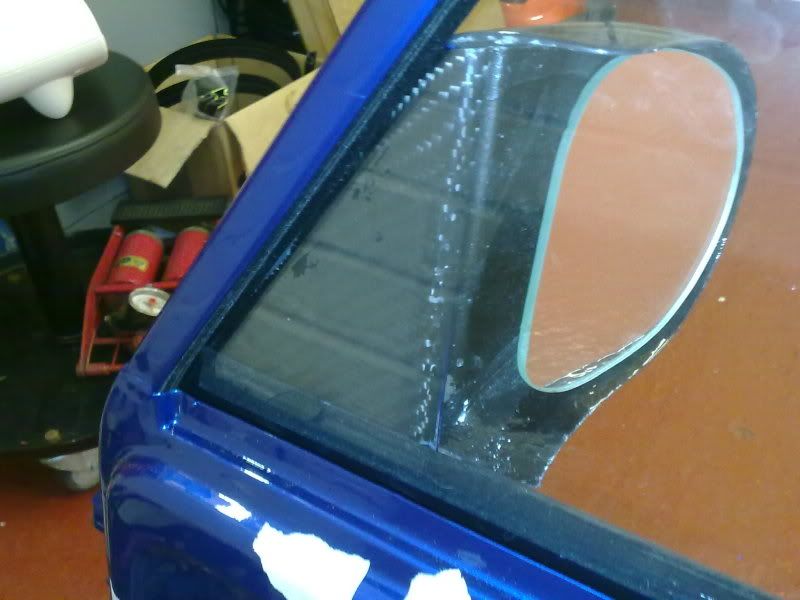
Doors
The doors were new sourced from Minispares. We cut off the upper door card holder on the inside due to the door cards we planned to use, and we had welded in the plates for the mirror mounting, apart from that they were pretty standard.
Once the doors were painted Rich fitted them up at his house away from the madness of the main build, plus he could do them in his own time, or when he came home from helping on the mini!
We decided we wanted minimalistic doors, so no internal door handle or lock, no visible fixings on the door cards, and the window winder and door opener were modified to sit at the same angle (Rich being anal again) and then painted the same anthracite colour as used elsewhere.
New handles, locks, rubbers and chromework were used, the mechanisms are all original but were fully refurbed.
Heater Mods
We knew that the standard heater was never the best. So we worked out if we needed one, and if so how did we want to use it. The conclusion was that yes we wanted one, and a newer 2 speed one at that, we wanted it to be hidden under the dash rather than hanging out the bottom as they are as standard, and it would only ever have to be used to demist the windscreen on a cold morning on the way to a show, or as it turned out in the torrential rain on the way back from L2B!
So we modified the heater so that it only had the blower towards the screen, it was permanently on hot and so that it was either in the 'off' position or 'setting 2'. We also swapped the standard corrugated pipes for a more modern, better sealed system using plumbing pipe, agreed its not the prettiest or most conventional but it allowed us to route the pipes where we wanted, it makes the most of the air available with no leaks, and its all going to be hidden under the dash anyway. This is all controlled from one of the switches on the dash and it works really well.
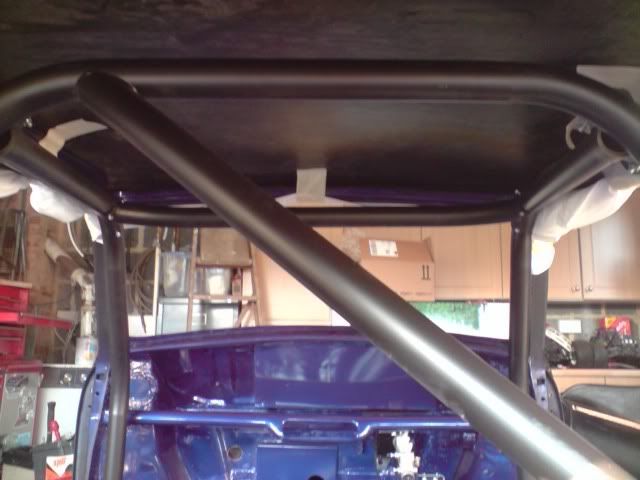
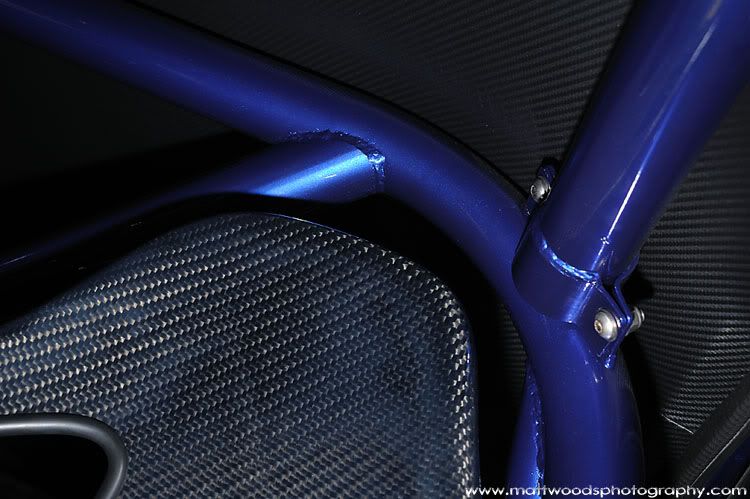
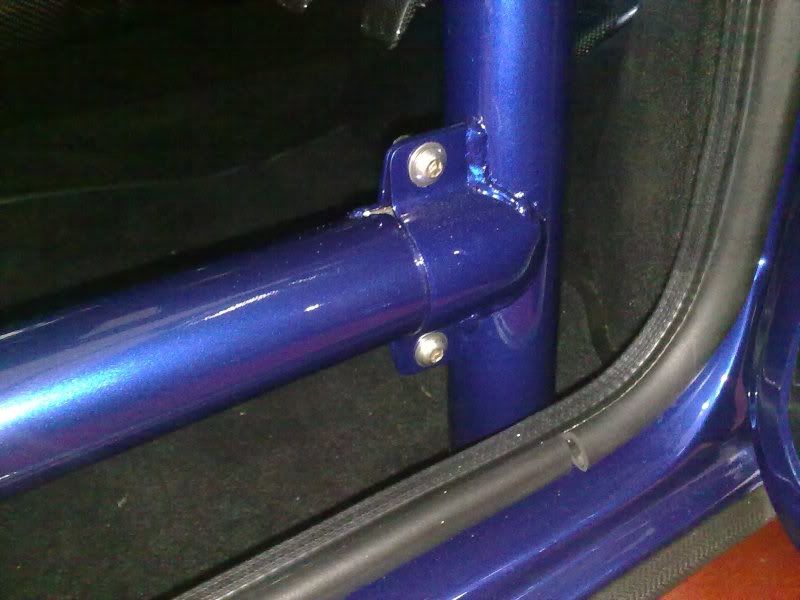
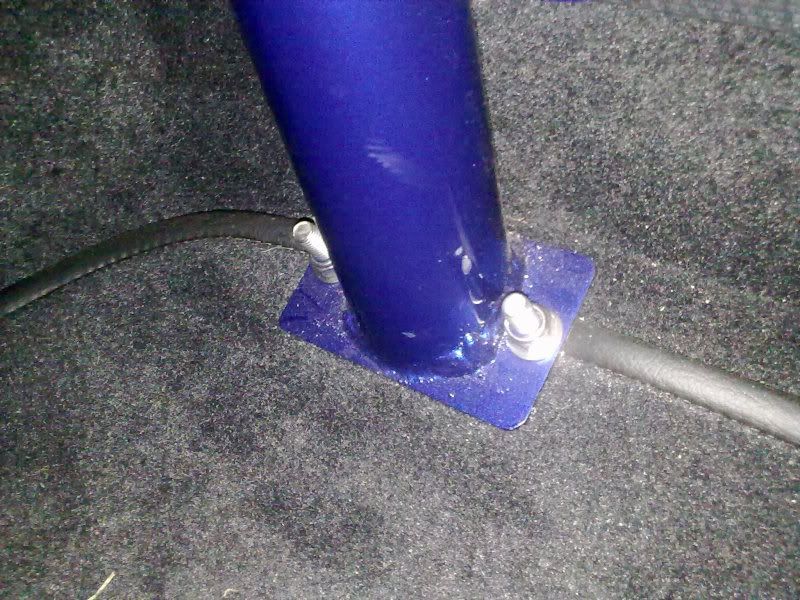
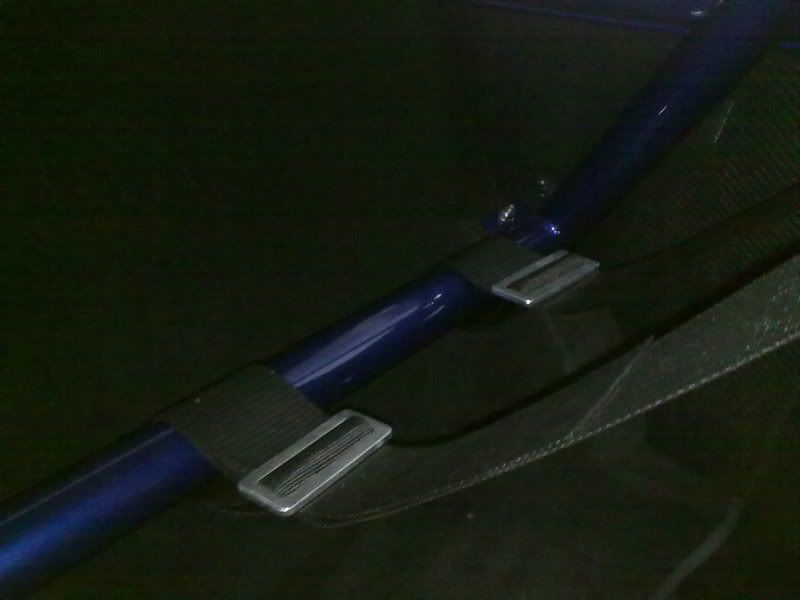
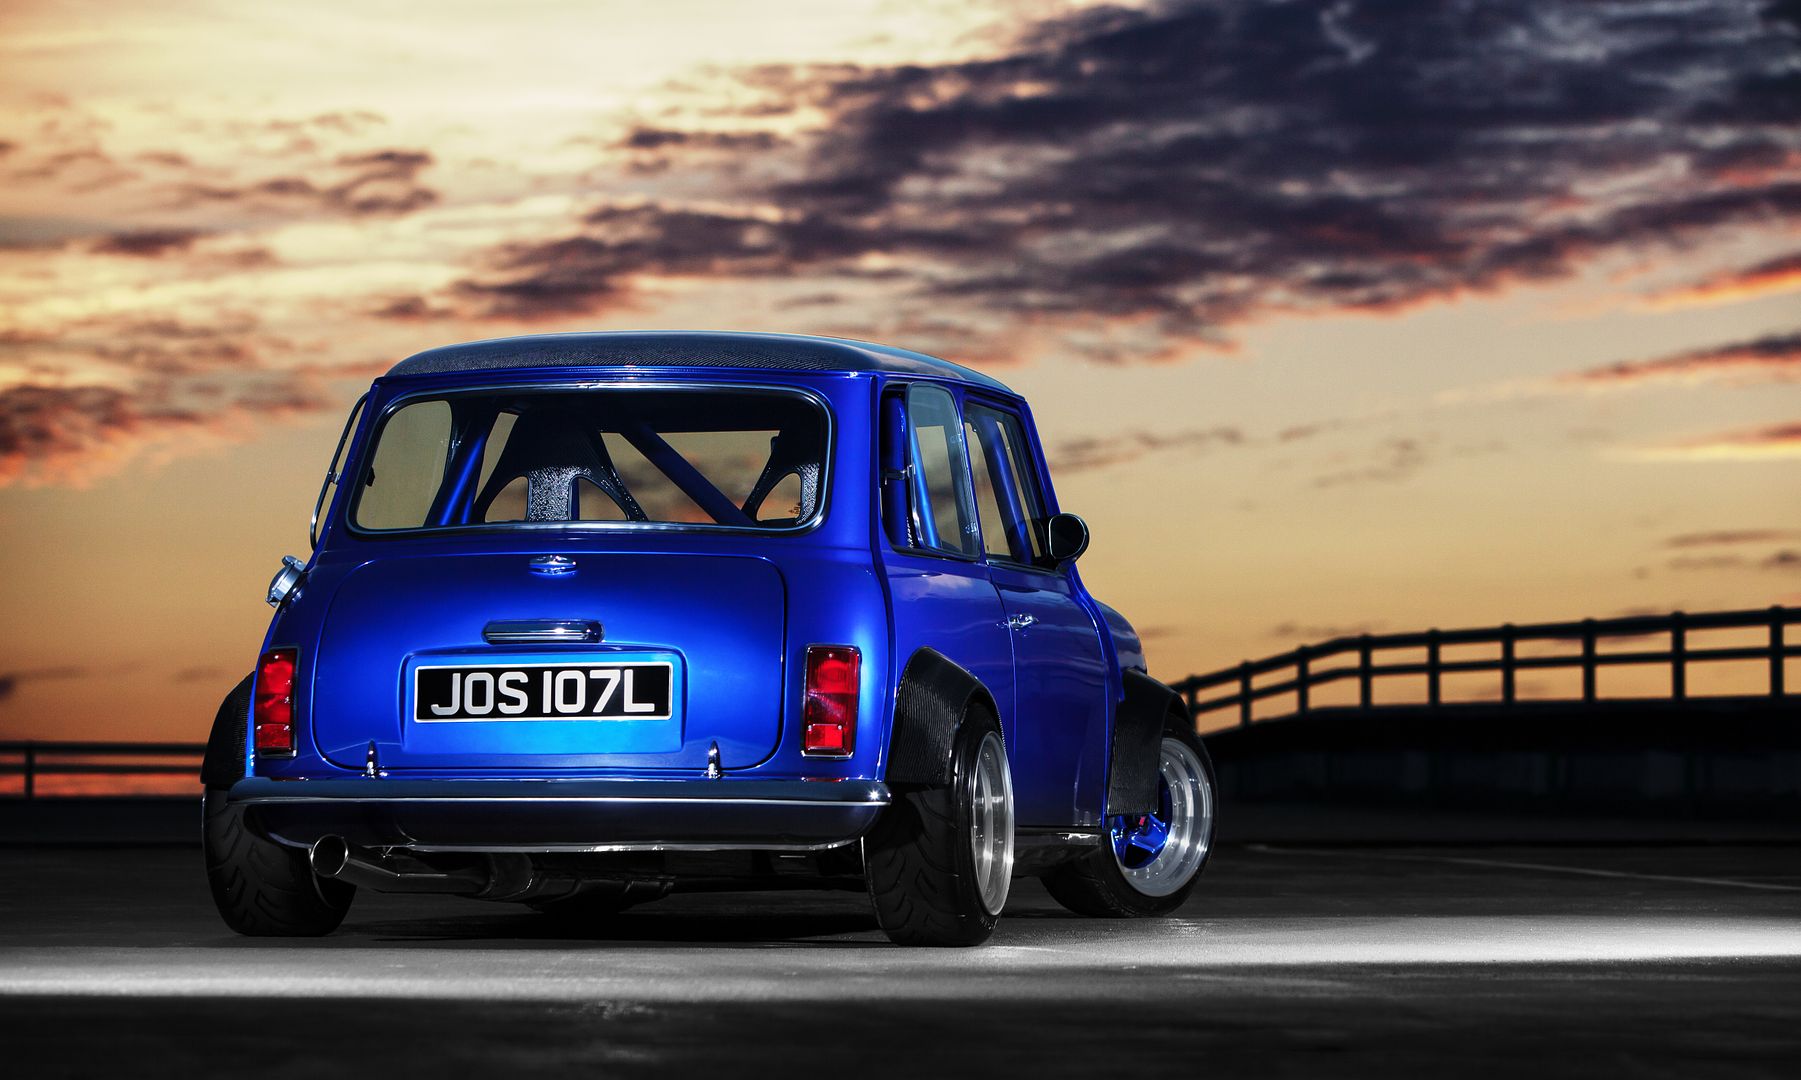
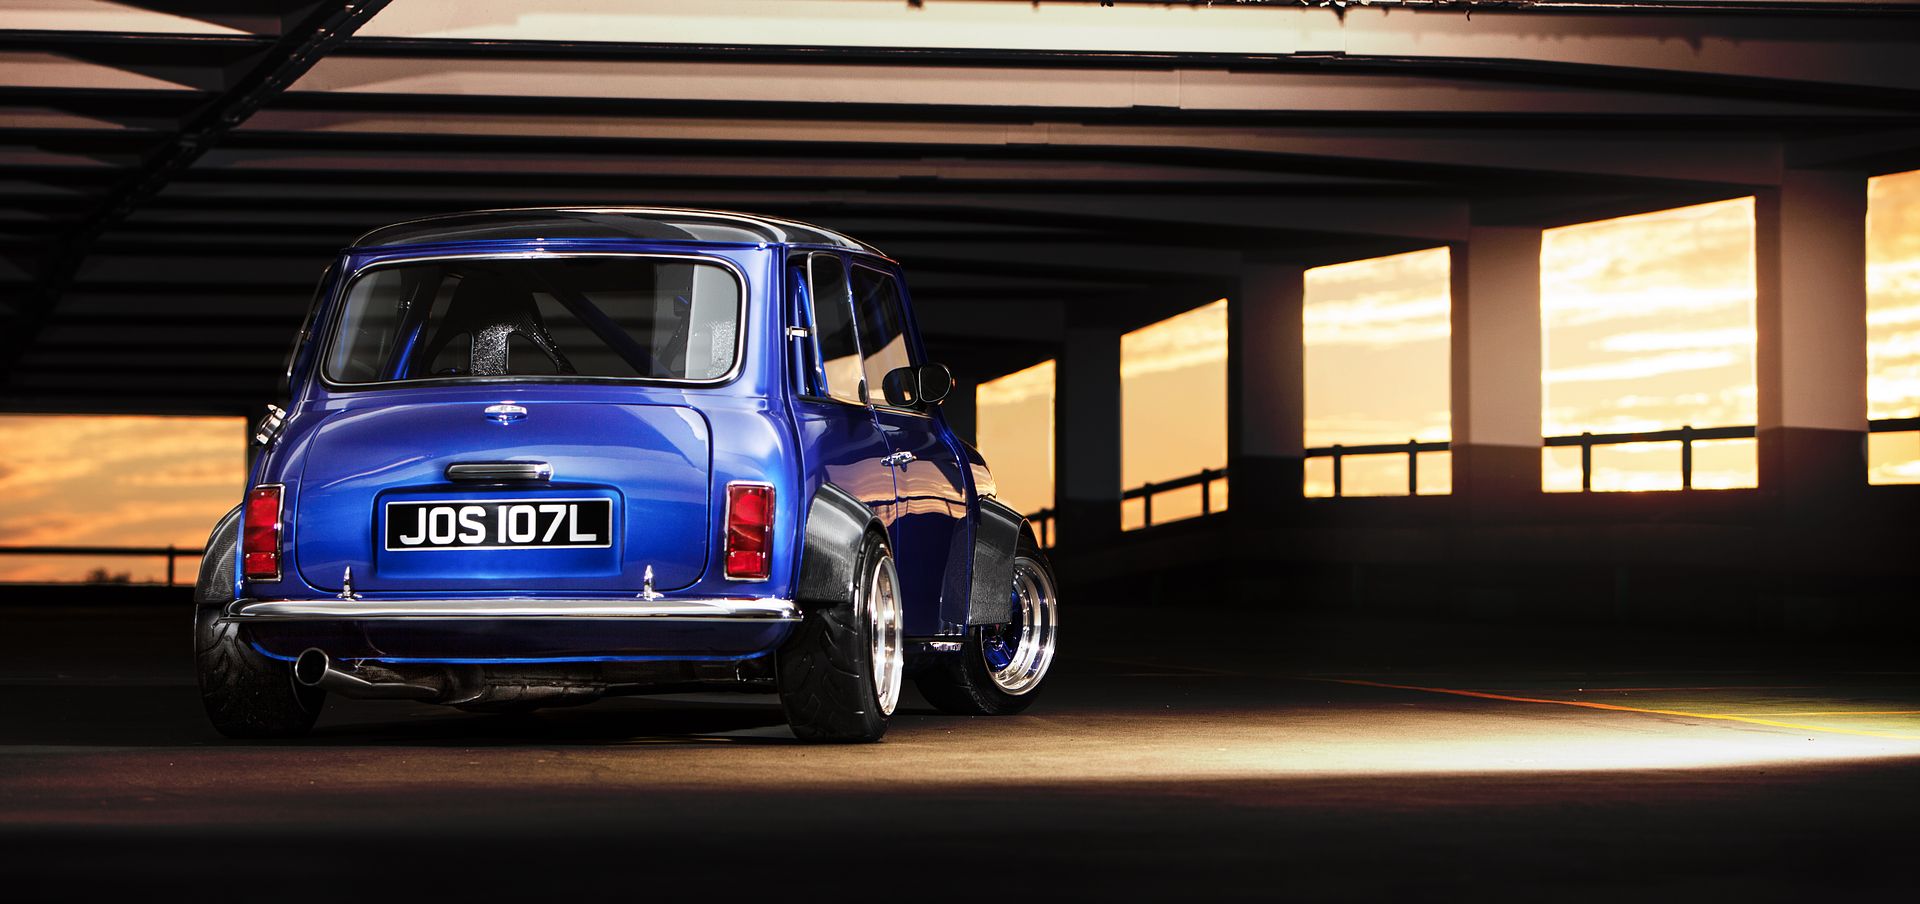
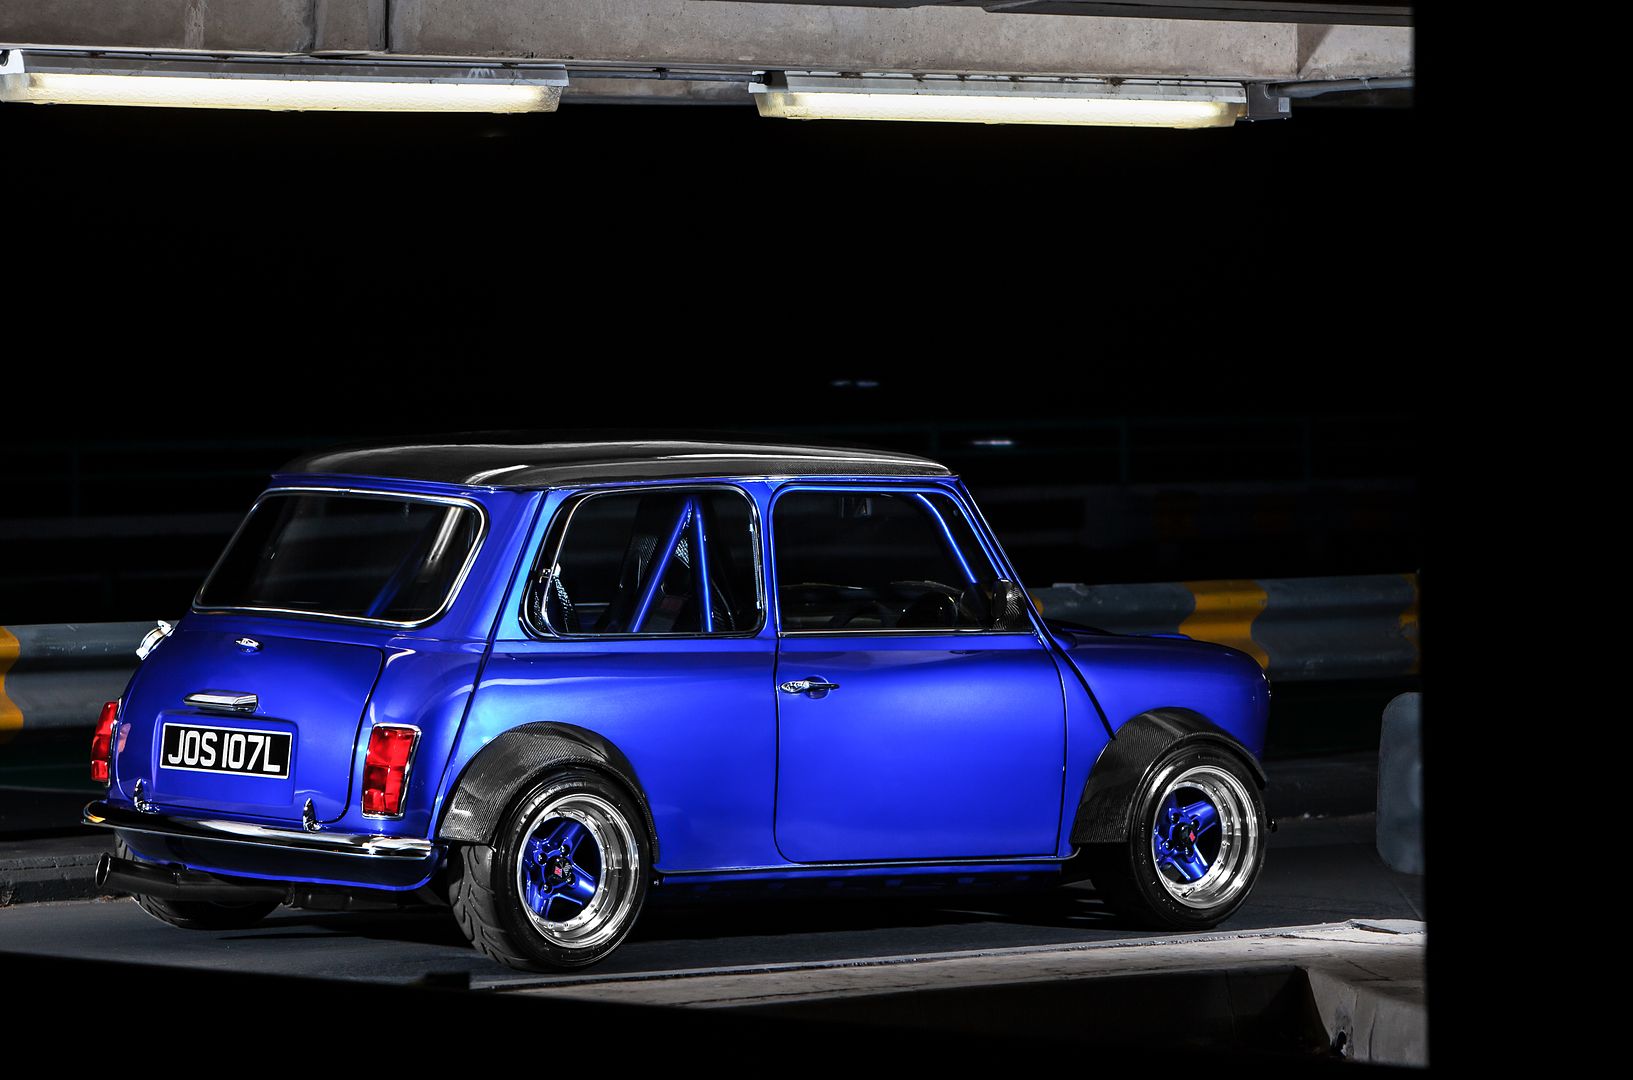
Rollcage
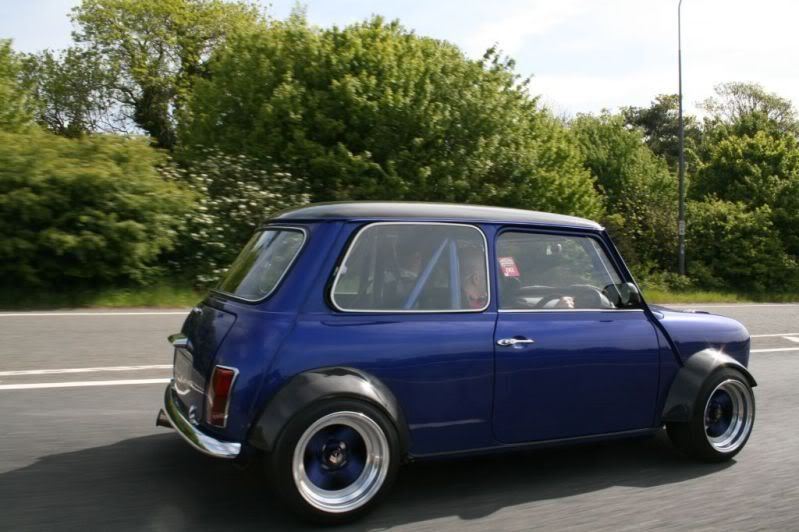
I wanted a rollcage. It would be 6 a point cage with a small amount of safety considered, but really I wanted it for aesthetics. So I knew of MPS from when a friend had a 1/2 cage made for his Nova back in the day. Normally they would make it out of 1.5" tubing, but I wanted it even chunkier so asked if they could do it out of 2" tube, which they could. It’s not a 5minute job to fit it, but once it was in it looks the business. It was also colour coded to bring some of the exterior colour into the car.


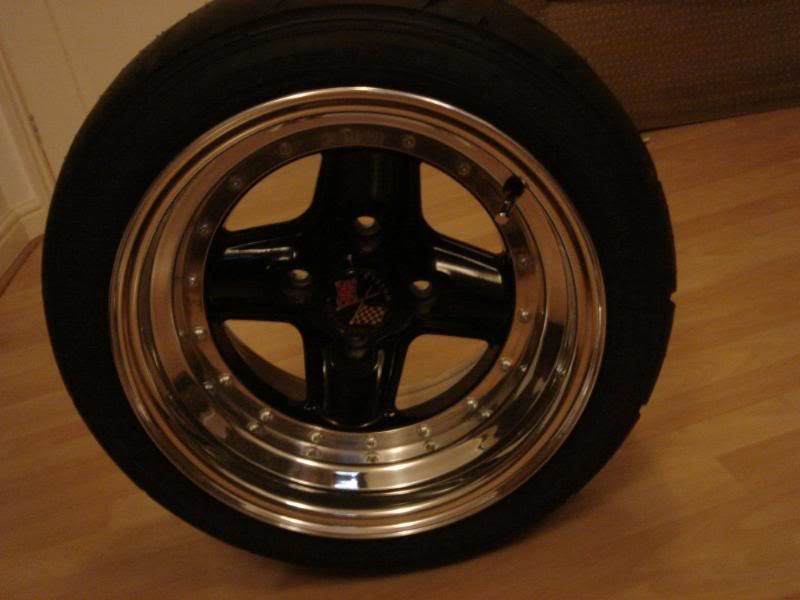
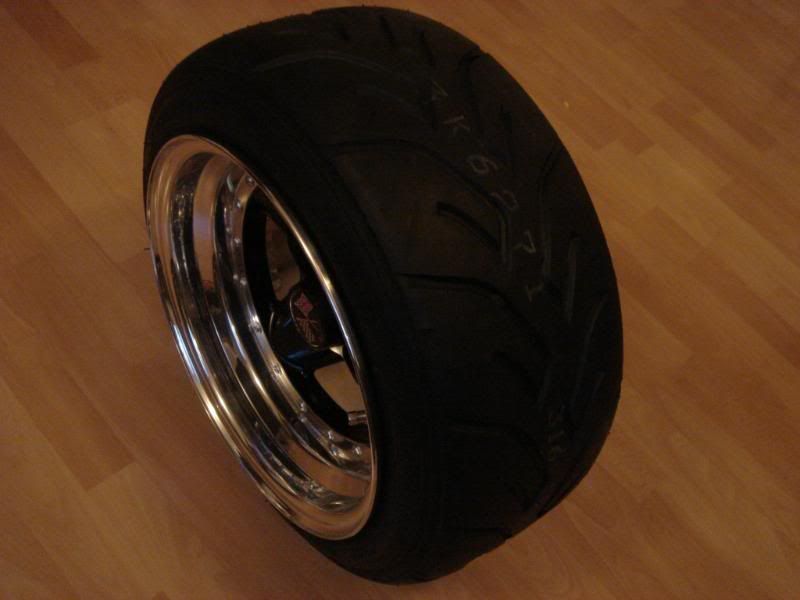
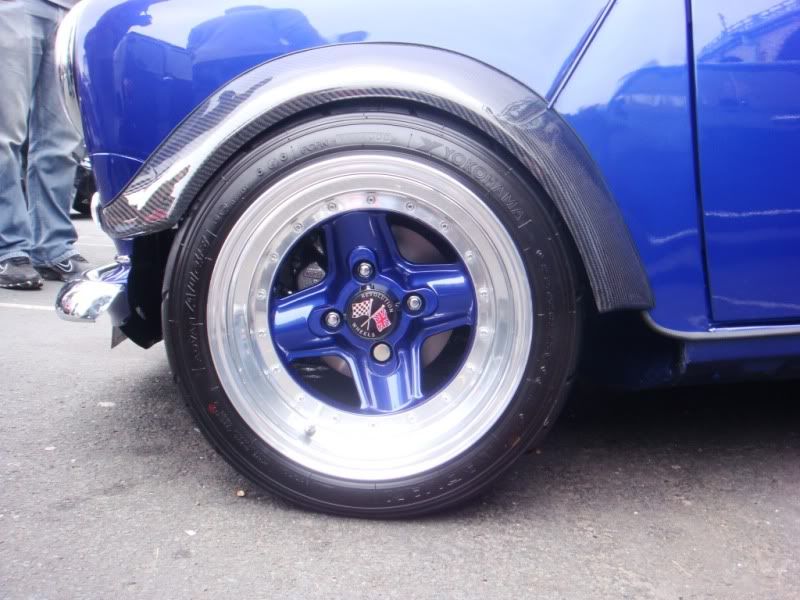
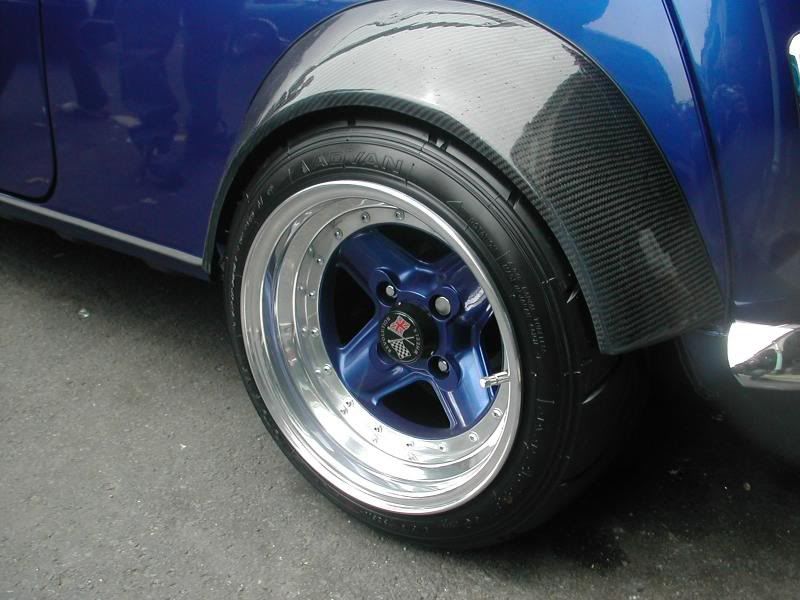
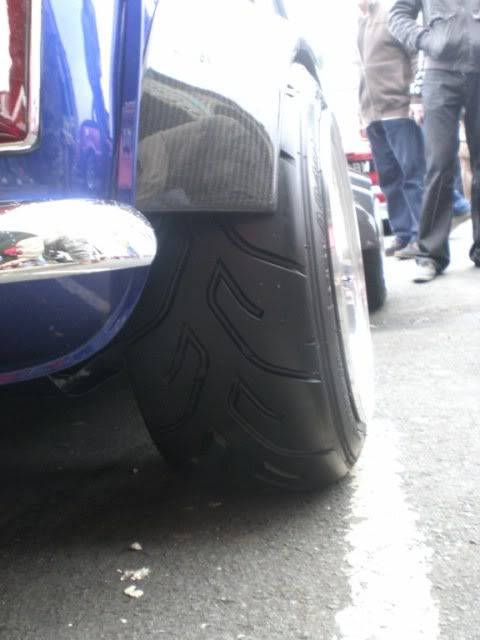
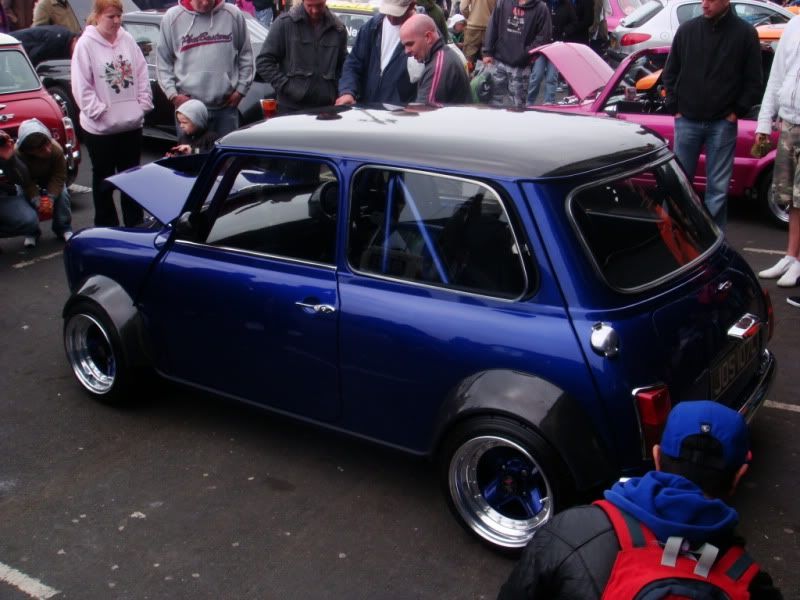
Wheels
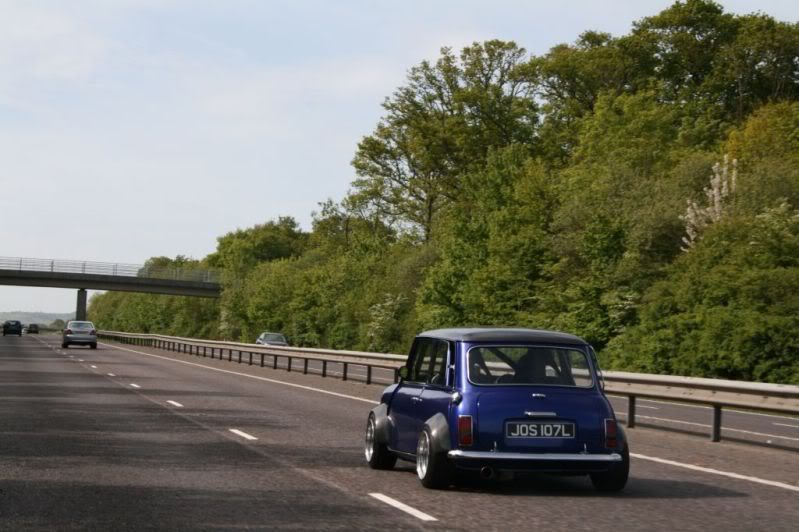
When I first owned the car I had 6x10 revolutions on, and if it was solely up to me I'd have had another 6x10 this time round, but Rich & Chris insisted we went for a more modern size giving the car a better stance and allowing a little more ground clearance. So I opted for 8x13 Revolution Split Rims wrapped in Yoko's finest A048 road legal cut slicks. When I bought them they had black centres, but these were soon colour coded.
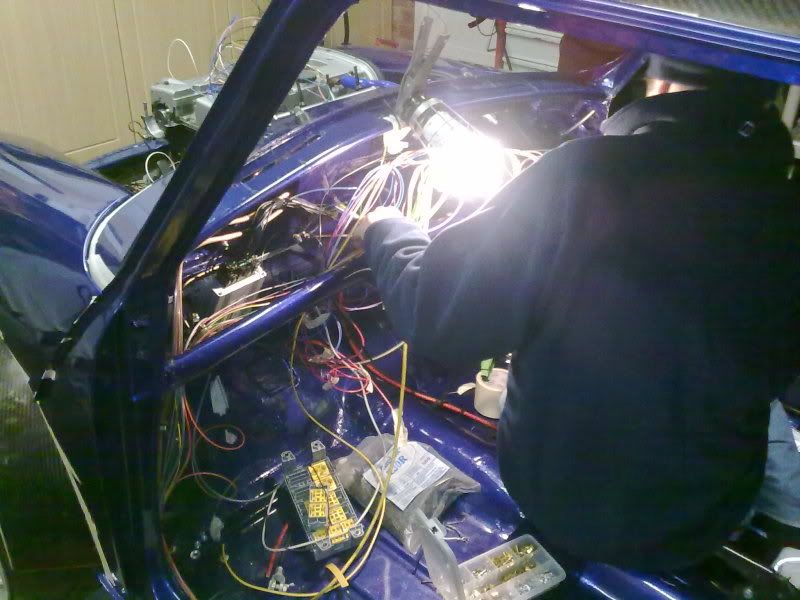
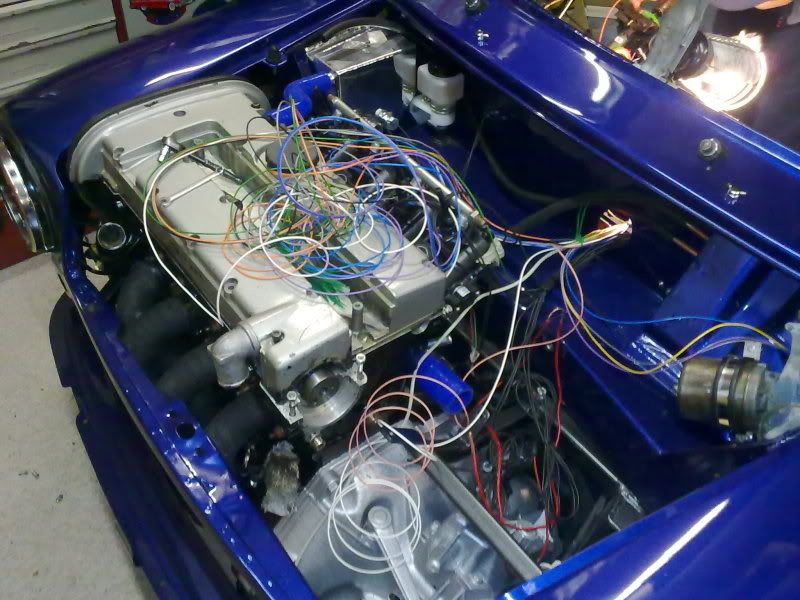
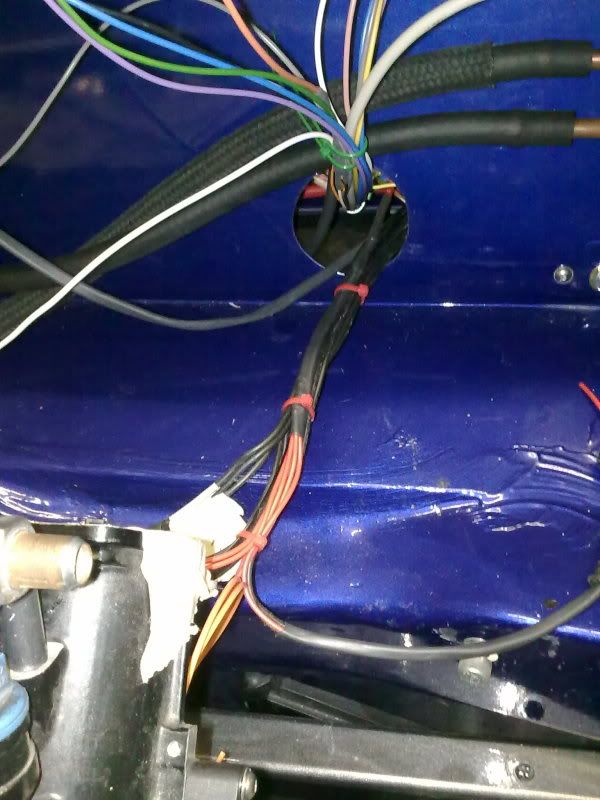
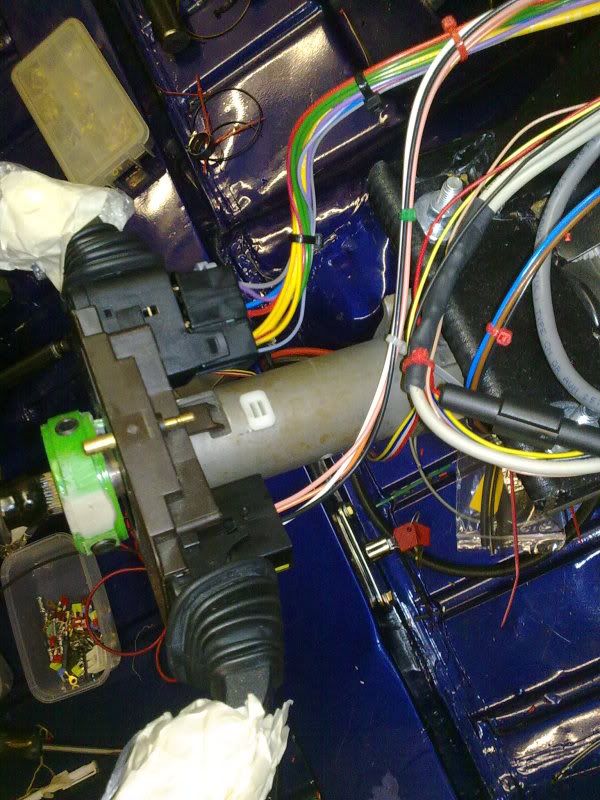
Wiring
Part of our build team were 2 Vauxhall Electrical Technicians, result. So knowledge around anything to do with the wiring was given to them. There plan was to make a 1 off loom from scratch, which they did. Another plan was to hide as much as possible to give a clean look, which they did. Then finally they wanted to give an OEM appearance to all of the wiring, which they did, so i can guarantee that the loom that you can't see is just as good as the bits you can see.
This was no mean feat when we were adding as much modern upgrades as possible.
As with any job there is a middle stage that look messy and unorganised, but we were assured throughout the build that they knew what they were doing and that it would all turn out ok in the end, which it did.
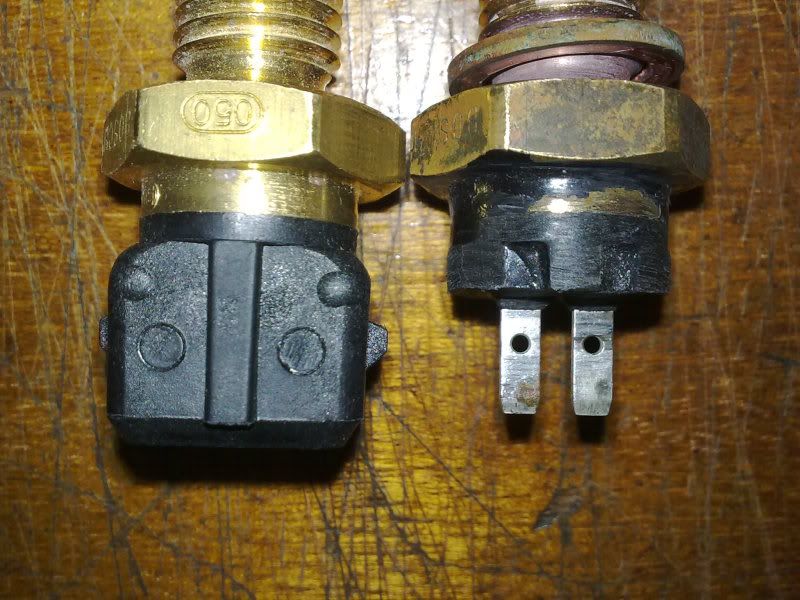
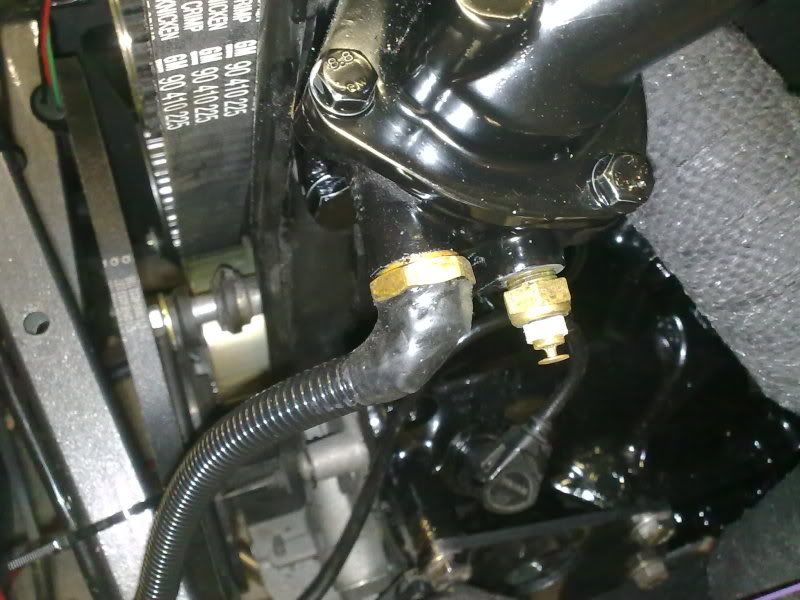
This was where the thermostat plug had to be modified to allow a little more clearance with the standard roundnose, every bit counts!
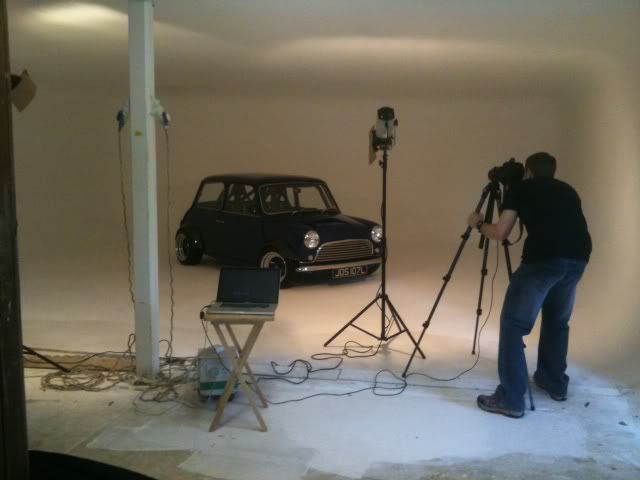
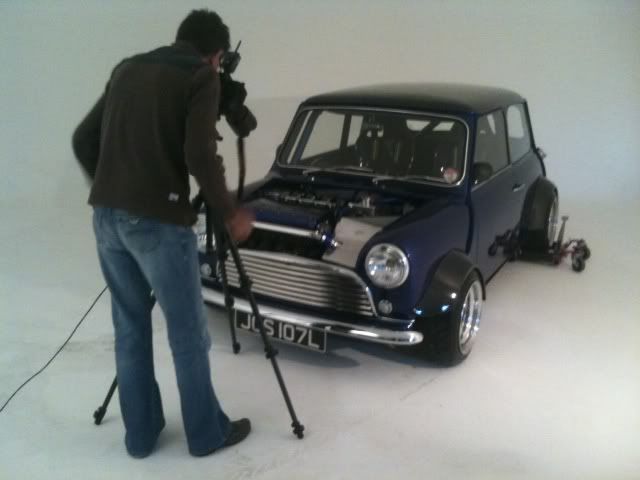
2010 Show Season
London to Brighton
We only finished the car about 2 weeks before L2B 2010 ( Note we were also booked in for L2B 2009 ( Its always good to have a plan). So we had a few evenings of shakedown time where we put about 150 miles on it. We then went around the whole car checking bolts to make sure everything was still tight. As much as you can check stuff, sometimes you just have to get it on the road and wait for things to go wrong.
Rich and I set off to L2B, we were only at J7 of the M1 when we heard a bang, pulled over, checked the car, the front number plate was missing! Rich went back to get it out of the middle lane of the M1, it was mangled to say the least! We laughed it off and less said about the original plate fixing the better (eh Rich) once we got to Brighton Rich bought me another plate.
We pulled up at Crystal Palace, parked up in the Show and Shine section, and got mobbed! No jokes, we were barely out of the car when the madness started. It was great, just what we wanted after 2 years in the making and without telling anybody! As much as we'd done our best to set up the ride height in our shakedown period, we checked the car over at Crystal Palace and we'd dropped an inch, and for those who saw it, will know we didn't have an inch to drop!
Within no time at all we'd had both Miniworld and Mini Magazine introducing themselves to us and the car.
We set off to Brighton with the trip down going perfectly. When we pulled up at Brighton we were given what we thought was a poor parking spot, at the back out of the way of the passers buy, but as it turns out it worked in our favour! (at the time we were cursing the guy who parked us, and maybe he didn't realise what he'd hidden at the back lol). It worked in our favour as we made the most of 2 spaces giving us space to open the doors with clearance of other cars. Plus the word got round pretty quickly that there was something very special at the show and people would come to find the car. For the whole day the people around the car was relentless, we had to leave the car in shifts so that somebody was always there to show people around it and answer those all important questions, it was one of those moments that make all of the late nights, wrapped knuckles and 'will we ever finish it' comments worth while. A lot of our friends and family came down for the day including my Parents from Scotland which it made it a real special occasion bare in mind it was my Fathers Father’s car from new in 1972.
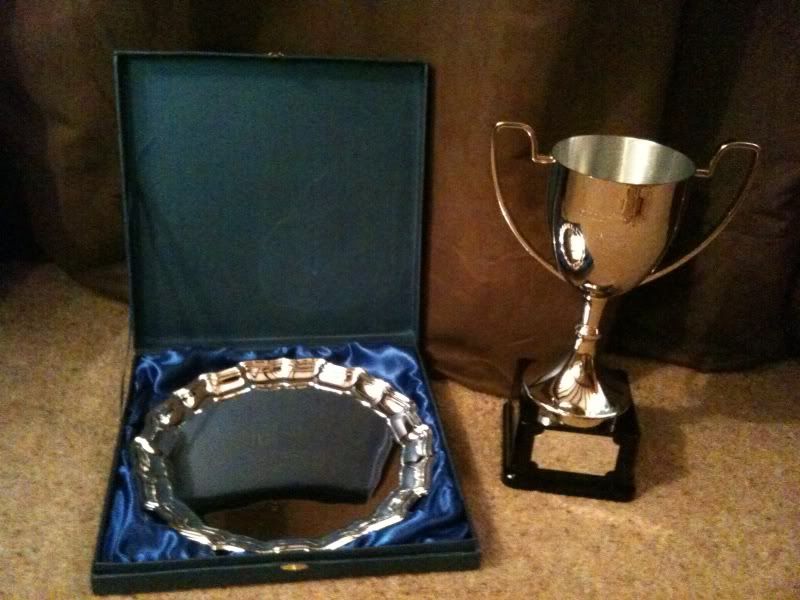
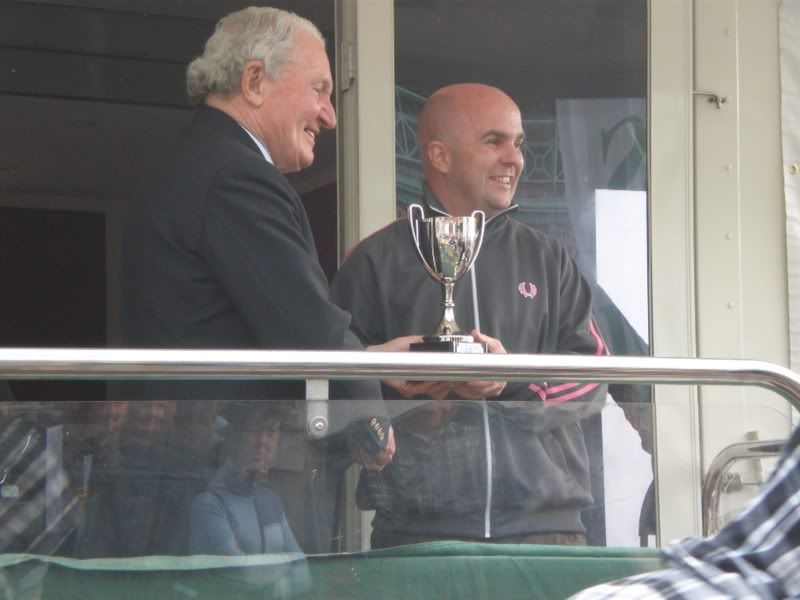
RESULTING IN THESE - Best in Class & Car of the Show!
 [/QUOTE]
Just for the record we drove it back to Bedfordshire 100 miles in torrential rain and it didn't miss a beat! A credit to all involved especially for the first outing out.
Miniworld
We were lucky to grace the cover of Miniworld in Dec 2010 - Studio Shoot

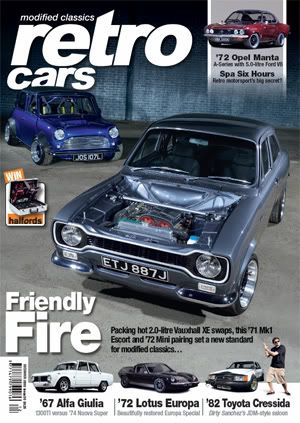
Retro Cars
Also we were on the cover of Retro Cars Dec 2010, along side Lee the boss of Crash Care Centre in his amazing Mk1 Escort.


Pistonheads Meet
The car got mobbed, even though there were supercars just along from us.
Now a Year on looking back I must give a special thank you to my wife Marion -for allowing the late nights and weekends to be spent with the Mini, Rich “Skunkworkz” - for just being anal and skilled with all his detail the project wouldn’t have been anywhere near what it has ended up at without it, Chris Woolsey for his awesome mechanical, electrical and everything engineering knowledge, Karen Woolsey -for the use for her Garage space, Teabags and loo for 2 years, Danny for his Electrical knowledge and help, Lee Proctor and the boys at Crash Care Centre for all the bodywork, paint, million coats of lacquer and flatting that they did, Jon Gurney Hotrod guru, Rob Hall at Allspeed, Wayne and Alex at Pro Alloy for all things radiator and cooling, Powerspeed exhausts, Dave and Henyk Franczak at V Tuning, Alex at A.B.S. Blasting and Pete at Delux Interiors.
We are now just looking forward to the 2011 Show season.
Please come and say hello if you see the car around.
We wanted a modern Digi Dash to give us all the modern accurate readings we needed, plus we still needed switches to activate the electrics, so the ETB digi Dash was chosen, it’s got so much on it you wouldn't believe! From this the carbon binnacle was purchase, it came about twice the size that you see in the pics! We spent a few hours then shrinking it down to size to get it as small as possible, and the key here was to keep it at the same angle as the steering wheel, which we did which worked out perfectly. Again Rich insisted on hidden fixings to keep that modern look.
We then mounted the 7 new style mini hoops that separate the 6 switches that operated the Ignition/Horn/Hazzards/Heater/Side Lights/Main Beam. The wipers, Full Beam and indicators were via the TVR stalks on the column as Vauxhall intended.
Carbon Gear Lever Surround & Linkage Cover
For those of you that know a little about mini XE conversions you'll know that the Vauxhall gear linkage would normally be visible and bolted to the floor with the shortened linkage joining the gearbox and gear lever just floating in mid air.
We knew we wouldn't be happy with this, so Rich got to work and started knocking up some more 1 off Carbon parts.
The cover for the gear lever assembly had to fit between the seats, accept the original gear lever gaiter, be a location for the power steering adjuster and have hidden fixings, so this was made from scratch. And the tube that went from this cover to the bulkhead had to sit in mid air with hidden fixings, so Rich used a 80mm pipe as a mould to wrap. Once the resin had cured the pipe was removed. We came up with these.
Carbon Steering Column Cover
As we were using Vauxhall Corsa C power steering, it was obvious to start life using the Corsa steering column shroud, but it didn't fit too good.
So again, rich had to get creative. So after numerous hours of playing and inventing, he came up with this.
But for us to be able to keep it useable, it had to be able to be removed, so we kept the original fixings and how it splits.
Then the area around the column had to be shrunk down do to the removable steering wheel, and also the addition of the push button start that replaced the key had to be blanked off.
Then the Carbon made another appearance and hey presto.
Carbon Heater Cover
With the newly positioned heater, as much as we tried to get it right up under the dash, you could just see the bottom of it, this wasn't acceptable. Also to keep the clutch cable with a smooth operation it looped around in front of the heater, so all this needed hiding. Rich knocked up a cover to sort this out, again out of carbon.
After making a 90deg jig with a radius corner.
This was then wrapped in Carbon.
And once cured some sides were made it was then trimmed down, resulting in this.
You can just see it under the dash in this picture.
Carbon Seats
With the obvious Carbon theme developing both outside & inside the car, it was only right we tried to source some Carbon seats. This isn't that easy when you look at the size of the car and the space you have to squeeze 2 front seats in. There was never going to be rear seats so the task was on to find 2 front seats.
We came across the chosen seats originally in fibreglass. We loved the style, the size was right, but the finish wasn't. Luckily for Rich, the seats were sourced before the rest of the Carbon work had started so he got away with this particular project! We spoke to people who made the seats if they could do them in Carbon, they said they never had before but they'd be up for giving it a go. The result was stunning.
Now the fun was to start to how we'd get them to fit. We bought a set of seat frame supports and a pair of universal runners to get the ball rolling. After 3 of us trying out different seating positions with the new steering and gear lever position and to give rollcage and gear lever cover clearance, we agreed on where they should be. Before we could mount the frames to the seats we needed to make up some small spacers to keep the frames square although the seat tapered off at the back, so Rich done this on a lathe.
Now these were made we got the frames mounted to the seats, the runners mounted to the frames and then decided the final positions to where they would mount to the floor. Once mounted we noticed they were a little wobbly so made up some seat stiffeners to fix the frames to the inner sills. We then mounted the runner adjusters at the back of the seats to keep them tucked away from sight.
The original thought was to have the seats with no padding on to show off the carbon, but after Lee @ Crash Care Centre had spent a lot of time lacquering both the front and backs of the seats, we decided it was a sensible idea to use the pads provided mainly to stop scratches from clothing but also for comfort. For those who are wondering, the seats are comfy for about an hour, then you start feeling a little numb LOL
The seat frames were finished in the anthracite colour we used throughout the car.
Here they are in the car with the SCHROTH Racing 4 point harnesses.
Carbon Mirrors
To continue the Carbon theme outside the car, I wanted some sort of small carbon mirrors. I considered bike or single seater mirrors, but none of them would have looked right. Then i stumbled across these that were designed for mini race cars and knew we could make them work.
Once we'd had a look at them the questions was asked about the mounting and that there was no way that we'd be screwing them through the door as per the picture. So after a bit of cutting, some new internal hidden fixings and a new panel welded onto the door we ended up with these.
This left the fixings exposed on the inside of the door, so Rich knocked up some Carbon panels as any modern car would have which covered these up.
Power Steering
With 8x13 wheels & slammed stance, we knew that the steering was going to be heavy, so from the start we needed a solution. A quick scan across a few forums showed us that people were using a few different power steering options from other vehicles. With the engine being a Vauxhall item we seemed it only right to use the Corsa power steering option, of which we found even then there were a few options. Being Vauxhall boys by trade we knew a little about what was available. Early Corsa B's had pump driven power steering, where as later Corsa B's and all Corsa C's had electric power steering. So after trying both a Corsa B & C item, we opted for the Corsa B as it was lightly shorter which suited our set up better.
We then made a bracket to hold the column that bolted through the bulkhead and onto the standard crossbrace.
We then had the Corsa end welded onto the mini end that connects to the steering rack.
We then added in an adjuster on the back of the gear lever surround to allow us to lighten up the steering for when we were parking.
Doors
The doors were new sourced from Minispares. We cut off the upper door card holder on the inside due to the door cards we planned to use, and we had welded in the plates for the mirror mounting, apart from that they were pretty standard.
Once the doors were painted Rich fitted them up at his house away from the madness of the main build, plus he could do them in his own time, or when he came home from helping on the mini!
We decided we wanted minimalistic doors, so no internal door handle or lock, no visible fixings on the door cards, and the window winder and door opener were modified to sit at the same angle (Rich being anal again) and then painted the same anthracite colour as used elsewhere.
New handles, locks, rubbers and chromework were used, the mechanisms are all original but were fully refurbed.
Heater Mods
We knew that the standard heater was never the best. So we worked out if we needed one, and if so how did we want to use it. The conclusion was that yes we wanted one, and a newer 2 speed one at that, we wanted it to be hidden under the dash rather than hanging out the bottom as they are as standard, and it would only ever have to be used to demist the windscreen on a cold morning on the way to a show, or as it turned out in the torrential rain on the way back from L2B!
So we modified the heater so that it only had the blower towards the screen, it was permanently on hot and so that it was either in the 'off' position or 'setting 2'. We also swapped the standard corrugated pipes for a more modern, better sealed system using plumbing pipe, agreed its not the prettiest or most conventional but it allowed us to route the pipes where we wanted, it makes the most of the air available with no leaks, and its all going to be hidden under the dash anyway. This is all controlled from one of the switches on the dash and it works really well.
Rollcage
I wanted a rollcage. It would be 6 a point cage with a small amount of safety considered, but really I wanted it for aesthetics. So I knew of MPS from when a friend had a 1/2 cage made for his Nova back in the day. Normally they would make it out of 1.5" tubing, but I wanted it even chunkier so asked if they could do it out of 2" tube, which they could. It’s not a 5minute job to fit it, but once it was in it looks the business. It was also colour coded to bring some of the exterior colour into the car.
Wheels
When I first owned the car I had 6x10 revolutions on, and if it was solely up to me I'd have had another 6x10 this time round, but Rich & Chris insisted we went for a more modern size giving the car a better stance and allowing a little more ground clearance. So I opted for 8x13 Revolution Split Rims wrapped in Yoko's finest A048 road legal cut slicks. When I bought them they had black centres, but these were soon colour coded.
Wiring
Part of our build team were 2 Vauxhall Electrical Technicians, result. So knowledge around anything to do with the wiring was given to them. There plan was to make a 1 off loom from scratch, which they did. Another plan was to hide as much as possible to give a clean look, which they did. Then finally they wanted to give an OEM appearance to all of the wiring, which they did, so i can guarantee that the loom that you can't see is just as good as the bits you can see.
This was no mean feat when we were adding as much modern upgrades as possible.
As with any job there is a middle stage that look messy and unorganised, but we were assured throughout the build that they knew what they were doing and that it would all turn out ok in the end, which it did.
This was where the thermostat plug had to be modified to allow a little more clearance with the standard roundnose, every bit counts!
2010 Show Season
London to Brighton
We only finished the car about 2 weeks before L2B 2010 ( Note we were also booked in for L2B 2009 ( Its always good to have a plan). So we had a few evenings of shakedown time where we put about 150 miles on it. We then went around the whole car checking bolts to make sure everything was still tight. As much as you can check stuff, sometimes you just have to get it on the road and wait for things to go wrong.
Rich and I set off to L2B, we were only at J7 of the M1 when we heard a bang, pulled over, checked the car, the front number plate was missing! Rich went back to get it out of the middle lane of the M1, it was mangled to say the least! We laughed it off and less said about the original plate fixing the better (eh Rich) once we got to Brighton Rich bought me another plate.
We pulled up at Crystal Palace, parked up in the Show and Shine section, and got mobbed! No jokes, we were barely out of the car when the madness started. It was great, just what we wanted after 2 years in the making and without telling anybody! As much as we'd done our best to set up the ride height in our shakedown period, we checked the car over at Crystal Palace and we'd dropped an inch, and for those who saw it, will know we didn't have an inch to drop!
Within no time at all we'd had both Miniworld and Mini Magazine introducing themselves to us and the car.
We set off to Brighton with the trip down going perfectly. When we pulled up at Brighton we were given what we thought was a poor parking spot, at the back out of the way of the passers buy, but as it turns out it worked in our favour! (at the time we were cursing the guy who parked us, and maybe he didn't realise what he'd hidden at the back lol). It worked in our favour as we made the most of 2 spaces giving us space to open the doors with clearance of other cars. Plus the word got round pretty quickly that there was something very special at the show and people would come to find the car. For the whole day the people around the car was relentless, we had to leave the car in shifts so that somebody was always there to show people around it and answer those all important questions, it was one of those moments that make all of the late nights, wrapped knuckles and 'will we ever finish it' comments worth while. A lot of our friends and family came down for the day including my Parents from Scotland which it made it a real special occasion bare in mind it was my Fathers Father’s car from new in 1972.
RESULTING IN THESE - Best in Class & Car of the Show!
[/QUOTE]Just for the record we drove it back to Bedfordshire 100 miles in torrential rain and it didn't miss a beat! A credit to all involved especially for the first outing out.
Miniworld
We were lucky to grace the cover of Miniworld in Dec 2010 - Studio Shoot
Retro Cars
Also we were on the cover of Retro Cars Dec 2010, along side Lee the boss of Crash Care Centre in his amazing Mk1 Escort.
Pistonheads Meet
The car got mobbed, even though there were supercars just along from us.
Now a Year on looking back I must give a special thank you to my wife Marion -for allowing the late nights and weekends to be spent with the Mini, Rich “Skunkworkz” - for just being anal and skilled with all his detail the project wouldn’t have been anywhere near what it has ended up at without it, Chris Woolsey for his awesome mechanical, electrical and everything engineering knowledge, Karen Woolsey -for the use for her Garage space, Teabags and loo for 2 years, Danny for his Electrical knowledge and help, Lee Proctor and the boys at Crash Care Centre for all the bodywork, paint, million coats of lacquer and flatting that they did, Jon Gurney Hotrod guru, Rob Hall at Allspeed, Wayne and Alex at Pro Alloy for all things radiator and cooling, Powerspeed exhausts, Dave and Henyk Franczak at V Tuning, Alex at A.B.S. Blasting and Pete at Delux Interiors.
We are now just looking forward to the 2011 Show season.
Please come and say hello if you see the car around.
Cheers guys for the comments
George - Yes Nice Speedster , my new toy comes out of the mould this week so pix will be coming soon of it too.
Regarding the brakes we dont plan to track it so wont require the Billet brakes (as mentioned we've heard mixed reports anyway on them) we will do more SantaPod 1/4miles etc etc with it this year.
With over 2000 miles under its belt last year the brakes seem sufficient especially when I remember what the brakes were like originally at least they now feel as if there is a pedal on the first push and not after 5.
George - Yes Nice Speedster
, my new toy comes out of the mould this week so pix will be coming soon of it too.Regarding the brakes we dont plan to track it so wont require the Billet brakes (as mentioned we've heard mixed reports anyway on them) we will do more SantaPod 1/4miles etc etc with it this year.
With over 2000 miles under its belt last year the brakes seem sufficient especially when I remember what the brakes were like originally at least they now feel as if there is a pedal on the first push and not after 5.
Big Thank You to Jason Laroza for doing this mega Video of my car and Andy's Zcar GSX-R -1000 Minus
Enjoy
http://vimeo.com/32742583
Enjoy
http://vimeo.com/32742583
Edited by DougieMc on Sunday 27th November 22:12
Phil210293 said:
Hi, I'm new to the forums, I was doing some research before embarking on my own Mini project, yours was one of the first threads I came across and you've blown me away with it. Absolutely incredible, I'm speechless at the attention to detail and innovation in the car; you've all obviously shed a lot of blood, sweat and tears for it, and it shows. Just dragging up a question you're probably bored of being asked, but how much did the project cost you in total? The carbon fibre looks incredible, too, you've converted me from a non-believer!
Congrats on it, you've got an enviable car, absolutely astonishing.
Cheers for the commentsCongrats on it, you've got an enviable car, absolutely astonishing.
Recon I spent £15k on it in parts but thats without any labour costs which was 2 years worth of a few mates and I to get it done so really couldnt put a figure on it.

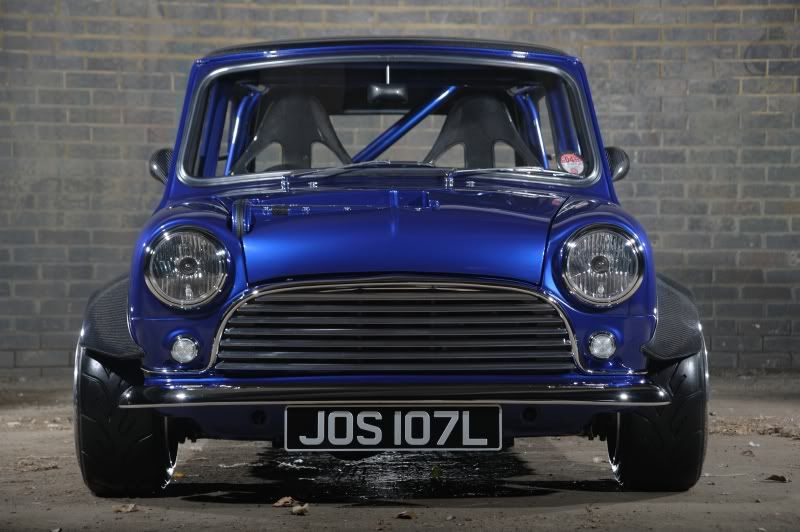
Thought you guys would like to see some new photos PHer rob200sx Rob Pepe took a few weeks back of my car
Awesome photos some more of his fantastic work can be found at
www.shutter-life.co.uk
And more info on the Mini here:
http://www.pistonheads.com/xforums/topic.asp?h=0&a...
Awesome photos some more of his fantastic work can be found at
www.shutter-life.co.uk
And more info on the Mini here:
http://www.pistonheads.com/xforums/topic.asp?h=0&a...
Edited by DougieMc on Monday 8th October 22:03
Edited by DougieMc on Monday 8th October 22:16

5potTurbo said:
I do love this Mini, but for all the work that's gone into it, I can't help but wonder why it wasn't de-seamed? 
Perhaps it was covered earlier in the thread - I have dipped in and out of this since it started, so to speak...
cheers guysPerhaps it was covered earlier in the thread - I have dipped in and out of this since it started, so to speak...
De-seaming is a personal choice
Im not a fan as they look fibreglass.
I know it sounds crazy but we wanted to make the car look as much like a Standard Mini ie Factory as possible ( Even with the Carbon and Engine)
BenAnscomb said:
First of all I would just like to say that its an amazing looking mini, well done mate.
Secondly I was wondering how hard it was to install the engine into it and did the subframe need modifying a lot? Would a vtec be easier to do?
Thanks.
Cheers for the commentsSecondly I was wondering how hard it was to install the engine into it and did the subframe need modifying a lot? Would a vtec be easier to do?
Thanks.
Everyone sayed you " Cant fit a Redtop into a Standard length round nose Mini "
Thats what we started it just to prove them wrong.
The Subframe is from a company called Allspeed that specialise in them.
We modified it purely to accept our Radiator and cooling design as we couldnt put it infront of the engine because of lack of space so we modded it to accept the rad above the gearbox.
The next thing was the exhaust manifold that need to be custom made to turn 90 deg as soon as poss, this lost us some BHP but not much but allowed us to maintain it inside the standard length car.
A V Tec and the smaller engined Vauxhall engines probably would be easier and a clubman or extended roundnose front would make things even easier but that wasnt the idea of our project.
Hope that helps.
any questions let me know
Gassing Station | Readers' Cars | Top of Page | What's New | My Stuff