Scaffolding poles + old VW bits + Rotary engine....
Discussion


Good news, I've reworked the mapping some more and it means she's far more responsive and makes much better noises with the loud pedal. Will refine it this week and see if we can get some music...
Bad news...rear CV boots don't work, the shafts are crushing the housings on the fancy aero boots because they stick out so far:
Now, a Sierra 4x4 rear boot looks like it might fit if I machine a ring for it to sit on, short and well tapered:

But the small end is only for a 24-25mm shaft, any of you lovely people know of one similar that will fit a 30-32mm shaft?
Bad news...rear CV boots don't work, the shafts are crushing the housings on the fancy aero boots because they stick out so far:
Now, a Sierra 4x4 rear boot looks like it might fit if I machine a ring for it to sit on, short and well tapered:
But the small end is only for a 24-25mm shaft, any of you lovely people know of one similar that will fit a 30-32mm shaft?
Edited by PhillipM on Monday 24th September 14:16
PhillipM said:
Turns out a Vauxhall Astra outer boot is perfect. And a tenner each, so even better.
Only the finest race-spec components used here!
Sounds familiar - my bespoke unobtanium driveshafts use GKN Rover 45/Honda Civic boots at the princely sum of £6.36 each from ECP including grease and bands.Only the finest race-spec components used here!
PhillipM said:
Turns out a Vauxhall Astra outer boot is perfect. And a tenner each, so even better.
Only the finest race-spec components used here!
How do you even find out about stuff like this!? Only the finest race-spec components used here!
Are there websites where you can sort CV boots by diameter rathet than by.... I don't even know what other measures you'd use. I just assumed that anyone looking for specific parts either knows the model number or at the very least, the car they're going to go on.
leglessAlex said:
How do you even find out about stuff like this!?
Are there websites where you can sort CV boots by diameter rathet than by.... I don't even know what other measures you'd use. I just assumed that anyone looking for specific parts either knows the model number or at the very least, the car they're going to go on.
Often a friendly motor factor who likes a challenge or has an interest in this sort of thing will be willing to help.Are there websites where you can sort CV boots by diameter rathet than by.... I don't even know what other measures you'd use. I just assumed that anyone looking for specific parts either knows the model number or at the very least, the car they're going to go on.
leglessAlex said:
How do you even find out about stuff like this!?
Are there websites where you can sort CV boots by diameter rathet than by.... I don't even know what other measures you'd use. I just assumed that anyone looking for specific parts either knows the model number or at the very least, the car they're going to go on.
A combination of a fair bit of searching the net - universal boots often have sizes and what they'll fit and GKN, etc, have a catalogue with sizes for their couple of stretch boots, or just google images and ebay for general shape - and a friendly motorfactor, who will generally have a catalogue of boots and sizes and you just need to supply him with tea and biscuits to keep him flicking through the pages when it's a quiet day for you!Are there websites where you can sort CV boots by diameter rathet than by.... I don't even know what other measures you'd use. I just assumed that anyone looking for specific parts either knows the model number or at the very least, the car they're going to go on.
Local scrapyards are good too - the lads cut that many parts off cars they'll often know something that looks about right that you can chase up yourself from there.
Edited by PhillipM on Saturday 3rd November 16:59
Well, I'm doing my usual terrible job of updating here with a complete lack of photo's again - but the new front end has had all the kinks worked out and mocked up in it's final form, everything seems to work okay, although I need to machine/make some new parts for the front dampers and rework the internals to give them a bit more travel.
Everything is just tack-welded scrap at the minute so I didn't bother with pictures as you can't really see what we're aiming for.
So, proper steel ordered instead of the scrap bits, some tube and bits, and we'll get it all made up and completed and then get some pictures up when it's done. Maybe we'll have a fun damper stripdown gallery again
This one is being made up on the bench and then it's a straight swap, so everything we've already done can stay on there for the minute in case we need to take it for paint + dyno or some testing before everything is ready.
Edited by PhillipM on Monday 12th November 21:18
For those unfamiliar with the old Beetles, the front uprights are a link and kingpin setup - basically there's a big Kingpin vertically that sits inside needle bearings, which allows the steering to happen. Then on the end of the front arms, two pins stick out horizontally into some bronze bushes for the upright to pivot on when the suspension cycles up and down.
Now, that's a relatively robust setup, as it's basically just some huge hardened steel pins taking the loads, but it also means you have to deliberately leave the pins loose to allow the suspension to cycle, which means even in perfect condition there's always some slop in the system, and also as the loads change and things flex, the friction in the front suspension jumps up and down as the bronze bushes get pinched, the pins rock in them, etc, and general wear and tear makes it a lot worse as dirt can get in easily.
The steering effort also changes a lot, as the kingpin runs against a hardened steel washer - so the friction there changes a lot with load - if you look back through the old photo's you'll see I replaced it with a bronze+acetal thrust washer when I rebuilt them the last time to help it out, in order to give more consistant feedback through the wheel.
After a lot of trial and effort to get the required angles and clearances, we've managed to get just about get enough room to switch out to a new upright using a pair of spherical bearings instead, which means everything can be bolted up tight, camber can be adjusted easily by just shimming behind the upright, and friction should be a bit more consistant as all the loads are taken through the bearing surfaces with no pinching/rocking effects like the old link pins had.
Whilst we were at it I took the opportunity to correct some of the VW front geometery at the same time - so we have less castor gain, less mechanical trail (as we have a fair amount with the castor we run and the big off road tyres give quite a bit of pnuematic trail as well), and I've corrected a lot of the scrub offset issues the Kingpin setup had
We've also shifted the axle down to the lower arm point - this lifts the arms further out of the dirt if running in deep, soft mud/peat, etc, and also means we can have a bit more travel up front (as we were only limited by arm angles in droop)
We're just waiting for the parts back from the laser cutters and the actual ones can go together:
Edited by PhillipM on Monday 10th December 13:53

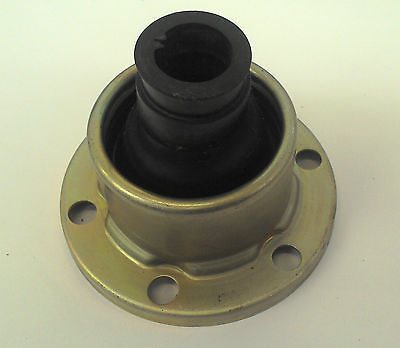
Thanks, would have been better without catching man-flu off the visitors, I'm laid up but Ed's been cracking on in the meantime, those new boots for the shafts required some new caps to strap to - as usual, not quite as simple as it sounds as the whole drive ring/cv joint bolts through them to save space - so they need to be in some decent material, however, he cracked on and knocked some up in EN19T - and a friend of hours kindly did some scalloping on his mill to lighten them a little:

So that's one more of the bits and pieces out of the way. Dampers are currently stripped to add the right amount of shimming to match the new travel numbers front and rear, shouldn't take long for them to go back together. Just hunting around for a decent dyno for mapping at the moment.
So that's one more of the bits and pieces out of the way. Dampers are currently stripped to add the right amount of shimming to match the new travel numbers front and rear, shouldn't take long for them to go back together. Just hunting around for a decent dyno for mapping at the moment.
Yes, I know it sounds really buzzy, the exhaust joints are weeping again, don't ask
And the phone gets really overwhelmed this close and starts clipping the sound.
But after fighting with it for a month trying to find a random, intermittent problem causing it to not want to start or idle (turned out to be the cam sensor) it's nice to hear it blipping again:
https://www.youtube.com/watch?v=KJkYWytZyZQ
Well I spent two hours today fine tuning the idle fuelling and timing, and put the cold weather to good use to tune the cold tip-in settings (which gives the engine a shot of extra fuel when you hit the throttle to stop it stumbling) - and got it blipping cleanly from cold with some beans. Also set up the camera to get some better video.
Then I spent 2 hours slithering home in the snow (it's only 10 miles) - including 30 minutes just getting up the 100m of farm track. I had to keep shoving my floor mats under the wheels, it was solid ice. I even put the car in drive at one point (one of those awful Merc paddleshift slushboxes) and got out and pushed it as well
Then, when I got back, I downloaded the video to find....it's corrupted. I've got the first minute (cranking it over and tweaking the cold start) and the last minute (the engine ticking as it cools down 'cause it's off) and nothing in between.
Doh!
Well, just as we thought we were sorted - the car ran fine when fired up - the intermittent starting reared it's head again, been tracking that down again over a lot of wasted weekends - traced it down to what we thought was the alternator or the ballast, so I pulled the loom apart and added a larger ballast to the field coil, no difference, bought a new alternator - no difference.
Take alternator off, starts fine.
Much head scratching.
Turns out the alternators we were getting from the local supplier (an electrical specialist, not just a factors) - were basically noisy as hell when they were trying to get to the right voltage at low rpms (i,e - startup only) - a cap in the line doesn't fix it, some shielding might but we've just sacked it off and got a different type of alternator instead, need to alter things to get that to fit properly again now, but after rigging it up today it's purring like a kitten. Need to retime it now though as not certain it was 100% before as it idles smoother now.
It never rains, it pours!
On the upside, I was rebuilding some other dampers* so I rebuilt/revalved the rears on ours to suit the new arms and bled them, so that's one more job off the list and ready to go - although I have just acquired some new go faster parts to machine and fit - I got told these were top secret so...there we go:

It's all very well getting shiny adjustable parts for your dampers but then I spent hours modelling the damned things yesterday - nearly there, housings next.
These are high and low speed compression adjusters, that hopefully with a bit of work on my side will be adaptable enough to use both on the small fronts and large rear dampers...hopefully.

And after another late night tonight, housings done:

And a smaller version with some slightly tweaked internals will fit the smaller dampers on the front too, sorted. And about a third of the the price or less compared to buying the official kit to fit adjusters....

Anyway, got plenty of other bits done in the meantime, made a little jig and counterbored the CVs - things were a little tight for plunge travel made a tool up to clamp the CV stars in the lathe, and we've counterbored the stars slightly.
That gives us a couple of mm more plunge on the shaft just to allow for a bit more flex in bushes/chassis/arms, etc, and also encapsulates the circlip at full extension - so it can't get knocked off the shaft and let the driveshaft fall out of the car - yes, we've had that before!
All the little boring stuff that takes up too much time, but the devil is in the details....


Stuck the old front end back together now we're done mocking up and measure to build the new hubs and arms (they'll get done on a jig now off the car so it can all get swapped as one unit and the car can run on the old front end for now) and rebuilding the front dampers back to their old spec and length, etc, as I'd lengthened the stroke to work out positions for the new front mounts, etc.
Anyway, now she's purring like a kitten, need to double check the timing, bolt the wheels back on and find a decent dyno...
Take alternator off, starts fine.
Much head scratching.
Turns out the alternators we were getting from the local supplier (an electrical specialist, not just a factors) - were basically noisy as hell when they were trying to get to the right voltage at low rpms (i,e - startup only) - a cap in the line doesn't fix it, some shielding might but we've just sacked it off and got a different type of alternator instead, need to alter things to get that to fit properly again now, but after rigging it up today it's purring like a kitten. Need to retime it now though as not certain it was 100% before as it idles smoother now.
It never rains, it pours!
On the upside, I was rebuilding some other dampers* so I rebuilt/revalved the rears on ours to suit the new arms and bled them, so that's one more job off the list and ready to go - although I have just acquired some new go faster parts to machine and fit - I got told these were top secret so...there we go:
It's all very well getting shiny adjustable parts for your dampers but then I spent hours modelling the damned things yesterday - nearly there, housings next.
These are high and low speed compression adjusters, that hopefully with a bit of work on my side will be adaptable enough to use both on the small fronts and large rear dampers...hopefully.
And after another late night tonight, housings done:
And a smaller version with some slightly tweaked internals will fit the smaller dampers on the front too, sorted. And about a third of the the price or less compared to buying the official kit to fit adjusters....
Anyway, got plenty of other bits done in the meantime, made a little jig and counterbored the CVs - things were a little tight for plunge travel made a tool up to clamp the CV stars in the lathe, and we've counterbored the stars slightly.
That gives us a couple of mm more plunge on the shaft just to allow for a bit more flex in bushes/chassis/arms, etc, and also encapsulates the circlip at full extension - so it can't get knocked off the shaft and let the driveshaft fall out of the car - yes, we've had that before!
All the little boring stuff that takes up too much time, but the devil is in the details....
Stuck the old front end back together now we're done mocking up and measure to build the new hubs and arms (they'll get done on a jig now off the car so it can all get swapped as one unit and the car can run on the old front end for now) and rebuilding the front dampers back to their old spec and length, etc, as I'd lengthened the stroke to work out positions for the new front mounts, etc.
Anyway, now she's purring like a kitten, need to double check the timing, bolt the wheels back on and find a decent dyno...
Edited by PhillipM on Tuesday 26th March 01:14
It's a bit tricky getting far enough away in the shed
And the bonnets are still off, but I'll get some when we get things back on the car and take it outside in the sun.
I think the last picture I have with at least most of the car in shot is the one in this thread from last year when the new side panels went on
And the bonnets are still off, but I'll get some when we get things back on the car and take it outside in the sun.
I think the last picture I have with at least most of the car in shot is the one in this thread from last year when the new side panels went on
Gassing Station | Readers' Cars | Top of Page | What's New | My Stuff