500+bhp Mk3 Fiesta Project
Discussion


Sir_Dave said:
I should really stop playing with these old things...Gallen - Thank you  The thread should hopefully start to become a lot more interesting over the months leading up to summer.
Greg – No problem! I am registered there but I don’t tend to use the forum. Is the engine going in your race car? If it’s not too much trouble then I would recommend a set of updated valve springs to prevent high-rpm misfires, as you’re no doubt going to be up to around 7k in no time at all I think Piper do them, if not my engine builder can supply them either via me or direct (message me if you’re interested). I believe they are £130. Additionally have you got some ARP bolts fitted? If not, make sure the rev ceiling is set to at most 7k, ideally 6.9k: the standard bolts stretch – I have in the past spun bearings, which was lucky, as most failures involve the rod leaving via the block!
Thanks,
Mark
The thread should hopefully start to become a lot more interesting over the months leading up to summer.Greg – No problem! I am registered there but I don’t tend to use the forum. Is the engine going in your race car? If it’s not too much trouble then I would recommend a set of updated valve springs to prevent high-rpm misfires, as you’re no doubt going to be up to around 7k in no time at all
I think Piper do them, if not my engine builder can supply them either via me or direct (message me if you’re interested). I believe they are £130. Additionally have you got some ARP bolts fitted? If not, make sure the rev ceiling is set to at most 7k, ideally 6.9k: the standard bolts stretch – I have in the past spun bearings, which was lucky, as most failures involve the rod leaving via the block!Thanks,
Mark
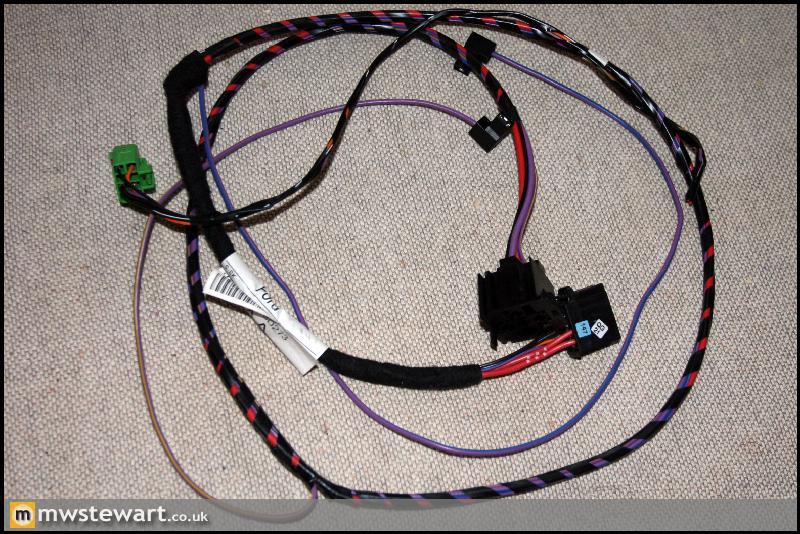
Wiring update. The loom I've used is from a later Fiesta, and it is split into a main/interior loom and an engine loom, and I've now nearly finished the interior wiring changes. All wire colours are OEM, exterior sections are insulation taped, interior are a mix of felt tape and cloth tape to maintain OEM standards.
Additional wires to the engine bay side. All are yet to be taped up:
Blue: Outside temp sensor
Re: Heated washer jets +ve
Green: Traction control on/off
The Fiesta never had switchable Traction Control, but luckily there are spare pins in the green & white connectors which join interio loom to engine loom. I have a spare loom from which I will take spare pins and wire up the switchable T/C wire as if it was standard (I have been using Ford OEM colours throughout).
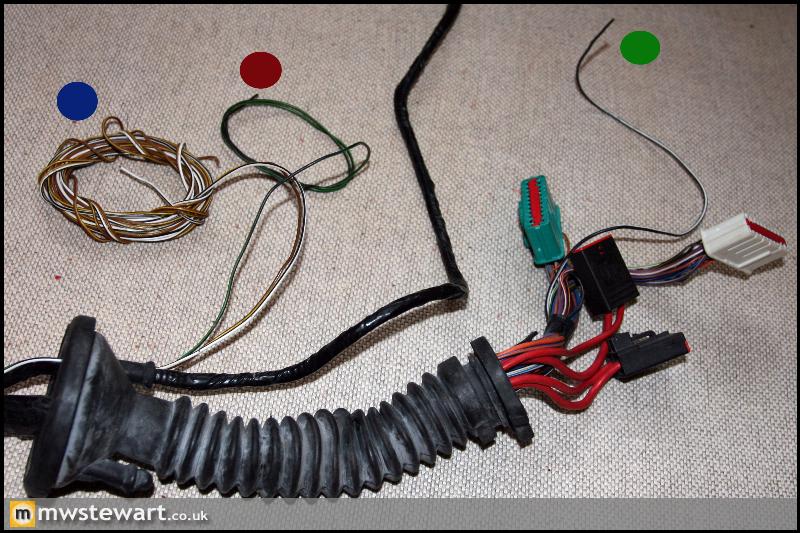
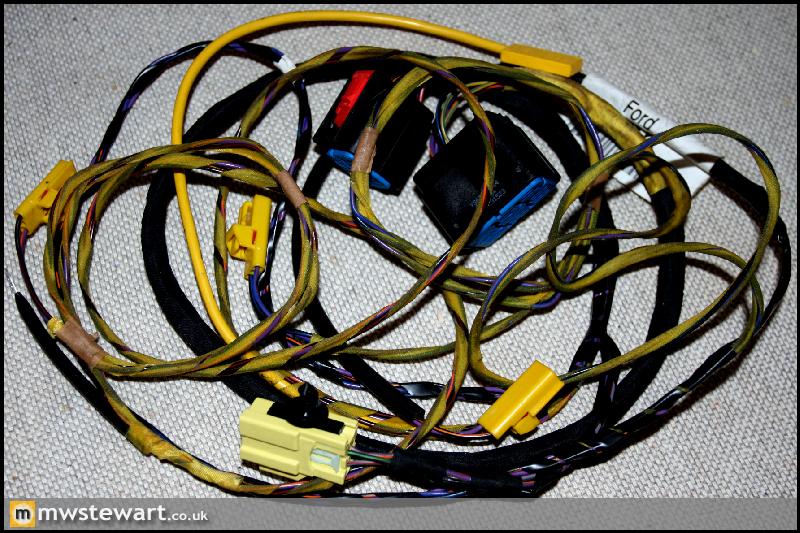
There are some spare pins in the door loom plugs, so I've run an illumination feed through for some puddle lights

In the roof area
Green: Reverse light and illumination feeds ready for a compass equipped auto-dim mirror.
Blue: Existing interior light
Red: New rear interior light
Yellow: New sun visor lights
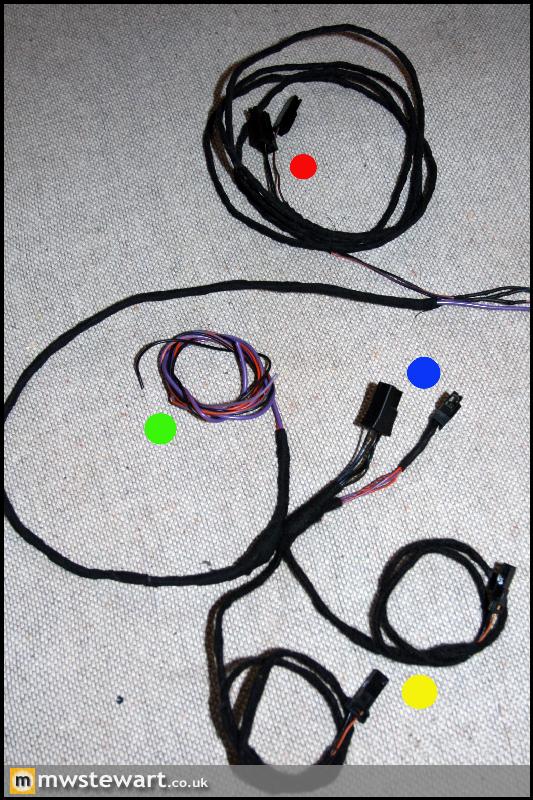
Centre console area
Red: New OEM Focus Heated seat connectors
Green: New rear seat area 12v socket
Yellow: New OEM Focus Traction control connector
Blue: Tailgate release switch

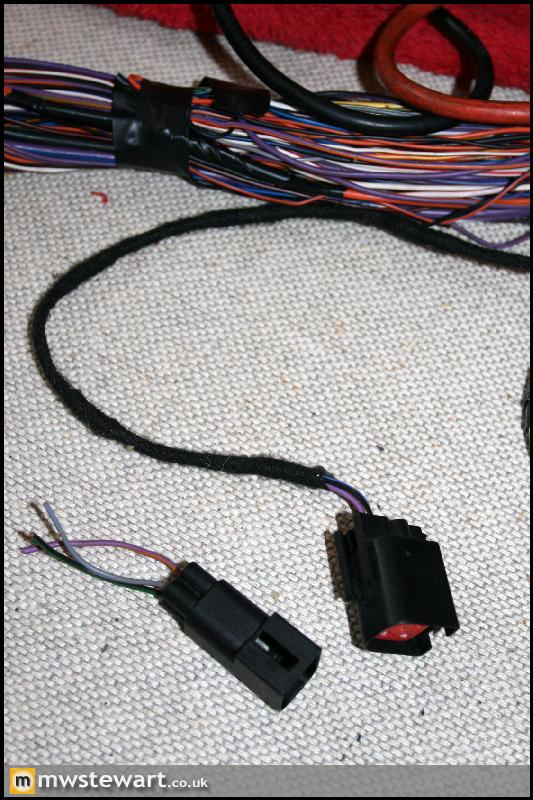
I've added an OEM 4 pin connector behind the instrument cluster area, for ground, +ve and illumination. This is for whatever engine monitoring systems I decide to fit.
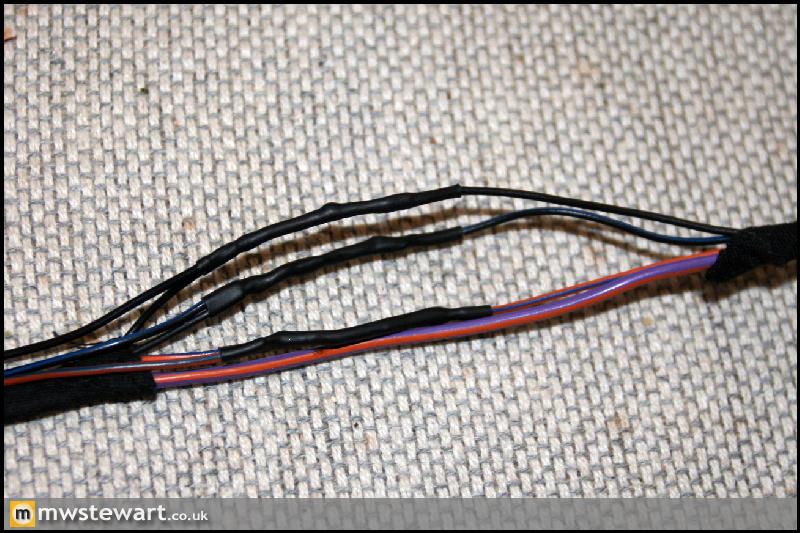
I try to keep the soldered joints as neat as possible, and barely larger than the original wire
OEM plug in modules
1) Heated Front Screen -new
2) Passenger Airbag and Seatbelt pre-tensioners -new (there is a seat airbag version I'm currently looking for)
3) Screenwash low level sensor -used
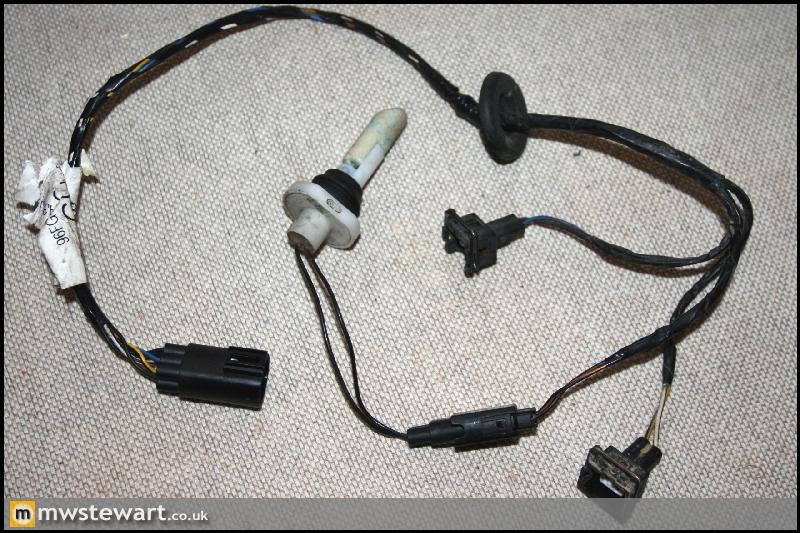
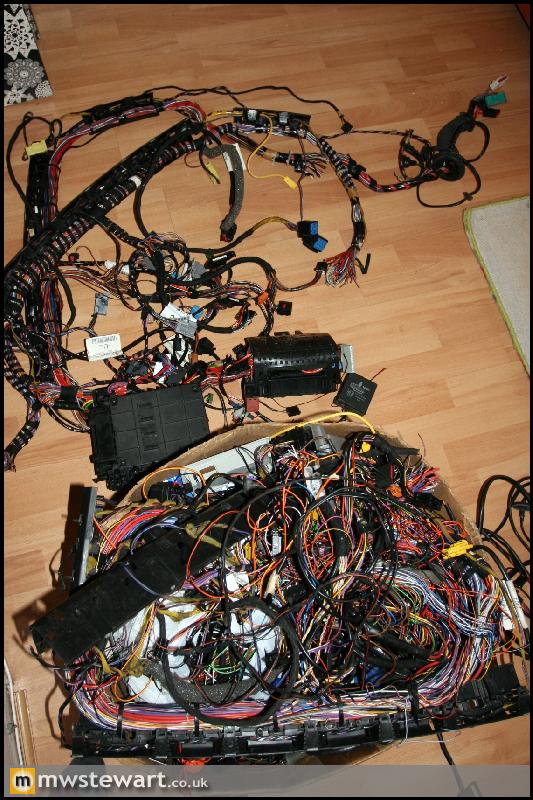
I have a spares pile of OEM looms, so I can utilise any OEM connectors, pins, wire colours etc. Our house is a renovation project so I don't feel guily about leaving this in the spare room...
Additional wires to the engine bay side. All are yet to be taped up:
Blue: Outside temp sensor
Re: Heated washer jets +ve
Green: Traction control on/off
The Fiesta never had switchable Traction Control, but luckily there are spare pins in the green & white connectors which join interio loom to engine loom. I have a spare loom from which I will take spare pins and wire up the switchable T/C wire as if it was standard (I have been using Ford OEM colours throughout).
There are some spare pins in the door loom plugs, so I've run an illumination feed through for some puddle lights
In the roof area
Green: Reverse light and illumination feeds ready for a compass equipped auto-dim mirror.
Blue: Existing interior light
Red: New rear interior light
Yellow: New sun visor lights
Centre console area
Red: New OEM Focus Heated seat connectors
Green: New rear seat area 12v socket
Yellow: New OEM Focus Traction control connector
Blue: Tailgate release switch
I've added an OEM 4 pin connector behind the instrument cluster area, for ground, +ve and illumination. This is for whatever engine monitoring systems I decide to fit.
I try to keep the soldered joints as neat as possible, and barely larger than the original wire
OEM plug in modules
1) Heated Front Screen -new
2) Passenger Airbag and Seatbelt pre-tensioners -new (there is a seat airbag version I'm currently looking for)
3) Screenwash low level sensor -used
I have a spares pile of OEM looms, so I can utilise any OEM connectors, pins, wire colours etc. Our house is a renovation project so I don't feel guily about leaving this in the spare room...
Edited by mwstewart on Friday 18th March 16:05
DuncanM said:
It's all been said before but I'll add that this project is utterly amazing and is testament to your seemingly endless talent .
Best thread I have read for while.
Although it amuses me somewhat that this car (beast!) will be your girlfriends daily driver ha ha ha!
Duncan
Ahh. This idea went out of the window when the project left the realms of 'cheap'. She (Lindsey) isn't a bad driver, but anything I lend her seems to need tracking within a month .Best thread I have read for while.
Although it amuses me somewhat that this car (beast!) will be your girlfriends daily driver ha ha ha!
Duncan
 I ended up buying her something more modern as my car is too big for her really.
Thanks for the comments!
Mark
Puma/Mk5 Fiesta dashboard fitting.
The A Pillar required modification
Top: an angled fixing bracket with captive nut
Middle: hole for a locating peg on the dashboard
Bottom: New bracket for the lower dashboard fixing
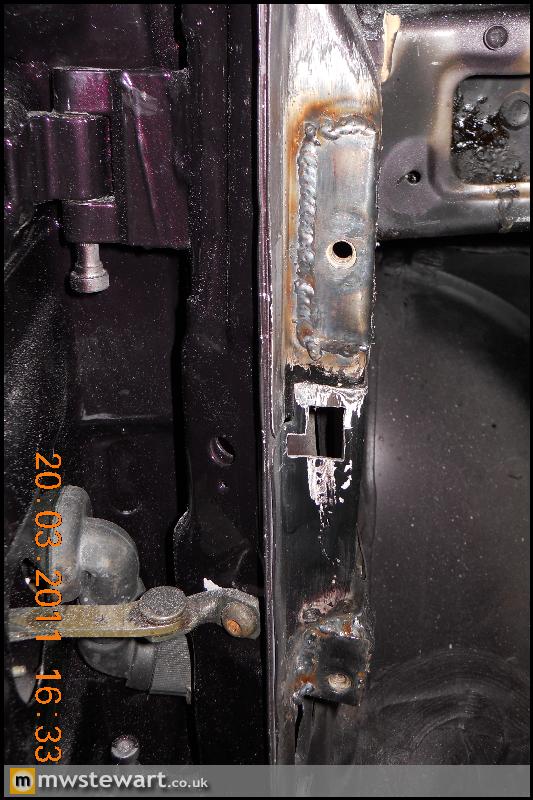
All bolted in correctly
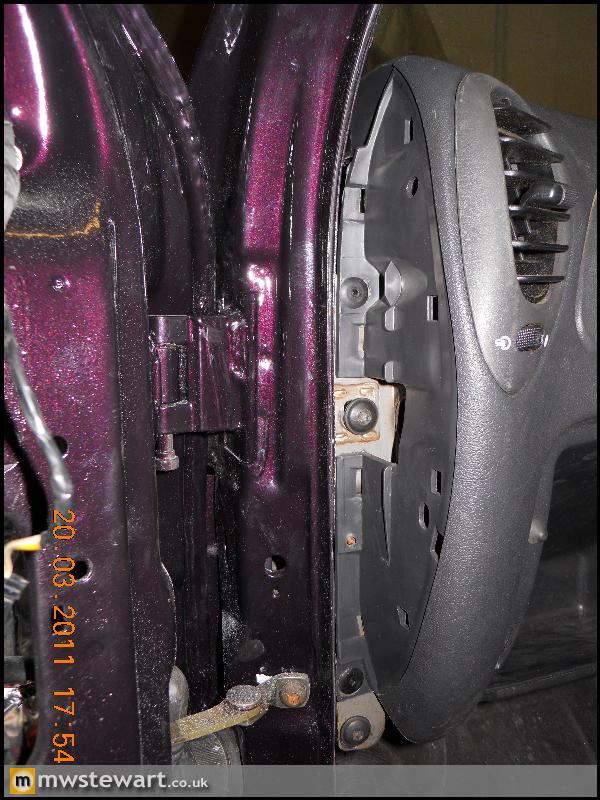
Perfect fit along the bottom of the windscreen.
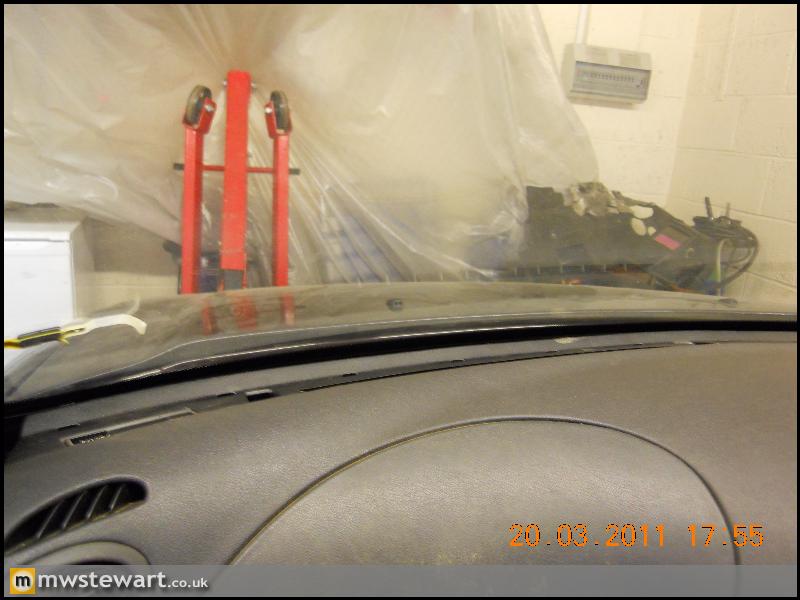
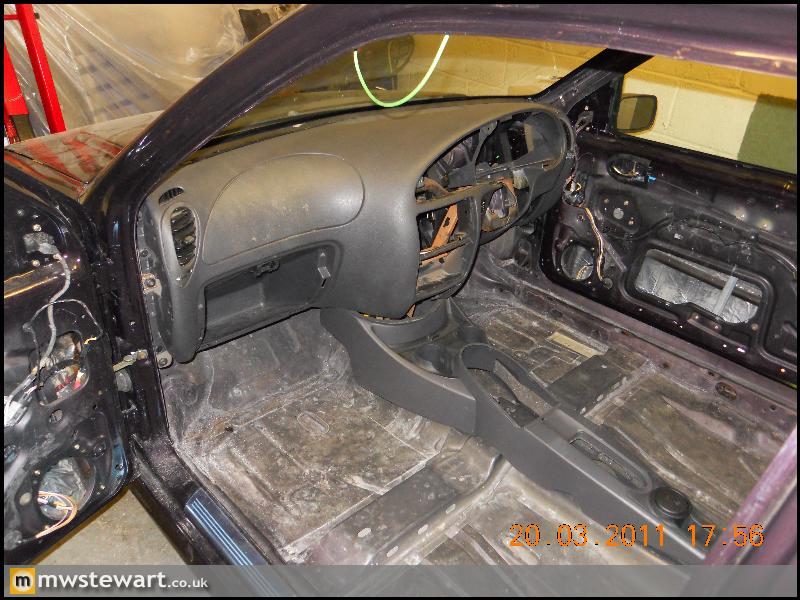
Here's the dash in place together with a Focus centre console that I will modify to fit.
Comparison of door seals: Mk3 Fiesta, left, and Mk5 Fiesta, right. I have a set of Mk5 seals on order as they provide a better seal.

The A Pillar required modification
Top: an angled fixing bracket with captive nut
Middle: hole for a locating peg on the dashboard
Bottom: New bracket for the lower dashboard fixing
All bolted in correctly
Perfect fit along the bottom of the windscreen.
Here's the dash in place together with a Focus centre console that I will modify to fit.
Comparison of door seals: Mk3 Fiesta, left, and Mk5 Fiesta, right. I have a set of Mk5 seals on order as they provide a better seal.
All, Thank you for the compliments!
I collected the new wheels this weekend past, only to get them home to find the PCD was 4x114 rather than 4x10⁸. To add insult to injury this was a custom order to my specification! I complained to the supplier and Team Dynamics responded by giving me a 25% discount should I order another set – so I have.
My engine will be ready by May; I spoke to the builder last night and the head has been ported and 16x oversize valves and associated hardware fitted. Cams will be replaced with Ian’s ‘response’ spec cams, and the Turbo is a GT30 based unit. I now have to source a nice Dry Sump system, and once the engine is built, make it fit in the bay along with HPAS, A/C and the Alternator – wish me luck!
Greg_D said:
http://www.zenperformance.co.uk/
these guys can supply a dry sump system for a zetec, at about half the money Pace want
Best of british Mark
Excellent, thanks Greg.these guys can supply a dry sump system for a zetec, at about half the money Pace want
Best of british Mark
Email sent.
pistonchris said:
Just a quick question how come no matter how many ford mags you read with big bhp fWd fords they never seem to match up to the vauxhalls.A example is speckys Tigra 500 bhp and 10.1 quarter mile but the fords with similar spec seem to be at least a second slower.
There are too many factors to compare cars based on power level alone, for example; driver, gearing, tyres, weight, suspension, geometry to name a few. The engine specification also plays a big part as two cars with a comparable power figure can behave completely differently depending on what the driver wanted from the build.I'm not really familiar with 1/4 mile races as they aren't my 'thing', but I know 10.1 in a FWD car is very impressive. I should image that car was in some way set up for 1/4 mile work? My project for example will not be, as I want it optimised for actual driving.
pistonchris said:
Ok i was just wondering it's just it seems anybody can chuck a half assed corsa together and beat most cars.
It's just i know how much zetec builds cost and i just doesnt seem right.
I very much doubt that Ford projects are disproportionally more expensive than similar Vauxhall projects: both are cheap brands and the components required to sustain reasonable HP from a forced induction 4cyl motor are usually around the same irrespective of manufacturer.It's just i know how much zetec builds cost and i just doesnt seem right.
I suspect some people may exaggerate their build costs

Braking update.
Slight change of plan. I'm no longer going to use the 304x25 MGTF front discs, instead I have located some slightly larger 325x25 two-piece AP Racing discs. They were spares kept by a rally team and protocol for these is to get them up to temperature once so they are ready for immediate use, so they are effectively new.
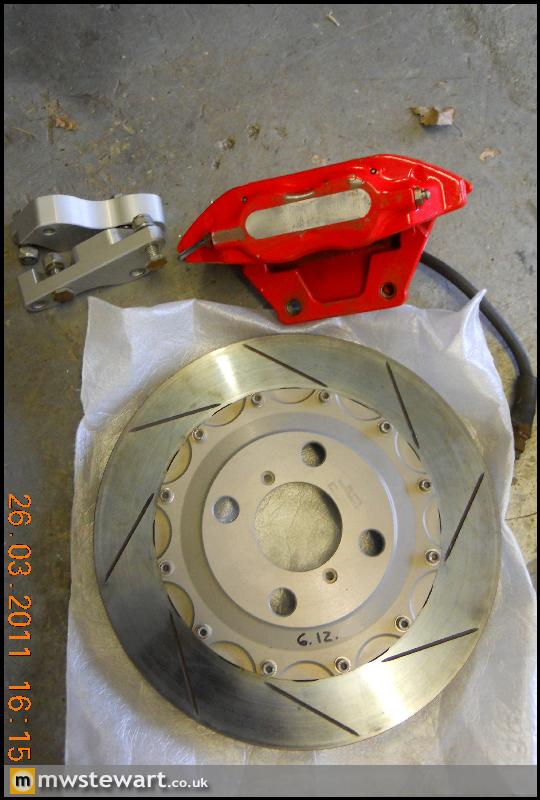
I also had the MG logo milled from the AP calipers. I will paint these in AP Grey and apply the standard yellow AP Racing decals (that's not rust on the shell in the background, it's wax).
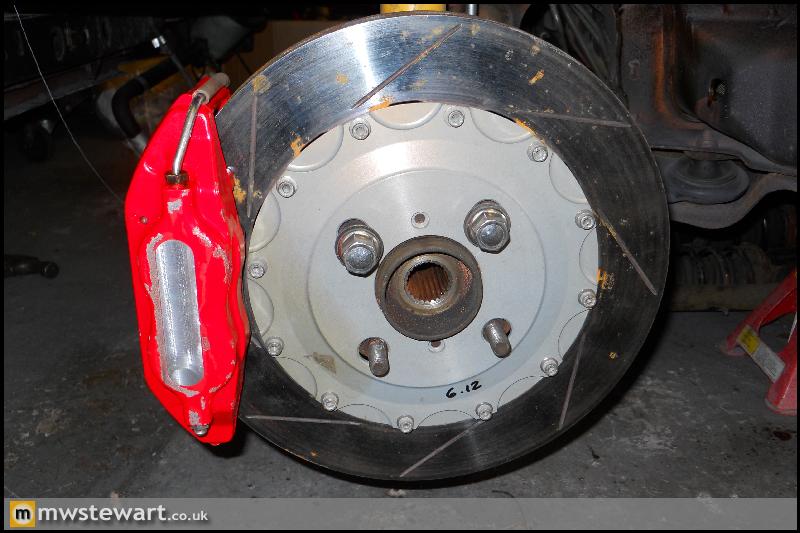
I haven't had prior experience of a quality two-piece disc and the difference in weight was a real surprise to me, it is incredible! Both front 325mm discs and bells weigh less than the standard 240mm Fiesta discs. The AP calipers also weigh less than the original cast iron single piston calipers.
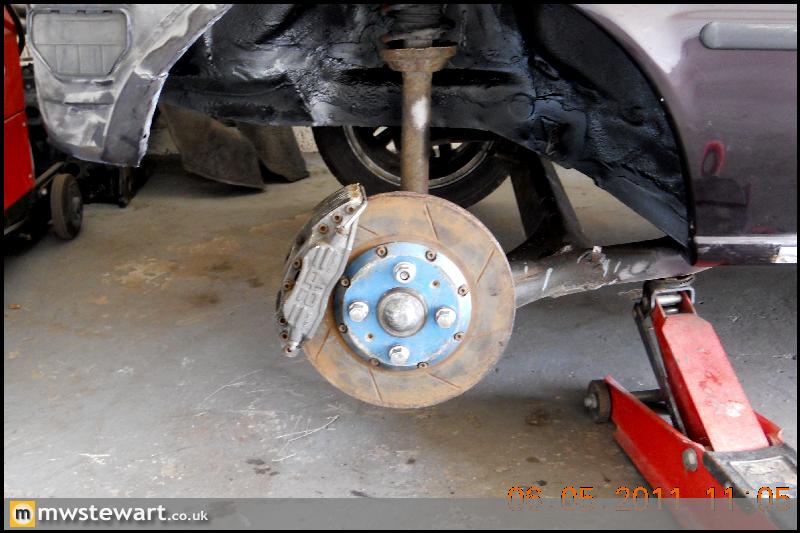
New rear brakes: Brembo two piston calipers and the MG 304mm discs. I'm considering ordering a two piece disc for the rear although this isn't an immediate priority at the moment.
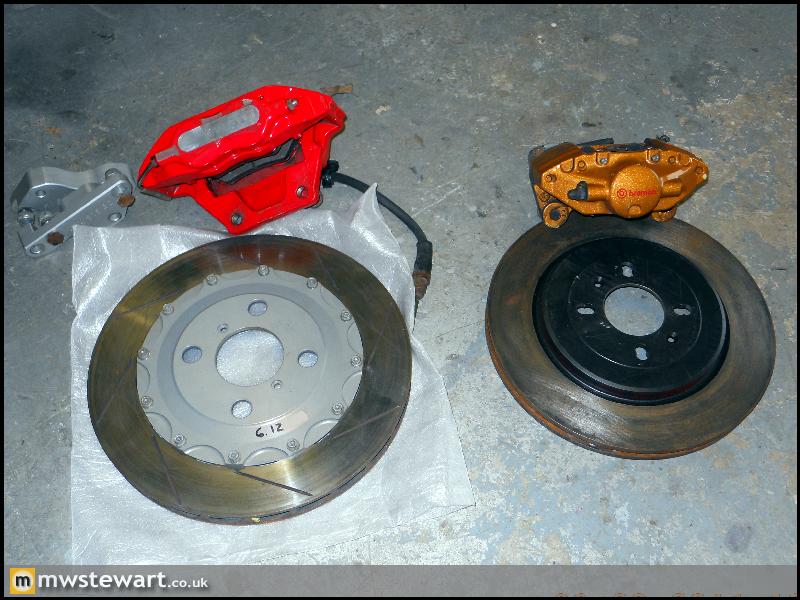
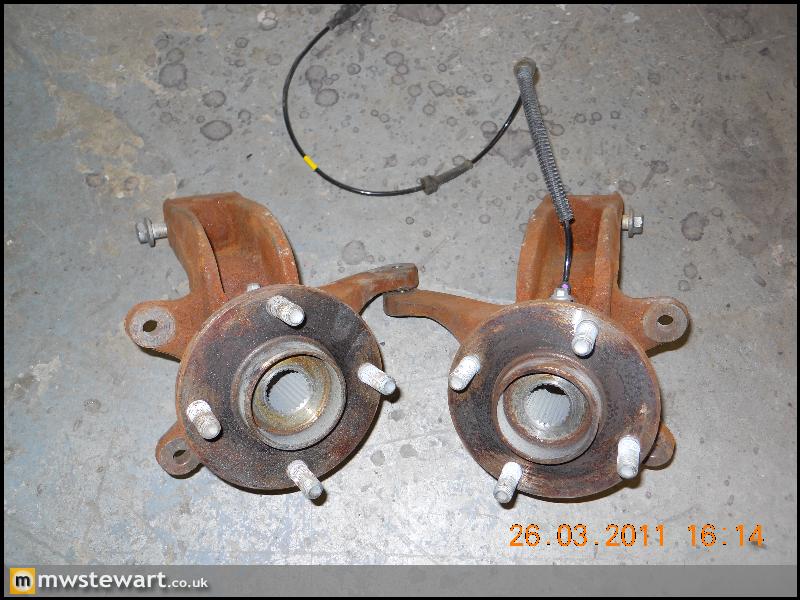
I got hold of a set of Mk6 Fiesta ST150 front hubs as on initial inspection the strut diameter and drive shaft size/spline are identical to the Mk3, but will enable me to use the later type ABS. I just need to check what changed in terms of alignment: I want to maintain the Mk3 steering geometry as it gives decent feel.
Slight change of plan. I'm no longer going to use the 304x25 MGTF front discs, instead I have located some slightly larger 325x25 two-piece AP Racing discs. They were spares kept by a rally team and protocol for these is to get them up to temperature once so they are ready for immediate use, so they are effectively new.
I also had the MG logo milled from the AP calipers. I will paint these in AP Grey and apply the standard yellow AP Racing decals (that's not rust on the shell in the background, it's wax).
I haven't had prior experience of a quality two-piece disc and the difference in weight was a real surprise to me, it is incredible! Both front 325mm discs and bells weigh less than the standard 240mm Fiesta discs. The AP calipers also weigh less than the original cast iron single piston calipers.
New rear brakes: Brembo two piston calipers and the MG 304mm discs. I'm considering ordering a two piece disc for the rear although this isn't an immediate priority at the moment.
I got hold of a set of Mk6 Fiesta ST150 front hubs as on initial inspection the strut diameter and drive shaft size/spline are identical to the Mk3, but will enable me to use the later type ABS. I just need to check what changed in terms of alignment: I want to maintain the Mk3 steering geometry as it gives decent feel.
DuncanM said:
I understand if you don't want to answer this but I would guess just from reading about your project that the cost has got to be close to if not more than 20k?
Quite awesome and insane at the same time.
Regards
Duncan
Duncan,Quite awesome and insane at the same time
.Regards
Duncan
I don't mind answering: I'm not even close to 7k at the moment and the bulk of that is the engine build and new Turbo. `All in` will be under 10k and that includes a full leather re-trim, Pectel management and Dyno mapping. I'm quite shrewd with purchases and tend to avoid the over-priced and well-known modifications in favour of trying something new.
I couldn't bring myself to spend much more on an old Fiesta

Regards,
Mark
DuncanM said:
Wow, just plain awesome then because in my mind that is a hell of a lot of car for the money!
Really surprised that the engine build doesn't bust 5k alone.
I'm genuinely impressed and cannot wait to see the finished article.
I love the reader's cars forum .
.
Duncan
Duncan,Really surprised that the engine build doesn't bust 5k alone.
I'm genuinely impressed and cannot wait to see the finished article
.I love the reader's cars forum
.Duncan
Thanks again. The engine bill will be over 5k once finished. The current engine spend is a £600 Crate engine, £3392.92 for the build and new Turbo, and a £300 manifold. The Dry sump, ECU and mapping will take that bill close to 6k with the remaining 4k swallowed up by the shell restoration and modifications.
Like you say, it's a lot of performance for sensible money.
Cheers,
Mark
Thanks chaps!
Duncan - It's effectively a total restoration, so costs would be astronomical if someone else were doing the work. I think your original suggestion would be accurate.
I would consider a TVR at some point. I guess a full strip down is on the cards depending on what age of car is purchased? I suppose getting the chassis galvanised and re-making the loom is a good start.
Cheers,
Mark
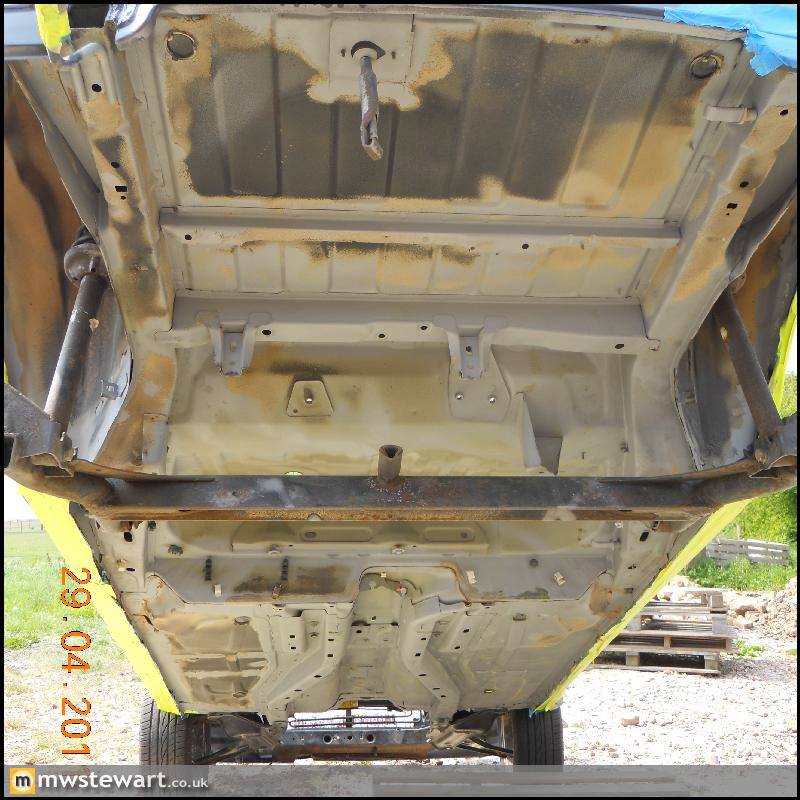
I have changed tack slightly with the shell and I ended up stripping out all the original sound deadening and underseal to seam welded it all. The shell is booked in for shot blasting on Friday - I'm having the entire underneath stripped so I can re-etch prime, underseal and stone chip. I've gone to all this work so I don't want anything lurking under the original underseal that could come back and haunt me in a few years' time. Really I should have done all this before I painted it, but I think I'll get a concourse paint job in the not too distant future anyway.
I have also ordered in some new metal ready for Friday, so I can strengthen the shell when it's been blasted. Ahead of that I have been busy blocking up every hole to prevent shot blasting media filling the box sections.
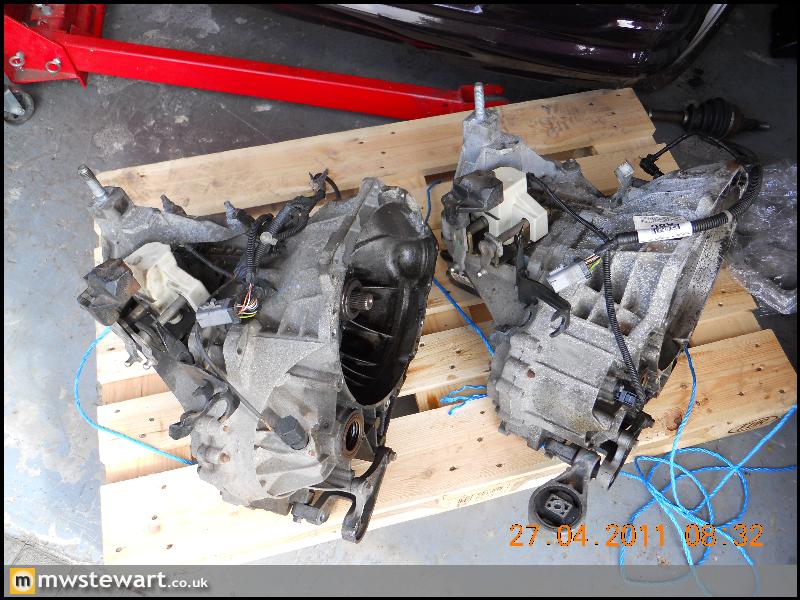
I bought a pair of low mileage MTX gearboxes to start building my custom gearbox. I also ordered a pair of brand new Quaife LSD's, so I will end up with one top speed gearbox, and one sprint gearbox.
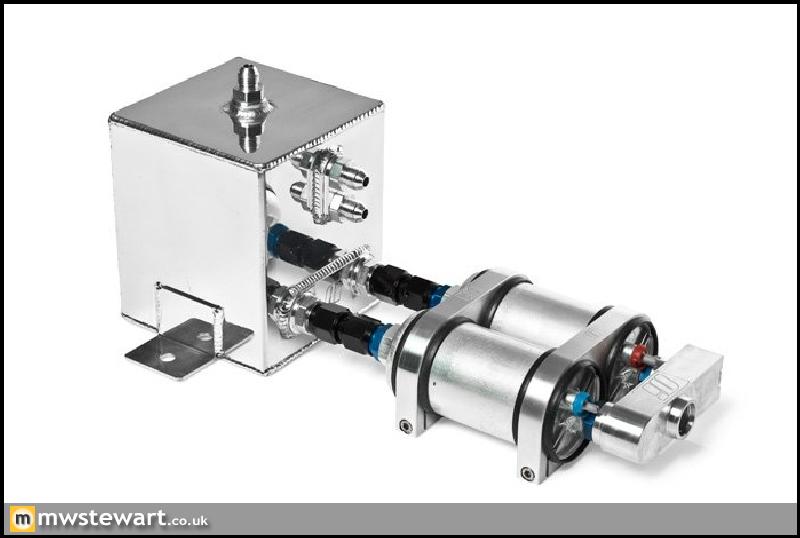
I have finalised the design of my fuel system and ordered parts: A 255LPH in-tank lift pump in the stock tank running to a two litre swirl pot, this feeds two Bosch 044 pumps with a 2-1 manifold. The second 044 is for resilience.
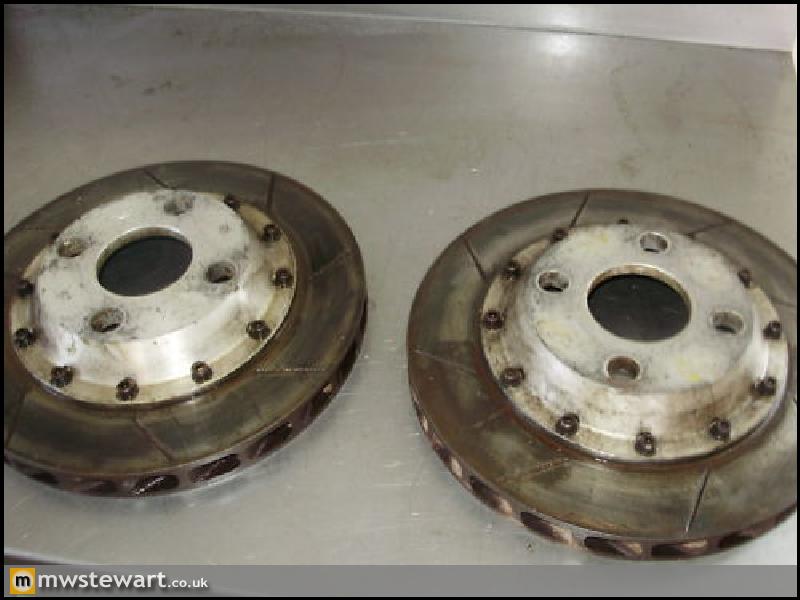
I bought some Escort Cosworth WRC rear discs, not realising that the bells have an incorporated 10mm spacer - they could be useful for someone who wishes to use them on the front, but I don't need the 10mm extra track at the rear.
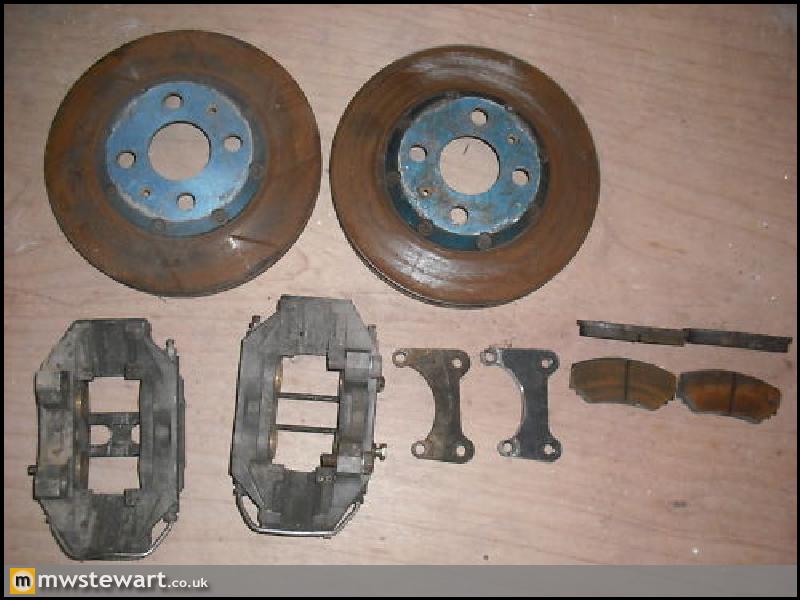
So, I ended up buying another set of rear brakes - these are AP Racing WRC 4 piston calipers with Titanium pistons and 285mm discs. They are AP motorsport calipers (hence Grey not black) and so don't have dust seals, this doesn't worry me as I will service most areas of the car anually anyway. For me that is part of the fun of owning a modified car.
Other parts have turned up including a new fuel tank, a new Ford carpet and other bits and bobs.
I have also ordered in some new metal ready for Friday, so I can strengthen the shell when it's been blasted. Ahead of that I have been busy blocking up every hole to prevent shot blasting media filling the box sections.
I bought a pair of low mileage MTX gearboxes to start building my custom gearbox. I also ordered a pair of brand new Quaife LSD's, so I will end up with one top speed gearbox, and one sprint gearbox.
I have finalised the design of my fuel system and ordered parts: A 255LPH in-tank lift pump in the stock tank running to a two litre swirl pot, this feeds two Bosch 044 pumps with a 2-1 manifold. The second 044 is for resilience.
I bought some Escort Cosworth WRC rear discs, not realising that the bells have an incorporated 10mm spacer - they could be useful for someone who wishes to use them on the front, but I don't need the 10mm extra track at the rear.
So, I ended up buying another set of rear brakes - these are AP Racing WRC 4 piston calipers with Titanium pistons and 285mm discs. They are AP motorsport calipers (hence Grey not black) and so don't have dust seals, this doesn't worry me as I will service most areas of the car anually anyway. For me that is part of the fun of owning a modified car.
Other parts have turned up including a new fuel tank, a new Ford carpet and other bits and bobs.
Today I started on chassis strengthening work, I have already reinforced the pedal box and brake servo area, and next up were the rear turrets.
I fabricated a piece that joins the turrets to the lower chassis leg that runs underneath the boot floor.
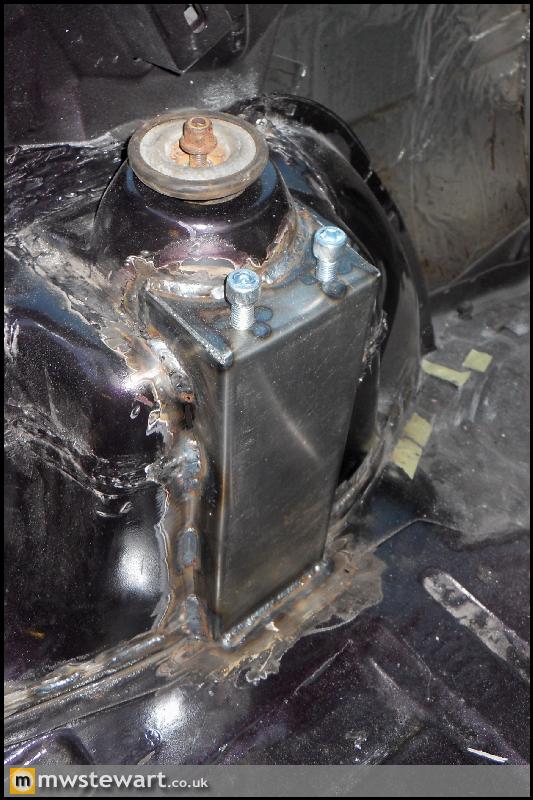
I added a pair of captive nuts on each piece:
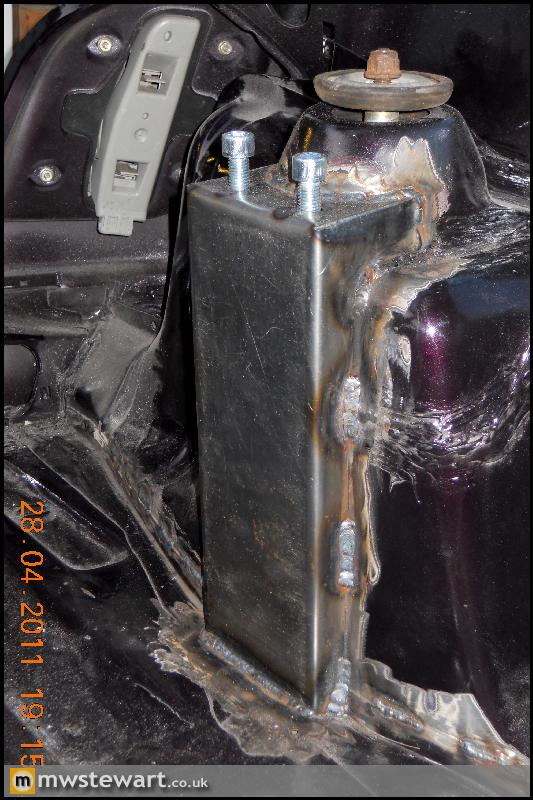
With the aim of designing a billet aluminum strut brace to go between:

I fabricated a piece that joins the turrets to the lower chassis leg that runs underneath the boot floor.
I added a pair of captive nuts on each piece:
With the aim of designing a billet aluminum strut brace to go between:
On Friday a friend of mine kindly trailered the Fiesta to a local farm to be blasted - thanks Jim! His friend races a Caterham and the Fiesta just squeezed on to the trailer.
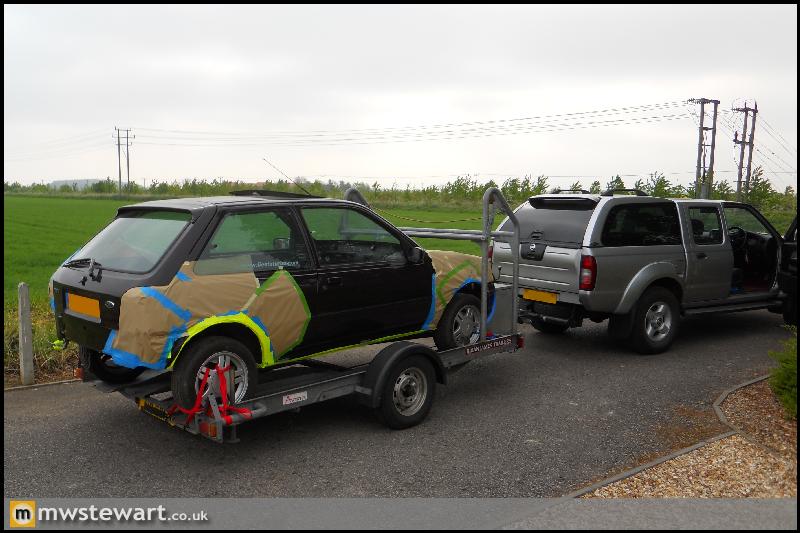
We used lifting straps on the front cross member and rear towing eye to get each end of the shell up in to the air. In terms of shell preparation key areas were masked off with several layers of masking tape and duct tape, and all holes inside had been taped off to prevent dust. Thanks to my Dad who helped here.

Underneath I had previously used Scotchbrite pads to remove underseal around stone chips that had begun to rust, and I'd applied grey primer as a temporary measure. The front end was very good and there were no major problems, and in fact this part alone didn't warrant blasting.

The rear end was what made me decide to have the work done: surface rust was present along the chassis seams and in hard to reach places, which would have taken a long time to remove when using a flap disc and hobby type sand blaster, especially in the wheel arches. In my opinion if rust removal is the objective then it all must be removed, otherwise there's little point starting.
The blasting media was a fine grade of glass bead.
The blaster only operated at 10bar, but there was a serious volume of air going through; It sounded like a jet engine!
Here are the results: one very solid shell and a good surface for me to work on. The man operating the blaster was also impressed and it made me feel even better when he recounted a previous job on a Karmann Ghia; by the time he'd finished removing layers of filler and rust there was nothing left underneath
It was good to have a blaster who had worked with cars previously, as the underneath of a car body requires far more finesse than a lot of the commercial jobs do. The photos show just how much resistance underseal has to abrasion, in fact removing it means holding the gun in one place to build up heat first which increases the risk of warped panels. I told the blaster to leave it given that all the areas with underseal left on them are perfect.
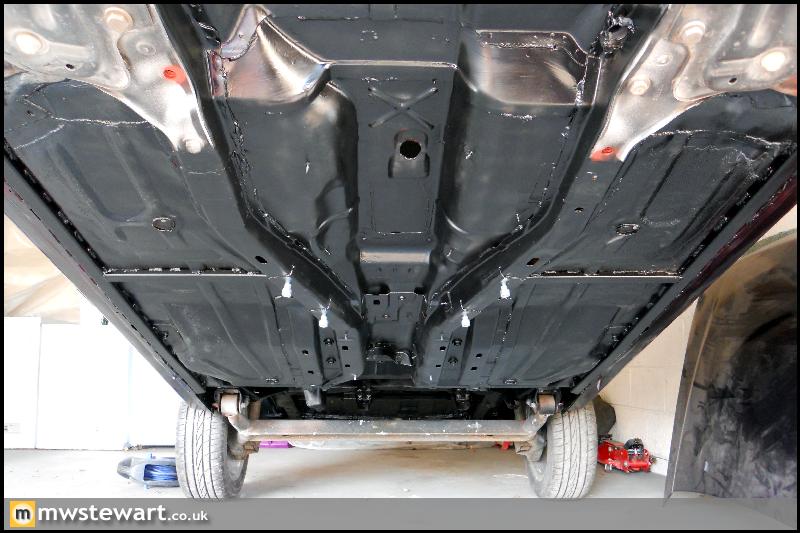
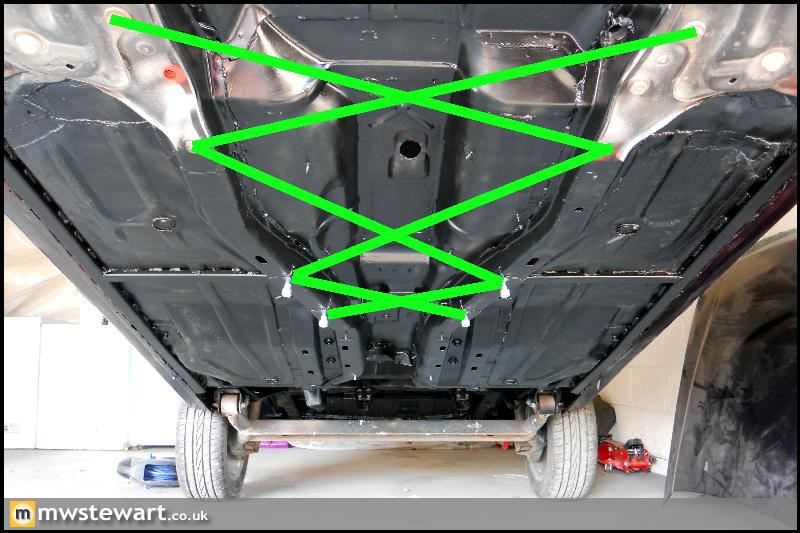
Some more chassis strengthening. The Fiesta is constructed in a way that places reliance on the sills for most of the middle-body strength. The rest of the shell and especially the rear end feature well sized box sections but for me the sills are disappointing given what is expected of them. This is especially true when compared to cars like the Mk5 Golf which have sills made of multiple sections in 1.5mm steel. The Mk3.5 revisions added rigidity by running two central chassis rails to the rear of the floorpan but this still doesn't go far enough for me, so I have added a 1.5mm 'U' section to each sill which links the rear beam mounts to the front lower arm area.

I made sure I had the entire underneath in primer on the same day it was blasted. I was lucky in that it was another very hot and dry day. I used 90% Zinc primer - it's amazing stuff, 1 litre weighs 5kg! I think this and Epoxy are the best things that can be applied to bare metal to prevent corrosion. The high Zinc content acts like a sacrificial anode does on a boat hull.
I used Halfords red oxide primer spray. It's like water so gets into the seams nicely.
We used lifting straps on the front cross member and rear towing eye to get each end of the shell up in to the air. In terms of shell preparation key areas were masked off with several layers of masking tape and duct tape, and all holes inside had been taped off to prevent dust. Thanks to my Dad who helped here.
Underneath I had previously used Scotchbrite pads to remove underseal around stone chips that had begun to rust, and I'd applied grey primer as a temporary measure. The front end was very good and there were no major problems, and in fact this part alone didn't warrant blasting.
The rear end was what made me decide to have the work done: surface rust was present along the chassis seams and in hard to reach places, which would have taken a long time to remove when using a flap disc and hobby type sand blaster, especially in the wheel arches. In my opinion if rust removal is the objective then it all must be removed, otherwise there's little point starting.
The blasting media was a fine grade of glass bead.
The blaster only operated at 10bar, but there was a serious volume of air going through; It sounded like a jet engine!
Here are the results: one very solid shell and a good surface for me to work on. The man operating the blaster was also impressed and it made me feel even better when he recounted a previous job on a Karmann Ghia; by the time he'd finished removing layers of filler and rust there was nothing left underneath
It was good to have a blaster who had worked with cars previously, as the underneath of a car body requires far more finesse than a lot of the commercial jobs do. The photos show just how much resistance underseal has to abrasion, in fact removing it means holding the gun in one place to build up heat first which increases the risk of warped panels. I told the blaster to leave it given that all the areas with underseal left on them are perfect.
Some more chassis strengthening. The Fiesta is constructed in a way that places reliance on the sills for most of the middle-body strength. The rest of the shell and especially the rear end feature well sized box sections but for me the sills are disappointing given what is expected of them. This is especially true when compared to cars like the Mk5 Golf which have sills made of multiple sections in 1.5mm steel. The Mk3.5 revisions added rigidity by running two central chassis rails to the rear of the floorpan but this still doesn't go far enough for me, so I have added a 1.5mm 'U' section to each sill which links the rear beam mounts to the front lower arm area.
I made sure I had the entire underneath in primer on the same day it was blasted. I was lucky in that it was another very hot and dry day. I used 90% Zinc primer - it's amazing stuff, 1 litre weighs 5kg! I think this and Epoxy are the best things that can be applied to bare metal to prevent corrosion. The high Zinc content acts like a sacrificial anode does on a boat hull.
I used Halfords red oxide primer spray. It's like water so gets into the seams nicely.
Thanks guys, the feedback is encouraging 
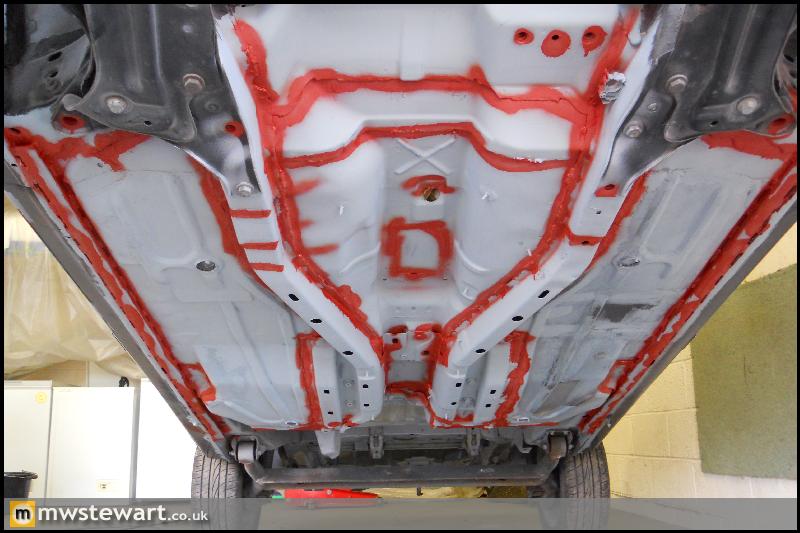
Given that primer is porous, I have sprayed over it with satin black.

The next step will be for me to apply some 3M underseal with a 'schultz' gun. The 3M product is of OEM quality:

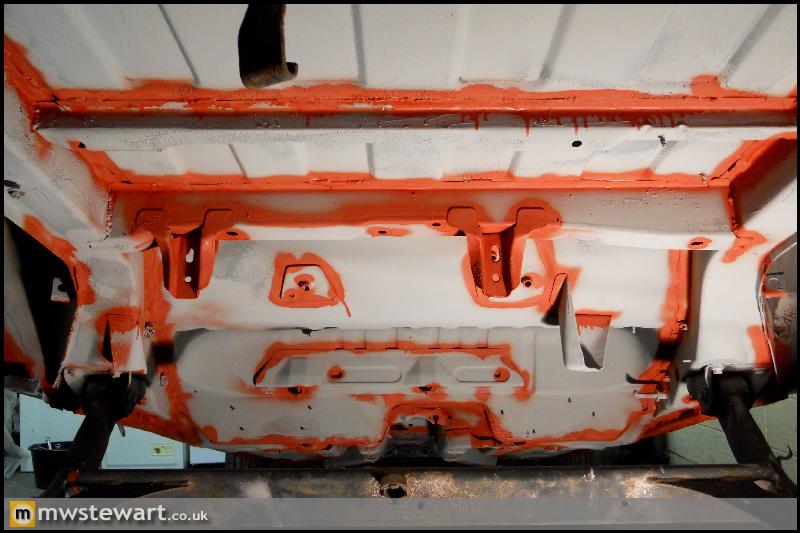
Some more shell reinforcement.

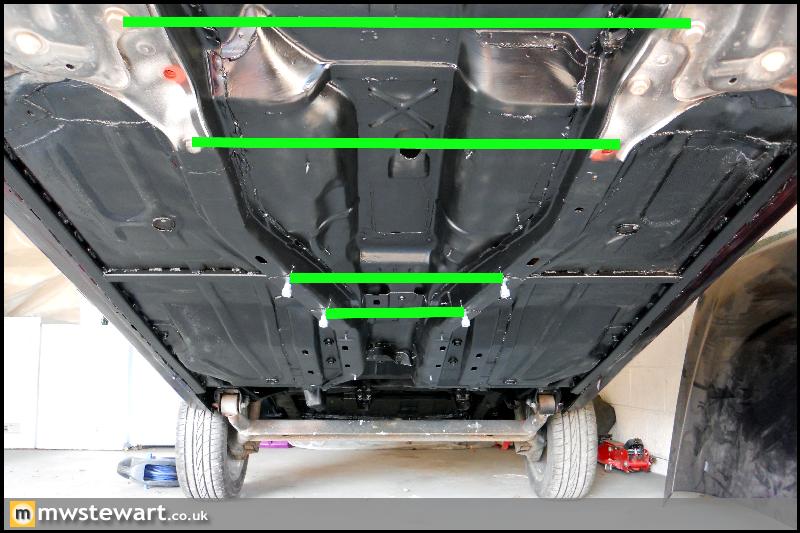
I have linked the new sill reinforcement to the central chassis rails.
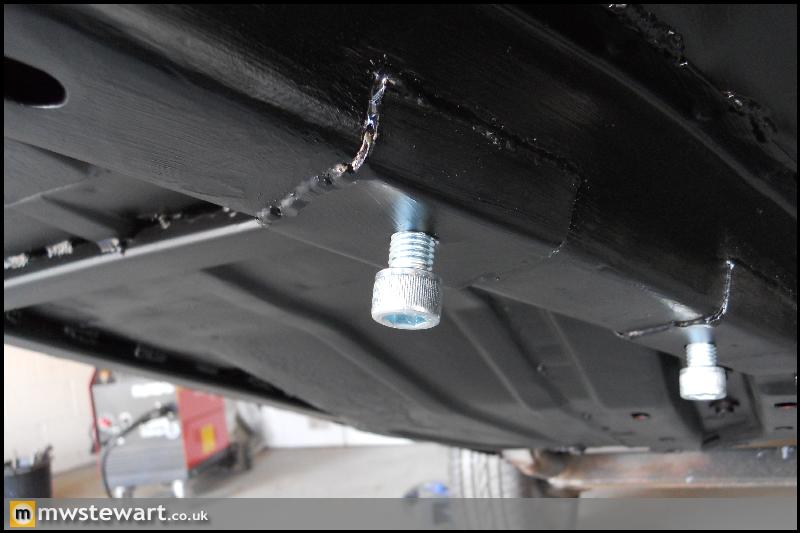
Then at the intersection on the central chassis rails I've added some 1.2mm thick pads with a captive nut attached.
I am still designing a subframe that that will link these new points to the front arm mounting points, then on to the lower engine mount, to the front chassis legs and finally to the front cross member. Ground clearance is a factor here, as is exhaust clearance. Looking at the shell I will need to drop down from a 3" downpipe into two 2.25" pipes for the length of this subframe, which isn't a problem as there is sufficient clearance in the exhaust tunnel.
A tubular steel version would probably look like this:
Or if I triangulate, I could step down to some 10mm thick Aluminium flat bar, then run countersunk machine screws to really keep a low profile. I think this will be the best option.
Given that primer is porous, I have sprayed over it with satin black.
The next step will be for me to apply some 3M underseal with a 'schultz' gun. The 3M product is of OEM quality:
Some more shell reinforcement.
I have linked the new sill reinforcement to the central chassis rails.
Then at the intersection on the central chassis rails I've added some 1.2mm thick pads with a captive nut attached.
I am still designing a subframe that that will link these new points to the front arm mounting points, then on to the lower engine mount, to the front chassis legs and finally to the front cross member. Ground clearance is a factor here, as is exhaust clearance. Looking at the shell I will need to drop down from a 3" downpipe into two 2.25" pipes for the length of this subframe, which isn't a problem as there is sufficient clearance in the exhaust tunnel.
A tubular steel version would probably look like this:
Or if I triangulate, I could step down to some 10mm thick Aluminium flat bar, then run countersunk machine screws to really keep a low profile. I think this will be the best option.
Edited by mwstewart on Monday 2nd May 11:40
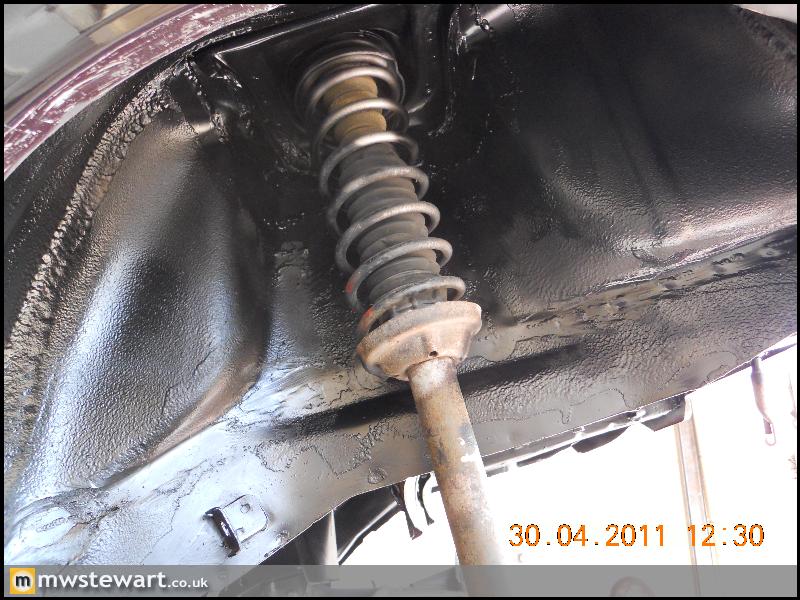
My new rear brakes arrived, so I couldn't resist fitting them. I will replace the disc/rotors, have the bells re-anodised and repaint the calipers.

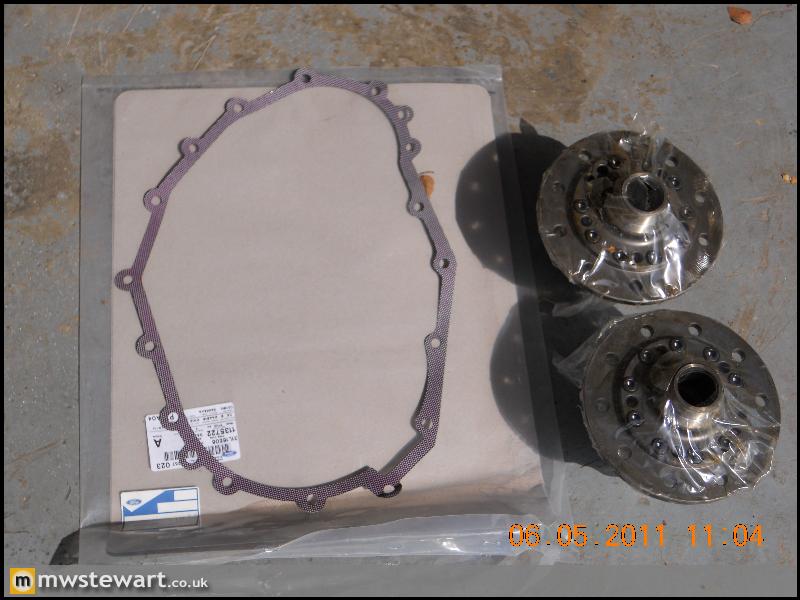
Thanks to TompeteRS for my Quaife ATB Limited Slip Differentials and the bellhousing spacer gasket:
I have news from Ian (engine builder); my head is back from the CNC shop and now has 16 oversize valves, double valve springs and the porting to both sides, so Ian can now measure clearances and order a pair of cams to suit. I borrowed a bare block & head from him in the mean time and I hope to get the engine mounts fabricated this weekend.
Edited by mwstewart on Friday 6th May 14:17
Gassing Station | Readers' Cars | Top of Page | What's New | My Stuff