500+bhp Mk3 Fiesta Project
Discussion


My first post here, but i love your attention to detail. Probably for most it looks obsessed, but i cannot get enough of those wonky lil' details like the plastic cover for the rear seat belt aperture... I reckon this Fiesta will look like a Fiesta, rides like a executive car and goes like stink! Lovely combo!
I reckon this Fiesta will look like a Fiesta, rides like a executive car and goes like stink! Lovely combo!
Lampredi said:
I guess I speak for most of us...
cmon mate ... we're getting desperate here!
+1cmon mate ... we're getting desperate here!
And in reference to Porkie, Yes it was Lucas trolley from one of the ford mags.
If you google the trolley 183.99mph it ll come up i think.
Edited: for spelling

Edited by cossy400 on Saturday 19th May 22:07
Ha, sorry all I'm very busy with work at the moment so I haven't had chance to devote a great deal of time to the car, but here's a small update. All the following photos were taken on my mobile, so please excuse the poor quality.
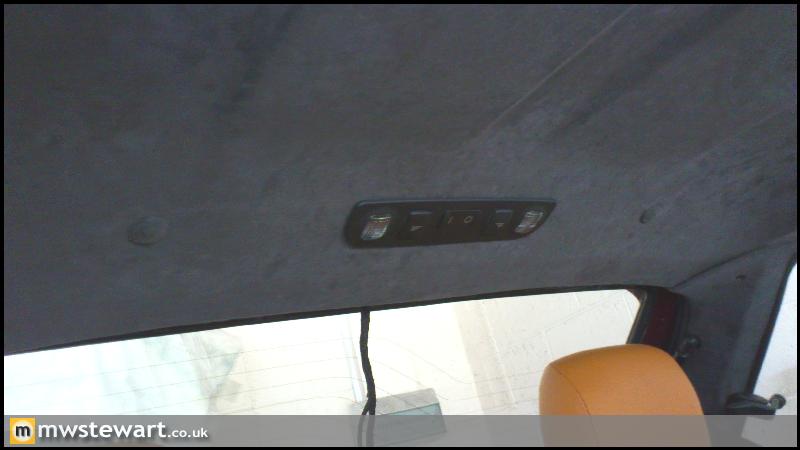
Alcantara Roof Fittings
I've trimmed in Alcantara the sunroof mounting bracket and also two 'buttons' which secure the rear roof lining. They were previously a pale grey.
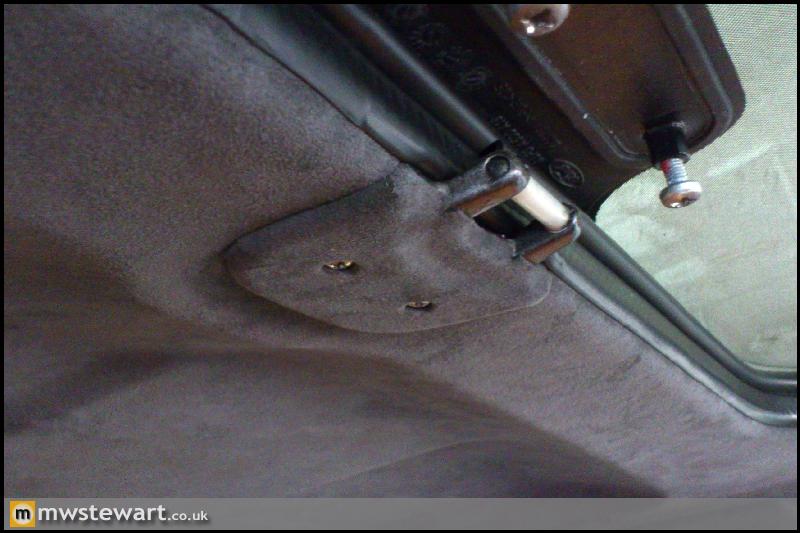
Poor photo, but the buttons are just visible either side of the rear light.
Cruise Control
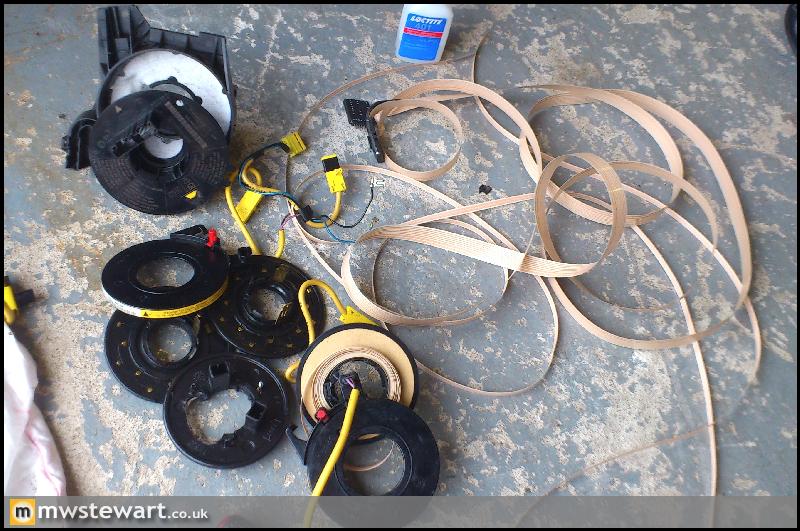
I mentioned way back in the thread that cruise control was on my 'to do' list, although it was one modification I wasn't entirely sure would be possible, so now the steering column is mounted it seemed like a good time to find out. It's not the technicalities of the system itself that are the issue as I have a good understanding of how it all works, it's the Fiesta airbag clock spring that may prevent the retrofit. The clock spring is mounted behind the steering wheel and provides a way to continue the wiring loom through to the steering wheel mounted electronics. In the Mk3, Mk4, and Mk5 Fiesta there were only ever two wires to connect the drivers airbag, but if I am to integrate cruise control then I will need more to support the steering wheel mounted controls.
The Cruise Control system I've chosen is from a Mk1 Focus and requires three additional conductors in the clock spring. To start investigations I bought a clock spring from a Focus equipped with CC and stripped it down to find the extruded flat cable had nine conductors, the additional being for Focus specific features including a dual stage airbag. The Fiesta cable is on the left for comparison, and note that the thicker tracks are always for the airbag.
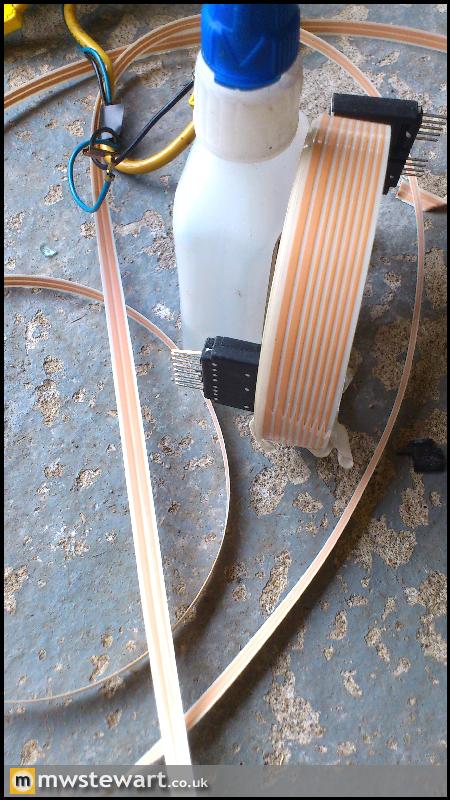
The clock spring is sandwiched between the column stalks/switches and steering wheel; moving the column switches was not possible, spacing the steering wheel was not a safe option and would leave an unsightly gap around the column trim, and I had ruled out machining of the steering wheel due to lack of material. The problem at this point then was how I could add tracks, but do so within the confines of the Fiesta clock spring housing. I tried several things and settled on including a cut down version of the Focus cable within the Fiesta housing together with the original Fiesta cable. This approach meant that I could leave the Fiesta airbag cable and terminations completely untouched, but the downside was that space in the housing was limited.
I produced a proof of concept build to test the theory and noted that the standard 6.5 turn capability of the Fiesta spring was reduced to 4.5 turns. The PAS rack in my car is 2.4 turns lock to lock which leaves 2.1 turns of excess in the spring. I knew that the same clock spring was used on all model variants and some came with a manual rack at 4.5 turns LtL, which gave an excess of 2 turns. This was slightly less than the excess I had with the PAS rack therefore I was happy that the concept was safe and had been proven.
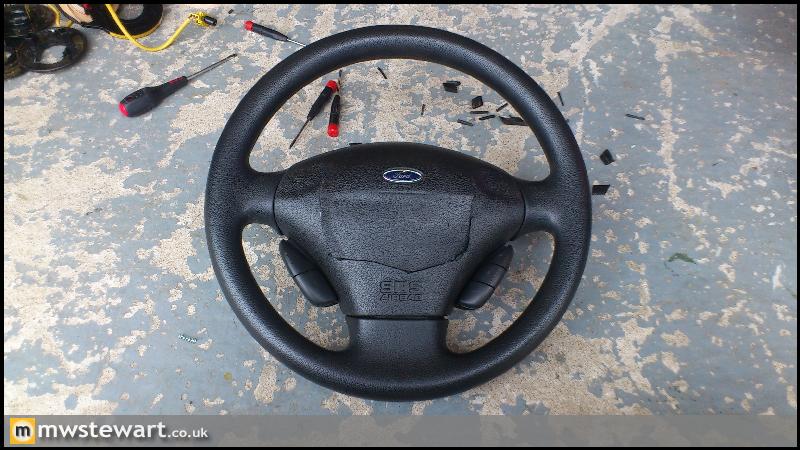
Now I knew the conversion was possible I looked to perfect the steering wheel controls. I bought some Focus cruise control switches and a base model fiesta steering wheel and deployed airbag to work on. The donor Focus was well worn so all the white text on the buttons had worn off!
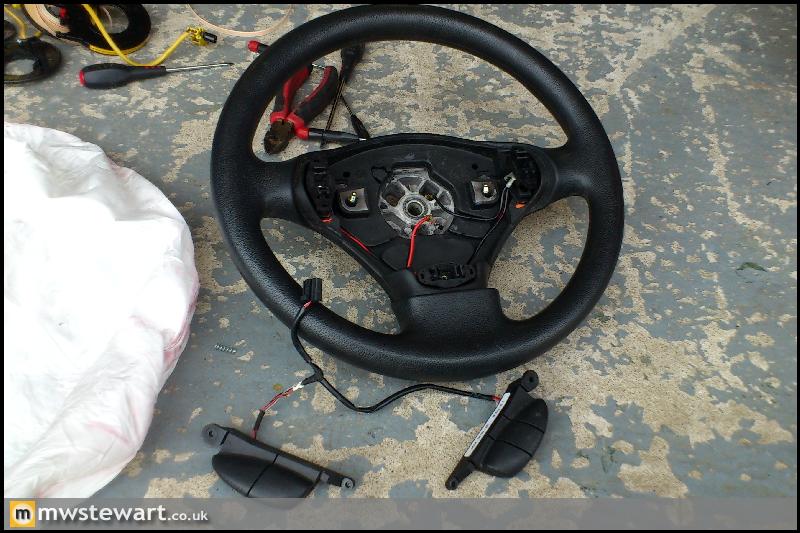
After a bit of trimming of both Fiesta airbag and Focus controls I had the controls sitting where I wanted them, and fabricated this bracket to mount them to the Fiesta steering wheel.
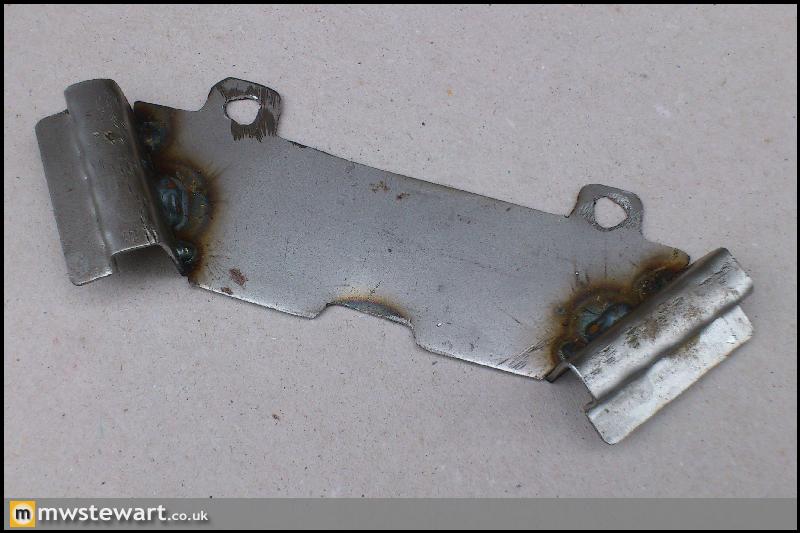
It fits snugly in the steering wheel and will be secured by 'fir tree' type trim clips through the two holes.
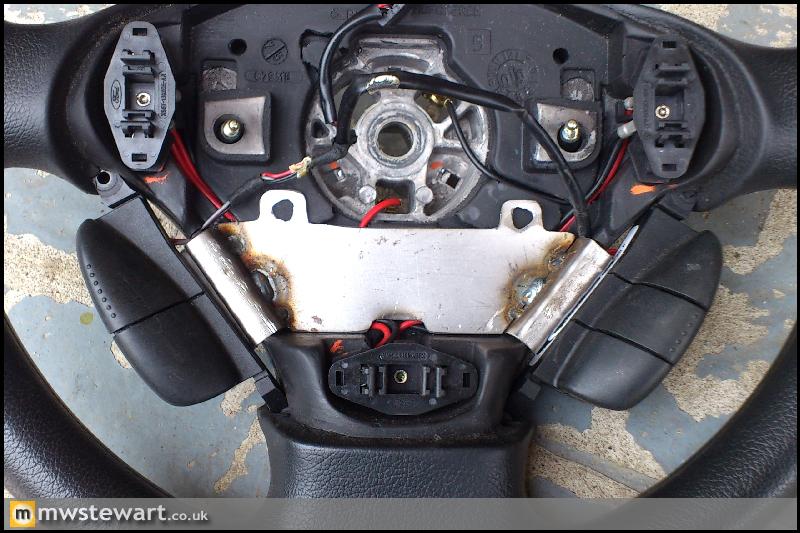
Controls screwed on.
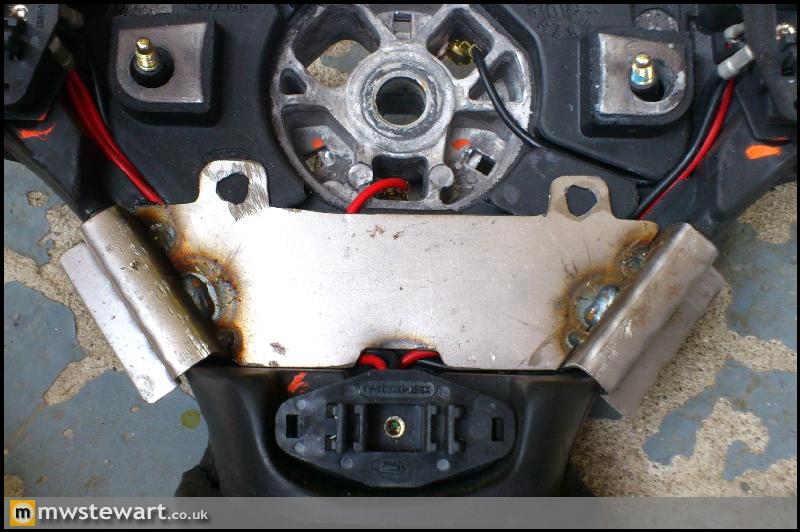
Looks reasonable from the rear.

Complete. They're not the greatest looking switches in the world, but will fulfil a useful purpose.
Alcantara Roof Fittings
I've trimmed in Alcantara the sunroof mounting bracket and also two 'buttons' which secure the rear roof lining. They were previously a pale grey.
Poor photo, but the buttons are just visible either side of the rear light.
Cruise Control
I mentioned way back in the thread that cruise control was on my 'to do' list, although it was one modification I wasn't entirely sure would be possible, so now the steering column is mounted it seemed like a good time to find out. It's not the technicalities of the system itself that are the issue as I have a good understanding of how it all works, it's the Fiesta airbag clock spring that may prevent the retrofit. The clock spring is mounted behind the steering wheel and provides a way to continue the wiring loom through to the steering wheel mounted electronics. In the Mk3, Mk4, and Mk5 Fiesta there were only ever two wires to connect the drivers airbag, but if I am to integrate cruise control then I will need more to support the steering wheel mounted controls.
The Cruise Control system I've chosen is from a Mk1 Focus and requires three additional conductors in the clock spring. To start investigations I bought a clock spring from a Focus equipped with CC and stripped it down to find the extruded flat cable had nine conductors, the additional being for Focus specific features including a dual stage airbag. The Fiesta cable is on the left for comparison, and note that the thicker tracks are always for the airbag.
The clock spring is sandwiched between the column stalks/switches and steering wheel; moving the column switches was not possible, spacing the steering wheel was not a safe option and would leave an unsightly gap around the column trim, and I had ruled out machining of the steering wheel due to lack of material. The problem at this point then was how I could add tracks, but do so within the confines of the Fiesta clock spring housing. I tried several things and settled on including a cut down version of the Focus cable within the Fiesta housing together with the original Fiesta cable. This approach meant that I could leave the Fiesta airbag cable and terminations completely untouched, but the downside was that space in the housing was limited.
I produced a proof of concept build to test the theory and noted that the standard 6.5 turn capability of the Fiesta spring was reduced to 4.5 turns. The PAS rack in my car is 2.4 turns lock to lock which leaves 2.1 turns of excess in the spring. I knew that the same clock spring was used on all model variants and some came with a manual rack at 4.5 turns LtL, which gave an excess of 2 turns. This was slightly less than the excess I had with the PAS rack therefore I was happy that the concept was safe and had been proven.
Now I knew the conversion was possible I looked to perfect the steering wheel controls. I bought some Focus cruise control switches and a base model fiesta steering wheel and deployed airbag to work on. The donor Focus was well worn so all the white text on the buttons had worn off!
After a bit of trimming of both Fiesta airbag and Focus controls I had the controls sitting where I wanted them, and fabricated this bracket to mount them to the Fiesta steering wheel.
It fits snugly in the steering wheel and will be secured by 'fir tree' type trim clips through the two holes.
Controls screwed on.
Looks reasonable from the rear.
Complete. They're not the greatest looking switches in the world, but will fulfil a useful purpose.

Nice job on the controls. Personally I'm a bit of a liability around car electric. A friend and I once let the smoke get out of the wiring in his mum's Escort's while "simply" putting in a head unit. We had to rewire the ignition barrel so she never found out.
Your switches end up looking like upgraded factory standard equipment, which is in keeping with rest of the dashboard. I'd probably have nailed a toggle switch or three to the side of the instrument binnacle if I hadn't already set fire to the car while testing it.
Your switches end up looking like upgraded factory standard equipment, which is in keeping with rest of the dashboard. I'd probably have nailed a toggle switch or three to the side of the instrument binnacle if I hadn't already set fire to the car while testing it.

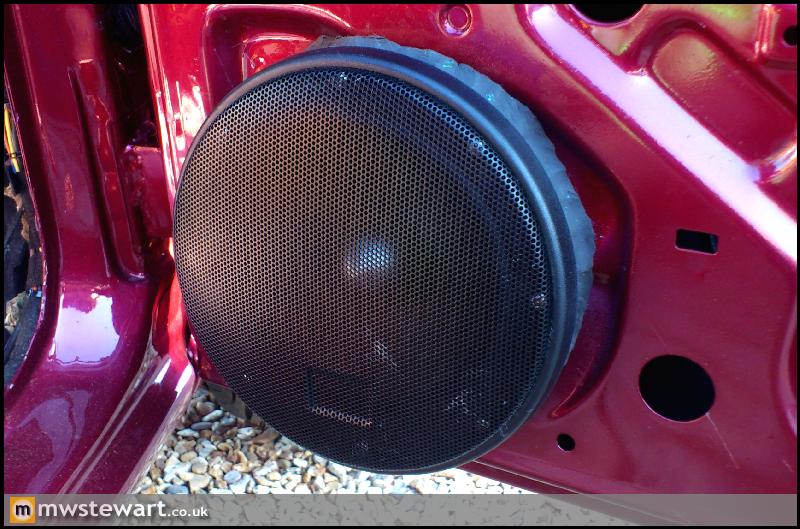
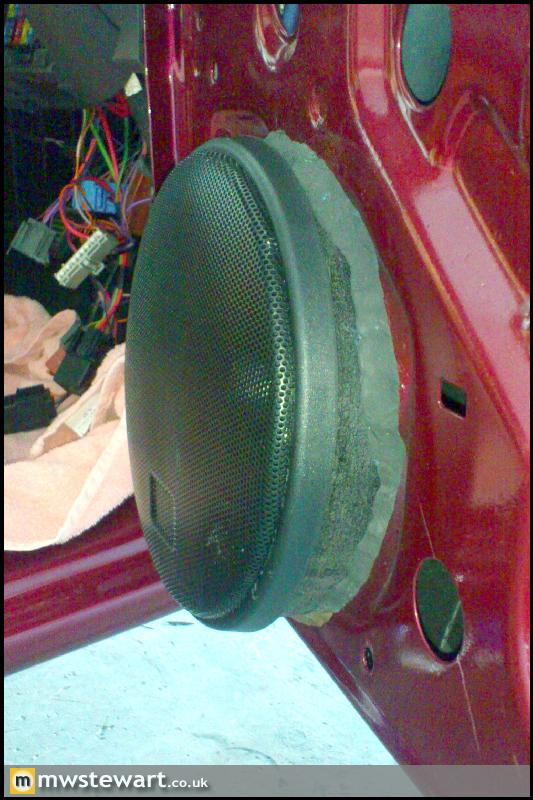
Front Midbass Driver Installation
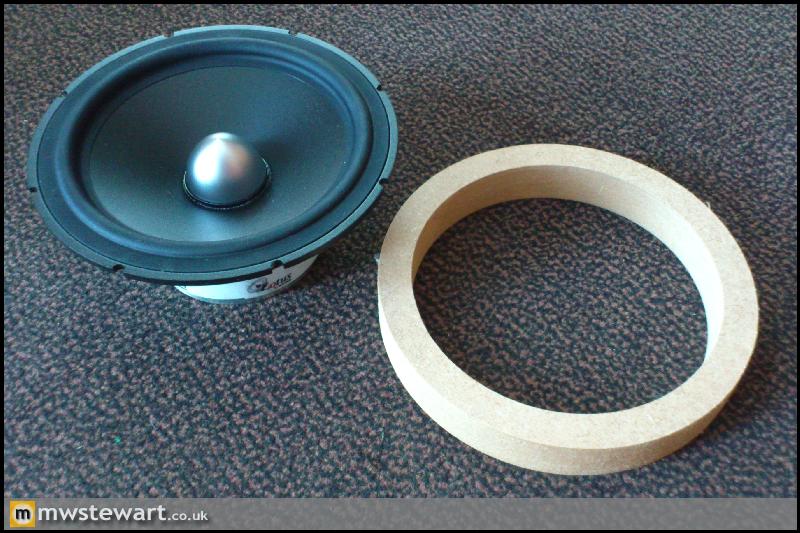
The standard Fiesta front speakers are 13cm which is really too small for a mid range speaker. The Lotus replacements I've chosen are 16.5cm, so there's a bit of work to be done. I've bought a pair of pre-made MDF rings which are 25mm deep to give plenty of depth to keep the larger speakers away from the window glass inside the door, and also to sculpt the rings around the various protrusions on the inner door skin.
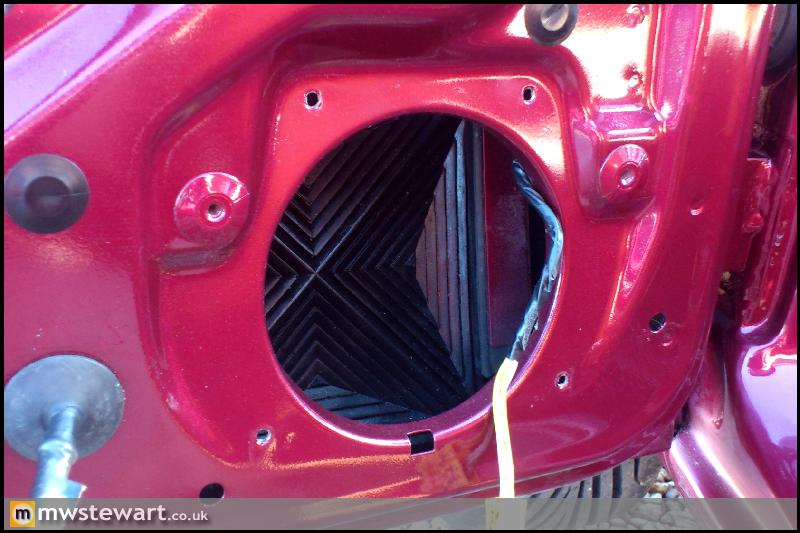
Standard Fiesta speaker aperture on the passenger side.
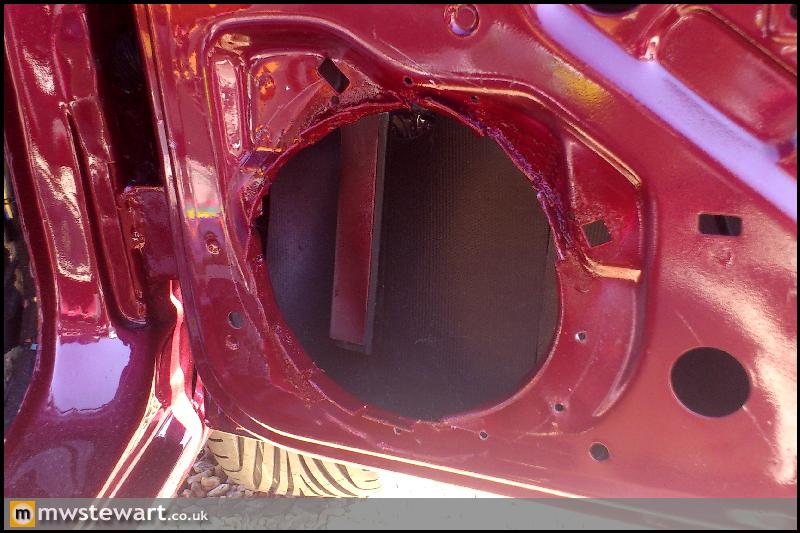
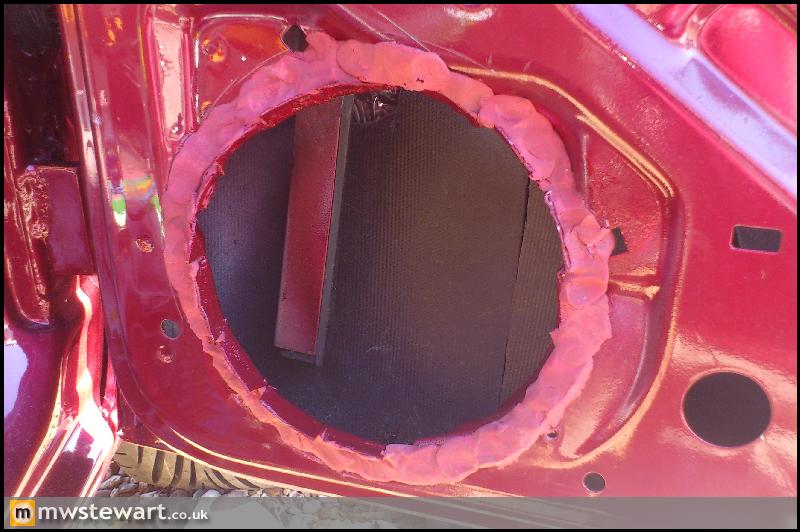
Here's the drivers door aperture enlarged for new speakers. I opened the aperture using Aviation shears, and bent the excess metal outwards to create 'fingers' to help seat the MDF ring, and any excess was cut off. I etch primed and sprayed in Noveau Red to finish. At this point I had already sculpted the MDF ring and test fitted it to ensure the new speaker had sufficient clearance around the edges of the door card.
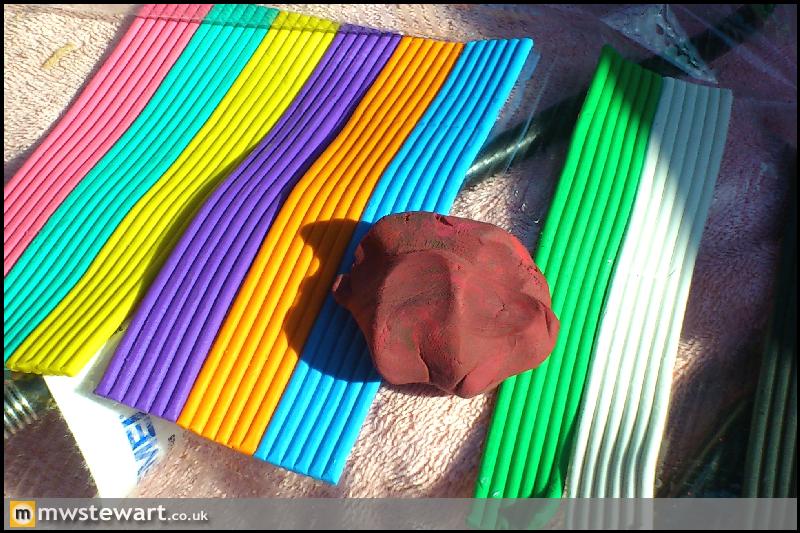
The first use of modelling clay on the project I did some quick research and it seems the material of choice to dampen vibrations and fill any gaps between the MDF ring and door. I wanted all black but could only find these multi packs, so I mixed a few colours to match the cars paint.
Clay applied around the speaker aperture and on the outside edge of the fingers.
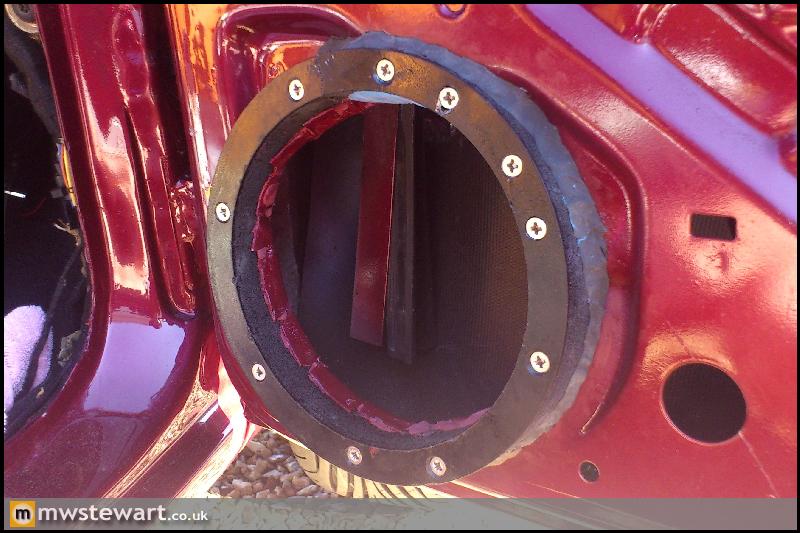
I primed and painted the MDF rings and mounted them with stainless screws. There was one strip of black clay in each pack so I used that to seal the outer edge of the rings.
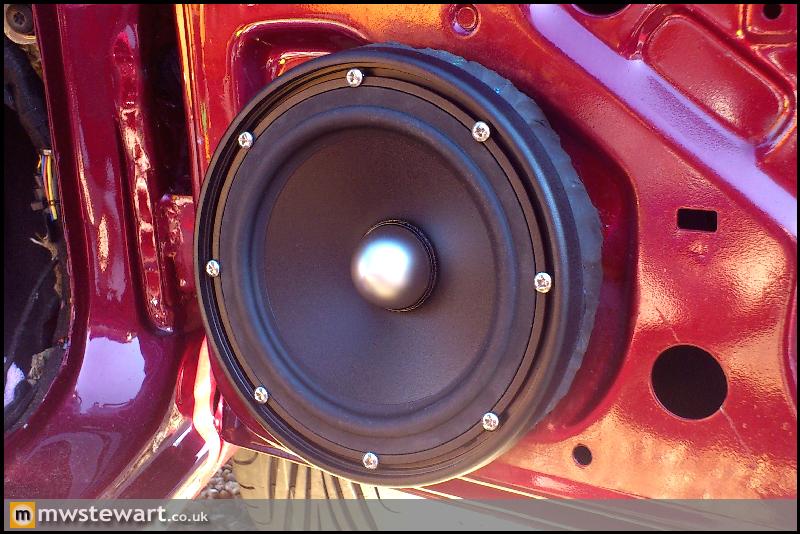
Seas driver mounted with stainless screws.
I put some metal covers on to protect the drivers for now. I'm still deciding what approach to take with the door cards; I can choose a stealth approach which leaves the door card mostly unmodified with the downside being some shrouding of the driver, or alternatively I can cut the door card and loose the standard look but ultimately ensure the driver can perform at its best.
This photo shows how I angled the mounts upwards and rearwards.
The standard Fiesta front speakers are 13cm which is really too small for a mid range speaker. The Lotus replacements I've chosen are 16.5cm, so there's a bit of work to be done. I've bought a pair of pre-made MDF rings which are 25mm deep to give plenty of depth to keep the larger speakers away from the window glass inside the door, and also to sculpt the rings around the various protrusions on the inner door skin.
Standard Fiesta speaker aperture on the passenger side.
Here's the drivers door aperture enlarged for new speakers. I opened the aperture using Aviation shears, and bent the excess metal outwards to create 'fingers' to help seat the MDF ring, and any excess was cut off. I etch primed and sprayed in Noveau Red to finish. At this point I had already sculpted the MDF ring and test fitted it to ensure the new speaker had sufficient clearance around the edges of the door card.
The first use of modelling clay on the project
I did some quick research and it seems the material of choice to dampen vibrations and fill any gaps between the MDF ring and door. I wanted all black but could only find these multi packs, so I mixed a few colours to match the cars paint.Clay applied around the speaker aperture and on the outside edge of the fingers.
I primed and painted the MDF rings and mounted them with stainless screws. There was one strip of black clay in each pack so I used that to seal the outer edge of the rings.
Seas driver mounted with stainless screws.
I put some metal covers on to protect the drivers for now. I'm still deciding what approach to take with the door cards; I can choose a stealth approach which leaves the door card mostly unmodified with the downside being some shrouding of the driver, or alternatively I can cut the door card and loose the standard look but ultimately ensure the driver can perform at its best.
This photo shows how I angled the mounts upwards and rearwards.
Gassing Station | Readers' Cars | Top of Page | What's New | My Stuff