Starting to build my jigsaw Cerbera .....
Discussion


There's an album on flickr with a selection of photos from my strip/rebuild
https://www.flickr.com/photos/187253106@N08/albums...
. . .might help
https://www.flickr.com/photos/187253106@N08/albums...
. . .might help
amazon said:
Hello Trouble.
Had it a while Worth mentioning though - that I wasn't looking for a Cerbera to build! I wanted to make sure that it went back on the road and not cannibalised for quick gain ;-). Remember. NSPCC. Nicky's Society for the Preventation of Cruelty to Cerberas
Now that we've got that sorted out - fancy a blat up soon to inspect? Or preferably to help me route the fuel and brake lines!
Just seen this, when are you thinking?Had it a while
Worth mentioning though - that I wasn't looking for a Cerbera to build! I wanted to make sure that it went back on the road and not cannibalised for quick gain ;-). Remember. NSPCC. Nicky's Society for the Preventation of Cruelty to Cerberas Now that we've got that sorted out - fancy a blat up soon to inspect?
Or preferably to help me route the fuel and brake lines! notaping said:
There's an album on flickr with a selection of photos from my strip/rebuild
https://www.flickr.com/photos/187253106@N08/albums...
. . .might help
Stunning rebuild. Highly detailed photos. https://www.flickr.com/photos/187253106@N08/albums...
. . .might help

V8fan said:
Stunning rebuild. Highly detailed photos.
Agreed - that's an awesome rebuild and the car looks better than new by the end of it!Love the detail like the proper cover over the brake fluid reservoir, rather than just a bit of plastic with some bathroom sealant around it like it come out of the factory with


Mr Cerbera said:
amazon said:
itsallyellow said:
Hey Nicky,
Don’t worry about where they go.
The early cars just went along the top of the inside of the chassis. Then the later cars went along the top of the transmission tunnel inside the car.
The fuel filter is a pain to get to as standard. I would just route them the easiest way possible. On the race car they are just cable tied to the chassis rails inside the tunnel.
The only thing you need to be conscious of is the exhaust.
Good luck!
Thanks Speedy! That's great info Don’t worry about where they go.
The early cars just went along the top of the inside of the chassis. Then the later cars went along the top of the transmission tunnel inside the car.
The fuel filter is a pain to get to as standard. I would just route them the easiest way possible. On the race car they are just cable tied to the chassis rails inside the tunnel.
The only thing you need to be conscious of is the exhaust.
Good luck!

But feel free to have the weekend off

notaping said:
There's an album on flickr with a selection of photos from my strip/rebuild
https://www.flickr.com/photos/187253106@N08/albums...
. . .might help
Thank you! :-)https://www.flickr.com/photos/187253106@N08/albums...
. . .might help
gruffalo said:
amazon said:
Hello Trouble.
Had it a while Worth mentioning though - that I wasn't looking for a Cerbera to build! I wanted to make sure that it went back on the road and not cannibalised for quick gain ;-). Remember. NSPCC. Nicky's Society for the Preventation of Cruelty to Cerberas
Now that we've got that sorted out - fancy a blat up soon to inspect? Or preferably to help me route the fuel and brake lines!
Just seen this, when are you thinking?Had it a while
Worth mentioning though - that I wasn't looking for a Cerbera to build! I wanted to make sure that it went back on the road and not cannibalised for quick gain ;-). Remember. NSPCC. Nicky's Society for the Preventation of Cruelty to Cerberas Now that we've got that sorted out - fancy a blat up soon to inspect?
Or preferably to help me route the fuel and brake lines!  (Did that come out right?)
CerbWill said:
Just seen you're around Cambridge. I live in Cambs during the week for work and I've recently done a body off refurb of my '96 Cerb so can assist if required.
What a great offer! Thank you! And how very fortunate for me :-). It would be great to meet you and get some tips. So message me when you have a spare moment and let's meet-up! Thanks again!roseytvr said:
I have a full library of a cerb strip down with full notes and pictures. Written so that I can understand it, not sure if anyone else will! PM me your address and I will send it on a stick. Very picture heavy as it included everything!
That sounds amazing! Thank you very much. I will PM you now! (Apologies for the slow reply).Juddder said:
V8fan said:
Stunning rebuild. Highly detailed photos.
Agreed - that's an awesome rebuild and the car looks better than new by the end of it!Love the detail like the proper cover over the brake fluid reservoir, rather than just a bit of plastic with some bathroom sealant around it like it come out of the factory with
The clutch cover was a 'first cut' with the rubber just stretched over the reservoir cap. I've since refined it with more of a dome shape in the centre which makes it look better. The rubber seal round the brake res is just the start. I plan to make a matching cover when I've time.
However, just adding the rubber seal stops any run off entering the car.
. . and thanks all for the complements. It was a long, but every enjoyable project.
However, just adding the rubber seal stops any run off entering the car.
. . and thanks all for the complements. It was a long, but every enjoyable project.
notaping said:
There's an album on flickr with a selection of photos from my strip/rebuild
https://www.flickr.com/photos/187253106@N08/albums...
. . .might help
https://www.flickr.com/photos/187253106@N08/albums...
. . .might help
Stunning rebuild!, in the process of doing mine.... what heat shielding did you use down the transmission tunnel and engine bay? Also where from? It’s the best looking finish I’ve seen so far!
The tunnel uses a Thermal Acoustic mat - similar to
https://www.ebay.co.uk/itm/Camper-Van-Insulation-F...
I taped the edges with aluminium tape. That was about 3 years ago now. No sign of lifting. The surface needs to be very, very clean before applying. ~£45
The engine bay uses a material similar to the original. I got it from nimbus motorsport: -
https://www.nimbusmotorsport.com/products/view-pro...
I used the old ones as a basis for the pattern, then stitched them up with an old sewing machine. Glued on with high temp contact adhesive, and only a couple of rivets in the roof above the bell-housing. ~£350
The tunnel stuff was cheap!! How does that deal with heat in the cabin? Any difference? What sort of mileage you done with it?
Also what did you use for your chassis guards? Im at the stage where I’ve just got to sort the heat shielding out then I can put the body back on..... so many choices and price variations slowing me down
Also what did you use for your chassis guards? Im at the stage where I’ve just got to sort the heat shielding out then I can put the body back on..... so many choices and price variations slowing me down
I spent a long time trawling the web looking at different options. Like you say - so many choices. What I put on has really lowered the heat thru' the tunnel. I think mainly because there are no gaps. The old individual rockwool slabs left lots of gaps thru' to the body.
The longest run last year was about 150 - 200 miles - no real build up of heat at all. The gear knob was slightly warm, but not hot, like it used to be. When I applied the heat barrier I covered up the hole for the gear lever, then cut a 'X' to let the lever through - so there is still some heat barrier there too.
The chassis protectors were fabricated from sheets of aluminium and sprayed with stonechip. Create a paper template, transfer it to the aluminium then bend it round a pipe with the same diameter as the chassis. A bit of trial and error - but worth it. The rubber at the top is bonded using Sikaflex and a couple of small holes allow the shield to be zip tied to the chassis.
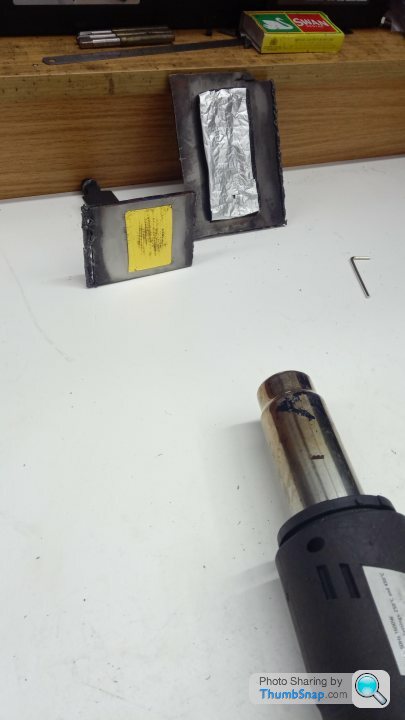
I'm in a similar situation in respects to a body off refurb so I thought I'd do a quick test before committing.
I bought some of the Gold heat proof tape that's doing the rounds at the mo and some closed cell foam with a aluminium facing on one side.
Using a paint stripper heat gun I monitored the temps on the front side and back side of the test piece until destruction.
The reflective properties of the tape may be good for a short burst however the chassis rails receive continuous heat from the headers for prolonged periods.
I found the gold tape did nothing, 100C on the front I read 100C on the back, the glue started to bubble at 120C and the gold finish changed state around 140C.
The closed cell foam backed aluminium was really good at protecting the test piece, the temps on the back never rose above 60C BUT the foam started to melt at the edges, maybe the aluminium tape would stop this.
I'm thinking the closed cell foam backed aluminium would be great for the tunnel ( As you have found) but anything close to the exhaust/chassis rail needs something other than gold tape or closed cell.
Gassing Station | Cerbera | Top of Page | What's New | My Stuff